

Qualarc LTP-1304 User Manual
Model #LTP-1304
EDGEWOOD CLASSIC
™
INSTALLATION INSTRUCTIONS:
FIGURE 1
Level
Mounting
Plate
The Edgewood Classic is a low-voltage outdoor light
fixture. It will operate in a range of 12-18 volts, as
provided by most doorbell and garage door opener
transformers. DO NOT plug the fixture directly into a
household outlet or current. The fixture requires a lowvoltage transformer (sold separately). If you need to
purchase a low-voltage transformer, please call Qualarc
at 916-273-1576. Two transformer models are available:
outlet plug-in (part #FPS-2018) or hard-wire (part #JBX-
15951).
Please read through all the instructions before starting
installation.
FIXTURE INSTALLATION:
1. Remove the frame (with lens) from the mounting
plate (do not remove the lens from the frame).
Remove all packing materials from the frame and
mounting plate. Locate and set aside the hardware
kit and the numbers.
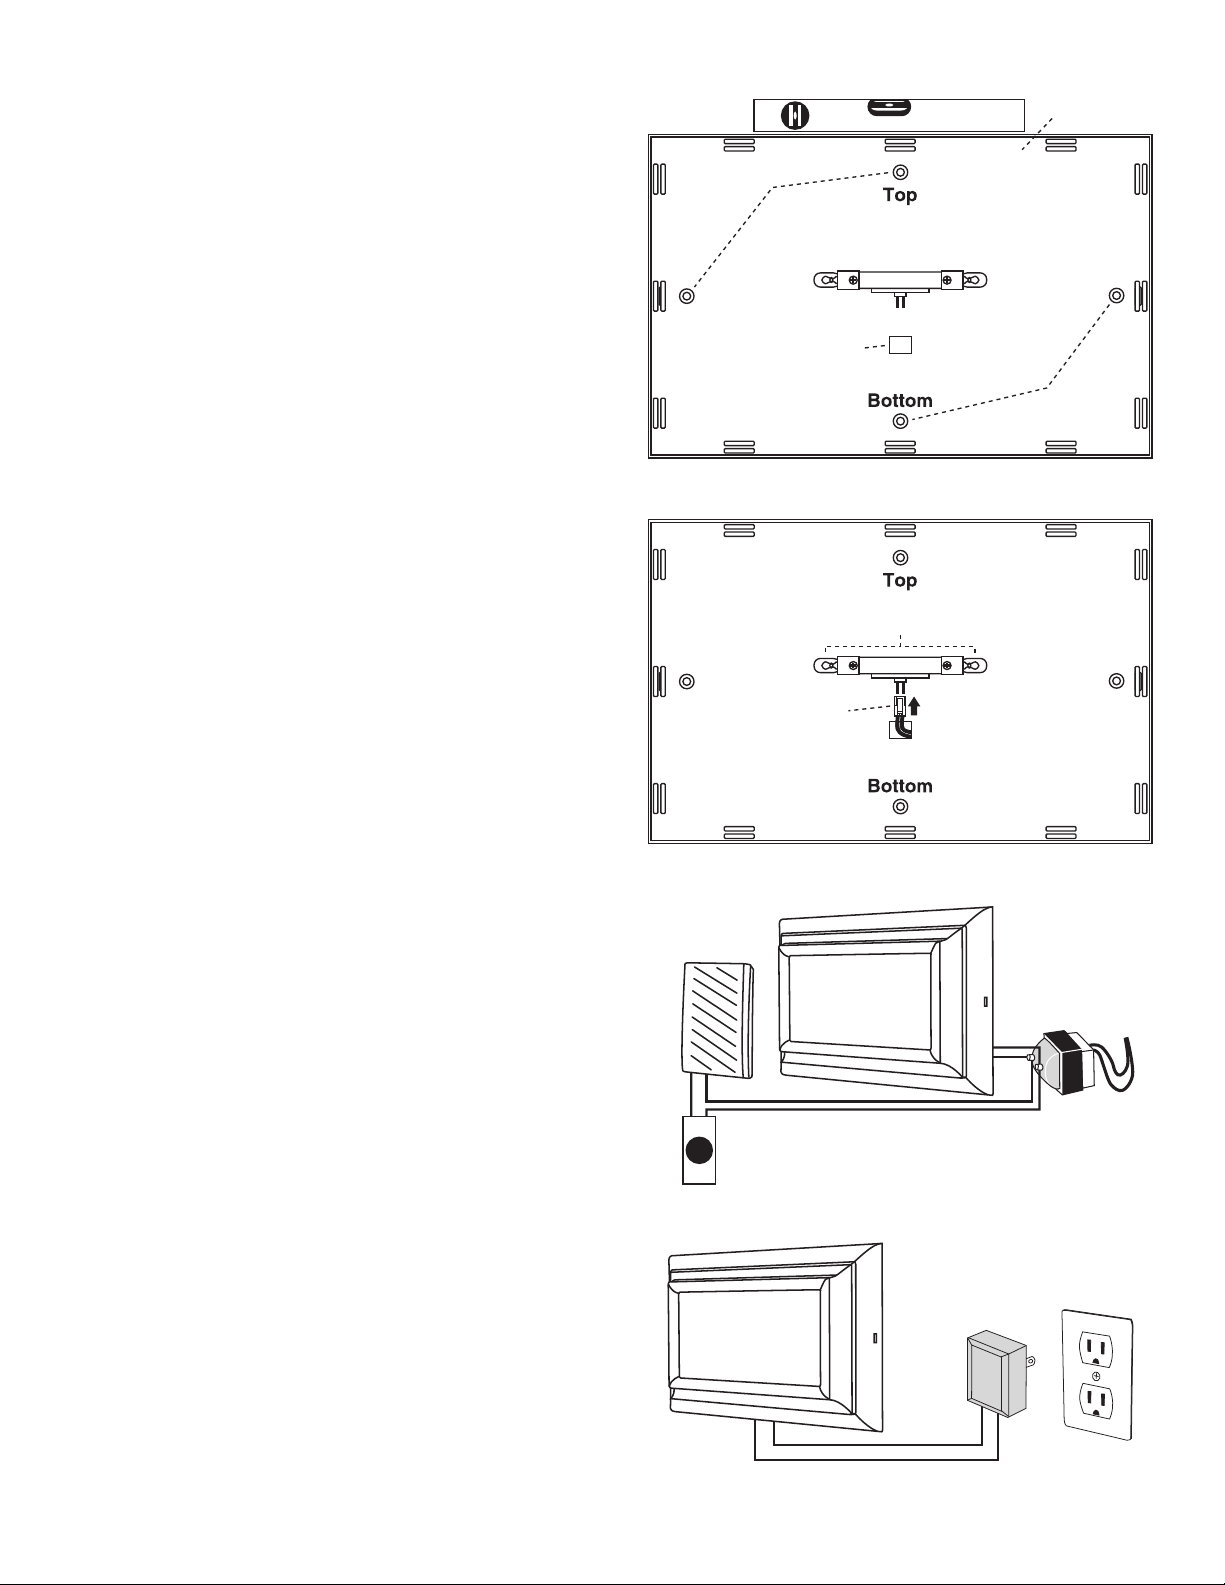
2. Position the mounting plate on a wall or other flat
surface (see Figure 1). Note, the mounting plate is
marked TOP and BOTTOM. Use a level to make sure
the mounting plate is straight. Then, using the
mounting plate as a template, mark the location of
the fastener holes and the hole for the low voltage
wire.
Fastener
Holes
Low Voltage
Wire Hole
Fastener
Holes
FIGURE 2
Bulbs
Low Voltage
Wire
3. Drill 9/32" diameter pilot holes for the wall anchors
(if mounting to wood surface, they may not be
necessary). Drill another hole through the wall to
run the low voltage wire.
4. Tap wall anchors (if necessary) into the mounting
holes and attach the mounting plate to the wall with
the fasteners (make sure “TOP” is up). Do not over
tighten the fasteners, or the mounting plate may
twist and the frame will not snap into place properly.
Note, on lap siding or other uneven surfaces, it may
be necessary to shim behind the mounting plate to
keep it from twisting.
5. Push the low-voltage wire through the mounting
plate and wall, leaving the plastic clip end outside
of the mounting plate (see Figure 2). Attach the
plastic clip to the metal prongs between the light
bulb sockets. If not already installed, insert light
bulbs into the plastic light bulb sockets and press
firmly.
6. Attach each low-voltage wire from the address plaque
to a terminal on your transformer (see Figure 3 or
4). Check the bulbs for proper operation. If the bulbs
do not light, double check the wiring connections.
Once the bulbs are working, proceed with number
application.
Doorbell
System
Edgewood
Classic
FIGURE 3
Edgewood
Classic
Doorbell
Transformer
INSTALLATION WITH EXISTING
DOORBELL TRANSFORMER
FIGURE 4
Plug-in
Transformer
(sold separately)
SEE REVERSE FOR NUMBER APPLICATION INSTRUCTIONS.
Outlet
INSTALLATION WITH PLUG-IN
TRANSFORMER
NUMBER APPLICATION:
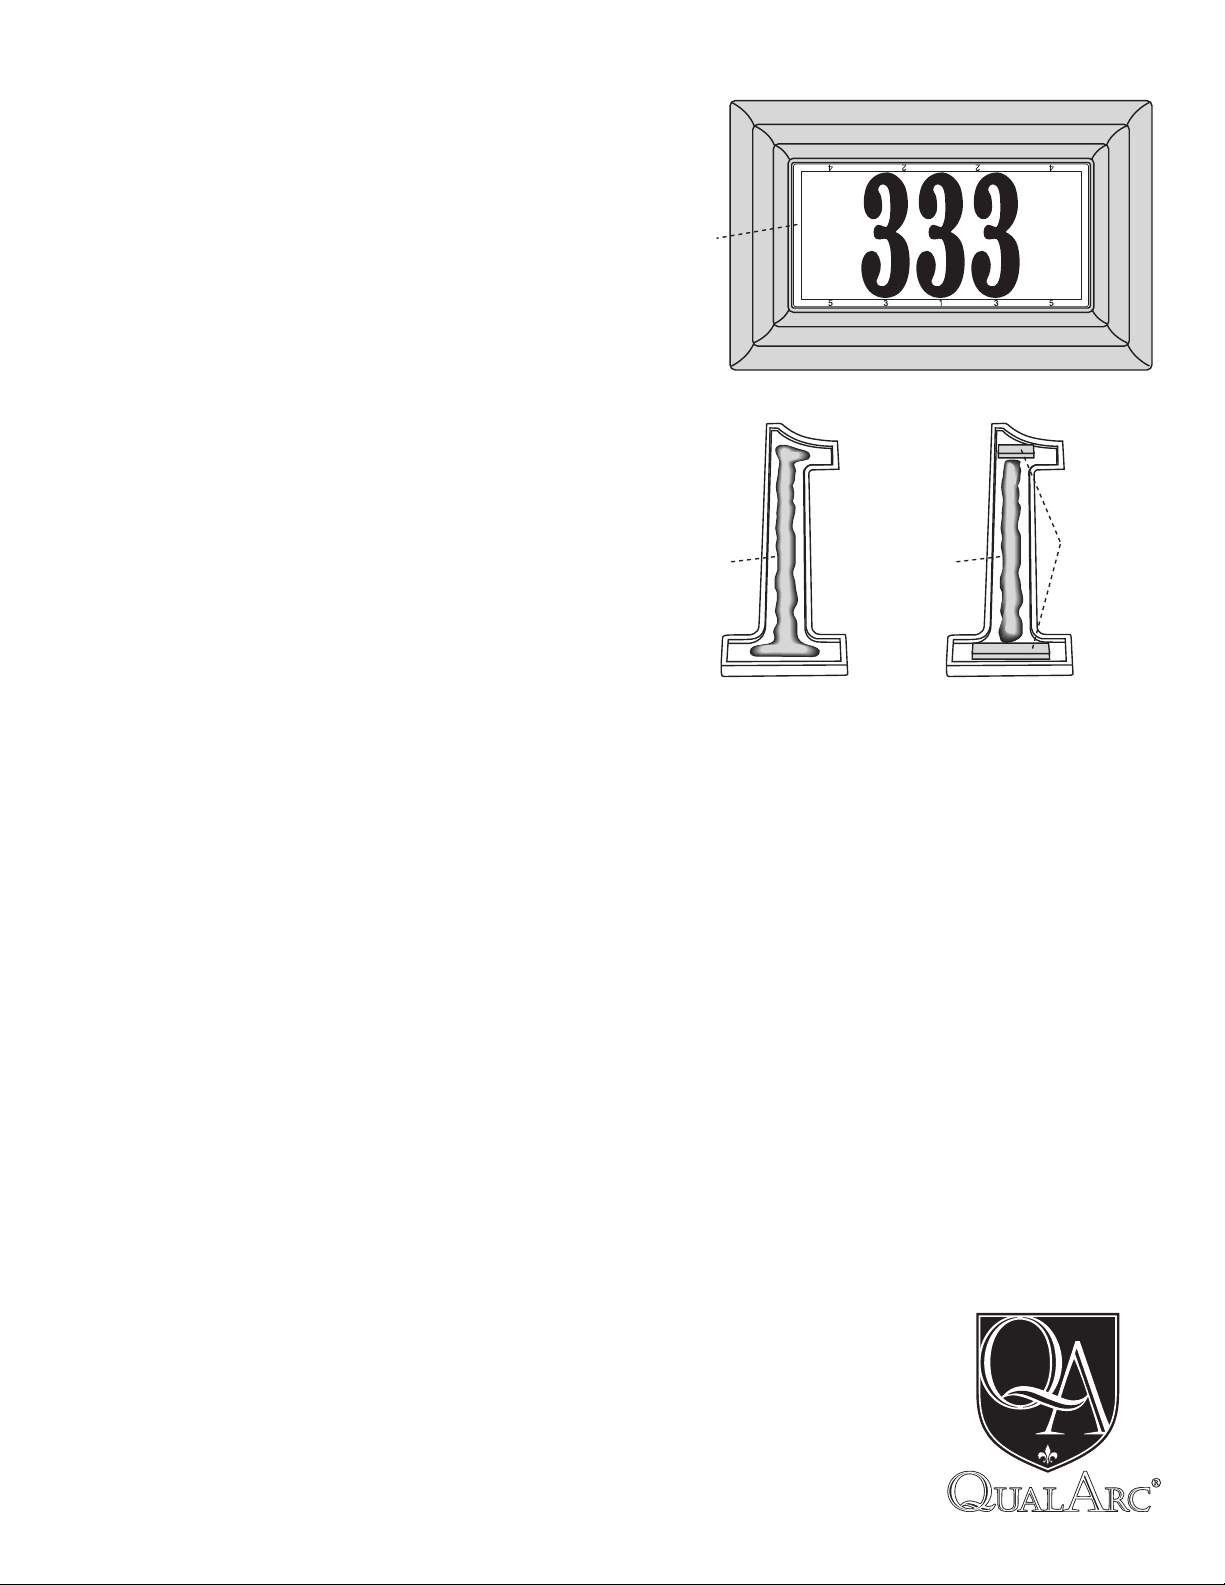
1. Lay the frame on a flat surface, lens side up. Place
the number layout template on the lens. This
template will help give you a rough spacing guide
for your numbers (see Figure 5).
FIGURE 5
For a 1 digit address: align the center of your number
with the “1” on the number layout template.
For a 2 digit address: align the center of your numbers
with the “2s” on the number layout template.
For a 3 digit address: align the center of your numbers
with the “3s” and “1” on the number layout
template.
For a 4 digit address: align the center of your numbers
with the “4s” and “2s” on the number layout
template.
For a 5 digit address: align the center of your numbers
with the “5s”, “3s” and “1” on the number layout
template.
2. Using the number layout template as a guide, lay
the address numbers dry (do not apply adhesive) on
the lens. Please note, for the numeral “1”, you will
need to adjust the spacing a little to achieve a pleasing
layout.
3. After you are satisfied with the alignment and spacing
of the numbers, lift the numbers, one at a time, and
apply a bead of adhesive in the middle of the number
channel (see Figure 6). Note, if you are in a hurry,
see next paragraph. Apply just enough adhesive so
it will make contact with lens once it is set in place.
If the entire channel is filled, the adhesive may ooze
out the sides of the number. Carefully set the number
back on the lens with the adhesive side down. Repeat
for each digit.
If you don’t have time to allow the numbers to cure
properly, cut and place a small piece of double sided
tape on the top and bottom of each number (see
Figure 7). Note, if you use tape, the number will be
very difficult to reposition once it is placed on the
lens.
Number
Layout
Template
Double
Adhesive
FIGURE 6
Adhesive
FIGURE 7
Sided Tape
Note: Two of each digit, 0-9, are included. If your address
requires more digits, mail a self addressed stamped
envelope to Qualarc with a list of the digits you require.
We will send you up to 3 digits at no charge.
Replacement bulbs are available at most hardware or
auto supply stores. A #124, 14V, .27 amp wedge base
automotive or comparable bulb is acceptable. You may
also obtain replacement bulbs or other parts from
Qualarc.
4. Double check the alignment and spacing of the
numbers. You may gently nudge the numbers to
improve the layout.
5. If you are satisfied with layout of the numbers,
remove the number layout template and then gently
press on each number to secure it in position. If any
excess adhesive pushes out from the edge of a
number, gently scrape it away with a toothpick or
similar device. It will be easier to remove the adhesive
if you allow it to cure for 12 hours.
6. Lay the frame on a flat surface with the numbers
facing up. Allow the adhesive to cure for at least 2448 hours before installation.
Once the adhesive holding the numbers is fully cured,
take the frame and line it up to the mounting plate.
Gently push the frame into position until it snaps into
place.
To replace the bulbs, you must detach the frame from
the mounting plate. Insert a small flat head screwdriver
into the slot on the side of frame. Push gently and then
pull outward on the frame to release it from the
mounting plate. Note: use gentle pressure or you may
break the holding tab from the mounting plate.
Qualarc
11300 Trade Center Drive, #A
Rancho Cordova, CA 95742
916-273-1576
www.qualarc.com
Model #LTP-1304
PRINTED IN CHINA
 Loading...