

Page 1
VCA
Page 2
VCA Installation and Configuration manual 2
Contents
CONTENTS .................................................................................................................................................................................................................... 2
1 INTRODUCTION ....................................................................................................................................................................................................... 3
2 ACTIVATING VCA LICENSE ................................................................................................................................................................................ 6
3 CONFIGURATION .................................................................................................................................................................................................. 10
3.1 VCA ................................................................................................................................................................................................................ 10
3.1.1 Camera Parameters .............................................................................................................................................................................. 11
3.1.2 VCA Parameters .................................................................................................................................................................................... 12
3.1.3 Streaming ............................................................................................................................................................................................... 12
3.2 VCA CONFIG .................................................................................................................................................................................................. 12
3.2.1 Zones ...................................................................................................................................................................................................... 13
3.2.1.1 Select zone.......................................................................................................................................................................................... 14
3.2.2 Rules ....................................................................................................................................................................................................... 14
3.2.2.1 Presence ............................................................................................................................................................................................. 14
3.2.2.2 Stopped ............................................................................................................................................................................................... 14
3.2.2.3 Speed .................................................................................................................................................................................................. 14
3.2.2.4 Enter and Exit .................................................................................................................................................................................... 15
3.2.2.5 (Dis)Appear ....................................................................................................................................................................................... 15
3.2.2.6 Dwell .................................................................................................................................................................................................. 15
3.2.2.7 Direction ............................................................................................................................................................................................ 15
3.2.2.8 Tailgaiting .......................................................................................................................................................................................... 15
3.2.3 Filters ..................................................................................................................................................................................................... 15
3.2.4 Streaming ............................................................................................................................................................................................... 16
3.3 GENERAL RULES ............................................................................................................................................................................................. 16
Version 4.9 Series
Page 3
VCA Installation and Configuration manual 3
1 Introduction
This manual is intended for administrators of WebCCTV and is applicable for version 4.8.0.0
or higher. You need to have the WebCCTV Alarm Component installed.
WebCCTV can be replaced by GuardNVR in this manual at all times.
The WebCCTV server has to be installed in order to use the VCA (Video Content
Analysis).
WebCCTV Alarm Component of the same version of WebCCTV has to be installed if
you wish to use VCA for triggering actions such as setting off the alarm, recording a
video, sound notification, changing PTZ camera position, etc.
VCA, or Video Content Analysis, is an intelligent way to generate alarms based on behaviour
of objects – people, vehicles, animals, etc. – detected by a camera.
VCA has been integrated in Quadrox WebCCTVNVR/GuardNVR software to be used with
any of the connected cameras. It can be used with analogue and network cameras of any model
and resolution, from VGA to 1-, 3- or 5-Megapixel.
VCA software was implemented into WebCCTV but can only be used when a VCA license is
bought and activated. This license can be retrieved separately, to use on any analog or IP
camera.
When configuring VCA, you need to set up rules for every parameter to analyse. These rules
trigger an alarm. These alarms can be set up with the WebCCTV Alarm Component; see
Alarm Component Installation Manual and Alarms section of WebCCTV User Manual.
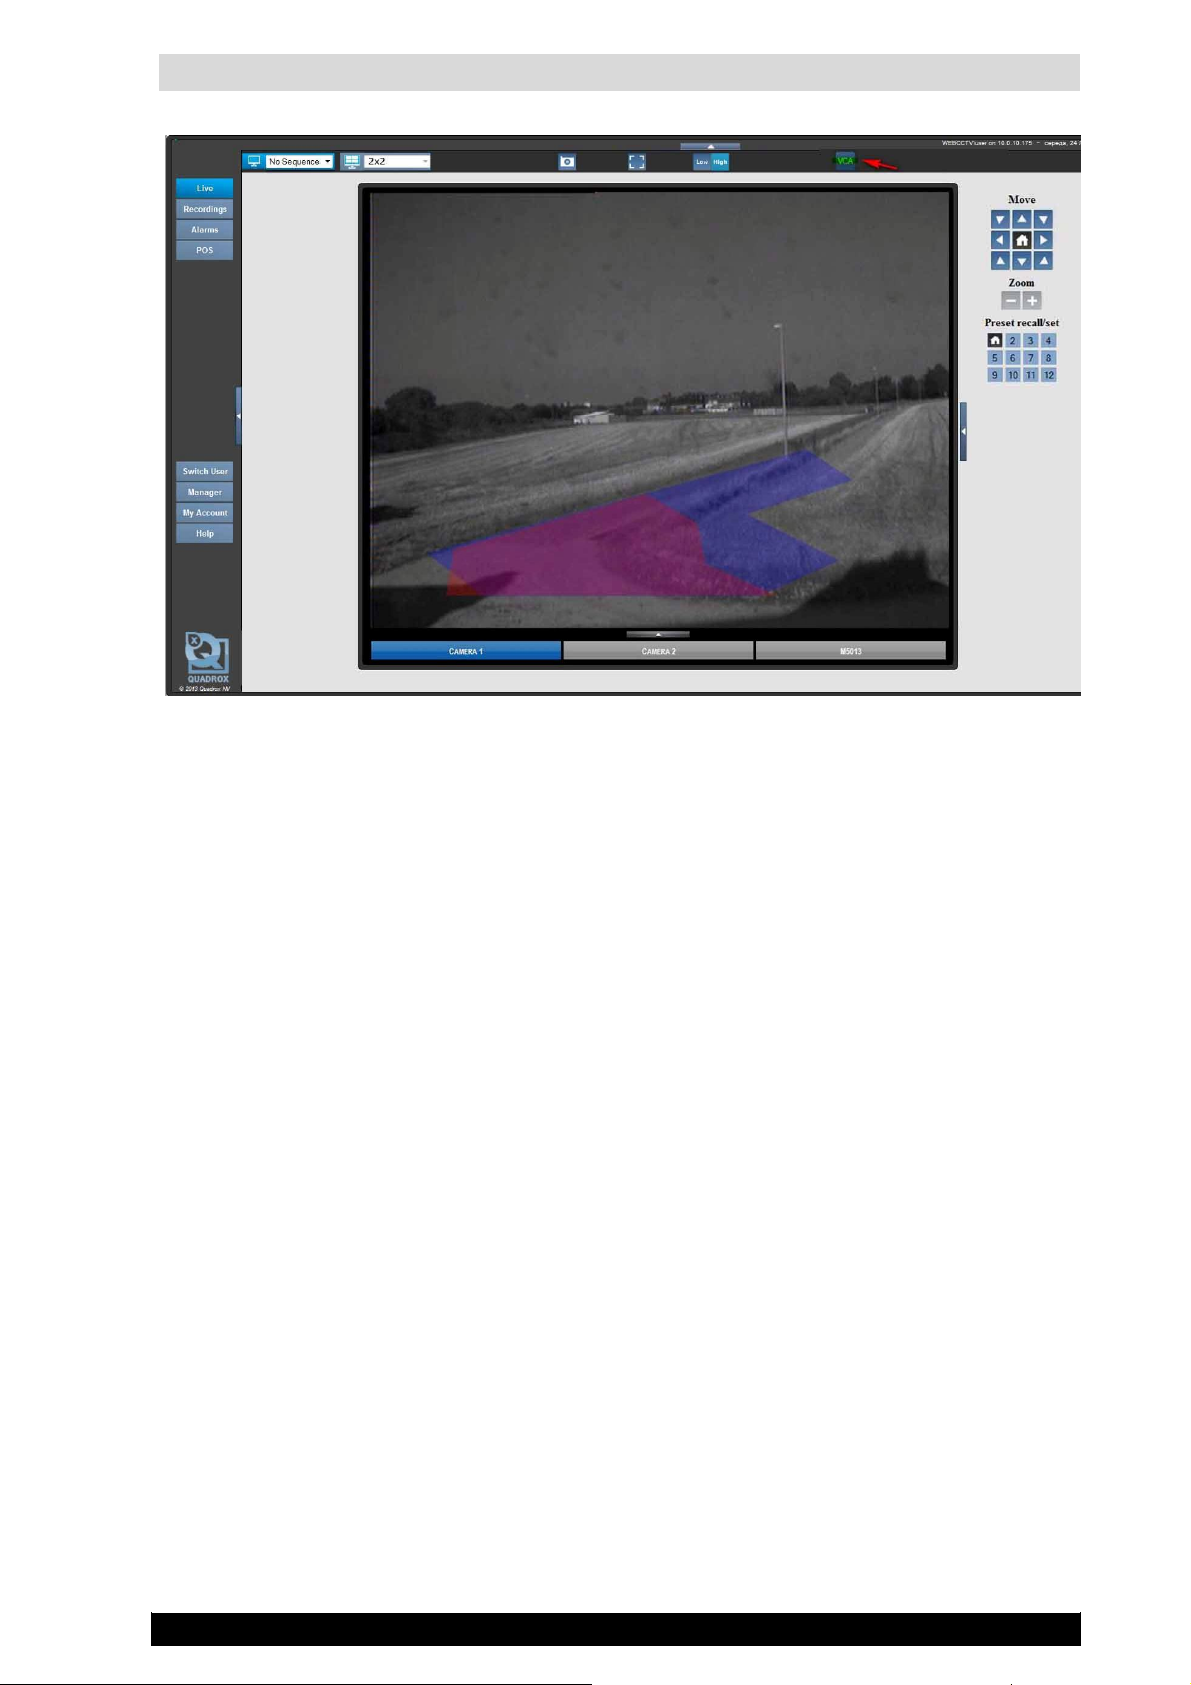
When your VCA license was activated, the user interface will show the VCA button in the
upper right corner when you open the camera with enabled VCA in Video Browser’s Live
View window. The selected zones for the VCA will also be shown.
Version 4.9 Series
Page 4
VCA Installation and Configuration manual 4
VCA enabled Camera
The configuration of the VCA settings is done through the camera wizard of WebCCV which
can be found in WebCCTV Manager under Settings → Cameras → Click ‘Edit’ on the camera
you want to configure the VCA settings for.
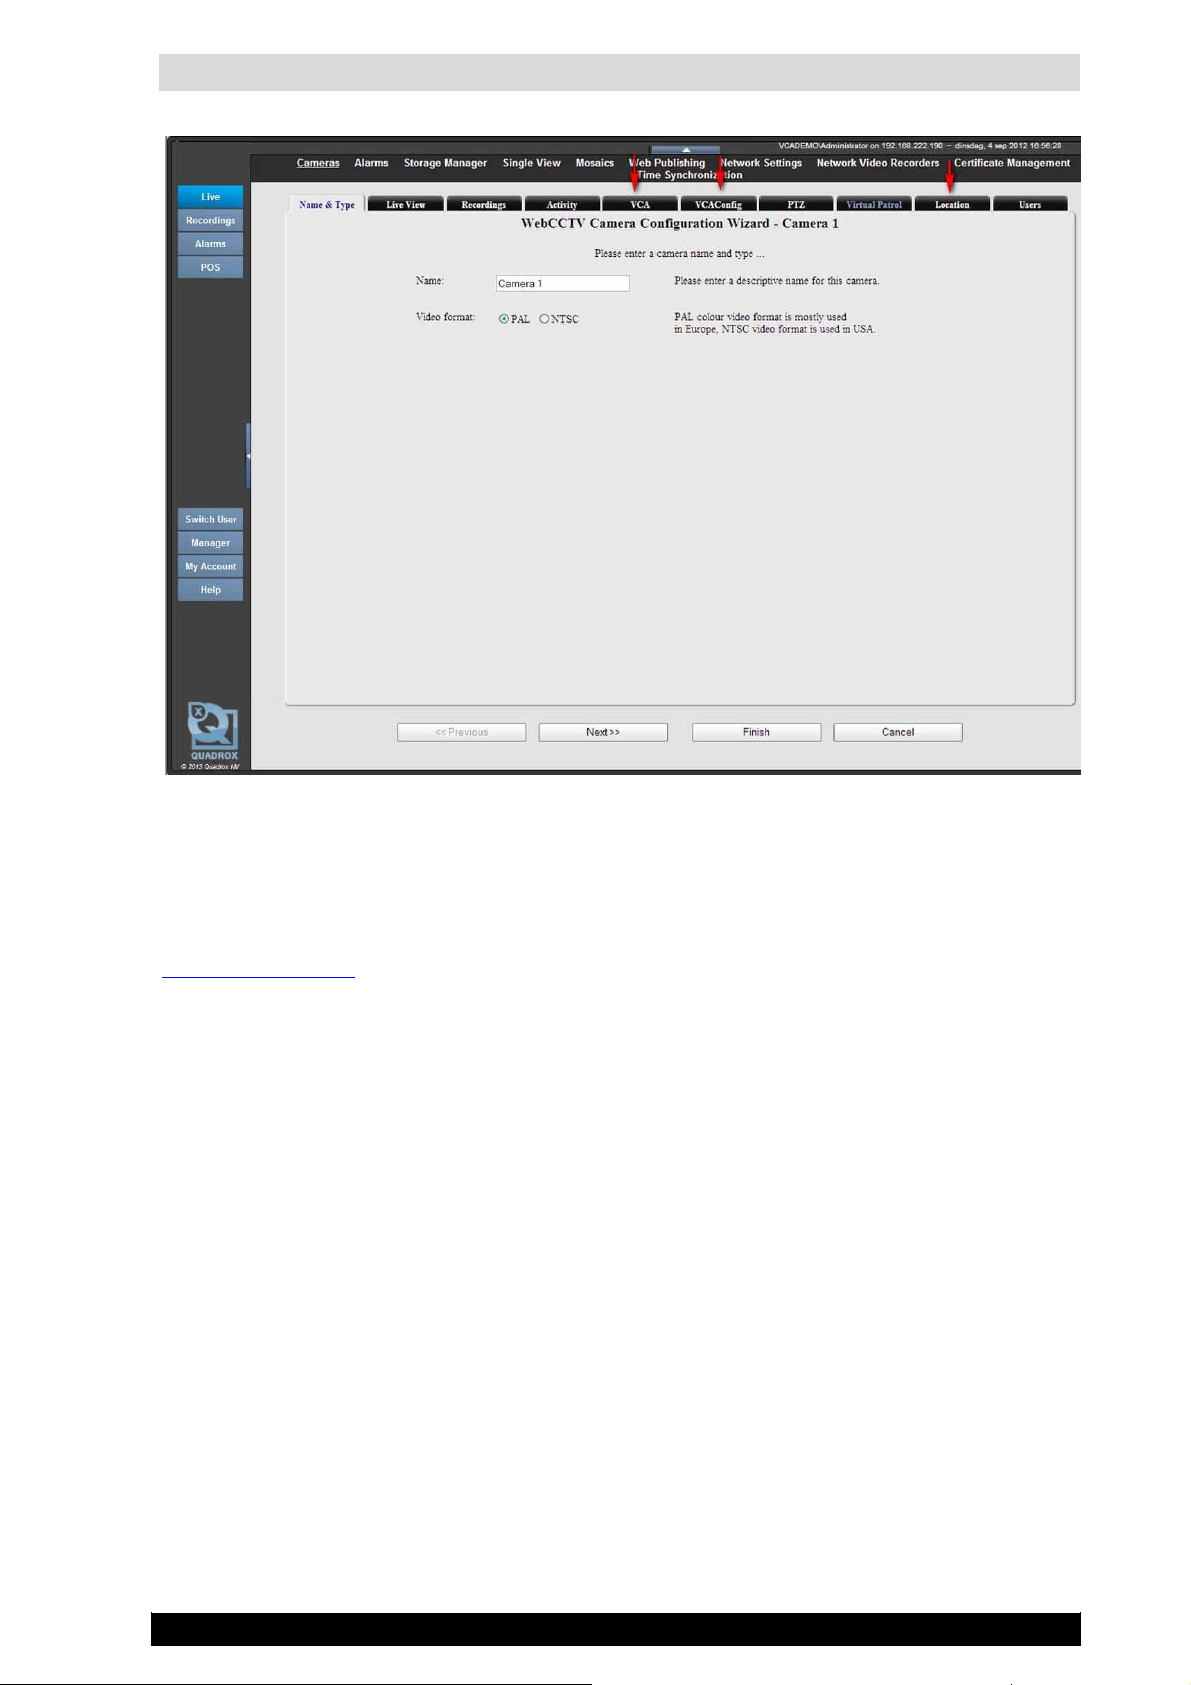
Now you enter the camera wizard, where you will see extra tabs: VCA and VCA Config.
Version 4.9 Series
Page 5
VCA Installation and Configuration manual 5
Camera Wizard with VCA tabs
You can check if VCA license is activated on your WebCCTV. To do so, open Video Manager
and navigate to Info. Check the field Allowed VCA Cameras. This number indicates how
many cameras can use VCA on your PC. If you see “None”, then your WebCCTV does not
have a VCA license. To obtain a license, you will need to request a VCA token via email:
support@quadrox.be or phone: +32 (16) 582585.
After obtaining a token you can proceed with activating VCA on your system (see Chapter 2:
Activating VCA License of this manual).
Version 4.9 Series
Page 6

VCA Installation and Configuration manual 6
2 Activating VCA License
To activate VCA on your WebCCTV 4.7.7.0 and higher, you should redeem the VCA
token and generate a license valid for your specific hardware configuration. You can
obtain a VCA activation token by contacting Quadrox office via support@quadrox.be
or +32 (16) 582585.
After you receive your activation token, you should perform the following steps to obtain and
activate your VCA license:
1. Go to http://www.activationmanager.com/ with your Internet Explorer
2. Enter a token you obtained in the “Token” field:
Activation Manager main page
3. Click “Submit.
4. In a new window of Internet Explorer open WebCCTV Video Manager. Don’t close
the Activation Manager window!
5. In WebCCTV Video Manager, go to “Info” tab, find the line “Allowed VCA cameras”
and click “Upgrade” button there:
Version 4.9 Series
Page 7

VCA Installation and Configuration manual 7
WebCCTV System Info page – Allowed VCA Cameras
6. Copy the Hardware key from the “VCA Info” page:
WebCCTV VCA Info
7. Switch back to Activation Manager page in Internet Explorer. Don’t close Video
Manager!
8. Paste the Hardware key you copied from Video Manager:
Version 4.9 Series
Page 8

VCA Installation and Configuration manual 8
Activation Manager - Hardware Code Request Page
9. Enter your e-mail address and click “Submit”.
10. You will get a VCA activation code. Copy all symbols of it:
Activation Manager – VCA License generation page
11. Switch to Video Manager and paste the activation code into the “License key” field.
12. Click “Apply”.
13. Click “OK” when asked for confirmation:
Version 4.9 Series
Page 9

VCA Installation and Configuration manual 9
WebCCTV VCA Info – License Confirmation
14. Restart WebCCTV Video Server.
15. After restart is complete, go back to Info page of Video Manager and check “Allowed
VCA Cameras” to see if the activation was successful.
Version 4.9 Series
Page 10

VCA Installation and Configuration manual 10
3 Configuration
To work, VCA needs to retrieve an absolute minimum of 8 fps (frames/second) in
JPEG compression from the camera. We strongly advice to make sure that camera
delivers 15 fps or more to get the best result. For H264 and MPEG4 compression you
need to use default 15fps for best results. You can check the actual framerate of your
camera: open WebCCTVNVR Video Browser’s Live View, hold CTRL button and
right-click right on the image. A pop-up window will show the actual frame rate.
If the framerate is lower than 10 FPS, VCA might not work as expected.
The following tabs in the camera wizard need to be filled in:
VCA
VCA Config
3.1 VCA
To be able to change the camera parameters, VCA needs to be enabled. To enable VCA, go to
Video Manager → Settings → Cameras. Click ‘Edit’ link for the camera where you want to
enable and configure VCA. Switch to VCA tab and check the VCA Enabled checkbox.
Note: If you already have VCA enabled on as many cameras as your VCA license
allows, you will not be able to enable VCA for additional cameras. You will need to
disable VCA on some of the previously configured cameras, or contact support for
additional VCA license.
Version 4.9 Series
Page 11

VCA Installation and Configuration manual 11
VCA enabled Screen
If you still need to activate your VCA license, please contact Quadrox support for the
activation of this license via support@quadrox.be or +32 (16) 582585.
After enabling VCA, click Finish and restart WebCCTV.
3.1.1 Camera Parameters
To use the VCA zones and rules correctly, the camera needs to be calibrated. This is done
through the camera parameters. The proper positioning of the camera makes sure the
recognition of the object (size, speed) is more accurate
1. Height (meters): how height is the installed camera positioned
2. Tilt Angle (degrees): this angle normally varies between -45° and +45°
3. Vertical FOV (Field of View) (degrees): defines the width angle of the camera lens.
Usual lenses have around 45-50°; a Tele lens has a smaller width, and Wide Angle
lenses can have more.
If you know the absolute numbers of the parameters, you can enter the information manually.
If you do not know the parameters, you can click on the screen with the video on the right side
and follow the onscreen instructions to change the height and tilt angle of the camera:
Measure or estimate the height of the camera above the ground
Version 4.9 Series
Page 12

VCA Installation and Configuration manual 12
Use the mouse wheel to set the camera height
Click and drag the grid to change the camera tilt angle
Click and drag the mimics around to verify sizes of people
Each grid square is 2x2 meters
The purpose of this is to receive approximately the same view as in the live view of the
camera. The green line represents the horizon. If you feel you cannot get the same view; try
changing the FOV by reducing or increasing the degrees. Only Height and Tilt Angle can be
changed using the grid.
3.1.2 VCA Parameters
You also see two VCA parameters, Minimum tracked object size and Stationary object hold on
time.
Minimum tracked object size defines how big an object should be to be tracked by
VCA. It is defined in pixels of a CIF image. Objects smaller than this size will not be
tracked.
Stationary object hold on time defines how long a non-moving object in the VCA zone
will be tracked after it stops moving. (e.g. when a car stops in the zone and a passenger
steps out and leaves the zone, the car will be ignored by the VCA after 60 seconds)
After you have changed the Camera Parameters, please click Apply Settings. Your settings
will now be saved.
3.1.3 Streaming
To access and configure the VCA over the Internet, it is best to put the streaming mode to
Low. For local streaming, it can be put to High.
3.2 VCA Config
In this tab, you can configure the zones in which the VCA needs to happen, and the rules you
want to track. After finishing the configuration, the VCA will display the route, size, speed and
type of the recognized object. Through the screen, you might see light blue pixels. They are the
minimum tracked object types that need to be recognized and that were defined in the VCA
tab.
Version 4.9 Series
Page 13

VCA Installation and Configuration manual 13
3.2.1 Zones
VCA Configuration screen with tracking
Version 4.9 Series
VCA Configuration screen
Page 14

VCA Installation and Configuration manual 14
3.2.1.1 Select zone
You can choose from already created zones, or make a new zone. For this, click on Add Zone.
A new square will appear. In the Name field, you can now enter a new name for the zone; and
you can also change the color you want the zone to be visualized in.
To change the shape and position of the zone, you can drag and drop it; place the mouse
pointer on a node and move it; or add and remove new nodes (see right, below Add Zone).
Add line is used as a special zone, and normally only used for counting and direction. For
counting, we prefer to use a camera which is specified for this. This function is not yet fully
operational.
3.2.2 Rules
For every zone, you can now enter a different set of rules. There are 10 different rules to
choose from. For every rule you want to use, you need to specify a software alarm trigger.
These alarms should be predefined in the Alarms section of WebCCTV Video Manager.
Note: To be able to create and set up alarms in WebCCTV, you need to install
WebCCTV Alarm Component of the same version as your WebCCTV. Please refer to
Alarm Component Installation Manual or contact support via support@quadrox.be or
+32 (16) 582585.
Note: Procedures for creating and configuring alarms in WebCCTV are described in
WebCCTV User Manual, chapter 3.3.2 Alarms. You will need to add Generic Alarm
Driver (see chapter 3.3.2.3 Generic Alarm Driver) first, then create and configure
necessary number of alarms to use with VCA (see chapter 3.3.2.5 Alarm
Configuration Wizard).
At the end of every rule, there also is the possibility to add a minimum time interval between
two alarms. By default this is set at 60 seconds. It means that when the same action happens
within this time frame of 60 seconds, no alarm will be triggered.
3.2.2.1 Presence
When an object enters the zone (e.g. the leg of a person); the rule is triggered. The object is
now present.
3.2.2.2 Stopped
An alarm is triggered when an object stops in the zone for a duration that is more than the time
that was specified.
3.2.2.3 Speed
The alarm is triggered when the speed of the object is inside the particular interval. The
interval is set in km/h. If the object is moving slower or faster than the specified limits, the
alarm will not be triggered.
Version 4.9 Series
Page 15

VCA Installation and Configuration manual 15
3.2.2.4 Enter and Exit
This is a directional rule. The alarm is triggered when the object enters or exits the zone
borders.
3.2.2.5 (Dis)Appear
The alarm is triggered when the VCA cannot see how the object appears or disappears. E.g. a
bird came from behind a tree that was partially in and partially out of the zone; or a person
suddenly appears from behind a wall that is present in the zone.
3.2.2.6 Dwell
An object needs to hang around in a zone for the minimum specified time before it triggers the
alarm.
3.2.2.7 Direction
Direction only works in combination with the Line you can add (instead of a zone). When
crossing the line in a particular direction, the alarm will be triggered (e.g. when a car violates a
traffic sign and makes an illegal turn).
There are 2 parameters that need to be defined here as well:
Direction (an object must be moving to trigger an alarm) between 0 and 360°
Variance (a tolerance margin) in degrees.
e.g. a car cannot make a u-turn, but it can cross the direction line to enter a street that
lies on 45° of that direction line.
3.2.2.8 Tailgaiting
Tailgaiting is useful when monitoring a queue. The alarm will be triggered when a new object
(person) appears in the line within a specified time frame.
e.g. this is useful in a store at the POS area. The time interval is set at 10 seconds. If customers
come to the POS area with an interval of 12 to 20 seconds, the alarm will not be triggered. If
customers come to the POS are with an interval of less than 10 seconds, the alarm will be
triggered and an automated message can be send to notify that a second (or third) POS needs to
be opened to prevent long waiting lines.
3.2.3 Filters
Each object is classified as one of four object types. This can be a:
Person: object with size less than 2m² and a speed less than 20km/h
Group of people: object bigger in size than a person but with speed less than 20km/h
Vehicle: object with size larger than 2m² and speed more than 20km/h
Clutter: none of the above (e.g. birds)
Version 4.9 Series
Page 16

VCA Installation and Configuration manual 16
A filter can be set up to be not in use, include or exclude any of these object groups. For
example, by default you would choose to exclude clutter.
3.2.4 Streaming
As for general VCA configuration, the streaming can be put to High and Low, where Low is
preferable for remote connections.
To be able to save the settings, please click Apply Settings.
3.3 General rules
The VCA works best on a camera with framerate of at least 10 fps. The absolute minimum is
8, and 12 is recommended. Please make sure that your camera can provide such framerate, or
VCA might not work as expected.
Take into account that VCA needs some time (and space on the image) to recognize an object.
Therefore, it is best that the overview of the camera shows more than just the area of interest.
The zones you create should have a gap between the image borders to provide to VCA the
space and time to catch and classify the objects. If the zones are created too closely to the
borders, the filters might not work as expected.
Note: If you want to use analogue cameras on a digitizer card for VCA, keep in mind
that on a 4-channel card, you will only be able to use two inputs. On a 16-channel
card, you will only be able to use 8 inputs.
You will have to decrease the amount of channels per VCA that you want to use.
To work, VCA needs to retrieve an absolute minimum of 8 fps (frames/second) in
JPEG compression from the camera. We strongly advice to make sure that camera
delivers 15 fps or more to get the best result. For H264 and MPEG4 compression you
need to use default 15fps for best results. You can check the actual framerate of your
camera: open WebCCTVNVR Video Browser’s Live View, hold CTRL button and
right-click right on the image. A pop-up window will show the actual frame rate.
If the framerate is lower than 10 FPS, VCA might not work as expected.
Version 4.9 Series
 Loading...