

Page 1

Alarm Component
Page 2

Alarm Component Installation Manual 2
© Quadrox 1997
– 2005
© Quadrox 1997
– 2005
Contents
CONTENTS .................................................................................................................................................................................................................... 2
1 INTRODUCTION ....................................................................................................................................................................................................... 3
2 INSTALLATION ........................................................................................................................................................................................................ 5
2.1 TYPICAL .................................................................................................................................................................................................................. 7
2.2 CUSTOM................................................................................................................................................................................................................... 8
2.2.1 Local Database ........................................................................................................................................................................................ 8
2.2.2 Remote Databas e ................................................................................................................................................................................... 10
3 CONFIGURATION .................................................................................................................................................................................................. 12
Version 4.9 Series
Page 3

Alarm Component Installation Manual 3
1 Introduction
This manual is intended for administrators of WebCCTV and is applicable for version 4.5.0.0
WebCCTV can be replaced by GuardNVR in this manual at all times.
The WebCCTV server has to be installed in order to install the Alarm Component.
The Alarm Component is an add-on of WebCCTV which allows the server to receive and store
input alarms/events from external devices. Alarms can be generated in different ways:
Hardware Alarms:
Physical alarm-input device (screw-block to attach physical wires) attached at the
back of the WebCCTV unit together with a digitizer card (Picolo Pro series)
PMD I/O Device (screw-block to attach physical wires) attached to the WebCCTV
unit via a USB cable
Physical alarm input connected to the I/O contacts of the camera
Software Alarms:
Alarms by the OPC A&E protocol; hence you are able to connect any OPC A&E
compliant alarm server to the WebCCTV Alarm Component
Alarms by the Common Alerting Protocol (CAP), an xml-based data format for
exchanging public warnings and emergencies between alerting technologies. CAP
allows a warning message to be consistently disseminated simultaneously over many
warning systems to many applications
MvRedlight Alarm Driver allows capturing traffic monitoring events
Generic Alarms triggered using the WebCCTV SDK
POS Alarms:
Generic POS Alarms allows for the generation of tickets (events) in an easy way for
different purposes. This is done by SDK.
Serial Port POS Driver allows capturing tickets (events) sent by POS devices.
NAMOS POS Driver is a customized driver for NAMOS based POS applications.
TP.NET POS Driver is a PosLog compliant driver which allows capturing tickets
(events) that are transmitted over the network by using the PosLog standard.
Version 4.9 Series
Page 4

Alarm Component Installation Manual 4
Based on the incoming alarms (e.g. infrared based motion detectors, door and windows
sensors, tamper detection, POS tickets, etc.), output reactions can be configured or triggered if
desired. Some examples:
Beep
Switch to camera
Switch to PTZ preset of camera
Email
SMS
Image export and upload (FTP)
Movie export and upload (FTP)
OPC A&E event
Switch I/O output relay
Execute script
Your own reactions created by the SDK (Arm/Disarm groups, cameras, devices… etc)
Version 4.9 Series
Page 5

Alarm Component Installation Manual 5
2 Installation
Before you can install the Alarm Component, the following components have to be installed:
WebCCTV Server 4.5.0.0 (or higher)
Microsoft Framework .NET 2.1 (or higher)
Microsoft SQL Server 2005 Express Edition with Advanced services (or better)
The Microsoft Framework .NET 2.1 and Microsoft SQL Server 2005 Express Edition
with Advanced services may be installed already on your system. The setup will
inform you if a component is not yet installed. If the setup finds the missing
component, it will try to install it automatically; otherwise this component has to be
installed manually.
Installing the Alarm Component is done in several steps:
Open the Optional Components folder on the desktop and click the Alarm
Component Setup link. The setup application will start automatically.
The welcome screen appears. Click Next.
Welcome Screen
Accept the License Agreement. Click Yes.
Please read the License Agreement carefully. If you don’t agree with the terms, you
can’t install the Alarm Component.
License Agreement Screen
Version 4.9 Series
Page 6

Alarm Component Installation Manual 6
Select the setup type and click Next. The following table gives an overview of the
different options depending on the setup type:
Typical
(Chapter 2.1)
Custom
(Chapter 2.2)
Alarm Drivers Alarm Components:
Generic SDK alarm driver
x x
OPC alarm driver
MvRedlight alarm driver
(CAP alarm driver)
POS Drivers Serial Port POS driver
(Includes Generic POS driver)
TP.Net POS driver (PosLog)
NAMOS POS driver
Local/Remote SQL database
Optional
x Optional
Optional
Optional
Local
Local or
Remote
Typical is the default setup type. This is advised for normal installations.
Depending on the setup type, the remaining part of the installation will differ slightly. See the
next chapters for more information.
Version 4.9 Series
Setup Type Screen
Page 7

Alarm Component Installation Manual 7
2.1 Typical
You have selected typical in the setup type screen and clicked Next. Please execute the
following steps:
The Alarm Component installation will start automatically. Click Finish.
Finish Installation Screen
If Microsoft SQL Server Express Edition or higher is not yet installed, the setup will
inform you about this and check for automatic installation. If not, it will ask you to
install it first manually.
The alarm component is now installed.
Version 4.9 Series
Page 8

Alarm Component Installation Manual 8
2.2 Custom
You have selected custom in the setup type screen and clicked Next. Please execute the
following steps:
Select the components you want in the Select Components screen and click Next.
Select Components Screen
Choose if you want a local or remote SQL database.
2.2.1 Local Database
Select “Use SQL database located on this machine” and click Next.
Version 4.9 Series
Database Type Selection Screen
Page 9

Alarm Component Installation Manual 9
If Microsoft SQL Server Express Edition with Advanced features or higher is not yet
installed, the setup will inform you about this and check if it can install it
automatically. If not, it will ask you to install it first manually.
Specify the database name and path and click Next. The Alarm Component installation
will start automatically.
Database Connection Information Screen
Click Finish.
Finish Installation Screen
The alarm component is now installed.
Version 4.9 Series
Page 10

Alarm Component Installation Manual 10
2.2.2 Remote Database
If you want to use a remote database, then this database has to be created before installing the
Alarm Component.
During the Alarm Component installation, all necessary tables will be created in the
existing remote database.
Select “Use SQL database located on another machine” and choose the
authentication type:
o Select the “Use integrated Windows Authentication mode instead of SQL
Server Authentication mode” check box if you want the Alarm Component to
connect to the database using Windows accounts.
o Deselect the “Use integrated Windows Authentication mode instead of SQL
Server Authentication mode” check box if you want the WebCCTV Alarm
Component to connect to the database using the SQL Server accounts. (Default
Installation)
Click Next.
Database Type Selection Screen
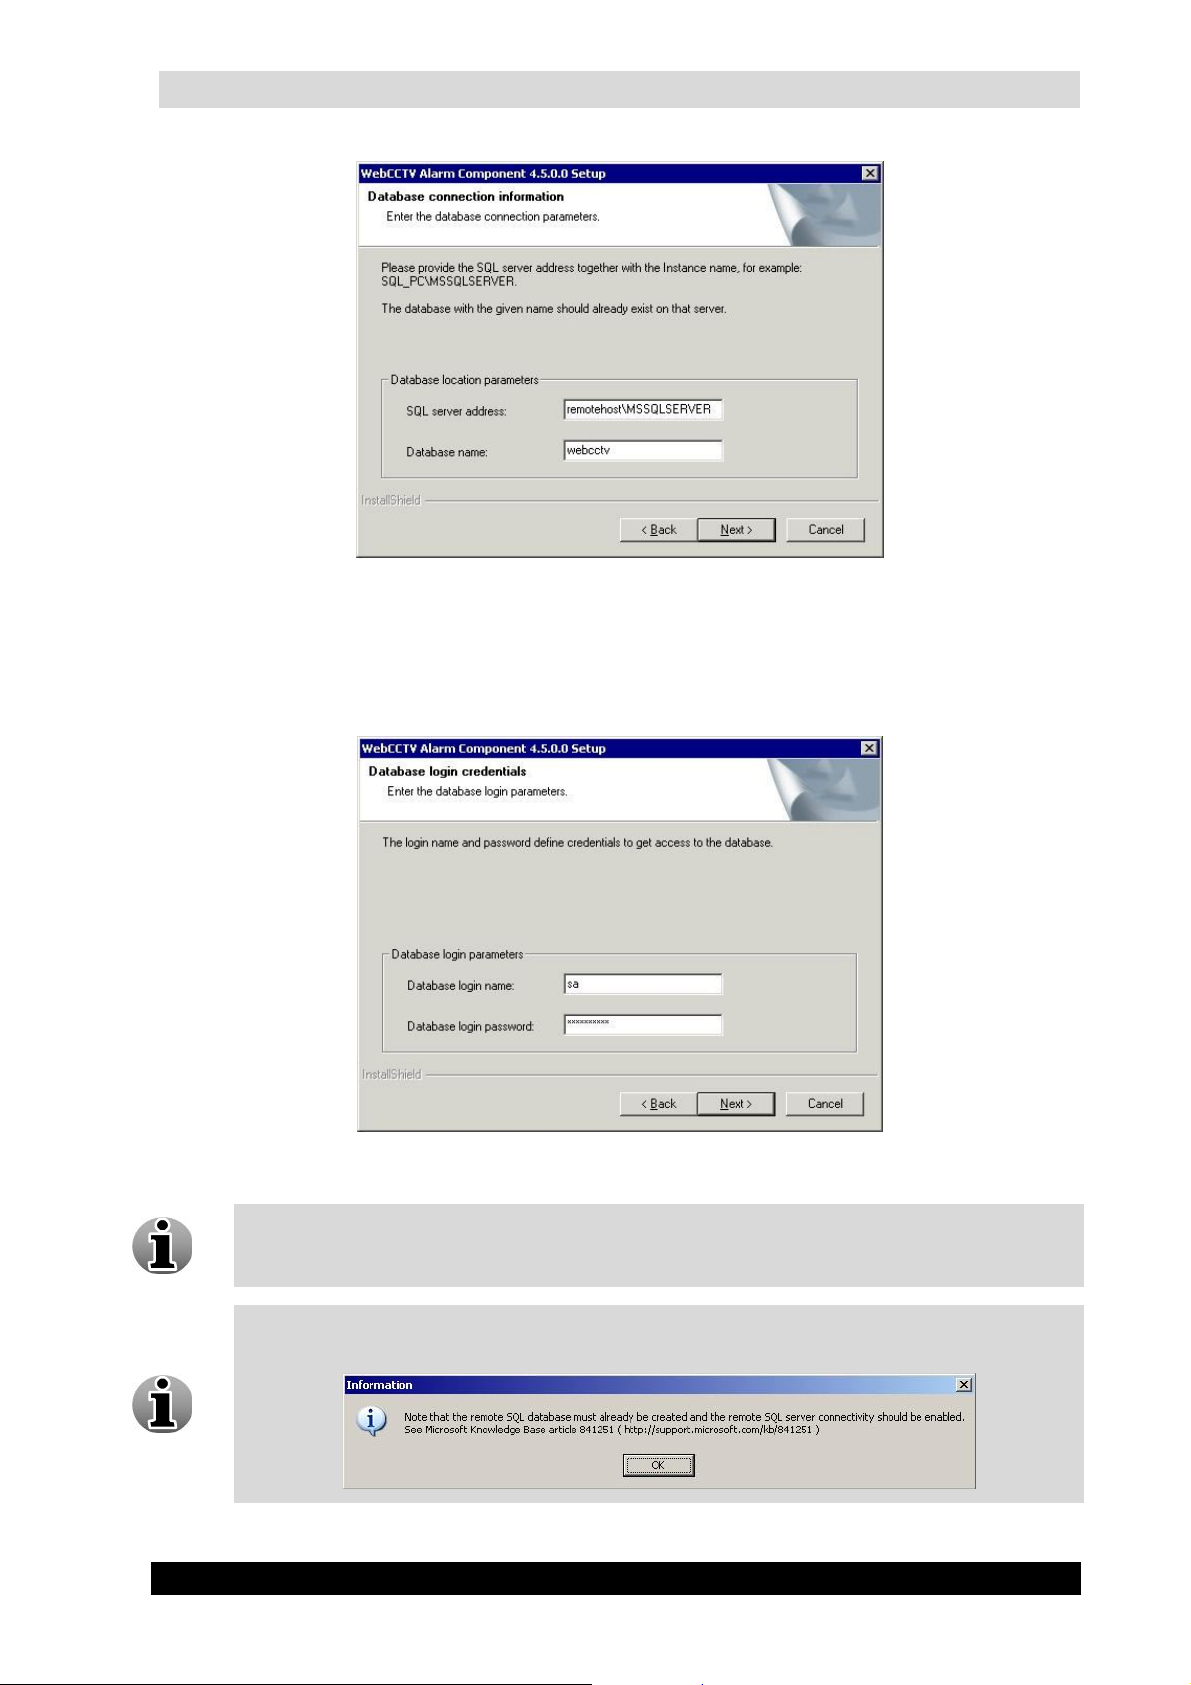
Specify the SQL server address (this is the name of the computer and name of the
SQL Server) and the database name. Click Next.
In order to make the connection to the SQL database possible, it is necessary to open
some ports on the firewall and router:
TCP Port 1433
UDP Port 1434
Add Sqlservr.exe to the application exception list
For more information: http://support.microsoft.com/kb/287932
Version 4.9 Series
Page 11
Alarm Component Installation Manual 11
Database Connection Information Screen
If you selected SQL authentication previously, you need to specify the name and
password for the SQL Server account. This account is used by WebCCTV to connect to
the database. Click Next.
If there is no special account for the WebCCTV connection, you may use the internal
SQL Server account sa (system administrator). To obtain the password for sa account
– contact your system administrator.
You will get the following screen which asks you to check if your database was
created before you started this installation!
Version 4.9 Series
Database Login Credentials Screen
Page 12

Alarm Component Installation Manual 12
Click Finish.
Finish Installation Screen
The alarm component is now installed.
3 Configuration
The User Manual for Alarms has been incorporated in the WebCCTV User Manual.
Version 4.9 Series
 Loading...