

Page 1
Instruction Manual
ANDROID APP ON
Please read the operation manual carefully before playing
Page 2
1. GETTING STARTED
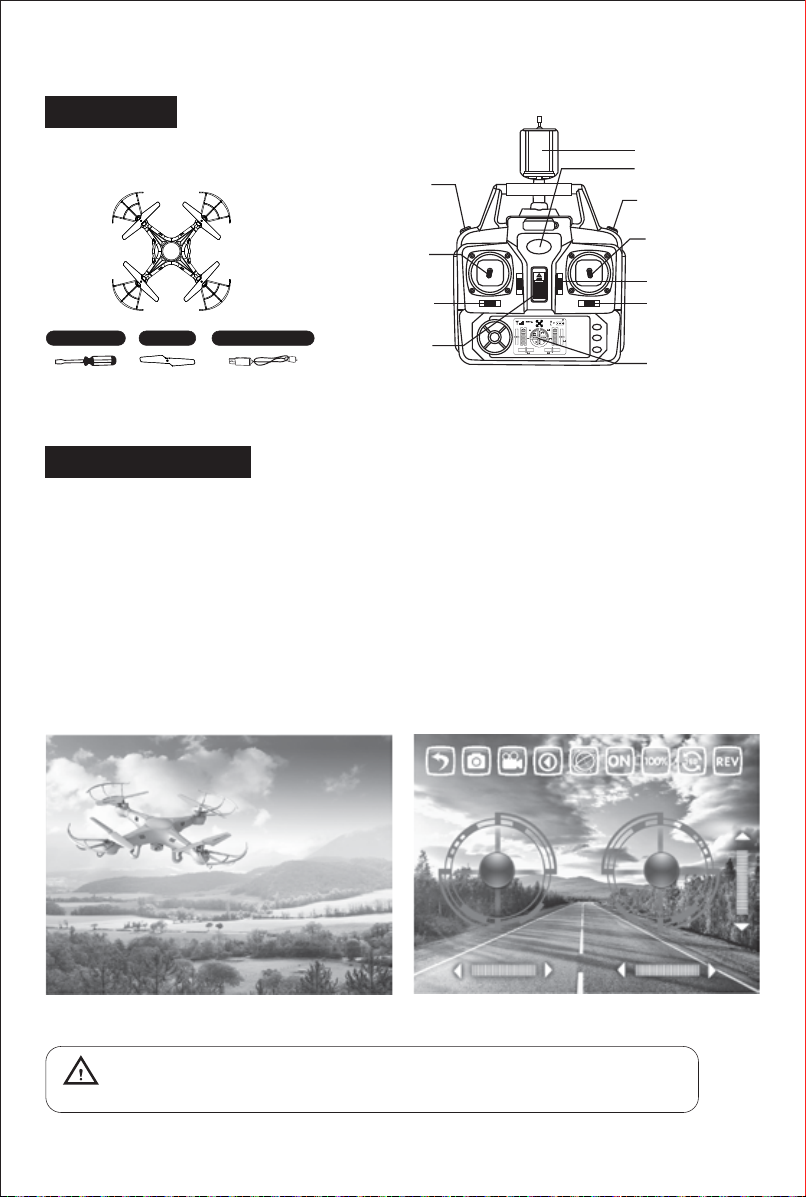
A. Parts
Phone clip
High/Low
speed switch
Left Joystick
(Up/Down, Turn
Screwdriver Blades
USB charging cable
Left/Right)
Turn Left/
Right Trim
Power ON/OFF
ON
B. WIFI connection
Please fly this product in an area clear of people, animals, or any other obstacles to prevent injury
or damage.
1. Download and install this software:
A: Apple Version: This software can be downloaded on iPhone or iPad. please go to the app store to
download the app "GM-WiFiUFO".
B: Android Version: On Googleplay (http://play.google.com/store), search "GM-WiFiUFO" to get
the app.
2. Connection instructions:
A: Turn on the power, the indicator of the aircraft starts flashing quickly.
B: Connect to the wifi signal "GM-WiFiUFO" on your phone.
C: Go back to the home screen and then open the app to match the signal and get ready to fly.
Indicator
Flip Mode
Right Joystick
(Forward/Backward,
Left/Right side flight)
Forward and
backward Trim
Left/Right side flight
Trim & Mode Button
LCD display
Start Interface Control Interface
Please make sure that the flying environment should be suitable for playing before flying.
during the course of flying, please do not let the aircraft fly beyond the eye scope. should
CAUTION
be on the spot and give guidance to the children during the course of operating.
1
Page 3

2. SMARTPHONE CONTROLLER INTERFACE
1 2 3 4 5 6 7 8 9
17
1. Back
2. Take a picture
3. Take a video
4. Picture & video check
5. Control mode for gravity sensor
3. FUNCTION SETTING
16
18 19 20
12 131514
6. ON/OFF
7. Speed selection
8. Flips
9. Rotary screen
10/11. Forward/backward trim
21
22
10
11
12/13. Sideways flying trim
14/15. Turning trim
16. Up/down
17/18. Turn left/right
19/20. Sideways fly
21/22. Forward/backward
Click this key to enter into the function setting
Language setting
English
Flight attitude parameters
Parameters auto save
Reset the parameters
Interface settings
Reverse control screen by gravity sensing
Left Hand Mode
2
English switch
Advanced setting
(defaulted)
Advanced setting
(defaulted)
Left/right throttle (switch
on the right-hand, switch
off the left-hand)
Page 4
4. OPERATING METHOD
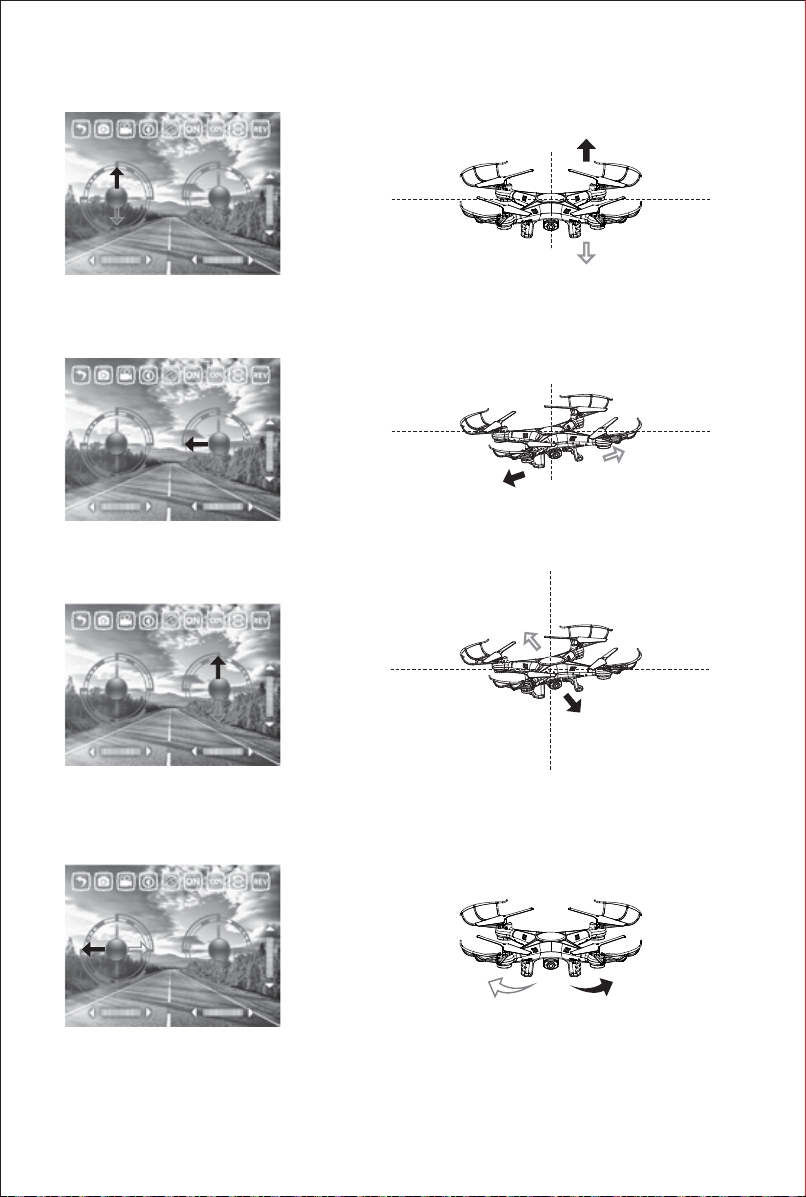
1. Manual flying control
(1) Power control, push up/down on the left button to control up/down.
(2) Direction control, push the right button to left/right to make it fly sideways.
(3) Direction control, push up/down on the right button to make it move forward/backward.
(4) Direction control, push the left button to left/right to make it turn left/right.
3
Page 5
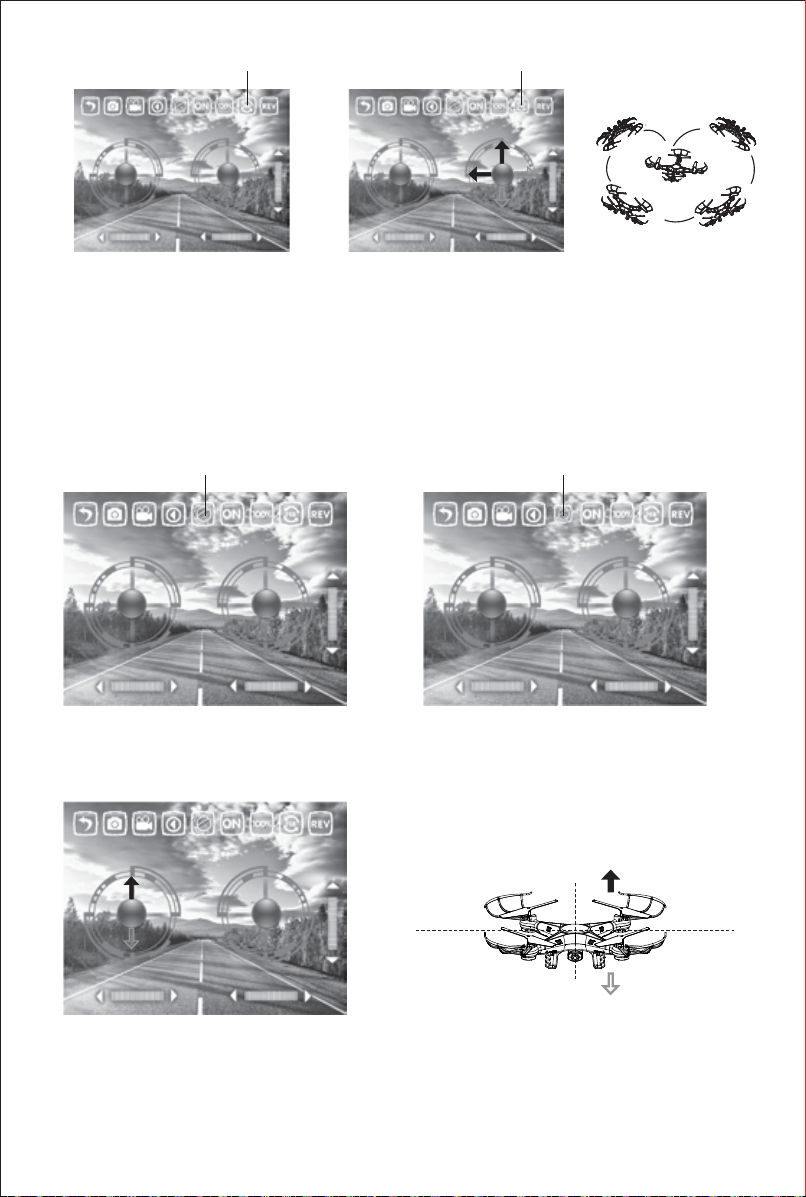
Flip mode is off when the icon is
white.
(5) Touch the 360° button and it will change to yellow, indicating the flip mode is on. Push the right button
up/down, left/right to make the drone flip forward/backward/left/right.
Flip mode is on when the icon is
yellow.
2. Gravity-sensor control
Touch the gravity sensor key on your smartphone. It will turn yellow indicating you are now in gravity mode. You
will now be able to control your drone using the tilt of your smartphone!
Gravity mode is off when the icon is white.
Gravity mode is on when the icon is
yellow.
When in gravity mode, sensors in your smartphone allow you to use the tilt of your phone to control the
forward/backward and sideways flight.
(1) Power control, push up/down on the left button to fly the drone up/down.
4
Page 6
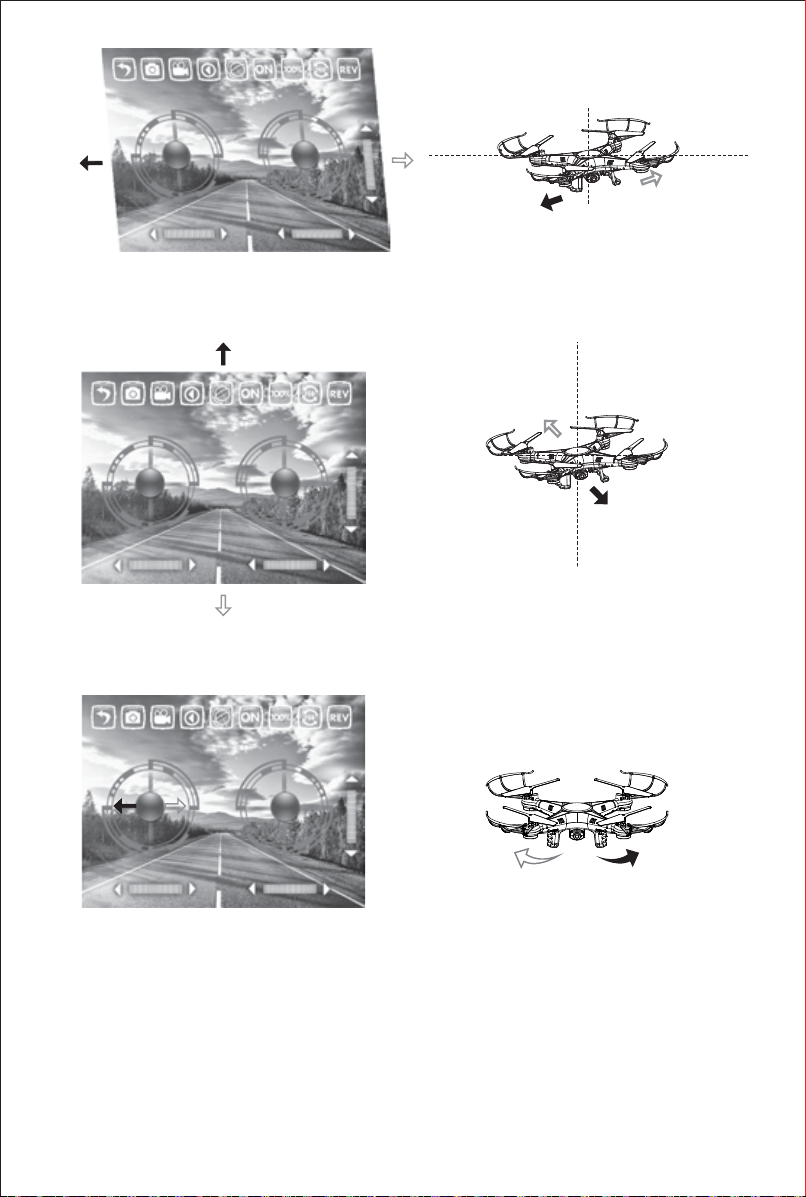
(2) Direction control, tilt the phone to left/right to make the drone sideways fly left/right.
(3) Direction control, tilt the phone to forward/backward to make the drone fly forward/ backward.
(4) Direction control, push the left button to left/right to make it turn left/right.
3. Caution:
(1) If you cannot search the wifi, try closing the wifi and then re-connecting to it.
(2) If you need to replace the batteries, please completely exit from the app and then select the corresponding
network to connect. when successfully connecting to it, please re-start the app.
(3) The maximum control radius of the wife is about 80 feet, please do not fly it beyond this distance.
(4) If the space is without interference signal, the maximum control distance is 165 feet.
5
Page 7
5. WIFI CONTROL & OPERATION
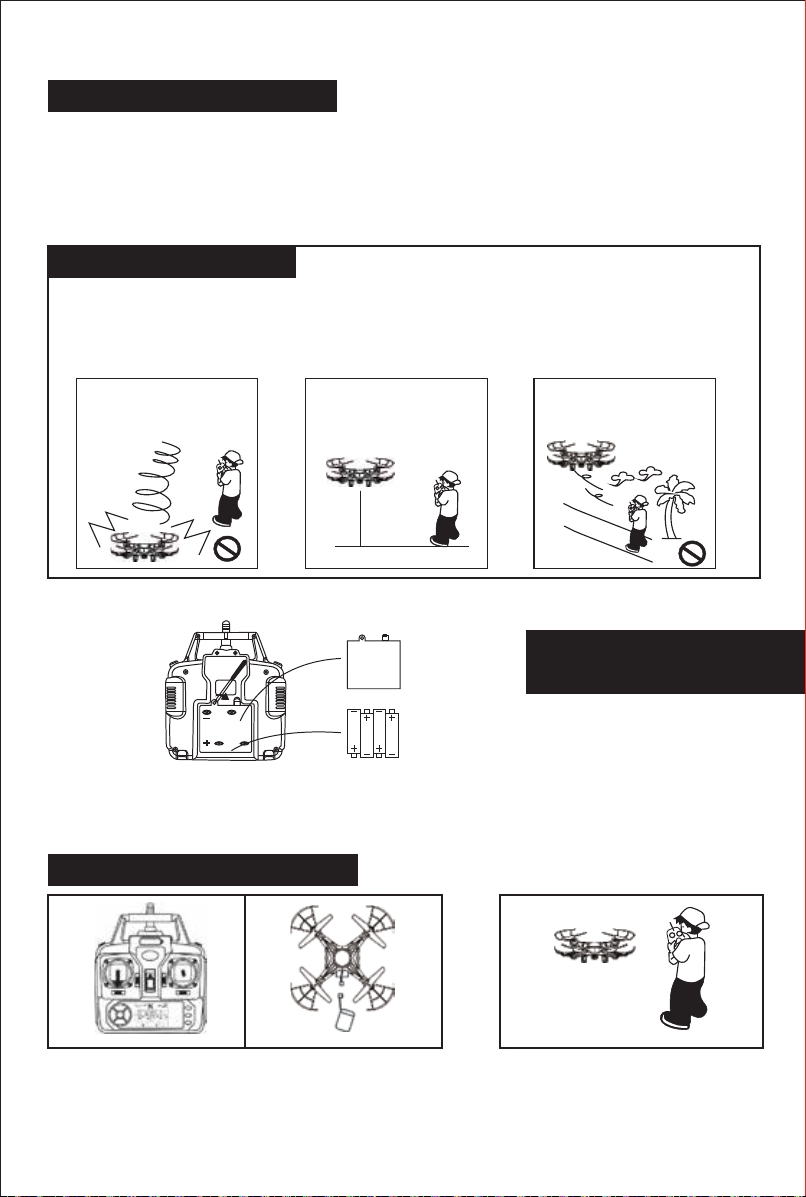
1. Preparation before taking off
(1) Insert the AA batteries in the controller as shown in the picture below.
(2) Please place the drone on a flat, level surface.
(3) Stand at least 5 feet behind the drone.
(4) Please double check for any obstacles or potential hazards near the area of flight.
(5) Please see below how to sync this drone with your remote. Once they are paired, you are ready
for take off.
2. Cautions on controlling
Control range: The flight distance is about 330 feet. If flown beyond this distance, you will lose control of
your drone.
WARNING: Flying your drone in strong winds can cause you to lose control of your drone and possible damage
might occur.
Flying time: The flying time is about 6-8 minutes.
Prevent the drone from crashing
from a large height to prevent
any possible damage.
Battery Installment
Aircraft should always be flown
at least 3 feet off the ground
at all times.
Do not fly near obstacles or
hazards to avoid any possible
damage.
Battery
cover
4X1.5V
batteries
AA
1. Install batteries to the correct polarity.
2. Do not mix old and new batteries.
3. Do not mix different types of batteries.
Battery Installation: Open the battery cover on the back of the remote control and insert 4 AA batteries,
according to the polarity illustrated on the remote. (Batteries not included)
3. Pairing the remote and drone
Picture 1 Picture 2
1. Push down the power joystick to the bottom position, when the
controller is still turned off. Connect the Li-battery with the drone as
shown in pic 1. Turn on the controller to pair it with the drone. When you
hear two beeps and the lights stay on, it means the match was
successful. (Note: If you have not push down the joystick in advance, it
may not match the signal).
6
3. Once the drone and the remote are paired
together, they are ready for take off!
Page 8
4. Controller modes
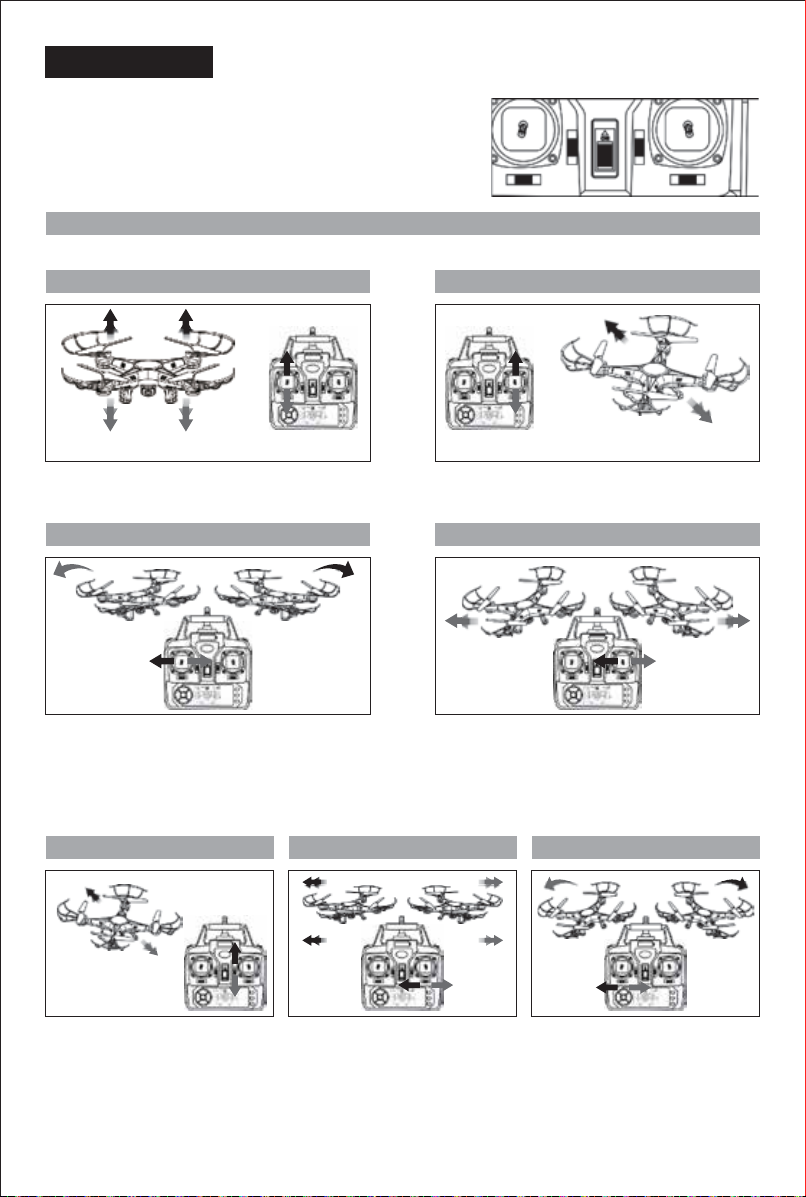
The remote can be operated in two modes. To change
modes, push button B to right, then restart the remote
controller's power.
MODE 1
Operating direction
Hover up and down
B
Forward and backward
Push the throttle up or down, the quadcopter
will ascend or descend.
Push the direction lever up or down, the
quadcopter will fly forward or backward.
Turn left and right Sideward fly
Pull the throttle left or right, the quadcopter
turns left or right.
Pull the direction lever left or right, the
quadcopter flies to the left side or the
right side.
Fine-tune Trimming
Forward/Backward trimming Sideward fly trimming Turn left/right trimming
When the quadcopter keeps
flying forward/backward, you
can correct it by pressing the
fine-tuning button down/up.
When the quadcopter keeps
flying to the left/right side, you
can correct it by pressing the
fine-tuning button right/left.
When the quadcopter keeps
rotating to the left/right, you
can correct it by pressing the
fine-tuning button right/left.
7
Page 9
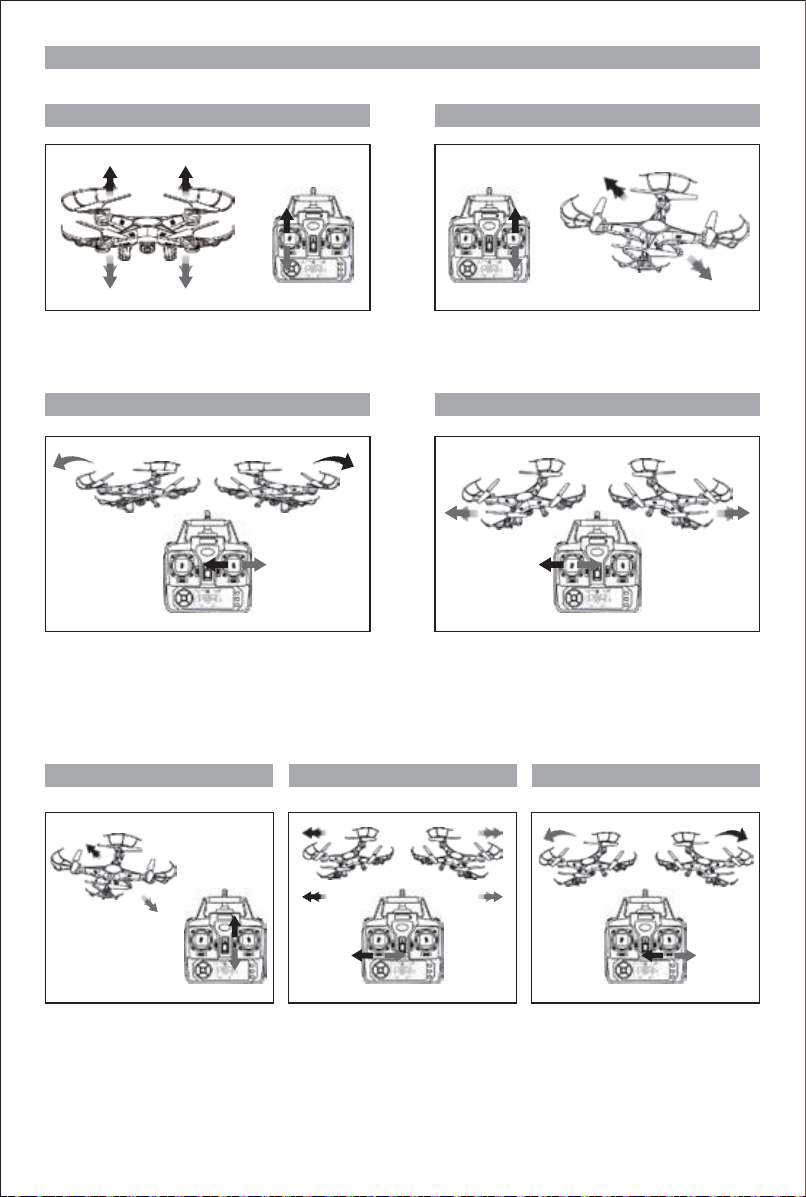
MODE 2
Operating direction
Hover up and down
Forward and backward
Push the throttle up or down, the quadcopter
will ascend or descend.
Push the direction lever up or down, the
quadcopter will fly forward or backward.
Turn left and right Sideward fly
Pull the throttle left or right, the quadcopter
turns to the left or right.
Pull the direction lever left or right, the
quadcopter flies to the left side or the
right side.
Fine-tuning Trimming
Forward/Backward trimming Sideward fly trimming Turn left/right trimming
When the quadcopter keeps
flying forward/backward, you
can correct it by pressing the
fine-tuning button down/up.
When the quadcopter keeps
flying to the left/right side, you
can correct it by pressing the
fine-tuning button right/left.
8
When the quadcopter keeps
rotating to the left/right, you can
correct it by pressing the
fine-tuning button right/ left.
Page 10
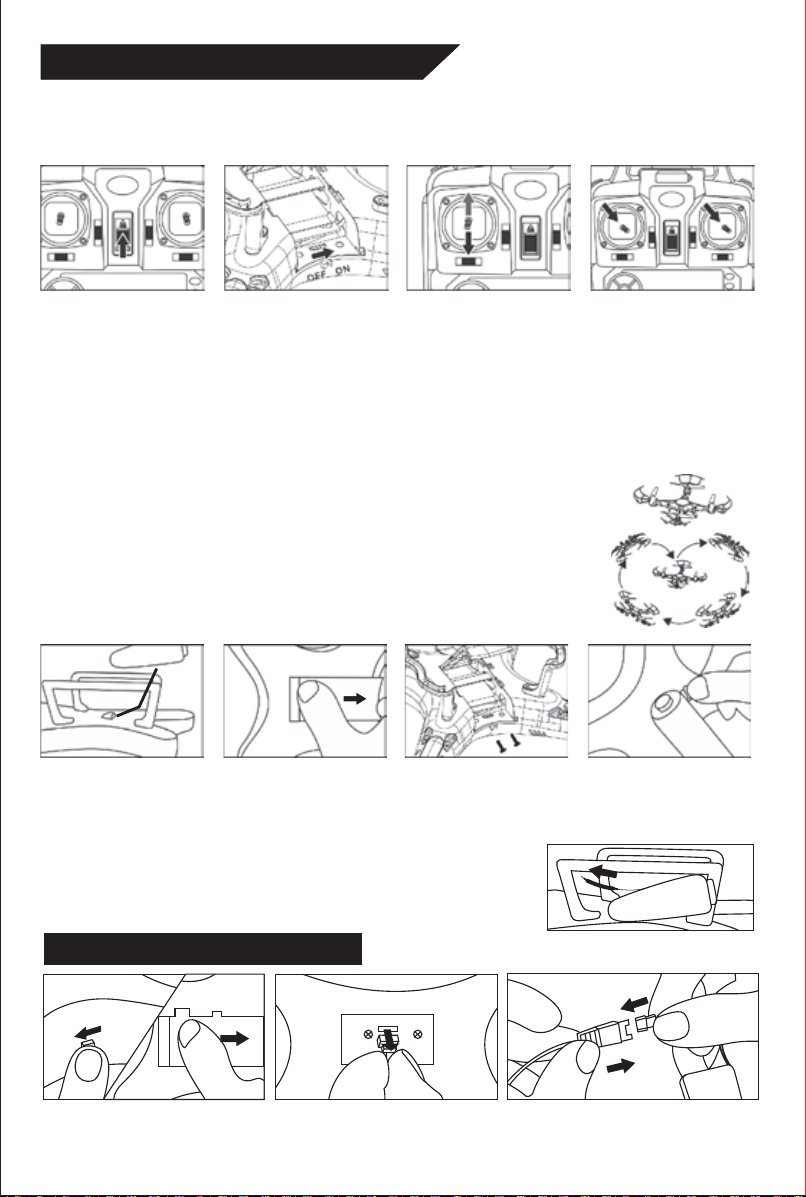
5. Quadrone Functions
1. Low-voltage protection: When the quadcopter battery is running low, power supply to the rotors will be
stopped. The quadcopter control system will automatically protect the battery.
2. Restart function: In case of incorrect flight patterns, use the following method to restore the
default factory settings.
Press the power
switch to turn on the
transmitter.
Press the power
switch to turn on the
quadcopter.
When the quadcopter
indicator goes from quickly
flashing to slowly flashing,
push the throttle lever to
the highest position, and then
pull it back to the lowest. The
quadcopter indicator will
change from slowly flashing
to lit.
Place the quadcopter on a flat
surface. Then hold the left
and right joysticks in the
bottom right corner for about
2-3 seconds. The indicator on
the drone will change from lit
up to quickly flashing. After
2-3 second, the indicator will
changed to normal lights,
meaning the quadcopter reset
successfully.
3. Throwing flight instructions
Thanks to the 6 axis gyroscope, you can throw the quadcopter and push the
throttle up, and it will automatically level out and hover smoothly.
4. Flips
Once you are familiar with the basic operation, you can do some awesome
& exciting tricks! First, fly the aircraft to a height of about 10 feet. Press the
flips button on the right side of the remote. Then push the right joystick in any
direction to make the drone perform a corresponding 360˚ flip.
INSTALLING THE OPTIONAL CAMERA
�1 �2
1. Push the camera into the slot on the battery cover (Figure 1).
2. Open the battery cover with camera attached (Figure 2).
3. Secure the camera tightly with the provided screws (Figure 3).
4. Close the battery cover with camera, then insert the 3-pin plug to the slot on the side (Figure 4)
Signal function: When the
signal is weak, pull the antenna
�3
as pic
�4
6. Charging the Quadcopter Battery
ON
OFF
1. Push the on/off switch of
quadcopter to OFF position, then
open the battery cover.
2. Pull out the battery wire from the
power port.
3. Take out the USB charging cable and
insert the battery power port to the
small end of it (Make sure the ports
9
connect tight and correct).
Page 11
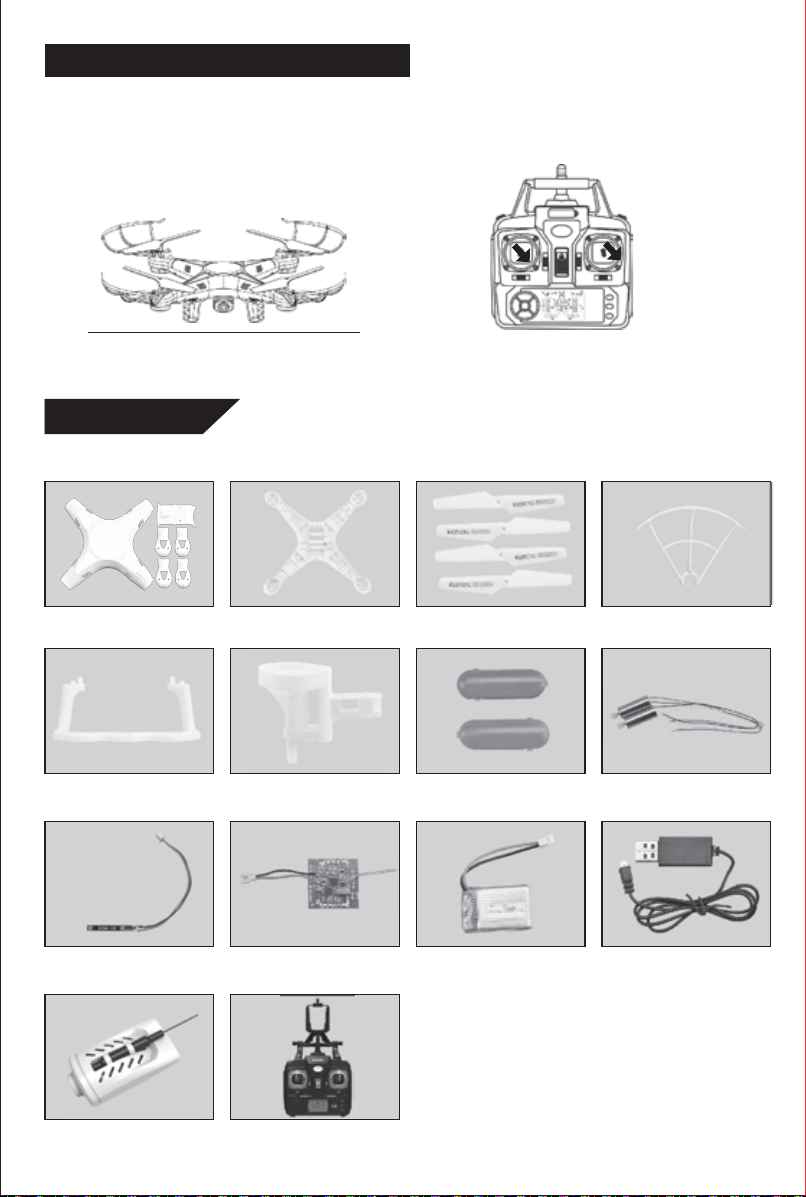
7. Recalibrating the Drone's Gyroscope
If flight cannot be corrected through fine tune trimming, try the following directions to recalibrate the drone's inner gyroscope:
(1) Place the drone on a flat, level surface.
(2) After matching the drone and remote, switch the speed to high speed, and then push the joysticks to the bottom right corner as
shown. When you hear two beeps and a red light flashes, it means the recalibration has been successful.
The drone must be on a flat surface to be recalibrated. Joysticks must be on the bottom right corner at the same
SPARE
PARTS
time
All the spare parts below can bought from your local distributor.
Body cover Main blades
Landing skids Motor holder Lampshades
The bottom
Protecting frames
Motor A/B
Light boards Receiver board Battery
Camera K300C/Wifi
Controller
10
USB charging cable
Page 12
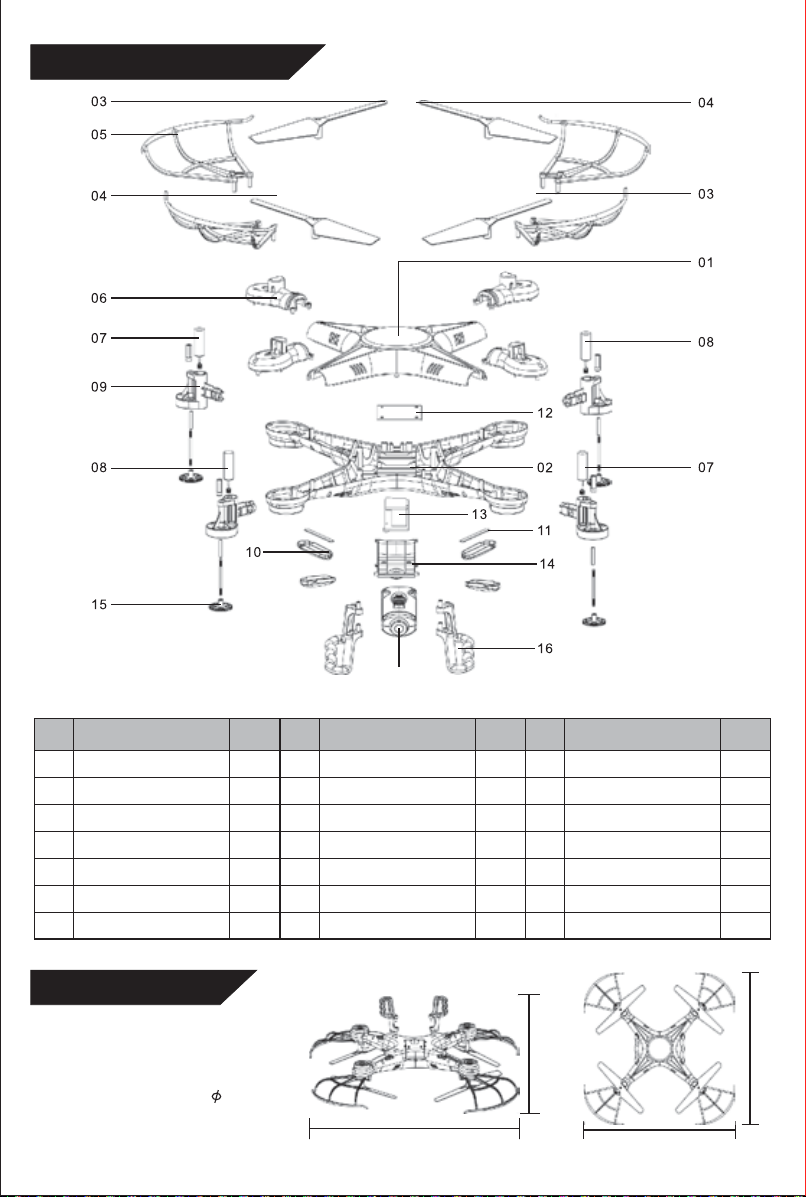
BREAKDOWN & DIAGRAM
Code
01
02
03
04
05
06
07
Description
Upper body
Lower body
Rotating blade
Reversing blade
Protecting frames
Battery cover
Rotating motor
Quantity
1
1
2
2
4
4
2
MAIN PARAMETER
Body length: 12"
Body width: 12"
Body high: 3"
Main motor code: 7
Battery: 3.7V500mAh Li-poly
Code
08
09
10
11
12
13
14
Description
Reverse motor
Motor holder
Lampshades
Light boards
Receiver board
Battery
Battery cover
11
Quantity Code
2
15
4
16
4
17
4
1
1
1
3"
Description
Gear
Landing skids
Camera K300C/Wifi
12"12"
Quantity
4
2
1
12"
 Loading...