

Page 1

USER INSTRUCTIONS
BEDIENUNGSANLEITUNG
NOTICE D´UTILISATION
MANUAL DE INSTRUCCIONES
Page 2

EN
3
First of all, thank you for deciding on AURUM loudspeakers.
It is to satisfy the high expectations of music lovers and connoisseurs such as you that we build
loudspeakers of a class that is well above average. Even though you may already be familiar
with them, we list below a few ground rules that will enable you to make optimal use of your
loudspeakers.
SAFETY ADVICE FOR PASSIVE LOUDSPEAKERS
Please take time to read through the manual carefully and follow all the steps describing how to set up
and operate the loudspeakers. Keep the manual somewhere you can quickly access it should you have any
questions later on.
• The stability of loudspeakers (especially large units) depends on the nature of the surface on which they
stand. Carpets are often very poor for stability. Even an average bump can cause a loudspeaker to fall
over and be a hazard for persons or pets in the vicinity. Stability can be significantly improved by using
“spikes”, but care should be taken during assembly as the sharp points can cause injury and the spikes can
damage the floor. On smooth floors, the loudspeakers can be stabilised with Velcro or double-sided tape.
Loudspeakers should never be used as a seat or as a substitute for a ladder!
• Use only wheeled furniture, stands or wall mounting systems and other devices for attaching and installing
the products, which are available from the manufacturer and are sold for or with the product. To avoid
damage or injury through tipping over, please be careful when moving table devices or stands on which the
speakers are mounted. If wall-mounting the product, take special care that all components are securely
screwed! Additional securing equipment (chains, etc.) should be fitted.
• The location for the loudspeakers should be dry and not too cold. Constant high humidity or strong sunlight
(UV radiation) can cause your loudspeakers to age prematurely and consequently affect their functioning.
• Very high volume levels for long periods of time are not only annoying for your neighbours, but can also be
harmful to the health of the user!
• When loudspeakers are overloaded with very high volume levels, there is a risk of individual components in
crossover circuits or individual speakers burning out. In particularly bad cases, it is even possible for fire to
break out inside a speaker. Speakers operated at these extremes should therefore not be left unattended.
• At high volumes, voltage levels of 30–50 V can be present at speaker terminals and components. Be very
careful not to touch uninsulated terminal contacts of speakers when in operation. To avoid injury, never put
hands or arms into sound outlets (bass reflex tubes). Children and pets, in particular, are at risk from this.
• For safety reasons, we generally forbid the opening of loudspeaker cabinets when in operation or
connected since, as explained in the above paragraph, voltages of up to 50 volts can be present inside.
• Improper handling of mains voltage can cause fatal injury!
Passive loudspeakers must on no account be connected to the electricity supply!
Speaker terminals may only be connected to the appropriate output terminals of the amplifier. You should
never connect these terminals to the electricity supply (230 V/115 V) in any way since that will otherwise
Contents
Safety advice for passive loudspeakers 3-4
Setting up 5-6
Stands 6
Connecting to the amplifier 6-9
Tips for better acoustics 9
Adapting the sound output 10
Beware of clipping 11
Care of your loudspeakers 11
What to do if your speakers don‘t sound right ? 12
Warranty registration 13
Inhalt
Sicherheitshinweise für passive Lautsprecher 14-15
Aufstellung 16-17
Stative 17
Anschluss an den Verstärker 17-20
Tipps für eine bessere Akustik 20
Klangliche Anpassung 21
Vorsicht Clipping 22
Pflege der Lautsprecher 22
Garantieregistrierung 22
Was tun in Störungsfällen? 23
Sommaire
Consignes de sécurité pour haut-parleurs passif 24-25
Installation 26-27
Pieds 27
Raccordement á l‘amplificateur 27-30
Conseils pour une meilleure acoustique 30
Réglage de la sonorité 31
Attention, risque de distorsion 32
Entretien des enceintes 32
Enregistrement de la garantie 32
Que faire en cas d’anomalies ? 33
Índice
Instrucciones de seguridad para altavoces pasivos 34-35
Disposición 36-37
Soportes de pie 37
Conexión al amplificador 37-40
Consejos para una mejor acústica 40
Ajuste del sonido 41
Cuidado Clipping 42
Mantenimiento de los altavoces 42
Registro de garantía 42
¿Qué hacer en caso de avería? 43
Page 3
4
EN
5
also immediately destroy the loudspeaker and all connected products. Avoid fitting plugs to ends of
speaker cables that could even remotely be confused with mains supply plugs.
• Loudspeakers that are not magnetically shielded can affect the colour of the TV picture or cause distortion.
A distance of 50 cm is generally sufficient to avoid problems of this kind. Avoid placing items such as credit
cards, diskettes, audio or video cassettes or other magnetic media on the loudspeaker. This could destroy
the information stored on them. Similarly,
SETTING UP
To obtain optimal sound results, it is generally necessary to try out different set-ups.
Since the room conditions have a major effect on sound reproduction, we suggest below a few useful
approaches for positioning your AURUM loudspeakers.
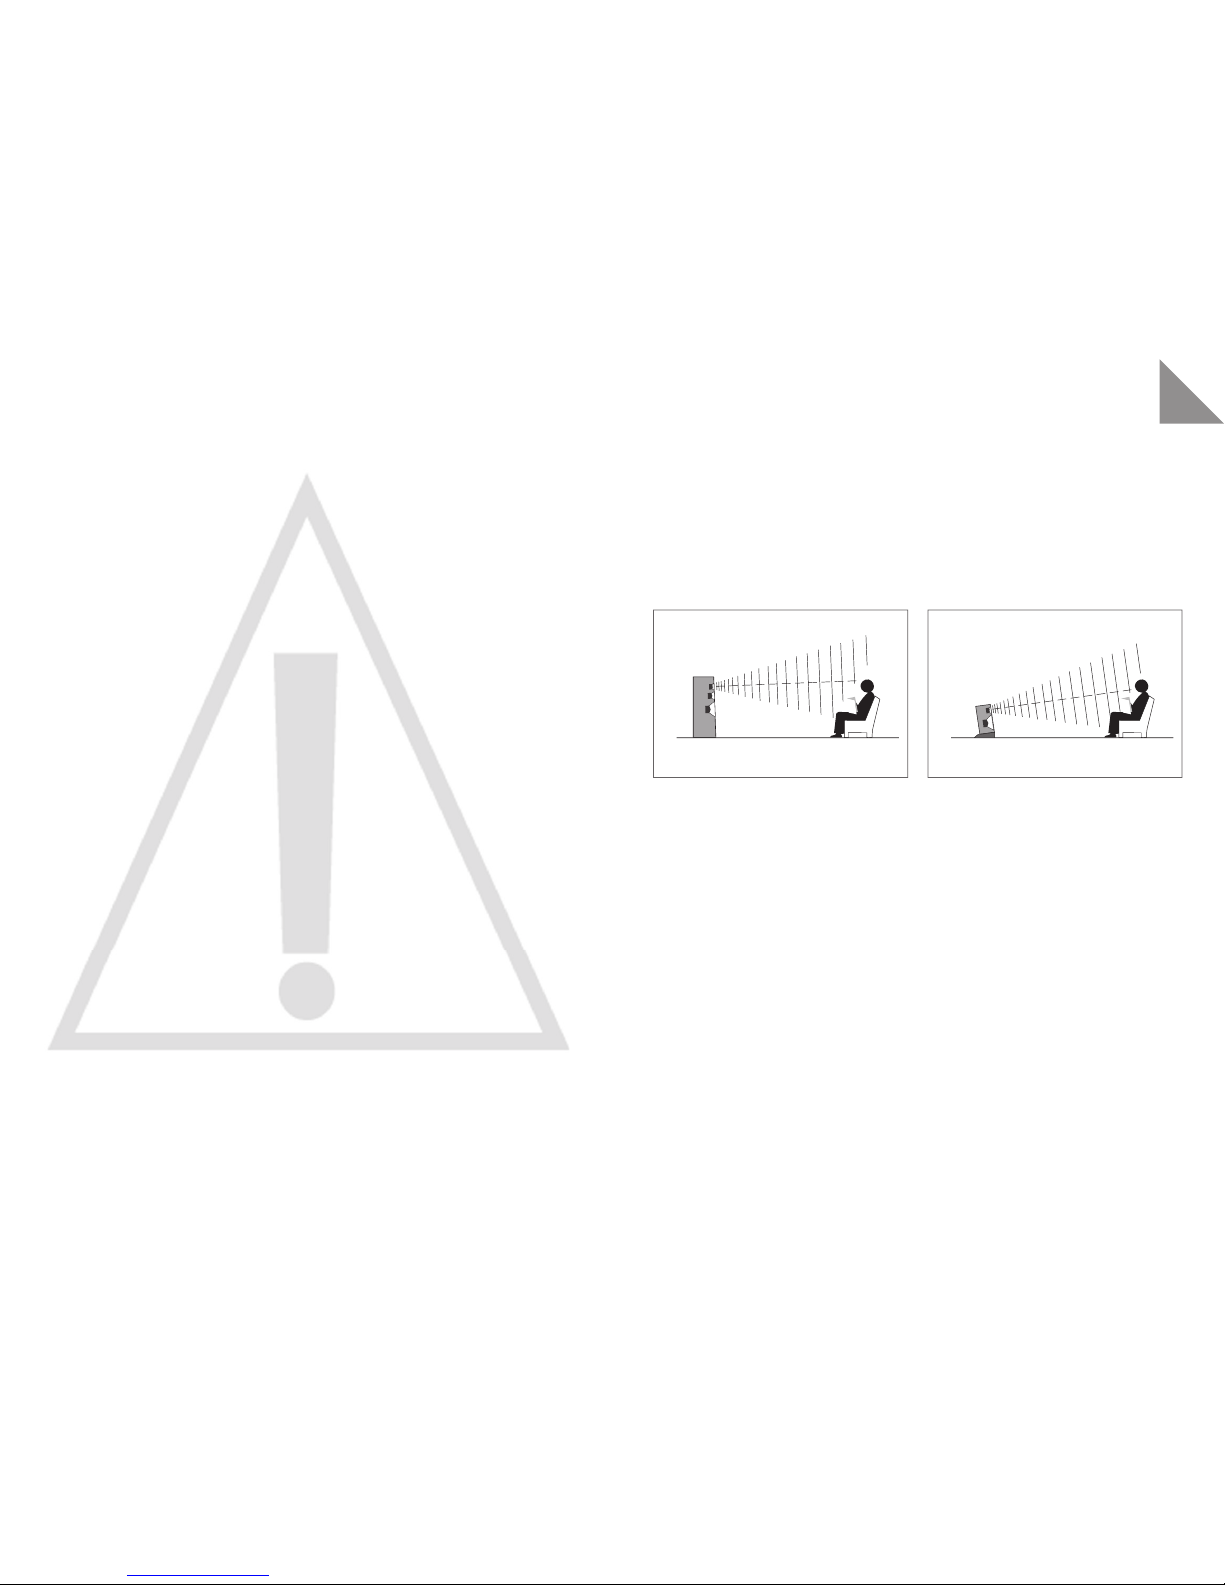
Main speakers (front)
Where the speakers are positioned in the listening space has a decisive effect on their sound. Placing the
speakers near the corners of the room will essentially give you loud bass reproduction but with little outline.
On the other hand, speakers positioned well away from the walls sound precise, but also very bright and thin.
The best solution is to place the speakers with at least 30 cm between their backs and the nearest wall. To
avoid loud wall reflections, the distance from the side walls of the room can even be 50 cm or more. With their
slanted fronts, the floorstand speakers are specially adapted to acoustic demands. Bookshelf speaker units
sound best on a speaker stand or shelf, with the tweeters arranged at ear height. The cases should be angled
and slightly tilted to achieve this.
So far as possible, the speakers should be equidistant from the listening position, while the distance of the
speakers from each other can be rather less than the distance from the listener.
Centre loudspeaker
These loudspeakers are no longer magnetically screened since the increase in use of plasma and LCD TVs.
Since mounting on the television is no longer possible the centre loudspeaker can be placed lying horizontally
under the television.
Further tips and tricks can also be found at:
www.youtube/quadral Technology World: loudspeaker mounting.
The distance to the television should be about 30 cm and at least 20 cm above the floor.
Apart from the above, we recommend angling the center speaker so that the tweeter is aimed at the listener
in order to enjoy its full sound potential.
Rear center speaker
In contrast to 5.1 surround sets, 6.1 systems have an additional rear center speaker that should be placed
behind and slightly above the typical listening position.
Page 4
CENTER
FRONT
TV
FRONT
SUBWOOFER
REAR
REAR
50 cm
>
–
REAR
CENTER
CENTER
FRONT
TV
FRONT
SUBWOOFER
REAR
REAR
50 cm
>
–
+
-
Jumper
Amplifier/
output stage
LO
+
+
-
-
HI
-
+
+
-
+
-
Jumper
Amplifier/
output stage
Amplifier/
output stage
LO
+
+
-
-
HI
-
+
LO
+
+
-
-
HI
-
+
+
-
+
-
+
-
+
-
Jumper
Amplifier/
output stage
Amplifier/
output stage
Amplifier/
output stage
Amplifier/
output stage
Tweeter/midrange
Woofer
LO
+
+
-
-
HI
-
+
LO
+
+
-
-
HI
-
+
LO
+
+
-
-
HI
-
+
6
EN
7
Rear speakers
Whether you direct the rear speakers toward the
listening position is a matter of taste. Also, many
listeners prefer the rear speakers to be positioned
above ear height. This can be achieved by mounting
the units on a sturdy wall bracket, a high speaker
stand, a sideboard or shelf.
STANDS
For optimal front and rear speaker setup, quadral has suitable stands in its product range.
Should you have any questions, please contact us on tel.: +49 (0) 511 7904-0,
e-mail: ovs@quadral.com or info@aurumspeakers.com
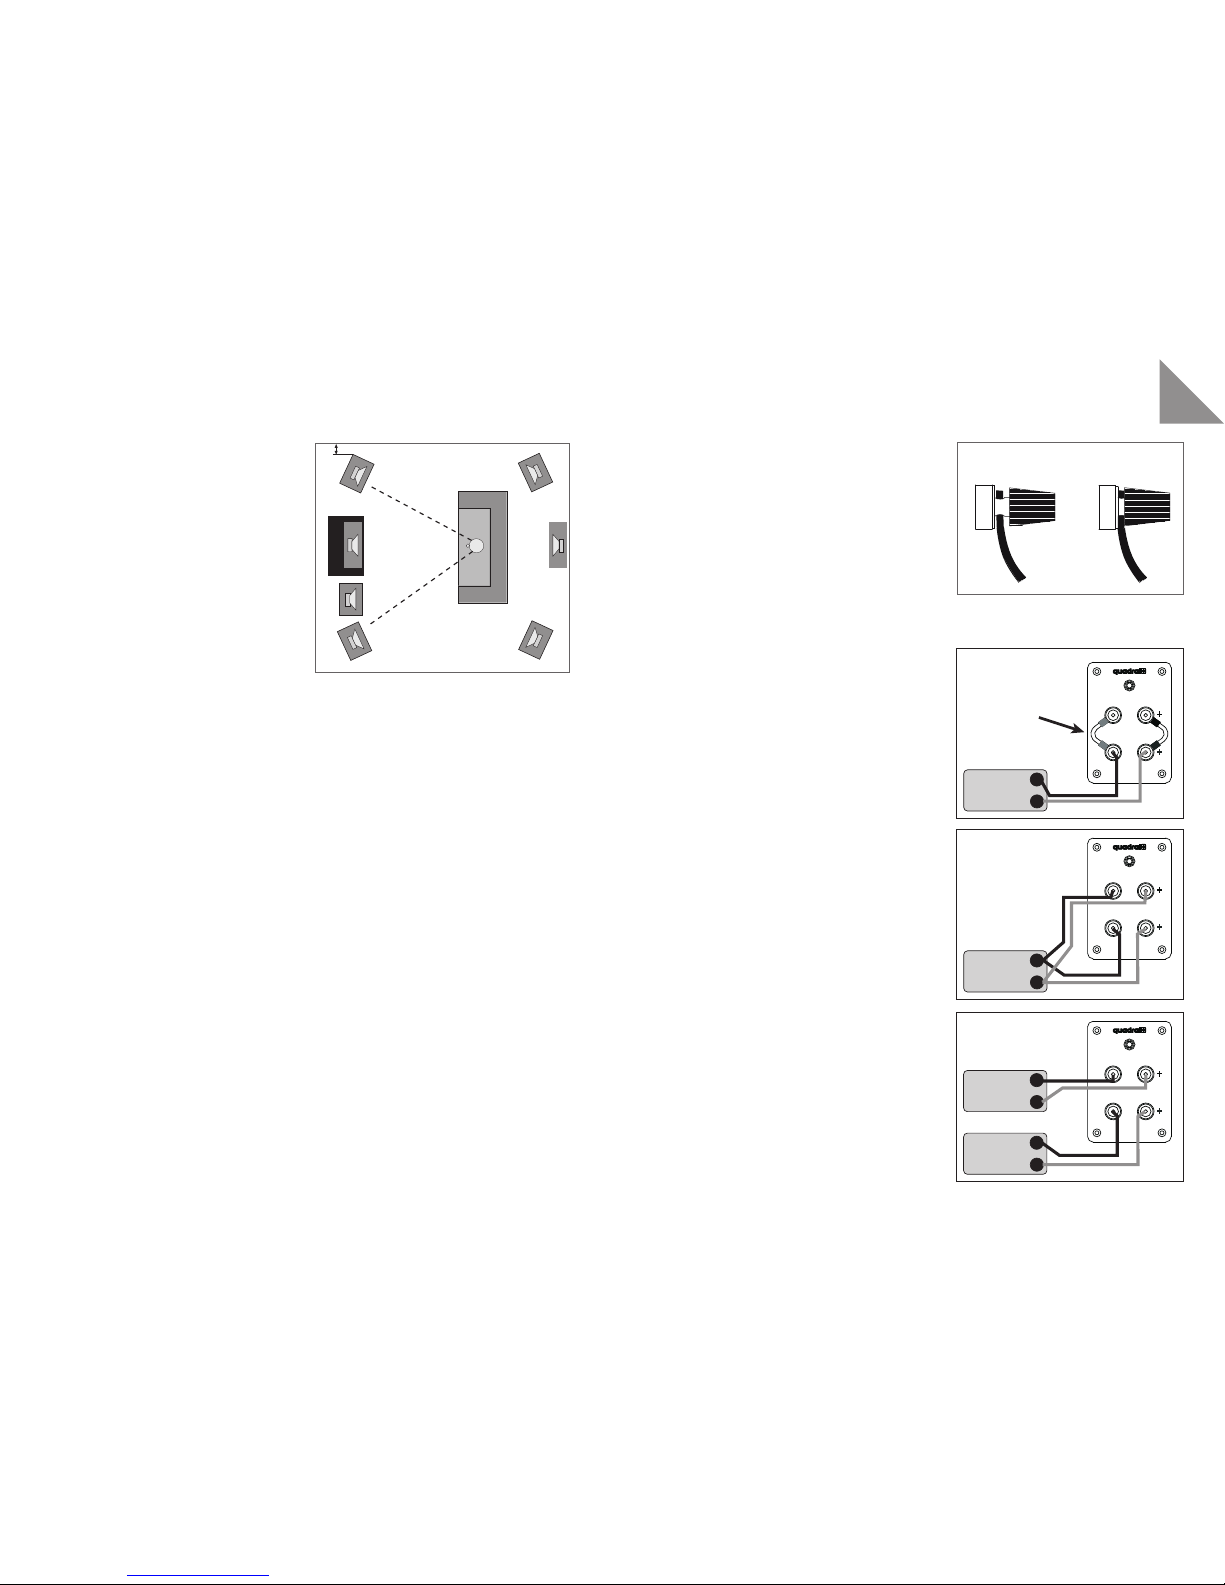
CONNECTING TO THE AMPLIFIER
Before connecting up the speakers to your hifi or surround sound system, please ensure that the amplifier/
receiver is switched off and its pilot light is not on. For connection, you will need a twin-core loudspeaker
cable for each speaker cabinet. Make sure these cables are sufficiently long and cut them to a length that will
subsequently enable you to lay them behind furniture or under the carpet where necessary. For cables more
than 5 m in length we recommend a cross-section area of at least 2.5 mm2 per core in order to avoid any
unnecessary loss of output. To enable optimum contact, about 10 mm of the cores at each end of the cable
must be isolated, and thus bare.
SCREW TERMINALS
For connection, the speakers are provided with colour-coded screw terminals on the back of the cabinet.
Loosen the screw terminals and feed the stripped end of the core into the hole that is now free. The two cores
of speaker cables have different colouring or shape for recognition. Connect the “+” core to the red, positive
terminal – the remaining core to the black terminal. Tighten the screws hand-tight. To ensure correct polarity,
check that the core connected to the red “+” terminal of the speaker is also the core that is connected to the
red “+” terminal of the amplifier and that the other core is
connected to the black “-“ terminals of both the speaker
and amplifier.
With AURUM loudspeakers you can choose between three modes of operation:
a) Conventional mode
Do not remove the jumpers, connect the speaker cable
as shown in the illustration.
b) Biwiring mode
Remove the jumpers after loosening the four screw
terminals on the back of the speaker and connect the
cable as shown in the illustration
c) Biamping mode
Remove the jumpers and connect the cables as shown
in the illustration.
Page 5
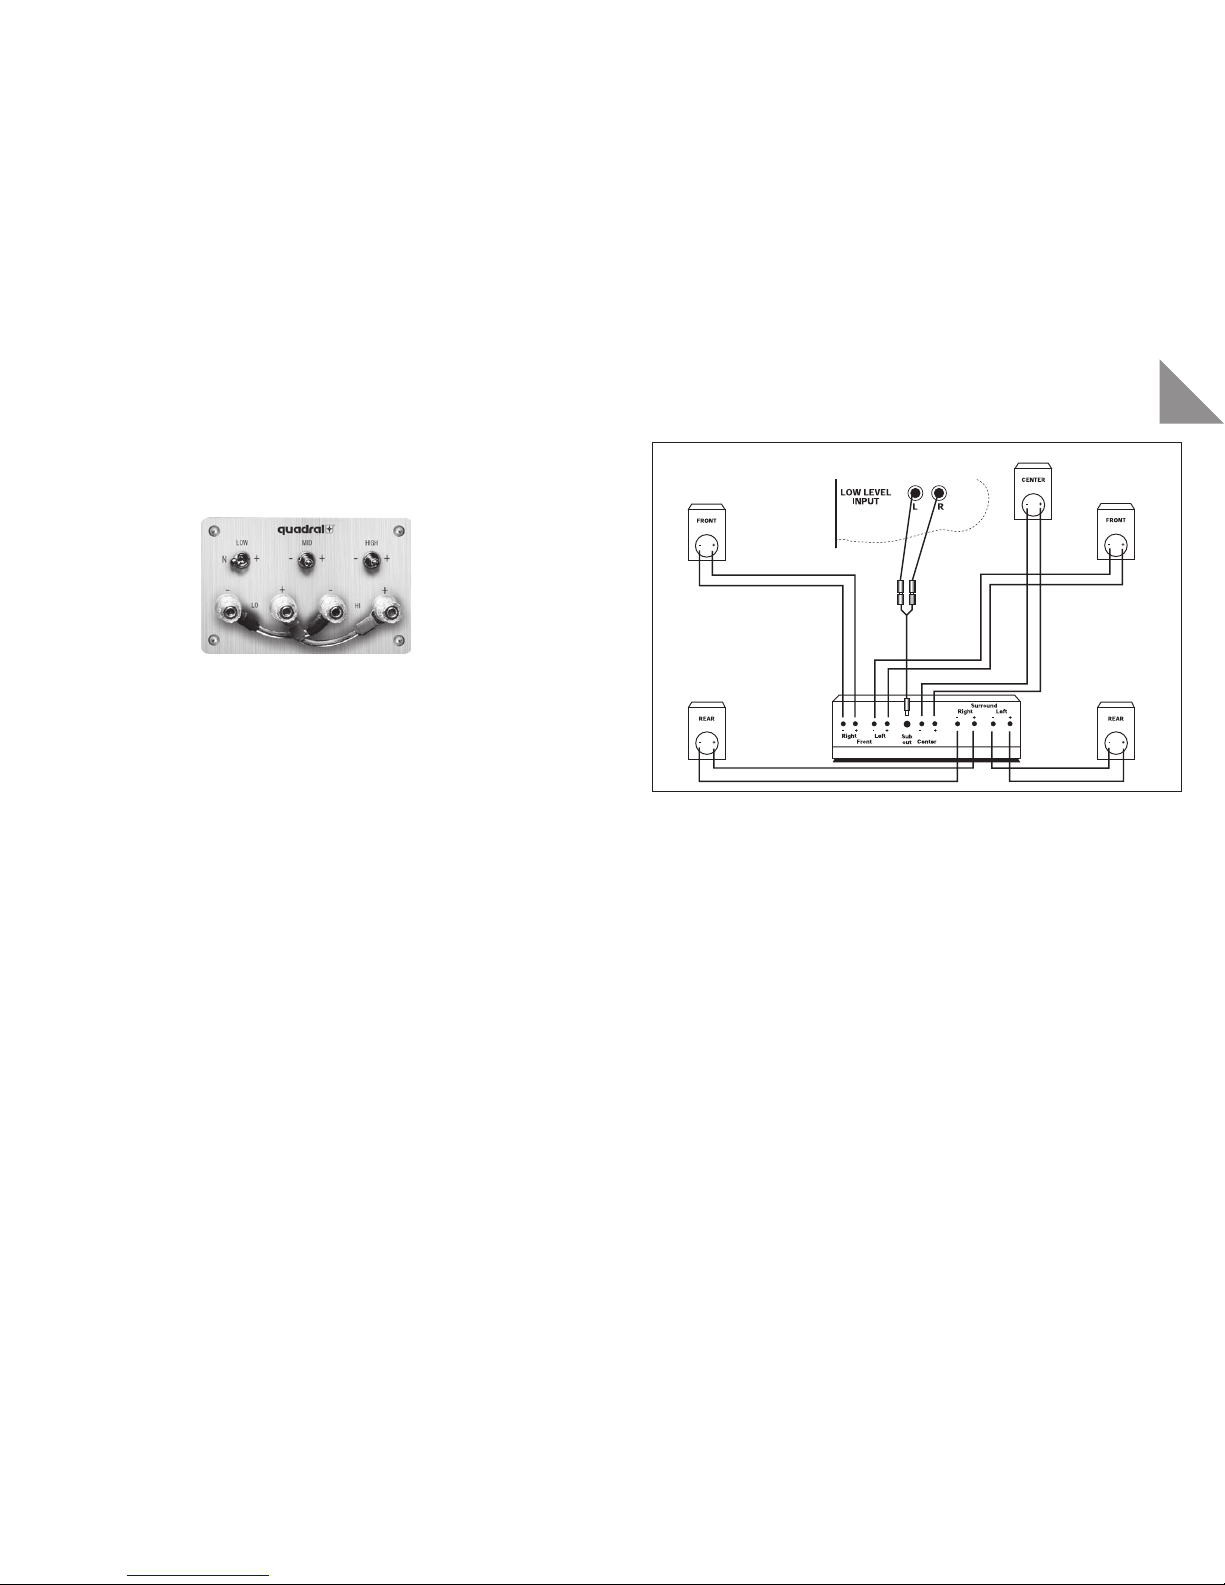
Subwoofer
Low Level connection
Surround-amplifier
Left
right
8
EN
9
During Bi-wiring / Bi-amping operation of the AURUM loudspeaker, both screw terminals for the woofer (LO)
are below and for the midrange speakers and tweeters (Hl) are above on the connection plate.
Only the largest models of the AURUM 9 series are fitted with an extended connector panel by means of
which these connections are arranged horizontally and the various operating modes apply analogously with
the assignment of (Hl) and (LO).
Make sure you use the correct polarities in these modes and that you remove the jumpers on the speaker
terminal to avoid damaging your amplifier.
OPERATION WITH A SURROUND AMPLIFIER
Once you have positioned and connected your speakers as shown in the illustration, you should perform the
necessary settings in the bass management system of your surround amplifier.
Make sure you read the user manual supplied by your amplifier’s manufacturer before doing this.
Since bass management primarily depends on the loudspeaker configuration, we give only typical settings
below.
a) Small and very small satellite speakers must be operated in “small” mode.
Perform the setting on your amplifier as follows:
Front: small Centre: small
Rear: small Subwoofer: yes
b) There is no definitive formula for the settings for compact speakers. In this case, the suitable mode may be
“large” or “small”. This depends on the volume level you prefer or the sound effect you wish to obtain (refer
to the section “Caution, clipping!”). The settings on your amplifier can optionally be configured as follows:
Front: large/small Centre: large/small
Rear: large/small Subwoofer: yes
c) Floorstanding speakers or large bookshelf speakers that are suitable for powerful bass reproduction
should be operated in “large” mode.
Perform the setting on the amplifier as follows:
Front: large Centre: large
Rear: large Subwoofer: yes/no
Subwoofer
If your surround amplifier has a “line subwoofer” output, you can make use of this by using the Y cable supplied
with the subwoofer (see illustration page 8). In this case, you connect the front speakers directly to the front
speaker terminals of your amplifier. Refer to the connection diagram for wiring your surround system.
Refer to the user manual of the active subwoofer for the necessary settings on your subwoofer!
TIPS FOR BETTER ACOUSTICS
1. The AURUM stand-mounted loudspeakers are fitted with a holder for spikes in order to achieve better
acoustic decoupling of loudspeaker from the floor. Use of spikes can be advantageous dependent on the
nature of the living room and the floor.
AURUM spikes can be obtained separately as an accessory from your dealer.
2. In order to achieve better acoustic decoupling from the mounting surface for shelf or centre speakers, lay
each of these loudspeakers on 4 self-adhesive felt washers.
Page 6
10
EN
11
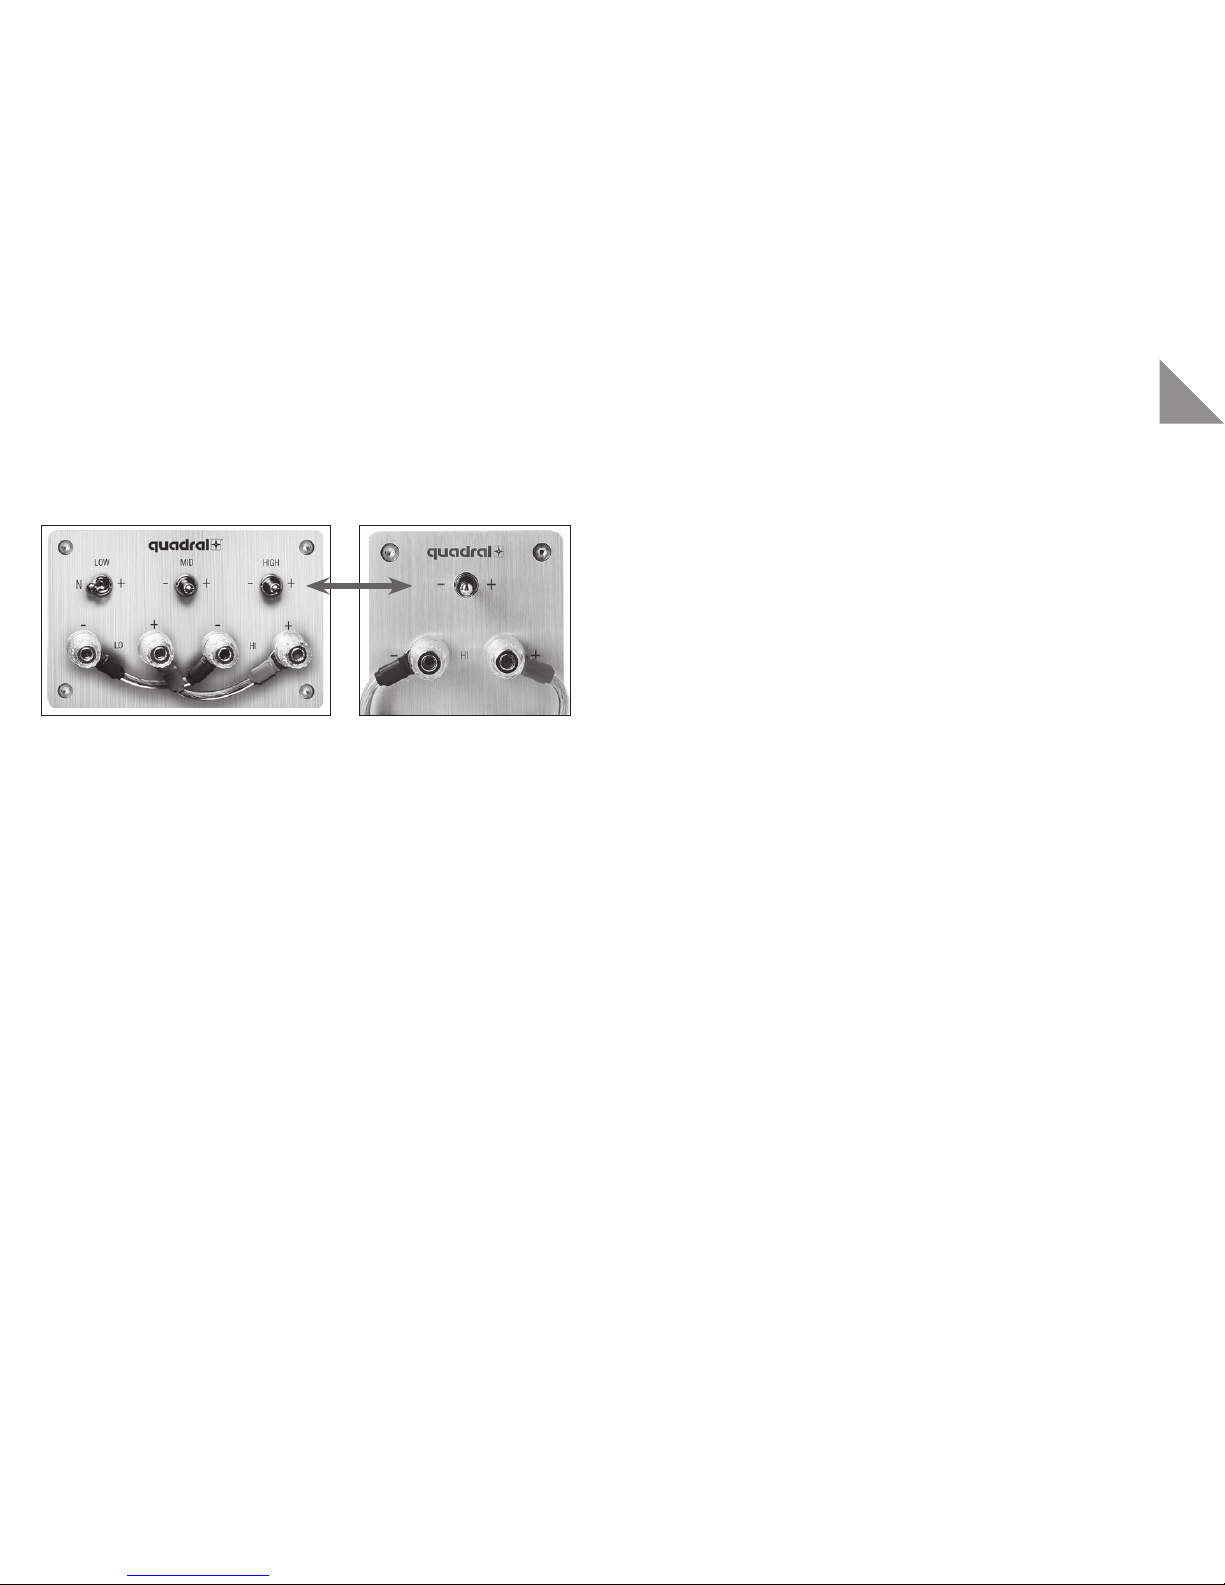
ADAPTING THE SOUND OUTPUT
In order to adapt the new AURUM 9 series individually to your living room conditions without distorting the
perfect sound character, all models are at least fitted with a high frequency switch (HIGH).
High range switch (HIGH)
HIGH +
In the high range, plus 2dB means an overall higher tonal level. This is worthwhile for very heavily insulated
rooms and for everyone who wants to hear a bit more “analytically”. It can be a special advantage when
enjoying soft music, because the frequency-response curve is adjusted to hearing at a low level.
HIGH -
This switch setting makes sense in very hall-like rooms or at high listening volumes, because the frequency
response in the high range is adjusted to the hearing curve at higher volumes.
The models AURUM TITAN 9. VULKAN 9 and TITAN BASE 9 are also fitted with a mid range tone and low
tone filter switch.
Midrange switch (MID)
MID -
This lowers the volume in the listening area. In hall-like spaces, this can eliminate some midrange penetration.
However, this switch setting can also simply be used as a matter of taste.
MID +
The midrange plus 2dB setting makes the fundamental tone range a bit warmer. For rooms with selectively
heavy insulation, this can make the sound altogether more balanced and warmer.
Low tone filter switch (LOW)
LOW N
The neutral setting (N) set as standard in the delivery condition offers ideally structured bass reproduction for
this loudspeaker.
LOW +
The LOW+ switch raises the middle bass range by between about 40 Hz and 100 Hz. In very large rooms this
can lead to a desirable increase in full bass and pressure.
BEWARE OF CLIPPING!
Even if an amplifier’s nominal output is significantly lower than the rated power-handling capacity of the
speakers connected to it, there is still every possibility that the speakers might be damaged if not used
correctly. The nominal output quoted merely indicates the number of watts the amplifier is capable of
delivering to the speakers with low distortion. If an amplifier is overloaded it delivers far more power on
the one hand while adding destructive direct current as well as high-frequency oscillation on the other. This
process is known as clipping and negatively affects the sound through severe distortion in loud passages of
music. When distortion becomes audible you should turn the volume down straight away to avoid damaging
the speakers. Amp-clipping is a typical indication of overloading and always occurs when the volume and/or
tone controls is/are turned up too high. Even when the tone controls are set in neutral (12 o’clock) position,
conventional amps already reach their limits when subject to loud impulses as soon as the volume control is
turned well beyond the 12 o’clock position.
CARE OF YOUR LOUDSPEAKERS
Your AURUM loudspeakers are best cleaned with a soft, dry cloth. Do not use solvents.
You should only clean the loudspeaker systems (woofer, midrange units) when they have become very dirty
(small amounts of dust have no effect on the acoustics). Use a soft, dry cloth or a soft brush with very gentle
pressure, otherwise there is a risk of damaging the diaphragms.
We strongly advise against cleaning the ribbon tweeter, because this special transducer reacts with extreme
sensitivity to compressed air and drafts and may be damaged. Therefore the ribbon tweeter must never be
cleaned with a vacuum cleaner. The front opening must also not be blown off!
We accept no liability for improper cleaning of the speaker.
Slight soiling on the fabric front frame can be removed by tapping, with a vacuum cleaner, or by using an
adhesive tape when the front frame has been removed.
Heavier soil can be removed with a dry foam cleaner (such as Centralin spray). Never use moisture to clean
the front frame.
The technical details for your product can be found on the back of the speaker cabinet!
Should you have any questions, please contact us on tel.: +49 (0) 511 7904-0,
e-mail: ovs@quadral.com or info@aurumspeakers.com
Page 7

12
13
FA ULT
Audible distortion even at low
volume
No sound
Slender, bright sound.
Sounds distant and unrealistic.
Bass notes too powerful
Lack of treble
CAUSE
a) Fault in the electronics
b) Fault in the speaker
a) Cabling incorrect
b) Amplifier switched off
a) Incorrect polarity
b) Unfavourable set-up
a) Unfavourable speaker
set-up (e.g. in the corner
of a room)
b) Bass control on amplifier
set high
a) The tweeters are not
properly aligned
RECTIFICATION
a) The fault lies in the
electronics if the problem
affects both speakers.
Swap over the left and
right speakers if only one
speaker is affected. If the
problem is still on the
same channel, your
electronics are faulty.
The speaker is faulty if
the problem is now on
the other channel.
b) Please contact your
dealer or our service
(tel. +49 (0) 511-7904-0).
a) Check the cabling.
b) Switch on the system.
a) Check to see if a terminal
marked with + on the
amplifier has been
inadvertently connected
to a terminal marked
with - on the speaker or
vice versa.
b) Set up the speaker closer
to a wall, but maintain a
minimum clearance of
5 cm between the back
of the speaker and the
wall.
a) Move the speaker further
away from the adjacent
walls.
b) Set the bass control on
your amplifier to a
neutral position.
a) Position the speakers so
that the tweeters are
facing directly towards
your listening position.
EN
WARRANTY REGISTRATION
In addition to the legally prescribed warranty of 2 years you also have the option of extending the warranty
for your AURUM loudspeaker to an overall period of 10 years. To do this you can go to our homepage
www.quadral.com to enter the required personal and device-specific data. These details will be treated as
confidential and not passed on to any third parties.
Please attach the purchase receipt as evidence of purchase. You can upload this as a file (scan, photograph) or
send us a copy by post using the keyword “Warranty registration“ to the above-mentioned address.
Once we we have checked the documentation we will send you a digital certificate (pdf) which you should
please keep in safe keeping and produce on request.
Please observe our warranty conditions.
Page 8

14
15
DE
Zunächst danken wir Ihnen dafür, dass sie sich für AURUM Lautsprecher entschieden haben.
Es sind Musikliebhaber und Kenner wie Sie, für deren hohe Ansprüche wir Lautsprecher
einer Güteklasse bauen, die weit über dem Durchschnitt liegt. Auch wenn Sie vieles vielleicht
schon wissen, führen wir im folgenden einige Grundregeln auf, die es Ihnen ermöglichen, Ihre
Lautsprecher optimal zu nutzen.
SICHERHEITSHINWEISE FÜR PASSIVE LAUTSPRECHER
Lesen Sie bitte die vorliegende Bedienungsanleitung sorgfältig durch und befolgen Sie bitte alle Schritte, die für
die Inbetriebnahme angegeben sind. Deponieren Sie diese Anleitung so, dass Sie bei späteren Fragen schnell
zur Hand ist.
• Die Standfestigkeit (insbesondere die großer Lautsprecher) ist stark von der Beschaffenheit des
Untergrundes abhängig. Teppichboden verringert, z.T. erheblich, die Standfestigkeit. Schon ein mittelstarker
Schlag kann einen Lautsprecher zum Umfallen bringen und birgt daher eine Verletzungsgefahr für in der
Nähe befindliche Menschen oder Haustiere. Die Standfestigkeit kann durch den Einsatz sogenannter
„Spikes“ deutlich verbessert werden, jedoch Vorsicht bei der Montage, da hier eine Verletzungsgefahr
durch die scharfen Spitzen besteht oder auch eine Beschädigung des Untergrundes erfolgen kann.
Auf glatten Böden lassen sich Lautsprecher mittels Klettverschlüssen oder doppelseitigem Klebeband
befestigen. Lautsprecher dürfen keinesfalls als Sitzmöbel oder Kletterhilfen (Leiterersatz) benutzt werden!
• Verwenden Sie bitte ausschließlich Rollmöbel, Stative oder Wandbefestigungen und andere Geräte
zum Anbringen und Draufstellen der Produkte, die beim Hersteller erhältlich sind und für oder mit dem
Produkt vertrieben werden. Beachten Sie bitte, dass Tischgeräte oder Stative, auf denen die Produkte
platziert werden, sehr vorsichtig zu bewegen sind, um Schäden oder Verletzungen durch ein Umkippen zu
vermeiden. Bei einer Wandmontage ist besondere Sorgfalt auf eine ausreichend sichere Verschraubung
aller Komponenten zu legen! Zusätzliche Sicherungseinrichtungen (Ketten, etc.) sollten montiert werden.
• Es sollte ein Standort für die Lautsprecher gewählt werden, der trocken und nicht zu kalt ist. Eine
dauerhafte hohe Luftfeuchtigkeit oder starke Sonneneinwirkung (UV-Strahlung) kann Ihre Lautsprecher
vorzeitig altern lassen und somit die Funktionsfähigkeit beeinträchtigen.
• Sehr große Lautstärken im Dauerbetrieb werden nicht nur von Ihren Nachbarn als störend empfunden,
sondern können auch für den Anwender zu gesundheitsschädlichen Auswirkungen führen!
• Bei einer Überlastung der Lautsprecher durch sehr große Lautstärken ist das Durchbrennen einzelner
Bauelemente auf den Frequenzweichen oder einzelner Lautsprecher nicht vollständig auszuschließen. In
besonders ungünstigen Fällen kann sogar ein Brand innerhalb eines Lautsprechers in einem derartigen
Überlastungsfall entstehen. Daher sollten Lautsprecher, die in diesem Grenzbereich betrieben werden,
nicht unbeaufsichtigt sein.
• Bei hohen Lautstärken können an den Lautsprecheranschlussklemmen und Bauteilen Spannungen
von 30 V bis 50 V anliegen. Vermeiden Sie daher unbedingt, nicht isolierte Anschlusskontakte der
Lautsprecher während des Betriebes zu berühren. Weiterhin sollten keinesfalls Hände oder Arme in die
Schallaustrittsöffnungen (Bassreflexrohre) gesteckt werden um Verletzungen zu vermeiden. Speziell
Kinder und Haustiere sind hier besonders gefährdet.
• Aus Sicherheitsgründen untersagen wir generell das Öffnen von Lautsprechern im Betrieb oder im
angeschlossenen Zustand, da, wie im oberen Absatz erläutert, Spannungen von bis zu 50 Volt im Inneren
anliegen können.
• Bei unsachgemäßem Umgang mit der Netzspannung besteht Lebensgefahr!
Kein passiver Lautsprecher darf direkt an das elektrische Netz angeschlossen werden!
Die Lautsprecheranschlussklemmen dürfen nur mit den betreffenden Verstärkerausgängen verbunden
werden. Eine irgendwie geartete Verbindung dieser Klemmen mit dem elektrischen Netz (230 V/115 V)
ist nicht erlaubt und führt direkt zur sofortigen Zerstörung des Lautsprechers und aller angeschlossenen
Produkte. Daher sollte es vermieden werden, die Kabelanschlüsse mit Steckern zu versehen die auch nur
entfernt zu einer Verwechselung mit Netzsteckern führen könnte.
• Magnetisch nicht abgeschirmte Lautsprecher können das Fernsehbild verfärben oder verzerren. Ein
Abstand von 50 cm ist im allgemeinen ausreichend, um derartige Störungen zu vermeiden. Vermeiden Sie
bitte die Ablage von z.B. Kreditkarten, Disketten, Audio oder Videokassetten oder anderen Magnetträgern
auf dem Lautsprecher. Die dort gespeicherten Informationen könnten zerstört werden. Ebenso sollten
Magnetbandgeräte nicht in unmittelbarer Nähe betrieben werden.
Page 9

CENTER
FRONT
TV
FRONT
SUBWOOFER
REAR
REAR
50 cm
>
–
REAR
CENTER
16
17
DE
AUFSTELLUNG
Um zu optimalen Klangergebnissen zu gelangen, müssen in der Regel verschiedene Aufstellungen ausprobiert
und probegehört werden.
Da der Raum einen erheblichen Einfluss auf die Wiedergabe hat, geben wir Ihnen im folgenden einige sinnvolle
Ansätze für die Positionierung Ihrer AURUM Lautsprecher an die Hand.
Hauptlautsprecher (Front)
Die Platzierung der Lautsprecher im Hörraum hat einen maßgeblichen Einfluss auf deren Klang. So führt die
Aufstellung nahe Raumecken grundsätzlich zu einer lauten, aber unkonturierten Basswiedergabe. Völlig frei
im Raum stehend klingen Lautsprecher dagegen zwar präzise, aber auch recht hell und schlank. Am besten
stellen Sie die Lautsprecher so auf, dass zwischen ihrer Gehäuserückwand und der nächsten Zimmer wand
mindestens 30 cm Freiraum bleiben. Von seitlichen Zimmerwänden sollte der Abstand sogar über 50 cm
betragen, um lautstarke Wandreflexionen zu vermeiden. Die Standlautsprecher sind mit ihrer geneigten
Frontseite speziell auf die akustischen Anforderungen abgestimmt. Die Regalboxen klingen auf einem
Lautsprecherstativ oder im Regal am besten, wobei die Hochtöner auf die Ohrhöhe auszurichten sind. Dazu
sind die Gehäuse gegebenenfalls anzuwinkeln und leicht zu neigen.
Der Abstand der Lautsprecher zur Hörposition sollte möglichst gleich groß sein, während der Abstand der
Lautsprecher voneinander ruhig etwas kleiner sein darf als der zum Hörer.
Center-Lautsprecher
Diese Lautsprecher sind durch die Verbreitung von Plasma- und LCD-TV´s nicht mehr magnetisch geschirmt.
Da die Aufstellung auf dem Fernseher nicht möglich ist, können die Center liegend unter dem Fernseher
angebracht werden.
Weitere Tipps und Tricks finden Sie außerdem auf:
www.youtube/quadral Technikwelt: Lautsprecher Aufstellung.
Der Abstand zum Fernseher sollte ca. 30 cm und vom Fußboden mind. 20 cm betragen.
Außerdem empfehlen wir den Center so anzuwinkeln, dass der Hochtöner auf die Zuhörer ausgerichtet ist. Nur
so kann er sein volles Klangpotential entfalten.
Rear Center-Lautsprecher
Im Unterschied zu 5.1 Surround-Sets verfügen
6.1-Systeme über einen zusätzlichen Rear-Center,
der hinter und etwas oberhalb der typischen
Hörposition zu platzieren ist.
Rear-Lautsprecher
Ob man auch die Rear-Lautsprecher zur Hörposition
hindreht, ist Geschmackssache. Zudem bevorzugen
manche Hörer für die Rear-Lautsprecher eine
Platzierung oberhalb der Ohrhöhe. Dafür ist der
Rear-Lautsprecher auf einem stabilen Wandhalter,
einem hohen Lautsprecher-Stativ, einem Sideboard
oder im Regal zu positionieren.
STATIVE
Um die Front- und Rear-Lautsprecher optimal aufzustellen, hat quadral geeignete Stative im Lieferprogramm.
Fragen beantworten wir Ihnen gerne unter der Telefon-Nr.: +49 (0) 511 7904-0,
email: ovs@quadral.com oder info@aurumspeakers.com
ANSCHLUSS AN DEN VERSTÄRKER
Bevor Sie die Lautsprecher an Ihre HiFi- oder Surround-Anlage anschließen, stellen Sie bitte sicher, dass
der Verstärker/Receiver ausgeschaltet ist und seine Betriebskontrollanzeige nicht leuchtet. Zum Anschluss
benötigen Sie ein zweiadriges Lautsprecherkabel für jeden Lautsprecher. Achten Sie auf ausreichende
Längen, und schneiden Sie die Kabel nicht vorzeitig zu kurz ab, damit sie später noch hinter Möbeln oder
unter dem Teppich verborgen werden können. Für Kabellängen von mehr als 5 m empfehlen wir Ihnen eine
Querschnittsfläche von mindestens 2,5 mm2 pro Ader, um unnötige Leistungsverluste zu vermeiden. Jede
Ader der Kabelenden muss für einen guten Kontakt knapp 10 mm abisoliert und damit blank sein.
SCHRAUBKLEMMEN
Für den Anschluss der Lautsprecherkabel befindet sich auf der Rückseite der Box ein Anschlussfeld mit farblich
gekennzeichneten Schraubklemmen. Drehen Sie die Schraubklemmen auf und führen Sie das abisolierte Ende
des Kabels in die dann frei werdende Bohrung ein. Am Lautsprecherkabel ist eine Ader farblich oder durch
Formgebung gekennzeichnet. Diese Plus-Zuleitung verschrauben Sie mit der roten Klemme, die andere Ader
mit der schwarzen Klemme. Ziehen Sie die Schrauben handfest an. Um die richtige Polarität zu gewährleisten,
Page 10

+
-
Brücke
Verstärker/
Endstufe
LO
+
+
-
-
HI
-
+
+
-
+
-
Brücke
Verstärker/
Endstufe
Verstärker/
Endstufe
LO
+
+
-
-
HI
-
+
LO
+
+
-
-
HI
-
+
+
-
+
-
+
-
+
-
Brücke
Verstärker/
Endstufe
Verstärker/
Endstufe
Verstärker/
Endstufe
Verstärker/
Endstufe
Hoch-/Mittelton
Tiefton
LO
+
+
-
-
HI
-
+
LO
+
+
-
-
HI
-
+
LO
+
+
-
-
HI
-
+
18
19
DE
überprüfen Sie bitte auch den korrekten Anschluss an
Ihrem Verstärker. Auch hier gehört die gekenn zeichnete
Ader an den (+) Pol, die andere an die schwarze (-)
Schraubklemme.
Bei den AURUM Lautsprechern können Sie zwischen drei Betriebsarten wählen.
a) konventioneller Betrieb
Entfernen Sie die Brücken nicht und schließen Sie die
Lautsprecherkabel gemäß der Abbildung an.
b) Bi-wiring Betrieb
Entfernen Sie die Brücken nach dem Lösen der vier
Schraubklemmen auf der Lautsprecherrückseite und
schließen Sie die Kabel gemäß der Abbildung an.
c) Bi-amping Betrieb
Entfernen Sie die Brücken und schließen Sie die Kabel
gemäß der Abbildung an.
Beim Bi-wiring / Bi-amping Betrieb der AURUM Lautsprecher befinden sich die beiden Schraubklemmen für
den Tieftöner (LO) unten und die für den Mittel- und Hochtöner (HI) oben auf der Anschlussplatte.
Nur die größten Modelle der AURUM 9 Reihe verfügen über ein erweitertes Anschlussfeld, bei dem diese
Anschlüsse horizontal angeordnet sind und die verschiedenen Betriebsarten mit der Zuordnung von (HI) und
(LO) sinngemäß gelten.
Achten Sie in diesen Betriebsarten unbedingt auf die Einhaltung der korrekten Polung und darauf, dass Sie die
Brücken am Lautsprecherterminal entfernen, da es sonst zu Beschädigungen an Ihrem Verstärker kommen
kann.
BETRIEB AN EINEM SURROUND VERSTÄRKER
Wenn Sie den Anschluss und die Platzierung Ihrer Lautsprecher gemäß der Abbildung vorgenommen haben,
müssen Sie die Einstellung im Bassmanagement Ihres Surround-Verstärkers vornehmen.
Lesen Sie hierzu bitte unbedingt die Bedienungsanleitung des Verstärker-Herstellers.
Da das Bassmanagement vor allem von der Lautsprecher-Konfiguration abhängt, geben wir Ihnen im
folgenden einige übliche Einstellungen vor.
a) Kleine und kleinste Satellitenlautsprecher müssen im „small“ Modus betrieben werden. Die Einstellung an
Ihrem Verstärker ist wie folgt vorzunehmen:
Front: small Center: small
Rear: small Subwoofer: yes
b) Bei der Einstellung für Kompaktlautsprecher gibt es keine feste Formel für den Einstellungsmodus.
Hier kann „large“ oder auch „small“ der geeignete Modus sein. Dies ist abhängig von Ihrer bevorzugten
Abhörlautstärke oder Ihrem damit verbundenen Klangeindruck (bitte beachten Sie hierbei auch das Kapitel
„Vorsicht Clipping!“). Die Einstellung an Ihrem Verstärker kann wahlweise wie folgt vorgenommen werden:
Front: large/small Center: large/small
Rear: large/small Subwoofer: yes
c) Standlautsprecher oder große Regallautsprecher, die für eine druckvolle Basswiedergabe geeignet
sind, sollten im „large“ Modus betrieben werden. Die Einstellung an Ihrem Verstärker muss wie folgt
vorgenommen werden:
Front: large Center: large
Rear: large Subwoofer: yes/no
Page 11

Subwoofer
Low Level Anschluss
Surround-Verstärker
Links
Rechts
20
21
DE
Subwoofer
Verfügt Ihr Surroundverstärker über einen „Line“-Subwoofer-Ausgang“, so können Sie diesen nutzen, indem
Sie das dem Subwoofer beiliegende Y-Kabel verwenden (siehe Abbildung). In diesem Fall werden die FrontLautsprecher direkt an die Front-Lautsprecherklemmen Ihres Verstärkers angeschlossen. Die Verkabelung
Ihres Surroundsets entnehmen Sie bitte dem Anschlusschema.
Die notwendigen Einstellungen an Ihrem Subwoofer entnehmen Sie bitte der Bedienungsanleitung des AktivSubwoofers!
TIPPS FÜR EINE BESSERE AKUSTIK
1. Um eine bessere akustische Entkopplung der Lautsprecher vom Fußboden zu gewährleisten, verfügen
die AURUM Standlautsprecher über eine Aufnahmemöglichkeit für Spikes. Je nach Wohnraum und Boden
kann der Einsatz von Spikes für Sie von Vorteil sein.
AURUM Spikes sind als Zubehör separat über Ihren Händler erhältlich.
2. Um bei Regal- bzw. Centerlautsprechern eine bessere akustische Entkopplung von der Stellfläche zu
erzielen, liegen diesen Lautsprechern je 4 selbstklebende Filzscheiben bei.
KLANGLICHE ANPASSUNG
Um die neue AURUM 9 Reihe Ihren Wohnraumverhältnissen individuell anpassen zu können, ohne den
perfekten Klangcharakter zu verfälschen, verfügen alle Modelle zumindest über einen Hochtonschalter
(HIGH).
Hochtonschalter (HIGH)
HIGH -
Diese Schalterstellung ist in sehr halligen Räumen oder bei hohen Abhörlautstärken sinnvoll, da der
Frequenzgang im Hochtonbereich an die Hörkurve bei höheren Lautstärken angepasst wird.
HIGH +
Im Hochtonbereich plus 2dB bedeutet insgesamt mehr Hochtonpegel. Interessant ist dies bei sehr stark
bedämpften Räumen und für alle, die noch etwas „analytischer“ hören wollen. Vor allem bei leisem
Musikgenuss kann dies sehr vorteilhaft sein, da der Frequenzverlauf dem Hörempfinden bei niedrigem Pegel
angepasst wird.
Die Modelle AURUM TITAN 9, VULKAN 9 und TITAN BASE 9 verfügen weiterhin über Mittelton und Tiefton
Filter-Schalter.
Mitteltonschalter (MID)
MID -
Hiermit wird die Lautstärke im Präsenzbereich gesenkt. In halligen Räumen kann dies eine gewisse
Mitteltonpenetranz beseitigen. Diese Schalterstellung kann aber auch einfach aus Geschmacksgründen
eingesetzt werden.
MID +
Die Mittelton plus 2dB Stellung bringt etwas mehr Wärme in den Grundtonbereich. Bei selektiv stark
bedämpften Räumen kann dies den Klang insgesamt ausgewogener und wärmer werden lassen.
Tieftonschalter (LOW)
LOW N
Neutralstellung im Bass - Normalfall. Die im Auslieferzustand vorgesehene Neutralstellung (N) bietet den für
diese Lautsprecher ideal strukturierte Basswiedergabe.
LOW+
Der LOW+ Schalter hebt den mittleren Bassbereich zwischen ca. 40 Hz und 100 Hz an. Dies kann in sehr
großen Räumen zu einem wünschenswerten mehr an Bassfülle und Druck führen.
Page 12

23
DE
22
VORSICHT CLIPPING
Auch wenn die Nennleistung eines Verstärkers deutlich geringer ist als die Nennbelastbarkeit der
angeschlossenen Boxen, können die Lautsprecher bei unsachgemäßem Betrieb durchaus beschädigt werden.
Denn die Nennleistung besagt lediglich, wieviel Watt der Verstärker verzerrungsarm an die Lautsprecher liefern
kann. Wird ein Verstärker überfordert, gibt er zum einen noch weit mehr Leistung ab, und zum anderen mischt
er zerstörerischen Gleichstrom sowie hochfrequente Schwingungen hinzu. Diesen Vorgang bezeichnet man
als “Clipping”, und er macht sich klanglich durch harte Verzerrungen bei lauten Passagen bemerkbar. Werden
Verzerrungen hörbar, ist die Lautstärke sofort zu verringern, um die Boxen nicht zu gefährden. VerstärkerClipping ist eine typische Überlastungserscheinung, die stets bei zu weit aufgedrehten Lautstärke- und/oder
Klangreglern auftritt. Selbst bei Mittelstellung der Klangregler erreichen übliche Verstärker bei lauten Impulsen
bereits ihre Grenzen, sobald der Lautstärkeregler die Stellung 12 Uhr klar überschreitet.
PFLEGE DER LAUTSPRECHER
Ihre AURUM Lautsprecher reinigen Sie am besten mit einem trockenen, weichen Tuch. Verwenden Sie keine
Lösungsmittel.
Die Lautsprechersysteme (Tieftöner, Mitteltöner) sollten Sie nur bei starker Verschmutzung reinigen (geringe
Mengen Staub sind akustisch bedeutungslos). Dies sollte mit einem trockenen, weichen Tuch oder einem
weichen Pinsel mit ganz geringem Druck geschehen, da die Gefahr besteht die Membranen zu beschädigen.
Von einer Reinigung der Bändchenhochtöner raten wir dringend ab, da diese speziellen Schallwandler
äußerst empfindlich auf Druckluft oder Luftzug reagieren und beschädigt werden können. Daher darf der
Bändchenhochtöner auf gar keinen Fall mit einem Staubsauger gereinigt werden. Ebenfalls darf auch nicht in
die Frontöffnung gepustet werden!
Leichte Verunreinigungen auf Stoff-Frontrahmen entfernen Sie durch klopfen, mittels Staubsauger oder auch
durch den Einsatz von Klebeband bei abgenommenem Frontrahmen.
Stärkere Verunreinigungen können mittels eines Trockenschaumreinigers (z.B. Centralin-Spray) behoben
werden. In keinem Fall sollte der Frontrahmen feucht gereinigt werden!
Wir übernehmen keine Haftung bei unsachgemäßer Reinigung der Lautsprecher.
Fragen beantworten wir Ihnen gerne unter der Telefon-Nr.: +49 (0) 511 7904-0,
email: ovs@quadral.com oder info@aurumspeakers,com
GARANTIEREGISTRIERUNG
Ergänzend zur gesetzlichen Gewährleistung von 2 Jahren haben Sie die Möglichkeit, die Garantie für Ihre
AURUM-Lautsprecher auf insgesamt 10 Jahre zu erweitern. Hierzu können Sie auf unserer Homepage www.
quadral.com die notwendigen personen- und gerätespezifischen Daten eintragen. Diese Angaben werden
vertraulich behandelt und nicht an Dritte weitergegeben.
Bitte fügen Sie als Nachweis den Kaufbeleg bei. Diesen können Sie als Datei (Scan, Foto) hochladen oder uns in
Kopie per Post unter Angabe des Stichwortes „Garantieregistrierung“ an die u.g. Adresse senden.
Nach Prüfung Ihrer Unterlagen erhalten Sie von uns eine digitale Urkunde (pdf), die Sie bitte sorgfältig
aufbewahren und bei Bedarf vorlegen.
Bitte beachten Sie unsere Garantiebedingungen.
STÖRUNG
Schon bei kleinen Lautstärken
sind Verzerrungen wahrnehmbar
Es kommt kein Ton
Klang ist dünn und hell,
wirkt entfernt und unrealistisch
Die Bässe sind zu stark
Es mangelt an Brillanz
URSACHE
a) Defekt in Ihrer Elektronik
b) Defekt im Lautsprecher
a) Verkabelung falsch
b) Verstärker ausgeschaltet
a) Verpolungsfehler
b) Aufstellung ungünstig
a) Aufstellung der Lautspre-
cher ist ungünstig
(z.B. in einer Raumecke)
b) Bässe sind am Verstärker
angehoben
a) Die Hochtöner sind nicht
ausgerichtet
ABHILFE
a) Treten die Störungen in
beiden Lautsprechern auf,
liegt der Fehler in der
Elektronik. Ist nur ein
Lautsprecher betroffen,
tauschen Sie den rechten
mit dem linken. Ist Kanal, ist
Ihre Elektronik defekt. Hat der
gestörte Kanal gewechselt, ist
Ihr Lautsprecher defekt.
b) Bitte wenden Sie sich an Ihren
Händler oder an unseren
Service
(Tel. 0511/7904-0)
a) Verkabelung überprüfen
b) Anlage einschalten
a) Kontrollieren Sie, ob
versehentlich eine mit +
gekennzeichnete Klemme des
Verstärkers auf eine mit
- markierte des Lautsprechers
geschaltet wurde oder
umgekehrt.
b) Stellen Sie die Lautsprecher
näher zu einer Wand auf,
halten sie aber den Mindest-
abstand von 5 cm von der
Lautsprecherrückseite
zur Wand ein.
a) Vergrößern Sie den Abstand
der Lautsprecher zu den
angrenzenden Wänden.
b) Bringen Sie die Klangregler
Ihres Verstärkers in Neutral-
stellung.
a) Stellen Sie die Lautsprecher
so auf, daß die Hochtöner
direkt auf Ihren Hörplatz
ausgerichtet sind (durch
Neigen und Drehen des
Lautsprechers).
Page 13

25
FR
Nous souhaiterions tout d’abord vous remercier d’avoir opté pour les haut-parleurs AURUM.
En effet, c’est pour satisfaire les sévères exigences des connaisseurs et des amateurs de
musique tels que vous que nous construisons des haut-parleurs d’une qualité bien supérieure
à la moyenne. Au risque de ressasser ce que vous savez peut-être déjà, nous souhaiterions
dresser ci-après quelques règles fondamentales qui vous permettront une utilisation optimale
de vos haut-parleurs.
CONSIGNES DE SÉCURITÉ POUR HAUT-PARLEURS PASSIFS
Veuillez lire attentivement les présentes instructions d’utilisation et suivre à la lettre toutes les étapes de la
mise en service. Veuillez conserver ces instructions de manière à les avoir rapidement à portée de main si vous
aviez des questions.
• La stabilité (en particulier pour les gros haut-parleurs) dépend largement des propriétés du sol. Une
moquette par exemple peut parfois réduire considérablement la stabilité de l’appareil. Un choc de force
moyenne suffit pour le renverser, ce qui signifie un risque de blessures pour les personnes et les animaux
se trouvant à proximité. Mais vous pouvez améliorer nettement la stabilité avec l’emploi de « crampons
». Le montage se fera toutefois avec la précaution qui s’impose pour ne pas se blesser avec les crampons
pointus ni endommager le sol. Sur des sols lisses, vous pouvez fixer les haut-parleurs par bandes Velcro
ou avec de l‘adhésif double face. Ne jamais utiliser les haut-parleurs comme sièges ou comme échelle !
• Pour la fixation ou le placement de nos produits, veuillez utiliser exclusivement des meubles sur roulettes,
des pieds, des fixations murales et d’autres accessoires en vente auprès du fabricant ou distribués avec
le produit concerné. Veillez à déplacer avec une grande précaution les appareils de table ou les supports
sur lesquels les produits sont posés pour éviter tout risque de blessures ou de détériorations en cas
de renversement. En cas de fixation murale, veiller plus particulièrement à un vissage suffisamment
sécurisé de tous les composants. Le montage de dispositifs de sécurité supplémentaires (chaînes, etc.) est
recommandé.
• Choisissez pour les haut-parleurs un emplacement sec et pas trop froid. Une exposition durable à une forte
humidité ou aux rayons du soleil (rayons UV) risque de les faire vieillir avant l‘heure, ce qui risque d‘altérer
leur fonctionnement.
• Un fonctionnement prolongé à très haut volume risque fort non seulement d’importuner vos voisins mais
peuvent également se révéler nocifs pour votre propre santé !
• En cas de surcharge massive des haut-parleurs, lorsque le réglage du volume est particulièrement élevé,
une fusion de certains composants des filtres répartiteurs de fréquence ou de certains haut-parleurs n’est
pas entièrement exclue. Il est même théoriquement possible qu’un incendie se déclare à l’intérieur d’un
haut-parleur dans de telles conditions de surcharge. Il est donc vivement recommandé de ne jamais laisser
sans surveillance les haut-parleurs utilisés dans ce type d‘environnements à risques.
• En cas de fonctionnement à des volumes sonores exagérés, les bornes de raccordement du haut-parleur
et de certains composants se trouvent à des tensions de 30 à 50 V. Vous devez donc absolument éviter
de toucher les contacts des haut-parleurs non isolés lors du fonctionnement. Par ailleurs, il est impératif
de ne pas insérer les mains ou les bras dans les orifices acoustiques (tubes Bass-Reflex) pour éviter tout
risque de blessures. Les enfants et les animaux de compagnie sont particulièrement concernés par ce
risque.
• Pour des raisons de sécurité, nous interdisons de manière générale l’ouverture des haut-parleurs, qu’ils
soient en fonctionnement ou connectés, car ils risquent d’être soumis à l’intérieur à des tensions de 50
volts comme décrit ci-dessus.
• Danger de mort en cas de manipulation anormale de la tension secteur !
Un haut-parleur passif ne doit jamais être branché directement sur une prise secteur !
Raccorder les bornes de raccordement des haut-parleurs uniquement aux sorties correspondantes sur
l’amplificateur. Tout raccordement de ces bornes au réseau électrique (230V/115V), de quelque nature que
ce soit, est interdit et détruit directement le haut-parleur et les appareils connectés. Il est donc impératif
d‘éviter de munir ces raccords de câbles de connecteurs susceptibles d‘être confondus avec des fiches
secteurs.
• Les haut-parleurs non équipés d’un blindage magnétique peuvent provoquer une altération des couleurs
voire une distorsion de l‘image télé. De manière générale, une distance de 50 cm est suffisante pour éviter
ce risque de parasite. Evitez également de déposer cartes de crédit, disquettes, cassettes audio ou vidéo
ou tous autres supports magnétiques sur le haut-parleur. Les informations qui y sont stockées risques
d’être détruites. De même, il est déconseillé de faire fonctionner des appareils à bande magnétique dans
les environs immédiats.
24
Page 14

CENTER
FRONT
TV
FRONT
SUBWOOFER
REAR
REAR
50 cm
>
–
REAR
CENTER
26 27
FR
INSTALLATION
Afin d‘obtenir une acoustique du meilleur effet, il faut en règle générale essayer diverses installations et
réaliser maints tests d‘écoute.
Comme la pièce influe considérablement sur la restitution du son, nous vous apportons ici quelques idées
astucieuses pour le positionnement de vos haut-parleurs AURUM.
Haut-parleur principal (frontal)
Le positionnement des haut-parleurs dans la pièce d’écoute influe de manière non négligeable sur leur effet
sonore. Ainsi, le placement à proximité des coins de la pièce conduit généralement à une restitution des basses
bruyante et sans contours. En revanche, bien dégagés au milieu de la pièce, les haut-parleurs sont certes
précis mais produisent un son clair plutôt mince. Le mieux est donc d’installer vos haut-parleurs de sorte que
le dos du coffret se trouve à au moins 30 cm du mur le plus proche. La distance le séparant des murs latéraux
devrait être même de l’ordre de 50 cm afin d‘éviter de bruyantes réflexions sur le mur. Les enceintes colonnes
sont particulièrement adaptées aux exigences acoustiques grâce à leur façade inclinée. Les enceintes dites
pour étagères déploieront toutes leurs qualités en les posant sur un trépied ou sur une étagère, en veillant
à orienter les tweeters à hauteur d’écoute. Il faudra donc éventuellement placer les coffrets en angle et les
incliner légèrement.
Chaque haut-parleur devrait être placé à la même distance de la position d’écoute tandis que la distance des
haut-parleurs les uns par rapport aux autres peut être plus courte que par rapport à l‘auditeur.
Haut-parleurs Center
Ces haut-parleurs ne sont plus blindés magnétiquement du fait de la multiplication des téléviseurs Plasma
et LCD. Leur installation sur le téléviseur n’étant plus possible, il est possible de coucher les Center dessous.
D’autres astuces et conseils sont également disponibles sur:
www.youtube/quadral Un monde de technologie : Installation haut-parleurs.
La distance avec le téléviseur doit être d’environ 30 cm et au moins 20 cm du sol.
Par ailleurs, nous conseillons d’incliner l’enceinte centrale de manière à orienter le tweeter vers l’auditeur. Ce
n’est qu’ainsi que le système pourra déployer toutes ses sonorités.
Enceinte centrale arrière
Contrairement aux ensembles Surround 5.1, les systèmes 6.1 disposent d’un haut-parleur arrière
supplémentaire que l’on placera derrière, légèrement au-dessus de la position d’écoute typique.
Enceinte arrière
L‘orientation du haut-parleur arrière vers la position
d‘écoute est laissée au goût de chacun. Par ailleurs,
certains auditeurs préfèrent positionner le hautparleur arrière au-dessus de la hauteur d‘écoute. Il
suffit alors de le placer sur un support mural stable,
un pied élevé pour haut-parleur, une commode ou
sur une étagère.
PIEDS
Pour l’installation optimale des enceintes avant et arrière, quadral dispose à son catalogue de pieds adaptés
pour tous les modèles.
Nous répondons volontiers à toutes vos questions au numéro de téléphone suivant : +49 (0) 511 7904-0, ou
par courriel : ovs@quadral.com ou info@aurumspeakers.com
RACCORDEMENT À L’AMPLIFICATEUR
Avant de brancher vos haut-parleurs à votre chaîne hi-fi ou Surround, vérifiez que l‘amplificateur/le récepteur
est bien hors tension et son témoin lumineux de fonctionnement n’est pas allumé. Pour le raccordement, vous
avez besoin d’un câble bifilaire spécial pour chaque haut-parleur. Veillez à une longueur suffisante, et ne coupez
pas le câble trop court trop tôt pour pouvoir le dissimuler par la suite sous le tapis ou derrière un meuble. Pour
les câbles d’une longueur supérieure à 5 m, nous recommandons une section transversale d‘au moins 2,5
mm2 par fil afin d’éviter toute perte de puissance inutile. Afin de garantir un bon contact, chaque extrémité
des fils doit être dénudée sur 10 mm.
BORNES À VIS
Pour le raccordement des câbles des haut-parleurs, chaque enceinte possède au dos une section de
raccordement comportant des bornes à vis codées par couleur. Desserrez les bornes à vis et insérez l‘extrémité
dénudée du câble dans le perçage ainsi dégagé. Sur le câble du haut-parleur, un fil est caractérisé par une
Page 15

+
-
le cavalier
Ampli./
Unité de
puissance
LO
+
+
-
-
HI
-
+
+
-
+
-
le cavalier
Ampli./
Unité de
puissance
Ampli./
Unité de
puissance
LO
+
+
-
-
HI
-
+
LO
+
+
-
-
HI
-
+
+
-
+
-
+
-
+
-
le cavalier
Ampli./
Unité de
puissance
Ampli./
Unité de
puissance
Ampli./
Unité de
puissance
Ampli./
Unité de
puissance
Haut-médium
Grave
LO
+
+
-
-
HI
-
+
LO
+
+
-
-
HI
-
+
LO
+
+
-
-
HI
-
+
28 29
FR
couleur ou une forme spéciale. C’est la ligne positive que
vous raccorderez à la borne rouge, l‘autre fil étant relié à la
borne noire. Resserrez les vis à fond. Afin de garantir une
polarité correcte, vérifiez également que le raccordement
à votre amplificateur est bien correct. Là aussi, le fil
caractérisé est à relier au pôle (+), l’autre à la borne à vis
noire (-).
Pour certains haut-parleurs AURUM, vous avez le choix entre trois modes de fonctionnement.
a) Mode conventionnel
N‘enlevez pas le cavalier et raccordez le câble du
haut-parleur conformément à l’illustration.
b) Mode bifilaire
Ouvrez le cavalier après avoir desserré les quatre
bornes à vis au dos du haut-parleur et raccordez le
câble conformément à l’illustration.
c) Mode bi-ampli
Ouvrez les cavaliers et raccordez le câble
conformément à l’illustration.
Si les haut-parleurs AURUM sont utilisés en mode Bi-wiring / Bi-amping, les deux raccords vissés pour les
basses (LO) se trouvent au-dessous de la plaque de raccordement et ceux pour les médiums et les tweeters
(HI) au-dessus.
Seuls les plus grands modèles de AURUM 9 Série disposent d’un bornier de raccordement sur lequel ces
raccords sont agencés à l’horizontale et pour lesquels les différents modes de fonctionnement avec les
affections pour les aigus et les graves s’appliquent.
Dans ces modes de fonctionnement, observez impérativement la polarité correcte et veillez à retirer les
cavaliers sur le bornier des haut-parleurs pour éviter tout risque d’endommagement de votre amplificateur.
FONCTIONNEMENT AVEC AMPLIFICATEUR SURROUND
Une fois que vous avez placé et raccordé vos haut-parleurs conformément à l’illustration, vous devez
maintenant procéder au réglage du gestionnaire des basses sur votre amplificateur Surround.
Sur ce point, veuillez lire impérativement les instructions de service du fabricant de votre amplificateur.
Etant donné que le gestionnaire des basses dépend avant tout de la configuration des haut-parleurs, nous
vous indiquons ci-dessous quelques exemples de réglages.
a) les petites et plus petites enceintes satellites doivent fonctionner en mode « small»
Pour obtenir ce réglage sur votre amplificateur, veuillez procéder comme suit :
Frontal : small Central : small
Arrière : small Caisson de graves : yes
b) En ce qui concerne les enceintes compactes, le mode de réglage n’est soumis à aucune règle. Le mode
approprié peut tout aussi bien être «large que «small». Ceci dépend du volume sonore que vous préférez
et donc de votre impression sonore qui en découle (sur ce point, voir également chapitre « Attention
distorsions ! »). Pour ce réglage, vous avez le choix suivant :
Frontal : large/small Central : large/small
Arrière : large/small Caisson de graves : yes
c) Les enceintes posées au sol, ou les grandes enceintes pour étagères, idéales pour un puissant rendu des
basses, devraient être configurées en mode « large ».
Pour obtenir ce réglage, veuillez procéder de la manière suivante :
Frontal : large Central : large
Arrière: large Caisson de graves : yes/no
Page 16

Surround-amplificateur
à gauche
30
FR
31
Caisson de graves
Si votre amplificateur surround est équipé d’une sortie pour caisson de graves « Line-Subwoofer », vous avez
la possibilité de l’exploiter en utilisant le câble en Y fourni avec le caisson de graves (cf. illustration). Dans ce
cas, les enceintes frontales seront raccordées directement aux bornes des haut-parleurs frontaux de votre
amplificateur. Pour le câblage, veuillez vous reporter au schéma de raccordement.
Pour les réglages nécessaires à effectuer sur votre caisson de graves, veuillez consulter les instructions de
service du caisson de graves actif.
CONSEILS POUR AMÉLIORER L’ACOUSTIQUE
1. Pour obtenir un meilleur découplage acoustique du haut-parleur par rapport au sol, les haut- parleurs sur
pied AURUM disposent d’un dispositif de fixation pour pointes. En fonction de la pièce et du sol,
l’utilisation de pointes peut vous être pratique.
Les pointes AURUM sont disponibles séparément auprès de votre distributeur.
2. Et pour améliorer le découplage acoustique des haut-parleurs à étagère ou Center par rapport à la
surface d’appui, ces haut-parleurs disposent de quatre pieds autocollants en caoutchouc.
RÉGLAGE DE LA SONORITÉ
Afin de pouvoir régler individuellement les nouveaux AURUM 9 Série en fonction des proportions de votre
pièce, sans fausser leur sonorité parfaite, tous les modèles disposent d’au moins un commutateur pour les
tonalités aigües {HIGH}.
Interrupteur des aigus (HIGH)
HIGH -
Cette position d’interrupteur est intéressante dans le cas de pièces présentant un niveau d’écho important ou
en cas de volumes d’écoute élevés, sachant que, aux volumes importants et pour ce qui est de la plage des
aigus, la courbe de fréquence se voit adaptée à courbe auditive.
HIGH +
Plus 2 dB dans les aigus signifie, au final, un relèvement du niveau des aigus. Ceci peut être intéressant dans
le cas de pièces présentant une très forte atténuation mais peut aussi convenir à tous ceux qui souhaiteraient
disposer d’une écoute quelque peu plus « analytique ». Ceci peut présenter un gros avantage, aux volumes
d’écoute faibles en particulier, sachant que la courbe de réponse en fréquence se voit adaptée, aux niveaux
faibles, à l’impression d’écoute.
Les modèles AURUM TITAN 9. VULKAN 9 et TITAN BASE 9 disposent en plus de commutateurs-filtres pour
les tonalités médiums et graves.
Interrupteur de médiums (MID)
MID -
Il sert à abaisser le volume sonore dans la plage de présence. Ceci peut permettre, dans les locaux présentant
de l’écho, d’éliminer une certaine intensité surfaite du médium. Mais rien n’interdit non plus d’utiliser cette
position pour une simple affaire de goût.
MID +
La position Médium plus 2dB accroît quelque peu la chaleur de la plage des tons fondamentaux. Cela peut
permettre, dans le cas de pièces présentant une forte atténuation sélective, de rendre la tonalité, dans son
ensemble, plus équilibrée et plus chaude.
Commutateur pour tonalités graves (LOW)
LOW N
Le réglage en position neutre (N) par défaut à l’achat permet la reproduction idéale des basses par ces hautparleurs.
LOW+
L’interrupteur LOW+ rehausse la plage moyenne des basses entre 40 et 100 Hz. Dans les très grandes pièces,
cela permet d’apporter le plus attendu à la profondeur et la pression des basses.
Page 17

32
Défaut
Présence de distorsions même à
faible volume
Pas de son
Son étriqué et clair: il semble
distant et manque de réalisme.
Basses trop puissantes
Regitre aigu flou
Origine
a) Electronique défectueuse
b) Enceinte défectueuse
a) Mauvais branchement
b) Amplificateur éteint
a) Défaut de polarité
b) Mauvaise disposition
a) Mauvaise disposition des
enceintes (par ex. dans
un coin)
b) Le niveau de grave de
l’amplificateur est trop
élevé
a) Mauvaise orientation des
tweeters
Remède
a) Si les distorsions
apparaissent dans les
deux enceintes, l’électro-
nique est défectueuse. Si
seule une d’entre elles
est concernée, intervertir
les deux enceintes: si les
distorsions se mani-
festent alors toujours sur
le même canal, l’électro-
nique est défectueuse. Si
elles sont par contre
maintenant passées sur
l’autre canal, c’est
l’enceinte qui est
défectueuse.
b) Prière de contacter votre
revendeur ou le service
après-vente quadral
(tél.: +49 (0) 511 7904-0).
a) Vérifier les branchements
b) Allumer la chaîne.
a) Vérifier si une borne „+ „
de l’amplificateur a été
raccordée par erreur à
une borne „- „ de
l’enceinte ou inversement.
b) Rapprocher les enceintes
d’un mur en veillant
toutefois à respecter la
distance minimum de
5 cm entre l’arrière du
coffretet le mur.
a) Eloigner les enceintes des
murs les plus proches
b) Amener le régulateur de
tonalité de l’amplificateur
en position neutre
a) Placer les enceintes de
sorte à ce que les
tweeters soient directe-
ment orientés vers la
position d’écoute (en
inclinant et tournant
l’enceinte)
ATTENTION, RISQUE DE DISTORSION
Même si la puissance nominale d’un amplificateur est considérablement plus faible que la capacité de charge
nominale des enceintes raccordées, les haut-parleurs peuvent très bien être endommagés en cas d‘utilisation
non conforme. En effet, la puissance nominale indique simplement le nombre de watts que l’amplificateur peut
fournir aux haut-parleurs sans distorsion. Si l‘amplificateur est incapable de répondre à ce qui est demandé,
il fournira non seulement encore plus de puissance mais y ajoutera également un courant continu parasite
ainsi que des oscillations haute fréquence. Ce comportement est appelé « distorsion » et se traduit sur le plan
acoustique par de fortes distorsions dans les passages forts. Si ces distorsions deviennent audibles, baissez
immédiatement le volume pour ne pas risquer d’endommager les enceintes. Une distorsion au niveau des
haut-parleurs est un effet secondaire typique des surcharges qui se produit systématiquement lorsque le
régulateur du volume et/ou de la sonorité. Même si le bouton de réglage de la sonorité est mis en position
médiane, les amplificateurs courants atteignent leurs limites dès les impulsions les plus élevées dès que le
réglage du volume dépasse la position « midi ».
ENTRETIEN DES ENCEINTES
Pour nettoyer vos enceintes AURUM, le mieux est d’utiliser un chiffon doux et sec. N’employez pas de solvants.
Il est recommandé de ne nettoyer les systèmes de haut-parleurs (haut-parleur de graves, medium) qu’en cas
de fort encrassement (de la poussière en faible quantité n’a aucune importance sur le plan acoustique). Pour
ce faire, utiliser un chiffon doux et sec ou un pinceau doux sans exercer de grande pression pour ne pas risquer
d’endommager les membranes.
Il est fortement déconseillé de nettoyer les membranes des tweeters, celles-ci étant extrêmement sensibles
à la pression. En cas de salissures des caches tissus, appliquer une mousse sèche spécifique pour tissus sur
l’endroit sale, laisser agir, puis éliminer simplement avec un aspirateur.
Ne pas brosser les cadres frontaux noirs mais les tamponner ou éliminer les salissures en décollant avec
précaution un large ruban adhésif. Ne nettoyer en aucun cas avec un chiffon humide !
Pour les caractéristiques techniques, veuillez vous reporter à l’emballage ou au dos de votre appareil.
Nous répondons volontiers à toutes vos questions au numéro de téléphone suivant : +49 (0) 511 7904-0, ou
par courriel : ovs@quadral.com ou info@aurumspeakers.com
ENREGISTREMENT DE LA GARANTIE
En complément de la garantie légale de 2 ans, vous avez la possibilité de prolonger la garantie de votre
haut-parleur AURUM d’une durée totale de 10 ans. Pour ce faire, vous pouvez saisir, sur notre page d’accueil
www.quadral.com, les données, personnelles et relatives à l’appareil, nécessaires à l’enregistrement. Ces
informations sont traitées de manière confidentielle et ne sont divulguées à aucun tiers.
Merci de fournir votre quittance d’achat comme preuve. Vous pouvez la charger (fichiers scan ou photo) ou
nous envoyer une copie par la poste en indiquant le code «Enregistrement Garantie» à l’adresse ci-dessous.
Après examen de vos documents, vous recevrez un accusé réception numérique (pdf), à conserver
précieusement et à présenter sur demande.
Merci de prendre note de nos conditions de garantie.
33
FR
Page 18

35
En primer lugar deseamos darle las gracias por haber elegido los altavoces AURUM.
Construimos cajas acústicas excepcionales con el único objetivo de satisfacer las elevadas
exigencias de melómanos y expertos como Ud. Aunque ya esté familiarizado, a continuación le
indicamos algunas reglas básicas que le permitirán un óptimo aprovechamiento de sus cajas
acústicas.
INSTRUCCIONES DE SEGURIDAD PARA ALTAVOCES
PASIVOS
Lea detenidamente estas instrucciones y tenga en cuenta todos los pasos indicados para la puesta en marcha.
Tenga siempre a mano el manual para poder realizar consultas en cualquier momento.
• La estabilidad (especialmente de grandes altavoces) depende en gran medida de las propiedades del suelo
donde se apoyen. Por regla general, las moquetas reducen considerablemente la estabilidad. Incluso un
golpe medianamente fuerte podría hacer que un altavoz se cayera y conlleva, por ello, el riesgo de que
personas o animales domésticos que se hallen cerca sufran lesiones. La estabilidad puede mejorarse
considerablemente empleando los denominados „spikes“, aunque es preciso tener cuidado durante el
montaje, ya que existe peligro de sufrir lesiones producidas por cantos afilados o incluso se podría dañar
el suelo. Los altavoces pueden sujetarse sobre suelos lisos usando un velcro o cinta adhesiva doble. ¡Los
altavoces no deben ser empleados nunca como asientos o ayudas para subirse (a modo de escalera de
mano)!
• Emplee exclusivamente muebles con ruedas, soportes de pie o pared y otros aparatos para colocar o
depositar los artículos, todos ellos suministrables por el fabricante y/o vendidos con el producto. Rogamos
se asegure de mover siempre con cuidado la mesa o soportes de pie sobre los que se hallen colocados
los productos para evitar que se produzcan daños o lesiones en caso de caerse. ¡En caso de montaje en
la pared, es preciso asegurarse especialmente de que todos los componentes estén bien atornillados!
También debería emplear y montar dispositivos de seguridad adicionales (cadenas, etc.).
• Debería escoger un lugar seco y no demasiado frío para los altavoces. Una alta humedad constante del aire
o el fuerte efecto de los rayos solares (radiación UVA) pueden deteriorar prematuramente sus altavoces e
influir negativamente en su funcionamiento.
• ¡Mantener el volumen alto durante largo tiempo no sólo resulta molesto para los vecinos, sino que puede
acarrear consecuencias nocivas para la salud del usuario!
• En caso de una sobrecarga de los altavoces debido a un volumen excesivamente alto, no se excluye del
todo la posibilidad de que se queme algún componente en los filtros divisores o altavoz. En ocasiones
especialmente desfavorables, puede incluso producirse un incendio en el interior de un altavoz en caso de
una sobrecarga de este tipo. Por este motivo, los altavoces que trabajan a cargas máximas deben vigilarse
constantemente.
• El funcionamiento a alto volumen puede generar tensiones de 30 V a 50 V en los bornes de conexión de
los altavoces y componentes. Por este motivo, es imprescindible no entrar en contacto con las conexiones
no aisladas de los altavoces durante el servicio. Además, no introducir, bajo ningún concepto, las manos o
los brazos en las aberturas de salida del sonido (tubos bass reflex) para evitar que se produzcan lesiones
o daños materiales. En este caso, son especialmente los niños y los animales domésticos los que corren
mayor peligro.
• Por motivos de seguridad, queda prohibido abrir los altavoces cuando están en servicio o conectados, ya
que, como se ha explicado más arriba, en su interior pueden existir tensiones de hasta 50 V.
• ¡Un comportamiento inadecuado en cuanto a la tensión de red conlleva peligro de muerte!
¡Los altavoces pasivos no deben conectarse directamente a la red eléctrica!
Los bornes de conexión de los altavoces sólo deben conectarse con las salidas del amplificador
correspondiente. No se permite establecer otro tipo de conexión de estos bornes con la red eléctrica (230
V/115 V), ya que provocaría una avería inmediata del altavoz y de todos los elementos conectados. Por
este motivo, para estas conexiones de cable deberá usar enchufes que no puedan confundirse con los
enchufes de red.
• Los altavoces no blindados de forma magnética pueden distorsionar o deformar la imagen del televisor.
Una distancia de 50 cm es generalmente suficiente para evitar distorsiones de este tipo. Evite depositar,
por ejemplo, tarjetas de crédito, disquetes, cintas de música o vídeo u otros soportes magnéticos sobre
el altavoz. Ello podría borrar la información en ellos contenida. Asimismo, no debería colocar aparatos de
banda magnética junto a los altavoces.
34
ES
Page 19

CENTER
FRONT
TV
FRONT
SUBWOOFER
REAR
REAR
50 cm
>
–
REAR
CENTER
36
37
ES
DISPOSICIÓN
Para obtener resultados óptimos de sonido, se deben probar generalmente diferentes ubicaciones y escuchar
cómo suenan los altavoces en cada ubicación.
Dado que el espacio en sí influye de forma considerable en la reproducción del sonido, le ofrecemos a
continuación algunos consejos importantes para ayudarle a colocar sus altavoces AURUM.
Altavoz principal (frontal)
La colocación de los altavoces en el espacio acústico influye de forma considerable en su sonido. Así, la
disposición cerca de esquinas ofrece una reproducción de graves de elevada sonoridad pero sin definición.
Por el contrario, los altavoces dispuestos libremente, a distancia de las paredes, ofrecen un sonido preciso,
a la par que nítido y estilizado. Lo mejor es colocar los altavoces de forma que entre la pared posterior de la
caja y la pared más próxima de la habitación existan como mínimo 30 cm de separación. Con respecto a las
paredes laterales de la sala, deberían hallarse a una distancia superior incluso a 50 cm, a fin de evitar elevadas
reflexiones. Los altavoces sobre pies se adaptan especialmente a las exigencias acústicas gracias a su fachada
inclinada. Donde mejor suenan los altavoces de estantería es sobre un soporte de pie para altavoces o en la
estantería, estando los tweeters orientados a la altura del oído. Para ello se debe calcular, en caso necesario,
el ángulo de ubicación de las cajas e inclinarlas ligeramente.
La distancia de los altavoces a dicha altura debería ser la misma en la medida de lo posible, mientras que la
distancia de los altavoces entre sí puede ser algo menor que la respectiva al oyente.
Altavoz de centro
Este altavoz ya no cuenta con blindaje magnético debido a la difusión de televisiones de plasma y LCD. Dado
que su colocación en la televisión ya no es posible, los altavoces de centro pueden colocarse debajo de ésta.
Puede ver más consejos y trucos en:
www.youtube/quadral Technology World: montaje de altavoces.
Además, recomendamos calcular el ángulo del altavoz central de forma que el tweeter esté orientado al
oyente. Solo así podrá desplegar todo su potencial de sonido.
Altavoz central posterior
En contraposición a los conjuntos Surround 5.1, los sistemas 6.1 disponen de un altavoz central posterior
adicional que está colocado detrás y algo por encima de la posición usual de audición.
Altavoz posterior
El hecho de girar a la posición de audición los
altavoces posteriores es tan solo una cuestión de
gustos. Algunos oyentes prefieren en este caso
una ubicación por encima de la altura del oído. A tal
efecto, el altavoz posterior debería colocarse sobre
un soporte de pared estable, un soporte elevado de
pie para altavoces o en una estantería.
SOPORTES DE PIE
Para instalar los altavoces delantero y trasero de forma óptima, quadral cuenta con trípodes adaptados en su
programa de entrega.
Responderemos a sus preguntas en el número de teléfono: +49 (0) 511 7904-0,
e-mail: ovs@quadral.com ó info@aurumspeakers.com
CONEXIÓN AL AMPLIFICADOR
Antes de conectar los altavoces a su equipo surround o HiFi, le rogamos que se cerciore de que el amplificador/
receptor esté desconectado y de que el control de funcionamiento no esté iluminado. A continuación,
necesitará un cable bifilar para cada altavoz. Tenga en cuenta que los cables sean lo suficientemente largos y
no los corte sin cerciorarse previamente de que podrá ocultarlos detrás de muebles o bajo la moqueta. Para
longitudes de cable superiores a 5 m le recomendamos una sección mínima de 2,5 mm2 por hilo, a fin de evitar
pérdidas de potencia innecesarias. Cada hilo de los extremos de cable debe desaislarse perfectamente unos 10
mm para obtener un contacto óptimo.
BORNES ROSCADOS
Para conectar los cables de los altavoces, el lado posterior de la caja dispone de un panel de conexiones con
bornes roscados marcados de color. Gire los bornes roscados e introduzca el extremo del cable pelado en
la perforación que queda abierta. En el cable del altavoz se ha marcado un hilo con color o dándole forma.
Page 20

+
-
puentes
Amplific./
Etapa de
potencia
LO
+
+
-
-
HI
-
+
+
-
+
-
puentes
Amplific./
Etapa de
potencia
Amplific./
Etapa de
potencia
LO
+
+
-
-
HI
-
+
LO
+
+
-
-
HI
-
+
+
-
+
-
+
-
+
-
puentes
Amplific./
Etapa de
potencia
Amplific./
Etapa de
potencia
Amplific./
Etapa de
potencia
Amplific./
Etapa de
potencia
Medios-agudos
Graves
LO
+
+
-
-
HI
-
+
LO
+
+
-
-
HI
-
+
LO
+
+
-
-
HI
-
+
38
39
ES
Atornille este cable de alimentación positivo con el borne
rojo, y el otro hilo con el borne negro. Apriete con fuerza
los tornillos manualmente. Para garantizar la polaridad
correcta, compruebe también la conexión correcta en
su amplificador. En este caso, el hilo marcado también
corresponde al polo positivo (+), y el otro hilo corresponde
al borne roscado negro (-).
En algunos de los altavoces AURUM se puede escoger entre tres modos operativos:
a) Modo convencional
No retire los puentes y conecte los cables de los altavoces
tal y como indica la figura.
b) Modo Bi-wiring (bicableado)
Abra los puentes tras soltar los cuatro bornes
roscados en el lado posterior del altavoz y conecte los
cables tal y como se indica en la figura.
c) Modo Bi-amping (biamplificación)
Abra los puentes y conecte los cable tal y como se indica
en la figura.
En el funcionamiento del bicableado / de la biamplificación del altavoz AURUM se encuentran bornes con
tornillos para las frecuencias graves (LO) en la parte inferior y para las frecuencias medias y altas (Hl) en la
parte superior, en la placa de conexión.
Sólo los modelos más grandes de la serie de AURUM 9 disponen de un panel de conexiones en el que se
distribuyen las conexiones de forma horizontal y los distintos modos de funcionamiento operan con la
distribución en (Hl) y (LO) .
En estos modos deberá asegurarse de que se mantiene la polaridad correcta y de retirar los puentes en el
terminal del altavoz, ya que de lo contrario podría dañarse su amplificador.
FUNCIONAMIENTO EN UN AMPLIFICADOR SURROUND
Una vez conectados y colocados los altavoces tal y como indica la figura, deberá ajustar su amplificador
Surround en la gestión de graves.
Lea para ello el manual de instrucciones del fabricante del amplificador.
Dado que la gestión de graves depende, sobre todo, de la configuración de los altavoces, le indicamos a
continuación algunos ajustes usuales.
a) Los satélites pequeños y de tamaño mínimo deben funcionar en el modo „small“.
El ajuste en su amplificador debe realizarse del modo siguiente:
Frontal: small Central: small
Posterior: small Subwoofer: yes
b) A la hora de ajustar altavoces compactos no existe ninguna fórmula fija para el modo de ajuste. Puede ser
que el modo adecuado sea el „large“ o lo sea el „small“. Esto depende del volumen que prefiera escuchar o
del equilibrio de sonido con ello relacionado (tenga en cuenta aquí también el capítulo „¡Cuidado! Clipping“).
El ajuste en su amplificador puede efectuarse opcionalmente como se indica a continuación:
Frontal: large/small Central: large/small
Posterior: large/small Subwoofer: yes
c) Los altavoces verticales o los grandes altavoces de estantería, adecuados para una potente reproducción
de graves, deberían funcionar en el modo „large“.
El ajuste en su amplificador debe efectuarse como se indica a continuación:
Frontal: large Central: large
Posterior: large Subwoofer: yes/no
Page 21

Subwoofer
Surround-amplificador
Izquierda
Derecha
40
41
ES
Subwoofer
Si su amplificador surround dispone de una „salida line-subwoofer“, puede utilizarla haciendo uso del cable Y
que se suministra con el subwoofer (ver figura). En este caso, los altavoces frontales se conectan directamente
a los conectores de altavoz de su amplificador. El cableado de su conjunto Surround se especifica en el
diagrama de conexiones.
¡Los ajustes necesarios de su subwoofer figuran en el manual de instrucciones del subwoofer activo!
CONSEJOS PARA MEJORAR LA ACÚSTICA
1. Para garantizar un mejor aislamiento del altavoz del suelo, los altavoces de suelo AURUM ofrecen la
posibilidad de usar clavos. Dependiendo del espacio de la habitación y del suelo, el uso de clavos puede
ser una ventaja.
Puede adquirir los clavos de AURUM como accesorio por separado a través de su proveedor.
2. Para mejorar el aislamiento acústico en la superficie de apoyo de los altavoces de estantería y de centro,
cada uno de dichos altavoces dispone de 4 patas de goma autoadhesivas.
AJUSTE DEL SONIDO
Para ajustar las cinco frecuencias de sonido de la nueva serie AURUM 9 de manera individual, sin alterar el
carácter de sonido ideal, todos los modelos disponen como mínimo de un interruptor para frecuencias altas
{HIGH}.
Conmutador de alta serie (HIGH)
HIGH -
Esta configuración de conmutador es ideal en habitaciones como los halls o con grandes volúmenes de
audición, ya que la respuesta de frecuencia en la serie alta se ajusta a la curva de audición en volúmenes
superiores.
HIGH +
En la serie alta, + 2dB significa un nivel de tonalidad general superior. Esto es adecuado para las habitaciones
muy aisladas y para todo aquel que desee gozar de una audición algo más “analítica”. Puede resultar una
ventaja especial al disfrutar de la música suave, ya que la curva de respuesta de frecuencia se ajusta a la
audición en un nivel bajo.
Además, los modelos AURUM TITAN 9, VULKAN 9 y TITAN BASE 9 disponen de un interruptor de filtro de
frecuencias medias y bajas.
Conmutador de serie intermedia (MID)
MID -
Este reduce el volumen en la zona de audición. En los espacios como los halls, puede eliminar alguna
penetración de serie intermedia. Sin embargo, esta configuración del conmutador también puede utilizarse
simplemente en cuestiones de gusto.
MID +
La configuración de serie intermedia + 2dB hace que la serie de tonos fundamental sea algo más cálida. Para
habitaciones con un aislamiento muy selectivo, esto puede hacer que el sonido sea más equilibrado y más
cálido.
Interruptor de frecuencias bajas(LOW)
LOW N
El estado neutro (N) ajustado en fábrica ofrece la reproducción de sonidos graves ideal para este altavoz.
LOW+
El interruptor LOW+ eleva las frecuencias bajas medias entre 40 Hz y 100 Hz. En espacios muy grandes, esto
puede tener la ventaja de lograr mayores matices en frecuencias bajas y un sonido más intenso.
Page 22

42
43
ES
Problema Causa Solución
Se perciben distorsiones, a) Fallo electrónico a) Si los problemas se producen
incluso a volúmenes bajos en ambas cajas acústicas, se
trata de un fallo electrónico. Si
sólo afecta a una de las cajas
acústicas, intercambie la
derecha con la izquierda. Si el
problema permanece en el
mismo canal, significa que
existe un fallo electrónico.
Si el canal afectado ha
cambiado, el problema reside
en la caja acústica.
b) Fallo en la caja acústica b) Diríjase a su distribuidor o bien
a nuestro servicio técnico.
(Tel +49 (0) 511 - 7904-0)
No hay sonido a) Cableado incorrecto a) Verificar cableado
b) Amplificador b) Conectar el equipo
desconectado
El sonido es como un hilo a) Error de polaridad a) Compruebe si, por descuido,
delgado, suena alejado e se ha conectado un borne
irreal positivo del amplificador a un
borne negativo de la caja
acústica, o viceversa.
b) Disposición inadecuada b) Sitúe la caja acústica más
cerca de la pared.
Los bajos son demasiado a) Disposición inadecuada a) Aumente la distancia entre las
potentes de las cajas acústicas cajas acústicas y las paredes
(por ejemplo, en un rincón) más próximas
b) Los bajos del b) Sitúe el regulador de sonido de
amplificador están su amplificador en posición
demasiado potenciados neutral.
Los agudos suenan a) La dispersión de los a) Disponga las cajas acústicas
demasiado bajos tweeters es inadecuada. de modo que los tweeters
queden orientados hacia la
posición del oyente
(inclinando y girando la caja
acústica)
CUIDADO! CLIPPING
Aun cuando la potencia nominal de un amplificador es considerablemente inferior a la potencia nominal de
las cajas conectadas, los altavoces se pueden deteriorar considerablemente en caso de funcionamiento no
adecuado. Se ha de tener en cuenta que la potencia nominal indica únicamente cuántos vatios puede facilitar
el amplificador sin distorsión en los altavoces. Si un amplificador es sometido a una excesiva solicitación,
éste, por un lado, suministra mucha más potencia y, por otro, añade una corriente continua destructiva, así
como oscilaciones de frecuencia elevada. Este proceso recibe el nombre de „Clipping“, que se detecta por una
fuerte distorsión en los pasajes de elevada sonoridad. Tan pronto como se perciban distorsiones, se ha de
bajar inmediatamente el volumen para no poner en peligro los altavoces. El Clipping de amplificador es un
típico síntoma de sobrecarga que aparece siempre que se eleva demasiado el tono de los reguladores de
sonido y/o volumen. Incluso colocando el regulador de sonido a la mitad de su potencia, los amplificadores
convencionales alcanzan sus límites al sonar impulsos fuertes, tan pronto como el regulador supere la posición
correspondiente a las 12 horas.
MANTENIMIENTO DE LOS ALTAVOCES
La forma óptima de limpiar sus altavoces AURUM es con un paño seco y suave. No utilice disolventes.
Limpie los sistemas de altavoces (woofers, altavoces para medios) sólo cuando estén muy sucios (un poco de
polvo no afecta a la acústica). Para limpiarlos, utilice simplemente un paño suave y seco o un pincel blando
aplicando poca presión para evitar dañar las membranas. Le aconsejamos que no limpie las membranas de los
tweeters, ya que son muy sensibles. Si se ensuciasen los marcos frontales, aplique una espuma seca (Centralin
en spray, por ejemplo) en el lugar sucio, deje que actúe y a continuación, elimine los restos simplemente con
una aspiradora.
Para limpiar la suciedad del marco frontal plateado, rocíe el lugar sucio con espuma limpiadora en seco, deje
que haga efecto y aspire con la aspiradora. No cepille los marcos frontales negros, simplemente sacuda
ligeramente o retire la suciedad utilizando una cinta adhesiva ancha. ¡No limpie con agua!
¡Encontrará los datos técnicos correspondientes a su producto en la parte posterior de la caja de su altavoz o
del cartón de embalaje!
Responderemos a sus preguntas en el número de teléfono: +49 (0) 511 7904-0,
e-mail: ovs@quadral.com ó info@aurumspeakers.com
REGISTRO DE GARANTÍA
Además de la garantía legal de dos años, tiene la posibilidad de ampliar la garantía de sus altavoces AURUM
un total de 10 años. Puede introducir los datos necesarios, tanto personales como específicos del aparato,
en la página www.quadral.com. Estos datos serán tratados de manera confidencial y no serán transmitidos
a terceros.
Por favor, adjunte como prueba el justificante de compra. Puede colgarlo como archivo (escaneado, en foto)
o enviarnos una copia por correo con la palabra clave “Registro de garantía” a la dirección anteriormente
facilitada.
Tras la comprobación de sus documentos, nosotros le enviaremos un certificado digital (en pdf), que debe
conservar en un lugar seguro y que debe presentar si es necesario.
Por favor, aténgase a las disposiciones de la garantía.
Page 23

quadral GmbH & Co. KG
Am Herrenhäuser Bahnhof 26-28
D-30419 Hannover
Phone: +48 (0) 511 - 79 04-0
Fax: +49 (0) 511 - 79 04-444
E-Mail: info@quadral.com
Internet: www.quadral.com
facebook.com/quadralhifi
www.youtube.com/user/quadralhifi
Art.-Nr. 8944242 · 06.2016
 Loading...