

Quad Vena II Play User Manual
Vena II Play
Wireless Streaming Integrated Amplifier
User Manual
IMPORTANT SAFETY INFORMATION
AVIS: RISQUE DE CHOC ELECTRIQUE-NE PAS OUVRIR
WARNING: SHOCK HAZARD-DO NOT OPEN
Refer all servicing to qualified service personnel. Servicing
is required when the apparatus has been damaged in any
way, such as power supply cord or plug is damaged, liquid
has been spilled or objects have fallen into the apparatus,
the apparatus has been exposed to
not operate normally, or has been dropped.
WARNING: Only use attachments/accessories specified
or provided by the manufacturer (such as the exclusive
battery etc.).
rain or moisture, does
This lightning flash with arrowhead symbol within an
equilateral triangle is intended to alert the user to the
presence of non-insulated “dangerous voltage” within the
product’s enclosure that may be of sufficient magnitude to
constitute a risk of electric shock.
Warning: To reduce the risk of electric shock, do not
remove the cover (or back) as there are no user-serviceable
parts inside. Refer servicing to qualified personnel.
This exclamation point within an equilateral triangle is
intended to alert the user to the presence of important
operating and maintenance instructions in the literature
accompanying the appliance.
Read these instructions.
Keep these instructions.
Heed all warnings.
Follow all instructions.
Do not use this apparatus near water.
Clean only with dry cloth.
Do not block any ventilation openings. Install in
accordance with the manufacturer’s instructions.
Do not install near any heat sources such as radiators, heat
registers, stoves, or other apparatus (including amplifiers)
that produce heat.
Do not defeat the safety purpose of the polarized or
grounding plug. A grounding plug has two blades and a
third grounding prong. The wide blade or the third prong
is provided for your safety. If the provided plug does not fit
into your outlet, consult an electrician for replacement of
the obsolete outlet.
Protect the power cord from being walked on or pinched
particularly at the plugs, convenience receptacles, and at
the point where they exit from the apparatus.
Use only with the cart, stand, tripod, bracket,
or table specified by the manufacturer, or
sold with the appa
is used, use caution when moving the cart/
apparatus combination to avoid injury from
tip-over.
Unplug this apparatus during lightning storms or when
unused for long periods of time.
ratus. When a cart or rack
WARNING: The mains plug/appliance coupler/is used
as disconnection device; the disconnection device shall
remain readily operable.
CAUTION: These servicing instructions are for use by
qualified service personnel only. To reduce the risk of
electric shock, do not perform any servicing other than
that contained in the operating instructions unless you are
qualified to do so.
Do not install this equipment in a confined or built-in
space such as a bookcase or similar unit, and keep well
ventilated in open space. The ve
impeded by covering the ventilation openings with items
such as newspaper, table-cloths, curtains etc.
WARNING: To reduce the risk of fire or electric shock,
do not expose this apparatus to rain or moisture. The
apparatus shall not be exposed to dripping or splashing
and ensure that objects filled with liquids, such as vases,
shall not be placed on the apparatus. No naked flame
sources, such as lighted candles, should be placed on the
apparatus.
WARNING:Do not ingest the battery, Chemical Burn
Hazard. (Supplied with the remote control.) This product
contains a coin/button cell battery. If the coin / button cell
battery is swallowed, it can cause severe internal burns in
just 2 hours and can lead to death. Keep new and used
batteries away from children. If the battery compartment
does not close securely, stop using the product and keep it
away from children. If you think batteries might have been
swallowed or placed inside any part of the body, seek
immediate medical attention.
Ground protection terminal.This product
should be connected to a power outlet with
ground protection.
Denmark:
Finland:
Norway:
Sweden:
WARNING: No naked flame sources, such as lighted
candles, should be placed on the apparatus.
WARNING: Attention should be drawn to environmental
aspects of battery disposal.
WARNING: Use of the apparatus in tropical climates.
Apparatets stikprop skal tilsluttes en
stikkontakt med jord, som giver forbindelse
til stikproppens jord.
Laite on liitettävä suojakoskettimilla
varustettuun pistorasiaan.
Apparatet må tilkoples jordet stikkontakt.
Apparaten skall anslutas till jordat uttag.
This product will generate certain heat during
use. Please pay attention to the hot surface.
ntilation should not be

QUAD
Vena II Play
CONTENTS
INTRODUCTION …………………………………………………………………………………………………… 4
UNPACKING THE EQUIPMENT………………………………………………………………………….………… 4
USB DRIVERS (AND FIRMWARE UPDATES) …………………………………………………………………… 4
PLACEMENT ……………………………………………………………………………………….……………....... 4
CONTROLS AND FUNCTIONS ………………………………………………………………………………… 5
OUTPUT CONNECTIONS .………….............………………………………………………………………… 8
INPUT CONNECTIONS .………….............………………………………………………………………… 10
REMOTE HANDSET
DTS PLAY-FI® WIRELESS STREAMING TECHNOLOGY ………...........................……………………… 14
DOWNLOAD THE APP …………………………………………………………………......…………......…… 15
WI-FI CONNECTION USING THE APP ………………………………………………………………......…… 16
WI-FI CONNECTION SETUP USING A WINDOWS PC OR MAC …………………………..………….. 18
APP OPERATION …………………………………………………………………......…………........………… 20
SPECIFICATIONS …………………………………………………………………......…………......……….… 26
………...........................…………………………………………………………........
The Bluetooth® word mark and logos are registered trademarks, owned by Bluetooth SIG, Inc. and
any use of such marks by IAG Group Ltd is under license. Other trademarks and trade names are
those of their respective owners.
aptX® software is copyright CSR plc. or its group companies. All rights reserved.
11
The aptX® mark and the aptX logo are trademarks of CSR plc. or one of its group companies and
may be registered in one or more jurisdictions.

INTRODUCTION
Thank you for your investment in the QUAD Vena II Play. We are sure that the Vena II Play will continue to delight you for years to
come.
The QUAD Vena II Play is designed to be the perfect match for all of your music sources and provides the necessary amplification
to realise the highest quality of your music, regardless of the source.
You can link the Vena II Play to both analogue and digital sources, thanks to its diversity of inputs. A built-in phono pre-amp offers
turntable connectivity. An innovative aptX codec provides CD quality audio over Bluetooth® connection. You can also make use
of wireless audio streaming and muti-room systems with the built-in DTS Play-Fi technology.
With DTS Play-Fi® Technology, music can be streamed over your wireless network in high resolution format and can be easily
expanded to an ultimate multi-room system, if required. You can stream from any source on your wireless network, including
smart-phones, tablets or PCs as well as a NAS Drive.
Please read this manual carefully to discover all the ways you can connect your equipment to the QUAD Vena II Play and learn
how to get the best performance from all of your music sources.
UNPACKING THE EQUIPMENT
The carton contains:
The QUAD Vena II Play
One IEC mains cable with a plug suitable for your area
Three antenna cables
One remote controller
One QUAD Vena II Play user manual
Consult the dealer from whom you purchased the equipment if any item is not present. Carefully unpack the unit and accessories.
Take care not to damage the surface finish when undoing the protective polythene sleeve. Retain the packing materials for future
use. Retain the user manual and information concerning the date and place of purchase of your equipment for future reference. If
you transfer the unit to a third party please pass on this instruction manual along with the equipment.
USB DRIVERS (AND FIRMWARE UPDATES)
To download Windows Drivers, please see the separate manual. Any firmware updates will also be available from
www.quad-hifi.co.uk
PLACEMENT
The unit must be mounted on a solid, level and stable surface. Before you connect the QUAD Vena II Play to AC mains power,
ensure your AC mains voltage corresponds to the rating on the rear panel of the product. If in doubt, consult your dealer. If you
move to an area which has a different mains voltage, seek advice from a QUAD appointed dealer or a competent service
technician.
4
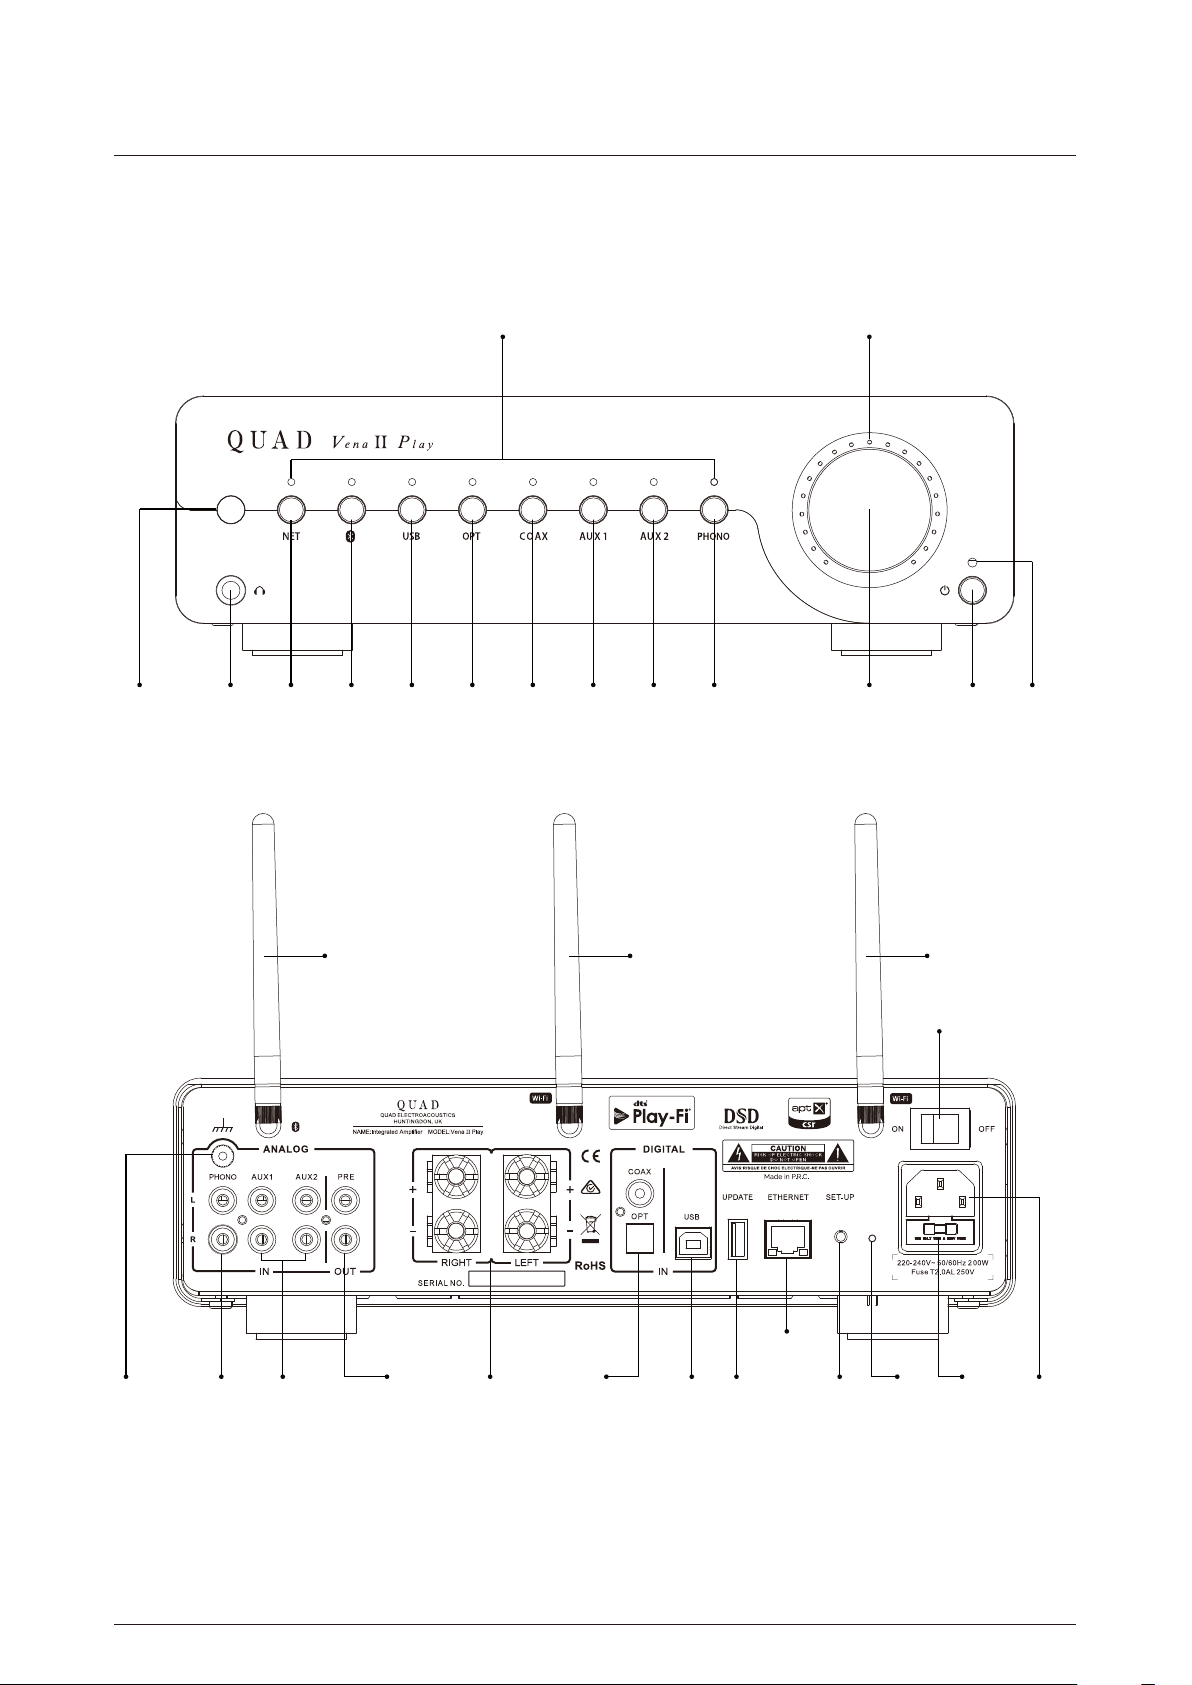
CONTROLS AND FUNCTIONS
Remote
Receiver
Headphone
Output
NET
Button
BT
Button
USB
Button
Input Selection
Indicators
OPT
COAX
Button
Button
AUX1
Button
AUX2
Button
PHONO
Button
Volume Level
Indicator
Volume
Knob
Standby
Button
Standby
Indicator
Ground
Terminal
Phono
Input
Analogue
Line Inputs
BT Antenna Wi-Fi Antenna Wi-Fi Antenna
Mains Switch
Ethernet
Port
Pre-amplifier
Output
Loudspeaker
Outputs
Digital
Inputs
USB B
Input
USB A
Firmware
Upgrading
Port
Wi-Fi
Setup
Button
Wi-Fi
States
Indicator
Fuse Mains
Supply
Socket
5

INSTALLATION
Before making any connections to your high fidelity equipment make sure that all units in the system are switched off and
unplugged at the mains.
Mains Connections
The Mains On/Off switch is on the rear panel. Before connecting your QUAD equipment to the AC mains supply check and make
sure the voltage marked on the back matches your supply voltage.
Analog Signal Output Connections
Preamplifier Output
Vena II Play has one pair of unbalanced RCA outputs which can make Vena II Play operate as a preamplifier.
Connect an RCA cable between the unbalanced pre output of Vena II Play and the unbalanced input of a power amplifier or
associated equipment. Interconnectors should be of low-noise construction and fully screened to minimize hum and noise
transmission.
Loudspeaker Outputs
Vena II Play has two sets of loudspeaker outputs. They are independent for right and left stereo amplifier outputs.
Connect the Positive (+) RED terminals of the amplifier to the Positive (+) RED terminals of the loudspeakers. Connect the Negative
(-) BLACK terminals similarly. When connecting loudspeakers tighten the terminals securely by hand. Make sure there are no loose
strands of wires which could cause short circuits.
Headphone Output
Vena II Play has a stereo 6.3mm(1/4”) jack on the front panel for connecting headphones Connecting headphones mutes the
audio signal to the loudspeakers. Vena II Play headphone output can be set up to 4.5V, users can select suitable output levels to
suit their headphones.
WARNING: Listening to music at high volume levels and for extended durations can damage one’s hearing. In order to reduce the
risk of damage to hearing, one should lower the volume to a safe, comfortable level, and reduce the amount of time listening at
high levels. Headsets should comply with EN 50332-2 requirements (for GS certification).
6

NET Button
Activates DTS Play-Fi mode for wireless audio streaming and APP control.
Volume Knob
You can rotate the volume knob clockwise to increase the volume, rotate it counter-clockwise to decrease the volume. Press it once
to mute the volume then press twice to un-mute the volume.
Volume Indicator
The volume level indicators have two states: brightly lit and off. To switch between the states, press and hold the volume knob for
4 seconds. In the ‘off’ state, the indicators will light for 5 seconds once the unit is activated, then go off. ‘Off’ is the default state.
Standby Button
Press the Standby button briefly to enter/exit the Standby mode.
Hold and press for 4 seconds to enter auto-standby set-up mode.(Please refer to page 12 to enable this function)
USB A Firmware Upgrading Port
This port must only be used to upgrade the internal firmware of Vena II Play. It cannot be used to connect a computer or USB disc
to play music.
Ethernet Port
QUAD Vena II supports wired connection to your network music source. Connect the Ethernet Port to the LAN Port of a wireless
router using a suitable cable. We recommend you use the wired network to play high resolution files without interruption or
instability.
Set-up Button
Use the setup button to help set up your WiFi connection. Press and hold it for 4 seconds to enter the WPS network set-up mode.
Press and hold for up to 8 seconds to enter the standard network set-up mode. Press the button again to cancel the WPS network
set-up mode.
7

OUTPUT CONNECTIONS
Artera Play
Loudspeaker
Right
QUAD Vena II Play
Loudspeaker
Left
Artera Stereo
8

Analog Signal Input Connections
Vena II Play has two sets of unbalanced RCA inputs for connection to sources which provide line level outputs. Both sets are
identical.
Connect an RCA cable between the unbalanced input of Vena II Play and the unbalanced output of a source unit like a CD player
or DAC. Interconnections should of low-noise construction and fully screened to minimize hum and noise transmission.
PHONO Signal Input Connections
Vena II Play has a PHONO signal input, the PHONO input should only be connected to turntables fitted with MM or high output
MC cartridges.
Digital Signal Input Connections
Vena II Play has a variety of digital inputs, which can be connected to most popular digital sources, like the digital output of a CD
or DVD player, DAC, PC.
Coaxial Input
Vena II Play has a coaxial SPDIF input. Connect an RCA digital interconnection between the digital coaxial output of the source
unit to the COAX input of Vena II Play.
Optical Input
Vena II Play has an optical SPDIF input. Connect an optical (TOSlink) interconnection between the digital optical output of the
source unit to the OPT input on Vena II Play.
Bluetooth Input
Vena II Play has a built-in Bluetooth signal processor module which can play audio files transmitted from the source unit via
Bluetooth wireless transmission. Please refer to page 13 to enable this function.
USB Input
Vena II Play has one B-type USB input which lets you connect a Mac or PC to play audio files stored on a computer.
B-type USB
9
 Loading...