

Page 1
C O N C O U R S E R S E R I E S
INSTRUCTION BOOKLET
MODELS R6 & R8
F O R T H E C L O S E S T A P P R O A C H T O T H E O R I G I N A L S O U N D
R E V.1
Page 2

2
SAF ETY INST RU CTIO NS
Safety First!
1. Please read this manual fully before installing and operating this
product.
2. Retain a copy of this manual for future reference.
3. Comply with all warning labels and instructions.
4. Do not attempt the installation of this equipment unless you are
qualified to do so.
5. Protect your hearing from high sound pressure levels.
Rigging and Suspension
The rigging, suspension or mounting of these products can expose the
installer and members of the public to serious health risks and even death.
UNDER NO CIRCUMSTANCES ATTEMPT TO RIG, SUSPEND
OR OTHERWISE MOUNT THIS EQUIPMENT UNLESS YOU ARE
FULLY QUALIFIED AND CERTIFIED TO DO SO BY RELEVANT
LOCAL, STATE AND NATIONAL AUTHORITIES. ALL RELEVANT
SAFET Y REGULATIONS MUST BE FOLLOWED. IF YOU ARE NOT
PROPERLY QUALIFIED OR DO NOT KNOW OF PERTINENT
REGULATIONS, CONSULT QUALIFIED PERSONNEL FOR ADVICE
AND ASSISTANCE.
Limited Liability
QUAD Industrial assumes no liability whatsoever for any damage or loss,
either direct or consequential arising from the installation and use of these
products. Liability is limited to replacement of product or refund, at the
QUAD Industrial’s discretion. Your rights to compensation may vary by ter
-
ritory; consult with your local QUAD Industrial office or distributor.
Warranty & Service
These products are designed to be used as specified, and are warranted to
be free from defects in materials or workmanship. Warranty terms and con
ditions vary by territory. Please contact your local QUAD Industrial sales
office or distributor for complete details. Under no circumstances should
you attempt to repair these products. Doing so may limit or void warranty
coverage.
TA BL E OF CON TENT S
Introduction:
Safety Instructions ....................................................................... 02
Introduction ................................................................................ 02
Warnings & Disclaimers .............................................................. 02
Rigging & Suspension ................................................................. 02
Warranty & Service .................................................................... 02
Product Descriptions:
Dimension Drawings ................................................................... 03
Product Features ......................................................................... 04
Installation:
Installation Instructions ................................................................. 05
Wiring & Connections:
Input Connectors ......................................................................... 06
Reccomended Wiring Scheme ...................................................... 06
CE Compliance:
Statement ................................................................................... 06
Specifications ............................................................................. 08
Contact Information:
QUAD Industrial Contact Information ............................BACK COVER
Page 3
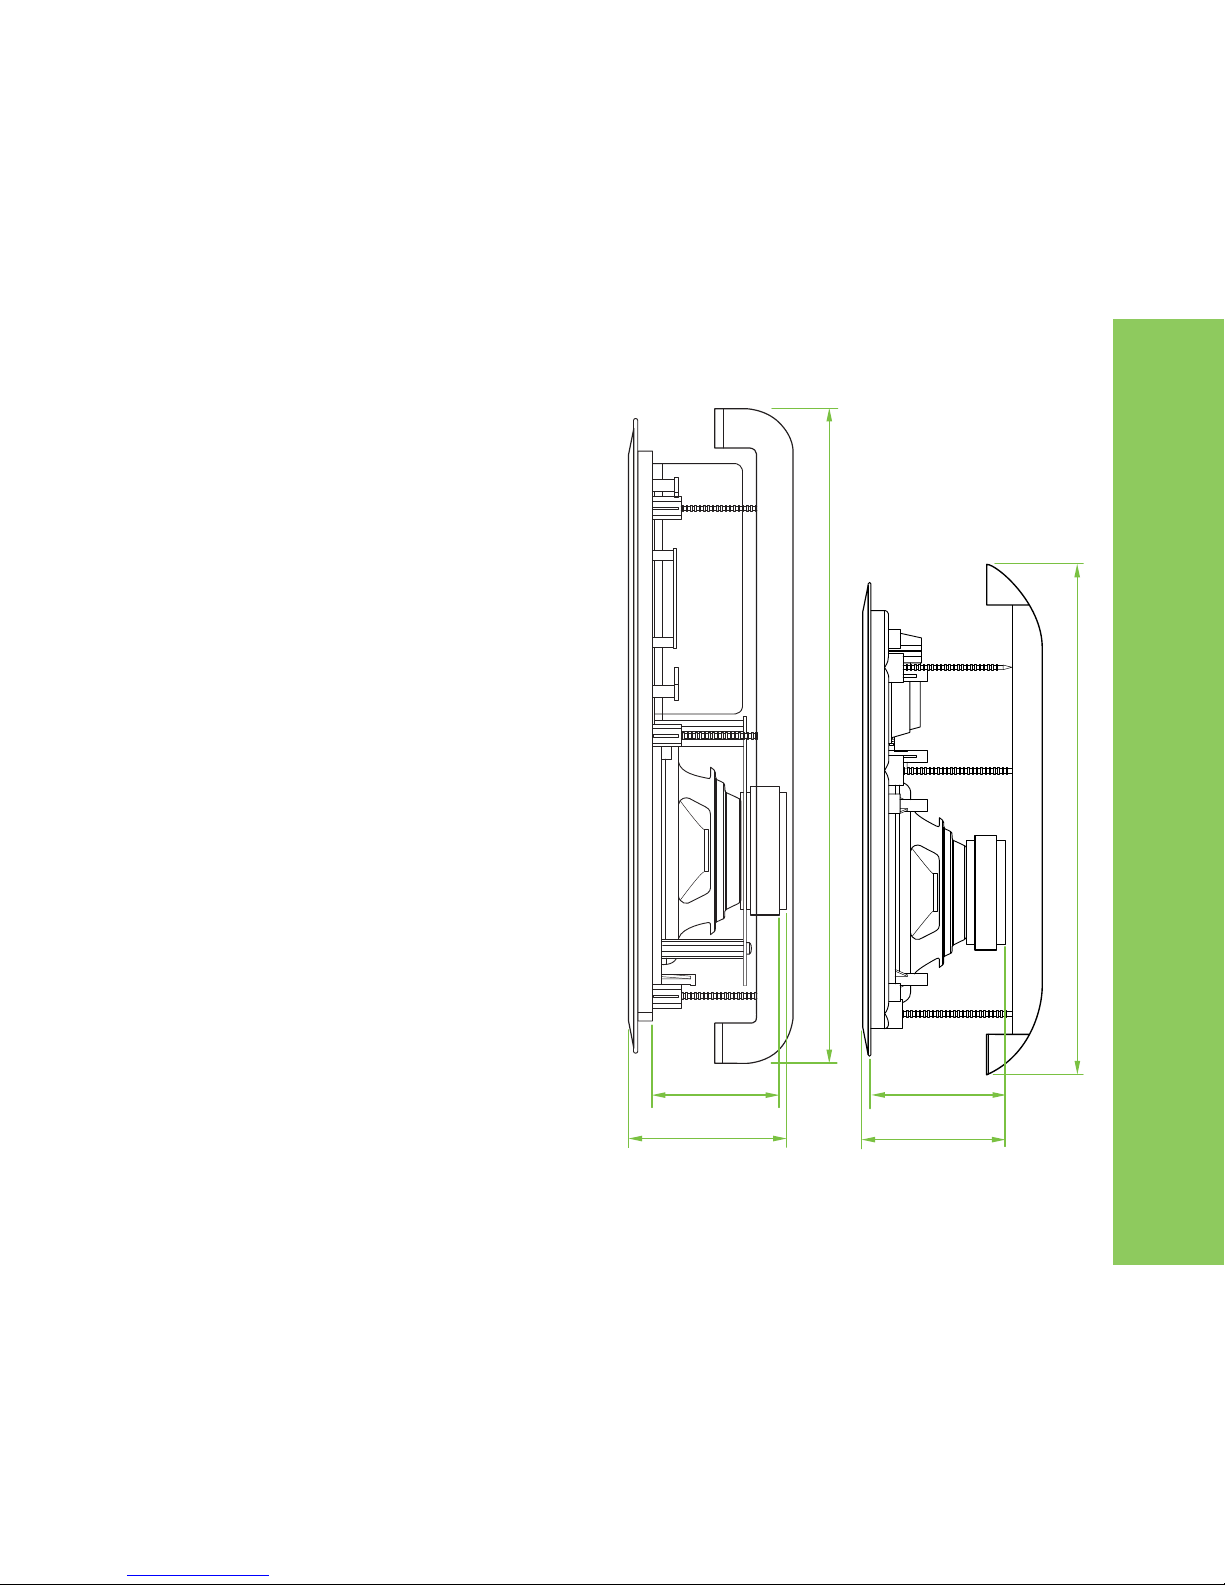
356mm/14.01”
85mm/3.35”
90mm/3.54”
R6
460mm/18.11”
105mm/4.13”
110mm/4.33”
R8
3
PRO DUCT DES CR IPTI ON
The Concourse R6 and R8 are two-way high performance in-wall
mounted speaker systems designed for distributed music, paging
and speech applications. The R6 and R8 are packaged in pairs
and combine premium drive units with a discrete ABS front baffle
and attractive metal grille. A unique mounting system makes the
R6 and R8 easy to install.
Concourse R6
The Concourse R6 is a premium two-way in-wall mounted speaker
system consisting of a 6.5" cone low frequency driver and a 1"
soft dome tweeter. Speakers are packed in pairs and come complete with mounting bars and screws, plastic paint covers and
cardboard cutout templates.
• Concourse R6-16 –16
Ω operation, 50W Continuous
power handling
Concourse R8
The Concourse R8 is a premium three-way in-wall mounted
speaker system consisting of an 8" cone low frequency driver, a 2"
soft dome midrange driver and a 1" soft dome tweeter. Speakers
are packed in pairs and come complete with mounting bars and
screws, plastic paint covers and cardboard cutout templates.
• Concourse R8-16 –16
Ω operation, 100W Continuous
power handling
Page 4

232mm/9.13”
R6
Speaker Cutout
305 x 200mm
12” x 7.87”
332mm/13.07”
284mm/11.18”
R8
444mm/17.48”
Speaker Cutout
410 x 245mm
16.14” x 9.65”
4
PRO DUCT FEATUR ES
The Concourse R6 and R8 are designed to be installed in a wall
cavity and are supplied with a unique latching bar for wall mounting. Wiring is terminated to a pair of color-coded spring terminals
on the rear of the speaker bezel.
Both models include the following components inside each carton:
• Speaker assembly (2)
• Cover grille (2)
• Latching bars (4)
• Latching bar screws (12)
• Plastic paint cover (2)
• Cardboard cutout template (2)
Please ensure that you are familiar with all of the
parts and how they are assembled before starting
the installation.
INS TALL ATI ON
NOTE: Installations in existing buildings require that you first
ensure that the location is suitable and that there are no obstacles
behind the wallboard material before cutting an opening. Use
extreme caution when cutting into walls to avoid severing electrical
wiring, heating ducts or water pipes.
Step 1
Carefully unpack the contents of the box and ensure that all parts
are accounted for before beginning the installation.
Step 2
Locate the cardboard mounting template and use it to mark the
hole size needed for the installation. Cut the mounting hole using
a suitable saw.
Page 5

5
Step 3
Install the latching bars to the rear of the speaker assembly by
inserting only the top two screws on each bar. Do not tighten the
screws yet, leaving enough slack to permit installation into the
wall cavity.
Step 4
Pull the speaker wire from inside wall cavity and terminate
to speaker.
Step 5
Lift speaker assembly to opening and, tilting the top forward,
insert the bottom latching bars into the cavity far enough to allow
the top of the latching bars to sink into the cavity.
Step 6
Lift the speaker into position and tighten all four mounting screws,
ensuring that the speaker remains centered in the opening.
Step 7
Insert the remaining two screws into the front of the bezel and
tighten.
Step 8
If the speaker bezel is to be painted place the supplied clear
plastic paint cover over the front. Otherwise, attach the grille to the
bezel by pushing firmly around the perimeter of the grille.
Page 6
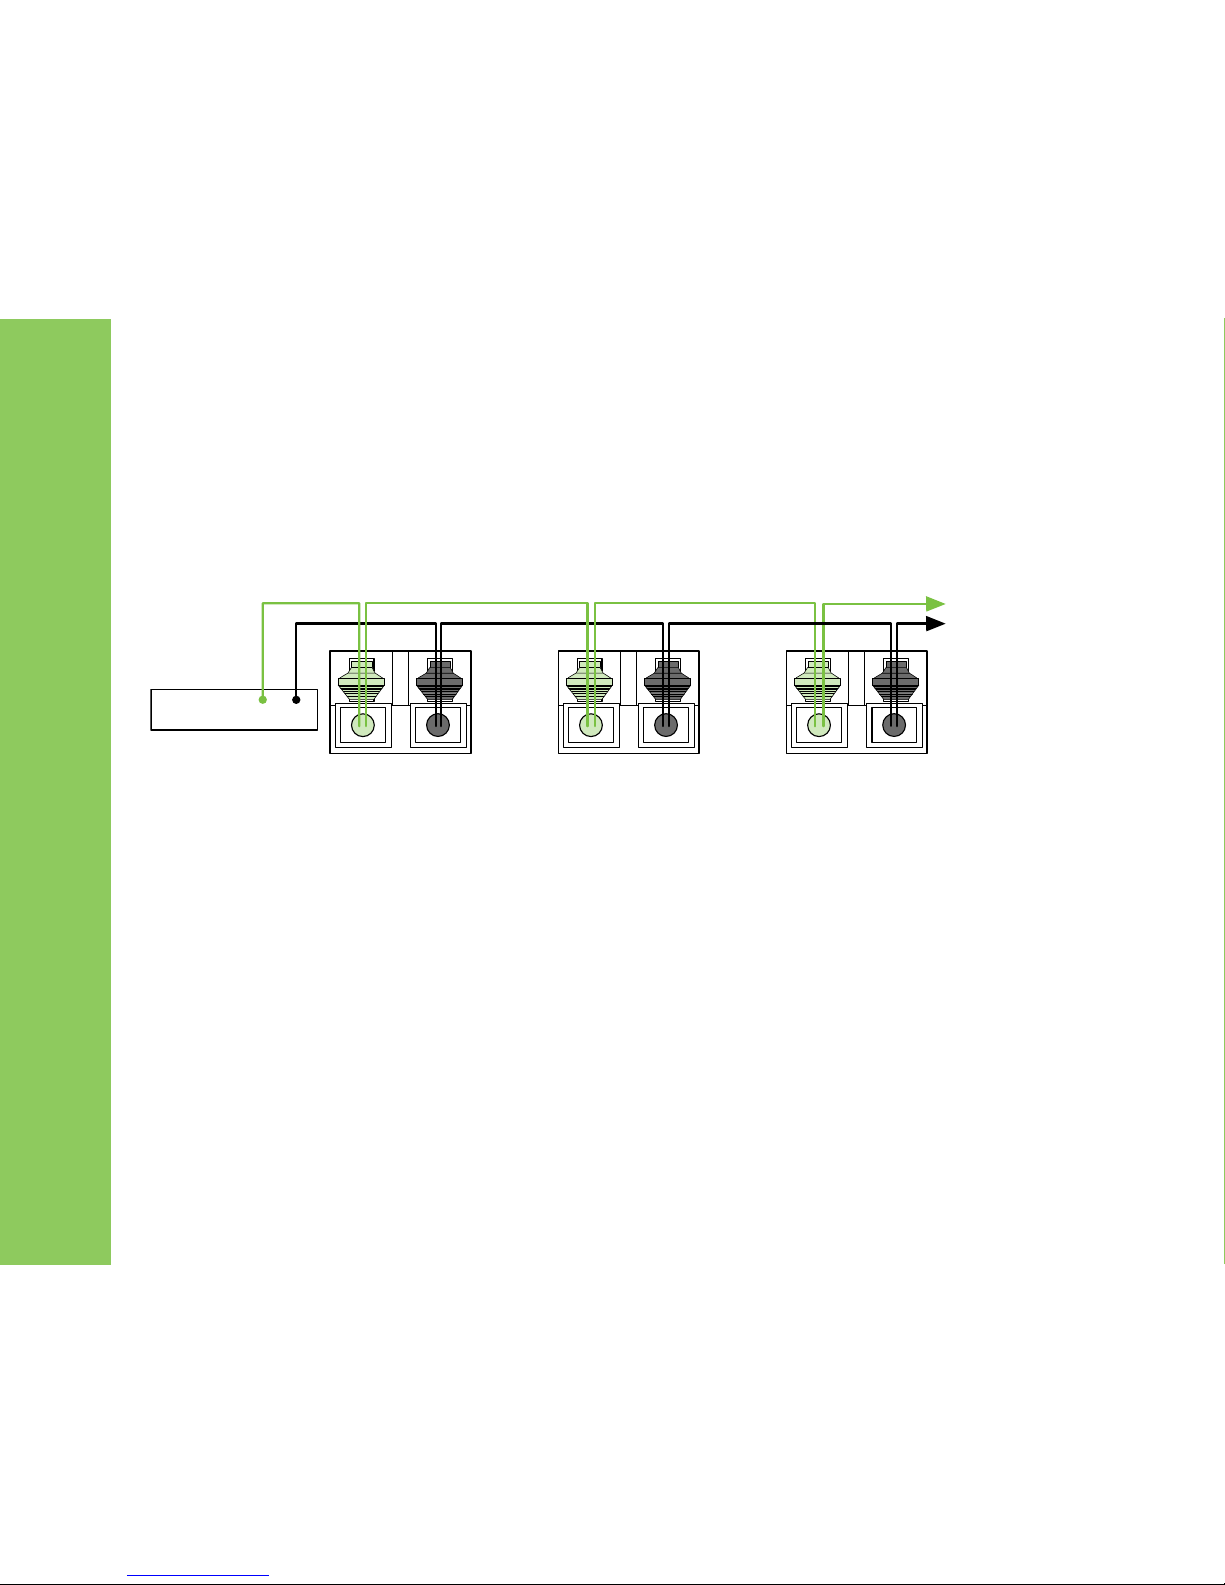
+
-
To subsequent
speakers
Power Amplifier
+
-
Red (+) Black (-)
Red (+) Black (-)
Red (+) Black (-)
6
WIR ING & CO NN ECTI ONS
Ensure that all wiring is installed in compliance with local laws, codes and convention. Obtain all necessary permits and approvals and
use only cable that is approved for the application and is sized to safely accommodate the impedance load.
Concourse R series speakers use spring terminals. The Positive, + terminal is coded RED, the Negative, Minus, terminal is coded BLACK.
Remove the plastic insulation from the top 0.5" (12mm) of each conductor. After twisting the copper strands tightly, depress a terminal
and insert the bare wire end. Release the terminal and the wire will be secured. Repeat for the other terminal. Use any color coding on
the cable as a guide to identification. Ensure there are no loose strands of wire that may short across the terminals.
COM PLIA NCE
This product is in compliance with CE directives and bears the CE mark. For detailed information on specific directives please contact
your local QUAD Industrial sales office or distributor.
Page 7

* Features, details & specifications are subject to change without notice
7
SPE CIFI CATI ONS
Power Handling: R6 R8
Continuous 50W 100W
Program 100W 200W
Peak 200W 400W
Frequency Response: 40Hz−20kHz 35Hz−20kHz
(-10dB)
Frequency Response: 70Hz−16kHz 45Hz−20kHz
(+/-3dB)
Sensitivity (@2.83V): 89dB 90dB
Max SPL: 112dB 115dB
Coverage (H x V): 140˚ x 110˚ 130˚ x 100˚
Directivity (DI) (H x V): 6.14 6.82
Impedance: 4 & 16Ω 4 & 16Ω
Regulatory Approvals: CE CE
(9UL, CE)
Transducers:
LF Driver Size 6.5" Cone 8" Cone
MID Driver Size ø 2" Soft Dome MID Range
HF Driver Size 1" Soft Dome Tweeter 1" Soft Dome Tweeter
Crossover Frequency: 2.3kHz 1.2kHz & 5.2kHz
Enclosure Material: Plastic (ABS) Plastic (ABS)
Connector Type: Screw Terminal Spring-loaded Terminal
Dimensions: 332 x 232 x 92mm 444 x 284 x 110mm
(H x W x D) 13.07" x 9.14" x 3.62" 17.48" x 11.18" x 4.33"
Net Weight: 1.8kg 4.8kg
3.96lbs. 10.56lbs.
Page 8

R E V.1
F O R T H E C L O S E S T A P P R O A C H T O T H E O R I G I N A L S O U N D
© 20 06 QUA D Ind us tri al . Q UA D I ndu st ria l is a mem ber o f t he In te rna ti ona l A ud io Gr oup . IAG Am er ica I nc. 8 440 1 54t h A ve nue NE · Re dm ond , WA 980 52
U S A C O N T A C T :
p h + 8 7 7 . 4 4 0 . 0 8 8 8
p h + 4 2 5 . 8 6 1 . 3 9 0 9
f x + 4 2 5 . 8 6 1 . 3 9 0 6
U K C O N T A C T :
p h + 0 8 4 5 4 5 8 0 0 1 1
p h + 4 4 ( 0 ) 1 4 8 0 4 4 7 7 0 0
f x + 4 4 ( 0 ) 1 4 8 0 4 3 1 7 6 7
O U T S I D E U S A & U K :
p h + 8 6 ( 0 7 5 5 ) 8 2 0 9 6 6 3 9
f x + 8 6 ( 0 7 5 5 ) 8 2 0 9 0 2 0 3
W E B :
w w w . q u a d i n d u s t r i a l . c o m
 Loading...