

Page 1
1
1
Page 2

Page 3

Qsonix Q100 User Guide
Version 3.01
Manual copyright © 2005 Qsonix, Inc All Rights Reserved
3
Page 4

Introduction
Welcome to Qsonix, an exciting new digital music management system. The Qsonix Q100 has been
designed to make loading, organizing and playing your CD music collection a pleasurable experience.
Qsonix allows you to quickly and easily load your CD collection directly to the internal hard drives of
the system. Using its unique AlbumBrowser™ interface, Qsonix displays detailed information about
each of your CDs, including the CD cover art. Qsonix supports a variety of compression quality
options including CD Quality Lossless Compression. Lossless Compression significantly reduces the
storage space required to rip CDs while still maintaining CD quality, making it possible to use Qsonix
to store a library of hundreds of CDs on a single hard drive.
Qsonix also includes many other unique high-quality features, such as the user controllable
SoftFade™ engine that delivers incredibly smooth cross-fading and soft volume transitions on all
transport functions such as Play, Stop, Pause and Mute. Qsonix’s user interface has been carefully
designed to take the work out of browsing your music, and building custom playlists using simple
drag-and-drop operations with the Q100’s integrated touchscreen controller.
4
4
Page 5

Setting Up Your Q100 System
In order to begin using your Qsonix Q100 system, you must first have it properly installed and
integrated with your sound system. Begin by unpacking both packages that came with your system
and identifying all of the cables that you will need for your installation
Confirm your package contents! Report any missing items to your installer/dealer. * = Qty
Q100 System Box Touchscreen Controller Box
-Q100 System (*1)
-Cable Package (*1)
-RCA Stereo audio cable (*1)
-Digital audio Coaxial cable (*1)
-Qsonix Touchscreen controller (*1)
-Power adapter (*1)
-Power cord (*1)
-D-sub 15-pin VGA signal cable (*1)
-RS-232 signal cable (*1)
-Touch monitor supporting bracket (*1)
and screws (*2)
5
Page 6

Attaching the Touch Monitor Support
To prevent the monitor from moving while using the touch screen, the touch screen
support should be attached.
Attach the touch screen support to the
rear of the monitor with the two
supplied screws as shown here.
6
6
Page 7

Identifying your touchscreen controls
Power switch
Turns the monitor on or off.
LED indicator
The indicator lights up in green when the
monitor is turned on, and lights
up in orange when the monitor is in power saving
mode.
AUTO button
Adjust the picture position and performance
automatically. It is highly recommended that you
press this button the first time you use the
monitor or any time you have a calibration or
image size issue.
UP button
Activates the On-Screen Display
menu.
Move the selected item clockwise.
Down button
Activates the On-Screen Display
menu.
Move the selected item counterclockwise.
Increase button
Activates the On-Screen Display menu.
Function as the “+” (increase)button when
adjusting.
Decre e button
as
Activates the On-S
Function as the “-” (decrease) button when
adjusting.
creen Display menu.
7
Page 8
Connecting your Q100 System and Touchsc roller
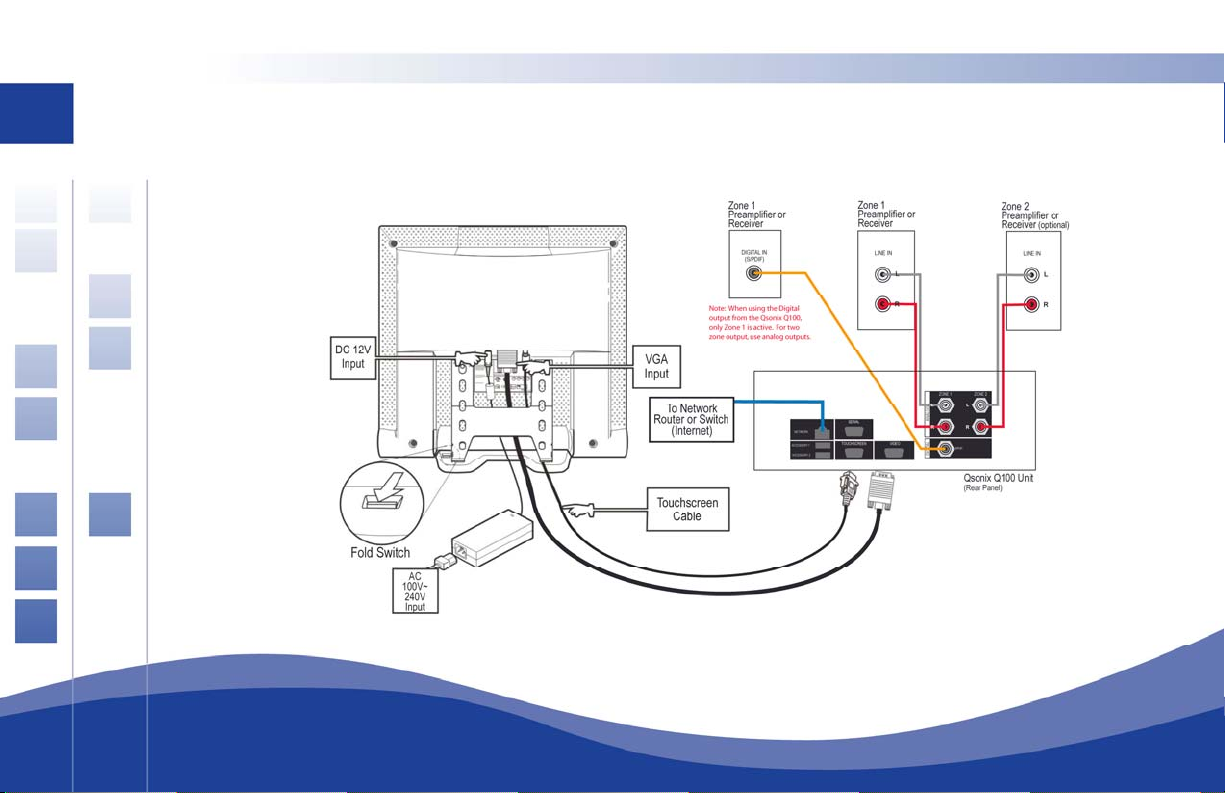
Please use the following diagram to assist you in making the necessary audio, video, power and
network connections.
reen Cont
8
8
Page 9

Step by Step cabling guidelines
1. Open the monitor stand (use fold switch), so you can locate the monitor on a flat surface suc
as a tabletop, on top of the Q100 unit or other suitable location. (Unit can be wall-mounted
with optional mounting kit and professional installation – contact your Qsonix dealer)
2. Connect AC power cable to touchscreen power adapter.
3. Connect DC 12V mini connector from power adapter to rear of touchscreen DC 12V input.
4. Connect one end of the D-sub 15-pin VGA signal cable to the “Video” connector on the Q100
unit and the other end to the “VGA Input” connector on the back of the touchscreen.
5. Connect the DB-9 (square) end of the RS-232 signal cable to the “Touchscreen” connector on
the back of the Q100 unit, and the other end (round plug) to the serial/touchscreen connector
on the back of the touchscreen.
6. Connect the Network port on the rear of the Q100 to your Network router, hub or switch using
a CAT5 Ethernet cable. (You may also use a 3
rd
party passive Wireless bridge)
7. Using the supplied audio cables, connect the appropriate analog and digital outputs to the
line-level inputs of your amplifier, preamplifier or powered speakers.
Note: The Q100 can only operate in two-zone mode when connected using analog outputs.
h
9
Page 10

Starting your Q
O y
nce ou have plugged in all the necessary cables, you are ready to power-up the system and begin
using i
t.
N
ote: The Q100 has been designed to be left in the “Power on” state, and does not need to be
turned e “power”
b n
utto located in the center of the front panel.
Step 1: Turn on the Touchscreen’s power
Step 2; Turn on the Q100s power switch
off when not in use. The system may be completely turned off by pressing th
100 for the First Time
10
10
Page 11

Tou
chscreen Basics
Your Qsonix Q100 system is operated through the use of the included touchscreen controller. Even
if you have
practice you will become comfortable in its use.
Keep the following in mind to get the most out of your Qsonix touchscreen system:
never worked with a touchscreen you will find that it is very simple and with only a little
♦ Don’t be afraid to press hard on the touchscreen glass, it is designed to withstand
considerable pressure. You will find that a slightly harder press will yield better control.
♦ a soft cloth lightly moistened with a mild
Clean the cabinet, glass, and controls with
detergent solution. Do not use any type of abrasive pad scouring powder or solvent, such
as alcohol o
♦ Do not rub, touch, or tap the surface of the screen with sharp or abrasive items such as a
pen or screwdriver. This type of contact may result in a scratched glass.
♦ Avoid using the touchscreen while your hands are wet or greasy, this reduces the
effectiveness of the touchscreen.
♦ Experiment a bit to learn what touch pressure and finger placement works best for you.
r benzene.
11
Page 12
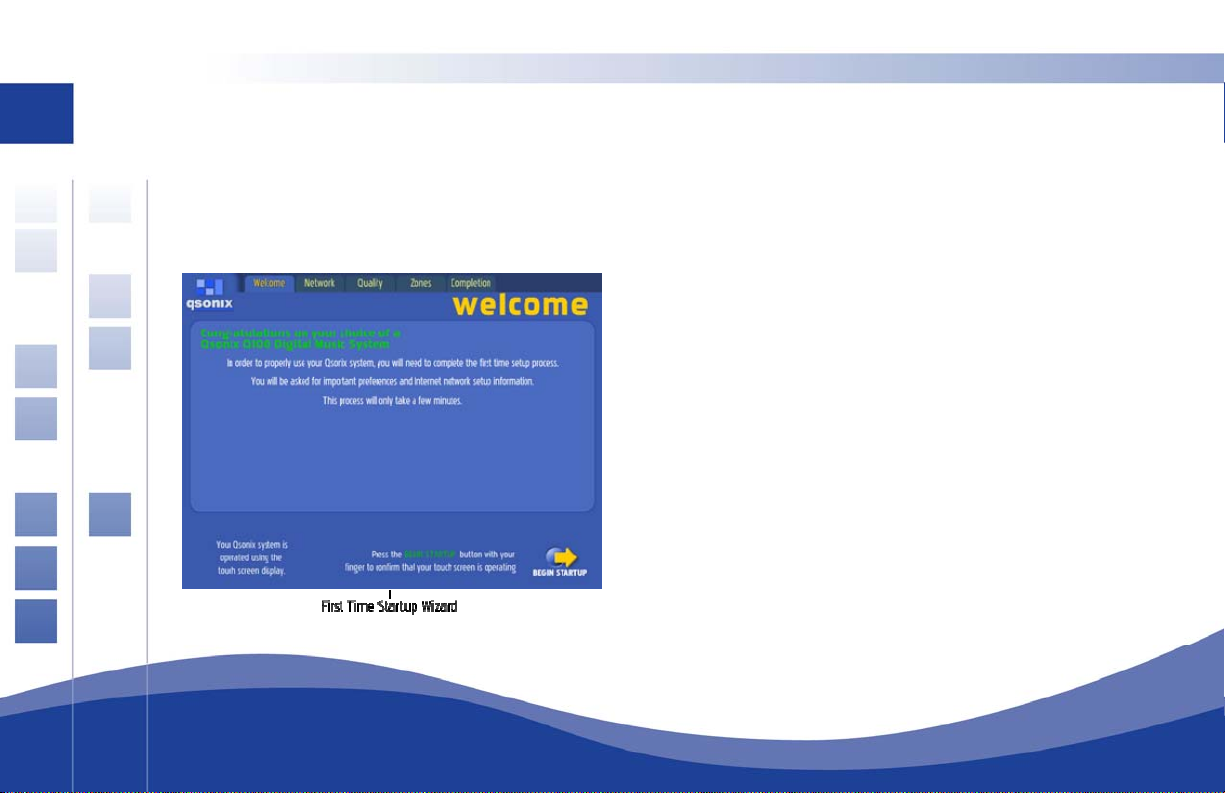
Completing the
Once the system has powered up, you will be presented with the “Welcome” screen and be
asked to complete the “First Time Startup Wizard” which helps you to configure basic settings
and preferences.
First Time Startup Wizard
Press the “Begin Startup” button located in the
the welcome screen to begin, and follow the on-screen help
You will be prompted through a series of five setup screens
which you must complete before you can begin using the
system.
lower right of
.
12
12
Page 13
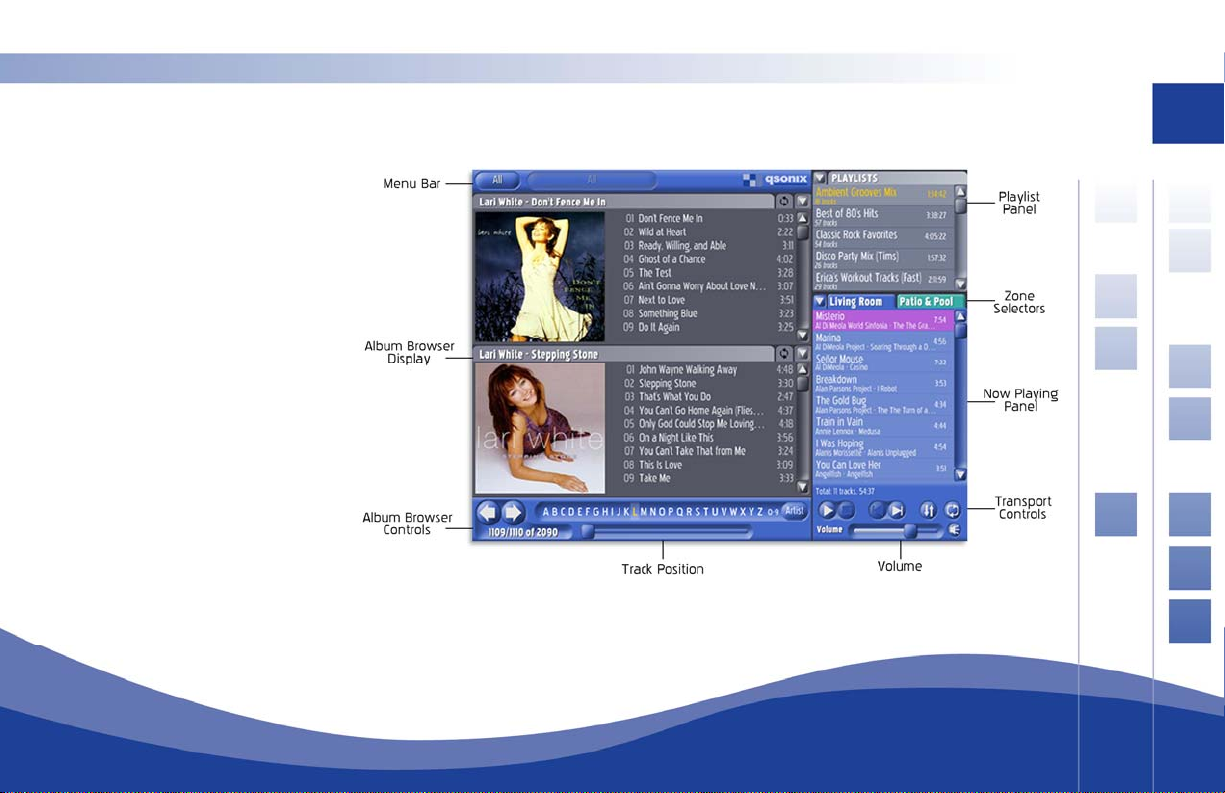
The Q
Us
The Qsonix user interface
is divided into several main
panels or areas that
comprise the entire system.
All of Qsonix’s features are
accessible from this primary
interface which has been
designed to be simple, fast
and fun to use.
This user guide will take
you briefly through each of
the systems key functions.
Feel free to experiment!
sonix
er Interface
13
Page 14
Load
In order to begi
CDs into th
ing your CD Library
n using your Q100 system, you will first need to create a CD library by Loading your
e system. The Qsonix system has been designed to make this a very simple and
automated process. Grab a handful of at least four to five
commercial CDs to load into the system and be sure that your
Internet connection is available to the Q100 system.
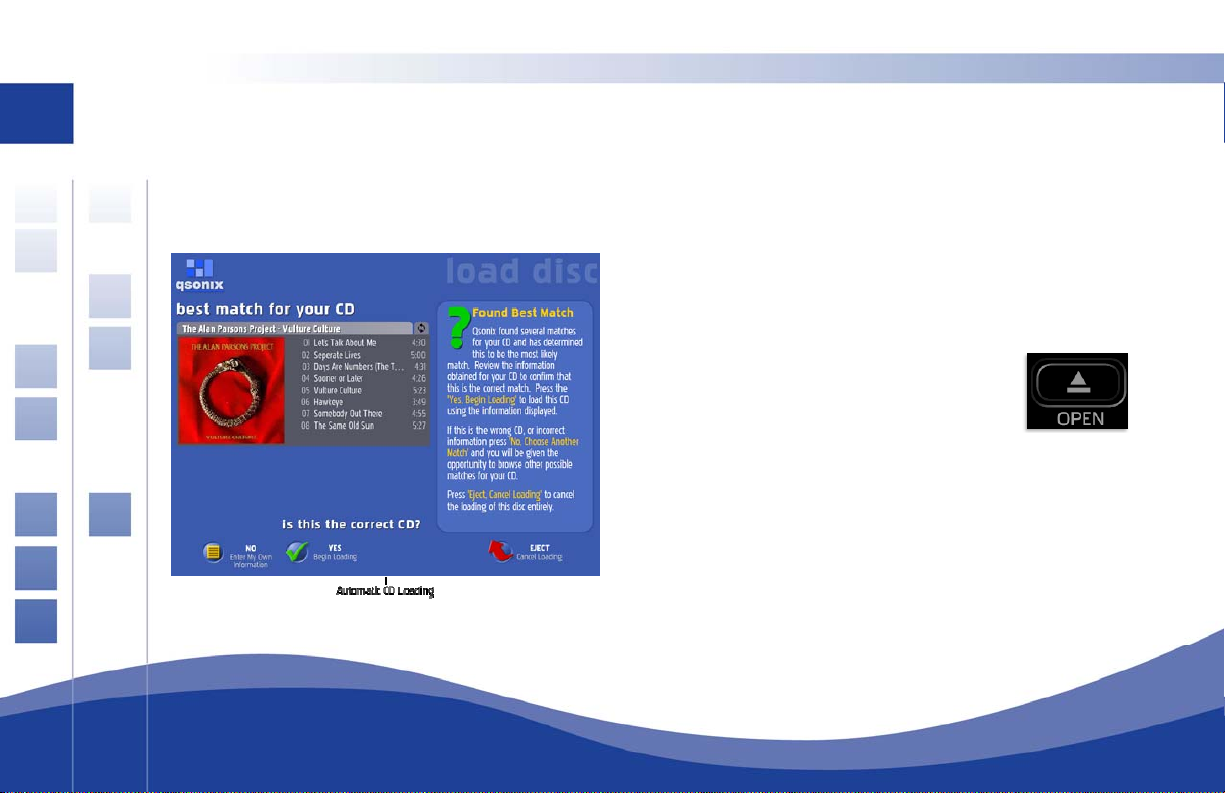
Automatic Loading CDs (commercial CDs)
Step 1 : Open the CD drive tray in the front of the
system by pressing the open tray button located just
below the CD tray on the right side.
Step 2 : Insert the CD you wish to load into the CD tray
Step 3: Confirm that the CD displayed matches your CD and
follow the on-screen instructions,
You may press “Yes Begin Loading” to immediately begin
loading the CD you inserted.
14
14
Page 15
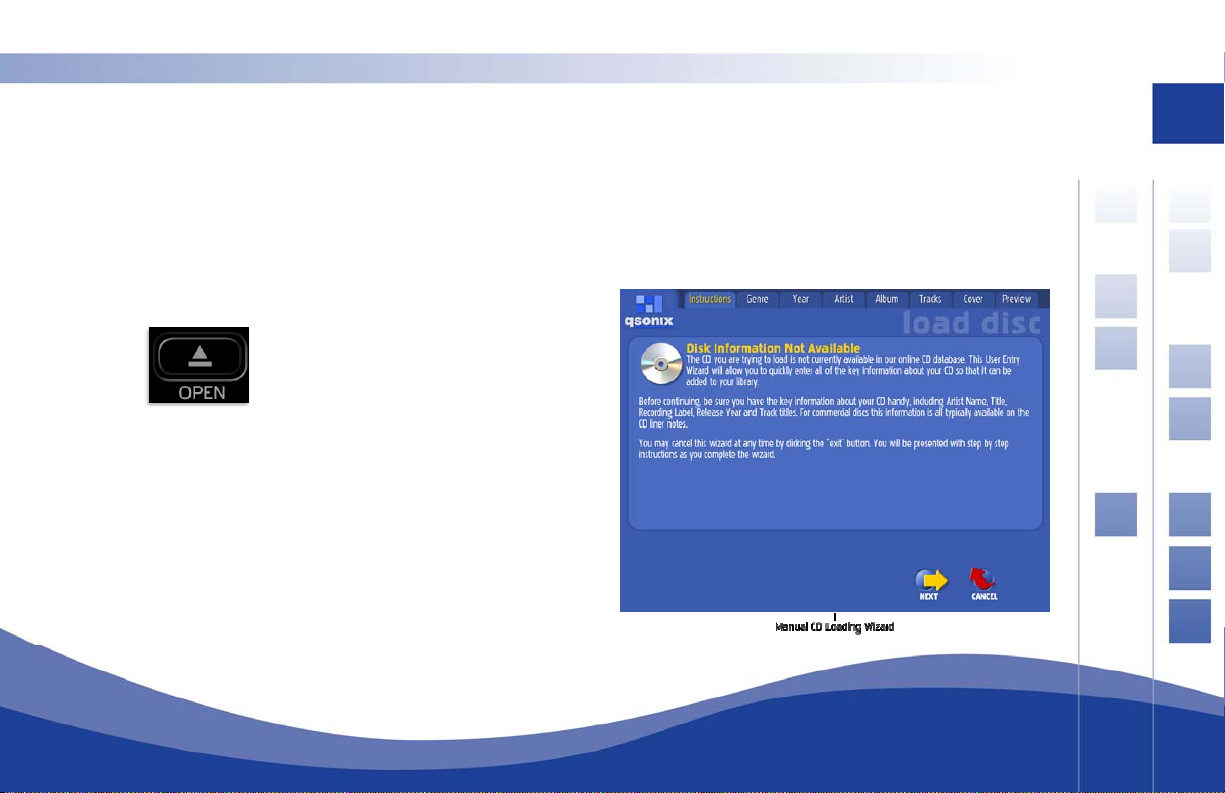
Using the C
In order to handle custom compilation CDs “e.g. discs you have burned or created yourself”, and to
handle discs not recognized by our system, the Q100 offers a quick and simple CD Loading Wizard
that will allow you to input your own information using the touchscreen. Locate a custom
compilation CD if you want to try this feature out.
Step 2 : Insert the CD you wish to load into the CD tray
Step 3: Follow the on-screen wizard that will allow you to
enter all of the necessary information about your CD. Begin by
pressing the “Next” button located in the lower right corner of
the “Disk Information Not Available” screen.
D Loading Wizard (compilation or not-found CDs)
Step 1 : Open the CD drive tray in the front of
the system by pressing the open tray button
located just below the CD tray on the right
side.
15
Page 16

Using your Qsonix System
Qsonix Menu Bar
The menu bar extends acro
access to important menus as well
as access to the preferences menu.
View Mode Menu
The first drop down menu view
the CDs loaded in your libra nu bar to open the menu,
and then press one of the view mode words to activate that view.
Album – View your library by Album Name
Artist – View yo
Genre – Browse
Cover – Browse
By Search – Sea
All – Browse all C
ss the top of the Qsonix application window and provides
that control what albums and songs you are viewing,
on the Tool Bar allows you to specify one of six ways to
ry. Simply press the button in the me
ur library by Artist Name
your library by Genre and Style
your library by CD cover/art
rch by Keyword
Ds in your library
Touch the Qsonix logo to
enter preference
& settings
16
16
Page 17
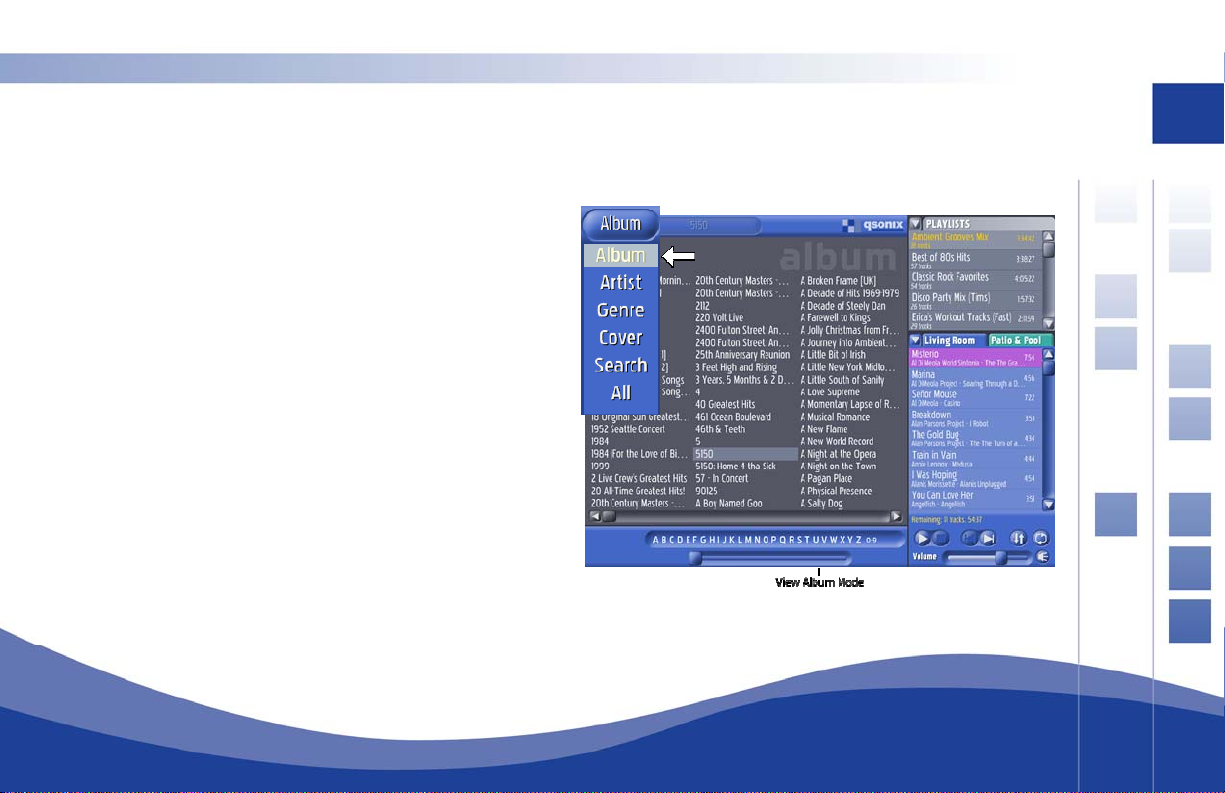
View Album
The View Album mode allows you to quickly navigate to a
specific album/CD in your library. After selecting this
view, you will be presented with a list of all of
albums/CDs in your library listed by album name.
browse to a partic
list.
ular album, simply press its name in the
To
Use the scroll bar
scroll through the
You may also use the alpha-sorter bar to quickly jump t
albums beginning with different letters of the alphabet.
For instance press the “A” to select an album name
beginning with “A”.
s at the bottom of the list to quickly
albums.
o
17
Page 18
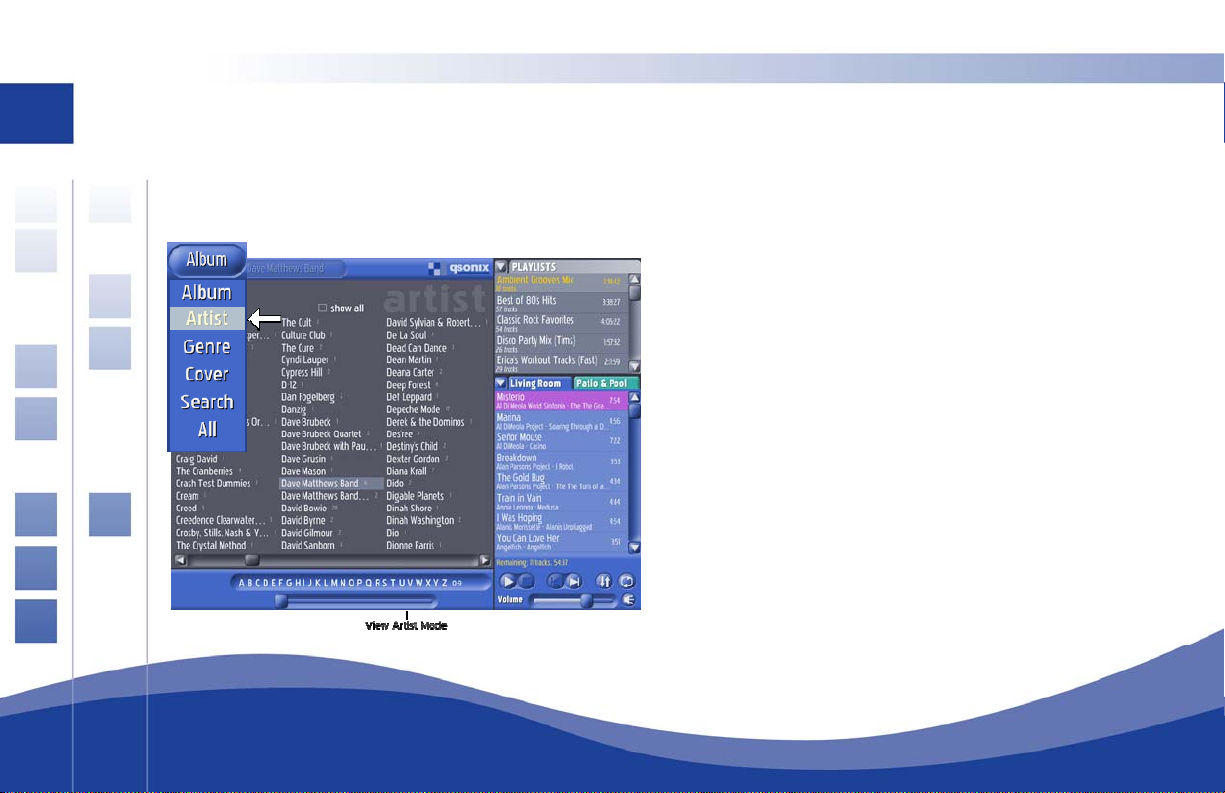
View Artist
18
The View Artist mode a rary. After
selecting this view, you will be presented with a list of all artists in your library listed by
rtist name. To browse all of the albums available by this artist, simply press on any
a
llows you to quickly navigate to a artist in your lib
artist name.
Enabling the “show all” checkbox will also include artists
t only appear on individual tracks of the albums/CDs,
tha
Use the scroll bars at the bottom of the list to quickly
scroll through the artist list.
You may also use the alpha-sorter bar to quickly jump to
artist names beginning with different letters of the
alphabet. For instanc
name beginning wi
The small number to t
number of
CDs available in your library by this artist.
e press the “A” to select an artist
th “A”.
he right of each artist indicates the
18
Page 19

View Genre
The View Genre
all of the albums/CDs that have been classified in a
given genre or style of music. Each CD is
automatically classified when you load it into you
library.
The left column indicates the “genre”, a quick
le-tap here will take you directly to all of the
doub
CDs in this genre. When available, the right column
will indicate “styles” that are available within the
genre currently selected, giving y
way to browse your music. Clicking on a “style” will
take directly to all of the CDs classified in this
genre/style combination.
Use the scroll bars and alph
the list to quickly scroll through available genres and styles.
mode allows you to quickly browse
ou a more refined
a sorter at the bottom of
19
Page 20

View Cover
20
The View Cover mode allows you to quickly navigate
an album/CD in your library. After selecting this view,
you will be presented with a list of all of the CDs in yo
library using t
you directly to a detailed view of that CD.
Use the “sort mode” button indicated by the arrow here to
control whether the albums are sorted by Artist name or
Album name.
Use the scroll bars at the bottom of the list to quickly
scroll through the cover list.
You may also use the alpha-sorter bar to quickly jump to
artist or album names begi
the alphabet. For instance press the “A” to select an
artist or album name (based on sort mode) beginning
with “A”.
he cover art. Clicking on any CD will take
nning with different letters of
to
ur
20
Page 21

View Search
The View Search mode allows you to quickly
search your entire library by keyword. After
selecting this view, an onscreen keyboard w
presented allowing you to type the keyword you
are lookin
Albums/CDs matching your search keywords will
be displayed accordingly in the Album Browser
area below. If there are no matches, you will be notified
with a “No matches found” dialog.
g for. After pressing the “Search” the
ill be
Remember: The search function only searches for a
to your search keyword in the “Artist Name”, “Album T
!
!
and “Track Title”.
example: A search for “Elvis
artist Elvis, and all albums with the word Elvis in the Al
Title or Track titles.
” will show all albums by the
m
atch
itle”
bum
21
Page 22

View All
22
The View All mode allows you to quickly navigate throu
your entire library. After selecting this view, you will be
presented with a list of all of the CDs in your library.
Use the “sort mode” button indicated by the arrow here to
control whether the albums are sorted by Artist name or
Album name.
Use the scroll bars at the bottom of the list to quickly
scroll through the cover list.
You may also use the alpha-sorter bar to quickly jump to
artist or album names beginning with different letters of
the alphabet. For instance press the “A” to select an
artist or album name (based on sort mode) beginning
with “A”.
gh
22
Page 23

Preferences
The “Preferences” system provides user control
system settings. To access this system, simpl
You will be presented with a series of tabs allowin
and preferences. Follow the on-screen help to ch
needs.
over
y click on the Qsonix logo in the menu bar.
all of the Q100’s preferences and
g you to specify important settings
ange these to fit your tastes and
23
Page 24

Album Browser Display
24
The albu
information about your albums. The Qsonix user
interface will display two albums at a time. If there are
at least two albums in your currently selected album
set, if t
will only see one album.
The Album Browser Display consists of the following
areas:
Artist & Album Name – The top of the album browse
shows the “Artist Name” and
Show Album Detail – Pressing this bu
area, including Release Year, Genres, Styl
Album Menu – Pressing this button will reveal a menu that allows you to perform other
functions to the selected album, including “delete album”, and “show track artists”.
tton will show more album details in the album browser
m browser display shows you detailed
here is only one album in your search filter, you
“Album Title”.
es and other relevant information.
r
24
Page 25

Fast Previe
the album browsers. You can start a preview at any time, even when you are lis
music in the “Now Playing” area. Qsonix will automatically fade any current playing mu
play several seconds of your preview track, then return to your already playing mu
starts the preview at 30% into the song making it easier to identify the song. You may stop
the preview while it is in progress by “double-tapping” the previewing track again, or you can
start previewing another track immediately by double-tapping on a
different track.
Album Cover and Details – By clicking on the cover art or using the
“Show Album Details” button, the system will show you are more
details about the CD, including; Release Year, Encoding Quality, Genre,
Styles and Other details.
w – The Fast Preview function is controlled by “double-tapping” any track in either of
tening to
sic, and
sic. Qsonix
25
Page 26

Track Number – The track number colum the
original CD that was loaded into the system.
Track Name – The “Track Name” column sed
on the original CD that was loaded into
Track Length – The “Track Length” colum
This information is used to calculate the ing indicators in the “Now
Playing” area.
n displays the track # for each song based on
displays the song title or track title of each song ba
the system.
n, displays the length in mm:ss format for each track.
duration and time remain
Using Cover Art with Drag and Drop
Drag and Drop - You can add the
area or “Now Playing” area by usin m into an
existing playlist in the “Playlists” area, or into the “Now Playing” area. The tracks will be
inserted at the point that you drop the album as indicated by the yellow insertion bar.
entire contents (all tracks) of an album to the “Playlists”
g the touchscreen to drag-and-drop the albu
26
26
Page 27

Add to End of Now Playing – You may also add an album to the end
of the current playlist by dropping the album, or track onto the footer
area (indicated in the yellow box of the Now Playing area. E.g. where
the “Tracks/Time Remaining indicator is located”
Album Browser C
The “Album Browser” Controls are located directly beneath
the “Album Browser” display area, and enable you to
navigate forward and backward through your current
album selection based on yo
display area indicates the Total n
current selection as well as the numbers of the currently
displayed albums. In this example “Albums 15 & 16 of
2089 total” are being displayed.
ontrols
ur view mode selection. The
umber of Albums in the
27
Page 28

Pag
ing through your Albums
Use
the “Next” button to page forward and view the next two albums in your selection and use the
“Back” to view the previous two albums.
Rem determined by the current Artist, Genre,
ember that the albums available to page through are
Cover or Search menu selections described above.
!
!
Cue Bar Control
28
The “cue bar” control provides a visual referen
the position
Changing
The “cue ba
the cue pos
location.
of the cue position knob.
current song position
r” can also be used to rapidly change locations in the current playing song. Simply drag
ition knob to a new location on the timeline and playback will change to the new
ce to the current playing song length, as indicated by
28
Page 29

Playlists Panel
The “Playlists” panel provides a
Qsonix’s playlist management and editing
nctions. A playlist is a collection of
fu
individual tracks or songs and associated
information necessary to play them back.
This includes artist name, song title, album
title and song duration. All playlists that
have been previously saved are displayed
here. If you have many playlists, you can
use the scroll bar to scroll through the list.
When naming playlists be sure to use nam
that are descriptive and provide you with a
context such as style, mood, event, etc.
ccess to all of
,
es
29
Page 30

Using your Playlists
To load a playlist into the “Now Playing” area for playback, simply drag the playlist from the “Playlist”
area to the “Now Playing” area. The playli
indicated by the yellow highlight. You may use
Playing Area” to clear an exis
playlist.
dding tracks to Playlists
A
ting playlist from the now playing area before dropping a saved
st will be inserted into an existing playlist at the point as
the “clear entire playlist” function in the “Now
30
Qsonix allows you to add tracks
This includes individual tracks or albums from the album browser, but also includes the ability to
drop items like an “artist”, or “genre” or
can drop the genre “Jazz” onto a playlist, and all albums/tracks in
playlist. Another example would be to
Beatles will be added to your playlist. Experiment with different drag-and-drop operations using the
touchscreen. The playlist area will indicate the number of tracks that each playlist contains. Y
can alway
Caution dropping an entire artist or genre may include a large number of tracks, and may take a few
!
!
seconds, or be undesirable.
s use the “Playlist Edit” function to make changes later.
to a playlist by drag-and-dropping items onto an existing playlist.
“style” from the various view mode lists. For example you
this genre will be added to the
drag the artist “Beatles” onto a playlist, and all music by the
ou
30
Page 31

laylist Management Functions
P
Rename – The rename functio
Simply highlight the playlist y
select the rename option. This will bring up
allowing you to enter a new name using th
“Ok” button to accept the new name or
Delete – Clicking the “Delete” button will bri
Be sure you want to delete the currently se
“Yes” button. If you are unsure, or do not want to delete the currently
selected, press “No”.
n allows you to rename an existing playlist.
ou want to rename, use the playlist menu to
th
e “Rename Playlist” dialog,
e onscreen keyboard. Click the
“Cancel” to leave the current name.
ng up a “Confirm Delete” dialog.
lected playlist, and click the
31
Page 32

New – Clicking the “New” button will bring up the “New Playlist” dialog.
Simply enter a descriptive name for the playlist that you would like to
create using the onscreen keyboard and press the ok button. The
playlist now appears in your “Playlist Area” in alphabetical order.
You may use the “Sort by Date” menu option in the playlist menu to sort
playlists by their creation date.
the
new
32
32
Page 33
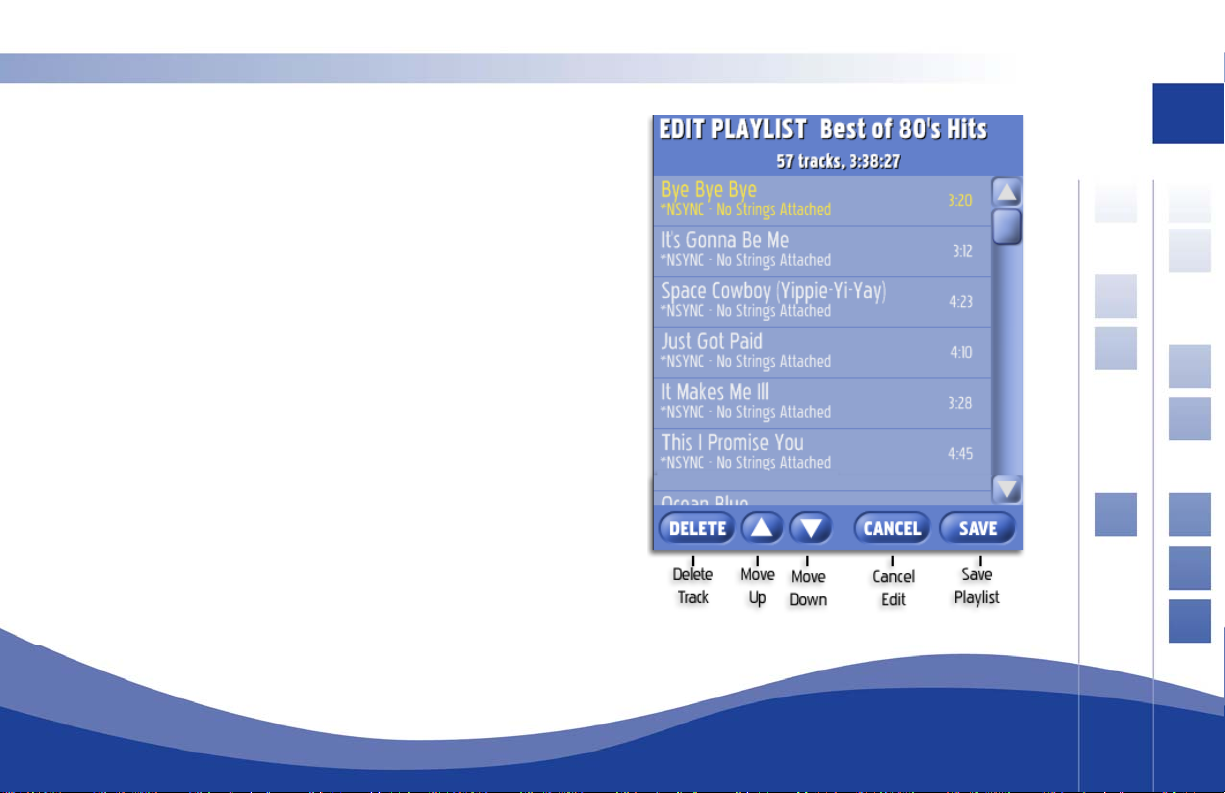
Edit– Clicking the “Edit Playlist” button fro
display the “Edit Playlist” interface, allowing you to see and edit the
contents of your playlist. From here you can re-arrange the order
of songs, delete songs, and even add new songs using drag-anddrop.
You will receive a warning if you attempt to perform a function that
not allowed, or exceed the playlist size limit of 3000 tracks.
is
sing drag-and-drop
U
ou can move any track in the playlist by dragging it to a new
Y
location, indicated by the yellow insertion bar. You may also freely
add tracks from the “Album browser” directly into the edit list view.
m the Playlist menu will
33
Page 34

Edit Playlist Functions
34
Delete – Clicking the “Delete
Move Up – Clicking the “Mov e
playlist.
Move Down – Clicking the “Move Down” button will move the currently selected song down one
position in the playlist.
Cancel – Click the “Cancel” button to exit the edit playlist interface without saving any changes you
made to your playlist.
Save – Click the “Save” button to exit the edit playlist interface saving all of your changes.
” button will delete the currently selected song from the playlist.
e Up” button will move the currently selected song up one position in th
34
Page 35

Now Playing Panel
The “Now Playing” panel controls the songs and song order
used for playback. Any music that you want to play must be
d up in this area for playback. The “Now Playing” list
queue
can be made up of any combination of “tracks” and “playlists”.
This area also provides important information about your
“Now Playing” playlist, such as total number of tracks, total
duration, as well as nu
the entire list.
Current Track – The purple highlighted track is the currently
playing track and will only be highlighted when you are in
or Pause mode. Qsonix will keep this item in the center
Play
of the list whenever possible. Note that previously played
ems will appear dimmed in a light grey color.
it
sertion Point – When using the drag-and-drop features to
In
dd items to your playlist, a yellow horizontal line will
a
mber of tracks and time remaining in
35
Page 36

indicate where you are inse
Zone 1 & Zone 2 Playlist Tabs – These tabs will toggle between two separate playlists that co
what tracks are played in each zone output of the system. Two zone playback is only possible
when con
!
!
will change colors to indicate which zone you are controlling. Each zone has it’s one playback
controls and individual playlist that can be independently controlled.
Remaining / Total Indicator – Displays the number of remaining tracks and remaining total time left
to play in your playlist. This display updates by counting down as you move through your playlist.
This display rotates to
is updated when you add or delete songs and playlists.
Drag and Drop – You can easily move any song in the playlist by dragging it to a new location,
indicated by the yellow insertion bar. You may freely add tracks or entire albums from the album
browser directly to the Now Playing list for playback.
figured for analog audio output (see preferences / advanced audio). The user-interface
rting the new items into the “Now Playing” list.
indicate the total number of tracks and total playtime for the entire playlist. It
ntrol
36
36
Page 37

Now Playing Menu
You may also access key functions in the “Now Playing” area using the Now Playing menu
including:
Delete Track from Playlist – Will delete the currently selecte
Save All to New Playlist – This is a very handy feature that will
playlist from the current “Now Playing” list. You will be pro
Enter a name and click “Ok” to save. This feature can also
the “Playlist” area, by adding them both to the “Now Playing” a
Playlist”.
Clear Played Tracks – Will remove any tracks that have alread
playing track).
Clear Entire Playlist – Will remove all tracks from the “Now Pl
clear your playlist. This will not delete a playlist
from disk.
Hide Album Covers – This toggles whether mini album
you have saved in the playlists area or remove files
d track from the “Now Playing” List.
mpted to enter a playlist name.
be used to merge two playlists from
aying” area. This is the quickest way to
covers are displayed in the Now Playing List.
allow you to create a new
rea, and then “Saving to a New
y been played (above the current
37
Page 38

Transport Controls
The Qsonix transport area provides control over song playback functions such as Play,
Stop, Next Track, etc. Users of other audio playback devices and software should find
easy to operate Qsonix’s transport controls.
it
38
Play/Pause – The “Play” button is available when you are in stop or pa
resume playback of the current track. The button will turn into a pause button during playback, to
pause playback, click the button again.
Stop – The “Stop” button will stop playback of the current track immediately. Playback can be
resumed by pressing the Play button.
Back Track – The “Back Track” button will start playing the previous track in the “Now Playing” list
“Repeat Mode” is enabled and you press the “Back Track”’ button at the beginning of the list, you wil
automatically loop to the last track in the playlist
Next Track – The “Next Track” button will start playing the next track in the “Now Playing” List. If
“Repeat Mode” is enabled and you press the “Next Track” button and you are on the last track of the
playlist, you will automatically loop to the first track in the playlist
use mode and will begin or
. If
l
38
Page 39

Shuffle Playlist – Th
current playing track at the top of the list. You can shuffle the list at any time.
t Mode – The “Repeat Mode” button is a toggle button that controls what happens when
Repea
you use the track next and track back buttons to move through the When “Repeat Mode” is
enabled, and you have selected “Play”, Qsonix will continue playing each track in your “Now
Playing” list and automatically repeat from the beginning when it reaches the end of
track.
e “Shuffle” button will randomize your current playlist, and place your
the last
39
Page 40

Volume &
The volume and mute controls are located just below the transport
controls and the Now Playing area.
Mute Controls
Adjusting Playback Volume
To adjust the volume of the currently pl
desired volume level. Moving the knob to the right will increase volume, moving to the left will
decrease the volume.
aying song, simply drag the volume control knob to the
Using the Mute Control
The “mute button” toggles back and forth between mute and un-mute modes. Qsonix will
automatically use your SoftFade™ settings to softly
fade the volume up or down.
40
40
Page 41

Fre
quently Asked Questions
Q; How do I use the SPDIF digital output on the Q100?
to the system preferences menu by clicking on the Qsonix logo in the menu Bar. Be sure you are on
A: Go
layback” tab, and click the “Advanced Settings” button. On this screen you will see the button
the “P
es for “Analog” or “Digital”. Choose Digital, and be sure your Q100 is connected to a an appropriate
choic
digital capable sound system. NOTE: The Q100 can only output one zone of digital output, you must use
analog mode if you are using both zone 1 and zone 2 outputs.
Q: My system has stopped responding or is not operating properly, what should I do?
A: If you experience any problems, you should reset the system by using the “reset” function in the
“preferences/Information” screen, or recycle the power on the system. All music data, playlists and
preferences are stored immediately, so you should NOT experience a loss of information.
Q: Why doesn’t my Q100 always recognize my CDs?
A: The CD recognition and data service is a comprehensive system, however given the number of CDs, slight
variations and multiple releases of similar CDs, you are bound to experience a “Not Found” situation. Use
the CD entry wizard to enter the information yourself.
41
Page 42

Contacting Customer Support
If you have additional questions
contact your installer/dealer, or f ebsite at
http://www.qsonix.com/support
other useful information.
or comments regarding Qsonix or your Q100 system be sure to
eel free to visit the support area our w
We maintain a list of Frequently Asked Questions and Answers and
42
The Qsonix firmware will be updated with new features and bug fixes periodically, so be sure to
our news page at
features and options.
Qsonix is Copyright Qsonix, Inc © 2002-2005 All rights reserved.
Version 3,01
http://www.qsonix.com/news or contact your reseller to learn more about new
visit
42
 Loading...