

Page 1
USER’S MANUAL
1
Page 2

2
Table of Contents
USER’S MANUAL
PAGE
1 General Introduction
2 Remote Controler........................................................................................................................................ 6
2.1 Appearance
2.2 Key Definition
3 Working Modes & Menu Structure......................................................................................................... 9
3.1 Working Modes................................................................................................................................... 9
3.2 Menu Structure................................................................................................................................... 9
3.2.1 Installation Menu................................................................................................................ 10
3.2.2 Channel Menu.....................................................................................................................10
3.2.3 Setting Menu....................................................................................................................... 11
3.2.4 Utility Menu.......................................................................................................................... 11
3.2.5 Game Menu......................................................................................................................... 11
3.2.6 Upgrade Menu.................................................................................................................... 12
3.2.7 MultiMedia Menu................................................................................................................ 12
4 DTV Mode
....................................................................................................................................................
..................................................................................................................................
.........................................................................................................................................
......................................................................................................................................
13
5
6
7
4.1 System Initialization......................................................................................................................... 13
4.2 Entering the DVB System and Power On/Off.............................................................................. 13
4.3 Volume Adjustment and Mute Control.......................................................................................... 14
4.4 TV/Radio Switching..........................................................................................................................14
4.5 Channel Switching........................................................................................................................... 15
4.6 Program Info Display....................................................................................................................... 18
4.7 Program Recall (Recall to the previous channel)........................................................................18
4.8 Program Language and Left/Right Channels Switching............................................................ 18
4.9 Electronic Program Guide (EPG).................................................................................................. 19
4.10 Teletext...............................................................................................................................................22
4.11 Subtitle............................................................................................................................................... 22
4.12 TTX Subtitle...................................................................................................................................... 23
5 Multimedia Mode....................................................................................................................................... 25
5.1 Movie
5.2 ISO
..................................................................................................................................................
......................................................................................................................................................
27
28
5.3 Music
5.4 Photo
..................................................................................................................................................
..................................................................................................................................................
28
29
Page 3

USER’S MANUAL
3
5.5 Native32 Games...............................................................................................................................31
5.6 Record Manager...............................................................................................................................31
5.7 Disk Manager....................................................................................................................................33
5.8 EBook................................................................................................................................................. 35
6 Network Mode
............................................................................................................................................
36
6.1 News..................................................................................................................................................37
6.2 YouTube.............................................................................................................................................38
6.3 Dailymotion........................................................................................................................................40
6.4 Native32 Game.................................................................................................................................40
6.5 Photo.................................................................................................................................................. 43
6.6 Google Map.......................................................................................................................................46
6.7 Weather............................................................................................................................................. 48
6.8 IPTV....................................................................................................................................................49
7 Main Menu...................................................................................................................................................52
7.1 Installation
7.1.1 Antenna Setting
7.1.2 Satellite List
7.1.3 Transponder List
7.1.4 Motor Setting
.........................................................................................................................................
..................................................................................................................
.........................................................................................................................
.................................................................................................................
.......................................................................................................................
52
52
54
55
57
7.1.5 Limit Setup
7.2 Channel
..............................................................................................................................................
6.1.1 Channel Manager
7.2.1 Channel Editor
7.2.2 Favorite List
7.2.3 Channel Setup
7.3 Setting
................................................................................................................................................
7.3.1 Preference
7.3.1 Preferred Subtitle
7.3.2 Hard Hearing
7.3.3 Preferred Audio
7.3.4 PVR Config
7.3.6 SPDIF
7.3.7 Aspect Ratio
7.3.8 Video Output
7.3.9 Video Resolution
...........................................................................................................................
...............................................................................................................
....................................................................................................................
.........................................................................................................................
....................................................................................................................
...........................................................................................................................
................................................................................................................
.......................................................................................................................
...................................................................................................................
..........................................................................................................................
...................................................................................................................................
........................................................................................................................
.......................................................................................................................
.................................................................................................................
58
59
59
61
63
65
65
66
67
67
68
69
70
71
71
72
7.3.10 HDMI Color Space
.............................................................................................................
73
Page 4

USER’S MANUAL
4
7.3.11 HDMI Deep Color............................................................................................................... 74
7.3.12 Ethernet Config................................................................................................................... 74
7.3.13 Factory Reset......................................................................................................................77
7.3.14 Version................................................................................................................................. 77
7.3.15 MultiMedia Setting...............................................................................................................78
7.3.15.1 MP4 Subtitle Language................................................................................................79
7.3.15.2 MP4 Subtitle CodePage..................................................................................................79
7.3.15.3 EBook Language..............................................................................................................80
7.3.15.4 EBook CodePage.............................................................................................................81
7.3.15.5 MovieRepeat.MusicRepeat and PhotoRepeat............................................................ 81
7.3.15.6 BGmusic............................................................................................................................ 81
7.3.15.7 Slide Time..........................................................................................................................82
7.3.15 Effect item.............................................................................................................................82
7.4 Utility...................................................................................................................................................83
7.4.1 Timers...................................................................................................................................83
7.5 Game..................................................................................................................................................85
7.5.1 Box Man............................................................................................................................... 85
7.5.2 Tetris..................................................................................................................................... 86
7.5.3 Hit Rat.................................................................................................................................. 87
7.5.4 Go Bang............................................................................................................................... 88
7.5.5 Sodoku................................................................................................................................. 89
8 Record & Timeshift
...................................................................................................................................
91
8.1 Record................................................................................................................................................91
8.2 Timeshift............................................................................................................................................ 93
8.2.1 Timeshift: Auto.................................................................................................................... 94
8.2.2 Timeshift: Pause................................................................................................................. 94
8.2.3 Timeshift: Off....................................................................................................................... 94
9 Upgrade....................................................................................................................................................... 95
9.1 USB/Card Upgrade
..........................................................................................................................
95
9.2 OTA Upgrade
9.3 FTP Upgrade
....................................................................................................................................
.....................................................................................................................................
97
98
Page 5

USER’S MANUAL
5
1 GENERAL INTRODUCTION
Remote Control
Working Modes & Menu Structure
DTV Mode
Multimedia Mode
Network Mode
Main Menu
Record & Timeshift
Upgrade
This document is an operation manual for users to operate SPHE1512 DVB-S2 STB products.
It includes these chapters:
Page 6
USER’S MANUAL
6
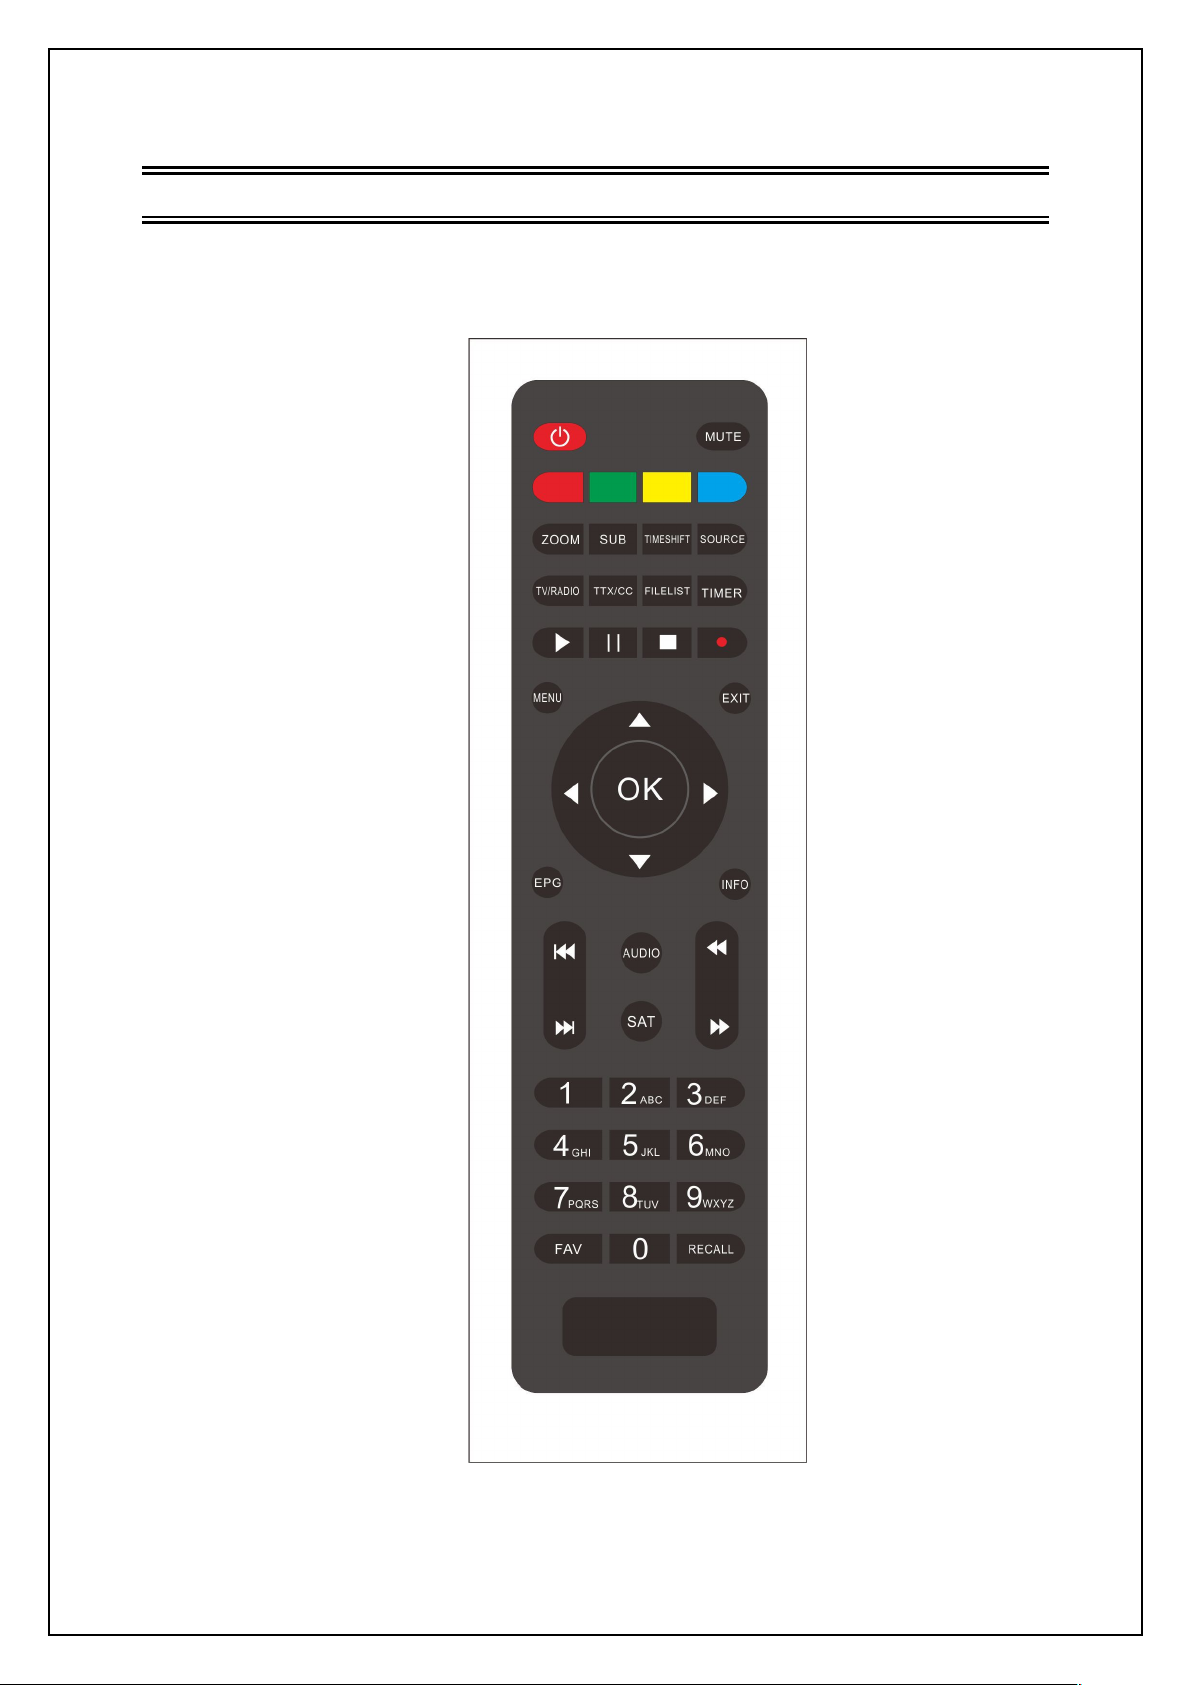
2 REMOTE CONTROLER
2.1 Appearance
Page 7
7
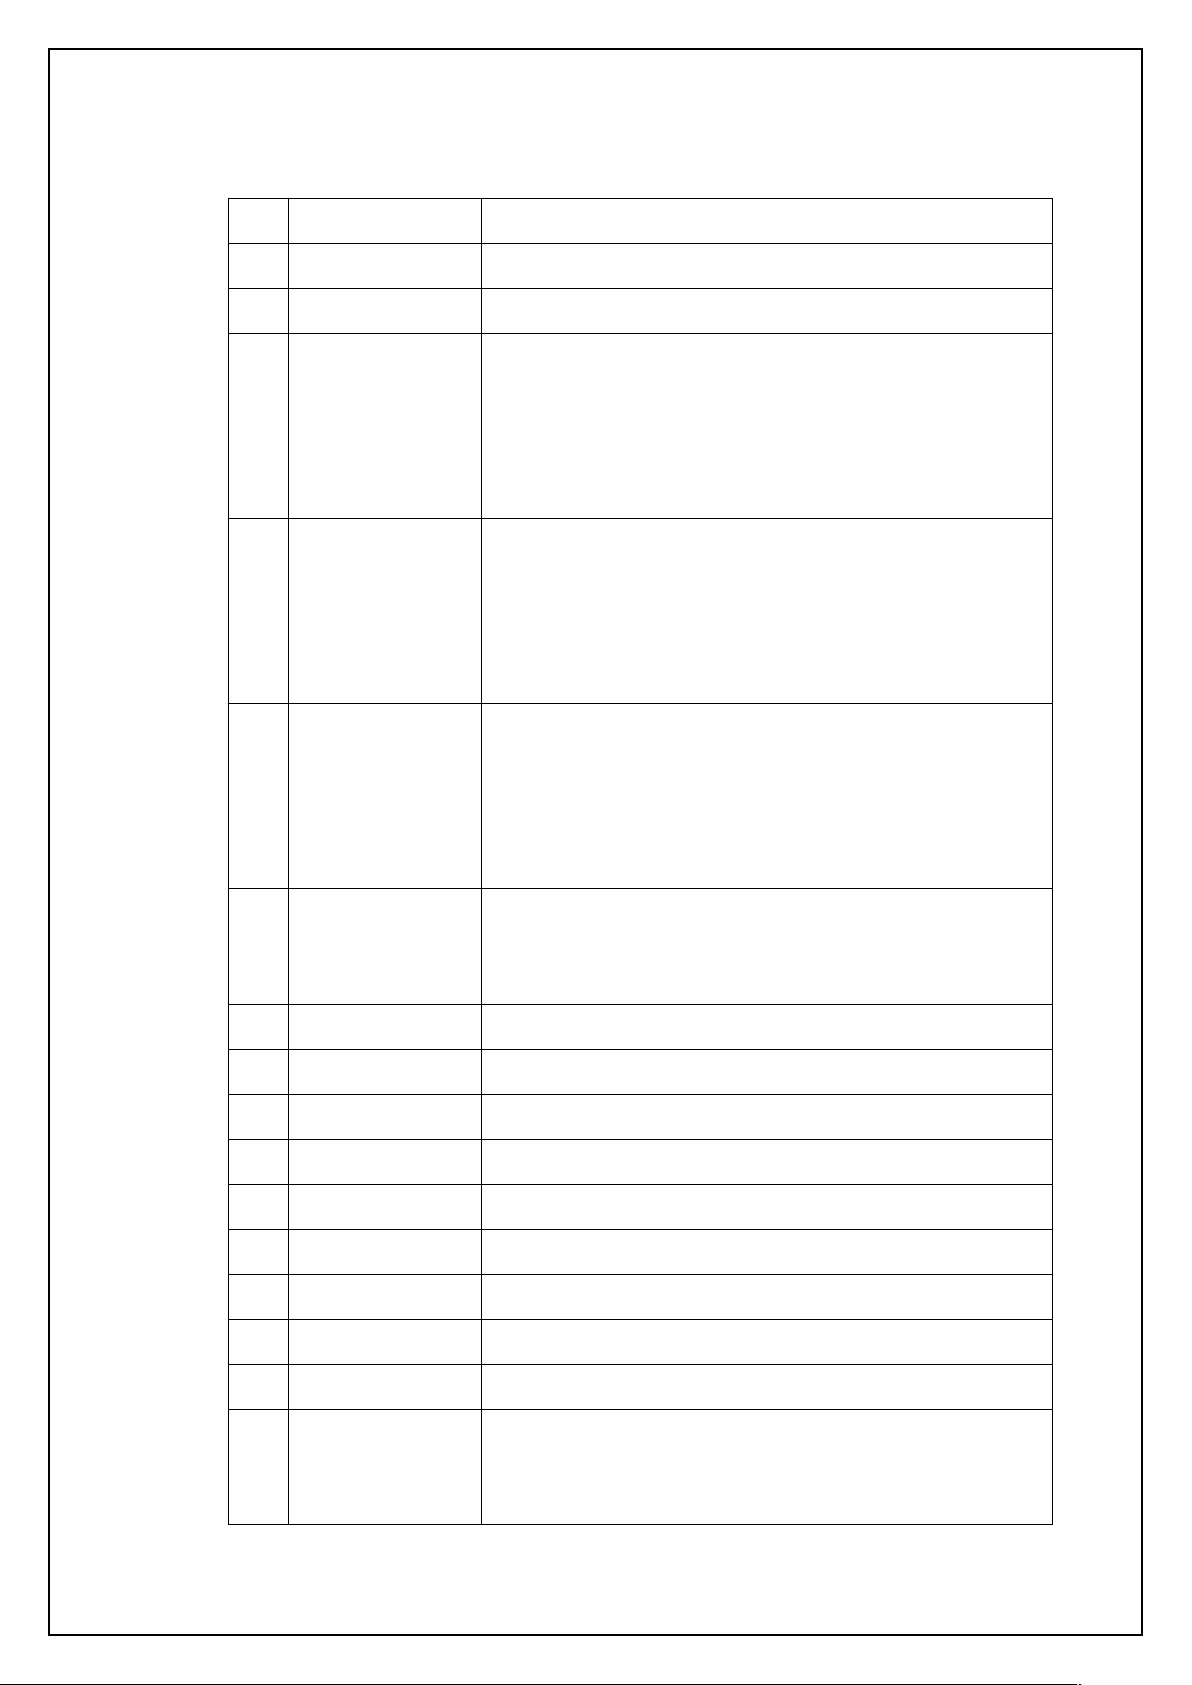
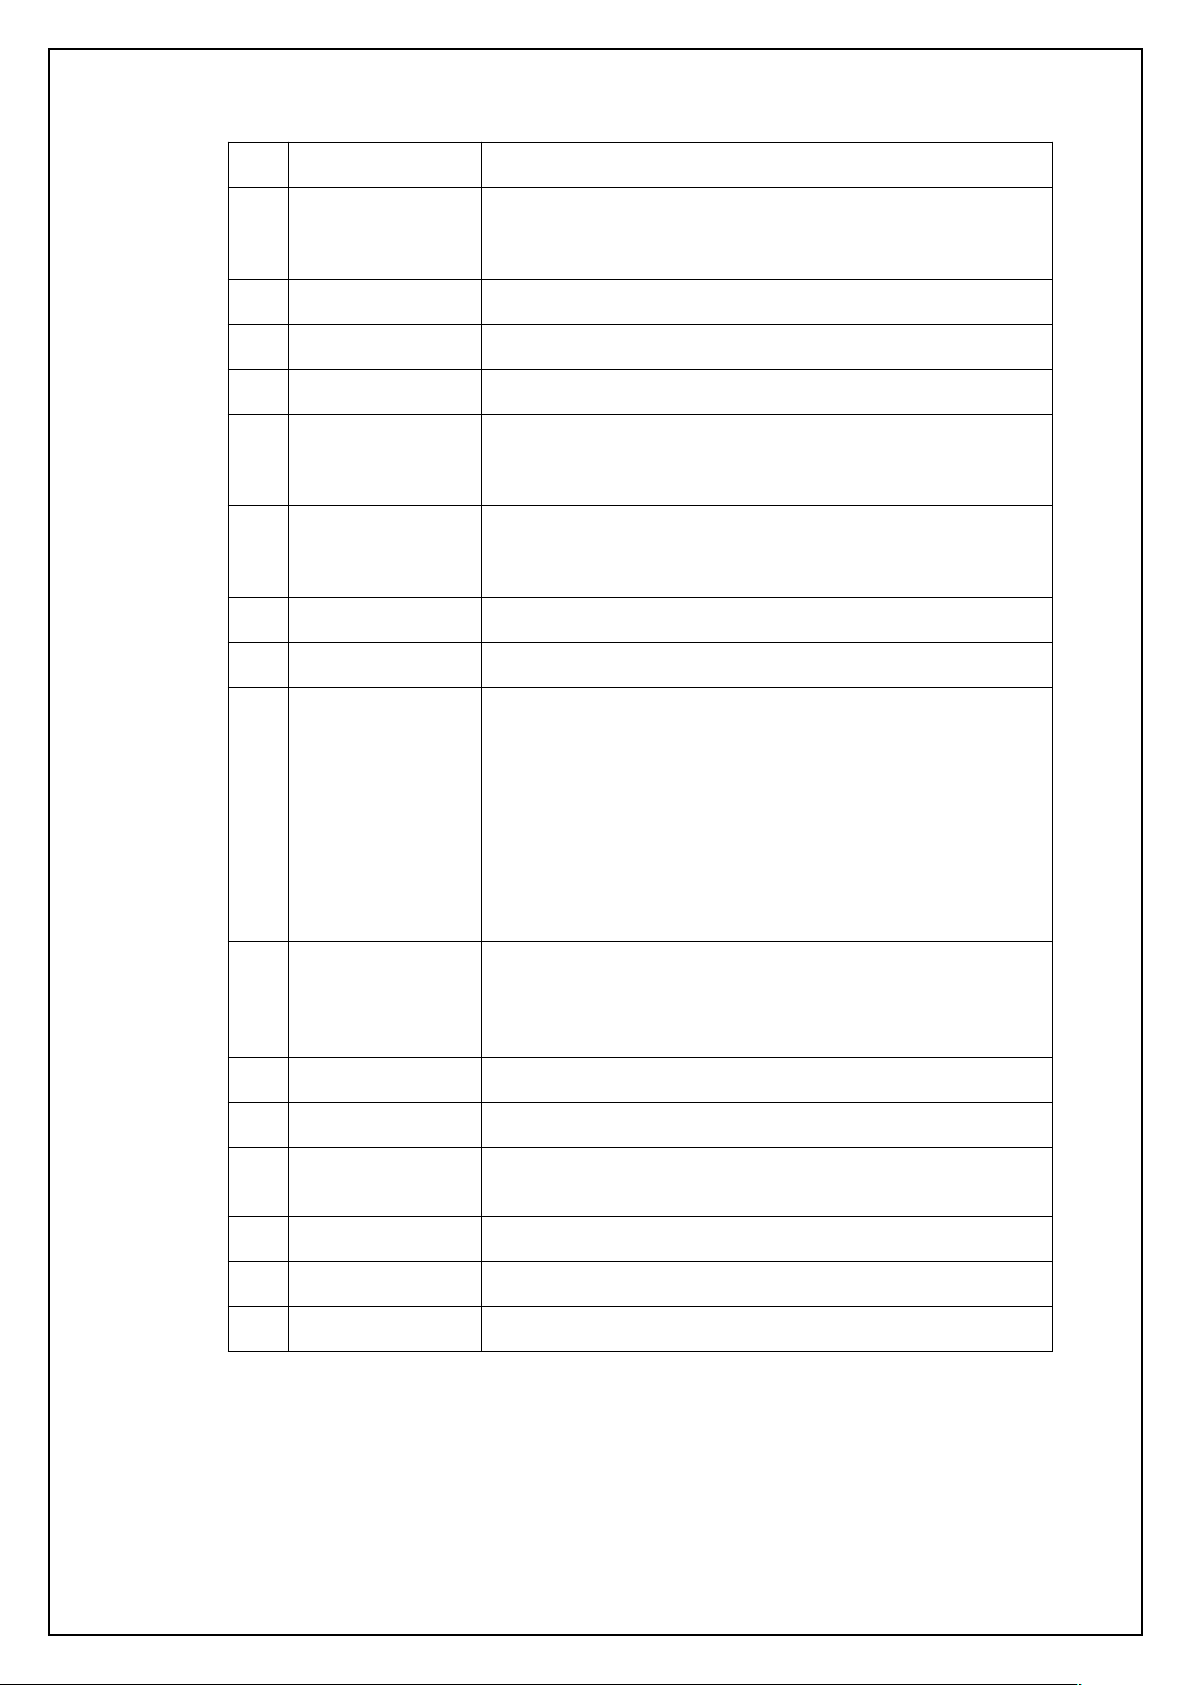
2.2 Key Definition
No. Key Description
Switch Daily and Weekly modes while in EPG state.
Lock or unlock the selected program while in program
Delete all the scheduled programs while in the scheduled
Schedule or record the current program while in EPG state.
Delete the selected program while in program management
Delete the selected scheduled program while in the
Go to the previous day while in the Weekly mode of EPG.
Ignore the selected program while in program management
Edit the selected scheduled program while in the scheduled
Go to the next day while in the Weekly mode of EPG.
Rename the selected program while in program
Pause multimedia playback.
Start the Timeshift function while in the record state or the
1 POWER Switch of power supply.
2 MUTE Mute control.
3 Red function key
management state.
program list.
4 Green function key
state.
USER’S MANUAL
scheduled program list.
5 Yellow function key
state.
program list.
6 Blue function key
management state.
7 ZOOM Enter the zoom state.
8 SUBTITLE Enter the program subtitle selection menu.
9 TIMESHIFT Set a method to start the timeshift function
10 SOURCE Switch of Multi-media mode and DTV mode.
11 TV/RADIO Switch of TV mode and radio mode.
12 TTX Enter Teletext page.
13 FILELIST Enter Record FileList.
14 TIMER Enter Timers menu, you can manage scheduled programs.
15 PLAY Play multimedia files.
16 PAUSE
Timeshift function is in Pause mode.
Page 8
USER’S MANUAL
8
Stop multimedia playback.
Stop recording.
Left/right direction keys.
Volume up/down.
Up/down direction keyw
Next/previous channel.
Show or hide program info.
Show the information of the selected item while in EPG
state.
Show the detailed information of the being played media file
while in multimedia playback state.
Show the record information or record list while in record
mode.
Zoom in or out images when viewing images.
Fast Rewind or Fast Forward while in multimedia playback
state.
Go to the previous or next media file to play while in multimedia
playback state.
No. Key Description
17 STOP
18 REC Record the current program while in full screen playing state.
19 MENU Enter or exit the main menu.
20 EXIT Exit the current menu.
21 LEFT/RIGHT
22 UP/DOWN
23 OK Enter menu.
24 EPG Enter or exit EPG page.
25 INFO
26 F.R & F.F
27 AUDIO Enter audio menu to change audio language, channel, etc.
28 SAT SWITCH Sateillite.
29 PREV & NEXT
30 NUMBER Number keys.
31 FAV Favorite program list.
32 RECALL Recall to the previous channel.
Page 9
USER’S MANUAL
9
3 WORKING MODES & MENU STRUCTURE
3.1 Working Modes
3.2 Menu Structure
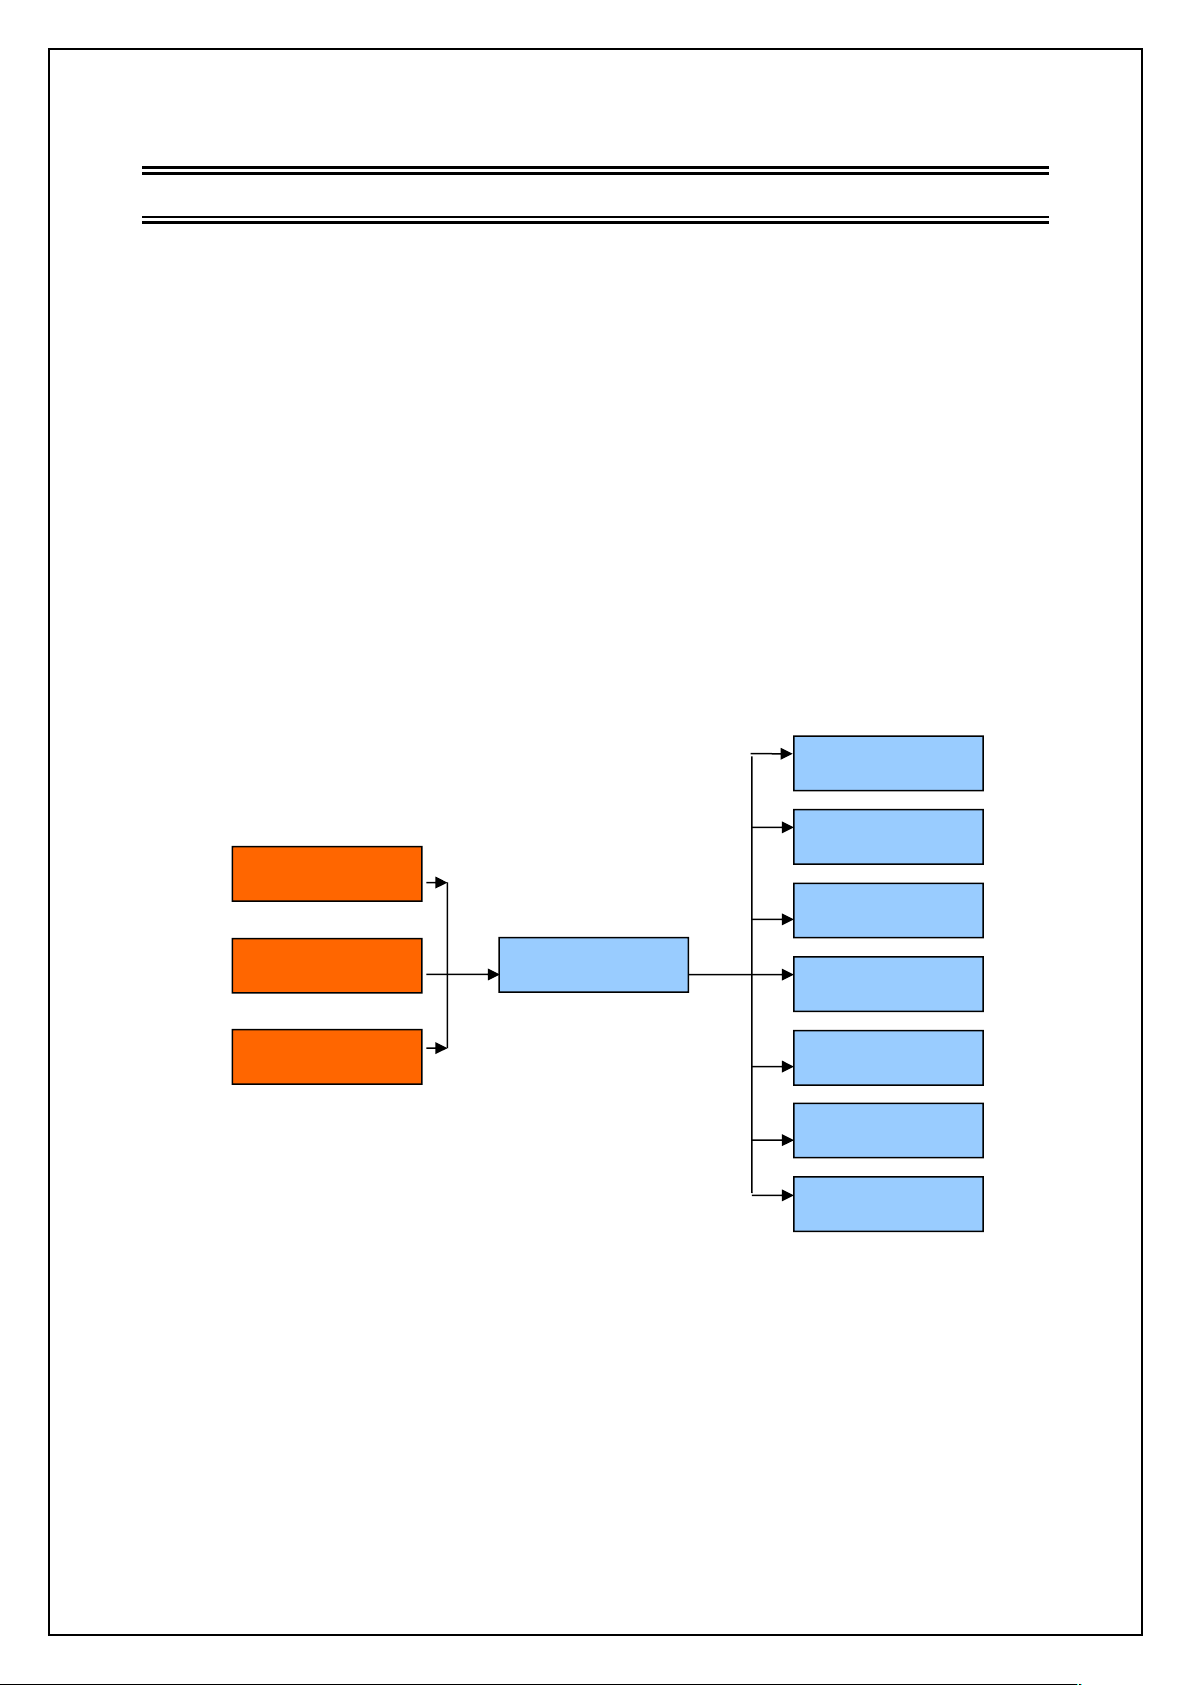
Main Menu
DTV Mode
Multimedia Mode
Metwork Mode
Installation
Channel
Setting
Utility
Game
Upgrade
Multi Media
At present the system has three working modes: DTV Mode, Multimedia Mode and Network
Mode. In DTV mode you can watch digital TV programs. In Multimedia mode you can play
multimedia files and games, record files, manage disks, and so on. In Network mode you can
browse information from network.
After power on, the system will auto enter the DTV mode. Pressing SOURCE key can switch
among the three working modes.
The figure below shows the structure of the system’s main menu:
Main Menu Structure
Page 10
10
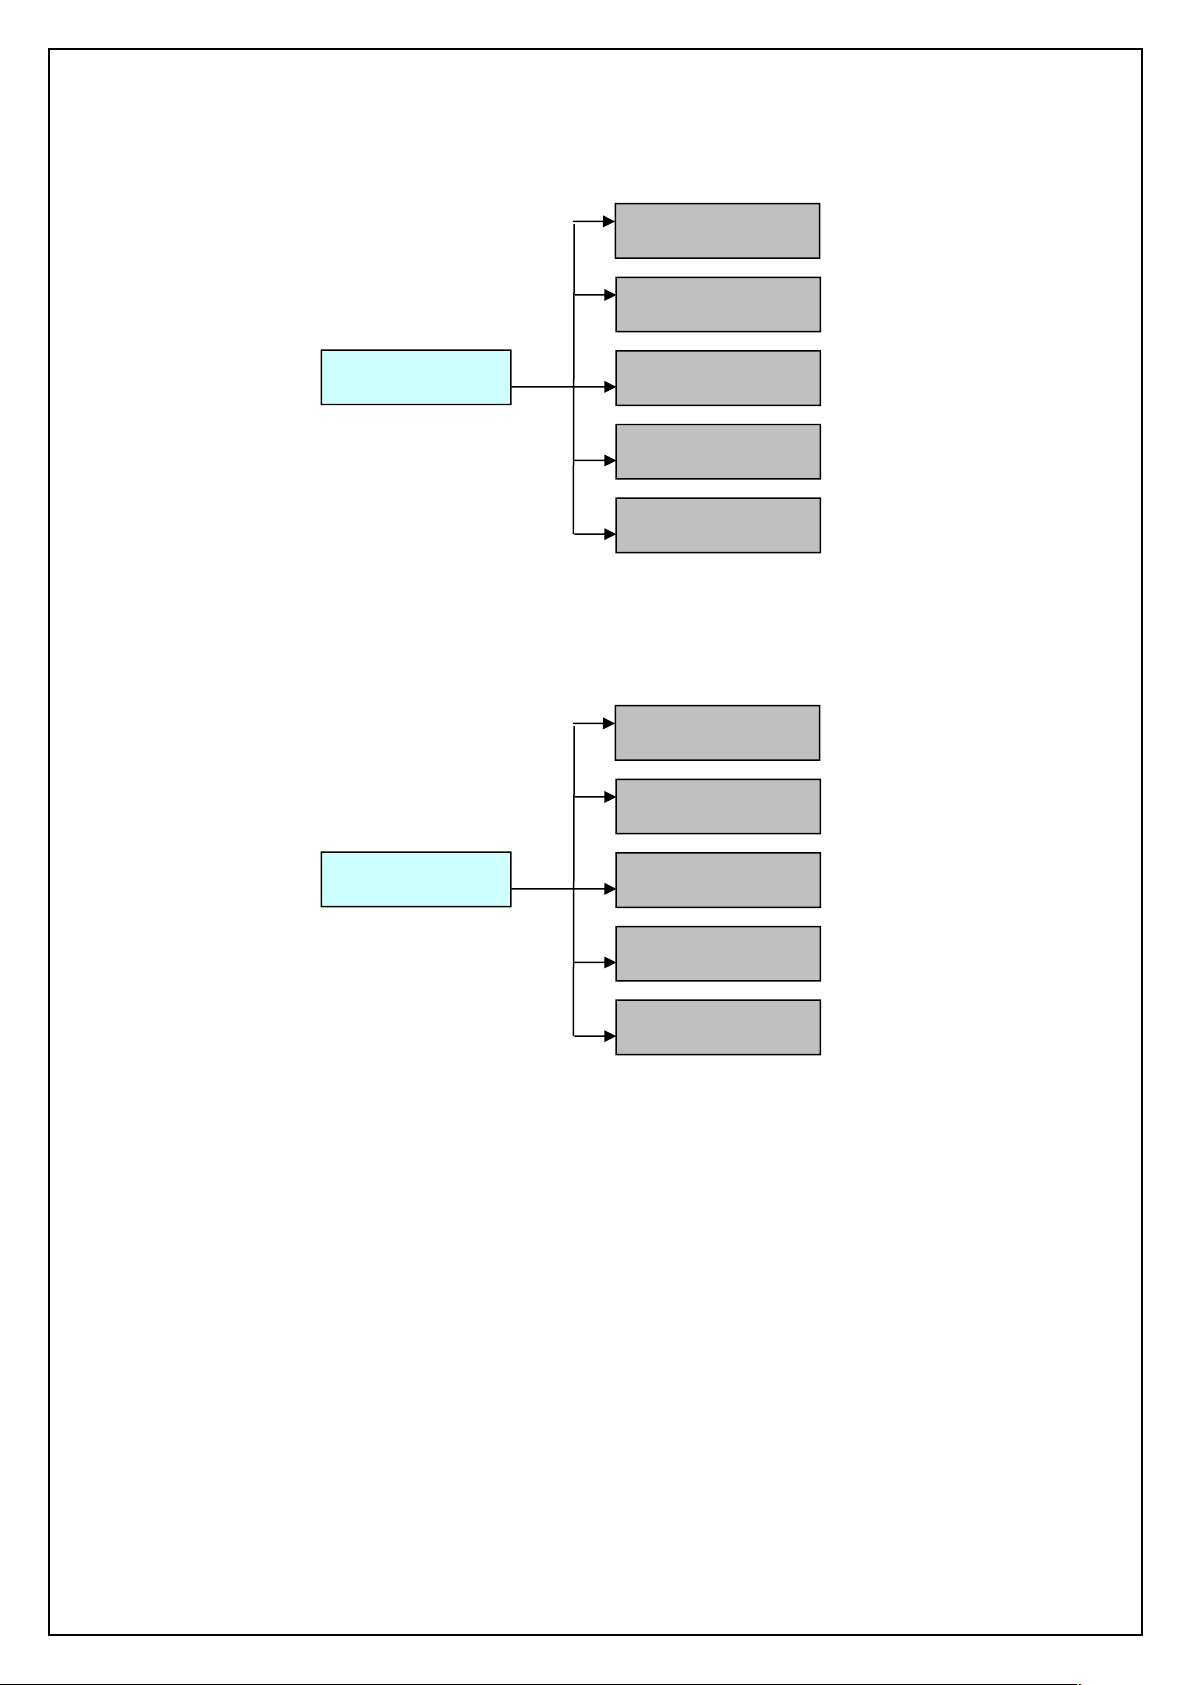
3.2.1 Installation Menu
Installation
Antenna Setting
Satellite List
Transponder List
Motor Setting
Limit Setup
Installation Menu
3.2.2 Channel Menu
Channel
Channel Manager
Channel Editor
Favorite List
Channel Setup
Delete All Channel
USER’S MANUAL
Channel Menu
Page 11
USER’S MANUAL
11
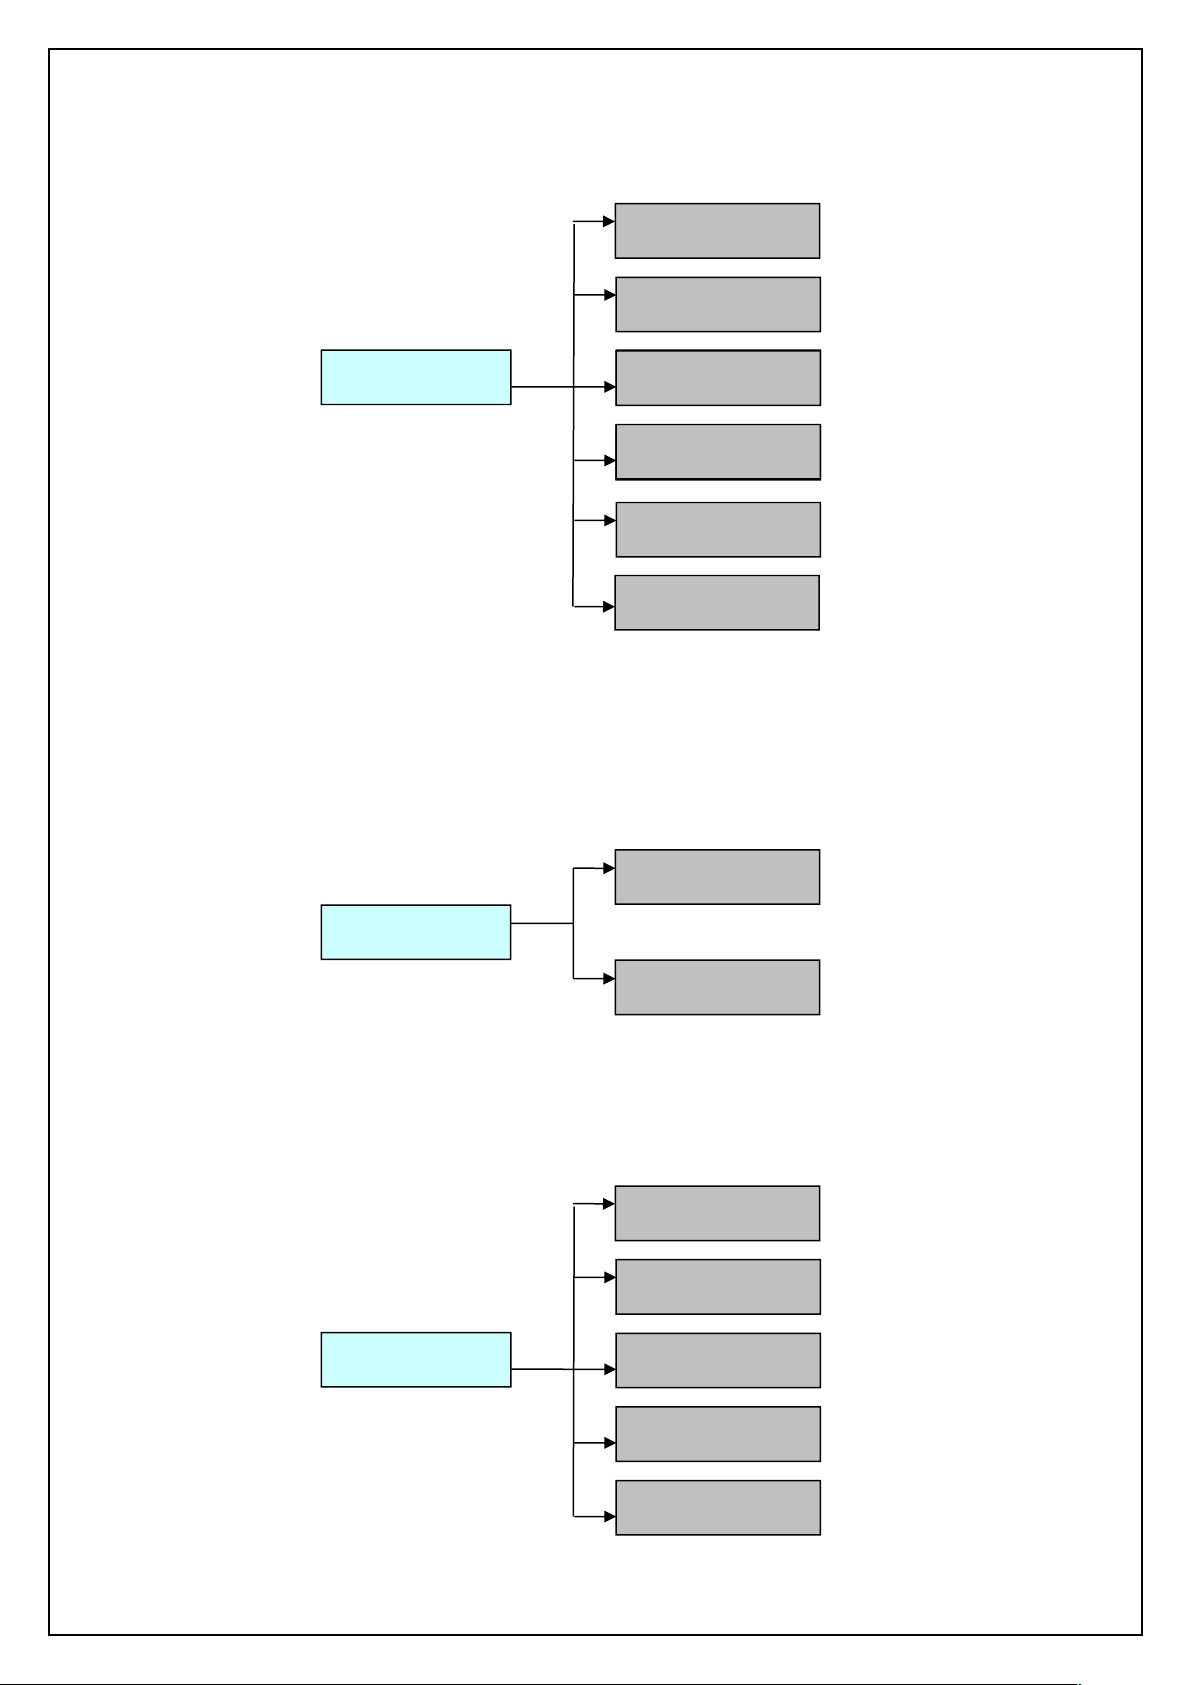
3.2.3 Setting Menu
Setting
Preference
AV
PVR Config
MultiMedia Setting
System
Ethernet Config
3.2.4 Utility Menu
Timers
Smartcard
Utility
3.2.5 Game Menu
Game
Box Man
Tetris
Hit Rat
Go Bang
Sudoku
PVR Setting
Ethernet Config
Setting Menu
Utility Menu
Page 12
12
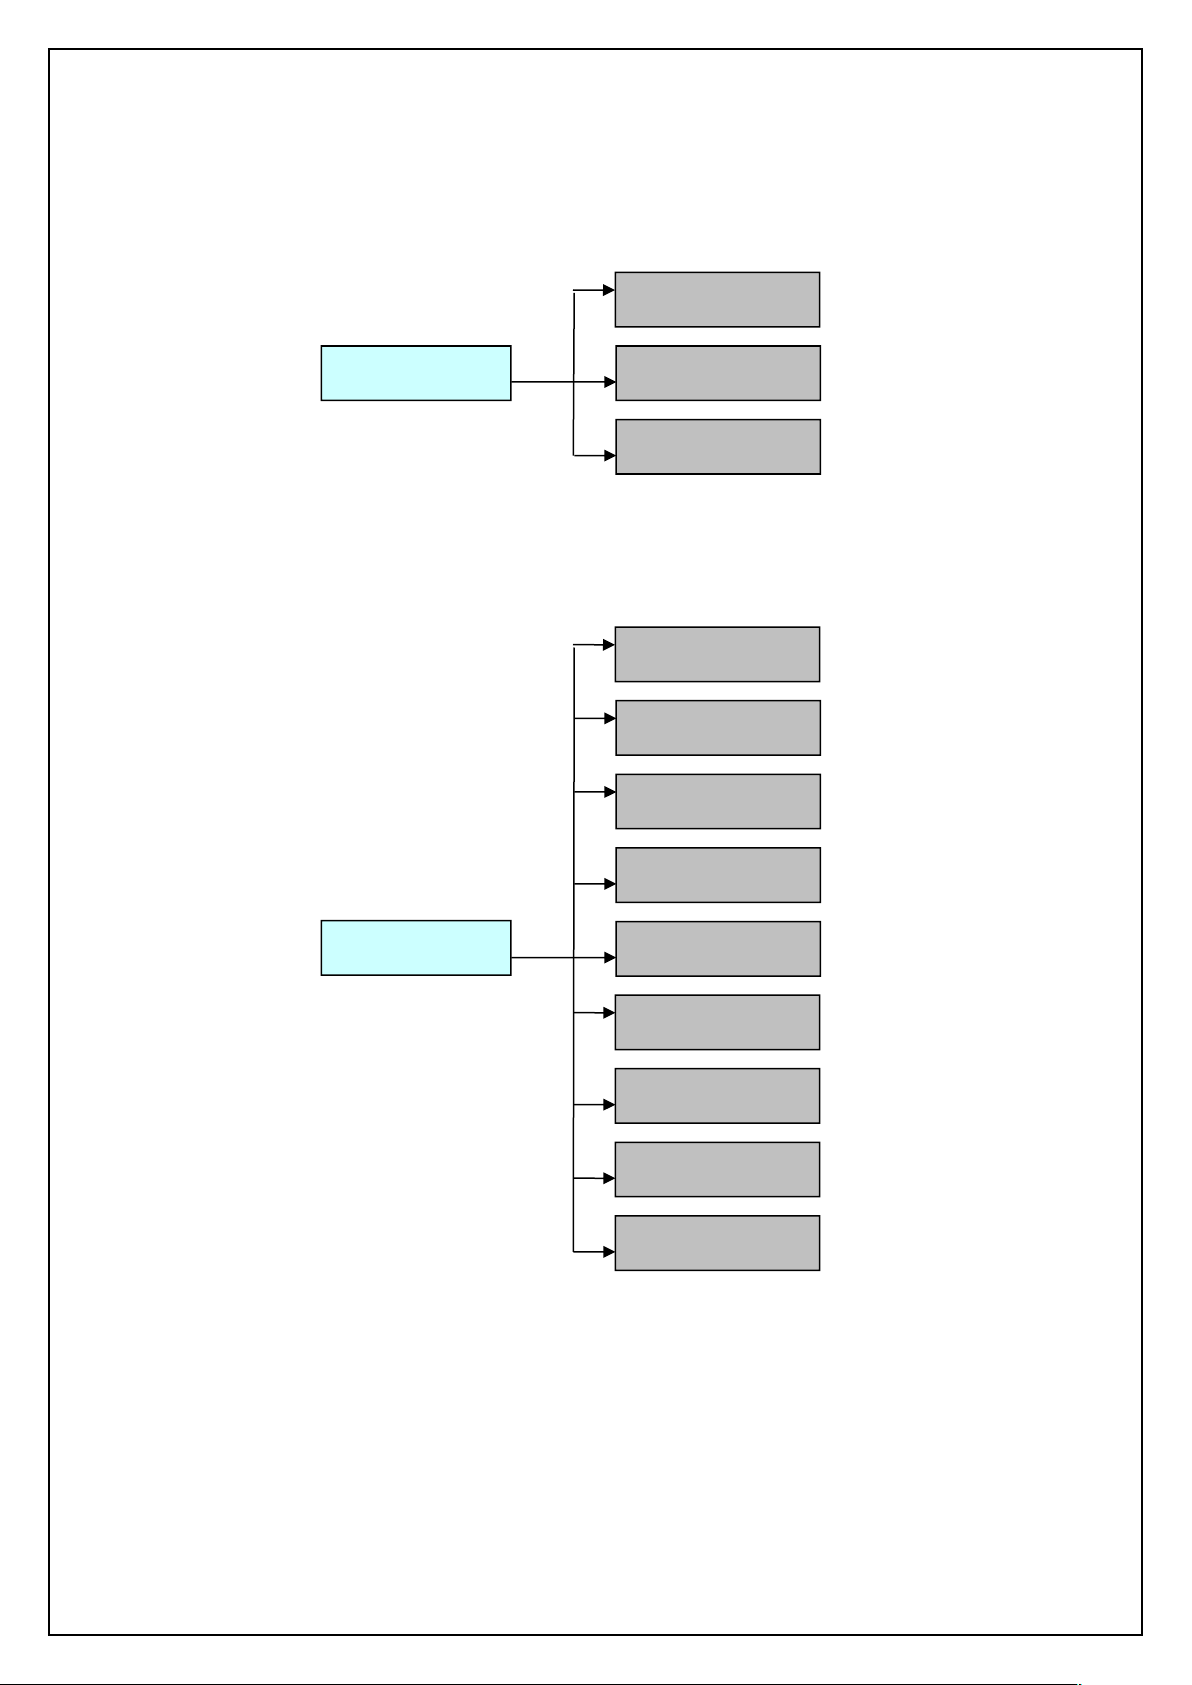
Game Menu
3.2.6 Upgrade Menu
Upgrade
USB/Card Upgrade
OTA Upgrade
FTP Upgrade
3.2.7 MultiMedia Menu
MultiMedia
Movie
ISO
Music
Photo
Game
Ebook
Record Manager
Disk Manager
Network
Upgrade Menu
USER’S MANUAL
MultiMedia Menu
Page 13
USER’S MANUAL
13
4 DTV MODE
4.1 System Initialization
4.2 Entering the DVB System and Power On/Off
Entering the DVB system
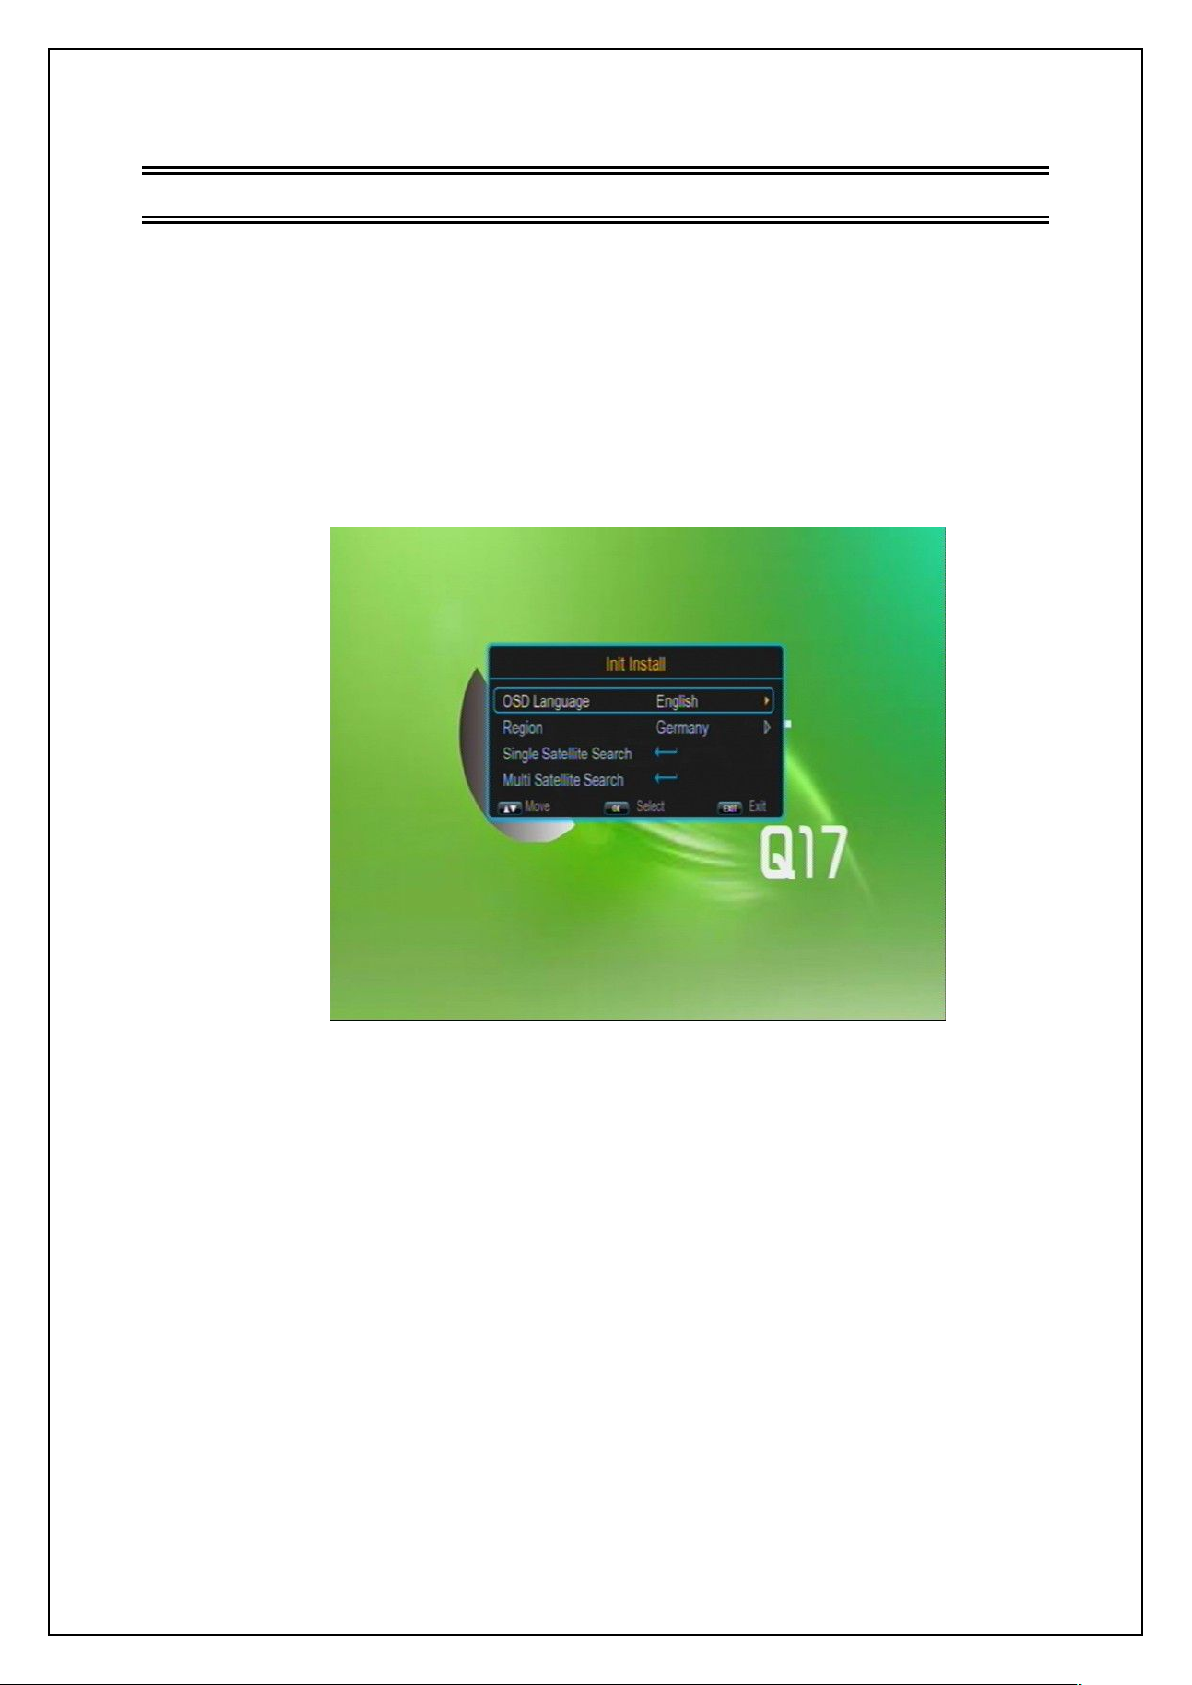
When entering the system for the first time, you should do some initialization settings on the
system including OSD language, time zone, active antenna etc. See the figure below for the
setting menu.
After setting, select the Start Search option and then press OK key to start auto scan. When
the scan completes, the scanned programs can be auto saved.
System Initialization
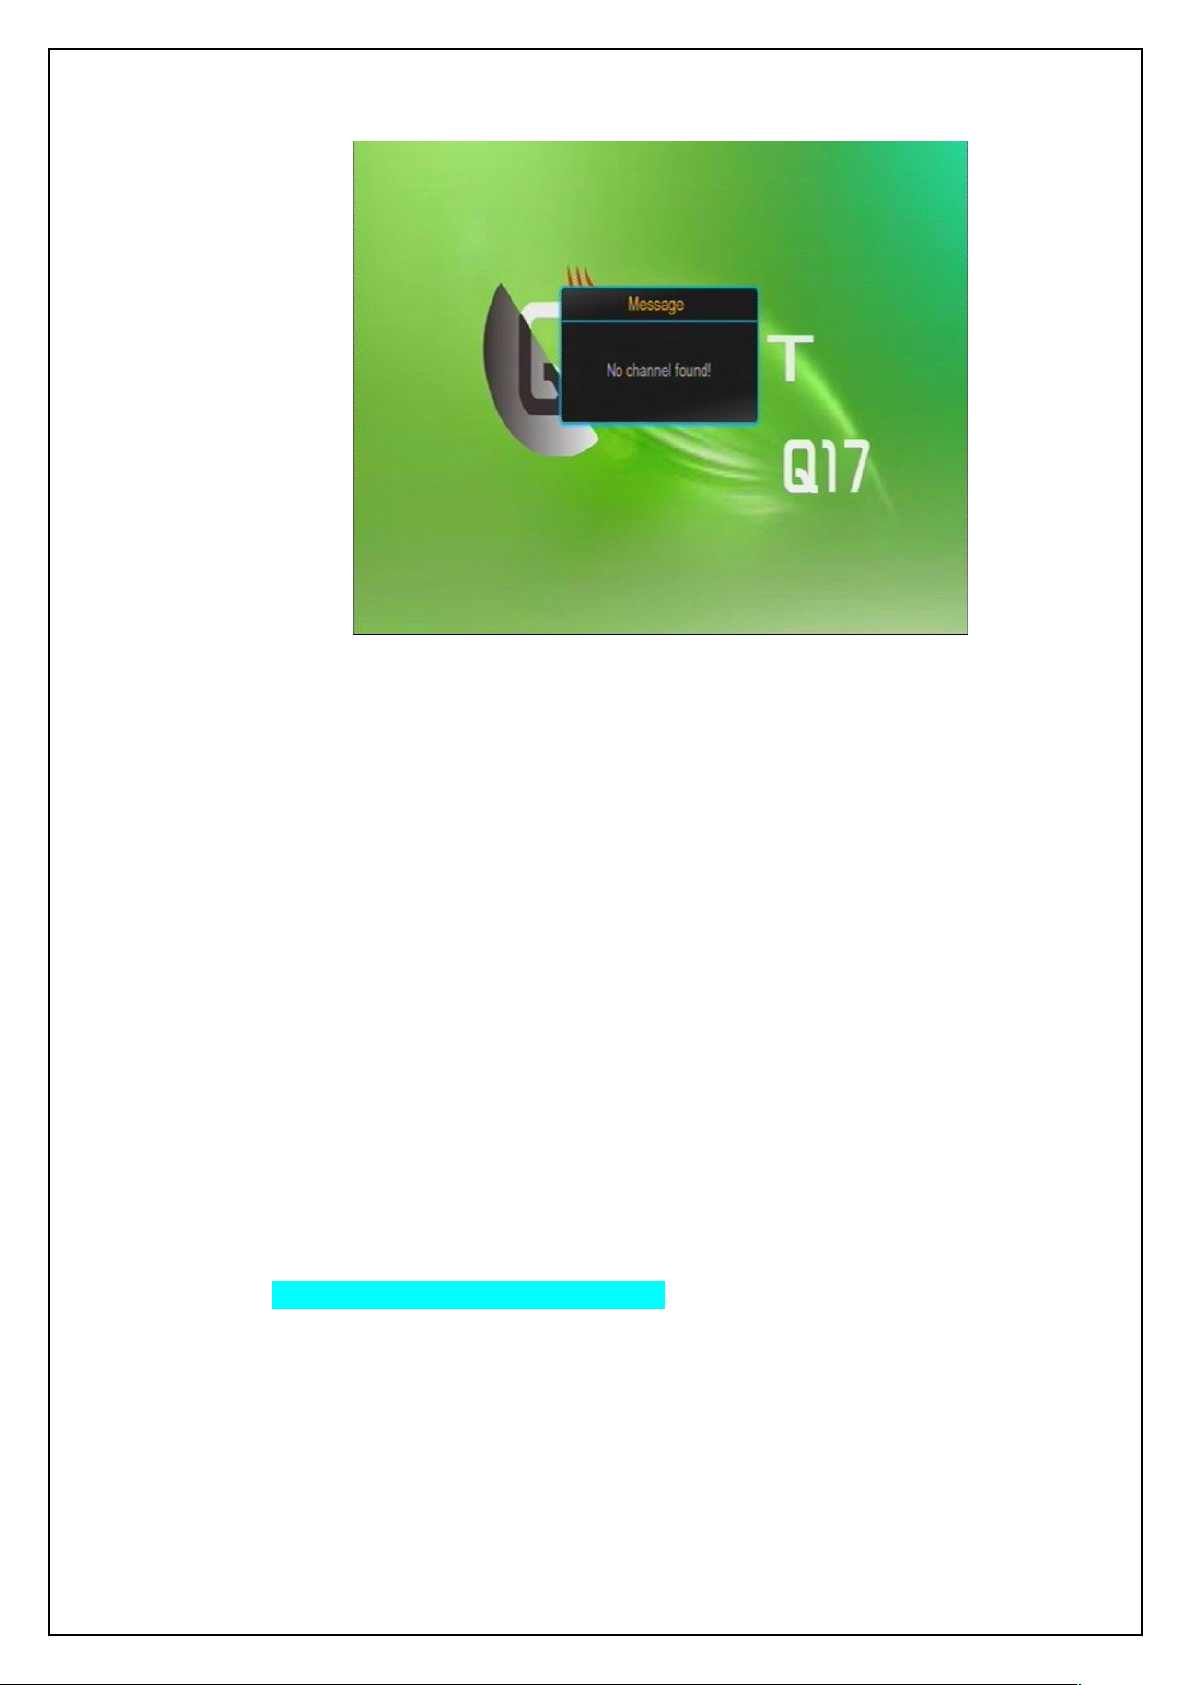
After power on, the system will enter the DVB mode. If there is no program data in the
database, the following message will appear:
Page 14
14
Database Empty Message
Power on
Power off
4.3 Volume Adjustment and Mute Control
Volume Adjustment
Mute Control
4.4 TV/Radio Switching
USER’S MANUAL
Otherwise, the last program being played before the previous power off will be played. If
the system fails to play the program, please check the power connection and antenna
connection.
When the machine is in Standby mode, press POWER key to turn it on.
When the machine is running, pressing POWER key at any time can make it into the
Standby mode.
While in playing state without menu display, press LEFT/RIGHT keys to adjust the
volume. A volume bar will appear, which has 0~30 levels.
While in playing state without menu display, press MUTE key to enter the mute state.
Pressing MUTE key again can exit the mute state.
While in full screen playing state, press TV/RADIO key to switch between the TV mode and
the Radio mode.
Page 15
USER’S MANUAL
15
4.5 Channel Switching
Method 1: While in full screen playing state, press Up/Down keys to play the next or
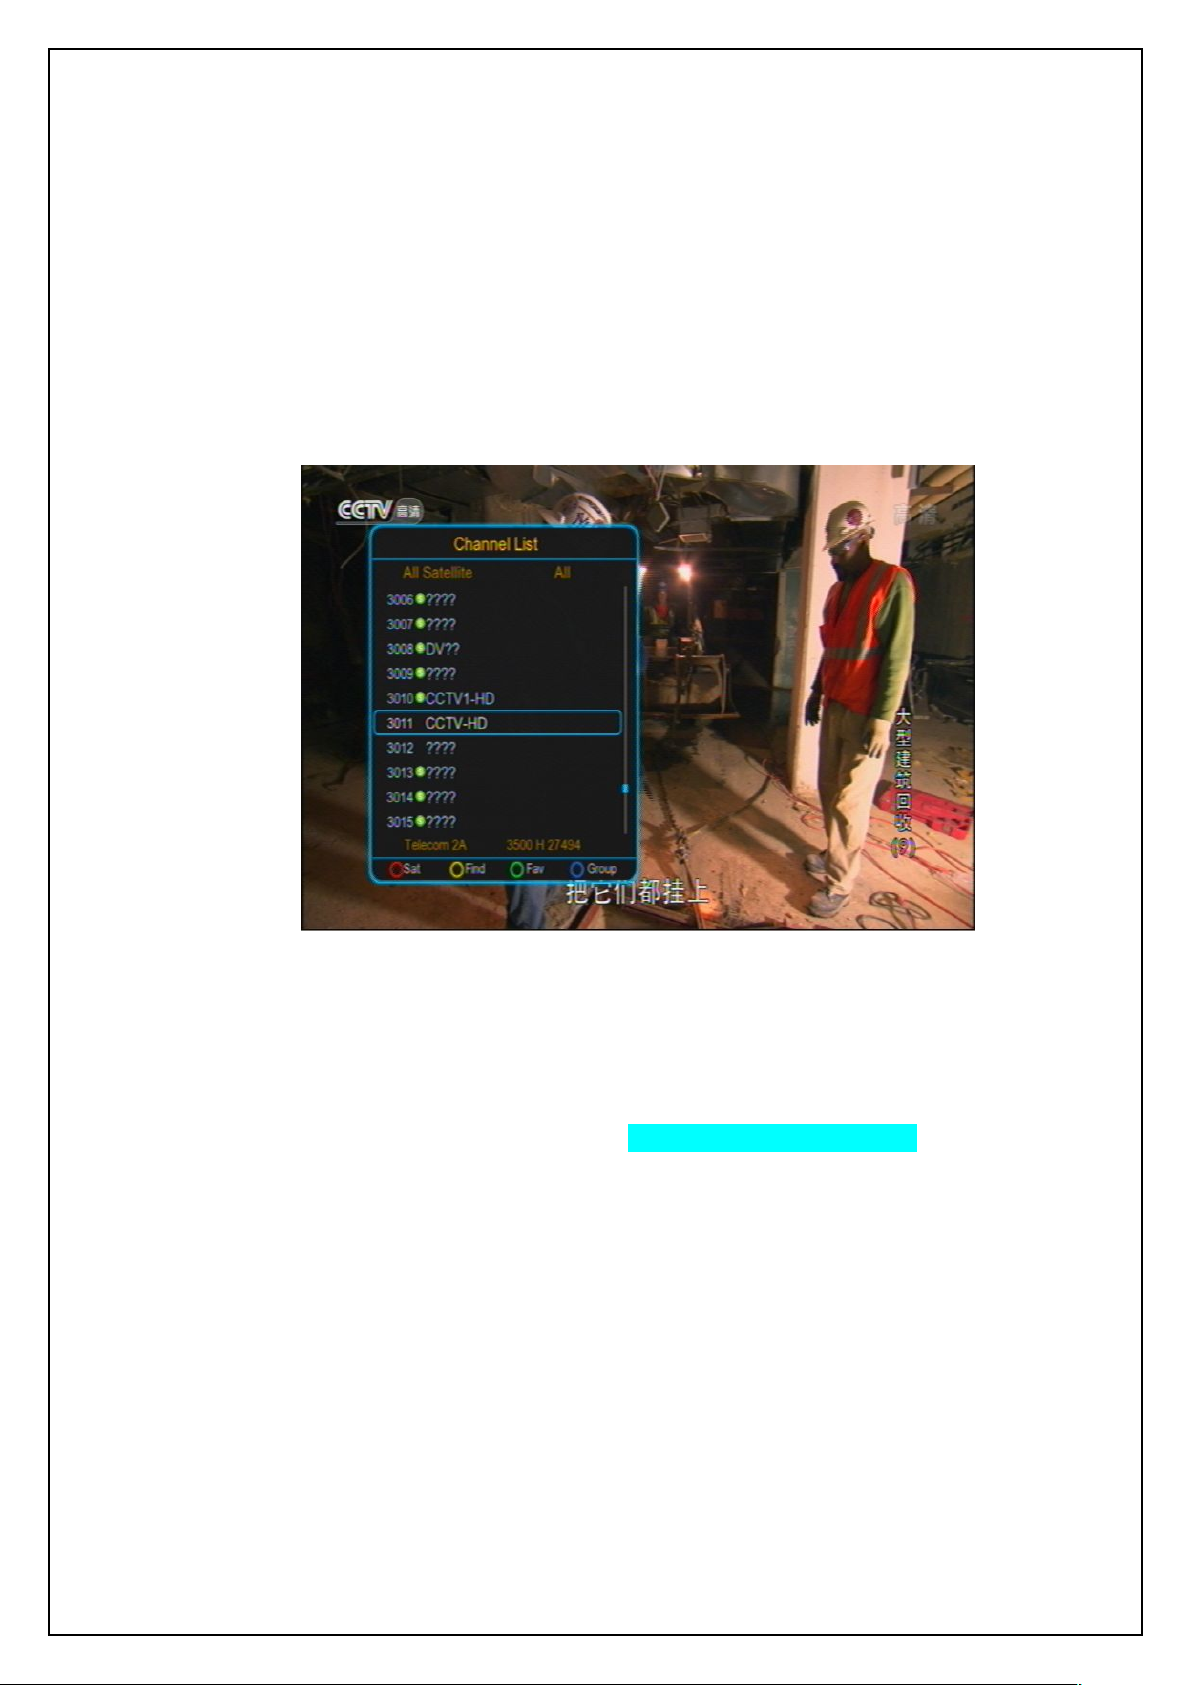
Method 2: While in full screen playing state, press OK key to enter the Channel List
Method 3: Press number keys to input the number of the channel you want to play
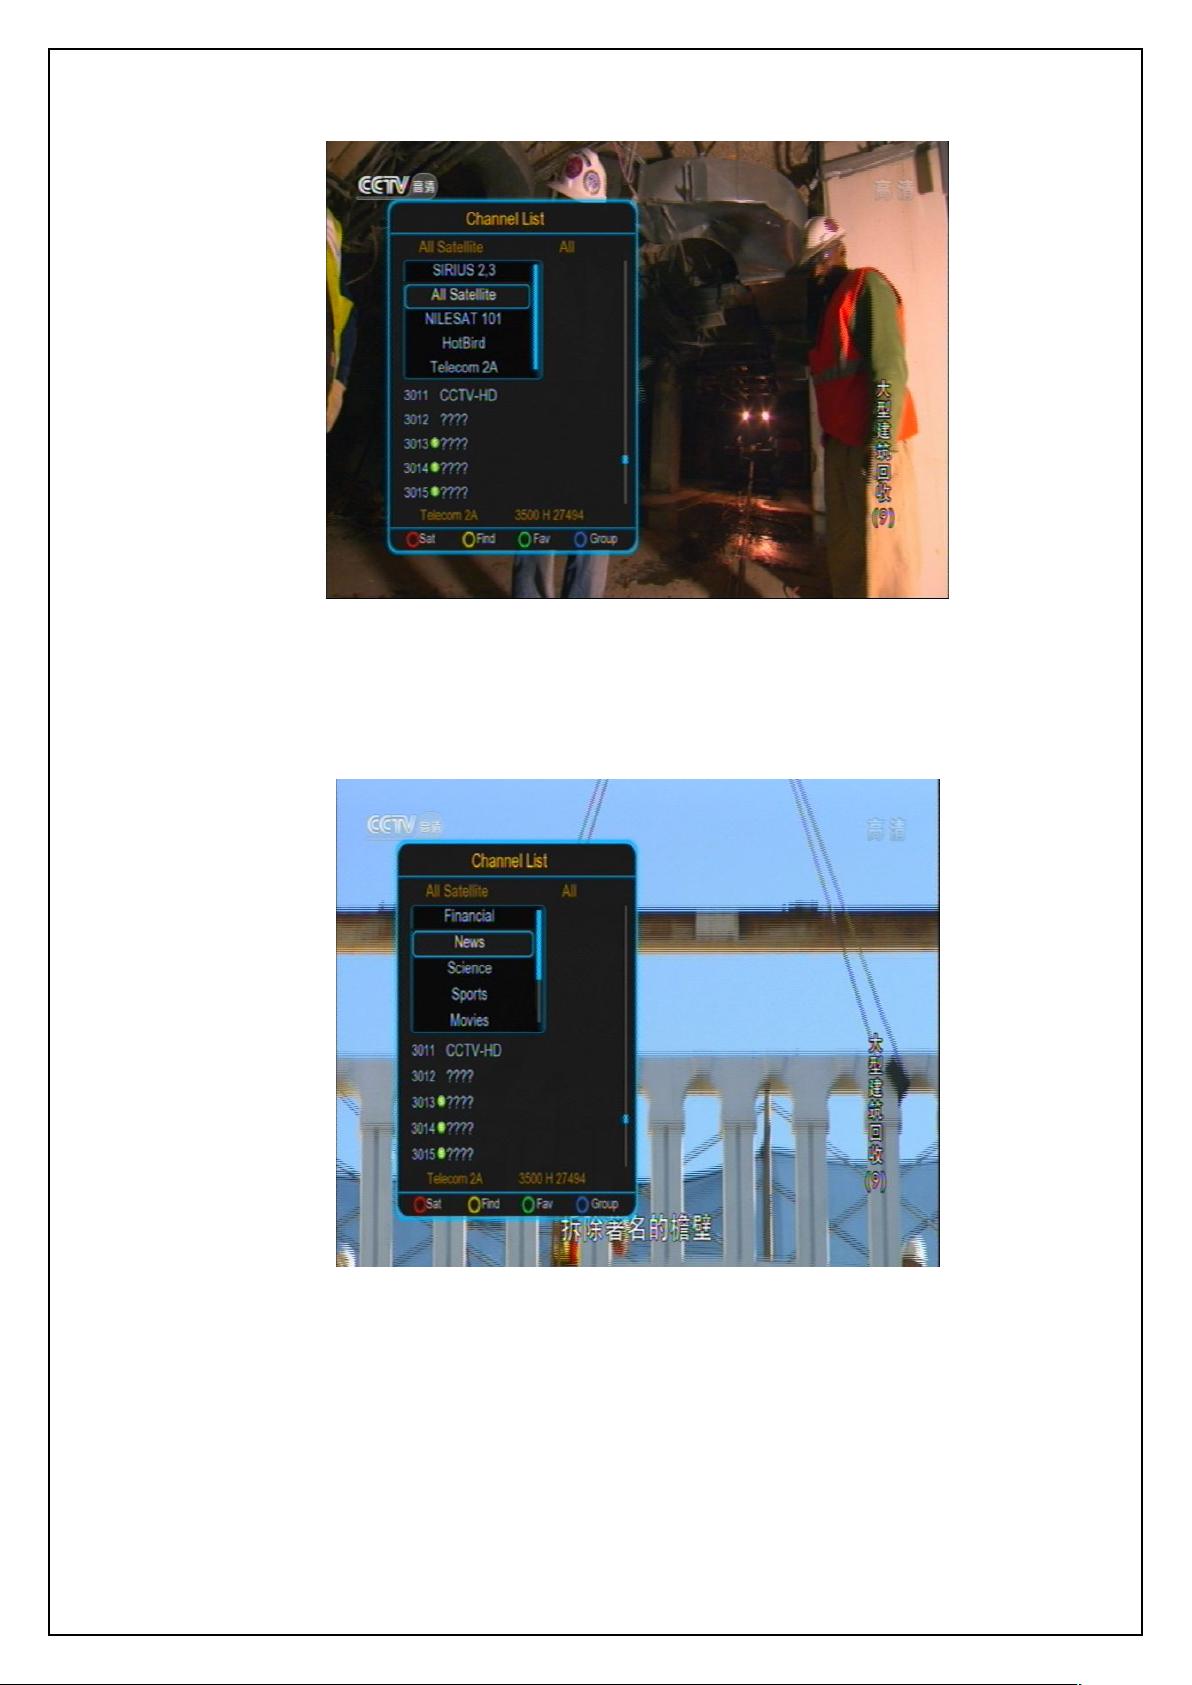
Method 4: Press the RED function key to select another satellite to play, see the figure
The system provides many methods to switch channels. See the descriptions below:
previous TV program channels or radio stations.
menu (see the figure below) to quickly select a channel you want to play. In which you
can press LEFT/RIGHT keys to select a channel group and then press UP/DOWN keys
to choose a desired channel.
Channel List for quick select
Press OK key to confirm your selection and switch to the selected channel to play.
Pressing EXIT key can exit the menu.
below:
Page 16
16
Satellite Select Menu
Method 5: If you have set favorite programs, press the green function key and a
Method 6: Press the yellow function key while in the state of Figure 4-3, and you can
USER’S MANUAL
Favorite list will appear (see the figure below). At this point, you can press UP/DOWN
keys to select a Fav item and then press OK key to enter its program list.
Favorite List
Pressing EXIT key can exit the menu.
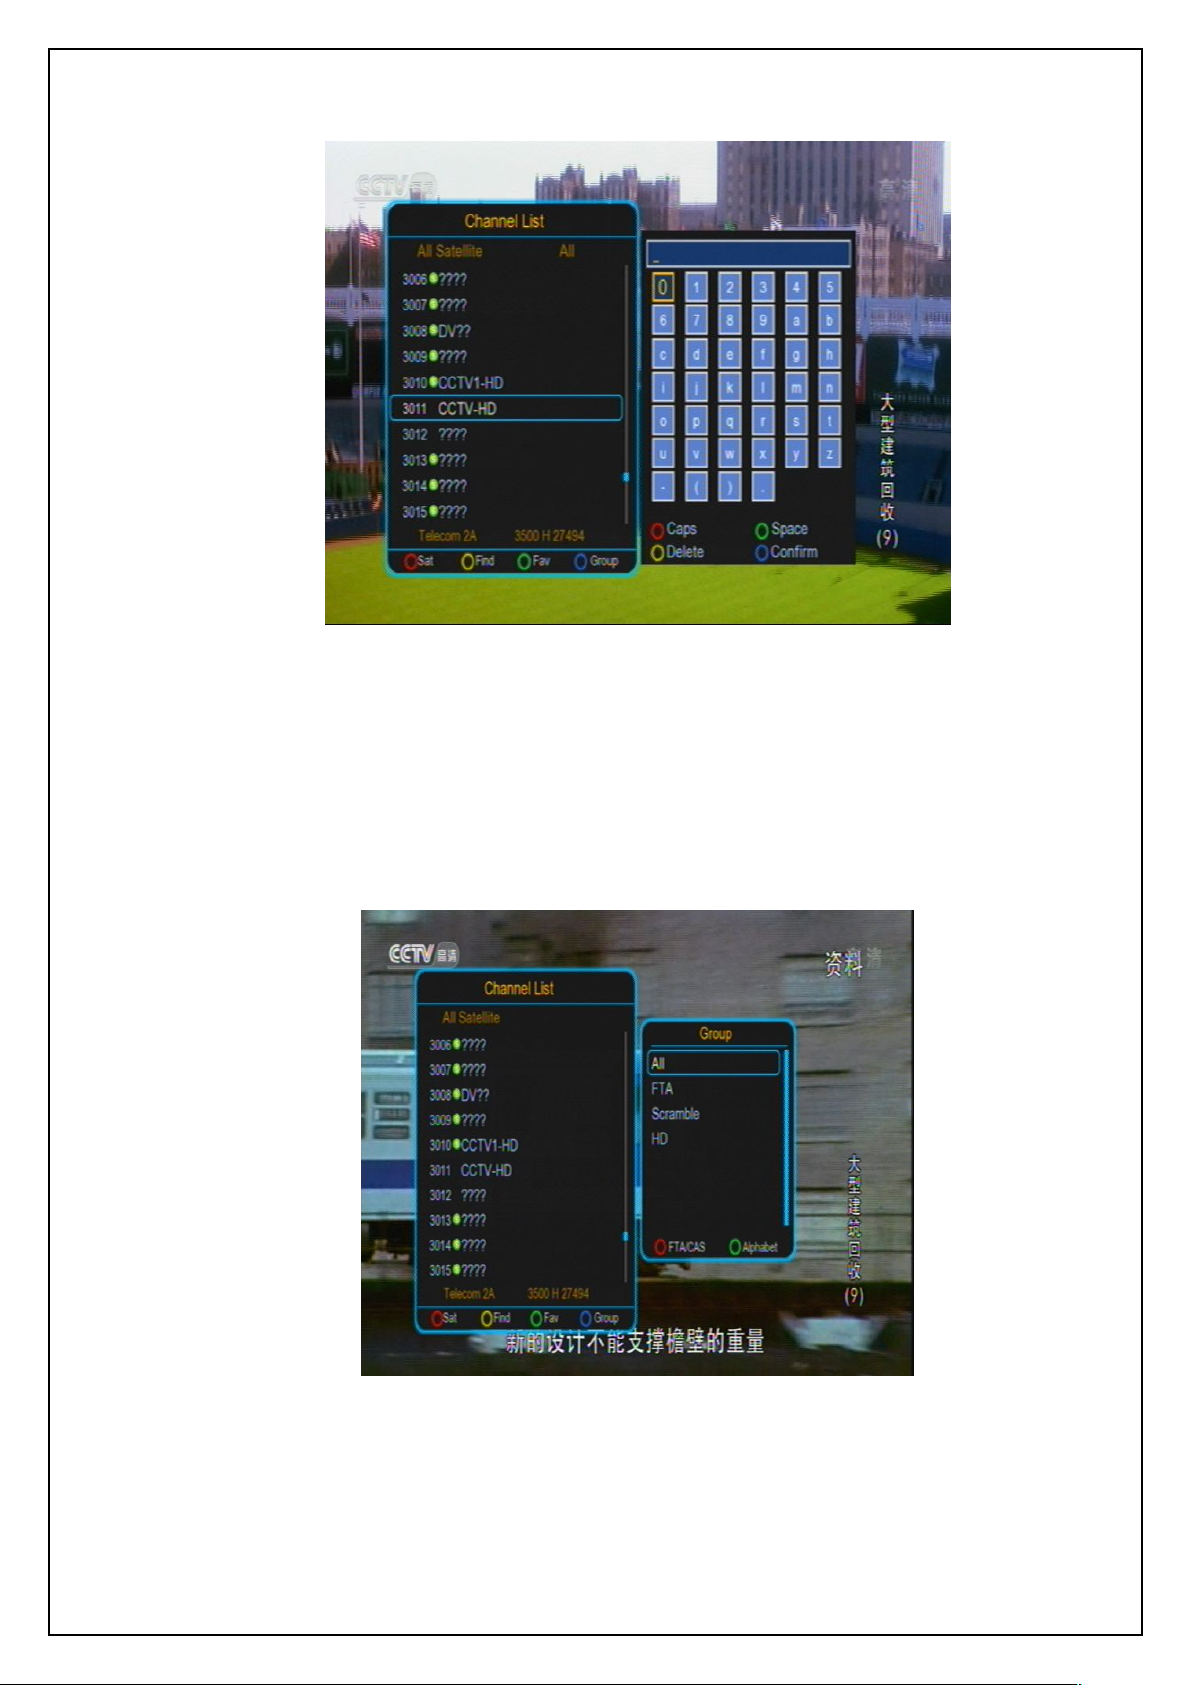
search for a channel by name. The figure below will appear:
Page 17
17
Find Channel by Name
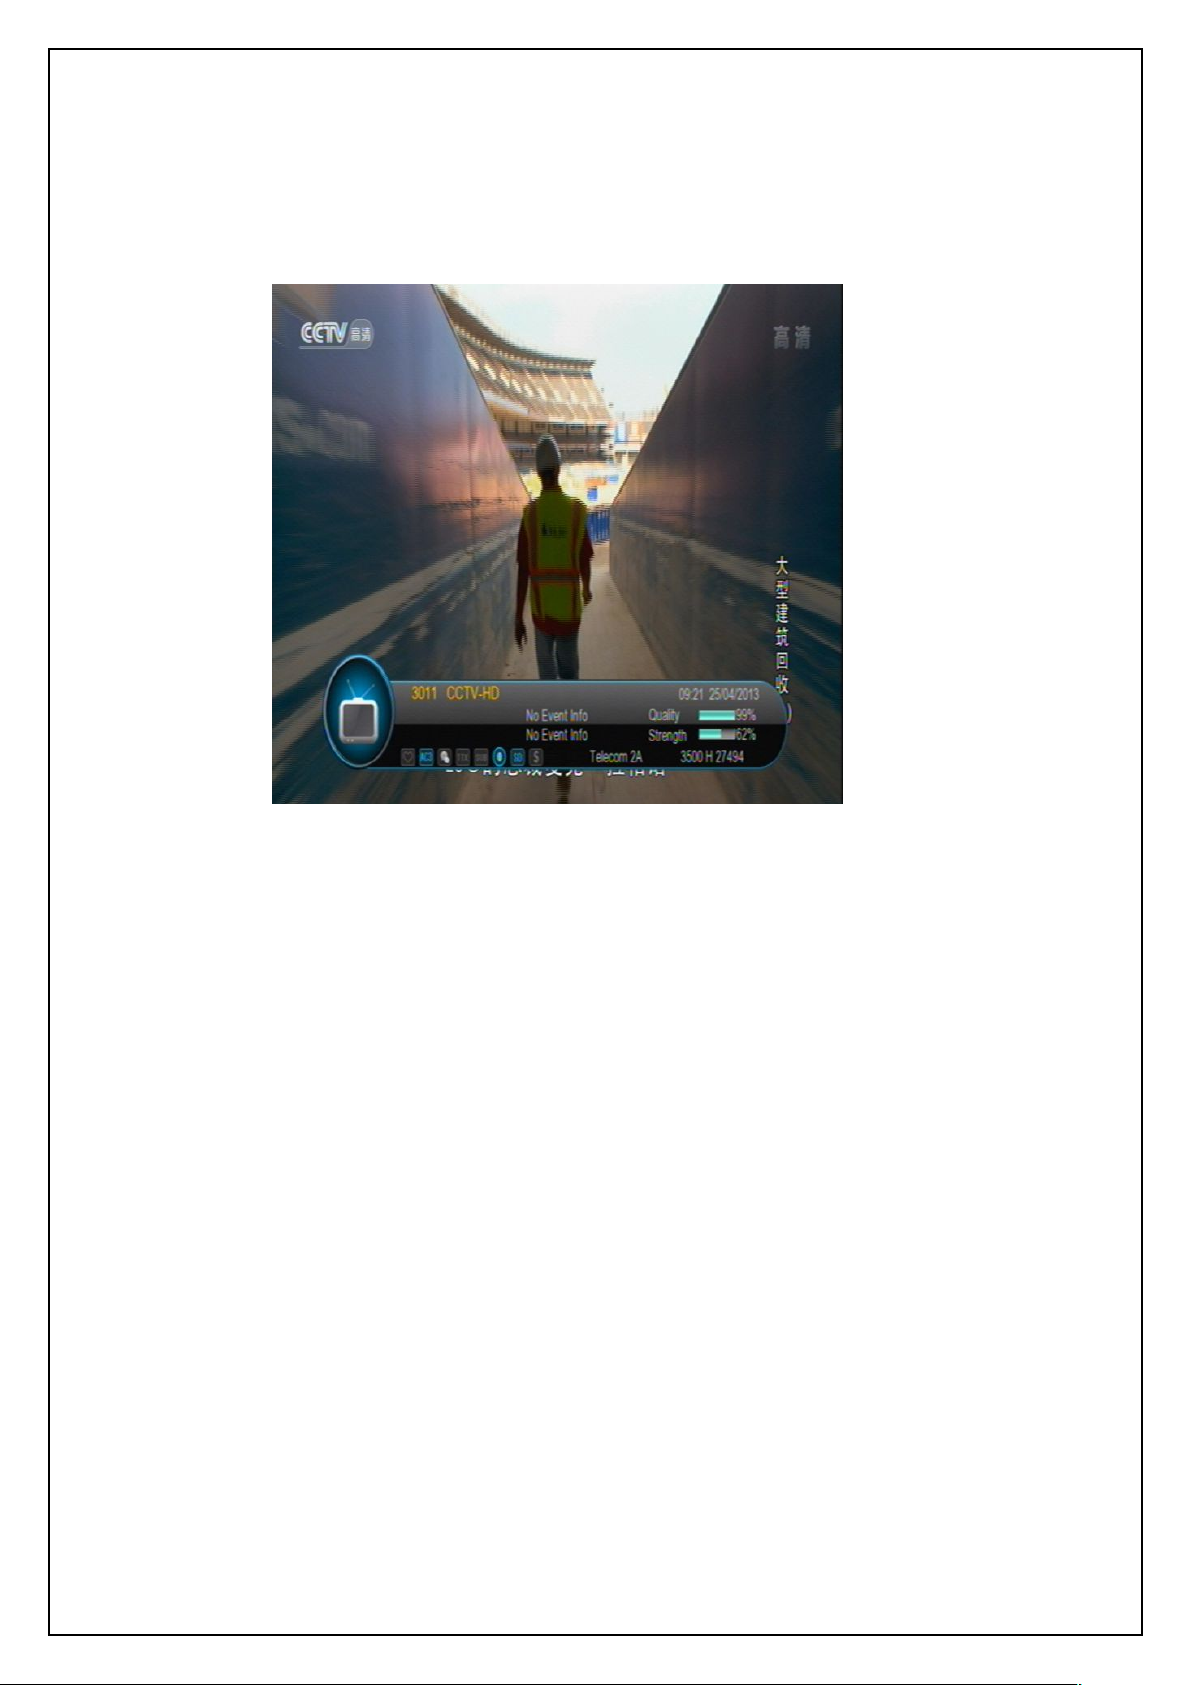
Method 7: Press the blue function key while in the state of Figure 4-3, and the channel
USER’S MANUAL
Press UP/DOWN/LEFT/RIGHT keys to select a character and then press OK key to
input. When you have finished inputting a channel name, press the blue function key to
confirm your input. (Pressing the red function key can change case. Number keys
cannot be used to input numbers here.)
group list appears (see the figure below), which includes free, scramble and so on.
Channel Group List
Page 18
USER’S MANUAL
18
4.6 Program Info Display
4.7 Program Recall (Recall to the previous channel)
4.8 Program Language and Left/Right Channels Switching
4.8.1.1.1 While in full screen playing state, press AUDIO key to call out the following menu to change
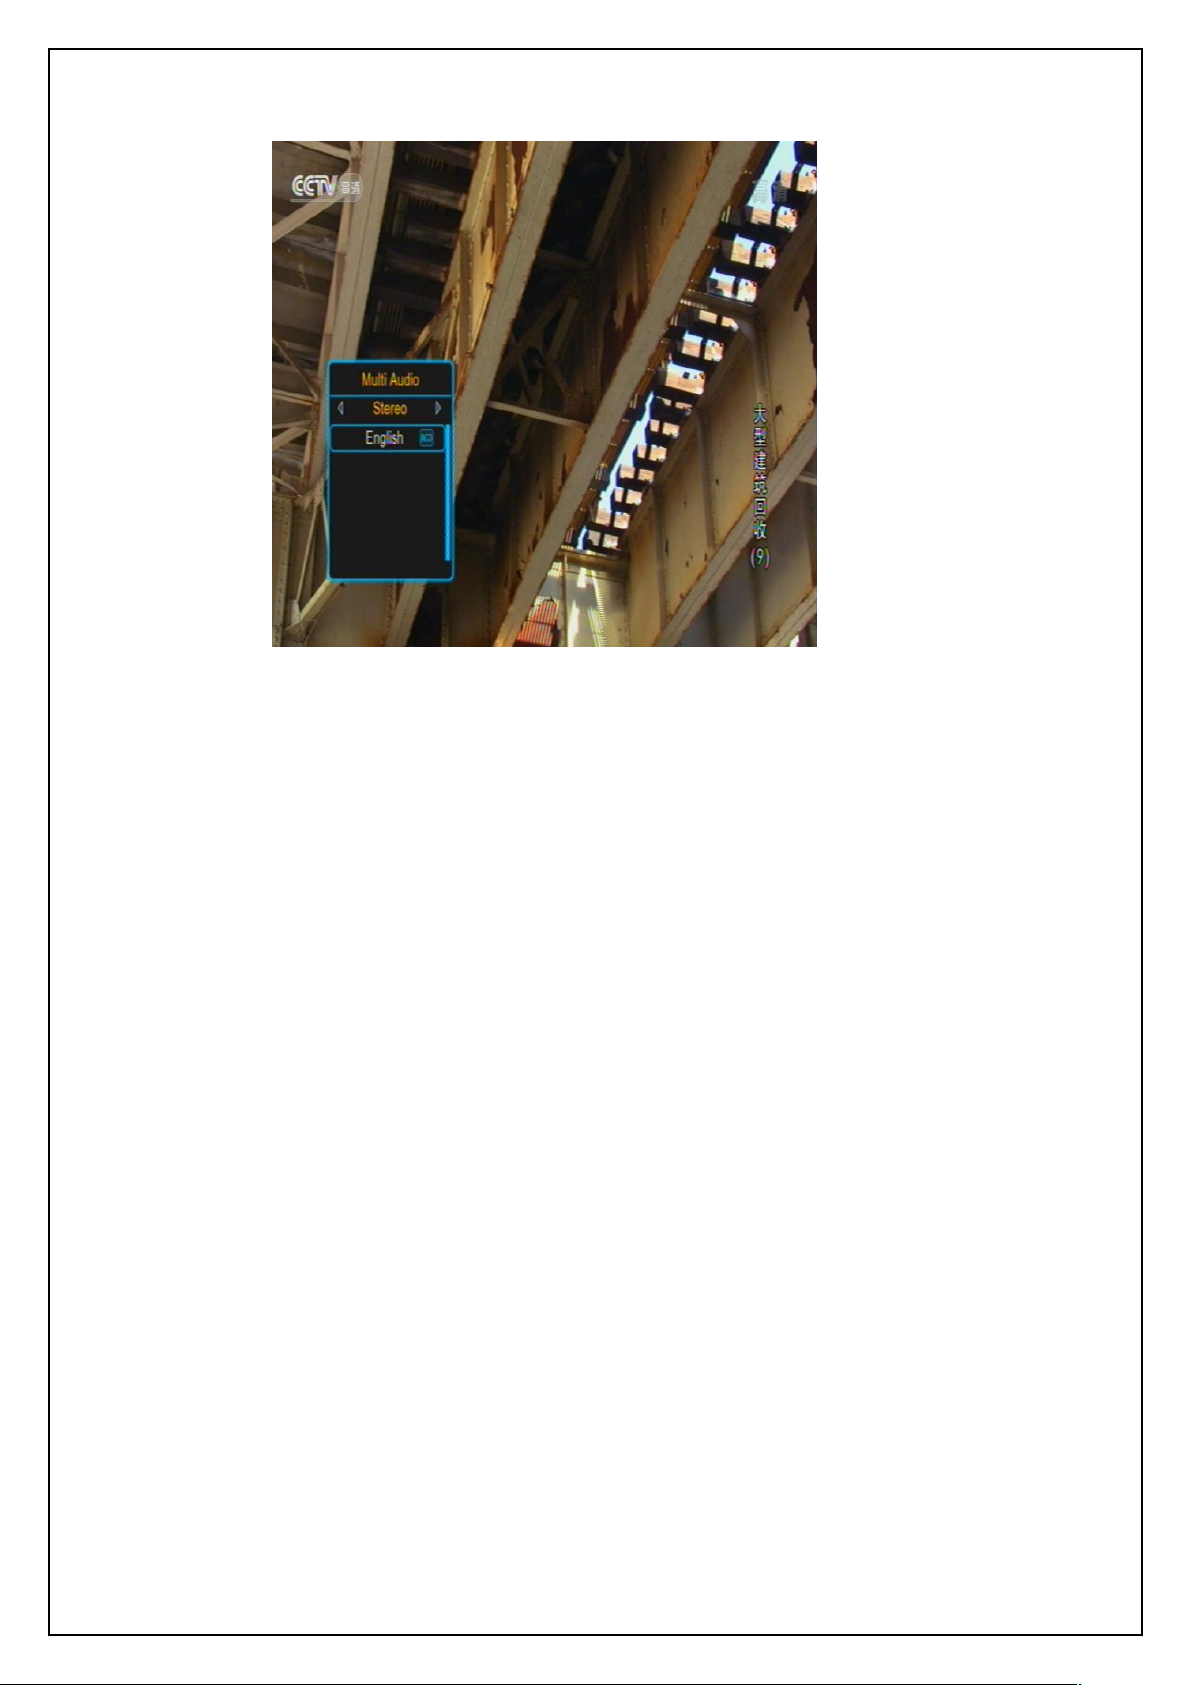
While in full screen playing state, press INFO key to show the brief information of the being
played program. See the figure below:
Brief Program Info
While in full screen playing state, press EXIT key to return to the previously played TV
program channel or radio station.
the audio language and sound channels.
Page 19
19
Language and Sound Channel Select Menu
4.8.1.1.2 Press LEFT/RIGHT keys to change sound channels among Left, Right and Stereo; press
4.8.1.1.3 Press OK key to confirm the setting and return to the program playing state.
4.9 Electronic Program Guide (EPG)
1. Daily Mode
USER’S MANUAL
UP/DOWN keys to choose audio language.
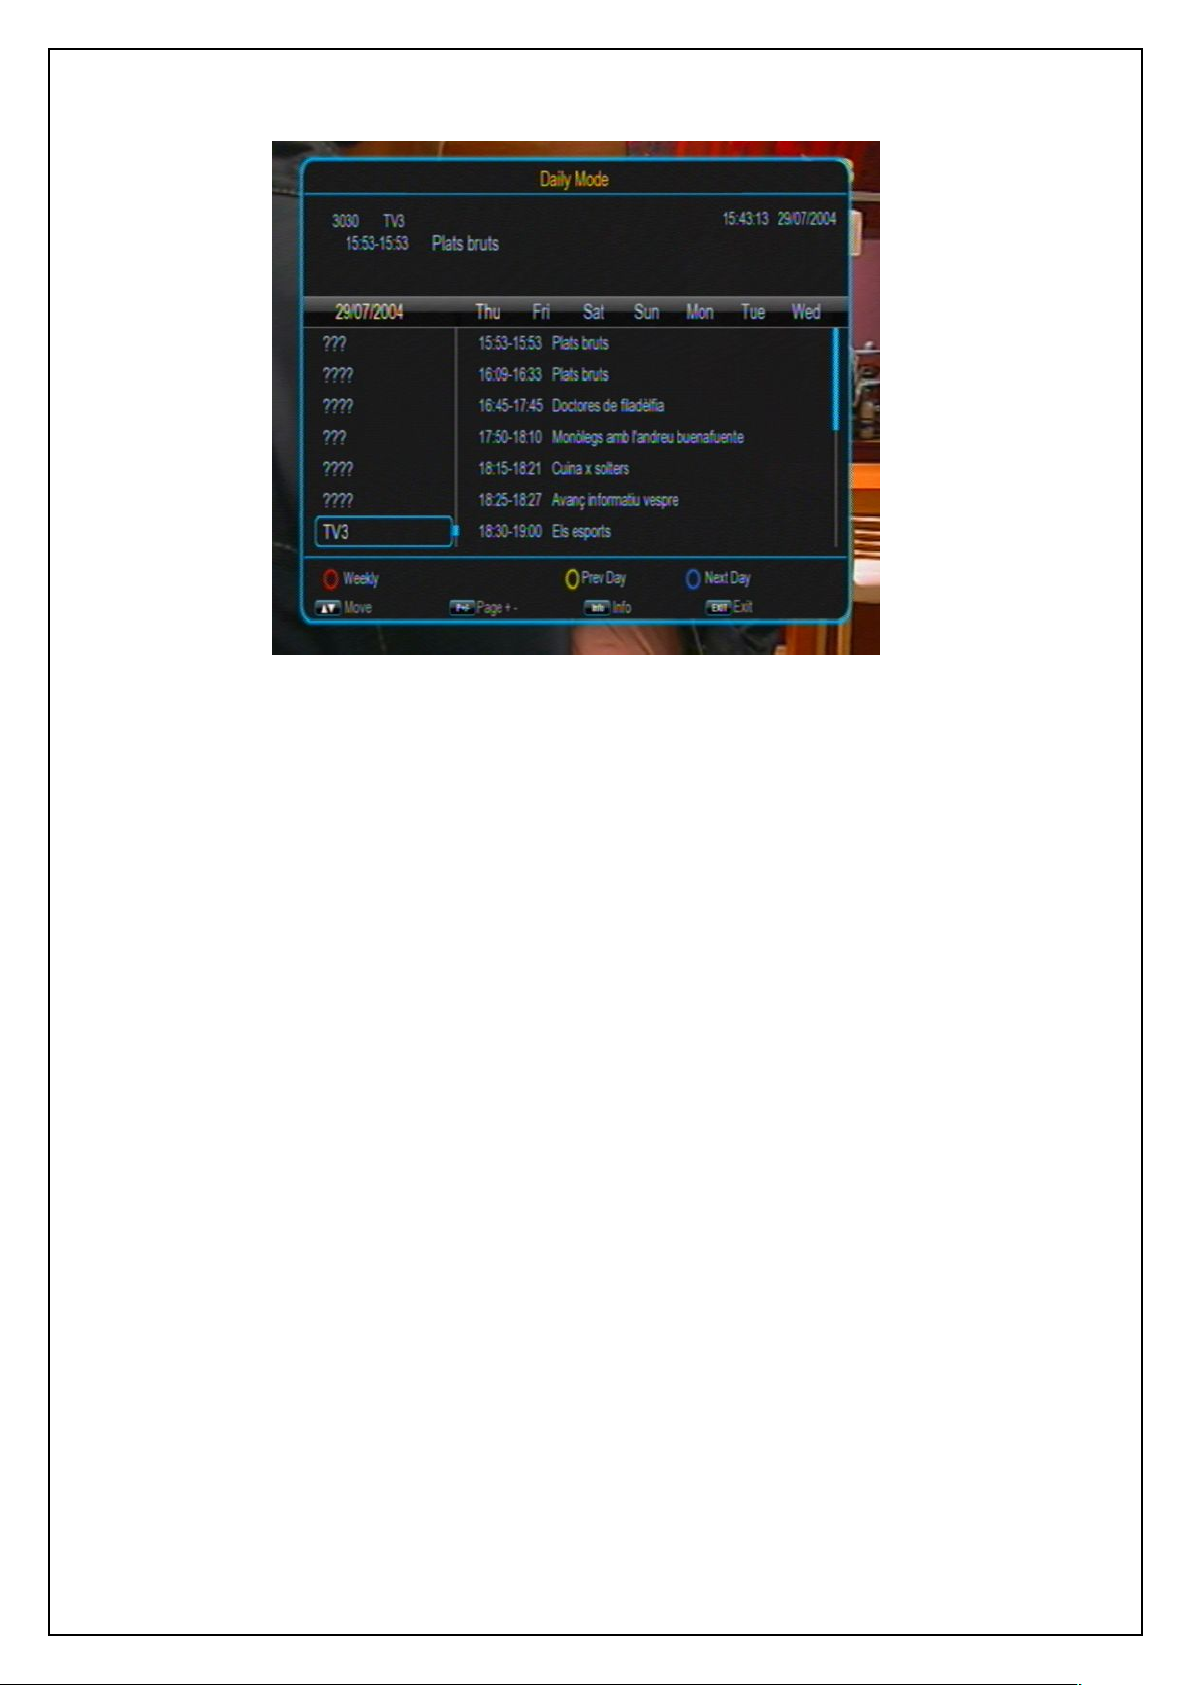
To get the information of programs being played or to be played in coming days, press EPG
key to enter the electronic program guide (EPG).
EPG info has two modes:Daily Mode and Weekly Mode. The system will enter the Weekly
mode by default, and you can press the red function key to change to other modes.
Press EXIT or EPG keys to exit EPG.
In Daily Mode, you can find the information of the programs on a day. See the figure
below:
Page 20
USER’S MANUAL
20
Red function key: Enter the Weekly Mode.
Yellow or blue function keys: Press one of the two keys to switch days from Monday
Green function key: If the selected program is being played, pressing this key can
2. Weekly Mode
Daily Mode
to Sunday.
record the program. If the selected program has not been played yet, pressing this
key can schedule to play or record the program.
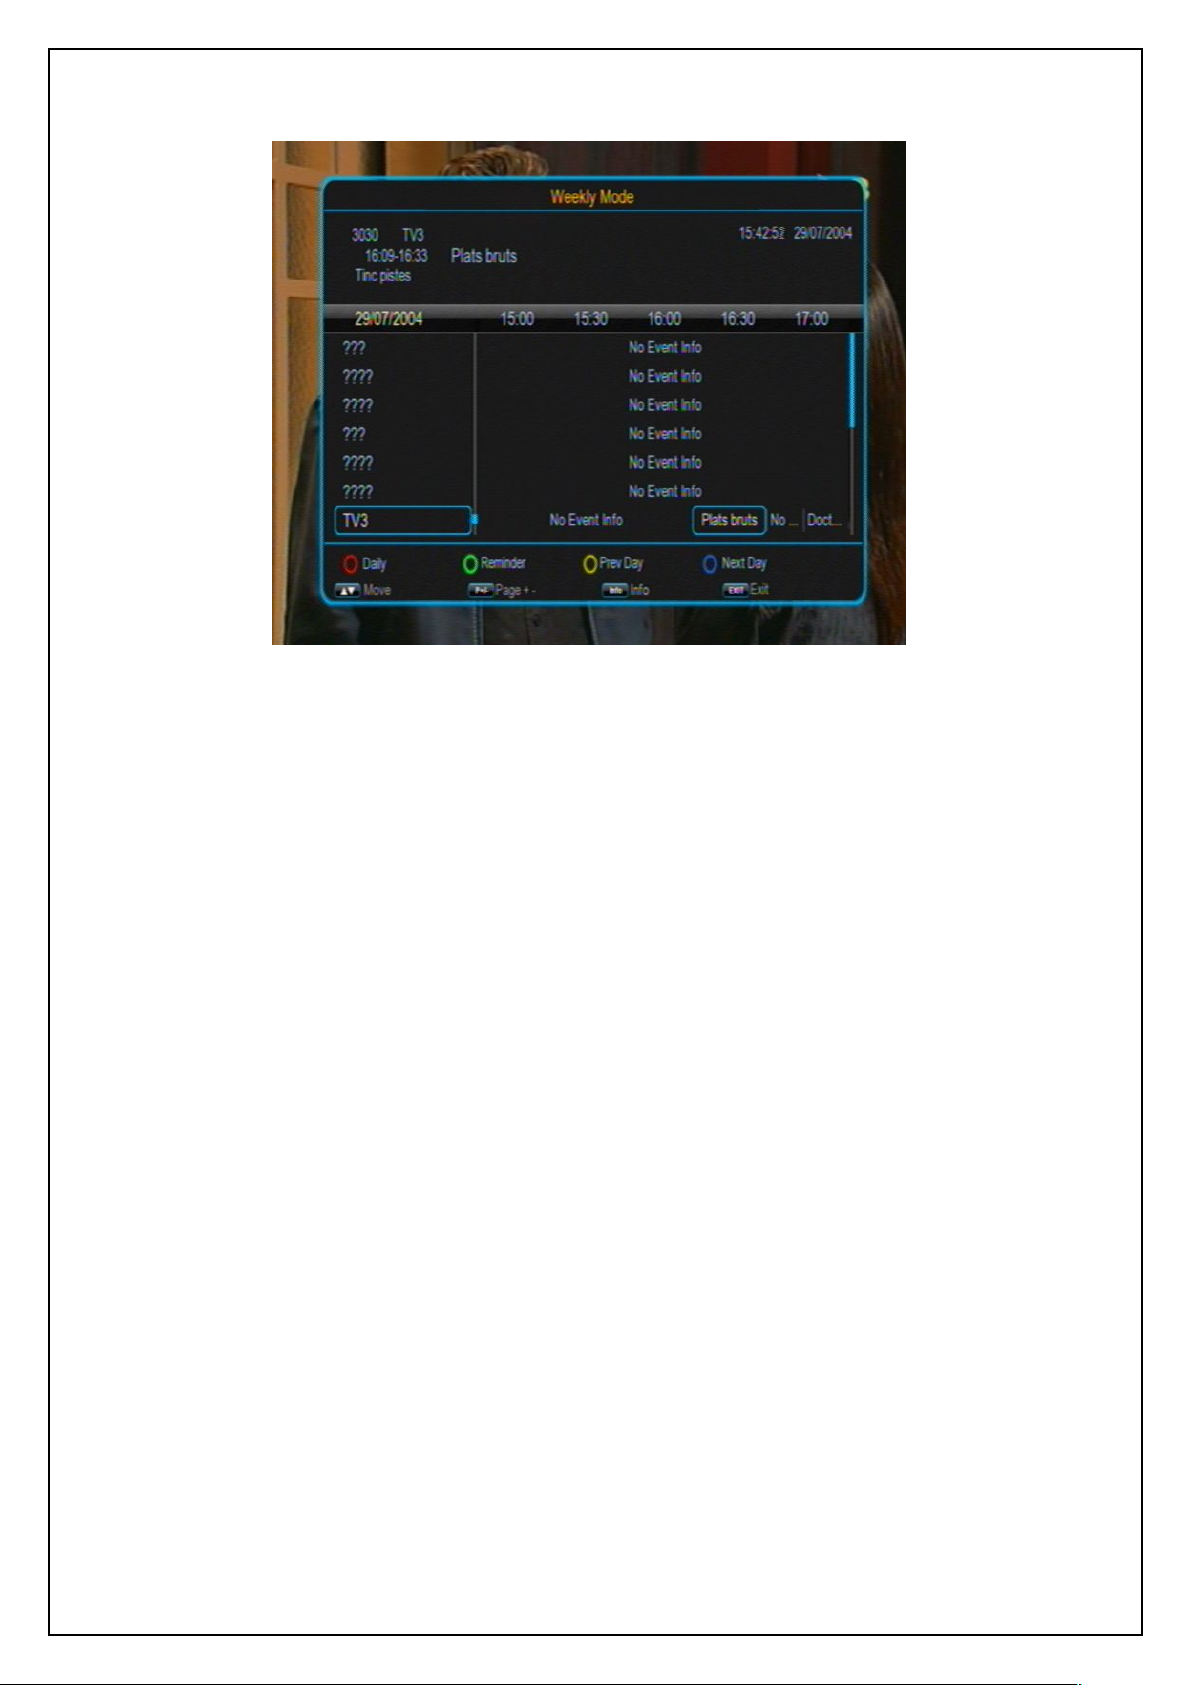
In Weekly Mode, you can find the information of the programs within a week. See the
figure below:
Page 21
21
Weekly Mode
Press LEFT/RIGHT keys to switch the highlight between the two list windows.
Press the red function key to enter the Weekly Mode.
Press the yellow or blue function keys to switch to the page of the previous or next
If the selected program is being played, pressing the green function key can record
USER’S MANUAL
days.
the program. If the selected program has not been played yet, pressing this key can
schedule to play or record the program.
Page 22
22
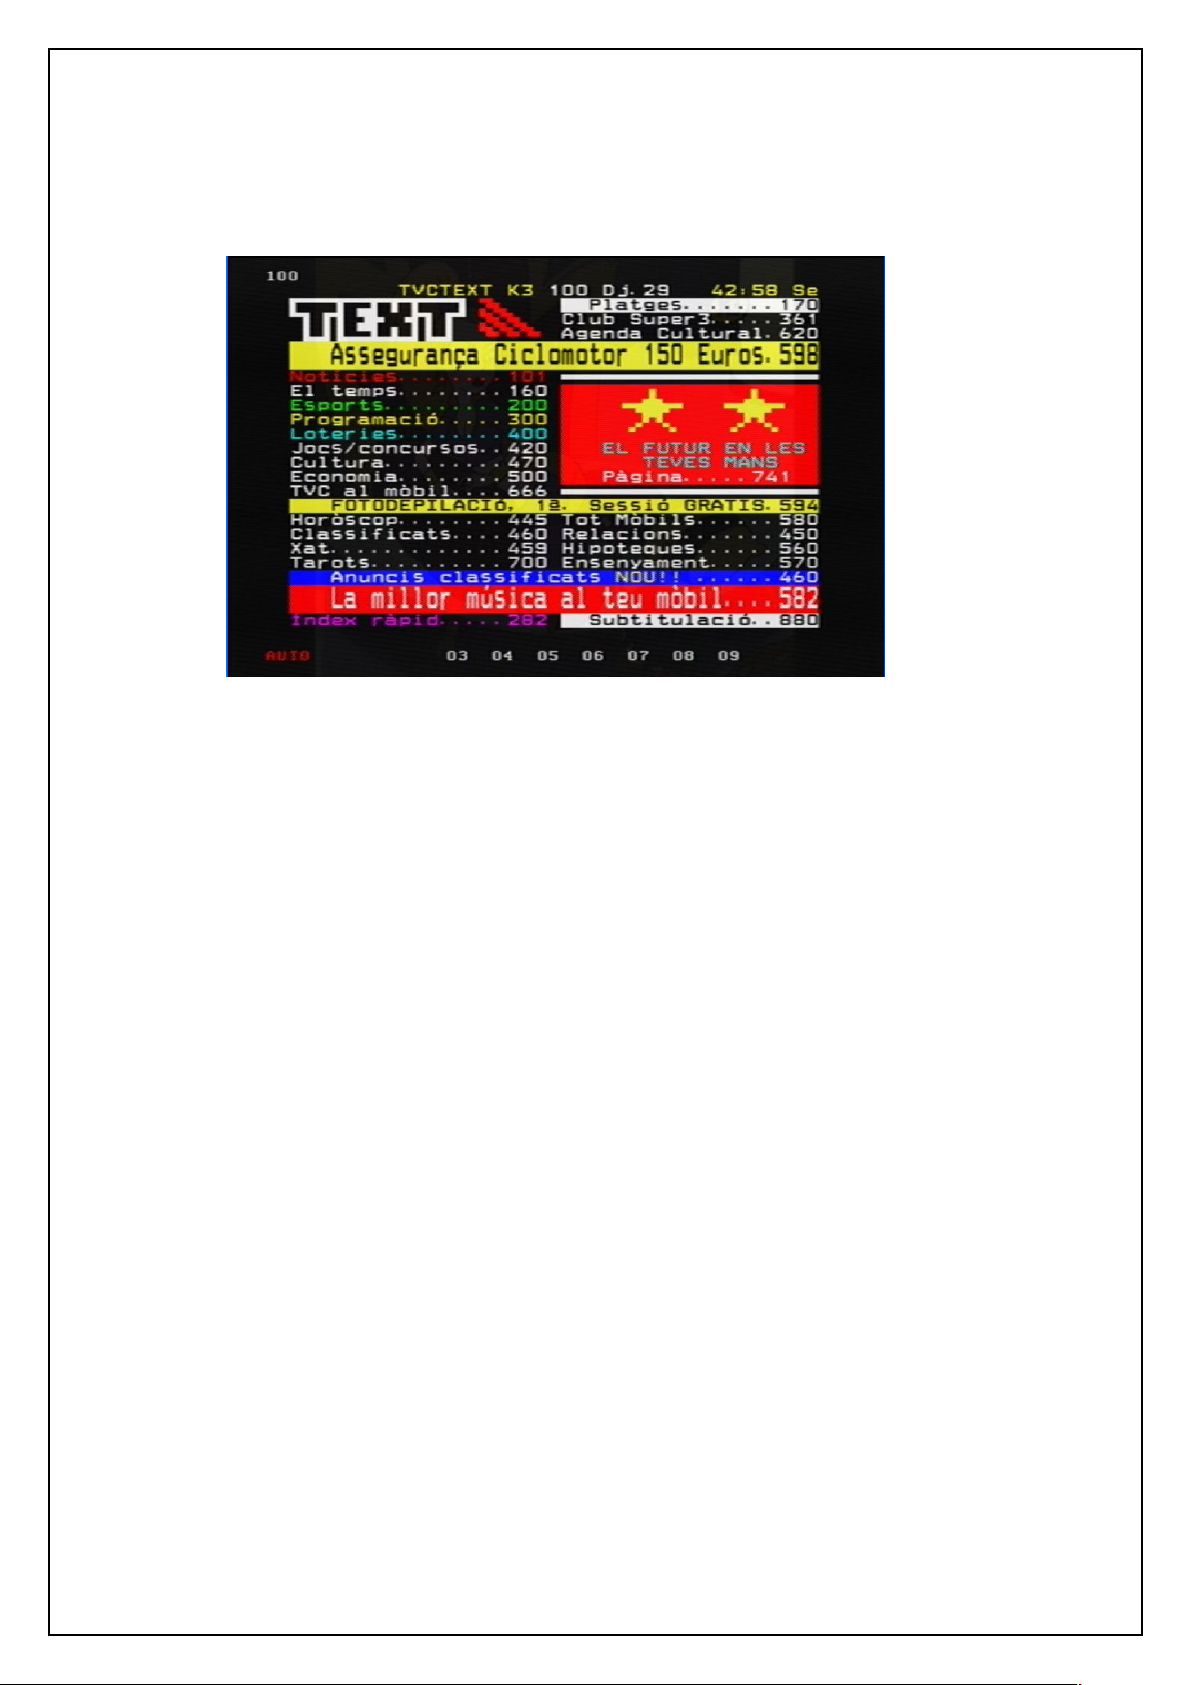
4.10Teletext
Press TTX key to enter the Teletext mode. See the figure below:
At the bottom of a Teletext page, enter a page number (range: 100~899) to go to
Press UP/DOWN keys to turn to the previous or next pages. The pages that have no
Long press UP/DOWN keys to quickly turn pages.
Press OK key to change the transparency of the background.
Press LEFT/RIGHT keys to enter the previous or next sub pages of the current page if
The four color function keys are navigation keys. Their concrete functions depend on the
Press TTX or EXIT keys to exit the teletext mode.
4.11Subtitle
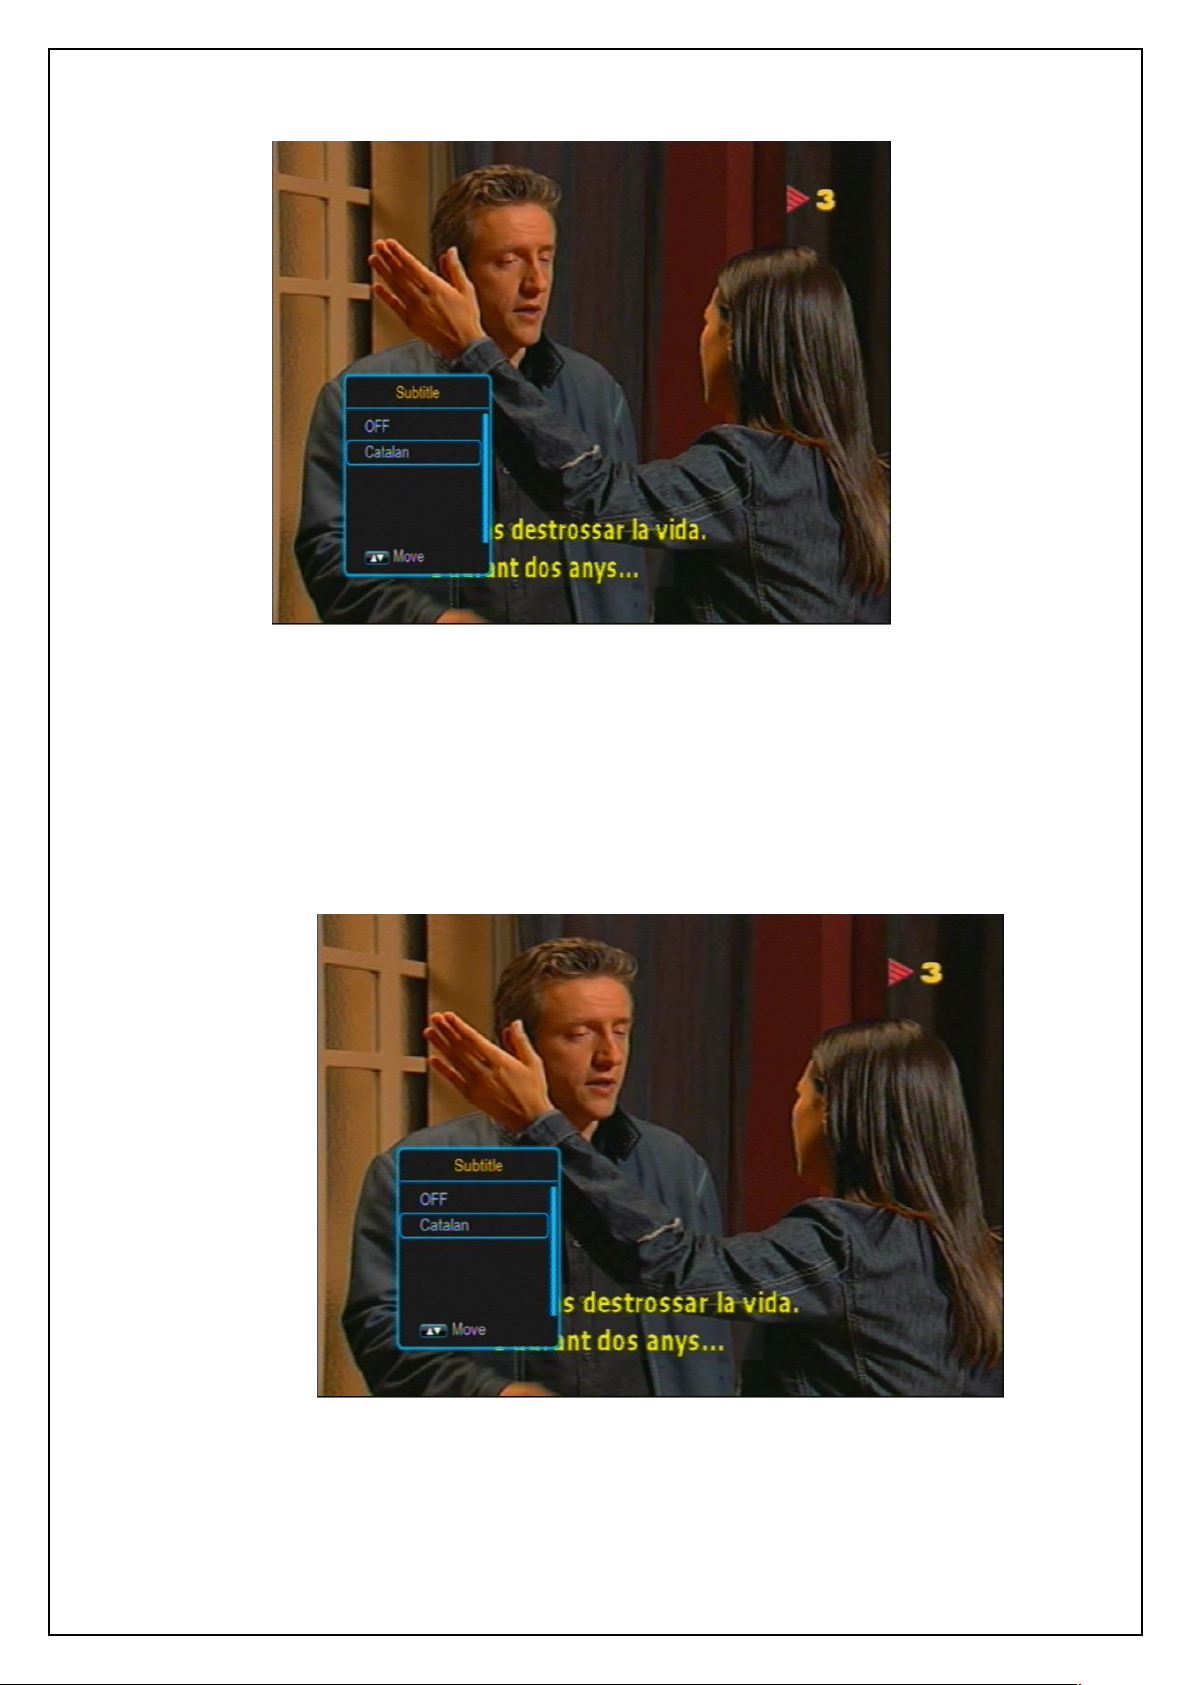
4.11.1 Press SUBTITLE key to enter the Subtitle menu. See the figure below:
USER’S MANUAL
Teletext Pages
Basic Operations
corresponding page.
teletext contents will be auto skipped.
there exists. If the AUTO option is selected, the sub pages will be auto turned.
streaming.
Subtitle is closed by default. To open it:
Page 23
23
Subtitle Menu
4.11.2
Press UP/DOWN keys to select a subtitle language to play.
4.12TTX Subtitle
4.12.1
Press SUBTITLE key to enter the Subtitle menu. See the figure below:
USER’S MANUAL
TTX Subtitle is closed by default too. To open it:
Note that, in the above figure, there is an icon behind the language menu item. This icon
indicates that the item is a TTX subtitle language.
TTX Subtitle
Page 24

USER’S MANUAL
24
4.12.2 Press UP/DOWN keys to select a TTX subtitle language to play.
Page 25
USER’S MANUAL
25
5 MULTIMEDIA MODE
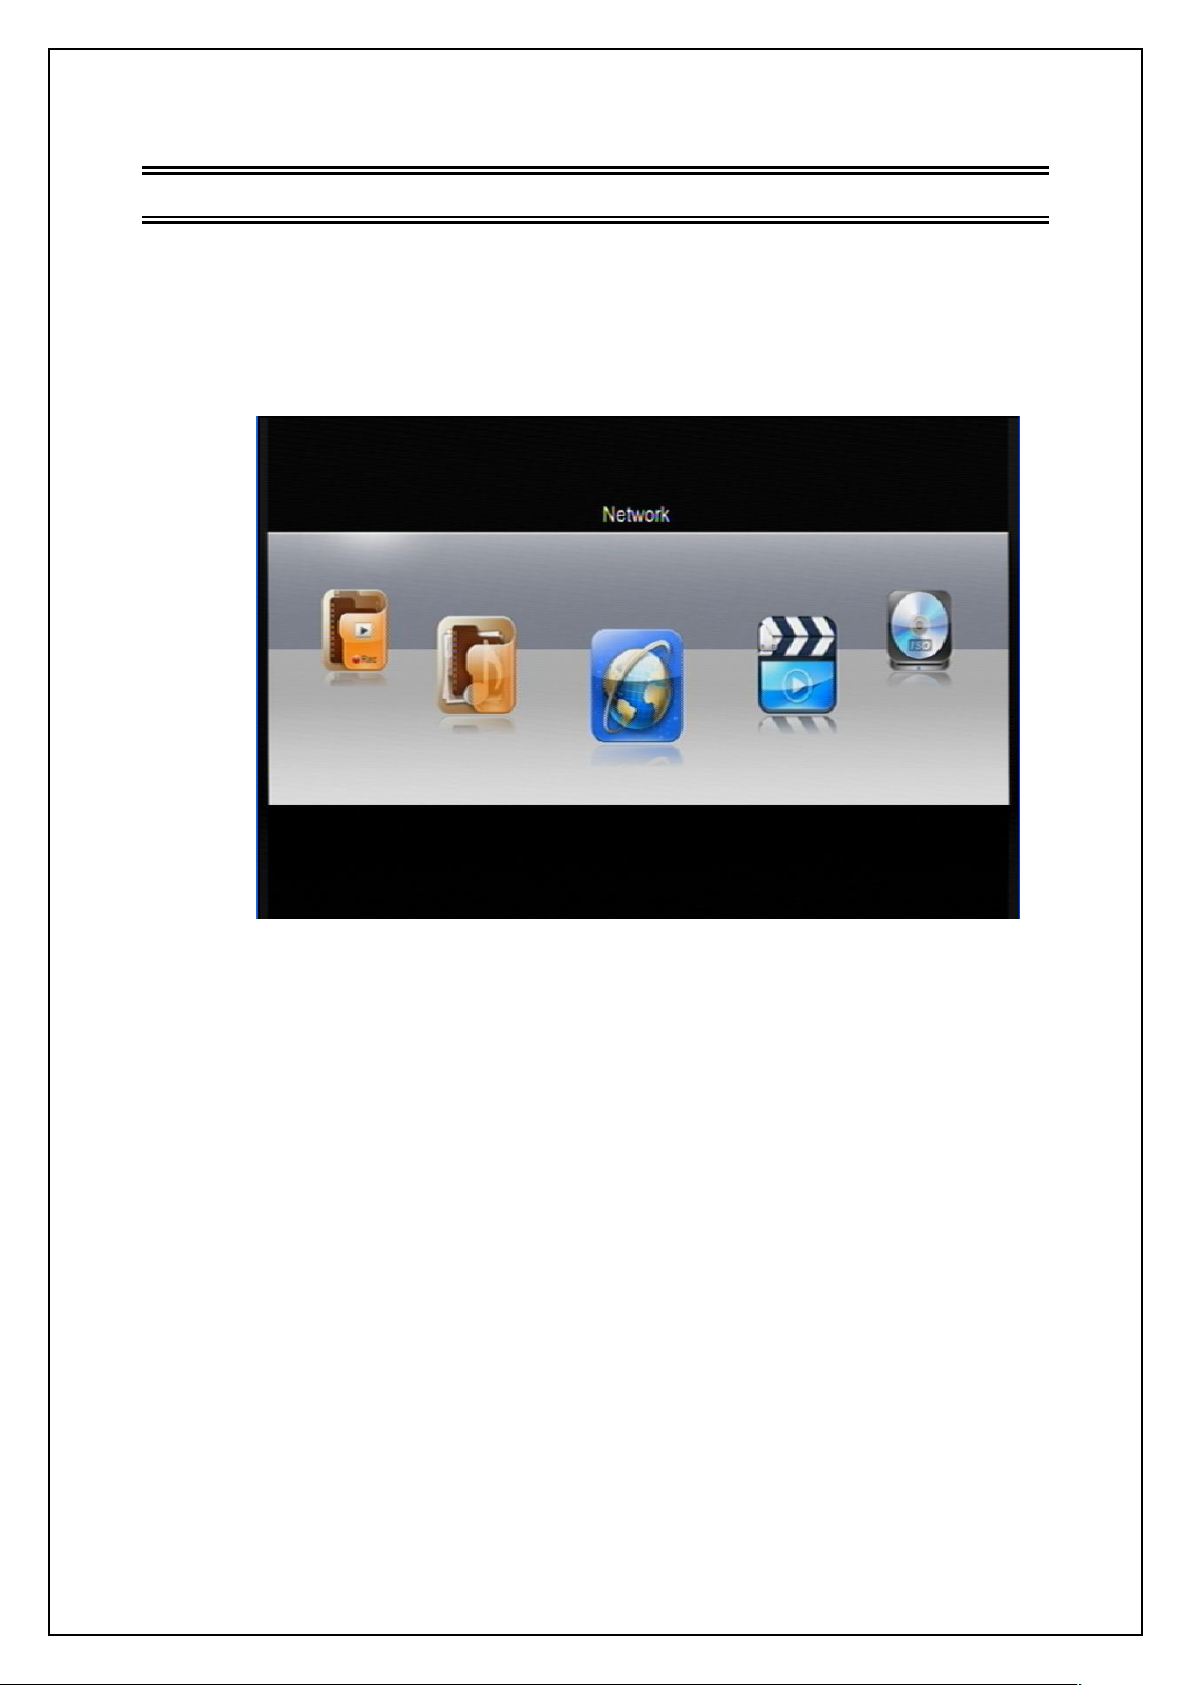
In Multimedia mode, you can play multimedia files and games; also can carry out record
management and disk management. See the figure 3-8:
Module Select :displays the current multimedia type: Network, Movie, ISO, Music, Photo,
Game, Ebook, Record Manager or Disk Manager. The ‘Home’ menu as figure below:
Multimedia - “Home” menu
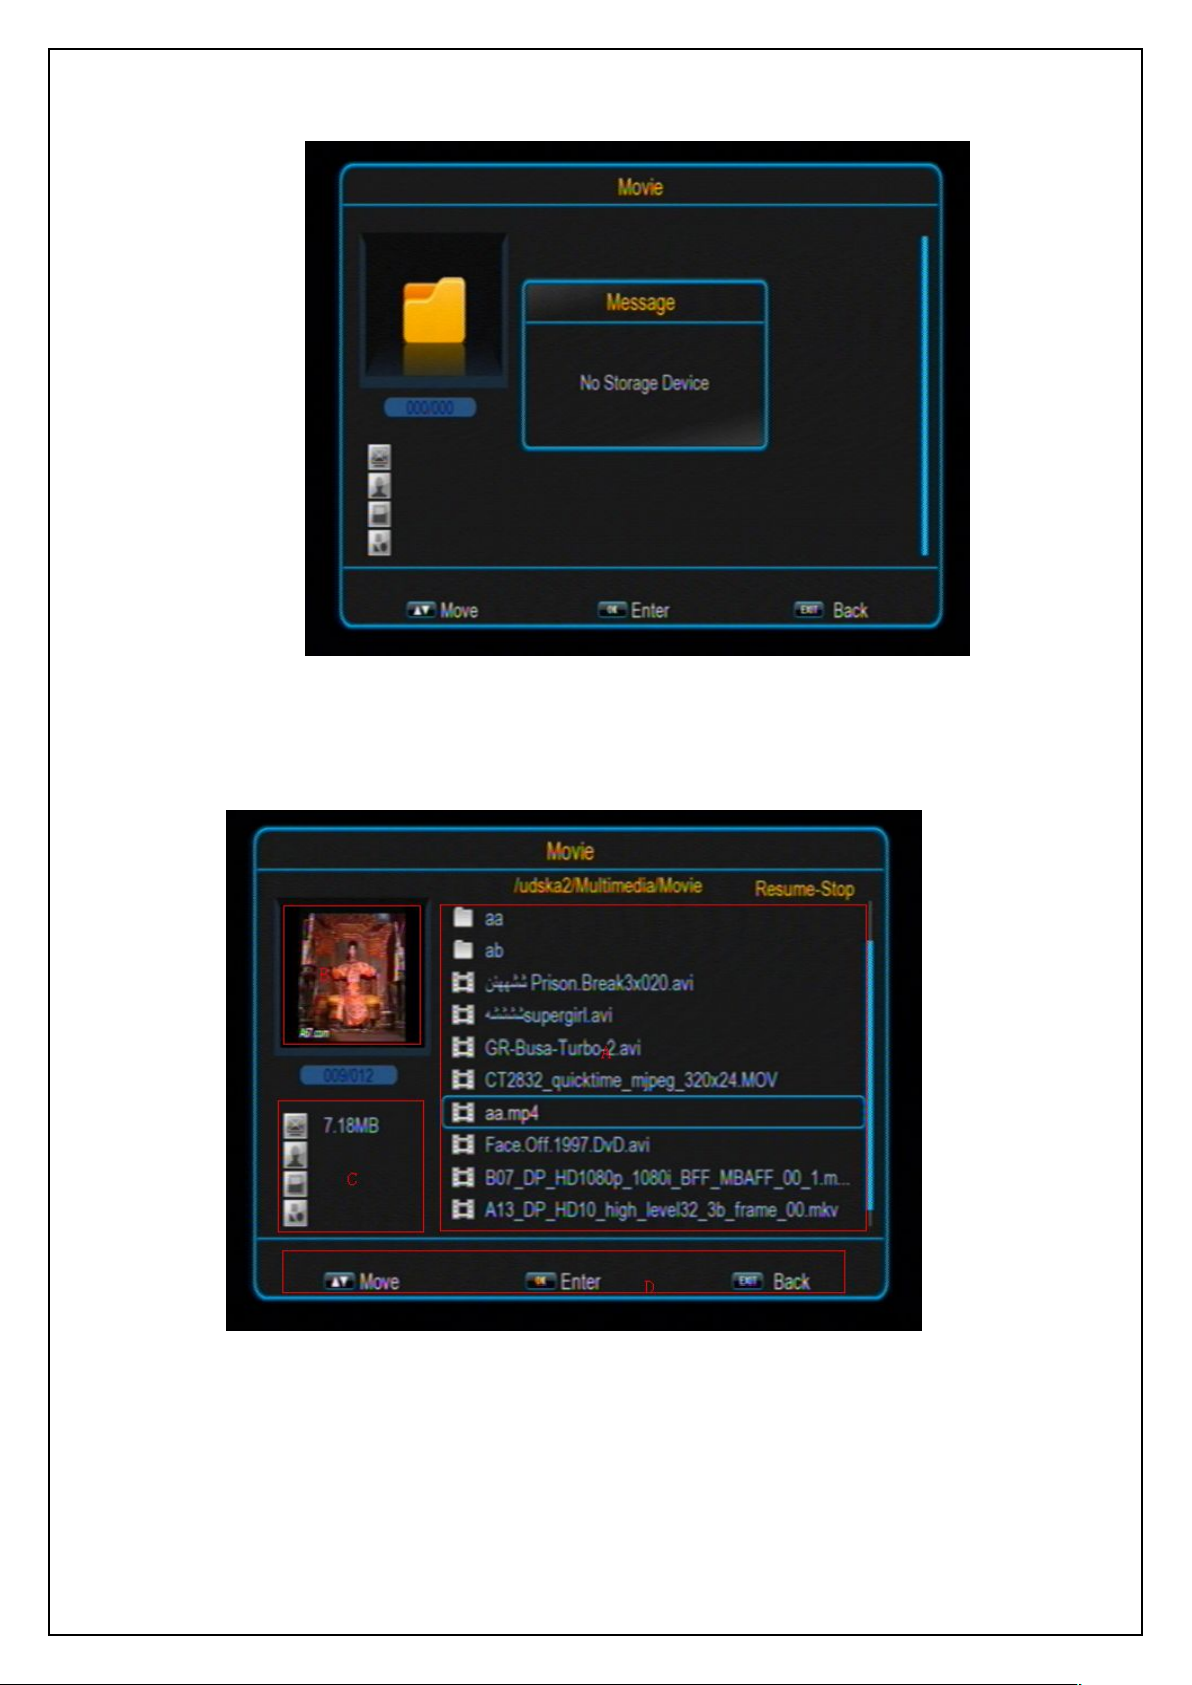
When the system has started, press SOURCE key to switch to the Multimedia mode. The
system will auto check whether there is a storage device (USB/CARD). If there is no USB
device or card, the following message will appear:
Page 26
USER’S MANUAL
26
NO USB (CARD) Device
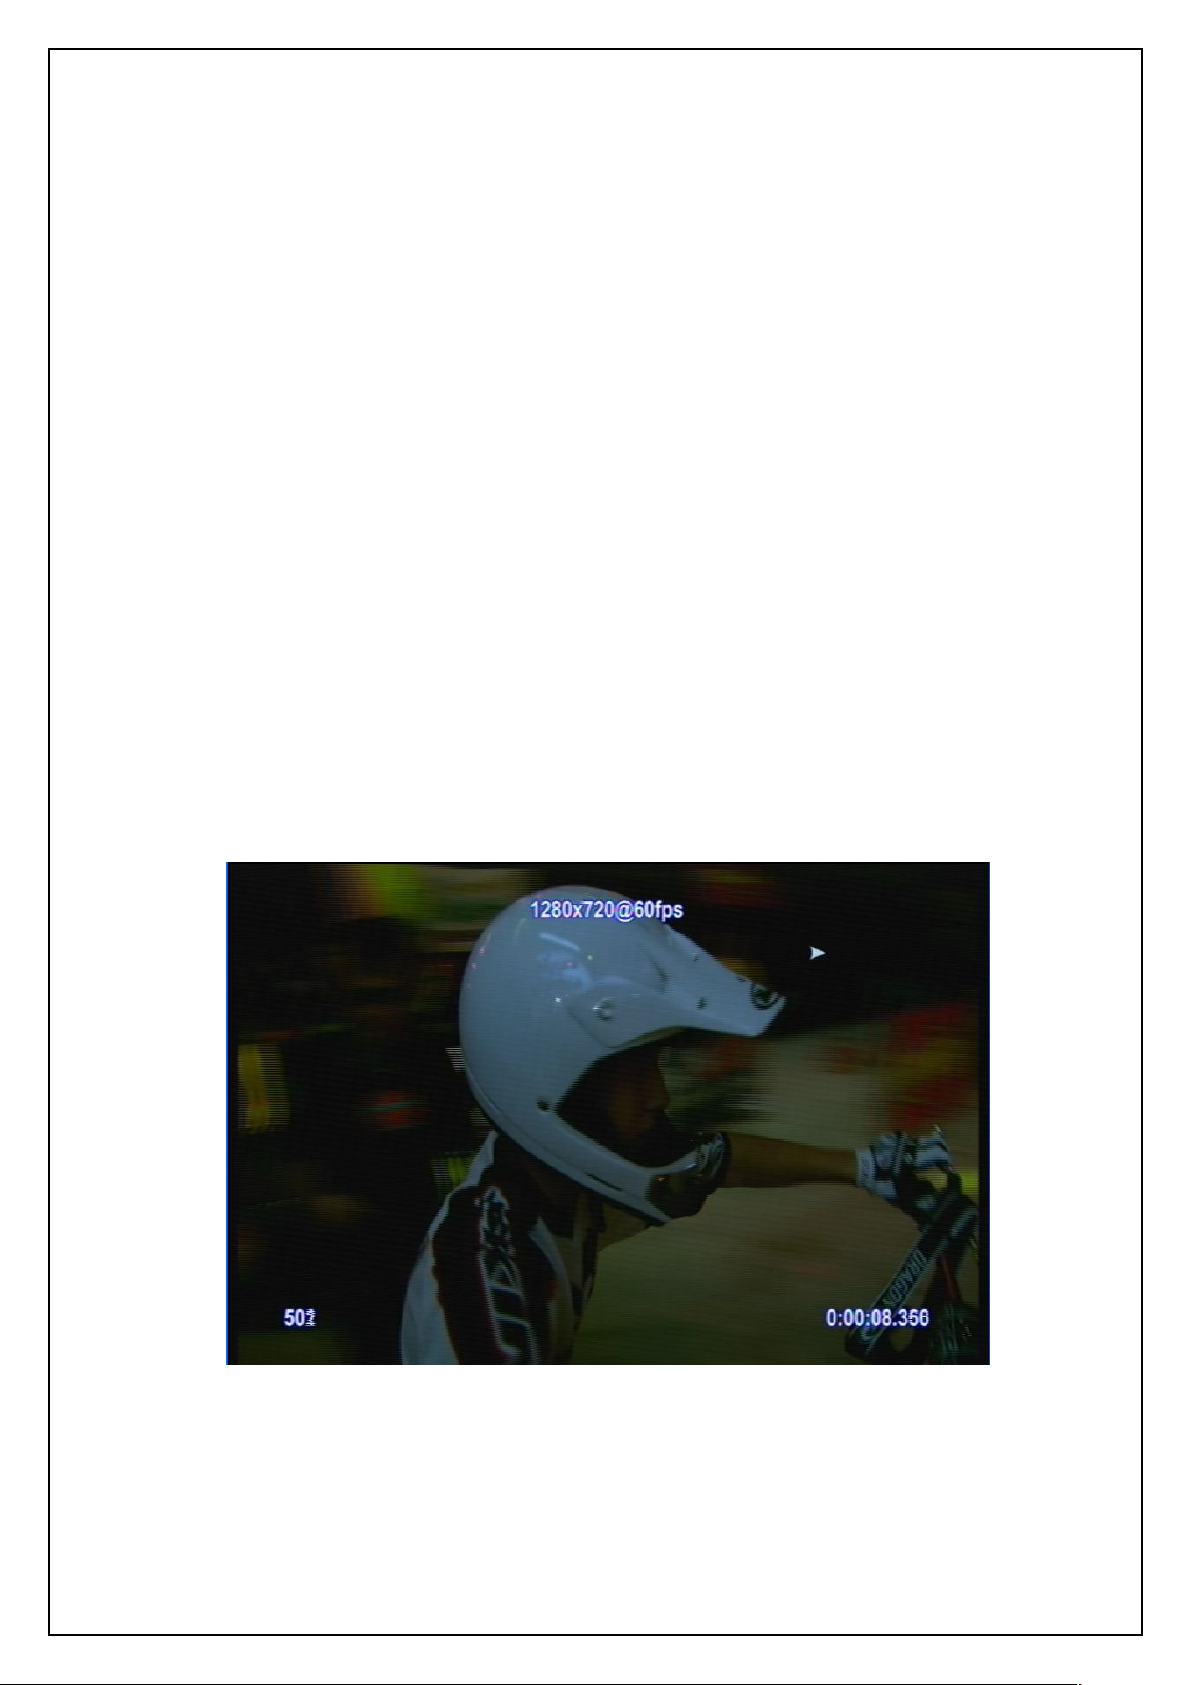
Once a USB device or card is found, the system will initialize the USB device or card. When
complete, the following interface will appear:
USB (CARD) Device Inserted
A – Module Select Area A – List Area B – Preview Area
C – File Info D – User Operation Tips
If the USB device or the card has more than one partition, all the partitions can be displayed.
Page 27
USER’S MANUAL
27
List Area (A) displays the file and folder list of the current partition or directory.
Preview Area (B) is used to preview photos.
File Info Area (C) shows the information of the selected media file.
User Operation Tips Area (D) shows the available keys and their functions.
Press DOWN key to enter the List Area (A).
In the List Area,
press OK or RIGHT keys to enter the current partition or directory;
press EXIT or LEFT key to go to the upper level directory;
5.1 Movie
Press UP/DOWN keys to select the previous or next video files.
Press OK/RIGHT keys to play the selected video file. (If the video file is under a folder,
At present the system support the following partition formats: FAT, FAT32 and NTFS.
In Multimedia Mode, the interface can be divided into 6 areas (see the figure above):
After entering the Multimedia mode, the highlight is in the area A by default. You can -
The Movie module is for playing video files stored on the USB (CARD) device.
In Movie Module press UP or DOWN keys to enter the video file list area.
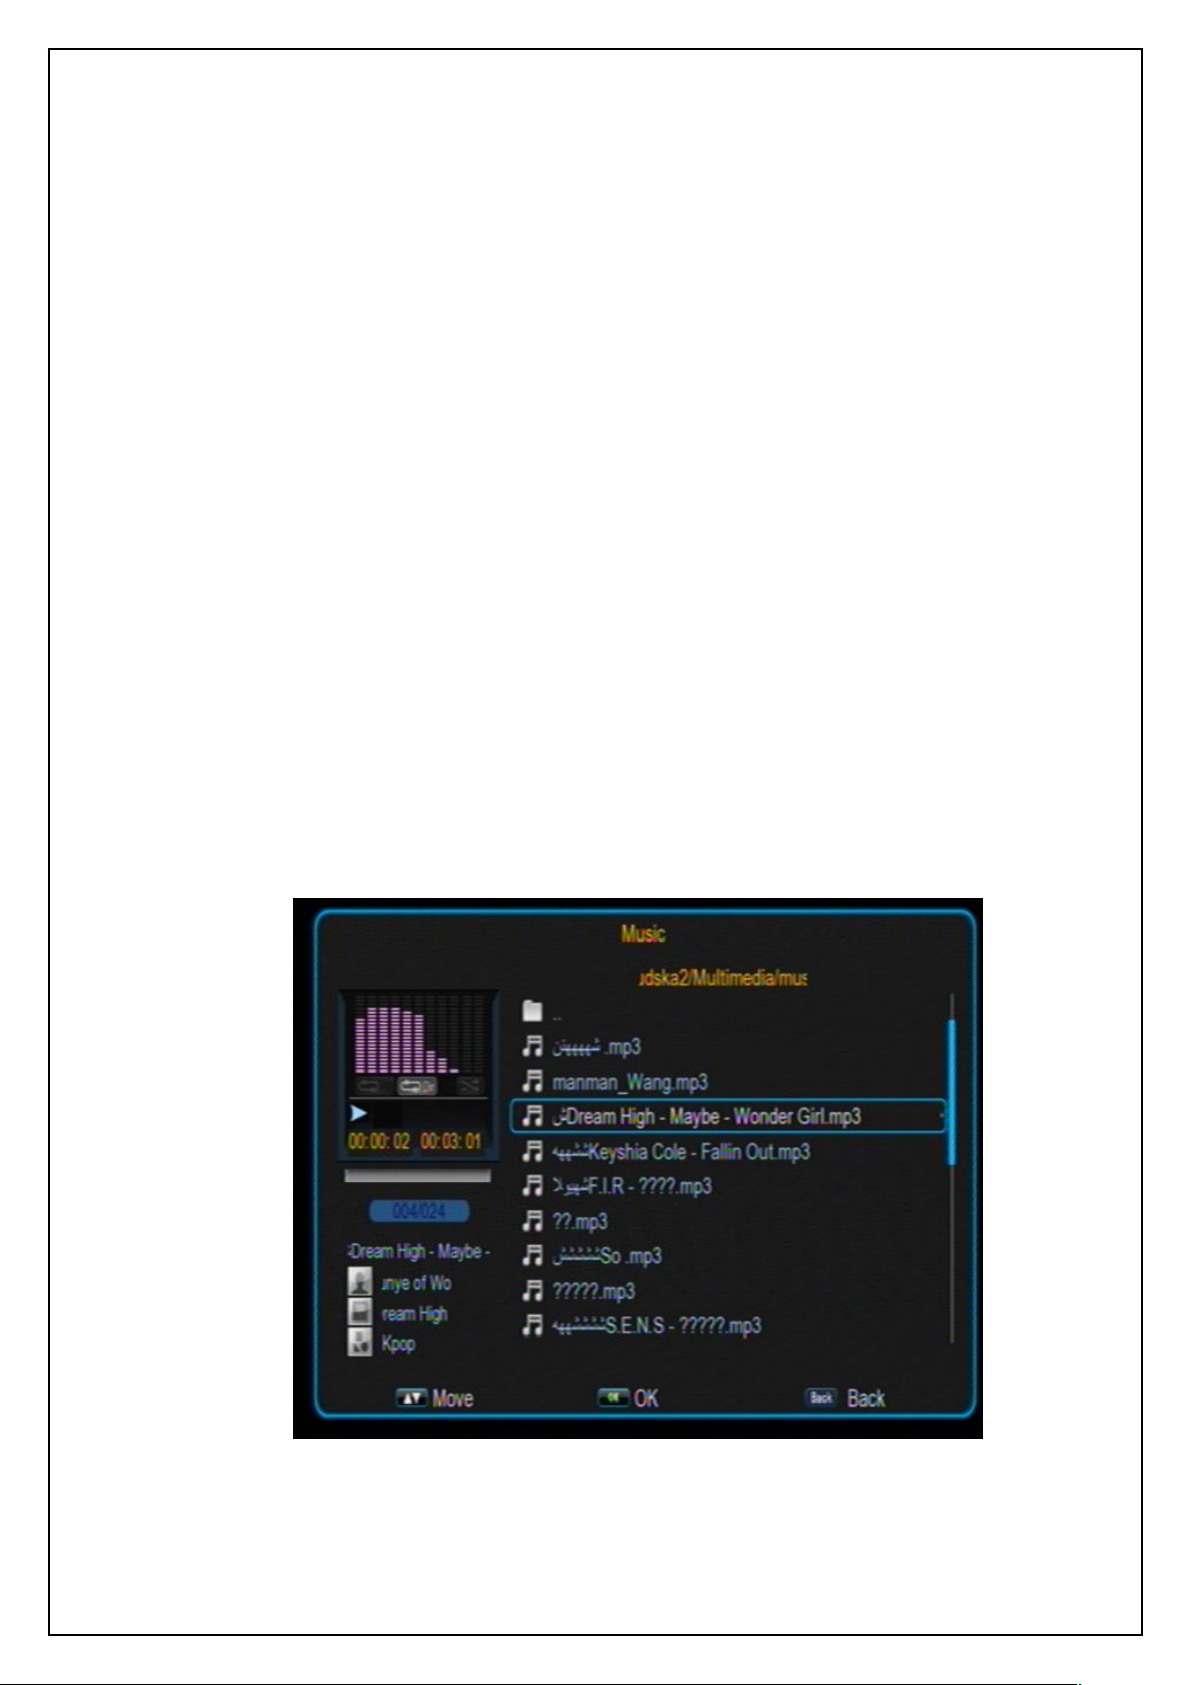
After selecting a movie, you can press OK key to play it. The play interface is as below:
Video Play Interface
pressing LEFT key can exit the folder.)
Page 28
USER’S MANUAL
28
Video Info: When a video playback starts, the information of the video file will be shown
Fast Play: Press FR/FF keys to fast move forward or backward through the video. The
Switch Video: Press PREV/NEXT keys to go to the previous or next video files to play.
Stop: Press STOP key to stop the current playback and return to the Multimedia Mode
Pause: Press PAUSE key to pause the current playback. Pressing PLAY key can
Exit: Press EXIT or EXIT keys to exit the playback state.
5.2 ISO
5.3 Music
Press UP/DOWN keys to select the previous or next audio files.
for 3 seconds. You can press INFO key to show the information again after it disappears.
max fast play speed is x16. Press PLAY key to resume the normal playback.
interface.
resume the playback.
Please See 5.1 movie.
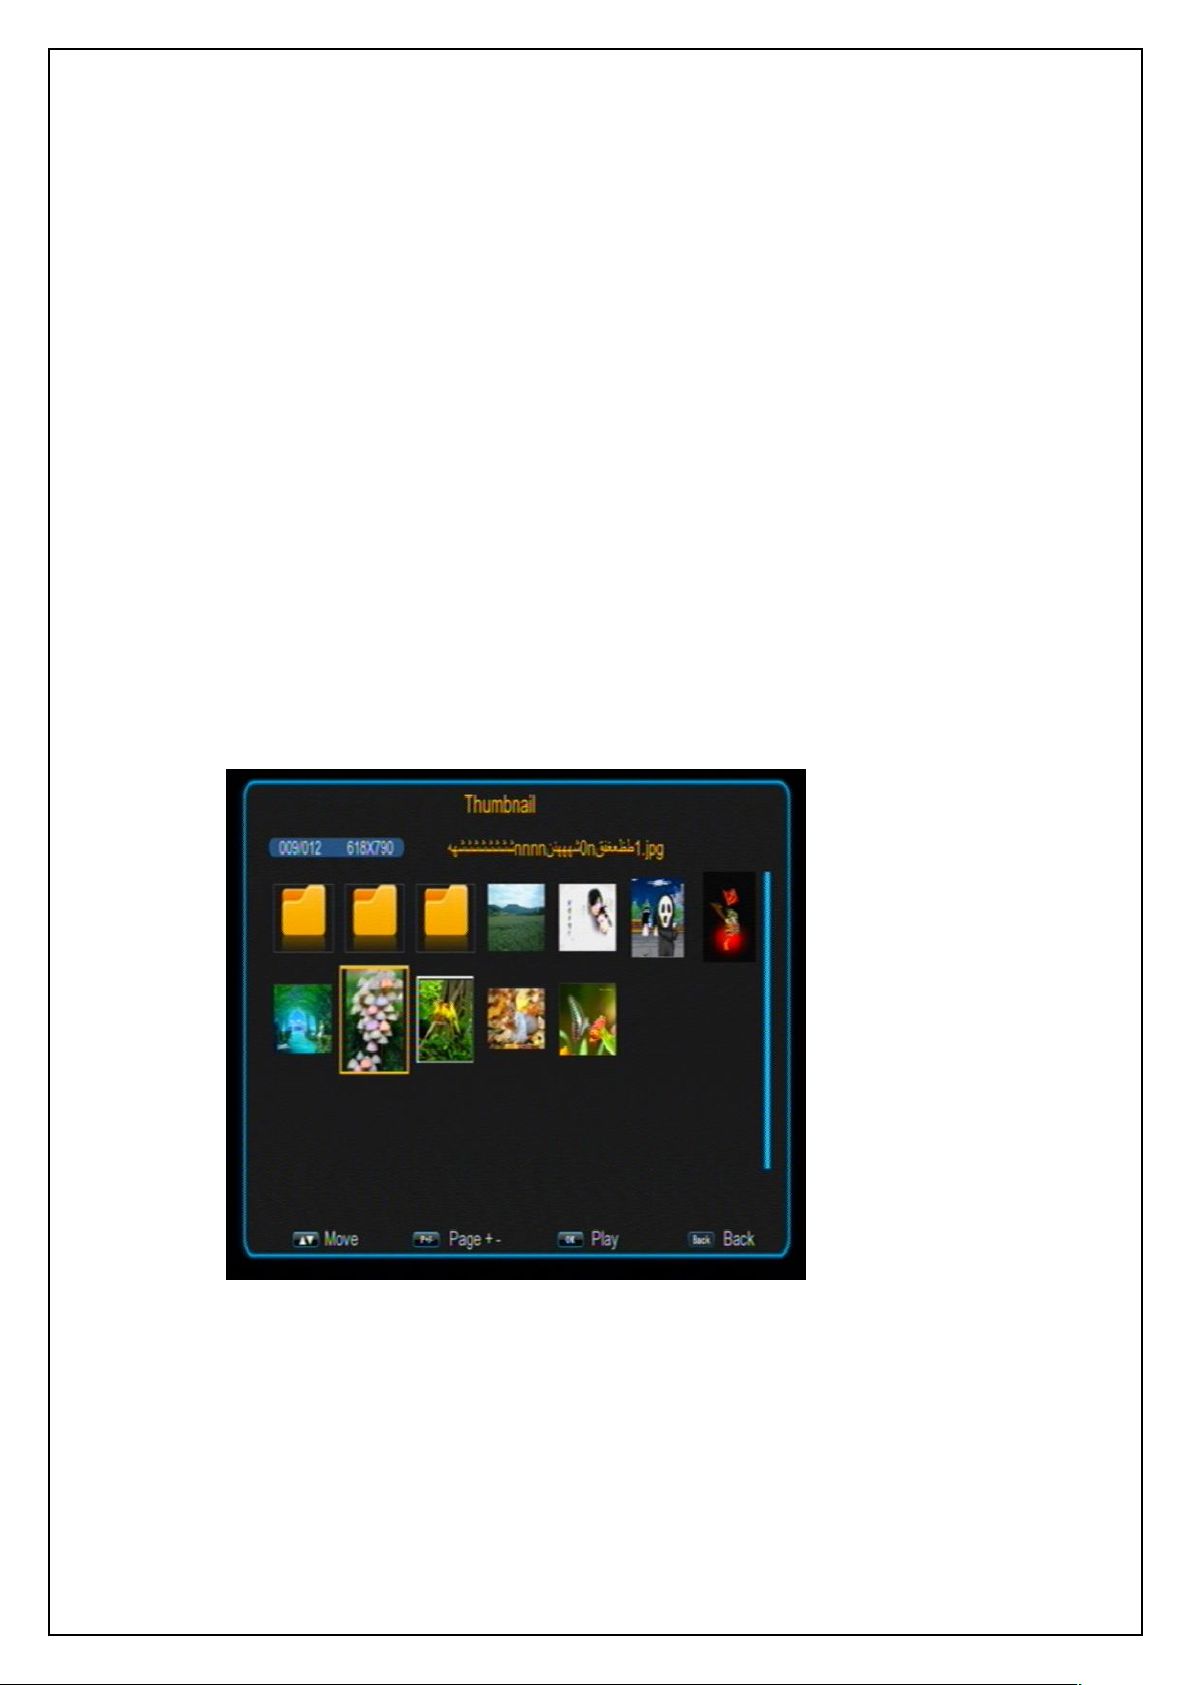
The Music module is for playing audio files stored on the USB (CARD) device. Most popular
audio formats are all supported.
In the Module Select Area, press LEFT/RIGHT keys to select the Music type, then press OK
or DOWN keys to enter the audio file list area. See the figure below:
Music
Page 29
USER’S MANUAL
29
Press OK/RIGHT keys to play the selected audio file. (If the audio file is under a folder,
Fast Play: Press FR/FF keys to fast move forward or backward through the audio file.
Switch Audio: Press PREV/NEXT keys to go to the previous or next audio files to play.
Stop: Press STOP key to stop the current playback.
Pause: Press PAUSE key to pause the current playback. Pressing PLAY key can
Exit: Press EXIT keys to exit the playback interface and return to the multimedia type
5.4 Photo
pressing LEFT key can exit the folder.)
The max fast play speed is x32. Press PLAY key to resume the normal playback.
resume the playback.
select interface. (Note that if the background play function has been turned on, the
music will not stop but become background music.)
The Photo module is for playing image files stored on the USB (CARD) device. Most popular
image formats are all supported.
In the Module Select Area, press LEFT/RIGHT keys to select the Photo type,
Photo
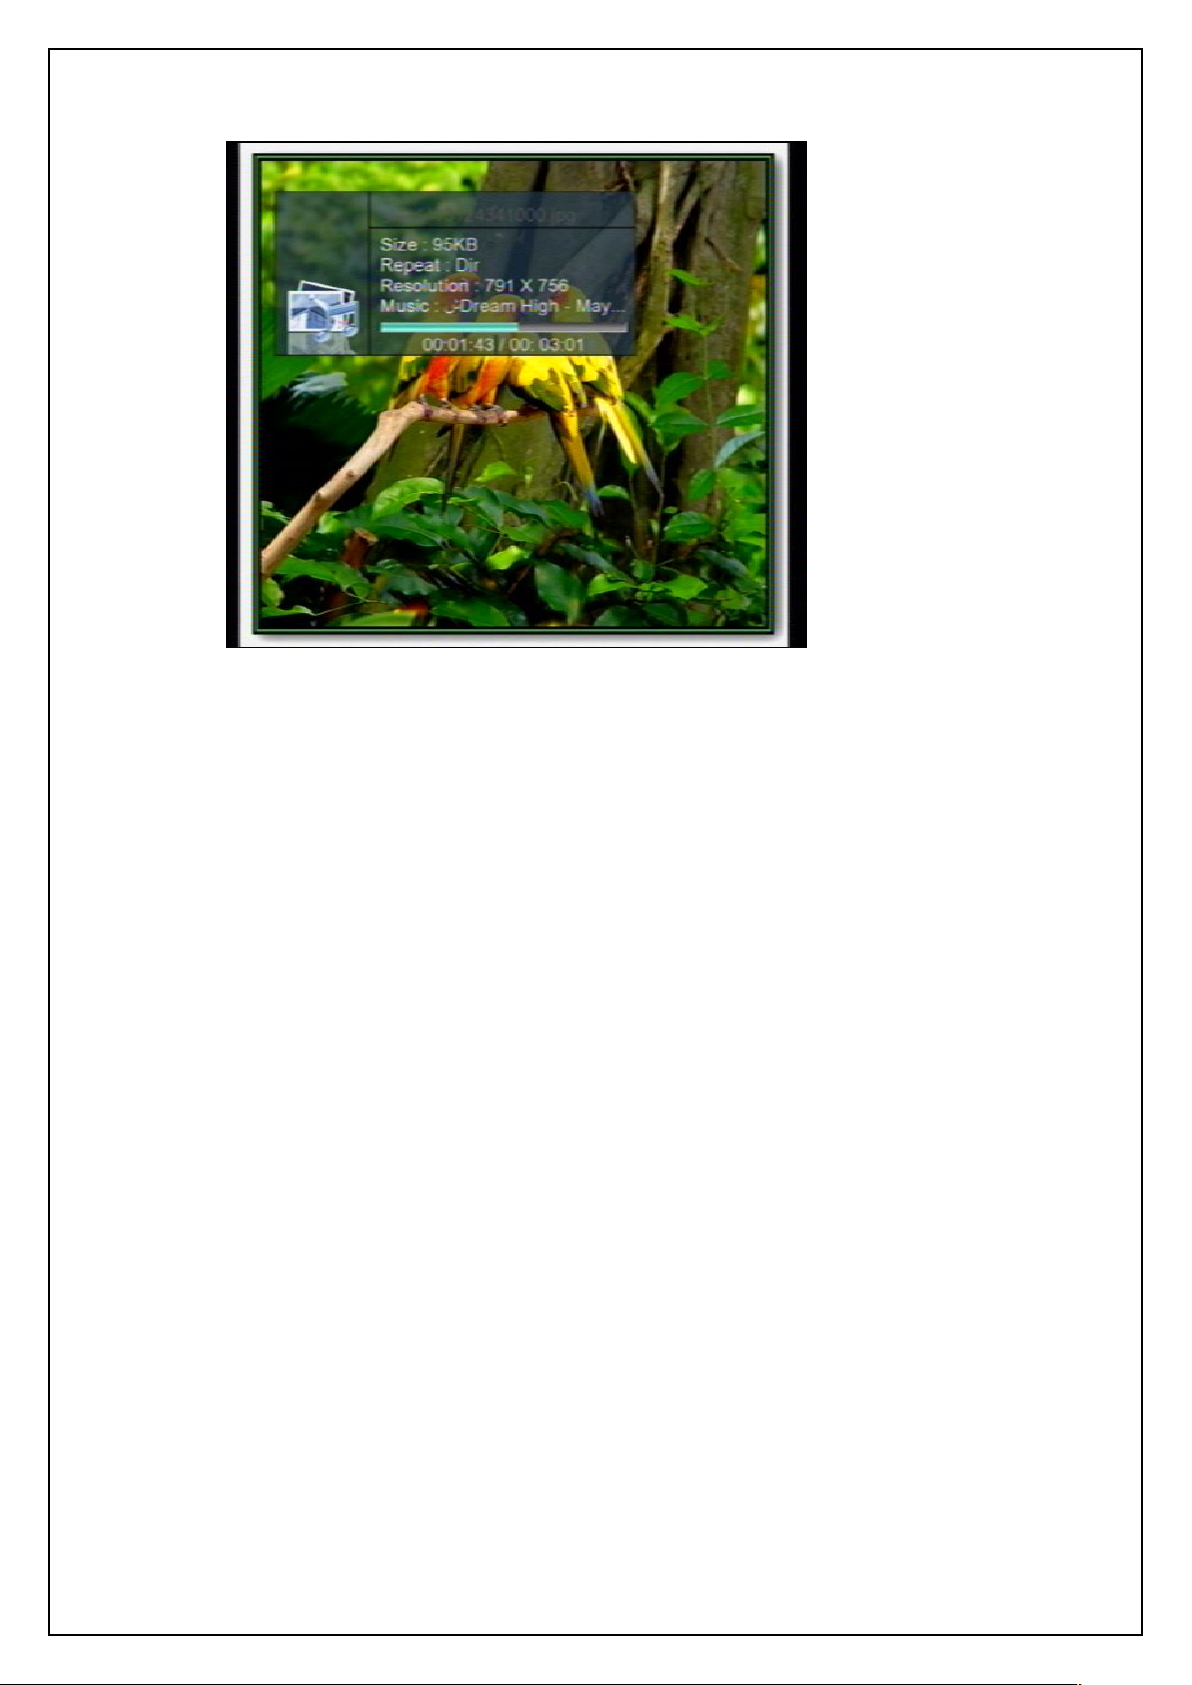
Press OK keys to play the selected image in full screen mode. By default the system will
enable the slideshow function to play all the images in the current directory. See the figure
below:
Page 30
USER’S MANUAL
30
Switch Image: Press PREV/NEXT keys to play the previous or next images.
Zoom: Press the ZOOM function key to enter the zoom state. In this state, you can –
press FR/FF keys to zoom in or out the image;
press LEFT/RIGHT keys to move the focus on the image left or right;
press UP/DOWN keys to move up or down;
press the red function key again to exit the zoom state.
Image Info: Press INFO key to show the detailed information of the image.
Rotate: Press LEFT/RIGHT keys to rotate the image 90° anticlockwise or clockwise.
Flip: Press UP/DOWN keys to flip the image up or down.
Exit: Press EXIT or EXIT keys to exit the playback state.
5.5 Native32 Games
Show Photo
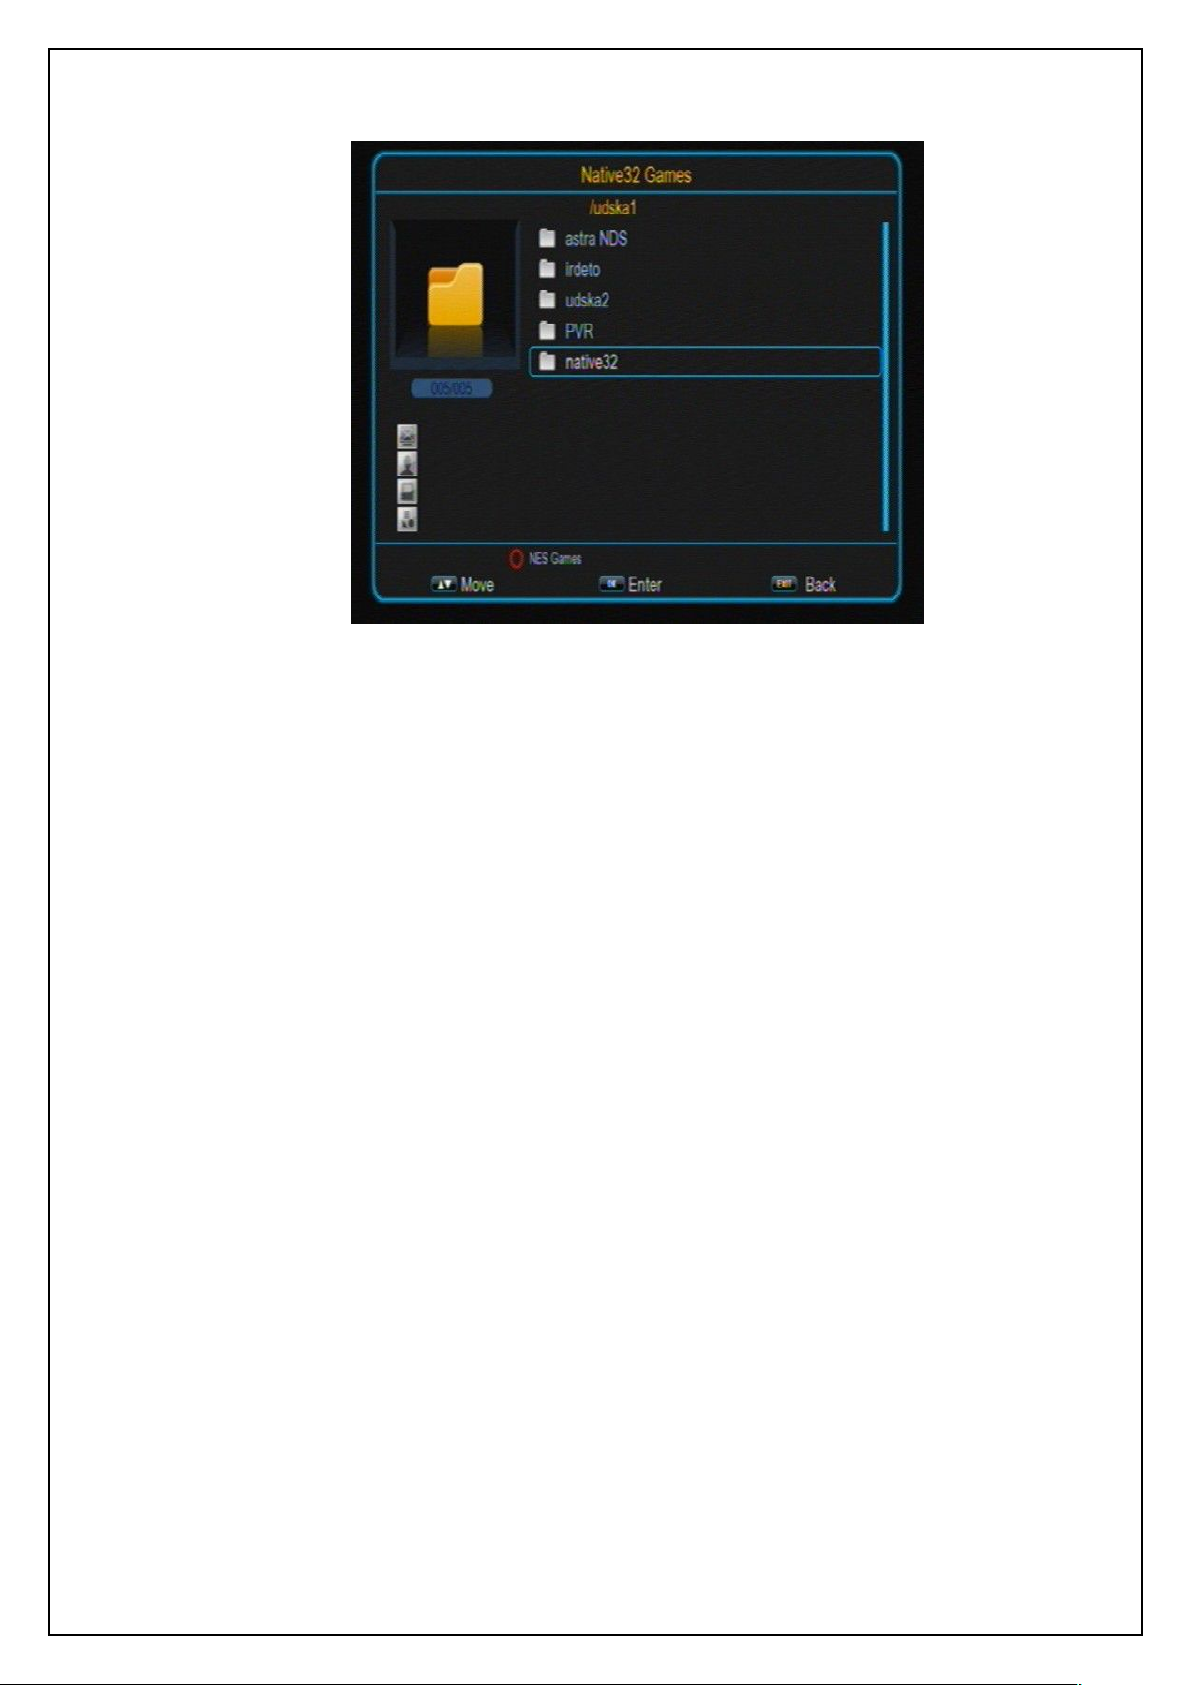
The Native32 Games modules provide several small games. See the figure below:
Page 31
31
Native32 Games
In Native32 Games list, after selecting a game press OK key to start the game. Game
LEFT/RIGHT key: Control left and right directions.
UP/DOWN key: Control up and down directions.
OK key: Confirm selection.
EXIT key: Exit the game.
5.6 Record Manager
USER’S MANUAL
control operations are as below:
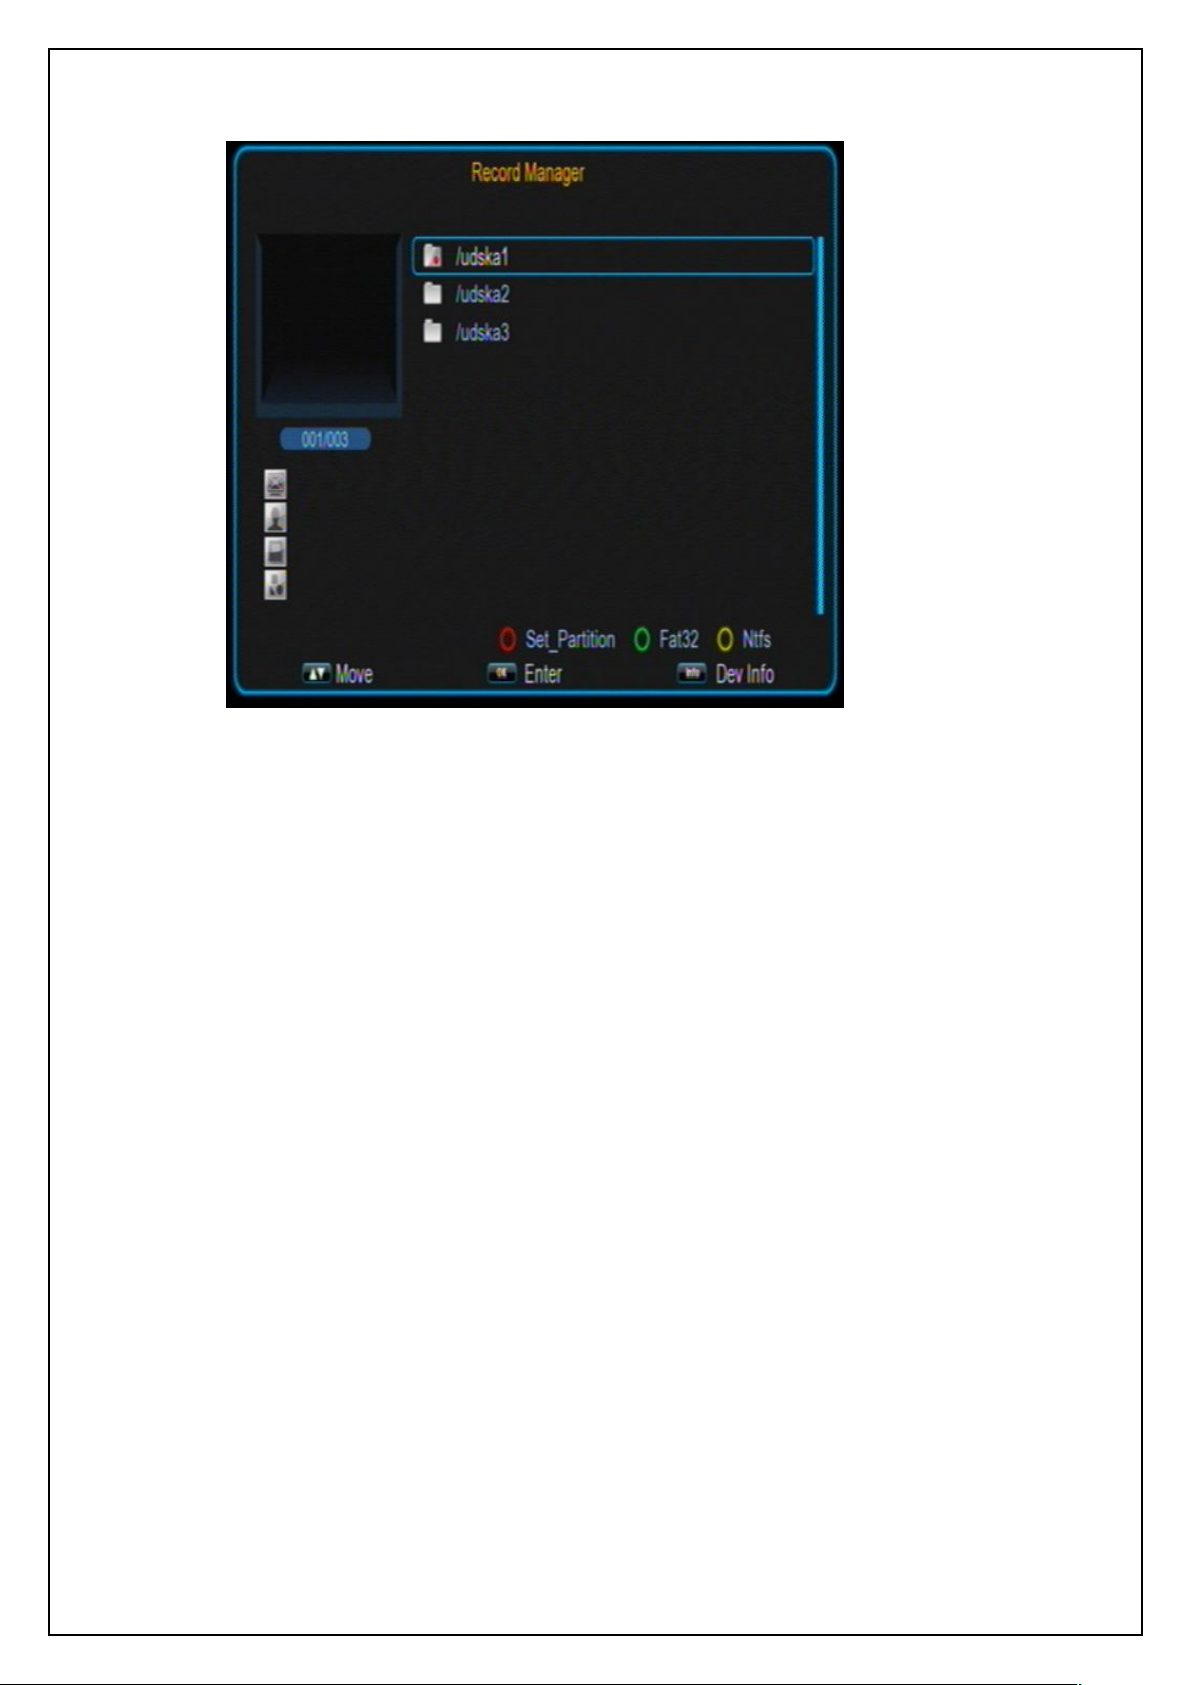
The Record Manager module is for users to carry out record setting and view the programs
recorded. See the figure below:
Page 32
USER’S MANUAL
32
Red function key: Set the selected partition as the default record partition.
Green function key: Format the selected partition into FAT32 format.
Yellow function key: Format the selected partition into NTFS format.
Recorder Manager
If the USB (CARD) device has more than one partition, you should manually set the partition
in which record files will be saved.
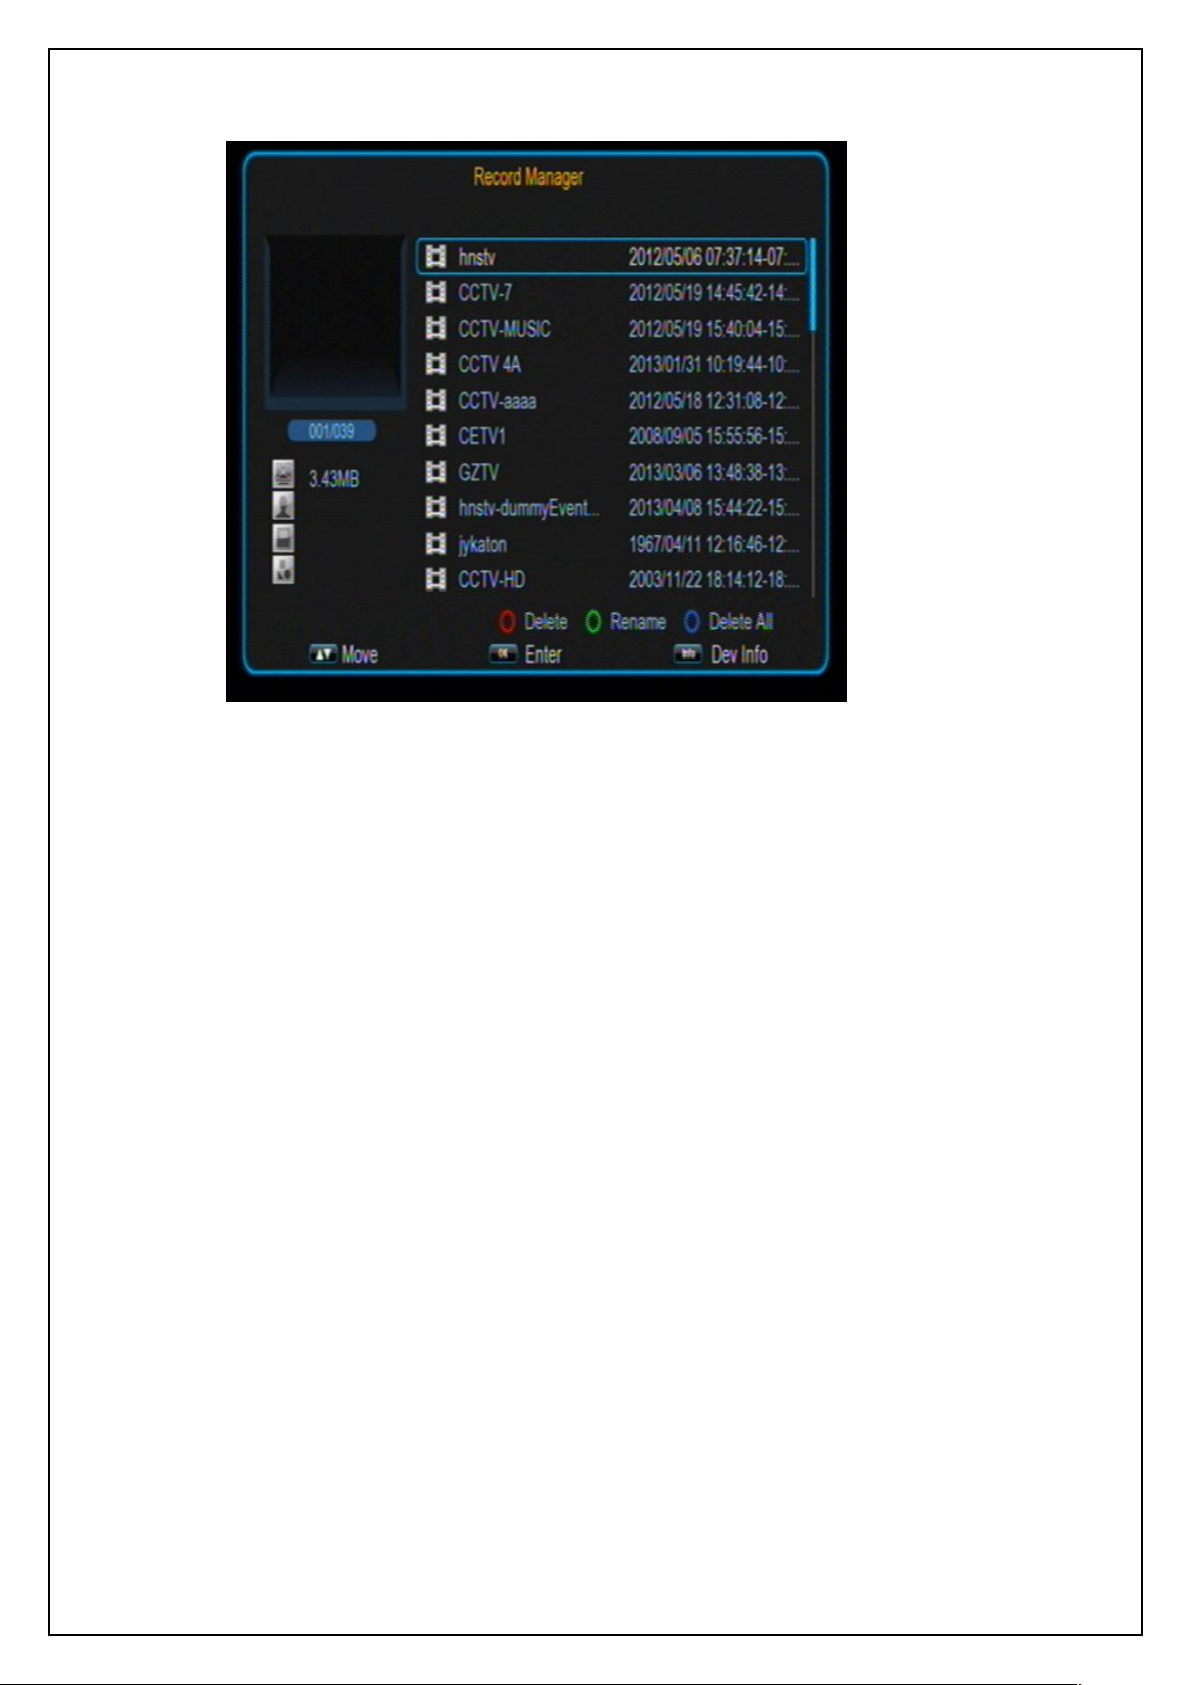
To view record files, select the partition that stores the record files and then press OK key to
enter it. The system will auto list all the recorded programs, see below:
Page 33
USER’S MANUAL
33
To play a record file: press UP/DOWN keys to select the record file first and then press
To delete a record file: select it first and then press the red function key.
To rename a record file: select it first and then press the green function key.
5.7 Disk Manager
Record Files
OK/RIGHT keys to play it.
During playback, the things you can do only include to press FR/FF keys to fast
backward or forward play the file, and to press STOP key to return to the record file list.
Both file switching and repeat mode setting cannot be done.
When the playback completes, the system will auto return to the record file list.
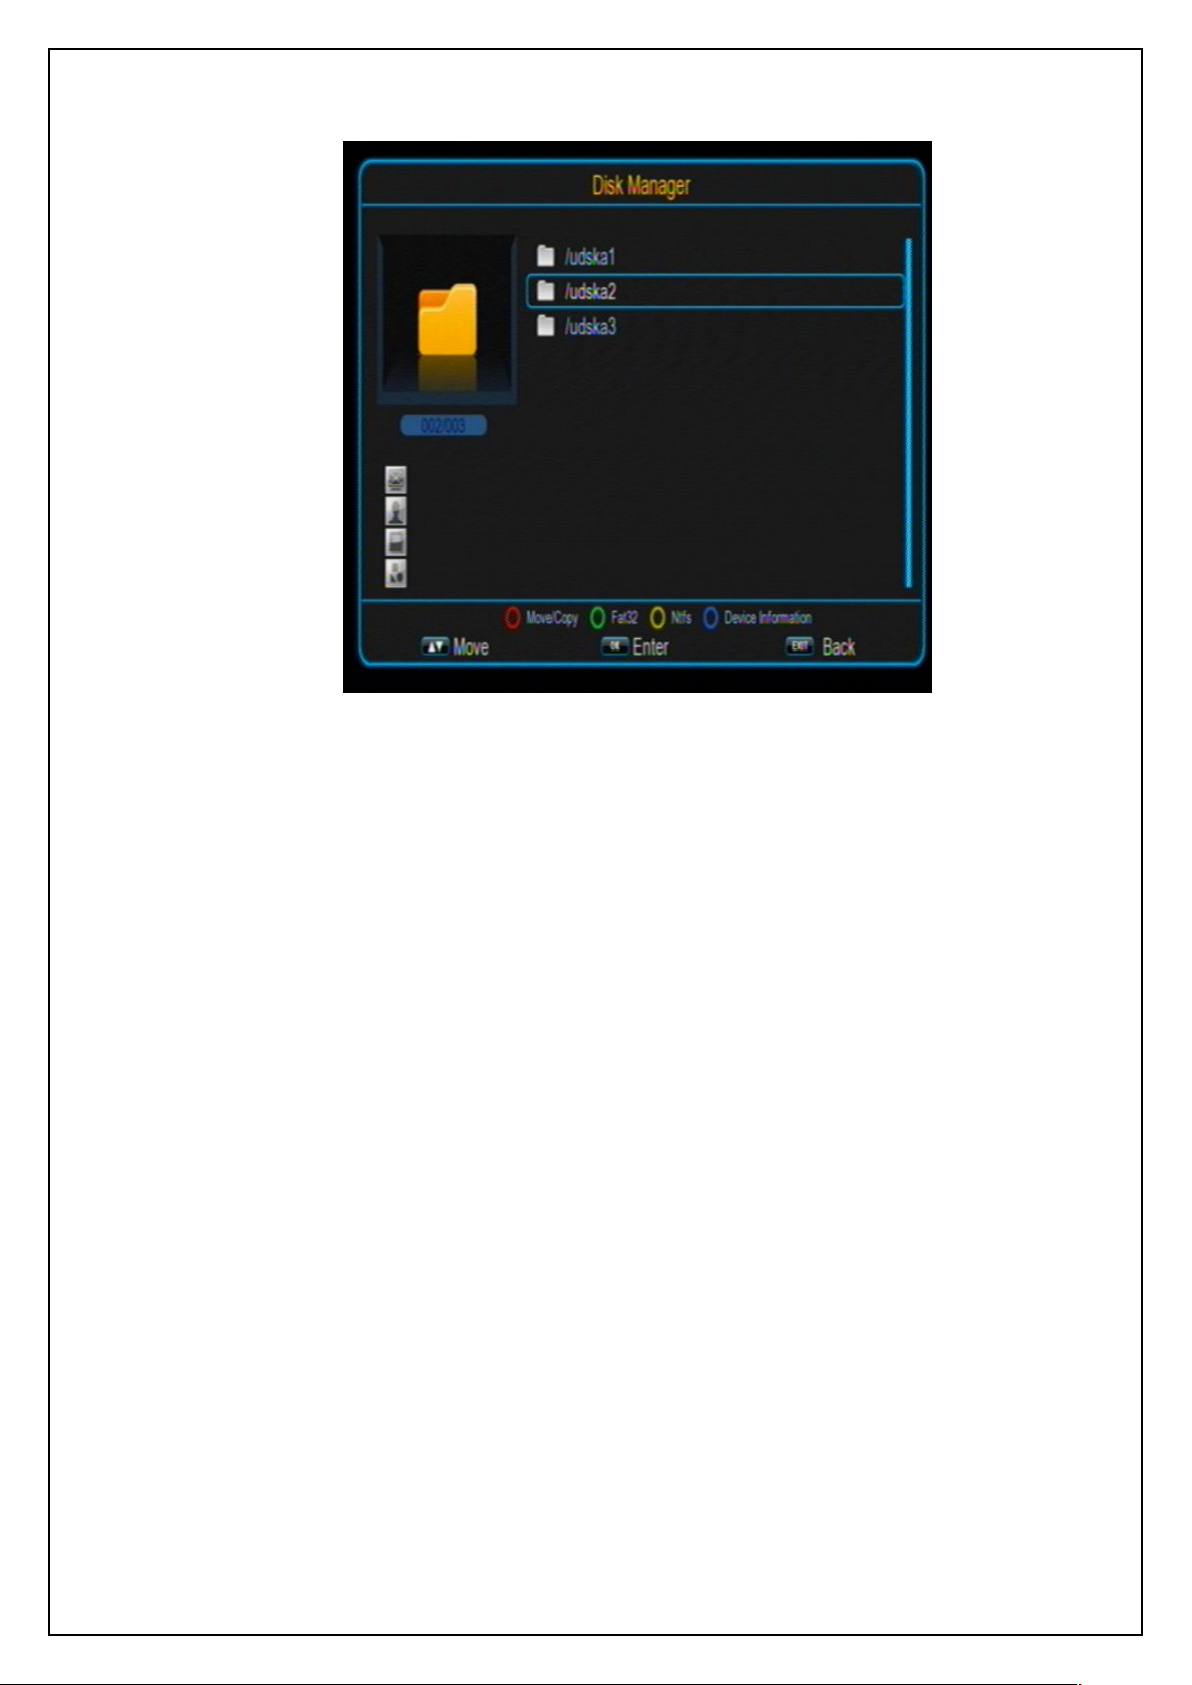
The Disk Manager module is for disk and file management. See the figure below:
Page 34
USER’S MANUAL
34
If the selected object is a partition:
Green function key: Format the selected partition into FAT32 format.
Yellow function key: Format the selected partition into NTFS format.
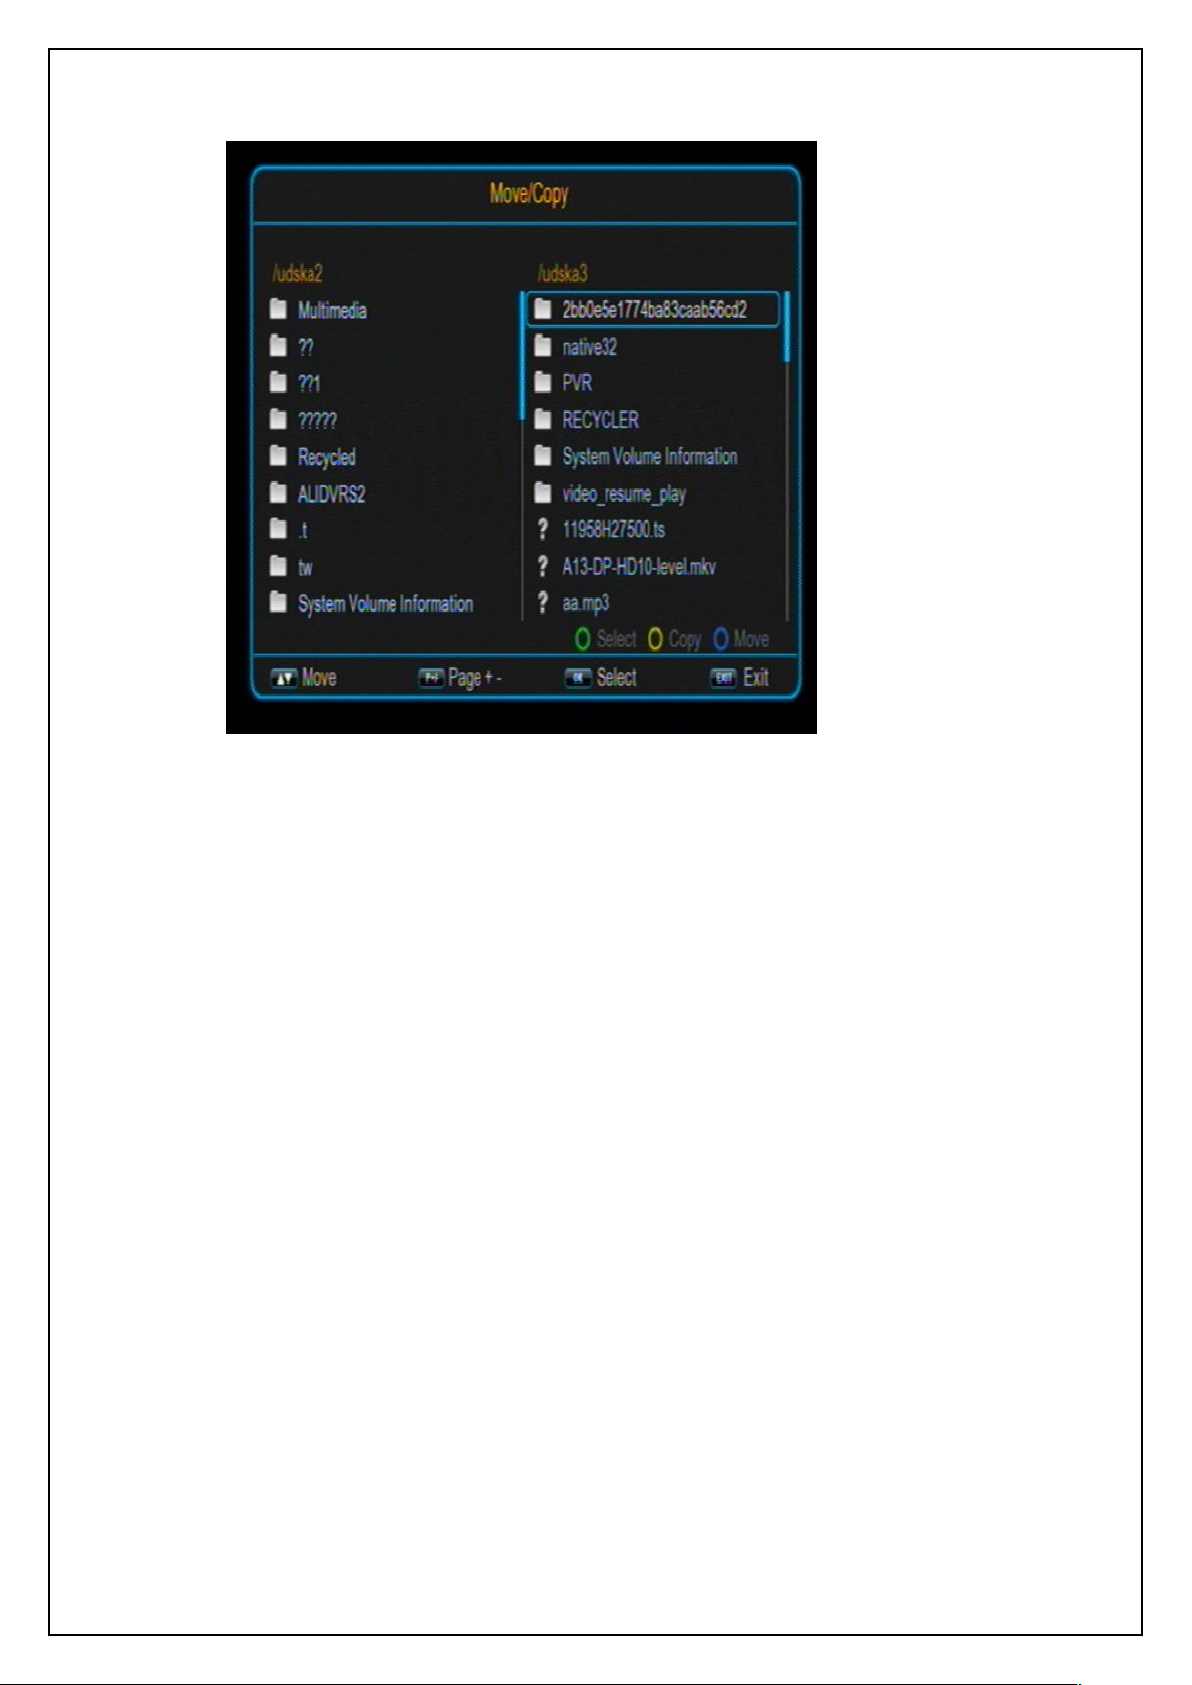
Red function key: Move or copy the files (folders) in this partition. See the figure
below.
Disk Manager
Page 35
USER’S MANUAL
35
If the selected object is a file (folder):
Red function key: Move or copy the selected file (folder).
Green function key: Rename the selected file (folder).
Yellow function key: Delete the selected file (folder).
5.8 EBook
Turning pages: Press PAGE+/- keys to turn page up and down.
Exit: Press EXIT keys to return to the book list.
Move
The left list is the Source list, the right list is the Destination list. Before moving or
copying a file (folder), the things you should do include: selecting the file (folder) from the
left list, then press the green function key to confirm your selection, and then entering
the destination directory in the right list. Next, to copy the file (folder) you have selected,
press the yellow function key; to just move it, press the blue function key.
The EBook module is for reading electronic books. TXT format is available. In addition you
can enjoy background music while reading.
Page 36
USER’S MANUAL
36
6 NETWORK MODE
Network Function
YouTube
Daillymotion
Native 32
Photo
Goolgle Map
News
Weather
IPTV
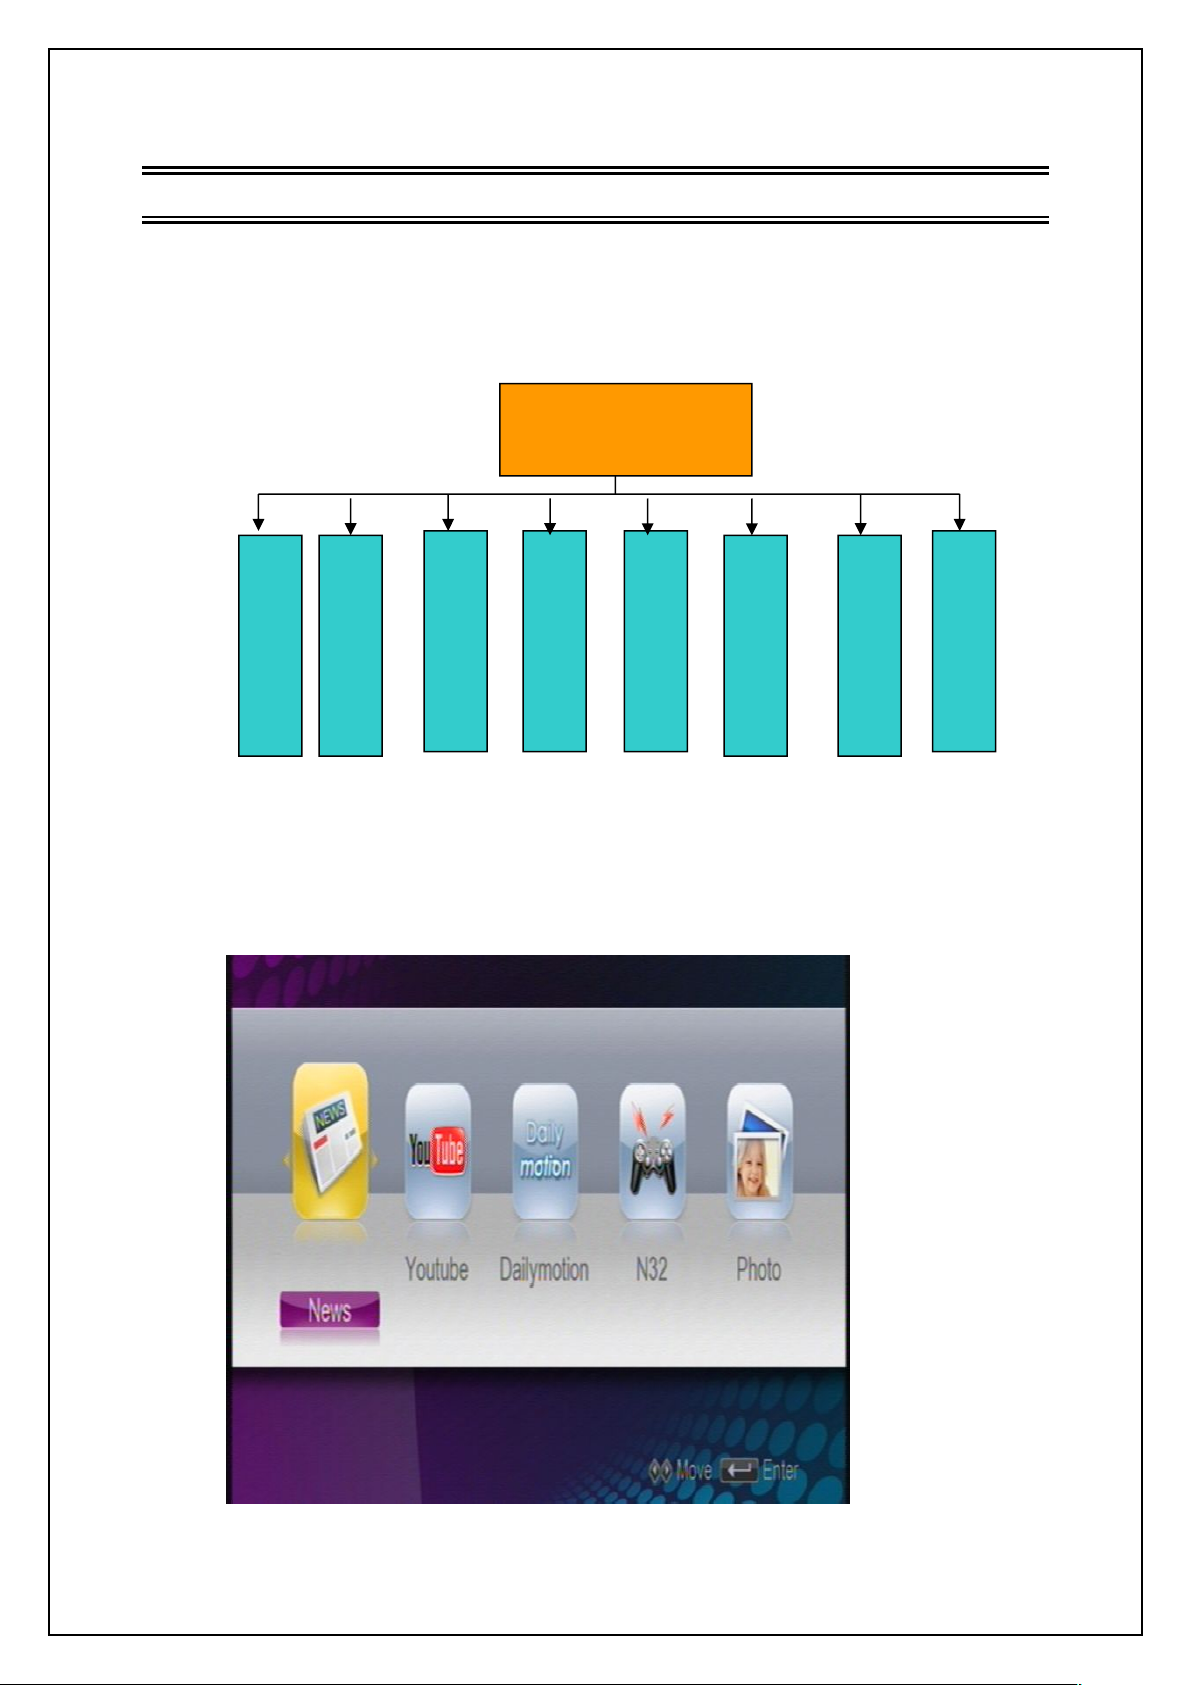
In the Network mode you can browse information and have entertainment from network,
which includes these modules: News, YouTube, Native32 Game, Photo, Google Map,
Weather and IPTV. See the figure below:
Network Mode Module Structure
When the system has started, press SOURCE key to switch to the Network mode. The
Network menu is as below:
Page 37
37
In this menu you can press LEFT/RIGHT keys to highlight a function module and then press
OK key to enter it.
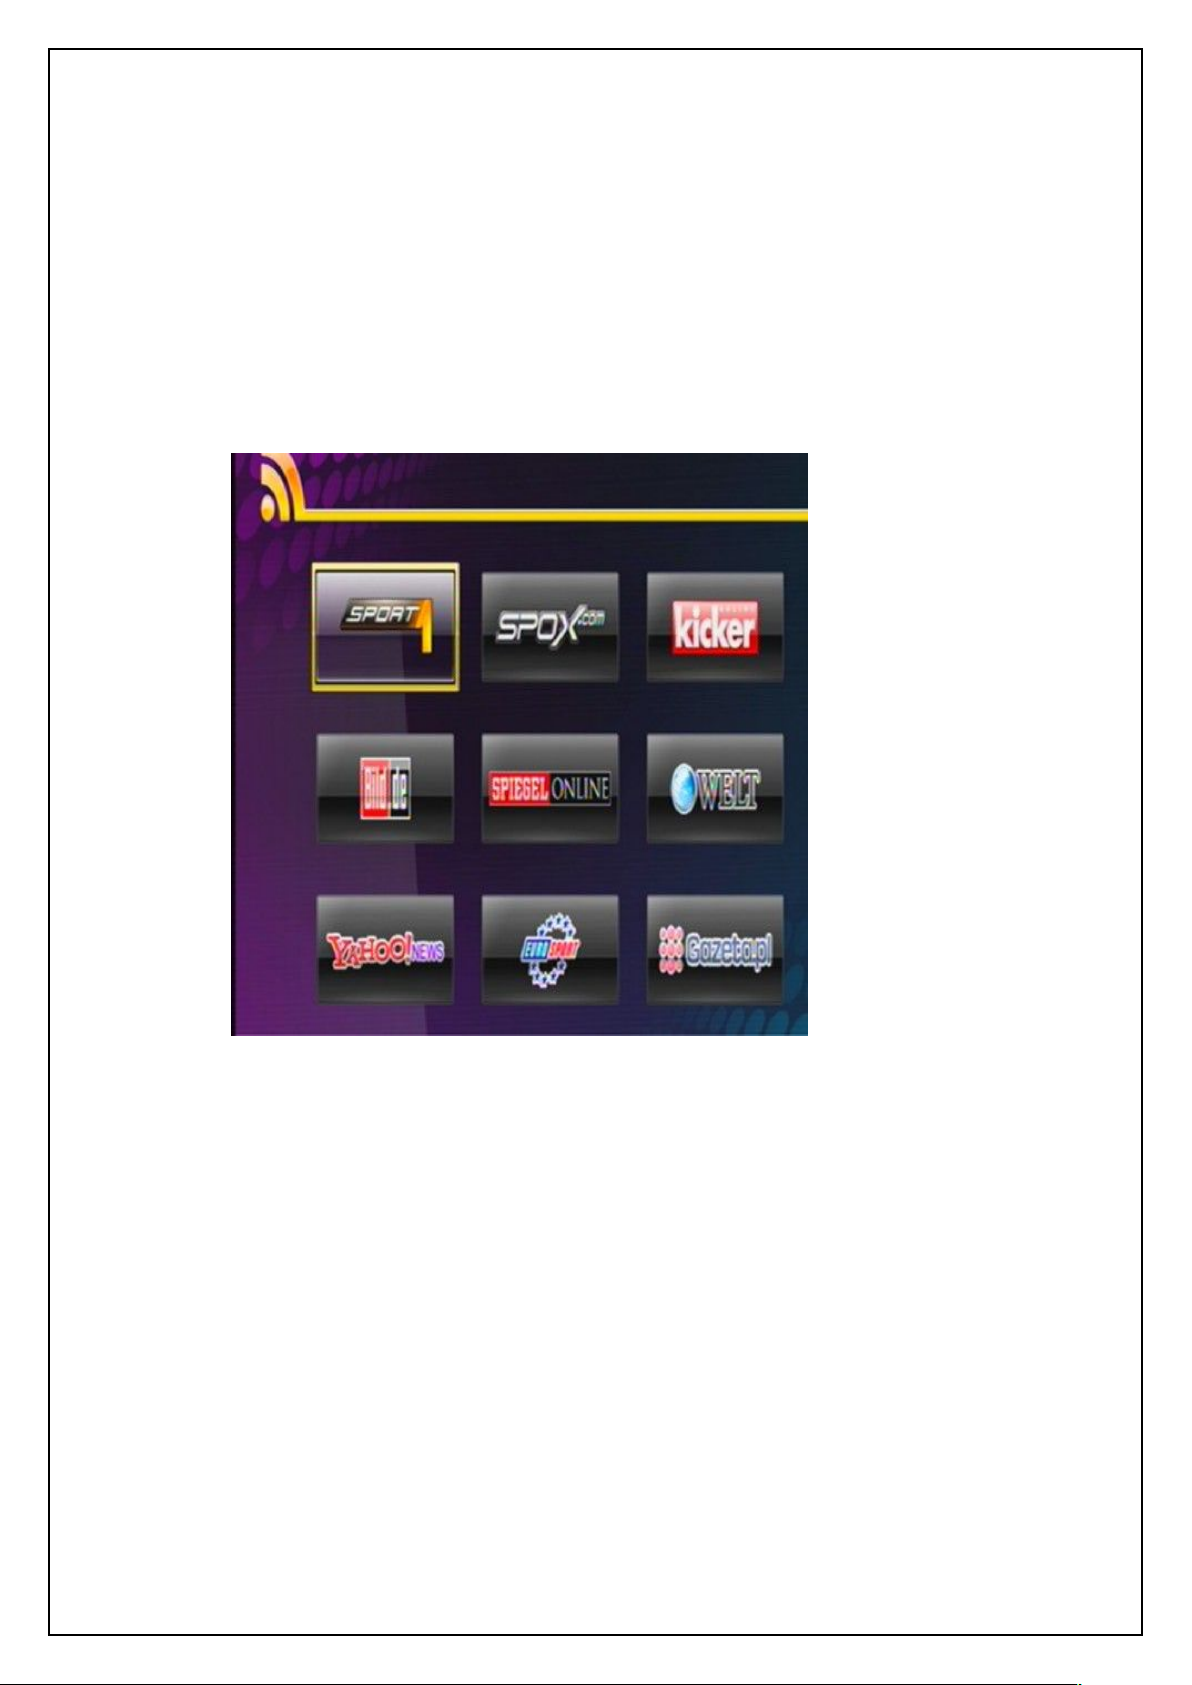
6.1 News
The news module is for reading news online. You can press UP/DOWN/LEFT/RIGHT
key to select one type news and then press ok key to enter it, See the figure below:
USER’S MANUAL
Network Menu
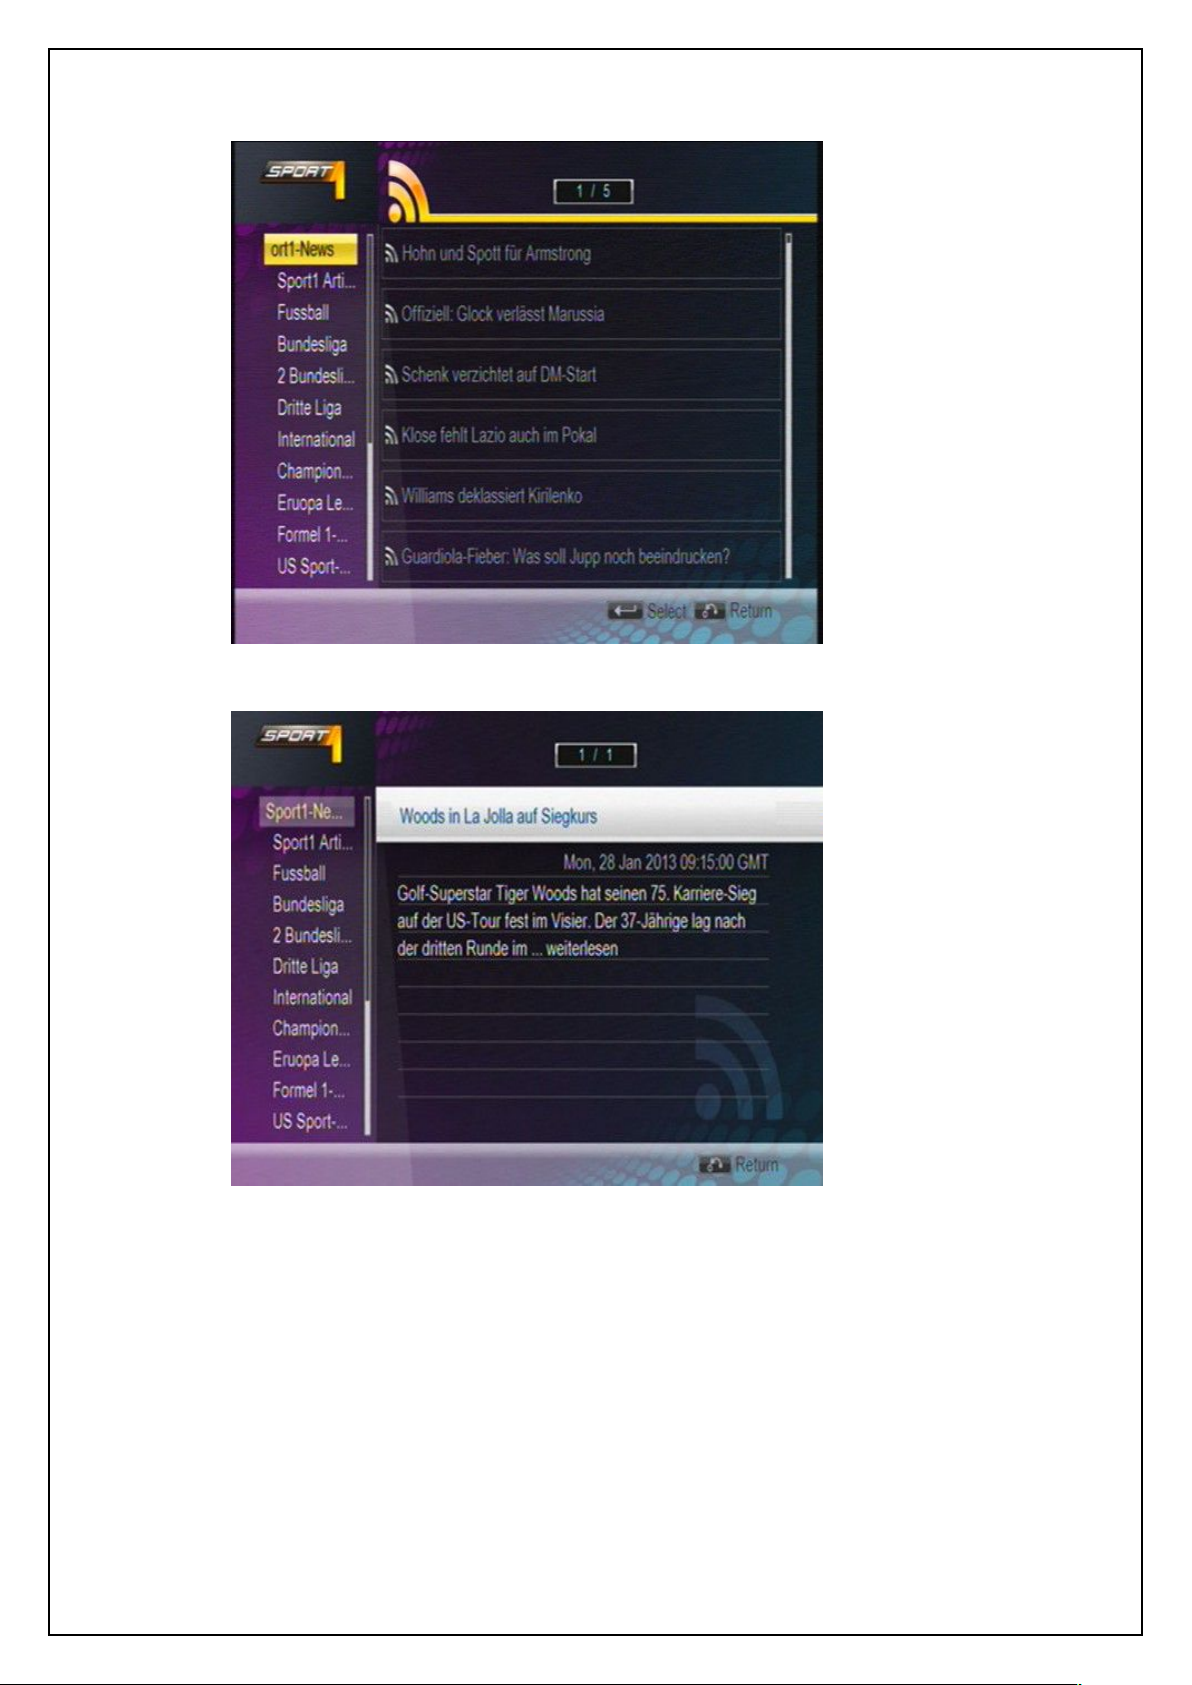
After entering one type news, you can press RIGHT key to switch to news list, press
UP/DOWN or P+/P- keys to view more news items online. The news items list as
bellow.
Page 38
USER’S MANUAL
38
6.2 YouTube
After selecting a news, you can press OK key to view it.
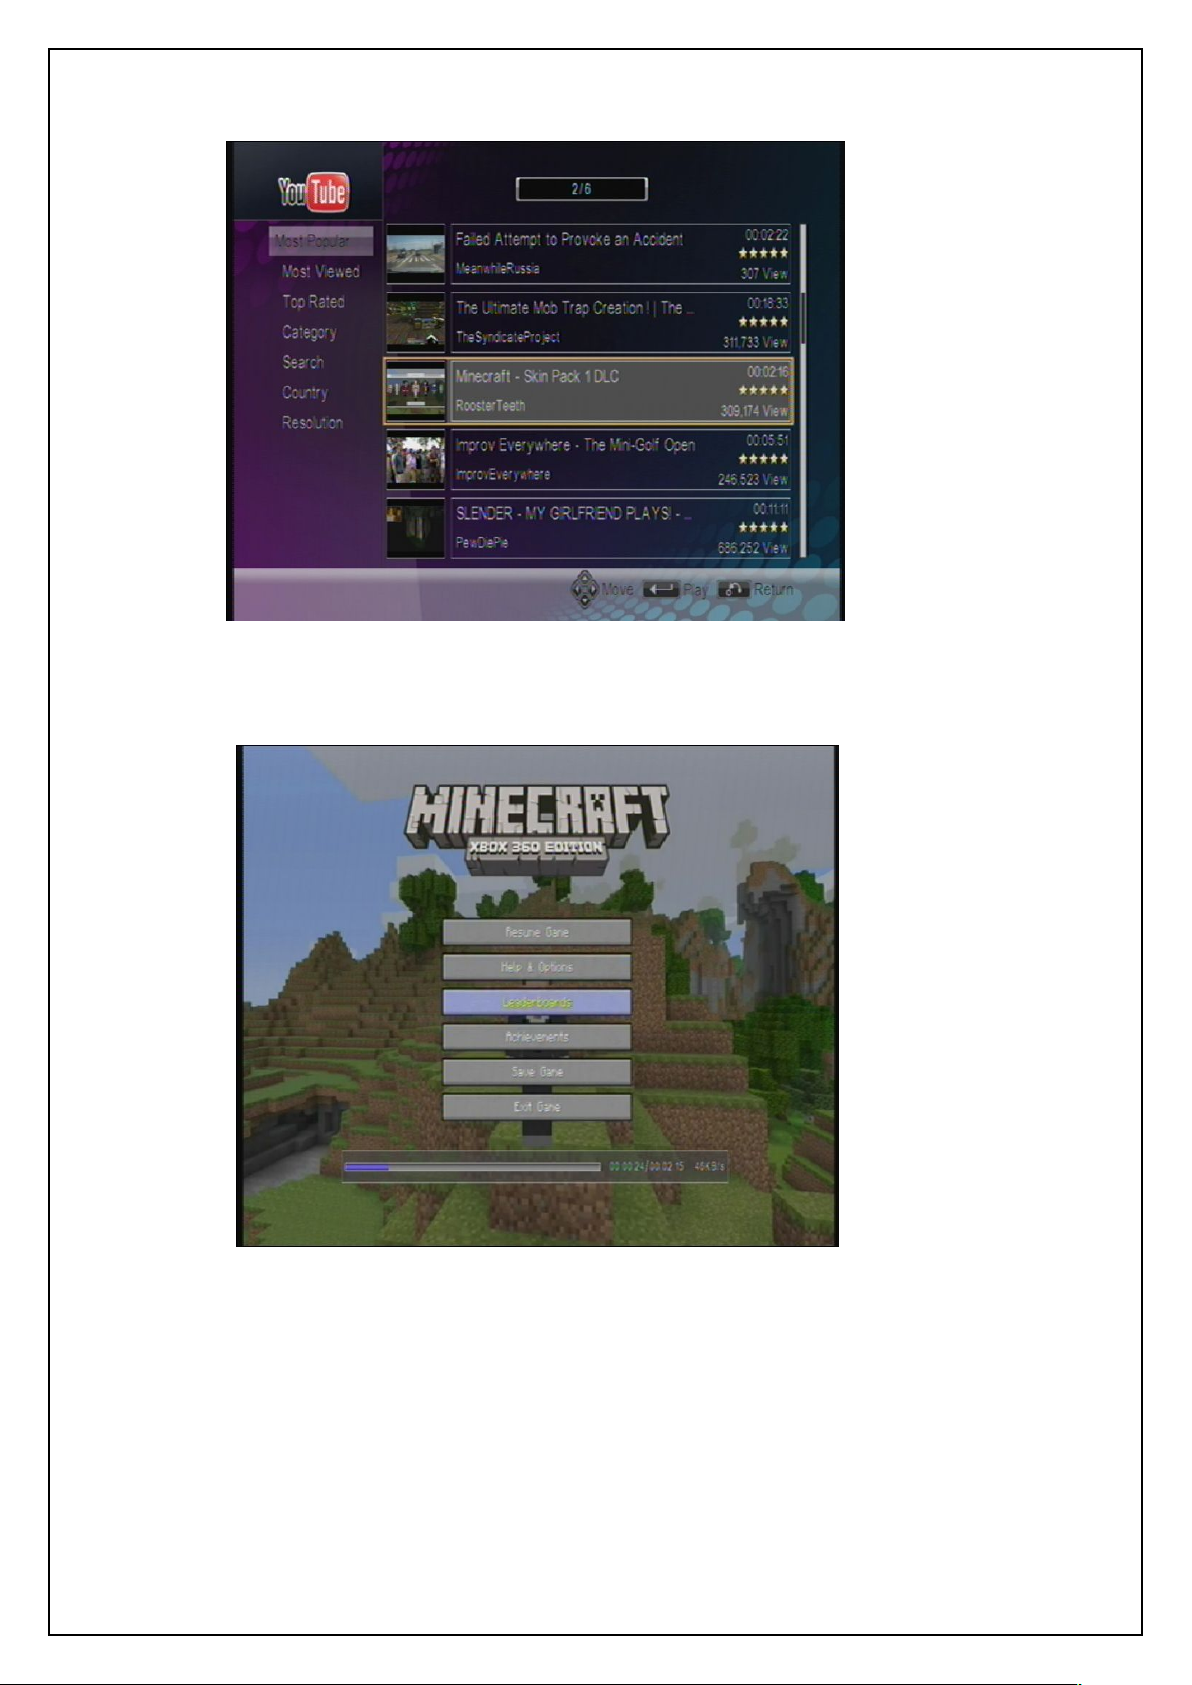
The YouTube module is for playing video files online. In this Module press RIGHT keys switch
to video list area. You can press UP/DOWN key to view more video items online. The video
itmes list is as belolw.
Page 39
39
Weather
USER’S MANUAL
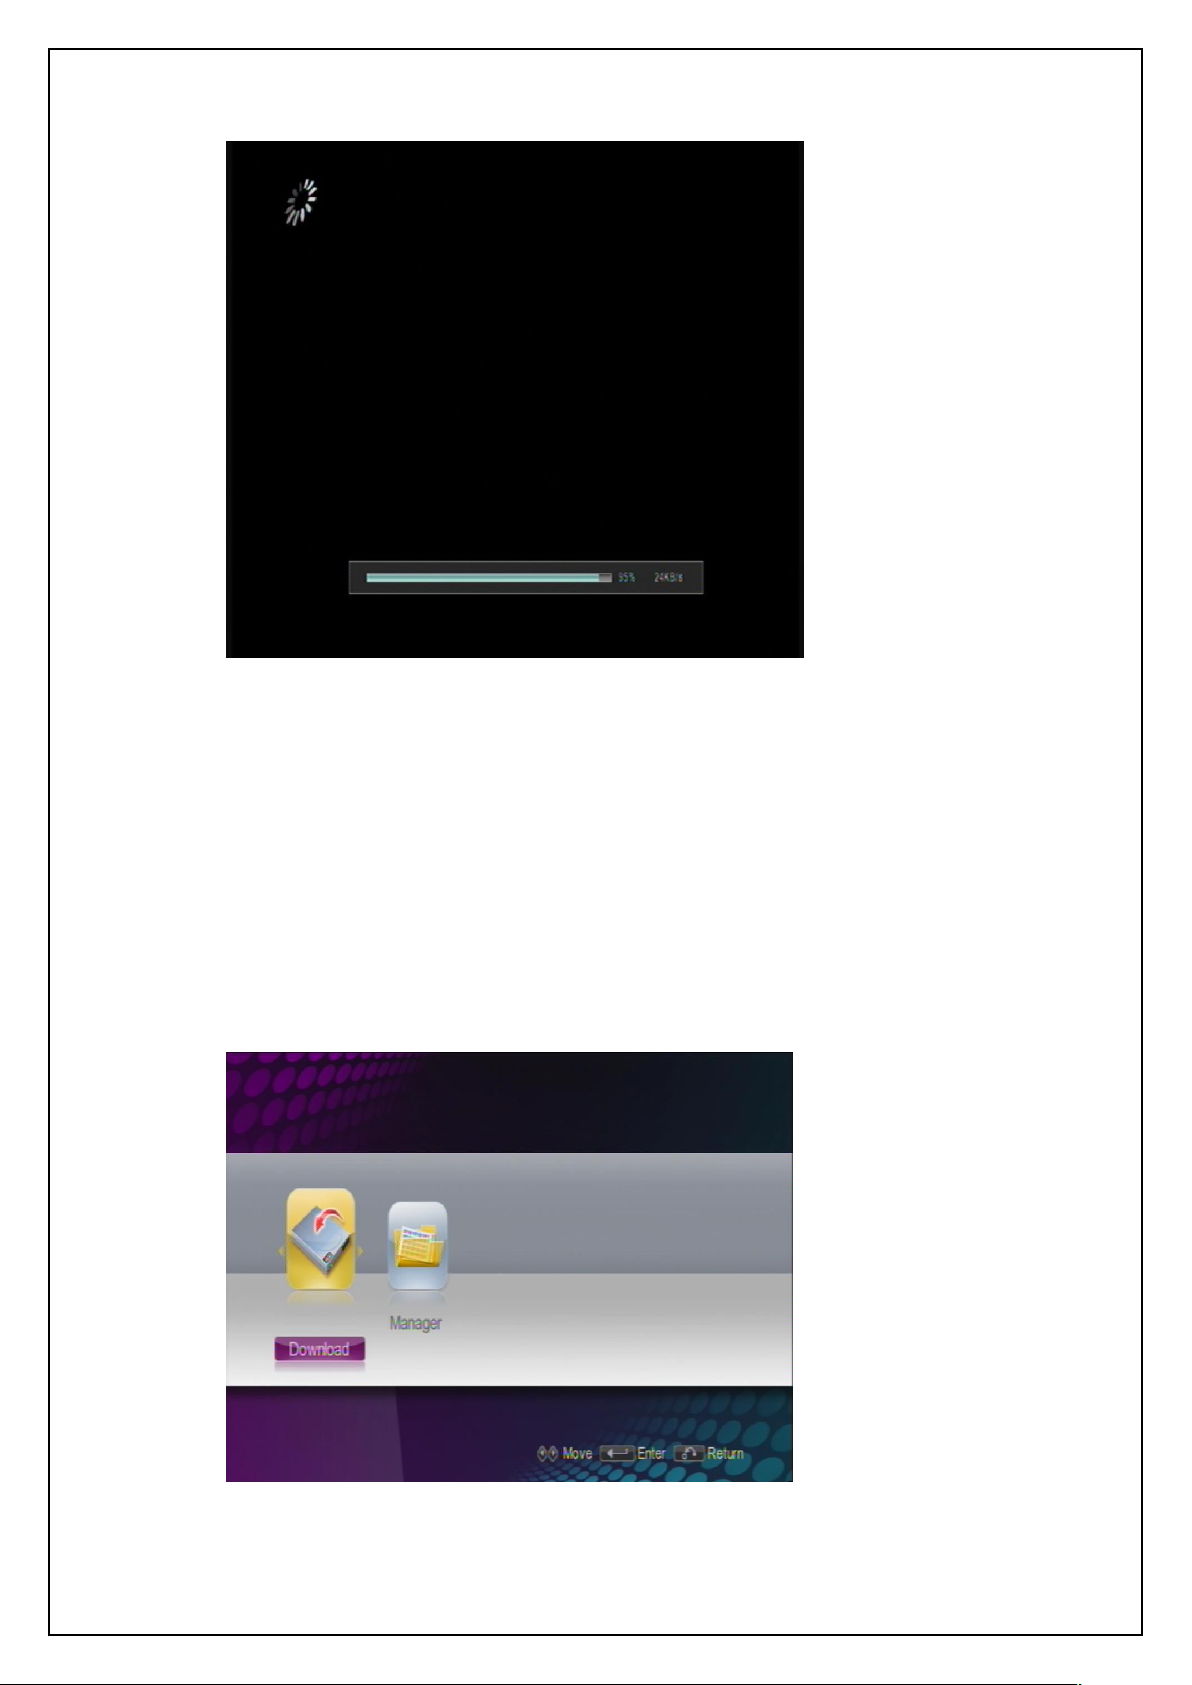
After selecting a video, you can press OK key to play it. The play interface is as below:
Weather
If have a slow network would display below:
Page 40
USER’S MANUAL
40
6.3 Dailymotion
6.4 Native32 Game
Weather
Like Youtube, please see 6.2 YouTube.
The Native32 Game (N32) module provides users with a platform to download Sunplus
native32 games. Downloaded games will be stored in a removable storage device such as a
U disk. Online games are not supported. The menu of this module is as below:
N32
Page 41
USER’S MANUAL
41
Download
Press UP/DOWN/RIGHT/LEFT keys to select a game.
Press the red or green function keys to turn pages if there are multiple pages in this list.
Press OK key to enter the selected game’s introduction page. See the figure below:
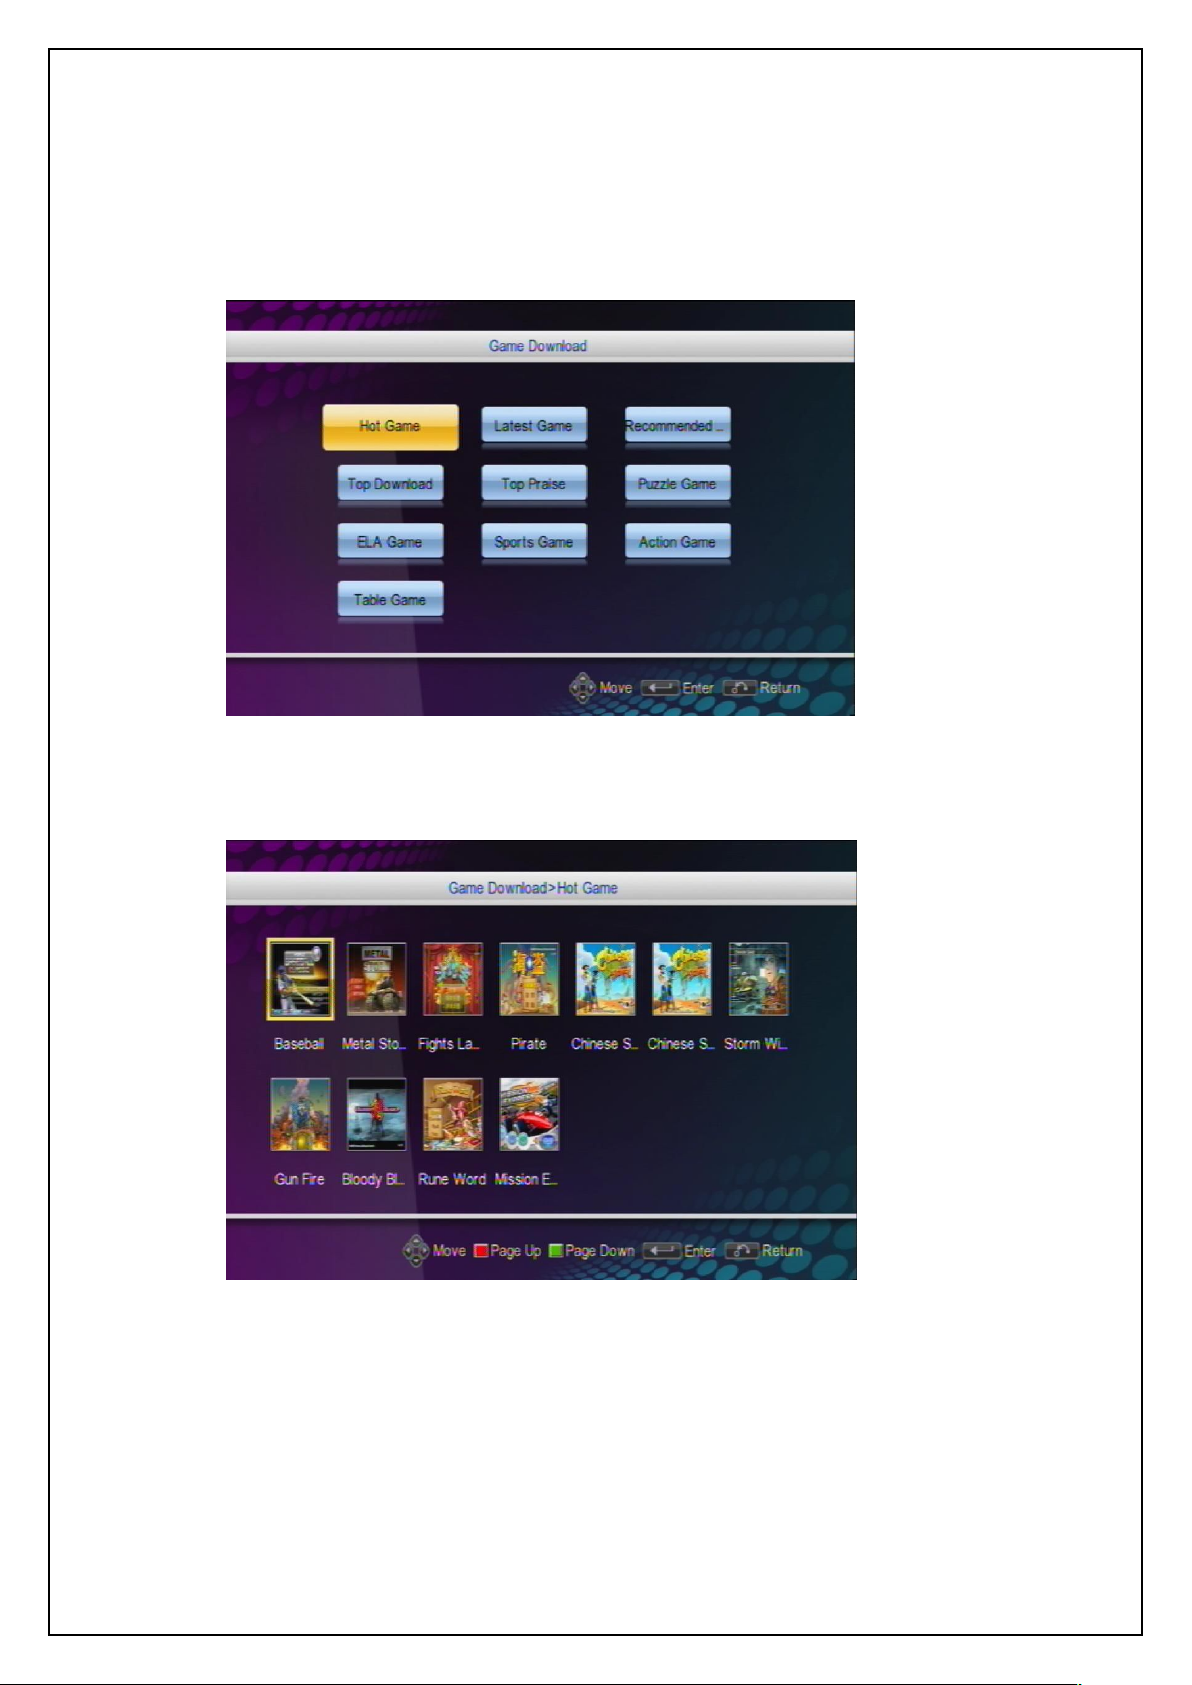
Highlight the Download item and then press OK key, and the game download category list will
appear. There are many categories: Hot Game, Latest Game, Sports Game, and so on. See
the figure below:
Game Download Category List
After selecting a game category, press OK key to enter the following game list:
Game List
In this list interface, you can -
Page 42
42
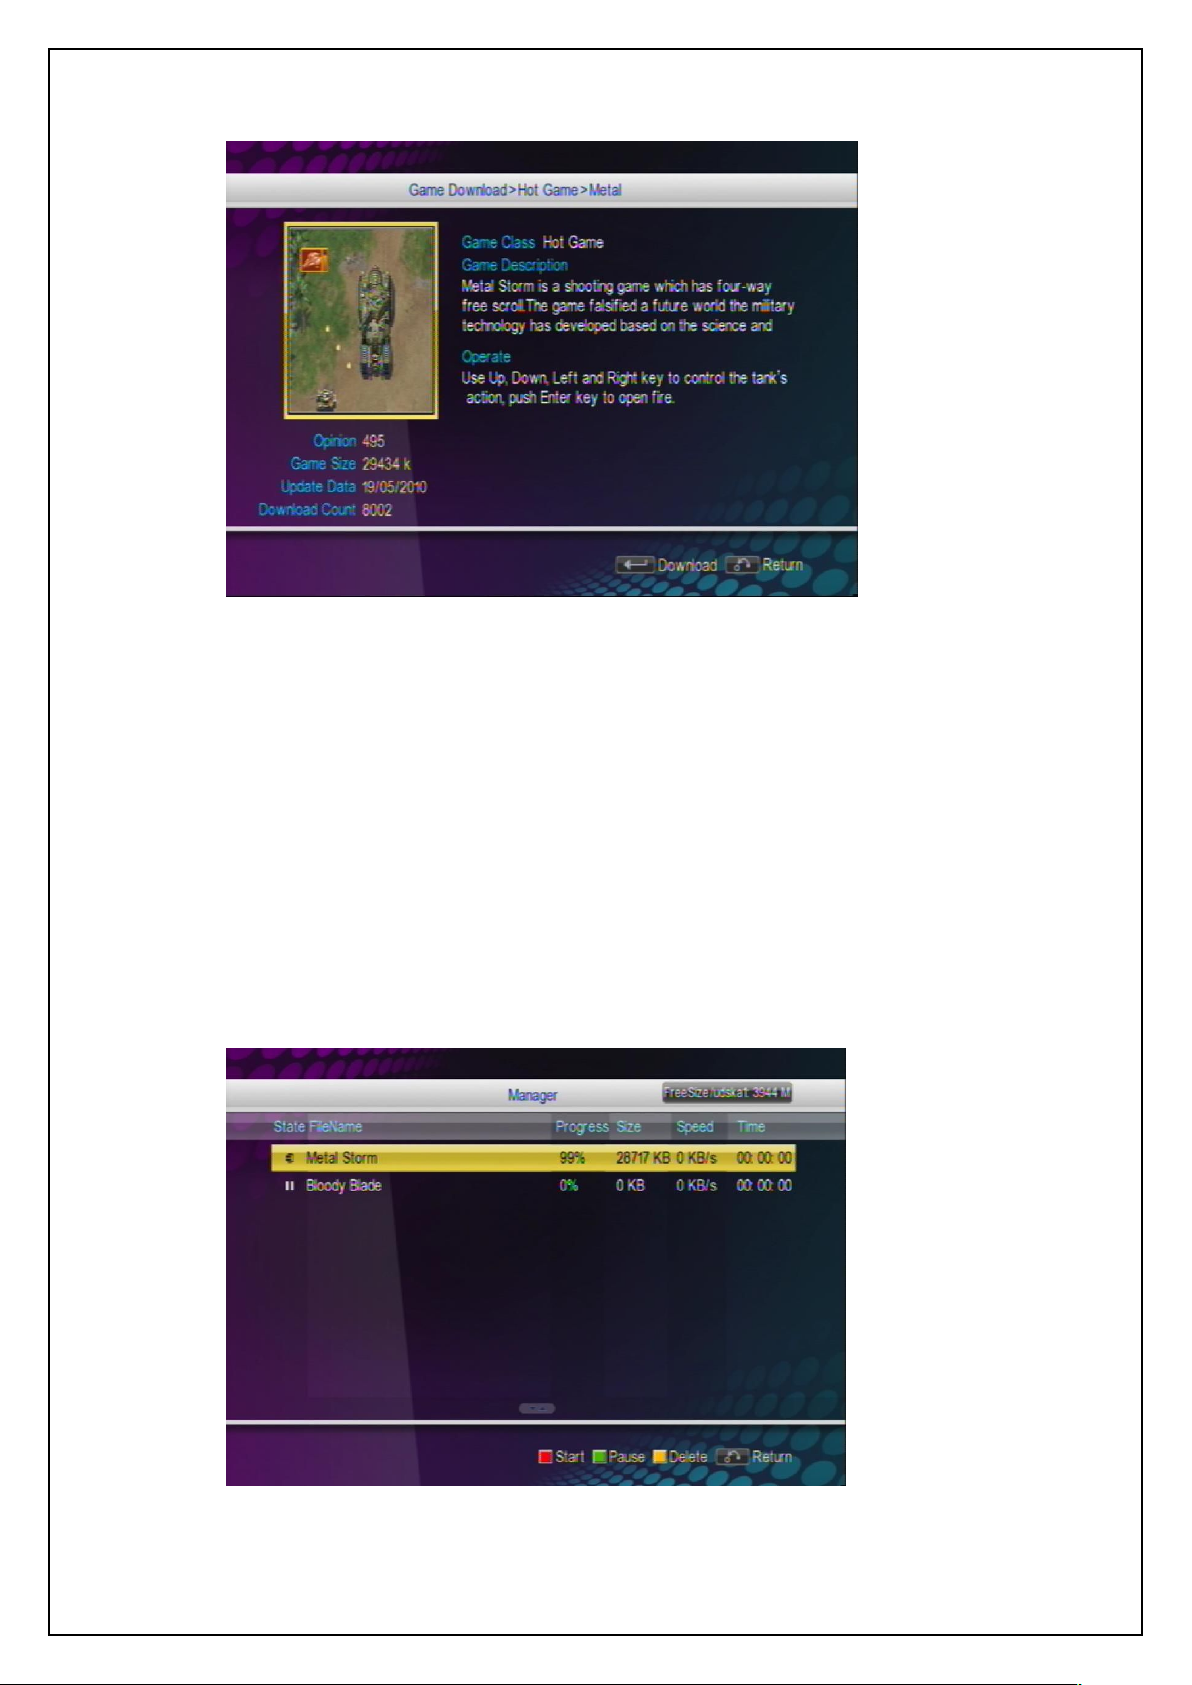
Game Information
Press EXIT key to go back to the upper level interface.
Press OK key to download this game. If there is enough memory space, a message will
Manager
USER’S MANUAL
In this page, you can -
appear to prompt that the game has been completely added to the game download
manager list.
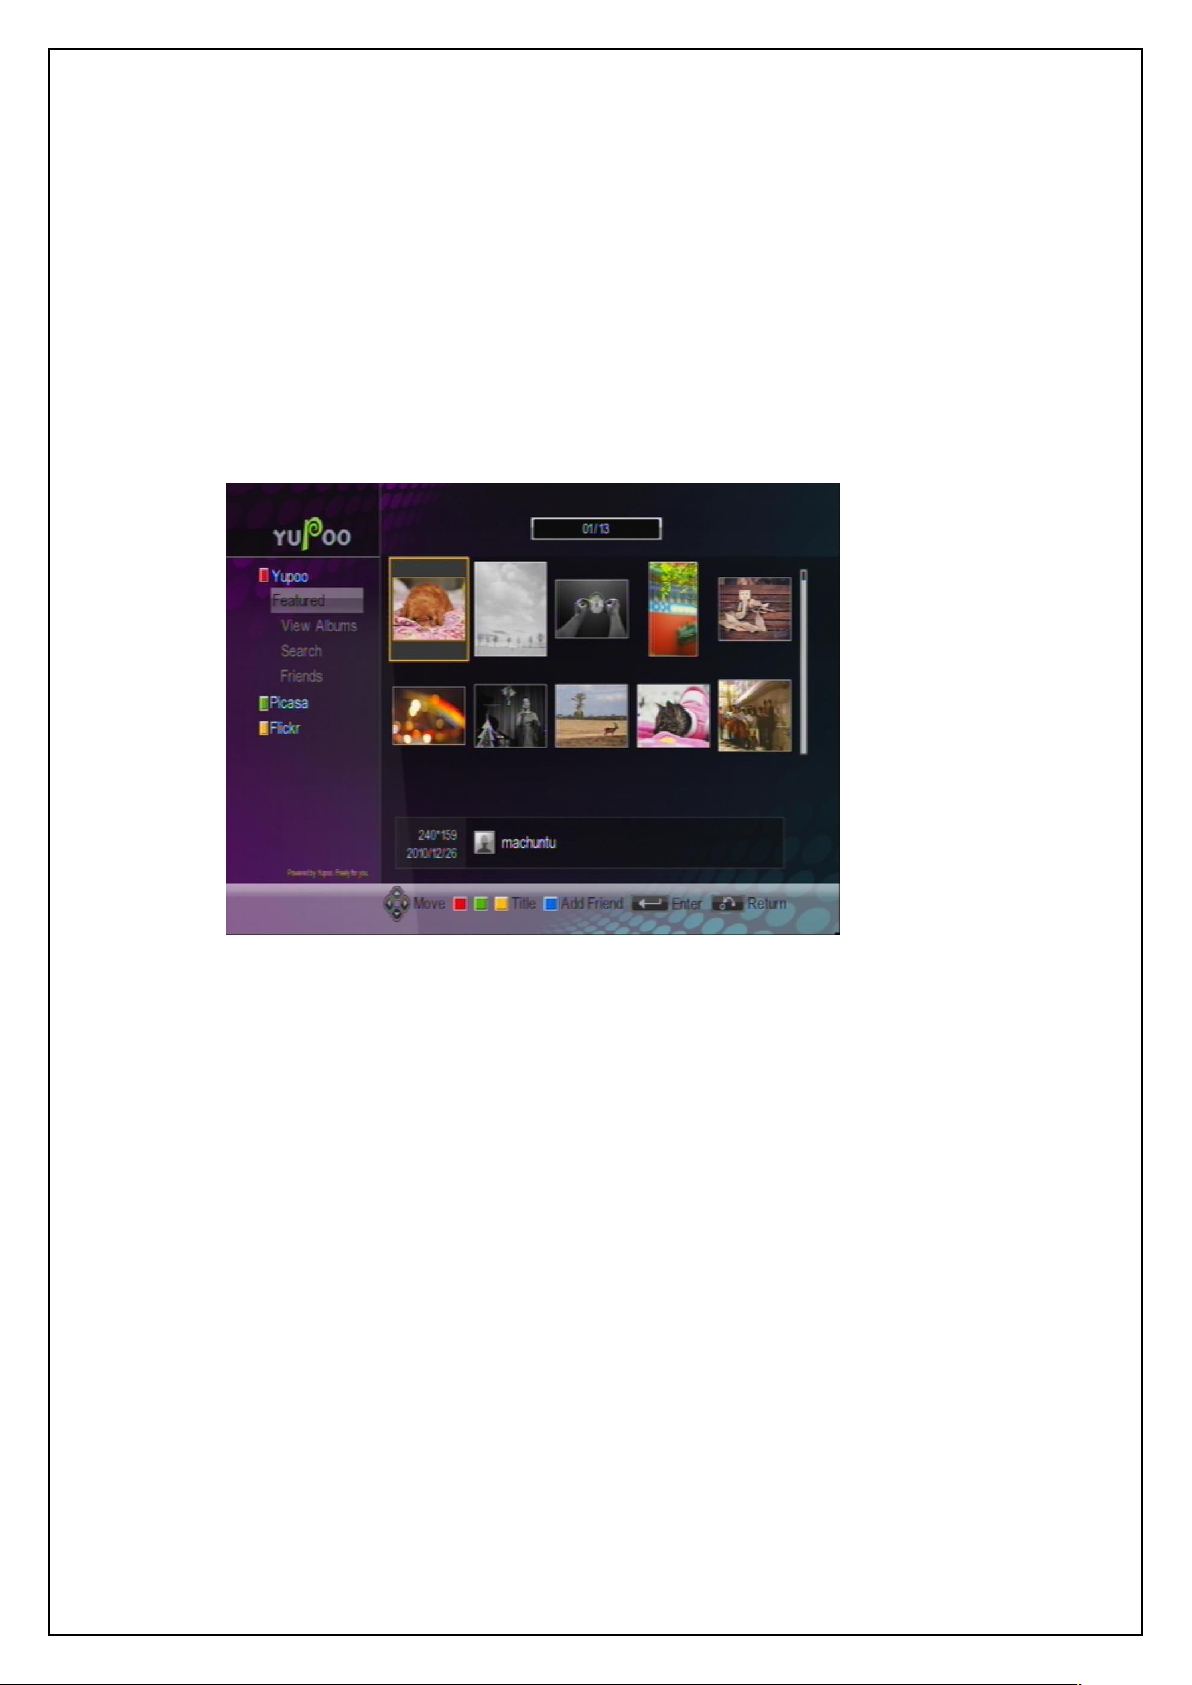
Highlight the Manager item in the N32 menu and then press OK key to enter the following
interface to manage download tasks. See the figure below:
N32 Manager
Page 43
USER’S MANUAL
43
Press the green function key to pause downloading.
Press the red function key to start or resume downloading.
Press the yellow function key to delete a download task.
6.5 Photo
Featured
In the Manager interface, you can –
Through the Photo module, you can visit several certain photo websites: Yupoo, Picasa and
Flickr. See the figure below:
Photo (Featured)
In each website category there are the following four sub categories: Featured, View Albums,
Search and Friends.
In the Featured page (see the above figure), you can press the yellow/green/red function keys
to switch among the three websites; press the blue function key to add the highlighted photo
into the Friends sub category list; press LEFT/RIGHT keys to switch between the website list
at the left and the photo list at the right.
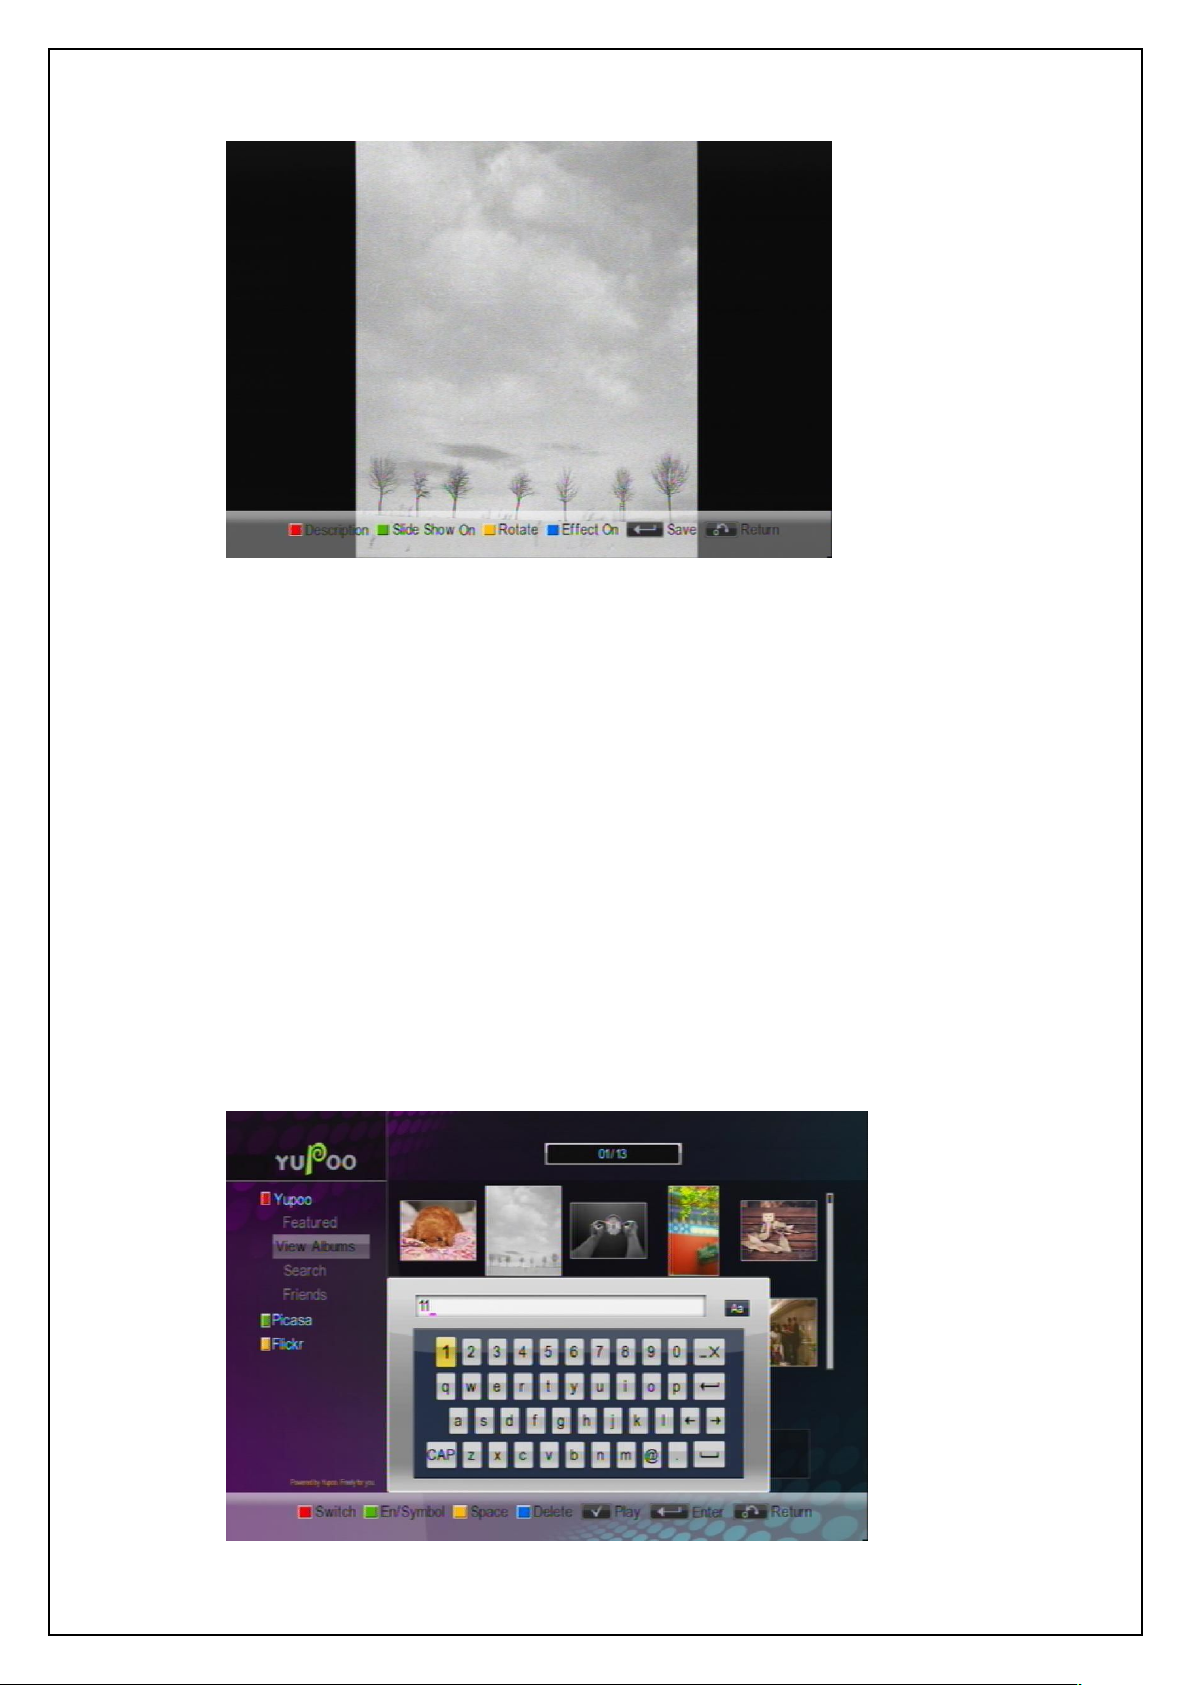
After selecting a photo in the photo list, press OK key to view it in full screen mode. See the
figure below:
Page 44
44
In the photo full play state, you can -
Press the red function key to show related information of the photo.
Press the green function key to show photos in slide mode. Default play interval is 3s.
Press the yellow function key to counterclockwise rotate the photo 90°.
Press the blue function key to turn on or off photo effects.
Press PLAY key to save the current photo.
View Albums
USER’S MANUAL
Photo Full Play
When the website list gets the highlight, you can press UP/DOWN keys to select other
categories: Featured, View Albums, Search or Friends. For example, after highlighting View
Albums, press OK key to enter the View Albums page.
Page 45
45
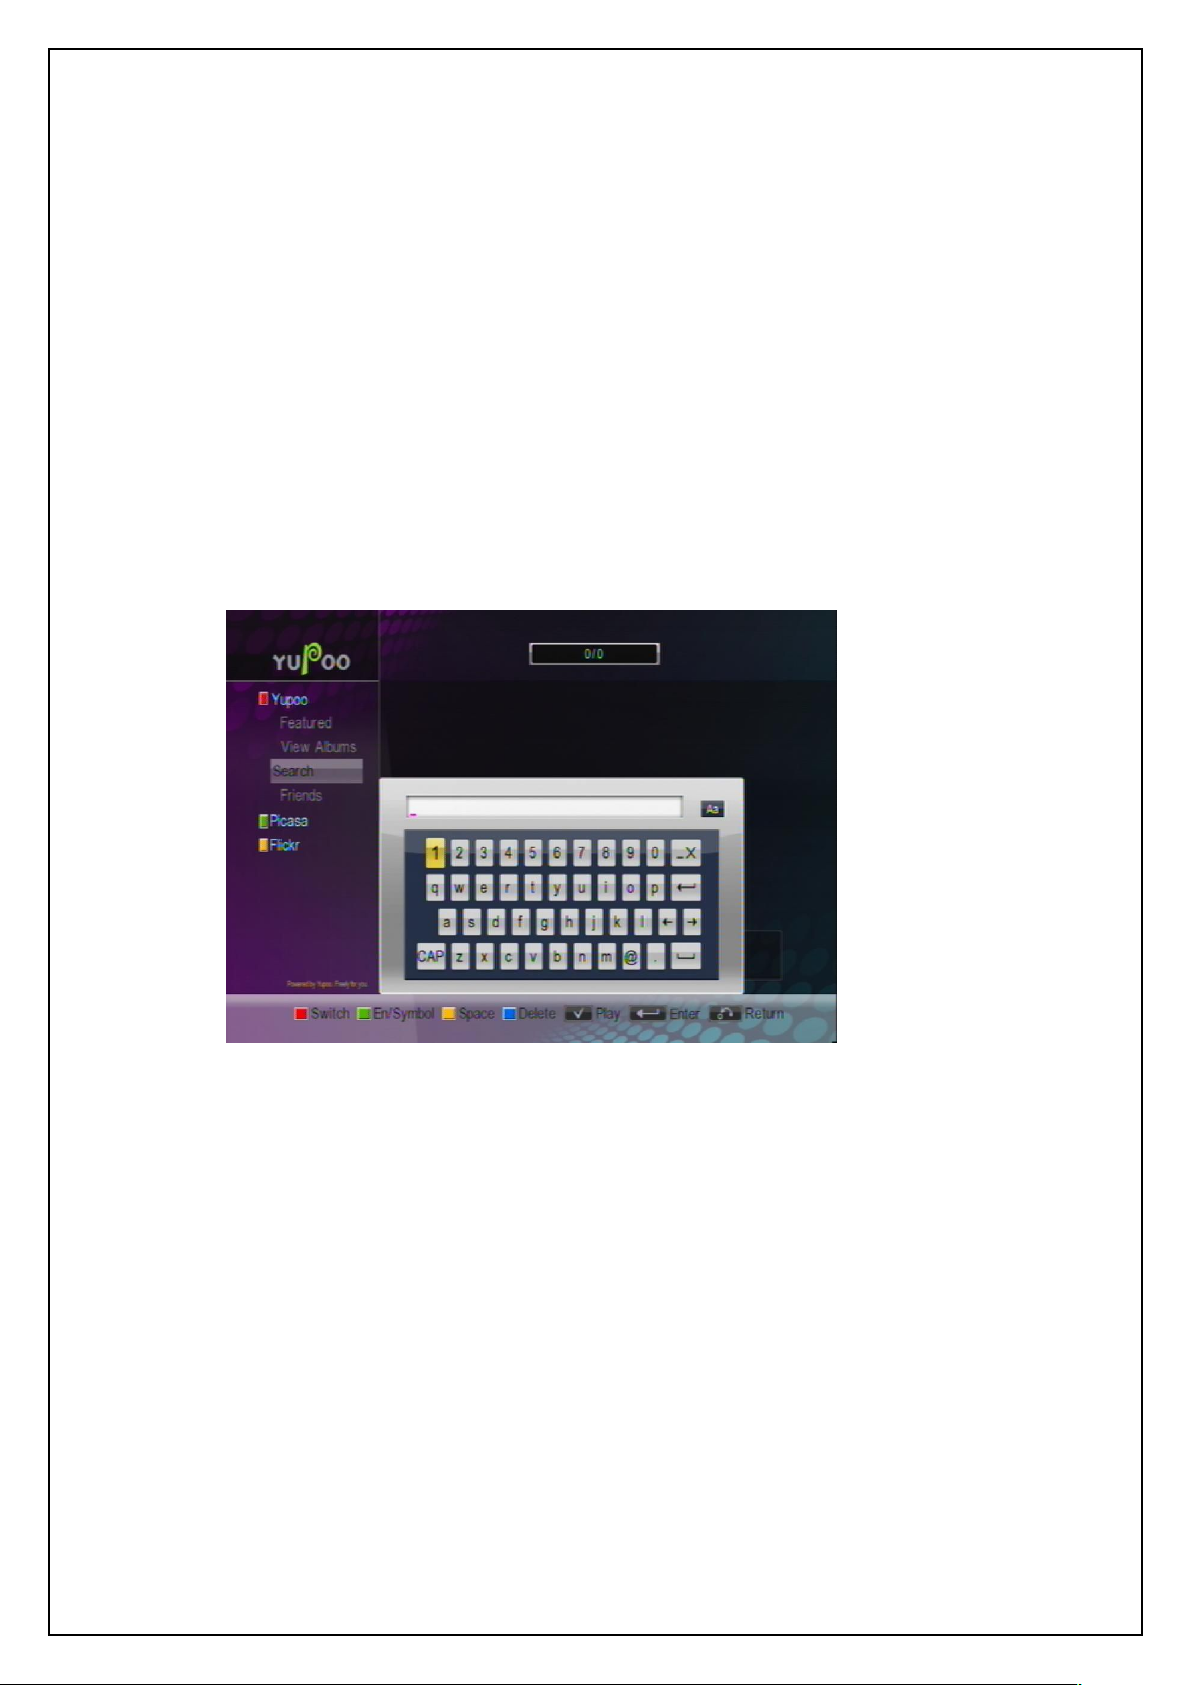
In the View Albums page,
Press the red function key to show the software keypad.
Press the green function key to switch the content of the keypad.
Press the yellow function key to enter a space character.
Press the blue function key to delete a character.
Press PLAY key to confirm you input.
Press EXIT key to exit the View Albums page.
Search
Friends
USER’S MANUAL
View Albums
Search
In the Search page, after inputting a photo file name, press PLAY key to start to search for the
photo. Press EXIT key to exit the Search page.
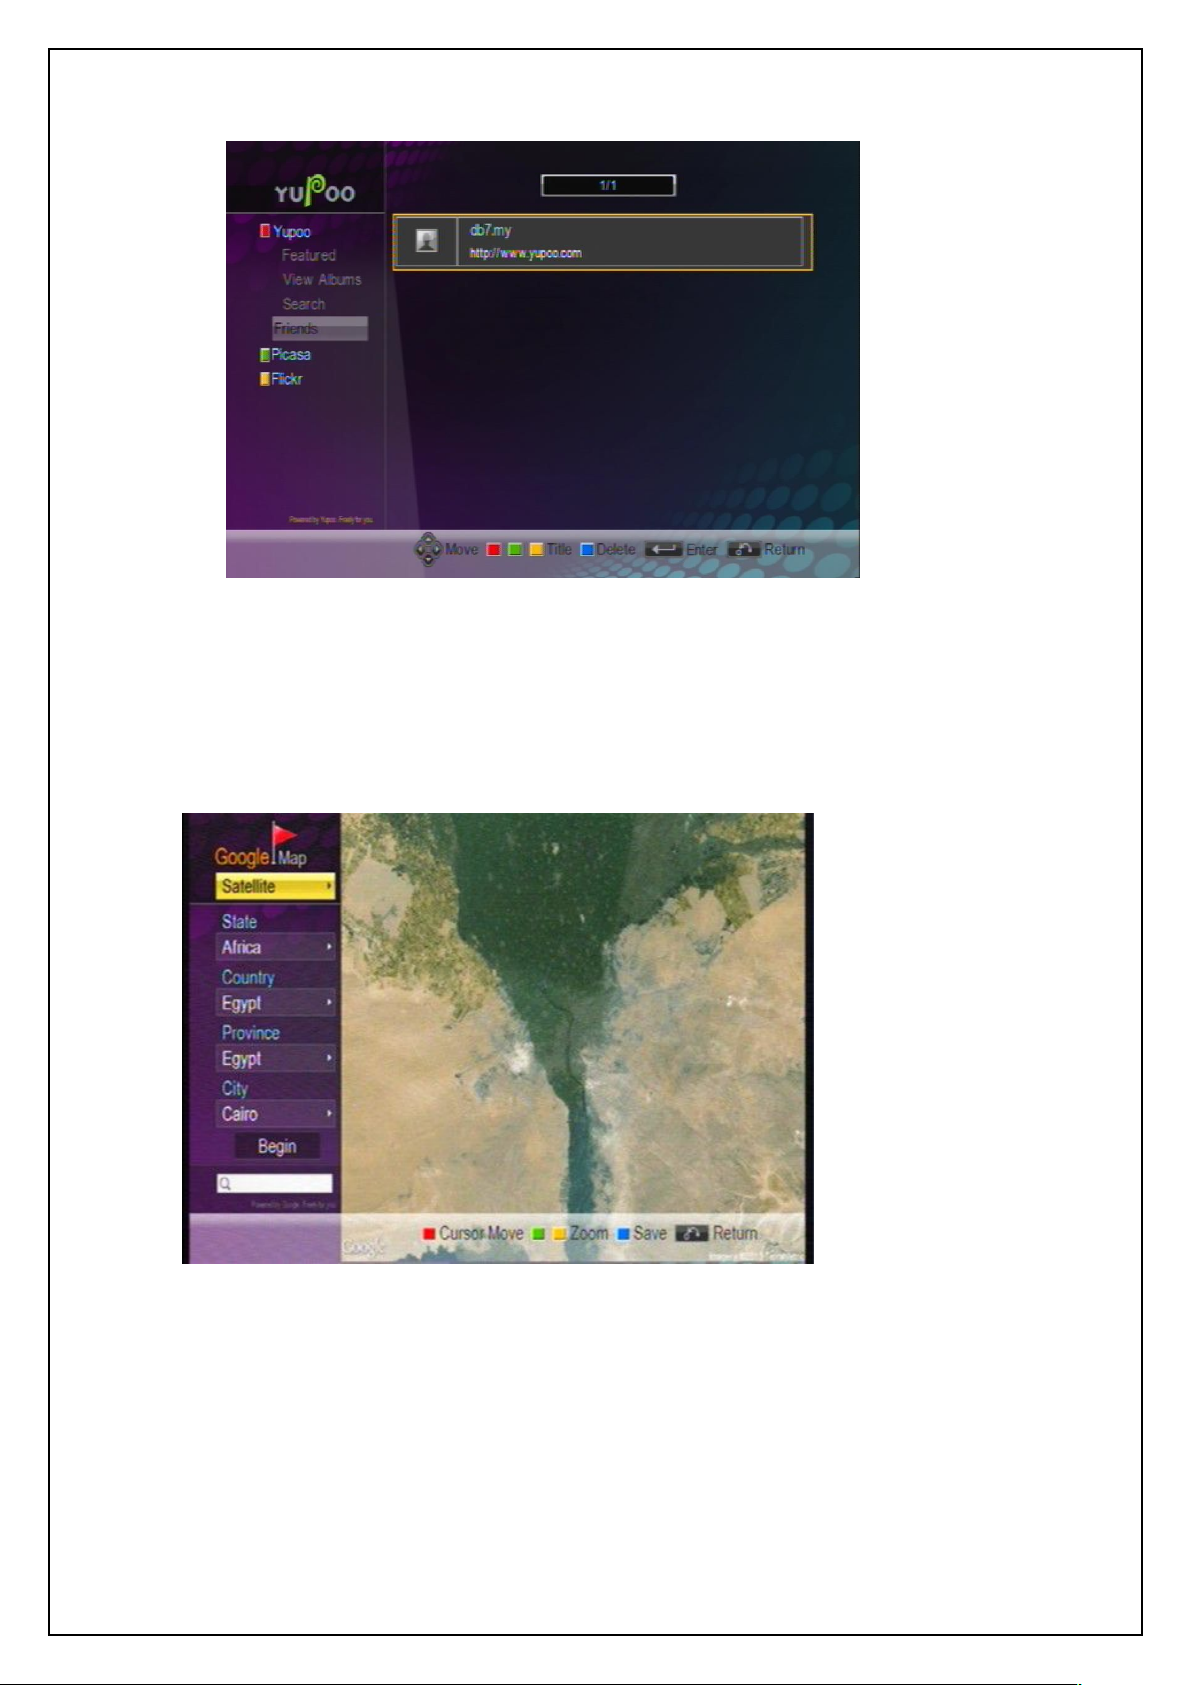
In the Friends page, you can find the photos that you have added from the Featured page.
See the figure below:
Page 46
46
Friends
6.6 Google Map
USER’S MANUAL
Google Map can help users know where they are and the environment around them, and also
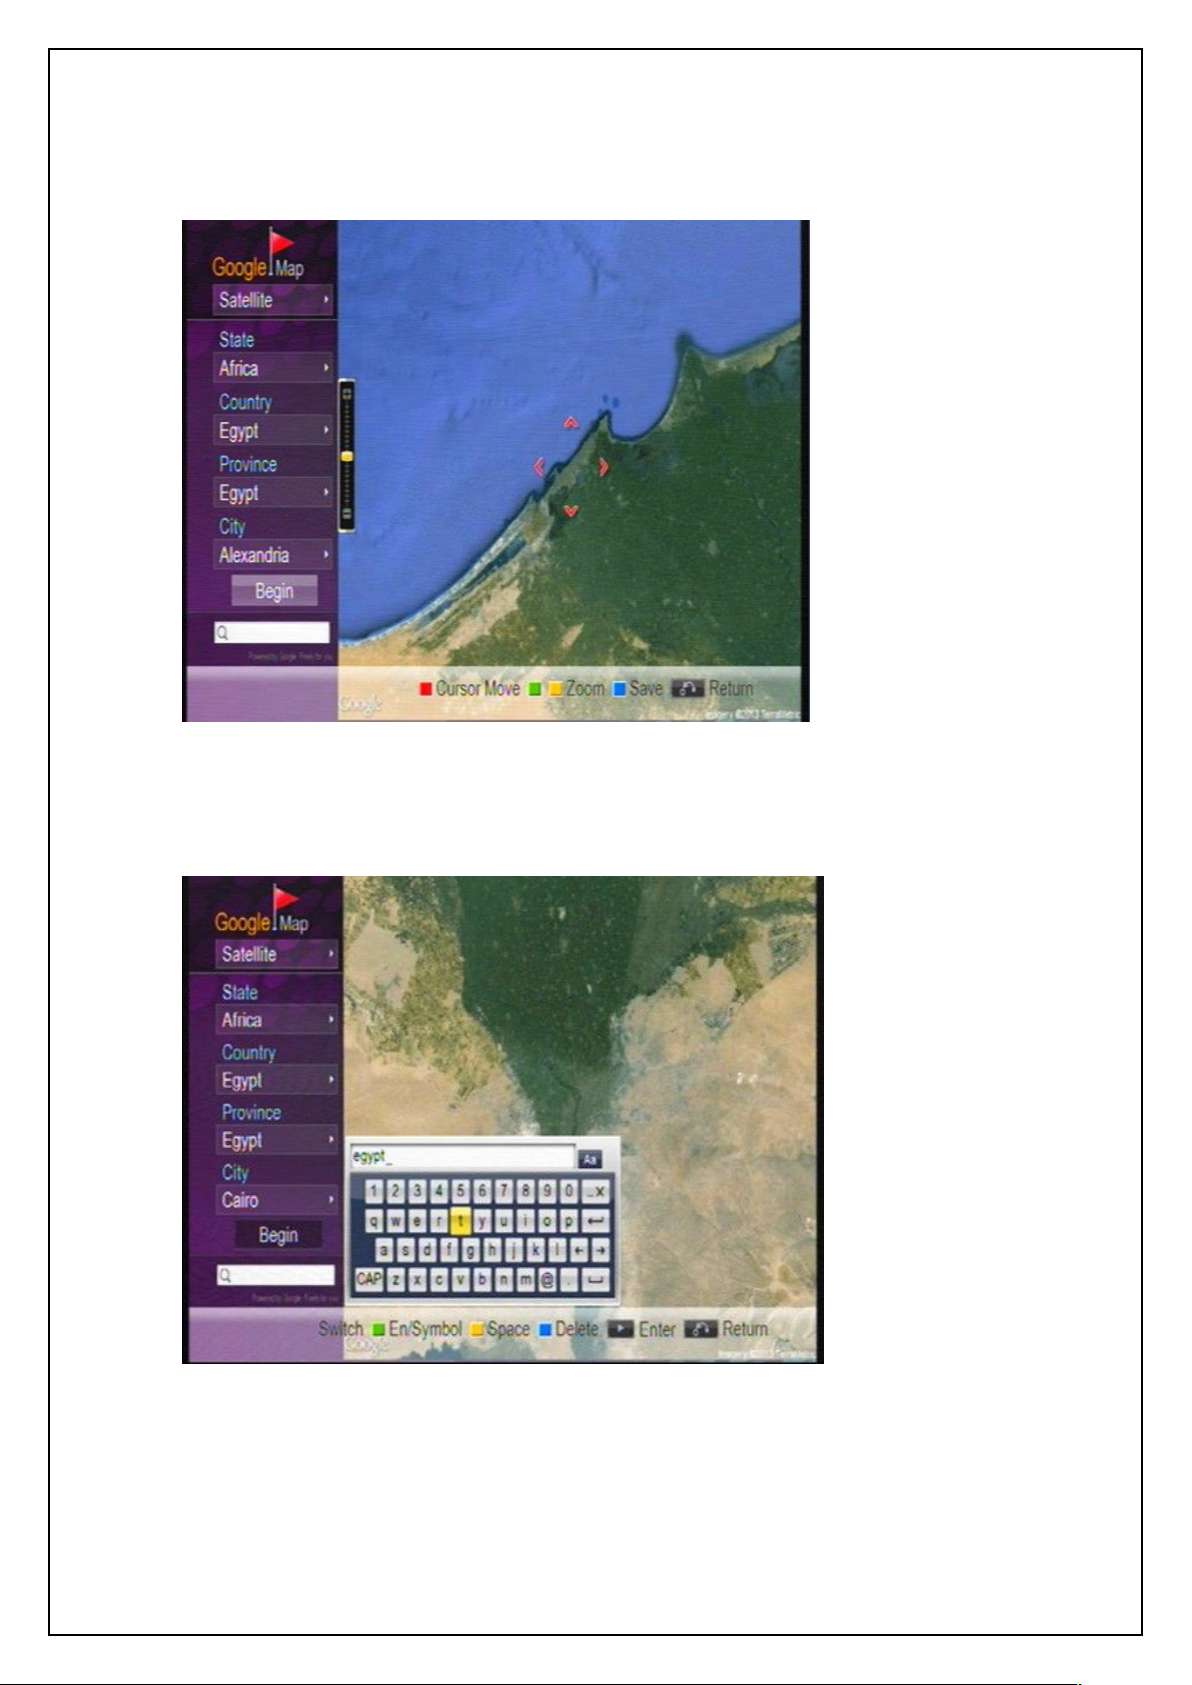
search for a certain location and surroundings. See the figure below:
Google Map
In the Google Map page, you can press the red function key to switch between the map search
setting area and the map display area; press the green/yellow function keys to zoom in or out the
map; press the blue function key to save the current map; press UP/DOWN/RIGHT/LEFT keys to
move the focus in the map to view different locations.
By default the displayed map is Roadmap. You can, according to your needs, change among
Roadmap, Satellite, Terrain and Hybrid. Also you can switch to another State, Country, Province
Page 47
USER’S MANUAL
47
and City to search for. After above setting, select the Begin button in this page to start to search.
See the figure below:
Google Map – Viewing a specified area
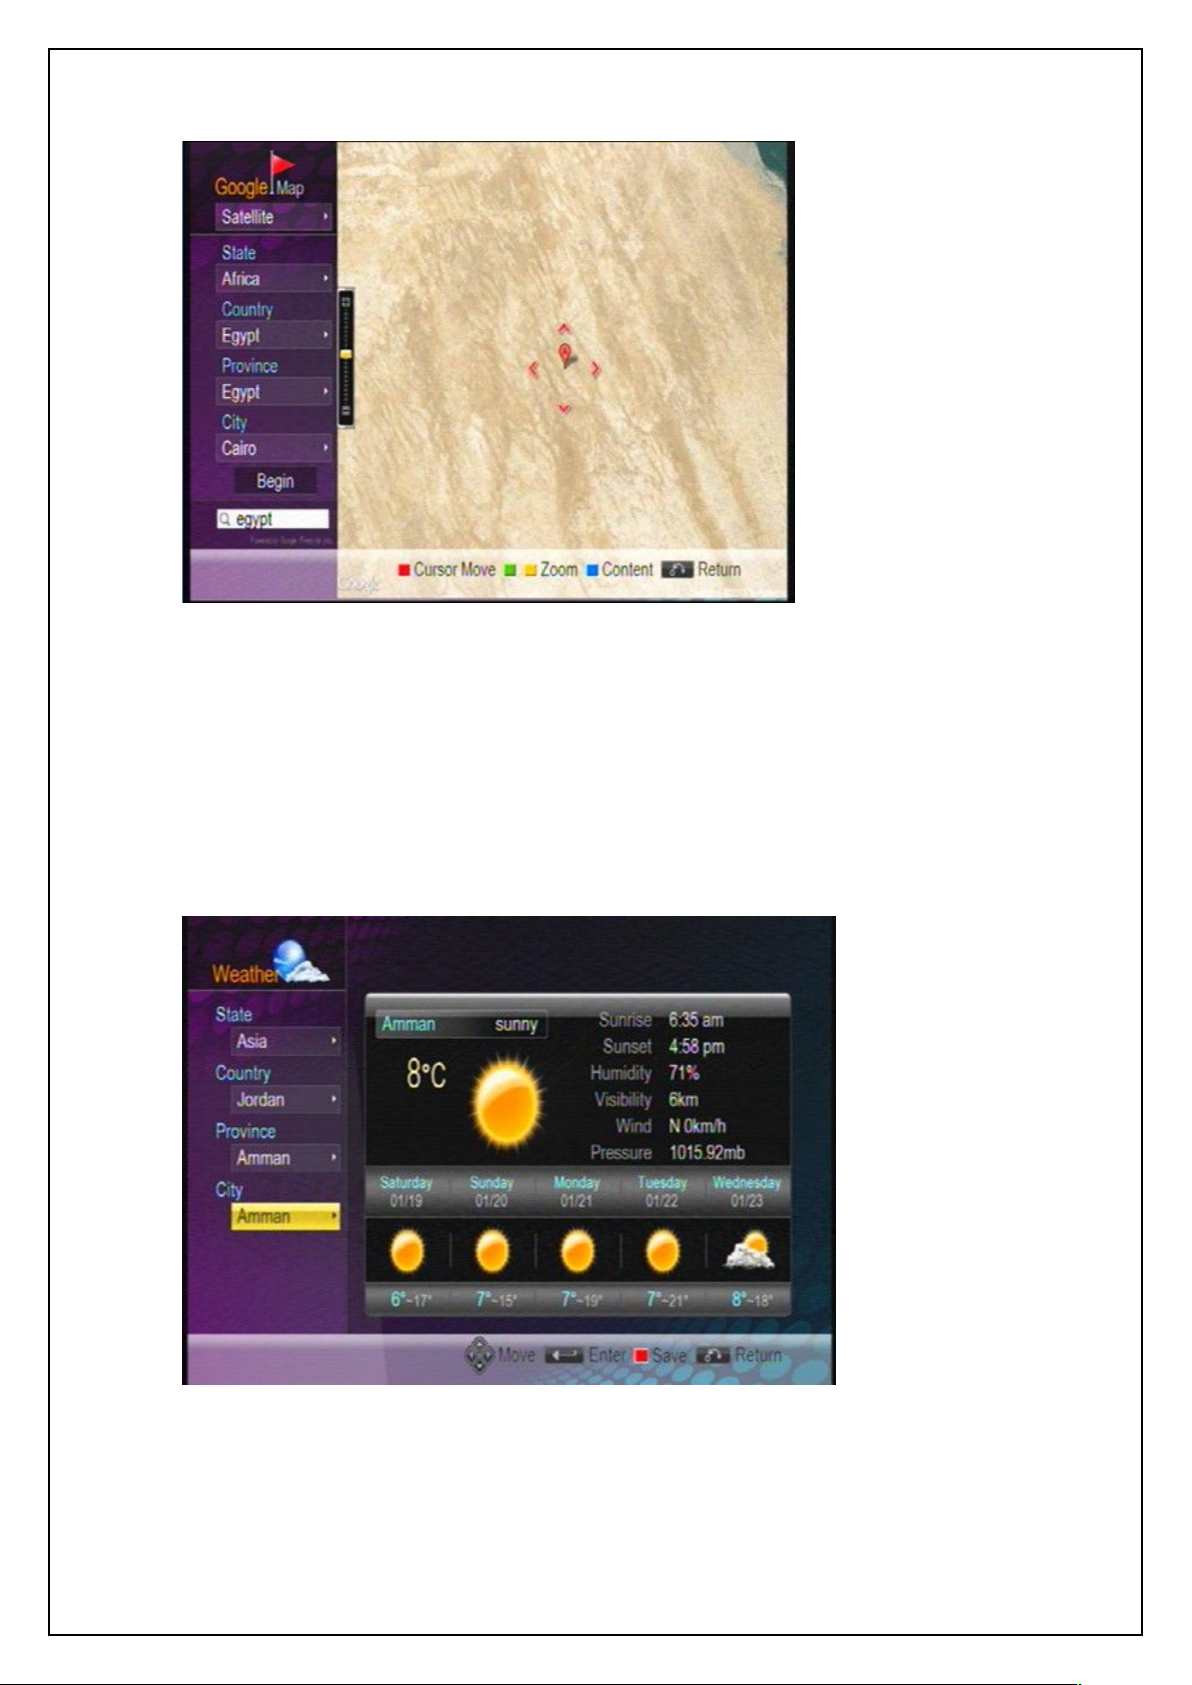
When the search text box at the left side is selected, pressing OK key can call out the following
window in which you can manually input a place name to search for.
Google Map – Manual Input for Search
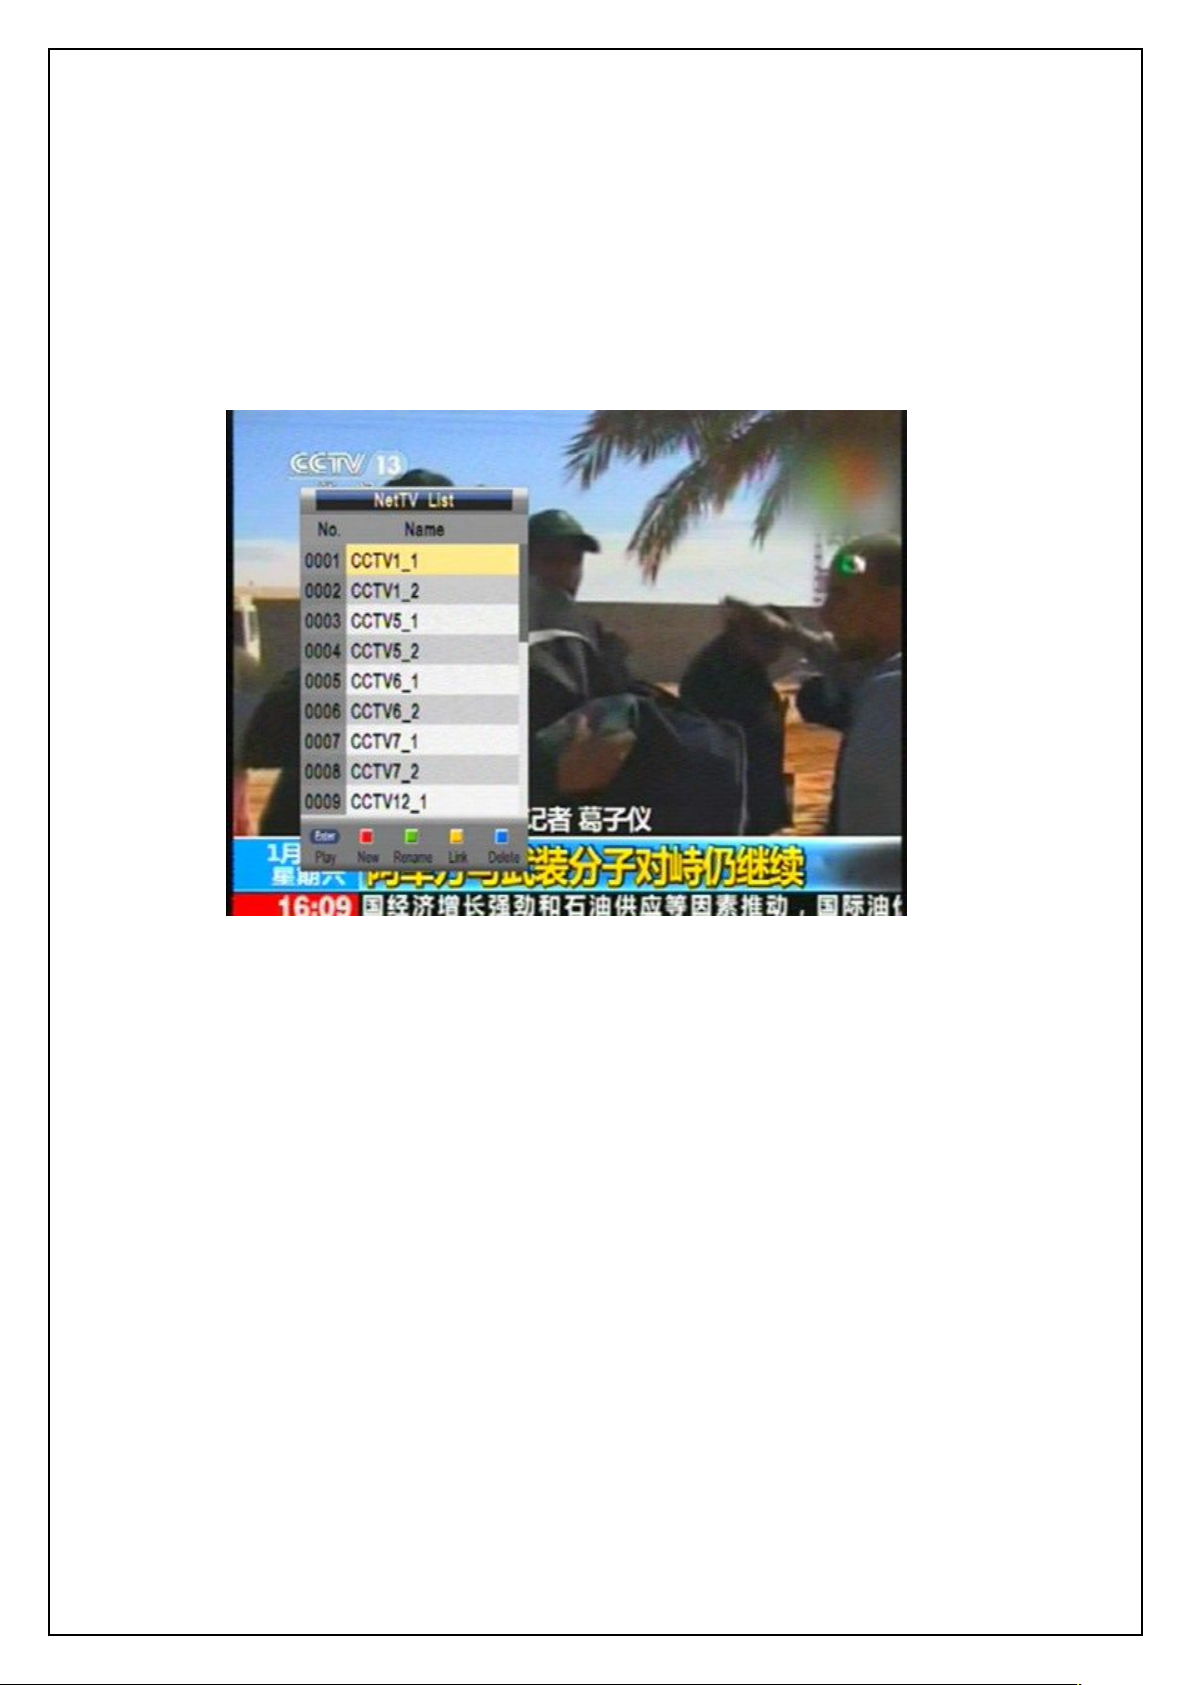
Enter a place name (e.g.egypt) and then press PLAY key, Google Map will auto search for the
place and then show it if found. In this state, pressing the blue function key can show the
corresponding information of the place. See the figure below:
Page 48
48
Google Map – Search Result
6.7 Weather
USER’S MANUAL
The Weather module provides weather forecast information for users. To enter this module, select
the Weather item in the Network menu by pressing LEFT/RIGHT keys and then press OK key. See
the figure below for the Weather page:
Weather
In this module you can get current weather conditions and forecast within a week for locations in
the world. You can press direction keys to set a city through the search fields at left and then press
Page 49
USER’S MANUAL
49
6.8 IPTV
OK key to view the weather information of the city. For example, to view Beijing’s weather
information, select Beijing City in the search field area and then press OK key. Then you will find
the Beijing’s weather information at the right side.
The IPTV module is for watching TV Channels online, Press ok key to show NetTV List, see the
figure below:
NetTV List
You can use UP/Down key to select a channel,press ok key to play the channel.
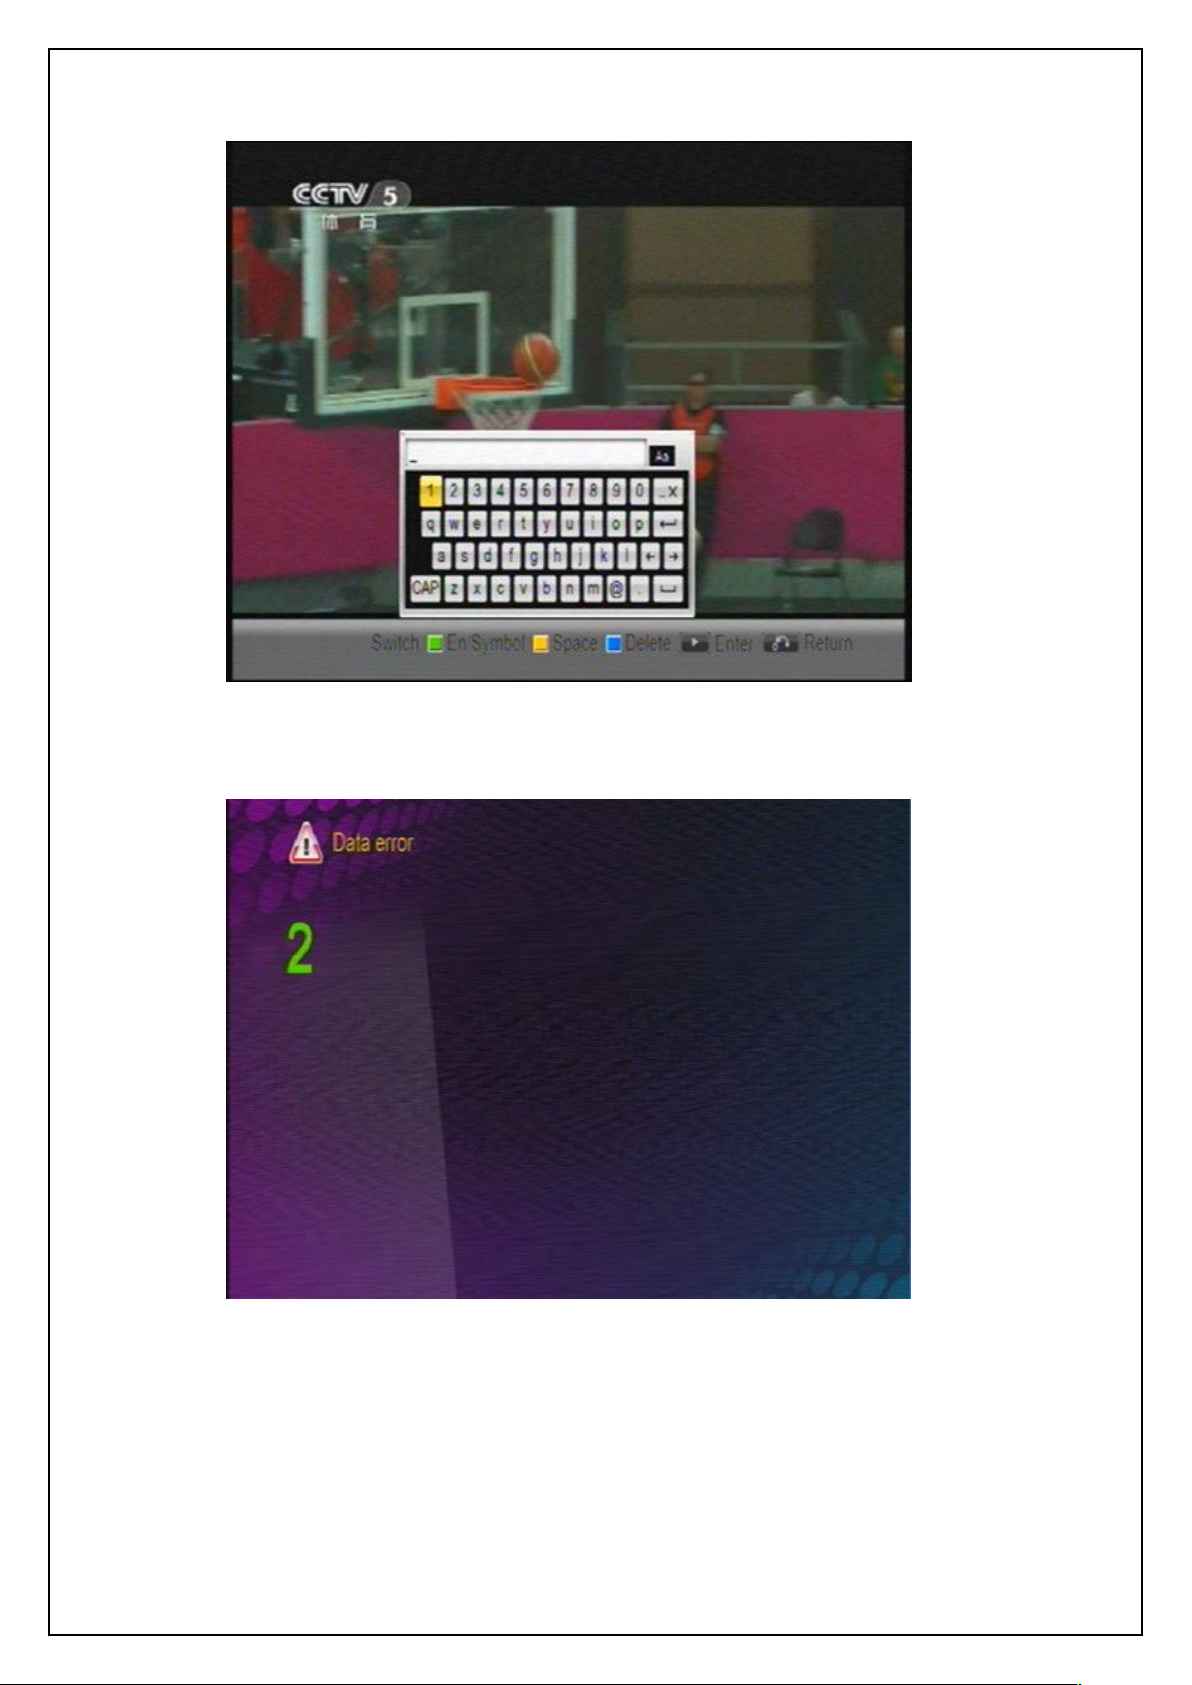
Method 1:you can press red function key to add a new link to watch the related channel(if the
link is valid,you can watch it ),see the figure below:
Page 50
USER’S MANUAL
50
Add a Link
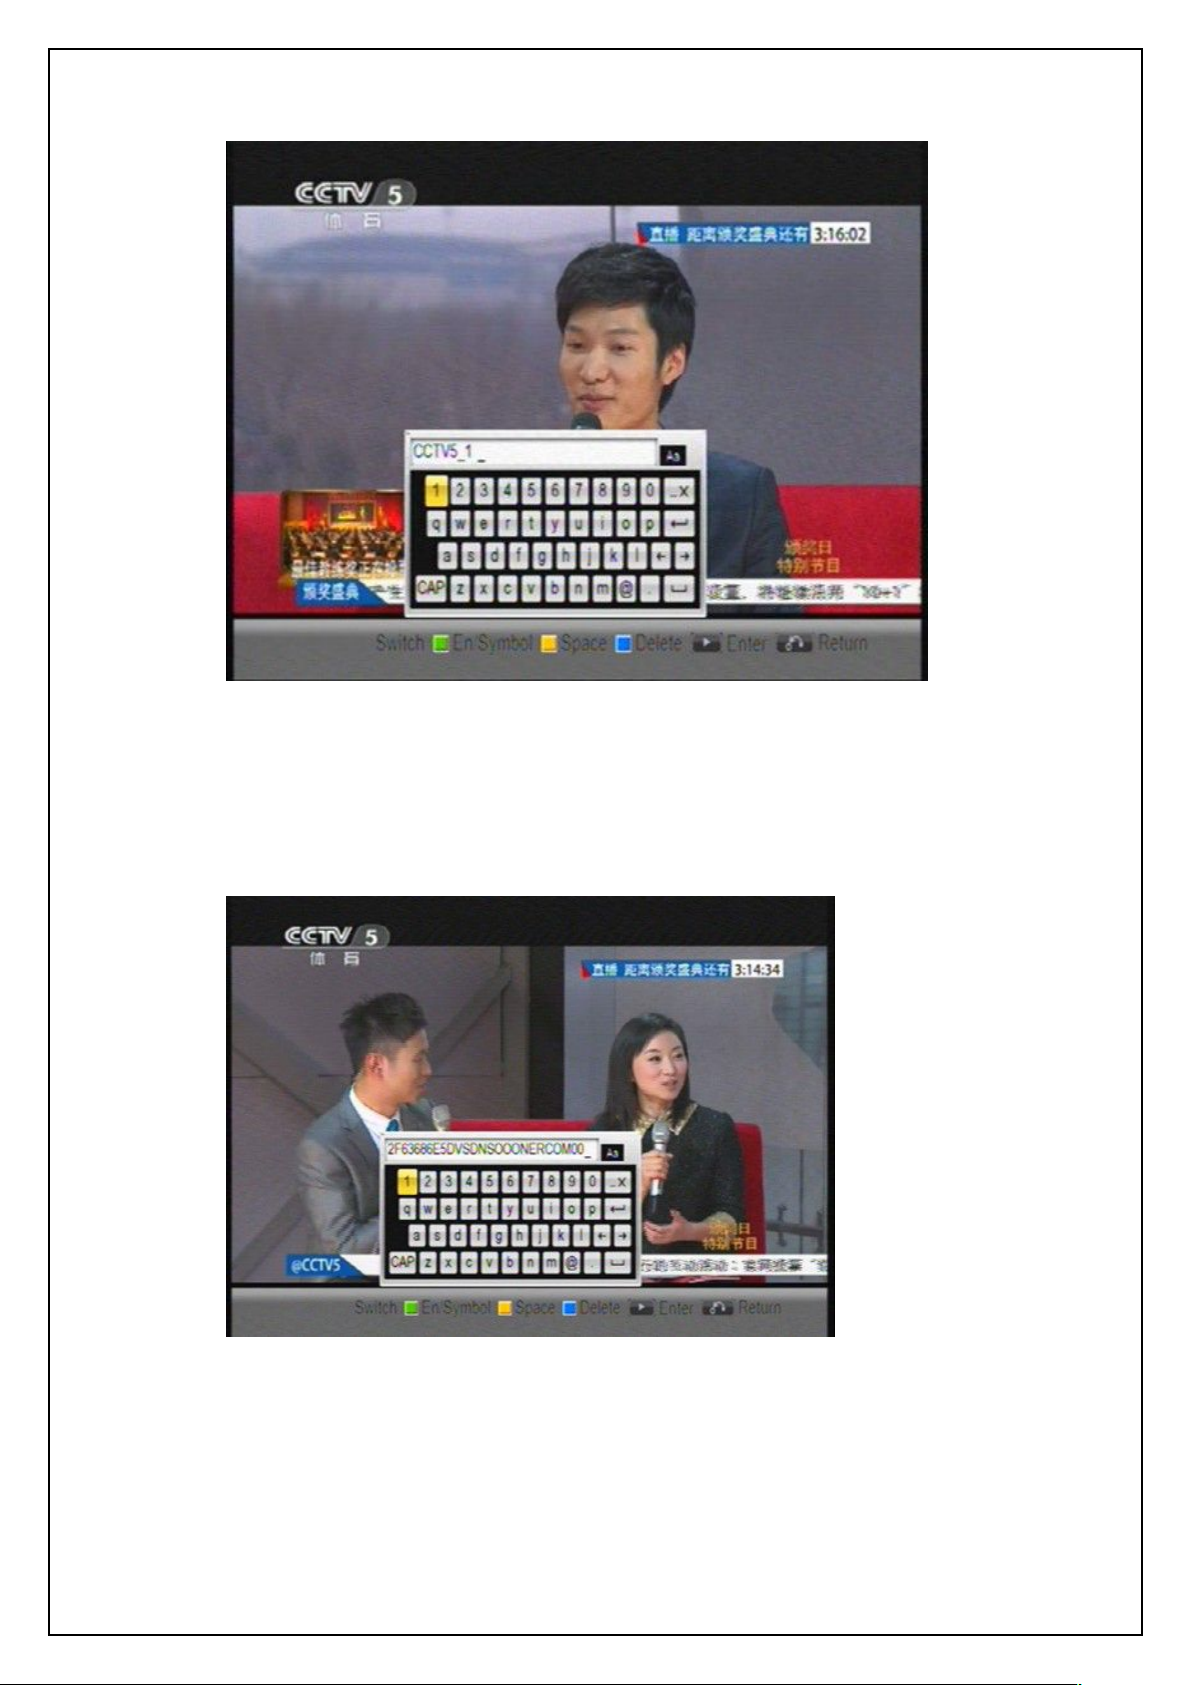
If the link is invalid, the following picture will appear:
Method 2:you can press green function key to rename the channel name,see the figure
below:
Page 51
USER’S MANUAL
51
Rename Channel Name
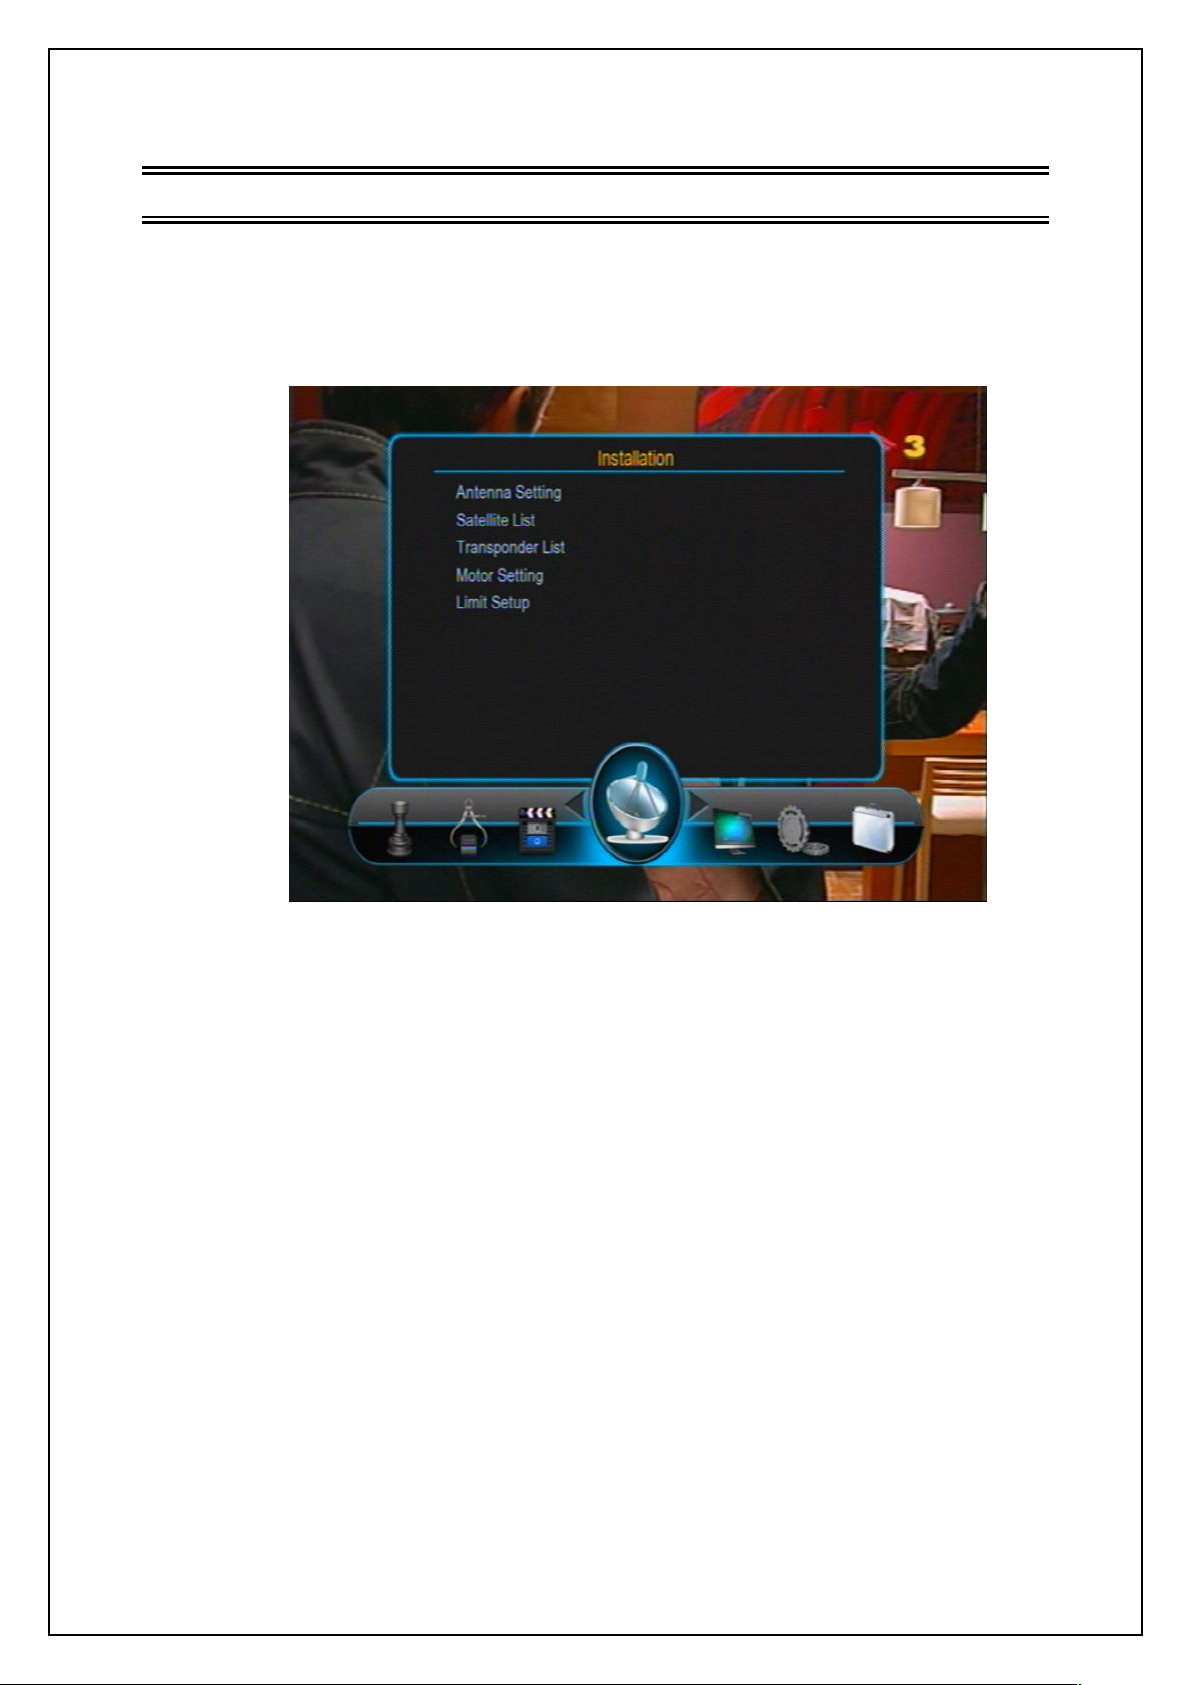
Method 3: you can press the yellow function key to show the link of the selected channel
see the figure below:
Channel’s Link
Page 52
USER’S MANUAL
52
7 MAIN MENU
7.1 Installation
Antenna Setting: Antenna and LNB settings
Satellite List: Satellite list setting
Transponder List: Transponder list setting
Motor Setting: Polar axis motor setting
Limit Setup: Polar axis move limit setting
7.1.1 Antenna Setting
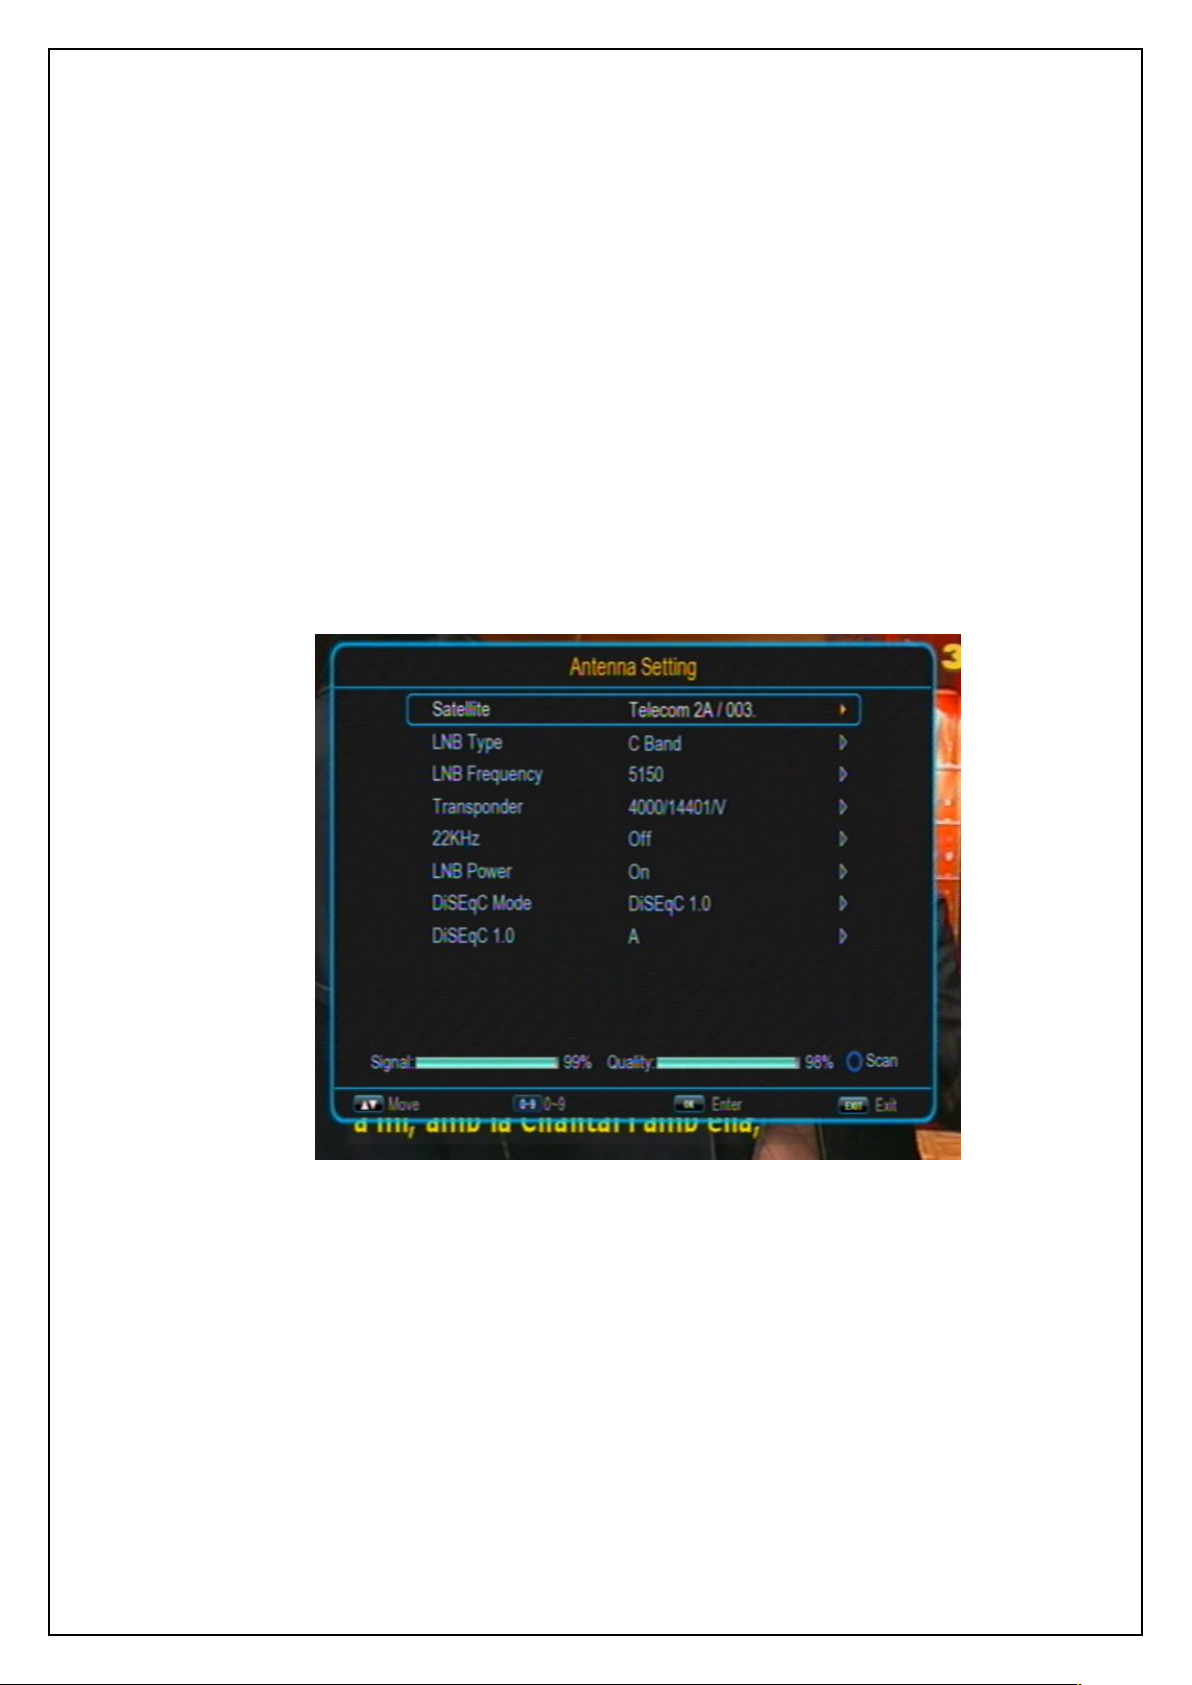
The Main Menu has seven items: Installation, Channel, Setting, Utility, Game, Upgrade and
MultiMedia. which include all setting items of the system.
Press MENU key to enter the Main Menu, see the figure below:
Main Menu
There are five sub items:
In the Installation menu press UP/DOWN keys to highlight the Antenna Setting sub item and
then press OK or RIGHT keys to enter the Antenna Setting page .
There are these setting items:
Page 53
53
Satellite: Select a satellite from the existing satellite list.
Tuner: Set the current working tuner index.
LNB Type: Set the working frequency band for LNB (three options: Ku Band, C Band
and User).
LNB Frequency: Set the local oscillation frequency of LNB.
Transponder: Select a transponder from the existing transponder list.
22KHz: Turn on or off the 22KHz switch (On, Off).
LNB Power: Set whether or not there is a STB to supply power to LNB.
Tone Burst Mode: Select tone burst mode(three potions: Tone Burst A、Tone Burst B、
DiSEqC (Digital Satellite Equipment Control) Mode: Select input signal. When more
None)
than one LNB is used, DiSEqC can be used to select one LNB to input.
USER’S MANUAL
Antenna Setting Menu
In the Antenna Setting page, you can press UP/DOWN keys to highlight a setting item and
then press OK key to enter corresponding editing state. In the editing state press UP/DOWN
keys to select an option and then press OK key to exit editing.
Page 54
USER’S MANUAL
54
7.1.2 Satellite List
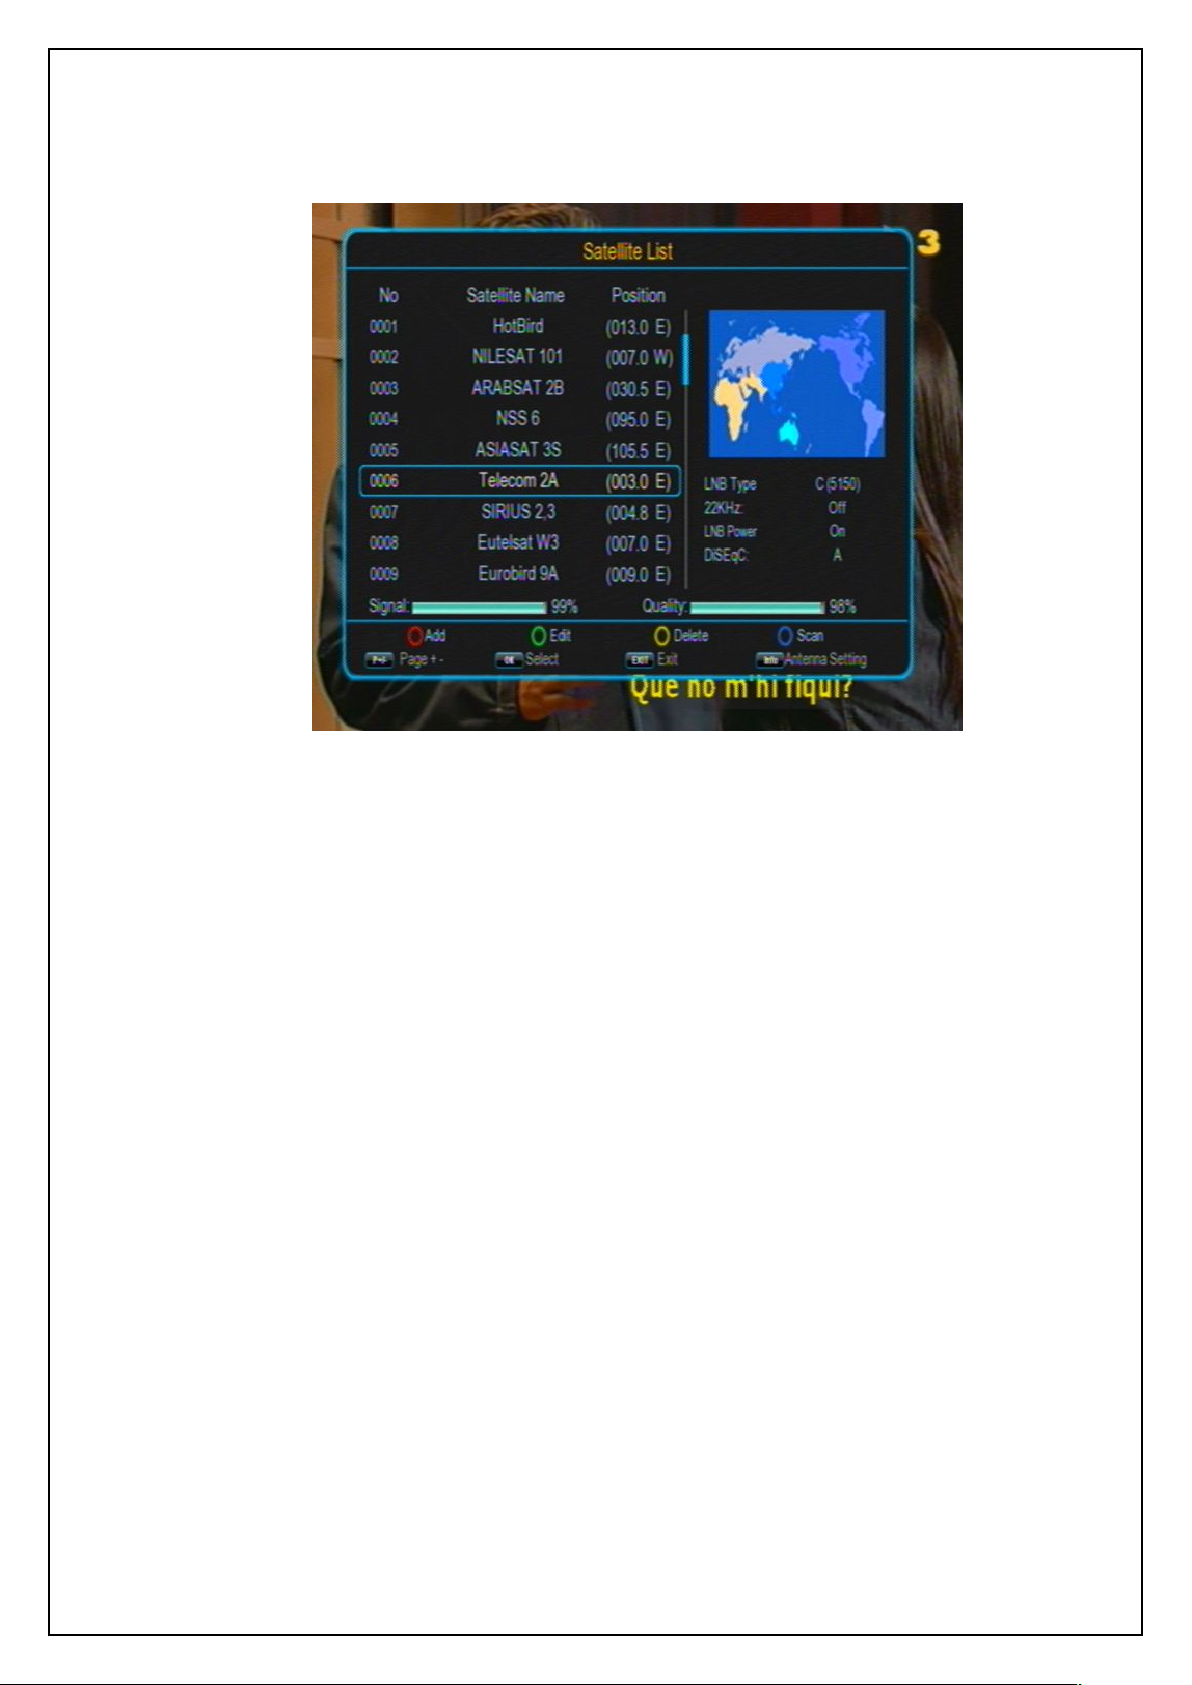
Satellite List
The Satellite List (see figure above) shows all the satellites the system has stored. Users can
press color function keys on the remote controller to edit the list, for example to add a satellite
(by pressing the red function key), to delete a satellite (by pressing the yellow function key), to
scan the selected satellite (by pressing the blue function key), etc.
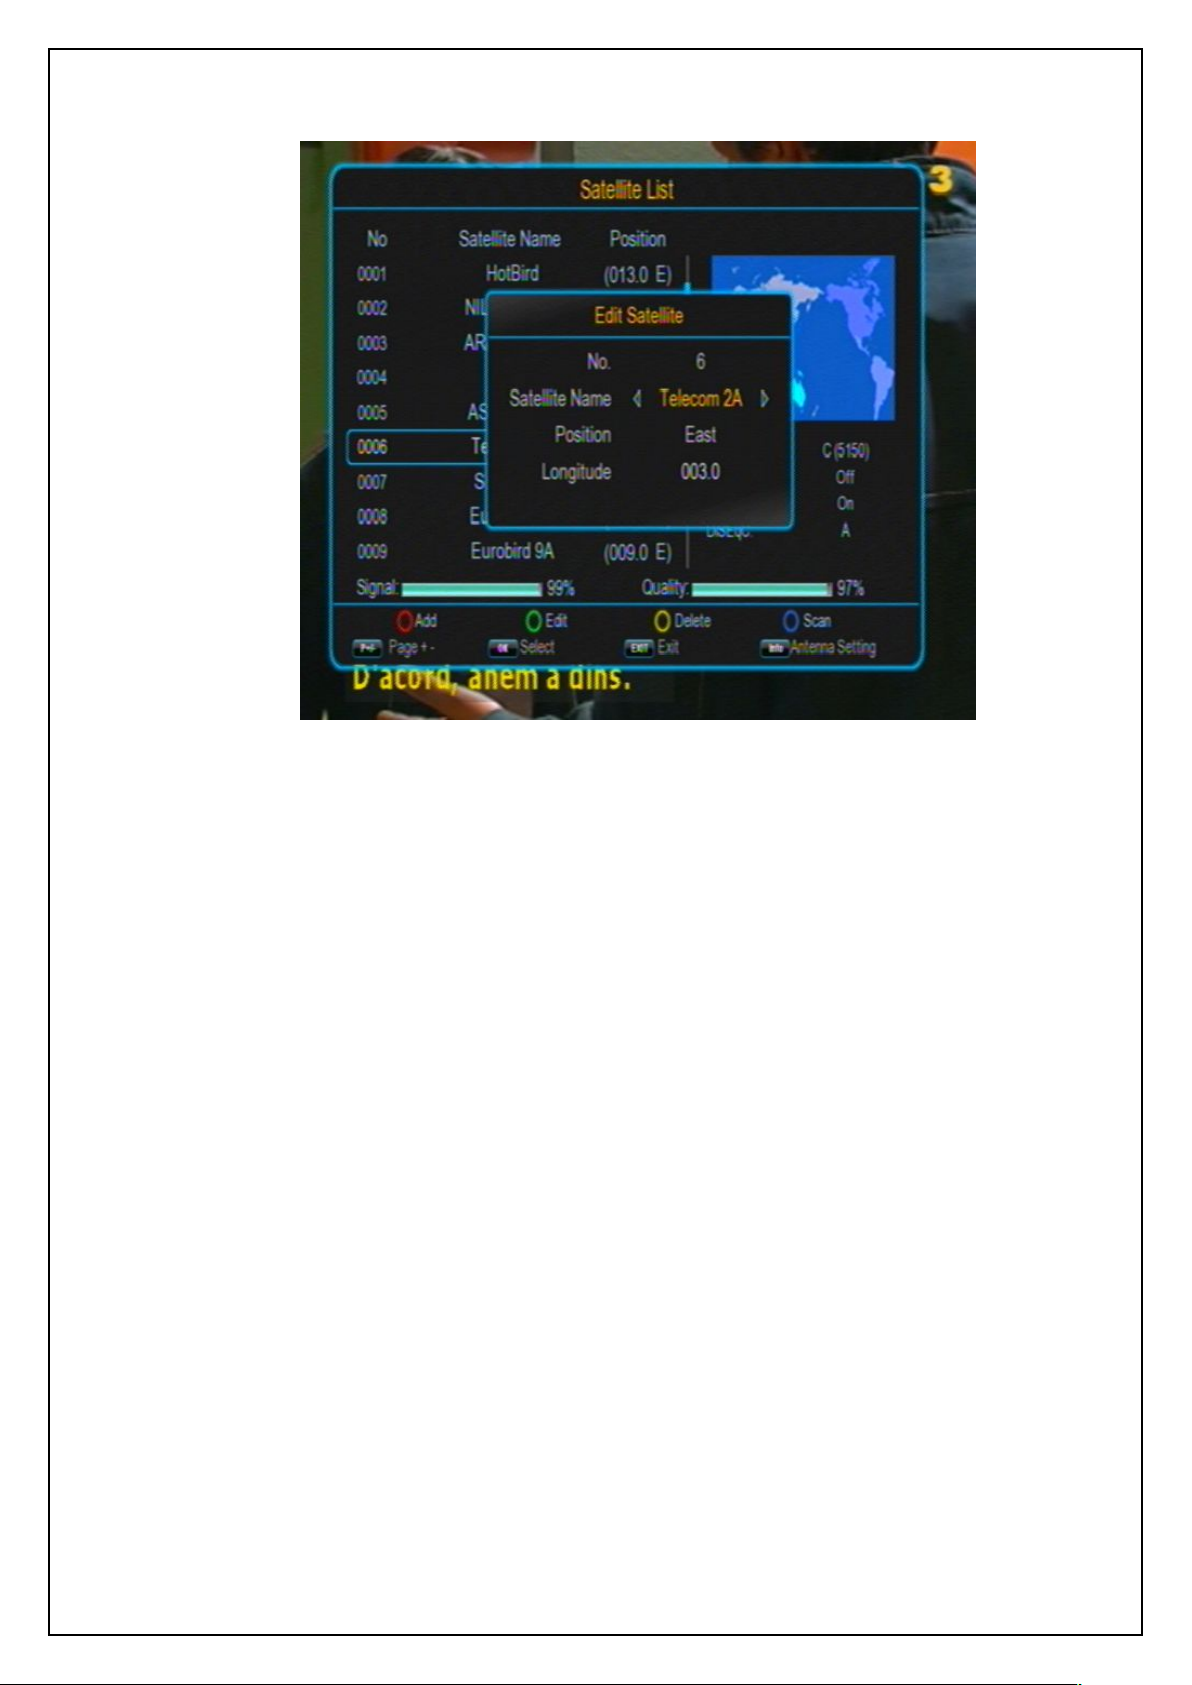
Also you can press the green function key to edit the detailed information of the selected
satellite: Satellite Name, Position and Longitude. See the figure below:
Page 55
USER’S MANUAL
55
7.1.3 Transponder List
Edit Satellite
In the Installation menu, press UP/DOWN keys to highlight the Transponder List item and
then press OK or RIGHT keys to enter the Transponder List page. See the figure below:
Page 56
USER’S MANUAL
56
Transponder List
The Transponder List stores the transponders of current satellite of current system. Each
transponder may have multiple frequencies. You can press color function keys on the remote
controller to edit the list, for example to add a transponder (by pressing the red function key),
to edit a transponder (by pressing the green function key), to delete a transponder (by
pressing the yellow function key), to scan transponders (by pressing the blue function key),
etc.
Page 57
USER’S MANUAL
57
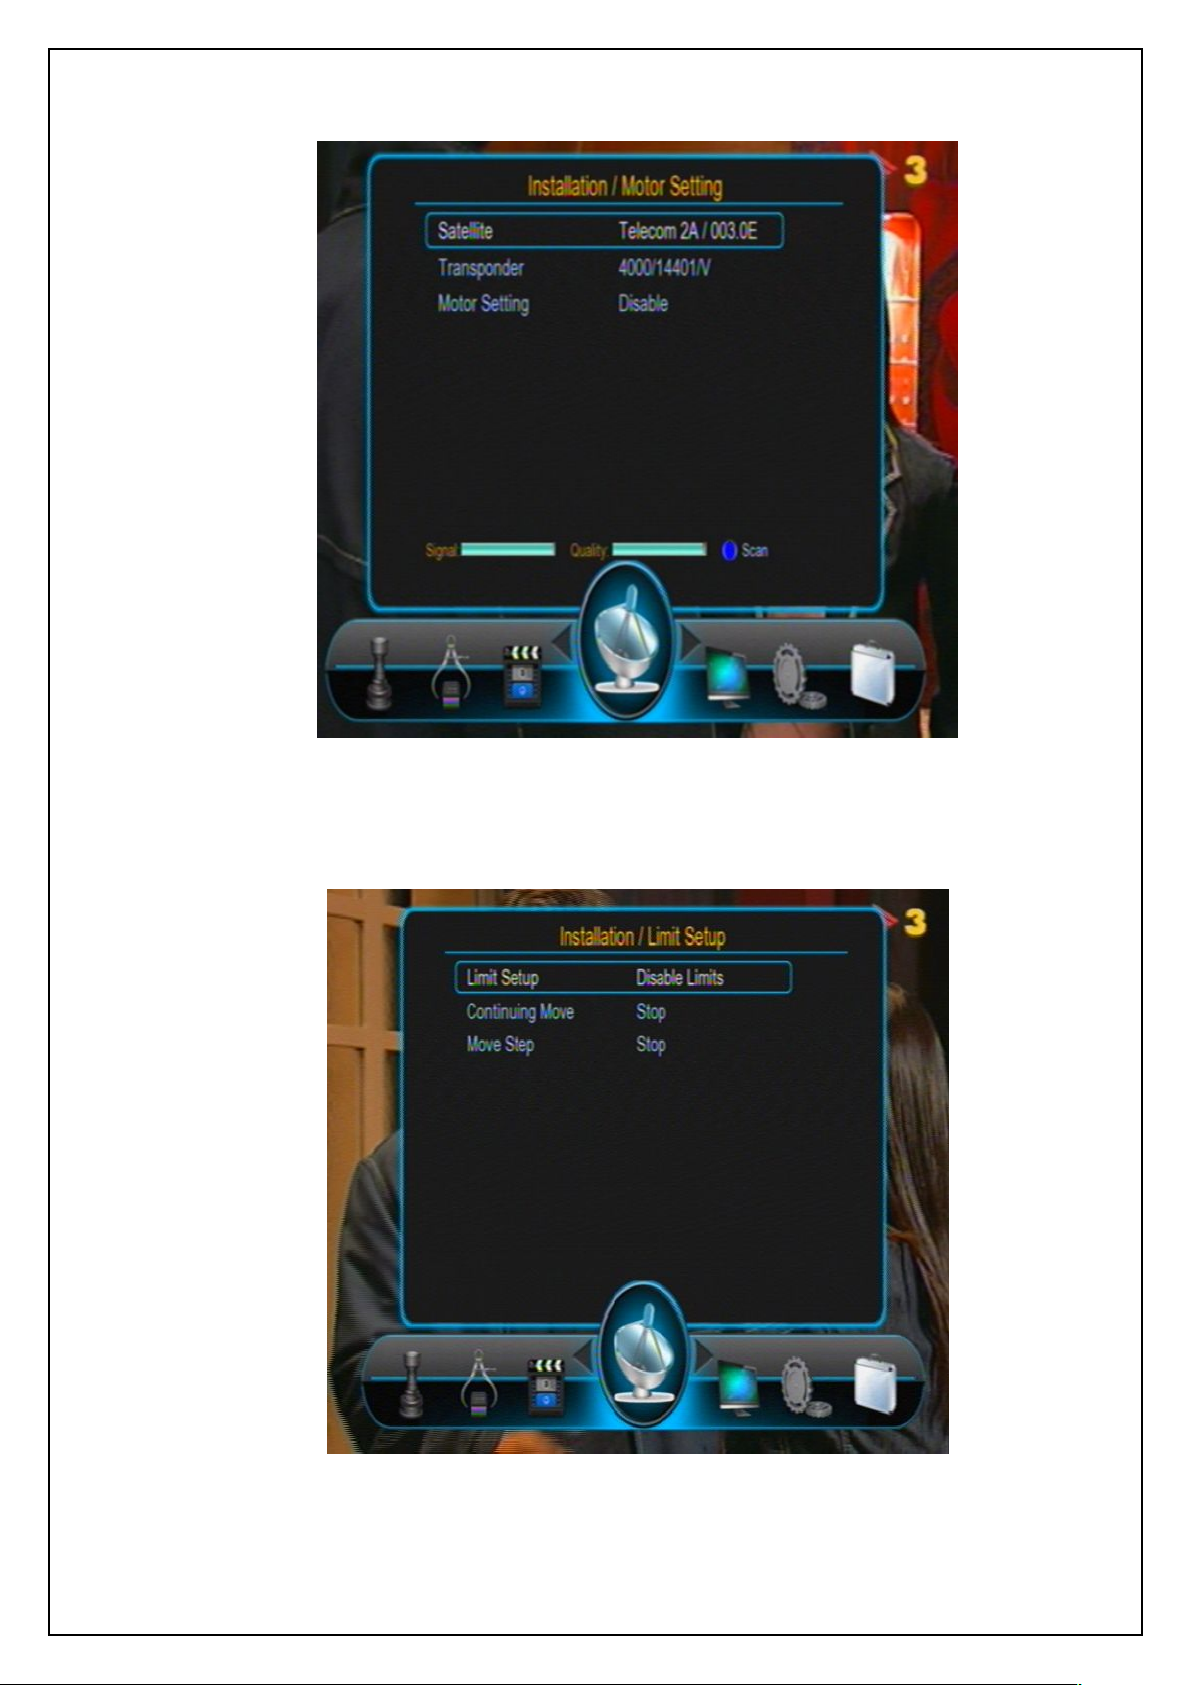
7.1.4 Motor Setting
Satellite: Select a satellite.
Transponder: Select a transponder.
Motor setting: Set the polar axis motor.
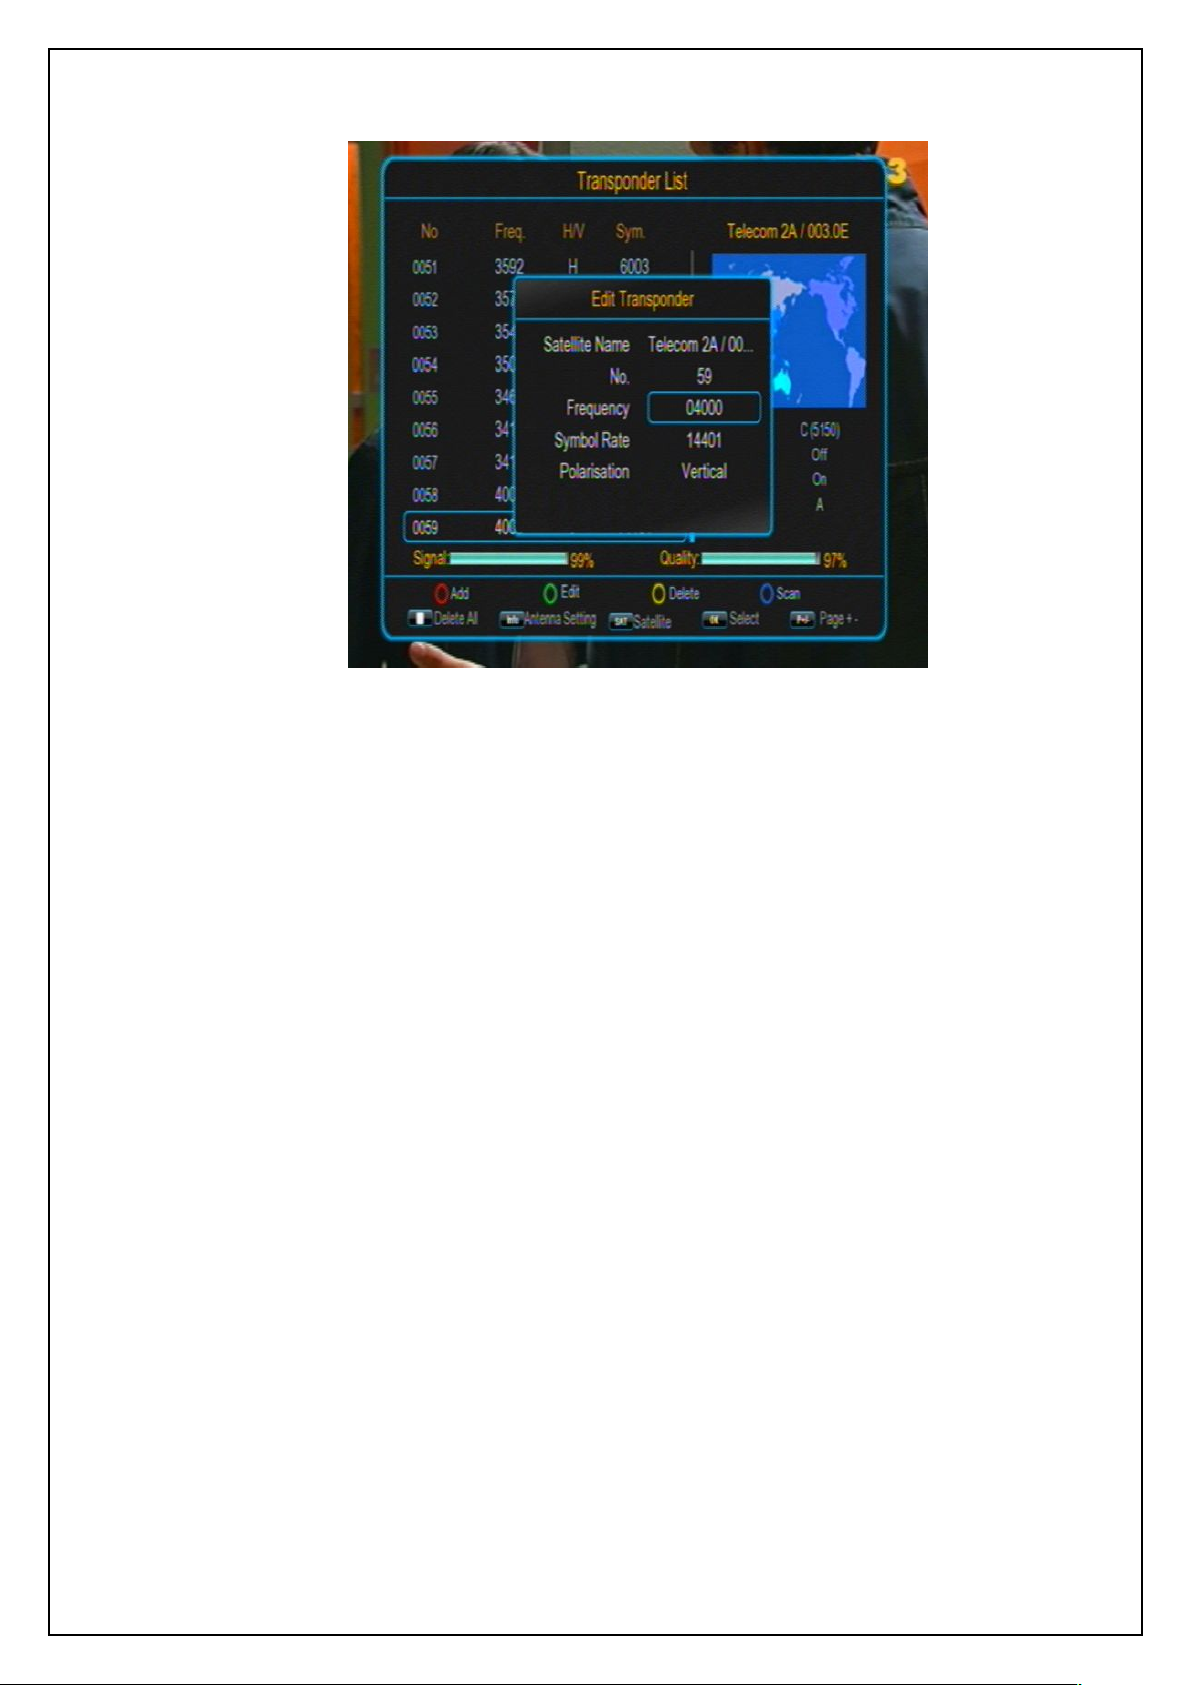
Edit Transponder
After pressing the green function key, you can edit the selected transponder’s detailed
information such as frequency, symbol rate and polarisation. When finished, press OK key to
exit the editing state.
Through the Motor Setting page you can control the polar axis motor to adjust the direction of
antenna so as to make the antenna accurately point to the satellite. There are these setting
items in this page (see Figure 7-8):
If you have already selected a satellite and a transponder, when moving the polar axis you will
find the signal strength and quality indicators at the bottom of the page.
Page 58
USER’S MANUAL
58
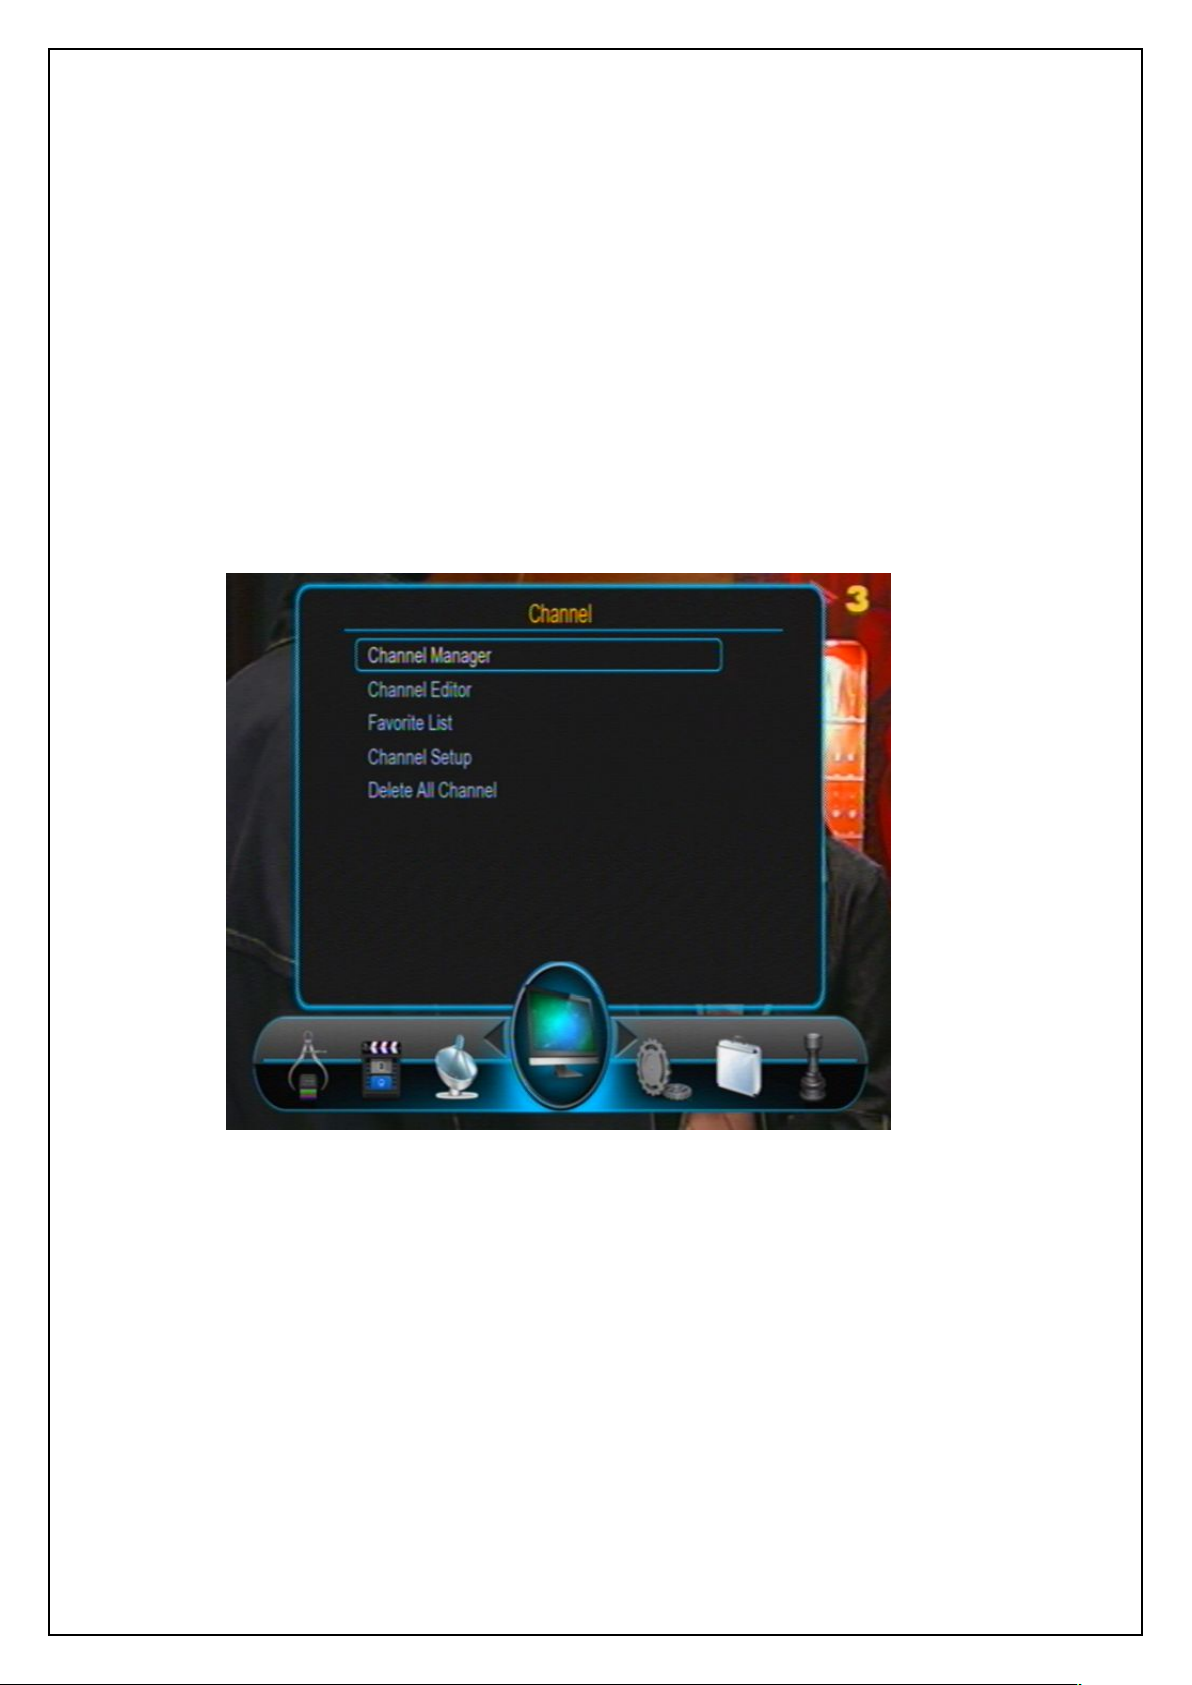
7.1.5 Limit Setup
Motor Setting
Limit Setup
Page 59
USER’S MANUAL
59
Limit Setup: Polar axis move limit setting.
Continuing Move: Enable polar axis continuous move.
Move Step: Enable polar axis step move. After setting, you can press LEFT/RIGHT
7.2 Channel
6.1.1 Channel Manager
There are three sub items:
keys to move the polar axis east or west step by step.
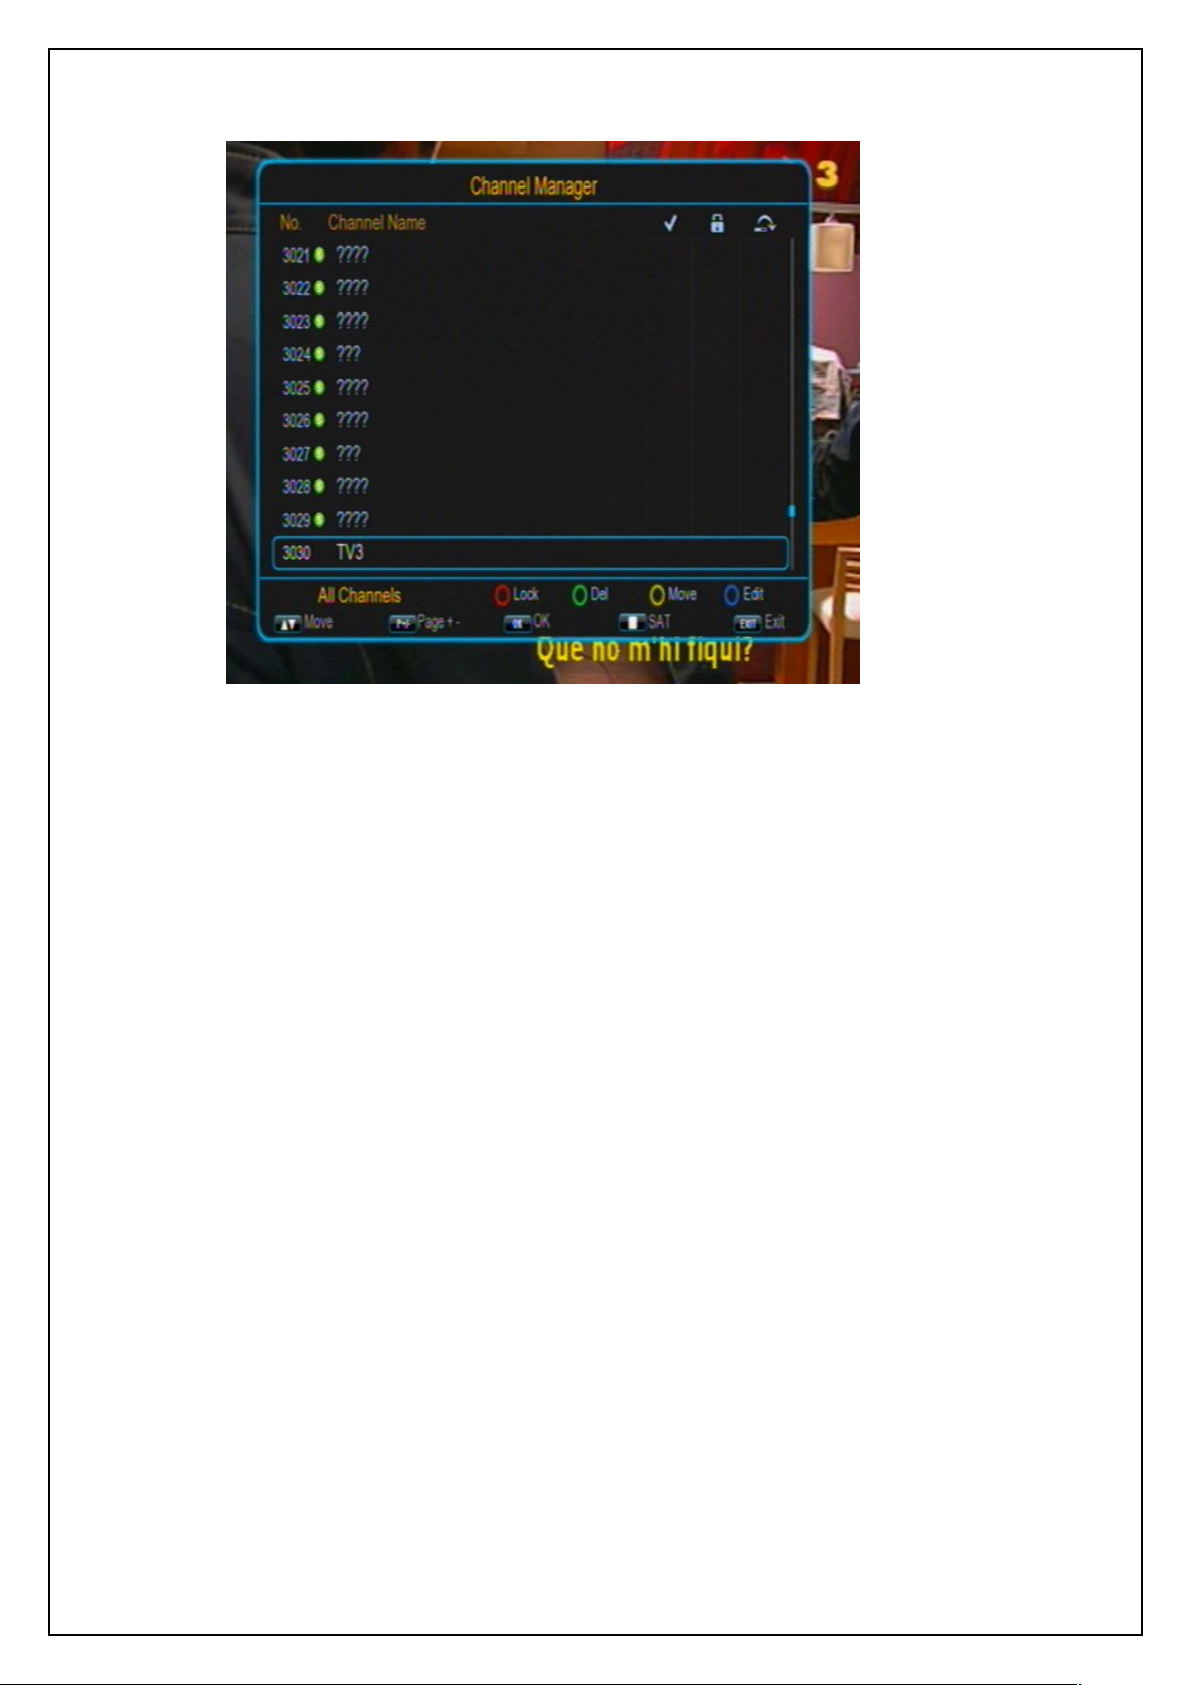
The Channel menu has five items: Channel Manager, Channel Editor, Favorite List Channel
Setup and Delete All Channel. To enter the Channel menu, press UP/DOWN keys in the Main
Menu to highlight the Channel item and then press OK or RIGHT keys. The Channel menu is
shown as below:
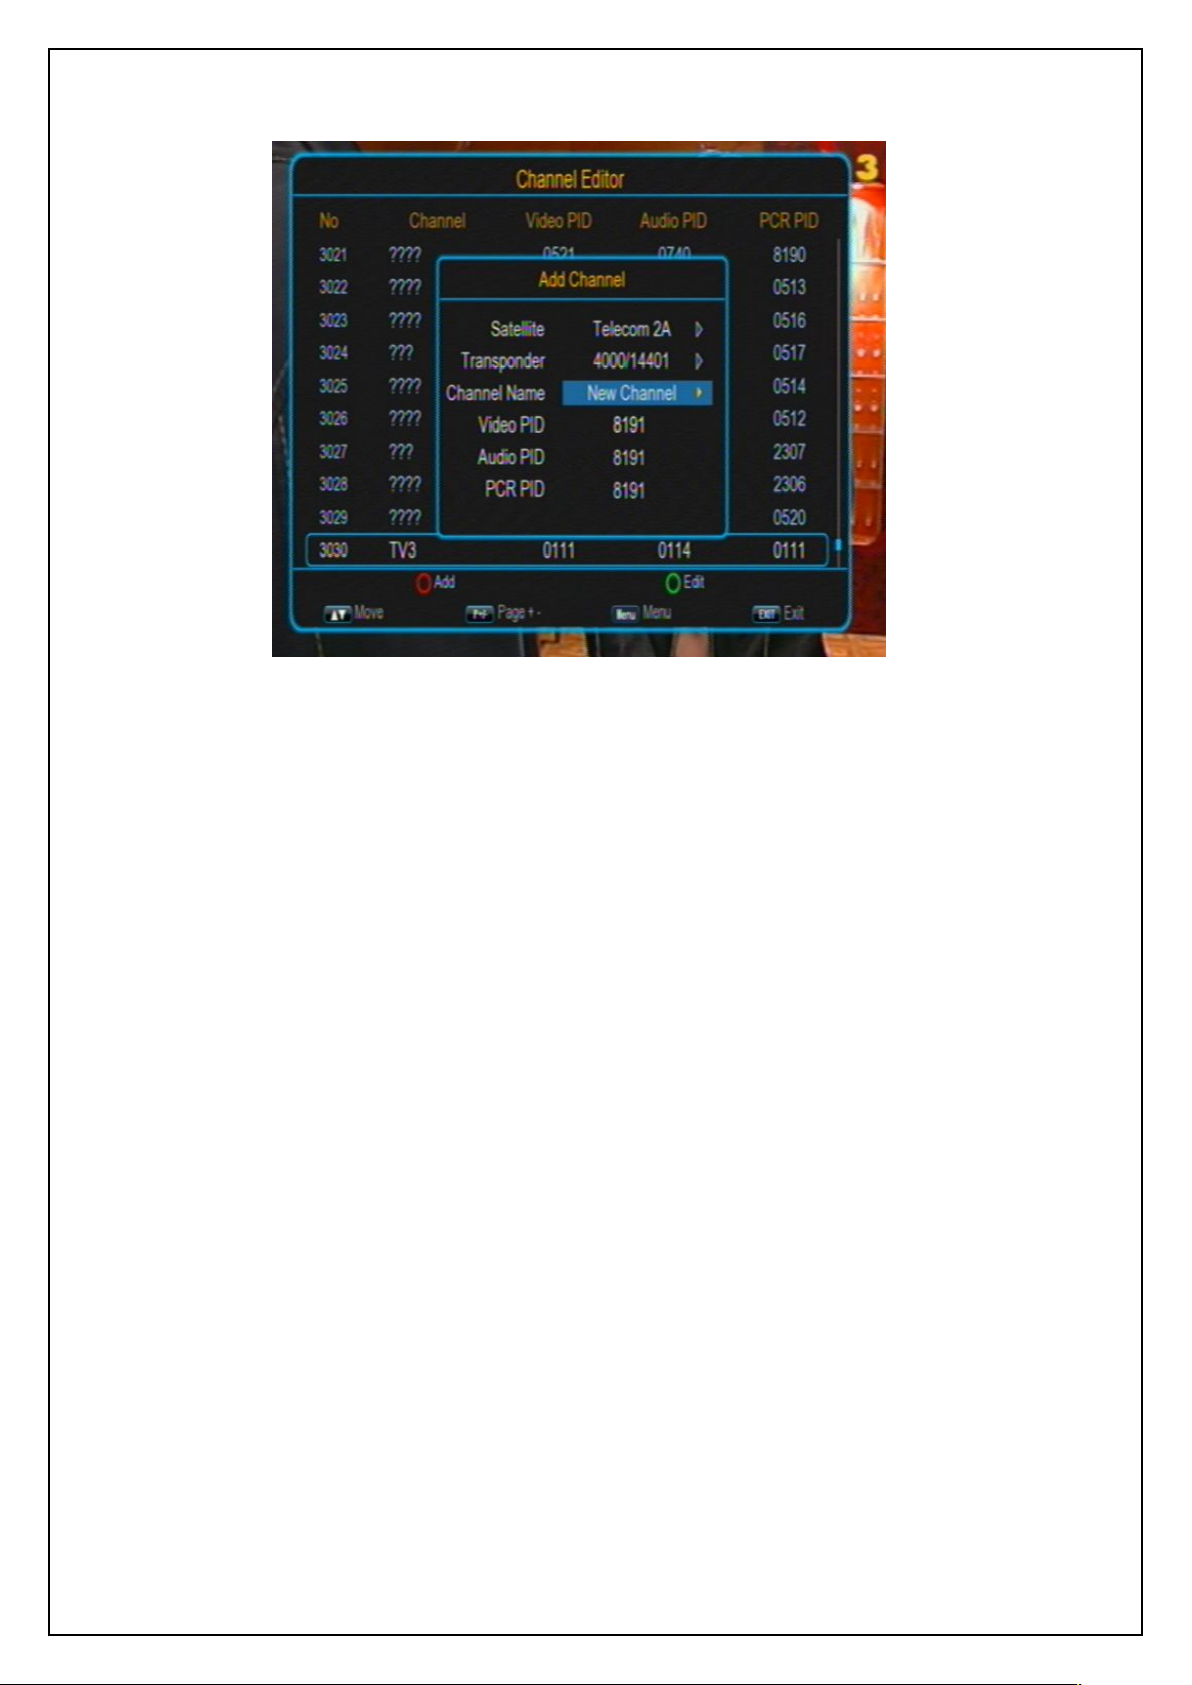
The system provides powerful channel management function. You can through the Channel
Manager menu to manage your channels such as deleting, locking, sorting, skipping or
renaming.
To enter the Channel Manager menu, in the Channel menu press UP/DOWN keys to select
the Channel Manager item and then press OK key. See the figure below:
Channel Menu
Page 60
USER’S MANUAL
60
To delete a channel, press UP/DOWN keys to select the channel and then press the
To change a channel’s number or resort the channels list, press UP/DOWN keys to
To rename a channel, press UP/DOWN keys to select the channel, then press the blue
Channel Manager Menu
If there is no program channel data in the database, ‘No Program’ message will appear and
both the Channel Manager and Favorite List menus cannot be accessed.
The Channel Manager menu contains these functions: Channel Delete, Channel Skip,
Channel Lock and Channel Rename. Press UP/DOWN keys to select the channel and then
press the four color function keys on the remote control to manage it: press the red function
key to lock or unlock the selected channel; the green function key to delete the selected
channel; the yellow function key to skip or cancel skipping the selected channel; the blue
function key to rename the selected channel. After setting, corresponding icons will appear.
green function key. Key in a correct four-digit password (default password: 0000) in the
pop-up dialog, a green check mark will appear in the delete column of the selected
channel. When exiting the Channel Manager menu, you will be asked to confirm the
deletion. Select YES and enter the correct password (default password: 0000), and the
channel will be deleted. To cancel the deletion state on a channel, select the channel
first and then press the green function key again.
select the channel you want to move, then press OK key. The selected channel item will
flicker. Next, press UP/DOWN keys to the destination position, then press YELLOW key
again. Thus the channel’s position in the list is changed.
function key to enter the channel name edit page. See the figure below:
Page 61
USER’S MANUAL
61
To lock a channel, after selecting the channel press the red function key, and then key in
Press EXIT key to exit the Channel Manager menu.
7.2.1 Channel Editor
Rename Channel Name
After editing, press BLUE key to confirm.
a correct four-digit password (default password: 0000) in the pop-up dialog. When
switching to the locked channel you will be asked to give a correct password to watch it.
To enter the Channel Editor menu, in the Channel menu press UP/DOWN keys to select the
Channel Editor item and then press OK key. See the figure below:
Page 62
USER’S MANUAL
62
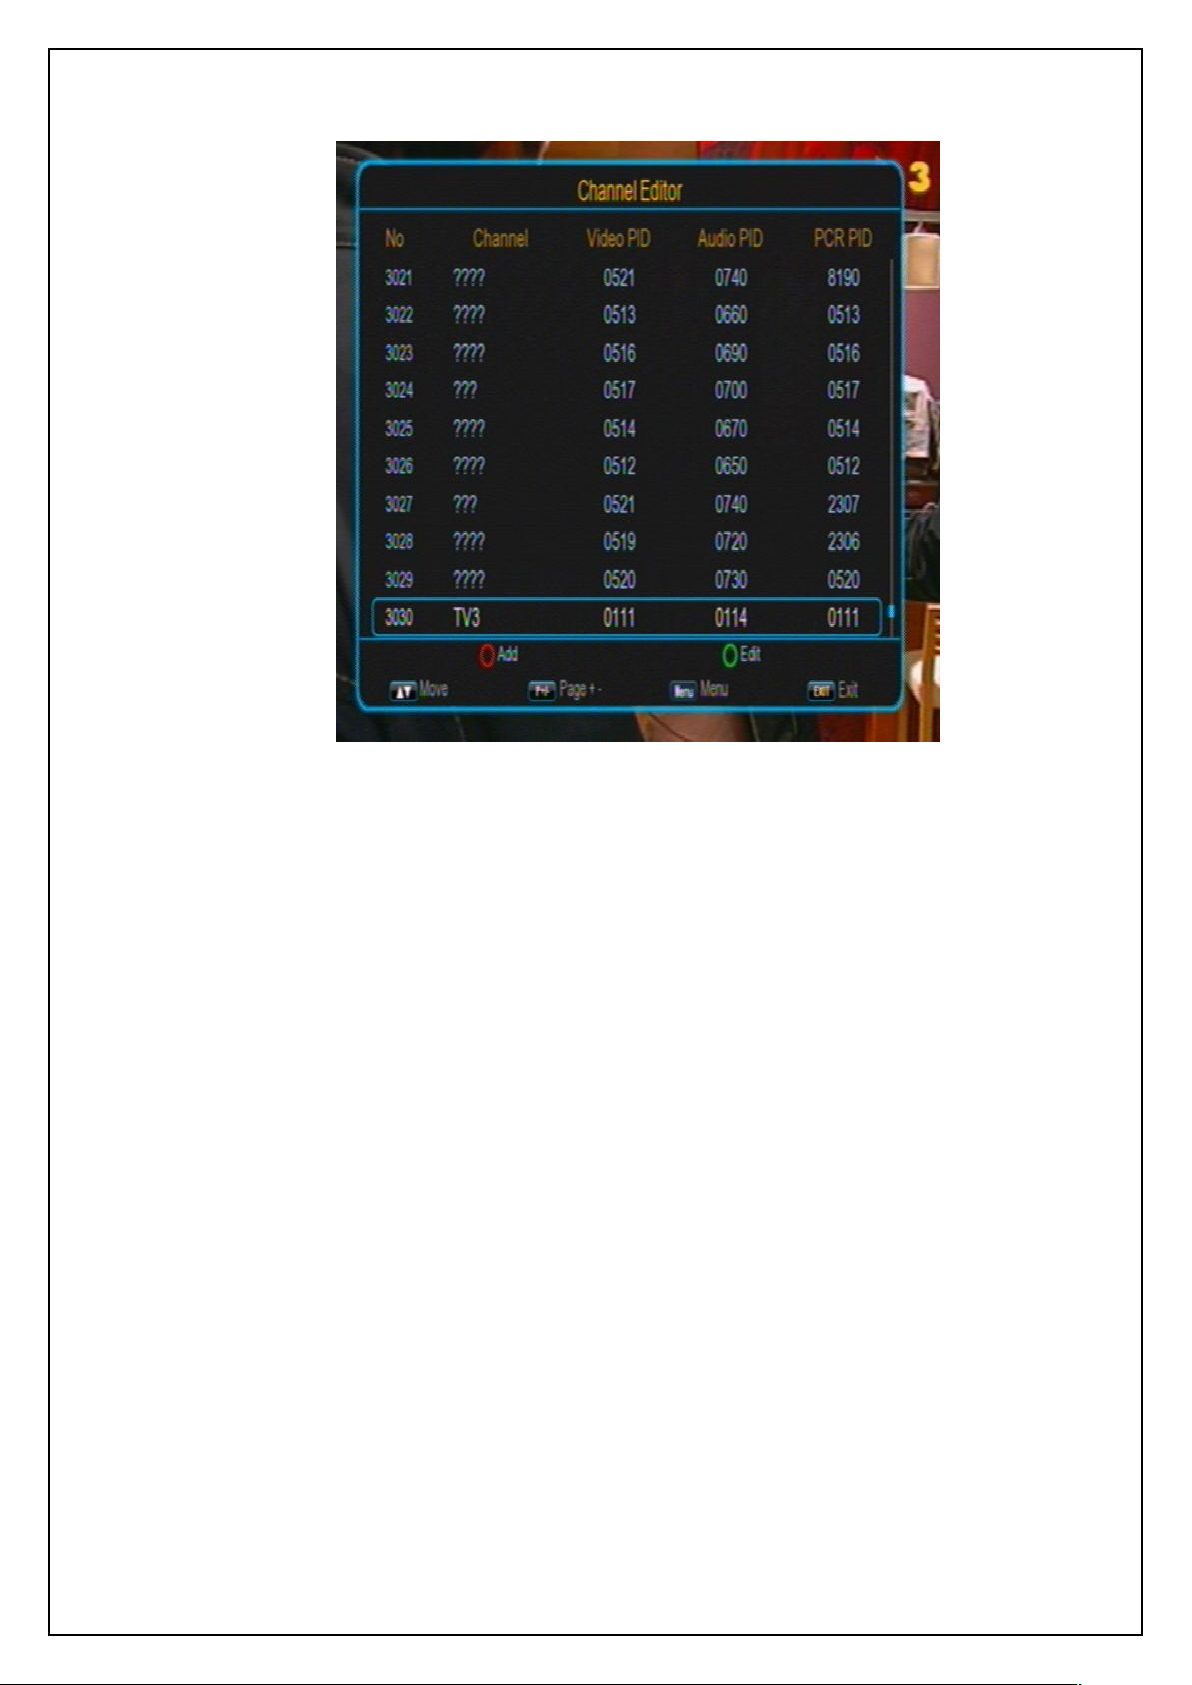
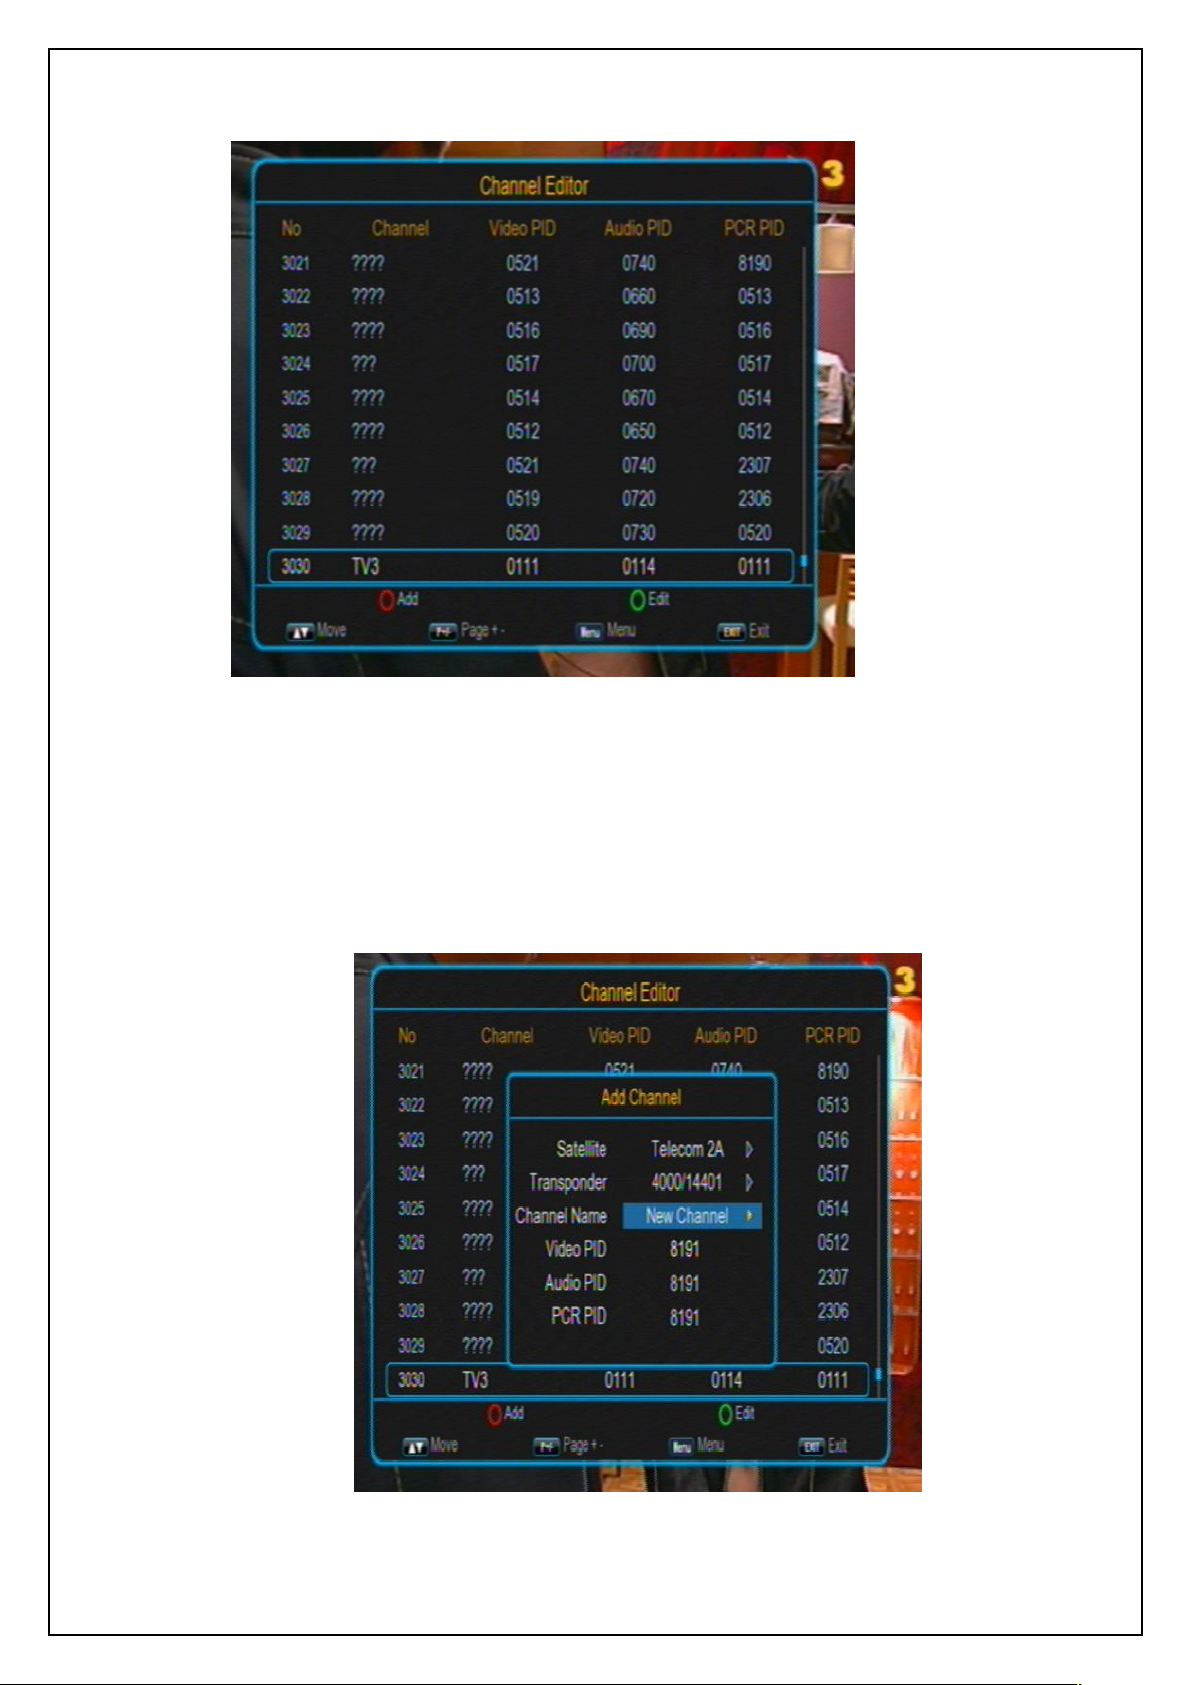
To add a new channel, press green color function key to enter the add channel page.
Figure 7- 13 Channel Editor Menu
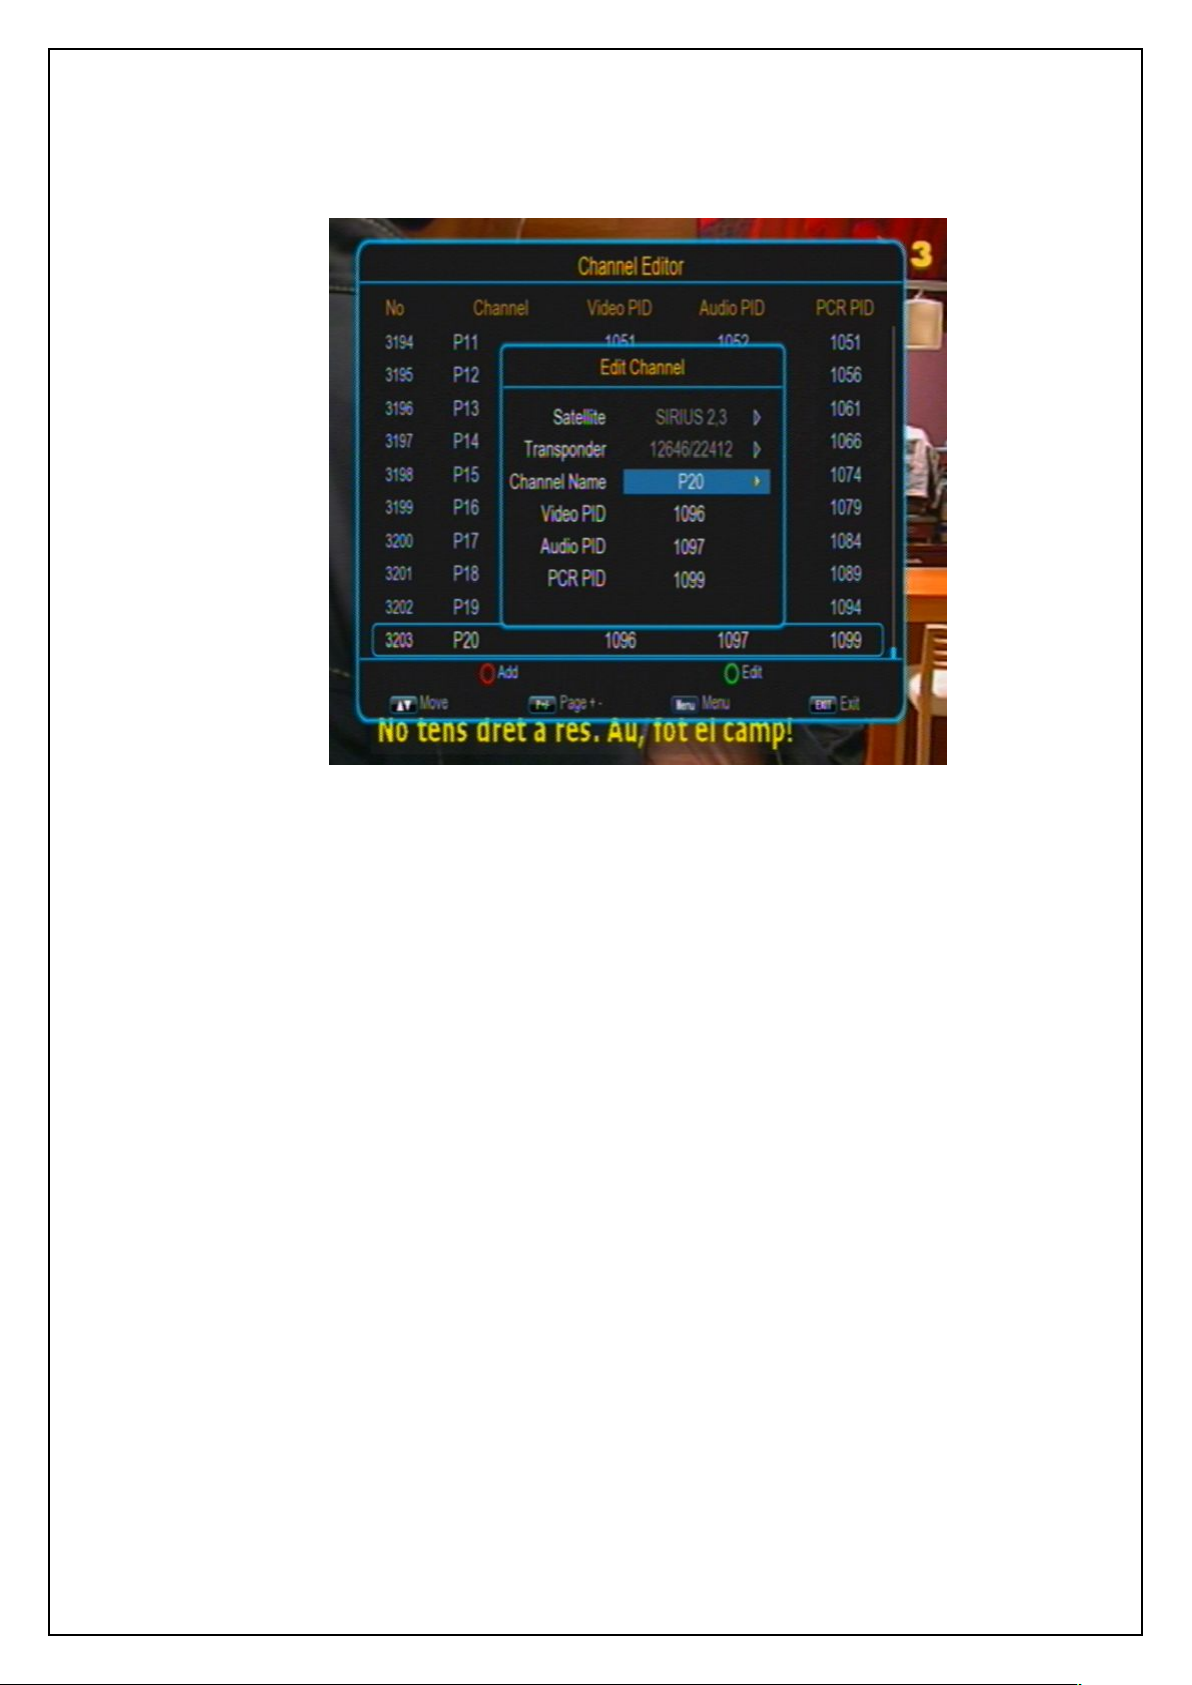
The Channel Editor menu contains two functions: Channel Add and Channel Edit, Press
UP/DOWN keys to select the channel and then press the red or green color function keys on
the remote control to manage it: press the red function key to add a new channel; the green
function key to edit the attributes of selected channel (Channel name, Video/Audio/PCR Pid).
See the figure below.
Figure 7- 14 Add Channel Menu
Page 63
63
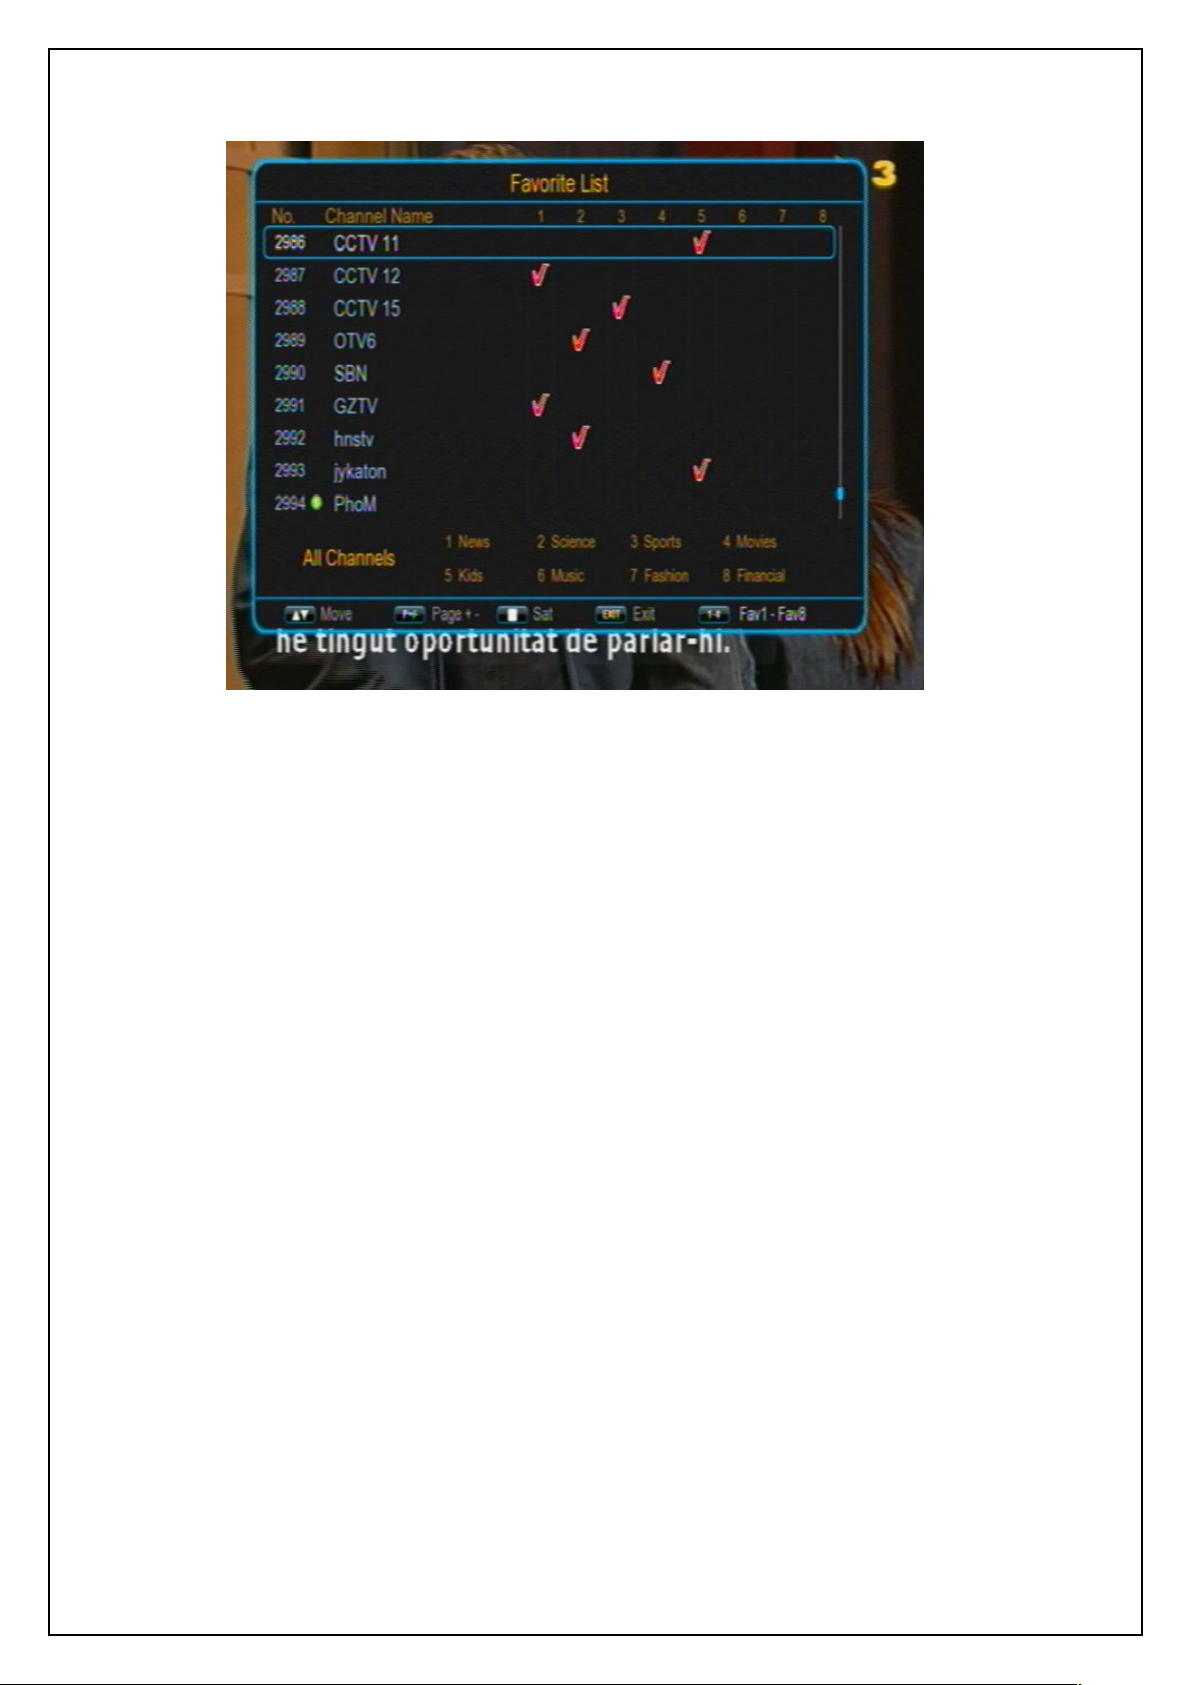
To edit a channel, press UP/DOWN keys to select the channel, then press the green
function key to enter the channel edit page. See the figure below.
Press EXIT key to exit the Channel Eidtor menu.
7.2.2 Favorite List
USER’S MANUAL
Figure 7- 15 Editor Channel Menu
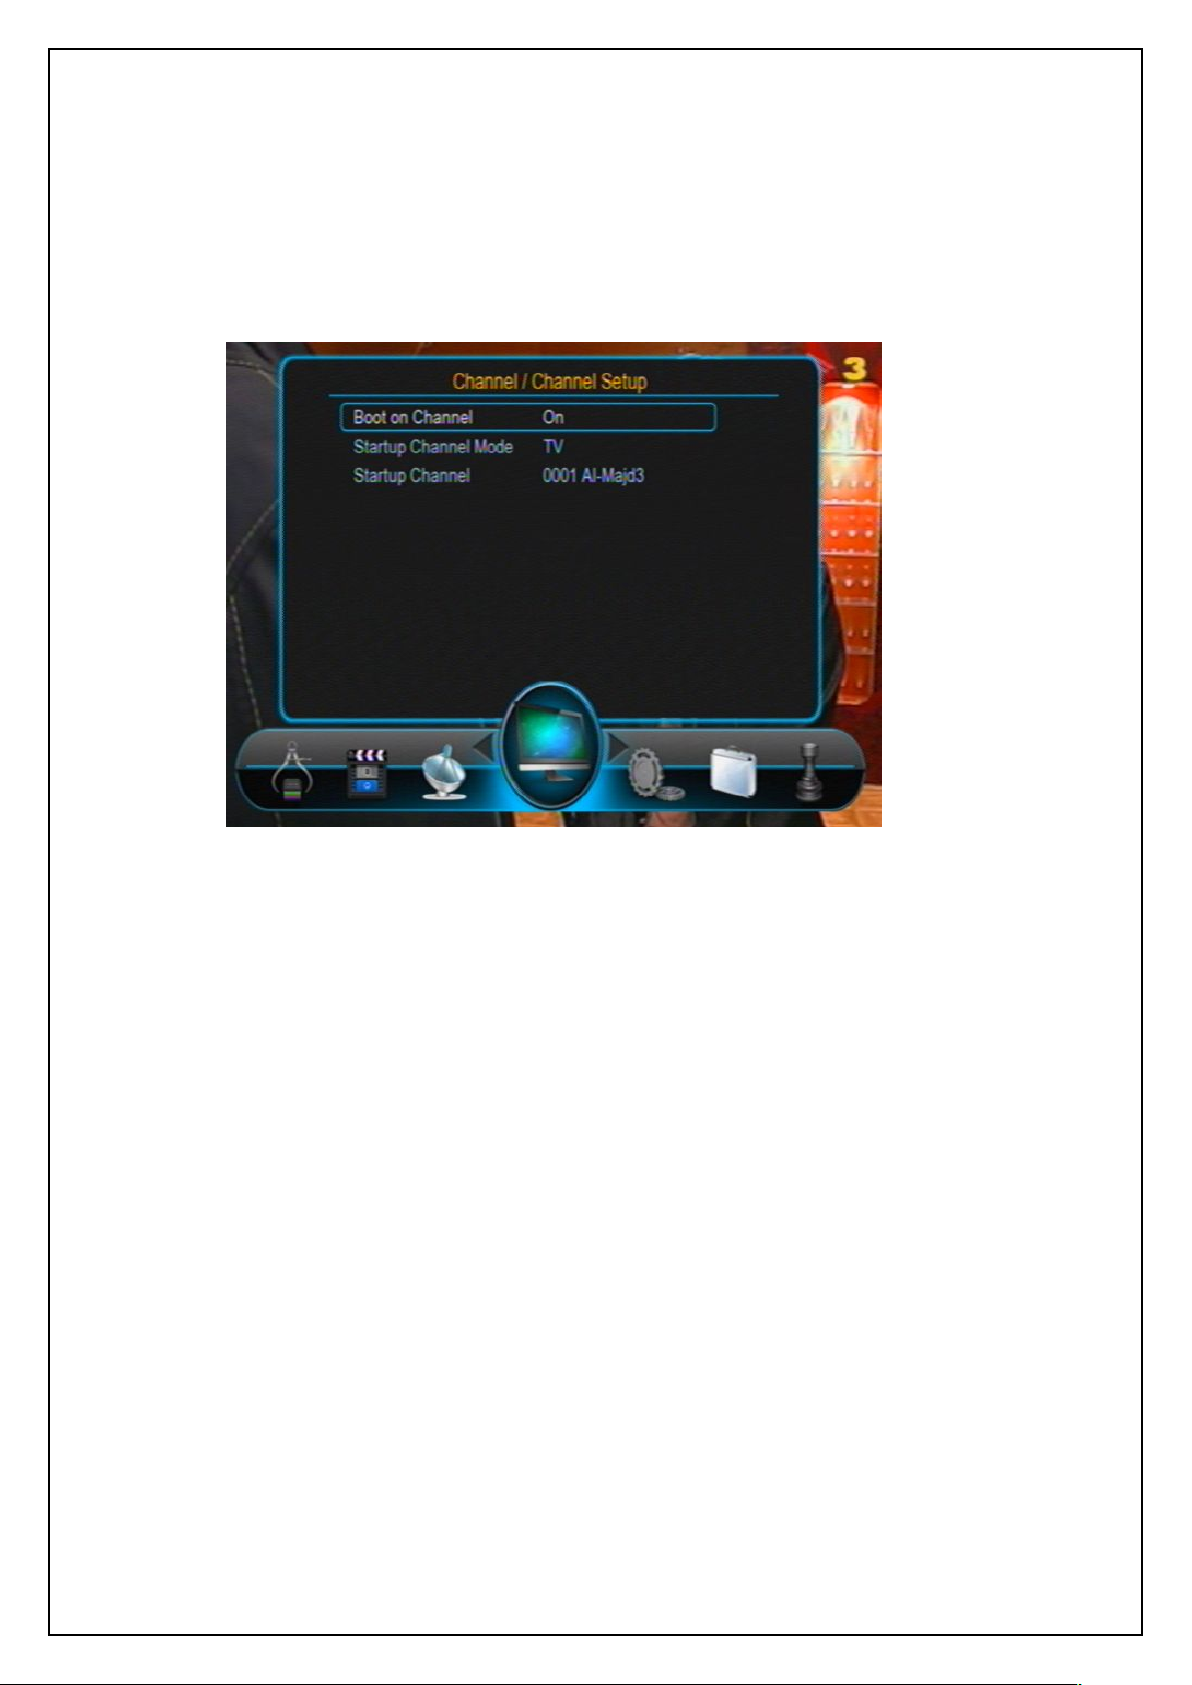
The system provides a favorite channels list function. You can through the Favorite List menu
to add, delete or group your favorite channels.
To enter the Favorite List menu, in the Favorite list menu press UP/DOWN keys to select the
Favorite List item and then press Number key. See the figure below:
Page 64
USER’S MANUAL
64
There are total 8 favorite lists. You can press the Nunber keys to add channels to
Press EXIT key to exit the Favorite List menu.
Favorite List Menu
corresponding favorite list. One channel can be added into multiple favorite lists.
Page 65
USER’S MANUAL
65
7.2.3 Channel Setup
7.3 Setting
This item is to set the default channel after the system boots. By default, after the system
boots, the channel that is being played before the previous turning off will be auto played. If
you want to make the system always play the Awaz TV every boot on, you can configure the
setting items in the Channel Setup menu as follows:
Channel Setup Menu
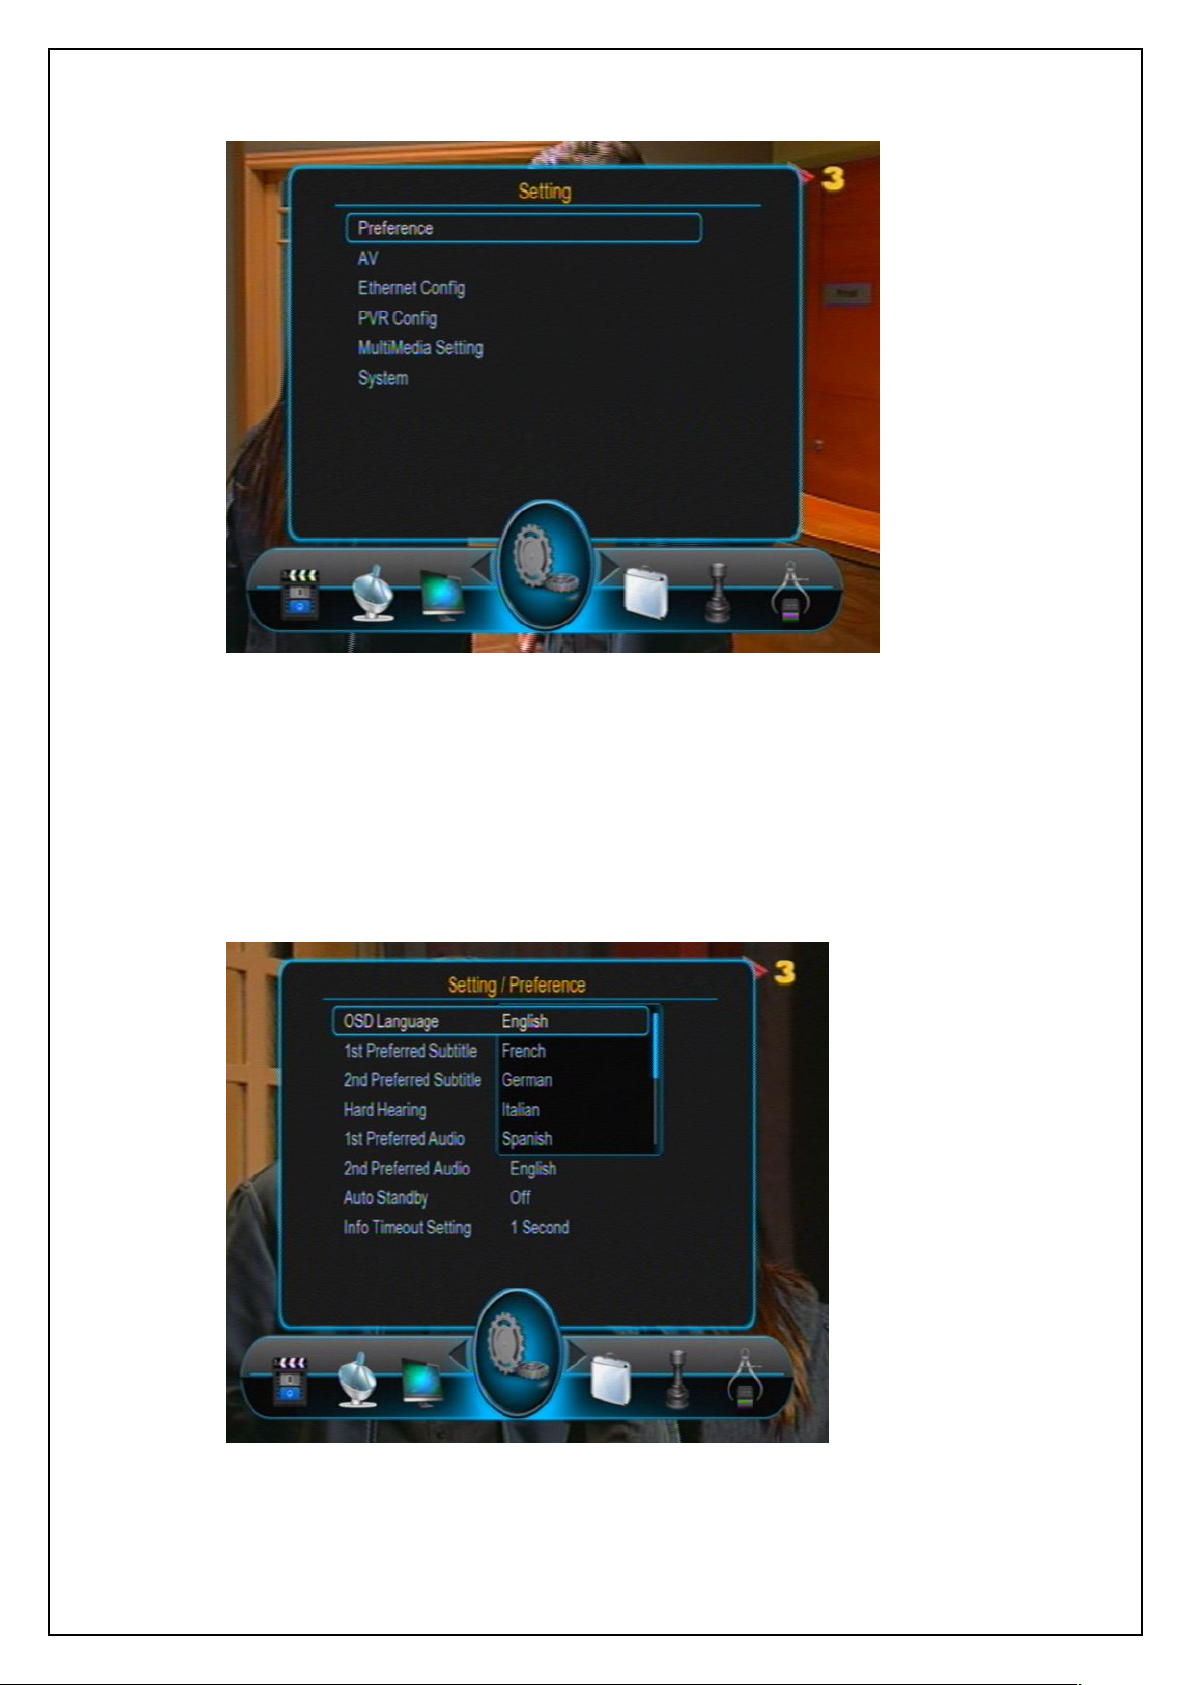
The Setting menu is mainly used to change preference setting and system settings.
To enter the setting menu, in the Main Menu press OK keys to select the Setting item and
then press OK keys. See the figure below:
Page 66
USER’S MANUAL
66
7.3.1 Preference
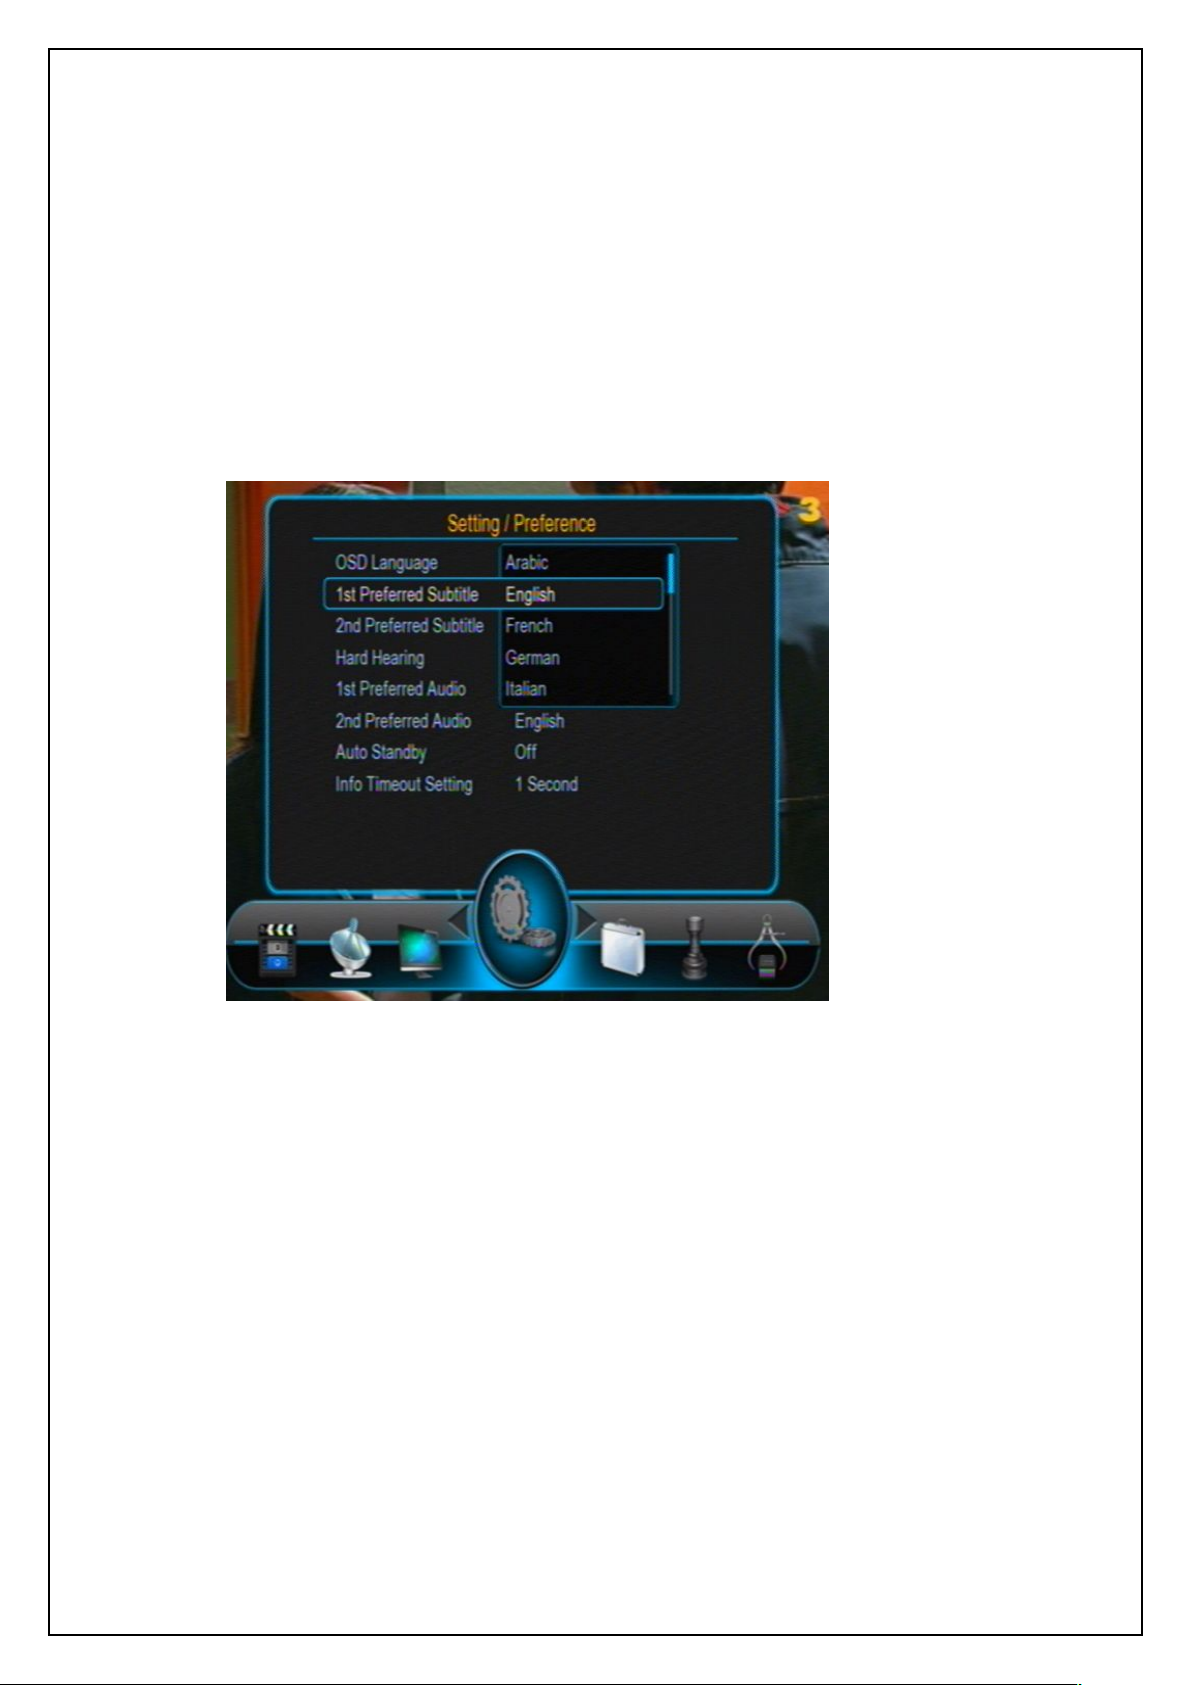
Preference Menu
The OSD Language item defines the language of menu and prompts. To change the OSD
language, press UP/DOWN keys to highlight this item and then press OK or RIGHT keys to
pull down a language list. In this list, you can press UP/DOWN keys to select a language and
then press OK key to confirm. See the figure below:
OSD Language Setting
Page 67
USER’S MANUAL
67
7.3.1 Preferred Subtitle
7.3.2 Hard Hearing
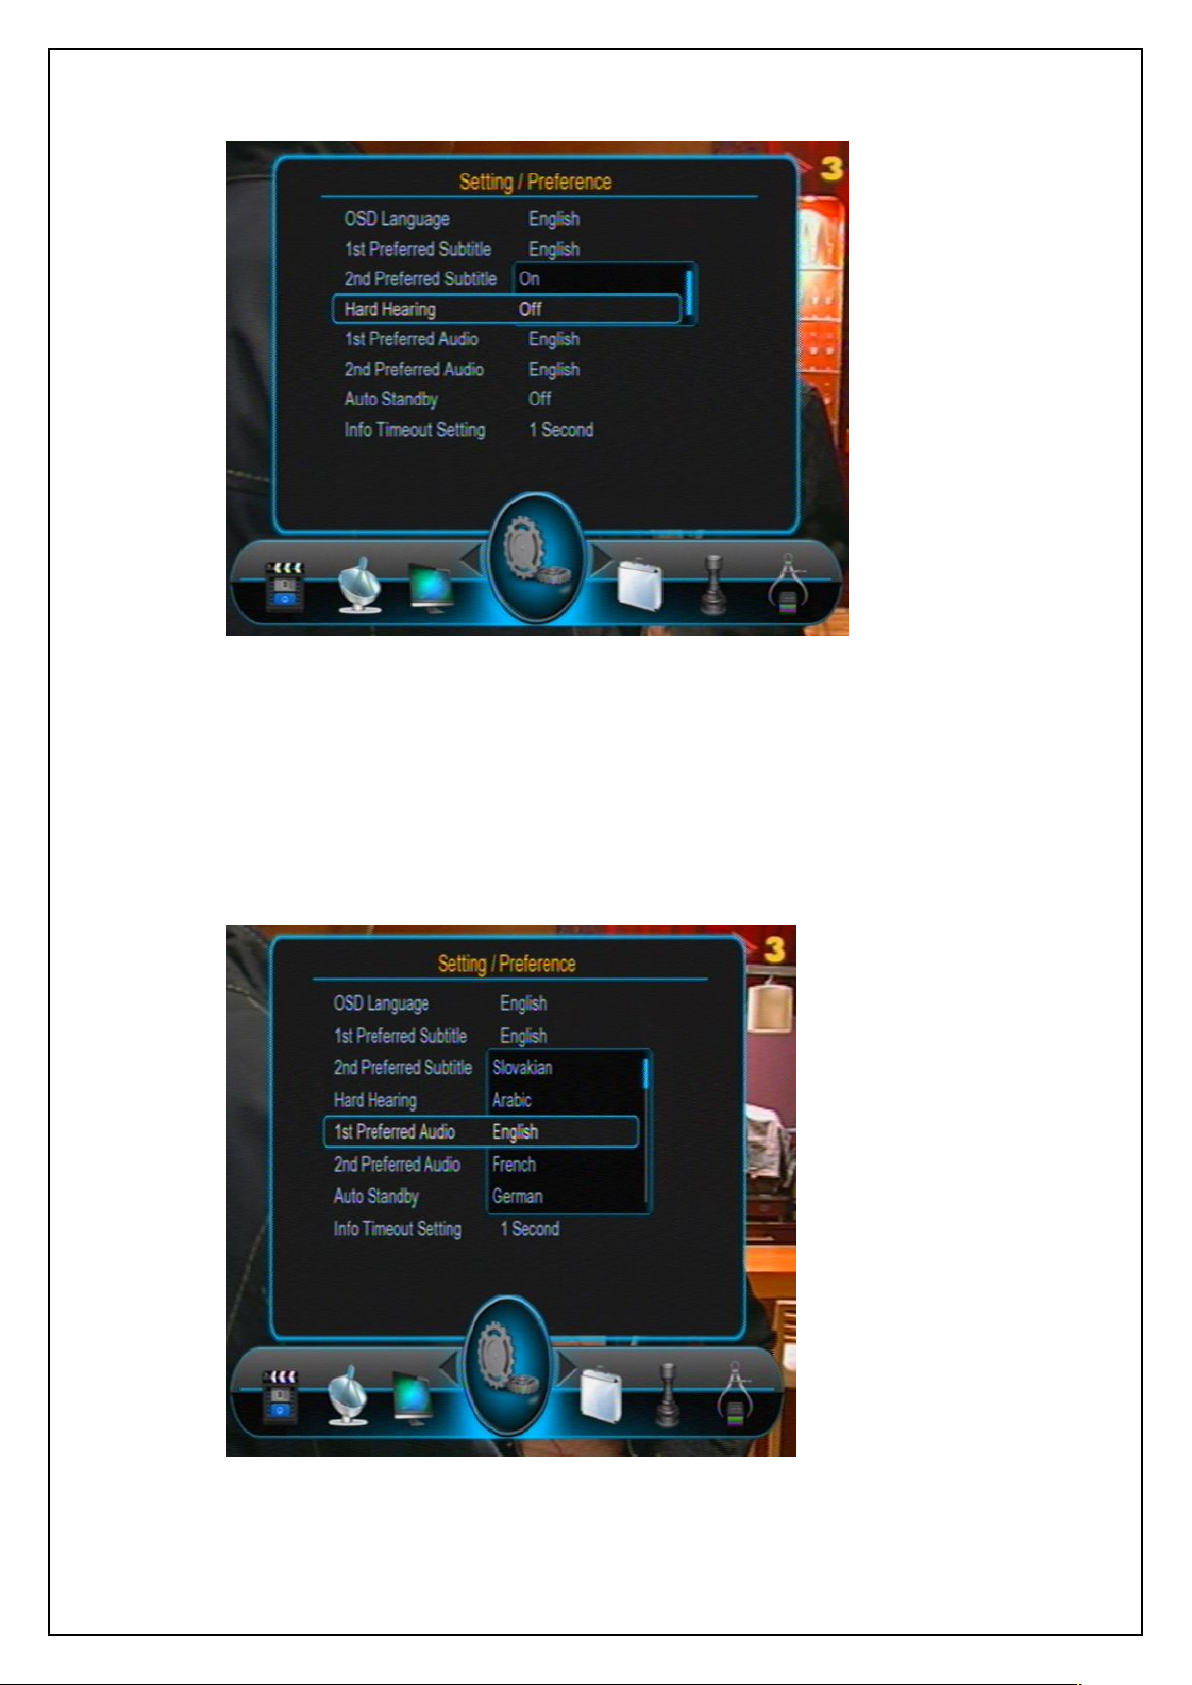
The Preferred Subtitle item is used to set subtitle languages. When a program has subtitles of
multiple languages, we can set priorities for these languages through this item. Two preferred
subtitle languages can be set here and the first one has a higher priority. The system will then
auto search the matched subtitle to play.
To change preferred subtitle languages, in the Preference menu press UP/DOWN keys to
highlight the Preferred Subtitle item and then press OK or RIGHT keys to pull down a
language list. In this list, you can press UP/DOWN keys to select a desired language and then
press OK key to confirm. See the figure below:
Subtitle Language Setting
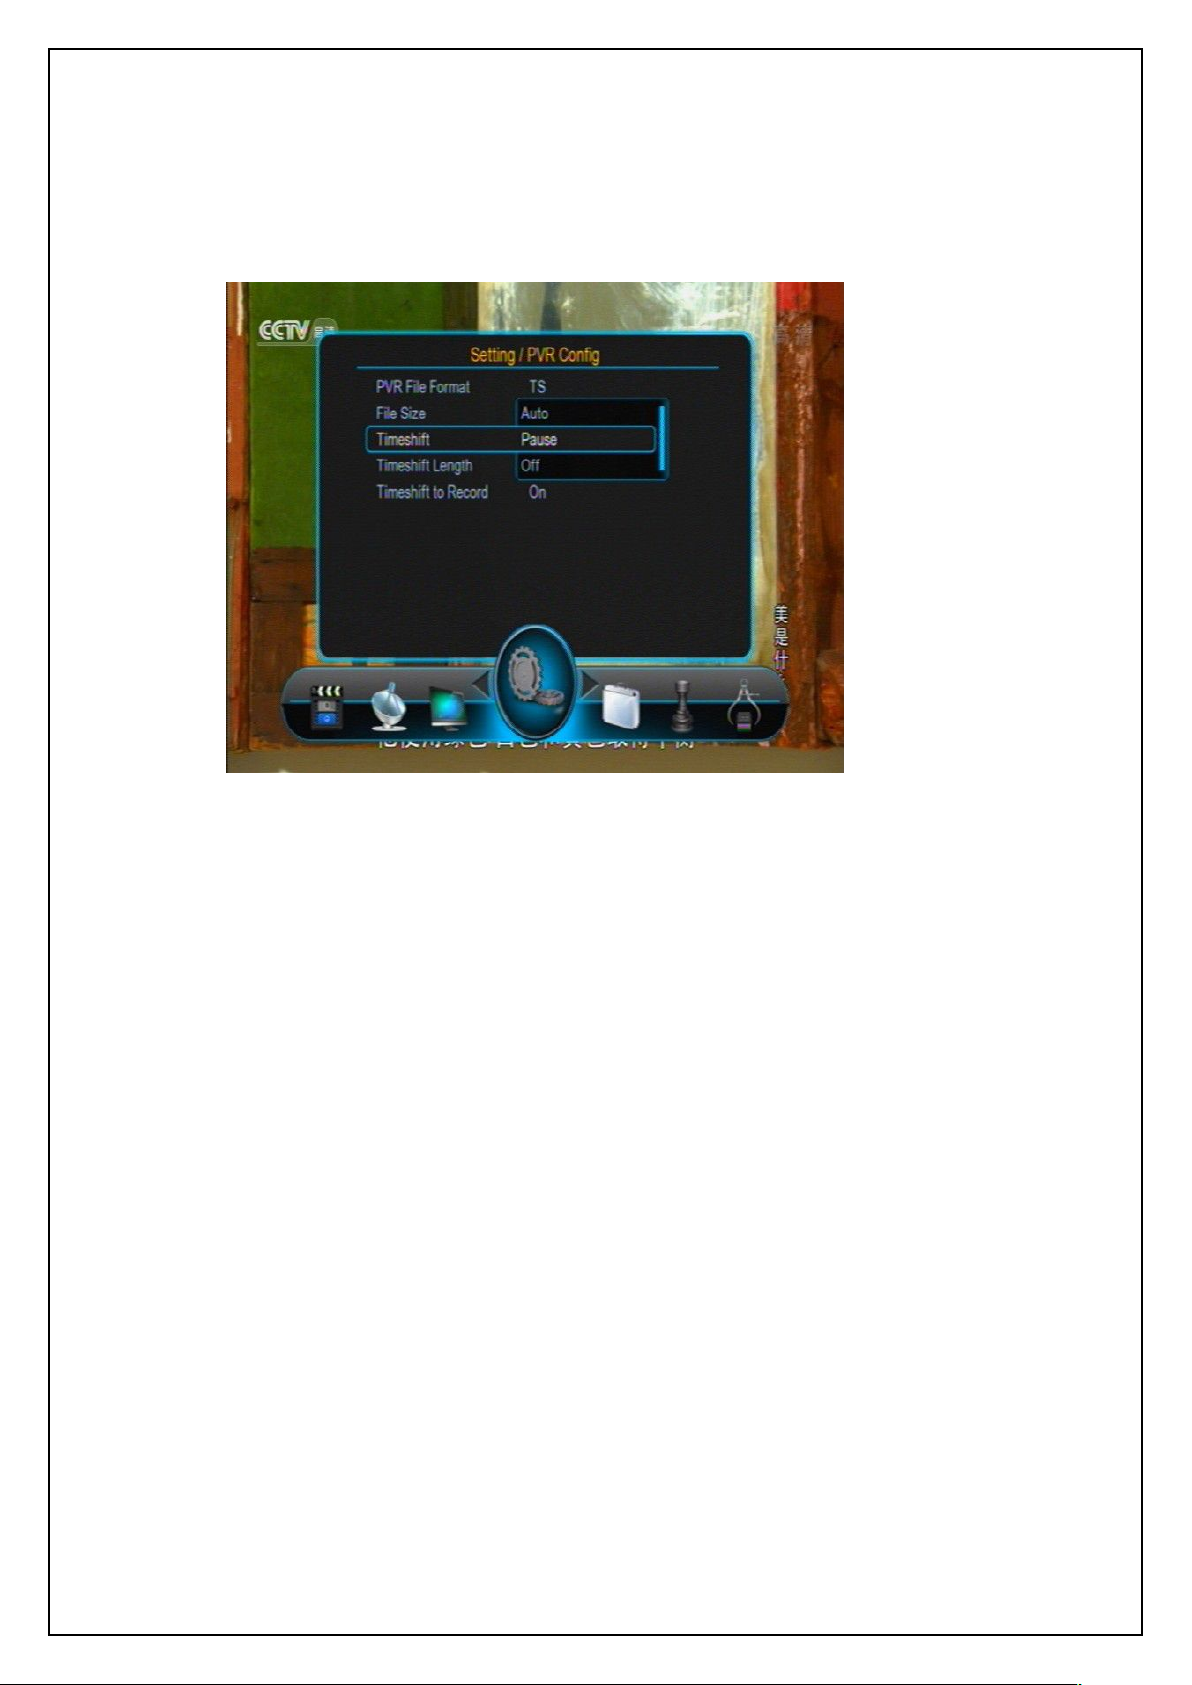
The Hard Hearing item provides a kind of subtitle display service special for hearing
impairment users, available when the streaming includes this service.
Page 68
68
Hard Hearing Setting
7.3.3 Preferred Audio
USER’S MANUAL
The Preferred Audio item is used to set the default audio language. When a program has
audios of multiple languages, the system will auto search the matched audio to play
according to the settings here. Two preferred audios can be set and the first one has a higher
priority. See the figure below:
Preferred Audio Setting
Page 69
USER’S MANUAL
69
7.3.4 PVR Config
PVR File Format: Set the format of record files (MPEG2 files), TS or PS.
File Size: Set the size of a single record file.
Timeshift: Set a method to start the timeshift function. Three options: Auto, Pause and
Timeshift Length: Set the timeshift length. Four options: Auto, 30min, 1hr and 2hr.
Timeshift to Record: Set that during timeshift if you press REC key the system will
7.3.5 AV Config
Through the PVR Config item you can do some settings on Timeshift and Record functions.
See the figure below for the PVR Config setting menu.
PVR Config Setting
Off.
When disk is full, the earlier data will be overwritten and it is not limited by this
parameter’s setting. This setting is unavailable when Timeshift is set as ‘Off’.
whether or not to record the data that have been buffered by timeshift. If On is selected,
after you press REC key the data that have been buffered by timeshift will be saved into
a file first and new data will then be saved into another file. If Off is selected, the buffered
data will be removed first and then the system will start to record new data.
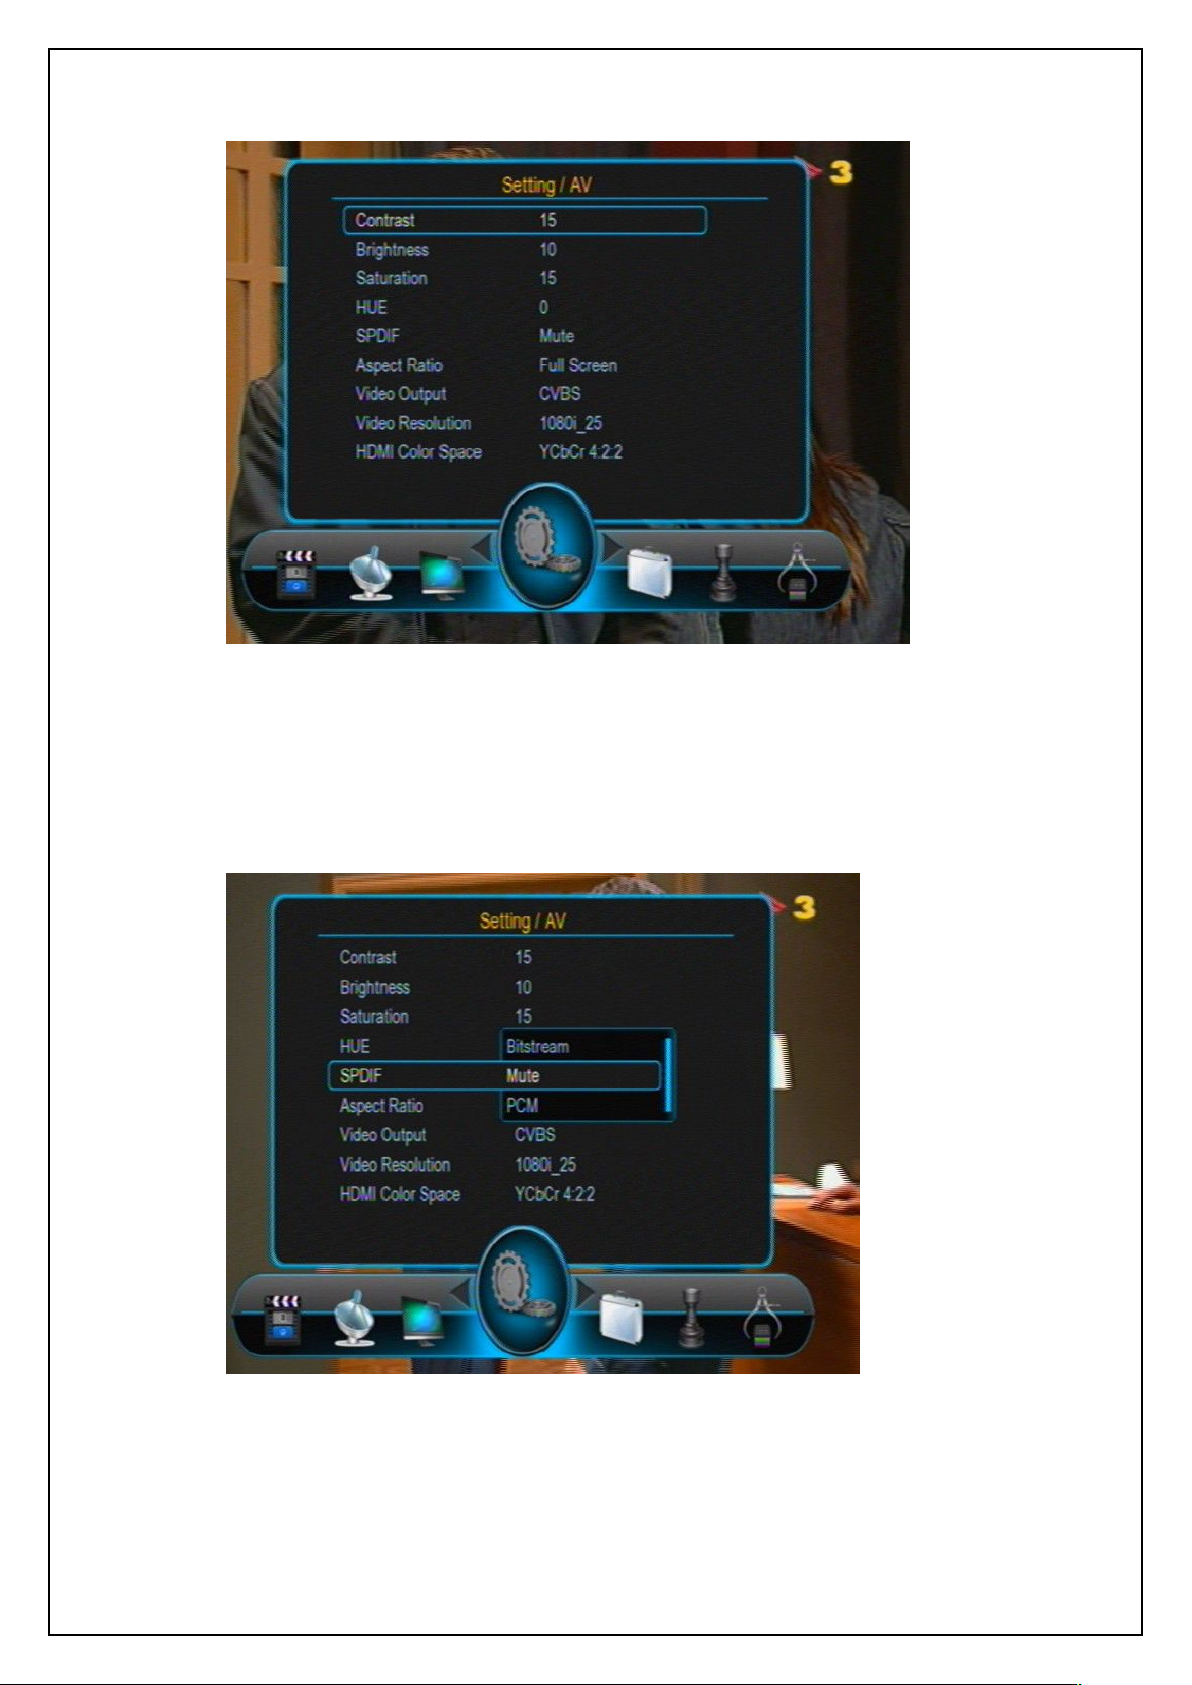
The AV menu is to carry out video output related settings such as brightness, resolution and
output format. In the Main Menu, press UP/DOWM keys to highlight the AV menu item and
then press OK key to enter the AV menu. See the figure below:
Page 70
70
AV Setting
7.3.6 SPDIF
USER’S MANUAL
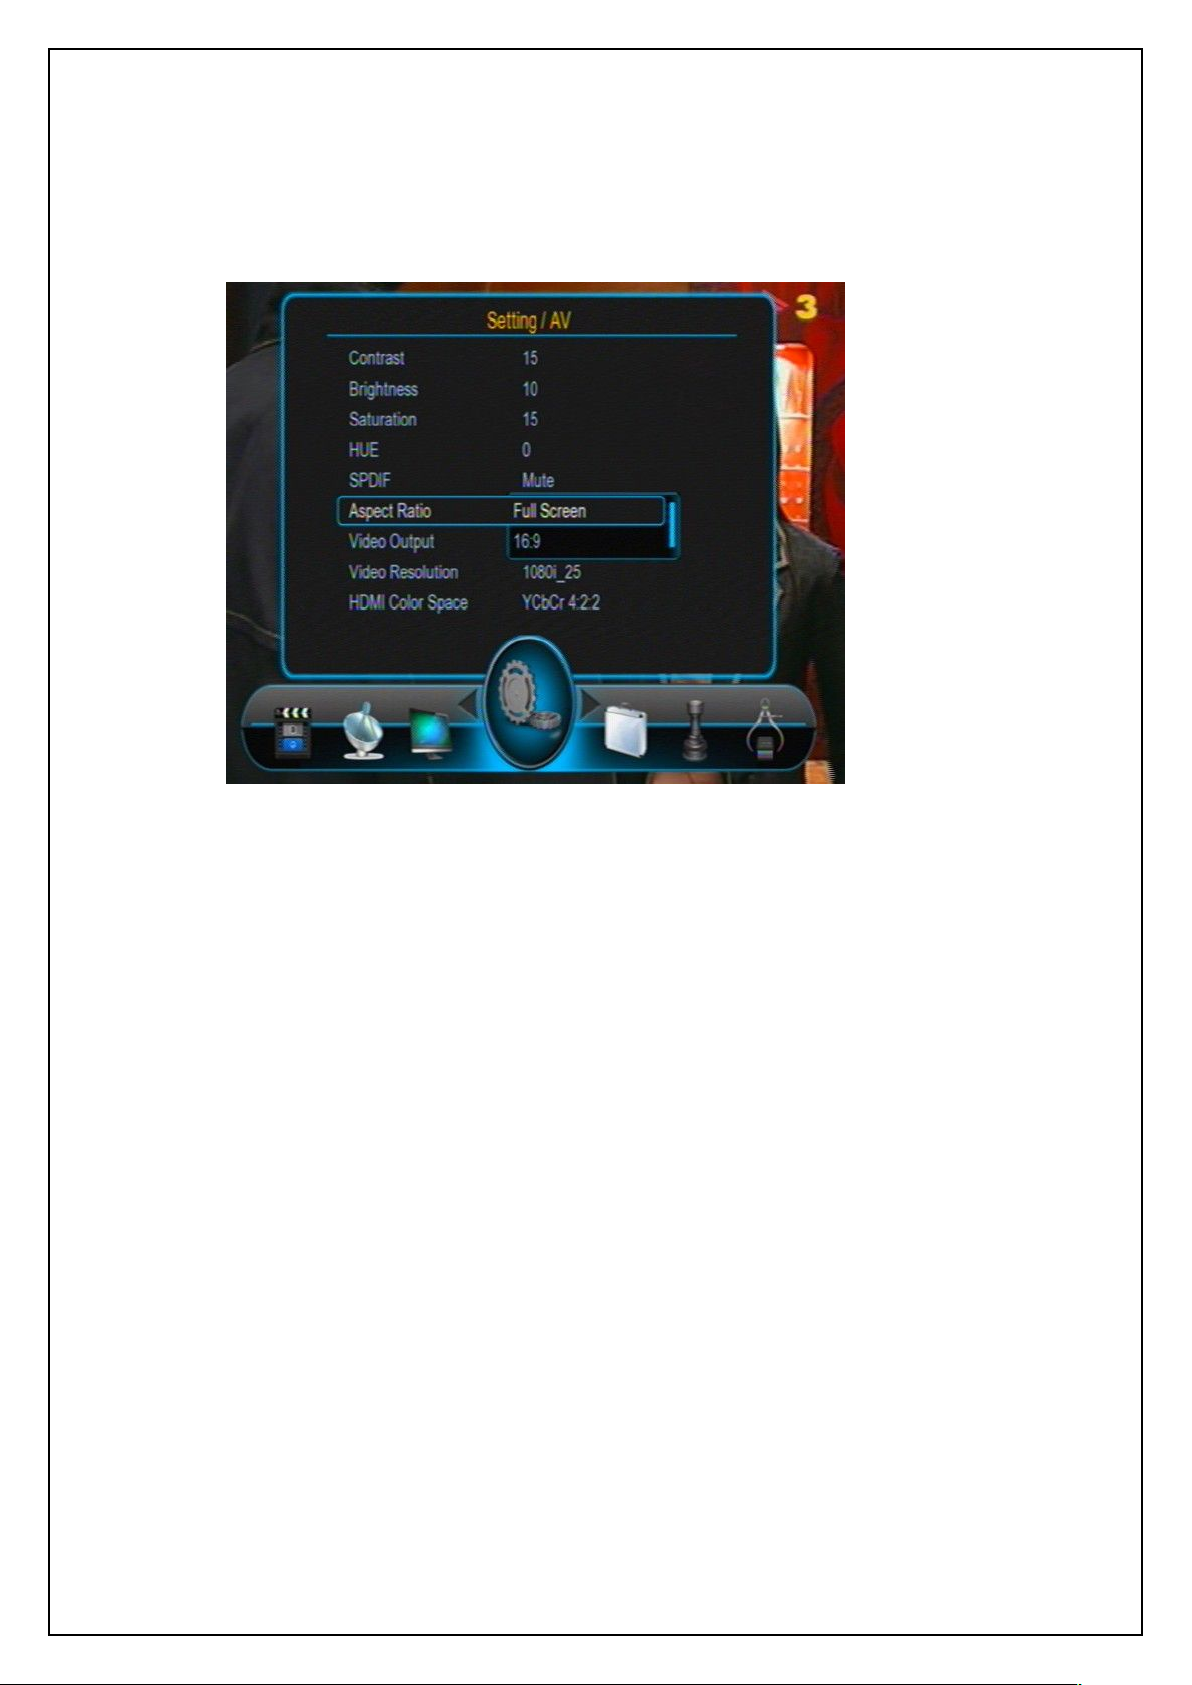
The SPDIF item is to set the output format of digital audios. After highlighting this item, press
OK key to pop out an option list, see the figure below:
SPDIF
The list has three options: PCM, Bitstream and Mute.
Page 71
USER’S MANUAL
71
7.3.7 Aspect Ratio
7.3.8 Video Output
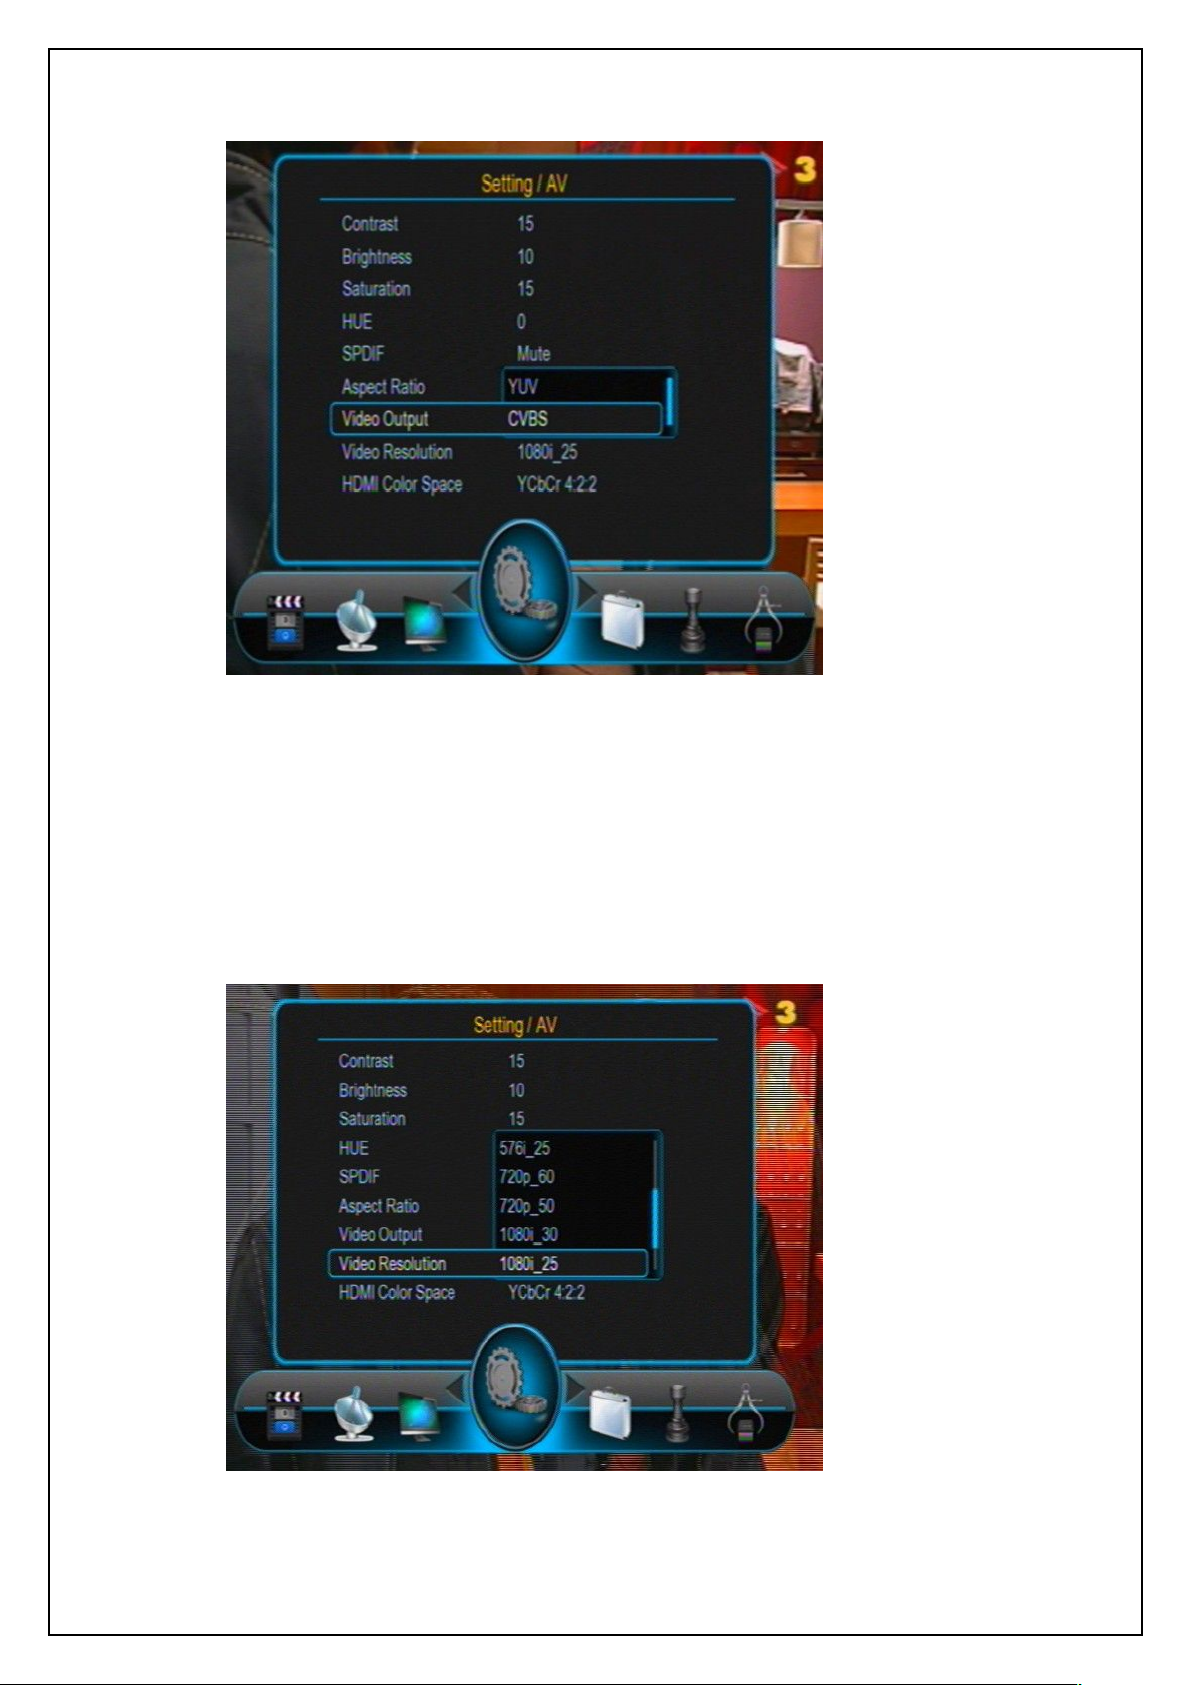
The Aspect Ratio item is to set the proportion between the length and width of output videos.
After highlighting this item, press OK key to pop out an option list, see the figure below:
Aspect Ratio
The list has four options: 16: 9, Full Screen, 4: 3 LB (Letter Box) and 4: 3 PS (Pan Scan).
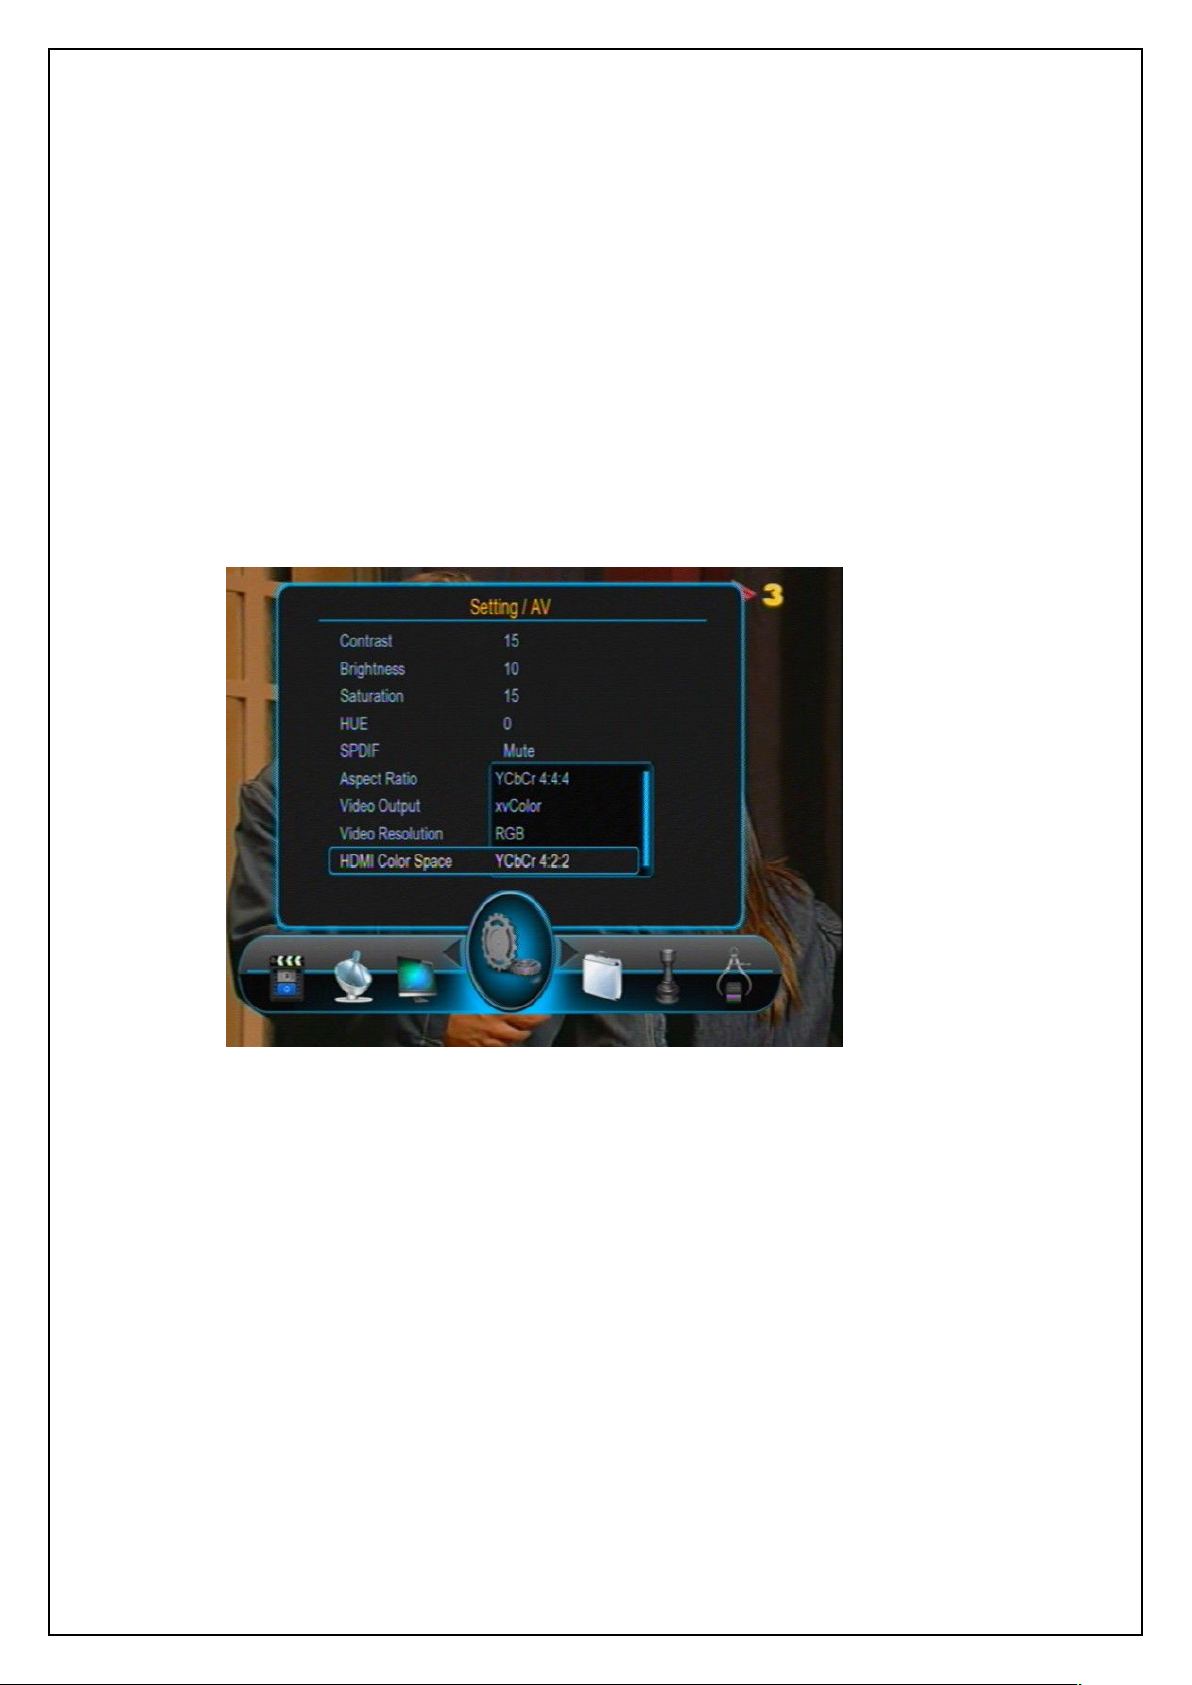
The Video Output item is to set the format of video output. After highlighting this item, press
OK key to pop out an option list, see the figure below:
Page 72
USER’S MANUAL
72
7.3.9 Video Resolution
Video Output
The list has three options: CVBS, RGB and YUV.
The Video Resolution item is to set the resolution (up to 1080p_60 (Full HD)) and refresh rate
of video output. After highlighting this item, press OK key to pop out an option list, see the
figure below:
Video Resolution
Page 73
USER’S MANUAL
73
Auto Detect
480p_60, 480i_30
576p_50, 576i_25
720p_60, 720p_50
1080p_60, 1080p_50, 1080i_30, 1080i_25
7.3.10 HDMI Color Space
The list has following options (‘p’ indicates progressive scan; ‘i' indicates interlaced scan):
The HDMI Color Space item is to set the color coding method of video output. After
highlighting this item, press OK key to pop out an option list, see the figure below:
The list has four options: xvColor, RGB, YCbCr 4:2:2 and YCbCr 4:4:4.
HDMI Color Space
Page 74
USER’S MANUAL
74
7.3.11 HDMI Deep Color
7.3.12 Ethernet Config
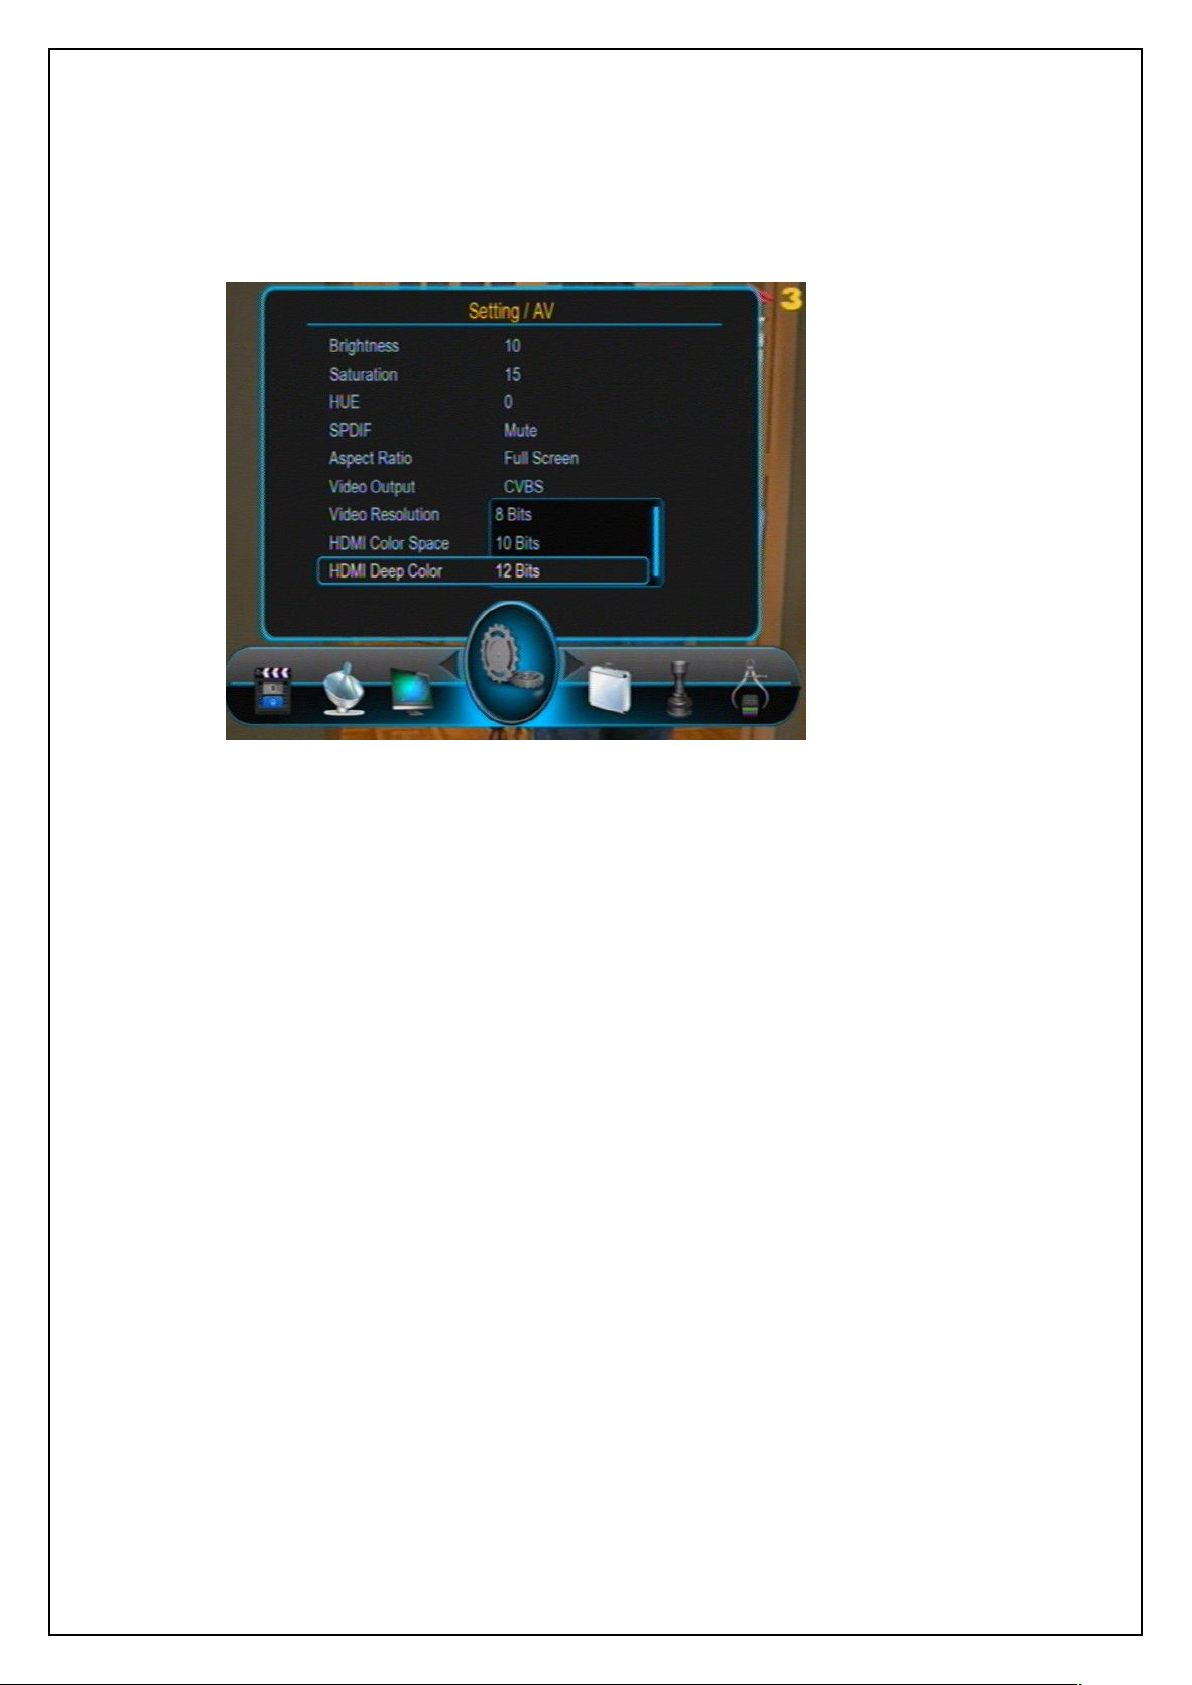
The HDMI Deep Color setting determines the depth of colors of HDMI output. After
highlighting this item, press OK key to pop out an option list, see the figure below:
HDMI Deep Color
The list has three options: 8 Bits, 10 Bits and 12 Bits.
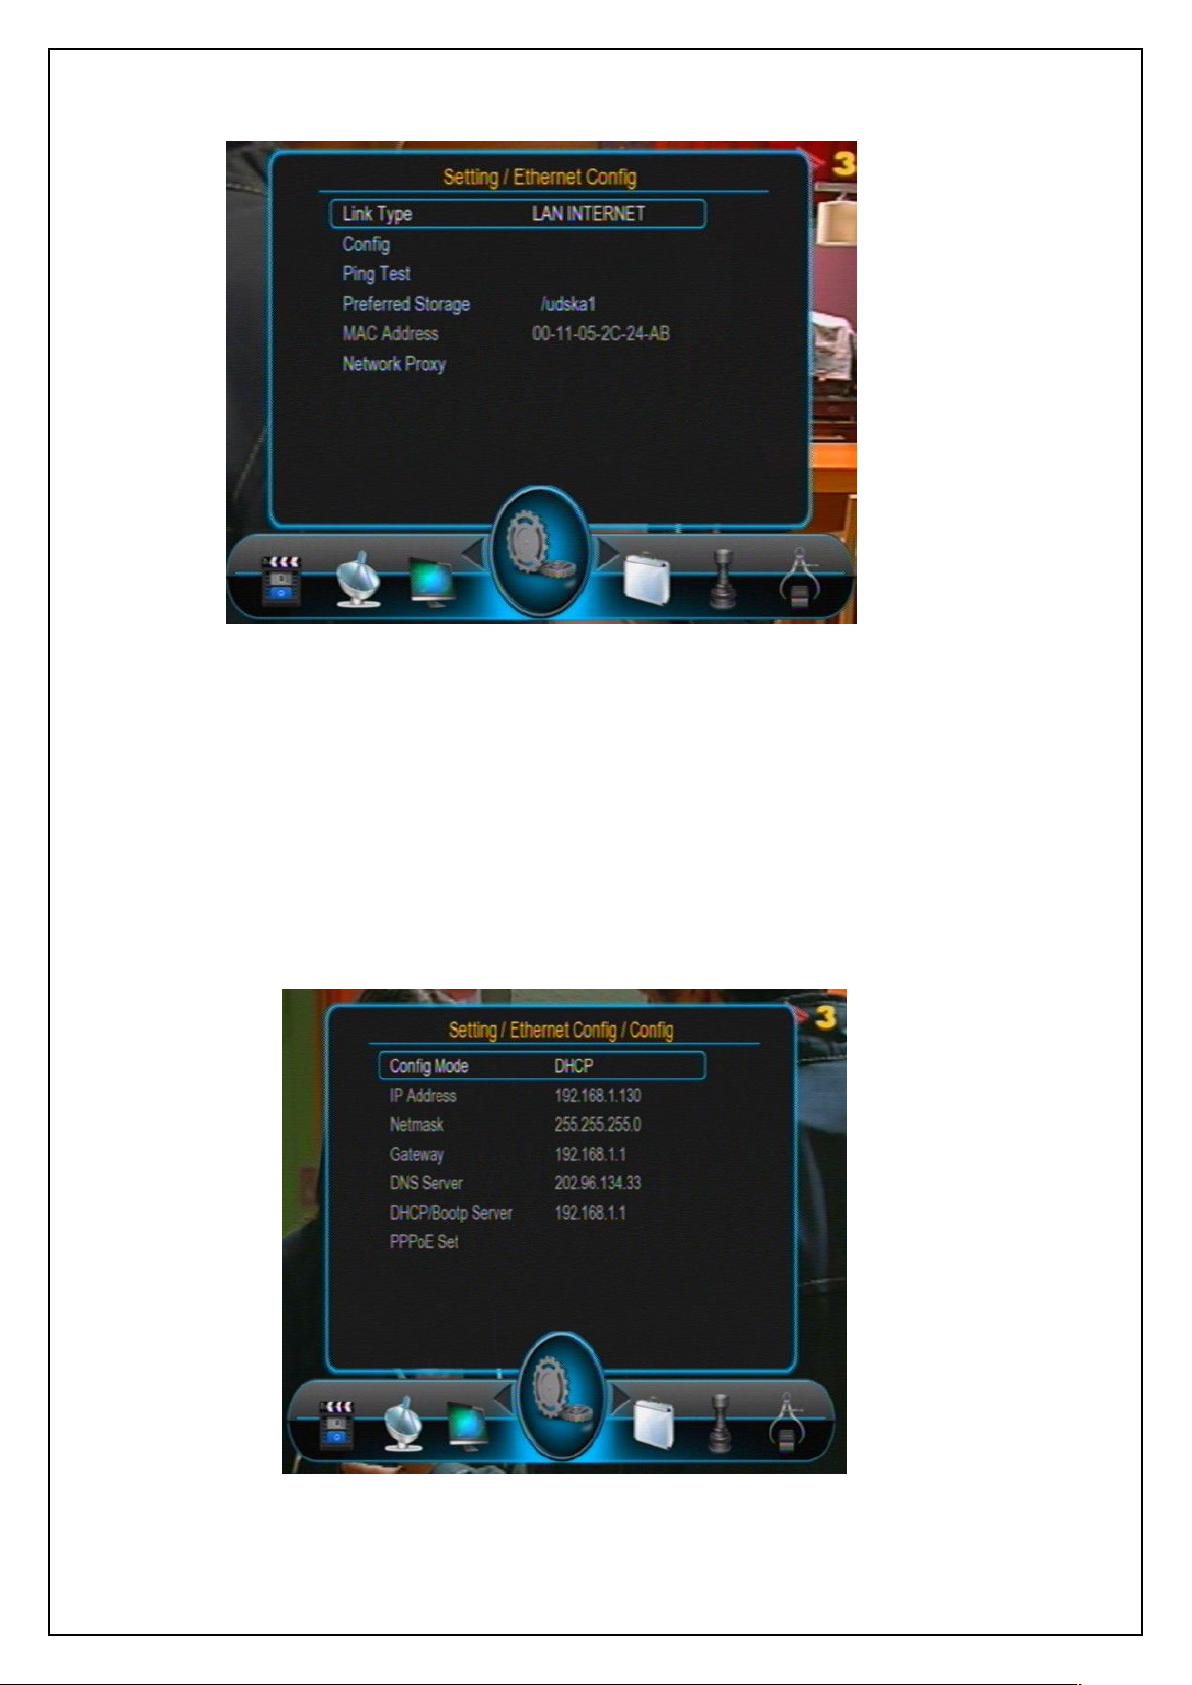
Through the Ethernet Config item you can carry out Ethernet related settings.
Highlight the Ethernet Config item in the Setting menu and then press OK or RIGHT keys to
enter the Ethernet Config menu. This menu has five items, see the figure below:
Page 75
75
Ethernet Config
Link Type: Select to use either Wire Network or Wireless Network.
Config: Select the network connection method. After entering this item, network
If the PPPoE method is chosen, the PPPoE Set item at the bottom will become
USER’S MANUAL
connection methods and related information can be found (see the figure below).
In which, the first item, Config Mode, is to select a network connection method. There
are four methods: Bootp, PPPoE, Static IP and DHCP.
active (see the figure below). After entering this item, a user name and password
input interface will appear.
Ethernet Config PPPoE
Page 76
USER’S MANUAL
76
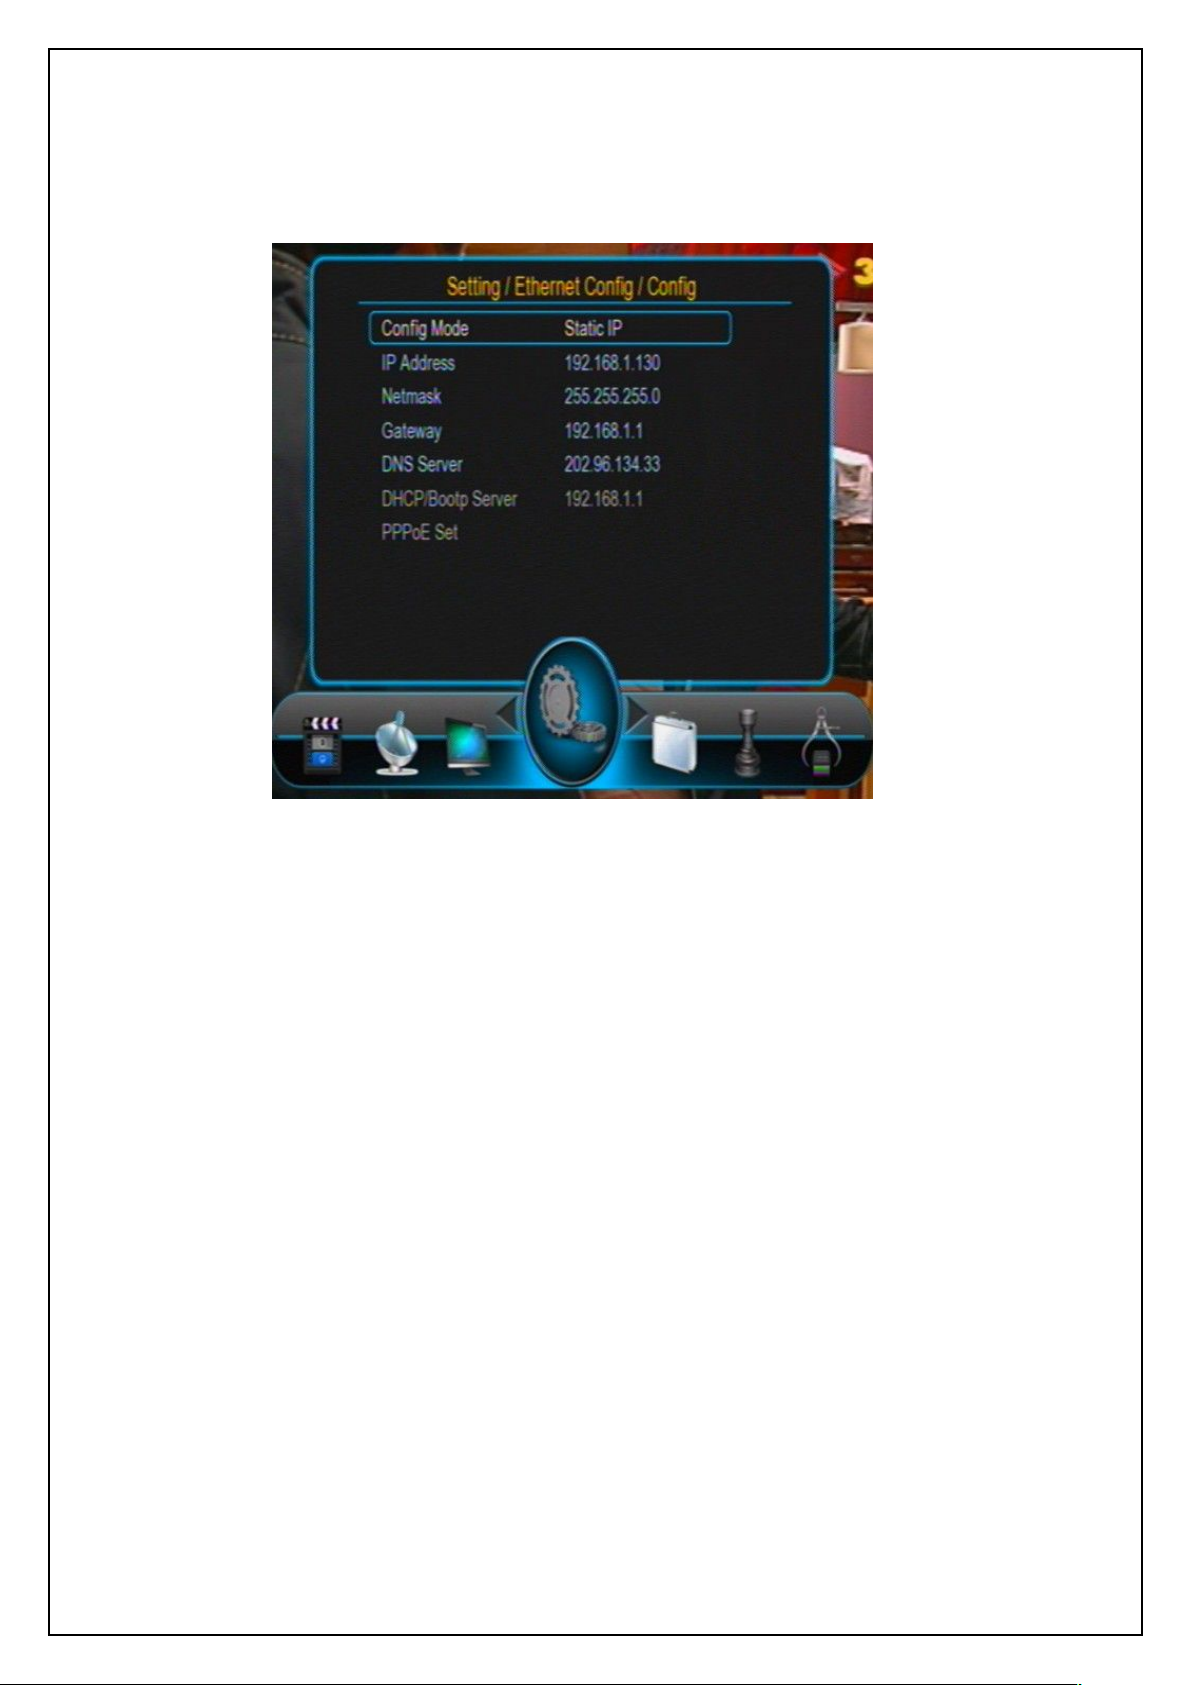
If the Static IP method is chosen, the IP Address, Netmask, Gateway and DNS
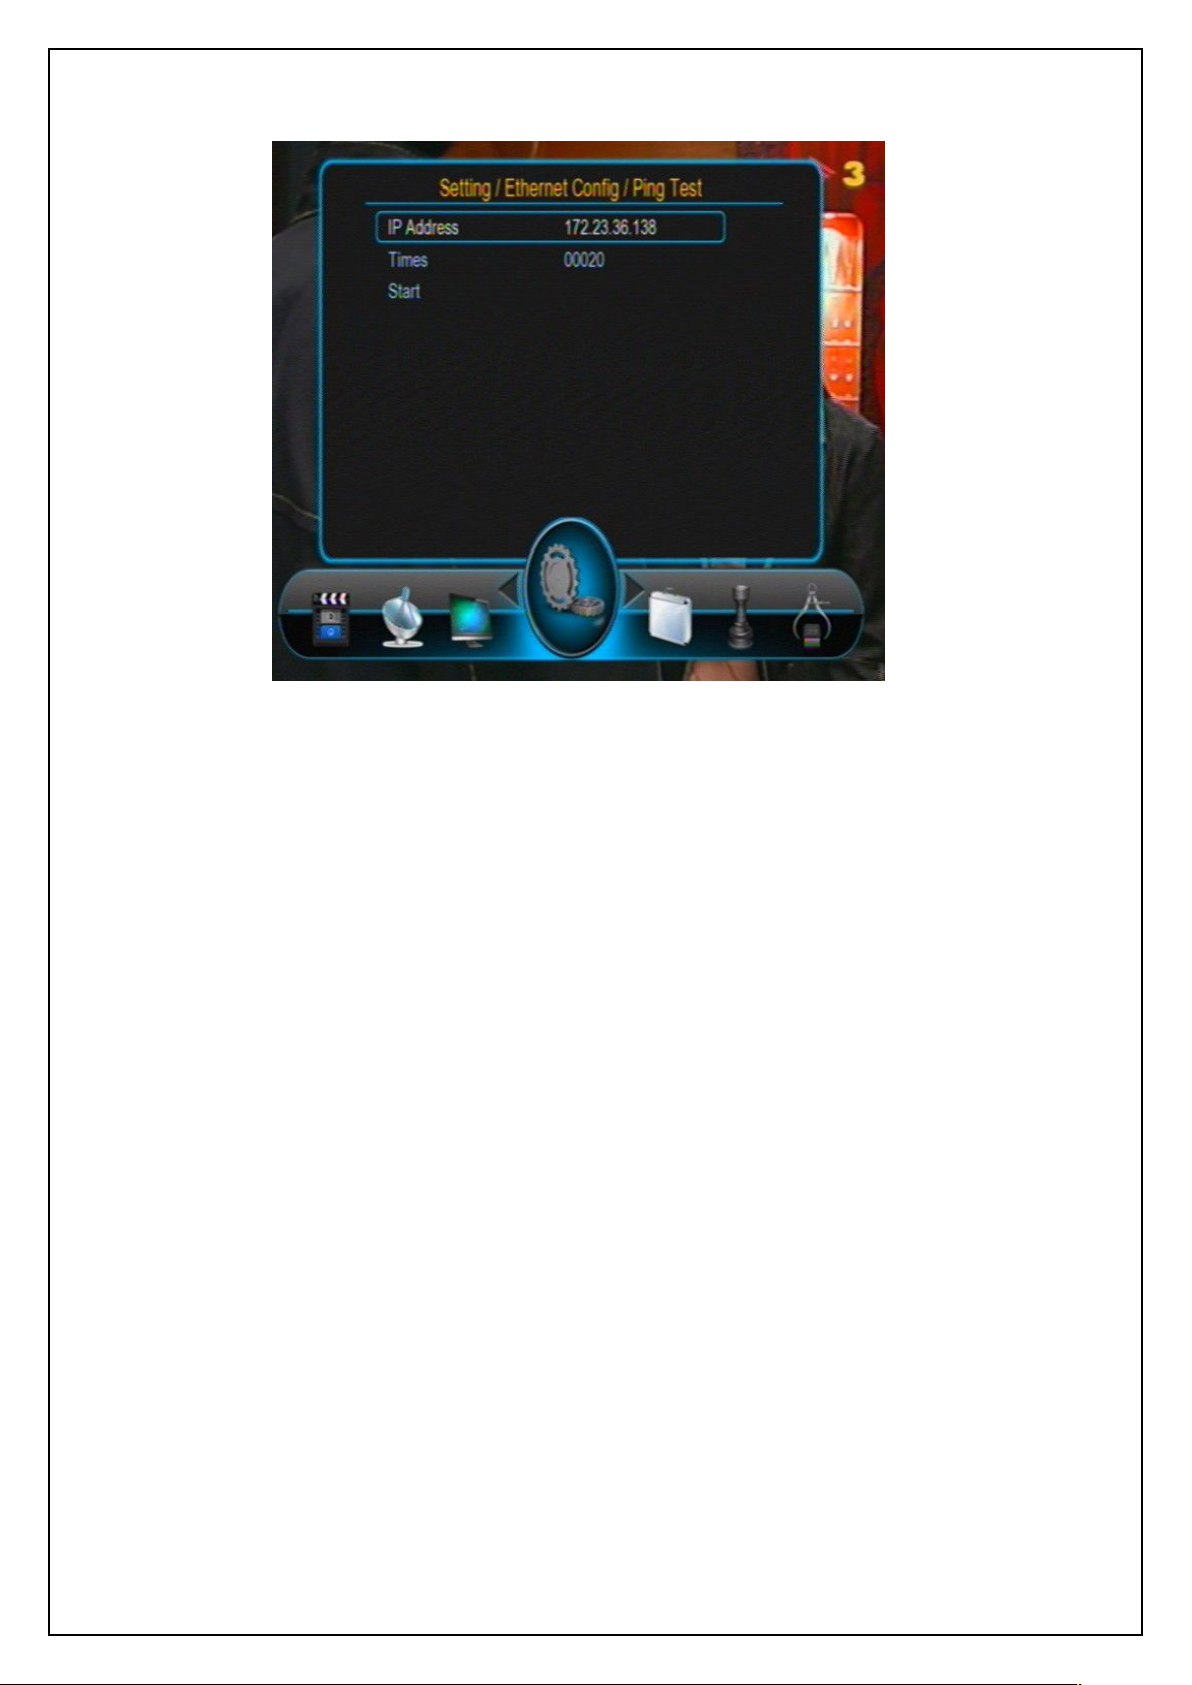
Ping Test: Through this item you can test the connection state to the target IP address.
Server items will become active (see the figure below). Users can establish the
network connection by giving these parameters.
Ethernet Config Static IP
After setting, press EXIT key to return to the Ethernet Config menu.
After entering this item, the following menu appears. In which, the Times item is to set
the times the Ping test will be carried out.
Page 77
USER’S MANUAL
77
Preferred Storage: When there are several storage devices connected, you can
MAC Address: Not configurable, showing the MAC address of the network adapter
7.3.13 Factory Reset
7.3.14 Version
Ping Test
through this item select one of them to store network data while in Network Mode.
card.
Through the Factory Reset item you can reset the system to factory settings.
Press UP/DOWN keys to highlight this item and then press OK key, and a password input
dialog will appear. Input a correct password (default: 0000), and the system will then start to
reset to factory settings. When finished, the Init Install menu (see Figure 4-1) will show,
through which you can re-initialize the system.
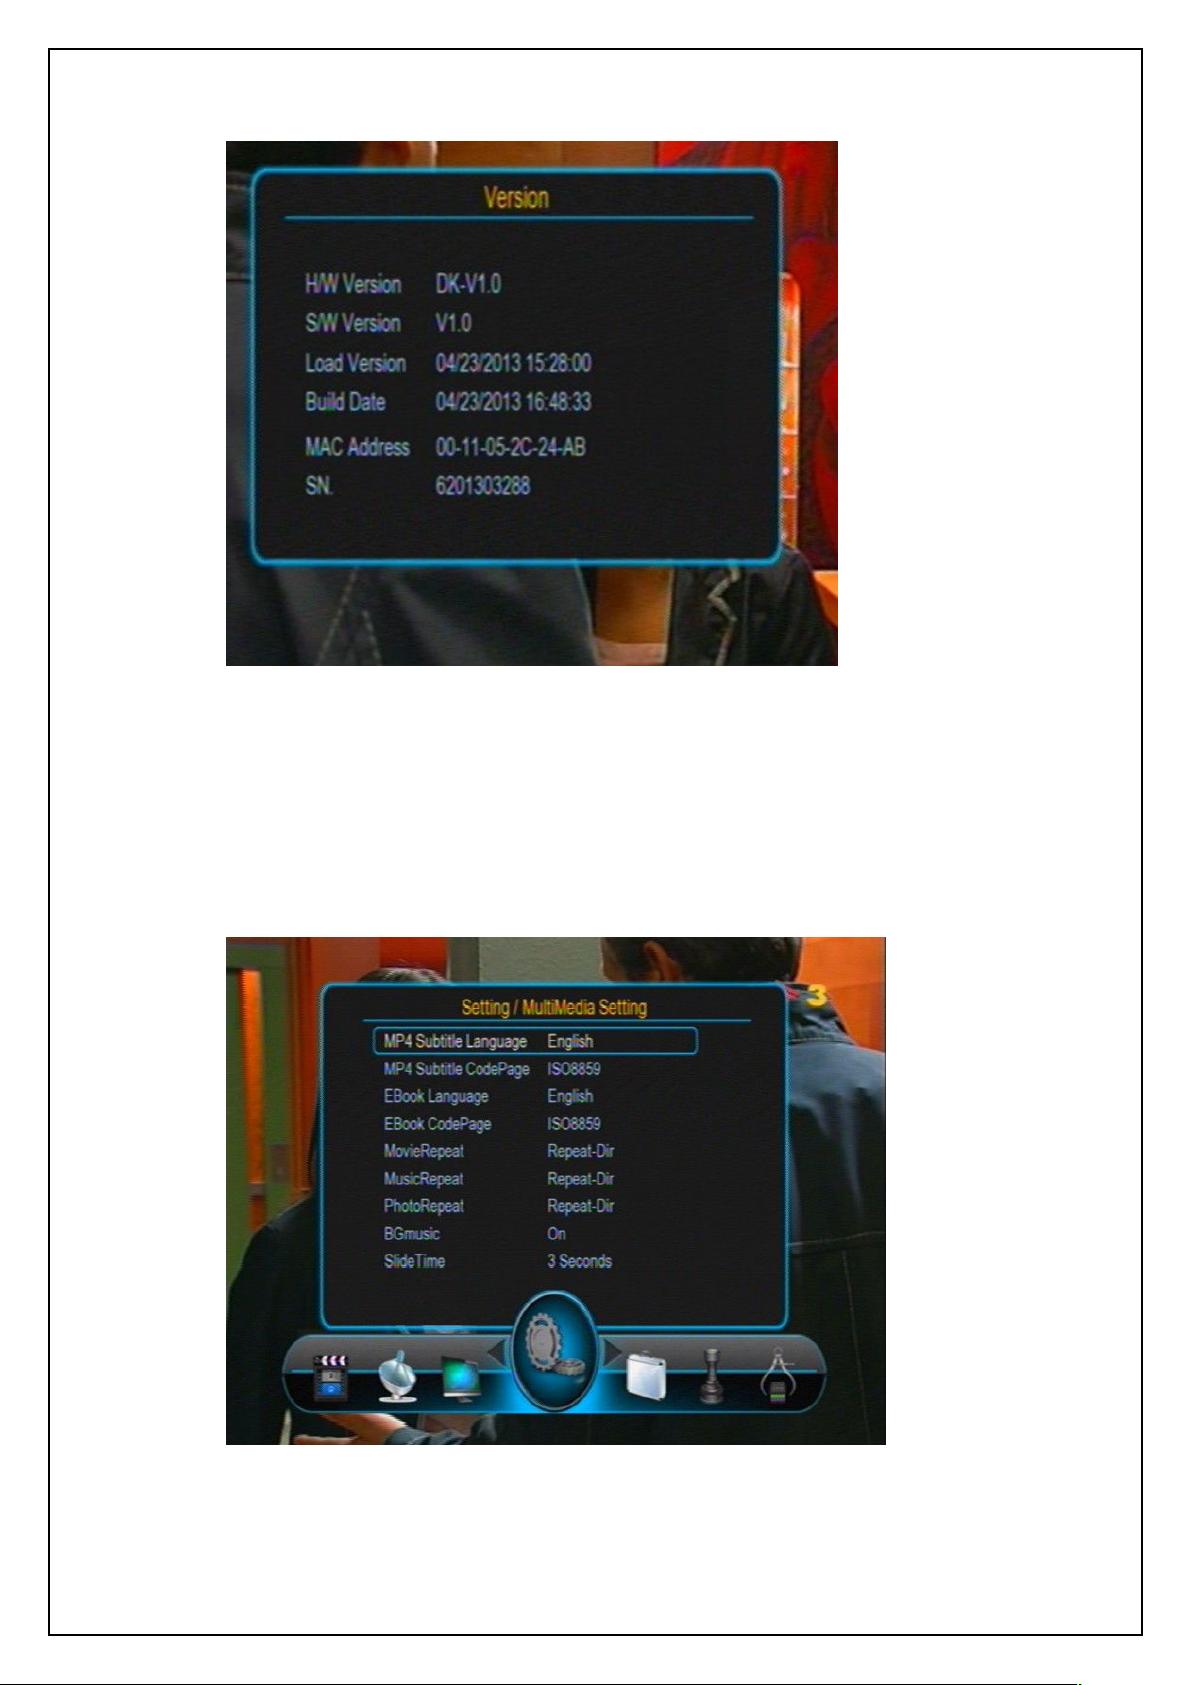
Through the Version item you can view the version information of system hardware and
software as well as the build date of the system. See the figure below:
Page 78
USER’S MANUAL
78
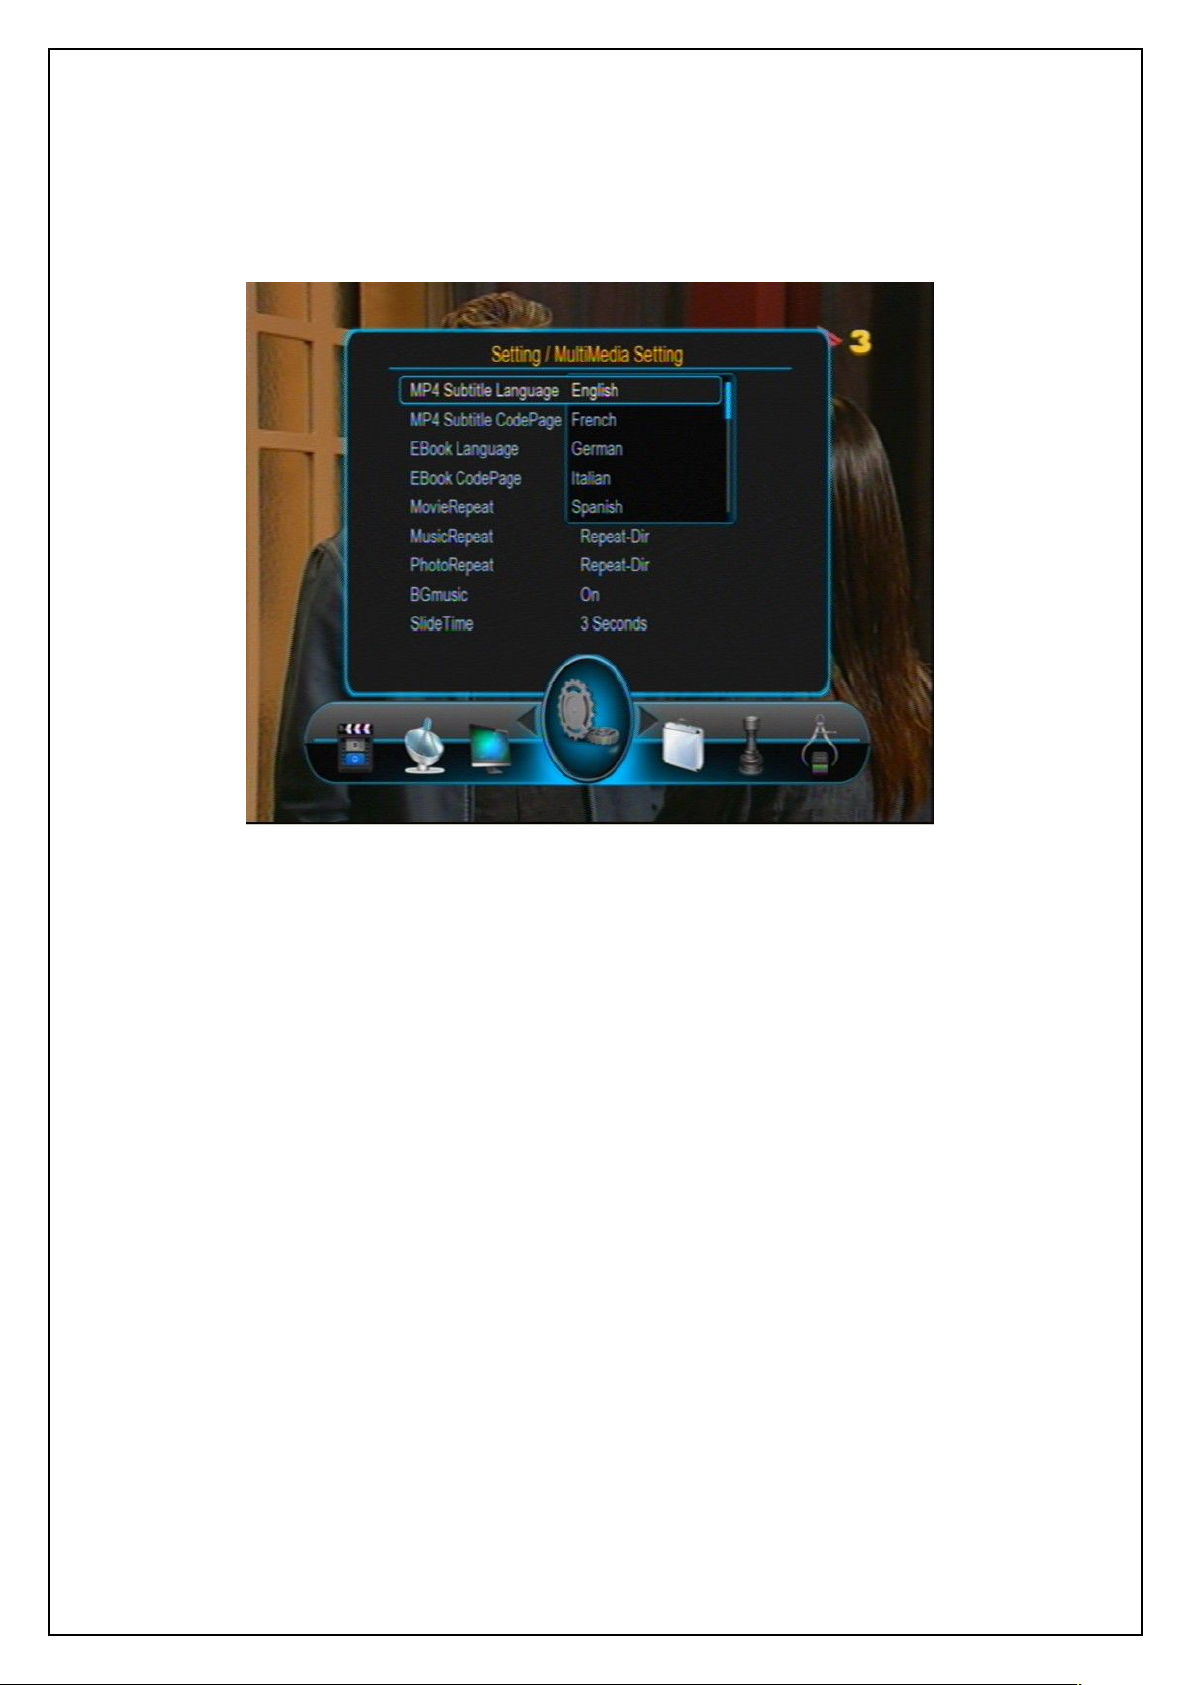
7.3.15 MultiMedia Setting
Through the MultiMedia Setting item you can set related MultiMedia settings.
Highlight the MultiMedia Config item in the Setting menu and then press OK or RIGHT keys to
enter the MultiMedia Config menu. This menu has ten items, see the figure below:
Version
MultiMedia Setting
Page 79
79
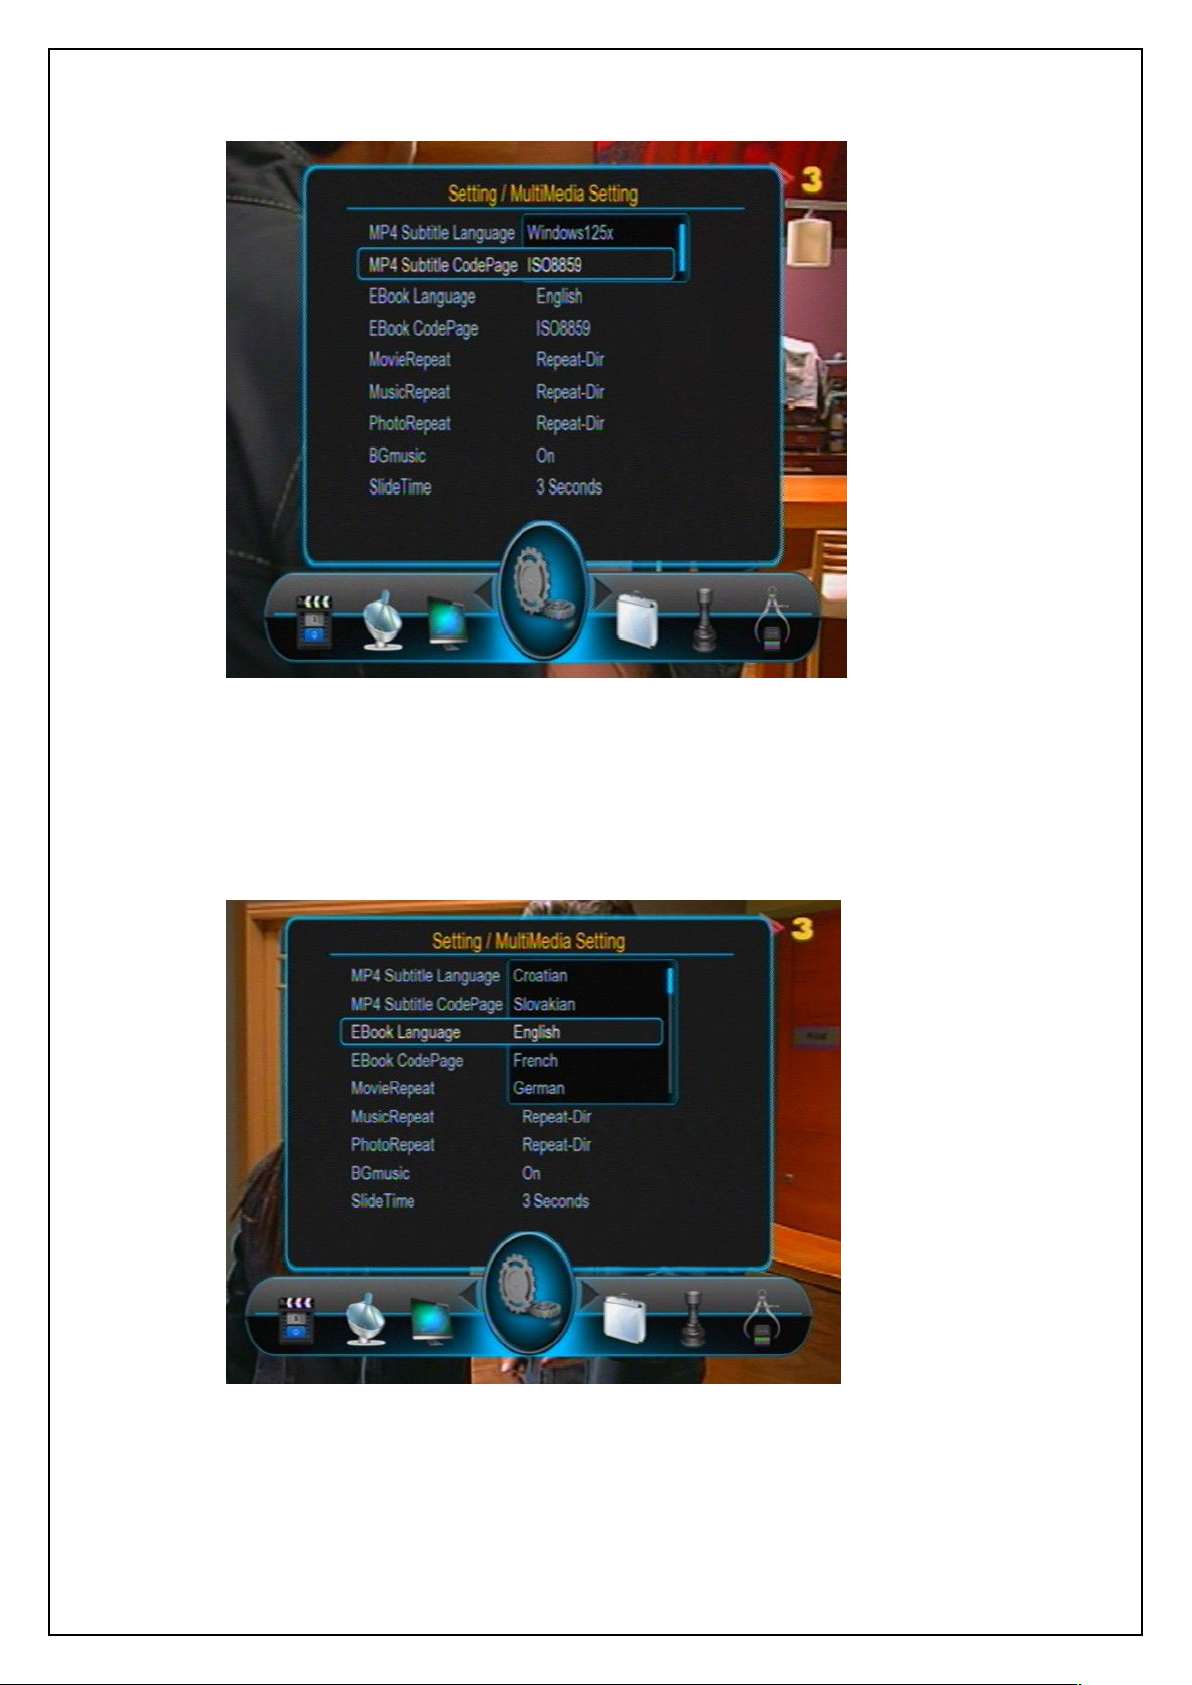
7.3.15.1 MP4 Subtitle Language
The MP4 Subtitle Language item is to set the video language,In this list, you can press
UP/DOWN keys to select a language and then press OK key to confirm. See the figure below:
USER’S MANUAL
7.3.15.2 MP4 Subtitle CodePage
The MP4 Subtitle CodePage item is to set encode mode of MP4 subtitle,In this list, you can
press UP/DOWN keys to select a style and then press OK key to confirm. See the figure
below:
MP4 Video Subtitle Language Setting
Page 80
USER’S MANUAL
80
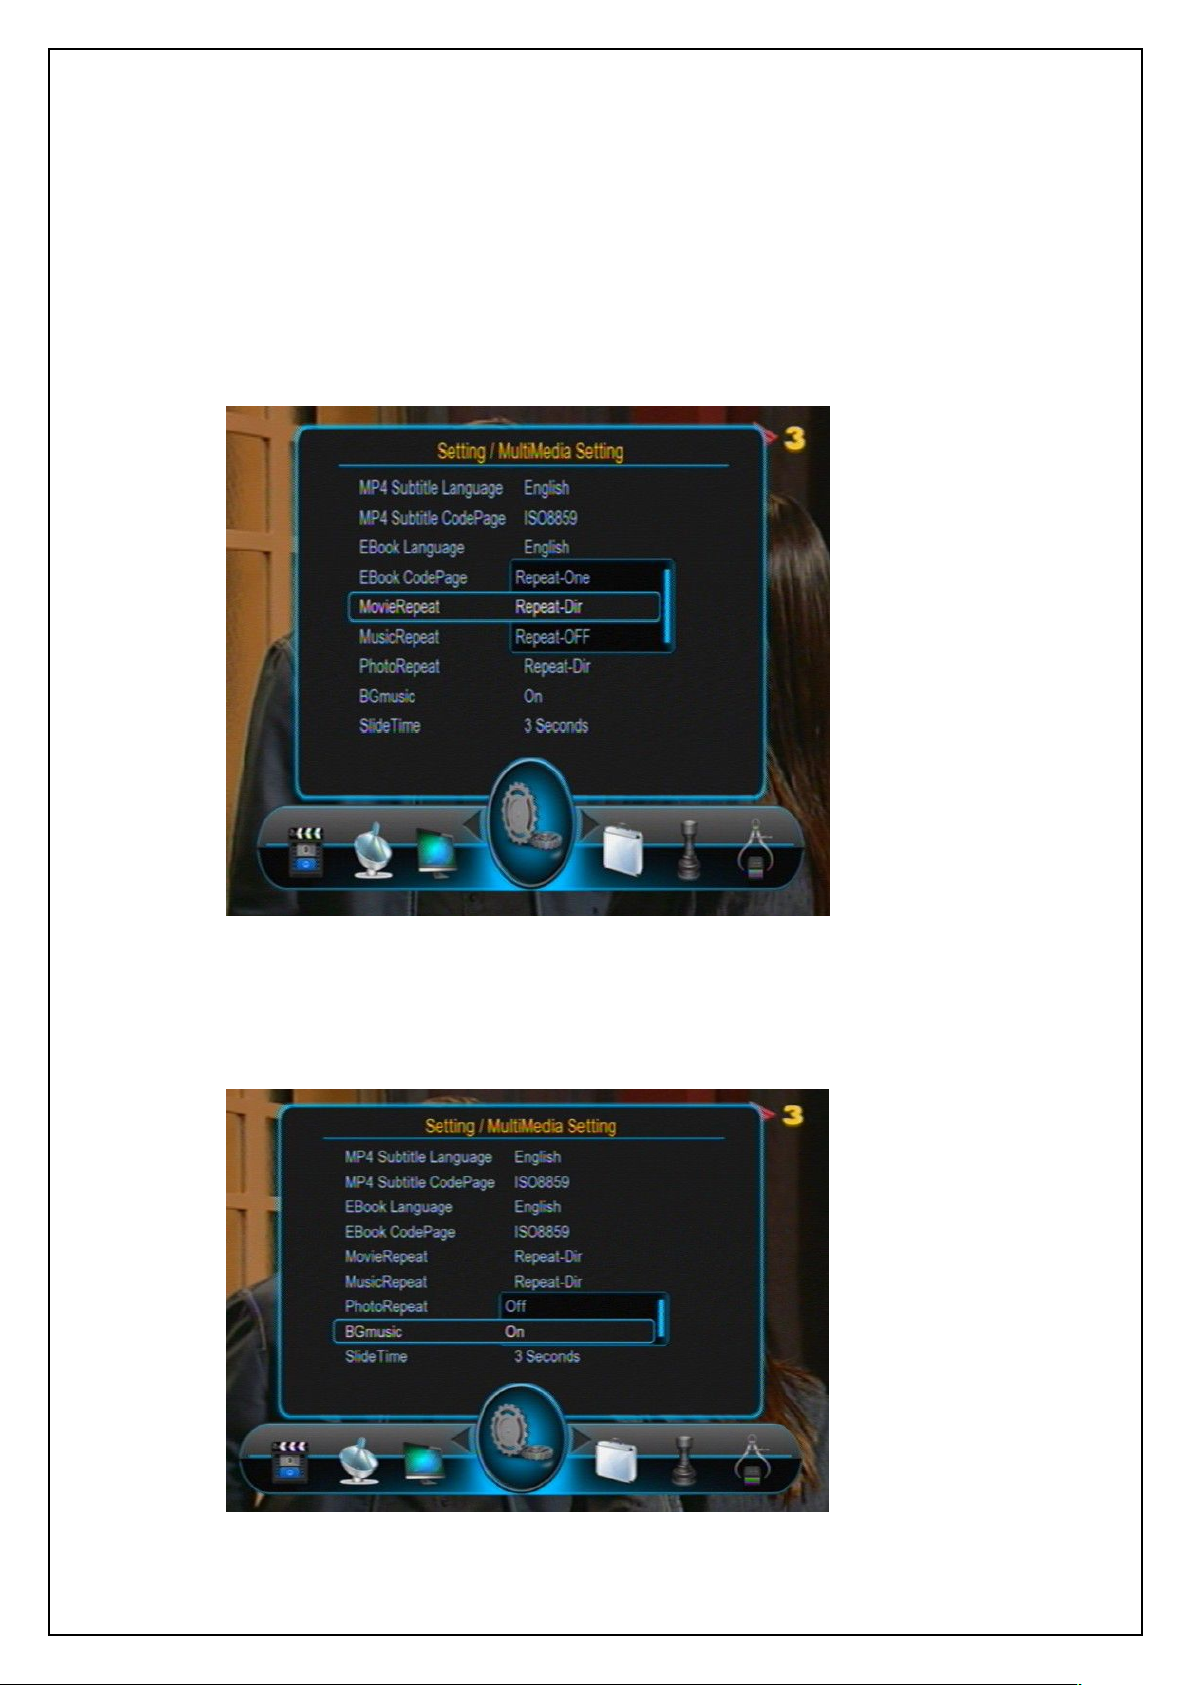
7.3.15.3 EBook Language
EBook Language item is to set the language to show the content of the EBook, you can press
UP/DOWN keys to select a language and then press OK key to confirm. See the figure below:
MP4 Subtitle Encoded Mode Setting
Ebook Language Setting
Page 81
81
7.3.15.4 EBook CodePage
EBook CodePage like MP4 Subtitle CodePage
7.3.15.5 MovieRepeat.MusicRepeat and PhotoRepeat
MovieRepeat.MusicRepeat and PhotoRepeat items is to select play type, press UP/DOWN
keys to select a play mode and then press OK key to confirm. See the figure below:
USER’S MANUAL
7.3.15.6 BGmusic
BGmusic item is to enable you to listen to music if you exit music UI after starting playing
process,see the figure below:
Page 82
82
7.3.15.7 Slide Time
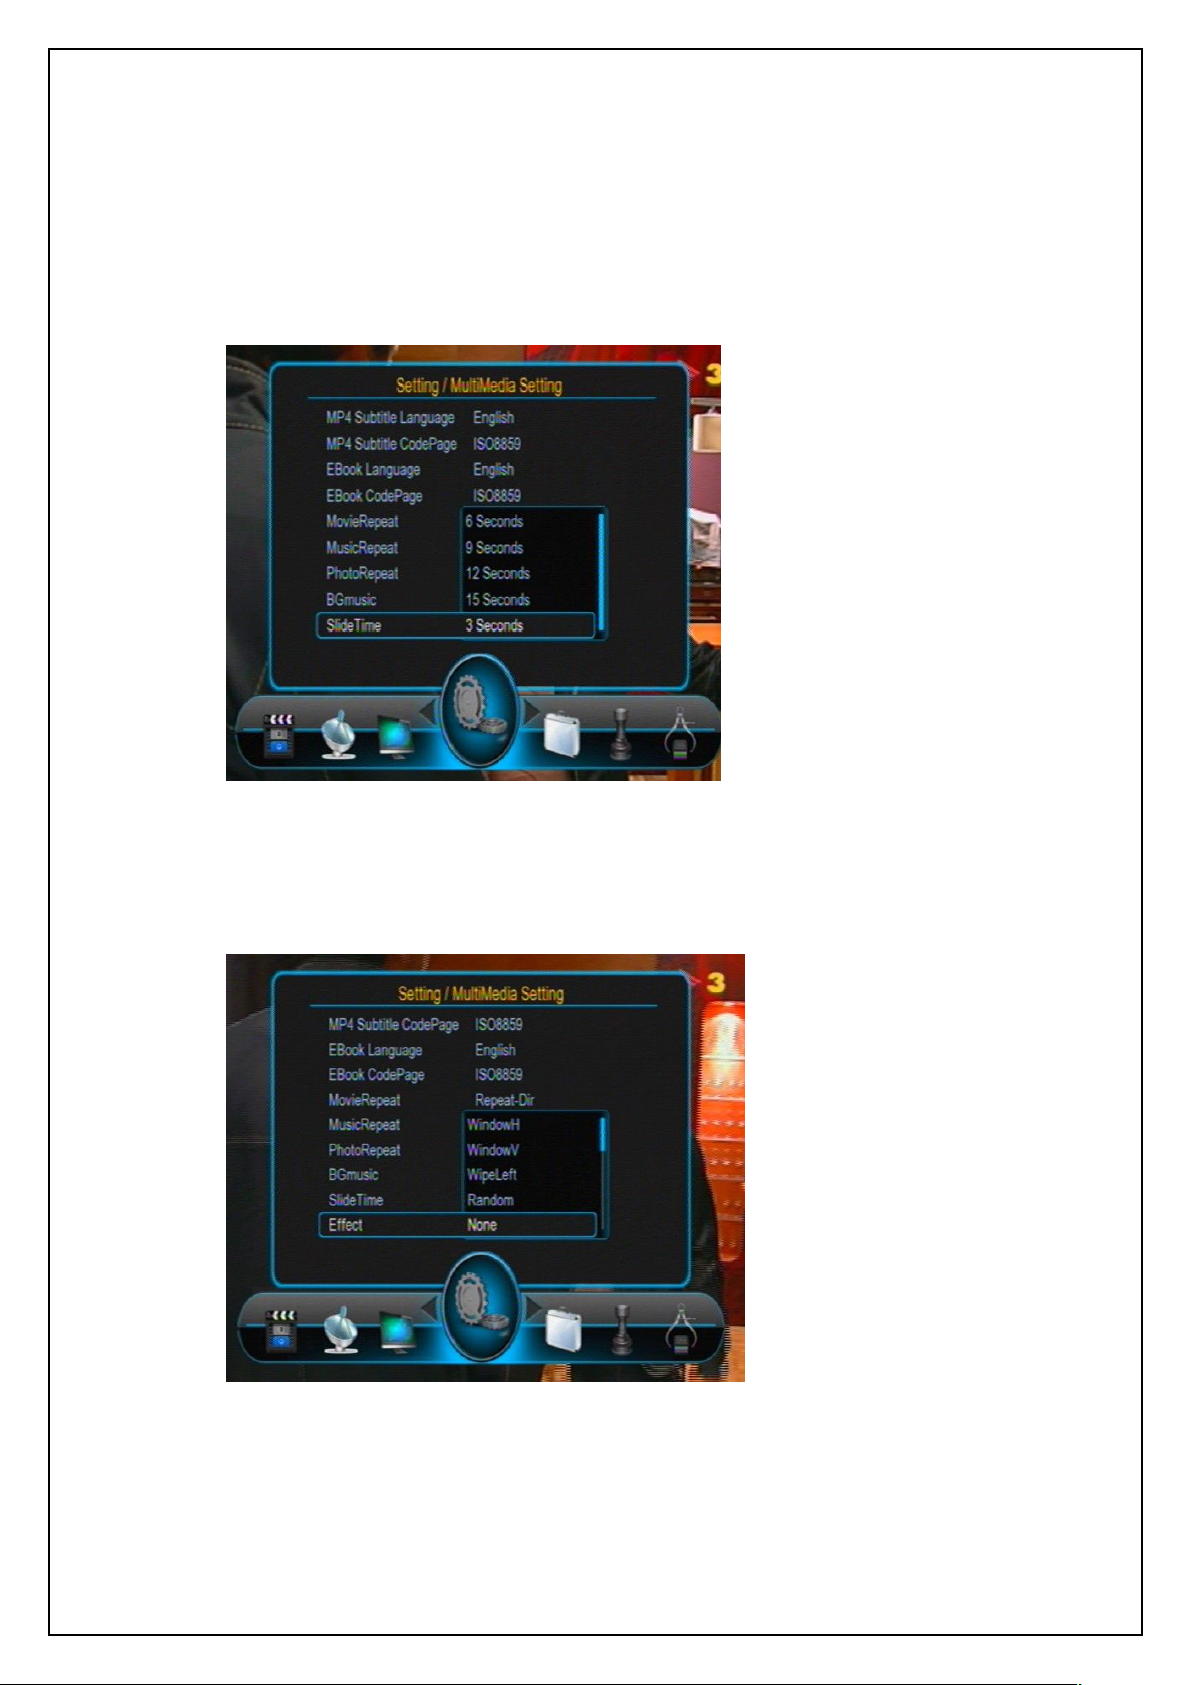
Slide Time item is to set the interval of each photos,press UP/DOWN keys to select one item
and then press OK key to confirm. See the figure below:
USER’S MANUAL
7.3.15 Effect item
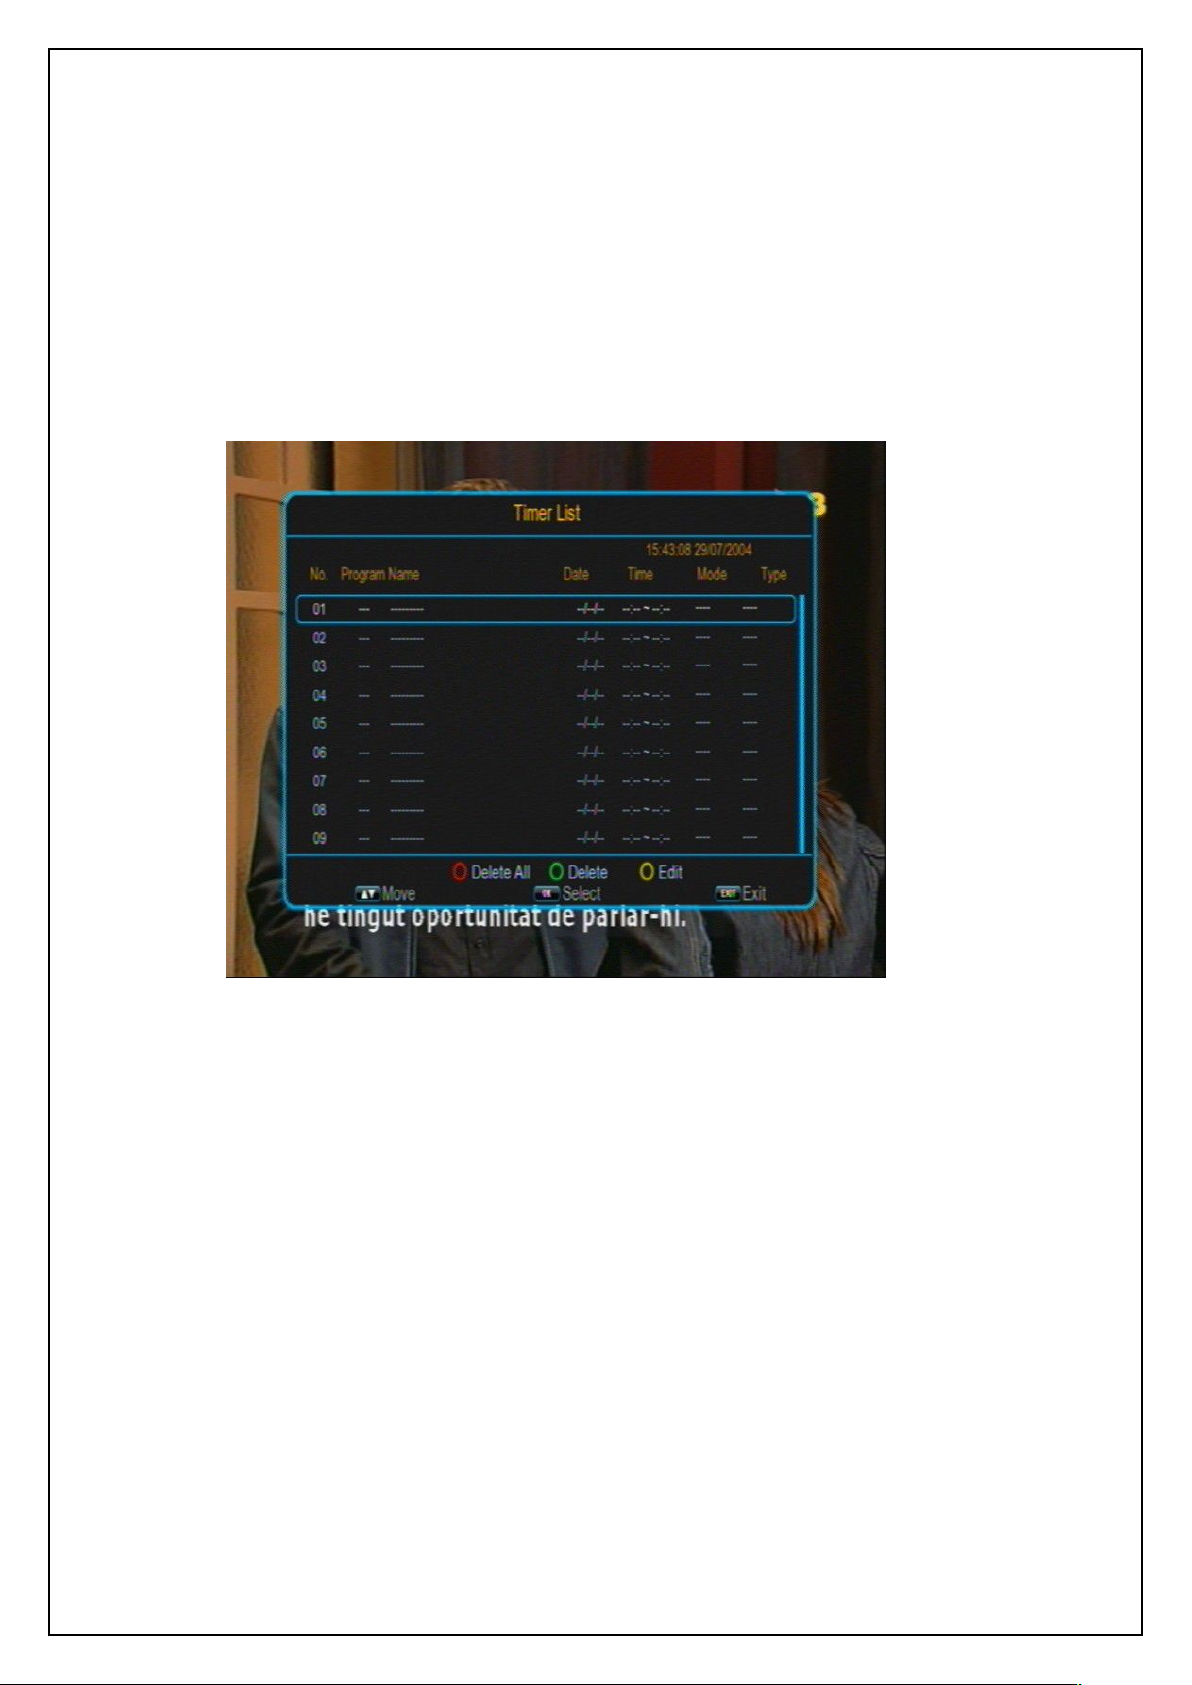
Effect item is to set the effects of the photos,press UP/DOWN keys to select a effect and then
press OK key to confirm. See the figure below:
Page 83
USER’S MANUAL
83
7.4 Utility
7.4.1 Timers
Press the red function key to delete all timers in the list.
Press the green function key to delete the selected timer.
Press the yellow function key or OK key to edit the selected timer. The following edit
The Utility menu has three items: Timers, and SmartCard.
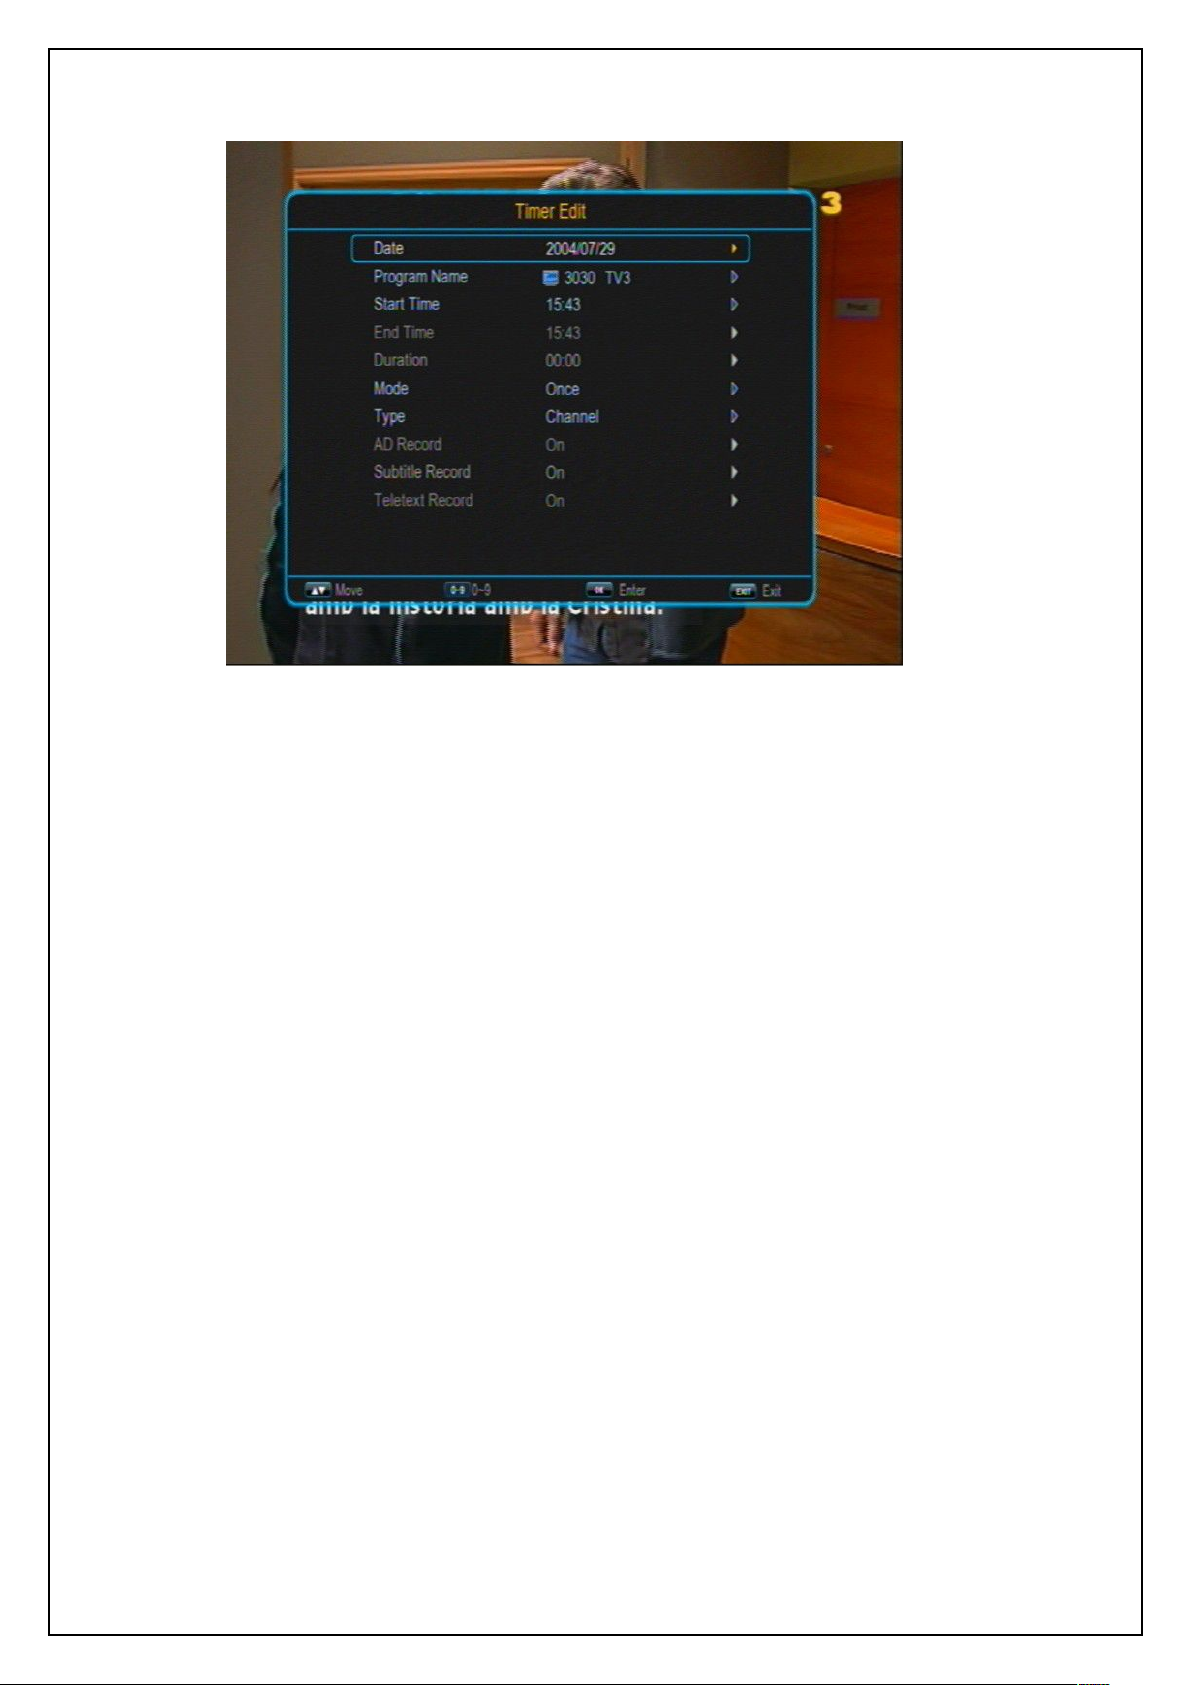
Through the Timers item, you can manage scheduled programs. In the Timers menu you can
view and edit the scheduled program’s name, start time, schedule type and so on. See the
figure below:
Timer List
In the above figure the fields from left to right are: Timer No., Program Name, Date, Time,
Mode and Type. Program Name indicates the scheduled program. Data and Time indicate
the scheduled time. Mode indicates the schedule mode: Once, Daily, Weekly or Monthly.
Type indicates the behaviors after the scheduled time is reached.
In this list, you can -
menu will appear.
Page 84
USER’S MANUAL
84
Date: Scheduled date. To edit it, highlight the Date item first and then press RIGHT key
Program Name: Scheduled program. To edit it, highlight the Program Name item first
Start Time: Start time of schedule. To edit it, highlight the Start Time item first and then
End Time: Cannot be set by hand. When the Type item is set as either ‘VCR’ or
Duration: Schedule duration. Available only when the Type item is set as ‘VCR’ or
Mode: Schedule mode. Four options: Once, Daily, Weekly and Monthly.
Once: In this mode, the scheduled behavior will happen only once at the specified
Daily: In this mode, the scheduled behavior will happen at the specified time every
Weekly: In this mode, the scheduled behavior will happen at the specified time every
Monthly: In this mode, the scheduled behavior will happen at the specified time
Timer Edit
to enter its editing state.
and then press RIGHT key to enter its editing state.
press RIGHT key to enter its editing state.
‘Recorder’, this parameter will auto change according to the Start Time and Duration
settings; when the Type item is set as others, this parameter is the same with the Start
Time.
‘Record’. To edit it, highlight the Duration item first and then press RIGHT key to enter its
editing state.
time. After that, the timer will be deleted.
day.
week.
every month.
Page 85
85
Type: Schedule type. Five options: Recorder, VCR, On, Channel and Standby.
Recorder: The system will record the scheduled program when the scheduled time is
reached. Users can select whether or not to record AD, TTX and Subtitle.
VCR: Similar to the Recorder type. But, AD, TTX and Subtitle will not be recorded.
On: While in standby mode, the system will auto wake up and then play the
Channel: The system will auto switch to the scheduled program to play when the
Standby: The system will enter the standby mode when the scheduled time is
AD Record, Subtitle Record, Teletext Record: Set whether to record AD, TTX and
7.5 Game
7.5.1 Box Man
scheduled program if the scheduled time is reached.
scheduled time is reached.
reached.
Subtitle or not. Available only when the Type item is set as ‘Recorder’.
USER’S MANUAL
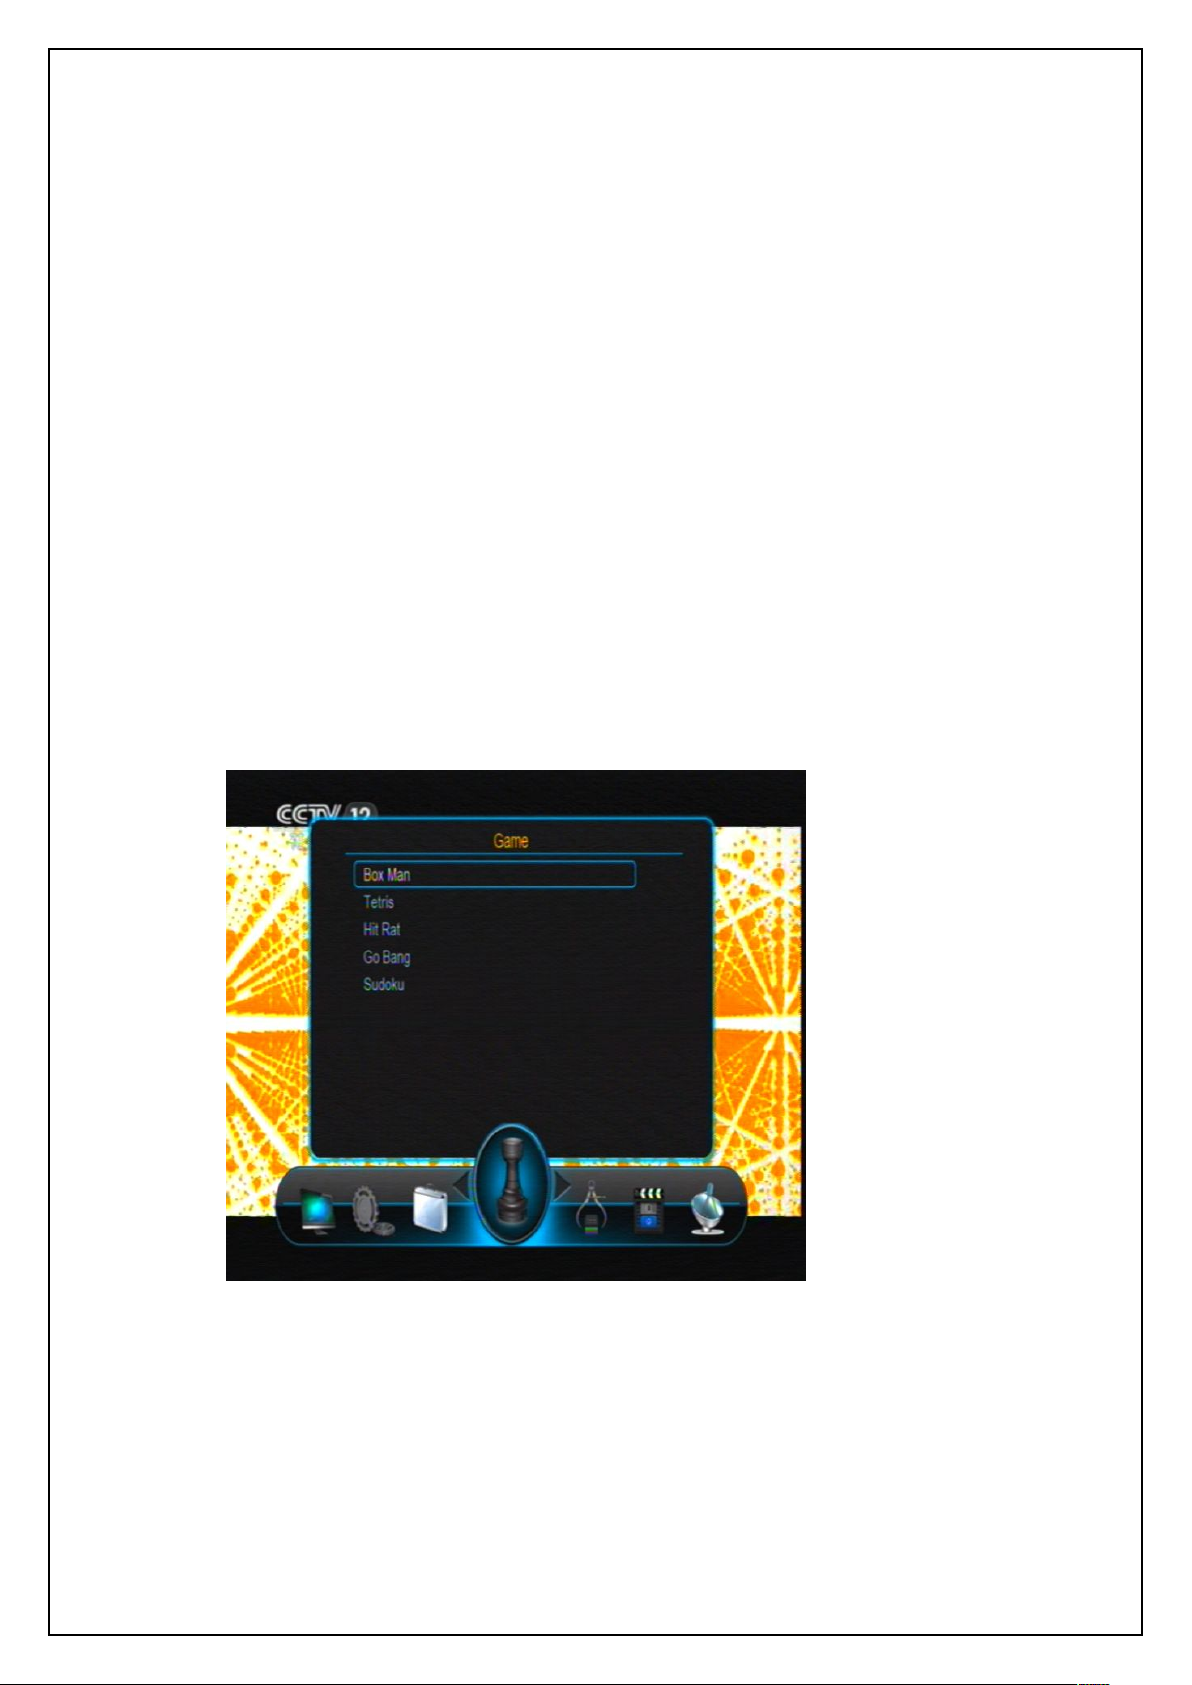
The Game menu manages several small games for your entertainment. At present the
system provides 5 small games. In the Main Menu, press UP/DOWM keys to highlight the
Game menu item and then press OK key to enter the Game menu. See the figure below:
The game list includes Box Man, Tetris, Hit Rat, Go Bang and Sodoku.
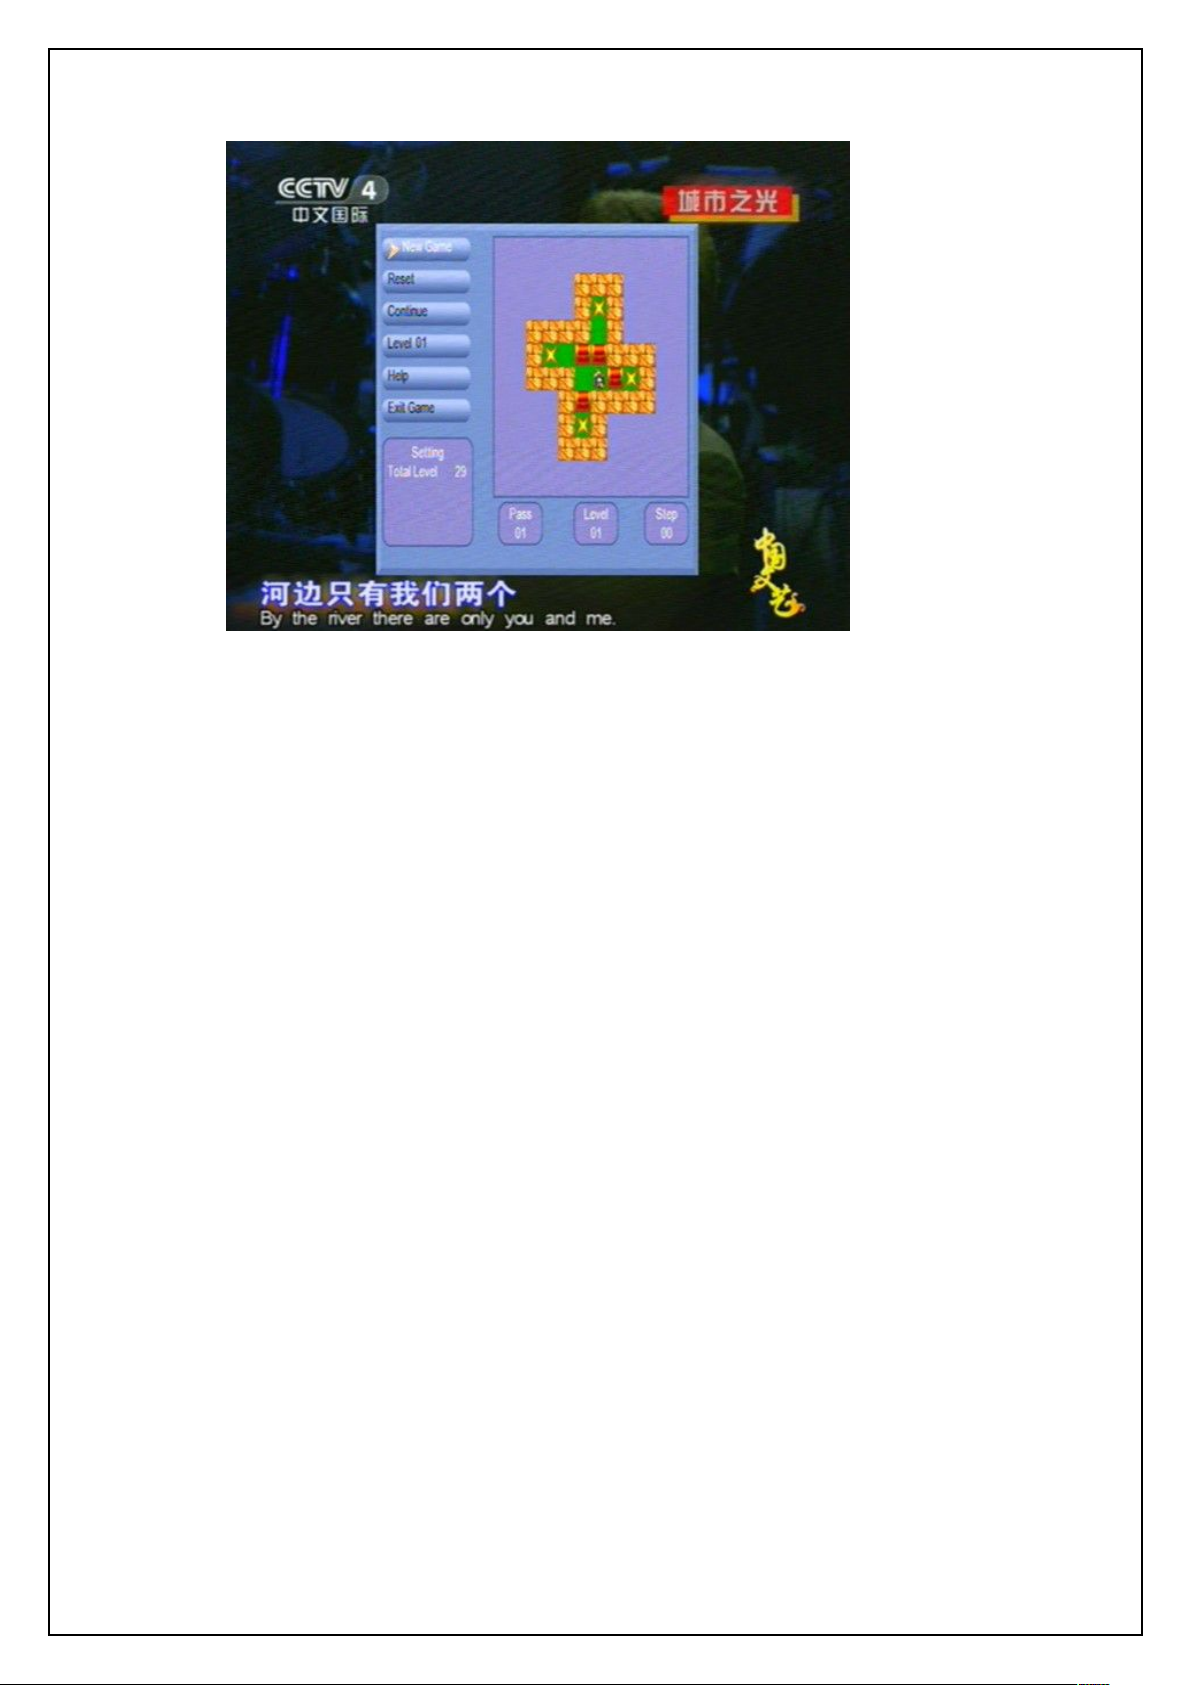
The Box Man game is also called Push Box game. In this game you become a boxman and
your target is to push all the boxes to certain positions. See the figure below:
Game
Page 86
86
Box Man
New Game: Start a new game.
Reset: Restart the current game.
Continue: Continue the current game.
Level: Set game difficult level.
Help: Get the help info on this game.
Exit Game: Exit this game.
UP/DOWN keys: Move up or down.
LEFT/RIGHT keys: Move left or right.
OK key: Pause the game.
EXIT key: Exit the game.
7.5.2 Tetris
USER’S MANUAL
After entering this game, press UP/DOWN keys to select a function button:
Following are game control keys:
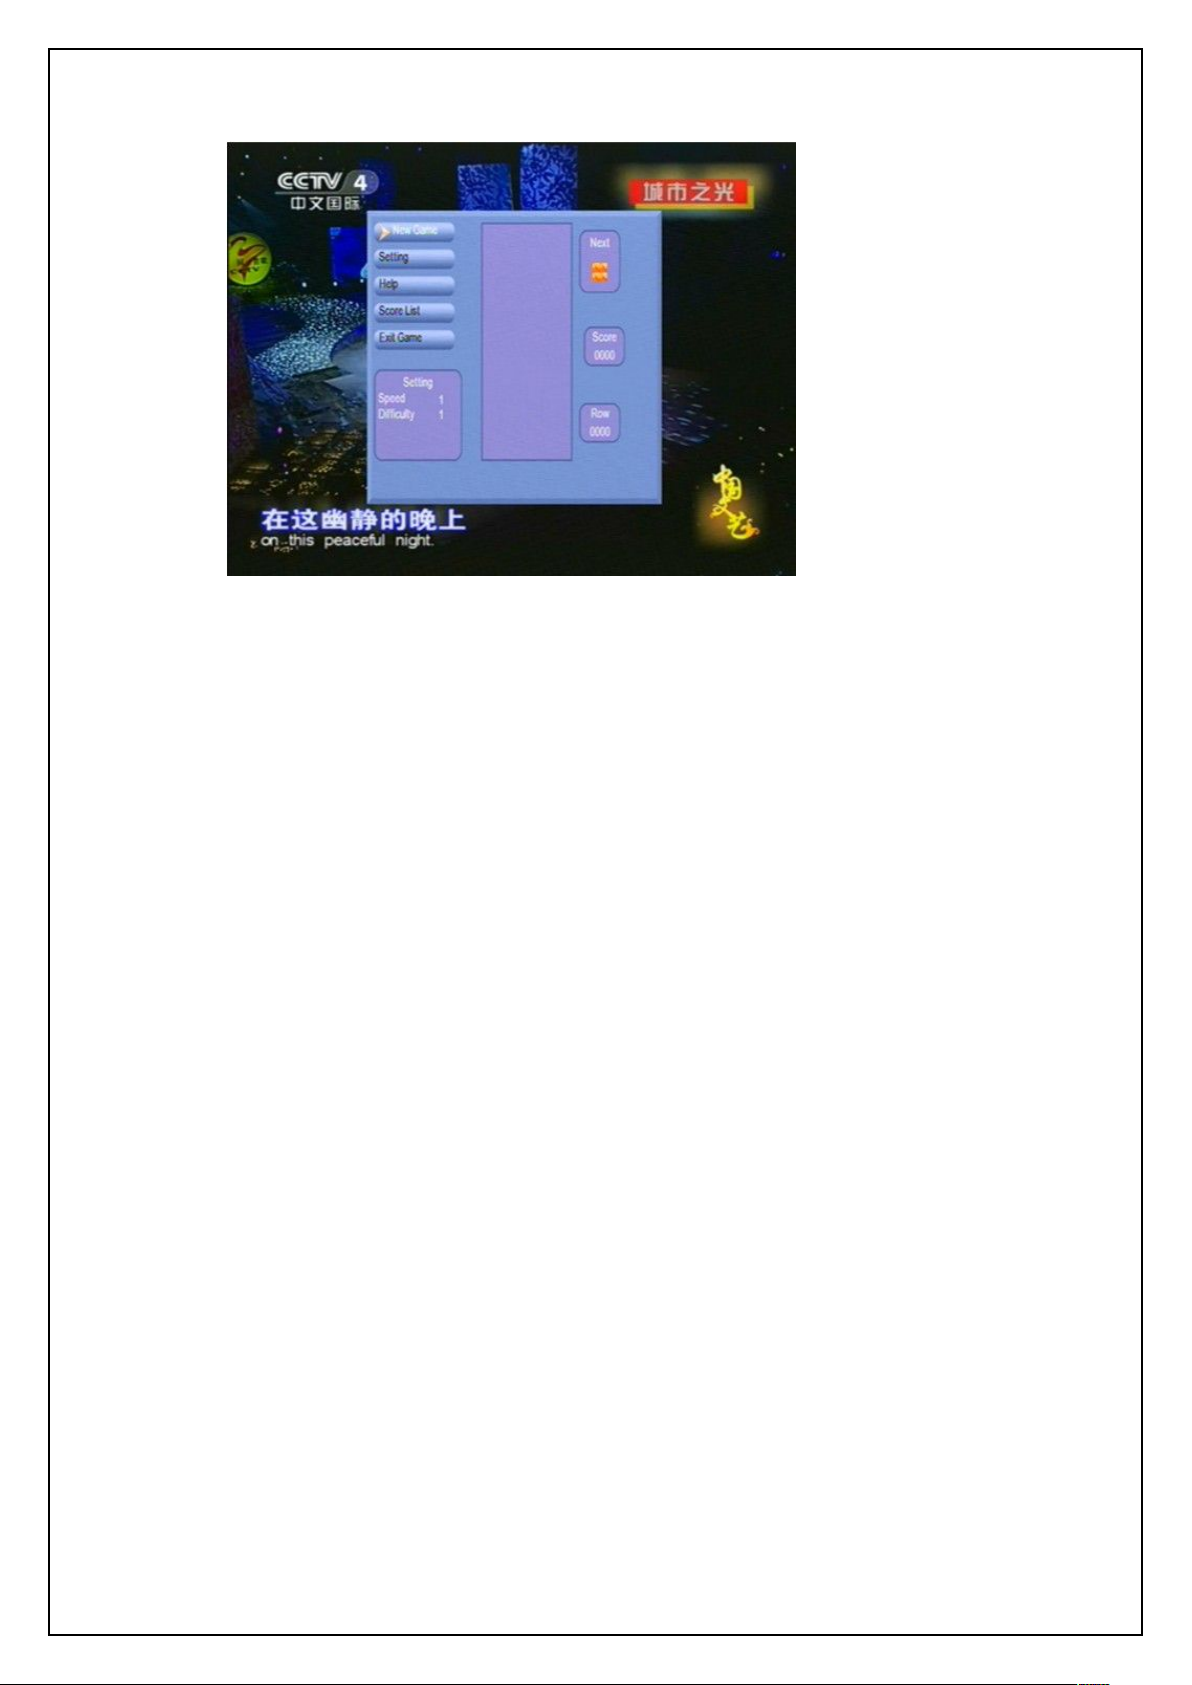
The Tetris game is a popular game. When playing a tetris game, one tries to arrange the
squares in a line, ensuring the squares do not touch the top. Once the top is touched, the
game is over. See the figure below:
Page 87
87
Game control keys:
UP key: Change the shape of falling squares.
LEFT/RIGHT keys: Move the falling squares left or right.
DOWN key: Speed up the falling squares.
OK key: Pause the game.
EXIT key: Exit the game.
7.5.3 Hit Rat
USER’S MANUAL
Tetris
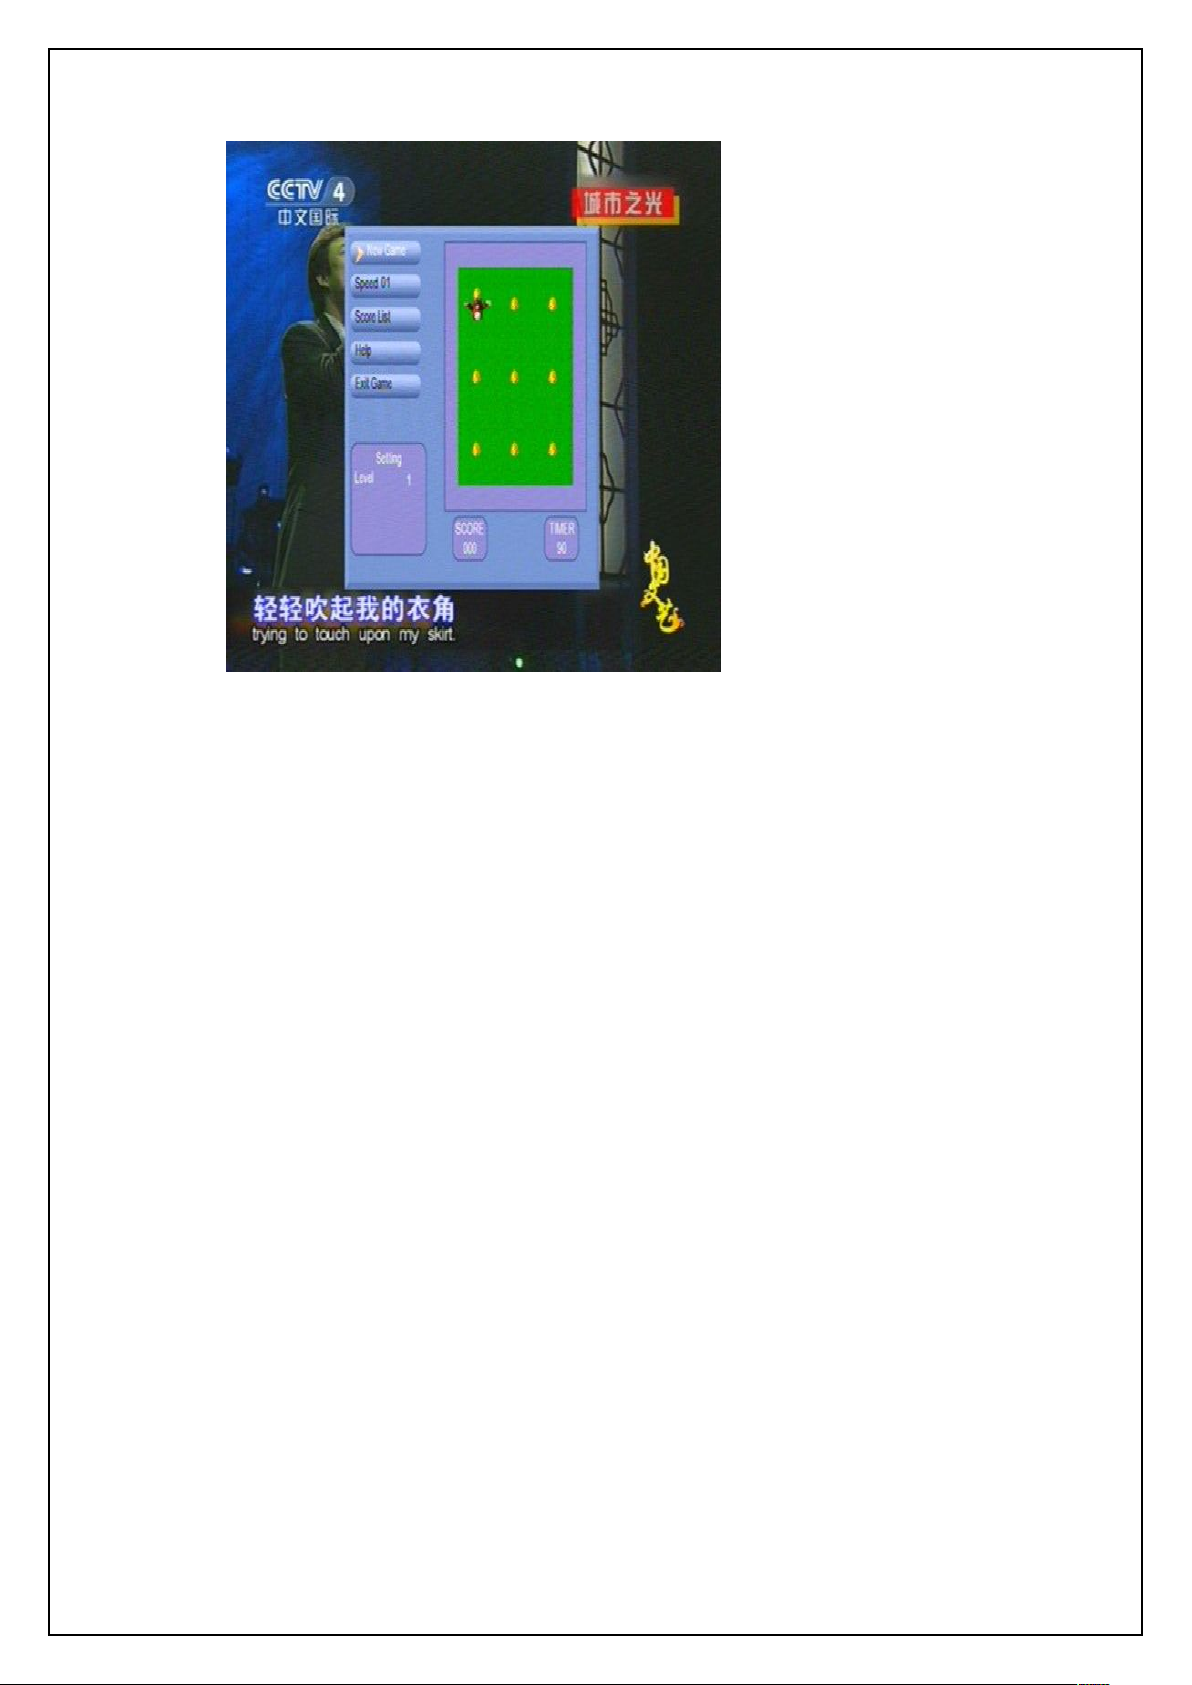
The Hit Rat game is also called Hit Mouse game, using 0~9 number keys to hit the rat that
appears at corresponding position. See the figure below:
Page 88
USER’S MANUAL
88
0~9 keys: Hit the rat that appears at corresponding position.
OK key: Pause the game.
EXIT key: Exit the game.
7.5.4 Go Bang
Hit Rat
Game control keys:
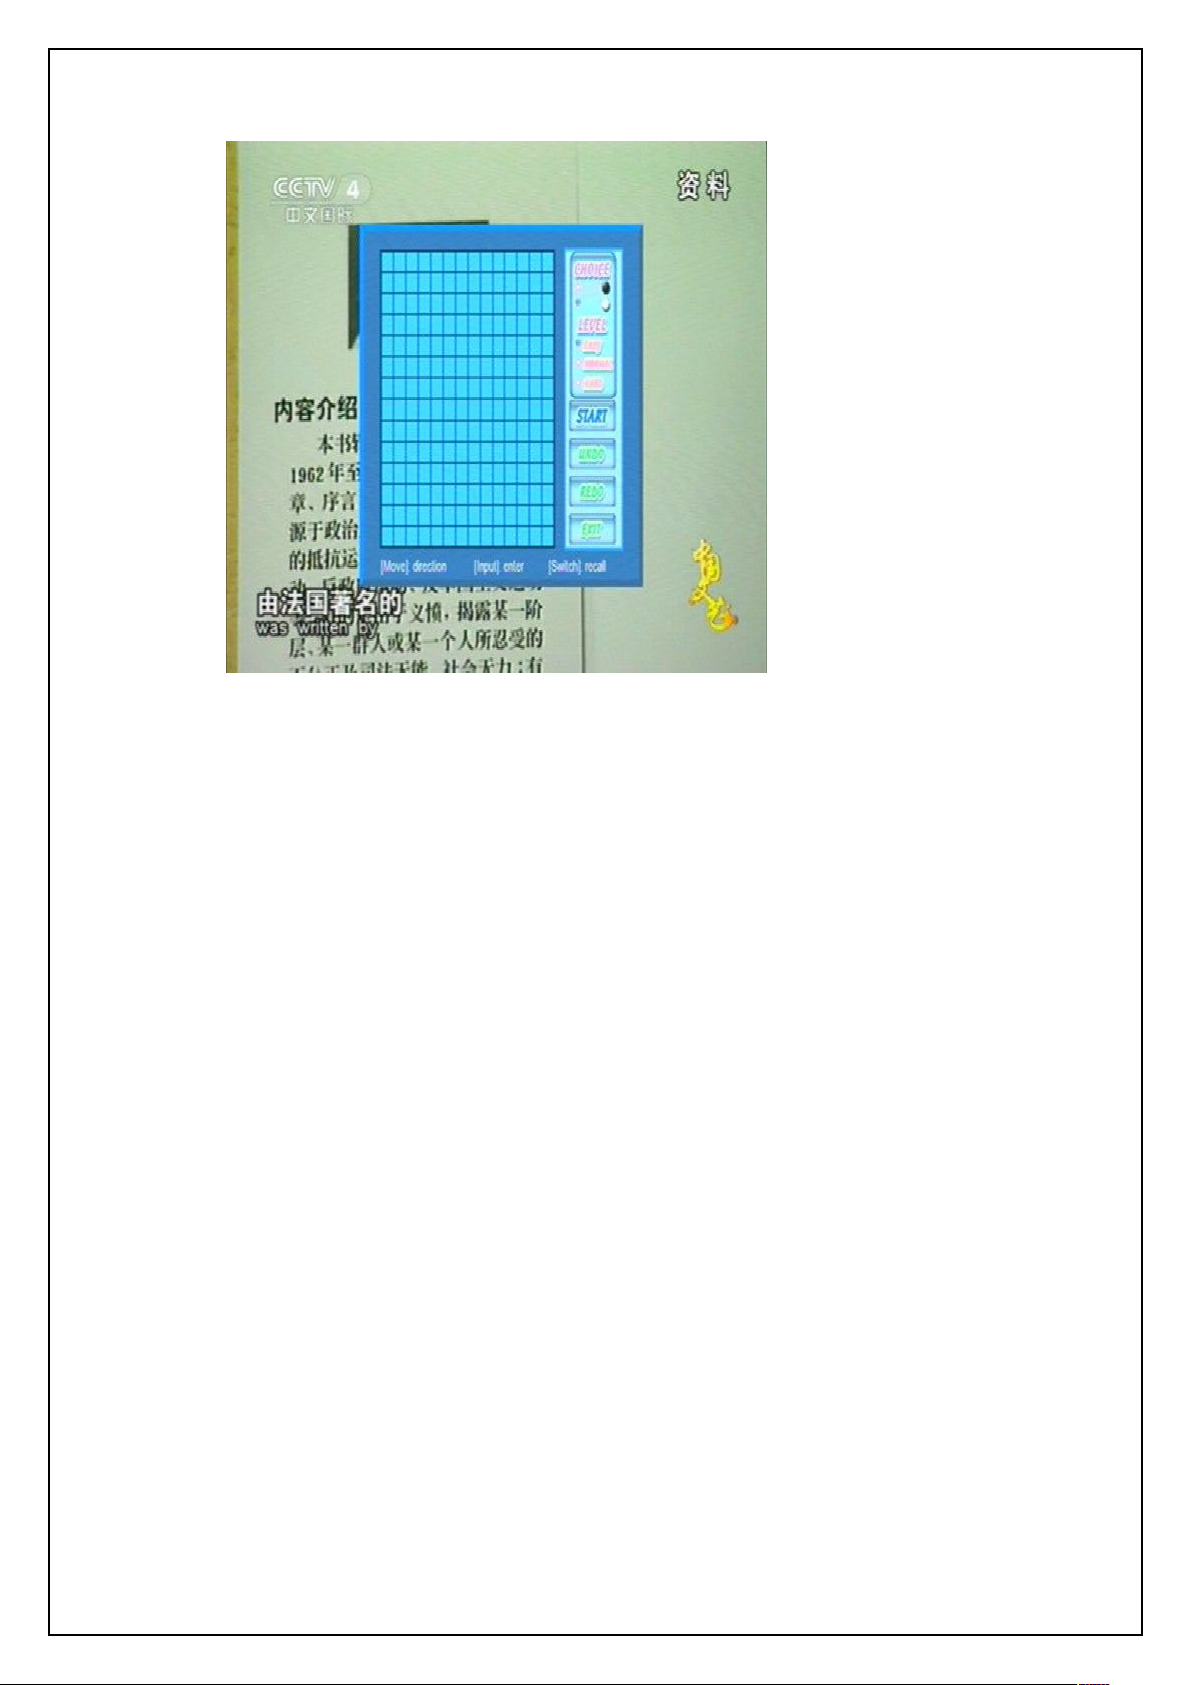
The Go Bang game is also called Black-and-White Chess game. The winner is the first party
who places 5 stones in a line. See the figure below:
Page 89
USER’S MANUAL
89
UP/DOWN/LEFT/RIGHT keys: Select a position to place a stone.
OK key: Place a stone.
EXIT key: Exit the game.
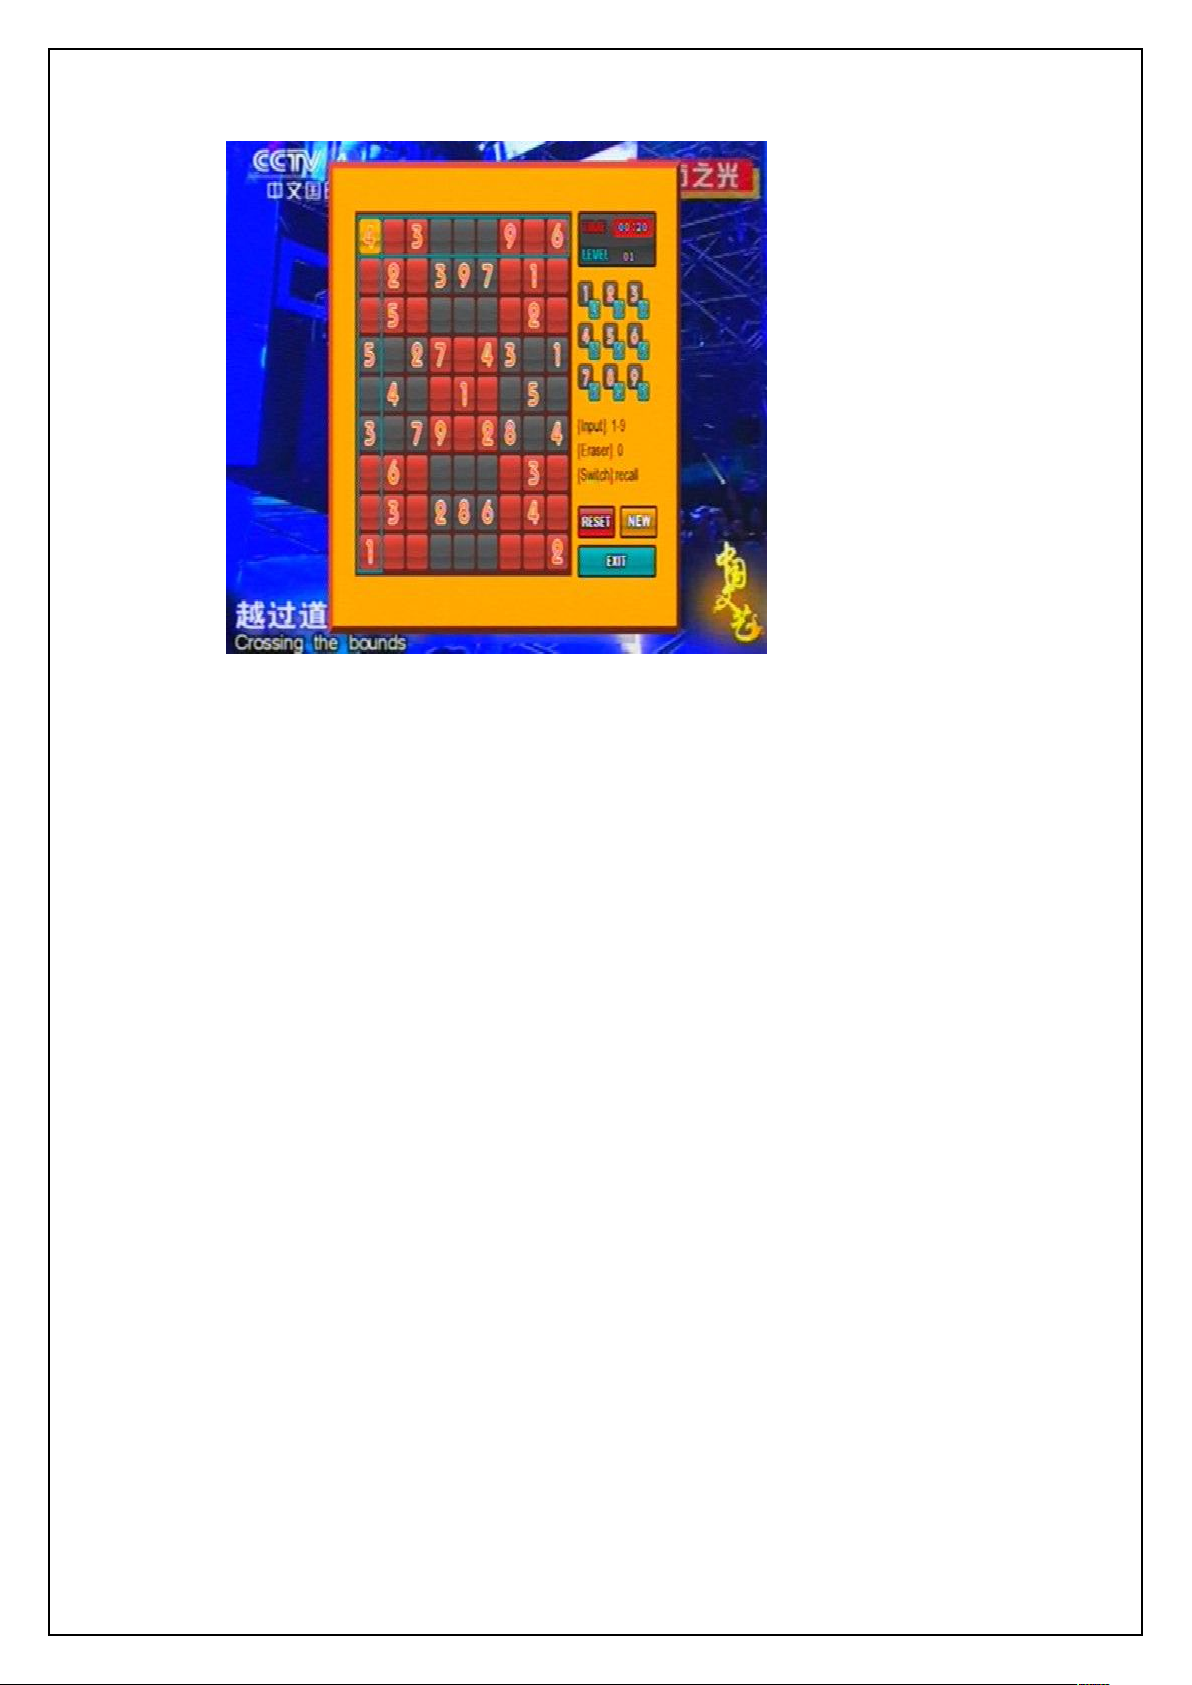
7.5.5 Sodoku
Game control keys:
The Sodoku game interface is as below:
Go Bang
Page 90
USER’S MANUAL
90
UP/DOWN/LEFT/RIGHT keys: Select a position to fill with a number.
OK key: Function select (such as RESET, NEW).
0~9 key: Enter a number at the selected position.
EXIT key: Exit the game.
Game control keys:
Sodoku
Page 91
USER’S MANUAL
91
8 RECORD & TIMESHIFT
8.1 Record
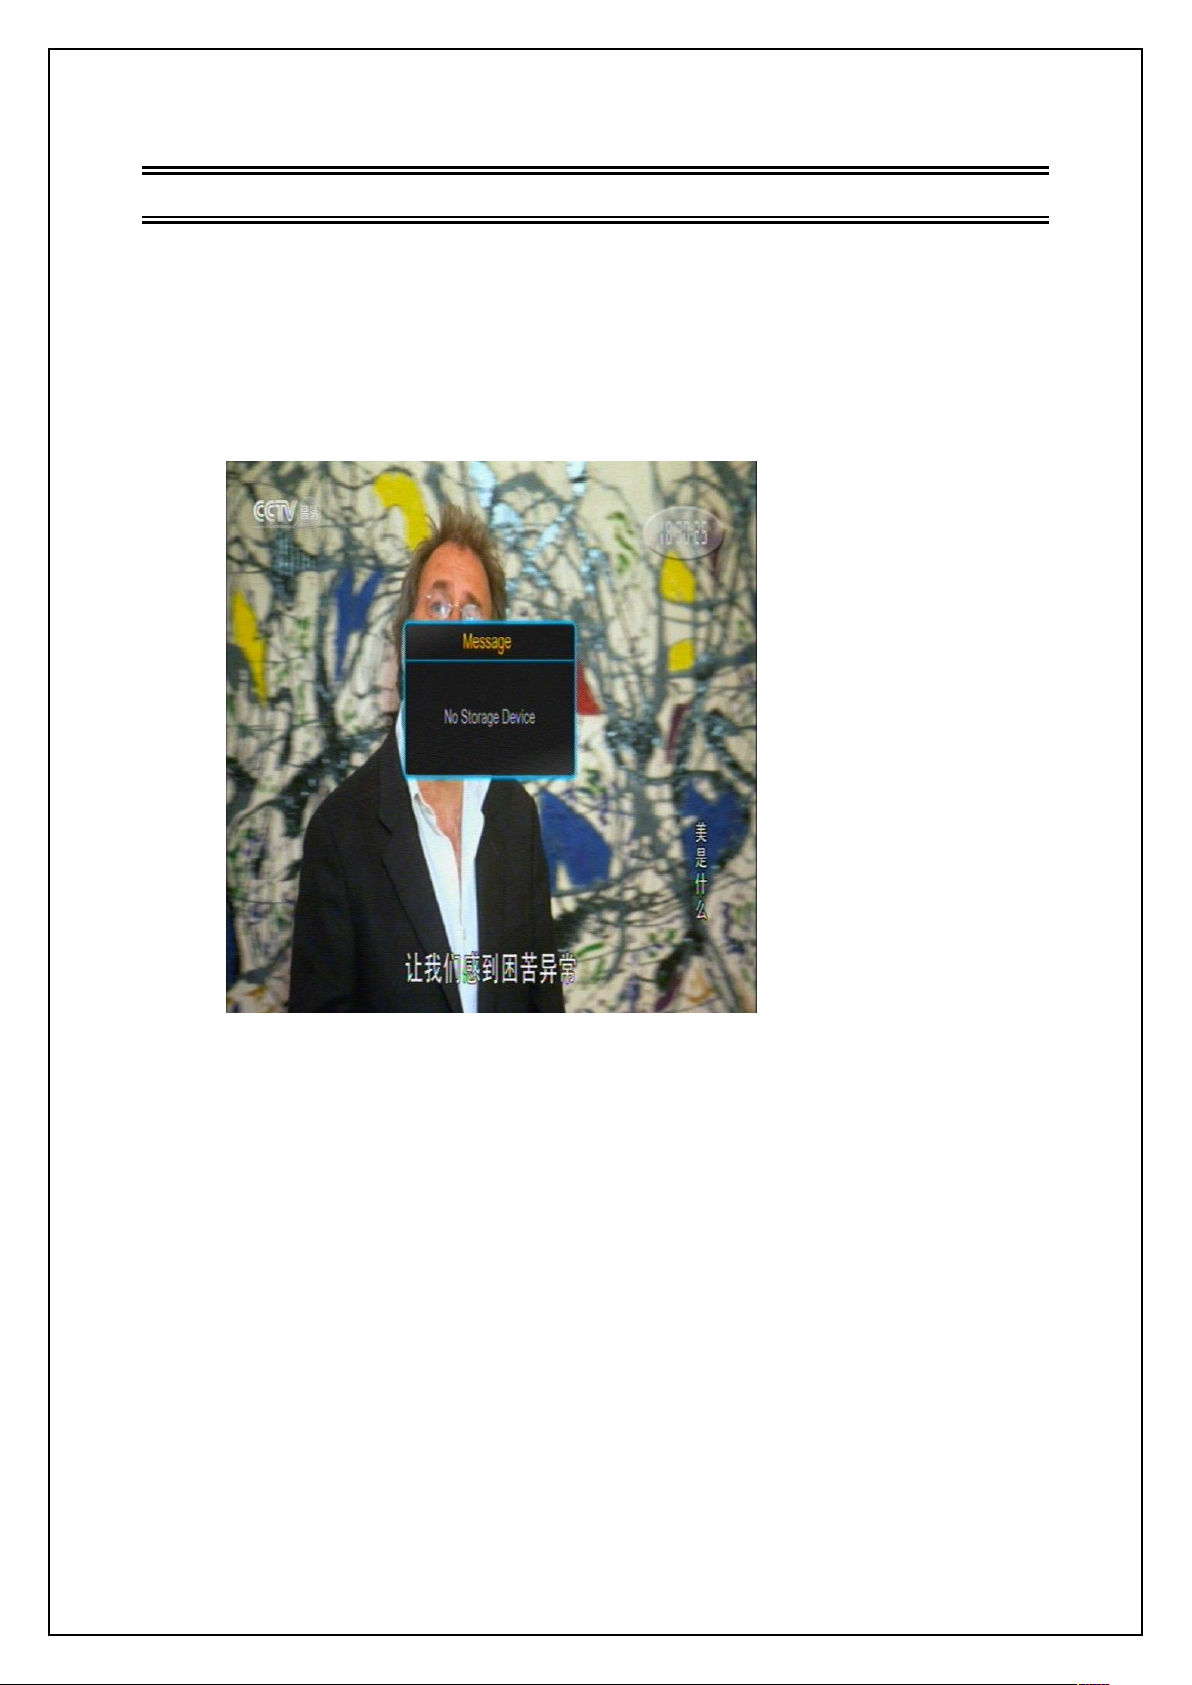
If there is no USB device or card inserted, corresponding message will appear. See the
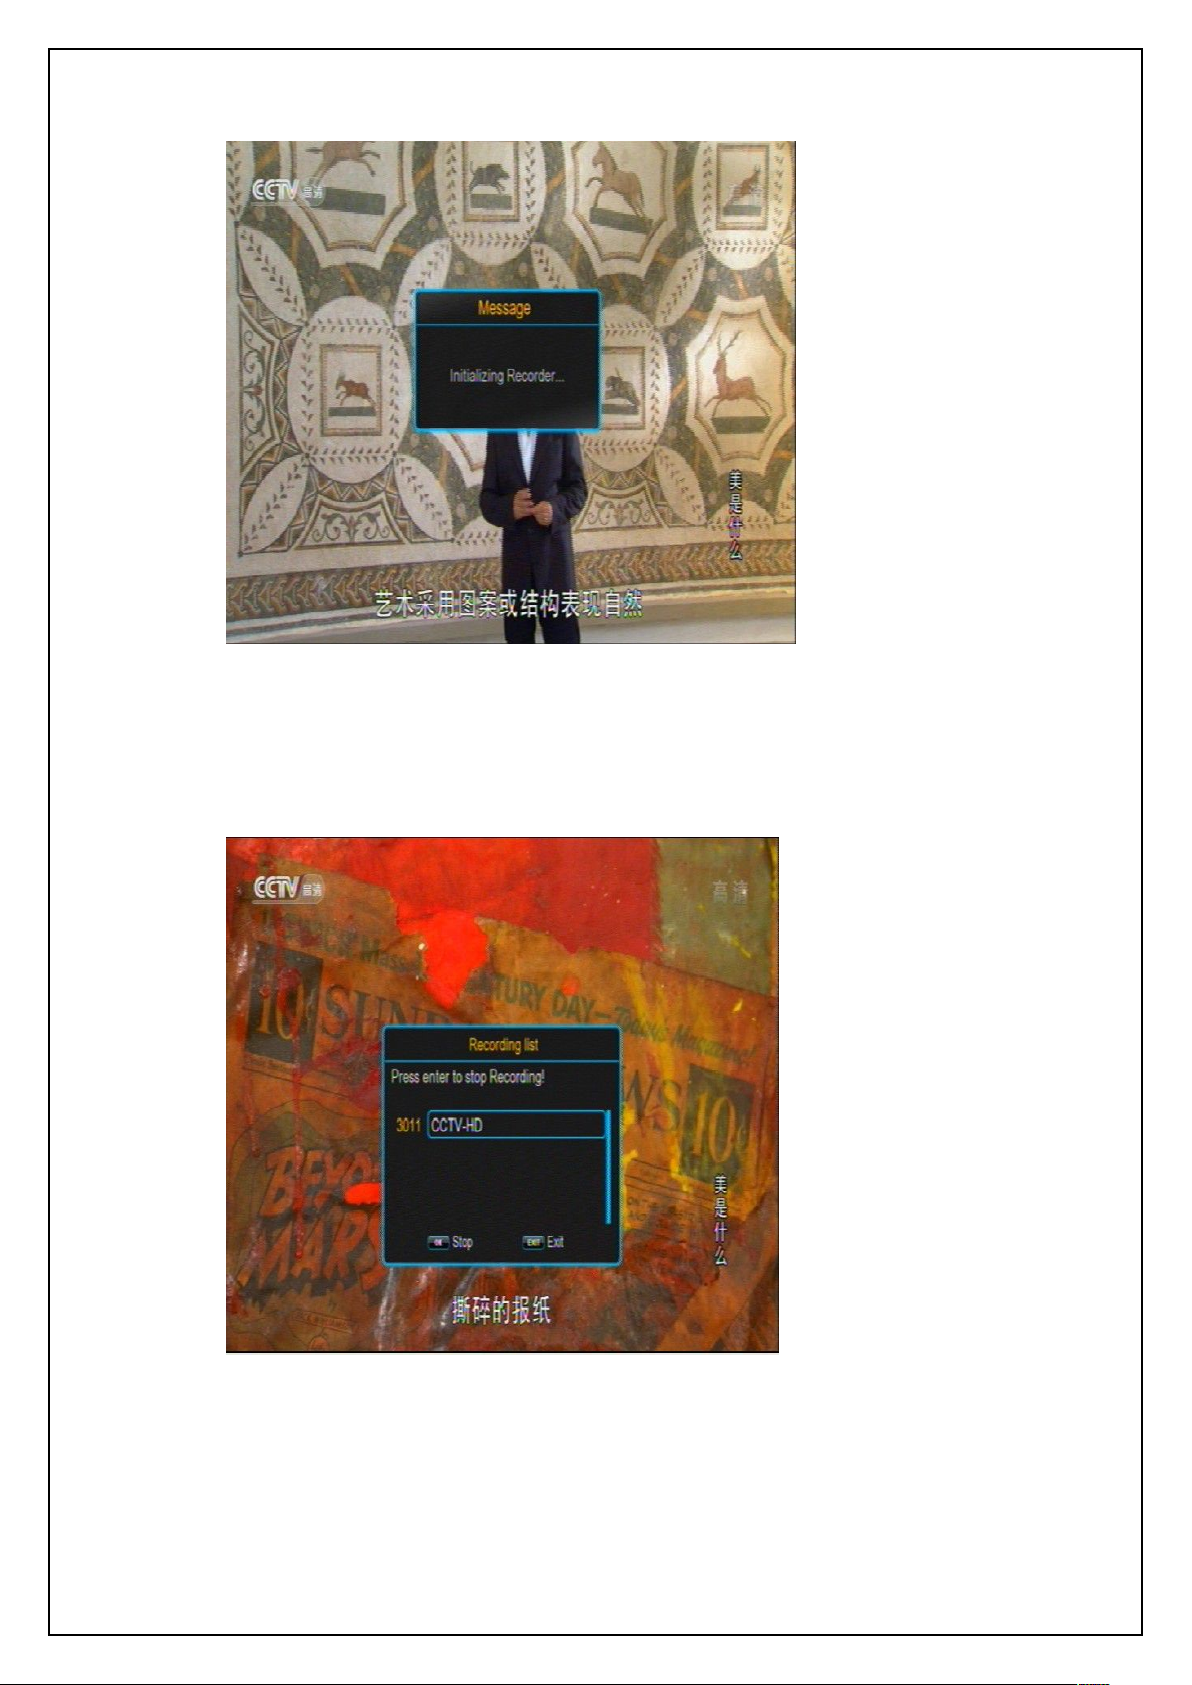
If there has been a USB device or card, the system will initialize the USB device or card
In full screen mode, if you want to record the being-played program, just press REC key.
figure below:
No USB (CARD) Device Prompt
and then start to record. See the figure below.
Page 92
92
Initializing USB (CARD) Device
During recording, to pause the recording, press PAUSE key.
During recording, to stop recording, press STOP key. A confirmation dialog will appear.
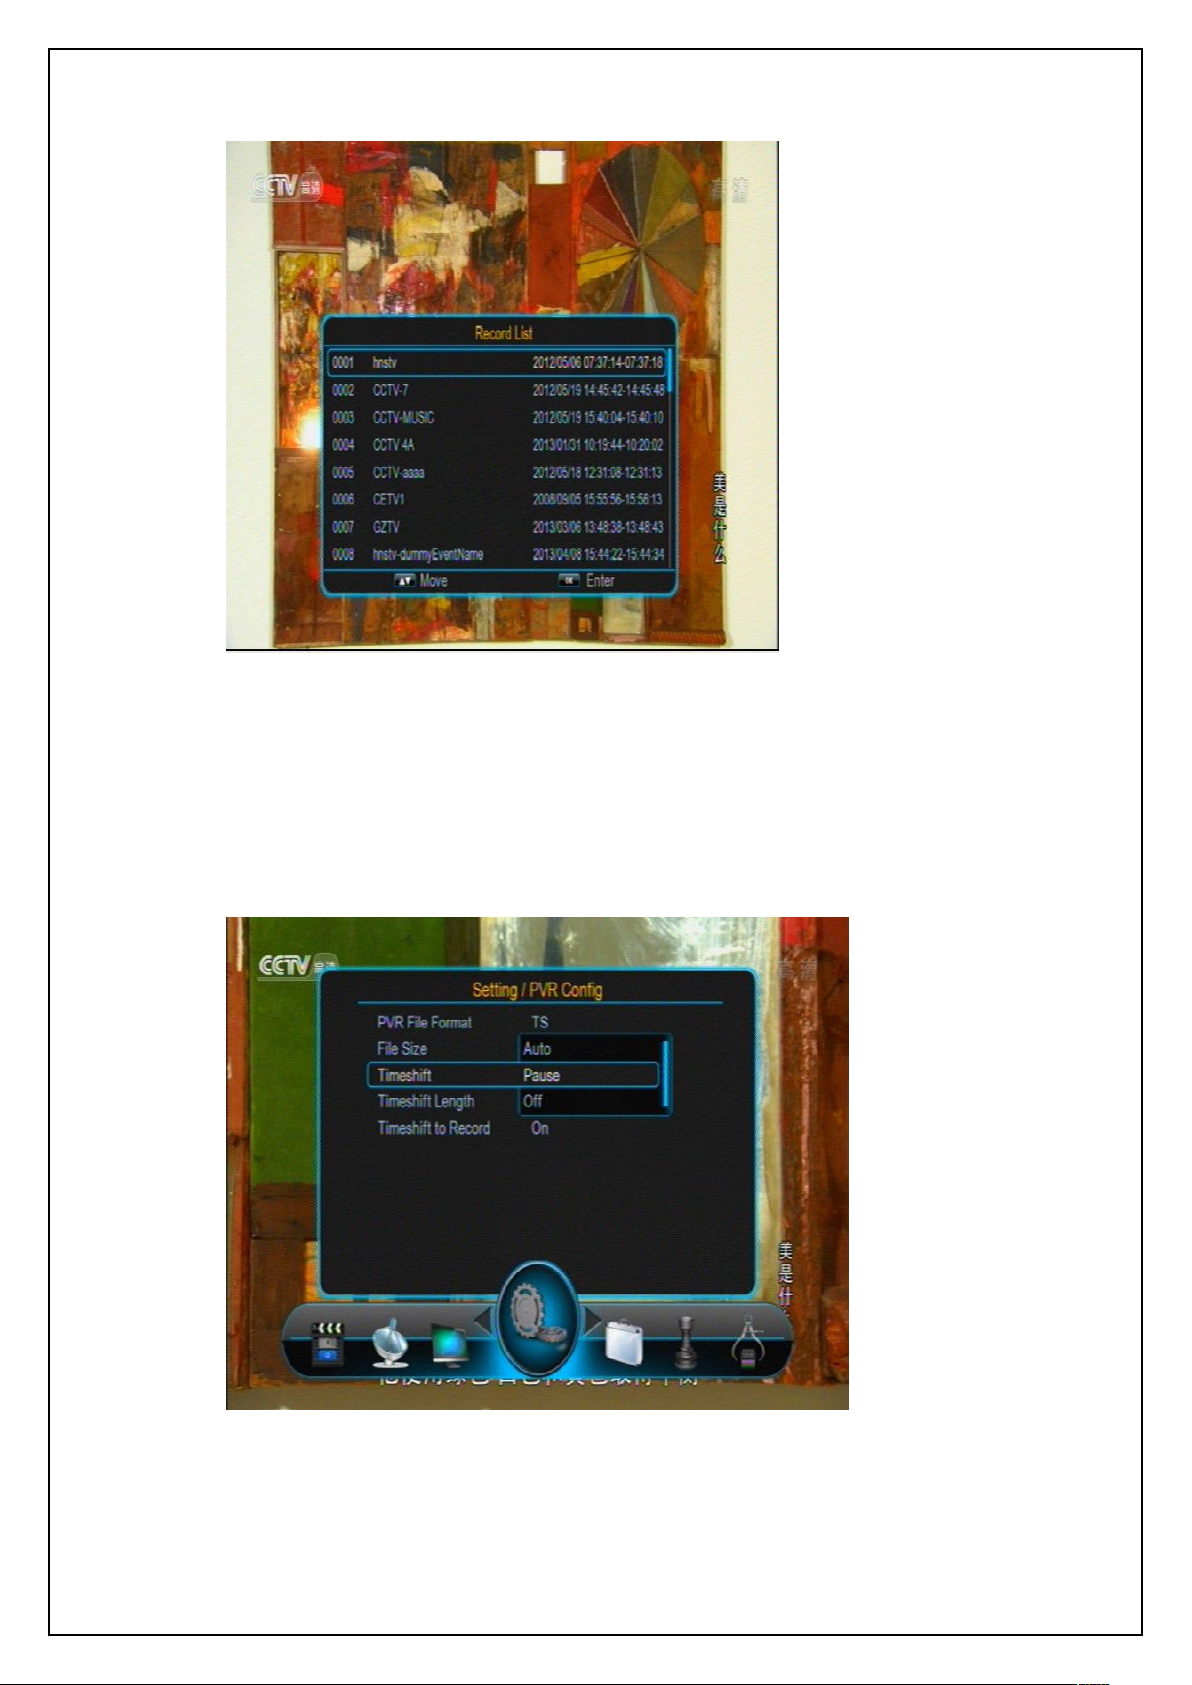
During recording, pressing INFO key can show the recording information. Pressing
USER’S MANUAL
See the figure below.
Stop Recording
INFO key again will show the record file list. See the figure below:
Page 93
USER’S MANUAL
93
8.2 Timeshift
Record List
The Timeshift function is to play the programs that have already been played just before. At
present there are three methods to start the Timeshift function, which can be set through
Main Menu -> Preference -> PVR Config. See the figure below:
Timeshift Setting
Three options of the Timeshift item:
Page 94

USER’S MANUAL
94
Auto: Auto start the Timeshift function 5 seconds after entering any channel.
Pause: During full-screen playing, press PAUSE key to start the Timeshift function.
Off: During program recording, press PAUSE or FR keys to start the Timeshift function.
8.2.1 Timeshift: Auto
8.2.2 Timeshift: Pause
8.2.3 Timeshift: Off
If you choose the ‘Auto’ method for the Timeshift item, you should also configure the Timeshift
Length and Timeshift to Record items to set the time length of timeshift and whether or not to
turn on the record function during timeshift. After setting, the Timeshift function will auto work
5 seconds after entering any channel.
To watch the program content before current time, press FR key to go back to the desired
time period. Press STOP key to exit the timeshift play.
If you choose the ‘Pause’ method for the Timeshift item, you should also configure the
Timeshift Length and Timeshift to Record items. After that, while watching a program if you
want to start the Timeshift function, just press PAUSE key. The system will then start to save a
video piece from the current time for you to watch later.
If you choose the ‘Off’ method for the Timeshift item, the Timeshift Length and Timeshift to
Record items are unavailable. In this case, you can press PAUSE or FR keys to start the
Timeshift function only when recording program. The timeshift length depends on the free
space of the USB device or card.
Page 95
USER’S MANUAL
95
9 UPGRADE
9.1 USB/Card Upgrade
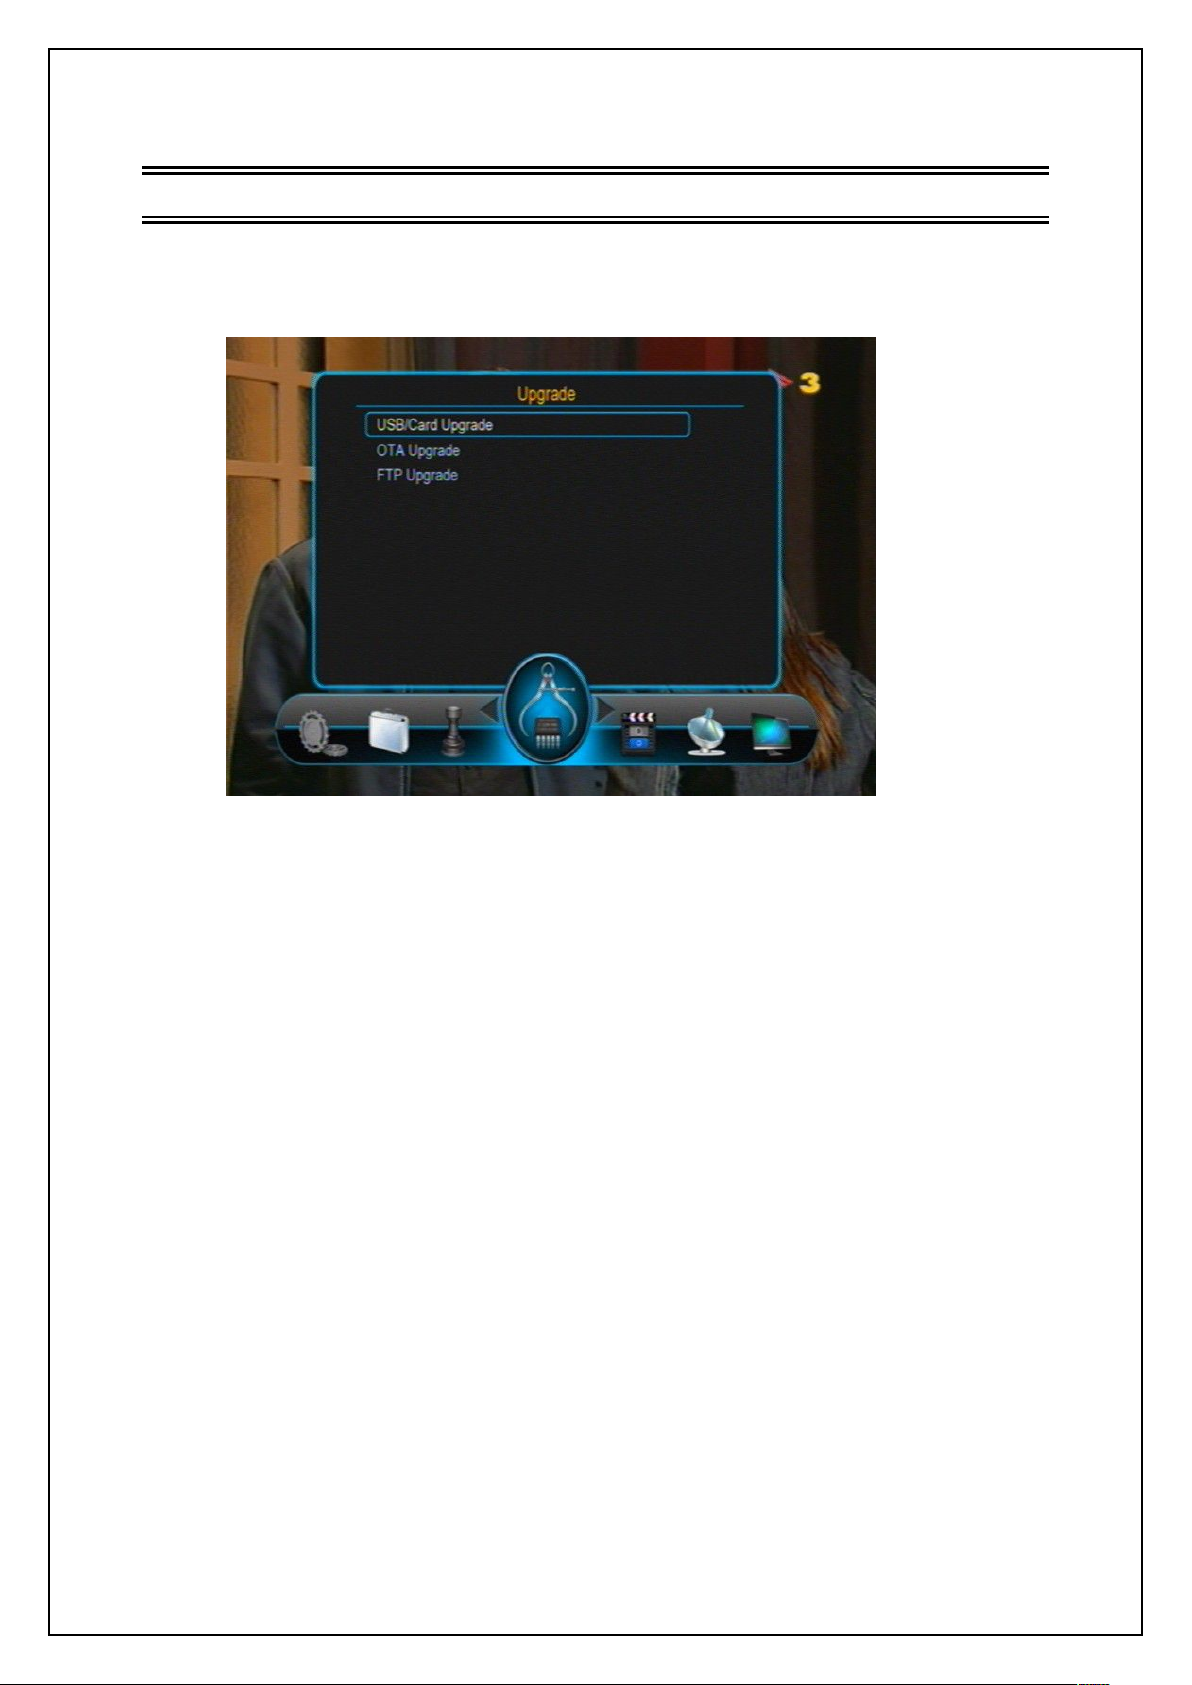
You can carry out system software upgrade through Main Menu -> Upgrade. See the figure
below:
Upgrade
At present the system supports three methods to upgrade the system software: USB Upgrade,
OTA Upgrade and NET Upgrade.
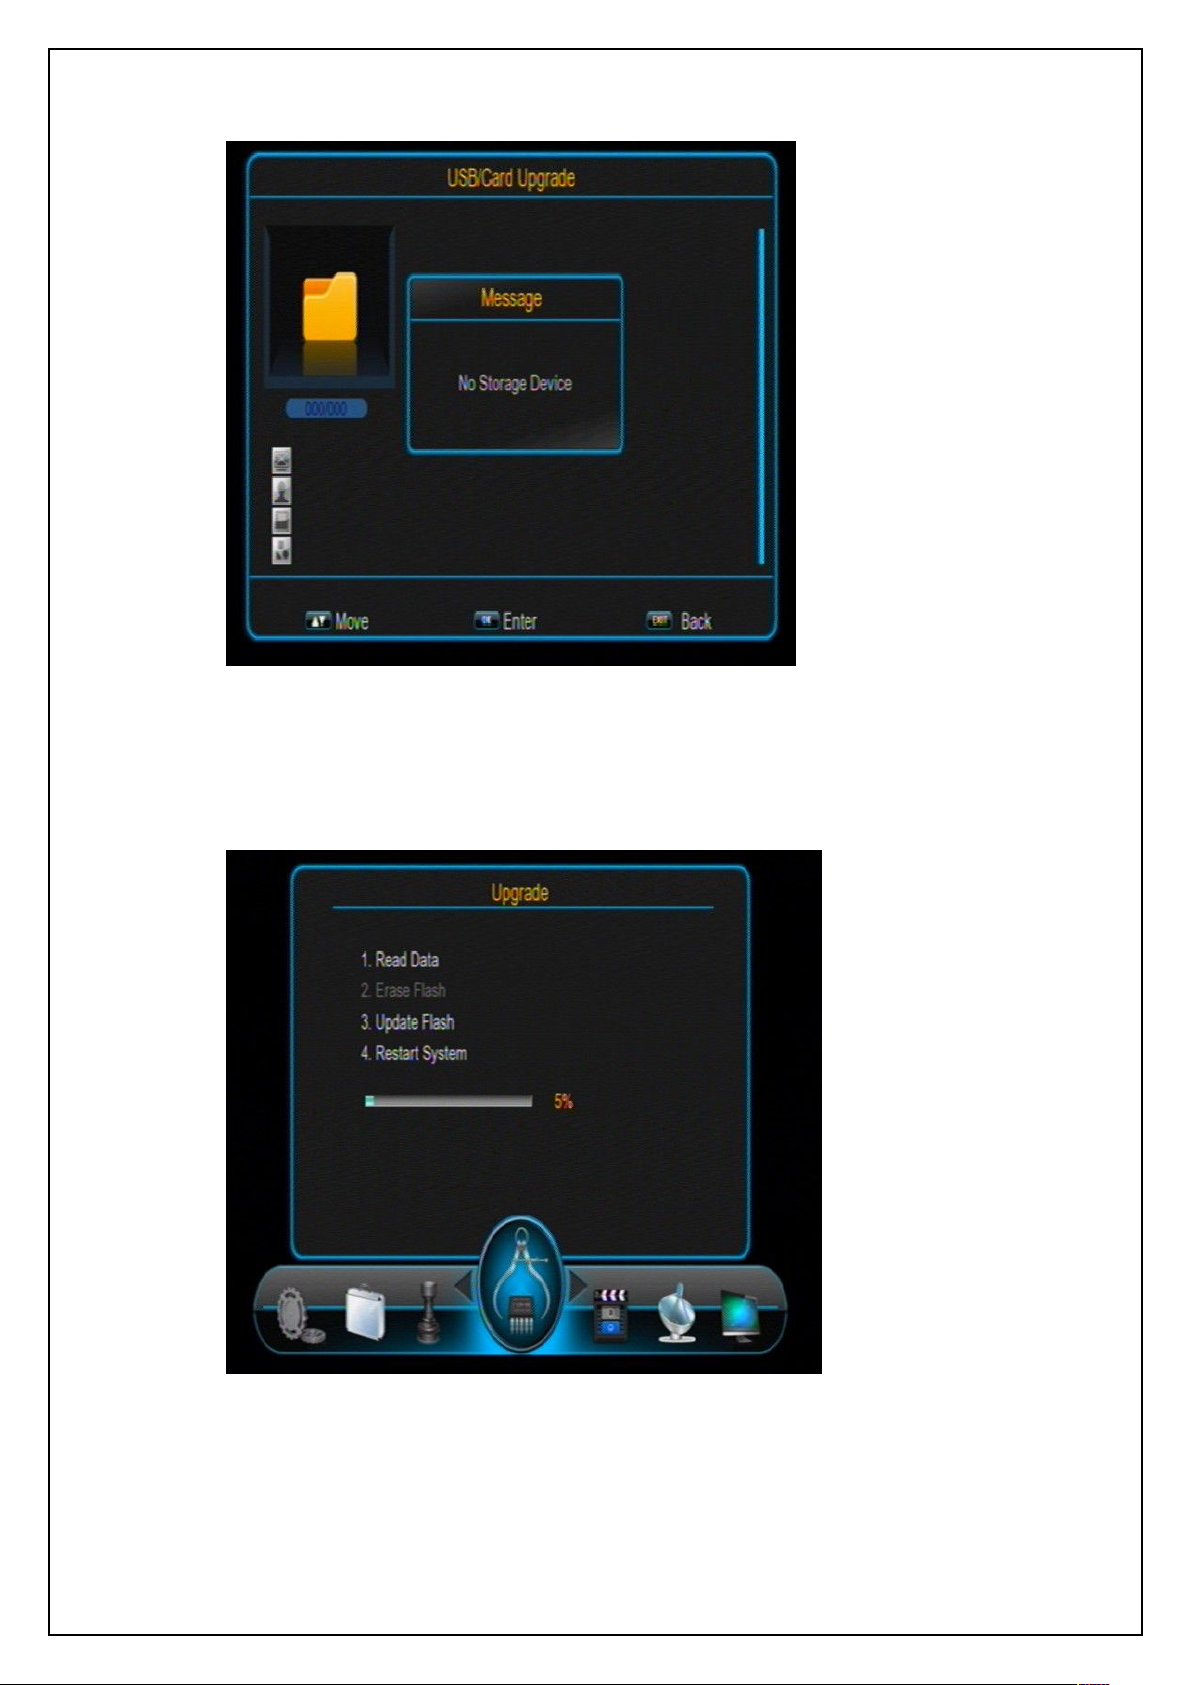
Highlight the USB Upgrade item and then press OK key to enter the following USB Upgrade
interface. If there is no USB device inserted, corresponding prompt will appear.
Page 96
USER’S MANUAL
96
USB Upgrade
Select the partition in which rom.bin is stored, then press OK key to enter a file list. From the
file list, select rom.bin and then press OK key to start the USB upgrade. The interface will be
as below:
USB Upgrade Flow
When the USB Upgrade completes, the system will auto restart.
Page 97
97
9.2 OTA Upgrade
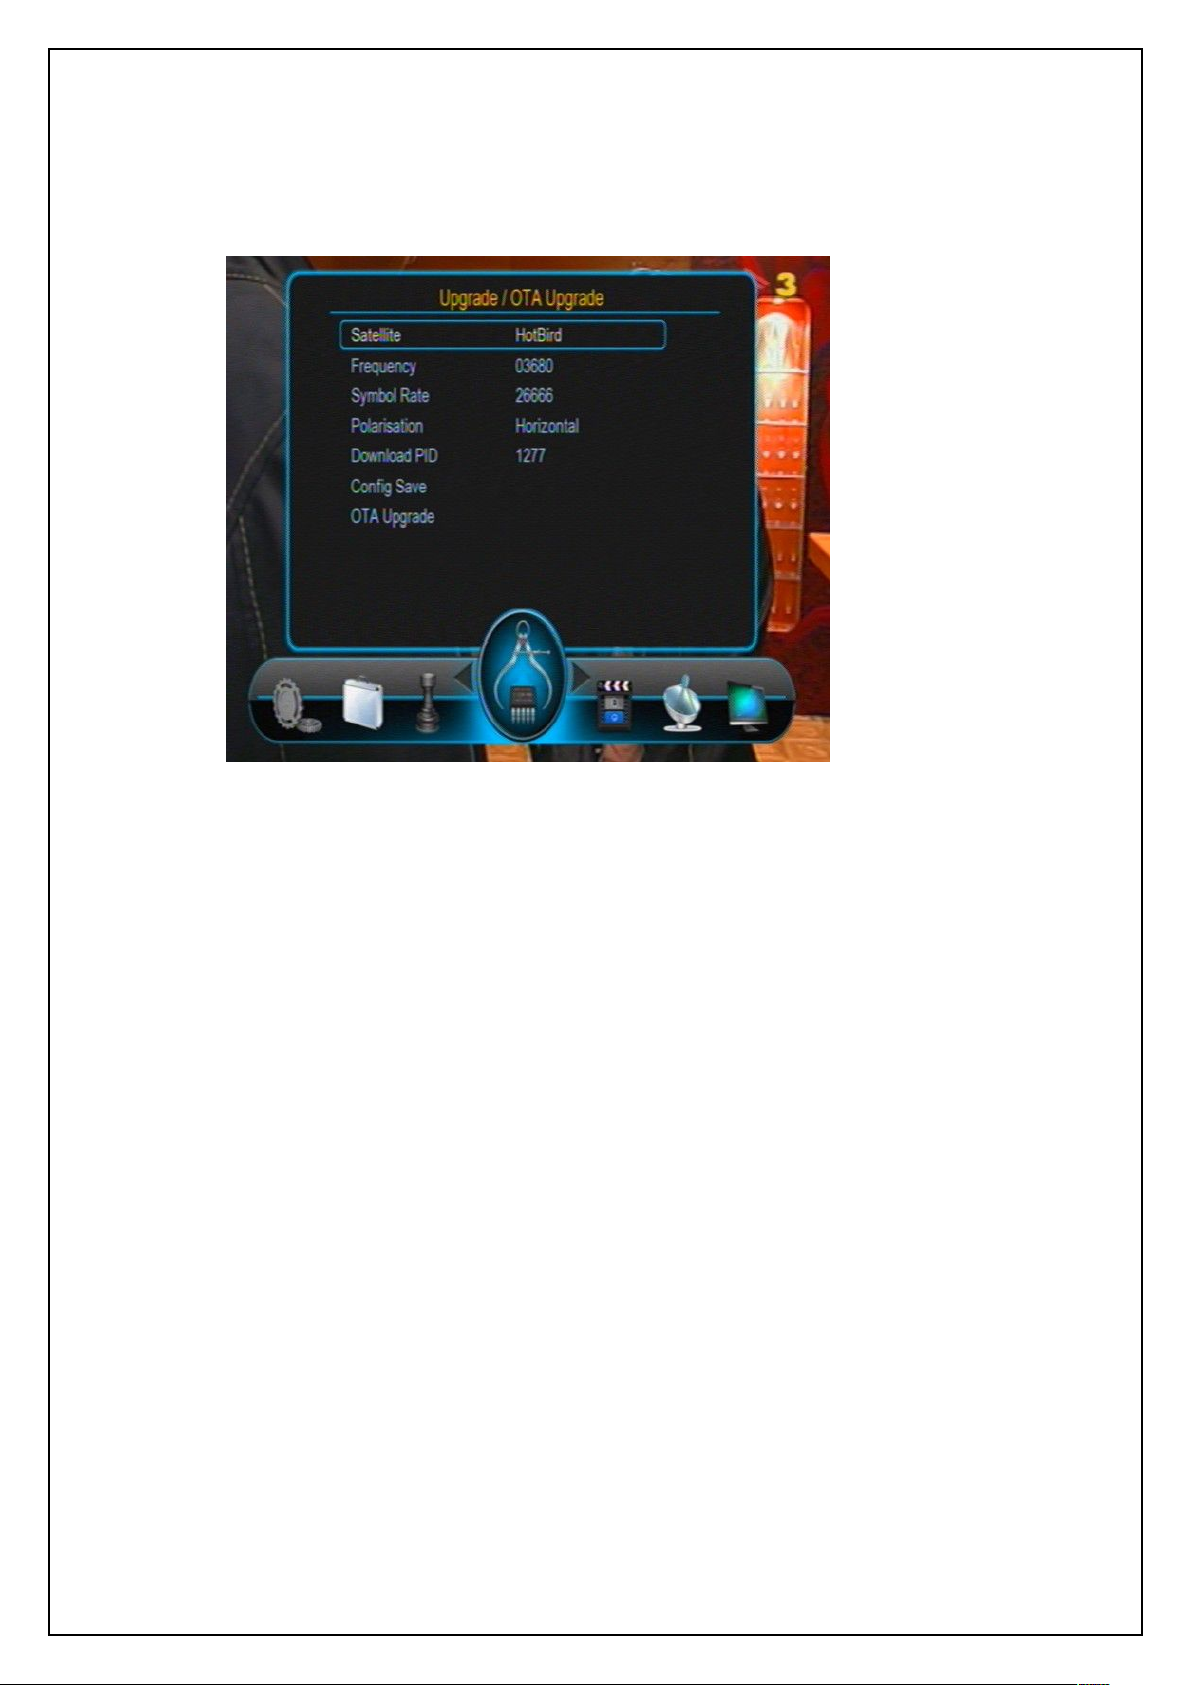
See below:
Satellite: Select currect satellite that carried new software:
Frequency,Symbol Rate and Polarisation: Input current value .
Download PID: the new software PID.
OTA Upgrade: Hightlight this item and press OK key to start OTA Upgrade. The
USER’S MANUAL
Setting items:
interface like USB Upgrade..
OTA Upgrade Setting
Page 98
98
9.3 FTP Upgrade
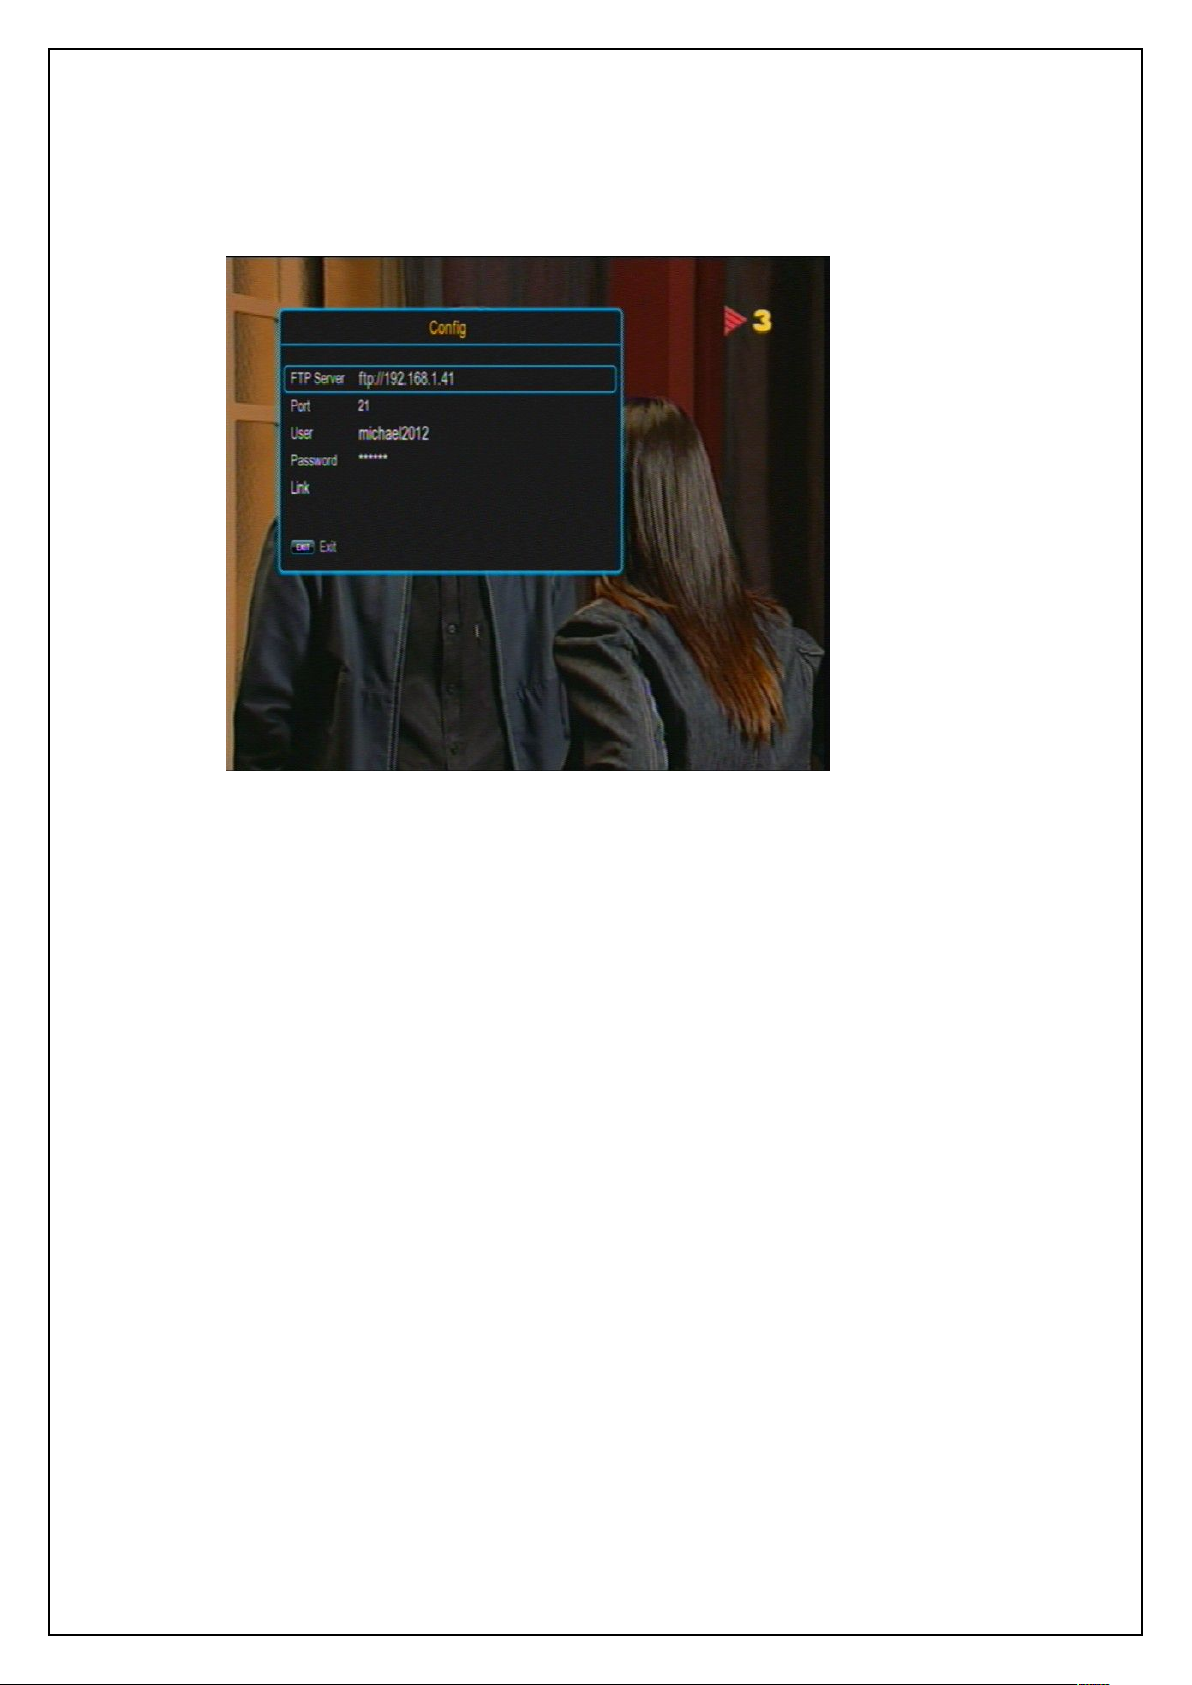
See below:
FTP Server, Port: Select valide FTP site and service port:
User, Password: Input currect user id and password.
Link: Hightlight this item and press OK to linked FTP site..and select new sw to
USER’S MANUAL
Setting items:
upgrade.
FTP Upgrade Setting
 Loading...