

Page 1

XN5004T Hardware
Owner’s Manual
QSAN Technology Inc. www.qsan.com
© Copyright 2017 QSAN Technology, Inc. All rights reserved.
No part of this document may be reproduced or transmitted without written permission from QSAN Technology, Inc
Page 2

Edition 1.0 (October 2017)
This edition applies to QSAN XCubeNAS XN5004T NAS storage systems. QSAN believes the
information in this publication is accurate as of its publication date. The information is subject to
change without notice.
Trademarks
QSAN, the QSAN logo, XCubeNAS, and QSAN.com are trademarks or registered trademarks of QSAN
Technology, Inc.
Intel, Xeon, Pentium, Core, Celeron and Intel Inside logo are trademarks of Intel Corporation in the
United States and other countries.
Other trademarks and trade names used in this document to refer to either the entities claiming the
marks and names or their products are the property of their respective owners.
Page 3

Notices i
Notices
The information contained in this manual has been reviewed for accuracy. It may include
typographical errors or technical inaccuracies. Changes are made to the document
periodically. These changes will be incorporated in new editions of the publication. QSAN
may make improvements or changes in the products. All features, functionality, and product
specifications are subject to change without prior notice or obligation. All statements,
information, and recommendations in this document do not constitute a warranty of any
kind, express or implied.
Any performance data contained herein was determined in a controlled environment.
Therefore, the results obtained in other operating environments may vary significantly.
Some measurements may have been made on development-level systems and there is no
guarantee that these measurements will be the same on generally available systems.
Furthermore, some measurements may have been estimated through extrapolation. Actual
results may vary. Users of this document should verify the applicable data for their specific
environment.
This information contains examples of data and reports used in daily business operations.
To illustrate them as completely as possible, the examples include the names of individuals,
companies, brands, and products.
All of these names are fictitious and any similarity to the names and addresses used by an
actual business enterprise is entirely coincidental.
Regulatory Statements
CE Statement
This device has been shown to be in compliance with and was tested in accordance with the
measurement procedures specified in the Standards and Specifications listed below.
Technical Standard: EMC DIRECTIVE 2014/30/EU Class B
(EN55032 / EN55024)
Page 4
ii © Copyright 2017 QSAN Technology, Inc. All Right Reserved.
FCC Statement
This equipment has been tested and found to comply with the limits for a Class B digital
device, pursuant to Part 15 of the FCC Rules. These limits are designed to provide reasonable
protection against harmful interference when the equipment is operated in a residential
installation and used in accordance with the instruction manual may cause harmful
interference to radio communications. However, there is no guarantee that interference will
not occur in a particular installation. If this equipment does cause harmful interference to
radio or television reception, which can be determined by turning the equipment off and on,
the user is encouraged to try to correct the interference by one or more of the following
measures:
Reorient or relocate the receiving antenna.
Increase the separation between the equipment and receiver.
Connect the equipment into an outlet on a circuit different from that to which the receiver
is connected.
Consult the dealer or an experienced radio TV technician for help.
Notice: The changes or modifications not expressly approved by the party responsible for
compliance could void the user’s authority to operate the equivalent.
VCCI Statement
B
VCCI - B
KCC Statement
B ( )
(B ) ,
.
Page 5
Notices iii
Safety Warnings
1. The XCubeNAS can operate normally in the temperature of 0ºC~40ºC (31.99 ~
103.99°F). Please make sure the environment is well-ventilated.
2. The power cord and devices connected to the XCubeNAS must provide a correct supply
voltage (100-127V~/ 4A, 50-60Hz, 200-240V~/ 2A, 50-60Hz).
3. Do not place the XCubeNAS in direct sunlight or near chemicals. Make sure the
temperature and humidity of the environment are in the optimized level.
4. Place the product right side up at all times.
5. Unplug the power cord and all connected cables before cleaning. Wipe the XCubeNAS
with a dry towel. Do not use chemical or aerosol to clean the NAS.
6. Do not place any objects on the XCubeNAS for the server’s normal operation and to avoid
overheat.
7. Use the screws provided in the product package to lock the hard disks in the XCubeNAS
when installing hard disks for proper operation.
8. Do not place the XCubeNAS near any liquid.
9. Do not place the XCubeNAS on any uneven surface to avoid falling off and damage.
10. Do no place the XCubeNAS on the ground and do not step on the system to prevent any
potential damages.
11. Make sure the voltage is correct in the location where the XCubeNAS is installed. Contact
the distributor or the local power supply company for the information.
12. Do not place any object on the power cord.
13. Do not attempt to repair the XCubeNAS in any occasions. Improper disassembly of the
product may expose the users to electric shock or other risks. For any inquiries, please
contact the distributor.
CAUTION: (English)
Replacing incorrect type of battery will have the risk of explosion. Please
replace the same or equivalent type battery use and dispose of used
batteries appropriately.
INFORMATION:
QSAN provides a limited warranty for QSAN-branded hardware products:
System hardware and peripheral product (s): 2 years limited warranty
from date of original purchase.
For more detail warranty policy, please refer to QSAN official website:
https://www.qsan.com/en/warranty.php
Page 6

iv © Copyright 2017 QSAN Technology, Inc. All Right Reserved.
Table of Contents
Notices ........................................................................................................................................... i
Regulatory Statements .................................................................................................................... i
Safety Warnings .............................................................................................................................. iii
Preface .......................................................................................................................................... 1
About This Manual .......................................................................................................................... 1
Related Documents ......................................................................................................................... 1
Technical Support ........................................................................................................................... 2
Information, Tip and Caution .......................................................................................................... 2
Conventions ..................................................................................................................................... 3
1. Overview ............................................................................................................................... 4
1.1. Package Contents .................................................................................................................. 4
1.2. XN5004T Product Overview ................................................................................................... 5
2. Hardware Overview ............................................................................................................. 6
2.1. Front and Rear Panel .............................................................................................................. 6
2.2. System Disk Drive Numbering ............................................................................................... 7
2.3. Disk Drive Form Factors ......................................................................................................... 8
3. Install the System Hardware .............................................................................................. 9
3.1. Install the Disk Drive in the Tray ............................................................................................ 9
3.2. Upgrade Memory .................................................................................................................. 16
3.3. Install the Optional Adapter Card ........................................................................................ 18
3.4. Connect the System to the Host .......................................................................................... 22
3.5. Start Up Your System ........................................................................................................... 24
4. Discover and Install QSM .................................................................................................. 26
5. Restart/Shutdown/Logout QSM ...................................................................................... 29
6. Reset to Default ................................................................................................................. 31
7. LED Indicator Table ........................................................................................................... 34
8. Buzzer Indicator Table ...................................................................................................... 37
9. Support and Other Resources .......................................................................................... 38
9.1. Getting Technical Support ................................................................................................... 38
9.2. Documentation Feedback .................................................................................................... 39
Appendix ..................................................................................................................................... 40
End-User License Agreement (EULA) .......................................................................................... 40
Recommended Optional Module List .......................................................................................... 43
Page 7
1
Preface
About This Manual
This manual provides technical guidance for designing and implementing QSAN XN5004T
system, and it is intended for use by system administrators, NAS designers, storage
consultants, or anyone who has purchased this product and is familiar with server and
computer network, network administration, storage system installation and configuration,
network attached storage management and relevant protocols.
CAUTION:
Do NOT attempt to service, change, disassemble or upgrade the
equipment’s components by yourself. Doing so may violate your warranty
and expose you to electric shock. Refer all servicing to authorized service
personnel. Please always follow the instructions in this owner’s manual.
Related Documents
There are related documents which can be downloaded from the website.
XCubeNAS QIG (Quick Installation Guide): https://www.qsan.com/en/download.php
Compatibility Matrix: https://www.qsan.com/en/download.php
XCubeNAS QSM 3.0 user manual: https://www.qsan.com/en/download.php
Online FAQ: https://www.qsan.com/en/faq.php
White Papers: https://www.qsan.com/en/download.php
Application Notes: https://www.qsan.com/en/download.php
Page 8
2 © Copyright 2017 QSAN Technology, Inc. All Right Reserved.
Technical Support
Do you have any questions or need help troubleshooting a problem? Please contact QSAN
Support, we will reply to you as soon as possible.
Via the Web: http://www.qsan.com/en/contact_support.php
Via Telephone: +886-2-7720-2118 extension 136
(Service hours: 09:30 - 18:00, Monday - Friday, UTC+8)
Via Skype Chat, Skype ID: qsan.support
(Service hours: 09:30 - 02:00, Monday - Friday, UTC+8, Summertime: 09:30 - 01:00)
Via Email: support@qsan.com
Information, Tip and Caution
This manual uses the following symbols to draw attention to important safety and
operational information.
INFORMATION:
INFORMATION provides useful knowledge, definition, or terminology for
reference.
TIP:
TIP provides helpful suggestions for performing tasks more effectively.
CAUTION:
CAUTION indicates that failure to take a specified action could result in
damage to the system.
Page 9

3
Conventions
The following table describes the typographic conventions used in this manual.
Conventions
Description
Bold
Indicates text on a window, other than the window title, including
menus, menu options, buttons, fields, and labels.
Example: Click the OK button.
<Italic>
Indicates a variable, which is a placeholder for actual text provided
by the user or system.
Example: copy <source-file> <target-file>.
[ ] square
brackets
Indicates optional values.
Example: [ a | b ] indicates that you can choose a, b, or nothing.
{ } braces
Indicates required or expected values.
Example: { a | b } indicates that you must choose either a or b.
| vertical bar
Indicates that you have a choice between two or more options or
arguments.
/ Slash
Indicates all options or arguments.
underline
Indicates the default value.
Example: [ a | b ]
Page 10
4 © Copyright 2017 QSAN Technology, Inc. All Right Reserved.
1. Overview
Thank you for purchasing QSAN XN5004T. The QSAN XN5004T is a high-performance
storage solution that features high availability, reliability, flexibility and easy management.
Before setting up your new XN5004T, please check the package contents to verify those
items below. Besides, make sure to read the safety instructions carefully.
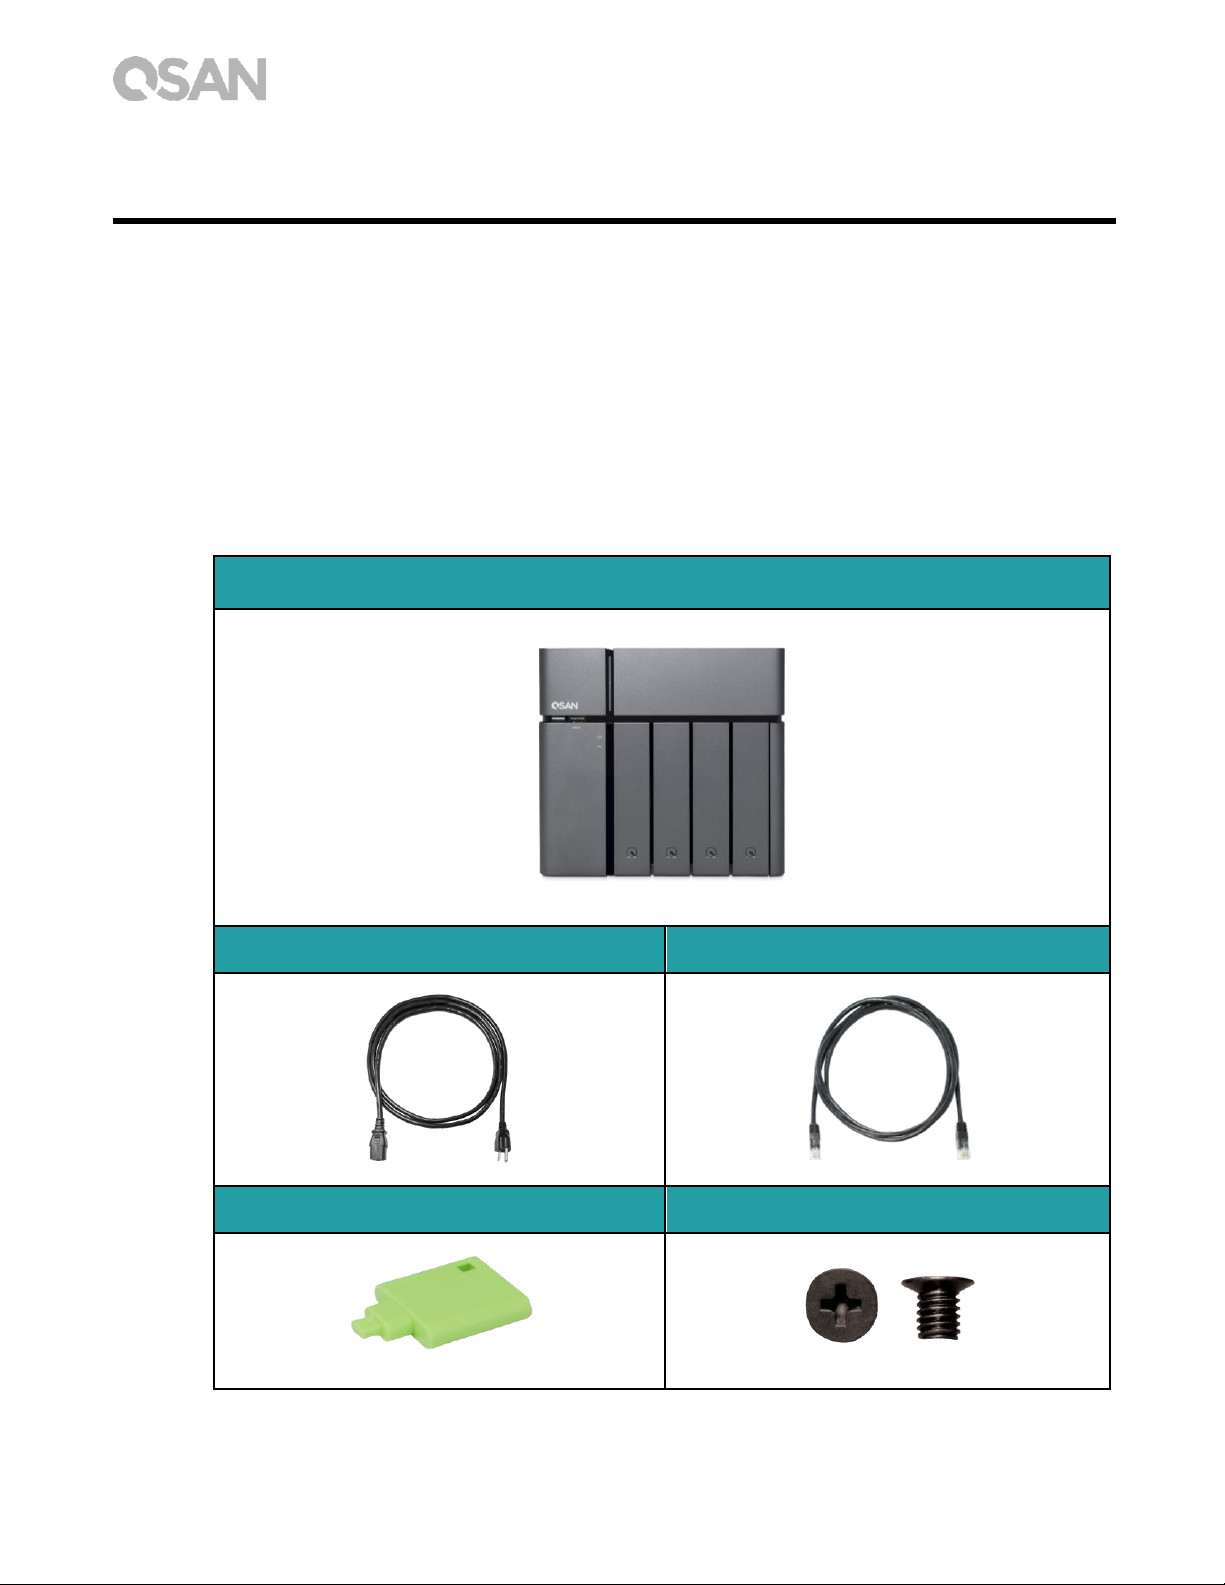
1.1. Package Contents
Main Unit x1
AC Power cord x1
RJ45 Cable x2
Lock Key x1
Screws for 2.5’’ Drives x16
Page 11
5
1.2. XN5004T Product Overview
QSAN XN5004T is a simple, solid and stylish storage device, the device is composed of
system hardware and the QSM operating system. The system hardware specifies
breakthrough 4+1(3.5’’ LFF x4 + 2.5’’ SFF x1) design that can benefit every workgroup and
SMB user. Following is the feature list of XN5004T:
4+1 (3.5’’ LFF x4 + 2.5’’ SFF
2
x1) exclusive design.
With Intel
®
Celeron® 2.9GHz Dual-Core Processor.
8GB DDR4 SO-DIMM RAM that can be expanded up to 32GB.
Built-in 1GbE Ethernet LAN ports x4.
Exclusive service door for a memory upgrade.
Screw-less design for HDD / SSD installation.
Following tables are hardware specifications of XN5004T.
Model Name
XN5004T
Form Factor
Tower, 4bay (LFF)+1 (SFF)
CPU
Intel® Celeron® 2.9GHz Dual-Core Processor
RAM
8GB DDR4 SO-DIMM (Max 32GB)
Note: The pre-install memory modules may need to be replaced when
expanding the memory.
USB
USB 3.0 x5 (Front x1, Rear x4)
Flash
8GB USB DOM
HDMI
1
Tray type
3.5’’ HDD tray with key lock x4
2.5’’ SSD tray x1
No. of Internal Hard Disks
4 (LFF disk) + 1 (SFF disk)
Max. Raw Capacity
10TB x4 + 2TB = 42 TB (LFF=10TB, SFF= 2TB)
Hard Drive Interface
SATA 6Gb/s (backward compatible with SATA 3Gb/s)
Expansion Slot
PCIe Gen3 x8 for 10 GbE / 40 GbE / Thunderbolt 3.0 adapter card
Ethernet Ports
1GbE LAN (RJ45) x4
PSU
FLEX ATX 200W
Dimension (H x W x D) mm
177 x 190 x 235
Agency Certifications
FCC Class B • CE Class B • BSMI Class B • VCCI Class B •
RCM Class B • KCC Class B
Note: Model specifications are subject to change without notice. Please refer to http://www.qsan.com for the latest information.
LFF : Large Form Factor / 3.5” disk drive
2
SFF : Small Form Factor / 2.5” disk drive
Page 12
6 © Copyright 2017 QSAN Technology, Inc. All Right Reserved.
2. Hardware Overview
This chapter outlines the key hardware components of the XN5004T system. After reading this
chapter, you will have a basic understanding of each XN5004T hardware component and give you
the ability to configure and operate your system successfully. Following is the key components of
XN5004T:
Front and Rear Panel
System Disk Drive Numbering
Disk Drive Form Factors
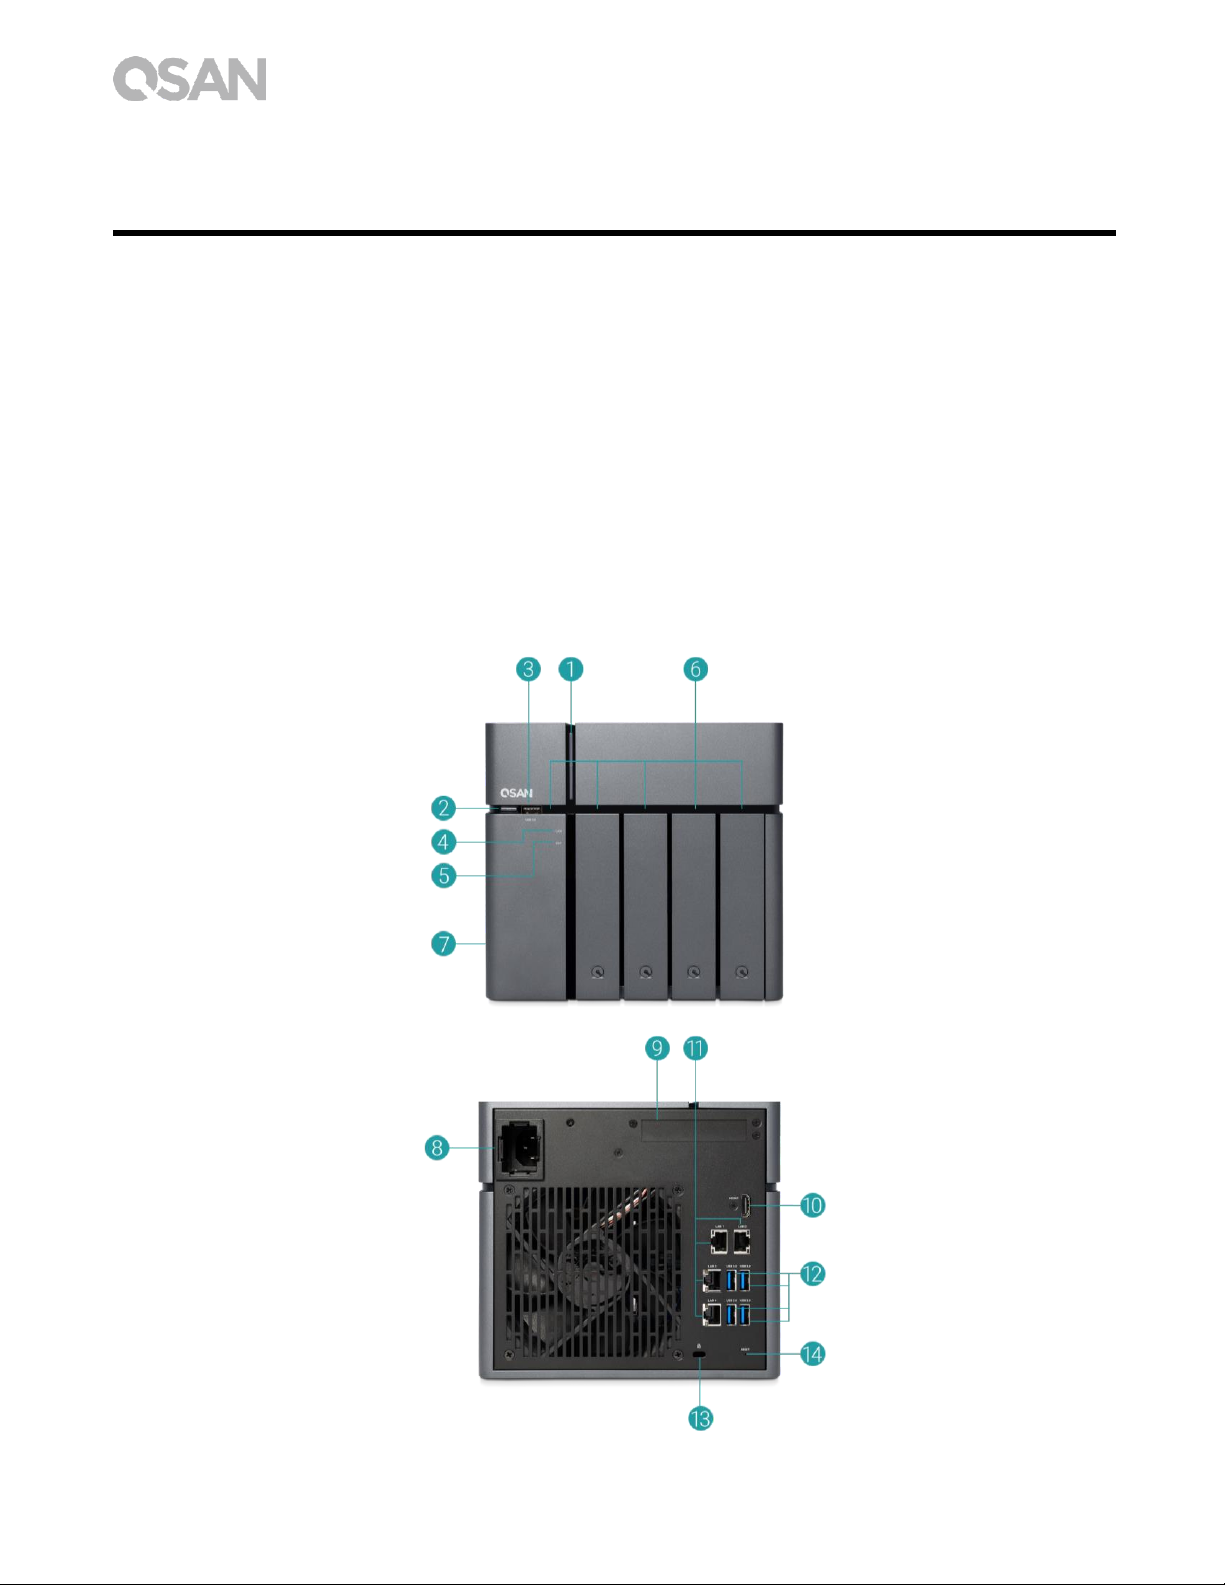
2.1. Front and Rear Panel
The figure below contains the information about buttons and indicators modules.
Page 13
7
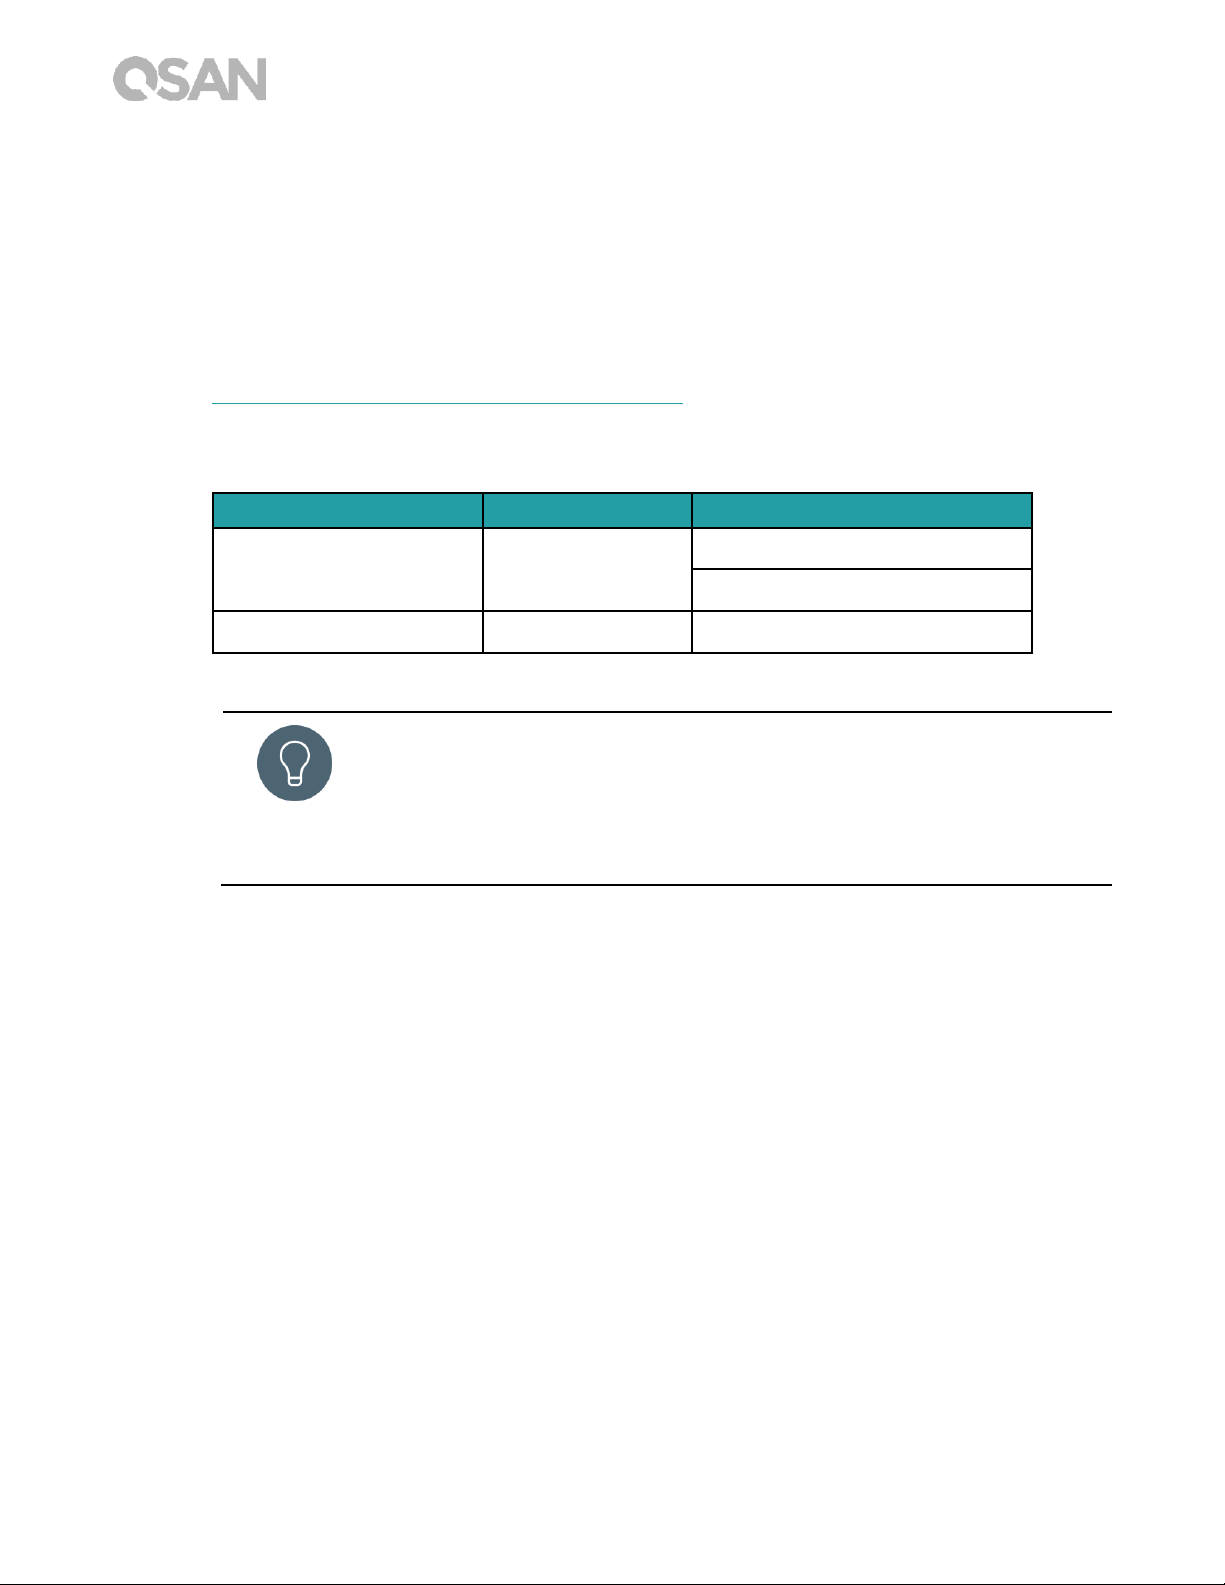
Table 2-1 Descriptions of System Controls and Indicators.
For a better understanding of the related colors and behaviors of each indicator on the front
panel, please refer to the chapter 7. LED Indicator Table section.
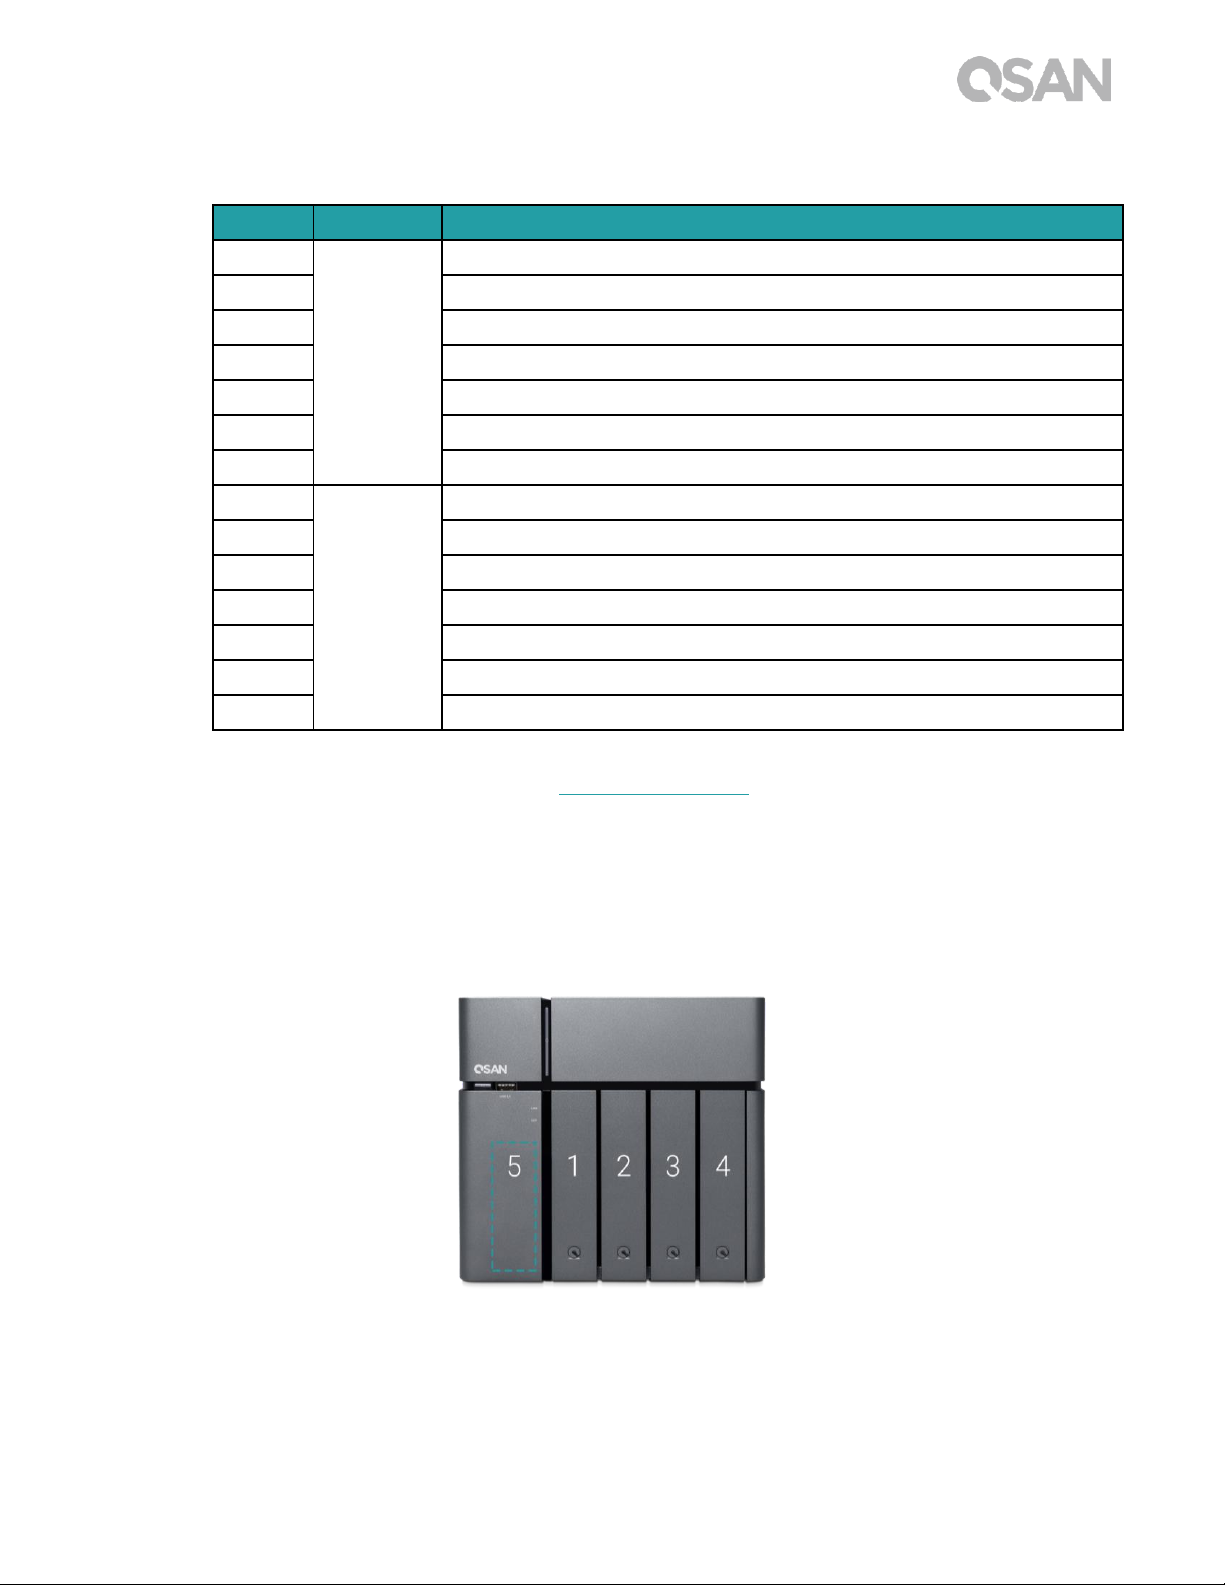
2.2. System Disk Drive Numbering
The figure illustrates the XN5004T system disk drive numbering.
Number
Location
Description
1
Front
Power button / LED Indicator for Power and System Status
2
USB copy button / LED Indicator for USB Status
3
USB 3.0 Port
4
LED Indicator for LAN Status
5
LED Indicator for Expansion Unit Status
6
LED Indicator for HDD and SSD Status
7
Service Door
8
Back
Power Port
9
Additional PCIe Slot for Expansion (Gen3 x 8)
10
HDMI Port
11
Gigabit LAN Port
12
USB 3.0 Port
13
Kensington Lock
14
Reset to Factory Default Button
Page 14
8 © Copyright 2017 QSAN Technology, Inc. All Right Reserved.
2.3. Disk Drive Form Factors
QSAN has tested and approved the popular SATA HDDs and SSD models available on the
market, you have the highest flexibility to choose the most advanced HDDs or SSD available
from the manufacturers or purchase the best cost/performance SATA HDDs or SSD from
the market, it will significantly reduce your IT infrastructure investment cost. Please refer to
the following website for the compatibility of HDD and SSD:
https://www.qsan.com/en/download.php?cid=5
Table 2-2 Supported Disk Drive Types
Form Factor
Number of Trays
Supported Drive Type
Type1: 3.5” LFF Tray
4
3.5’’/2.5’’ SATA HDD
2.5’’ SATA SSD
Type2: 2.5” SFF Tray
1
2.5’’ SATA SSD
TIP:
1. 2.5” SATA drives can also be installed on 3.5” LFF trays.
2. If you would like to maximize volume space with RAID being set, we
recommend that all your installed drives be the same size.
Page 15
9
3. Install the System Hardware
This chapter will show you the procedure of the XCubeNAS hardware installation and initial
configuration.
3.1. Install the Disk Drive in the Tray
3.1.1. Tools and Parts for Drive Installation
At least one 3.5” or 2.5” SATA drive (please visit www.qsan.com for compatible drive
models).
A screwdriver (Phillips #1, for installing 2.5” SATA drive on LFF only).
CAUTION:
Please ensure that there is no data on the disk to prevent important data
being formatted
3.1.2. Install the Disk Drive (LFF)
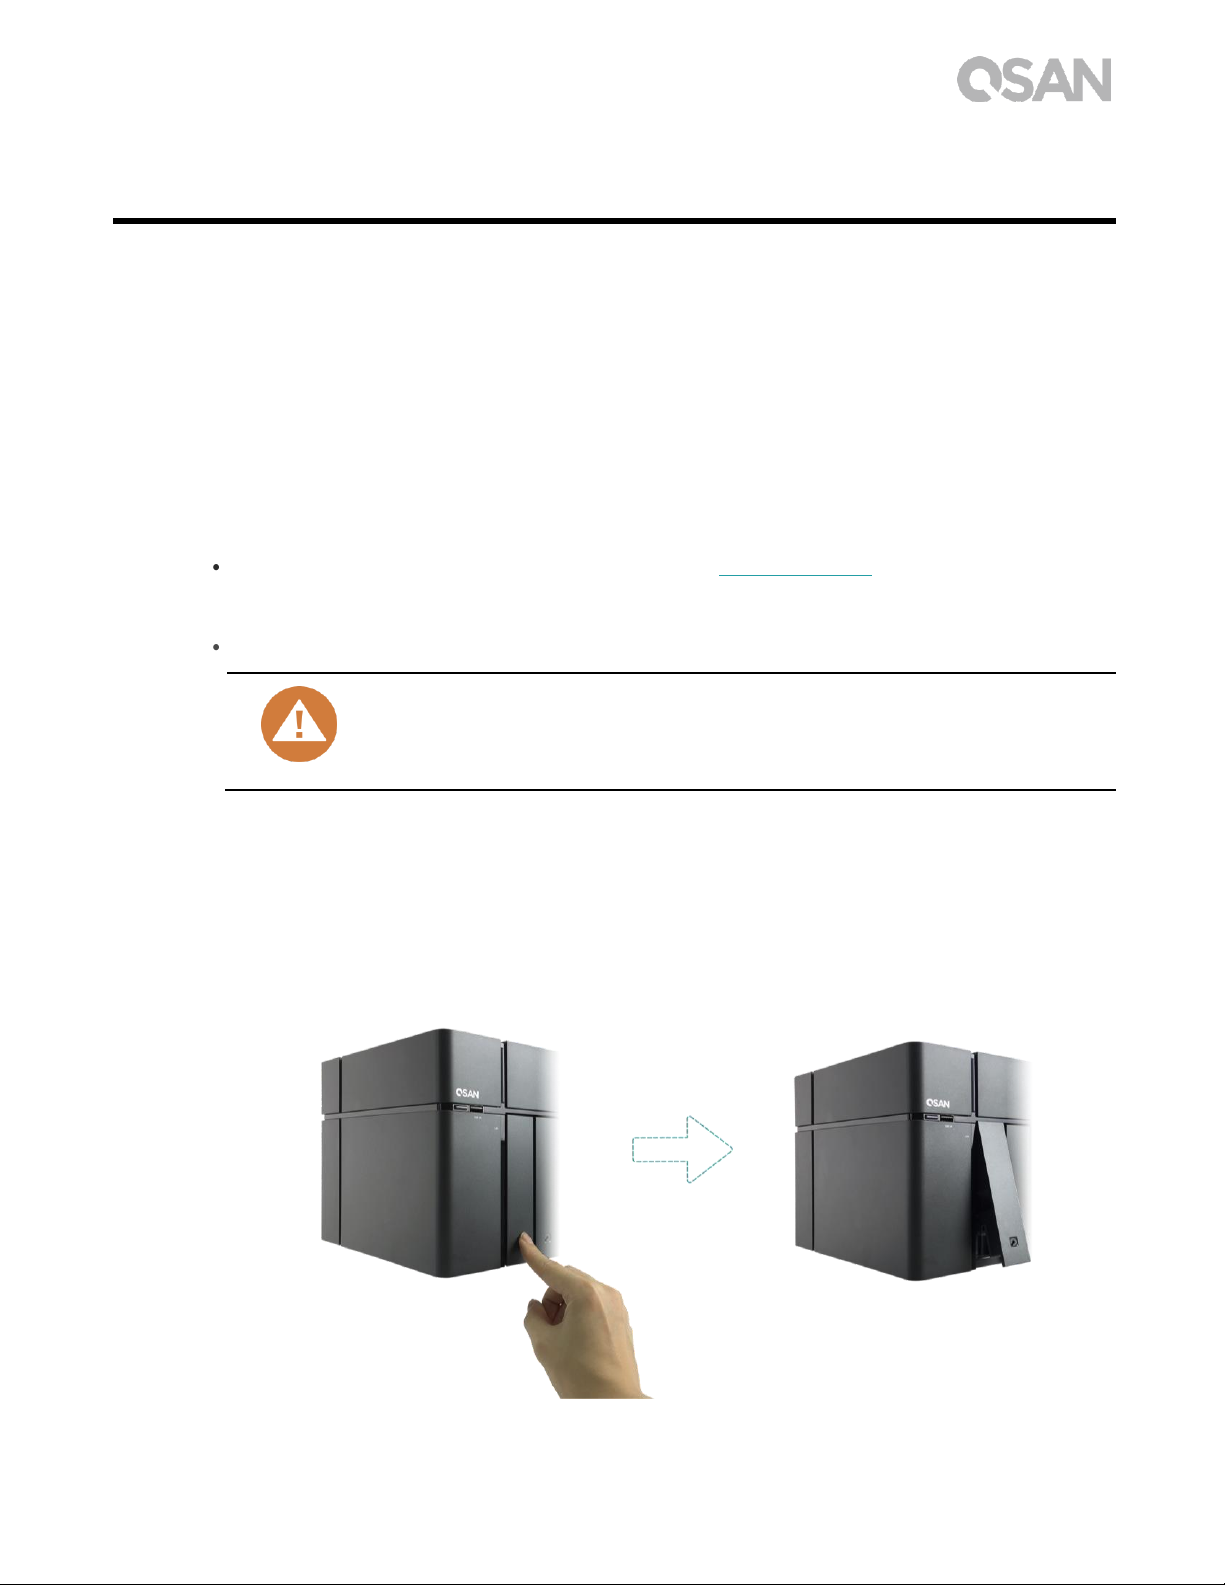
1. Open the drive tray.
① Push to release the carrier handle.
Page 16
10 © Copyright 2017 QSAN Technology, Inc. All Right Reserved.
② Hold the carrier handle and pull out the disk drive tray, repeat the steps above to
remove other disk drive tray.
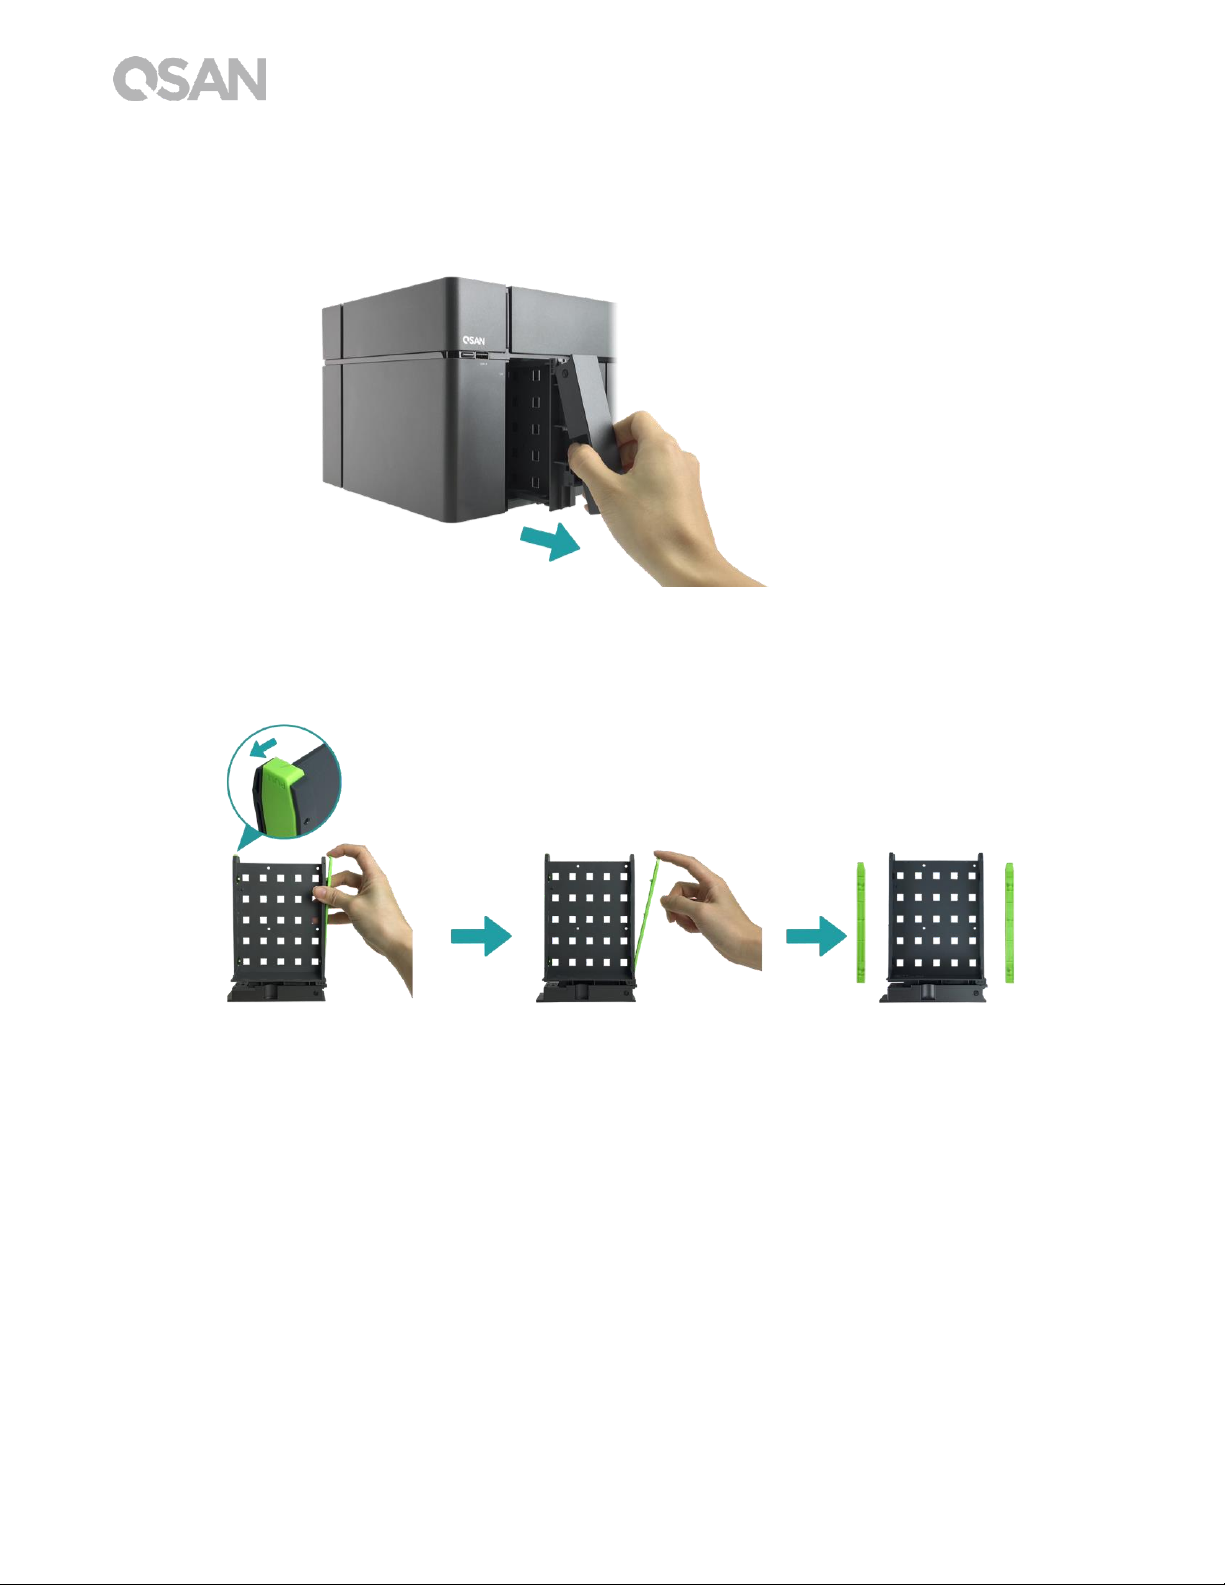
2. Install a 3.5’’ HDD into a LFF tray.
① Remove both brackets from each side of the tray by following the arrow direction
shown on the bracket (please see the figure below).
Page 17
11
② Place the drive on the tray and clip-in both brackets to tighten the disk drive to the
tray.
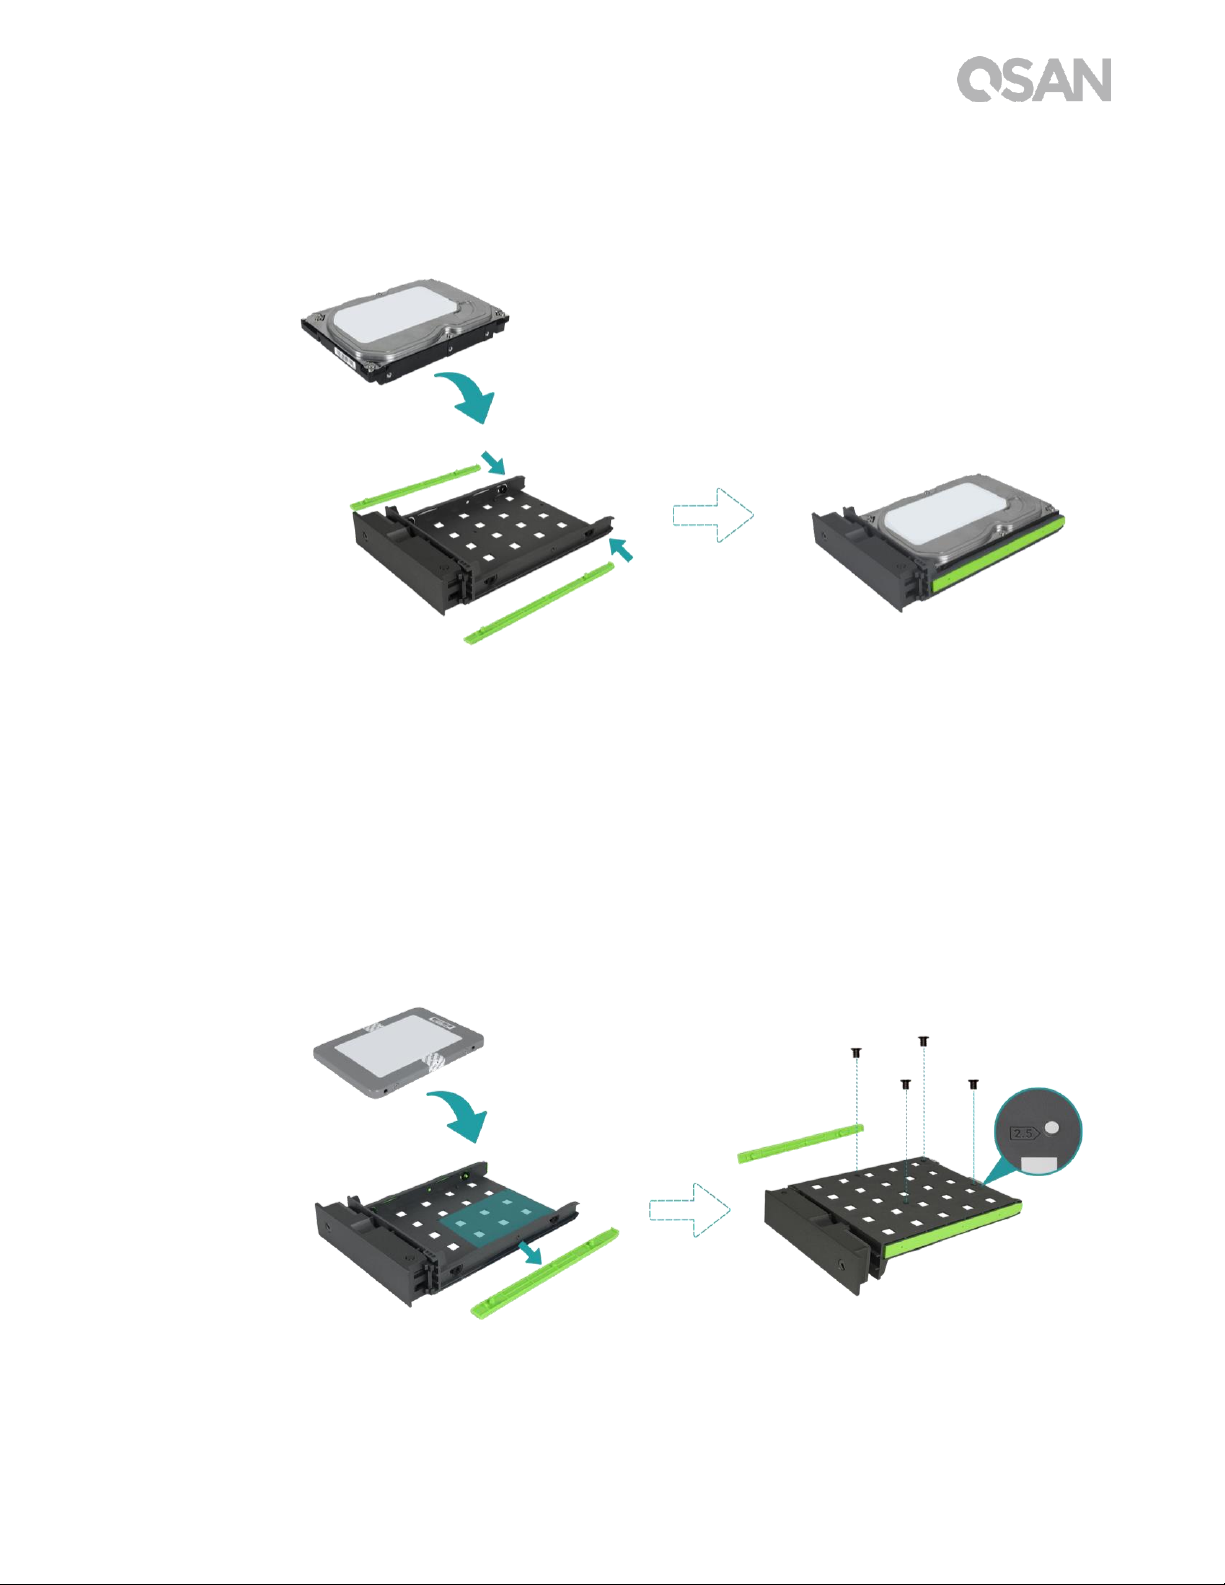
3. Install a 2.5’’ SSD into a LFF tray.
① Only remove the bracket next to the 2.5” screw holes (they are marked on the
bottom of the tray).
② Place the drive in the blue area (shown below) of the tray.
③ Turn the tray upside down and secure the drive from the bottom of the tray with four
screws provided in the accessory box.
Page 18

12 © Copyright 2017 QSAN Technology, Inc. All Right Reserved.
4. Install a LFF tray into the XCubeNAS.
① Insert the loaded drive tray into the empty drive bay all the way to the bottom until
the carrier handle can be closed.
TIP:
Make sure the tray is pushed in all the way, otherwise the drive might not
function properly.
5. Repeat the steps above to install all prepared drives.
6. Lock/unlock the LFF tray.
① Use the key provided in the accessory box to lock/unlock the carrier handle lock.
Page 19

13
3.1.3. Install the Disk Drive (SFF)
1. Open the service door and pull out a SFF tray.
① Use the key provided in the accessory box to press the door button.
② Remove the service door.
Page 20

14 © Copyright 2017 QSAN Technology, Inc. All Right Reserved.
2. Install a 2.5’’ SSD into a SFF tray.
① Hold down the release button and pull out the disk drive tray from the XCubeNAS.
② Follow the mark shown on the side of the SFF tray and place the SSD with its label
side facing accordingly.
③ Secure the disk drive by making sure the four pins on the side of the SFF tray is
clutched to the disk drive.
Page 21

15
3. Install a SFF tray into the system.
① Insert the loaded drive tray into the empty drive bay all the way to the bottom until
you hear a “click” sound.
4. Close the service door.
① Follow the steps below by closing the service door from the front.
② Once the door is clutched to the front of the NAS, close the door until you hear a
“click” sound.
Page 22

16 © Copyright 2017 QSAN Technology, Inc. All Right Reserved.
3.2. Upgrade Memory
CAUTION:
The following instructions should only be performed by an authorized
and trained technician. Strictly adhere to the instructions to install a
RAM module on the NAS.
Before you start, please ensure that you turn off the NAS, disconnect
the power adapter, network cable(s), and also remove any other
device/cable that is attached to the NAS.
XN5004T is installed with two 4GB DDR4 memory module by default, dual channel
performance is also supported. In order to achieve dual-channel RAM performance, it is
suggested that you install memory modules with the same capacity in pairs. If you want to
expand the memory capacity, please follow the steps as illustrated below:
1. Shutdown your XCubeNAS and disconnect power adapter, network cable(s) or any other
device/cable that is attached to your system to prevent any possible damages.
2. Use the key provided in the accessory box to press the door button and remove the
service door.
3. Remove existing memory module(s).
① Push the retaining clips on each side of the slot, the existing memory module will
pop out from the slot.
② Take out the memory module.
Page 23

17
4. Installing the memory module.
① Align the notch on the gold edge of the module.
② Slide the memory module into the slot at a 45-degree angle. Press the memory
module down until it clips into place. Ensure the memory module sits properly with
the retention clips in place.
The following table is the suggested installation combination for memory.
Table 3-1 The Suggested Installation Combination for Memory
Slot #1
Slot #2
Total Memory
4GB
4GB
8GB (Default)
8GB
8GB
16GB
16GB
-
16GB
16GB
16GB
32GB
CAUTION:
To ensure the system stability, you MUST install genuine QSAN memory
modules for system memory size expansion.
INFORMATION:
(1) If you want to purchase the optional memory, please contact your
nearest local reseller or visit QSAN official website:
https://qsan.com/location
(2) See the recommended memory module on Appendix: Recommended
Optional Module List
Page 24

18 © Copyright 2017 QSAN Technology, Inc. All Right Reserved.
3.3. Install the Optional Adapter Card
CAUTION:
This section is for QSAN authorised partners (including distributors,
resellers and systems integrators) ONLY. Warrently may void if the
warrently label is broken. If you would like to purchase optional adapter
cards and have it installed, please contact local QSAN authorised
partners, or QSAN support for detailed information.
XCubeNAS supports a PCIe Gen 3x8 add-on adapter cards that demand high bandwidth and
capacity expansion. To install the adapter card, please follow the steps as illustrated below:
1. Prepare a Phillips #1 screwdriver.
2. Shutdown your XCubeNAS and disconnect power adapter, network cable(s) or any other
device/cable that is attached to your system to prevent any possible damages. Place
your XCubeNAS on a flat and stable surface to prevent scratches.
3. Please refer to chapter 3.1 to remove the service door, SFF tray, and all the drive trays.
4. Removing screws and the top cover.
① Turn your XCubeNAS upside down and remove two screws below the top cover,
shown in the figure below.
② Remove the screws on the back of the XCubeNAS.
Page 25

19
③ Slide to remove the top cover, put the cover aside.
5. Removing the power supply.
① Remove the screw securing the power supply on the back of the XCubeNAS.
② Remove the screws on the power supply.
Page 26

20 © Copyright 2017 QSAN Technology, Inc. All Right Reserved.
③ Slide to remove the power supply.
6. Remove the two expansion slot cover screws.
7. Align and insert the card connector into the expansion slot.
Page 27
21
CAUTION:
Make sure the connector is fully inserted. Otherwise, the network
expansion card might not be able to function properly.
8. Tighten the screws that you removed in step 5 and 6 to secure the newly inserted card.
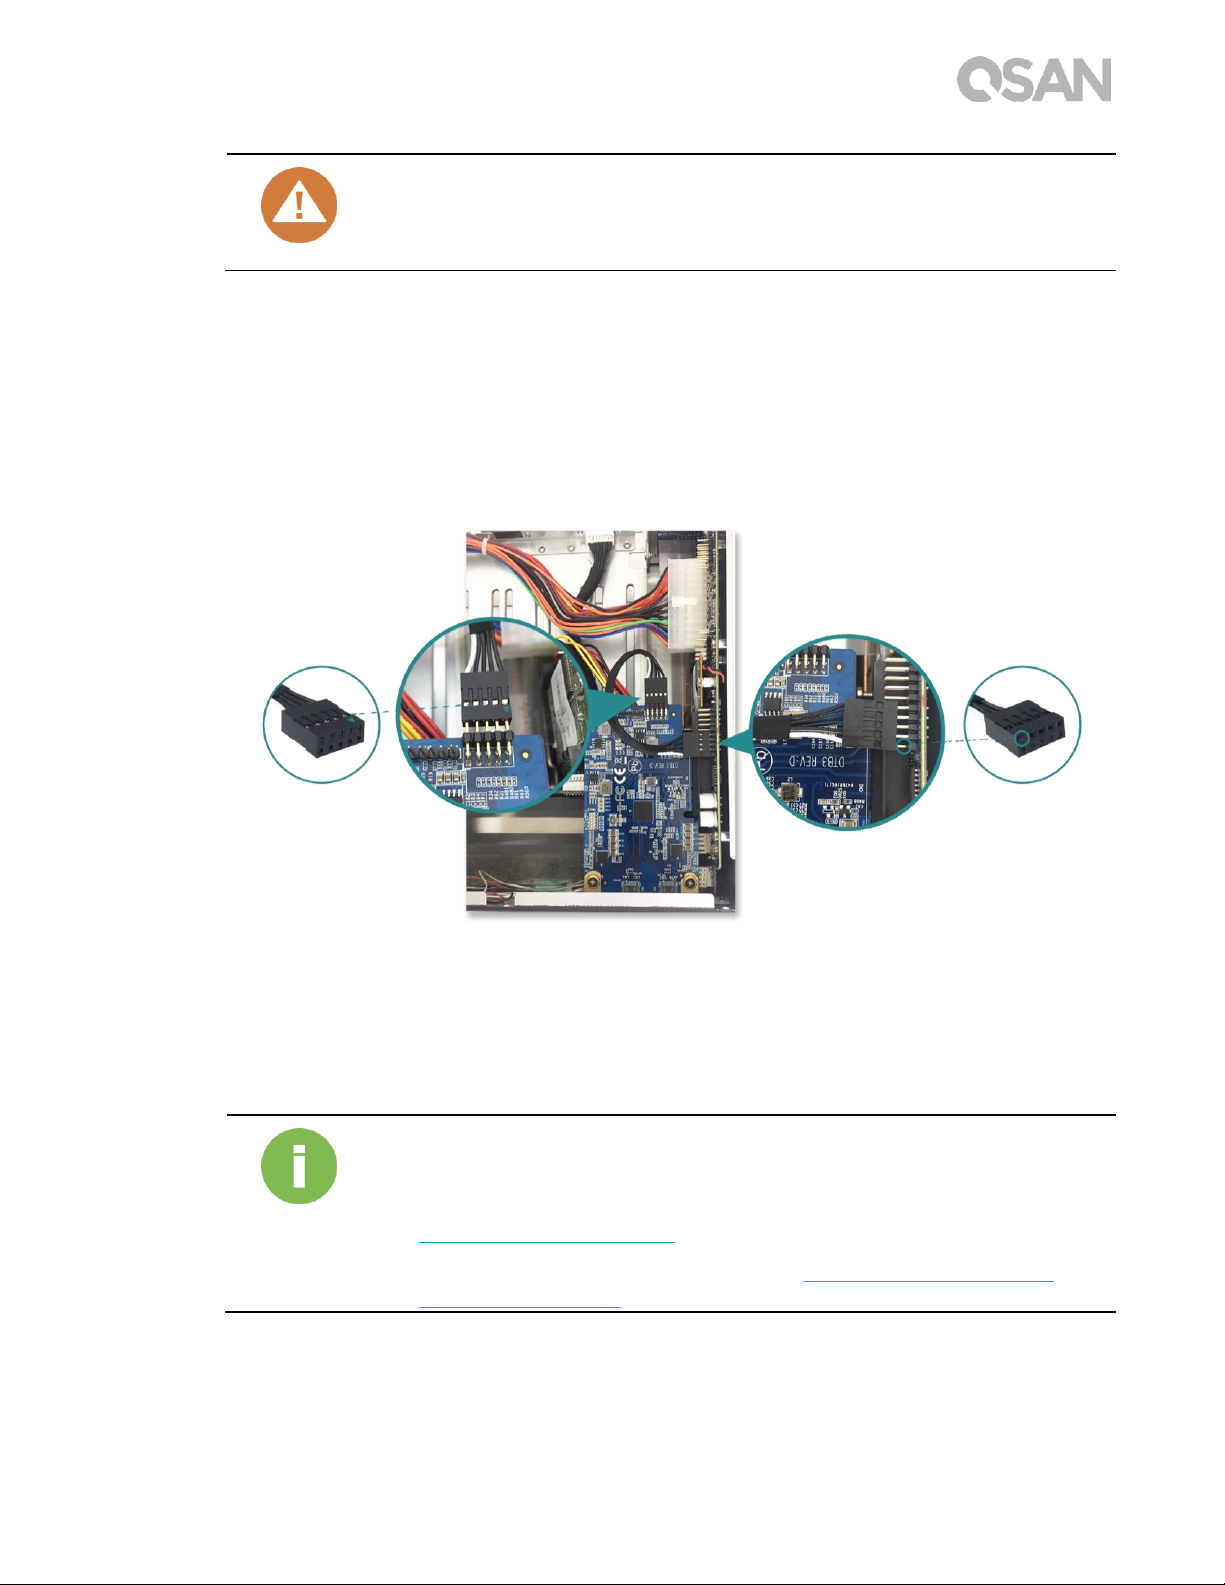
9. For thunderbolt 3.0 adapter card only, connect the cable from the adapter card to the
mainboard.
① Align the connectors. Please make sure that the position is the same as the figure
shown below.
② Push to connect the cable and the connectors.
10. Slide to put back the top cover you removed in step 4, put back and tighten the screw on
the XCubeNAS.
INFORMATION:
(1) If you want to purchase the optional adapter card, please contact your
nearest local reseller or visit QSAN official website:
https://qsan.com/location
(2) See the recommended adapter card on Appendix: Recommended
Optional Module List
Page 28

22 © Copyright 2017 QSAN Technology, Inc. All Right Reserved.
3.4. Connect the System to the Host
XN5004T has four onboard 1Gbps LAN ports for host connections. You can learn more
about the path configuration in cabling for the XN5004T by following images:
a. One LAN connection
Page 29

23
b. Multiple LAN connections
c. Direct attachment
Page 30

24 © Copyright 2017 QSAN Technology, Inc. All Right Reserved.
3.5. Start Up Your System
Before you power on your XCubeNAS for the first time, please make sure the following tasks
are done:
1. Connect one end of each power cord to the power ports located on the back of the
XCubeNAS and the other end to a power outlet.
2. Connect at least one LAN cable to one of the LAN ports and the other end to your
switch, router, or hub.
3. Press the power button to turn on your XCubeNAS.
Your XCubeNAS is now online and detectable from a network computer.
Page 31

25
INFORMATION:
The power cord rating is the minimum requirement. The rating of the
power cord that you purchase must equal to or be higher than the
minimum requirement to ensure the system safety and reliability.
INFORMATION:
The Following are the operational conditions for XN5004T:
Temperature:
Operating temperature 0 to 40°C
Shipping temperature -10°C to 50°C
Relative Humidity:
Operating Relative Humidity 20% to 80% non-condensing
Non-Operating Relative Humidity 10% to 90%
Page 32
26 © Copyright 2017 QSAN Technology, Inc. All Right Reserved.
4. Discover and Install QSM
After hardware setup is finished, the next step is to discover the system on the network and
start the initial configuration. To discover and install the QSAN Storage Manager (QSM),
please follow the steps below:
1. Power on the XCubeNAS.
2. Open a web browser on your computer connected to the same local area network as
XCubeNAS, and use either of the following methods on the browser:
a. Use Web Finder: find.qsan.com (Please make sure the XCubeNAS has internet
access ability before using the Web Finder.)
b. If your XCubeNAS cannot be connected to the internet, please try downloading and
installing XFinder application from the QSAN website to your PC:
https://www.qsan.com/zh-tw/download.php
Page 33

27
3. Click “Connect” on the web Finder or double click on your XCubeNAS on the XFinder, the
welcome page will be launched on your web browser.
4. Click Quick Setup or Custom Setup to start the setup process and follow the onscreen
instructions.
Page 34
28 © Copyright 2017 QSAN Technology, Inc. All Right Reserved.
5. If you accidentally leave the quick install page, you can always return to the setup page
by go through the steps above from step 1 again.
6. After quick setup is finished, login to the QSM as “admin” (default account name) with
the password you set on former instructions.
INFORMATION:
1. The XCubeNAS must be connected to the Internet to install QSM with
Web Finder.
2. Both the XCubeNAS and your PC must be on the same local network.
3. If you cannot find your XCubeNAS, the default IP address for LAN 1 is
169.254.1.234.
4. If you expanded your memory earlier on, you can now check to make
sure the system recognizes the new memory capacity. You can check the
status by following steps:
a. Login to QSM as admin or a user belongs to the administrator’s
group.
b. Find the memory status in Monitor app Hardware.
If your system cannot recognize the expanded memory or failed to start
up, please check again and ensure the memory is properly installed.
Page 35

29
5. Restart/Shutdown/Logout QSM
If you want to restart, shutdown or log out QSM, please follow the steps below:
1. To restart or shutdown QSM, please click on the QSAN logo on the top left corner, then
choose the option which you would like to proceed. Click Yes button on the confirm
window.
Page 36

30 © Copyright 2017 QSAN Technology, Inc. All Right Reserved.
2. To log out QSM, please click User Profile on the top right corner, then choose Logout.
Click Yes button on the confirm window.
Page 37

31
6. Reset to Default
If you want to reset XCubeNAS to factory default, there are several options to choose from.
Please follow the steps below:
Reset to default by using the reset button on the back of XCubeNAS:
1. Reset network settings: Press and hold the reset button on the rear panel for 3 seconds,
a short beep sound for 1 second will be heard. The administrator password and all the
network settings will be reset, the system configuration will result in:
▪ Reset Admin password to the default value: 1234.
▪ All networking set to "DHCP".
▪ All data service ports set to default setting (All data service enable and set to
default port).
▪ VLAN will be terminated.
▪ Vswitch will be deleted.
▪ Port trunking will be disabling.
▪ After configs are deleted, restart the XCubeNAS.
▪ Log out QSAN Cloud.
▪ DNS settings.
▪ DDNS and UPNP settings.
Page 38

32 © Copyright 2017 QSAN Technology, Inc. All Right Reserved.
2. Reset all settings: Press and hold the reset button on the rear panel for 10 seconds, you
will hear a short beep sound at the third second and a long beep sound at the tenth
second. The operating system (including reset the administrator password and all the
network settings) will be reinstalled, the system configuration will result in:
▪ Reset all network settings to factory default.
▪ Reset all system settings to factory default.
▪ All accounts, groups, folder permission, and ACL are deleted.
▪ Access control lists are all deleted.
▪ All backup tasks are deleted.
▪ Cloud sync job delete.
▪ VPN settings are deleted.
▪ Web server setting are set to default.
▪ AntiVirus setting are deleted.
▪ SQL settings are set to default.
▪ Media Library index will be deleted.
▪ After configs are deleted, restart the XCubeNAS.
▪ Log out QSAN Cloud.
Reset to default through QSM:
You can also reset network setting or all the setting through QSM.
1. Please click Control Panel System Maintenance System Recovery. Choose the
option which you would like to proceed.
a. Reset network settings: The administrator password and all the network settings
will be reset.
b. Reset all settings to factory default: The operating system (including reset the
administrator password and all the network settings) will be reinstalled.
c. Reinitiate the system: All settings will return to factory default. The system config
and all data will be deleted. The system will restart automatically and return to
quick install page.
Page 39
33
2. Click the Reset Device button to proceed.
Page 40

34 © Copyright 2017 QSAN Technology, Inc. All Right Reserved.
7. LED Indicator Table
XN5004T features the button and indication module on both the front panel and the rear
panel. Please refer to the following content for definitions of LED behaviors.
Table 7-1 Descriptions of the System Controls and Indicators LEDs
Number
Description
Definition
1
USB One Touch
Copy Button/ USB
Status LED
USB Copy Button
Press the button one time to start the action defined
through UI (Note: USB one touch copy function
needs to be enabled through UI first)
USB Status LED
Blue: A front USB device is detected (after the
device is mounted).
Page 41
35
Blue flashes every 0.5 sec: 1) The USB device
(connected to the front USB port) is being
accessed. 2) The data is being copied to or from the
external USB or eSATA device.
OFF: No USB device is mounted.
2
Solid State Drive
(SSD) LED
Blue: The hard disk is attached.
Blue flashes: The disk data is being accessed.
Amber: A hard drive read/write error occurs.
Blue and Amber flashes alternatively: The hard disk
is being rebuilt or identify a specific disk drive.
OFF: No disk drive is inserted.
3
Power Button/LED
Power Button
Press the button one time to turn ON or OFF the
system power.
Keep pressing for 4 seconds to force turn OFF the
system power.
Power LED
White: power is ON.
White flashes every 0.5 sec: the system is at the
stage of starting up or shutting down, or the NAS is
not configured.
Amber: 1) The system pool has reached its full
capacity (100%). 2) The system pool is going to be
full (95%). 3) The system fan is out of function. 4) A
bad sector is detected on the hard disk drive or hard
disk failed. 5) One of the pool is in degraded readonly mode. 6) Hardware self-test error. e.g.
abnormal voltage, the temperature is at critical
high/low, any cooling fan module failed, any pool
failed.
White and Amber flash every 0.5 sec alternatively:
1) The system firmware is being updated. 2) RAID
rebuilding is in a process. 3) Software control LED
indicator.
Off: the system shutdown.
4
LAN Status LED
Blue: The NAS is connected to the network.
Blue flashes: The disk data is being accessed from
the network.
Page 42

36 © Copyright 2017 QSAN Technology, Inc. All Right Reserved.
5
Expansion Unit
Status LED
Blue: An expansion card is being accessed.
OFF: No expansion card is being accessed.
6
Disk Drive Status
LED
Blue: The hard disk is attached.
Blue flashes: The disk data is being accessed.
Amber: A hard drive read/write error occurs.
Blue and Amber flashes alternatively: The hard disk
is being rebuilt or identify a specific disk drive.
OFF: No disk drive is inserted.
7
LAN Port
Activity/Link:
Light OFF: No connection.
Light ON: Connected to the internet
Light flashes: when data is being accessed.
Speed:
Light OFF: Speed less than 10Mbps
Light ON: Connected to the internet
Page 43
37
8. Buzzer Indicator Table
Number
Beep Sound
No. of Times
Description
1
Short beep
(0.5 sec)
1
The XCubeNAS is ready (finish start up).
The XCubeNAS is being shut down
(software shutdown).
The system firmware has been updated.
Front USB start copy
Front USB finish copy
USB drive is removed
The user starts hard drive rebuilding.
2
Short beep
(0.5 sec)
3 times,
interval of 0.5
sec
The NAS data cannot be copied to the
external storage device from the front
USB port.
3
Long beep
(1.5 sec)
Beep until
event
finishes,
interval of 0.5
sec
1) The system pool has reached its full
capacity (100%). 2) The system pool is
going to be full (95%). 3) The system fan
is out of function. 4) A bad sector is
detected on the hard disk drive or hard
disk failed. 5) One of the pool is in
degraded mode. 6) Hardware self-test
error. e.g. PSU failed, abnormal voltage,
the temperature is at critical high/low,
any cooling fan module failed or
removed, any pool failed. 7) Remove hard
disk or solid state drive.
Note: If one event has triggered the beep sound, the next event will not trigger the beep
sound until the previous event has finished.
Note 2: The beep sound will not be triggered if buzzer function is disabled from the QSM.
You can check the error messages through the Notification Center on QSM.
Page 44

38 © Copyright 2017 QSAN Technology, Inc. All Right Reserved.
9. Support and Other Resources
9.1. Getting Technical Support
After installing your device, locate the serial number on the sticker located on the side of the
chassis and register your product at partner.qsan.com/ (End-User Registration). We
recommend registering your product in QSAN partner website for firmware updates,
document download, and latest news in eDM. To contact QSAN Support, please use the
following information.
1. Via the Web: http://www.qsan.com/en/contact_support.php
2. Via Telephone: +886-2-7720-2118 extension 136
(Service hours: 09:30 - 18:00, Monday - Friday, UTC+8)
3. Via Skype Chat, Skype ID: qsan.support
(Service hours: 09:30 - 02:00, Monday - Friday, UTC+8, Summertime: 09:30 - 01:00)
4. Via Email: support@qsan.com
Collect Information for Analysis
1. Product name, model or version, and serial number
2. Firmware version
3. Error messages or screenshot images
4. Product-specific reports and logs
5. Add-on products or components installed
6. Third-party products or components installed
Information for Technical Support
The following system information is necessary for technical support, please refer to
following for what and where to get the information of your XN5004T model.
If the technical support requests you to download the service log, please navigate to the
QSM UI Control Panel System Maintenance Import/Export Export system
diagnosis report, and then click the Export button.
Page 45

39
9.2. Documentation Feedback
QSAN is committed to providing documentation that meets and exceeds your expectations.
To help us improve the documentation, email any errors, suggestions, or comments to
docsfeedback@qsan.com.
When submitting your feedback, including the document title, part number, revision, and
publication date located on the front cover of the document.
Page 46

40 © Copyright 2017 QSAN Technology, Inc. All Right Reserved.
Appendix
End-User License Agreement (EULA)
Please read this document carefully before you use our product or open the package
containing our product.
YOU AGREE TO ACCEPT TERMS OF THIS EULA BY USING OUR PRODUCT, OPENING THE
PACKAGE CONTAINING OUR PRODUCT OR INSTALLING THE SOFTWARE INTO OUR
PRODUCT. IF YOU DO NOT AGREE TO TERMS OF THIS EULA, YOU MAY RETURN THE
PRODUCT TO THE RESELLER WHERE YOU PURCHASED IT FOR A REFUND IN
ACCORDANCE WITH THE RESELLER'S APPLICABLE RETURN POLICY.
General
QSAN Technology, Inc. ("QSAN") is willing to grant you (“User”) a license of software,
firmware and/or other product sold, manufactured or offered by QSAN (“the Product”)
pursuant to this EULA.
License Grant
QSAN grants to User a personal, non-exclusive, non-transferable, non-distributable, nonassignable, non-sub-licensable license to install and use the Product pursuant to the terms
of this EULA. Any right beyond this EULA will not be granted.
Intellectual Property Right
Intellectual property rights relative to the Product are the property of QSAN or its licensor(s).
User will not acquire any intellectual property by this EULA.
License Limitations
The user may not, and may not authorize or permit any third party to (a) use the Product for
any purpose other than in connection with the Product or in a manner inconsistent with the
design or documentations of the Product; (b) license, distribute, lease, rent, lend, transfer,
assign or otherwise dispose of the Product or use the Product in any commercial hosted or
Page 47

Appendix 41
service bureau environment; (c) reverse engineer, decompile, disassemble or attempt to
discover the source code for or any trade secrets related to the Product, except and only to
the extent that such activity is expressly permitted by applicable law notwithstanding this
limitation; (d) adapt, modify, alter, translate or create any derivative works of the Licensed
Software; (e) remove, alter or obscure any copyright notice or other proprietary rights notice
on the Product; or (f) circumvent or attempt to circumvent any methods employed by QSAN
to control access to the components, features or functions of the Product.
Disclaimer
QSAN DISCLAIMS ALL WARRANTIES OF PRODUCT, INCLUDING BUT NOT LIMITED TO ANY
MERCHANTABILITY, FITNESS FOR A PARTICULAR PURPOSE, WORKMANLIKE EFFORT,
TITLE, AND NON-INFRINGEMENT. ALL PRODUCTS ARE PROVIDE “AS IS” WITHOUT
WARRANTY OF ANY KIND. QSAN MAKES NO WARRANTY THAT THE PRODUCT WILL BE
FREE OF BUGS, ERRORS, VIRUSES OR OTHER DEFECTS.
IN NO EVENT WILL QSAN BE LIABLE FOR THE COST OF COVER OR FOR ANY DIRECT,
INDIRECT, SPECIAL, PUNITIVE, INCIDENTAL, CONSEQUENTIAL OR SIMILAR DAMAGES OR
LIABILITIES WHATSOEVER (INCLUDING, BUT NOT LIMITED TO LOSS OF DATA,
INFORMATION, REVENUE, PROFIT OR BUSINESS) ARISING OUT OF OR RELATING TO THE
USE OR INABILITY TO USE THE PRODUCT OR OTHERWISE UNDER OR IN CONNECTION
WITH THIS EULA OR THE PRODUCT, WHETHER BASED ON CONTRACT, TORT (INCLUDING
NEGLIGENCE), STRICT LIABILITY OR OTHER THEORY EVEN IF QSAN HAS BEEN ADVISED
OF THE POSSIBILITY OF SUCH DAMAGES.
Limitation of Liability
IN ANY CASE, QSAN’S LIABILITY ARISING OUT OF OR IN CONNECTION WITH THIS EULA OR
THE PRODUCT WILL BE LIMITED TO THE TOTAL AMOUNT ACTUALLY AND ORIGINALLY
PAID BY CUSTOMER FOR THE PRODUCT. The foregoing Disclaimer and Limitation of
Liability will apply to the maximum extent permitted by applicable law. Some jurisdictions
do not allow the exclusion or limitation of incidental or consequential damages, so the
exclusions and limitations set forth above may not apply.
Termination
If User breaches any of its obligations under this EULA, QSAN may terminate this EULA and
take remedies available to QSAN immediately.
Page 48

42 © Copyright 2017 QSAN Technology, Inc. All Right Reserved.
Miscellaneous
QSAN reserves the right to modify this EULA.
QSAN reserves the right to renew the software or firmware anytime.
QSAN may assign its rights and obligations under this EULA to any third party without
condition.
This EULA will be binding upon and will inure to User’s successors and permitted
assigns.
This EULA shall be governed by and constructed according to the laws of R.O.C. Any
disputes arising from or in connection with this EULA, User agree to submit to the
jurisdiction of Taiwan Shilin district court as first instance trial.
Page 49

Appendix 43
Recommended Optional Module List
Model name
P/N
Product Name
DIM-SD44GB
92-DIMD404G-01
RAM - DDR4 4G SO-DIMM
DIM-SD48GB
92-DIMD408G-01
RAM - DDR4 8G SO-DIMM
XN-TB302
92-HCQTB3TC-20
Thunderbolt 3.0 Adapter Card
XN-E1002
92-HCQ10GS2-20
10GbE Ethernet Adapter Card
XN-E4002
92-HCQ40GQP-20
40GbE Ethernet Adapter Card
CBL-TB3
92-CBLTPCH0-50
Thunderbolt Cable
CBL-10SFP200
92-CBLCSPH2-00
10GbE Ethernet Cable
CBL-40QSFP200
92-CBLCQPH2-00
40GbE Ethernet Cable
GBC-SFP+10Gb
92-GBC10GS2-00
10GbE SFP+ GBIC
GBC-QSFP+40Gb
92-GBC40GQP-00
40GbE QSFP GBIC
 Loading...