

Page 1
Page 2

Table of Contents
Part 1. QRF300 ARS Overview .................................................................................... 4
Part 2. Software ........................................................................................................... 5
Software Overview .......................................................................................................... 5
System Requirements ..................................................................................................... 5
Installation ....................................................................................................................... 5
Using the QClick Software .............................................................................................. 6
2.1 Quiz Genius ...................................................................................................... 6
2.1.1 The Normal Routine of Running a Quiz Genius: .............................................. 6
2.1.1.1 Class: ............................................................................................................... 8
2.1.1.2 Participation Mode: ......................................................................................... 12
2.1.1.3 Activity Modes: ............................................................................................... 12
2.1.1.4 Load: .............................................................................................................. 12
2.1.1.5 Title ................................................................................................................. 13
2.1.1.6 Run / Start a Quiz ........................................................................................... 13
2.1.1.7 Result and Report ........................................................................................... 14
2.1.1.8 Exit ................................................................................................................. 16
2.1.2 Activity Modes ................................................................................................ 17
2.1.2.1 Normal Quiz: .................................................................................................. 17
2.1.2.2 Paper Quiz: .................................................................................................... 17
2.1.2.3 Rush Quiz: ...................................................................................................... 17
2.1.2.4 Elimination: ..................................................................................................... 17
2.1.2.5 Multiple Mode: ................................................................................................ 18
2.1.2.6 Vote: ............................................................................................................... 18
2.1.2.7 Roll Call: ......................................................................................................... 18
2.1.2.8 Hand Raise ..................................................................................................... 18
2.1.2.9 Quick Grouping............................................................................................... 18
2.1.2.10 Pop Quiz Normal/Rush/Elimination: ............................................................... 18
2.1.2.11 Comparison of Mode Selections and Their Functions .................................... 20
2.2 Exam Editor .................................................................................................... 21
2.2.1 Open ............................................................................................................... 22
2.2.2 New ................................................................................................................ 22
2.2.3 Questions Setup ............................................................................................. 22
2.2.3.1 Standard Setup .............................................................................................. 25
2.2.3.2 Question Modes ............................................................................................. 26
2.3 Reports ........................................................................................................... 26
2.3.1 Reports ........................................................................................................... 26
Copyright © 2009 All Rights Reserved by QOMO HiteVision.
www.qomo.com 2
Page 3

2.3.1.1 Create New Session ....................................................................................... 29
2.3.1.2 Import a data session to the system database from a file ............................... 31
2.3.1.3 Edit a session ................................................................................................. 31
2.3.1.4 Merge two or more sessions .......................................................................... 34
2.3.1.5 Delete selected sessions ................................................................................ 35
2.3.1.6 Save a session to a file ................................................................................... 36
2.3.1.7 Create Report ................................................................................................. 36
2.3.2 Course Grade ................................................................................................. 47
2.3.2.1 Course Grade Set Up ..................................................................................... 48
2.3.2.2 Create Course Grade Report ......................................................................... 52
2.3.2.3 Save Course Grade ........................................................................................ 60
2.3.3 Grade Book .................................................................................................... 60
2.3.3.1 Import a grade book to the system database from a file ................................. 61
2.3.3.2 Save a grade book to a file ............................................................................. 61
2.3.3.3 Delete a grade book in the system database ................................................. 62
2.3.3.4 Create Grade Book Report ............................................................................. 63
2.4 Settings .......................................................................................................... 65
2.4.1 System: .......................................................................................................... 65
2.4.2 Remote ID: ..................................................................................................... 66
2.4.2.1 Students ......................................................................................................... 66
2.4.2.2 Teacher .......................................................................................................... 68
2.4.2.3 Channel Set .................................................................................................... 69
2.4.3 Hardware test: ................................................................................................ 70
2.4.4 Database Management: ................................................................................. 71
2.4.4.1 Database Backup: .......................................................................................... 71
2.4.4.2 Database Recover: ......................................................................................... 72
2.4.4.3 Clear Session: ................................................................................................ 72
2.4.4.4 Del All Records: .............................................................................................. 72
2.4.5 Login Setup: ................................................................................................... 72
2.4.6 Version Info: ................................................................................................... 73
Part 3. Hardware & System Installation Illustration .................................................... 74
3.1 Student keypad .............................................................................................. 74
3.1.1 Specifications ................................................................................................. 74
3.1.2 Illustration ....................................................................................................... 74
3.2 Instructor keypad ............................................................................................ 75
3.2.1 Specifications ................................................................................................. 75
3.2.2 Illustration ....................................................................................................... 75
3.3 Main Receiver and USB Cable ....................................................................... 76
3.4 Keypad pack ................................................................................................... 76
Copyright © 2009 All Rights Reserved by QOMO HiteVision.
www.qomo.com 3
Page 4

Part 1. QRF300 ARS Overview
The QRF300 Audience Response System (QRF300 ARS) is an easy-to-use RF response system
that obtains immediate feedback from each participant (up to 400 persons) synchronously. QClick is
both easy to learn and use as it has the ability to work completely out of *.qc file. You could even
utilize Pop Quiz mode to start a quiz without any prior preparation or documentation. The Pop Quiz
instantly captures quiz questions and answers can be easily saved to the system after a quiz is
finished.
The system is composed of hardware (instructor keypad, student keypad, RF receiver, cable, etc)
and software.
The QRF300 ARS encourages participation and elicits individual response through the following
activities: Normal Quiz, Paper Quiz, Rush Quiz, Elimination, Multiple Mode, Vote, Roll Call,
Hand Raise and Quick Grouping. The oral quiz and any other quizzes without prior preparation
can be taken under the Pop Quiz mode. The QRF300 ARS displays instant results in the form of a
histogram and score board.
Copyright © 2009 All Rights Reserved by QOMO HiteVision.
www.qomo.com 4
Page 5

Part 2. Software
Software Overview
The QClick Software has 4 main sections: Quiz Genius, Exam Editor, Reports and Settings.
The Quiz Genius allows you to set up classes, to conduct quizzes, games, take a vote.
The Exam Editor allows the creation and editing of the .qc file exam slides and the selection of the
slide question answers.
The Reports allows you to query or modify quiz session data results, grade tests and generate the
student performance reports. It also allows you to create the student session data not obtained from
using the QClick hardware system. The other function of Reports is used for generating course
grade books and final report cards.
The Settings section is designed for system set up. Click on hardware testing for setting the channel
number of the QClick receiver(s), managing the system database, system administration set up and
for displaying the hardware and software version information.
System Requirements
PC with Intel Pentium 4 or higher processor and with at least one USB port
Minimum 512 MB RAM
Minimum 200 MB of hard drive space for software
Mac OSX
Screen resolution of 1024x768 or higher
Display system such as a data projector, Liquid Crystal Display (LCD), Plasma, or TV
(recommended, but not required)
Installation
1. Place the software disk into your computer CD drive.
2. Open the disk and double click on the “QClick.exe” file in the root directory.
3. Follow the instructions displayed during the installation.
If the program has been previously installed, we suggest you remove the older version of the
program prior to installing the new program.
The default installation path is: /applications, and will produce one shortcut icon on the desktop.
Copyright © 2009 All Rights Reserved by QOMO HiteVision.
www.qomo.com 5
Page 6
Using the QClick Software
2.1 Quiz Genius
Note: One .qc file = one quiz paper
One slide = one question
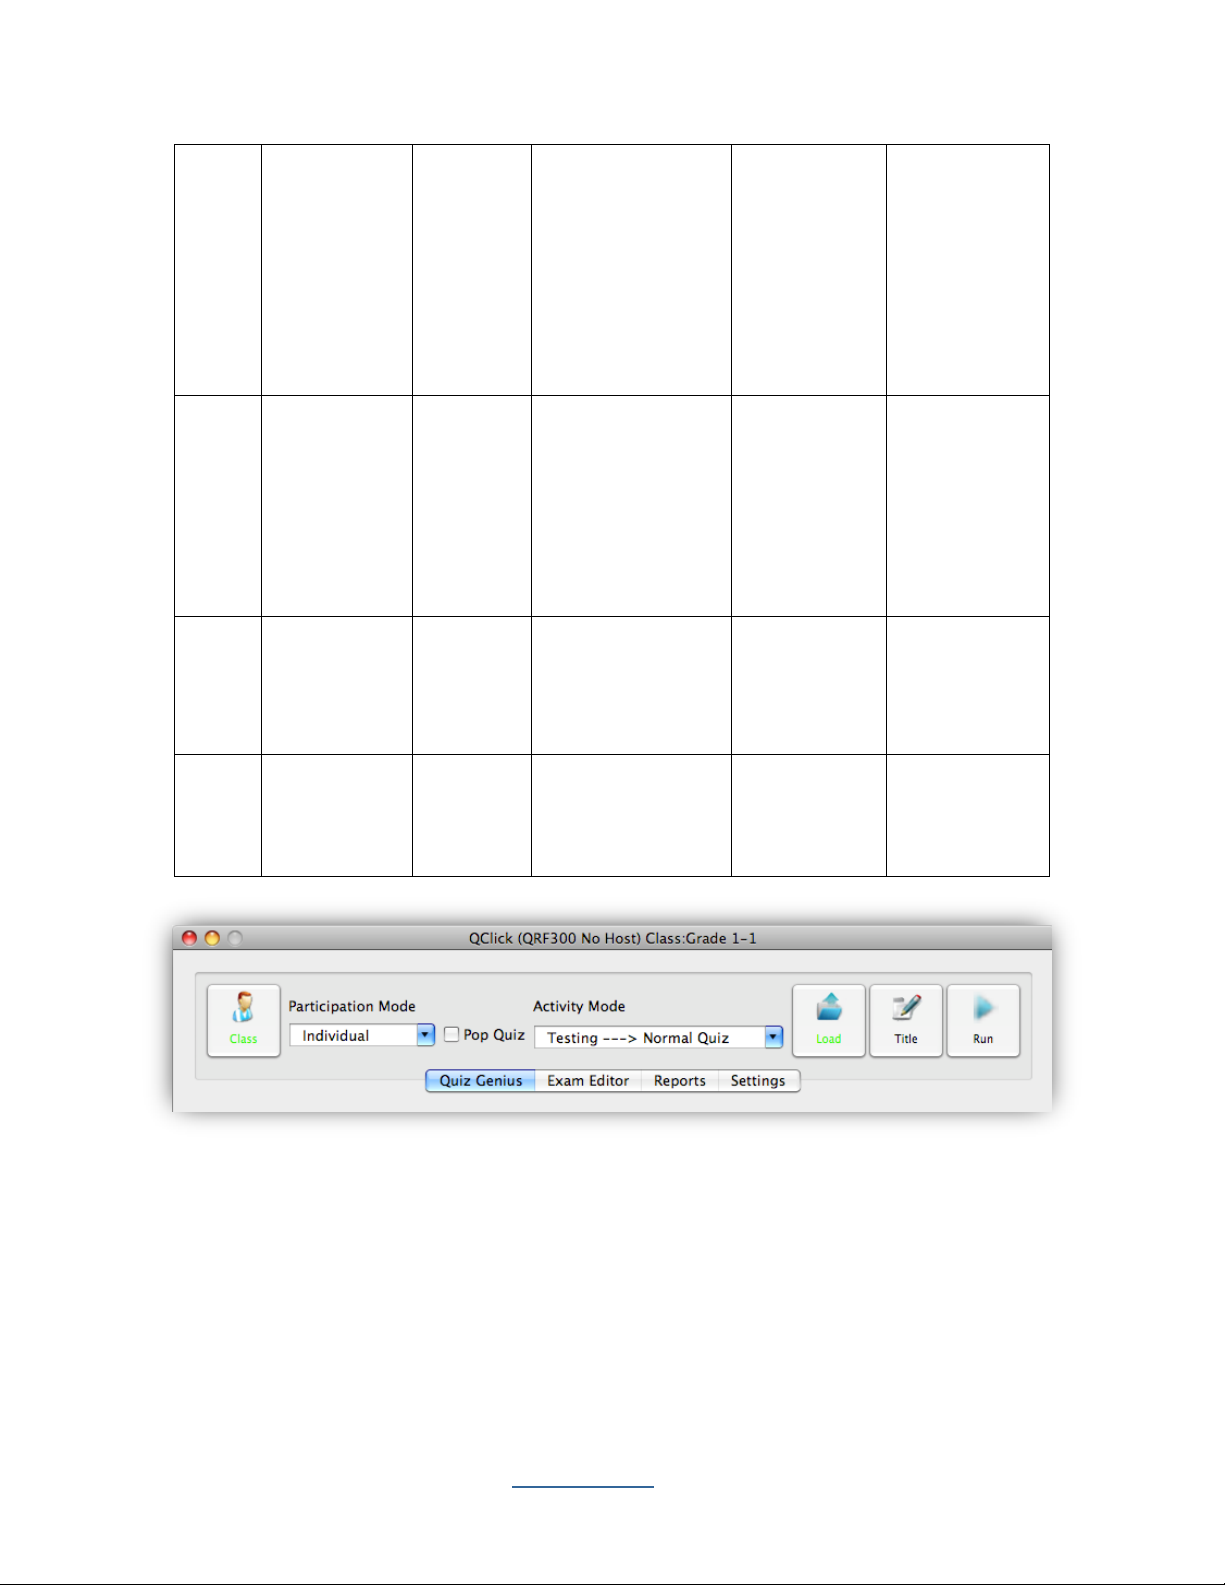
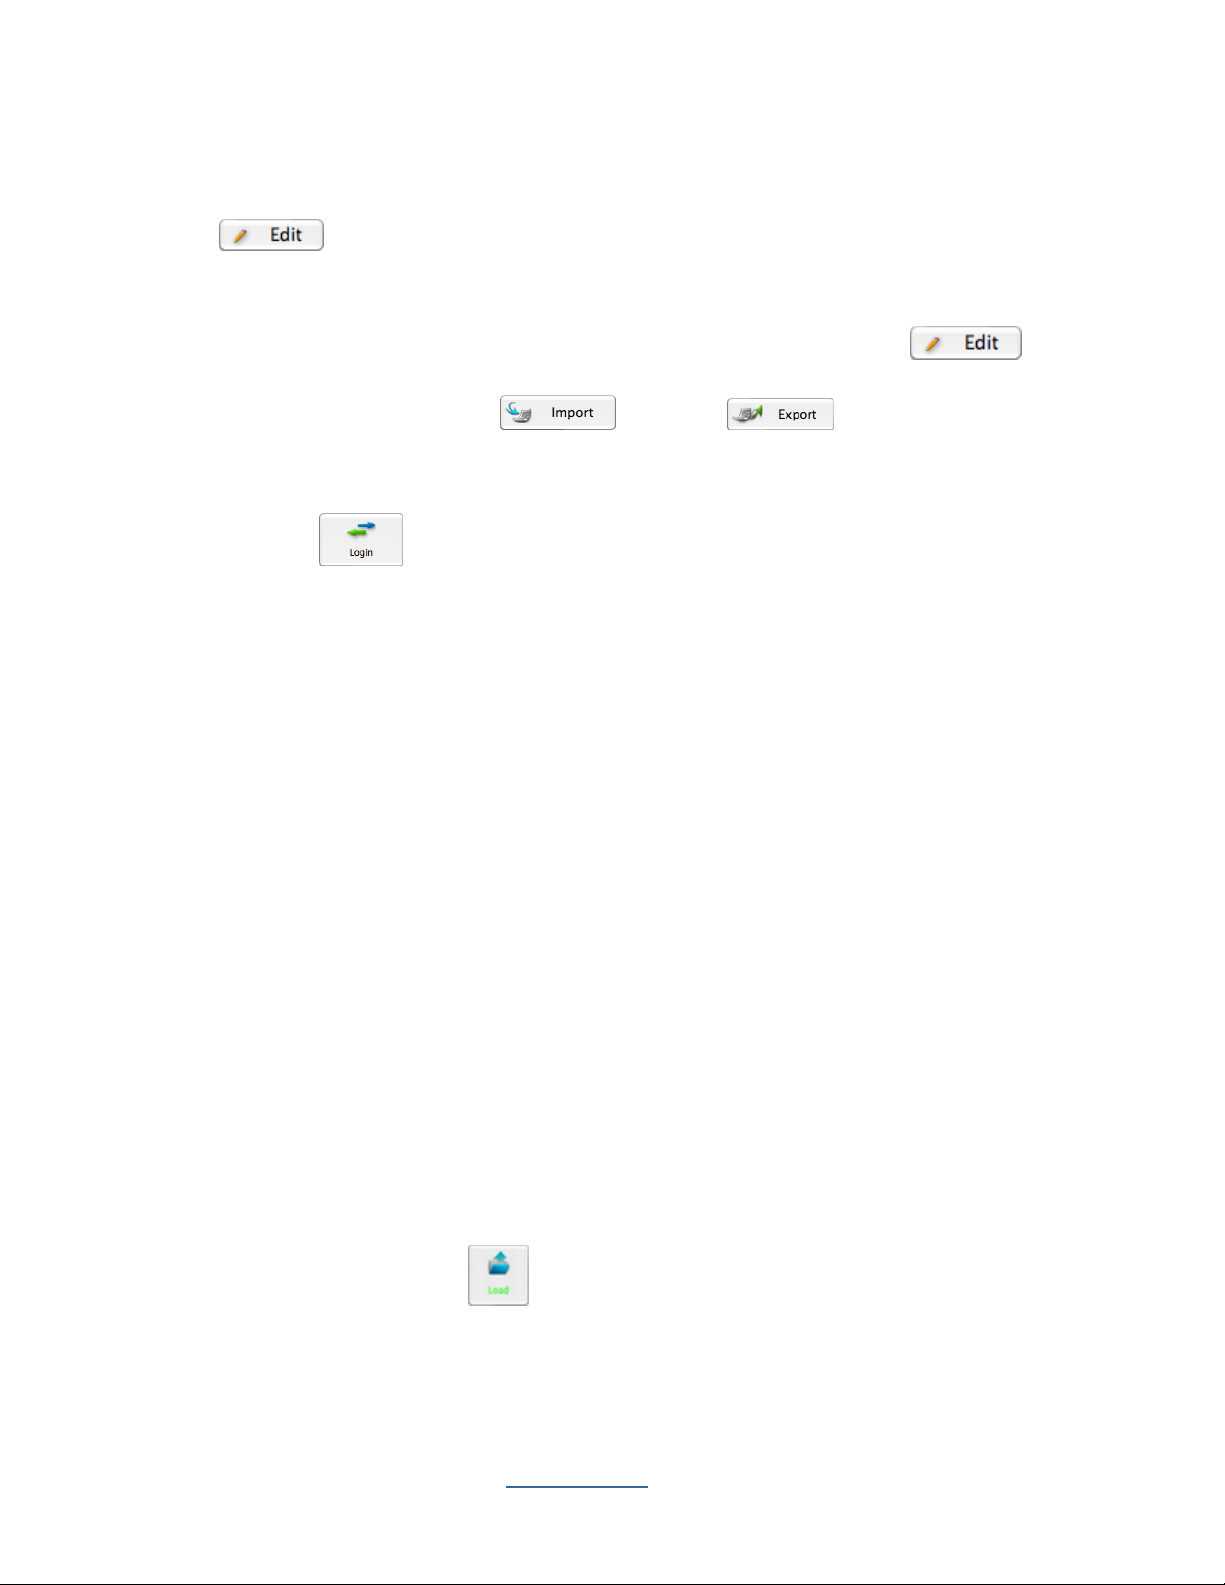
Run the QClick program by double clicking the QClick icon on the desktop. Select the Class
tab, then click on Login button at the bottom of the Class Settings window, the User Login window
will open allowing you to type in the valid user name and password. The software sets the default
user name and password to “qomo”. After finishing the valid inputs, click Login button to log into the
system. If you do not want to logon to the system, click the Cancel button. The
software will allow you to do some limited operations, however,the system database will not be
updated.
Note: The QClick software monitors the QRF300 main receiver plug-in status all the time. It will
either display “QRF300 No Host” for Offline and “QRF300 Connected” for Online.
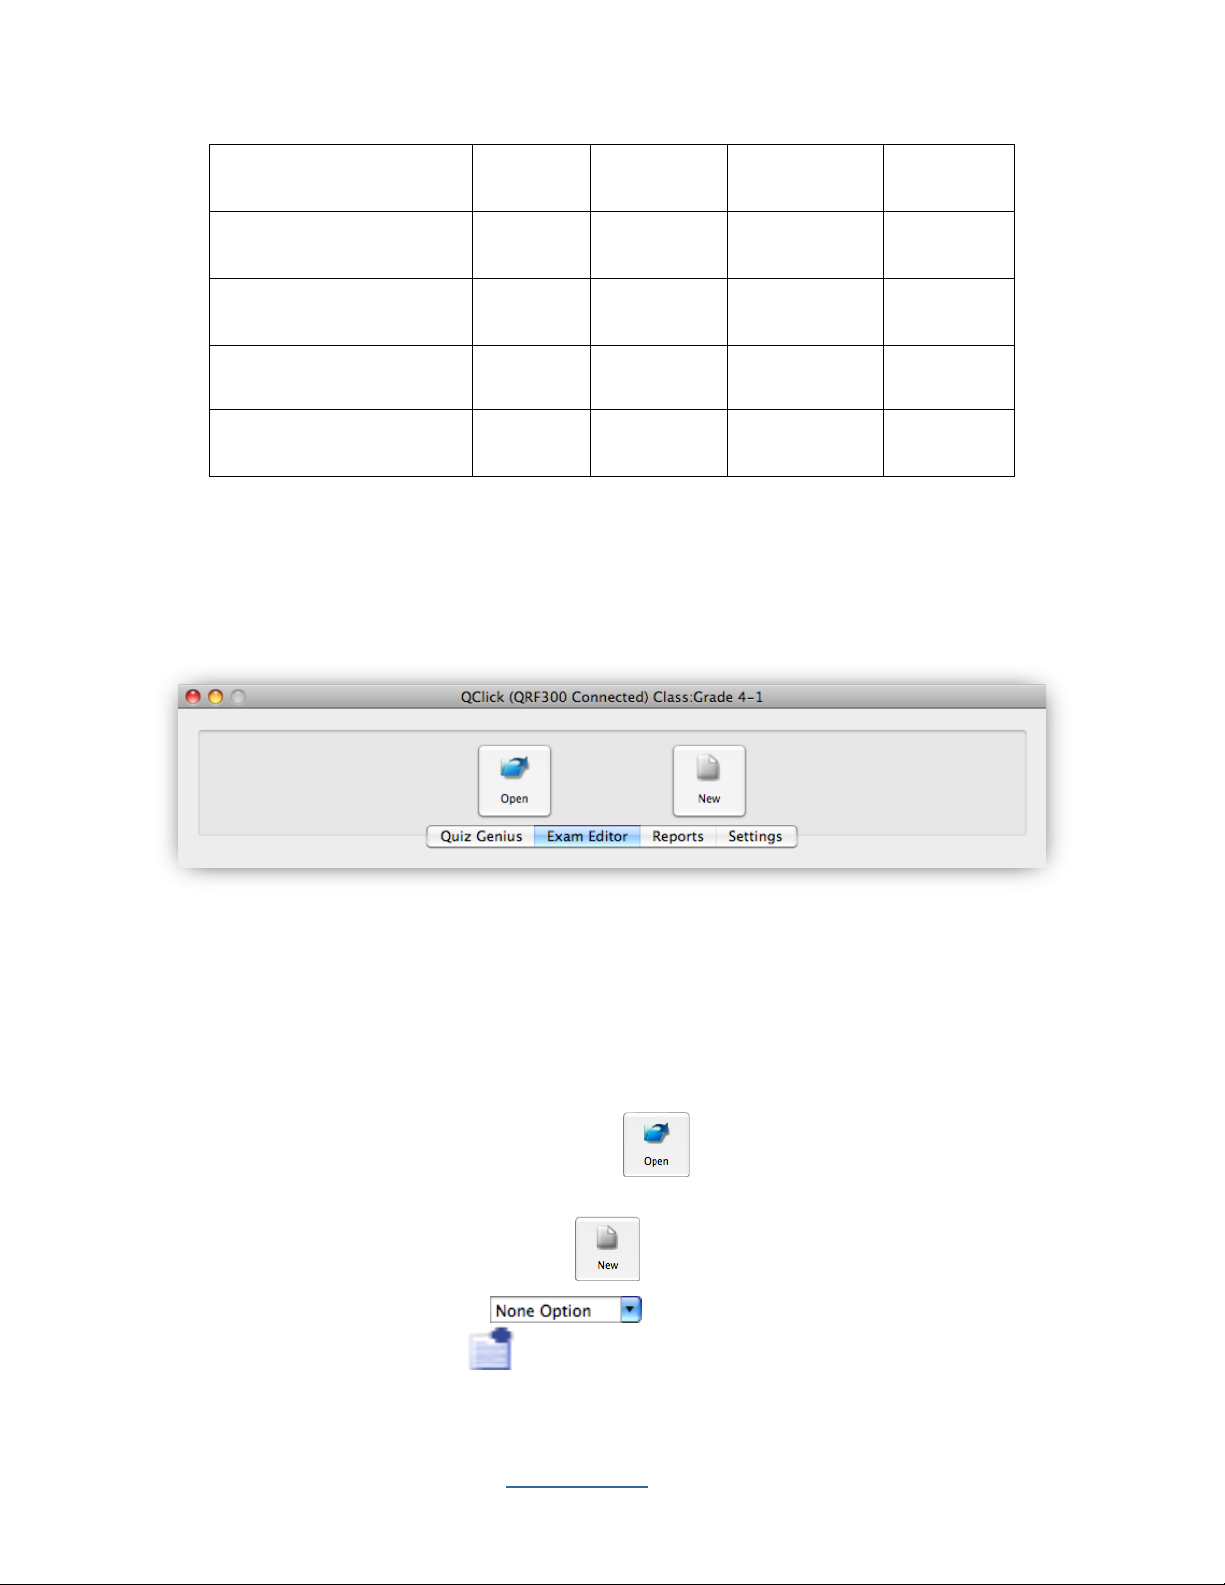
Once the application is running, the software displays the following control Tab windows, Quiz
Genius, Exam Editor, Reports, and Settings on the top of the screen. The active default tab is set
to Quiz Genius.
Before conducting a quiz, you need to set up a class. If the class information is not available at this
time but if you intend to use the system casually, you may choose some software preset examples
for classes, subjects and teachers. The student roster table always goes with the class selection.
The roster includes the student ID number, name and grouping information. The student profile is
embedded under the student record.
2.1.1 The Normal Routine of Running a Quiz Genius:
To set up a quiz genius, follow these steps:
Copyright © 2009 All Rights Reserved by QOMO HiteVision.
www.qomo.com 6
Page 7
1. Set up a class by clicking the Class icon, refer to session 2.1.1.1 Class for detail set
Pop
Quiz
Activity
Mode
Type of
File
Loaded
Title & Test ID
Need
Answers
After Each
Question?
Need
Answers
After the
Whole Test is
completed?
No
Normal,
Rush,
Elimination,
Multiple
Mode, Hand
Raise
System
QC file
The loaded exam
file name is used
as the title name,
and the system
default test ID
number can be
changed
No
No
up.
2. Select a participation mode from the Participate Mode drop-down menu.
3. You may choose the pop quiz by checking or un-checking the Pop Quiz check
box; refer to session 2.1.2.10 Pop Quiz Normal/Rush/Elimination.
4. Load a .qc file, by clicking the Load icon which will display the browser; refer to
session 2.1.1.4 Load.
5. You may change the test ID by clicking the Title icon and set the change or use the
system default ID number; refer to session 2.1.1.5 Title.
6. Click the Run icon to start the quiz, refer to session 2.1.1.6 Run /Start a Quiz.
7. Depending on your selection, not all of these steps are necessary. The following table shows
the relationship:
Copyright © 2009 All Rights Reserved by QOMO HiteVision.
www.qomo.com 7
Page 8
No
Paper Quiz
Hardcopy
The loaded file
name is used as
the title name, and
the system default
test ID number can
be changed
No
No
No
Vote
System
QC file
The loaded file
name is used as
the title name, the
system default test
ID number can be
changed
No
No
No
Roll Call,
Quick
Grouping
None
Not needed
No
No
Yes
Normal,
Rush,
Elimination
Not
needed
Not needed
Optional**
Optional**
2.1.1.1 Class:
The QClick system engages the class in a quiz session. A class must be created and selected prior
to any activities. A teacher and a subject are associated with a specific class. The students in the
class can be place in groups. The class setting, allows several options for entering, class information.
You can choose to import a student roaster from a *.csv file or choose to enter the individual student
information into the program. In like manner, the teacher information and the subject name can be
www.qomo.com 8
Copyright © 2009 All Rights Reserved by QOMO HiteVision.
Page 9

imported from a *.csv file or entered into the QClick system. To create, to select or to modify class
information, follow these steps:
1. Click the Class button under the Quiz Genius Tab window to display the Class Settings
window.
2. Select a class from the Class Name drop-down list. A student roster associated with the class will
be displayed and may be edited or renamed.
3. To add a new class, click the Edit button next to Class Name, then select the Add tab. Type in
the new class name and click the Add button. The Student Settings window will
display with three choices, Add New Students, Add Existing Students and Import Students from
a *.csv file.
4. Select one of choices in the Student Settings to enter the student information.
5. The student information can be modified by directly double clicking on the student row in the
roster to display the Student Profile window.
Copyright © 2009 All Rights Reserved by QOMO HiteVision.
www.qomo.com 9
Page 10
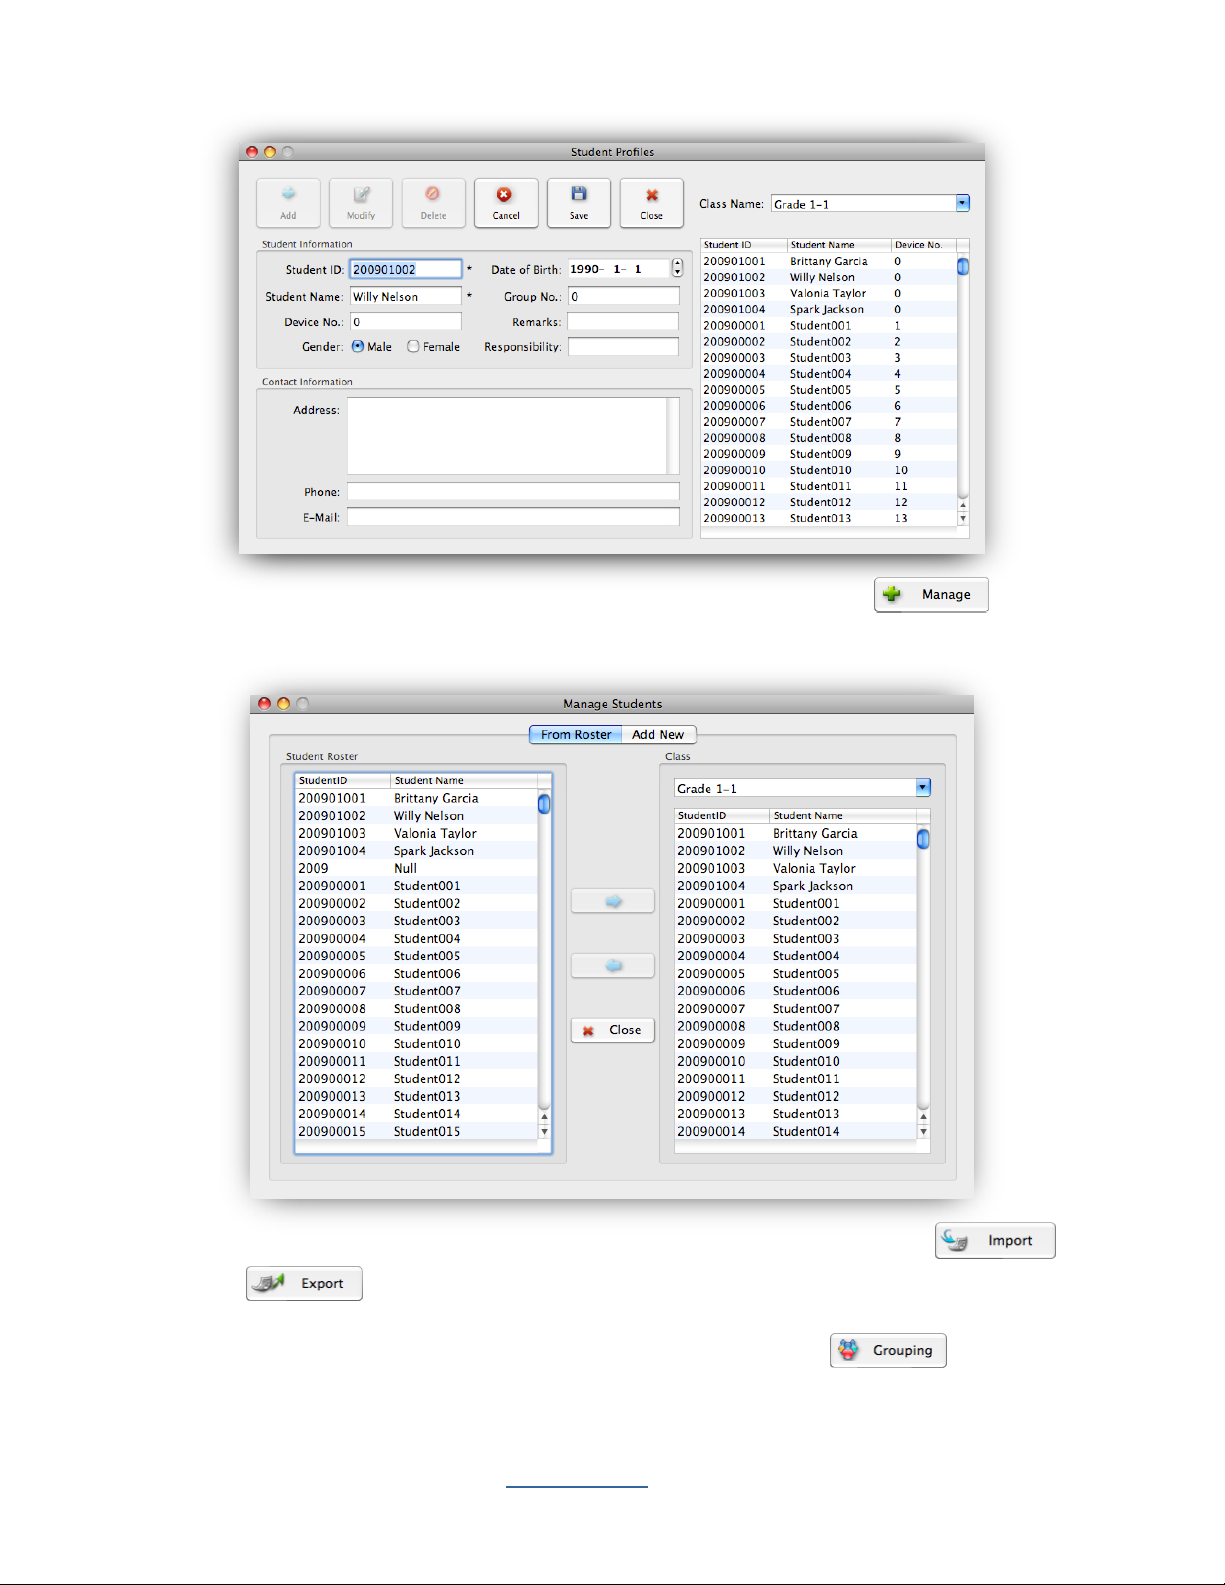
6. To add or remove the students to or from the class, click the Manage button to
display the Manage Students window.
7. To import or export the student roster from or to a *.csv file, click the Import or
Export button to display the file browser.
8. To set up the grouping for the students in the class, click Grouping to display the
Group Management window.
Copyright © 2009 All Rights Reserved by QOMO HiteVision.
www.qomo.com 10
Page 11
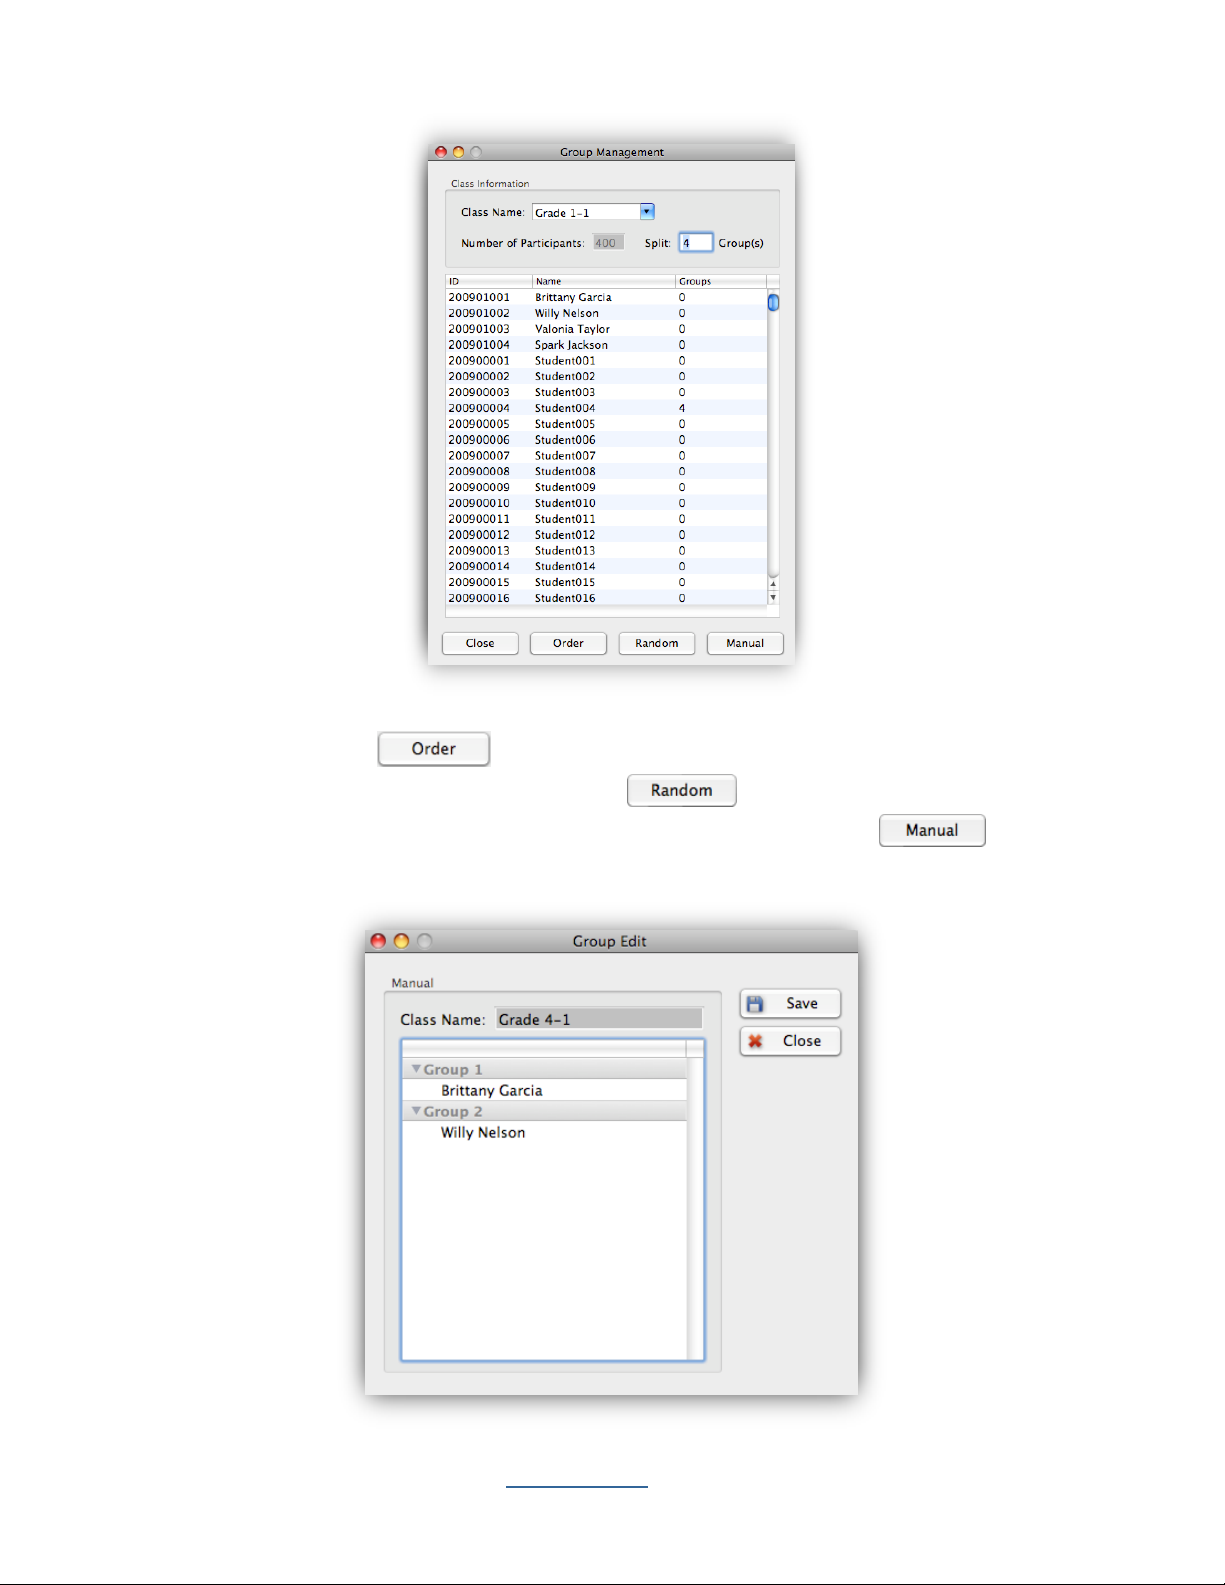
There are three grouping methods, order, random and manual. Type in the group number you desire,
then click on the Order button, the system will automatically group the class in order
with the desired group number .Click the Random button for the random grouping, the
software will randomly select students for the grouping. Click the Manual button to
display Group Edit window for the manual grouping. You can simply click and hold the left mouse
button to drag and drop a student from one group to another group.
Copyright © 2009 All Rights Reserved by QOMO HiteVision.
www.qomo.com 11
Page 12
9. Select the subject associated with the class from the Subject Name drop-down list.
10. You may Add, Delete, or Rename a subject name in the subject list by clicking the
Edit button next to the Subject Name drop-down list.
11. Select the teacher associated with the class from the Teacher Name drop-down list.
12. You may Add, Delete, or Rename a teacher information by clicking the Edit button
next to the Teacher Name drop-down list. The teacher list can be imported or exported from a
*.csv file by clicking the Import or Export button under the teacher
group window.
13. You must log into the QClick system in order to edit or modify your database. Click the
Login/Logout button to login or logout of the QClick system.
Note: Once a class is selected, the character of the Class button changes into green.
2.1.1.2 Participation Mode:
The QClick system has two participation modes Individual and Group. The system default mode is
Individual. You can select either Individual or Group participation mode from the Participation
Mode drop-down list. In the Individual mode, the performance test score is taken and reported
individually. In the Group mode, the performance test scores and reports are handled in a group.
The grouping information is obtained from the class setting and Quick Grouping mode. Please refer
to section 2.1.1.1 Class step 8 to set up groups or 2.1.2.9 Quick Grouping. Only the activity modes
Normal Quiz, Rush Quiz and Elimination apply to the group participation mode.
2.1.1.3 Activity Modes:
The QClick system has these activity modes: Normal Quiz, Paper Quiz, Rush Quiz, Elimination,
Multiple Mode, Vote ,Roll Call, Hand Raise and Quick Grouping. Choose a mode from the
Activity Modes drop-down list before beginning a quiz or activity session. For further detailed
information about these modes and how to choose a mode, please refer to section 2.1.2 Activity
Modes.
2.1.1.4 Load:
The load function allows you to load a quiz file. The quiz file is required to be loaded for these
activity modes: Normal Quiz, Rush Quiz, Elimination, Multiple Mode and Hand Raise. To load a
quiz file, simply just click the Load button to display the file browser.
Note: Once the loading is finished, the character of the Load button changes into green.
Copyright © 2009 All Rights Reserved by QOMO HiteVision.
www.qomo.com 12
Page 13
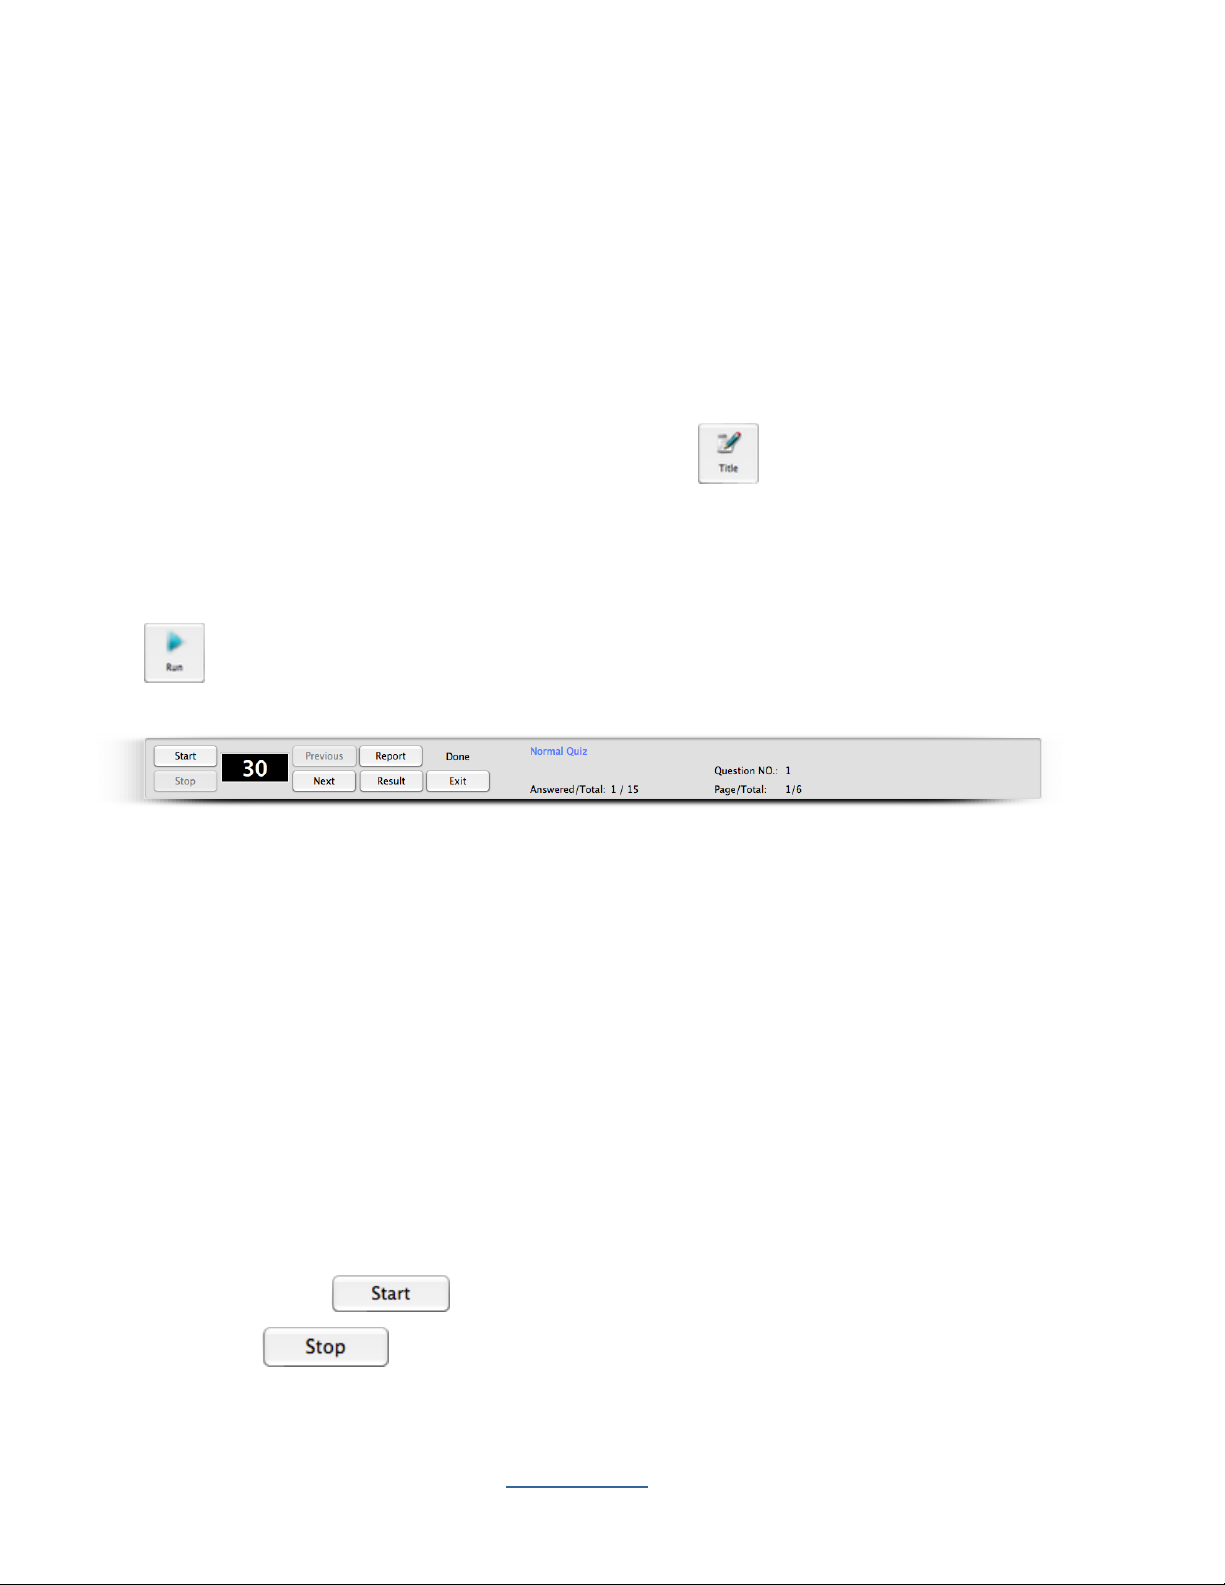
2.1.1.5 Title
The QClick system uses the title information to associate the quiz or an activity. The title name and
the test ID are used in the quiz management and for the searching use in the student keypads which
storing the quiz information. Once a quiz file is loaded into the system, associated file name is
copied and saved to the quiz title name area and the test ID is embedded into the quiz file in the
system. If a quiz file loaded into the system for the first time, and there is no test ID embedded in the
file, the system will automatically assign a test ID and save it to the file for the associated quiz. The
test ID number is kept by increasing by one every time the system uses the test ID number to save it
to the file. The valid test ID number is 1 to 9999. When the maximum number 9999 reaches, the
system will reset the number to 1. You may click the Title button to display the Set Test ID window and change the test ID number you desire to set or to write a memo for the associated quiz.
2.1.1.6 Run / Start a Quiz
Once a class is selected and a quiz file is loaded, you can start the quiz session by clicking the Run
button to start the session. The loaded quiz file will display on the screen with a tool bar at the
bottom.
The display screen is divided into four segments:
Register/Answer Status Bar
Questions display
Tool Status Bar
Tool Bar
Register/Answer Status Bar: Displays the students logged in register number. The number is
displayed in successive order based upon first entry.
Blue/Orange color – indicates response signal received. The color is toggled between blue
and orange each time the answer is changed, the system only records the last response
received before the test ends.
Tool Status Bar:
1. Control Buttons:
Start/Pause – to start or pause the timer
Stop – to stop the time
Copyright © 2009 All Rights Reserved by QOMO HiteVision.
www.qomo.com 13
Page 14
Previous – return to the previous question page
Next – turn to the next question page
Exit– exit the current quiz session
Report/Result / Display the instant report and result. Refer to
session 2.1.1.7 Result and Report.
Note: All these control buttons are duplicated and displayed on the instructor remote keypad.
2. The Question Answer Timer:
The timeout value is selected for each question during the quiz file set up.
Timer box background colors are: Black: Stop; Green: Running; Yellow: Pause.
3. Quiz Status:
Activity Mode: Indicates the current activity you selected.
Answered/Total: Indicates the ratio of the number of people who answer the question to the
total number of people who have logged on.
Question Done: When the question is finished, the sign “Done” will display.
Question No.: Indicate the current question number.
Page/Total: The current page number of the total pages.
To begin gathering responses from the students, click the Start/Pause button or using
the instructor remote keypad press the play button. The register number corresponding to each
individual clicker logged in will appear on the right of the screen.
The countdown timer will display the remaining time in minute(s) and seconds. Once the timer is at 0,
the receiver will no longer receive audience/participant responses. The timer window will change to
black. The instructor can always stop the timer by pressing the Start/Pause button.
Tool Bar. Provide the tools that used to design quiz templates under Pop Quiz.
Note: If the computer goes into the sleep mode during the testing interface, then the system may not
have any response to the instructor keypad. Don’t worry, at this time you just need to use the mouse
to simply click the start button on the Tool Status bar to start the quiz again or exit the testing
interface and return to the test.
2.1.1.7 Result and Report
By pressing the Result button (using the PC , or through the instructor remote ,
the instructor can view the responses to the individual quiz question. Results are displayed in a
histogram. Green indicates correct responses. Pink indicates incorrect responses. Both the correct
responses and incorrect responses are displayed in percentage form in the histogram.
Copyright © 2009 All Rights Reserved by QOMO HiteVision.
www.qomo.com 14
Page 15
Press the F1 key to show the detail response percentage for each answer.
By pressing the Report button (using the PC or through the instructor remote Report key), the
instructor can view the individual student‟s response. The results are displayed in a table. The table
shows the student ID, the student names, point information, responses and the response time.
Copyright © 2009 All Rights Reserved by QOMO HiteVision.
www.qomo.com 15
Page 16
Press the F1 key to show the detail responses in the table.
Press F1 key to show the correct answer.
2.1.1.8 Exit
You can exit the current quiz session by pressing the ESC key on the PC keyboard or the Power
Copyright © 2009 All Rights Reserved by QOMO HiteVision.
www.qomo.com 16
Page 17
key on the instructor remote keypad, or by pressing the Exit button on the screen
(using the PC). The system will prompt you to save the data to the system database, when the
completed session is completed.
Note: If the completed session data is not saved, it will be permanently lost.
2.1.2 Activity Modes
The QClick system has 9 activity modes: Normal Quiz, Paper Quiz, Rush Quiz, Elimination,
Multiple Mode, Vote, Roll Call, Hand Raise and Quick Grouping. Using the Pop Quiz selection,
there are 3 activity modes: Normal Quiz, Rush Quiz and Elimination.
Note: Under Vote, Roll Call, Hand Raise, Group Mode, the finished session can be exported to
*.csv format.
2.1.2.1 Normal Quiz:
In the Normal Quiz, a quiz file must be provided with the correct answer for each question prior to
starting the quiz. The instructor controls the pace of the question answering session.
2.1.2.2 Paper Quiz:
Once the Paper Quiz has started, the instructor can set up a time limit which will be displayed on the
bottom of the tool bar. Once students start to answer on their keypads, the question being answered
currently will be displayed on Register/Answer status bar. Press to go to the last question,
press to go to the next question, after finishing all the questions the student login status will turn
into green.
2.1.2.3 Rush Quiz:
This mode is similar to the normal mode. The first student who presses any effective “Rush Quiz”
button locks out the rest of the students and is the only person able to respond to this particular
question. The time for the response is preset before the test by the instructor. Points can be added
for a correct answer or subtracted for a wrong answer.
Note: Blue indicates correct answer, Red indicates wrong answer.
2.1.2.4 Elimination:
This mode is similar to the normal mode. Only those students answering correctly can continue with
the test. Those answering incorrectly are automatically eliminated.
Note: Blue indicates correct answer, Red indicates wrong answer, Dark Red indicates eliminated.
Copyright © 2009 All Rights Reserved by QOMO HiteVision.
www.qomo.com 17
Page 18

2.1.2.5 Multiple Mode:
The Multiple Mode activity combines the Normal Quiz, Rush Quiz and Elimination in one quiz
session. The loaded quiz file contains the mode activity information in each question set up. If you
choose the Multiple Mode as your quiz session activity mode, the system automatically selects the
activity mode for the current quiz question based on what activity mode the system reads from the
embedded mode set up for each question in the quiz file.
2.1.2.6 Vote:
The Vote activity mode is used for subjective response. The audience responses contain no correct
or incorrect answer information. When you select the Vote activity mode, the system allows you to
only load the vote file in. qc format. In this activity mode, the audience‟s response is either a positive
or a negative with no correct answer.
2.1.2.7 Roll Call:
The Roll Call mode allows the instructor to take attendance. When you select the Roll Call activity
mode, the system won‟t ask you to load in any quiz files prior to starting the Roll Call activity. The
roll call result can be saved into the system database as a part of the permanent file, or it can be
viewed immediately after the activity.
2.1.2.8 Hand Raise
The Hand Raise mode allows the instructor to directly score for individual student for each question, and there is only Report in Hand Raise mode, by clicking on the Report button through the PC or on the instructor keypad, the instructor can view the individual student‟s point information for their responses.
2.1.2.9 Quick Grouping
The Quick Grouping mode allows the students to choose the group they want at their wills. By
clicking the Start button, students can choose the group according to the guide displayed on the top
of window. The grouping result will automatically saved in the Class.
2.1.2.10 Pop Quiz Normal/Rush/Elimination:
The QClick system uses the Pop Quiz option for the Normal Quiz, Rush Quiz and Elimination
activity mode. The Pop Quiz option allows the instructor to start a quiz session without loading a
prepared quiz file. The quiz question information could be the captured images from the computer or
from the internet or from a third party software application. The question information could also be
verbal questions while using a white board or just verbal questioning. The correct answers to these
questions are provided after each question is answered or after the whole quiz session is completed.
The main advantage of Pop Quiz is ease of use, no prepared materials, and instant engagement of
the students. Additionally, if the teacher chooses all of the student quiz performance data can be
stored in the report section and become a part of the grade book.
Copyright © 2009 All Rights Reserved by QOMO HiteVision.
www.qomo.com 18
Page 19
To use the Pop Quiz option, follow these steps:
1. Under the Quiz Genius tab window, check the Pop Quiz check box to select the Pop Quiz
option.
2. Select the Normal Quiz, Rush Quiz or Elimination activity mode from the Activity Mode
drop-down list.
3. Click the Run button to start the Pop Quiz activity mode.
4. The status tool bar will appear on the bottom of screen, after creating the question, click the
Start button on the status tool bar to start an oral quiz.
5. To capture an image, click on tab in the Tool Bar on the top of the screen. Hold the left
mouse button and draw a rectangular window on the image you want to capture. Double
click on the selection box. The system will display the image you captured on the center of
the screen.
6. The system tool bar contains these controls:
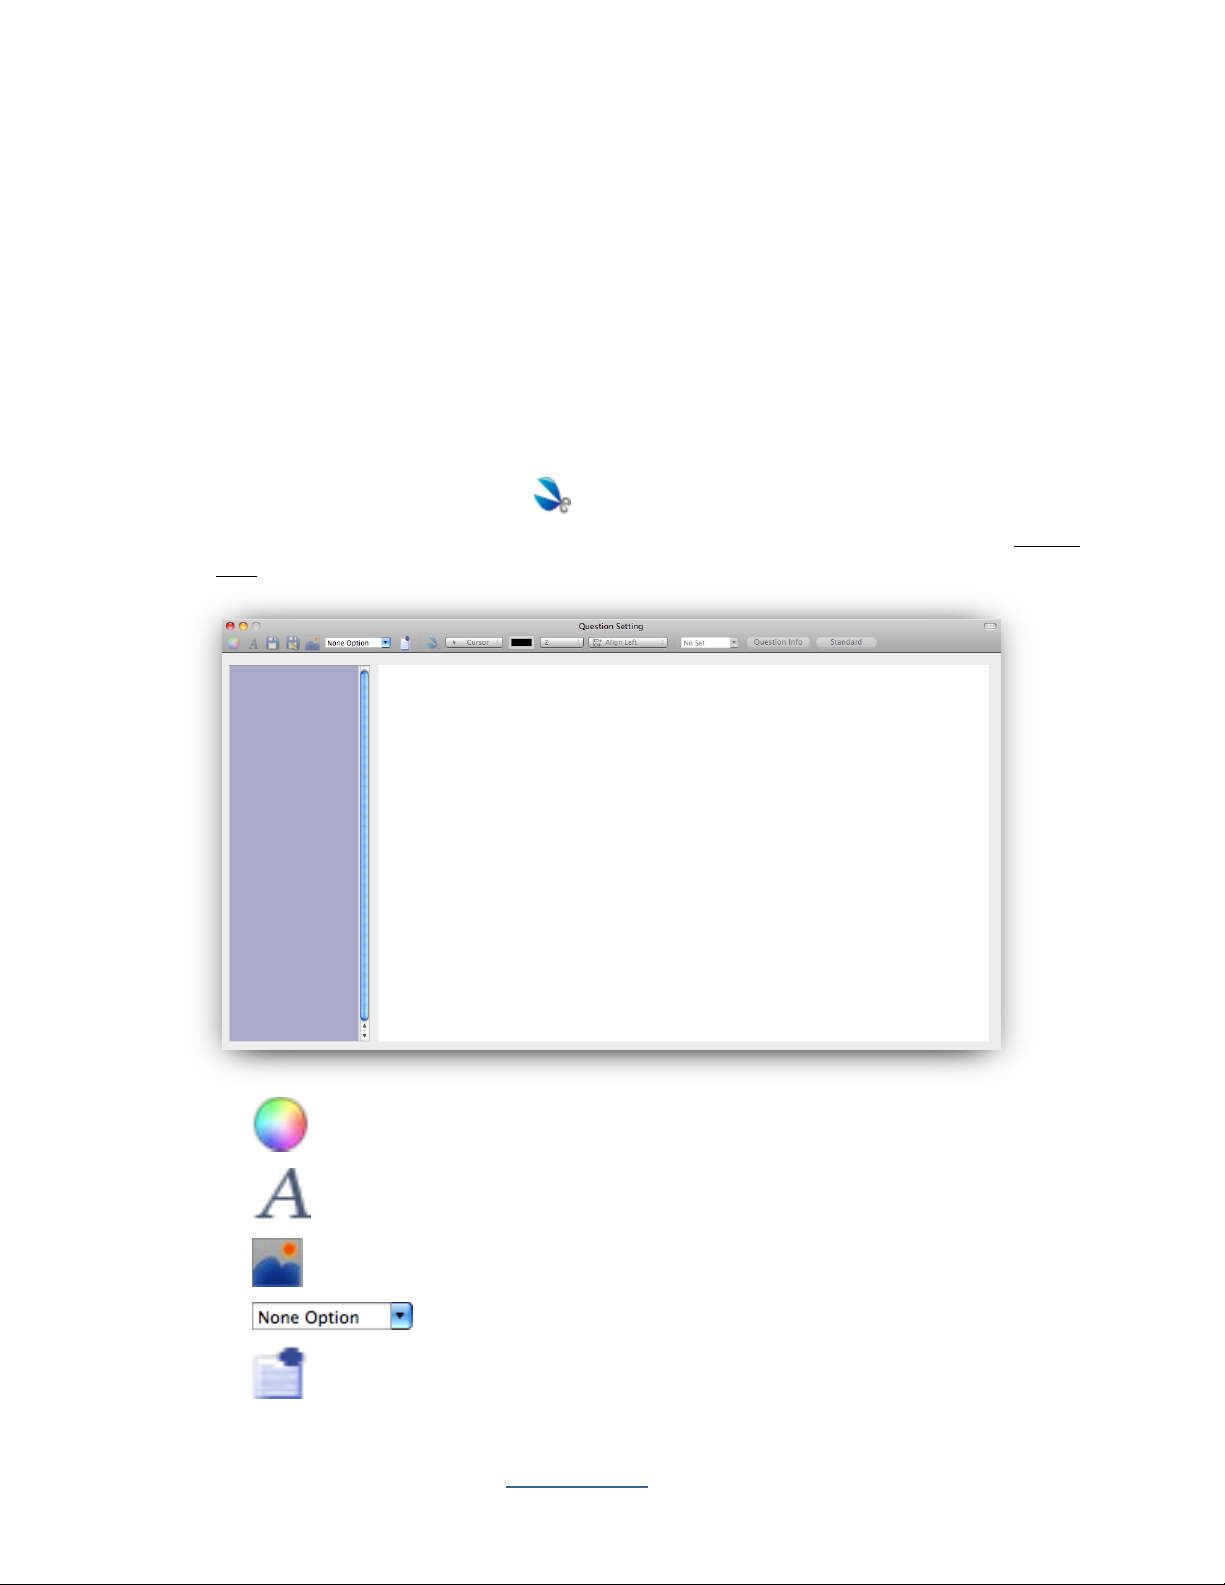
1. – Click the button to select the text color.
2. – Used for the selection of a typeface for the text.
3. – Click the button to add pictures to the screen from the opened file browser.
4. –Select the template options from the drop down list.
5. – Click the button to add (the selected) templates to the screen
Copyright © 2009 All Rights Reserved by QOMO HiteVision.
www.qomo.com 19
Page 20

6. – Click this button to cut an image
Activity modes
Need
correct
answer?
Group
participate
mode
restricted?
Instance
result
histogram
available?
Report
available?
No-Pop Normal Quiz
√ √
√
No-Pop Paper
√ √
√
No-Pop Rush Quiz
√ √
√
No-Pop Elimination
√ √
√
No-Pop Vote
√ √
√
No-Pop Roll Call
√ √
7. – Click this button to select the cursor‟s functions from the drop– down
list
8. – When the cursor applies the Pen function, click this button to select the color
for the pen .
9. –When the cursor applies the Pen function, click this button to select the
thickness from the drop– down list
10. – Click the button to order and arrange the block as you like from
the drop-down list.
11. –Click the button, select one block then select the item Question or
Option from the drop-down list and edit the contents as you like.
12. – Click this button to edit the current question.
13. – Opens the state education standard hierarchical chart for you to
choose a standard for question setup.
2.1.2.11 Comparison of Mode Selections and Their Functions
www.qomo.com 20
Copyright © 2009 All Rights Reserved by QOMO HiteVision.
Page 21
No-Pop Hand Raise
√
√
No-PopQuick Grouping
√
Pop Normal
√* √**
√
Pop Rush Quiz
√* √
√
Pop Elimination
√* √
√
“√” (Yes) means the activity mode can support the function. Blank (No) means the activity mode
cannot support the function.
2.2 Exam Editor
The QClick system software allows you to take *.qc files and convert them easily at the touch of a
button.
To use the Exam Editor, follow these steps:
1. Select Exam Editor Tab window.
2. To edit an existing .qc file, click the Open button which will display the file browser
allowing you to select a file.
3. To create a new .qc file, click the New button which displays a new .qc template.
4. To add a new slide, click the button to select the template options from the
drop down list then click on .
www.qomo.com 21
Copyright © 2009 All Rights Reserved by QOMO HiteVision.
Page 22

5. To save the edited .qc file, click the button.
6. To save the current open .qc file by another file click the button.
7. To delete the current slide from the .qc file, select the slide you desire to delete then click the
Delete button on the PC keypad.
8. To close the edited .qc file, close the Question Setting window directly.
9. To edit the current slide, click the button, this will display you the Question
Info window allowing you to edit the question information.
10. To choose a standard for your question setup, click the button, this will
display you the Standard window allowing you to choose the standard(s) from.
2.2.1 Open :
The Open function is used to open an existing .qc file for editing. A file browser will appear after
clicking the Open button allowing you to choose a .qc quiz file. The default loading path is Desktop.
2.2.2 New :
The New function is used to create a new *.qc file. Clicking the New button will bring up a blank .qc
file.
2.2.3 Questions Setup
To set up the questions, go to the Exam Editor Tab open an existing .qc file by pressing from
the file browser or to open a new blank .qc file, this will display you the Question Setting
window. If a .qc file is open, the file name will be displayed on the top of the window bar, confirming
you are setting up the questions for the quiz file. Then under the Question Setting window select
the tab. This will display the Question Info window.
Copyright © 2009 All Rights Reserved by QOMO HiteVision.
www.qomo.com 22
Page 23
To set up questions for an opened *.qc file, follow these steps:
Open a *.qc file from the Exam Editor, refer to session 2.2.1 Open; click Open in the menu bar
shown at the top of this window, allowing you to open an existing *.qc file. You can also create a
new *.qc file from the Exam Editor, refer to session 2.2.2 New; click on New shown in the menu
on the top of this window to open a new *.qc file. Under the Question Setting window select the
Question Info Tab, display the Question Info window:
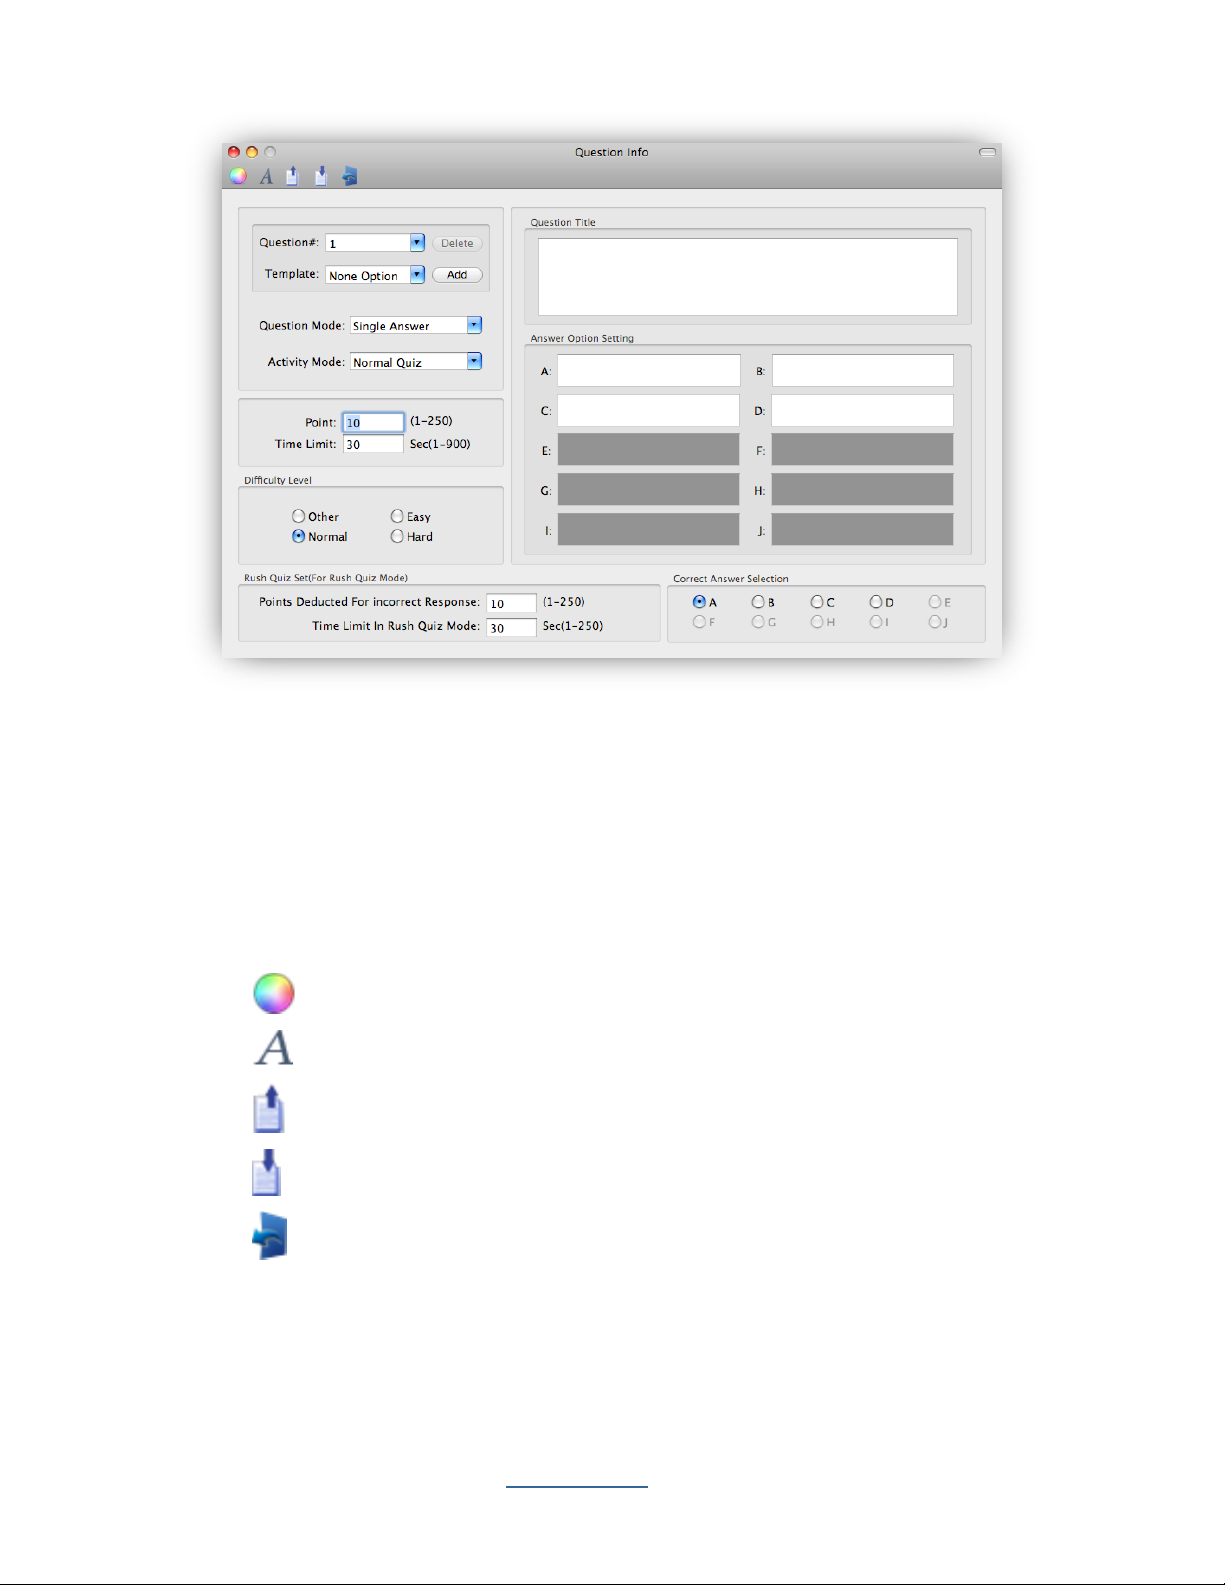
1. Window Menus:
–Select the text color
–Selection of a typeface for the text.
–Display the previous question.
–Display the next question.
–Return to Question Setting window.
2. Function Items:
Question#: -- Select the question you desire to set up from the Question# drop-down
list.
Copyright © 2009 All Rights Reserved by QOMO HiteVision.
www.qomo.com 23
Page 24

Add a Question: -- Click the Add button to add an additional question
right after the currently displayed question.
Delete a Question: -- Click the Del button to delete the currently
displayed question.
Template: -- Click the Template drop-down list to select the template for the current
question set up.
Question Mode: -- Click the Question Mode drop-down list to select the question mode
for the current question set up.
Activity Mode: -- Click the Activity Mode drop-down list to select the activity mode for
the current question set up. This function is used for using in the Normal Quiz, Rush
Quiz and Elimination when used in the Multiple Mode activity.
Question Title: -- The question title window is used to edit the current question title
content. If you create a new .qc file, this window will be blank.
Answer Option Setting: -- Before adding a question, select a template from the
Template drop-down list, the template(s) you selected has the default set answer options
Correct Answer Selection: -- Click on the ratio button next to the letter option to
indicate the correct option.
Point: -- The point value is specified for correct answers. The valid point number is from
1 to 250 and the default value is set to 10.
Time Limit: -- Specifies the time limit for answering the questions. The session running
timer copies this time limit value when every question is started. The valid time is from 1
second to 900 seconds and the default value is set to 30 seconds.
Note: The new set timer value in a running session will overwrite the time limit value set here in the
question set up.
Difficulty Level: -- Select the Difficulty Level for the current question setting, by clicking
on the corresponding radio button.
Rush Quiz Set: -- The Rush Quiz Set is only applied to the Rush Quiz activity mode.
1. Points Deducted For Incorrect Response: -- Set the point‟s value from 1 to
250 for incorrect answering deduction when the session is in Rush Quiz mode. The
default point is set to 10.
2. Time Limit in Rush Quiz Mode: -- Set the time limit for an answer given in the
Rush Quiz. When a student wins the question rush, then he or she will be given this
amount of time to answer the question.
Copyright © 2009 All Rights Reserved by QOMO HiteVision.
www.qomo.com 24
Page 25

Note: The new set timer value in a running session will overwrite the time limit value set here in the
Rush Quiz question set up.
Note: After question editing finished, by simply pressing the button or directly closing the
Question Info window the system will automatically save the edited contents.
2.2.3.1 Standard Setup
The state education standard can be set up for a question setting. Click the menu Standard under
the Question Setting window, the Standard set up window will display.
The standard hierarchical chart is displayed on the right of the window. Select a standard applied for
the question setting from the chart by clicking the corresponding check box, and then click the OK
button. The standard setting will be saved to the question. This state education
standard is used in the QClick reports system. These controls are displayed on the left of the
Standard window:
Import: -- The Import function is used to import the state education standard XML file. Click
the Import button to display the Import Standard window. Next, click the
Browse button; the import file browser will display. Load in the file and then choose the
standard you desire to import from the list in Choose the standard or standards window.
Current import function only supports XML format files.
Export: -- The Export function is used to export the state education standards to XML files.
Copyright © 2009 All Rights Reserved by QOMO HiteVision.
www.qomo.com 25
Page 26

Click the Export button to display the Export file browser. Save the exporting
standard to the XML format file you desire.
Add: --The Add function is used to add a standard under an existing parent state education
standard. Select the parent standard by clicking the check box on the right hierarchical
standard chart window. Then click the Add button; the Standard Setting
window will display. In the window, enter the code into the Code text box and enter the
standard title into the Title text box. Then click the button Save.
Delete: -- The Delete function is used to delete a standard from the hierarchical standard
chart. Select the standard you desire to delete by clicking the check box on the right
hierarchical standard chart window. Then click the Delete button to delete the
standard. The software will prompt you for confirmation of the deletion.
Save: -- Click the Save button to save all standard setting changes. If you close
the Standard window without saving the change, all the standard setting changes will be lost.
Close: -- Click the Close button to close the Standard window. The software
will prompt you to save the standard setting changes if there are any changes to the
standard setting.
2.2.3.2 Question Modes
The QClick exam system handles 2 question modes: Single Answer and Teaching Plan.
Single Answer: -- Single choice question with only a single correct answer choice.
Teaching Plan: -- If a question is set up as a teaching plan, the question cannot be used as
a quiz question. It is used for the presentation of teaching material.
2.3 Reports
2.3.1 Reports
Click the Reports tab on the QClick main window, this opens the reports tool. QClick Reports has two main categories; Data Manager and Create Report:
Copyright © 2009 All Rights Reserved by QOMO HiteVision.
www.qomo.com 26
Page 27

Data Manager
Creating a new session
Import a data session to the system database from a file
Edit a session
Merge two or more sessions
Delete selected sessions
Save a session to a file
Create Report
Session data are recorded during the session activities in a class; or created by clicking the Create
button. The session information is recorded in the system database once a session is completed.
The QClick Create Reports generates reports from sessions regardless of the activity mode. When
you access the Create Report tab and select an individual or a group of students and the type of
report you desire, QClick organizes the recorded data around the class associated with the previous
session and in the report form you selected.
Copyright © 2009 All Rights Reserved by QOMO HiteVision.
www.qomo.com 27
Page 28

In the Report interface, there are several filters to help you select an engaged session from which
you want a report. If you select All for a filter selection, the filter functioning is Off. The filters are:
Test Title – Related to an individual electronic or paper test title used in the system.
Activity Mode – The mode selected during a test. These modes include Normal Quiz, Paper
Quiz., Homework, Rush Quiz, Elimination, Multiple Mode, Vote, Roll Call.
Type – Indicates session type. For example, class participation, exam, lab or a game. When
an activity mode is selected during a test, the session type is automatically generated. A
session type also can be entered when a new session is created using this reporting
software. Please refer to the Creating a new session in the following headings.
Class – Select a class name to filter a session
Subject – Select a subject name to filter a session
Teacher – Select a teacher name to filter a session
Time period – Select a period of time to cover a date that an activity has taken place to
accurately locate a session
Typically, the session data is recorded after a classroom test activity. When an activity is finished,
the system asks whether you want to save the test session just completed. If the answer is yes, the
session is saved to the system database. In the report tool, the session can be viewed and a report
can be created from the session.
Occasionally, session data is not available. The student scores could be from lab exams or an
activity that is not possible to obtain using the QClick system. However, teachers still want the
system grade book software to include these test results. In this application, the session data can be
entered manually.
Copyright © 2009 All Rights Reserved by QOMO HiteVision.
www.qomo.com 28
Page 29

2.3.1.1 Create New Session
To create a new session, follow these steps:
In Data Manager groups, click the button Create to begin creating a new session.
1. Type in a session name into the Session box.
2. Type in a test title name into the Test Title box. The test title should correspond to the
electronic or paper copy test title or a file name loaded in a classroom activity. In order to
make the session being created consistent with the session generated in an activity test, the
test title is entered for the purpose of filtering to easily locate a session in order to generate a
report.
3. Select a type for the session being created from the drop down list Type.
4. Select a class name for the session being created from the drop down list Class.
5. Select a subject name for the session being created from the drop down list Subject.
6. Select a teacher name for the session being created from the drop down list Teacher.
Copyright © 2009 All Rights Reserved by QOMO HiteVision.
www.qomo.com 29
Page 30

7. Select a date for the session being created, the default set date is the current time that the
system sets. Highlight the concrete date and click the or to edit the date you desire or
you can edit the time manually.
8. Select the total question number from the drop down list Total Questions. The maximum
number default is 99.
9. Questions may now be answered and in any order desired! Questions may be selected from
the drop down list Question #.
10. Select the Difficulty level by selecting from the drop down list Difficulty Level for the
question you are working on.
11. Enter a correct answer for the question you are working on into the box labeled Correct
Answer. The default is set to No Answer.
12. Select the number of options from the drop down list Num of Options. The default number
of options is set to 4.
13. Enter a point value for the question you are working on into the box labeled Point. The
default point value is 10.
14. If you want to associate the question you are working on to a state standard, then you need
to select that association from the drop down list Standard.
15. The question content is optional. It serves as a hint for the current question. It may also be
used as the question comment. Just type in the text or copy and paste the text in the box
marked Question (Optional).
16. Select a student name and ID by clicking the student information row in the Student
Answer area to enter an individual student answer to the current selected question.
17. Repeat step 16 to finish entering all the student answers to the current selected question.
18. Repeat from step 8 to 17 until all questions are finished.
19. Click the Save button and then click the Close button to close the creating a new session
window. The saved session data will be recorded in the system database.
Copyright © 2009 All Rights Reserved by QOMO HiteVision.
www.qomo.com 30
Page 31

2.3.1.2 Import a data session to the system database from a file
In Data Manager groups, click the Import button to open the file browser to import a
session stored in a file. The import and save of session data allows you to transfer this data from
one computer to another. The saving function allows you retrieve a session from the QClick system
database and save it to another file that you have created. The import function allows you to merge
the session data from that data file to a different QClick system database. The file takes the
extension .dat format. Click the Import button to start importing. If the data to be imported is already
in the system database, the software will prompt you with a message saying “The session already
exists”; the importing is still successful.
2.3.1.3 Edit a session
Select a session you wish to edit and then click the Edit button in the Data Manager
Groups to open the Edit Session window. This window contains two tabs; Edit Question and Edit
Student Answer Sheet. Under the two tabs, you can change the session name, session type,
session date, and subject, if desired. All question information contained in the session can also be
modified. Under the Edit Student Answer Sheet tab, you can change the answers to the students.
Copyright © 2009 All Rights Reserved by QOMO HiteVision.
www.qomo.com 31
Page 32

This following section will demonstrate how to:
Modify session information
Re-assign the type of questions
Re-calculate the questions (including point value)
Re-grade the students test
MODIFY SESSION INFORMATION
Session information is contained in both Edit Question and Edit Student Answer Sheet tabs. To
modify the information in a session, follow these steps:
1. Click either the Edit Question or Edit Student Answer Sheet tab.
2. Move the cursor into the Session text box by clicking the session name edit box and then
type the text directly into the box to change the session name.
3. Click the Type drop down list to select the new type of session if desired.
Copyright © 2009 All Rights Reserved by QOMO HiteVision.
www.qomo.com 32
Page 33

4. Clicking or to edit the date you desire or simply edit the date manually.
5. Click the Subject drop down list to select a new subject if desired.
6. Click the Save button and then click the Close button or click the Save and Close button to
close the edit session window. The saved edited session data will be recorded in the system
database. If the edited session data is not saved, the editing changes will be lost.
EDIT QUESTIONS
Editing question(s) will allow you to make these changes:
Edit the correct answer to a question
Change the answer option
Change the difficulty level of a question
Change the point value of a question
Change the associated standard of a question
Follow these steps to edit a question
1. Click the Edit Question tab.
2. Select a question you wish to edit by clicking the question number and highlighting it.
3. Click the Correct Answer edit box in the Questions area and type in the new correct
answer into the box.
4. Click the # Of Options edit box in the Questions area and type in the new number option
you desire. The number entered will be checked against the correct answer. For example, if
you change the number options to 2 but the correct answer is kept as „D‟, this will not
correlate to the existing settings.
5. Click the Difficulty Level drop down list in the Questions area then select a new difficulty
level if desired.
6. Click the Point edit box in the Questions area and type in the new point value you desire.
7. Click the Standard button in the Questions area and select a new standard level for the
question if you choose to associate the standard to the question.
8. Click the Save button then click the Close button or click the Save and Close button to close
the edit session window. The saved edited session data will be recorded in the system
database. If the edited session data is not saved, the editing changes will be lost.
Copyright © 2009 All Rights Reserved by QOMO HiteVision.
www.qomo.com 33
Page 34

EDIT STUDENTS ANSWERS
A student answer can be edited and the correct answer changed. To edit a student answer, follow
these steps:
1. Click the Edit Student Answer Sheet tab.
2. Select the student you choose to edit by clicking the student name and highlighting it in the
Student list window.
3. Select a question you choose to edit by clicking the question number.
4. Click the Answer editing box and type in the new correct answer.
5. Click the Save button then click the Close button or click the Save and Close button to close
the edit session window. The saved edited session data will be recorded in the system
database. If the edited session data is not saved, the editing changes will be lost.
2.3.1.4 Merge two or more sessions
From the session list window, select two or more existing sessions with the same class and subject
and then click the Merge button to begin the merging function. The merge function is
useful when you have a make-up session but don‟t want to keep two separate sessions; one for the
regular and one for the make-up with the same class and the same subject, using the same activity
test. This way, you can merge the make-up session and regular session together to form a single
session. To begin the merge function, follow these steps:
1. Select two or more sessions with the same class and subject from the session list window by
holding the Ctrl key and clicking the session selected. An alternative method to select
multiple sessions would be to hold the Shift key and then click the start and the end session
in the list. All of the sessions between the start and end session are now selected.
2. The Merge button becomes available after step 1. Click the Merge button.
3. If the sessions to be merged have the same class and subject name, quiz file and
number of questions, the merge window will appear; otherwise, an error message will
prompt you to select the same class and the same subject to merge.
Copyright © 2009 All Rights Reserved by QOMO HiteVision.
www.qomo.com 34
Page 35

4. The Merge window consists of two sections. The top section lists all the sessions to be
merged, and the lower section lists a single session to be created. Create a new session
name by clicking the area under the session title, then type in your text.
5. At the bottom of the Merge window there is a check box, you may choose to replace the old
sessions with the new one.
6. Click the Save button to begin merging. The new created session will be stored in the system
database.
2.3.1.5 Delete selected sessions
Select one or more sessions you wish to delete and then click the Delete button in the
Data Manager groups to delete the selected sessions in the list. To delete sessions, follow these
steps:
1. Select the sessions you wish to delete by holding the Ctrl key and click the session you have
selected from the list. You may select multiple sessions by holding the Shift key and clicking
the start and the end session in the list. All of the sessions between the start and the end
session will be selected.
2. Click the Delete button; the system will prompt you with a message verifying the deletion.
Click the Yes or No button to continue or to cancel the deletion.
Copyright © 2009 All Rights Reserved by QOMO HiteVision.
www.qomo.com 35
Page 36

2.3.1.6 Save a session to a file
Select a session from the list you wish to save. In the Data Manager groups, click the Save As
button to open the file browser to save the selected session to a file. The import and
saving of the session data is a pairing function to let you transfer session data from one computer to
the other. The saving function allows you to retrieve session data from the QClick system database
from one computer and save it to a file that you have selected. The import function allows you to
merge the session data from the data file to the other computer‟s QClick system database. The file
takes the extension .dat format. To save a session, follow these steps:
1. Click the session you wish to save from the list.
2. Click the Save As button to begin saving.
3. The file browser will open allowing you to select a file you wish to save the session data into.
4. Click the Save button to start saving. If the session data file already exists, the system will
prompt you to replace it or not. By selecting the No button, the exporting is canceled.
2.3.1.7 Create Report
The QClick reporting system generates various category reports using the student class activity
performance data. There are four categories of reports, each report focusing on different areas.
These categories are:
Individual Student Reports
Class Response Reports
Question Reports
The QClick system generates these reports for the session selected:
Student Grade Report
Student Response Result
Question Report
Copyright © 2009 All Rights Reserved by QOMO HiteVision.
www.qomo.com 36
Page 37

Class Response Report
Study Guide
Class Study guide
Item Analysis
The QClick system provides these reporting functions.
Generate reports
Control of previewing a report
Export reports to PDF format
All reports include a Report Title which includes:
Class Name
Date of Session
Subject Name
Teacher Name
Session Name
Additionally, each report includes the following:
STUDENT GRADE REPORT
The Student Grade Report lists students overall performance in the session.
This list includes:
Report Title
Student name and ID
Copyright © 2009 All Rights Reserved by QOMO HiteVision.
www.qomo.com 37
Page 38

Correct answer ratio relating to the total number of questions.
Correct answer percentage.
Total points for student performance in the Session
Copyright © 2009 All Rights Reserved by QOMO HiteVision.
www.qomo.com 38
Page 39

STUDENT RESPONSE RESULT
The Student Response Result provides detailed information for each question by the student.
This report includes:
Report Title
Student name and the total points earned during the session
Questions and option content
Student answer and checker
Copyright © 2009 All Rights Reserved by QOMO HiteVision.
www.qomo.com 39
Page 40

QUESTION REPORT
The Question Report provides a composite analysis of each question.
This report includes:
Report Title
Question and option content
Answer Key per question
Distribution bar chart for the selected options.
Copyright © 2009 All Rights Reserved by QOMO HiteVision.
www.qomo.com 40
Page 41

CLASS RESPONSE REPORT
The Class Response report provides a composite analysis of the overall class performance.
The Class Response report list includes:
Report Title
Question and option content
Student response percentages per question
Highlighted correct answer per question
Copyright © 2009 All Rights Reserved by QOMO HiteVision.
www.qomo.com 41
Page 42

STUDY GUIDE
The Study Guide report provides a list of incorrect answers per student. It also provides the
information to the instructor which is necessary to develop a study guide for the individual student.
The Study Guide report includes:
Report Title
Incorrect Question and option identification per student
Correct/Incorrect answer comparison per question for each student
Copyright © 2009 All Rights Reserved by QOMO HiteVision.
www.qomo.com 42
Page 43

CLASS STUDY GUIDE
The Class Study Guide report lists the percentage of incorrect answers per student in the class as
well as no response to the question. The Class Study Guide report list includes
Report Title
Student name
Incorrect percentage
Question number, indicating the correct answer and the incorrect answer per student
Copyright © 2009 All Rights Reserved by QOMO HiteVision.
www.qomo.com 43
Page 44

ITEM ANALYSIS
The Item Analysis report provides an analysis of the options available for every question in the
session. A table is provided showing the overall response percentage of the class to the individual
item. The Item Analysis report includes:
Report Title
Question number
List of all option items and the percentage of responses to the item.
Copyright © 2009 All Rights Reserved by QOMO HiteVision.
www.qomo.com 44
Page 45

GENERATE REPORTS
To generate a report, follow these steps:
1. Click a session you wish to generate a report from.
2. Click the Report button in the Create Report group.
3. The Create Report window appears the session name, class and teacher name for the
selected session are displayed on the top of the window. The list of students in the class is
displayed in the Student List window and all of the available report formats are displayed in
the Report Format window.
4. Select the student(s) by checking the box in front of each student name or by clicking the
Select All check box to select all students.
5. Select the report formats desired from the list in the Report Format window by checking one
of them. The item selected will be highlighted.
6. You can double click the report format you select or click the Preview button to preview the
report contents.
CONTROL OF PREVIEWING A REPORT
Copyright © 2009 All Rights Reserved by QOMO HiteVision.
www.qomo.com 45
Page 46

The tool bar on the top of Create Report window provides optional controls for previewing a report.
Go to the first page of report viewing
Go to the previous page of report viewing
Go to the next page of report viewing
Go to the last page of report viewing
Go to the particular page you wish by typing the page number in the Go to page
dialogue window
Export a preview report to PDF format
Select a zoom control from the Zoom drop-down list to properly view a
report.
EXPORT REPORTS
The preview report can be exported to these third-party software applications:
Adobe Acrobat (*.pdf)
To export a preview report, follow these steps:
1. From the tool bar on the Create Report preview window, click the Export Icon
2. The Export Report file browser window will be displayed.
3. Type in the file name of the exporting report in the File Name text box.
4. Click the Save button to begin exporting. If the preview report is long, it may take some
additional time to export.
Copyright © 2009 All Rights Reserved by QOMO HiteVision.
www.qomo.com 46
Page 47

2.3.2 Course Grade
Click the Reports tab on the QClick main window then click the Report button. This opens the
reports tool. Under the report tool tab, select the Course Grade tab. The QClick Course Grade has
two main categories; Data Manager and Create Report:
Data Manager
Course Grade set up
Create Report
Course Grade session data are stored when a session activities is completed. The course grade
session data may include the detailed question information and the answer and score to each
question, like the report session data or may just contain the overall grade information for the
session not associated with any question. For example, the course grade session is about an overall
lab grade. The QClick Course Grade Create Report generates reports from the Weight List and
Conversion List associated to the group. (See the detail about how to set up the Weight and
Conversion List in the Course Grade set up session.) The Weight setting should match the
selection of the course grade sessions. For example, if a Weight setting includes the attribute of
“Attendance” in the list, then the selection of the group of Course Grade should include a session
with a type of “Attendance”. Click the Create Report tab to enter the Session Select window.
In the Course Grade tab window, 4 filters allow you to select a group of course grade sessions for generating the course grade book. These filters are:
Grading Period – Set up in the Course Grade Setting window to define the start and end
date for the grade book.
Copyright © 2009 All Rights Reserved by QOMO HiteVision.
www.qomo.com 47
Page 48

Class – Select a class name associated with the course grade session.
Subject – Select a subject name associated with the course grade session.
Teacher – Select a teacher name associated with the course grade session.
There are 2 settings associated with the course grade book. These settings are:
Weight List– Select in the Course Grade Setting window; this sets the weight percentage
in the course grade book for a type in the course grade sessions.
Conversion List –Select in the Course Grade Setting window; this associates letters to the
final score of the group in the course grade sessions.
2.3.2.1 Course Grade Set Up
The QClick course grade setup interface provides users a method of defining the setup for
generating a grade book. To generate a grade book, firstly choose the class name, subject, teacher
and grading period from the drop down list. Next, determine how to calculate the final score based
on these sessions. The weight list and conversion list will allow you to select a list from. The course
grade setup also provides a method to define a list of session types. For example, you may define
several exams in one semester into types, Term1 exam, Term2 exam, Mid Term exam, and final
Term exam. The Session Type provides an interface to define a list of types to be used in the
weight setting. Finally, the course grade setup provides a letter grade setup to output the letter grade
based upon your setup parameters. To enter the Course Grade set up, click the button Set
Up under the Data Manager group. Course Grade set up includes
Set Period
Set Weight
Letter Grade
Session Type
To set up a grading period, follow these steps:
Copyright © 2009 All Rights Reserved by QOMO HiteVision.
www.qomo.com 48
Page 49

1. Click the Set Up button in the Data Manager group.
2. Select the Set Period tab; the set period window appears.
3. The text box window on the top shows a summarized help guide providing information on
how to add a new period, and how to edit and delete an existing period.
4. To add a new period, right click on the data showing area, then select Add from the dropdown menu.
5. The system assigns the default grading session title name and assigns the current date as
the starting and ending date of the period.
6. To edit an existing period, click on the period data you choose to edit. Click the Grading
Session if you choose to edit the grading session title name. To change the date period,
select the date in the “From” or “To” area.
7. To delete an existing period, right click on the period setup you choose to delete. Then select
Delete from the pop-up, drop-down menu.
To set up a weight, follow these steps:
Copyright © 2009 All Rights Reserved by QOMO HiteVision.
www.qomo.com 49
Page 50

1. Click the Set Up button in the Data Manager group.
2. Click the Set Weight tab; the set weight window appears.
3. The text box window on the upper left corner provides a summarized help guide showing
how to add a new weight setup, and how to edit and delete an existing weight setup.
4. To add a new weight setup, click on the system template in Weight List, then select the
class name, subject name, and teacher name associated to the weight from the drop-down
lists. Enter the weight title in the Weight Title text box.
5. All the session types set up in the course grade setup are shown in the weight list. Each
session type has a weight setting associated with it. Click on the weight item to enter the
percentage of the selected weight item you wish to edit.
6. Click the checkboxes corresponding to the weight applied to the course grade report. The
total weight percentage added together should be 100%.
7. To edit a weight setup, click the weight item you wish to edit in the Weight List window. Edit
the contents in the Option window, as previously described.
8. To delete a weight setup, right click the weight item you wish to delete in the Weight List
window. From the popup drop-down menu select delete.
Copyright © 2009 All Rights Reserved by QOMO HiteVision.
www.qomo.com 50
Page 51

To set up a letter grade, follow these steps:
1. Click the Set Up button in the Data Manager group.
2. Click the Letter Grade tab; the letter grade window appears.
3. The text box window on the upper left corner provides a summarized help guide showing
how to add a new letter grade conversion, and how to edit and delete an existing letter grade
conversion.
4. To add a new letter grade conversion, click on the system template in Conversion List then
select the class name, subject name, and teacher name associated with the letter grade
conversion from the drop-down lists. Enter the conversion title in the Conversion Title text
box.
5. Edit the letter and points by clicking on the item. To add more letters or to delete a letter
conversion, right click on the letter list window, and then select add or delete from the popup,
drop-down menu. The points range setup should not be overlapped!
6. To edit a letter grade conversion, click on the conversion you wish to edit in the Conversion
List. Edit the items in the Option window as previously described.
7. To delete a letter grade conversion, right click the letter grade conversion you wish to delete
in the Conversion List window. From the popup, drop-down menu select delete.
Copyright © 2009 All Rights Reserved by QOMO HiteVision.
www.qomo.com 51
Page 52

To set up a session type, follow these steps:
1. Click the Set Up button in the Data Manager group.
2. Click the Session Type tab; the session type window will appear.
3. The text box window on the top provides a summarized help guide showing how to add a
new session type, and how to edit and delete an existing session type.
4. To add a new session, right click in the session type data and then select Add from the
popup, drop-down menu. Enter the session type name. The new added session type will be
shown in the weight setup list. Please refer to the Weight setup session.
5. To edit a session type, click on the session type you wish to edit.
6. To delete a session type, right click on the session type you choose to delete in the Session
Type window. From the popup, drop-down menu select delete.
2.3.2.2 Create Course Grade Report
The QClick Course Grade system generates a course grade report using the student class
performance data. Usually, the course grade report covers a period of time, which includes many
completed session data in the period. Typically this period would be a semester. The generation of
the course grade book is based upon the weight set up for each type of session included in the
Copyright © 2009 All Rights Reserved by QOMO HiteVision.
www.qomo.com 52
Page 53

period defined. For detail on how to set up the weight, please check the session 2.3.2.1 Course
Grade Set Up.
Note: The weight used for the Course Grade report generation should contain the number of
session types exactly the same as the number of session types included in all sessions selected for
the Course Grade period.
You should select a set of letter grade conversions to finish the configuration before generating the
Course Grade report. The grading period, class name, subject name, and the teacher name work as
filters allowing you to select the sessions used to create the Course Grade report.
To generate a Course Grade report, follow these steps:
1. Under the report window select the Course Grade window tab.
2. Select a class name from the Class drop-down list.
3. Select a subject name from the Subject drop-down list.
4. Select a teacher name from the Teacher drop-down list.
5. Select a grading period from the Grading Period drop-down list.
6. Enter the Course Grade book name in the Subject Grade text box
Copyright © 2009 All Rights Reserved by QOMO HiteVision.
www.qomo.com 53
Page 54

7. Select a weight set for the Course Grade report from the Weight List.
8. Select a letter grade set for the Course Grade report from the Conversion List text box.
9. Click on the button to begin create the report.
Note: The Course Grade report is uniquely determined by the time period, class name, subject
name and by the teacher name.
Click the Create button under the Create Report group. If there are no errors involving
the weight setting, the Session Select window will be displayed.
The Session Type, Weight and Letter Grade will be listed on the top of the window. According to
the session type listed above, select session(s) with the same type(s) listed below. Click the
button to open the Create Course Grade Report window. These are the four reports for
the Course Grade:
Copyright © 2009 All Rights Reserved by QOMO HiteVision.
www.qomo.com 54
Page 55

1. Progressive Report – Lists each session points for a student and the session class average
points before the weight setting is applied.
2. Academic Summary – Lists each type of session average points for a student and the class
average point for this type of session before the weight setting is applied.
3. Course Grade Summary – Lists each type of session average points for a student and the
class average point for this type of session after the weight setting is applied. This list also
includes the letter grade for each session, the final grade point and the final letter grade for
the student.
4. Class Grade Report – Lists all students final grade point and their letter grade in the class.
Select one of these four reports and click on the Preview button to preview the
Course Grade Report. The preview report can be exported to PDF file.
To preview the report and export the preview report, please refer to the session 2.3.1.7 Create
Report about the portion EXPORT REPORTS and CONTROL OF PREVIEWING REPORT.
To generate the Progressive Report, follow these steps:
Copyright © 2009 All Rights Reserved by QOMO HiteVision.
www.qomo.com 55
Page 56

1. Follow the above 9 steps to generate a Course Grade Report, open the Create Course
Grade Report window.
2. Click Progressive Report from the four reports listed in the window.
3. Select the student you choose to report by clicking on the student name in the Course
Grade Report list.
4. Click the Preview button and the Progressive Report window for the student will be
displayed.
Copyright © 2009 All Rights Reserved by QOMO HiteVision.
www.qomo.com 56
Page 57

To generate the Academic Summary, follow these steps:
1. Follow the above 10 steps to generate a Course Grade Report then click the Create button
under the Create Report group to open the Create Course Grade Report window.
2. Click the Academic Summary from the four reports listed in the window.
3. Select the student you choose to report by clicking on the student name in the Course
Grade Report list.
4. Click the Preview button and the Academic Summary window for the student will be
displayed.
Copyright © 2009 All Rights Reserved by QOMO HiteVision.
www.qomo.com 57
Page 58

To generate the Course Grade Summary, follow these steps:
1. Follow the above 9 steps to generate a Course Grade Report then, open the Create
Course Grade Report window.
2. Click Course Grade Summary from the four reports listed in the window.
3. Select the student you wish to report by clicking on the student name in the Course Grade
Report list.
4. Click the Preview button and the Course Grade Summary window for the student will be
displayed.
Copyright © 2009 All Rights Reserved by QOMO HiteVision.
www.qomo.com 58
Page 59

To generate the Class Grade Report, follow these steps:
1. Follow the above 9 steps to generate a Course Grade Report, open the Create Course
Grade Report window.
2. Click Class Grade Report from the four reports listed in the window.
3. Click the Preview button and the Class Grade Report window for the class will be displayed.
Copyright © 2009 All Rights Reserved by QOMO HiteVision.
www.qomo.com 59
Page 60

2.3.2.3 Save Course Grade
Under Create Course Grade Report window, press the Save button to save the course grade, the
system will automatically generate a grade book of the saved session.
2.3.3 Grade Book
Click the Reports tab on the QClick main window, this opens the reports tool. Under the report tool tab, select the Grade Book tab. The QClick Grade Book has two main categories; Data Manager and Create Report.
Copyright © 2009 All Rights Reserved by QOMO HiteVision.
www.qomo.com 60
Page 61

Data Manager
1. Import a grade book to the system database from a file
2. Save a grade book to a file (refer to section 2.3.2 Course Grade)
3. Delete a grade book in the system database
Create Report
Select the grading period you wish to create from the Grading Period drop-down list. Select the
students you wish to create in the grade book from the student list window. And select the class and
teacher you wish to create from the drop down list. In the Create Report group click the
Preview button to preview a student grade book. A grade book for a student integrates the
student course grade for a time period such as a semester or an academic year. Select the student
you wish to report and select the grade book report period. The class name and the teacher name
will help filter the student selection. If you choose to turn off the filter in order to view all students in
the list, select “All” from the drop-down list of Class name and Teacher name.
2.3.3.1 Import a grade book to the system database from a file
In the Data Manager groups, click the Import button to open the file browser to import a
grade book stored in a file. The import and saving of grade book data is a pairing function allowing
you to transfer one or more course grade data from one computer into another. The saving function
allows you to retrieve one or more course grade data from the QClick system database in one
computer to save it to a dedicated file name and path. The import function allows you to merge the
course grade data from the data file into another computer QClick system database. This file takes
the extension “.gbd” format.
2.3.3.2 Save a grade book to a file
Select a grading period you choose to save from the Grading Period drop-down list. In the Data
Manager groups, click the Save As button to open the subject selection dialog window.
From the window, select one or more subjects you choose to save to the grade book. If you select
one subject, the related course grade data regardless of class selection will be exported. If you
select all subjects, the grade data for all subjects regardless of class selection will be exported. After
the subject selection, a file browser will open allowing you to select or enter the file and path you
Copyright © 2009 All Rights Reserved by QOMO HiteVision.
www.qomo.com 61
Page 62

wish to use for the saving file. The import and saving of the grade book data is a pairing function
allowing you to transfer the grade data for one or more subjects from one computer into another.
The saving function allows you to retrieve the course grade data for one or more subjects from the
QClick system database in one computer, and save it to the file you have chosen. The import
function allows you to merge the grade data for one or more subjects from the data file into another
computer‟s QClick system database. The file takes the extension “.gbd” format. To save a grade
book, follow these steps:
1. Under the report window select the Grade Book window tab.
2. Click the Grading Period drop down list and select the period you choose to save.
3. Click the Save As button to open the subject selection dialog window.
4. Select one or more subjects in the subject selection dialog window and click the OK button.
5. The file browser is open allowing you to provide a dedicated file name and path to save the
grade book data into.
6. Click the Save button to start exporting.
2.3.3.3 Delete a grade book in the system database
Select the grading period you wish to delete from the Grading Period drop-down list. In the Data
Manager groups, click the Delete button to open the subject selection dialog window.
From the window, select one or more subjects you want to delete from the grade book. If you select
one subject, all grade data associated with this subject regardless of classes are deleted from the
system database. If you select all subjects, the grade data for all subjects regardless of classes are
deleted. To delete a grade book, follow these steps:
1. Click the Grading Period drop down list and select the period you choose to delete.
2. Click the Delete button to open the subject selection dialog window.
3. Select one or more subjects in the subject selection dialog window and click the Ok button.
4. The deletion confirmation message window is open to ask if you want to delete or not.
Copyright © 2009 All Rights Reserved by QOMO HiteVision.
www.qomo.com 62
Page 63

2.3.3.4 Create Grade Book Report
Select the grading period you wish to create from the Grading Period drop-down list. Select the
students you wish to create in the grade book from the student list window. In the Create groups,
click the Preview button to open the Create Report window. The student grade book
report is actually the report card that includes the period, a list of subjects the student has taken and
the student score and letter grade for each subject. To control viewing the preview report and how to
export the preview report, please refer to session 2.3.1.7 Create Report about the portion EXPORT
REPORTS and CONTROL OF PREVIEWING REPORT.
To generate a student report card, follow these steps:
1. Under the report window select the Grade Book window tab.
2. Select a grading period from the Grading Period drop-down list.
3. Select a class name from the Class drop-down list, if you don‟t want the class to filter the
student list, select “All” from the list. (if desire)
4. Select a teacher name from the Teacher drop-down list, if you don‟t want the teacher to filter
the student list, select “All” from the list. (if desire)
5. Check the boxes by the student names to select the students that you wish to generate the
report card for.
6. Click the Preview button to preview the report card.
Copyright © 2009 All Rights Reserved by QOMO HiteVision.
www.qomo.com 63
Page 64

EXPORT REPORT CARD
The preview report can be exported to (*.pdf) file.
To export a preview report, follow these steps:
1. From the tool bar on the Create Report preview window, click the Export Icon
2. The Export Report file browser window will be displayed.
3. Type in the file name of the exporting report in the File Name text box.
4. Click the Save button to begin exporting. If the preview report is long, it may take some
additional time to export.
Copyright © 2009 All Rights Reserved by QOMO HiteVision.
www.qomo.com 64
Page 65

2.4 Settings
2.4.1 System:
The System settings contain audio settings and the instructor remote control mouse sensitivity
settings (This function is not available in this system).
The audio setup allows the selection of sounds to be used when entering a quiz, starting a quiz, and
completing a quiz.
To set up the audio sounds, follow these steps:
1. Select Settings Tab.
2. Click the System icon; this will display the System Settings window.
3. Click on the sound activity check boxes you desire and the Browse… button will be
displayed. Click the Browse button; this will display the sound file browser. Select the
desired sound file for the activity and then click the Save button to save it into the system.
4. Repeat step 3, if you desire to set up additional sounds for other activities.
Copyright © 2009 All Rights Reserved by QOMO HiteVision.
www.qomo.com 65
Page 66

Note: If the check box is unchecked, the sound will be muted for that activity.
2.4.2 Remote ID:
The function is used to set up the student remote keypad device ID. All settings require the user to
log in the system to perform.
2.4.2.1 Students
Student ID
There are two ways to set up the student device ID.
1. Click the Set button to set up the student device ID.
To set the student device ID, follow these steps:
1) From the main QClick window, select Settings tab, then click Remote ID to display the Set Remote ID window. The default shows the Students tab.
2) Enter the remote ID number into the text box under New ID: on the right by directly
typing or clicking the digital up or down buttons next to the box.
3) Press and hold the key „B‟ and then press the key „Rush Quiz‟ on the student keypad.
4) After the red indication light start flashing, release both keys at the same time.
5) Click the Set button to set the new ID you have entered.
Copyright © 2009 All Rights Reserved by QOMO HiteVision.
www.qomo.com 66
Page 67

Note: Once the new ID has been set successfully, the color of the Set button changes to green. If
the set up is failure, the color changes to red.
2. You can also click the Test button to set up the student remote ID.
To set up the student device ID, follow these steps:
1) Click the Test button to display the Set Remote ID and the Hardware Test window.
2) Press and hold the key „B‟ and then press the key „Rush Quiz‟ on the student keypad.
3) After the red indication light start flashing, release both keys at the same time.
4) Click a row number on the table to set the device ID to the corresponding row number.
(You can turn the pages by clicking the button or )
Note: Once the new ID has been set successfully, the color of the row you click changes to green. If
the set up is failure, the color changes to red.
Test
You can click the Test button in the students tab or click the Hardware under Settings
window to test the student remote keypad stroke.
To use the hardware test tool, follow these steps:
1. Click the Hardware button to display the Hardware test window.
2. Press a key on the student keypad; the key result will display on the corresponding ID row.
(This test can only test one student keypad for a time.)
3. Press a key on the instructor keypad; the result will display on the teacher‟s key grid.
You may press the Reset button to clear the test results; turn the pages by clicking the
button or and press the OK button to close the test window.
Copyright © 2009 All Rights Reserved by QOMO HiteVision.
www.qomo.com 67
Page 68

2.4.2.2 Teacher
To reset the instructor remote keypad, follow these steps:
1. From the main QClick window, select Settings tab, then click Remote ID to display the Set
Remote ID window.
2. Select the Teacher tab.
3. Press and hold the key „Start‟ and then press the key „OK‟ on the instructor keypad.
4. After the red indication light is flashing, release both keys at the same time.
5. Click the Set button to set the new ID.
Note: Setting the new ID means that the instructor keypad would match the currently plugged in
main receiver channel.
Copyright © 2009 All Rights Reserved by QOMO HiteVision.
www.qomo.com 68
Page 69

Note: Once the new ID has been set successfully, the color of the Set button changes to green. If
the set up is failure, the color changes to red.
2.4.2.3 Channel Set
To set the host main receiver channel number and the band number, follow these steps:
1. From the main QClick window, select Settings tab, then click Remote ID to display the Set
Remote ID window.
2. Select the Channel Set tab.
3. The software will prompt you to login again to double check if you have the authority to
change the main receiver channel.
4. After login, the Set Remote ID window displays. Enter the new channel number into the text
box next to the Channel No.. Then click the Send button .
5. If you want to set a new band for the setting channel. Enter the new band number into the
text box next to the Band. Then click the send button
6. Click the Close button to close the setting.
Note: The valid channel number is from 0 to 49 and the valid band number is from 0 to 3.
Copyright © 2009 All Rights Reserved by QOMO HiteVision.
www.qomo.com 69
Page 70

Channel No.: The channel number has been preset by the factory. Only under very rare
circumstance it is needed to change the channel and band to avoid the interference with other
nearby host.
Once the channel number has been changed, the instructor‟s remote and all the student remote
keypads channel need to be reset in order to make sure the system will work properly.
Band: Normally the band is used for the test purpose. It is managed automatically by the software.
The default band is 0.
2.4.3 Hardware test:
You can click the Hardware under Settings window to test the student remote keypad stroke.
To use the hardware test tool, follow these steps:
1. Click the Hardware button to display the Hardware test window.
2. Press a key on the student keypad; the key result will display on the corresponding ID row.
3. Press a key on the instructor keypad; the result will display on the teacher‟s key grid.
You may press the Reset button to clear the test results; turn the pages by clicking
the button or and press the OK button to close the test window.
Copyright © 2009 All Rights Reserved by QOMO HiteVision.
www.qomo.com 70
Page 71

Note: If the computer goes into the sleep mode during the hardware test interface, then the system
may not have any response to the student keypad. Don’t worry, at this time, you just need to close
the interface and reopen it again.
2.4.4 Database Management:
The QClick system database management will perform some basic database management
operations including database backup and recovery. Additionally, you can also perform basic data
clean up such as deleting session test data, deleting students, teachers, classes, and subjects
records. Please use caution in backing up important data and information before using the data
clean up, once the data or records are purged, there is no way to rollback deleted information.
2.4.4.1 Database Backup:
Backup the current database to a file which can be used for recovery. Remember the login
information for later use when you need to access the recovery information from this backup file.
Copyright © 2009 All Rights Reserved by QOMO HiteVision.
www.qomo.com 71
Page 72

2.4.4.2 Database Recover:
A backed up file can be used to recover the database information.
Caution: All records in the current database will be lost after the recovery operation. Please change
the login information immediately.
2.4.4.3 Clear Session:
This operation will clear all user generated and created records. You will be prompted to backup the
database if desired.
To use the database management tool, follow these steps:
1. Select Settings Tab.
2. Click the Database icon; this will display the Data Management window.
3. Click the Backup button, if you desire to backup the current database.
The backup file browser will be displayed allowing you to select the desired file to use for the
backup.
4. Click the Recover button, if you want to recover the database from a file.
The recover file browser will be displayed allowing you to select the file for recovery.
5. Click the Clear Session button; if you want to clear all test data from a session.
The software will prompt you to backup the current database first.
Note: The cleared session test data cannot be recovered without backing the database containing
the session test data.
2.4.4.4 Del All Records:
1. Click the Del All Records button, if you want to delete all input records. The
software will prompt you to backup the current database first.
Note: The delete all records cannot be recovered without backing up the database containing the
records.
2. Click the OK button to close the Data Management window.
2.4.5 Login Setup:
The default login name and password are: Login: qomo; Password: qomo. It is recommended to
change these settings after the first time using the QClick software.
Copyright © 2009 All Rights Reserved by QOMO HiteVision.
www.qomo.com 72
Page 73

To change the login user name and the password, follow these steps:
1. Select the Settings Tab.
2. Click the Login Set icon; this will display the Change Password window.
3. Enter the current user name and the password and then enter the new user name and the
new password. The new password needs to be re-entered to confirm the charge.
4. Click the OK button to save it into the system.
2.4.6 Version Info:
Version Info is used to display the QClick system hardware and software version information as
well as the PC Microsoft Office and window operating system version info.
To view the version information, follow these steps:
1. Select the Settings Tab window.
2. Click the Version Info icon; this will display the Version Info window. The
information for the Windows Operating System version, the host main receiver hardware
version and the current QClick software version will displayed in this window.
3. Click the OK button to close the Version Info window.
Copyright © 2009 All Rights Reserved by QOMO HiteVision.
www.qomo.com 73
Page 74

Part 3. Hardware & System
Installation Illustration
3.1 Student keypad
3.1.1 Specifications
Dimensions (l w h): 104mm x 49mm x15 mm
Buttons on Remote: (3) Rush Quiz, (4) A-F
Power required: 2 AAA Batteries
Transmission distance: ~200 feet
Battery life: > 6 months
Function: Transmit response signals
Each student keypad is labeled with an ID number. The ID number can be set and reset by the
manager. This feature is very important, if one student keypad is lost or damaged, don‟t worry, you
can replace a spare remote by just resetting its ID number.
3.1.2 Illustration
1. Transmission window
2. Indicator light
3. Button for “Rush Quiz” activity mode
4. Choice buttons, labeled “A” to “F”
Copyright © 2009 All Rights Reserved by QOMO HiteVision.
www.qomo.com 74
Page 75

3.2 Instructor keypad
3.2.1 Specifications
Dimension (l w h): 104mm x 49mm x 15mm
Buttons: 11
Power required: 2 AAA Batteries
Transmission distance: ~200 feet
Battery life: >1 year
Function: Used by the instructor/presenter
3.2.2 Illustration
1. Transmission window, it is used to transmit RF signal.
2. Indicator light
3. Laser pointer
4. “Power”, it used to start/stop the presentation of the PPT
files and start/stop an activity.
5. “F1” function button
6. “F2” function button
7. “Report”, it is used to display the Score Board.
8. “Result”, it is used to display histogram of results.
9. “OK”
10. “Up” is used to control the presentation of PPT slides: page-up.
11. “Down” is used to control the presentation of PPT Slides: page-down.
12. “Start” and “Pause”, it is used to start gathering the response information of the audience
remotes; when pressed again, and it will be used to pause the timer while the receiver
continues to gather information.
13. “Stop”, it is used to stop gathering the response information from the participants‟ remotes.
Copyright © 2009 All Rights Reserved by QOMO HiteVision.
www.qomo.com 75
Page 76

3.3 Main Receiver and USB Cable
Used to receive signals from the remotes and send information. The main receivers is connected to
computer through USB cable
Specifications
Dimension (l w h): 76mm x 23mm x 10mm
Weight: 26g
Operating Temperature: 0-40 degree
Operating Relative Humidity: 0-90%
Receiving distance: ~200 feet radial
Function: Used to receive signals from the remotes, and send information to the computer.
Illustration
1. Antenna Terminal.
2. Power light (Signal light): when the main receiver is
plugged into the USB port of a computer, the power
light will light up red. The flashing red light indicates the
main receiver is receiving and processing the data.
3. Antenna: helps pick up weak signal to extend the working distance.
4. Extension USB: extends the connection between the
main receiver and the computer.
3.4 Keypad pack
Convenient carrying case that holds student keypad, instructor keypad, receiver, software disk, and
cables
Copyright © 2009 All Rights Reserved by QOMO HiteVision.
www.qomo.com 76
Page 77

QOMO HiteVision
Michigan, USA
Information: info@qomo.com
Phone: 1-866-990-QOMO (1-866-990-7666)
Fax: 1-248-281-1999 (US) or 1-248-281-1998
Web: www.qomo.com
Copyright © 2009 All Rights Reserved by QOMO HiteVision.
www.qomo.com 77
 Loading...