

Page 1
Page 2

Table of Contents
Product Features
LCD Monitor Special Considerations
Precautions
Explanations
Safety Instructions
Warning
Product Maintenance
Careful Use of Power
Safety Precautions
Cleaning and Maintenance
Shipping Safety
Wall Installation
Package Contents
Monitor Appearance Overview
System Installation Steps
Supplementary Key Program Settings
Functions of Shortcut Keys
Stylus
OSD Control Buttons
OSD Menu
Technical Specifications
Troubleshooting
Software
Accessories
Others
01
03
05
06
06
06
07
08
09
09
10
10
11
13
16
17
18
21
22
23
45
46
47
47
48
CONTENT
Page 3

PAGE
01
Product Features
Page 4

PAGE
02
Wide range of diagonal display
Full HD 1920x1080 @ 60Hz
HDMI / VGA dual video input interface
Fast response time, provides a great gaming and
visual experience
Adjustable tilt angle
Wall-mountable, and meets VESA standard
mounting hole
Security lock slot (lock sold separately in
connected lines)
"Plug and Play" (computer system support
required)
Power-saving features to reduce energy
consumption
On-screen Display (OSD) to optimize display
settings easily
3 Shortcut keys, which provides users fast key
functions
Page 5

PAGE
01
PAGE
03
LCD Monitor Special Considerations
Page 6

PAGE
04
Attention
A
B
C
D
LCD problems may occur in the
following, but this does not mean that
the display itself is the problem.As such,
it may not be covered under warranty.
Because of the characteristics of liquid crystal
displays, the initial screen may flash when used
wrongly. Please turn off the monitor screen and then
turn it on to ensure that there are no flickers.
When you use a different desktop pattern, the screen
brightness may exist to be slightly uneven.
Pixel LCD screen is effective or over 99.99%
However, it will have 0.01% or less of the pixels
missing or with a degree of lost brightness.
As the LCD screen runs, with the same image that
keeps showing for a long time, switching the image
displayed might still have the previous residual
image continuing to stay. In this case, by changing
the display image, the display will have a slow
recovery. Start with the computer side of the screen
saver, prevent screen display with a picture for a long
time, or shut down every other few hours. Under the
above actions, it will help to avoid the screen
catching the residual image phenomenon mentioned
above. Residual image phenomenon is not covered
under warranty range.
Page 7

PAGE
05
Precautions
Page 8

PAGE
06
Explanations
■
Manual mentioned in the product specifications are
for information purposes only, and it does not
guarantee its content without any negligence or
error, especially if changed without prior notice.
■
To safeguard the interests of consumers, the
product labels should not be destroyed or
removed, or would affect the warranty date.
Safety Instructions
Please read these instructions and retain this document
for future reference; please observe all the notes and
instructions marked on the product.
Warning
■
Do not use of this product near the water.
■
Do not use this product on an unstable desktop,
pedestal or the ground or push cart. This product
may receive serious damage from tipping over.
■
Do not block or cover the vents on the chassis, to
ensure that the product can give reliable operation
and prevent it from overheating. Do not block or
cover ventilation openings, and do not place it on
the bed of the products, sofa, rug or other types of
similar surface, to avoid plugging the holes.
■
Do not install the screen close to heat sources,
such as radiators, heat, gas, or air ducts. Do not
place next to or directly exposed to sunlight.aa
Page 9

PAGE
07
■
Unless there is normal ventilation, or do not place it
in a confined location.
■
Do not put any object into this product through the
holes of the chassis, or else it may cause a fire.
Do not personally touch, due to the danger of high
voltage electric shock, compartment bits or short
circuit parts. Do not risk placing any liquid near
the product or allow any liquid to spill onto the
product.
■
To avoid damage to internal components and
prevent battery leakage, do not put this product on
the surface with vibrations.
■
Do not put device with motion near monitor or it
may cause a short circuit or damage. It cannot be
expected to be placed near devices with spinning
motions such as transferring devices like hard
drives, CD drives, or even a lithium exposure risk
group. Do not place product with any risk of the
vibration environments.
Product Maintenance
Do not attempt to service this product, because
opening or disassembling this product’s chassis
will give you a risk of high voltage parts or other
hazards. Please request professional service
personnel.
In the following cases, where the appliance's
power plug is from the wall outlet, then contact
professional service personnel:
■
Power cord or plug is damaged, cut, or has abrasion
■
Liquid has been spilled into the product
.
■
Product is exposed to rain or environment with
water
.
■
Products have been dropped or damaged
.
■
Product's performance shows significant difference
that calls for the need for maintenance
.
Page 10

PAGE
08
■
In accordance with the instructions, you cannot
properly operate the product
Note: Please follow the instructions to adjust
controls, adjustments due to errors will damage it,
and it will result in professional and technical
personnel requiring more time to restore the
normal conditions of the product.
Careful Use of Power
■
Please use your screen with the correct local
voltage power line.
■
The screen should be installed near the outlet and
should be easy to plug it in position.
■
To monitor the power supply interruption, please
hold the plug and pull from the wall socket the
plug. Do not pull the power cord to interrupt the
power supply monitor.
■
Do not allow any objects on the power cord. Do not
trample the power cord.
When the following conditions occur, unplug the
monitor’s plug from the wall outlet:
■
If you have a period of time of not using it.
■
When the power cord or plug fails or is frayed.
■
If the product is dropped from a height or chassis
receives damage.
■
Significantly reduced product performance, on
behalf of needed maintenance.
Page 11

PAGE
09
Safety Precautions
■
Avoid placing the monitor or any other heavy objects on
the power line, which may result in fire or electric shock.
■
Do not expose the monitor to rain, excessive
moisture or dust, which may result in fire or
electric shock.
■
Do not cover the slot or open the monitor casing to facilitate
the normal heat dissipation.
■
Please ensure monitors placed on the location has
adequate ventilation space.
■
Avoid placing the monitor in the background too
bright, or in daylight, or other light source that
shines directly on it.
■
Monitor the location of the surface. Please ensure
that the monitor placed directly in the eye is
slightly lower as the level of position.
■
When moving the monitor, please be extremely
careful.
■
Avoid scratching the monitor. Please do not
scratch the screen surface, since the screen is
very fragile.
Cleaning and Maintenance
■
Before cleaning, unplug the monitor's power cord.
■
Use a soft clean dry cloth to clean the shell, glass, and
controls. Do not use any corrosive materials or
solvents, such as alcohol or benzene.
■
Do not sharp or abrasive objects, such as a pencil
or screwdriver to rub, contact, or tap the screen
Page 12

PAGE
10
surface, as this will scratch the screen.
■
Do not put something hot or liquid into the hole
behind the screen. This may cause fire, electric
shock, or component failure.
■
Do not service this product by yourself, such as
opening or removing the cover without
authorization, to protect yourself from electric
shocks or other hazards.
Shipping Safety
■
For transportation of the screen for repair or
shipment, please use the original carton and
packaging materials.
Wall Installation
The screen on the back of four perforations are
VESA flat panel.
The display interface standard set up (FPMPMI)
are there for you to choose relevant cantilever wall
products used in conjunction.
21.5 "screen’s weight is about 6 kg, installation is
as follows:
Please remove the back shelf. The base of the four
M4 screw holes, which meet the VESA Flat Panel
display interface standard set up, are 100 * 100
mm.
Note: screws, wall or cantilever related products
are not included.
Page 13

PAGE
11
Package Contents
Page 14

PAGE
12
When you open the carton, check the carton to
ensure it includes the following:
LCD Monitor
AC power cord
D-Sub signal cable
USB cable
2 Stylus Pen
1Charging cable for stylus
CD (includes setup, operation guide)
Page 15

PAGE
13
Monitor Appearnce Overview
Page 16
PAGE
14
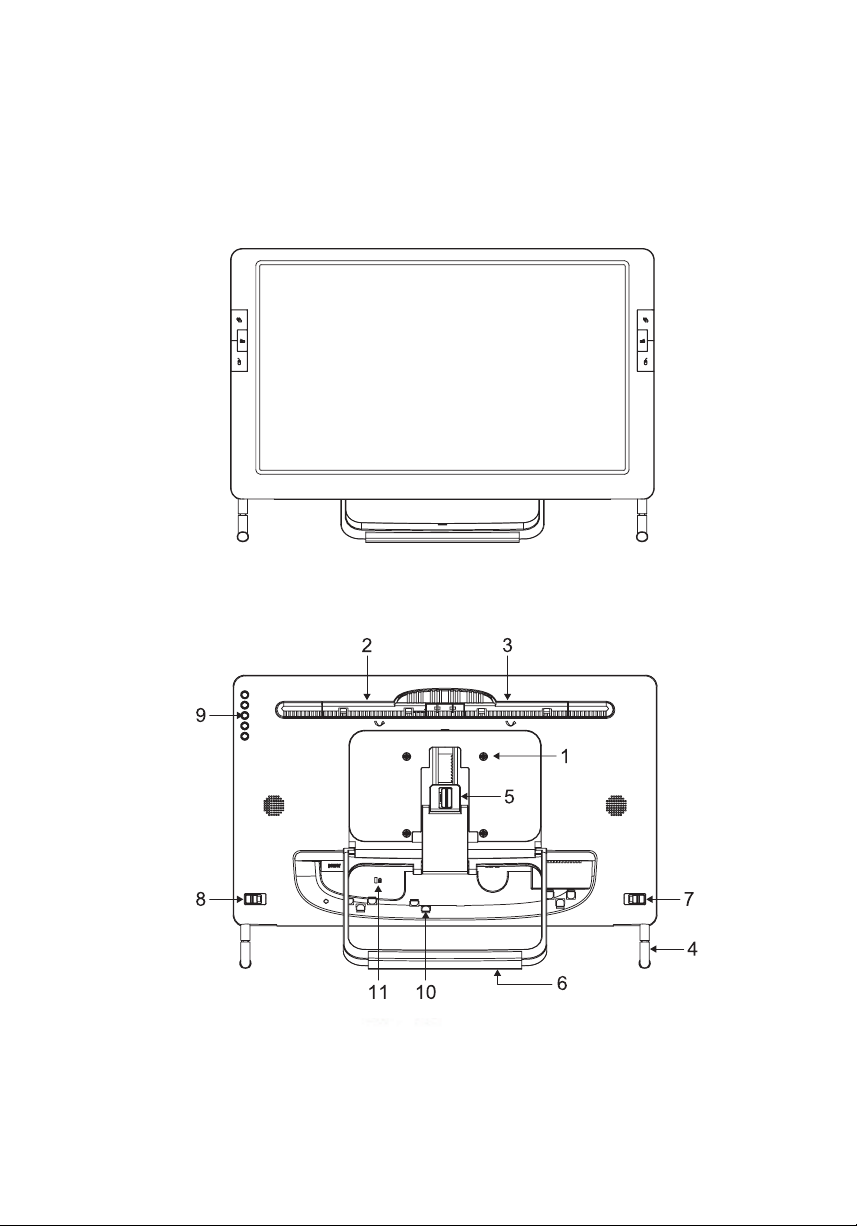
1:Back cover screw holes
2 & 3:Stylus storage
4:Frontal retractable stands
5:Angle adjustments switch
6:Back rack
7 & 8:Frontal retractable
stands adjustments switch
9:OSD controls
10:Clamps to secure chords
11:Anti-theft security keyhole
Monitor Appearance Overview
Front View
Shortcut Keys Shortcut Keys
Back View
Page 17

PAGE
15
Side View
Screen Tilt Adjustment
Page 18

PAGE
16
Systems Installation Steps
Page 19

PAGE
17
System Installation Steps
Please put the CD into the CD-ROM drive. The
installation program will self-execute, followed by
instructions to complete the installation setup
screen action.
After installation, please follow the onscreen
instructions to reboot the computer.
If the installer does not start automatically, please
check the CD-ROM.
Select Setup.exe and double-click with the mouse
for installation.
Supplementary Key Program Settings
After the IDTI_TOUCHPACK program is executed,
look in the system toolbar for the
IDTI_TOUCHPACK icon. Click with the left mouse
button, and the following menu choices will
appear:
For right-handed stylus users, select the "Right
Hander." Selecting this mode will make the left
side of the screen 3 shortcut keys operable, while
the right side of the screen 3 shortcuts will be
closed to prevent the user from inadvertently
touching them.
For left-handed stylus users, select the "Left
Hander." Selecting this
mode will make the right
side of the screen 3
shortcut keys operable,
while the left side of the
screen 3 shortcuts will be
closed to prevent the user
from inadvertently touching
them.
Page 20

PAGE
18
Functions of Shortcut Keys
From the top of the three shortcut keys,
respectively, are the following features:
1. Shortcut Key 1: There is usually a list of running
applications, so use this button to quickly use the
stylus to click to choose:
■
Windows 7 or Windows Vista Aero effect in the
following screen:
■
Without Windows 7 or Windows Vista Aero effect
in following screen:
Page 21

PAGE
19
■
Windows XP appears in the following screen:
2. Shortcut Key 2: The emergence of the virtual
keyboard makes it possible for the stylus to
operate the virtual keyboard for input:
In Windows 7, below is the following picture:
In Windows Vista, below is the following picture:
Page 22

PAGE
20
Under the Windows XP, below is the following
picture:
3. Shortcut Key 3: Press once to enter "Move
Mode." In the bottom right corner, you will be
prompted with the message confirming the mode;
pressing the button again will leave "Move Mode."
"Move Mode" allows the traditional stylus to
simulate a simple mouse movement as a target
function, similar to hovering. This is useful for some
applications or page drop-down menu, designed to
approach by moving the mouse cursor over. When
there will be no need for mouse click action, you can
use the stylus in "Move Mode."
Page 23

PAGE
21
Stylus
■
Charging
Attach either two stylus, which contain lithium
batteries, by connecting the USB charging cable to
the end of the stylus. The tail will be bright green
when charging. Once fully charged, the light will
automatically go out.
■
Twisting the Stylus
The stylus’ silver metal rings in the middle are the
power switch of the stylus. Use one hand to hold
the silver metal rings, and use the other to rotate
around the black part of the stylus. Power switch
operates by twisting the stylus. Twisting to the
opposite direction will power off the stylus.
■
Actual Use
In accordance to the earlier 2 steps by turning on
the stylus power switch, you can begin using the
stylus when it is on. As long as the pressure of the
stylus is on the screen, it will light and can be used
to operate the computer.
Page 24

PAGE
22
OSD Control Buttons
Button 1 Power
Button 2 Menu/Enter
Button 3 Up
Button 4 Down
Button 5 Auto
Button
POWER
MENU/ENTER
+
-
AUTO
Number
Button 1
Button 2
Button 3
Button 4
Button 5
Function
LCD is used to switch
Used to display the menu in order to modify the display settings
Used to select options and increased up to adjust the amount
Used to down select the option and adjust the volume reduction
Used to automatically adjust the LCD screen to the best
(Only D-SUB input valid)
Used as an adjustment in the menu to leave or return to the previous menu level
Page 25

PAGE
23
OSD Menu
OSD Main Menu Screen
Press Menu (MENU) button to open the OSD main menu
screen.
Color Adjustment
1. Press + / - keys to select "Color Adjustment" and then
"MENU" button to enter the selection operation.
2. Press the + / - button to select the items you want to adjust.
3. Press "MENU" button to enter the options operational.
4. Press the + / - button to adjust the settings of the project.
5. Then click the "AUTO" button will be back on the floor
screen.
6. Repeat steps 2 to 5 to adjust other items or click the
"AUTO,” which will return to main menu.
Page 26

PAGE
24
Contrast
Page 27

PAGE
25
Brightness Color Adjustment
Page 28

PAGE
26
Page 29

PAGE
27
Color Temperature
Page 30

Explanation
Press the + / - keys to increase or decrease the screen contrast.
Press the + / - button to brighten or darken images
Press the + / - keys to select the color you want to edit the red, green, blue (1)
Press MENU key to enter and then + / - button to adjust your favorite color screen
Press the + / - key to select a different color temperature
9300 ° K / 6500 ° K / 5800 ° K / USER
Adjustments
Contrast
Brightness
Standard Color Spaces
Color Temperature
Automatic Color Adjustment
Note 1: Only when the color temperature option is set to “USER”will this be adjustable.
Start Mode
D-SUB/HDMI
D-SUB/HDMI
D-SUB/HDMI
D-SUB/HDMI
D-SUB/HDMI
PAGE
28
Auto Color
Function
Page 31

PAGE
29
Image Setting
1. Press the + / - button to select "Image Setting" and then
"MENU" button to enter the selection operation.
2. Press the + / - button to select the items you want to adjust.
3. Press "MENU" button to enter the options operational.
4. Press the + / - button to adjust the settings of the project.
5. Then click the "AUTO" button will be back on the floor screen.
6. Repeat steps 2 to 5 to adjust other items or click the "AUTO,"
which will return to main menu.
Page 32

PAGE
30
1. Clock
Page 33

PAGE
31
2.Phase
Page 34

PAGE
32
3. Sharpness
Page 35

PAGE
33
4.Horizontal Position 5.Vertical Position
Page 36

Explanation
Is fixed at 60Hz, without the user having to adjust
Press the + / - button to adjust the computer screen's clarity and image focus
Press the + / - button to get a clearer picture or more soft
By + / - keys to adjust the position of the screen left and right
Press the + / - button to adjust the screen's upper and lower position
Adjustments
Clock
Phase
Sharpness
Horizontal Position
Vertical Position
Start Mode
None
D-SUB
D-SUB/HDMI
D-SUB
D-SUB
PAGE
34
Function
Page 37

PAGE
35
Menu Adjustment
1. Press the + / - button to select "OSD Menu" and then "MENU"
button to enter the selection operation.
2. Press the + / - button to select the items you want to adjust.
3. Press "MENU" button to enter the options operational.
4. Press the + / - button to adjust the settings of the project.
5. Then click the "AUTO" button will be back on the floor screen.
6. Repeat steps 2 to 5 to adjust other items or click the "AUTO",
which will return to main menu.
Page 38

PAGE
36
1.Horizontal Position
Page 39

PAGE
37
2.Vertical Position 3.OSD Timer
Page 40

PAGE
38
Page 41

PAGE
39
Explanation
Press the + / - button to adjust menu (OSD) screen left and right position
Press the + / - button to adjust the menu (OSD) screen up and down position
Press the + / - button to adjust the length of time for the menu to appear
(0-30 seconds)
Press <> key to select the language: English / English
Adjustments
Horizontal position
Vertical position
OSD timer
Menu Language
Starting Mode
D-SUB/HDMI
D-SUB/HDMI
D-SUB/HDMI
D-SUB/HDMI
4.Language Selection
Function
Page 42

PAGE
40
Signal Source
1. Press the + / - button to select "Signal Source" and then
"MENU" button to enter the selection operation.
2. Press the + / - button to select the desired input signal.
3. Press "MENU" button to confirm selection.
4. Screen darkens first, and then re-appears, where the
upper right corner would show the contents of the input
signal.
5. When you select and the input signal does not exist, the
screen will display "No Signal," and then it will enter the
power saving mode.
Page 43

PAGE
41
1.Input Signal Selection 2.D-SUB (VGA)
Page 44

PAGE
42
Page 45

PAGE
43
Explanation
Select input signal for the D-SUB (VGA)
Select input signal HDMI
Automatically select the input signal exists (when both D-SUB priority)
Adjustable Items
D-SUB
HDMI
Auto Search
Starting Mode
D-SUB
D-SUB
D-SUB/HDMI
3.No Signal Input Reset
Function
Page 46

PAGE
44
1. Press the + / - button to select "Reset" and then
"MENU" button to enter the options operational
2. Resets all the settings back to factory default
Page 47

PAGE
45
TFT-LCD
21.5 Inch Diagonal
0.24825(H)*0.24825(V) mm
1920(H)*1080(V) Pixel
16.7M
16:9
HDMI / D-Sub
67.8 KHz
60 Hz
Multi-touch (2 points)
5 ms (Typ.)
300cd/m2 (Typ.)
1000:1 (Typ.)
170/160 (Typ.)
476.64(H)*268.11(V) mm
6 kg.
552 X 381.5 X 94.5 (mm)
90º~0º
VGA Cable / Power Cord / USB Cable /
Touch Pen*2 / Touch Pen Charger / CD-ROM
Warranty Card / Quick Start Guide
Microsoft Windows 7/ Vista / Windows XP
(Only in Windows 7 Home Premium and above editions can support multi touch)
The entire machine for 3 years, the panel only for 1 year.
(Natural disasters, such as floods or earthquakes, and disasters, such as
handling of machine with negligence, are not included in guarantee)
LCD type
Size
Pixel pitch
Resolution
Number of color
Aspect Ratio
Video Input
H-Freq (KHz)
V-Freq (Hz)
Touch Support
Response time
Brightness
Contrast Ratio
Viewing Angle (H/V)
Active Area
Weight
Dimension (mm)
Tilt Angle
Accessory
OS Support
Guarantee
Technical Specifications
Page 48

PAGE
46
Troubleshooting
Q1. After inserting the USB cable, what if the computer does not capture
the touch device?
A1. Please unplug the USB cable, wait about 15 seconds and then
reinsert it.
Q2. Display resolution cannot achieve 1920x1080?
A2. Make sure to connect the computer, and that the display card driver
is installed properly. If you have not installed the correctly, new graphics
card drivers may be out and your driver is probably out of date. Please
re-install the correct graphics card drivers.
Q3. In the Windows XP login screen, how do you use the virtual
keyboard?
A3. Users can download at the Siemens website to Windows XP login
screen using the virtual keyboard (OSKGina).
http://support.automation.siemens.com/WW/llisapi.dll/22402193?func=ll&
objId=22401977&objAction=csView&nodeid0=10805618%E2%8C%A9=e
n&siteid=cseus&aktprim=0&extranet=standard&viewreg=WW&load=treec
ontent
Q4. When using the stylus to operate, how do you use the corresponding
right function?
A4. Please use the stylus to press and hold, and the screen can
correspond to the right function.
Q5. Both screens are on (one screen for the IS215P), so is there any
normal touch function?
A5. Please set IS215P as the main display screen (that is, the first screen
or the Primary Screen), then you can use the normal touch feature.
Page 49

PAGE
47
Software
Q1. What operating system can be supported so far?
A1. IDTI 21.5” In-Cell multi touch screen supports Windows 7, Vista, and XP.
Windows 7 is recommended for best touch-screen performance.
Q2. Is Mac OS supported?
A2. Mac OS is not yet supported. However, this will be planned out in the near
future.
Q3. Does this product work as a professional tablet?
A3. IDTI IS215P provides all graphic design software. It does not yet support
pressure sensitivity.
Q4. Does it support any graphic software? ex: Microsoft Paint, Adobe
Photoshop
A4. IDTI IS215P provides all graphic design software. It does not yet support
pressure sensitivity.
Accessories
Q1. What type of battery is used for the stylus?
A1. Lithium battery is used for the stylus.
Q2. How do I charge the stylus?
A2. Connect the stylus with the micro USB charger to the USB port on the
computer.
Q3. How long is the battery life of the stylus?
A3. Under normal condition, it takes about 2 hours to fully charge the stylus.
The fully charged stylus can be used for more than 3 days without the need for
charging, and it can stand by for 1,000 hours.
Q4. Can I use 2 styluses at the same time?
A4. IDTI 21.5” In-Cell multi touch screen supports multi-touch function. Please
install Windows 7 Home Premium or higher, and select multi-touch applications
for best user experience.
Page 50

PAGE
48
Last Updated: July 9,2010
Q5. Can I use other optical styluses?
A5. Please use the IDTI official stylus or any IDTI certified accessories only on
IDTI 21.5” In-Cell multi touch screen.
Q6. Would the optical styluses make any scratches after a long period of use?
A6. Scratches will not be made on the screen if the stylus is properly used.
Q7. Do the optical styluses support pressure sensitivity?
A7. IDTI stylus does not support pressure sensitivity.
Others
Q1. Can I disassemble the back mount, and use the monitor on another mount?
A1. The back mount design is based on the standard VESA flat panel
100*100mm. Any mount with standard VESA flat panel 100*100mm will work.
Q2. Is PChome the only sales channel?
A2. You are welcome to call customer services at 0800-001-218 for the nearest
store.
Q3. What should I do when the display is abnormal?
A3. Reset the monitor by the OSD buttons.
1. “Menu” “Down” “Reset” “Menu”
2. “Menu” “Color” “Menu”
3. “DOWN” “AUTO COLOR” “MENU” “AUTO” Exit OSD screen.
Q4. What should I do when the touch screen does not operate normally?
A4. Un-plug the USB wire from the computer, make sure the screen is
connected and displaying correctly. Plug in the USB wire back to the computer.
The screen should be able to function normally after the above steps are
followed.
Page 51

 Loading...