

Page 1
User Manual for KidzFlow! Software
1
KidzFlow! Software
User Manual
© Copyright 2012 QOMO HiteVision, LLC. All Rights Reserved
Page 2

User Manual for KidzFlow! Software
2
Table of Contents
Part 1 Software Overview ............................................................................................................. 3
1. System Requirements ....................................................................................................... 3
2. Software Installation .......................................................................................................... 3
2.2 Installation of Teaching Resource ......................................................................... 8
2.3 Full Installation ................................................................................................. 10
3. Uninstallation of Software ............................................................................................... 10
4. Software Startup ............................................................................................................... 12
5. Offline Application ............................................................................................................ 12
6. Software Modes ............................................................................................................... 13
6.1 Writing Mode ........................................................................................................... 13
6.2 Desktop Mode ........................................................................................................ 14
Part 2 Overview of the Software Interface ................................................................................ 15
1. Functions of the Buttons on the Main Interface ........................................................... 15
Trash ............................................................................................................................... 15
Start ................................................................................................................................ 16
New Page ...................................................................................................................... 21
Page Properties ............................................................................................................ 21
Previous Page ............................................................................................................... 23
Next Page ...................................................................................................................... 23
Effects............................................................................................................................. 23
Resources ...................................................................................................................... 25
Select.............................................................................................................................. 33
Eraser ............................................................................................................................. 33
Tools ............................................................................................................................... 34
Return ............................................................................................................................. 44
Undo ............................................................................................................................... 44
Pen Properties .............................................................................................................. 45
2. Common Pen Tools ......................................................................................................... 47
Pen Container ............................................................................................................... 47
Palette ............................................................................................................................ 48
Types of Pens ............................................................................................................... 50
Part 3 Basic Operation of the Objects in the Software ........................................................... 52
Select Tool ............................................................................................................................. 52
Combine ................................................................................................................................. 53
Lock ........................................................................................................................................ 54
Setting of Visibility ................................................................................................................ 54
Clone ...................................................................................................................................... 54
Display Order ........................................................................................................................ 56
Turn ........................................................................................................................................ 56
Mirror ...................................................................................................................................... 57
Cut, Copy, Paste, and Delete ............................................................................................. 58
© Copyright 2012 QOMO HiteVision, LLC. All Rights Reserved
Page 3

User Manual for KidzFlow! Software
3
Part 1 Software Overview
The KidzFlow! software is created so the interactive whiteboard will engage the
students and assist the teacher in making lessons more fun and interactive. It is filled
with multimedia resources, along with the basic tools needed for teaching and
demonstrating content. Such features include writing, drawing, erasing, animating, and
handwriting recognition tools.
Teachers can make each lesson more exciting while developing the basic skills that
young minds need to learn and grow. Students will be engaged through lessons
promoting observations, asking questions, problem solving, organizing, and doing
hands-on activities. This software is kid-friendly in appearance and is very easy to
operate—it’s so simple that formal training isn’t necessary.
1. System Requirements
The following system configurations are required in order to install KidzFlow! onto
your computer.
Hardware Requirements: Processor inter(R) Core i3 2.27 GHz or above, 2G memory,
and 1G independent video display card.
Software Requirement: Windows 2000/XP/2003/Vista/Windows 7 operating system
Resolution: 1024×768 (16 bit high color or more) screen resolution.
2. Software Installation
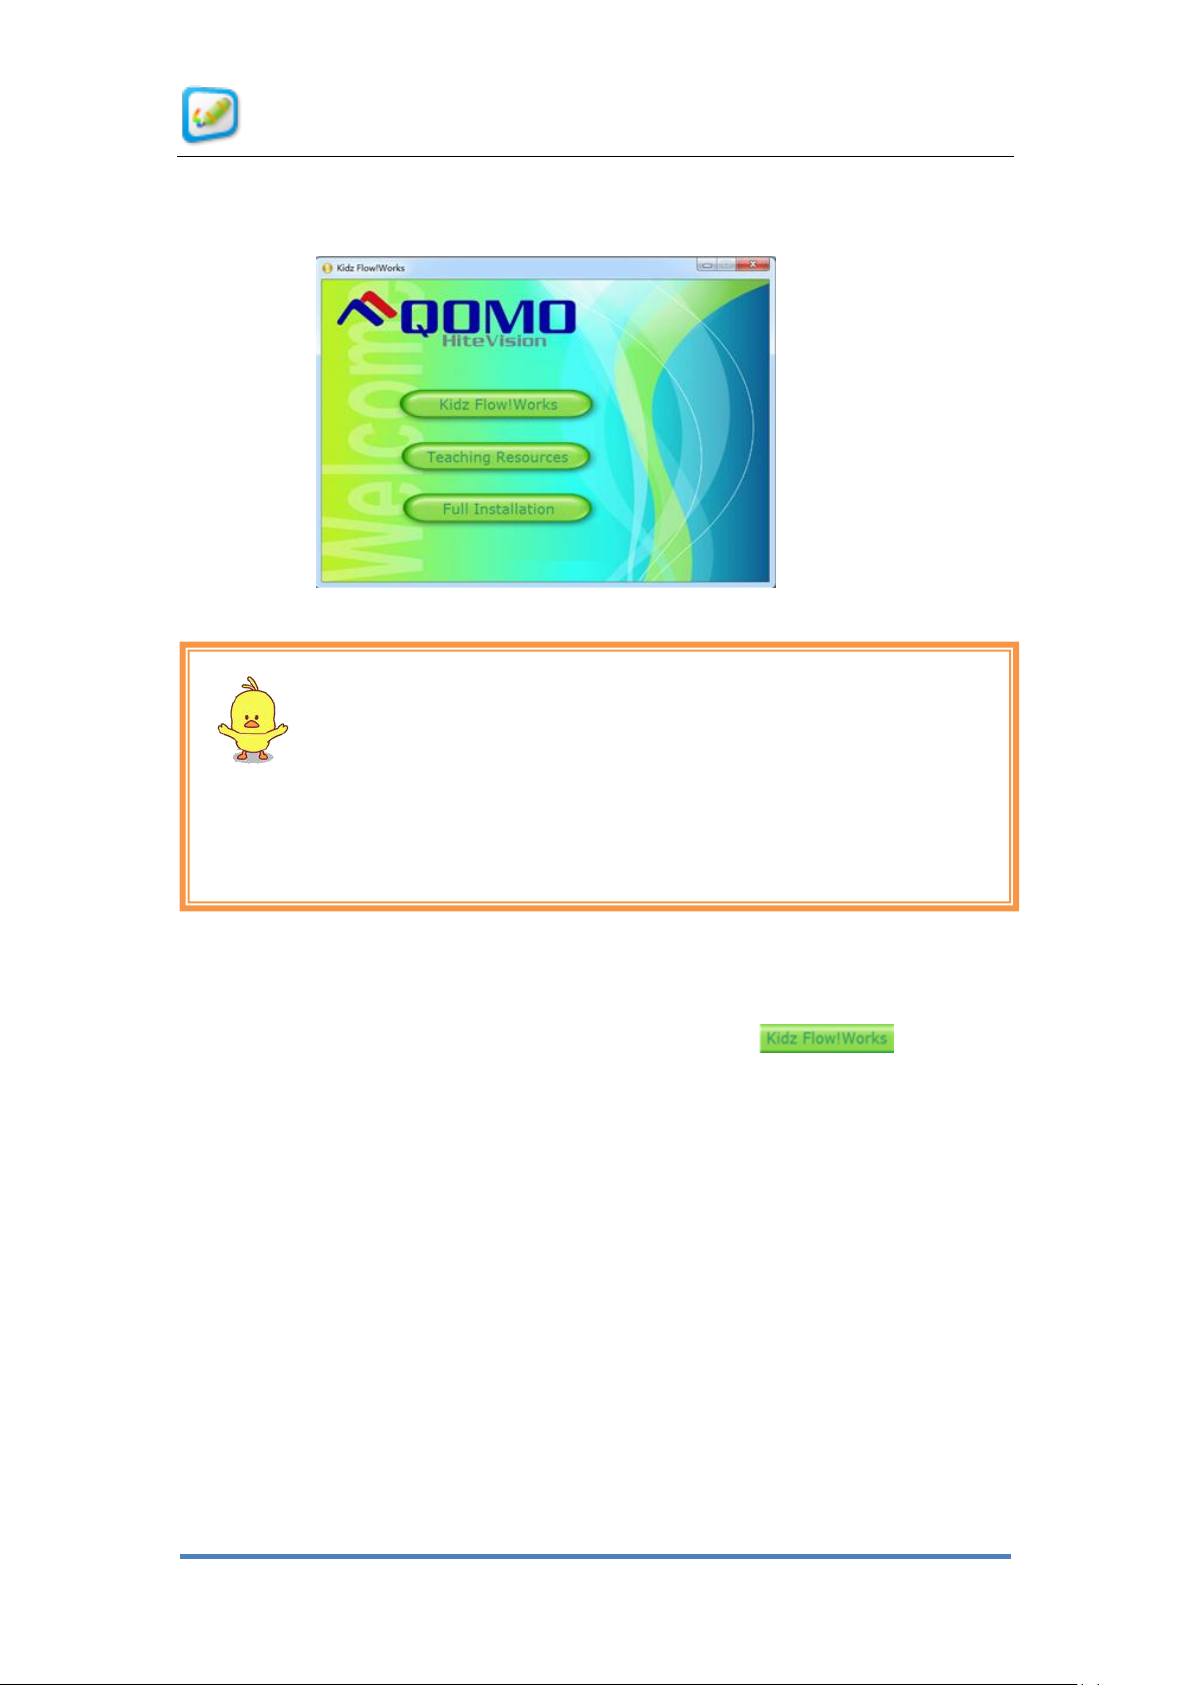
Run the program in the CD installation directory as shown in Figure 1- 1
Initial Interface for Software Installation. The system provides three installation options,
the KidzFlow! interactive whiteboard software, the teaching resources, and the full
© Copyright 2012 QOMO HiteVision, LLC. All Rights Reserved
Page 4
User Manual for KidzFlow! Software
4
Note:
You cannot install the teaching resource without installing the KidzFlow! software first.
If you select the full installation, both parts will install automatically.
installation, which simply bundles the whiteboard software and the teaching resources
together. Users can customize the installation during the setup process.
Figure 1- 1 Initial Interface for Software Installation
1. To begin installation of the whiteboard software, select the button from
the dialog box in Figure 1- 1 Initial Interface for Software Installation. The installation
wizard, shown in Figure 1- 2 Whiteboard Installation Page, will pop up.
© Copyright 2012 QOMO HiteVision, LLC. All Rights Reserved
Page 5
User Manual for KidzFlow! Software
5
Figure 1- 2 Whiteboard Installation Page
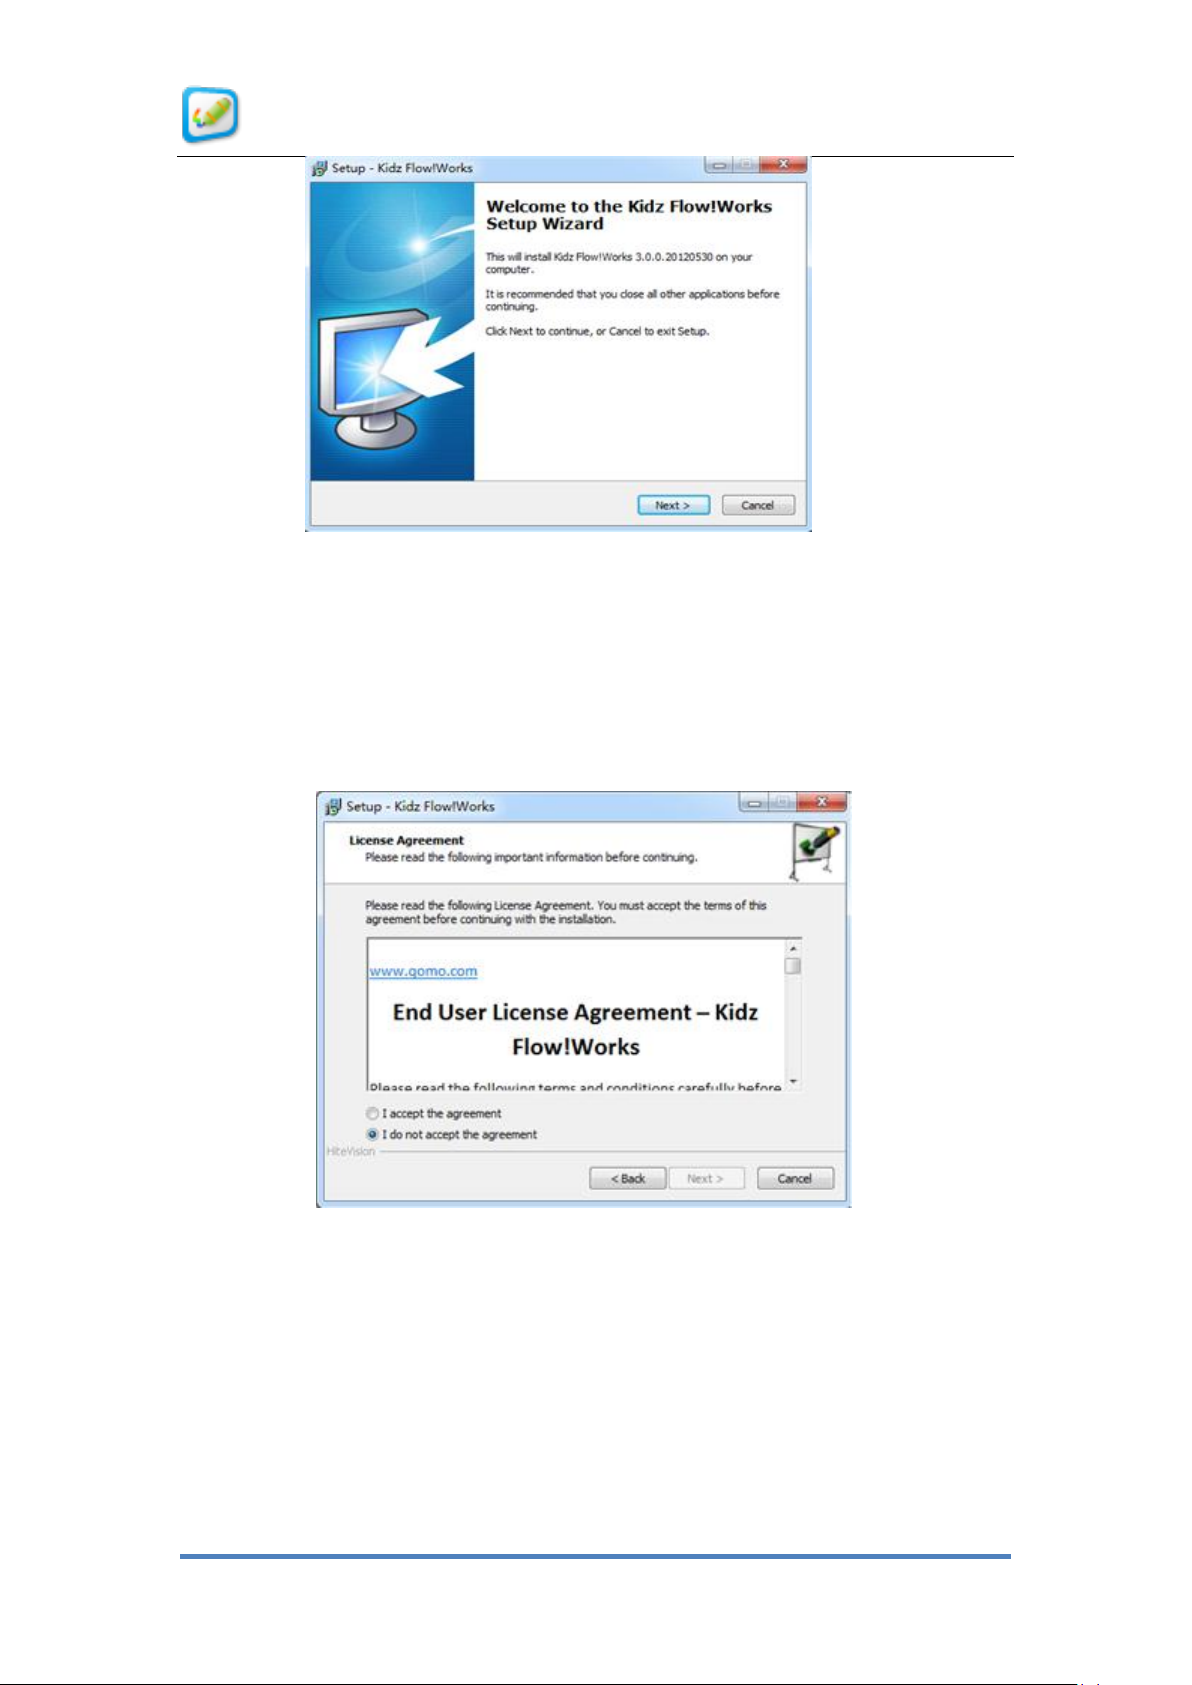
2. Click the Next button to display the License Agreement interface as shown in Figure 1- 3
License Agreement Interface. To continue the installation, go into the License Agreement
interface and select the “I accept to the agreement” option. Click Next to continue with
the installation setup.
Figure 1- 3 License Agreement Interface
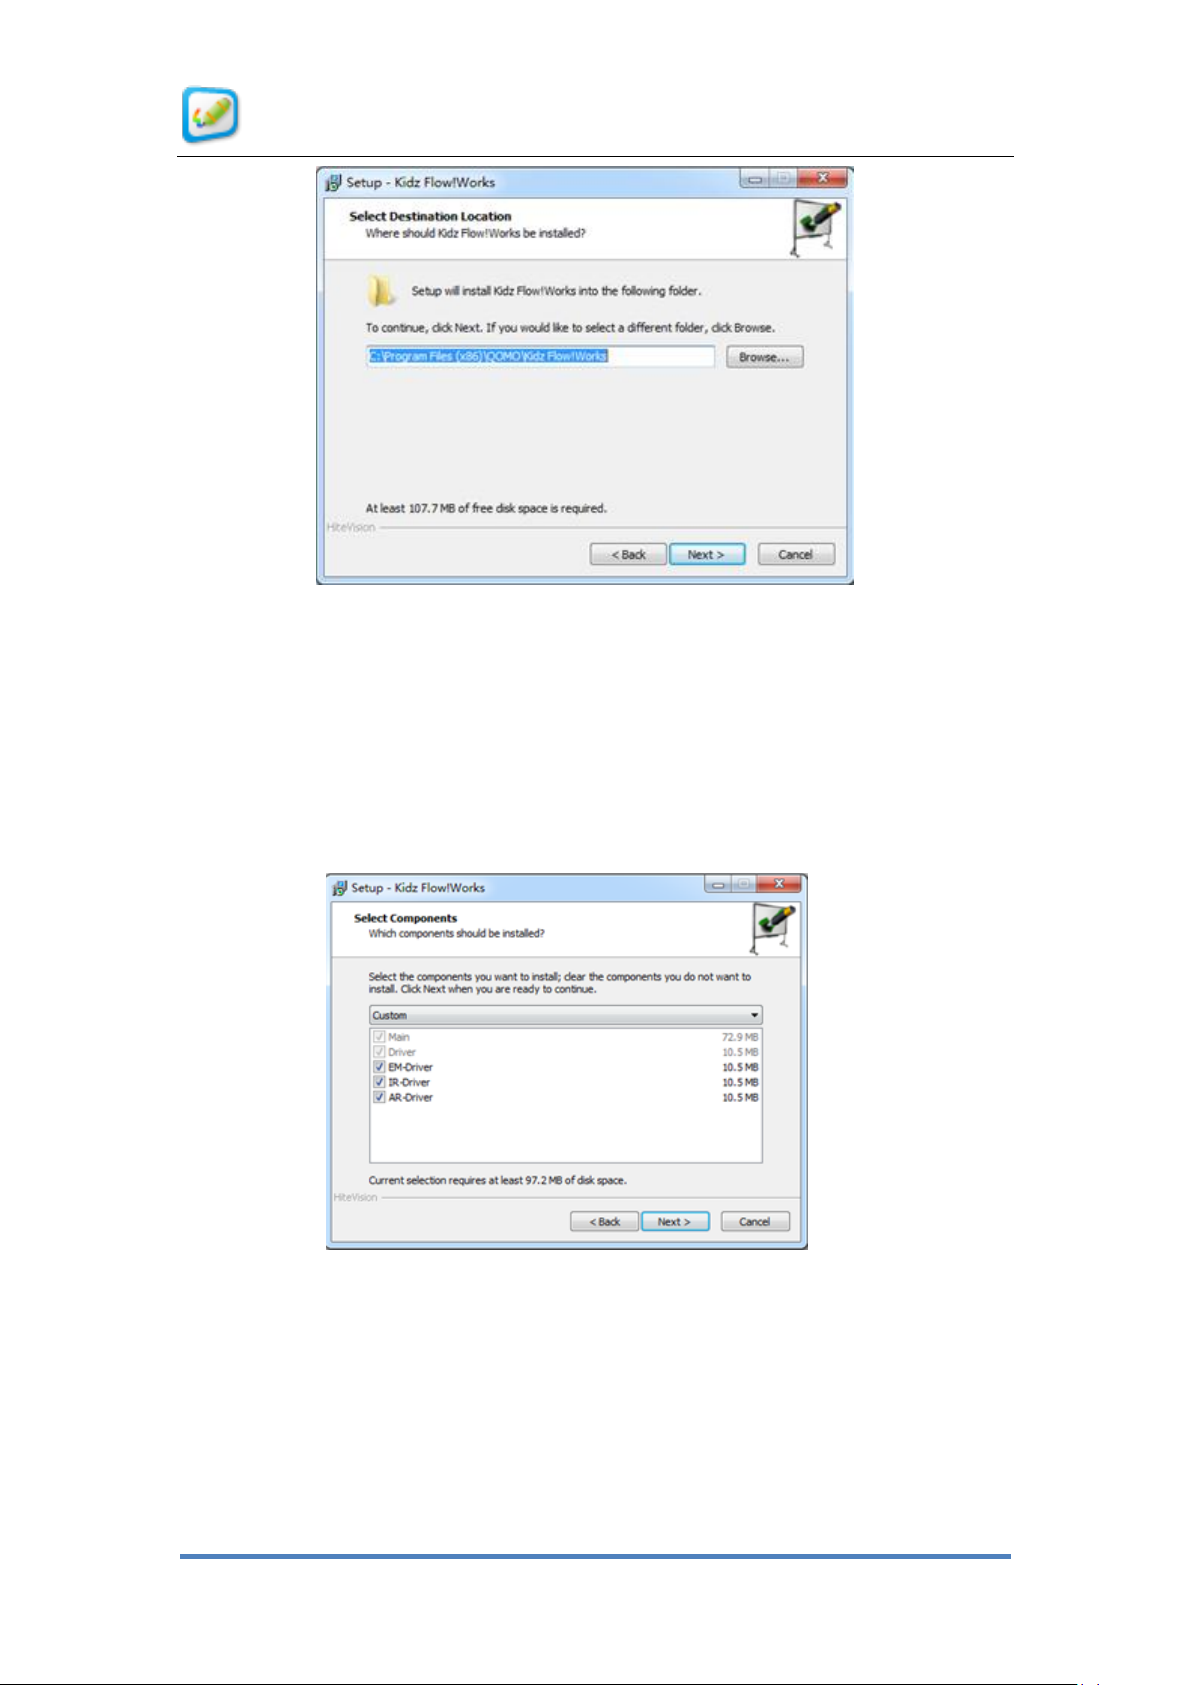
3. The program will automatically install in the C: drive. You can change the installation
location from the Installation Destination dialog box, as shown in Figure 1- 4 Type of
Installation Dialog Box. Click the Next button to continue with the installation setup.
© Copyright 2012 QOMO HiteVision, LLC. All Rights Reserved
Page 6
User Manual for KidzFlow! Software
6
Figure 1- 4 Type of Installation Dialog Box
4. A Select Component Interface box, as shown in Figure 1- 5 Select Component Interface
gives you the option to select which drivers you will need for your white board. All three
drivers are selected by default, but for example, if you are only going to use an EM board,
you can uncheck the boxes for the IR and AR drivers. Click the Next button to continue
the installation.
Figure 1- 5 Select Component Interface
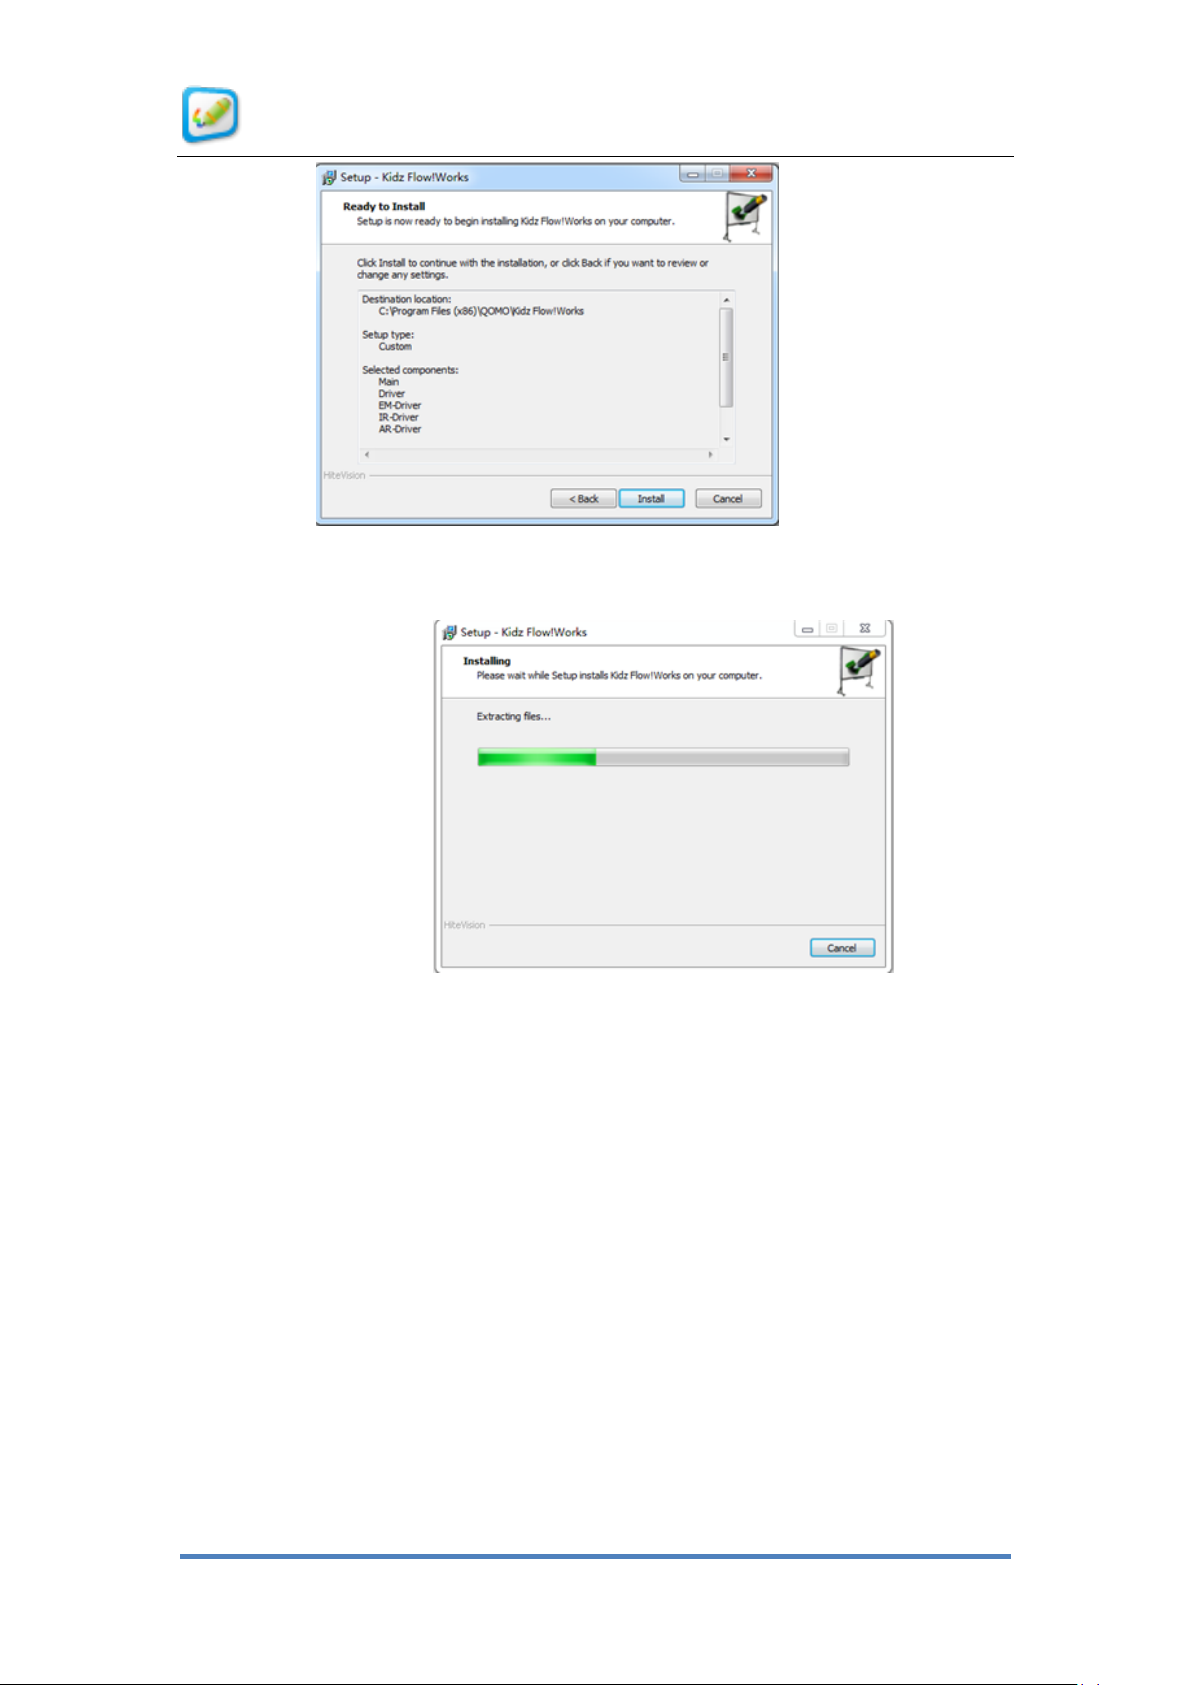
5. The Prepare for Installation screen summarizes the settings that you selected for
installation, as shown in Figure 1- 6 Prepare for Installation. Click the Install button to
launch the installation process.
© Copyright 2012 QOMO HiteVision, LLC. All Rights Reserved
Page 7
User Manual for KidzFlow! Software
7
Figure 1- 6 Prepare for Installation
6. The installation progress bar as shown in Figure 1- 7 Installation Progress .
Figure 1- 7 Installation Progress
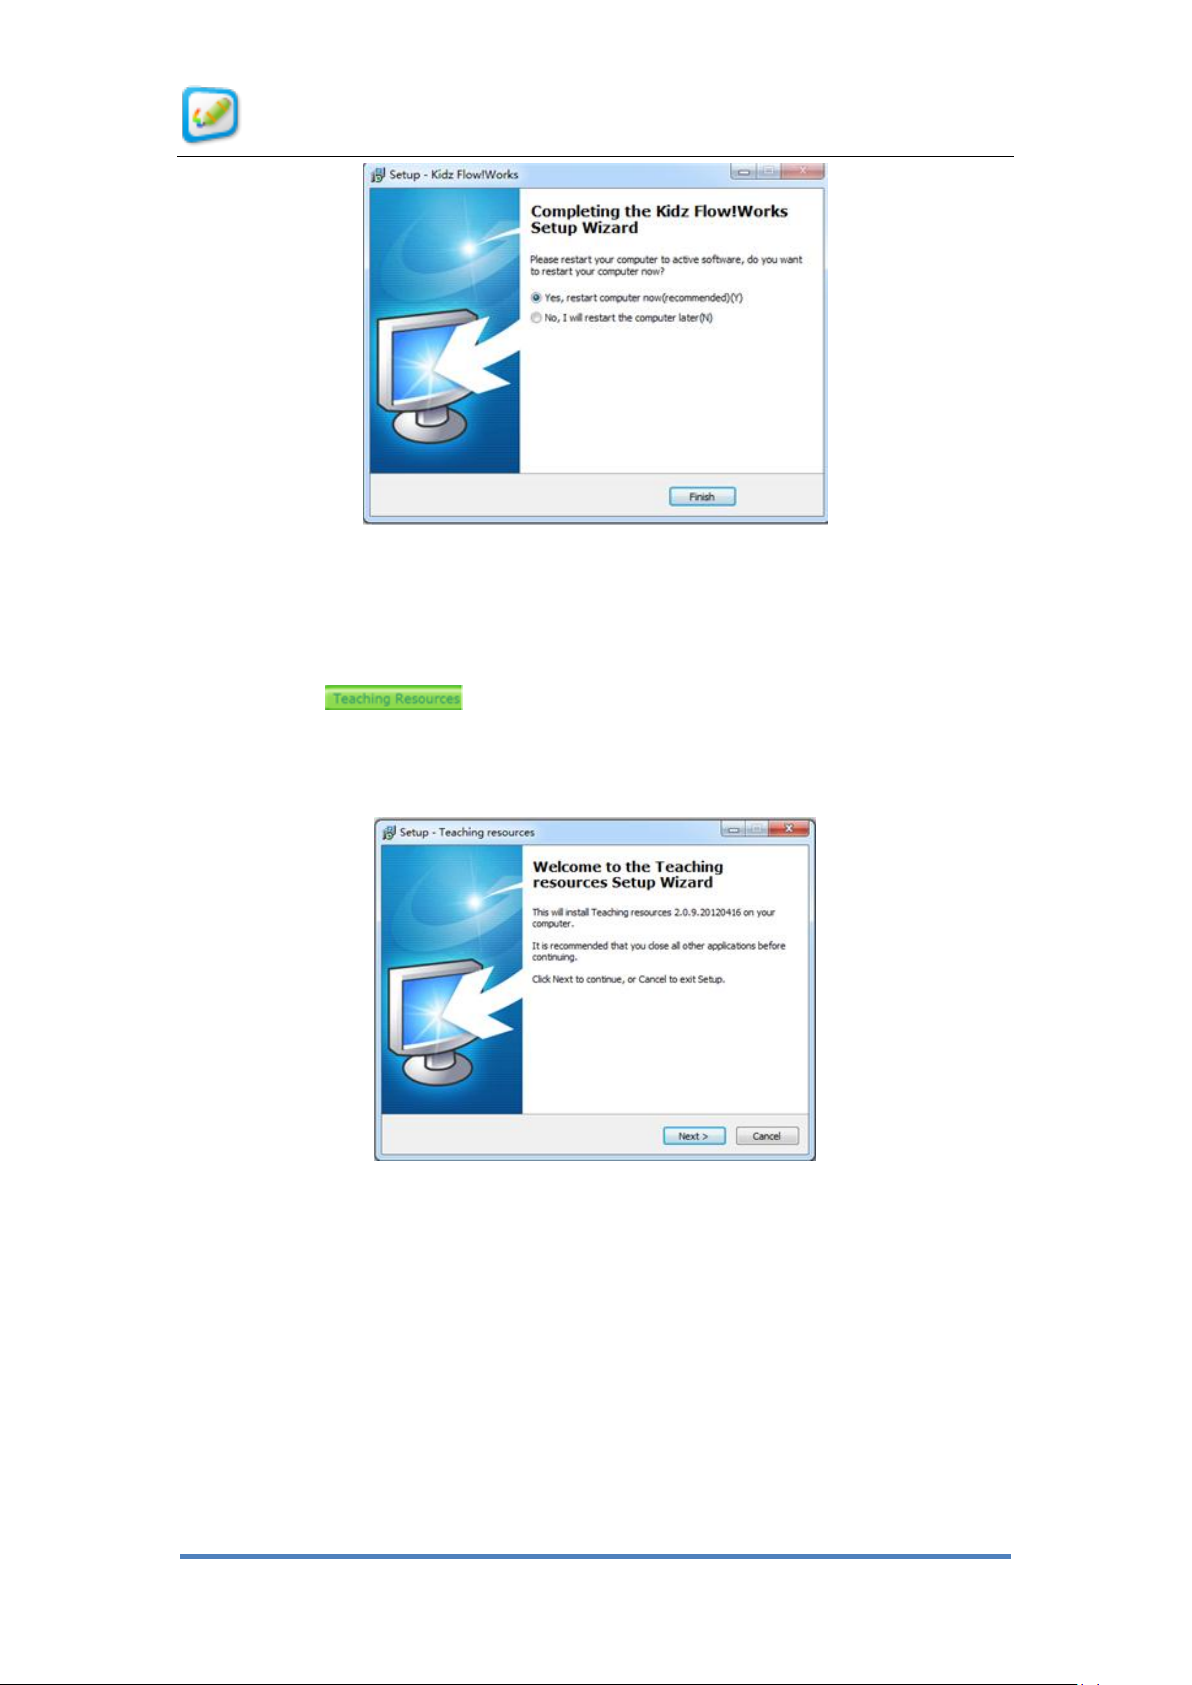
7. Upon completion of the software installation, you will need to restart the computer for
the new program to take effect.
© Copyright 2012 QOMO HiteVision, LLC. All Rights Reserved
Page 8
User Manual for KidzFlow! Software
8
Figure 1- 8 Completion of Software Installation
2.2 Installation of Teaching Resource
1. Select the button from Figure 1- 1 Initial Interface for Software
Installation. The Teaching resources setup wizard window will appear as shown in
Figure 1-9.
Figure 1- 9 Installation of Teaching Resource
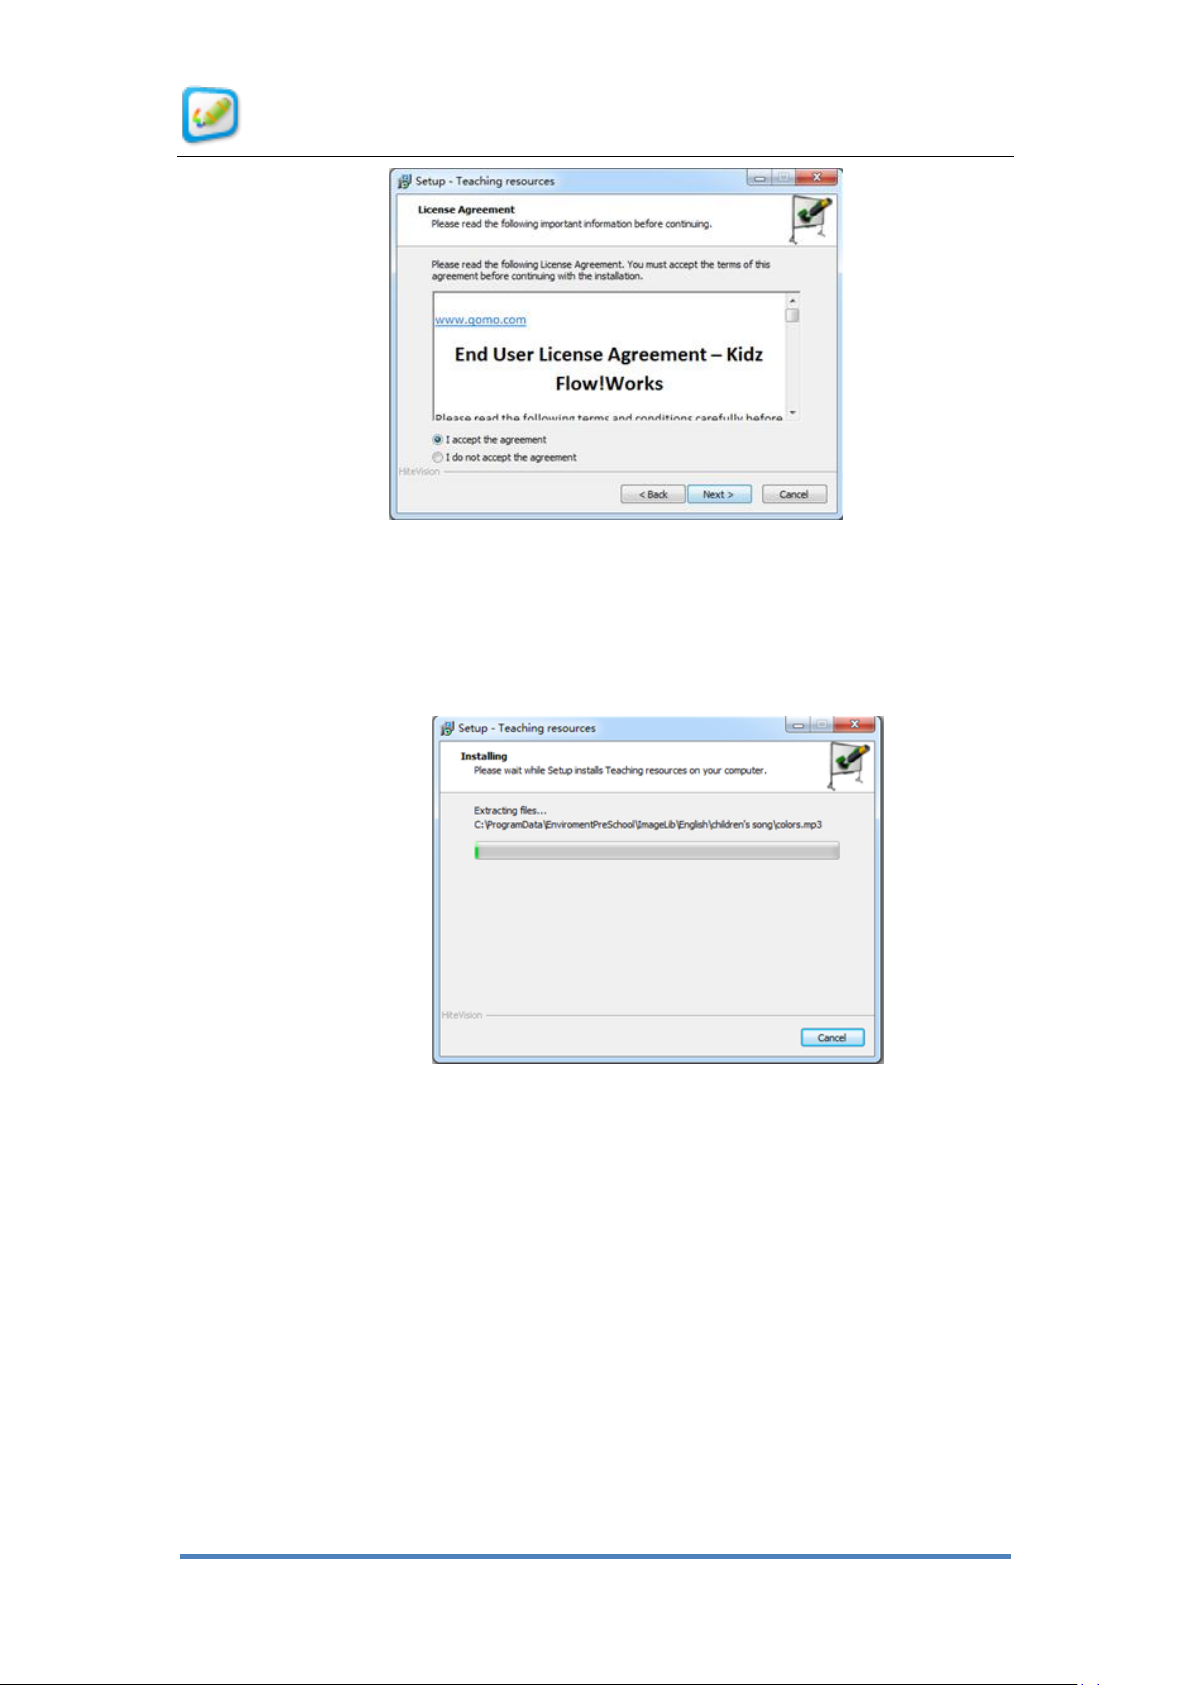
2. Click the Next button to display the License Agreement interface as shown in Figure 1- 3
License Agreement Interface. To continue the installation, go into the License Agreement
interface and select the “I accept to the agreement” option. Click the Next button to
continue with the installation setup.
© Copyright 2012 QOMO HiteVision, LLC. All Rights Reserved
Page 9
User Manual for KidzFlow! Software
9
Figure 1- 10 License Agreement Interface
3. Click the Install button to display the dialog box as shown in Figure 1- 11 Installation of
Teaching Resource to continue the installation setup.
Figure 1- 11 Installation of Teaching Resource
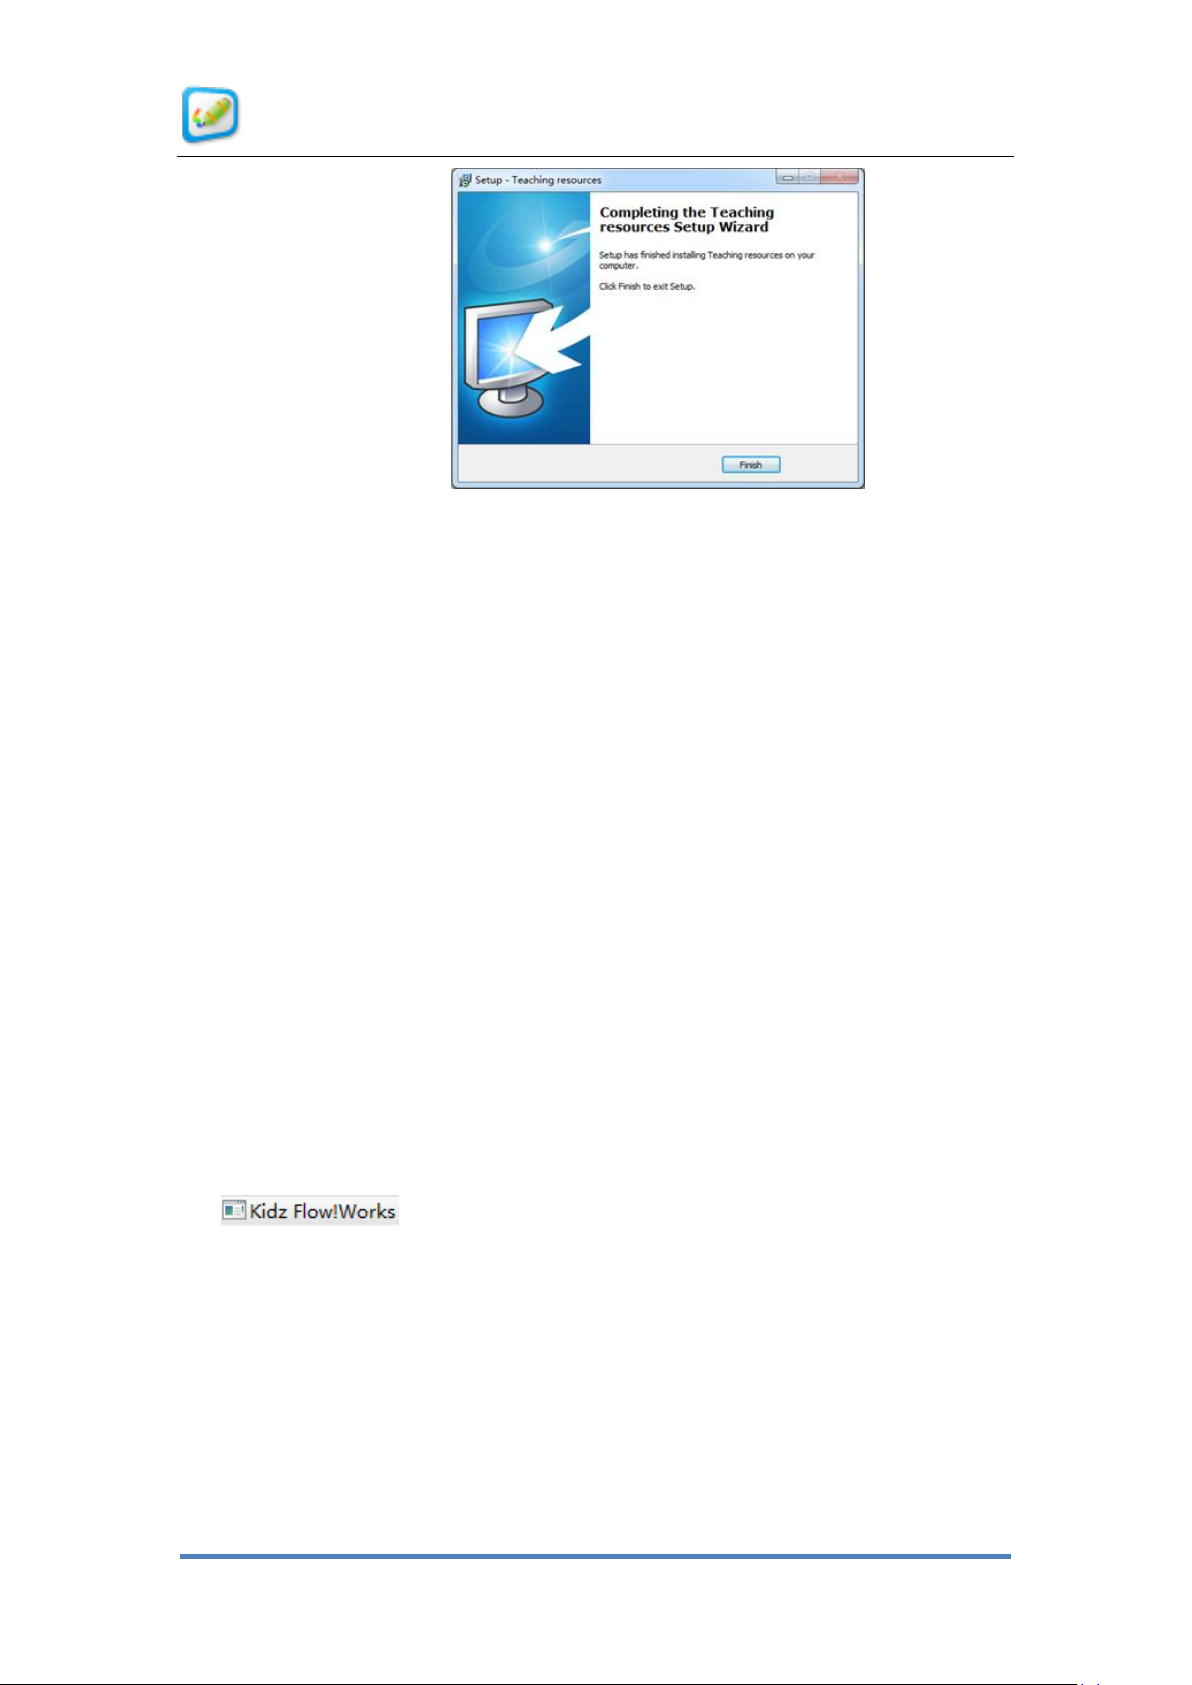
4. When the Completion of Installation box appears, click the Finish button to complete the
installation. It is not necessary to restart the computer to complete the installation of the
teaching resources.
© Copyright 2012 QOMO HiteVision, LLC. All Rights Reserved
Page 10
User Manual for KidzFlow! Software
10
Figure 1- 12 Completion of Installation of Teaching Resource
2.3 Full Installation
Select Full Installation from the initial installation interface of the software and the system
will install the whiteboard software and the teaching resources automatically. The
operation is the same as mentioned above, so refer to the previous instructions for details.
3. Uninstallation of Software
There are two methods to uninstall the kid education whiteboard software respectively:
Select the Start menu and select Uninstall KidzBoard from the HiteVision folder in the
Program menu.
Go to the Control Panel and select Programs and Features. Select
from the list and click the Uninstall button.
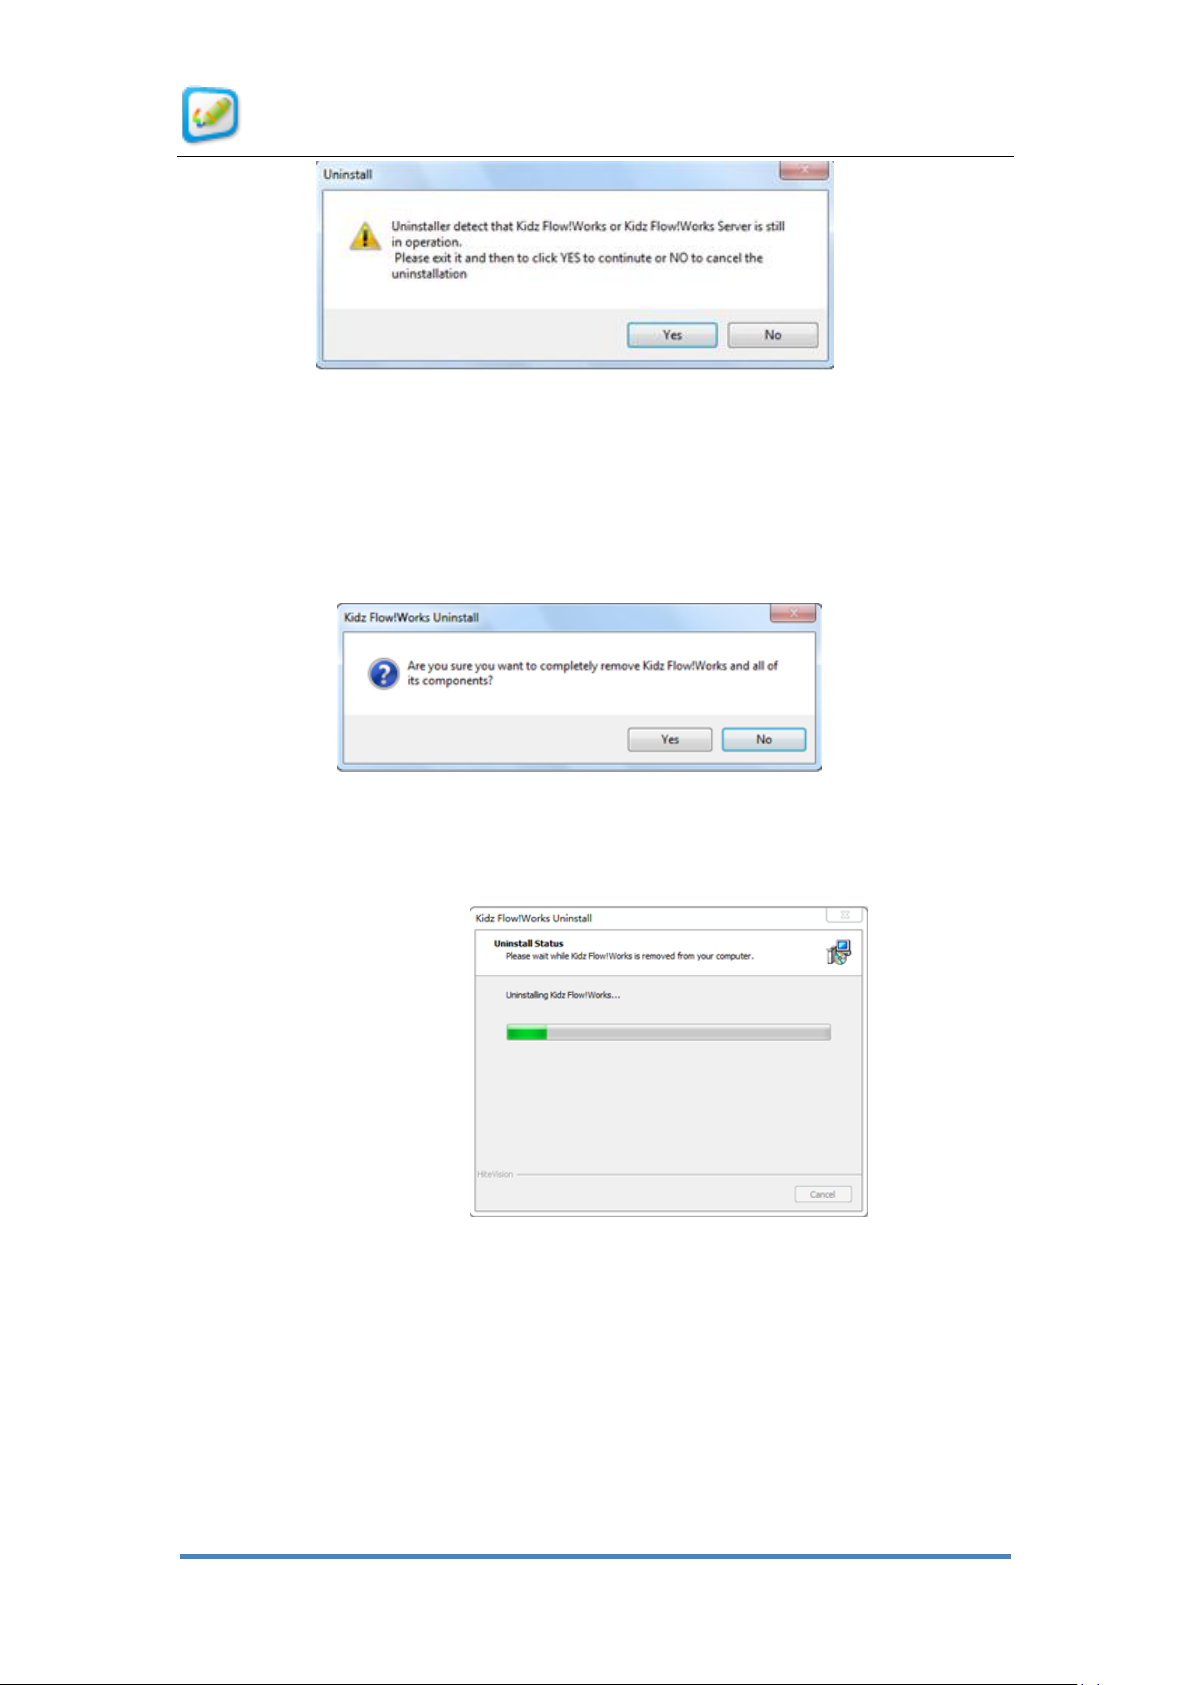
Before you uninstall the software, be sure that you are logged out of the program.
Otherwise, an error box will appear as shown in Figure 1-15.
© Copyright 2012 QOMO HiteVision, LLC. All Rights Reserved
Page 11
User Manual for KidzFlow! Software
11
Figure 1- 13 Prompt for Un-installation Dialog Box
1. When users uninstall the software, it will display the Software Uninstall dialog box as
shown in Figure 1- 14 Software Un-installation Dialog Box, to prompt whether you want to
delete the software.
Figure 1- 14 Software Un-installation Dialog Box
2. Click Yes to launch the uninstall process. A status box as shown in Figure 1- 15
Un-install Software Dialog Box will show.
Figure 1- 15 Un-install Software Dialog Box
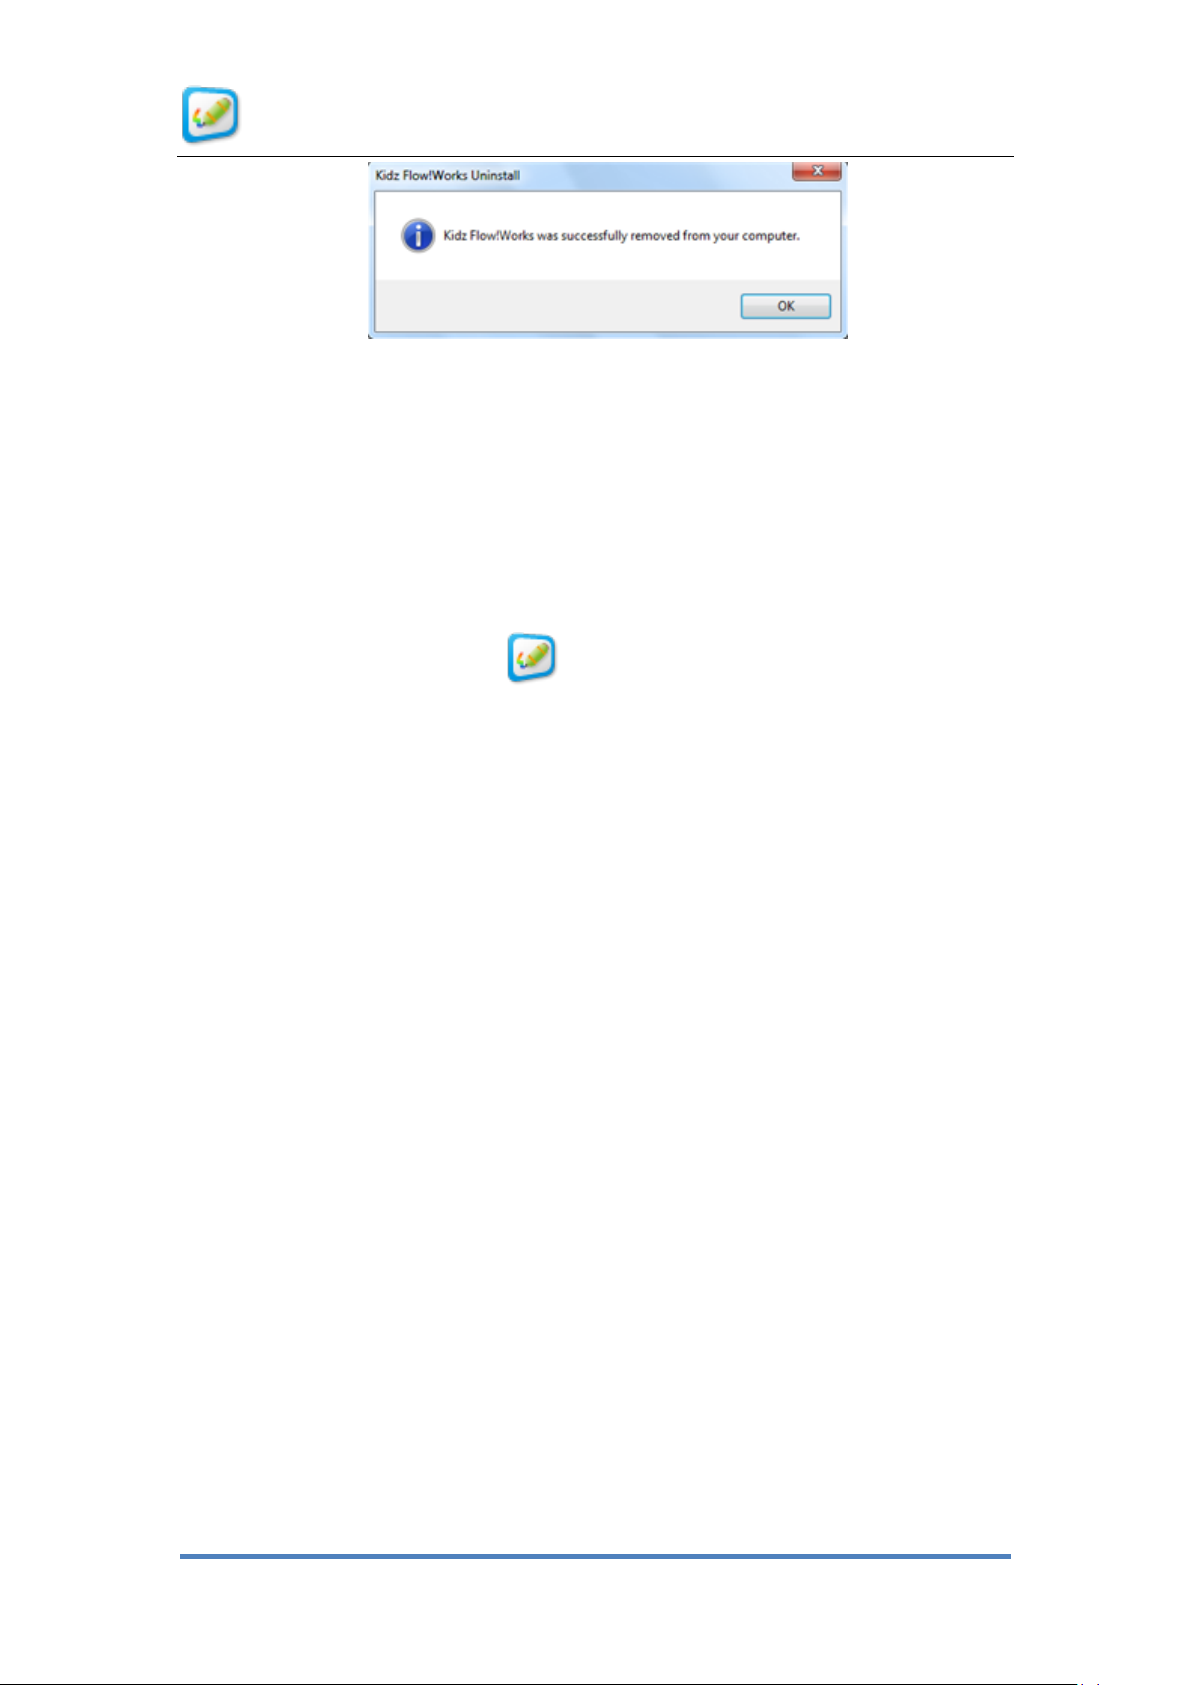
1. The uninstall process removes the whiteboard software, the teaching resources,
and the underlying driver. A dialog box will appear when the uninstall process is
complete as seen in Figure 1- 16 Completion of Uninstallation Dialog Box. Click
the OK button to finalize the uninstallation.
© Copyright 2012 QOMO HiteVision, LLC. All Rights Reserved
Page 12
User Manual for KidzFlow! Software
12
Figure 1- 16 Completion of Uninstallation Dialog Box
4. Software Startup
There are three ways to start the white board software:
Go to the Start menu and select KidBoard from the HiteVision folder in the Program
menu.
Double click the shortcut icon of the program on the desktop.
Click any one of the shortcut keys that are printed on either sides of the whiteboard.
5. Offline Application
The KidzFlow! software can be opened and used without being connected to a
whiteboard. This allows the teacher to prepare lessons within the software before the
lesson is administered in the class.
When the program is used without being connected to a whiteboard, the QOMO
HiteVision watermark will appear on the background of the screen, as shown in Figure 1-
17 Offline Lesson Preparation Watermark Page. The watermark will have no effect on the
functional application in the program. The watermark will disappear after the computer is
connected to the whiteboard and the program is restarted.
© Copyright 2012 QOMO HiteVision, LLC. All Rights Reserved
Page 13
User Manual for KidzFlow! Software
13
Figure 1- 17 Offline Lesson Preparation Watermark Page
6. Software Modes
The kid education whiteboard software provides two application modes, such as the
writing mode and desktop mode. Users can select different modes to prepare or teach the
lesson on demand. The following will describe these two modes in detail and how the user
can switch between them easily.
6.1 Writing Mode
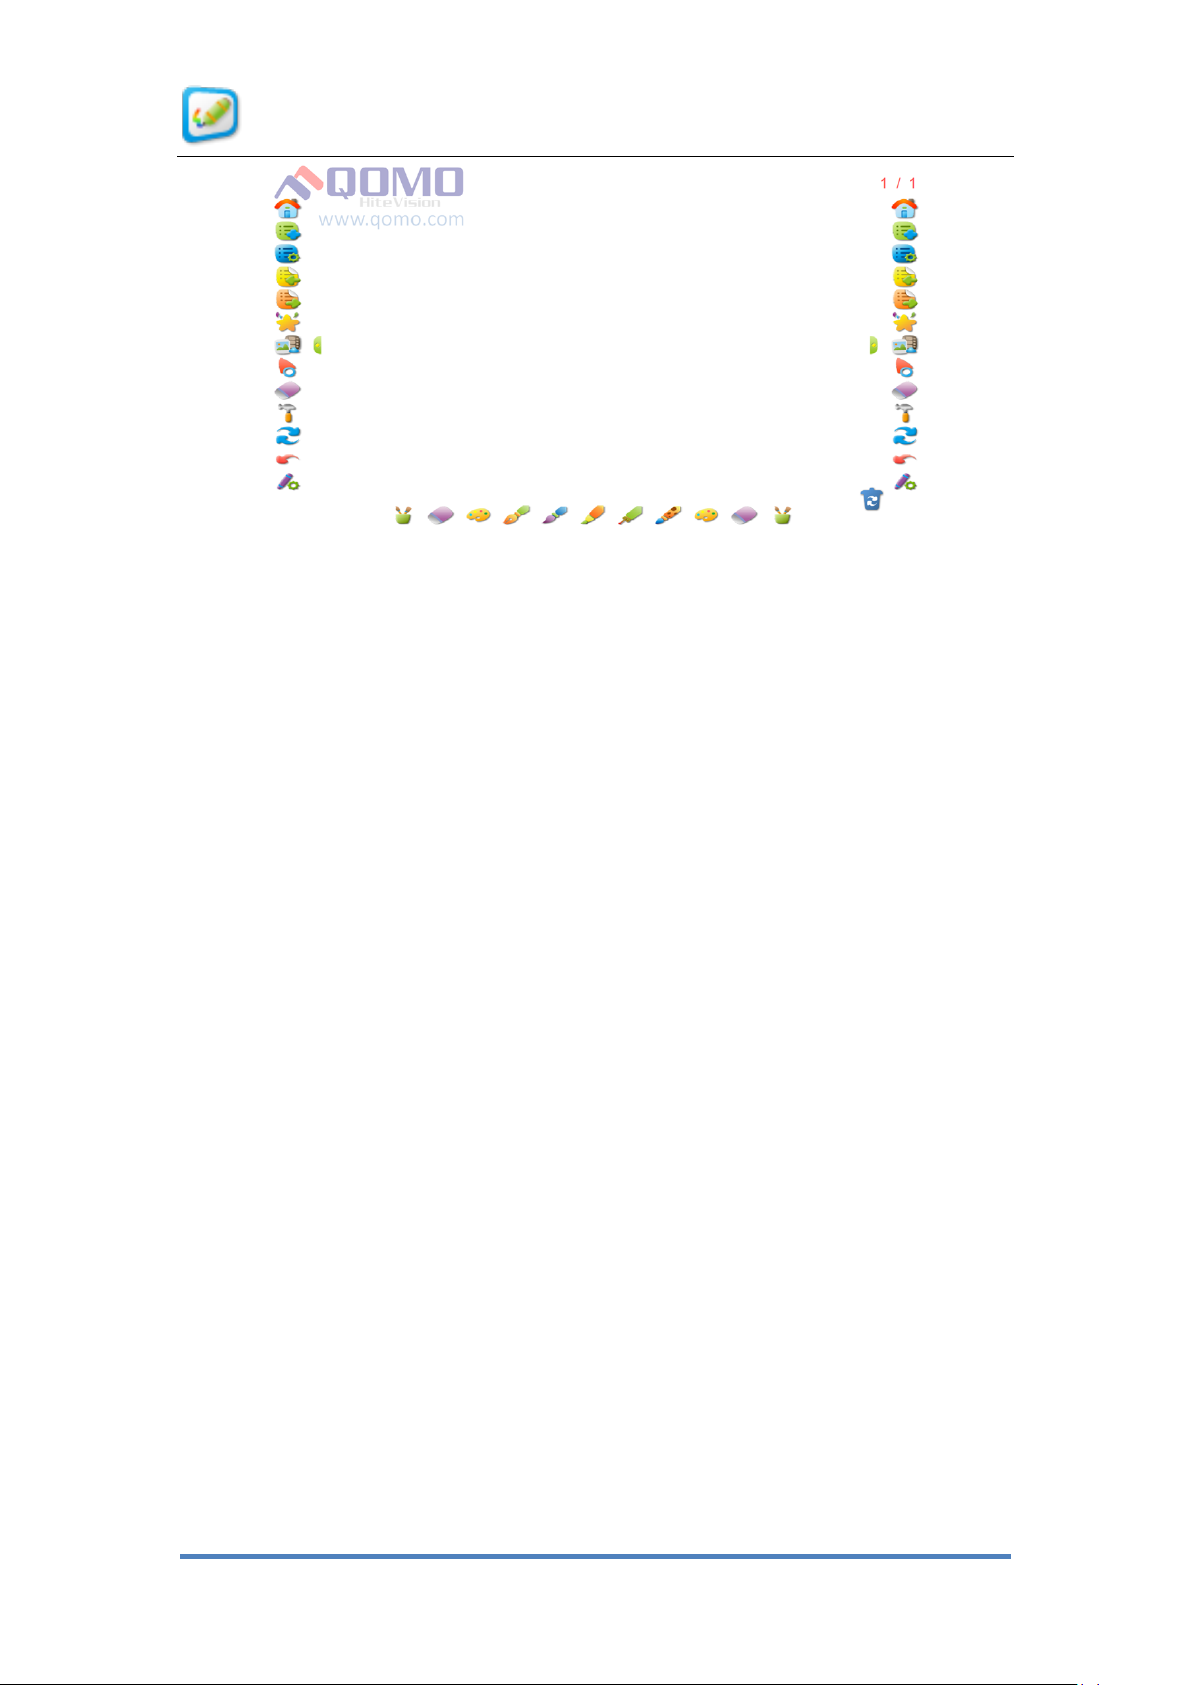
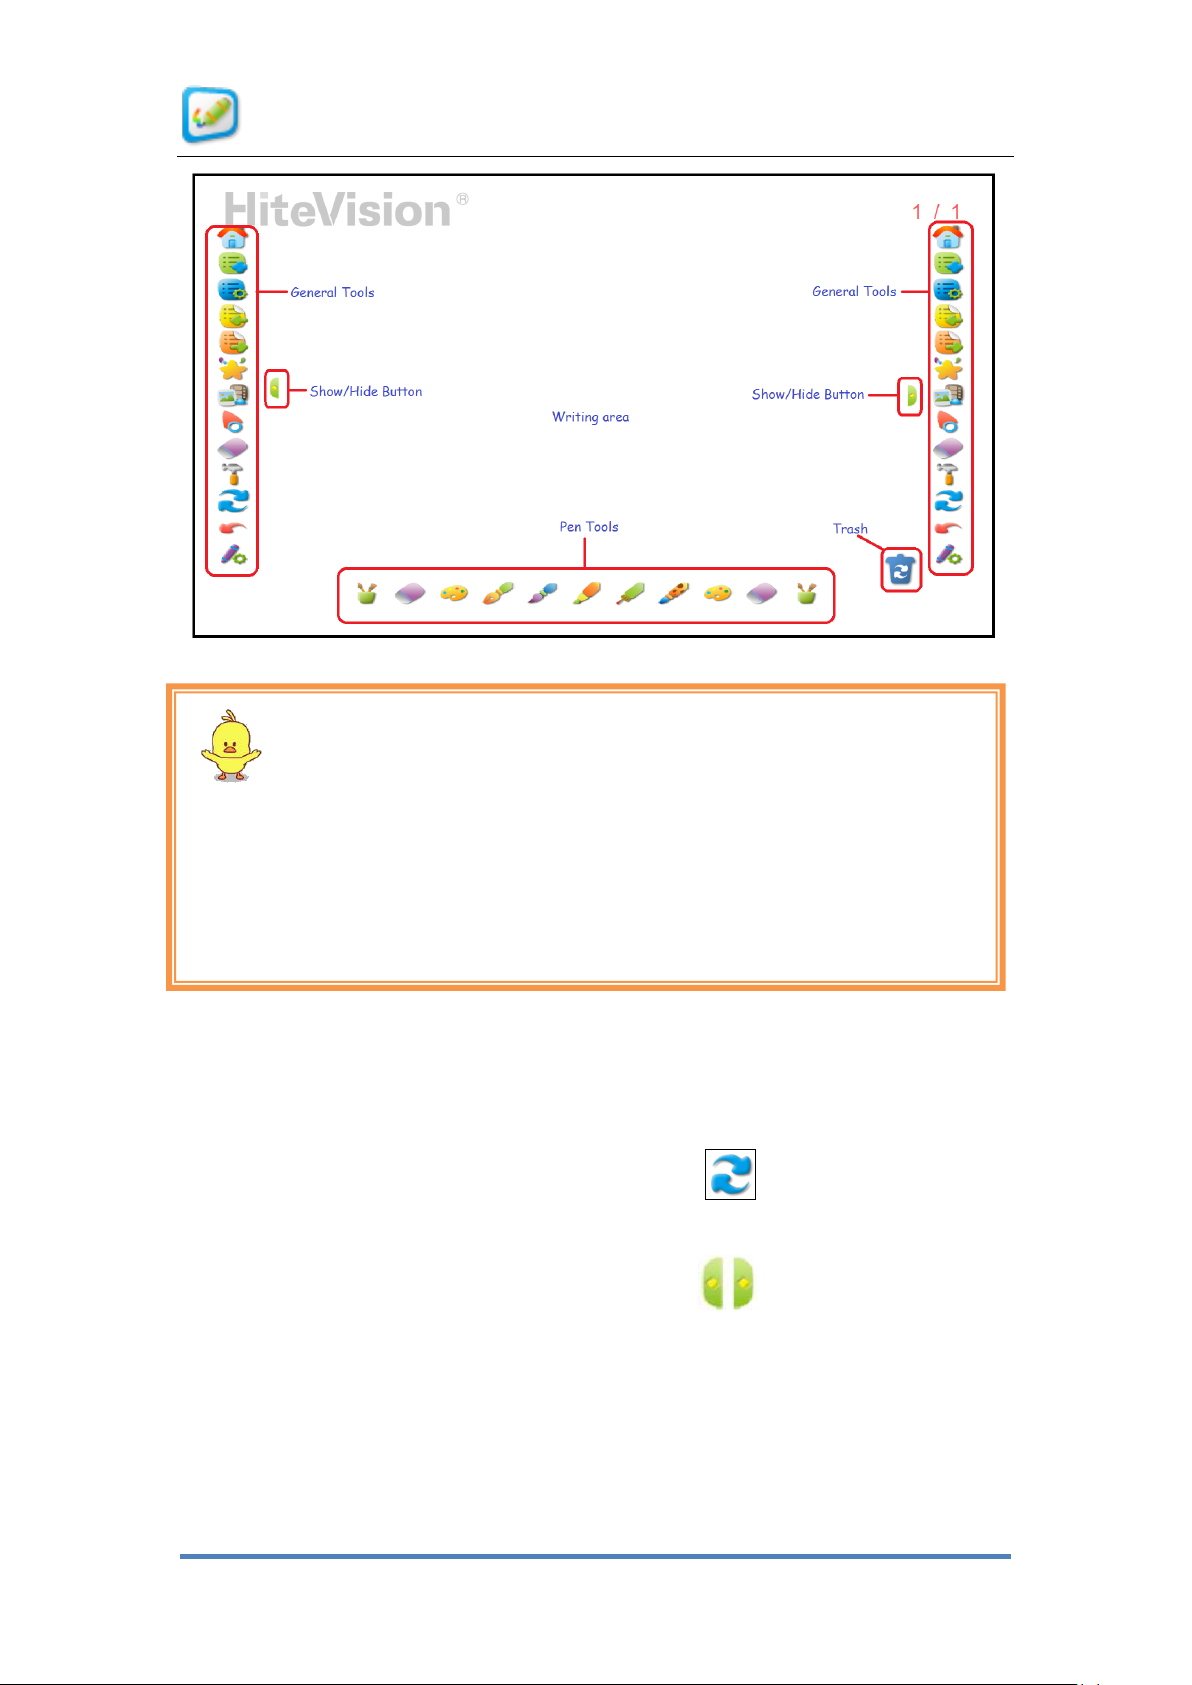
The software is designed to have commonly used writing tools on the main interface.
There is a general toolbar, pen toolbar, and writing area as shown in Figure 1- 18 Writing
Mode.
© Copyright 2012 QOMO HiteVision, LLC. All Rights Reserved
Page 14
User Manual for KidzFlow! Software
14
Note:
After you start the kid education whiteboard software, it will enter the writing mode by
default. The toolbar will disappear if it is connected with the whiteboard in the writing
mode. However, it will display the toolbar if it is not connected with the whiteboard.
Figure 1- 18 Writing Mode
6.2 Desktop Mode
Teachers can switch to their Windows desktop, open documents, or use other programs,
and annotate over any of it. Click the switch button in the General Toolbar to
switch to the desktop. The whiteboard software is still running in the background and
can be accessed by clicking on the Hide/Display button . Any of the writing tools
can be used at this time and the annotations can be saved as a whiteboard
presentation.Error! Reference source not found..
© Copyright 2012 QOMO HiteVision, LLC. All Rights Reserved
Page 15
User Manual for KidzFlow! Software
15
Part 2 Overview of the Software Interface
The KidzFlow! whiteboard software provides common functions and a lot of resources
to assist teachers with their everyday activities.
1. Functions of the Buttons on the Main Interface
.
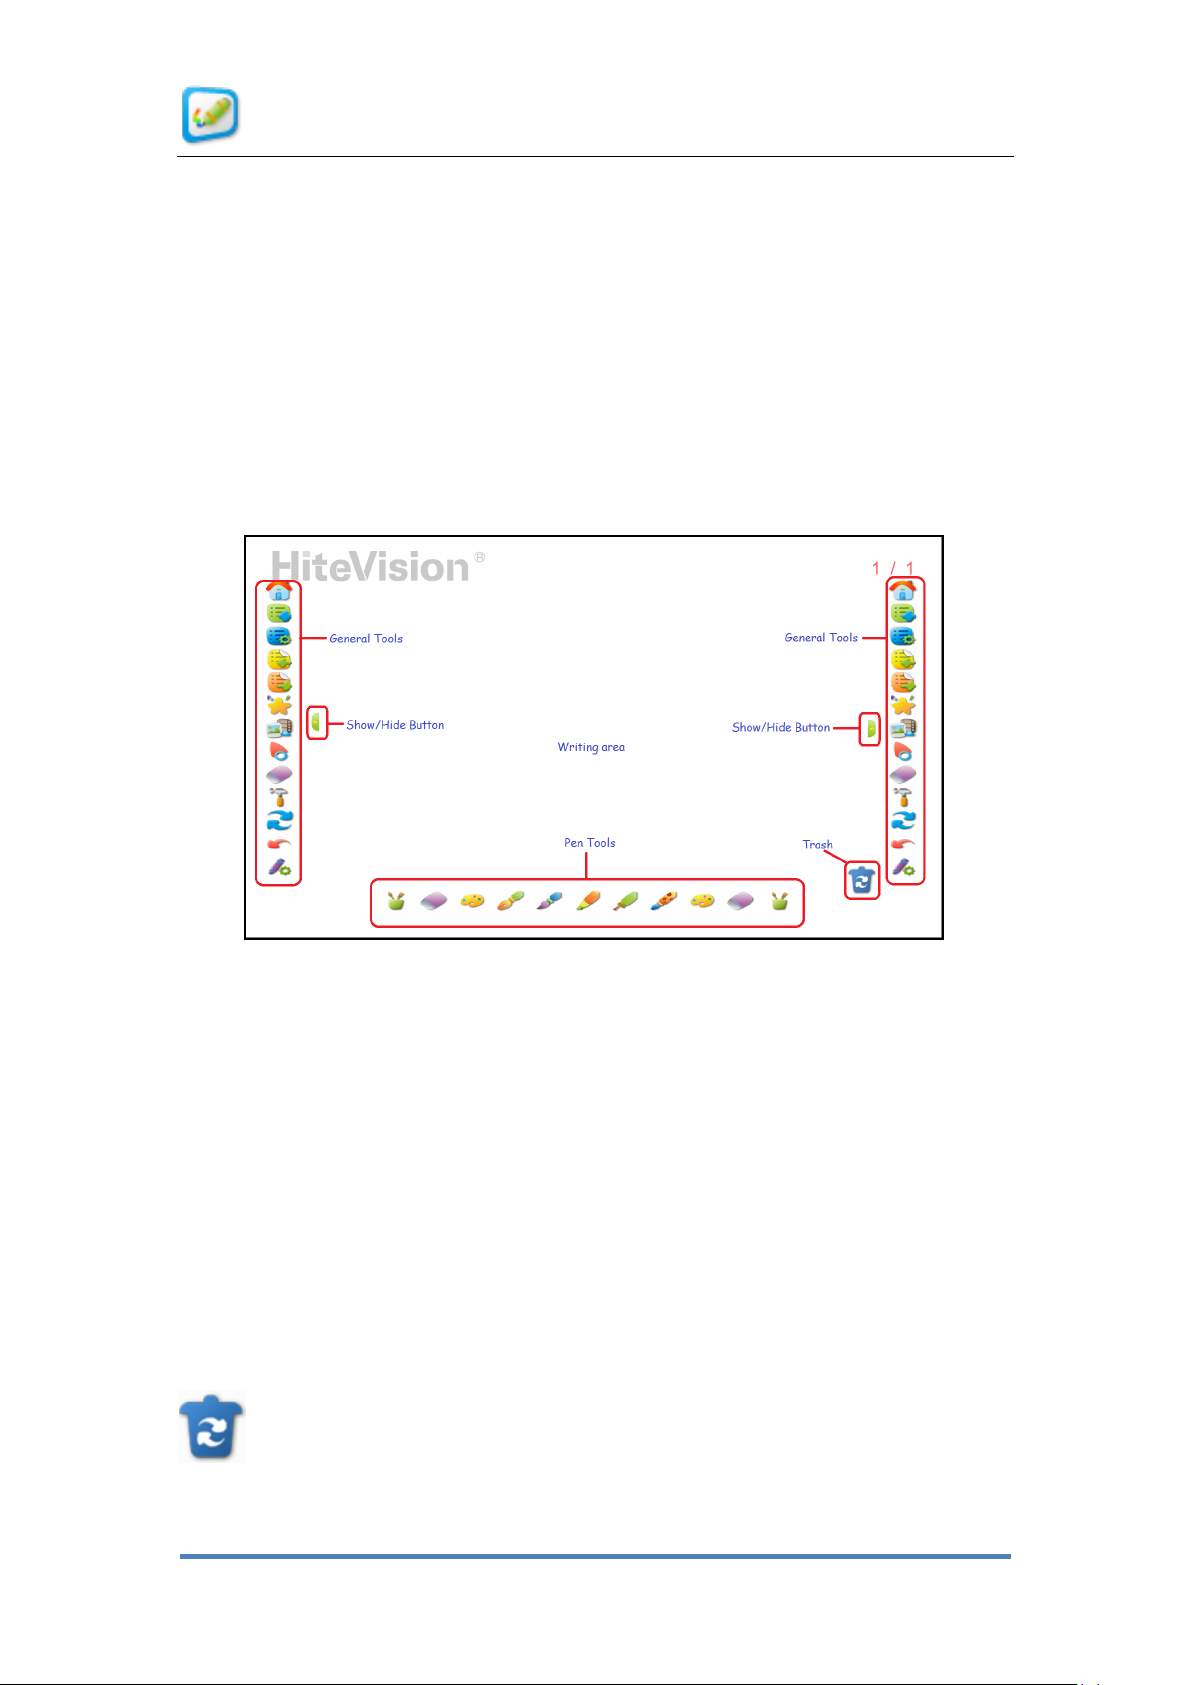
Figure 2- 1 Writing Mode Main Interface
The main interface provides two toolbars: the general toolbar and the pen toolbar. The
general toolbar has the Start, New Page, Page Properties, Previous Page, Next Page,
Teacher Resources, Select Tool, Eraser, Switch Mode, Undo, and Pen Properties icons.
The pen toolbar contains a Pen Container, Eraser, Color Palette, Hard Pen, Soft Pen,
Highlighter, Laser Pen, and Texture Pen. Users can switch to various functions by
tapping the different icons.
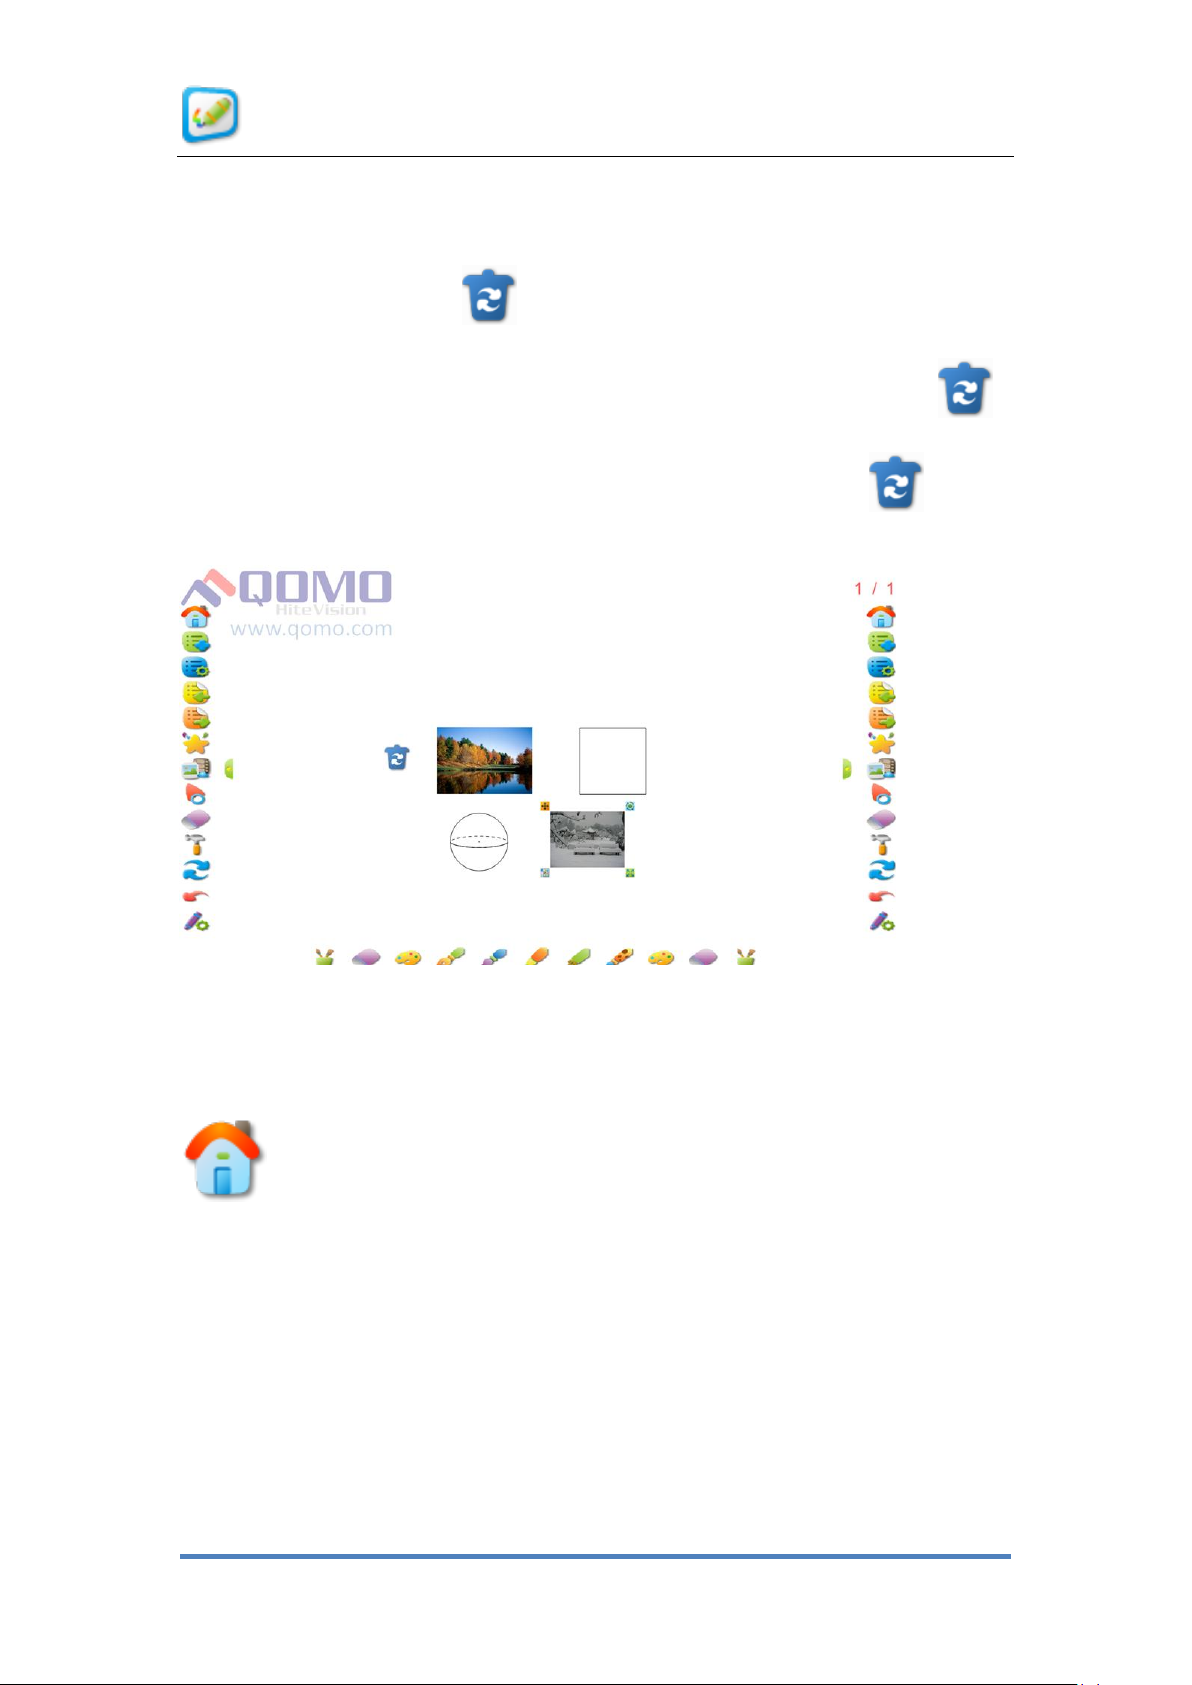
Trash
The trash function is designed to clear the current page or a part of the objects.
You can restore the cleared pages or objects by the Undo function.
© Copyright 2012 QOMO HiteVision, LLC. All Rights Reserved
Page 16
User Manual for KidzFlow! Software
16
The trash can be moved to anywhere on the screen by simply clicking it and dragging
it with the mouse; or by holding down on it with your finger and dragging it.
Clicking on the Trash icon will clear the entire screen.
You can erase objects by selecting them and dragging them to the Trash icon .
You can erase object by selecting them and clicking on the Trash icon .
Figure 2- 2 Writing Mode Main Interface
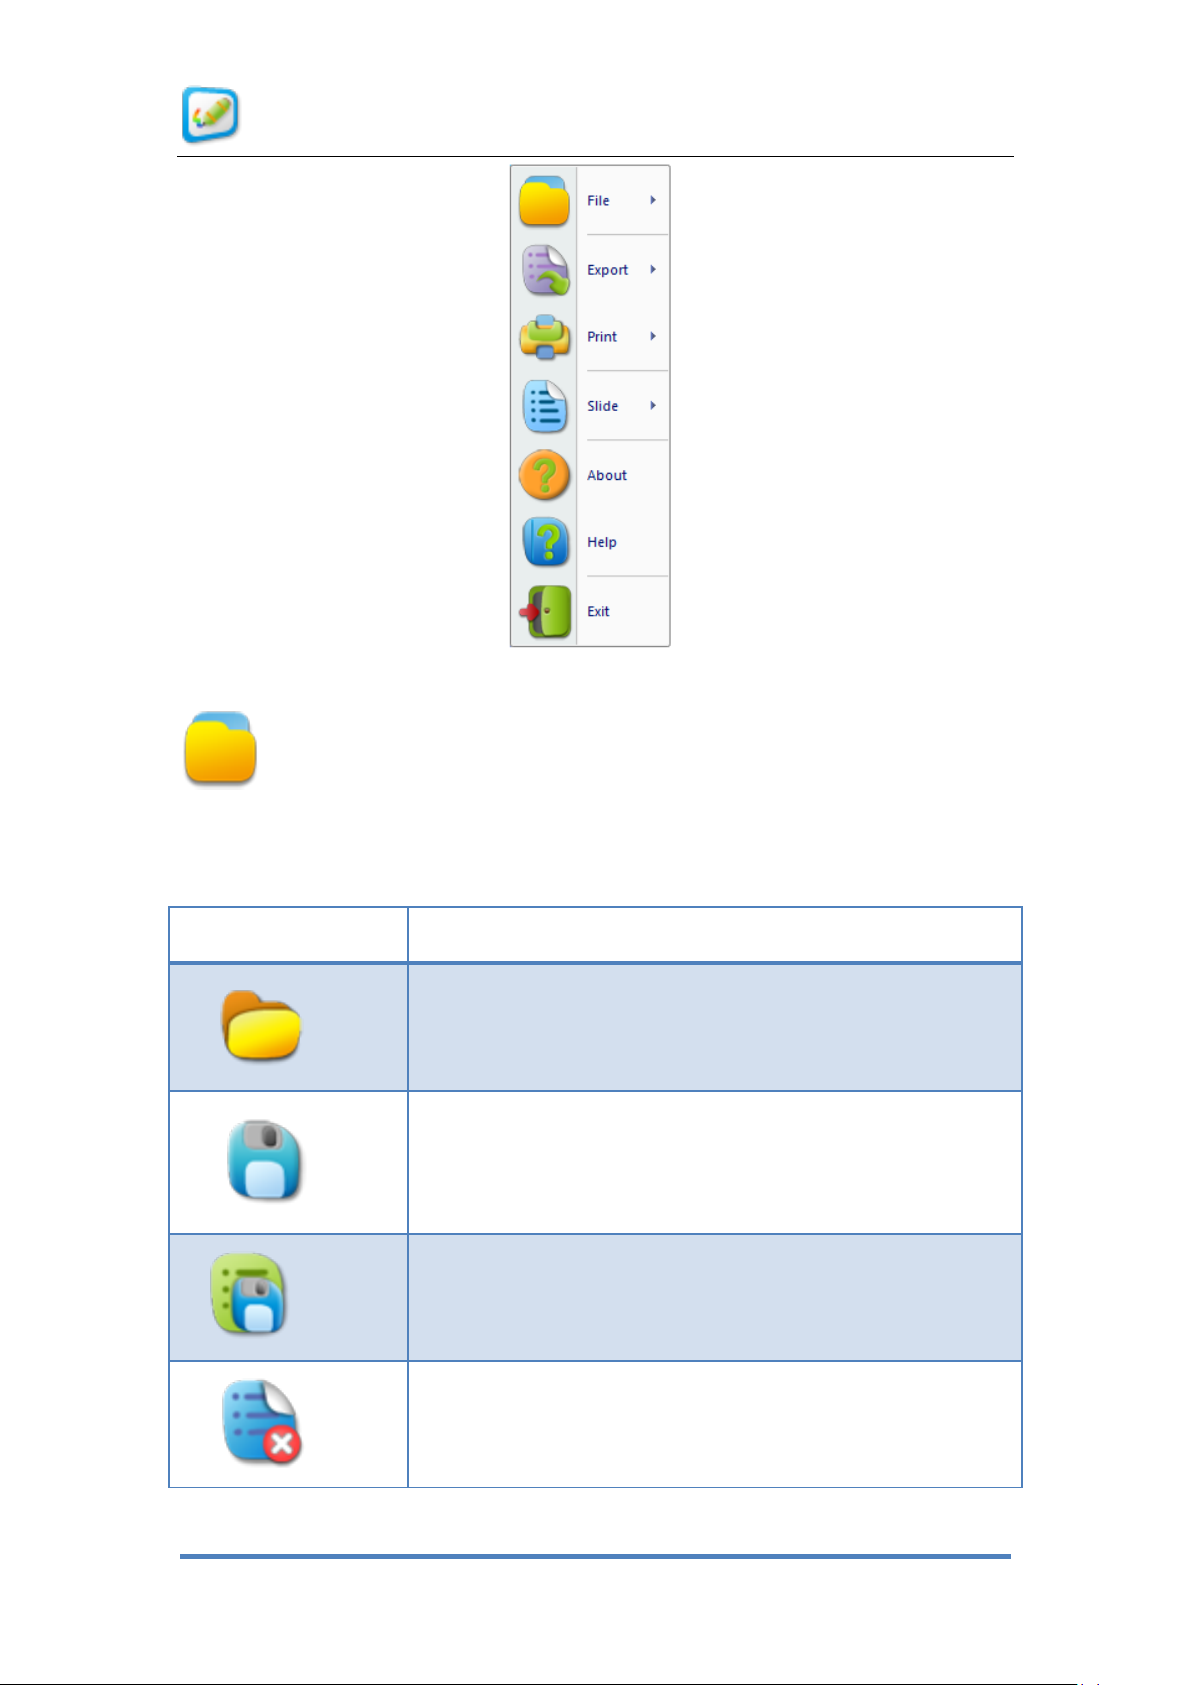
Start
Start: The Start icon provides the common functions of the software as shown in
Figure 2- 3 Start Tab. This provides the open, save, close, export, print page, and exit
software functions.
© Copyright 2012 QOMO HiteVision, LLC. All Rights Reserved
Page 17
User Manual for KidzFlow! Software
17
Option Name
Functional Description
Open
Open an existing file in the .hht format.
Save
Save writing and editing files in the .hht format. The default file
name is composed of the current time or saves the modified .hht
file.
Save As
Save writing and editing file in the .hht format. You can select
different places and names to save it.
Close
Close the currently opened .hht file.
Figure 2- 3 Start Tab
File: The File tab provides the open, save, save as, and close functions of the
files generated in the whiteboard software. Detailed descriptions of each function is shown
in Table2- 1 File Menu.
Table2- 1 File Menu
© Copyright 2012 QOMO HiteVision, LLC. All Rights Reserved
Page 18
User Manual for KidzFlow! Software
18
Option Name
Functional Description
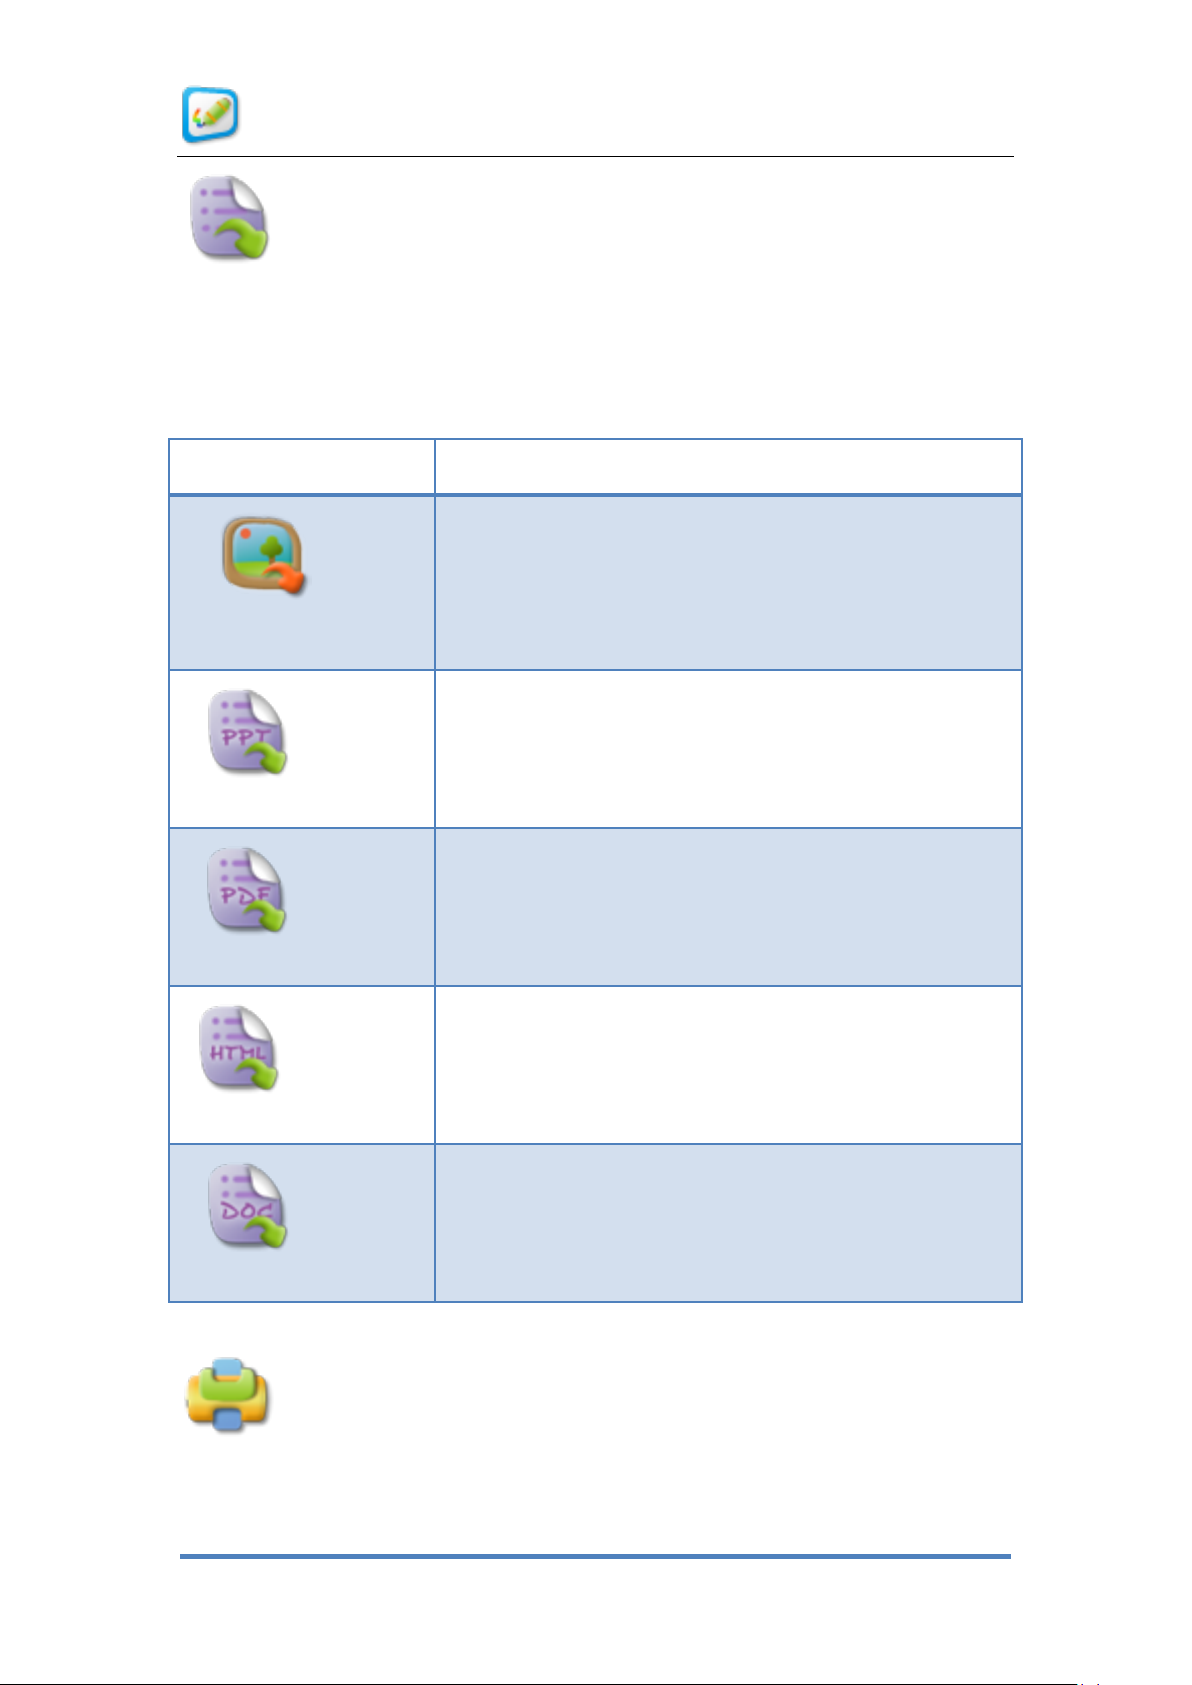
Export
Picture File
Export the content in a picture format. The supported picture
format includes .bmp, .jpg, .jpeg, .png, .tif, .tiff and .gif.
Several page files will be saved as several picture files.
Export PPT
File
Export content as a file in the PowerPoint format.
Export PDF
File
Export content as a file in the Portable Document Format.
Export HTML
File
Export content as the file for a website.
Export DOC
File
Export content as the file in the Word Document format.
Export: This allows you to save your presentation in a different format. The
software will provide the file in five export formats on default by default, such as the picture,
PowerPoint, PDF, HTML and DOC. The detailed functional description is shown in
Table2- 2 Export Menu.
Table2- 2 Export Menu
Print: The Print tab includes the print, print preview, and print part of pages
functions. The detailed descriptions of these functions are shown in Table2- 3 Print Menu.
© Copyright 2012 QOMO HiteVision, LLC. All Rights Reserved
Page 19

User Manual for KidzFlow! Software
19
Option Name
Functional Description
Print
Print the content directly. Set the Page Range and Numbers as
desired.
Print Preview
Preview the content before it prints. You can select the
corresponding preview size, zoom in, or zoom out. Upon
completion of the preview, click the Close button to return to the
Writing and Editing state.
Figure 2- 4 Print Preview State
© Copyright 2012 QOMO HiteVision, LLC. All Rights Reserved
Page 20

User Manual for KidzFlow! Software
20
Option Name
Functional Description
Print Part of
Pages
After you click on this function, you will need to select the printing
area by clicking and dragging the mouse over this area. Upon
completion of the print, select Finish as shown in Figure 2- 5 Part
of Print Area.
Figure 2- 5 Part of Print Area
Option Name
Functional Description
Delete Page
Deletes the currently opened page.
Copy Page
Copies the currently opened pages and the objects into the page.
Paste Page
Pastes the currently copied page or pages into the presentation.
Table2- 3 Print Menu
Slide: The Slide tab includes the Delete Page, Copy Page, and Paste Page
functions. The detailed descriptions of these functions are shown in Table2- 4 Page Menu.
Table2- 4 Page Menu
Figure 2- 6 Kid Education Page
© Copyright 2012 QOMO HiteVision, LLC. All Rights Reserved
About: Provides all the information about the current software version and
Page 21

User Manual for KidzFlow! Software
21
copyright as shown in Figure 2- 7 About Dialog Box.
Figure 2- 7 About Dialog Box
Help: Click this button to open the user’s manual for the KidzFlow! software in the
PDF format.
Exit: Exit the program.
New Page
New Page: Click the New Page button to create a new writing page. Users can
create the page with any color. Refer to the Page Properties section to find out how to
change the background settings.
Page Properties
Page Properties: The Page Properties menu allows you to set include the page
color, page background file, and page background Flash file. Only that page in the
presentation will have those set properties.
© Copyright 2012 QOMO HiteVision, LLC. All Rights Reserved
Page 22

User Manual for KidzFlow! Software
22
Figure 2- 8 Page Properties Dialog Box
Page Color: The default page color is white. Users can select any one of 16 preset
colors and it will display a preview in the area to the right. If you want to customize the
color, click the Select button in the Preview area. A window will appear as
shown in Figure 2- 9 Select Color Dialog Box. After you select you color, it will only
change the color of your current page.
Figure 2- 9 Select Color Dialog Box
Page Background Images: Users can set the page background image. After you
select any one of the images, you can preview it in the preview area to the right. If
users want to add a personalized background image, they can click the Select
© Copyright 2012 QOMO HiteVision, LLC. All Rights Reserved
Page 23

User Manual for KidzFlow! Software
23
button in the Preview area to the right and select an image from the computer
Page Background Flash: Animated backgrounds can be added to the presentation.
These can be used along with a custom background color and image. There are
twelve different flash backgrounds to choose from.
Previous Page
Previous Page: Click this button to provide the Page up function for users.
Next Page
Next Page: Click this button to provide the Page Down function for users.
Effects
Effects: Click the Effects button to pop up the effect panel as shown in Figure 2-
10 Effects Panel. The software has ten effects that can be assigned to an object, such as a
bouncing ball, a balloon floating, a seesaw, and a star twinkling.
© Copyright 2012 QOMO HiteVision, LLC. All Rights Reserved
Page 24

User Manual for KidzFlow! Software
24
Figure 2- 10 Effects Panel
The effect can be added to text, inserted images, flash objects, or drawings. Select
the object that you wish to add the effect to and click on the desired effect. Up to two
effects can be assigned to the object.
: This button stops the effect of the currently selected object.
: This button stops the effect of all objects.
: Click this button to close the Effects Panel.
© Copyright 2012 QOMO HiteVision, LLC. All Rights Reserved
Page 25

User Manual for KidzFlow! Software
25
Resources
Resources: The resource menu includes different types of media that can be
inserted into the presentation. This includes text, media, material, graphics, and flash
games as shown in Figure 2-11 Resource Tab. The following will describe these resources
in detail.
Figure 2-11 Resource Tab
1) Text: Users can insert a text box in the page and modify the text. Click the
Text button, and drag it in the page to determine the location and size of the text as
shown in Figure 2- 12 Input Text.
Figure 2- 12 Input Text
Users can set the color, size, and font of the text by opening the Text Box toolbar.
Select the text object and click on the Property Setting button in the lower left
© Copyright 2012 QOMO HiteVision, LLC. All Rights Reserved
Page 26

User Manual for KidzFlow! Software
26
side. The Property Setting menu as shown in Figure 2- 13 Property Setting Menu will pop
up. Select the Display Toolbar option as shown in Figure 2- 14 Text Box Toolbar. If you
want to modify the text, select the Edit option from the Property Setting menu.
Figure 2- 13 Property Setting Menu
Figure 2- 14 Text Box Toolbar
© Copyright 2012 QOMO HiteVision, LLC. All Rights Reserved
Page 27

User Manual for KidzFlow! Software
27
Click the On-Screen Keyboard button to pop up the On-screen Keyboard
as shown in Figure 2- 15 On-screen Keyboard.
Figure 2- 15 On-screen Keyboard
Media: Click the Media menu and the open dialog box will appear as
shown in Figure 2- 16 Open Dialog Box. Users can select any multimedia file from the
system and insert it into the page. The supported multimedia file includes Media,
Audio, Image and Flash files. The supported video formats include *.wmv; *.avi;
*.mov; *.mpeg; *.mpg; *.dat; *.rm; *.rmvb; *.asf;*.mp4;*.flv;*.mkv;*.vob;*.swf, and the
supported audio formats include *.mp3; *.wav; *.wma; *.mid; and *.ra.
Figure 2- 16 Open Dialog Box
After the user selects the object and clicks open, they will drag it in the page and
determine the location and size of the play window.
© Copyright 2012 QOMO HiteVision, LLC. All Rights Reserved
Page 28

User Manual for KidzFlow! Software
28
Audio: If users want to play the audio, they can select the audio file by selecting Material
in the Resource tab. Click the properties button, and then click in the
Property Settings menu to display the Audio toolbar as shown in Figure 2- 17 Audio
Toolbar. Audio operations are done with the Play button, Pause button or
Stop button. ◘
Figure 2- 17 Audio Toolbar
The Audio Toolbar has the following buttons: Play , Pause , Stop ,
Sound , Sound Adjustment , Play Progress Control ,
Loop Start Location , Loop End Location and Setting . Click Setting
, to display the Custom Audio dialog box as shown in Figure 2- 18 Custom Audio.
Users can customize the start point and end point of the cycle.
Figure 2- 18 Custom Audio
Video: After you insert a video, click the properties button, and click
© Copyright 2012 QOMO HiteVision, LLC. All Rights Reserved
Page 29

User Manual for KidzFlow! Software
29
in the menu. The video toolbar is shown in Figure 2-19 Video
Toolbar.
Figure 2-19 Video Toolbar
The Video Toolbar button is the Play , Pause , Stop , Slow , Fast
, Sound and Sound Adjustment ,
Play Progress Control , Loop Start Location , Loop End
Location and Annotation . Users can select to play the section by clicking
the Loop Start Location button and the Loop End Location button , and
capture or annotate over the video or animation screen by clicking the Annotation button
.
Flash: After you insert the Flash resource, click the properties button, and
click . The Flash toolbar is shown in Figure 2- 20 Flash Toolbar.
© Copyright 2012 QOMO HiteVision, LLC. All Rights Reserved
Page 30

User Manual for KidzFlow! Software
30
Figure 2- 20 Flash Toolbar
The Flash Toolbar button has the Play , Previous Frame , Next Frame
and Stop buttons.
If you want to play Flash, the file needs to be dragged in to the page.
Material: There are picture files provided in the software and can be
selected by clicking on the Material option, as shown in Figure 2-21 Resource Library
Dialog Box. The size of the image can be adjusted by clicking on the Original Size,
Small Size, Middle Size, and Large Size buttons at the top of the Resources window.
Figure 2-21 Resource Library Dialog Box
Click the Resource button in the Resource Library dialog box, to pop up
the list of resources, as shown in Figure 2- 22 List of Resources. The software is preset
with fifteen types of resources, such as transportation, characters, sports, animals,
seasons, sea, weather, plants, games, cartoons, and many others.
© Copyright 2012 QOMO HiteVision, LLC. All Rights Reserved
Page 31

User Manual for KidzFlow! Software
31
Figure 2- 22 List of Resources
Select the desired resource and drag it into the software page directly or with the use of a
mouse.
Click the button in the Resource Library dialog box, to pop up the dialog box as
shown in Figure 2- 23 Browser. Users can add images, video, and audio files that are
stored directly on the computer.
Figure 2- 23 Browser
Figure: Select the Figure option. A popup with the Figure toolbar appears as
shown in Figure 2-24 Figure Toolbar. The software provides the following shapes, such as
© Copyright 2012 QOMO HiteVision, LLC. All Rights Reserved
Page 32

User Manual for KidzFlow! Software
32
Button Name
Functional Description
Legend
Regular
Polygon
Click this button to draw the regular polygon
in the software page.
Square
and
Rectangle
Click this button to draw the square and
rectangle in the software page.
Circle
Click this button to draw the circle in the
software page.
Cylinder
Click this button to draw the cylinder in the
software page.
Sphere
Click this button to draw the sphere in the
software page.
Cuboid
Click this button to draw the cuboid in the
software page.
the regular polygon, square, circle, cylinder, sphere, cuboid, cube and cone.
Figure 2-24 Figure Toolbar
Users can use this function to draw the figures. For the detailed function, refer to Table2- 5
List of Figure Tools.
© Copyright 2012 QOMO HiteVision, LLC. All Rights Reserved
Page 33

User Manual for KidzFlow! Software
33
Button Name
Functional Description
Legend
Cube
Click this button to draw the cube in the
software page.
Cone
Click this button to draw the cone in the
software page.
Table2- 5 List of Figure Tools
Puzzle: Click the Puzzle option to access the Puzzle Resource Library as
shown in Figure 2- 25 Puzzle Resource Library. These are interactive flash activities in
Science, Math, Art, Language Arts and Games.
Figure 2- 25 Puzzle Resource Library
Select
Select: Click this button to switch activate the selecting tool in the software.
This is used if you need to select an object to move or change its properties.
Eraser
Eraser: Delete the annotation or object. The deleted object may be restored
by clicking on the Undo button.
© Copyright 2012 QOMO HiteVision, LLC. All Rights Reserved
Page 34

User Manual for KidzFlow! Software
34
Tools
Tools: The tools provide some tools frequently used by users during teaching,
such as a clock timer, handwriting recognition, screen keyboard, spotlight, screen curtain,
writing window, magnifying glass, compass, protractor, and ruler as shown in Figure 2- 26
Tools Tab. The detailed function of these various tools is described as follows.
Figure 2- 26 Tools Tab
1) Clock/Timer: Places a clock/timer in the whiteboard page. This tool
provides the clock and the countdown timer function, as well as two display modes,
such as the digital clock and an analog clock as shown in Figure 2- 27 Two Display
Modes of Clock.
© Copyright 2012 QOMO HiteVision, LLC. All Rights Reserved
Page 35

User Manual for KidzFlow! Software
35
Figure 2- 27 Two Display Modes of Clock
Left click the mouse at any location of the clock to pop up the clock control menu in
Figure 2- 28 Clock Control Menu. Users can select the timing mode and the clock
mode in the menu, and set the countdown time and adjust the clock transparency.
Select the Exit option from the control menu to exit the clock timer.
Figure 2- 28 Clock Control Menu
2) Handwriting Recognition: Provides users with the handwriting recognition
tool which will change a written word into a text format. Click the Handwriting
Recognition option to pop up the Handwriting Recognition toolbar as shown in Figure
2- 29 Handwriting Recognition Toolbar.
Figure 2- 29 Handwriting Recognition Toolbar
© Copyright 2012 QOMO HiteVision, LLC. All Rights Reserved
Page 36

User Manual for KidzFlow! Software
36
3) On-screen Keyboard: Click this button to pop up the on-screen keyboard,
as shown in Figure 2- 30 On-screen Keyboard. This tool simulates the computer
keyboard and may be used by clicking on it directly.
Figure 2- 30 On-screen Keyboard
4) Spotlight: Provides users with a curtain over the screen, except for a
circular window which can be used to focus on just a few objects. Users can change
the shape and transparency of the spotlight, move and rotate the spotlight, and adjust
its size.
Figure 2- 31 Spotlight Effect
Click the gray area of the curtain to pop up the Spotlight Control menu as shown in
Figure 2-32 Highlight Control Menu. The spotlight can be moved by touching near
the red border and sliding it around the screen. The size of the spotlight can be
changed by clicking directly on the red border and moving it inward or outward. To
access the spotlight properties, click on the curtain and the Spotlight Control Menu
© Copyright 2012 QOMO HiteVision, LLC. All Rights Reserved
Page 37

User Manual for KidzFlow! Software
37
will appear as shown in Figure 2-34.
Figure 2-32 Highlight Control Menu
5) Curtain: Click this button to generate a curtain to shade the whole whiteboard
so that the audience is focused on only part of the whiteboard. You can drag the shade
screen up, down, left, and right to reveal the content underneath.
Figure 2- 33 Curtain
Click any location on the Curtain to display the control menu as shown in Figure
2- 34 Curtain Properties Menu. Users can select corresponding function on demand.
It can only move the screen horizontally or vertically, to adjust the color and picture of
the screen.
© Copyright 2012 QOMO HiteVision, LLC. All Rights Reserved
Page 38

User Manual for KidzFlow! Software
38
Figure 2- 34 Curtain Properties Menu
5) Handwriting Window: Add one new window to write the content in to the
original page. Users can write in this window, and adjust the size and location of this
window.
Figure 2- 35 Handwriting Window
6) Magnifying Glass: Users can magnify objects, text, and other things that
are on the whiteboard. To change the magnifying power, click on the magnifying glass
to display the properties window. Two magnifications are provided, such as 2X and 4X
as shown in Figure 2- 36 Screen Magnifier.
© Copyright 2012 QOMO HiteVision, LLC. All Rights Reserved
Page 39

User Manual for KidzFlow! Software
39
Adjust the radius
of the circle.
Click here to draw
the circle.
Figure 2- 36 Screen Magnifier
7) Compass: The Compass tool is used to draw circles, arcs and sectors with a
measured radius. Click the corresponding location to manipulate the compass, such
as adjusting the radius and drawing the circle.
Figure 2- 37 Compass Tool
Click any location of the compass to display the Compass menu as shown in Figure 2- 38
Compass Tool.
© Copyright 2012 QOMO HiteVision, LLC. All Rights Reserved
Page 40

User Manual for KidzFlow! Software
40
Trace finger along
the edge to draw
the shape.
Figure 2- 38 Compass Tool
The compass can be used to draw arcs and sectors, as shown in Figure 2-41.
Figure 2- 39 Arc and Sector Drawn by Compass
8) Protractor: This tool is used to measure angles and can also be used to
draw arcs and sectors. To display the Protractor properties menu, as shown in Figure
2- 40 Protractor Menu, click on the protractor itself. Users can select the drawing type
(angle, arc or sector), and then drag it at the edge of the protractor scale, to generate
the drawing. If users want to draw the circle, draw it around the protractor for 360°.
Users can translate, zoom and rotate the protractor on demand.
Figure 2- 40 Protractor Menu
© Copyright 2012 QOMO HiteVision, LLC. All Rights Reserved
Page 41

User Manual for KidzFlow! Software
41
Click here to
rotate the ruler.
Figure 2- 41 Sector with Specified Angle, Angle and Circle
9) Ruler: This tool allows you to draw a line with a measured distance. Click
the Ruler to display the properties box, as shown in Figure 2-44, configure the size,
location, and placement of the ruler, or hit close to remove the ruler from the page.
Figure 2- 42 Ruler Tool
10) Screen Annotation: Screen annotation allows you to annotate and embed
the handwriting in any program, document, or media file. Click the screen annotation
button to establish one transparent page in the current operating interface. Users can
manipulate and annotate over this.
© Copyright 2012 QOMO HiteVision, LLC. All Rights Reserved
Page 42

User Manual for KidzFlow! Software
42
Figure 2- 43 Tools Menu
The software performs a seamless switching function between the mouse and pen in the
Screen Annotation state. If users want to write in it, they may click on any pen. If users
want to open the file or implement another operation, it is only necessary to double click
the file to be opened or click open.
If you annotate over a Word, PowerPoint or Excel file in the Screen Annotation mode, an
Office Mode Toolbar will appear in the page as shown in Figure 2- 44 PPT Toolbar.
Figure 2- 44 PPT Toolbar
The Office Mode toolbar provides the following functional buttons:
☆ Embed Annotation Content : Click this button to embed the annotation
content into the Office file.
☆ Page Up : Click this button to page up the PowerPoint file in the Screen
Annotation mode, and create a corresponding Screen Annotation page. You can click this
© Copyright 2012 QOMO HiteVision, LLC. All Rights Reserved
Page 43

User Manual for KidzFlow! Software
43
button when you play the PowerPoint file.
☆ Page Down : Click this button to page down the PowerPoint file in the
Screen Annotation mode, and create a corresponding Screen Annotation page. You can
click this button to play the PowerPoint file.
☆ Stop Playing : Click this button to stop playing the PowerPoint file in the
Screen Annotation mode. Before you stop playing the PowerPoint file, the software will
prompt users whether it is necessary to embed all of the annotation content into the
PowerPoint file. Furthermore, the corresponding Screen Annotation page of the
PowerPoint file will be converted into the common page which takes the PowerPoint
content as the background. Click this button to play the PowerPoint file.
☆ Mouse Mode : Click this button to switch from the pen mode to mouse mode.
Figure 2- 45 Screen annotation features
If users want to save the written and annotated content, click Embed . Click Stop
Playing to stop playing. At this time, it will display the dialog box as shown in
Figure 2- 46 Prompt Dialog Box. Click Yes and you will find that it display the embedded
writing content in original PowerPoint file as shown in Figure 2- 47 PowerPoint File. These
writing contents are saved in the picture format and may be modified.
© Copyright 2012 QOMO HiteVision, LLC. All Rights Reserved
Page 44

User Manual for KidzFlow! Software
44
Figure 2- 46 Prompt Dialog Box
Figure 2- 47 PowerPoint File
When you close the PowerPoint file and select Yes, it will save the written content into
the PowerPoint file. If you select No, the written content will disappear.
Note: You can only close or page up/down the Office software in the Pen mode in the
Screen Annotation page.
Return
Return: Return to the desktop.
Undo
Undo: Undo the previous operation.
© Copyright 2012 QOMO HiteVision, LLC. All Rights Reserved
Page 45

User Manual for KidzFlow! Software
45
Pen Properties
Pen Properties: You can set various property values of the pen with the Pen
Properties menu, such as setting the pen color, transparency, line width, and line style as
shown in Figure 2- 48 Pen Properties Dialog Box. You can view the changes after the
setting in the preview area in the right.
Figure 2- 48 Pen Properties Dialog Box
Pen Color – Transparency: You can set the color and transparency of the pen in
this tab. Click the Select Color dialog box as shown in Figure 2- 49 Color Dialog
Box to change the color setting of the pen. Drag the slider to
set the amount of transparency.
Figure 2- 49 Color Dialog Box
© Copyright 2012 QOMO HiteVision, LLC. All Rights Reserved
Page 46

User Manual for KidzFlow! Software
46
Option Name
Functional Description
Line Head
The software provides 7 line head styles by default. Select
the line head style of the required segment from the pop-up
drop-down box.
Line Body
The software provides 5 line body styles by default. Select
the line body of the required segment from the pop-up
drop-down box.
Line Tail
The software provides 7 line tail styles by default. Select the
line tail of the required segment from the pop-up drop-down
box.
Line Width: You can set the line width of the pen in this tab. Click , ,
or to select different widths, or drag the slider , to set
the width of the pen.
Line Style: You can set the line head, line body and line tail in this tab as shown
in Table2- 6 Setting of Pen Properties.
Table2- 6 Setting of Pen Properties
© Copyright 2012 QOMO HiteVision, LLC. All Rights Reserved
Page 47

User Manual for KidzFlow! Software
47
2. Common Pen Tools
Pen Container
Pen Container: Click the Pen Container option to pop up the pen container as
shown in Figure 2- 50 Pen Container.
Figure 2- 50 Pen Container
The pen container is empty by default. Click the Pen Setting button , to open the
dialog box as shown in Figure 2- 51 Setting of Pen Container Dialog Box. Users can add,
delete and modify the pen in the pen container. Click the Add button in the List of
Pens setting to add one pen. It will add one hard pen by default. The pen can be change
to a soft pen, highlight pen, laser pen, and texture pen. The color, line width, and line style
of this pen can be changed too. Click the Delete button to delete the currently
selected pens, or adjust the front and rear position of the pen by the button Move Up
and Move Down buttons. Click the Restore button to clear all of the pens
in current List of Pens.
© Copyright 2012 QOMO HiteVision, LLC. All Rights Reserved
Page 48

User Manual for KidzFlow! Software
48
Figure 2- 51 Setting of Pen Container Dialog Box
The pen container provides a shortcut mode for various custom pens. The pens with
the properties setting are stored in the pen container..
Figure 2- 52 Pen Container for Pen
Palette
Palette: The software provides cartoon and practical palette as shown in Figure
2- 53 Palette.
© Copyright 2012 QOMO HiteVision, LLC. All Rights Reserved
Page 49

User Manual for KidzFlow! Software
49
Figure 2- 53 Palette
For the color setting in the palette, the software presets 12 crayon colors and 15
common optional colors by default, and users can add the common colors in the custom
area. Users can add up to 17 custom colors.
Select one palette from the custom color area , and click the Color Setting
button , to show the Custom Color dialog box as shown in Figure 2- 54 Custom Color
Dialog Box. Select the added color and click the OK button to add this color to the custom
color area.
Figure 2- 54 Custom Color Dialog Box
There are two states for the Lock button in the palette.
Lock : If users select the pen for the operation in the writing state, the palette
© Copyright 2012 QOMO HiteVision, LLC. All Rights Reserved
Page 50

User Manual for KidzFlow! Software
50
Pen Name
Functional Description
Legend
Hard
Pen
Simulate the handwriting of a ballpoint pen
or chalk.
Soft Pen
Simulate the handwriting of a paint brush.
The lines are thick when you move slowly
and thin when you move quickly.
Highlight Pen
Simulate the effect of the highlight pen. You
can select different colors to highlight.
Laser Pen
This pen stroke draws attention to the board
by flashing. The previous mark
disappears when you make a new mark.
Texture Pen
It provides pen strokes with different
patterned colors.
is always displayed in the specified location.
Unlock : If users click any location of the palette before they select the pen
for the operation in the writing state, it is same as clicking the Close button of the
palette. Click the Close button in the palette, to close current palette.
Types of Pens
The software provides five pens by default, such as the hard pen, soft pen, highlight
pen, laser pen and texture pen. The function and handwriting effect of these five pens are
shown in Table2- 7 Common Pen Functions.
© Copyright 2012 QOMO HiteVision, LLC. All Rights Reserved
Page 51

User Manual for KidzFlow! Software
51
Table2- 7 Common Pen Functions
© Copyright 2012 QOMO HiteVision, LLC. All Rights Reserved
Page 52

User Manual for KidzFlow! Software
52
Part 3 Basic Operation of the Objects in
the Software
Select Tool
If you want to operate any object in the software, it is necessary to check this object first
by selecting the Select button and selecting the object on the board. When you select an
object, four functional buttons display at the four corners of the selected object. For
example, the following picture shows that it has been selected as shown in Figure 3- 1
Select Picture.
Figure 3- 1 Select Picture
Move button—change the location of the object
Rotate button—change the orientation of the object
Edit button—Opens up a set of properties that you can change for this object.
Stretch button—change the size of object.
The Edit menu is shown in Figure 3- 2 Edit Menu. You can cut, copy, paste, delete,
combine, lock, hide, clone, mirror, layer, and change the center of rotation with the object.
© Copyright 2012 QOMO HiteVision, LLC. All Rights Reserved
Page 53

User Manual for KidzFlow! Software
53
Combine
Figure 3- 2 Edit Menu
Users can combine several objects in the page into one integral object. Check
several objects to be combined simultaneously and click the Edit button . Select the
Combine option from the menu. At this time, you can combine several objects into one
complete object for the operation as shown in Figure 3- 3 Check Several Objects
Simultaneously.
Figure 3- 3 Check Several Objects Simultaneously
The Combine Object allows users to select, move, rotate, and delete the objects
simultaneously. If you click the Cancel Combination option, it will restore the
uncombined state, allowing you to operate each object independently.
© Copyright 2012 QOMO HiteVision, LLC. All Rights Reserved
Page 54

User Manual for KidzFlow! Software
54
Lock
Users can lock current object so that it may not be moved. Check the current object
and select Lock from the Edit menu as shown in Figure 3- 4 Lock Object.
Figure 3- 4 Lock Object
The locked object may not be moved, cloned, or removed. To restore it to the
unlocked state, click the Unlock option.
Setting of Visibility
Users can set the visibility of any object. After the object is selected, select Setting of
Visibility in the Edit menu as shown in Figure 3- 5 Setting of Object Visibility. If the object is
selected to Hide, it will not be visible.
Figure 3- 5 Setting of Object Visibility
Clone
Users can clone the object in the software page. It provides the Clone and Drag to
Clone mode.
1. Clone: Select the Clone option from the Edit button after the object is checked as
shown in Figure 3- 6 Clone Current Object.
© Copyright 2012 QOMO HiteVision, LLC. All Rights Reserved
Page 55

User Manual for KidzFlow! Software
55
Figure 3- 6 Clone Current Object
2. Drag to Clone: Select the Drag to Clone option from the Edit menu of the object
as shown in Figure 3- 7 Drag to Clone.
Figure 3- 7 Drag to Clone
Users can click the Move button after they select the Setting of Drag to Clone
option, to drag the initial object in the page, as shown in Figure 3- 8 Drag to Clone for
Several Times. The drag to clone of the initial object may be carried out for unlimited times.
Users can terminate current Drag to Clone operation by canceling the drag to clone.
Figure 3- 8 Drag to Clone for Several Times
© Copyright 2012 QOMO HiteVision, LLC. All Rights Reserved
Page 56

User Manual for KidzFlow! Software
56
Display Order
Users can adjust the display order of current object if they are layered on top of one
another. Select the Display Order option from the Edit menu, to complete the following
operations, such as move to top, move up, move down and move to the bottom as shown
in Figure 3- 9 Display Order Effect.
Figure 3- 9 Display Order Effect
Turn
Users can turn the current object. Select the Turn option from the Edit menu as
shown in Figure 3- 10 Turn Option. The software provides the Flip Vertical and Flip
Horizontal options.
Figure 3- 10 Turn Option
© Copyright 2012 QOMO HiteVision, LLC. All Rights Reserved
Page 57

User Manual for KidzFlow! Software
57
Mirror
Figure 3- 11 Comparison of Turn Effect
Users can carry mirror an object to the left, right, upward, or downward. Select the
Mirror option from the Edit menu as shown in Figure 3- 12 Mirror Option.
Figure 3- 12 Mirror Option
Select the current object to carry out the Mirror operation. Its effect is shown in Figure 3- 13
Mirror Effect.
© Copyright 2012 QOMO HiteVision, LLC. All Rights Reserved
Page 58

User Manual for KidzFlow! Software
58
Figure 3- 13 Mirror Effect
Cut, Copy, Paste, and Delete
You can select the Cut, Copy, Paste, and Delete option from the Edit menu of the
current object to carry out the selected operation as shown in Figure 3- 14 Copy, Paste,
and Delete Option of Current Object
Figure 3- 14 Copy, Paste, and Delete Option of Current Object
Contact Us
For questions, comments, or concerns, please contact us at:
Qomo Hite Vision
46950 Magellan Drive
Wixom, MI 48393, USA
1-866-990-QOMO (7666)
1-248-960-0985
For additional training manuals and videos go to www.qomo.com .
© Copyright 2012 QOMO HiteVision, LLC. All Rights Reserved
Page 59

User Manual for KidzFlow! Software
59
For technical support questions, call 866-990-7666 or email at support@qomo.com .
© Copyright 2012 QOMO HiteVision, LLC. All Rights Reserved
 Loading...