

Page 1

INTERACTIVE WHITEBOARD
Owner’s Manual
Page 2

1
Table of Contents
What’s In The Box ............................................................................. 2
System Requirements ....................................................................... 3
Introduction ........................................................................................ 4
Software Features ............................................................................. 5
How to Install Hardware .................................................................... 6
How to Install Software ..................................................................... 15
How to Use Annotation Software ..................................................... 20
Troubleshooting Guide ..................................................................... 21
Interactive Whiteboard User Tips .................................................... 23
Page 3

2
What’s In the Box
Thank you for your purchase of the Interactive whiteboard. If any items are
missing or damaged, please contact your authorized reseller immediately.
CONTENTS:
White Board * 1 pc
Writing Pen *1 pc
USB Cable 24 ft (7.5m) * 1 pc
Erase * 1 pc
Installation CD * 1 pc
Floor Stand (Optional) *1 set
Warranty Card * 1 pc
Castor (Optional) * 1 set
Pen Tray (Optional) * 1 pc
Wall-mounting Bracket (Optional) * 1 set
Page 4

3
System Requirements
Lowest Environmental Requirements:
· CPU: 500MHz×86
· Memory: 256M
· Display Card: Support 256 or above
· Hard Disk: 500M
· Screen Display Resolution: 800×600、1024×768、
1280×1024
· USB1.1 port
Recommended:
· CPU: 1GHz×86
· Memory: 512M or above
· Display Card: Support 256 or above
· Hard Disk: 1000M
· Screen Display Resolution: 1024×768 、1280×1024
· USB port
Software Running Environment:
· Microsoft Windows 2003/XP/VISTA/7 (32bit&64bit )
Page 5

4
Introduction
The Interactive whiteboard uses infrared technology. Working
seamlessly with a projector and computer, the Interactive whiteboard
provides more convenient, interactive and effective presentations.
Perfect for school auditoriums, conference rooms, trade shows,
symposiums and lecture halls. Users can write on the screen using the
included pens, wand or the user‟s finger.
Writing: Write, draw and perform mouse functions with your finger.
The whiteboard displays your penmanship instantaneously.
Annotating: The user can operate and annotate over any computer
applications, or save notes directly into Flow! Software, including
PowerPoint, Word, Excel, MEPG JPEG, AVI and etc.
Interacting: In video conferencing, both parties can share data and
write in real time just like a standard conference room. Once
integrated with Polycom or other video conferencing systems, using
Interactive whiteboard can improve video conference results and
efficiency. The system can support up to 40 writing locations.
Touch System: The Interactive whiteboard is sensitive to pressure
and can be used as a high-resolution interactive white board.
Touch Recognition: Can recognize touch of a single-finger,
multi-finger, right-click, left-click and double click.
Hot Keys: Hot keys located on opposite ends of the boards provide
quick access to frequently used keys.
Energy conservation: Controls energy cost within 0.5W. No need
for additional power supply.
Page 6

5
Software Features:
Designed for teaching and conference systems.
The screen display is high light and low glare.
Saves images in Vector image format. Vector images take up less
storage space and makes file transferring easier and faster
Users can customize pen type, line width, and color schemes to fit
Their individual preferences.
Powerful screen functioning supports real-time editing
Graphic tools allow users to choose a background, input
Graphics and images.
Paintbrush pen is pressure sensitive
Writing file allows for easy conversion to many other formats such
As PDF, JPG, GIF, PNG, TIFF, BMP, etc.
Graphic tools and Hot Keys allow users to choose a pen to annotate,
or use as a mouse control.
Supports other application software.
Note: The projection area is outlined at the upper left and lower right corner
of the board using these icons(“ ”). Please project onto this area for best
results.
Page 7

6
How to Install Hardware
1. How to install QWB56,200,300,105WS hardware
Install Pen Tray: In the frame of the board, prior to securing the pen tray you
will find a slot that accommodates a Kensington lock. If you would like to
use a Kensington lock insert and loop the cable through the center hole on
the frame, position the pen tray in line with the four screws, and then screw
the pen tray in place. (Shown below)
Page 8
7
Install Wall-mounting: Set desired height according to user‟s preferences.
Using the wall-mounting brackets as a template, place the 8 stilettos on the
wall and screw bolts into each hole. Align the wall-mounting brackets onto
the bolts and tighten the bolts. Check that each location hole faces each
corresponding bolt and hang the white board to the wall. (As shown below)
Page 9
8
Page 10

9
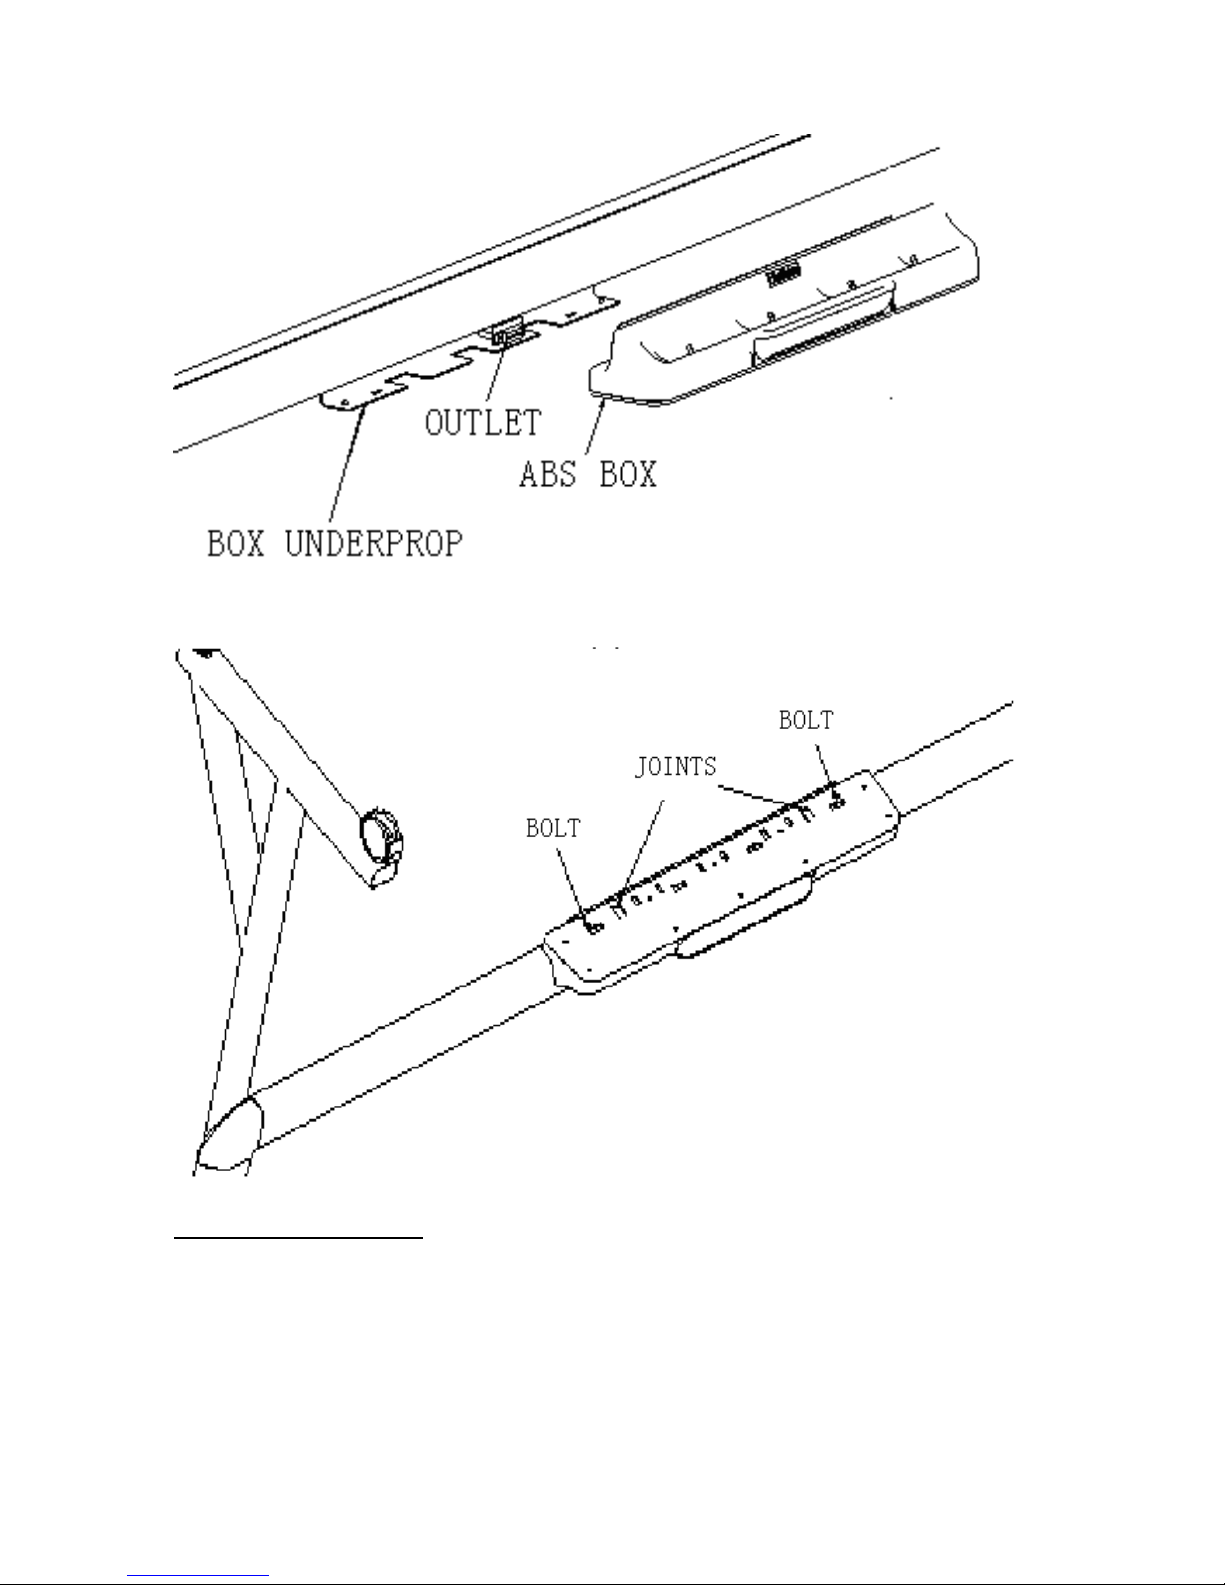
Install White Board on a Floor Stand:
(1) Lock all four casters in the down position (as shown)
(2) With an assistant‟s help, hang Interactive whiteboard on the floor stand
by lowering the two bolts onto the top hooks and securing the bottom bolts
into the bottom hooks. There are two heights for hanging according to
user‟s preferences.(as shown below)
Page 11

10
2. How to install QWB200 SLIM / 300 SLIM hardware
Install Securing Pen Tray:
80”/ 92” with aluminum pen tray: Install aluminum pen tray at the bottom of
the interactive whiteboard (with the screws at the bottom of the back of the
interactive whiteboard) shown below:
Page 12

11
80”/ 92” with pen tray: In the frame of the board, prior to securing the pen
tray you will find a slot that accommodates a Kensington lock. If you would
like to use a Kensington lock insert and loop the cable through the center
hole on the frame, position the pen tray in line with the four screws, and then
screw the pen tray in place. (Shown below)
Page 13

12
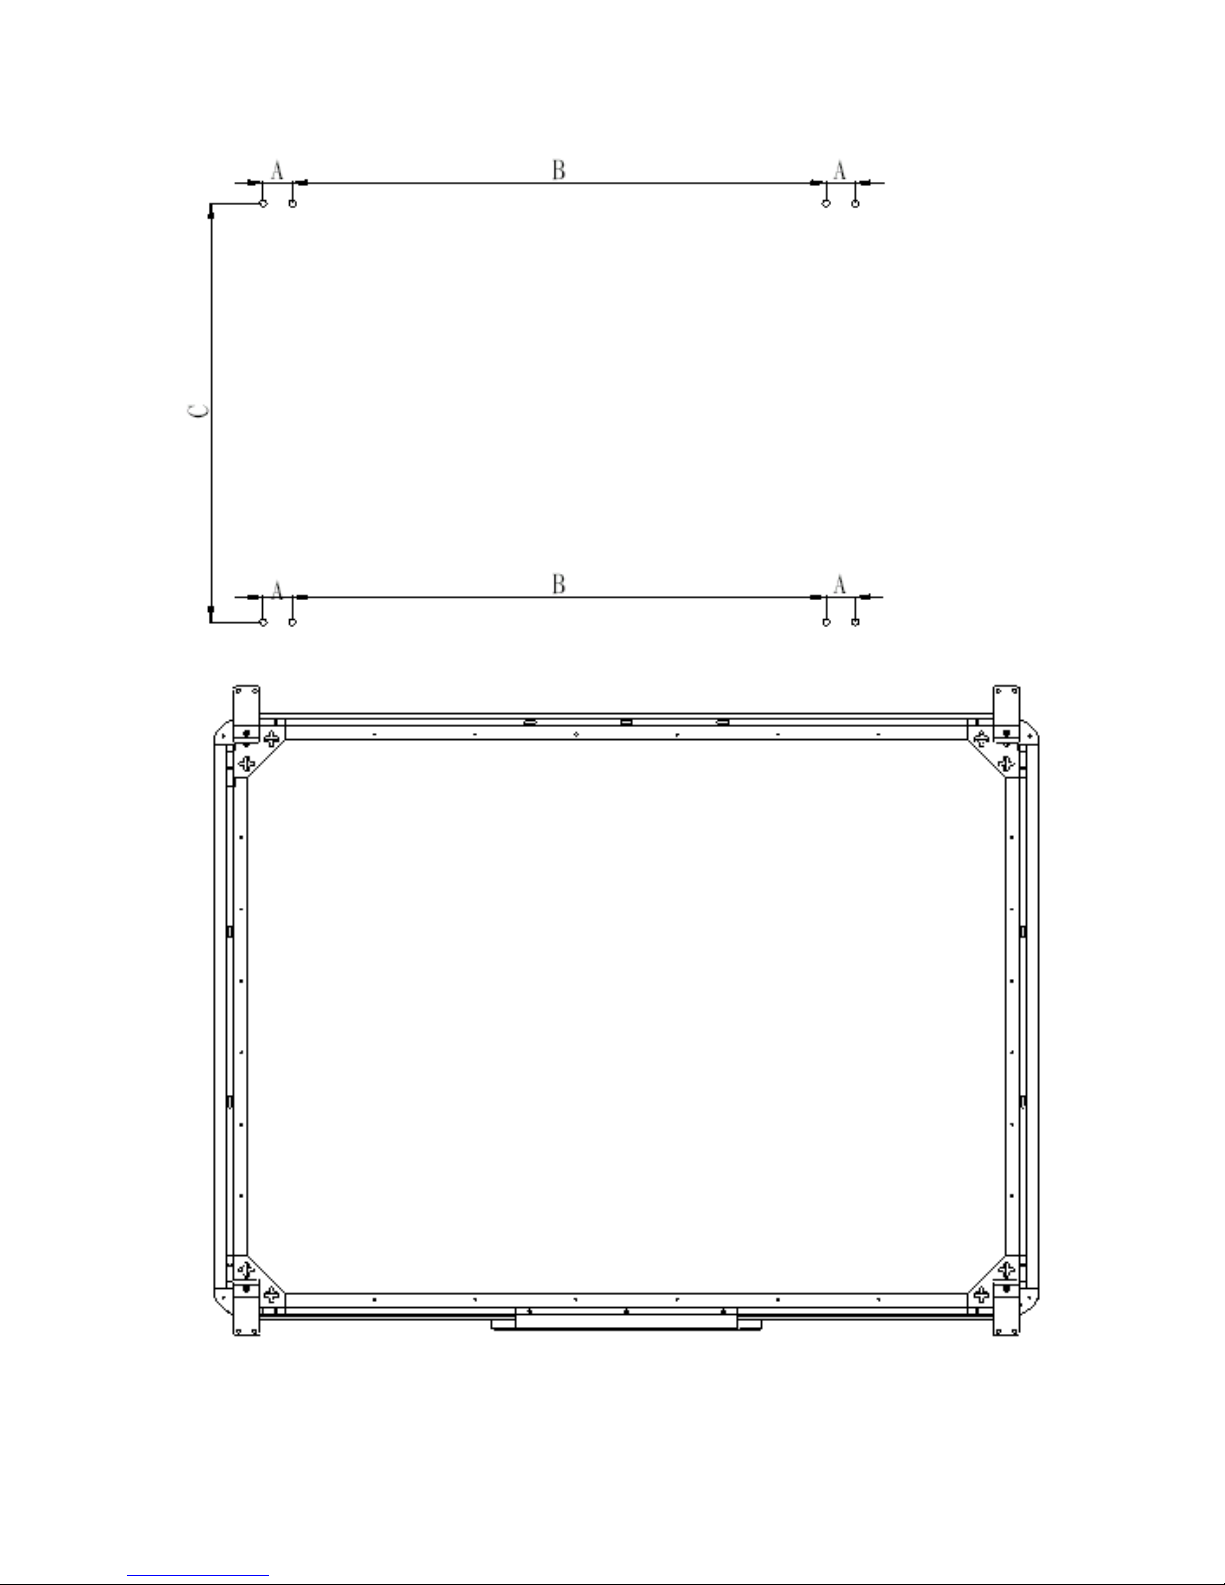
Install Wall-mounting:
(1) Install two wall-mounting brackets A at the back of the interactive
whiteboard (with the four screws at the top of the back of the interactive
whiteboard), shown below:
(2) Install two wall-mounting brackets C at the back of the whiteboard (with
the two screws at the bottom of the back of the whiteboard), shown below:
Page 14

13
Set desired height according to user‟s preference. Place the 4 stilettos on
the wall and screw bolts into each hole to fix the wall-mounting brackets B.
Make sure the distance between the two wall-mounting brackets B is fit for
hanging the interactive whiteboard. Shown below:
After hanging the interactive whiteboard, place 2 stilettos on the wall
according to the actual position and screw bolts into each hole to fix the
wall-mounting brackets C. shown below:
Page 15

14
Install White Board on a Floor Stand:
(1) Assemble the stand with screws, shown below:
(2) Lock all four casters in the down position (as shown)
(3)With an assistant‟s help, hang Interactive whiteboard on the floor stand
by lowering the two bolts onto the top hooks and securing the bottom bolts
into the bottom hooks. There are five heights for hanging according to
user‟s preferences.
Page 16

15
How to Install Software
1. Install Software
Connect the whiteboard to your computer or laptop using the provided USB
cable and insert the Interactive whiteboard CD. Once the USB cable is
connected the computer will notify that it has “found new hardware” and the
following window will appear:
Pease click “Cancel” and use the following method to install the application
software. Once the QOMO Interactive whiteboard CD is placed in the
computer‟s CD-ROM, the auto run install window will appear.
Page 17

16
Click HiteBoard Software to begin installation
Follow the prompts in the dialog box messages to complete the installation.
Double-click on the Microsoft DirectX9.0 to install Direct X9.0
Follow the prompts to install DirectX9.0. Once the installation of the
DirectX and whiteboard Setup is complete, click „Yes” to restart your
computer.
Page 18

17
Once the software is installed, an icon will appear in the computer‟s windows
system tray.
indicates a connection has been made to the whiteboard.
indicates no connection has been made, please check the hardware
connection and USB driver.
Note: Under Windows XP, the USB driver may need to be reinstalled if the
connection to another USB port. Please press “Next” to search USB driver
automatically.
Double-click on the icon to populate the options menu.
‘About’ Option
The dialog box displays the driver version and hardware version.
Page 19

18
Calibrating
Click the center of the flashing “十” with pen to make four “十”s stop
flashing. This is a successful calibration. And according to the operation
to calibrate the other “ 十 ” one by one to finish the Whiteboard
calibration.
★Tips:
1. When you use finger to calibrate, it will cause inaccurate calibration,
please use pen to calibrate to get accurate calibration.
2. Wrong calibration may cause whiteboard cannot work, please do
calibration again.
3. During calibration, click the key "ESC” to will cancel the calibration
operation.
4. There is hotkey calibration process if your whiteboard has hotkey, please
do calibration as screen prompt.
Page 20

19
Exit
When the Interactive whiteboard is no longer needed, click “Exit” to exit the
program and stop whiteboard. When you want to use whiteboard again,
please click to open whiteboard server program from the start menu
and connect the whiteboard.
2. Hot Keys
Some model whiteboard has screen hotkey, it has two types shown as below,
hotkey area is not display area, but you can touch hotkey to operate, the
function will be started when you click in the area of every hotkey.
Page 21

20
3. Writing pens and eraser
★ There are three colored writing pens and one eraser on pen tray, from
right to left; it is red pen, black pen, and blue pen. They has different
priority, eraser has first priority, then is blue pen, black pen and red pen.
When you pick up a pen, this pen color is current color, when you pick
up several pens, the current color will be the color of pen that has first
priority, and you can also select pen color in software toolbar when you
pick up pen. Please put the pen in its corresponding slot on pen tray.
★ Writing with single-finger, moving with multi-finger.
How to Use Annotation Software
Please refer to the <Application Software Instruction> on the CD for details.
Page 22

21
Troubleshooting Guide
Problem
phenomenon
May caused by
Try the following
Whiteboard
does not
work
There is no server
icon on system tray
Does not start server
program
Start server program
Has not install server
program
Install server program
The server icon is in
red
The whiteboard and
computer does not
connect
Connect whiteboard and
computer with USB cable
Whiteboard cannot
pass self test, so
caused whiteboard
cannot connect
Check if there are object
pressed on whiteboard
surface, please move it
away
Something wrong
with driver
Uninstall driver and install
again
The server icon is in
green
Wrong calibration
Calibrate again
When
calibrating,
some
calibration
point can not
been seen
No green crossed
cursor on
whiteboard
There are something
wrong with projector
adjustment so that part
of image is outside the
whiteboard projected
area
Adjust projector
Cannot write
Mouse can move
but no writing stroke
Software is not in
writing mode
Shift to writing mode and
set mouse status as pen
Mouse can move in
desktop operation
mode but cannot
write under writing
mode
The selected stroke
color is same to or
similar to the
background color
Change stroke color or
background color
Page 23

22
Pen can
operate, but
calibration
has deviation
Whiteboard pen is
accurate in some
place while have big
deviation in some
other place
Calibration is not
accurate
Calibrate again properly
Projection image is not
proper
Adjust projector
Pen can
write, but
operation
speed is
slow
Writing stroke don‟t
accord with writing
operation and is
slow than writing
operation
Conflict with anti-virus
software such as Rising
Close the monitoring of
concerned anti-virus
software
Computer run too many
software
Close the software which
will not be used at
present
Computer hardware
configuration is too low
Contact with professional
person to upgrade
computer hardware
Something
wrong with
pen tray
Cannot change pen
stroke color when
pick up or put down
pen
There is dust or other
object on pen tray
Clean pen tray or move
object away
Pen tray is loose or
does not connect well
to whiteboard
Please take off and plug
pen tray, fix screws at the
bottom of pen tray
Page 24

23
Interactive Whiteboard User Tips
When searching for a specific page among many pages, enter the Page
Index mode and look up this page quickly on the Page Sorter window.
Press the Ctrl+ key combination ( 、 、 ) to move/place objects
accurately.
To improve the displaying speed, the size of the image in use should be no
larger than the size of the screen resolution.
If possible, convert the picture that will be inserted into WMF format first.
This operation can improve the displaying speed and reduce distortion when
magnifying or shrinking the image.
In order for the image to be displayed on the screen clearly, set the image
size to the same size as the screen being displayed. For example: If the
screen resolution is 1024×768, the image pixel should be set to1024×768.
Page 25

24
Specifications
56" Interactive Whiteboard
QWB56
Technology
Infrared
Touch System
Pen, Wand or Finger
Touchable range
46" x 33" (1159mm x 831mm)
Resolution
1024 x 1024
Response Time
First dot:25ms,continuous dot:8ms
Cursor Speed
120 inches/second
Coordinate Accuracy
3mm
Consumer Current Active
Area Size (Diagonal)
≤75mA 56"
Port
USB
Dimensions
52" x 38" (1331mm x 971mm)
Packing Dimensions
55" x 43" x 8" (1400 x 1100 x 200mm)
Net Weight
31 lbs (14kg)
Gross Weight
48 lbs (22kg)
Software Drivers
Windows 2000/XP/32 bits vista
Accessories
Standard: 3 Interactive Pens (red, black,
blue), Eraser, Pen Tray
Optional: Floor Stand
Operating Temp
5°F to 122°F (-15°C to 50°C)
Operating Humidity
20~90%
Storage Temp
-40°F to 122°F (-40°C to 50°C)
Storage Humidity
10~95%
Page 26

25
78" Interactive Whiteboard
QWB200
Technology
Infrared
Touch System
Pen, Wand or Finger
Touchable range
65" x 46" (1653mm x 1159mm)
Resolution
1024 x 1024
Response Time
First dot:25ms,continuous dot:8ms
Cursor Speed
120 inches/second
Coordinate Accuracy
3mm
Consumer Current Active
Area Size (Diagonal)
≤80mA 78"
Port
USB
Dimensions
72" x 51" (1824mm x 1301mm)
Packing Dimensions
80" x 60" x 8" (2040 x 1520 x 200mm)
Net Weight
57 lbs (26kg)
Gross Weight
75 lbs (34kg)
Software Drivers
Windows 2000/XP/32 bits vista
Accessories
Standard: 3 Interactive Pens (red, black,
blue), Eraser, Pen Tray
Optional: Floor Stand
Operating Temp
5°F to 122°F (-15°C to 50°C)
Operating Humidity
20~90%
Storage Temp
-40°F to 122°F (-40°C to 50°C)
Storage Humidity
10~95%
Page 27

26
88" Interactive Whiteboard
QWB300
Technology
Infrared
Touch System
Pen, Wand or Finger
Touchable range
72" x 52" (1817mm x 1323mm)
Resolution
2048 x 2048
Response Time
First dot:25ms,continuous dot:8ms
Cursor Speed
120 inches/second
Coordinate Accuracy
3mm
Consumer Current Active
Area Size (Diagonal)
≤85mA 88"
Port
USB
Dimensions
78" x 58" (1988mm x 1465mm)
Packing Dimensions
80" x 66" x 8" (2204 x 1684 x 200mm)
Net Weight
66 lbs (30kg)
Gross Weight
88 lbs (40kg)
Software Drivers
Windows 2000/XP/32 bits vista
Accessories
Standard: 3 Interactive Pens (red, black,
blue), Eraser, Pen Tray
Optional: Floor Stand
Operating Temp
5°F to 122°F (-15°C to 50°C)
Operating Humidity
20~90%
Storage Temp
-40°F to 122°F (-40°C to 50°C)
Storage Humidity
10~95%
Page 28

27
105" Interactive Whiteboard
QWB100WS
Technology
Infrared
Touch System
Pen, Wand or Finger
Touchable range
84" x 46" (2145mm x 1159mm)
Resolution
4096 x 4096
Response Time
First dot:25ms,continuous dot:8ms
Cursor Speed
120 inches/second
Coordinate Accuracy
3mm
Consumer Current Active
Area Size (Diagonal)
≤100mA 105"
Port
USB
Dimensions
91" x 51" (2317mm x 1301mm)
Packing Dimensions
99" x 59" x 7" (2522 x 1500 x 170mm)
Net Weight
66 lbs (30kg)
Gross Weight
88 lbs (40kg)
Software Drivers
Windows 2000/2003/XP
Accessories
Standard: 3 Interactive Pens (red, black,
blue), Eraser, Pen Tray
Optional: Floor Stand
Operating Temp
5°F to 122°F (-15°C to 50°C)
Operating Humidity
20~90%
Storage Temp
-40°F to 122°F (-40°C to 50°C)
Storage Humidity
10~95%
Page 29

28
Technical Support
How to Reach QOMO:
By Phone
Call us at 1-866-990-QOMO. Our expert personnel provide
technical assistance from 9:00AM through 5:00PM Eastern
Standard Time, Monday through Friday. Please gather the
following information before calling:
- Product model name(s) and numbers
- Product serial number(s)
- Detailed and specific questions
Online
Technical support is also available online at QOMO‟s web site at
www.qomo.com. You can enter your questions and concerns
through our online form. Or you can email us at info@qomo.com.
Copyrights 2004 QOMO Hitevision, LLC. All Rights Reserved.
 Loading...