

Page 1

TS-hx83XU-RP
TS-h1683XU-RP
TS-h2483XU-RP
User Guide
Document Version: 1
27/10/2020
Page 2

TS-hx83XU-RP User Guide
Contents
1. Preface
About This Guide.......................................................................................................................................... 2
Audience.......................................................................................................................................................2
Document Conventions................................................................................................................................ 2
2. Product Overview
About the TS-hx83XU-RP.............................................................................................................................3
Hardware Specifications............................................................................................................................... 3
Package Contents........................................................................................................................................ 5
Components................................................................................................................................................. 6
Front Panel...............................................................................................................................................6
Rear Panel................................................................................................................................................7
Rear Panel Network Interface.................................................................................................................. 8
System Board...........................................................................................................................................9
Drive Numbering.....................................................................................................................................11
Safety Information.......................................................................................................................................12
Installation Requirements........................................................................................................................... 13
Setting up the NAS..................................................................................................................................... 13
3. Installation and Configuration
Hardware Installation.................................................................................................................................. 14
Drive Installation.....................................................................................................................................14
Replacing Memory Modules...................................................................................................................20
Replacing Expansion Cards................................................................................................................... 25
Hot-swapping Redundant Power Supply Units.......................................................................................29
Rail Kits.................................................................................................................................................. 31
Expansion Unit Installation..................................................................................................................... 31
QuTS hero Installation................................................................................................................................ 35
Installing QuTS hero Using Qfinder Pro................................................................................................. 36
Installing QuTS hero Using the Cloud Key.............................................................................................38
4. Basic Operations
Power Button.............................................................................................................................................. 41
Reset Button............................................................................................................................................... 41
LEDs........................................................................................................................................................... 42
Audio Alert.................................................................................................................................................. 45
5. Troubleshooting
Forcing Qfinder Pro or myQNAPcloud to Locate the NAS......................................................................... 46
Hot-Swapping Failed Drives....................................................................................................................... 46
Recovering Unintentionally Removed Drives............................................................................................. 47
Support and Other Resources.................................................................................................................... 47
6. Glossary
Cloud Key................................................................................................................................................... 48
myQNAPcloud............................................................................................................................................ 48
myQNAPcloud Link.....................................................................................................................................48
Qfinder Pro................................................................................................................................................. 48
QNAP ID..................................................................................................................................................... 48
QuTS hero.................................................................................................................................................. 48
1
Page 3
TS-hx83XU-RP User Guide
1. Preface
About This Guide
This guide provides information about the device and step-by-step instructions on installing the hardware. It
also provides instructions on basic operations and troubleshooting information.
Audience
This document is intended for storage administrators. This guide assumes that the user is knowledgeable
and qualified to install, maintain, and troubleshoot issues involving servers, server components, and storage
systems. This guide also assumes that the user is trained to recognize hazards, including the appropriate
actions the user needs to take to prevent personal injury and damage to data and property.
Document Conventions
Symbol Description
Notes provide default configuration settings and other supplementary
information.
Important notes provide information on required configuration settings and other
critical information.
Tips provide recommendations or alternative methods of performing tasks or
configuring settings.
Warnings provide information that, when ignored, may result in potential loss,
injury, or even death.
Preface 2
Page 4
TS-hx83XU-RP User Guide
2. Product Overview
This chapter provides basic information about the QNAP device.
About the TS-hx83XU-RP
Powered by Intel® Xeon® E-2236 processor, the TS-hx83XU-RP is an enterprise rackmount NAS designed
for AI applications, such as deep learning, data analysis, and other large data volume applications. The NAS
runs on QNAP's latest QuTS hero operating system that is optimized for applications on the powerful ZFS
file system. The TS-hx83XU-RP is available in 16-drive bays and 24-drive bay models for storing tetrabytes
of data. The NAS also features four-channel long-DIMM DDR4 memory that can be scaled up to 128 GB,
expansion card slots, and pre-installed 10 Gigabit Ethernet network cards, and various input/output (I/O)
ports for better scalability and flexibility.
Hardware Specifications
Warning
• If your QNAP product has hardware defects, return the product to QNAP or a QNAPauthorized service center for maintenance or replacement. Any attempt to repair or
perform maintenance procedures on the product by you or an unauthorized third-party
invalidates the warranty.
• QNAP is not responsible for any damage or data loss caused by unauthorized
modifications and installation of unsupported third-party applications.
For details, see the QNAP Warranty Terms and Conditions.
Tip
Model specifications are subject to change without prior notice. To see the latest
specifications, go to https://www.qnap.com.
Ordering P/N Drive bays Memory Power supply
TS-h1683XU-RPE2236-128G
TS-h2483XU-RPE2236-128G
Component TS-h1683XU-RP-E2236-128G TS-h2483XU-RP-E2236-128G
Processor
CPU Intel® Xeon® E-2236
Frequency 6-core/ 12-threads/ 3.4 GHz /4.8 GHz burst
Architecture x86 64-bit
Encryption engine AES-NI
Memory
Pre-installed
memory
16 128 GB Redundant
24 128 GB Redundant
128 GB RAM: 4 x 32 GB ECC DDR4 UDIMM
Product Overview 3
Page 5
TS-hx83XU-RP User Guide
Component TS-h1683XU-RP-E2236-128G TS-h2483XU-RP-E2236-128G
Memory slots 4 x Long-DIMM DDR4
Important
Use only QNAP memory modules to maintain system performance
and stability. For NAS devices with more than one memory slot,
use QNAP modules with identical specifications.
Using unsupported modules may degrade performance, cause
errors, or prevent the operating system from starting.
Maximum memory 128 GB RAM: 4 x 32 GB
Flash memory 5 GB (dual-boot OS protection)
Storage
Drive bays 16 x 3.5-inch SATA 6 Gbps 24 x 3.5-inch SATA 6 Gbps
Note
The SATA 6 Gbps interface is backward compatible with SATA 3
Gbps.
Drive compatibility 3.5-inch bays:
• 3.5-inch SATA hard disk drives
• 2.5-inch SATA hard disk drives
• 2.5-inch SATA solid-state drives
SSD cache
3.5-inch drive bays: 1 to 16 3.5-inch drive bays: 1 to 24
acceleration support
Hot-swapping Supported
Network
10 Gigabit Ethernet
• 2 x 10 GbE SmartNIC SFP+
ports
• 2 x 10GBase-T RJ45
Gigabit Ethernet
4 x GbE RJ45
ports
Wake-on-LAN Yes (GbE RJ45)
External I/O Ports & Expansion Slots
PCIe slots • 1 x PCIe Gen 2 x 4
• 2 x PCIe Gen 3 x 4
• 1 x PCIe Gen 3 x 8
• 3 x PCIe Gen 2 x 4
• 1 x PCIe Gen 3 x 4
• 1 x PCIe Gen 3 x 8
USB ports • 4 x USB 3.2 Gen 2 (10 Gbps) 4V/1A Type-A
• 2 x USB 3.2 Gen 2 (10 Gbps) 5V/3A Type-C
Interface
Buttons • Power
• Reset
Dimensions
Form factor 3U Rackmount 4U Rackmount
Dimensions (H x W
x D)
130 x 481 x 573.5 mm
5.12 x 18.93 x 22.58 in
176.15 x 481.04 x 672.02 mm
6.94 x 18.94 x 26.46 in
Product Overview 4
Page 6
TS-hx83XU-RP User Guide
Component TS-h1683XU-RP-E2236-128G TS-h2483XU-RP-E2236-128G
Net weight 13.76 kg
(30.34 lbs)
20.67 kg
(45.57 lbs)
Others
Rail compatibility RAIL-A03-57 RAIL-A02-90
Note
• Rail kits are not included with the NAS and must be purchased
separately. For details, contact an authorized reseller or go to
http://shop.qnap.com.
• Information on rail kit installation can be found in the
installation guide included in the rail kit package.
Power supply unit TS-h1683XU-RP: 2 x 500W, 100-240V
AC, 50/60 Hz
TS-h2483XU-RP: 2 x 800W, 100-240V
AC, 50/60 Hz
System battery CR2032 lithium battery (3V, 225 mAh)
Sound level 53 dB(A) 28.7 dB(A)
Note
The sound level was tested at a bystander position, which is within
one meter of the NAS. The test NAS operated at low speed with
the maximum number of drives installed.
Fans • TS-h1683XU-RP: 4 x 92mm, 12V DC system fans
• TS-h2483XU-RP : 3 x 80mm, 12V DC system fans
Operating
0˚C to 40˚C (32˚F to 104˚F)
temperature
Relative humidity • Non-condensing relative humidity: 5% to 95%
• Wet-bulb temperature: 27˚C (80.6˚F)
Tip
For the list of compatible drive models and expansion cards, go to https://www.qnap.com/
compatibility.
Package Contents
Item Quantity
TS-hx83XU-RP NAS 1
Power cord • TS-h1683XU-RP: 2
• TS-h2483XU-RP: 2
Ethernet cable • 2 x 1GbE (Cat5e)
• 2 x 10GbE (Cat6a)
Screws for 2.5-inch drives • TS-h1683XU-RP: 64
• TS-h2483XU-RP: 96
Screws for 3.5-inch drives • TS-h1683XU-RP: 64
• TS-h2483XU-RP: 96
Product Overview 5
Page 7
Item Quantity
Quick Installation Guide (QIG) 1
Components
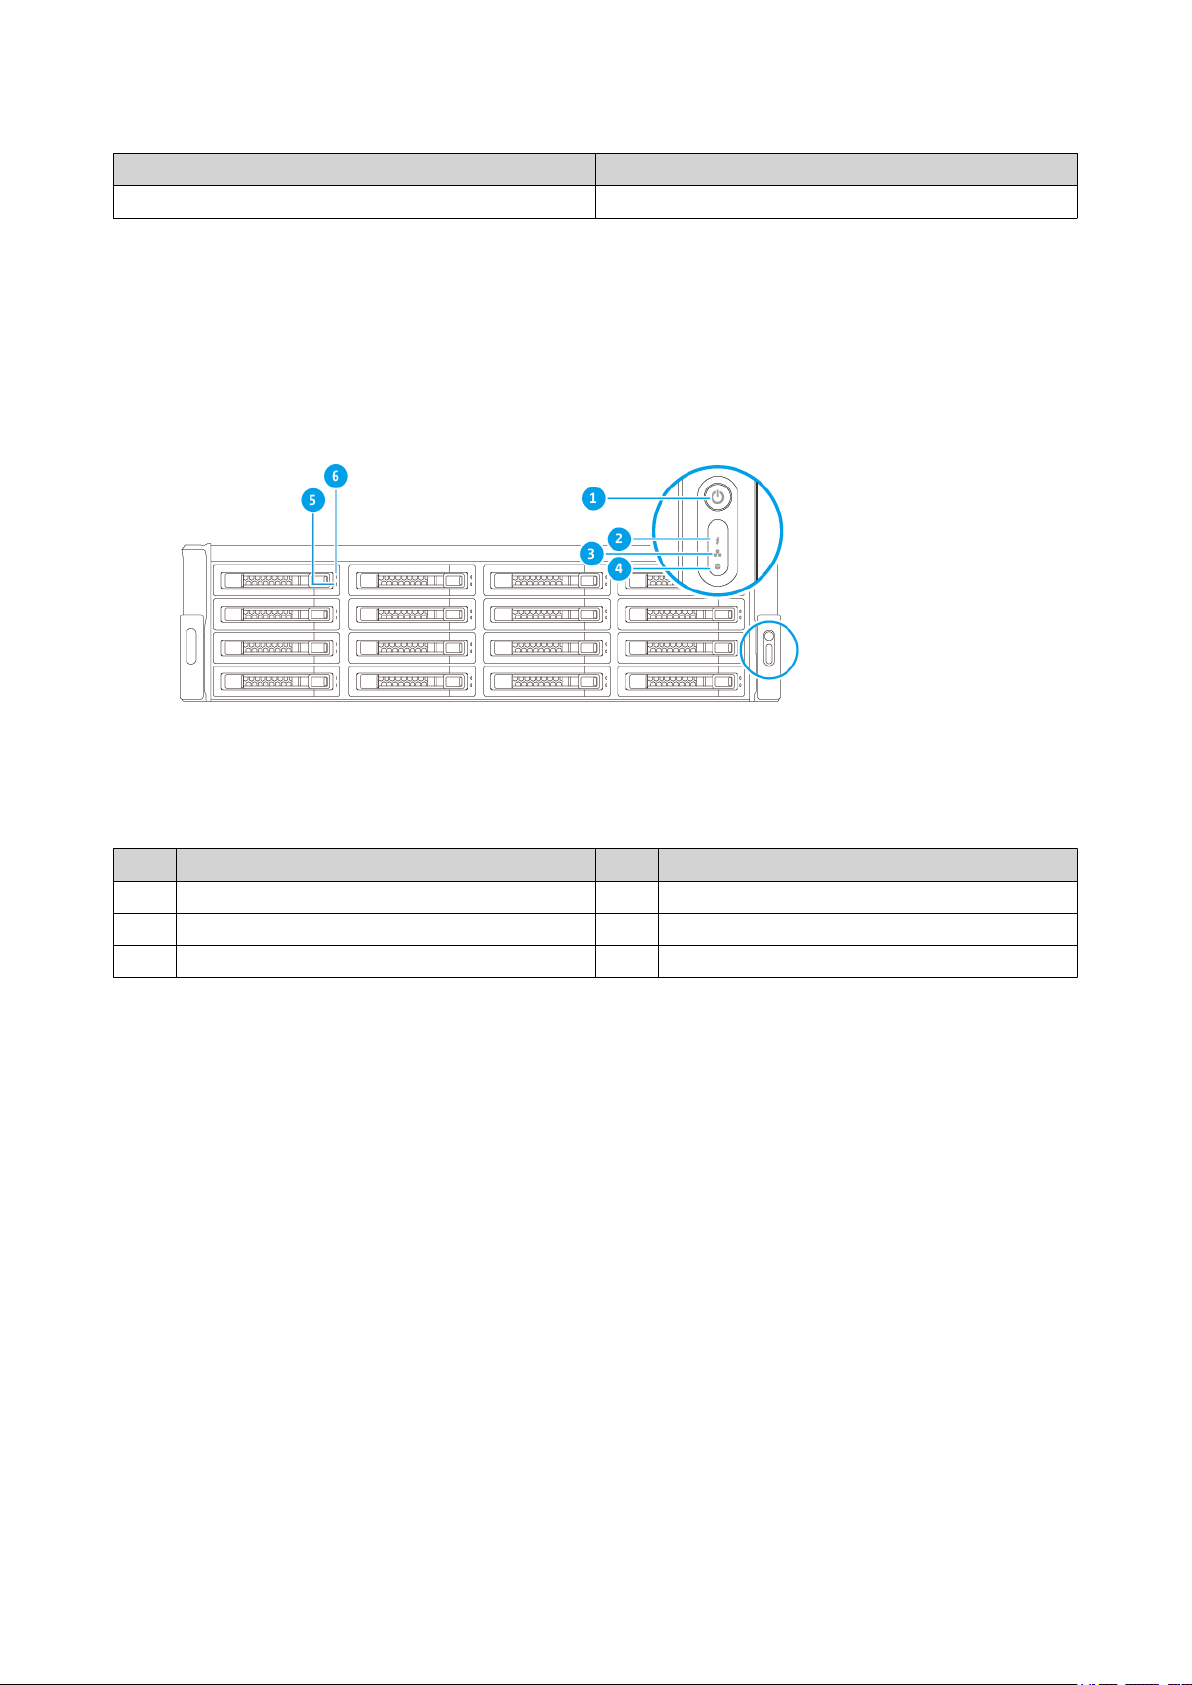
Front Panel
TS-hx83XU-RP User Guide
No. Component No. Component
1 Power button 4 Expansion unit LED
2 Status LED 5 Drive status LED
3 LAN LED 6 Drive activity LED
Product Overview 6
Page 8
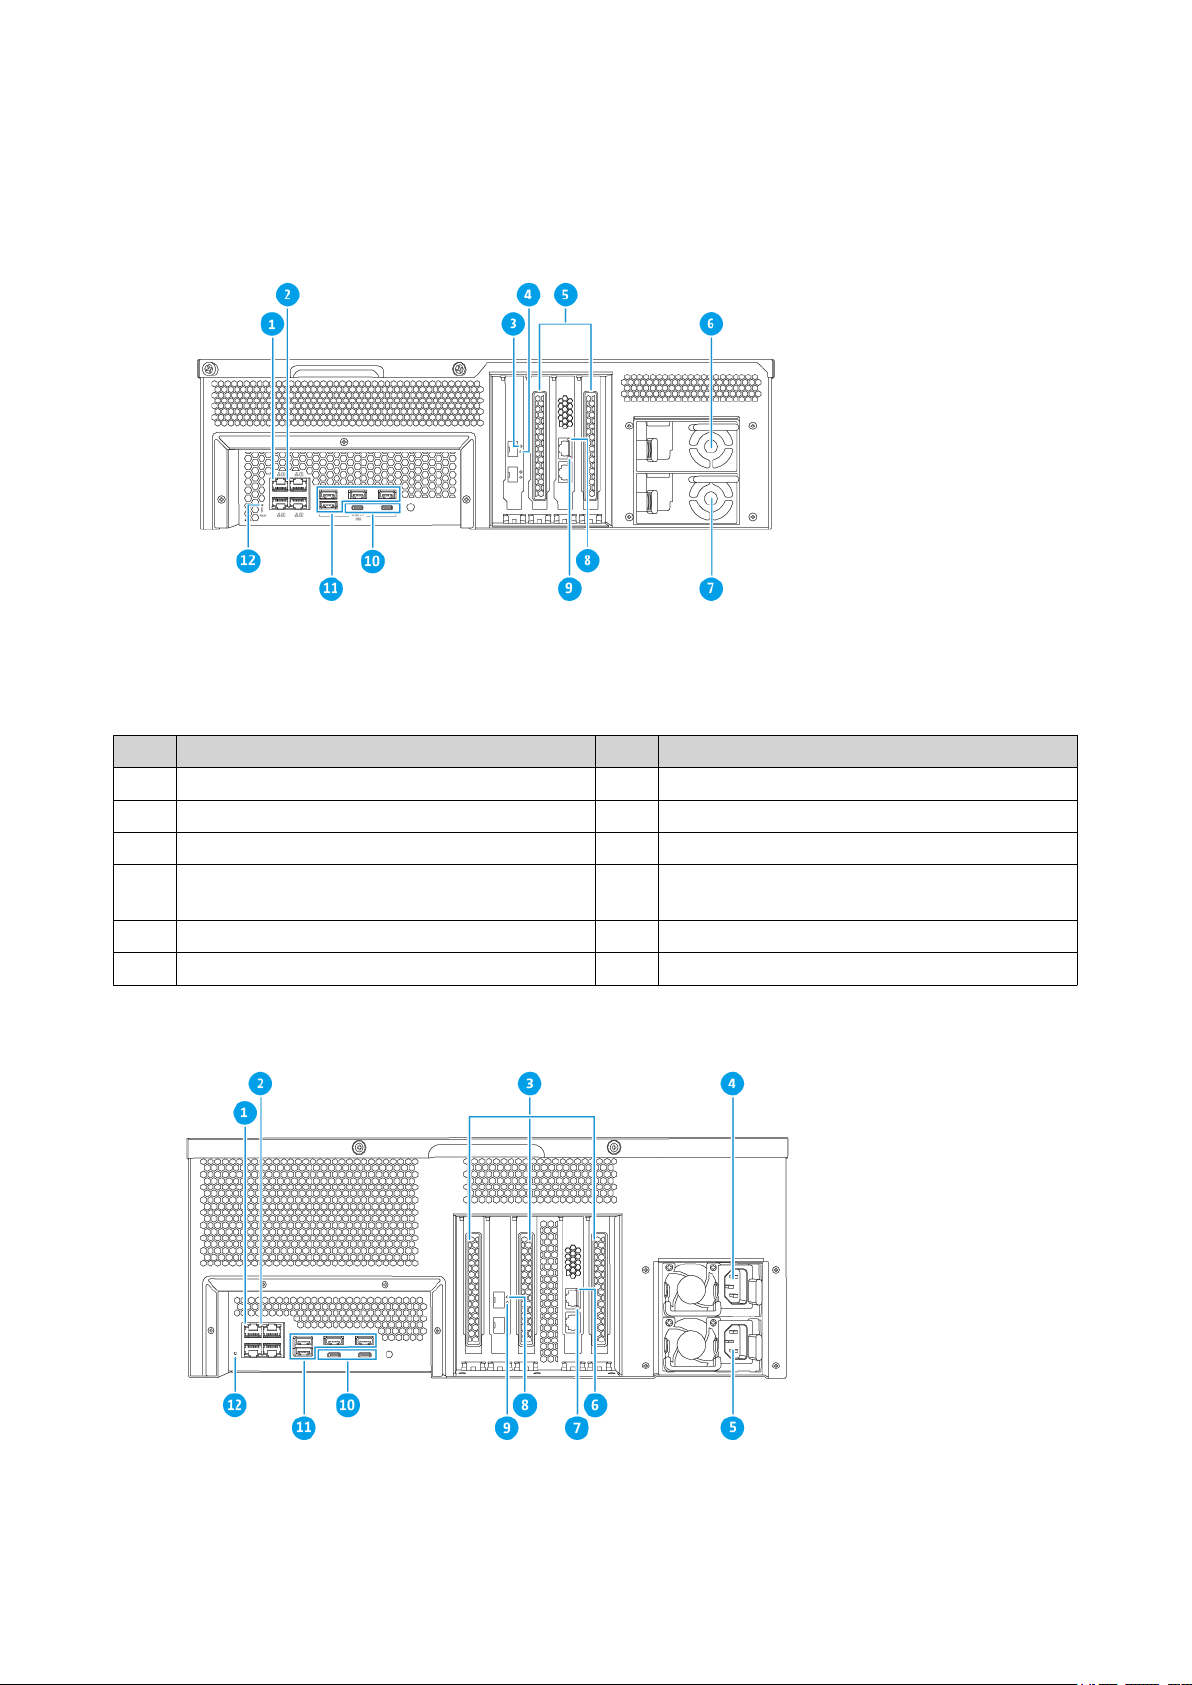
Rear Panel
TS-hx83XU-RP User Guide
TS-h1683XU-RP
No. Component No. Component
1 Gigabit Ethernet activity LED 7 Power supply unit 2
2 Gigabit Ethernet speed LED 8 10 Gigabit Ethernet Speed (RJ45) LED
3 10 Gigabit Ethernet Speed (SFP+) LED 9 10 Gigabit Ethernet Activity (RJ45) LED
4 10 Gigabit Ethernet Activity (SFP+) LED 10 USB 3.2 Gen 2x2 5V/3A (10Gbps) Type-C
ports
5 PCIe full-height covers 11 USB 3.2 Gen 2 4V/1A (10Gbps) Type-A ports
6 Power supply unit 1 12 Reset button
TS-h2483XU-RP
Product Overview 7
Page 9
TS-hx83XU-RP User Guide
No. Component No. Component
1 Gigabit Ethernet activity LED 7 10 Gigabit Ethernet Activity (RJ45) LED
2 Gigabit Ethernet speed LED 8 10 Gigabit Ethernet Speed (SFP+) LED
3 PCIe full-height covers 9 10 Gigabit Ethernet Activity (SFP+) LED
4 Power supply unit 1 10 USB 3.2 Gen 2x2 5V/3A (10Gbps) Type-C
ports
5 Power supply unit 2 11 USB 3.2 Gen 2 4V/1A (10Gbps) Type-A ports
6 10 Gigabit Ethernet Speed (RJ45) LED 12 Reset button
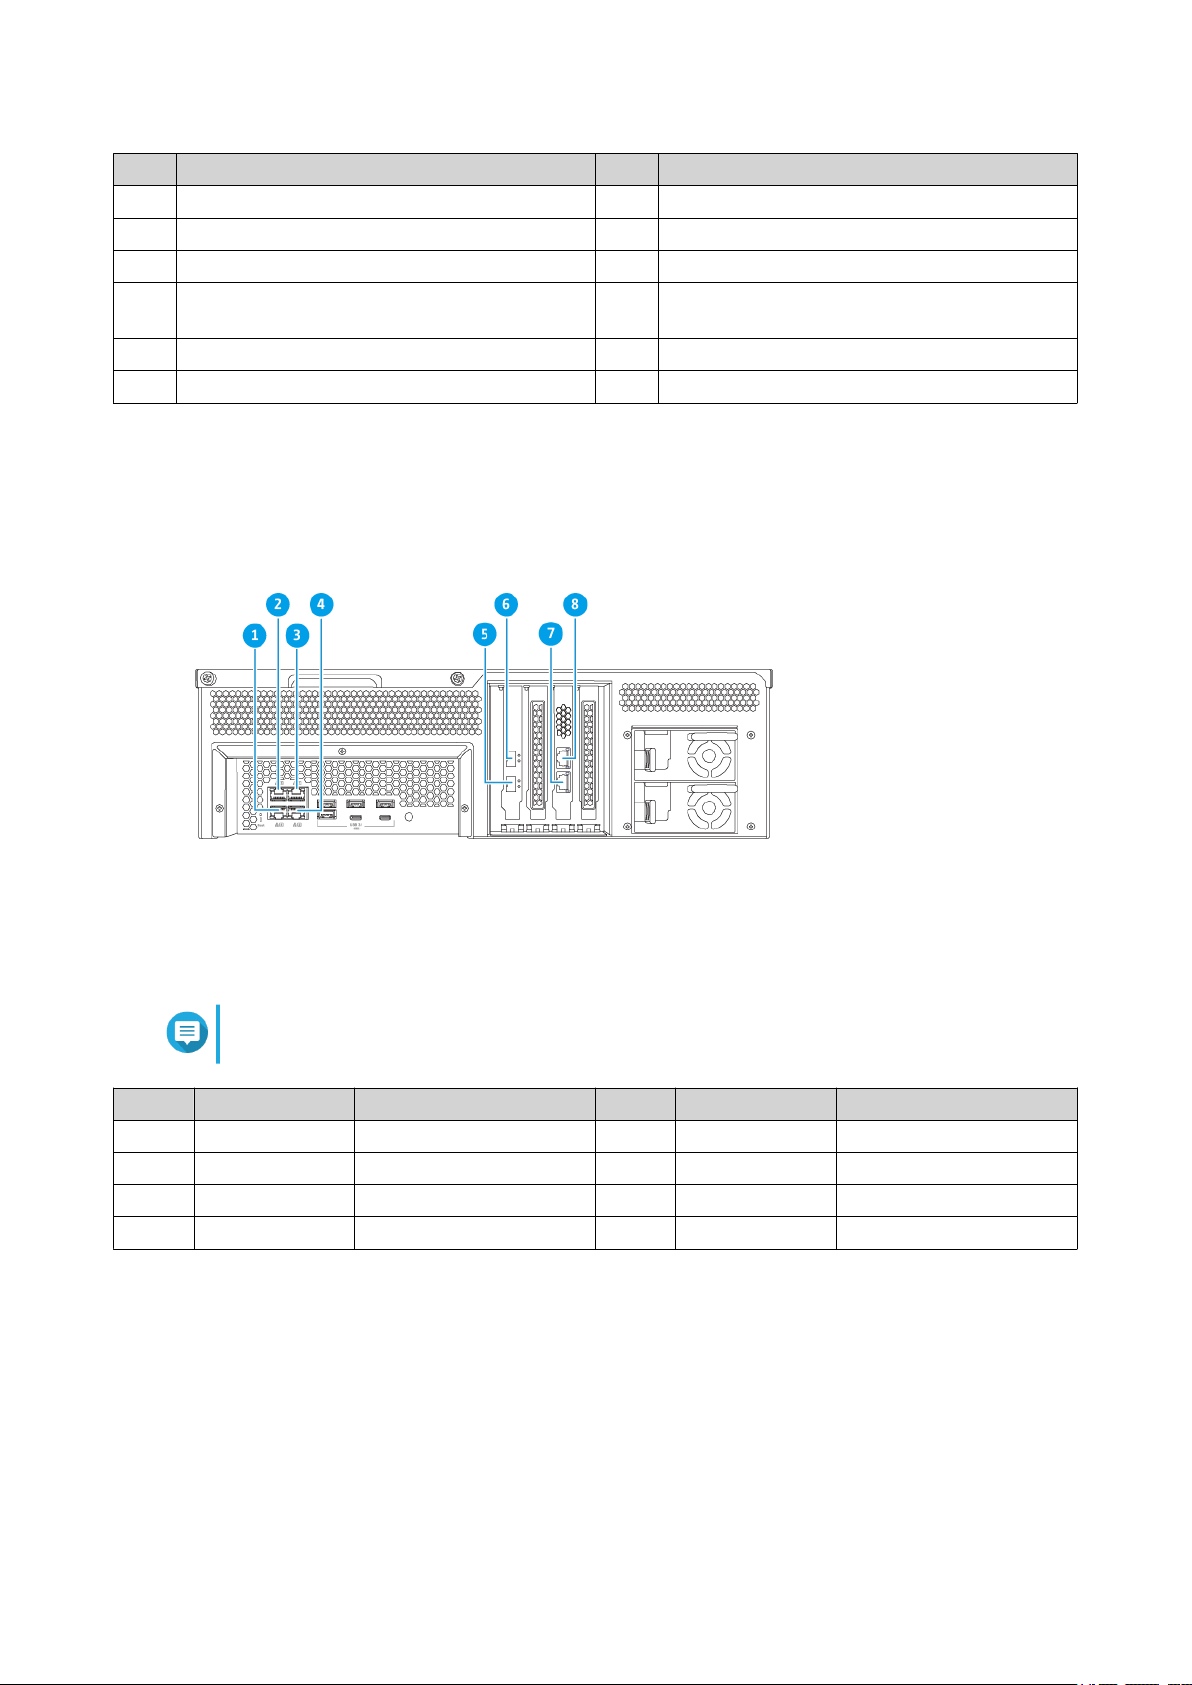
Rear Panel Network Interface
TS-h1683XU-RP
Note
Only Gigabit Ethernet (RJ45) ports support Wake-on-LAN configurations.
No. Component Specifications No. Component Specifications
1 Ethernet port 4 GbE RJ45 5 Ethernet port 7 10GbE SFP+ SmartNIC
2 Ethernet port 3 GbE RJ45 6 Ethernet port 8 10GbE SFP+ SmartNIC
3 Ethernet port 1 GbE RJ45 7 Ethernet port 5 10GbaseT RJ45
4 Ethernet port 2 GbE RJ45 8 Ethernet port 6 10GbaseT RJ45
Product Overview 8
Page 10
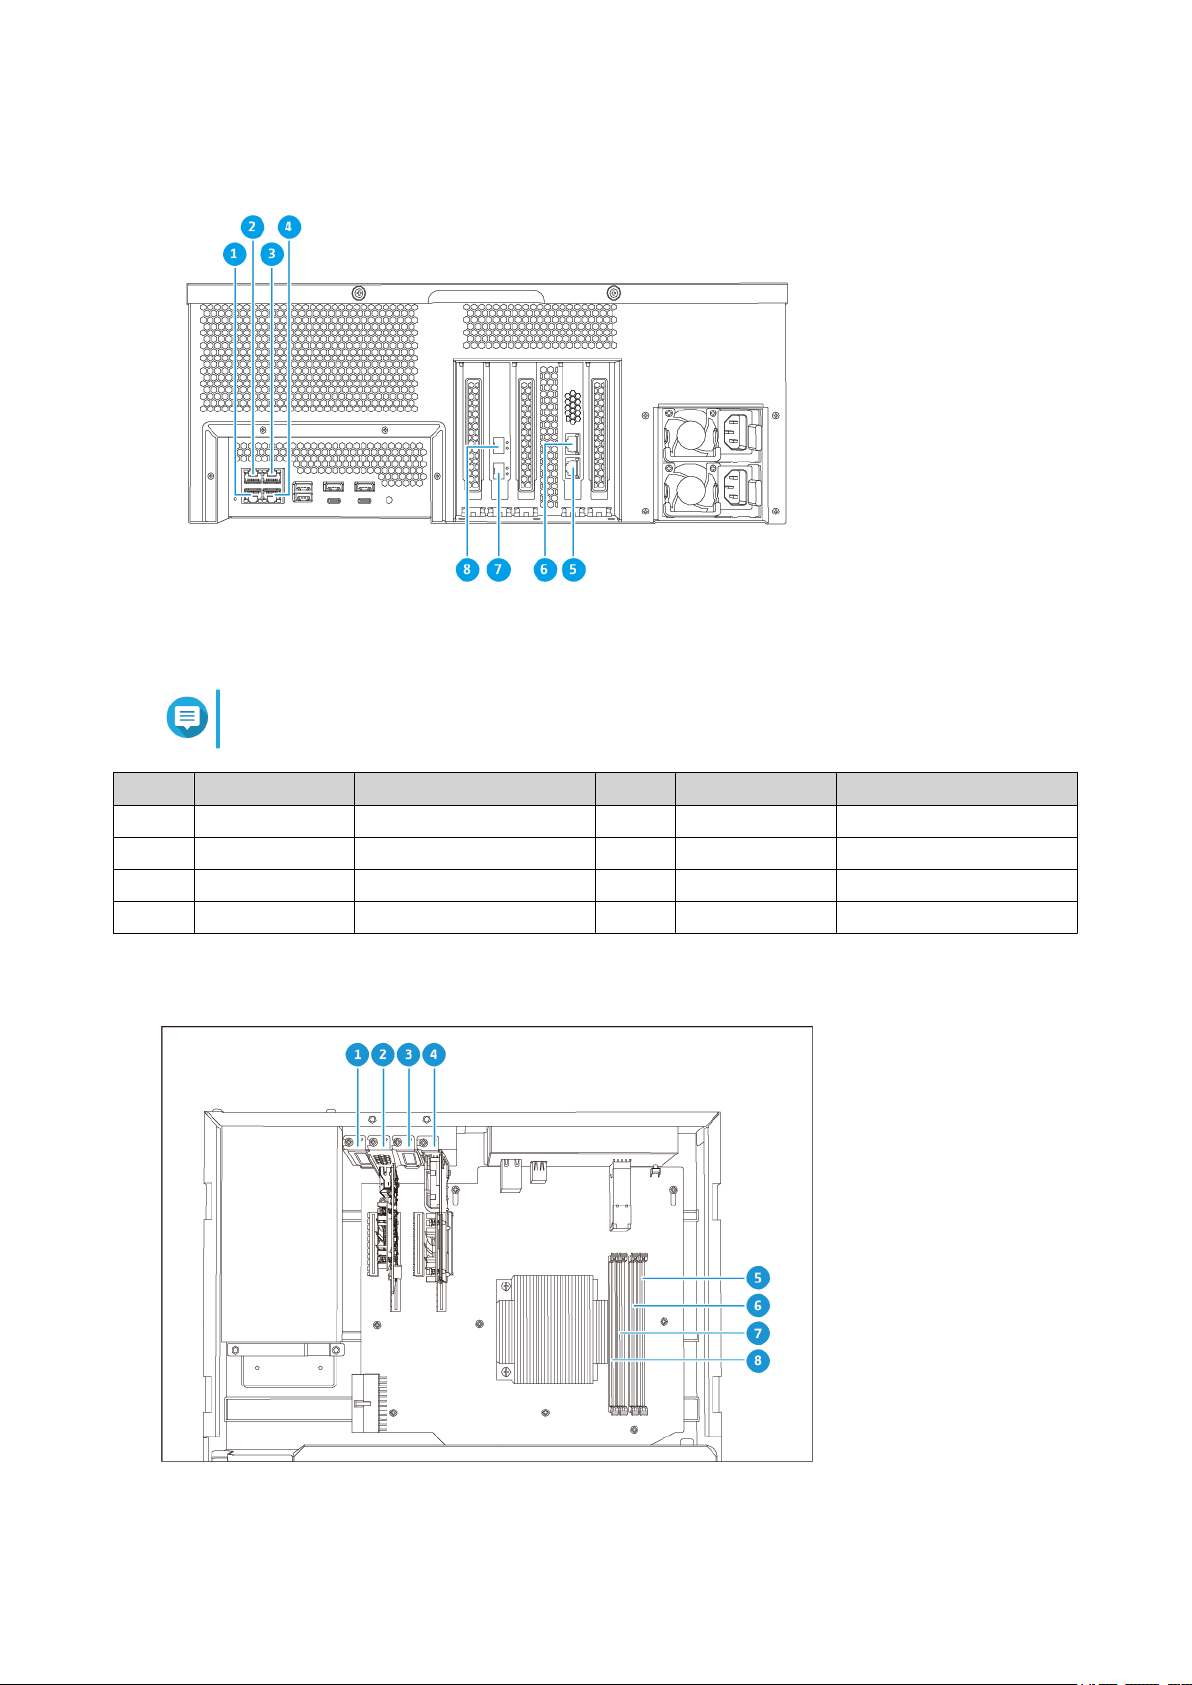
TS-h2483XU-RP
TS-hx83XU-RP User Guide
Note
Only Gigabit Ethernet (RJ45) ports support Wake-on-LAN configurations.
No. Component Specifications No. Component Specifications
1 Ethernet port 4 GbE RJ45 5 Ethernet port 5 10GbaseT RJ45
2 Ethernet port 3 GbE RJ45 6 Ethernet port 6 10GbaseT RJ45
3 Ethernet port 1 GbE RJ45 7 Ethernet port 7 10GbE SFP+ SmartNIC
4 Ethernet port 2 GbE RJ45 8 Ethernet port 8 10GbE SFP+ SmartNIC
System Board
TS-h1683XU-RP
Product Overview 9
Page 11
TS-hx83XU-RP User Guide
No. Component No. Component
1 PCIe slot 1 (PCIe 2.0 x4) 5 Memory slot 4
2 PCIe slot 2 (PCIe 3.0 x8)
6 Memory slot 3
Note
A dual-port 10 Gbase-T network
expansion card is pre-installed on
this PCIe slot.
3 PCIe slot 3 (PCIe 3.0 x4) 7 Memory slot 2
4 PCIe slot 4 (PCIe 3.0 x4)
8 Memory slot 1
Note
A dual-port 10 GbE SFP+ network
expansion card is pre-installed on
this PCIe slot.
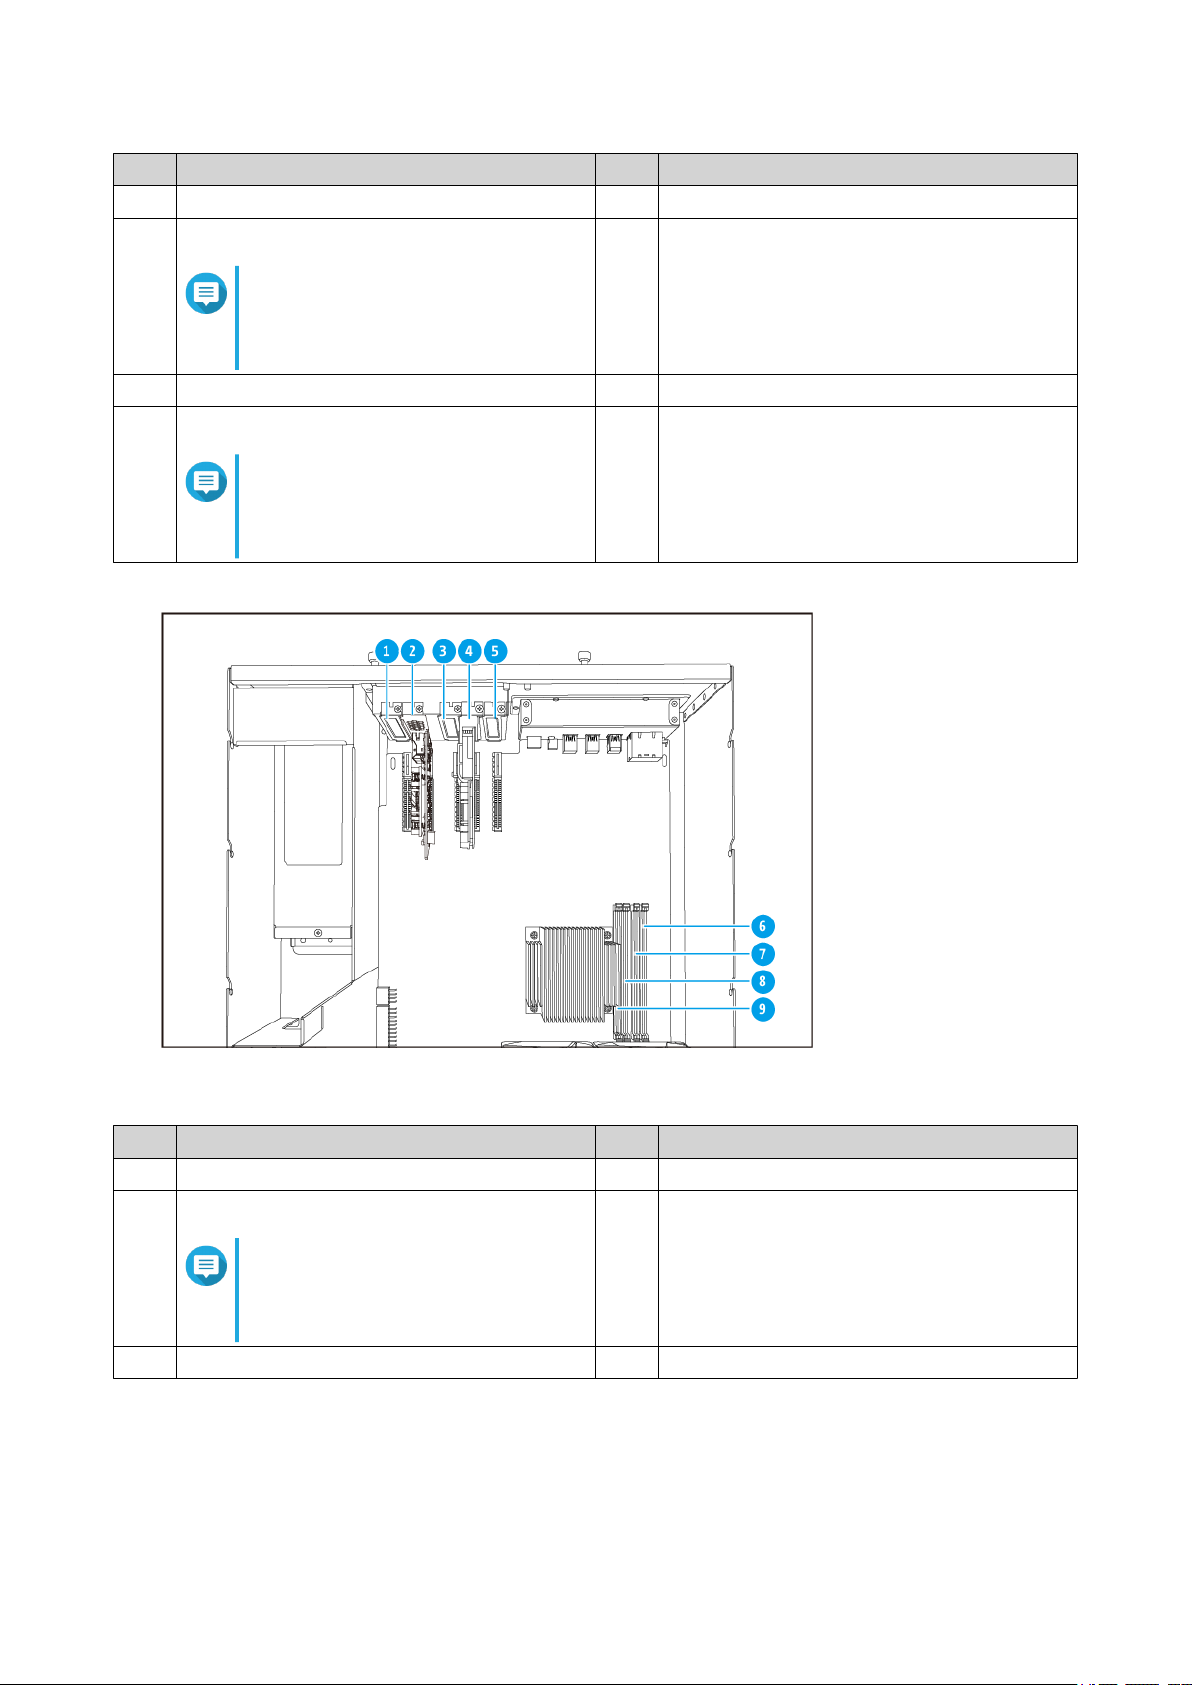
TS-h2483XU-RP
No. Component No. Component
1 PCIe slot 1 (PCIe 2.0 x4) 6 Memory slot 4
2 PCIe slot 2 (PCIe 3.0 x4)
7 Memory slot 3
Note
A dual-port 10 Gbase-T network
expansion card is pre-installed on
this PCIe slot.
3 PCIe slot 3 (PCIe 2.0 x4) 8 Memory slot 2
Product Overview 10
Page 12
No. Component No. Component
4 PCIe slot 4 (PCIe 3.0 x8)
9 Memory slot 1
Note
A dual-port 10 GbE SFP+ network
expansion card is pre-installed on
this PCIe slot.
5 PCIe slot 2 (PCIe 3.0 x4) - -
Drive Numbering
TS-hx83XU-RP User Guide
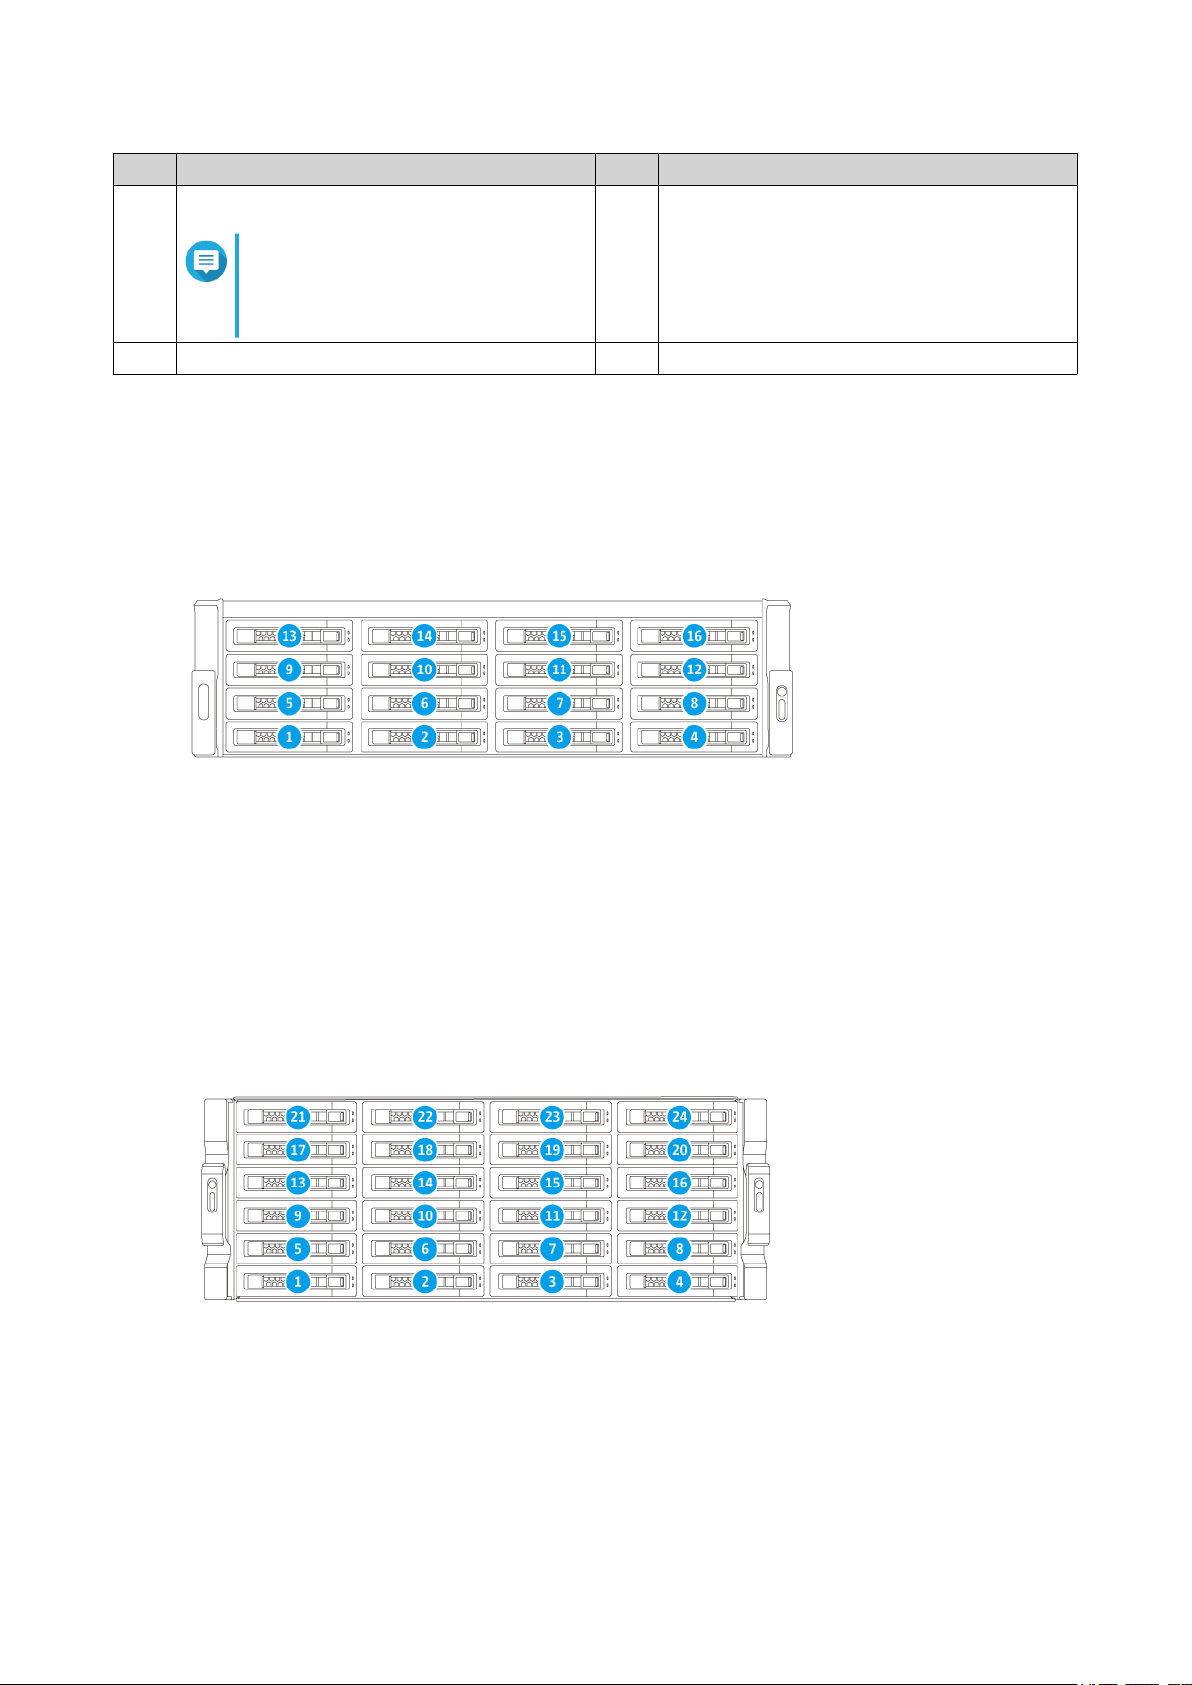
TS-h1683XU-RP
TS-h2483XU-RP
Product Overview 11
Page 13
TS-hx83XU-RP User Guide
Safety Information
The following instructions help ensure personal safety and environmental safety. Read these instructions
carefully before performing any operations.
General Instructions
• The device should be stored in a secure location with restricted access, controlled through the use of a
tool, lock and key, or any means of security.
• Only qualified, skilled, and authorized persons with knowledge of all restrictions, safety precautions,
and installation and maintenance procedures should have physical access to the device.
• To avoid potential injury or damage to components, ensure that the drives and other internal system
components have cooled before touching them.
• Observe electrostatic discharge (ESD) procedures to avoid potential injury or damage to components.
Power
• To reduce the risk of fire or electric shock, ensure that you only connect the power cord to a properly
grounded electrical outlet.
•
Devices with redundant power supply may have one or more power supply unit (PSU) cords. To avoid
serious injuries, a trained service technician must disconnect all PSU cords from the device before
installing or replacing system components.
System Battery
• To avoid potential battery explosion, causing injury or damage to components, ensure that you replace
the existing battery with a battery of the same type.
• Dispose of used batteries properly according to local regulations or the instructions of the battery
manufacturer.
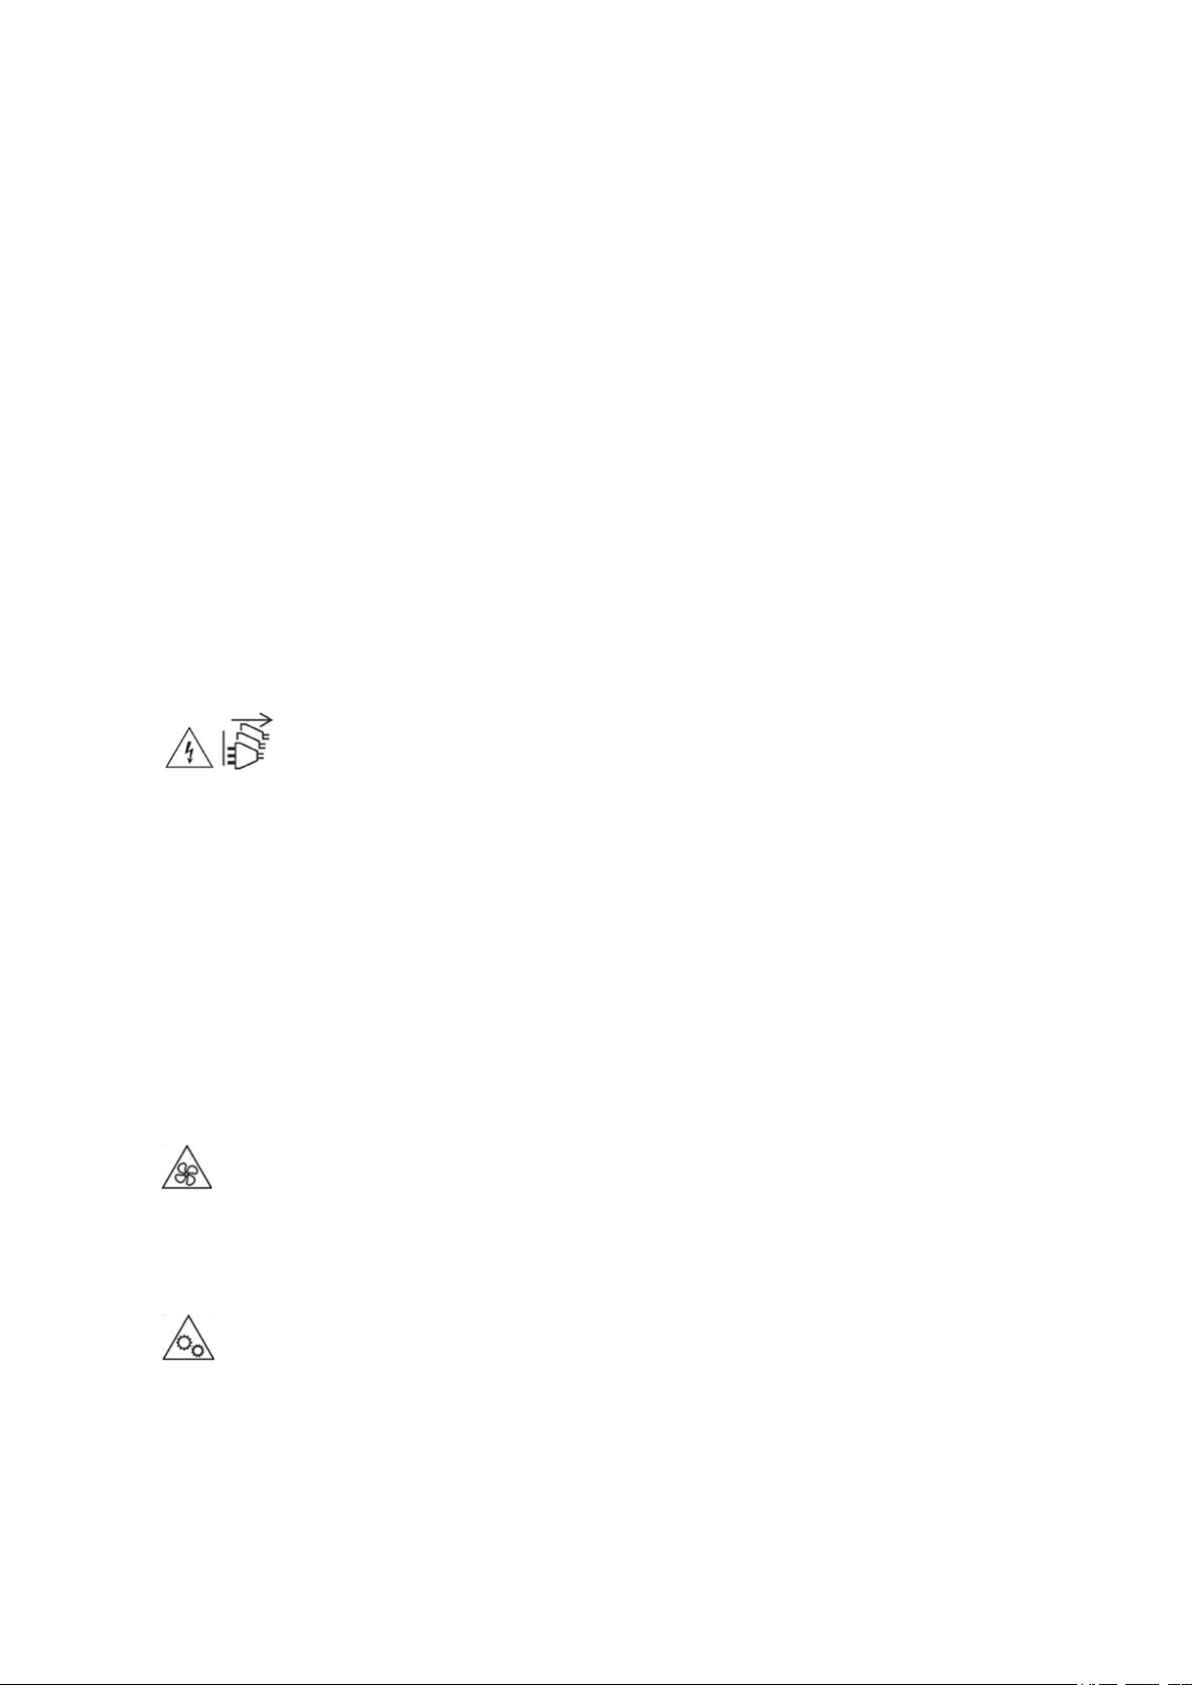
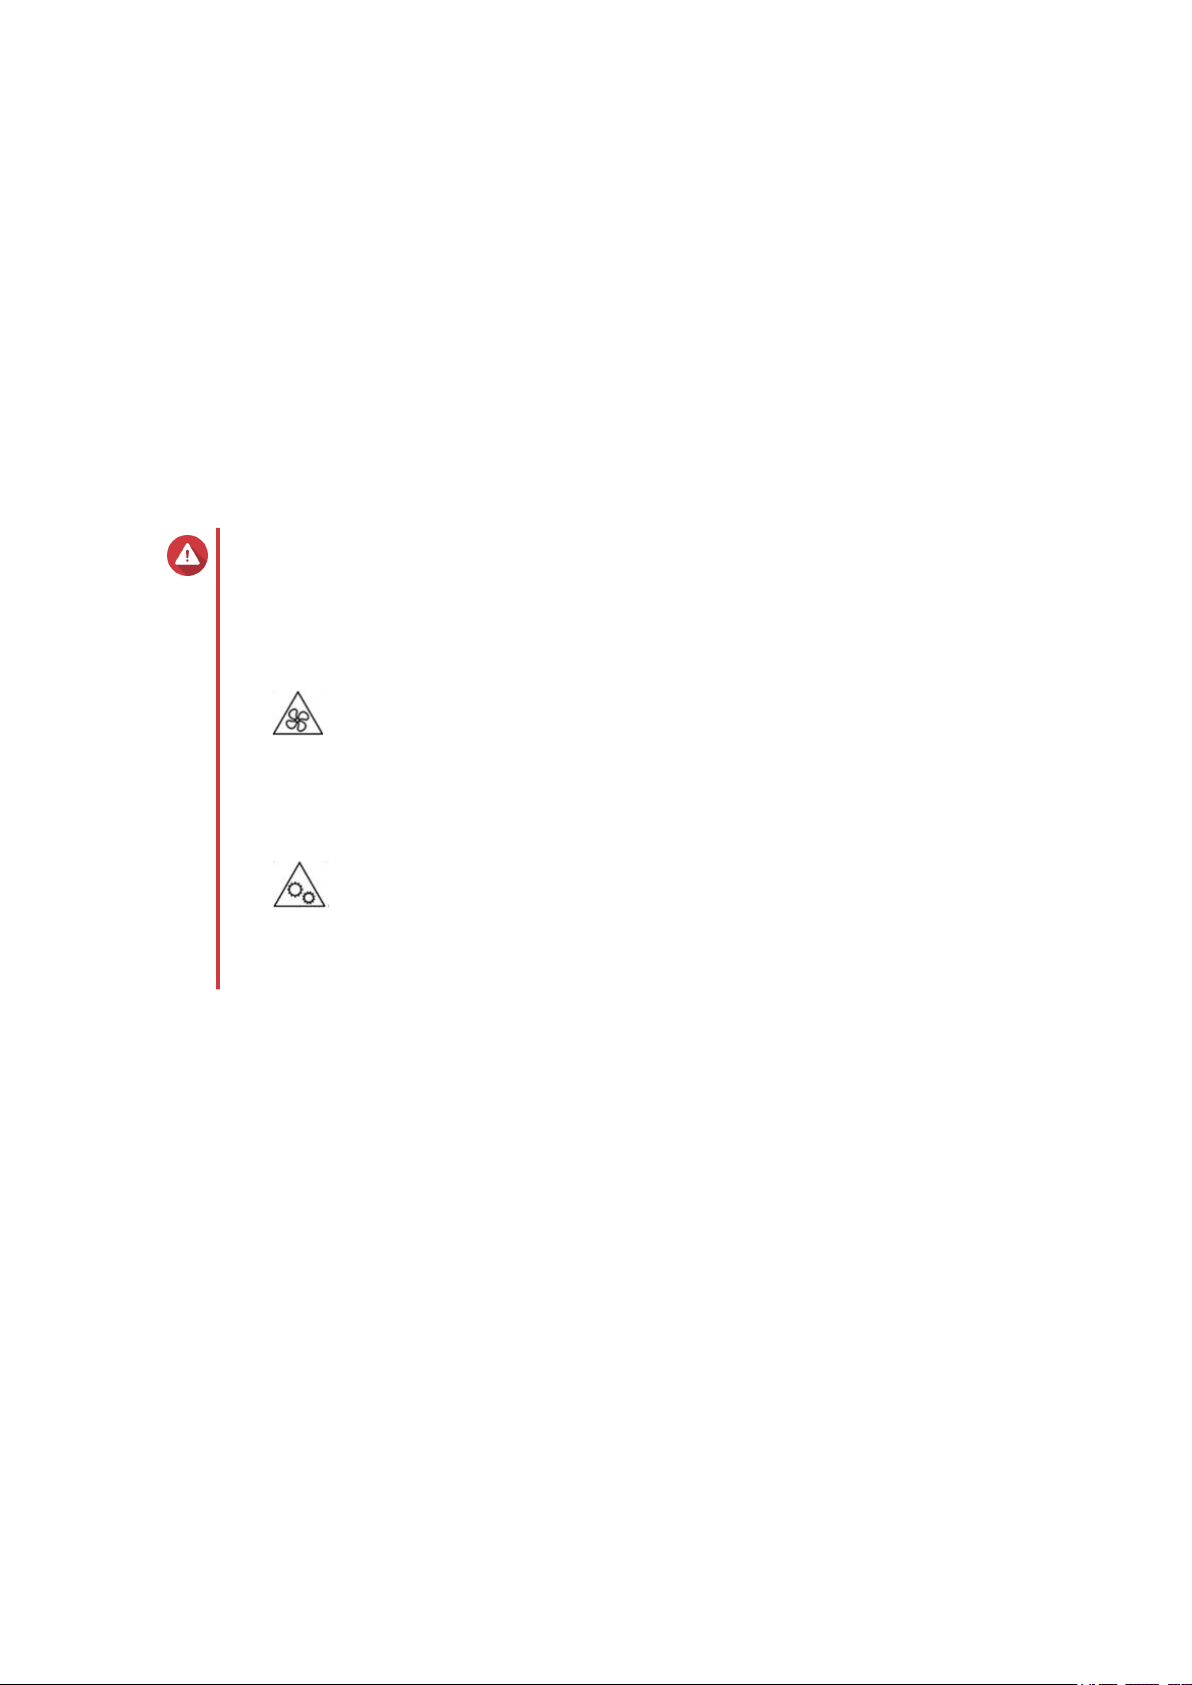
Moving Parts
•
Moving fan blades: Keep your body parts away from moving fan blades while the device is connected
to a power source.
•
Moving components: Keep your body parts away from other moving components.
Product Overview 12
Page 14
Installation Requirements
Category Item
Environment • Room temperature: 0˚C to 40˚C (32˚F to 104˚F)
• Non-condensing relative humidity: 5% to 95%
• Wet-bulb temperature: 27˚C (80.6˚F)
• Flat, anti-static surface without exposure to direct sunlight, liquids,
or chemicals
Hardware and peripherals • Storage drives
For details on compatible drives, go to https://www.qnap.com/
compatibility/.
• Network cable
Tools • Phillips #1 or #2 screwdriver
• Anti-static wrist strap
TS-hx83XU-RP User Guide
Setting up the NAS
Important
Read all safety requirements and information carefully before setting up the NAS or
installing NAS components.
1. Place your NAS device in an environment that meets the requirements.
For details, see Installation Requirements.
2. Install the NAS on a rack.
3. Verify that the intake vents on the bottom of the case are unobstructed.
4. Install the drives.
For details see the following topics:
• Installing 3.5-inch Hard Drives on 3.5-inch Trays
• Installing 2.5-inch Hard Drives or Solid-State Drives on 3.5-inch Trays
5. Optional: Install expansion cards.
For details see, Removing Expansion Cards.
6. Optional: Connect the expansion units.
For details, see Connecting SAS Expansion Units.
7. Connect the power cord and all applicable cables.
8. Power on the NAS.
9. Install QuTS hero.
For details, see QuTS hero Installation.
10. Log on to QuTS hero.
Product Overview 13
Page 15
TS-hx83XU-RP User Guide
3. Installation and Configuration
This chapter provides specific hardware and firmware installation and configuration steps.
Hardware Installation
This section provides information on installing drives, memory modules, and expansion cards.
Drive Installation
The TS-hx83XU-RP is compatible with 3.5-inch and 2.5-inch hard drives, and 2.5-inch solid-state drives.
Installing 3.5-inch Hard Drives on 3.5-inch Trays
Warning
• Installing a drive and installing QuTS hero deletes all data on the drive.
• Observe electrostatic discharge (ESD) procedures to avoid damage to components.
•
Moving fan blades: Keep your hands and other body parts away from moving fan
blades.
•
Other moving components: Keep your hands and other body parts away from other
moving components.
1. Power off the NAS.
2. Remove the drive tray.
a. Slide the lock to the left.
Installation and Configuration 14
Page 16

TS-hx83XU-RP User Guide
b. Push the button to release the tray handle.
c. Pull the tray out.
3. Install a drive on the tray.
a. Place the drive on the tray so that the holes on the sides of the drive are aligned with the holes on
the sides of the tray.
b. Attach the screws.
Installation and Configuration 15
Page 17

TS-hx83XU-RP User Guide
4. Load the tray into the bay.
a. Insert the tray into the bay.
b. Push the handle.
c. Slide the lock to the right.
Installation and Configuration 16
Page 18

TS-hx83XU-RP User Guide
5. Power on the NAS.
Installing 2.5-inch Hard Drives on 3.5-inch Trays
Warning
• Installing a drive and installing QuTS hero deletes all data on the drive.
• Observe electrostatic discharge (ESD) procedures to avoid damage to components.
•
Moving fan blades: Keep your hands and other body parts away from moving fan
blades.
•
Other moving components: Keep your hands and other body parts away from other
moving components.
1. Power off the NAS.
2. Remove the drive tray.
a. Slide the lock to the left.
Installation and Configuration 17
Page 19

TS-hx83XU-RP User Guide
b. Push the button to release the tray handle.
c. Pull the tray out.
3. Install a drive on the tray.
a. Place the drive on the tray so that the holes on the sides of the drive are aligned with the holes on
the sides of the tray.
b. Attach the screws.
Installation and Configuration 18
Page 20

TS-hx83XU-RP User Guide
4. Load the tray into the bay.
a. Insert the tray into the bay.
b. Push the handle.
c. Slide the lock to the right.
Installation and Configuration 19
Page 21

TS-hx83XU-RP User Guide
5. Power on the NAS.
Replacing Memory Modules
The TS-hx83XU-RP has four memory slots. You can increase the memory capacity of the NAS by upgrading
memory modules. For optimal dual-channel performance, replace memory modules in all four slots at the
same time.
Use only QNAP memory modules to maintain system performance and stability. You can purchase QNAP
memory modules from authorized resellers.
Important
QNAP recommends installing modules in pairs.
Ensure the following when replacing memory modules:
• When installing one memory module, install the memory in slot 1.
• When replacing two memory modules, ensure that each pair uses identical modules.
• When replacing four memory modules, ensure that all four modules are identical.
• Install the pairs in sequence and follow the assigned slots for each pair.
• When installing four memory modules, install the memory in slots 2, 4, 1, and 3.
For details on slot numbering, see System Board.
Module Pair Slot Number
First pair Slots 2 and 4
Second pair Slots 1 and 3
Warning
• Only qualified personnel should perform the following steps. Failure to follow
instructions can result in serious injury or death.
Installation and Configuration 20
Page 22

• Observe electrostatic discharge (ESD) procedures to avoid damage to components.
•
Moving fan blades: Keep your hands and other body parts away from moving fan
blades.
•
Other moving components: Keep your hands and other body parts away from other
moving components.
1. Power off the device.
2. Disconnect the power cord from the electrical outlet.
3. Disconnect all cables and external attachments.
TS-hx83XU-RP User Guide
4. Remove the case cover.
a. Loosen the screws.
b. Slide the cover back.
c. Lift the cover off the device.
Installation and Configuration 21
Page 23

TS-hx83XU-RP User Guide
5. Remove an existing module.
a. Push the retention clips outward simultaneously to release the module.
b. Verify that the module has tilted upward and is completely released from the slot.
Warning
Attempting to remove a module that is not completely released may damage the module and
the motherboard.
c. Hold the module by the edges.
d. Carefully slide the module out of the slot.
Installation and Configuration 22
Page 24

Warning
• Do not touch the internal components, particularly the metal connectors.
• Do not bend the module.
6. Install a new module.
a. Align the notch with the ridge in the slot.
b. Insert the module into the slot.
c. Verify that the metal connectors are completely inserted into the slot.
d. Carefully press down on the module until the retention clips lock the module into place.
TS-hx83XU-RP User Guide
7. Attach the case cover.
a. Place the cover on the device.
Installation and Configuration 23
Page 25

TS-hx83XU-RP User Guide
b. Slide the cover forward.
c. Tighten the screws.
Installation and Configuration 24
Page 26

TS-hx83XU-RP User Guide
8. Connect all cables and external attachments.
9. Power on the device.
10. Verify that the module is recognized by the device.
11. Log on to QuTS hero as administrator.
12. Go to Control Panel > System > System Status > Hardware Information .
13. Check the value for Total memory.
Replacing Expansion Cards
The device supports selected expansion cards, some of which require QNAP PCIe brackets. QNAP-branded
expansion cards purchased from the company website are shipped with the brackets necessary to fit the
device.
Warning
•
Moving fan blades: Keep your hands and other body parts away from moving fan
blades.
•
Other moving components: Keep your hands and other body parts away from other
moving components.
• Observe electrostatic discharge (ESD) procedures to avoid damage to components.
Installation and Configuration 25
Page 27

1. Power off the device.
2. Disconnect the power cord from the electrical outlet.
3. Disconnect all cables and external attachments.
4. Remove the case cover.
a. Loosen the screws.
TS-hx83XU-RP User Guide
b. Slide the cover back.
c. Lift the cover off the device.
5. Remove the PCIe cover.
a. Remove the screw that secures the cover to the bracket.
Installation and Configuration 26
Page 28

b. Pull the cover away from the slot.
TS-hx83XU-RP User Guide
Note
This image shows removing an expansion card from a TS-h1683XU-RP NAS.
6. Optional: Attach the QNAP bracket to the expansion card.
a. Remove all screws of the existing bracket.
b. Carefully pull the bracket away from the card.
c. Attach the QNAP bracket to the card using the same screws.
d. Verify that the bracket does not move.
7. Install the expansion card.
a. Hold the card by the edges.
b. Insert the card into the slot.
c. Attach the screw.
Installation and Configuration 27
Page 29

TS-hx83XU-RP User Guide
Note
This image shows removing an expansion card from a TS-h1683XU-RP NAS.
8. Attach the case cover.
a. Place the cover on the device.
b. Slide the cover forward.
Installation and Configuration 28
Page 30

TS-hx83XU-RP User Guide
c. Tighten the screws.
9. Connect all cables and external attachments.
10. Connect the power cord to the electrical outlet.
11. Power on the device.
Hot-swapping Redundant Power Supply Units
Warning
Installation and Configuration 29
Page 31

TS-hx83XU-RP User Guide
The NAS may have one or more power supply unit (PSU) cords. To avoid serious injuries,
a trained service technician must disconnect all PSU cords before installing or replacing
system components.
1. Power off the device.
2. Disconnect the power cord from the electrical outlet and the power supply unit (PSU) that you are
replacing.
3. Firmly press the latch toward the handle and then pull the PSU out.
4. Insert the new PSU.
Installation and Configuration 30
Page 32

TS-hx83XU-RP User Guide
5. Connect the power cord to the PSU and the electrical outlet.
6. Power on the device.
Rail Kits
Rail kits are not included with the NAS and must be purchased separately. For details, contact an authorized
reseller or go to http://shop.qnap.com.
The TS-hx83XU-RP is compatible with the following rail kit models:
Model Compatible Rail Kit
TS-h1683XU-RP RAIL-A03-57
TS-h2483XU-RP RAIL-A02-90
You can find installation information in the rail kit package.
Expansion Unit Installation
The TS-hx83XU-RP supports SAS expansion units. For details, please see table below.
The device supports SAS expansion units, SATA JBOD expansion units, and USB expansion units. For
details, please see table below.
You can purchase storage expansion accessories from QNAP or an authorized reseller.
For details, go to https://shop.qnap.com/.
For the list of compatible expansion units and the maximum number of applicable expansion units, go to
http://www.qnap.com/go/compatibility-expansion.
Expansion Unit Model Description Required Accessories
REXP-1620U-RP • Uses a SAS 12 Gbps
REXP-1220U-RP
REXP-1610U-RP • Uses a SAS 6 Gbps
REXP-1210U-RP
TL-D400S • Uses a SAS 6 Gbps
TL-D800S • Uses a SAS 6 Gbps
(SFF-8644) interface
• Supports SAS/SATA
HDD/SSD
(SFF-8644) interface
• Supports SATA/HDD/SSD
(SFF-8088) interface
• Supports SATA/HDD/SSD
(SFF-8088) interface
• SAS-12G2E storage
expansion card
• mini-SAS SFF-8644 cable
• RAIL-A03-57
• SAS-12G2E storage
expansion card
• mini-SAS SFF-8644 cable
• RAIL-A03-57
• 1 x SFF-8088 connector cable
• QXP-400eS-A1164 host bus
adapter
• 2 x SFF-8088 connector
cables
• Supports SATA/HDD/SSD
• QXP-800eS-A1164 host bus
adapter
Installation and Configuration 31
Page 33

TS-hx83XU-RP User Guide
Expansion Unit Model Description Required Accessories
TL-R400S • Uses a SAS 6 Gbps
• 1 x SFF-8088 connector cable
(SFF-8088) interface
• QXP-400eS-A1164 host bus
• Supports SATA/HDD/SSD
adapter
• RAIL-B02
TR-002 • Uses a USB 3.2 Gen 2 Type-C
interface
• USB 3.2 Gen 2 Type-A to
Type-C cable
• Supports SATA drives
TR-004 • Uses a USB 3.2 Gen 1 Type-C
interface
• Supports SATA drives
TR-004U • Uses a USB 3.2 Gen 1 Type-C
interface
• Supports SATA drives
TL-D800C • Uses a USB 3.2 Gen 2 Type-C
interface
• Supports SATA drives
TL-R1200C-RP • Uses a USB 3.2 Gen 2 Type-C
interface
• Supports SATA drives
• USB 3.2 Gen 2 Type-C to
Type-C cable
• USB 3.2 Gen 2 Type-A to
Type-C cable
• USB 3.2 Gen 2 Type-C to
Type-C cable
• USB 3.2 Gen 1 Type-A to
Type-C cable
• USB 3.2 Gen 2 Type-C to
Type-C cable
• RAIL-B02
• USB 3.2 Gen 2 Type-A to
Type-C cable
• USB 3.2 Gen 2 Type-C to
Type-C cable
• USB 3.2 Gen 2 Type-A to
Type-C cable
• USB 3.2 Gen 2 Type-C to
Type-C cable
• RAIL-B02
Connecting SAS Expansion Units
To connect the device to SAS expansion units, a storage expansion card must be installed in the device.
1. Install a storage expansion card on the PCIe slot.
For details, see Removing Expansion Cards.
2. Connect the expansion units to the device using the following topology.
Installation and Configuration 32
Page 34

TS-hx83XU-RP User Guide
3. Power on the expansion units.
4. Verify that the expansion units are recognized by the device.
5. Log on to QuTS hero as administrator.
6. Go to Main Menu > Storage & Snapshots > Overview > System .
7. Verify that the expansion units are listed.
Connecting SATA JBOD Expansion Units
To connect the TS-hx83XU-RP to SATA JBOD expansion units, a host bus adapter must be installed on the
NAS.
For required accessories details, see Expansion Unit Installation.
1. Power off the NAS.
2. Install a host bus adapter on the PCIe slot.
Installation and Configuration 33
Page 35

Important
The QNAP QXP host bus adapter is required for connecting the SATA JBOD enclosure to a
host device. Third-party host bus adapters are not compatible with QNAP JBOD enclosures.
For details, see Replacing Expansion Cards.
3. Connect the expansion units to the NAS using the following topology.
TS-hx83XU-RP User Guide
Note
This image shows connecting the NAS to a TL-R400S and TL-R1200S-RP.
4. Power on the SATA JBOD expansion units.
5. Power on the NAS.
6. Verify that the expansion units are recognized by the NAS.
a. Log on to QuTS hero as administrator.
b. Go to Main Menu > Storage & Snapshots > Overview > System .
c. Verify that the expansion units are listed.
Connecting USB Expansion Units
To connect the device to USB expansion units, USB Type-A to USB Type-C cables or USB Type-C to USB
Type-C cables are required.
For required accessories details, see Expansion Unit Installation.
1. Connect the expansion unit to the NAS.
Installation and Configuration 34
Page 36

TS-hx83XU-RP User Guide
a. Connect the USB cable to the USB Type-C port on the expansion unit.
b. Connect the USB cable to a USB 3.2 Gen 1 Type-A port or USB Type-C port on the NAS.
Note
This image shows the NAS connected to TL-R1200-RP USB expansion units.
2. Power on the expansion units.
3. Verify that the expansion units are recognized by the NAS.
a. Log on to QuTS hero as administrator.
b. Go to Main Menu > Storage & Snapshots > Overview > System .
c. Verify that the expansion units are listed.
QuTS hero Installation
The TS-hx83XU-RP uses the QNAP QuTS hero operating system. You can install QuTS hero using any of
the following methods:
Installation and Configuration 35
Page 37

Method Description Requirements
Qfinder Pro
installation
(Recommended)
If the NAS is connected to your local area
network, you can do the following:
• Computer
• Network cable
• Locate the NAS using Qfinder Pro.
• Qfinder Pro installer
• Complete the steps in the Smart
Installation Guide wizard.
For details, see Installing QuTS hero
Using Qfinder Pro.
Cloud installation If the NAS is connected to the internet,
• Computer or mobile device
you can do the following:
• myQNAPcloud account
• Scan the QR code on the NAS.
• Cloud Key
• Specify the Cloud Key.
• Log into your myQNAPcloud account.
• Use myQNAPcloud Link to remotely
access your NAS.
TS-hx83XU-RP User Guide
• Complete the steps in the Smart
Installation Guide wizard.
For details, see Installing QuTS hero
Using the Cloud Key.
Installing QuTS hero Using Qfinder Pro
Warning
Installing QuTS hero deletes all data on the drives. Back up your data before proceeding.
Note
You can revert to QTS operating system anytime. For details, see QuTS hero user guide.
1. Power on the device.
2. Connect the device to your local area network.
3. Run Qfinder Pro on a computer that is connected to the same local area network.
Note
To download Qfinder Pro, go to https://www.qnap.com/utilities.
4. Locate the NAS in the list and then double-click the name or IP address.
The Smart Installation Guide opens in the default web browser.
5. Click Start Smart Installation Guide.
The Install Firmware window appears.
6. Install firmware using any of the following methods:
Installation and Configuration 36
Page 38

Installation methods Steps
Automatic Click Start.
Automatically searches for available firmware
updates and installs firmware.
Manual installation a. Click Manual Installation.
The Install Firmware window appears.
b. Click Browse.
The upload file window appears.
c. Select file.
d. Click Open.
Starts firmware installation.
Skip a. Click Skip.
Skips firmware installation.
7. Specify the following information
• NAS name: Specify a name with 1 to 14 characters. The name supports letters (A to Z, a to z),
numbers (0 to 9), and hyphens (-), but cannot end with a hyphen.
TS-hx83XU-RP User Guide
• Password: Specify an administrator password with 1 to 64 characters. The password supports all
ASCII characters.
8. Click Next.
9. Specify the time zone, date, and time.
Tip
QNAP recommends connecting to an NTP server to ensure that the NAS follows the
Coordinated Universal Time (UTC) standard.
10. Click Next.
The Configure the network settings screen appears.
11. Select Obtain an IP address automatically (DHCP).
12. Click Next.
The Cross-platform file transfer service screen appears.
13. Select the types of devices that you will use to access shared folders on the NAS.
14. Click Next.
15. Review the settings.
16. Click Apply.
A confirmation message appears.
Warning
Clicking Yes deletes all data on the drive before installing QuTS hero.
17. Click Yes.
• The QuTS hero installation progress bar appears.
• QuTS hero is installed.
Installation and Configuration 37
Page 39

Note
It may take a couple of minutes to complete QuTS hero installation.
18. Optional: Click Go to NAS Management.
Tip
Click Go to NAS Management to set more advanced QuTS hero configurations and settings.
For details, see QuTS hero User Guide.
Installing QuTS hero Using the Cloud Key
Warning
Installing QuTS hero deletes all data on the drives. Back up your data before proceeding.
Note
You can revert to QTS operating system anytime. For details, see QuTS hero user guide.
1. Power on the device.
2. Connect the device to the internet.
TS-hx83XU-RP User Guide
3. Go to the QNAP Cloud Installation page using one of the following methods:
• On your computer, go to http://install.qnap.com/.
• Scan the QR code on the NAS using a mobile device.
The web page lists all the uninitialized QNAP NAS devices on the local network.
4. Locate the NAS in the list and then click Initialize.
Note
If your NAS is not listed, follow the instructions on the web page to specify the Cloud Key on the
NAS.
The installation wizard opens in the default web browser.
5. Create an account or sign in to myQNAPcloud.
Note
You must return to this page to complete the installation after creating an account.
6. Specify the myQNAPcloud device name for the NAS.
Note
• The myQNAPcloud device name is used when remotely accessing the NAS.
• For security purposes, the myQNAPCloud Link remote connection service will be disabled
on your NAS after initialization. You can enable it by connecting to QuTS hero through LAN
and then installing myQNAPCloud Link.
7. Click Next.
The Smart Installation Guide opens in the default web browser.
8. Perform any of the following actions.
Installation and Configuration 38
Page 40

• To check for the latest available version, click Start.
The wizard downloads the latest available version, and then the NAS restarts after the download
is complete. If a newer version is not available, the wizard automatically displays the Smart
Installation Guide.
• To install the out-of-the-box version, click Skip.
9. Click Start Smart Installation Guide.
The Install Firmware window appears.
10. Install firmware using any of the following methods:
Installation methods Steps
Automatic Click Start.
Automatically searches for available firmware
updates and installs firmware.
Manual installation a. Click Manual Installation.
The Install Firmware window appears.
b. Click Browse.
The upload file window appears.
TS-hx83XU-RP User Guide
c. Select file.
d. Click Open.
Starts firmware installation.
Skip Click Skip.
Skips firmware installation.
11. Specify the following information
• NAS name: Specify a name with 1 to 14 characters. The name supports letters (A to Z, a to z),
numbers (0 to 9), and hyphens (-), but cannot end with a hyphen.
• Password: Specify an administrator password with 1 to 64 characters. The password supports all
ASCII characters.
12. Click Next.
13. Specify the time zone, date, and time.
Tip
QNAP recommends connecting to an NTP server to ensure that the NAS follows the
Coordinated Universal Time (UTC) standard.
14. Click Next.
The Configure the network settings screen appears.
15. Select Obtain an IP address automatically (DHCP).
16. Click Next.
The Cross-platform file transfer service screen appears.
17. Select the types of devices that you will use to access shared folders on the NAS.
18. Click Next.
19. Review the settings.
Installation and Configuration 39
Page 41

20. Click Apply.
A confirmation message appears.
Warning
Clicking Confirm deletes all data on the drive before installing QuTS hero.
21. Click Confirm.
QuTS hero is installed.
22. Optional: Click Go to NAS Management.
Tip
Click Go to NAS Management to set more advanced QuTS hero configurations and settings.
For details, see QuTS hero User Guide.
TS-hx83XU-RP User Guide
Installation and Configuration 40
Page 42

TS-hx83XU-RP User Guide
4. Basic Operations
This chapter describes basic NAS operations.
Power Button
Operation User Action Result
Power on Press the button once. The device powers on.
Power off Press and hold the button for 1.5
seconds.
Force power off Press and hold the button for 5
seconds.
The device powers off.
The device powers off.
Important
Use this method only
when the device is
unresponsive.
Reset Button
Operation User Action Result
Basic system reset Press and hold the
button for 3 seconds.
The following settings are reset to default:
• System administrator password: The default password
is the first MAC address in uppercase letters without
special characters. For example, if the first MAC
address is 00-08-9B-F6-15-75, then the admin
password will be 00089BF61575.
Tip
You can find the first MAC address using
Qfinder Pro. A label attached to the device
also lists the address as MAC1.
• TCP/IP configuration:
• Obtain IP address settings automatically via
DHCP
• Disable jumbo frames
• If port trunking is enabled (multi-LAN models
only), the port trunking mode is reset to “Active
Backup (Failover)”.
• System port: 8080 (system service port)
• Security level: Low (Allow all connections)
• LCD panel password: (blank)
• VLAN: Disabled
Basic Operations 41
Page 43

TS-hx83XU-RP User Guide
Operation User Action Result
Advanced system
reset
Press and hold the
button for 15 seconds.
The default factory settings are restored.
• To retrieve old data after an advanced system reset,
recreate the previous folder structure on the NAS.
LEDs
LEDs indicate the system status and related information when the device is powered on. The following LED
information applies only when the drive is correctly installed and when the device is connected to the
network or to a host.
For details on the location of the LEDs, see Components.
Basic Operations 42
Page 44

LED Status Description
System Status Flashes green and red
• The drive is being formatted.
alternately every 0.5
seconds
• The device is being initialized.
• The operating system is being updated.
• RAID rebuilding is in progress.
• Online RAID Capacity Expansion is in progress.
• Online RAID Level Migration is in progress.
• The firmware is being updated.
Important
When updating the firmware, do not remove
the power cord or USB cable, and do not
force-exit the application.
Red • The drive is invalid.
TS-hx83XU-RP User Guide
• The shared folder has reached its full capacity.
• The shared folder is about to reach its full capacity.
• The system fan is not functioning.
• An error occurred when accessing (read/write) the
data.
• A bad sector is detected on the hard drive.
• The device is in degraded read-only mode (two
member drives failed in RAID 5 or RAID 6 but the data
can still be read).
• A hardware self-test error occurred.
Flashes red every 0.5
seconds
The device is in degraded mode (one member drive failed
in RAID 1, RAID 5, or RAID 6).
Flashes red once The device has received a command from the remote
control.
Green The device is ready.
Flashes green every 0.5
• The device is not configured.
seconds
• A drive is not formatted.
Flashes orange The device is in sleep mode.
Off • All drives are in standby mode.
• The device is powered off.
Drive Status Green The drive is ready.
Red A drive read/write error occurred.
Flashes red 5 times per
The drive is being located in the operating system.
second
Off No drive was detected.
Basic Operations 43
Page 45

TS-hx83XU-RP User Guide
LED Status Description
Drive Activity Green The drive is ready.
Flashes green The drive is being accessed.
Off No drive was detected.
LAN Orange The network connection is operating at 1 Gbps.
Note
The LAN LED can only detect the device's
in-built Gigabit Ethernet port connections. It
cannot detect network expansion cards'
Gigabit Ethernet port connection status.
Flashes orange The device is being accessed from the network.
Off The device is not connected to a network.
Expansion Orange • A SAS JBOD expansion unit has been detected.
• A REXP expansion unit has been detected.
Off No JBOD expansion unit has been detected.
10 Gigabit
Ethernet (SFP+)
speed
10 Gigabit
Ethernet (SFP+)
activity
Green The network connection is operating at 10 Gbps
Off There is no network connection.
Orange A network connection has been established.
Flashes orange Data is being transmitted.
Off There is no network connection.
10 Gigabit
Ethernet (RJ45)
speed
Green A 10 GbE network connection has been established.
Orange The network connection is operating at below 10 Gbps.
Off There is no network connection.
10 Gigabit
Ethernet (RJ45)
activity
Orange A network connection is established.
Flashes orange Data is being transmitted.
Off There is no network connection.
1 Gigabit
Ethernet speed
Green The network connection is operating at 1 Gbps.
Orange The network connection is operating at 100 Mbps.
Off There is no network connection.
1 Gigabit
Ethernet activity
Green A network connection has been established.
Flashes green The device is being accessed from the network.
Off There is no network connection.
Basic Operations 44
Page 46

Audio Alert
Duration Frequency Description
Short beep (0.5 seconds) 1 • The NAS is starting up.
• When the reset button is pressed for 3 seconds,
the NAS resets configurations.
• When the reset button is pressed for 10
seconds, the NAS resets configurations and
reboots.
• The operating system was updated.
3 Cannot detect installed disk.
Long beep (1.5 seconds) 3 (every 5 minutes) • A power error occurred.
• The system fan is not functioning.
2 • The shared folder is about to reach full capacity.
TS-hx83XU-RP User Guide
• The shared folder is about to reach full capacity.
• The shared folder has reached full capacity.
• A drive is plugged in or out.
1 • The NAS was powered off by force shutdown
(hardware shutdown).
• The NAS was powered on successfully and is
ready.
Basic Operations 45
Page 47

TS-hx83XU-RP User Guide
5. Troubleshooting
This chapter describes basic troubleshooting information.
Forcing Qfinder Pro or myQNAPcloud to Locate the NAS
If Qfinder Pro or myQNAPcloud is unable to locate the NAS during QuTS hero installation, the drives or data
may be faulty.
1. Power off the NAS.
2. Remove all drives.
3. Power on the NAS.
4. Locate the NAS using Qfinder Pro or myQNAPcloud.
5. Reinsert the drives.
6. Continue with the QuTS hero installation.
Hot-Swapping Failed Drives
The NAS supports hot-swapping of drives in the following situations:
RAID Type Number of Disks Situation
RAID 1 2 One member drive fails
RAID 5 ≥ 3 One member drive fails
RAID 6 ≥ 4 One or two member drives fail
RAID 10 ≥ 4 (Must be an even number) One or two member drives in two different pairs fail.
RAID 50 ≥ 6 One disk per subgroup fails.
RAID 60 ≥ 8 Two disks per subgroup fail.
Triple Mirror Multiple of 3. (For example, 3,
6, 9, 12 disks and so forth.)
RAID-TP ≥ 5 One, two, or three member drives fail.
1. Log on to QuTS hero.
2. Go to Main Menu > Storage & Snapshots > Storage > Disks/VJBOD .
3. Locate the failed drive.
4. Prepare a new hard drive with a capacity that is the same as or larger than the failed hard drive.
One or two member drives fail.
5. Remove the failed drive from the device.
6. Wait for 20 seconds or until the device beeps twice.
7. Remove the failed drive from the drive tray.
8. Insert the new drive into the drive tray.
9. Install the new drive.
The NAS beeps twice.
Troubleshooting 46
Page 48

TS-hx83XU-RP User Guide
10. Go to Main Menu > Storage & Snapshots > Storage Space .
11. Locate the shared folder that contains the new drive and then verify that the status is Rebuilding.
Recovering Unintentionally Removed Drives
The NAS supports exclusive RAID recovery technology to recover failed RAID disk volumes from
unintentional disconnection or removal of drives. Users can recover an inactive RAID 1, RAID 5, RAID 6,
RAID 10, RAID 50, RAID 60, triple mirror, and RAID-TP volume from degraded mode.
Disk Volume RAID
Recovery
Support
RAID 0 Yes ≥ 2 N/A
RAID 1 Yes 2 1
RAID 5 Yes ≥ 3 1
RAID 6 Yes ≥ 4 2
RAID 10 No ≥ 4 (Must be an even
RAID 50 Yes ≥ 6 One disk per subgroup fails.
RAID 60 Yes ≥ 8 Two disks per subgroup fail.
Triple Mirror Yes Multiple of 3. (For example,
RAID-TP Yes ≥ 5 3
Number of Disks Maximum Number of Removed Drives
One or two member drives in two different
number)
3, 6, 9, 12 disks and so
forth.)
pairs fail.
2
Support and Other Resources
QNAP provides the following resources:
Resource URL
Documentation https://download.qnap.com
Compatibility List https://www.qnap.com/compatibility/
NAS Migration Compatibility https://www.qnap.com/en/nas-migration
Expansion Unit Compatibility http://www.qnap.com/go/compatibility-expansion
Service Portal https://service.qnap.com
Product Support Status https://www.qnap.com/product/eol.php
Downloads https://download.qnap.com
Community Forum https://forum.qnap.com
QNAP Accessories Store https://shop.qnap.com/
Troubleshooting 47
Page 49

TS-hx83XU-RP User Guide
6. Glossary
Cloud Key
Unique 8-digit code assigned to each NAS device
myQNAPcloud
Provides various remote access services such as DDNS and myQNAPcloud Link
myQNAPcloud Link
Enables you to access the NAS over the internet without configuring complex port forwarding settings
Qfinder Pro
QNAP utility that lets you locate and access QNAP NAS devices in your local area network
QNAP ID
User account that enables you to use myQNAPcloud remote access and other QNAP services
QuTS hero
QNAP NAS operating system featuring ZFS file system
Glossary 48
 Loading...