

QNAP TS-EC880 Pro, TS-EC1080 Pro, TS-EC2480U-RP, TS-EC1680U-RP, TS-EC1280U-RP Hardware guide [de]
...Page 1

QNAP Turbo NAS
TS-ECx80-Serie – Bedienungsanleitung
für Ha rdware
© 2014. QNAP Sy stems, Inc. All Rights Reserved.
Page 2

Viele n Dank für die Wahl von QNAP-Produkten! D iese Bedie nungsa nlei tung beschreibt die
Hardware des Turbo-NAS und erklärt bestimmte Funktionen. Lesen Sie die Anleitung
aufmerksam durch und halten Sie sich genau an die darin aufgeführten Anweisungen.
Diese Bedienu ng sanlei tu ng g i lt fü r fo lg ende Turbo NAS-Modelle:
TS-EC880 Pr o, TS-EC1080 Pro, TS-EC2480U-RP, TS -EC1680U-RP, TS-EC1280U-RP,
TS-EC880U-RP
Hinweis
Der „Turbo NAS“ wird nachstehend „NAS“ genannt.
Möglicherweise unterstützt das von Ihnen erworbene Produkt bestimmte Funktionen
nicht, die bestimmten Modellen zugehörig sind.
Änderungen aller Funktionen, Funktionalitäten und anderer Produktdaten sind ohne
vorhe rig e Ank ü nd igung oder Ve rpflichtung v o rb ehalten.
Änderungen de r v o r l ieg enden Angabe n si nd v o rbehalten.
Kein Teil dieser Dokumentation darf ohne vorh erige schriftl iche Genehmigung seitens
QNAP Systems, Inc. mechanisch oder elektronisch oder in anderer Form vervielfältigt,
in einem Datenabfragesystem gespeichert, fotokopiert, aufgezeichnet oder in anderer
Form vervielfältigt oder weitergegeben werden.
QNAP und das QNAP-Logo si nd eingetragen e Marke n von QNAP Sys tems, Inc. Andere in
dieser Dokumentation aufgeführte Produkte oder Unternehmensnamen könnten
Marken ihre r je w eilige n Un te rnehme n s ei n.
2
Page 3

HAFTUNGSAUSSCHLUSS
Die Haftung von QNAP Systems, Inc. (QNAP) übersteigt bei dir ekten, mittelb a ren,
konkreten, beiläufig entstandenen oder Folgeschäden in Folge der Benutzung des
Produk t e s, se i ne r mitgel ie ferten Softwa re oder Dokumentation u nte r ke i nen Umstände n
den für das Produkt bezahlten Preis. QNAP ü bernimmt keine ausdrückliche, implizite oder
gesetzlich angeordnete Garantie und gibt keine entsprechenden Erklärungen im Hinblick
auf seine Produkte, die Dokumentation, sämtliche Software und den Paketinhalt ab und
gara ntiert nicht die Qualität, Leis t ungsfähigkeit, Marktgängigkeit od e r E ig n ung für e i nen
bestimmten Z w eck. QNAP behält sich das Recht vor, seine Produkte, Software oder
Dokume nta t ion z u änd er n, oh ne ver pf lic hte t zu s ein, e inze lne o de r j ur istis che P e rs on en z u
benachrichtigen.
Hinweis:
Erstellen Sie regelmäßig Sicherungskopien vo n Ihrem System , um mö gliche
Datenverluste zu vermeiden. QNAP übernimmt keinerlei Verantwortung für
Dat enverl uste oder -wiederherstellungen jeglicher Art.
Für den Fall, dass Sie Komponenten des NAS-Pakets zwecks Rückerstattung oder
Wartung an uns senden, achten Sie darauf , dass diese für den T r ansport gut verpackt
sind. Für Schäden aufgrund unsachgemäßer Verpackung wird keine Entschädigung
gezahlt.
3
Page 4

Behördliche Bekanntmachung
FCC-Mitteilung
Der QN AP N AS er füll t unte rsc hiedl iche F CC -Übereinstimmungsk lasse n. De tails hier zu s iehe
Appendix A. Sobald die Geräteklasse ermittelt ist, beziehen Sie sich auf die jeweilige
Erklärung.
=======================================================
Mitteilung für FCC-Klasse A
Dieses Gerät erfüllt Teil 15 der FCC-Vorschriften. Folgende zwei Bedingungen müssen für
die Inbe triebnahme e rfüllt sein:
1. Dieses Gerät darf keine Funkstörungen verursachen.
2. Dieses Gerät muss alle empfangenen Funkstörungen akzeptieren, auch Störungen,
die zu einem unerwünschten Betriebsvorgang führen könnten.
Hinwe is : Diese Ausrüstung w urd e g etestet und als m i t de n Gr enzwerten für Dig i ta lg eräte
der Klasse A gemäß Teil 15 der FCC-Vorschriften übereinstimmend befunden. Diese
Grenzwerte sind so a usgelegt, dass sie e inen angemessenen Sc hutz gegen Störungen beim
Betrieb des Geräts in einem kommerziellen Umfeld gewährleisten. Diese Ausrüstung
erzeug t, v e r w e ndet und kann Hoch f re quenzenergie abstrahlen und kann, sofern sie ni cht
gemäß d er Anle itung install iert und verw endet w urde, de n Funkv erkeh r empf indlich störe n.
Der Betrieb dieses Geräts in Wohngebieten kann Störungen verursachen, wobei der
Anwender diese Störungen au f eigene Koste n besei tige n m uss.
Modifizierungen: A n d iesem Gerät vorgenommene Mo d i fizierungen, die nicht von QNAP
Systems, Inc. genehmigt sind, können die durch die FCC erteilte Befugnis des Benutzers,
dieses Ger äts in Betrieb zu setzen, ungül t ig ma chen.
4
Page 5

Mitteilung für FCC-Klasse B
Dieses Gerät erfüllt Teil 15 der FCC-Vorschriften. Folgende zwei Bedingungen müssen für
die Inbe triebnahme e rfüllt sein:
1. Dieses Gerät darf keine Funkstörungen verursachen.
2. Dieses Gerät muss alle empfangenen Funkstörungen akzeptieren, auch Störungen,
die zu einem unerwünschten Betriebsvorgang führen könnten.
Hinwe is : Diese Ausrüstung w urd e g etestet und als m i t de n Gr enzwerten für Dig i ta lg eräte
der Klasse B gemäß Teil 15 der FCC-Vorschriften übereinstimmend befunden. Diese
Grenzw erte si nd so ausgelegt, da ss sie einen ang emessenen Schutz gege n Störungen beim
Betrieb des Geräts in einem Wohngebiet gewährleisten. Dieses Gerät erzeugt und
verbraucht Hochfrequenzenergie und dann diese abstrahlen. Wenn das Gerät nicht
entsprechen dem Handbuch installiert und verwendet wird, können Störungen bei der
Hochfrequenzübertragung auftreten. Allerdings ist nicht gewährlei stet, dass bei
bestim mte n I nsta lla t ione n k eine S tör ung en a uf tr ete n wer de n. W e nn d ies e A usr üs tung de n
Radio- oder Fernsehempfang stören sollte, wa s d urch Aus- und Eins c halten des Gerä ts
festgestellt werden kann, kann der Anwender versuchen, die Störung durch eine oder
mehrere der folgenden Maßnahmen zu beseitigen:
Die Empfangsantenne neu ausrichten oder an einem anderen Platz aufstellen.
Den Abs tand zwis c h e n Ge rä t und Empfänger ver g rößern.
Das Gerät an eine Steckdose anschließen, deren Stromkreis nicht zum Stromkreis
gehört, an den der Empfänger angeschlossen ist.
Den Händler oder einen erfahrenen Radio-/Fernsehtechniker um Abhilfe bitten.
Modifizierungen: A n d iesem Gerät vorgenommene Mo d i fizierungen, die nicht von QNAP
Systems, Inc. genehmigt sind, können die durch die FCC erteilte Befugnis des Benutzers,
dieses Ger äts in Betrieb zu setzen, ungül t ig ma chen.
CE-MITTEILUNG
Der QNAP NAS erfüllt unterschiedlic he C E-Übereinstimmungsklassen. Details hierzu siehe
Appendix A.
5
Page 6

In diesem Dok ument verwe nd et e Sy mbole
Dieses Symbol bedeutet, dass die Anweisungen genau befolgt
Warnung
Vorsicht
werden müssen. Ander nfalls kann es zu Verletzungen oder
Todesfälle n kommen.
Dieses Symbol bedeutet, dass der V organg daz u führen kann, dass
Daten von der Festplatte gelöscht werden oder diese verloren
gehen, oder dass bei Nichtbeachtung der Anweisungen mit
Beschädigung von Daten, der Festplatte oder des Geräts zu
rechnen ist.
6
Page 7

Inhaltsverzeichnis
Sicherheitshinweise ........................................................................................... 8
Chapter 1. CPU- und Arb ei t ssp ei cherspezifikat i onen ....................................... 9
Chapter 2. Verhalt en des Netzs chal t ers und der Reset-Taste ........................ 11
Chapter 3. USB-One Touch-Kopie .................................................................. 13
Chapter 4. LED- und Ala rmsummer-Spezifikationen ...................................... 14
Chapter 5. Arbeitsspeicher auf dem QNAP Turbo NAS aufrü st en
(RAM-Modulinstallation) .............................................................. 17
5.1 TS-EC2480U-RP, TS-EC1680U-RP, TS-EC1280U-RP, TS-EC880U-RP ........ 17
5.2 TS-EC880 PRO, TS-EC1080 PRO ......................................................... 20
Chapter 6. Netzw erk erweiterungskarte installieren ...................................... 23
6.1 TS-EC880 PRO, TS-EC1080 PRO ......................................................... 23
6.2 TS-EC2480U-RP, TS-EC1680U-RP, TS-EC1280U-RP, TS-EC880U-RP ........ 27
Chapter 7. mSATA-Flash-Modul im NAS installieren ...................................... 29
7.1 TS-EC2480U-RP, TS-EC1680U-RP, TS-EC1280U-RP, TS-EC880U-RP ........ 29
7.2 TS-EC880 PRO, TS-EC1080 PRO ......................................................... 33
Chapter 8. Festp l a t ten i m laufenden Betrieb vertauschen ............................. 36
Chapter 9. RAID-Wiederherstellung .............................................................. 38
Chapter 10. LCD-Bildschirm v erw enden .......................................................... 40
Chapter 11. Netzteil installieren ...................................................................... 46
Technischer Sup p ort ........................................................................................ 49
Produktübereinstimmungsklasse ..................................................................... 50
GNU GENERAL PUBLIC LICENSE ....................................................................... 51
7
Page 8

Sicherheitshinweise
1. Der NAS funktioniert bei Temperaturen von 0 ºC – 4 0 ºC und einer relativen
Luftfeuchte von 5 % – 95 % ganz normal. Achten Sie bitte auf eine gut belüftete
Umgebung.
2. Das Netzkabel und die mit dem NAS verbundenen Gerä te müssen die rich tige
Versorgungsspannung zuführen (100 W, 90 - 264 V).
3. Stelle n Sie den N AS nicht in da s d irekte Son nenl ich t oder in de r Nä he vo n Ch emik alie n
auf. A chte n Si e dar auf , das s die Temper atur und die Luf tfeuc htig keit der U mgeb ung im
optimalen Bere ich liegen.
4. Ziehen Sie vor der Reinigung das Netzkabel und alle angeschlossenen Kabel heraus.
Wischen Sie den NAS mit einem trockenen T uch ab. Verwend en S ie z ur R e in igung de s
NAS keine Chemikalien oder Reinigungssprays.
5. Damit der Server normal funktion ie r t und nicht überhitzt, dü rfen keine Gege ns tände
auf dem NAS abgestellt werden.
6. Befestigen Sie die Festplatten mit den mitgelieferten Flachkopfschrauben im NAS,
wenn Sie die Festplatten für eine richtige Betriebsweise installieren.
7. Stellen Sie den NAS nicht in der Nähe von Flüssigkeiten auf.
8. Stellen Sie den NAS nur auf einer ebenen Fläche auf, damit das Gerät nicht
herunterfallen und dabei beschädigt werden kann.
9. Achten Sie darauf, dass die Spannung am Installationsort des NAS richtig ist.
Informieren Sie sich hierüber beim Händler oder beim örtlichen Stromversorger.
10. Stellen Sie keine Gegenstände auf das Netzkabel.
11. Versuchen Sie unter keinen Umständen, den NAS zu reparieren. Bei unsachgemäßer
Demontage des Geräts muss der A nwender mit Stromschlag oder ander en Gefahren
rechnen. Bei Nachfragen wenden Sie sich bitte an den Händler.
12. NAS-Modelle mit Gehäuse sollten nur im Serverraum aufgestellt und vom
autor isierten Ser ver- oder IT-Administrator gewartet werden. Der Serverraum ist mi t
einem Schlüssel oder einer Zugang sk a r te v erschlosse n und es ist nur qua l ifiziertem
Personal gestattet, den Serverraum zu betreten.
Warnung:
Wird der Akku falsch ausgetauscht, besteht Explosionsgefahr. Setzen Sie nur einen
Akku desselben oder gleichwertigen Typs ein, der vom Hersteller empfohlen wird.
Verbrauchte Akkus sind gemäß den Anweisungen des Herstellers zu entsorgen.
Berühren Sie NICHT den Lüfter im System, um schwere Verletzungen zu vermeiden.
8
Page 9

Chapter 1. CPU- und Arbeitsspeicherspezifikationen
Austauschbare CPU
Vorsicht: Wird die Hardware, Software oder Firmware von QNAP-Produkten
modif iz i e rt, verlier t die Gara n tie ihre Gültigkeit. QNAP ist nicht für eine Beschä digung oder
einen Verlust von Daten aufgrund einer Modifizierung von QNAP-Produkten verantwortlich.
Der Benutzer trägt das alleinige Risiko für Datenverluste und Systeminstabilität aufgrund
von Änd erungen an Hard w a re -Komponenten, der Modifizierung der standardmäßigen
System-F irmware oder In s tallation von u na u to risierten Anw endungen and erer Hersteller
auf QNAP-Produkten.
System TS-EC880 Pro
Intel-Xeon-Vierkern-P
CPU
Arbeitsspeicher 2 GB DDR3 ECC RAM 2 GB DDR3 ECC RAM 4 GB DDR3 ECC RAM
Flash-Speicher 512 MB (USB-DOM) 512 MB (USB-DOM) 512 MB (USB-DOM)
Austauschbarer
Arbeitsspeicher
Anzahl der
LONG-DIMM-Steck
plätze
Anzahl der
Festplattensteckpl
ätze
rozessor, Familie
E3-1200 v3
Nein Nein Nein
Ja Ja Ja
4 4 4
8 10 8
TS-EC1080 Pro TS-EC880U-RP
Intel-Xeon-Vierkern-P
rozessor, Familie
E3-1200 v3
Intel-Xeon-Vierkern-P
rozessor, Familie
E3-1200 v3
Anzahl der
PCIe-Steckplätze
Anzahl der
internen
Cache-Ports
9
1 1 2
2 2 2
Page 10

System TS-EC1280U-RP TS-EC1680U-RP TS-EC2480U-RP
Austauschbare CPU
Intel-Xeon-Vierkern-P
CPU
Arbeitsspeicher 4 GB DDR3 ECC RAM 4 GB DDR3 ECC RAM 4 GB DDR3 ECC RAM
Flash-Speicher 512 MB (USB-DOM) 512 MB (USB-DOM) 512 MB (USB-DOM)
Austauschbarer
Arbeitsspeicher
Anzahl der
LONG-DIMM-Steck
plätze
Anzahl der
Festplattensteckpl
ätze
Anzahl der
PCIe-Steckplätze
rozessor, Familie
E3-1200 v3
Nein Nein Nein
Ja Ja Ja
4 4 4
12 16 24
2 2 2
Intel-Xeon-Vierkern-P
rozessor, Familie
E3-1200 v3
Intel-Xeon-Vierkern-P
rozessor, Familie
E3-1200 v3
Anzahl der
internen
Cache-Ports
2 2 2
10
Page 11

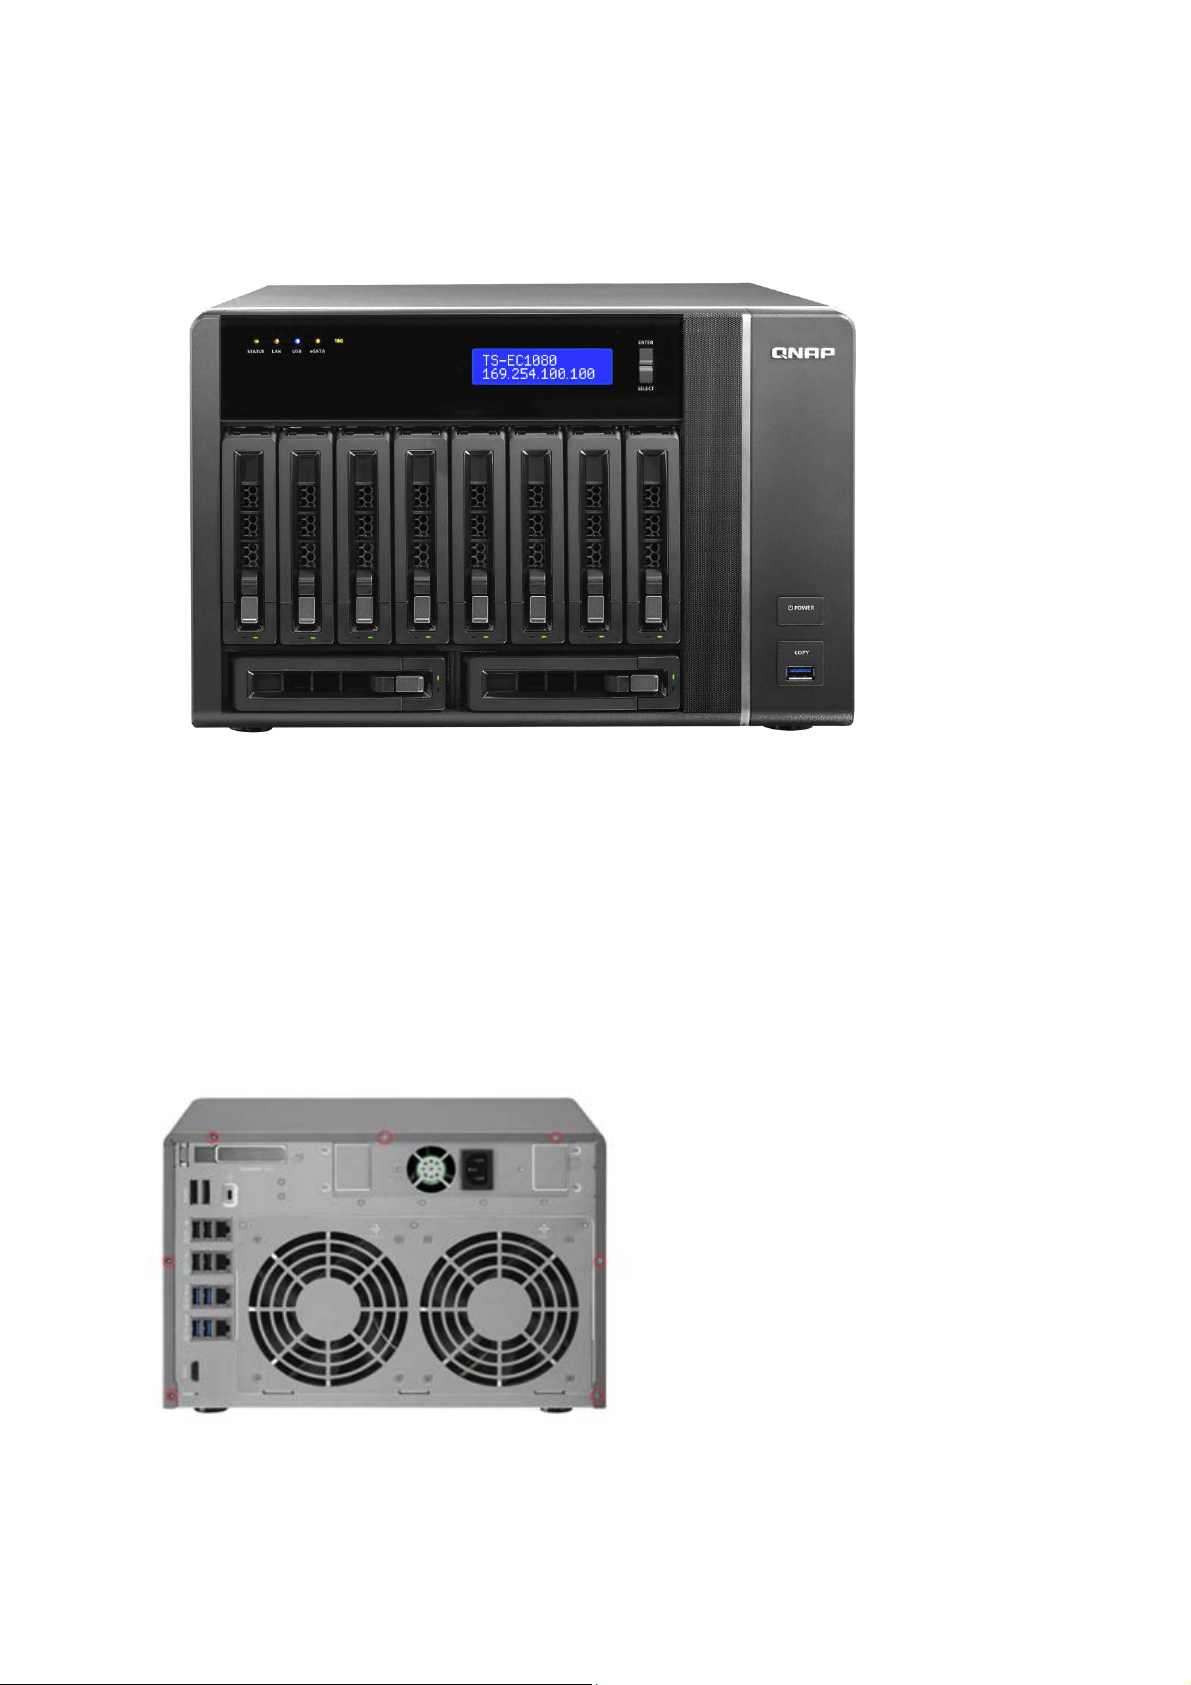
Chapter 2. Verhalten des Netzschalters und der Reset-Taste
Netzschalter: Zum Ei n- oder Ausschalten drücken.
Netzschalter
Netzschalter
Netzschalter
System
(Hardware
(Abschaltung
(einschalten)
ausschalten)
erzwingen)
Alle Modelle Einmal drücken 1,5 s 5 s
Reset-Taste: Zum Rücksetzen der Systemeinstellungen drücken.
Grundlegendes
Erweitertes Syst emr eset
System
Systemreset
(2 Signaltöne)
(1 Signalton)
Alle Modelle 3 s 10 s
Grundlegend es Sy stemreset (3 s)
Halten Sie die Reset-Taste 3 Sekunden lang gedrückt, bis ein Signalton ausgegeben wird.
Folgende Einstellungen werden auf die Stand a rdwerte zurückgese tzt:
Systemadministrationskennwort: admin
TCP/IP-Konfiguration: IP-Adresseinstellungen automatisch über DHCP beziehen
TCP/IP-Konfiguration: Jumbo Frame deaktivieren
TCP/IP-Konfiguration: Wenn die Portbündelung aktivier t ist (nur Dual-LAN-Modelle),
wird der Portbündelungsmodus auf „Aktive Sicherung (Ausfallschutz)“ zurückgesetzt.
Systemport: 8080 (Systemservice po rt)
Sicherheitsstufe: Niedri g (alle Verbindungen erlauben)
LCD-Anzeigekennwort: (leer)*
VLAN wird deaktiviert.
Dienstbindung: Al le N AS-Dienste sind an allen Netzwerkschnittstellen verfügbar.
*Dies e F unk tio n is t nur b e i N AS-Modellen mit LCD-Anzeige verfügbar. Weitere E inzelheiten
finden Sie unter
http://www.qnap.com.
11
Page 12

Erweitertes Systemreset (10 s)
Halten Sie die Reset-Taste 10 Sekunden lang gedrückt; Sie hören zwei Signaltöne in der
dritte n und zehnten Sekunde. Der NAS setzt alle Systemeinstellungen auf die
Standa rdp ar am ete r z ur ück , wie be im we bba sie rt en Systemres et u nte r „S y ste ms teuerung“
> „Systemeinstellungen“ > „Sichern / wiederherstellen“ > „Werksstandard
wiederherstellen“, abgesehen von den reservierten Dat en. Einstellungen, wie zuvor
erstellte Benutzer, Benutzergrup pen und Netzwerkfr eigab eordner werden gel öscht. Wenn
Sie alte Daten nach dem erweiterten Systemreset abrufen möchten, erstellen Sie dieselben
Netzwerkfreigabeordner auf dem NAS und die Daten sind wieder zugänglich.
12
Page 13
Chapter 3. USB-One Touch-Kopie
Diese Funktion ist nur auf NAS-Modelle n m i t e i n e r Taste für USB One Touch-Kopie
verfügbar. Weitere Einzelheiten finden Sie unter
Anzahl der Sek und en (Taste fü r One Touch-Kopie
System
drücken, um Daten zu kopieren)
Alle NAS-Modelle 0,5 s
Datenkopie üb er v orderen USB-Port
Der NAS unterstützt über die Taste für One Touch-Kopie an der Vorderseite eine sofortige
Datensicherung vom exter nen USB-Gerät auf dem NAS oder umgekehrt. A nhand fo lgender
Schritte wird diese Funktion ausgeführt:
1. Stellen Sie sicher, dass eine Festplatte im N AS insta lliert und fo r matiert ist. Die
standardmäßige Netzwerkfreigabe Qusb oder Usb wird erstellt.
2. Schalten Sie den NAS ein.
3. Konfigurieren Sie das Verhalten der Kopiertaste auf der Seite „Backup Station“ >
„Externe Sicherung“ > „USB-Kopie mit einer Taste“.
http://www.qnap.com.
4. Verbinden Sie das USB-Speic her gerät mit dem USB-Port an de r Vorderseite des N A S.
5. Drück en Sie die Kop iertaste. Die USB-LED blinkt. Die Daten werden entsprec hen den
NAS-Einst el lungen vom oder auf das USB-Gerät kopiert.
Hinweis: Diese Funktion sic hert schrittweise. N ach der e rsten Da tensicherung kopiert der
NAS die Dateien, die sich seit der letzten Sicherung geändert haben.
13
Page 14

Chapter 4. LED- und Alarmsummer-Spezifikationen
Kapazitätserweiterung wird
1. Die Fe s tplatte ist ung ü lt ig .
Der NAS bef i ndet sich im her ab g ese tzte n
die Fe s tpla tte nda te n kö nne n im mer noc h
8. Hardware-Selbsttestfehler.
Der NAS befindet sich im herabgesetzten
ausgefallen).
1. Der NAS fährt hoch.
Festplattendat en werden über das Netzwerk
Lese-/Schreibfehler aufgetreten.
Die LED-Anzeigen des NAS zeigen den Systemstatus und Informationen an. I st der NA S
eingeschaltet, prüfen Sie anhand folgender Elemente, ob der Systemzustand normal ist.
Ach ten Sie darauf, dass folgende LED-Informationen nur gelten, wenn Benutzer die
Festplatte richtig installiert und den NAS mit dem Netzwerk und der Stromversorgung
verbun den haben.
LED Farbe LED-Status Beschreibung
1. Die Festplatte im NAS wird formatiert.
2. Der NAS wird initialisiert.
3. Die System-Firmware wird g erade
Blinkt
abwechselnd
alle 0,5 s
grün und rot
aktualisiert.
4. RAID-Neuaufbau wird gerade
durchgeführt.
5. Online-RAIDgerade durchgeführt.
6. Online-RAID-Level-Migration wird ger ade
durchgeführt.
Systemstat
us
Grün
Rot/
2. Das Datenträgervolume hat seine volle
Kapazität erreicht.
3. Das Datenträgervolume ist bald voll.
4. Der Systemlüfter funktioniert nicht.
5. Beim Zugriff (Lesen/Schreiben) auf die
Festplattendaten ist ein Fehler
aufgetreten.
Rot
Blinkt alle 0,5
s rot
Blinkt alle 0,5
s grün
Grün Der NAS ist betriebsbereit.
6. Ein fehlerhafter Sektor wurde auf der
Festplatte erka nn t.
7.
Schreibschutzmodus (2
Mitgliedslaufwerke in einer RAID 5- oder
RAID 6-Konfiguration sind ausgefallen,
gelesen werden).
Modus (ein Mitgliedslaufwerk in der RAID 1-,
RAID 5- oder RAID 6-Konfiguration ist
2. Der NA S ist nicht konfiguriert.
3. Eine Festplatte ist nicht formatiert.
Blinkt orange Der NAS bef indet sich im Ruhe modus.
LAN Orange Orange
14
Aus
Alle Festplatten im NAS befinden sich i m
Bereitschaftsmodus.
abger uf e n un d hierbei ist ein
Page 15

LED Farbe LED-Status Beschreibung
installiert.
Es ist keine
installiert.
Es ist ein Lese/Schreibfehler auf einer
Festplatte aufgetreten.
Es findet ein Zugriff auf die Festplattendaten
statt.
1. Ein USB-Gerät (verbunden mit dem
Port an der V o rderseite des
oder eSATA-Gerät kopiert.
Ein USB-Gerät an der Vorderseite wird
erkannt (nach Einbinden de s Ge räts).
1. Es wurde kein USB-Gerät erkannt.
der Vorderseite verbunden ist.
Es findet ein Zugriff auf das eSATA-Gerät
statt.
Blinkt orange Der NAS ist mit dem Netzwerk verbunden.
10 GbE Grün
Festplatte Rot/Grün
USB Blau
Grün
Aus
Blinkt rot
Die 10-GbE-Netzwerkerweiterungskarte ist
10-GbE-Netzwerkerweiterungskarte
Es findet ein Zugriff auf das NAS über das
Netzwerk statt.
Rot
Blinkt grün
Grün Es kann auf die Fes tplatte zugegriffen werd en.
USB-Port an der Vorderseite) wird
erkannt.
2. Ein USB-Gerät (verbunden mit dem
Blinkt alle 0,5
s blau
USB-Port an der Vorderseite) wird vom
NAS entfernt.
3. Es wird auf das USB-Gerät (ver bunden
mit dem USBNAS) zugegriffen.
4. Die Daten werden auf das oder vom USB-
Blinkt orange
eSATA Orange
Speichererw
1
Orange
eiterungspo
rtstatus
1
Die Status-LED des Sp eich ererweiteru ng s por ts wi rd n ur vo m TS -EC2480U-RP, TS-EC1680U-RP,
TS-EC1280U-RP und TS-EC880U-RP unterstützt.
Blau
2. Der NAS hat das Kopieren der Daten auf
Aus
das oder von dem USB-Gerät
abgeschlossen, das mit dem USB-Port an
Aus Es kann kein eS ATA-Gerät erkannt werden.
Aus Es wurde kein Erweiterungsgehäuse erkannt.
Orange Erweiterungsgehäuse w urd en erkannt.
15
Page 16

Alarmsignalton: Alle NAS-Modelle
1. Der NAS fährt hoch.
aktualisiert.
1. Das Da ten träger vol ume ist b ald vo ll.
oder getrennt.
1. Der NAS wird durch erzwungene
einge schal tet und ist
betriebsbereit.
Der Alarmsigna lton kann un ter „Systemste uerung“ > „Systemei nstellungen“ > „Hardware“
deaktiviert werden.
Signalton Anzahl Beschreibung
2. Der NAS wird heruntergefahren
(Softwareabschaltung).
Kurz e r Signalton ( 0, 5 s) 1
Kurz e r Signalton ( 0, 5 s) 3
Langer Sig nalto n (1,5 s ) 3, alle 5 Min . Der Systemlüfter funktioniert nicht.
2
Langer Signa lton (1, 5 s)
3. Der Benutzer drückt die Reset-Taste,
um den NAS zurückzusetzen.
4. Die System-Firmware wurde
NAS-Daten können nicht über den
USB-Port an der Vorderseite auf ein
externes Speichergerä t kopier t werde n.
2. Das Datenträgervolume hat seine
volle Kapazität erreicht.
3. Die Festplatten im NAS befinden
sich im herabgesetzten Modus.
4. Der Benutzer beginnt mit dem
Festplattenneuaufbau.
5. Eine Festplatte wird angeschlossen
1
Abschaltung ausgeschaltet
(Hardwareabschaltung).
2. Der NAS w urde
16
Page 17
Chapter 5. Arbeitsspeicher auf dem QNAP Turbo NAS
aufrüsten (RAM-Modulinstallation)
Warnung:
Die folgenden Anweisungen sollten nur von einem autorisierten und ausgebildeten
Technike r durchgeführt werden.
Halten Sie sich streng an die Installationsanweisungen für ein RAM-Modul auf dem
NAS. Andernfalls kann es zu Verletzungen oder Todesfällen kommen.
QNA P bietet Benutzern RAM-Module (optionaler Kauf) zur Aufrüstung des NAS-Speichers
an. Instal li e ren Sie ein zusätzliches RAM-Modul auf dem Motherboard des NAS, um den
Arbeitsspeich er aufzurüst en. Der Ge sam tspe iche rplat z wird unte r „S yste minfo rma tion“ auf
der Verwaltungsseite angezeigt.
5.1 TS-EC2480U-RP, TS-EC1680U-RP, TS-EC1280U-RP, TS-EC880U-RP
17
Page 18
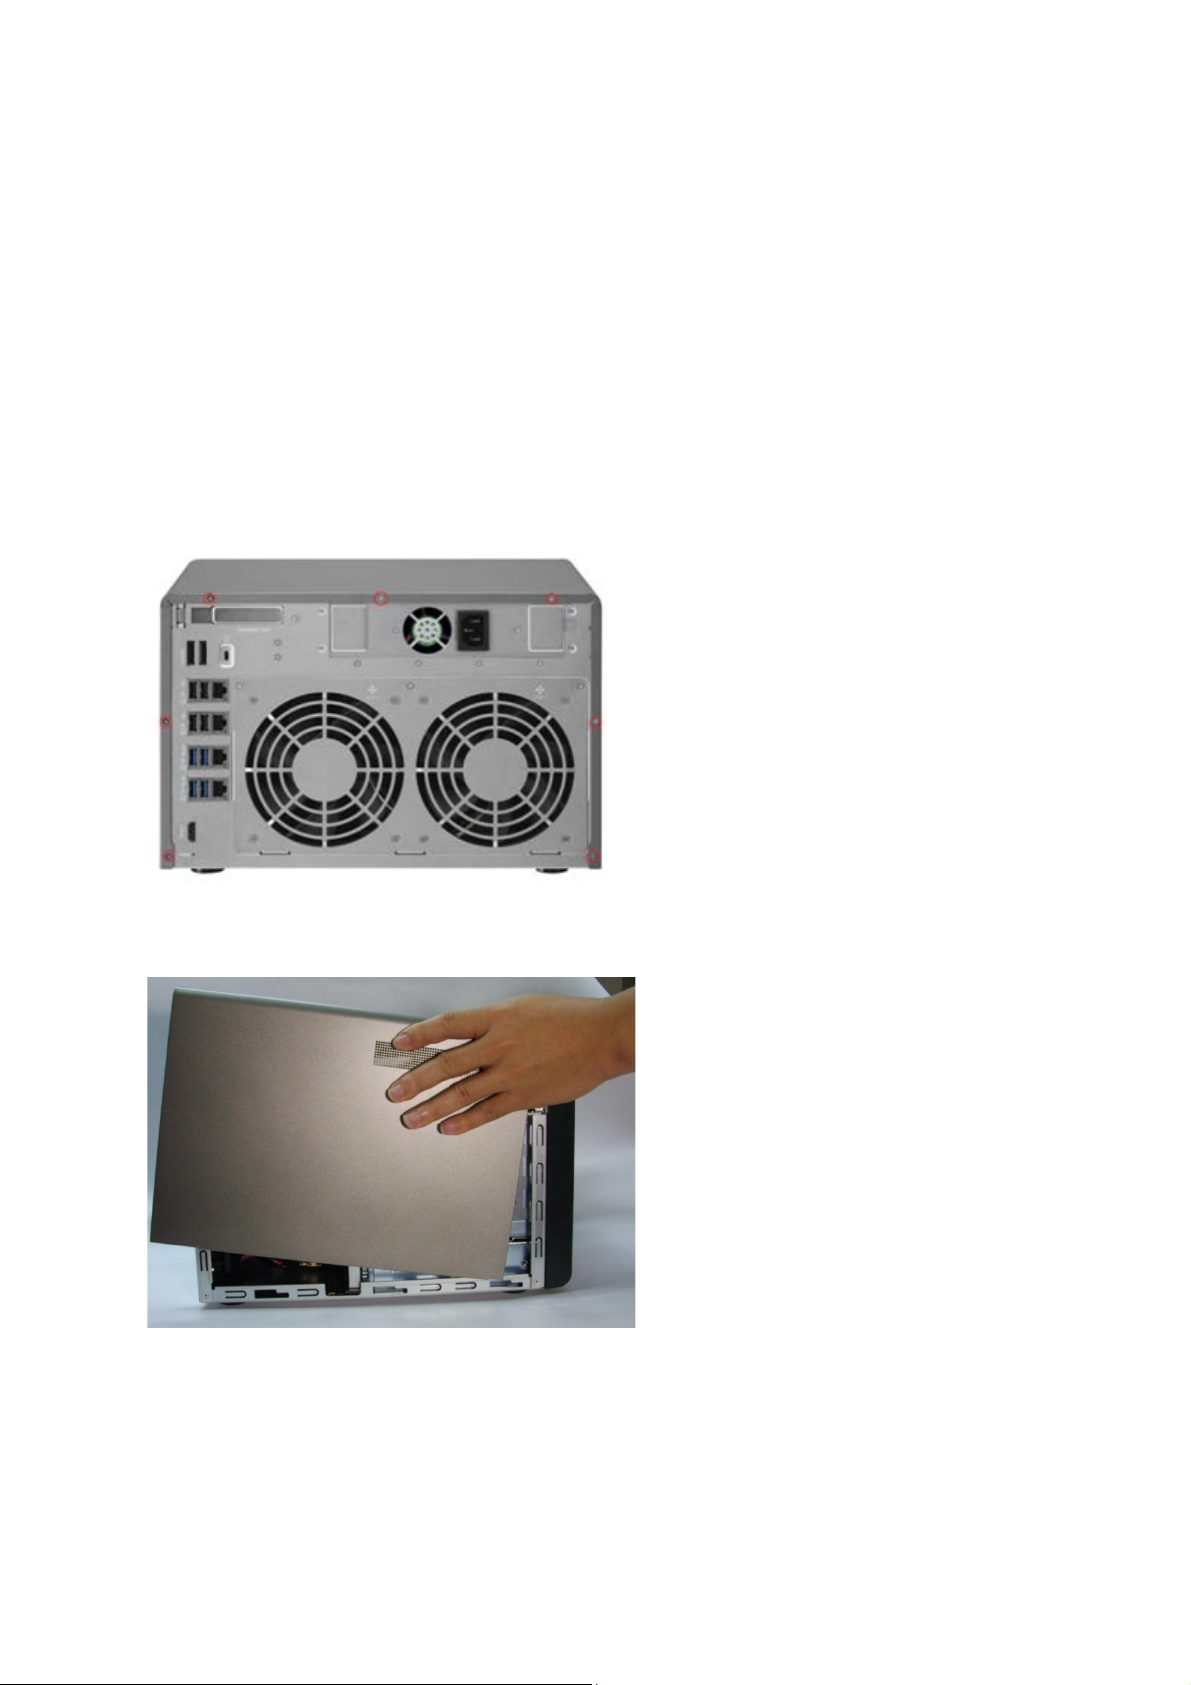
1. Schalten Sie den NAS aus. Trennen Sie das Netzteil, die Netzwerkkabel und andere
Anschlüsse bzw . Kabel vom NAS.
2. Legen Sie ein Antistatik-Armband an, bevor Sie die Netzwerkerweiterungskarte
installieren, um eine Entladung von statischer Elektrizität zu verhindern. Die
Krokodilklemme sollte geerdet sein.
3. Lösen Sie die beiden Schrauben an der Rückseite des NAS, wie in der Abbildung
dargestellt ist.
4. Halte n Sie den Griff nach hinte n gez o g en, um die Mo th e rb o a r d-Schublade zu
entfernen.
18
Page 19
5. Lösen Sie vorsichtig die Auswerfklemmen, indem Sie sie aus den Seiten des
RAM-Steckplatzes her a usz iehen.
6. Ergreifen Sie den Rand des RAM-Moduls. Richten Sie die K erbe a m goldenen R and d es
RAM-Moduls mit der Kerbe im RAM-Steckplatz aus. Stecken Sie das RAM-Modul bis
zum Anschlag in den RAM-Steckplatz.
7. Setzen Sie die Motherboard-Schublade ein, drücken den Griff und verriegeln die zwei
Schrauben an der NAS-Rückseite.
19
Page 20
5.2 TS-EC880 Pro, TS-EC1080 Pro
1. Schalten Sie den NAS aus. Trennen Sie das Netzteil, die Netzwerkkabel und andere
Anschlüsse bzw . Kabel vom NAS.
2. Legen Sie ein Antistatik-Armband an, bevor Sie die Netzwerkerweiterungskarte
installieren, um eine Entladung von statischer Elektrizität zu verhindern. Die
Krokodilklemme sollte geerdet sein.
3. Lösen Sie die sieben Schrauben an der Rückseite des NAS.
20
Page 21
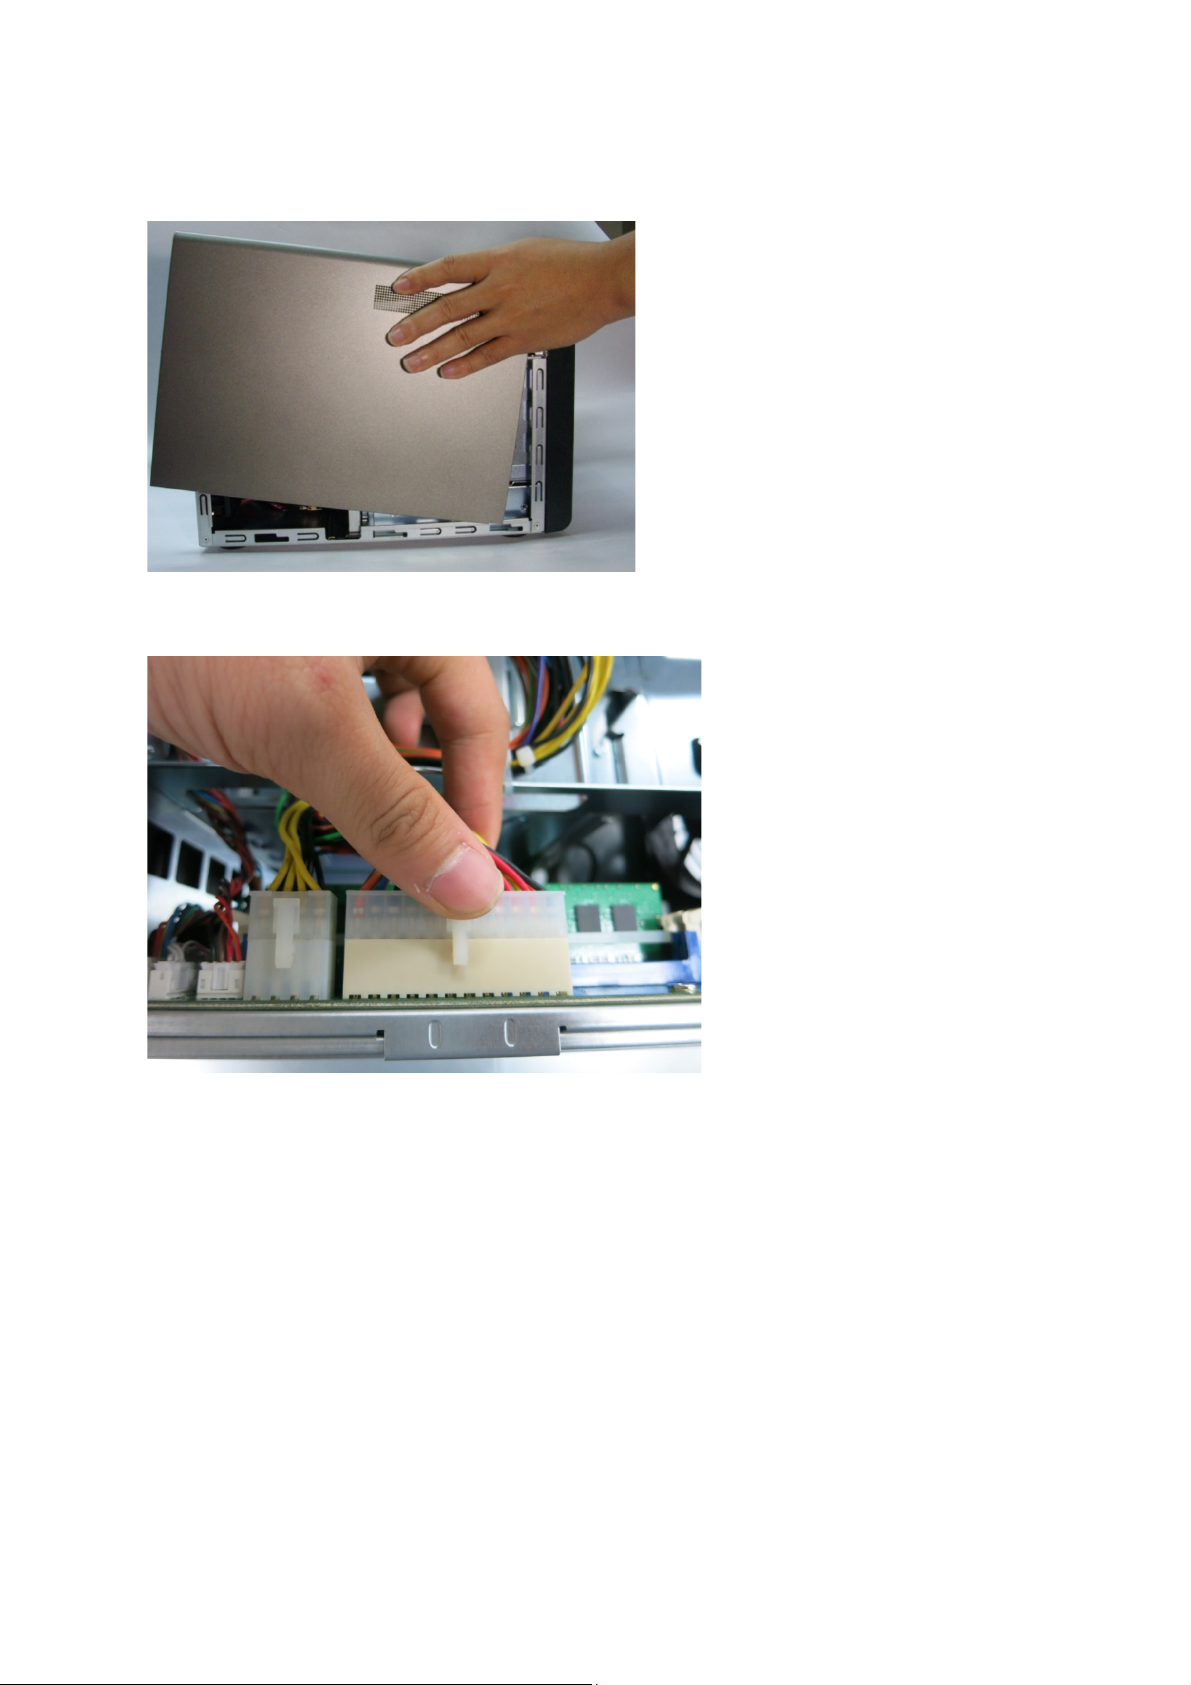
4. Nehmen Sie die Gehäuseabdeckung des NAS vorsichtig ab.
5. Kab el lösen
21
Page 22

6. Lösen Sie vorsichtig die Auswerfklemmen, indem Sie sie aus den Seiten des
RAM-Steckplatzes her a usz iehen.
7. Ergreifen Sie den Rand des RAM-Moduls. Richten Sie die K erbe a m goldenen R and d es
RAM-Moduls mit der Kerbe im RAM-Steckplatz aus. Stecken Sie das RAM-Modul bis
zum Anschlag in den RAM-Steckplatz.
8. Installieren Sie es im NAS-Gehäuse und z iehe n di e sieb en Schra uben a n de r Rück sei te
des NAS fest.
22
Page 23

Chapter 6. Netzwerkerweiterungskarte installieren
Warnung:
Die folgenden Anweisungen sollten nur von einem autorisierten und ausgebildeten
Technike r durchgeführt werden.
Halten Sie sich streng an die Installationanwei s u ng en für ei ne
Netzwerkerweiteru ngs kar te im NAS. Andernfalls kann es zu Verletzungen oder
Todesfälle n kommen.
Die TS-x80-Serie verfügt über Erweiterungss teckplä tze für eine Ne tzwer kerw e iteru ng.
Installieren Sie zur Erhöhung der Netzwerkbandbreite eine zusätzliche
Netzwerkerweiterungskarte (als Option zu erwerben) auf dem Motherboard des NAS.
6.1 TS-EC880 Pro, TS-EC1080 Pro
Beziehen Sie sich bitte auf die nachstehende Kompatibilitätstabelle und bringen eine
geeignete Halterung für die Netzwerkerweiterungskarte an.
Halterung A Halterung B Halterung C
23
Page 24

Netzwerkadapter, optisches
Kompatib ilität der Netzwerkerweiterungskarte
Halt erung A (X520-T2) Intel®-Ethernet-Serveradapter X520-T2 (E10G42B)
Halterung B
(X520-SR2/ X520-DA2)
Halterung C (Emulex) 1. Emulex OneConnect 10-GbE-Netzwerkadapter,
1. Schalten Sie den NAS aus. Trennen Sie das Netzteil, die Netzwerkkabel und andere
Anschlüsse bzw . Kabel vom NAS.
2. Legen Sie ein Antistatik-Armband an, bevor Sie die Netzwerkerweiterungskarte
1. Intel®-Ethernet-Serveradapter X520-SR2
(E10G42BFSR)
2. Intel®-Ethernet-Serveradapter X520-DA2
(E10G42BTDA)
SFP+-Direct-Attach-Kupferkabel (O Ce11102 -NX)
2. Emulex OneConnect 10-GbE-Netzwerkadapter, optisches
Short-Reach-Kabel (O C e11102-NM)
3. Emulex OneConnect 10-GbE-Netzwerkadapter,
SFP+-Direct-Attach-Kupferkabel (O Ce11102 -IX)
4. Emulex OneConnect 10-GbEShort-Reach-Kabel (O C e11102-IM)
installieren, um eine Entladung von statischer Elektrizität zu verhindern. Die
Krokodilklemme sollte geerdet sein.
3. Lösen Sie die sieben Schrauben an der Rückseite des NAS.
24
Page 25

4. Nehmen Sie die Gehäuseabdeckung des NAS vorsichtig ab.
5. Lösen Sie d ie Schr auben und nehmen Sie die Ab deckung de r Erweiter ungssteckplä tze
ab.
25
Page 26

6. Ergreifen Sie den Rand der Netzwerkerweiterungskarte. Richten Sie die Kerbe am
goldenen Rand der Karte mit der Karte im PCIe-Steckplatz aus. Stecken Sie die
Netzwerkerweiterungskarte bis zum Anschlag in den PCIe-Steckplatz.
7. Ziehen Sie die Schrauben fest.
8. Schließen Sie die Gehäu seabde ckung und ziehe n Sie die Schra uben fes t. Schließen Sie
das Netzteil und die Kabel an den NAS an.
9. Um zu prüfen, ob die Netzwerkerweiterung vom NAS erkannt wird, schalten Sie den
NAS ein und melden sich als Administrator an der Weboberfläche an. Rufen Sie
„Systemsteuerung“ >„Systemeinstellungen“ > „Netzwerk“ > „TCP/IP“ auf und prüfen
Sie die Gesamtzahl der Netzwerkschnittstellen.
26
Page 27
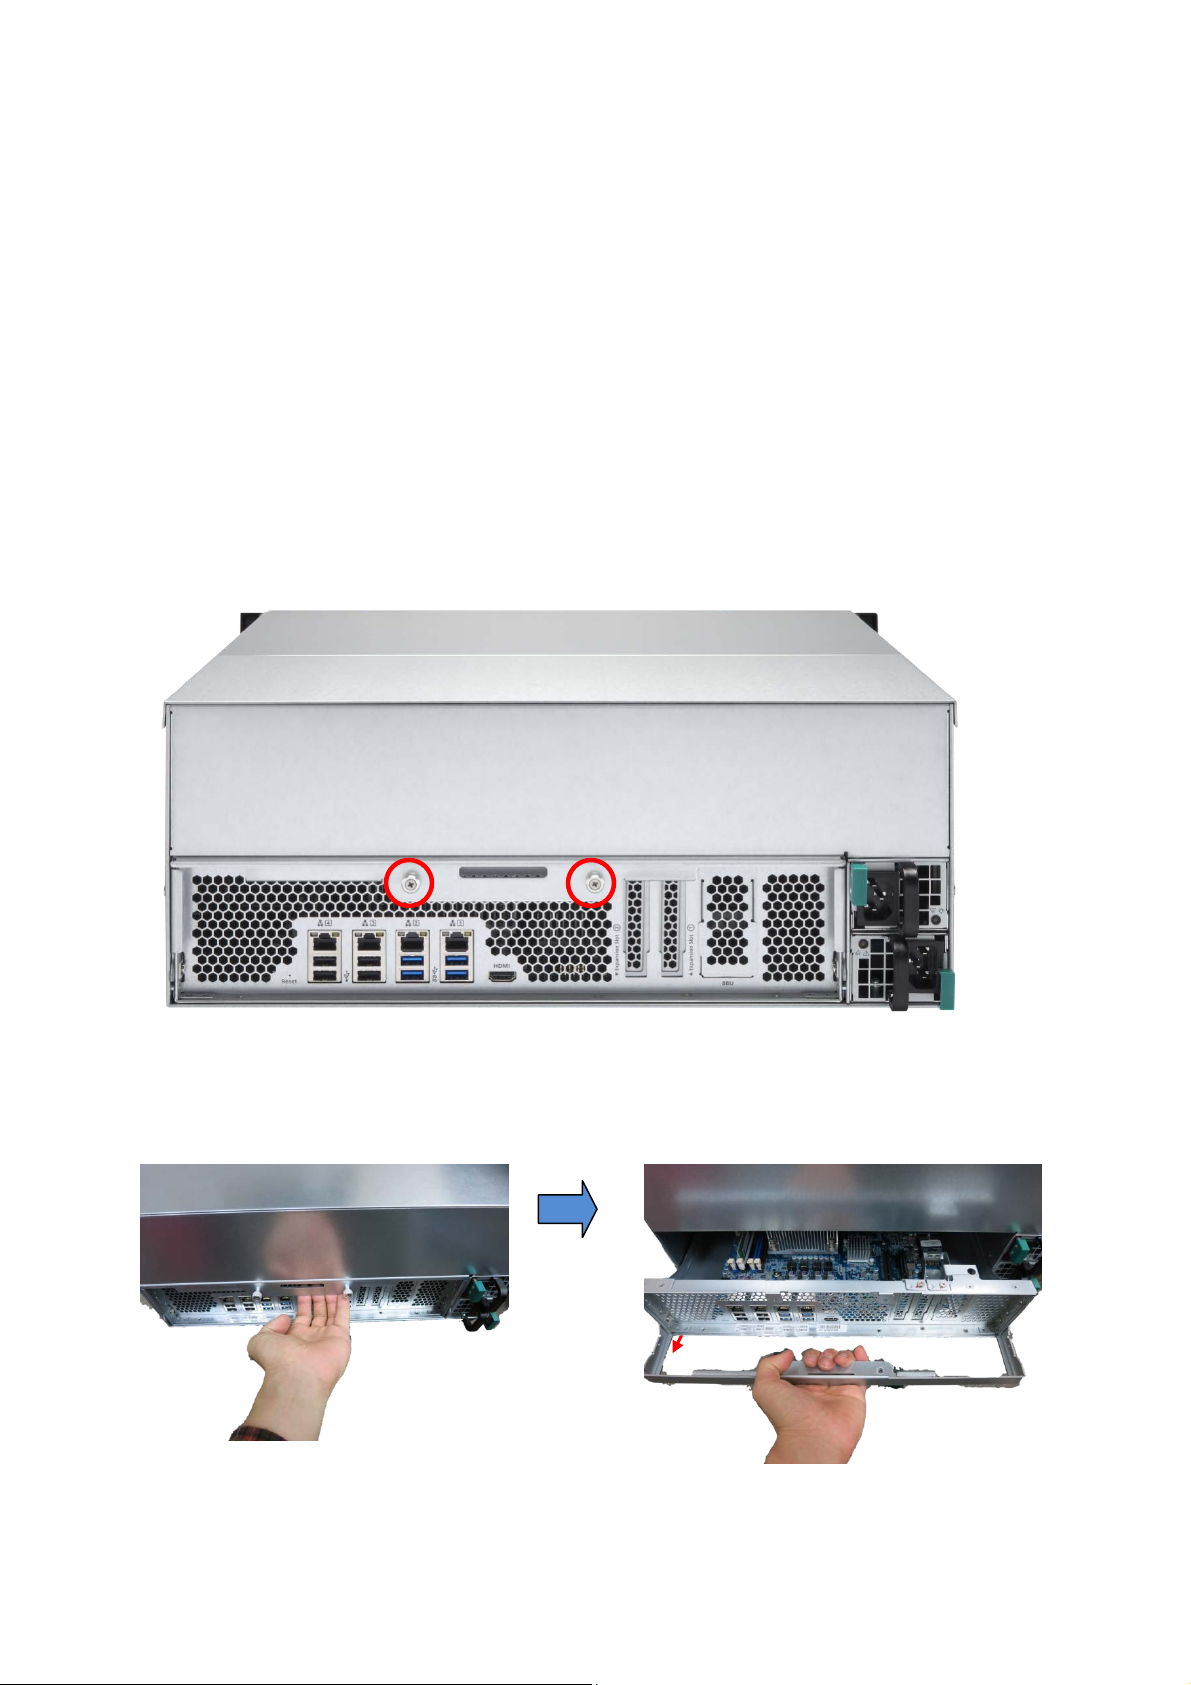
6.2 TS-EC2480U-RP, TS-EC1680U-RP, TS-EC1280U-RP, TS-EC880U-RP
1. Schalten Sie den NAS aus. Trennen Sie das Netzteil, die Netzwerkkabel und andere
Anschlüsse bzw . Kabel vom NAS.
2. Legen Sie ein Antistatik-Armband an, bevor Sie die Netzwerkerweiterungskarte
installieren, um eine Entladung von statischer Elektrizität zu verhindern. Die
Krokodilklemme sollte geerdet sein.
3. Lösen Sie die beiden Schrauben an der Rückseite des NAS, wie in der Abbildung
dargestellt ist.
4. Halte n Sie den Griff nach hinte n gez o g en, um die Mo th e rb o a r d-Schublade zu
entfernen.
27
Page 28

5. Lösen S ie d ie Sc hr aube u nd nehme n Sie d ie Abd ec kung d es Erweiterungssteckplatzes
ab.
6. Stecken Sie d ie Netzwer kerwei terungskar te bis z um A nschlag in den PC Ie-Steckplatz.
Ziehen Sie dann die Schraube fest.
7. Drücken Sie die Motherboard-Schublade hinein. Ziehen Sie dann die Schraube fest.
8. Schließen Sie das Netzteil und die Kabel an den NAS an.
9. Prüfen Sie, ob die Netzwerkerweiterungskarte vom NAS erkannt wird, indem Sie den
NAS einschalten und die Webschnittstelle als Administrator aufrufen. Rufen Sie
„Systems te uer ung“ > „ Systemeinstellunge n“ > „Netzwerk“ > „TCP/IP“ auf und prüfen
Sie die Gesamtzahl der Netzwerkschnittstellen.
28
Page 29

Chapter 7. mSATA-Flash-Modul im NAS installieren
Warnung:
Die folgenden Anweisungen sollten nur von einem autorisierten und ausgebildeten
Technike r durchgeführt werden.
Halten Sie s ich str eng a n die Insta lla tionsa nwe isung en für e in mS A T A-Moduls im NAS.
Andernfalls kann es zu Verletz ungen oder Todesfällen ko mmen.
7.1 TS-EC2480U-RP, TS-EC1680U-RP, TS-EC1280U-RP, TS-EC880U-RP
29
Page 30

1. Schalten Sie den NAS aus. Trennen Sie das Netzteil, die Netzwerkkabel und andere
Anschlüsse bzw . Kabel vom NAS.
2. Lösen Sie di e 2 Schr a ube n a n d er Rüc ks eite de s N AS, wie in de r Ab b ild ung d arg es tel lt
ist.
3. Halte n Sie den Griff nach hinte n gez o g en, um die Mo th e rb o a r d-Schublade zu
entfernen.
30
Page 31

4. Ergreifen Sie das mSATA-Flash-Modul vorsichtig am Rand. Richten Sie die Kerbe am
goldenen Rand des mSATA-Moduls mit der Kerbe im mSATA-Steckplatz aus. Stecken
Sie das mSATA-Flash-Mod ul bis zum Ans chlag in den mSATA-Steckplatz.
5. Setzen Sie die Modulbefestigung ein.
6. Bringen Sie die Motherboar d-Schublade wieder in ihre normale Position.
7. Schließen Sie das Netzteil und die Kabel an den NAS an.
31
Page 32
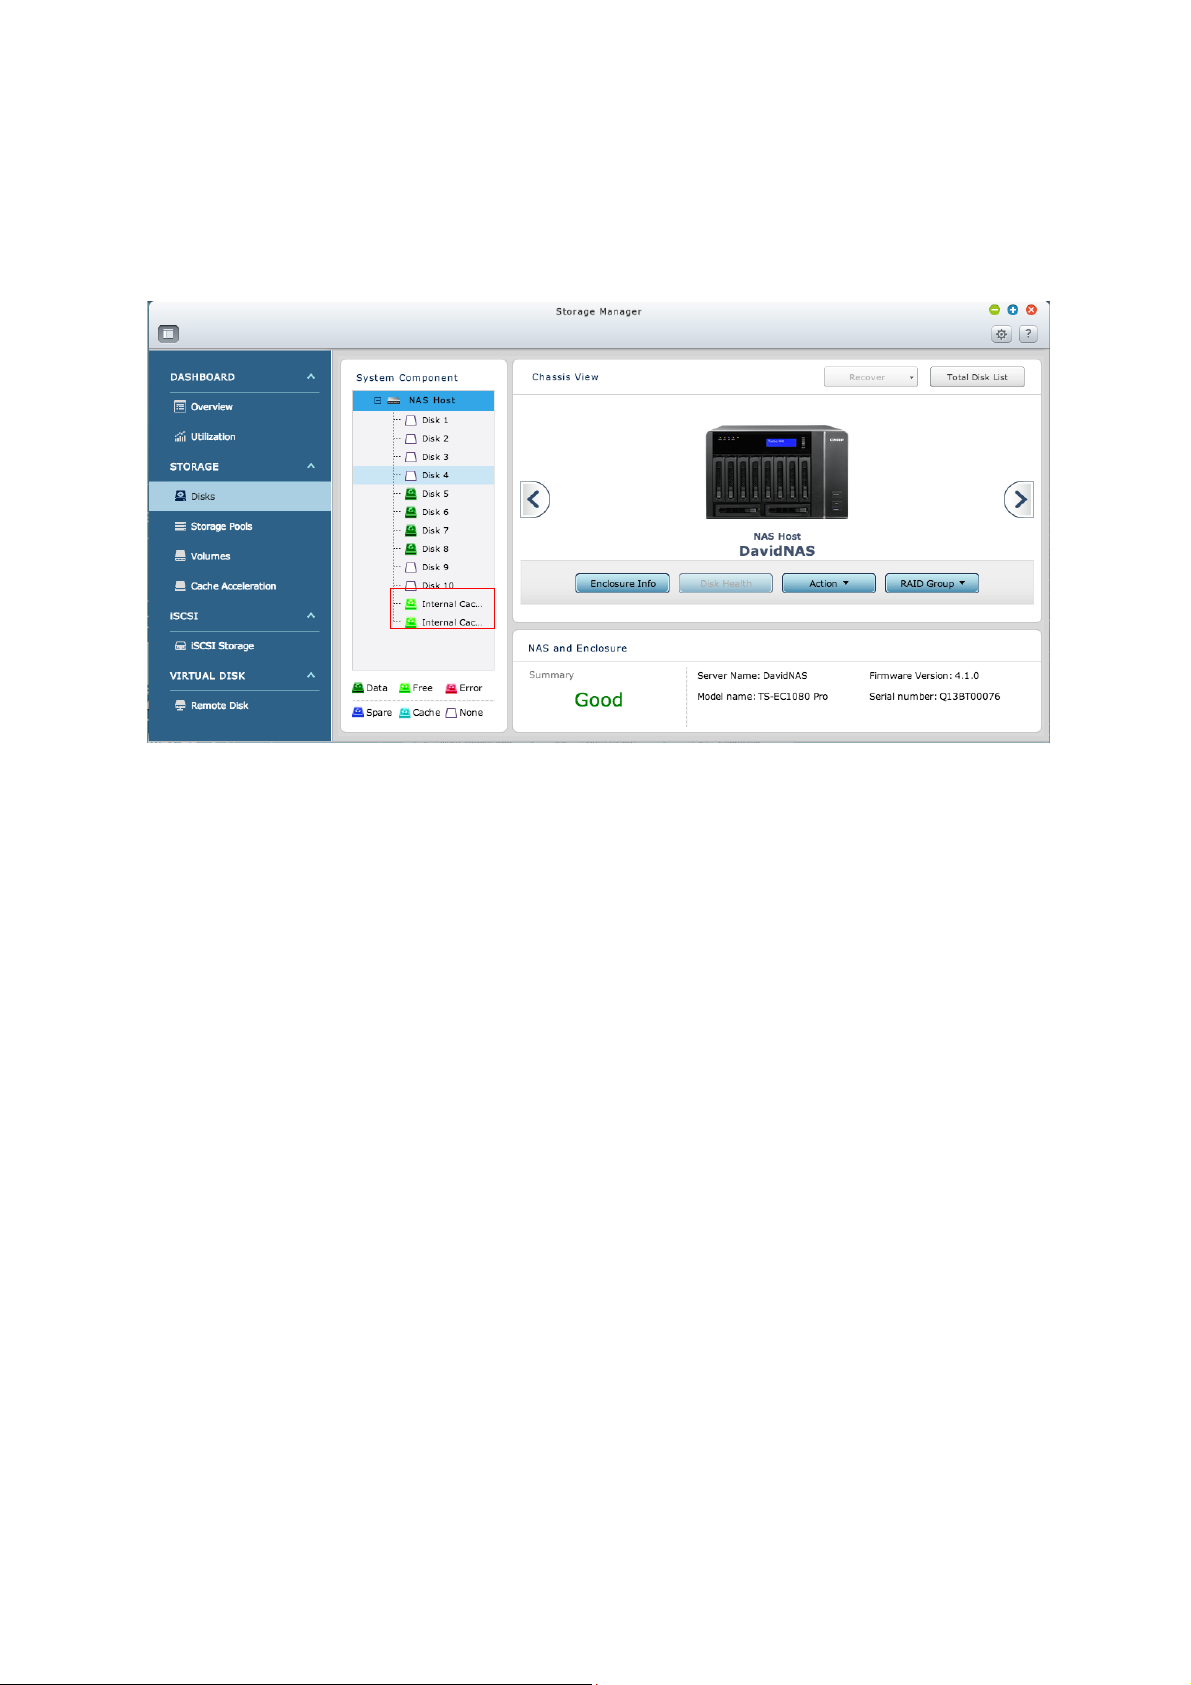
8. Prüfen Sie , ob das mSATA-Flash-Modul vom NAS erkannt wird, indem Sie den NAS
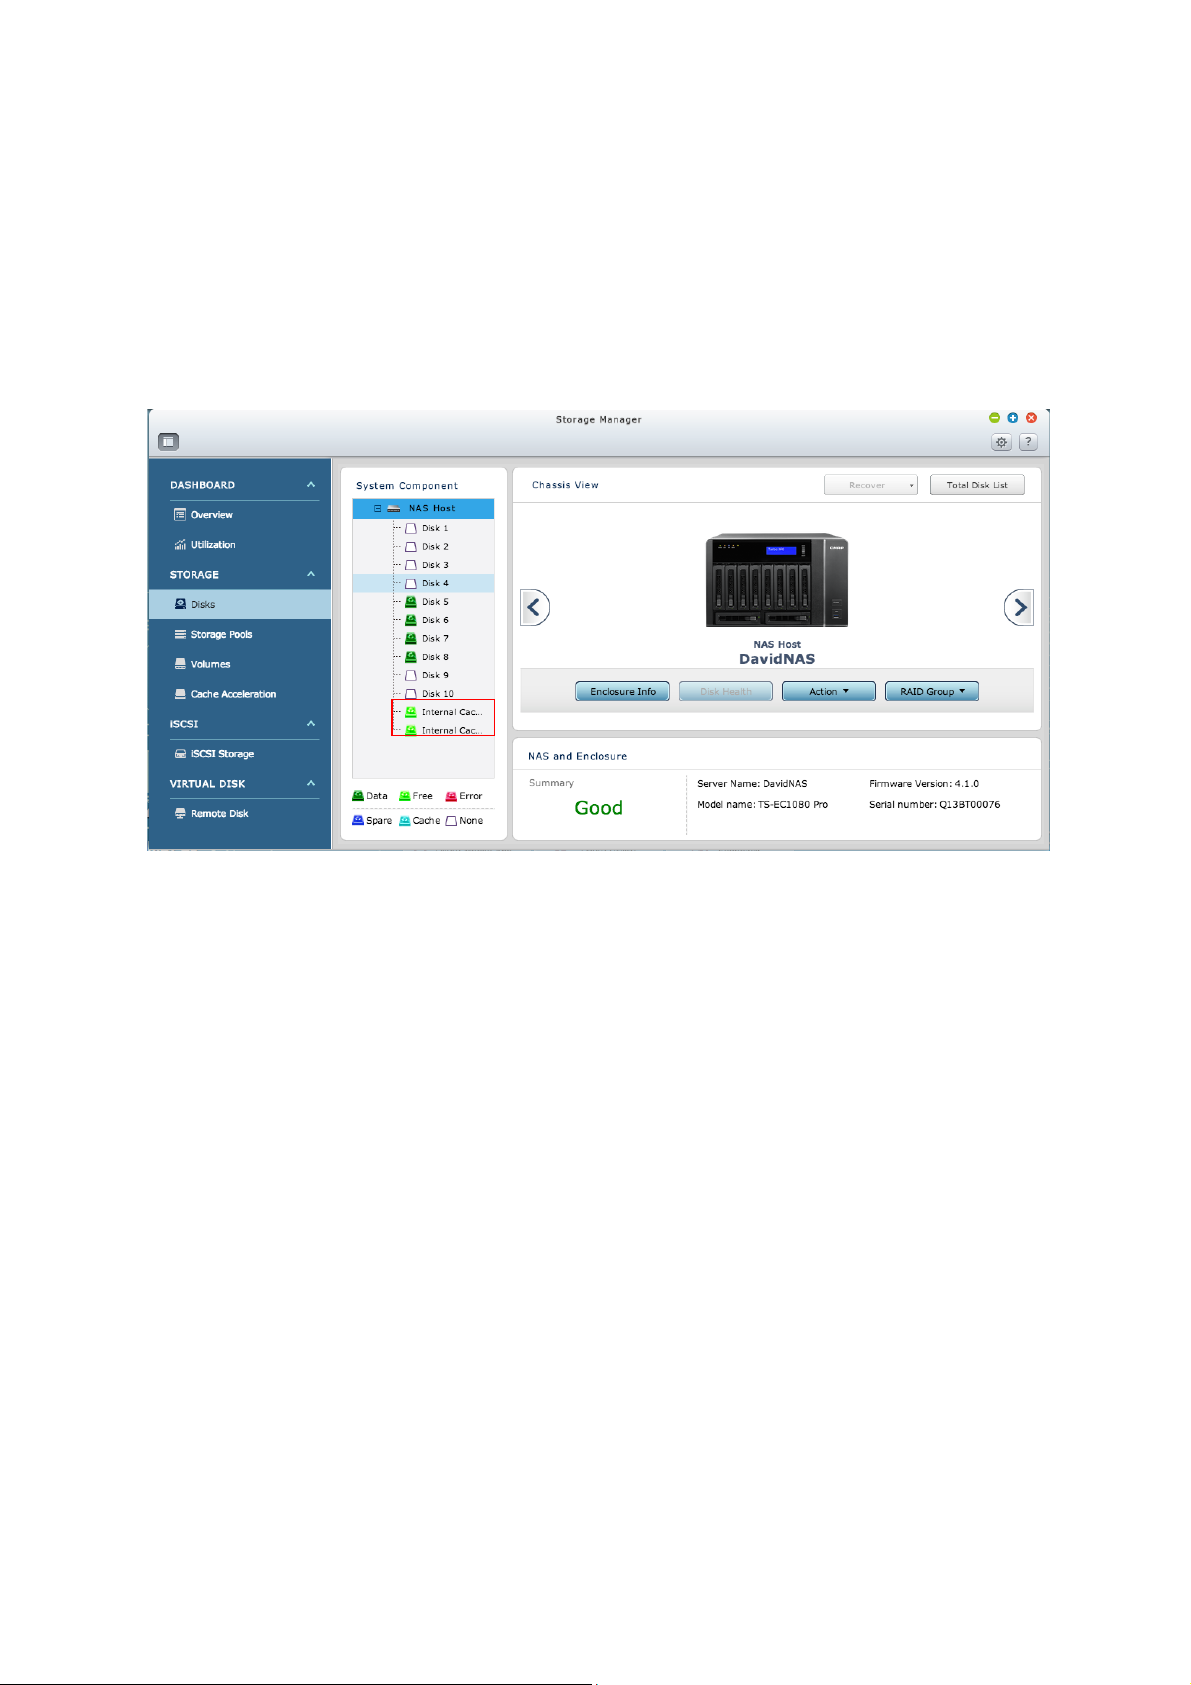
einsc ha l ten und die Webschnittstelle als Administrator aufrufen. Rufen Sie
„Systemsteuerung“ > „Storage Manager“ > „Datenträger“ auf und prüfen „Interner
Cache-Port“.
32
Page 33
7.2 TS-EC880 Pro, TS-EC1080 Pro
1. Schalten Sie den NAS aus. Trennen Sie das Netzteil, die Netzwerkkabel und andere
Anschlüsse bzw . Kabel vom NAS.
2. Legen Sie ein Antistatik-Armband an, bevor Sie die Netzwerkerweiterungskarte
installieren, um eine Entladung von statischer Elektrizität zu verhindern. Die
Krokodilklemme sollte geerdet sein.
3. Lösen Sie die sieben Schrauben an der Rückseite des NAS.
4. Nehmen Sie die Gehäuseabdeckung des NAS vorsichtig ab.
33
Page 34

5. Ergreifen Sie das mSATA-Flash-Modul vorsichtig am Rand. Richten Sie die Kerbe am
goldenen Rand des mSATA-Flash-Moduls mit der Kerbe im mSATA-Steckplatz aus.
Stecken Sie das mSATA-Flash-Modul bis zum Anschlag in den mSATA-Steckplatz.
6. Fügen Sie Schrauben an den angegebenen Positionen ein und ziehen Sie sie fest.
34
Page 35
7. Schließ en S ie die Gehä useab deck ung und befestigen Sie die Schrauben. Schließen Sie
das Netzteil und die Kabel an den NAS an.
8. Prüfen Sie , ob das mSATA-Flash-Modul vom NAS erkannt wird, indem Sie den NAS
einsc ha l ten und die We b schnittstelle als A dministrato r a ufrufen. Rufen Sie
„Systemsteuerung“ > „Storage Manager“ > „Datenträger“ auf und prüfen den
internen Cache-Port.
35
Page 36

Chapter 8. Festplatten im laufenden Betrieb vertauschen
System
Unterstüt
Unterstüt
Unterstüt
Unterstüt
höher)
Der QNAP NAS ist mit 2,5-/3,5-Zoll-SATA-Festpl a tten bek annter Fes tp lattenmark en
kompatibel. Eine aktuelle Kompatibilitätsliste für die Festplatten finden Sie
http://www.qnap.com.
unter
Vorsicht:
QNAP ha ft e t u nt e r keinen Umständ e n f ür Produktschäden/-fehler oder
Datenverlust/-wiederherstellung aufgrund von Missbrauch oder falscher Installation
von Festplatten.
Beachten Sie, dass bei Installation einer Festplatte (neu oder gebraucht), die zuvor
noch nie im NAS installiert war, diese automatisch formatiert und partitioniert wird,
wobei alle Festplattendaten gelöscht werden.
zt
3,5-ZollSATA-Fes
tplatten
zt
2,5-ZollSATA-Fes
tplatten
zt SSDs
zt
Hot-Swa
p-fähige
Festplatt
en (nur
RAID 1
oder
TS-EC880 Pr o, TS-EC1080 P ro,
Ja Ja Ja Ja
TS-EC2480U-RP, TS-EC1680U-RP,
TS-EC1280U-RP, TS-EC880U-RP
36
Page 37

Der NAS unterstützt das Vertauschen von Festplatten im laufenden Betrieb, wenn 1
Mitgliedslaufwerk bei RAID 1 oder 1 bis 2 Mitgliedslaufwerke bei RAID 5 oder RAID 6
ausfallen. Beachten Sie die nachstehenden Schritte für den Wechsel einer Festplatte im
laufenden Betrieb, wenn diese in einer RAID-Konfiguration ausfällt.
1. Melden Sie sic h a m NAS an und prüfen d en Speicherpoolstatus unter „Storage
Manager“ > „Speiche rpools“.
2. Der Speicherpoolstatus sollte „Warnung“ und der RAID-Gruppenstatus sollte
„Herabge setzt“ sein.
3. Halten Sie eine neue Festplatte als Ersatz für die ausgefallene Festplatte bereit. Die
Kap azität de r neue n Fes tplatt e sollte g rößer oder gleich de r Kap azitä t der aus gefall enen
Festplatte sein.
4. Trennen Sie die ausg efallene Festplatte vom NAS. Warten Sie etwa 20 Sekunden oder,
bis der Server zwei Signaltöne ausgibt.
5. Entfernen Sie die ausgefallene Festplatte aus dem Festplatteneinsatz.
6. Installier en Sie die neue Festplatt e im Festplatteneinsatz. Stecken Sie ihn in den NAS.
7. Der Server sollte zweimal einen 1,5 Sekunden langen Signalton ausgeben.
8. Prüfen Sie den Volumestatus auf der Webadministrationsseite. Das Volume sollte neu
aufgebaut werden.
Warnung: Benutzern wird dringend geraten, den Server vor dem Austausch der
Festplatte auszuschalten, um die Stromschlaggefahr zu mindern.
37
Page 38

Chapter 9. RAID-Wiederherstellung
Der QNAP NAS unterstützt die Wiederherstellung einer ausgefallenen RAID-Gruppe durch
unbeachsichtigtes Trennen oder Entfernen von Festplatten aus dem System. Benutzer
können e ine i naktive RAID 1-, RAID 5- oder RAID 6-Gruppe au f de n hera bges etzt en Mod us
bzw. eine inaktive RAID 0- und JBOD-Konfiguration auf den Normalzustand
wiederherstellen.
Datenträgervolume Unterstützt
RAID-Wiederherstellung
Maximal erlaubte Anzahl
entfernter Festplatten
Einzellaufwerk Nein JBOD Ja 1 oder mehr
RAID 0 Ja 1 oder mehr
RAID 1 Ja 1 oder 2
RAID 5 Ja 2 oder mehr
RAID 6 Ja 3 oder mehr
RAID 10 Nein -
Anhand na chste hender Sc hritte ste llen Sie ei ne inakti ve RAID-Gruppe auf dem NAS wieder
her:
1. Achten Sie darauf, dass der Volumestatus der RAID-Gruppe „Nicht aktiv“ ist.
2. installieren Sie dieselben Festplatten, die zuvor aus dem NAS entfernt wurden, in
denselben Festplattensteckplätzen.
3. Rufen Sie „Storage Manager“ > „Speicherp ools“ auf. Wählen Sie die herabgesetzte
oder inaktive RAID-Gruppe. Klicken Sie auf „Verwalten“ > „Wiederherstellen“.
4. Warten Sie etwa 1 Minute, bis der Vorgang abgeschlossen ist. Anschließend können
Sie auf die NAS-Daten zugr eifen.
Hinweis:
Nach Wiederherstellung einer RAID 1-, RAID 5- oder RAID 6-Gruppe vom „inaktiven“
Zustand durch RAID-Wiederherstellung können Benutzer normal auf dem Volume
lesen un d sc hr e ib en. Der Normalzustand des Volumestatus wird nach der
Synchronisierung wiederhergestellt.
Ist das getrennte Festplattenmitglied beschädigt ist, funktioniert die
RAID-Wied e rherstellu ng nicht.
38
Page 39

Standard
QNAP-RAID 5 Standard
QNAP-RAID 6
Herabgesetzter
Modus
Schreibschutz
(für soforti g e (n)
Datensicherung &
Festplattenaustau
sch)
RAID-Wiederhers
tellung
(RAID-Status:
Nicht aktiv)
-RAID 5
-RAID 6
N-1 N-1 N-1 & N-2 N-1 & N-2
Nicht
zutreffend
N-1, fehlerhafte
Blöcke in
überlebenden
Festplatten des
Verbunds
Nicht
zutreffend
N-2, fehlerhafte
Blöcke in
überlebenden
Festplatten des
Ver bunds g efunde n.
gefunden.
Nicht
zutreffend
Wenn alle
Originalfestplatten
wieder auf dem
NAS installiert und
in Betrieb
genommen,
identifiziert und
abgerufen werden
Nicht
zutreffend
Wenn alle
Originalfestplatten
wieder auf dem N AS
insta ll ie rt und in
Betrieb genommen,
identifiziert und
abgerufen werden
können, und we nn
können, und we nn
der
Festplatten-Super
block nicht
beschädigt ist.
RAID-Absturz N-2 N-2 ausgefallene
Festplatte und
sämtliche
restlichen
Festplatten
können nicht in
Betrieb
genommen,
identifiziert oder
abgerufen werden.
N = Anzahl der Festplatten im Verbund
der
Festplatten-Superbl
ock nicht
beschädigt ist.
N-3 N-3 und alle
restlichen
Festplatten können
nicht in Be trieb
genommen,
identifiziert oder
abgerufen werden.
39
Page 40

Chapter 10. LCD-Bildschirm verwenden
Diese F u nktion ist nur bei NAS-Modellen mit LCD-Anzeige verfügbar. Weitere Einzelheit en
finden Sie unter
Der NAS bietet einen praktischen LCD-Bil dschirm, über den Benutzer die
Festplattenkonfiguration durchführen und Systeminformationen einsehen können.
Nachdem sich der NAS hochgefahren hat, werden der Servername und die IP-Adresse
angezeigt.
N A S 5 F 4 D E 3
1 6 9 . 2 5 4 . 1 0 0 . 1 0 0
Bei der ersten Installation zeigt der LCD-Bildschirm die Anzahl der erkannten Festplatten
und die IP-Adresse an. Konfigurieren Sie die Festplatten.
Anzahl
erkannter
Festplatten
1 Einzellaufwerk Einzellaufwerk
http://www.qnap.com.
Standard-
Datenträgerkonfiguration
Verfügbare
Festplattenkonfigurationsoptionen*
2 RAID 1
3 RAID 5
4 oder mehr RAID 5
*Drüc k e n Sie zur O p t io nswahl die „Auswahl“-Taste und drücken Sie zur Bestätigung die
„Enter“-Taste.
Einzellaufwerk -> JBOD -> RAID 0 ->
RAID 1
Einzellaufwerk -> JBOD -> RAID 0 ->
RAID 5
Einzellaufwerk ->JBOD -> RAID 0 ->
RAID 5 -> RAID 6
40
Page 41

Wenn z. B. 5 installierte Festplatten im NAS verfügbar sind, zeigt der LCD-Bildschirm:
C o n f i g . D i s k s ?
→
R A I D 5
Drücken Sie für weitere Optionen, z. B. RAID 6, die „Auswahl“-Taste.
Drücken Sie die „Enter“-Taste und folgende Meldung erscheint. Drücken Sie die
„Auswahl“-Taste, um die Wahl von „Ja“ zu bestätigen.
C h o o s e R A I D 5 ?
→
Y e s N o
Wenn eine RAID 1 -, RAID 5- oder RAID 6-Konfiguration ausgeführt wird, initialisiert das
System die Festplatten, erstellt das RAID-Gerät, formatiert das RAID-Gerät und bindet es
als Vo lum e a uf de m N AS e in. Der Verlauf wird auf dem LCD-Bildsc hir m a ng eze ig t. Wenn er
100 % erreicht, kann auf das RAID-Volume zugegriffen werden. Benutzer können
Freigabeordner erstellen und Dateien in Ordner auf dem NAS hochladen. In d er
Zwischenzeit führt der NAS zur Sicherstellung, dass die Streifen und Blöcke in allen
RAID-Komponentengeräten betriebsbereit sind, eine RAID-Synchronisierung au s und der
Verlauf wird auf der Seite unter „Storage Manager“ > „Speicher p ools“ angezeigt. Die
Synchronisierungsrate beträgt etwa 30 – 60 MB/s (variiert je nach Festplattenmodell,
Systemressourcenauslastung etc.).
Hinweis: Falls ein Mitgliedslaufwerk einer RAID-Konfiguration während der
Synchr o nisierung v erlorengeht, ruft das RAID -Gerät den herabgesetzten Modus auf. Ein
Zugrif f a uf d ie Vo l u m e d a ten ist immer noch möglich. Wird ein neues Mitgliedslaufwerk
hinzugefügt, beginnt der NAS mit dem Neuaufbau. Der Status kann auf der Seite
„Volumeverwaltung“ überp rü ft werden.
Wähle n Sie zu r Versc hlüss elung e ines D atenträ ge rvolumes * „Ja“ , wen n der LCD -Bildschirm
<Encry pt Volume?> anzeigt. Das standardmäßige Ver schlüsselung skennwort lautet
„admin“. Bitte melden Sie sich zur Änderung des Kennwortes als Administrator an der
webba s ierten Administrationssc hnittstelle a n u n d ände rn Sie die Einstellungen un te r
„Storage Manager“ > „Speicher“ > „Verschlüsselung“ > „Ändern“.
E n c r y p t V o l u m e ?
→
Y e s N o
Wenn die Ko nfig ura tio n a bge sc hlos se n is t, we rde n Ser ve rna me und IP-Ad resse angez eigt.
Falls der NAS das Datenträgervolume nicht erstellen kann, wird folgende Meldung
angezeigt.
C r e a t i n g . . .
R A I D 5 F a i l e d
41
Page 42

Hinweis: Die Funktionen zu Datenverschlüsselung sind je nach gesetzlichen
Beschränkungen in einigen Ländern möglicherweise nicht verfügbar.
Systeminforma tionen auf dem LC D-Bildschirm anzeigen
Wen n der LCD-Bildschi rm den Servern am en und die IP-Adresse anzeigt, drüc ken Si e die
„Enter“-Taste, um das Hauptmenü aufzurufen. Das Hauptmenü enthält die folgenden
Elementen:
1. TCP/IP
2. Physikalischer Datenträger
3. Volume
4. System
5. Abschaltung
6. Neustart
7. Kennwort
8. Zurück
1. TCP/IP
Folgende Optionen sind verfügbar:
LAN 1-IP-Adresse
LAN 1-Subnetzmaske
LAN 1-Gateway
LAN 1 prim. DNS
LAN 1 sek. DNS
Netzwerkeinstellungen aufrufen
Netzwerkeinstellungen – DHCP
Netzwerkeinstellungen – Stat is che IP*
Netzwerkeinstellungen – Zurück
Zurück zum Hauptmenü
* Unter Netzwerkeinstellungen – Statische IP kö nnen Sie die IP-Adresse, die
Subnetzmaske, den Gateway und den DNS von LAN 1 und LAN 2 konfigurieren.
42
Page 43

2. Physikalischer Datenträg er
LCD-Display
Laufwerkskonfiguration
RAID5 (D)
Herabgesetzter RAID 5-Modus
RAID 5 (S)
RAID 5-Neusynchronisierung
RAID 5 (X)
RAID 5 ni cht akt iviert
Folgende Optionen sind verfügbar:
Datenträgerinformationen
Zurück zum Hauptmenü
Die Datenträgerinformationen weisen die Temperatur und Kapazität der Festplatte
aus.
D i s k : 1 T e m p : 5 0 ° C
S i z e : 2 3 2 G B
3. Volume
Dieser Abschnitt zeigt die Datenträgerkonfiguration des NAS an. Die erste Zeile zeigt
die RAID-Konfiguration und die Speicherkapazität an; die zweite Zeile enthält die
Anzahl Mitgliedslaufwerke der Konfiguration.
R A I D 5 7 5 0 G B
D r i v e 1 2 3 4
Ist mehr als ein Volume vorhanden, drücken Sie zur Anzeige der Informationen die
„Wählen“-Taste. Die folgende Tabelle beschreibt die LCD-Meldungen für die RAID
5-Konfiguration.
RAID5+S RAID5+Spare
RAID 5 (B) RAID 5-Neuaufbau
RAID 5 (U) Bereitstellung von RAID 5 wird
aufgehoben
4. System
Dieser Abschnitt zeigt Systemtemperatur und die Drehzahl des Systemlüfters an.
C P U T e m p : 5 0 ° C
S y s T e m p : 5 5 ° C
S y s F a n : 8 6 5 R P M
5. Herunterfahren
Mit die ser O ptio n scha lte n Sie den N AS aus. Drücken Sie d ie „Auswahl“-Taste, um „Ja“
zu wählen. Drücken Sie dann zur Bestätigung die „Enter“-Taste.
43
Page 44

6. Neustart
→
Mit di e s er Option s tarten Sie d en NAS neu. Drücken Sie die „Auswa hl“-Taste, um „Ja“
zu wählen. Drücken Sie dann zur Bestätigung die „Enter“-Taste.
7. Kennwort
Das Kennwort des LCD-Bilds chir ms ist stand ardmä ßig leer. Rufen Sie d iese O ptio n zur
Änderung des Kennworts für den LCD-Bildschirm auf . Wählen Sie „Ja‟, um den
Vorgang fortzusetzen.
C h a n g e P a s s w o r d
Y e s
Geben Sie ein aus maximal 8 Ziffern (0 bis 9) bestehendes Kennwort ein. Wenn sich
der Cursor auf „OK“ setzt, drücken Sie die „Enter“-Taste. Ve r i f iziere n S ie das
Kennwort zur Bestätigung der Änderungen.
N e w P a s s w o r d :
O K
8. Zurück
Wähle n Sie diese O ption, um zum Hauptmenü zur ü ck zukehren.
N o
44
Page 45

Systemmeldungen
Wenn der NAS einen Systemfehler feststellt, erscheint eine Fehlermeldung auf dem
LCD-Bildschirm. Drücken Sie zur Anzeige der Meldung die „Enter“-Taste. Drücken Sie
erneut die „Enter“-Taste, um die nächste Meldung anzuzeigen.
S y s t e m E r r o r !
P l s . C h e c k L o g s
Systemmeldung Beschreibung
Systemlüfterfehler Der Systemlüfter ist ausgefallen
System überhitzt Das Sys te m ist überhitzt
Festp la t te üb erhitzt Die Festpla t te ist überhitzt
CPU überhitzt Die CPU ist überhitzt
Netzwerktrennung Sowohl di e LA N 1- als auch di e LAN 2-Verbindung wurde
im Ausfallschutz- oder Lastausgleichsmodus getrennt
LAN 1 getrennt Die LAN 1-Verbindung wurde getrennt
LAN 2 getrennt Die LAN 2-Verbindung wurde getrennt
Festplattenfehler Die Fes tplatte ist ausgefallen
Vol 1 voll Das Volume ist voll
Festplatte ausgeworfen Die Festplatte wurde ausgeworfen
Vol 1 herabgesetzt Das Volume ist im herabgesetz ten Modus
Vol 1 ausgeworfen Das Volume-Ber eitstellung wurde aufgehoben
Vol 1 ina ktiv Das Volume ist nicht aktiviert
45
Page 46

Chapter 11. Netzteil installieren
Hinweis: Die folg enden Anweisu ng en sollten nur vo n e in e m a u torisier ten und
ausgebi ldeten Techniker durchgeführt werden.
Anhan d folgender Schritte wi rd ein ausgefalle nes N etzteil im Turbo NAS TS-EC2480U-RP,
TS-EC1680U-RP, TS-EC1280U-RP, oder TS-EC880U-RP ausgetauscht.
1. Schalten Sie den NAS aus. Trennen Sie das Netzteil, die Netzwerkkabel und andere
Anschlüsse bzw . Kabel vom NAS.
2. Halten Sie den schwarzen Griff und halten Sie die grüne Taste fest gedrückt.
46
Page 47

3. Ziehen Sie das fehlerhafte Netzteil heraus.
4. Schließen Sie das neue Netzteil an den NAS an.
5. Sch alten Sie den NAS ein.
6. Schließen Sie das Netzteil und die Kabel an den NAS an.
47
Page 48

Warnung für redundante Stromversorgung in der web basierten Schnittstelle
aktivieren:
Wenn zwei Netzteile (PSU) im NAS installiert und an Steckdosen angeschlossen sind,
versorgen beide Netzteile den NAS mit Strom (gilt für 1U- und 2U-Modelle). Benutzer
können den redundant en Stromversor gungsmodus unter „Systemste uerung“ >
„Systemeinstellungen“ > „Hardware“ aktivieren, wenn eine Warnung bezüglich der
redundanten Stromversorgung au sgegeben wer den sol l. Der N AS gibt einen Signalton aus
und zeichnet die Fehlermeldungen unter „Systemprotokolle“ auf, wenn ein Netzteil
getrennt wird oder ausfällt.
Aktivieren Sie diese Option NICHT, wenn nur ein Netzteil im NAS installiert ist.
* Diese Funktion ist standardmäßig deaktiviert.
48
Page 49

Technischer Support
QNAP bietet über den Instant Messenger einen hochqualifizierten Support und
Kund e ndienst im Internet.
Online-Support:
Forum: http://forum.qnap.com/
Technischer Sup p ort i n den USA und Kanada:
E-Mail: q_supportus@qnap.com
Te l. : +1-909-595-2782
Adresse: 16 8 Universi ty P a rkway, Po m o na C A 9 1768
Dienststunden: 8.00-17.0 0 Uh r (UTC-8 Pazifikzeit, Montag bis Freitag)
http://www.qnap.com
49
Page 50

Produktübereinstimmungsklasse
NAS-Modelle FCC CE
TS-EC2480U-RP Klasse A Klasse A
TS-EC1680U-RP Klasse A Klasse A
TS-EC1280U-RP Klasse A Klasse A
TS-EC880U-RP Klasse A Klasse A
TS-EC1080 Pro Klasse B Klasse B
TS-EC880 Pr o Klasse B Klasse B
50
Page 51

GNU GENERAL PUBLIC LICENSE
Version 3, 29 June 2007
Copyright © 2007 Free Software Foundation, Inc. <http://fsf.org/>
Everyo n e is pe rm itte d to co py a nd d istr ib ute v er b ati m cop ie s of th is li ce nse doc um en t, b ut
changing it is not allowed.
Preamble
The GNU General Public License is a free, copyleft license for software and other kin ds of
works.
The licenses for most software and other practical works are designed to take away your
freedom to share and change the works. By contrast, the GNU General Public License is
intended to guarantee you r freedom to share and change all versi ons of a program--to
make sure it rema ins free softw are for a ll its user s. W e, the Free So ftwa re Fo undatio n, use
the GNU General Public License for most of our software; it applies also to any other work
released this way by its authors. You can apply it to your programs, too.
When we speak of free software, we a re referring to freedom, not pric e. Our Genera l Public
Licenses are desig ned to make sure t hat you ha ve the free d om to distribute copies of free
software (and c harge for t hem if you wis h), that you recei ve source code or can get it if you
want i t, tha t yo u ca n cha nge the so ftwar e or use piece s of it in new free progr ams, and that
you know you ca n do these t hi ngs.
T o protect your rights, we need to prevent others from denying you these righ ts o r as ki ng
you to surrender the rights. Therefore, you have certain responsibilities if you distribute
copies of the software, or if you modify it: responsibilities to respect the freedom of others.
For example, if you distribute copies of such a program, whether gratis or for a fee, you
must pass on to th e recipie nts t he sa me freedoms that you received. You m ust make sure
that the y , too , rece ive or ca n get the so urce cod e. And yo u mus t show the m the se ter ms so
they know their rights.
Developers that use the GNU GPL prot ect yo ur rig hts wi th two steps: (1) asse r t co pyr igh t
on the software, and (2) offer you this License giving you legal permission to copy,
51
Page 52

distribute and/or m o d if y it.
For the developers' and authors' protection, the GPL clearly explains that there is no
warranty for this free software. For both users' and authors' sake, the GPL requires that
modified versions be marked as changed, so that their problems will not be attributed
errone ously to authors of previous versions.
Some devices are designed to deny users access to install or run modified version s of the
software inside them, although the manufacturer can do so. This is fundamentally
incompatible with the aim of protecting user s' freedom to chang e th e software. The
systematic p attern of s uch abuse o ccurs in the area of prod ucts for indi viduals to u se, which
is precisely where it is most u nacceptab le. There fore, we ha ve des igned this v ersion of the
GPL to pro hibit the p rac tice for thos e pro duc ts. If suc h pro blems aris e s ubstantially in other
domain s, we s tand read y to exte nd this prov isio n to tho se do ma ins i n f uture vers ion s of the
GPL, as needed to protect the freedom of users.
Finally, every program is threatened constantly by software patents. States should not
allow p a tents to restrict development and use of software on general-purpose computers,
but in those that do, we wish to avoid the special danger that patents applied to a free
program could make it effectively proprietary. T o prevent this, the GPL assures that patents
cannot be used to render the program non-free.
The precise terms and conditions for copying, distribution and modification follow.
TERMS AND CONDITIO NS
0. Definitions.
"This License" refers to version 3 of the GNU General Public License.
"Copyright" also means cop yrig ht-like laws that apply to other kinds of works, such as
semiconduc tor ma sks.
"The Progr a m" refers to a n y copyrightable work l ice nsed under this Lice nse. Each licen see
is addressed as "you". "Licensees" and "reci pients" may be individuals or organizations.
T o "modify" a work means to copy from or adapt all or part of the work in a fashion requiring
copyright perm ission, other than the making of a n exact copy. T he r esulting wo rk is called
a "modified version" of the e arlier work or a work "based on" the earlier work.
52
Page 53

A "covered work" means either th e un modified Program or a work based on the Program.
T o "propagate" a work means to do anything with it that, without permission, would make
you directly or second a rily liable fo r infringemen t under applicable copyright law, except
executin g it on a computer or modif ying a private copy. Propagation include s copying,
distribution (with or without modification), making available to the public, and in some
countries other activities as well.
To "convey" a work means any ki nd of propagation that enables oth e r pa rties to make or
receive copies. Mere interaction with a user through a computer network, with no transfer
of a copy, is not conveying.
An interactive user interface displays "Appropriate Legal No t ices" to the exte n t that it
includes a convenient and prominently visible feature that (1) displays an appropriate
copyright no tice, a nd (2) tel ls the user that there is no warra nty for the work ( except to the
extent that warranties are provided), that licensees may con vey the work under this
License, and how to view a copy of this License. If the interface presents a list of user
commands or options, such as a menu, a prominent item in the list meets this criterion.
1. Source Code.
The "source code" for a work means the preferred form of the work for making
modifications to it. "Object code" means any non-source form of a work.
A "Standard Interface" means an interface that either is an official standard defined by a
recognized standards body, or, in the case of interfaces specified for a particular
programming language, one tha t is widely used among developers working in that
language.
The "System Libraries" of an executable work include anything, other than the work as a
whole, that (a) is included in the normal form of packaging a Major Component, but which
is not part of that Major Component, and (b) serves only to enable use of the work with that
Major Compon ent, or to implem ent a Standard Interface for which an imple mentation is
available to the public in source code form. A "Major Component", in this context, means a
major essential component (kernel, window system, and so on) of the specific operating
system (if any) on which the executable work runs, or a compiler used to produce the work,
or an object code interpret er used to run it.
The "Corre sponding Source" for a work in object code form means all the source code
53
Page 54

needed to ge nerate, install, and (for an executabl e work) r un the objec t code a nd to mod ify
the work, includi ng scr ip ts to control those activities. However, it does not include the
work's System Librari es, or general-purpose tools or generally availa bl e free programs
which a re use d un modified in per form ing tho se ac tivitie s but w hich ar e not p art o f the w ork.
For example, C orresponding Sour ce includes interface definiti on files associat ed with
source files for the work, and the source code for sh ared libraries and dynamically linked
subprograms that the work is specifically designed to require, such as by intimate data
communication or control flow between those subprogram s and other parts of th e work.
The Corr e sp o nding Source ne ed no t include anythi ng that users can regenerate
automati cally from other parts of the Correspond ing Source.
The Corre sponding Source for a work in source code form is that same work.
2. B asic Permissions.
All rig hts gr a nted und er th is Li cen se a re g ra nt ed fo r th e te rm o f co p yrig ht o n t he Pr og ra m,
and are irrevocable provided the stated conditions are met. This License explicitly affirms
your unlimited permission to run the unmodified Program. The output from running a
covered work is covered by this License only if the output, given its content, constitutes a
covered work. This License acknowledges your rights of fair use or other equivalent, as
provided by copyright law.
You may make, run and propagate covered works that you do not convey, without
conditions so long as your license otherwise remains in force. You may convey covered
works to othe rs for the so le purpose o f having t hem make mo difications e xclusively for you,
or provide you with facilities for running those work s, provided that you comply with the
terms of this L ice nse i n co nve ying all mate ria l fo r whic h you d o no t co ntro l co pyrig ht. Thos e
thus makin g or running the covere d works for you must do so exclusively on your behalf,
under your direction and control, on terms that prohibit them from making any copies of
your copyrighted material outside their relationship with you.
Conveying under any other circumstances i s permitted solely under the conditions stated
below. Sublicen sing is no t al lo w e d ; s ection 10 make s it unne c e ss a ry.
3. Protecting Users' Legal Rights From Anti-Circumvention Law.
No covered work shall be deemed part of an effective technological measure under any
applica ble law fu lfilling obliga tions under a rticle 11 of t he WIP O copy right tr eaty a dopted on
20 December 1996, or similar laws prohibiting or restricting circumvention of such
54
Page 55

measures.
When you convey a covered work, you waive any legal power to forbid circumvention of
technological measures to the extent such circumvention is effected by exercising rights
under t his L icens e wi th resp ect to the cov ered w ork, and you d iscla im a ny inte ntio n to li mit
operation or modification of the work as a means of enforcing, against the work's users,
your or third parties' legal rights to forbid circumvention of technological measures.
4. Conveying Verbatim C op ies.
You may convey verbatim copies of the Program's source code as you receive it, in any
medium, provided that you conspicuously and appropriately publish on each copy an
appropriate copyright notice; keep intact all notices stating that this License and any
non-permissive terms added in accord wi th section 7 apply to the code; keep intact all
notices of the a bs ence of a ny w a r ranty; and give al l r ecipients a copy of this License along
with the Pro g ram.
You may charge any price or no price for each copy that you convey, and you may offer
support or warranty protection for a fee.
5. Conveying Modified Source Versions.
You may convey a work based on the Program, or the modifications to produce it from the
Program, in the form of source code un der the terms of section 4, provided that you als o
meet all of these conditions:
a) The work must carry prominent notices stating that you modified it, and giving a
relevant date.
b) The wo rk mus t ca r ry pro min en t n ot ices s tat in g t hat it is re lease d und er th is L ice nse a nd
any con ditions adde d un der section 7. This requirem ent modifies the requirement in
section 4 to "keep intact all notices".
c) You must license the entire work, as a whole, under this License to anyone who comes
into possession of a copy. This License will therefore apply, along with any applicable
section 7 additional terms, to the whole of the work, and all its parts, regardless of how
they are pa ckage d. Th is L icense gives no p er mis sio n to l ice nse t he wo rk in any other wa y,
but it doe s not invalidate such permission if you have separately received it.
d) If the work has interactive user interfaces, each must display Appropriate Legal Not ices;
however, if the Program has interactive interfaces that do not di splay Appropriate Legal
Notices, you r work need not make them do so.
A comp ilatio n of a cove red wo rk w ith ot her sep ara te and indep enden t wor ks, w hich ar e no t
55
Page 56

by their na ture extensions of the covered work, and whic h are not co mbined w ith it suc h as
to form a large r progr am, in o r on a volume of a sto rage or distr ibutio n medi um, is ca lled a n
"aggr egate" if the co mpi latio n and its r esul ting c opy righ t are not u sed to lim it th e acces s or
legal r ights o f the co mpila tion's users b eyond what the indiv idual w orks pe rmit. Inclus ion of
a covered work in an aggregate does not cause this License to apply to the other pa rts of
the aggregate.
6. Conveying Non-Source Forms.
You may convey a covered work in object c od e form under the terms of sections 4 and 5,
provided tha t you a lso co n ve y the mac hine -readable Corresponding Source under the
terms of this License, in one of these ways:
a) Convey the ob ject code in, or embodied in, a physical product (including a physical
distribution medium), accompanied by the Cor responding Sou rc e fixed on a durable
physical medium customarily used for software interchange.
b) Convey the object code in, or emb odi ed in, a physical product (including a physical
distribution medium), accompanied by a written offer, valid for at least three years and
valid for as long as you offer spare par ts or customer support for that product m odel, to
give anyone who possesses the object code either (1) a copy of the Corresponding Source
for all the software in the product that is covered by this License, on a durable physical
medium customarily used for software interch ange, for a price no more than your
reasonable co st of p hysical ly perfor ming this conve ying of source, o r (2) access to cop y the
Corresponding Source from a network server at no charge.
c) Convey individual copies of the object code with a copy of the written offer to provide the
Corresponding Source. This alternative is al lowed only occasionally and noncom mercially,
and only if you received the object code with such an offer, in accord with subsection 6b.
d) Convey the object code by offering access from a designated place (gratis or for a
charge), and offer equivalent access to the Corresponding Source in the same way t hroug h
the same place at no further charge. You need not require recipients to copy the
Corresponding Source along with the object code. If the place to copy the object code is a
network server, the Corr esponding Source ma y be on a different server (operated by you or
a third party) that supports equivalent copying facilities, provided you maintain clear
directions next to the object code saying where to find the Corresponding Source.
Regardless of what serv er hosts the C orresponding Source, yo u remain obli gated to ensur e
that it is available for as long as needed to satisfy these requirements.
e) Convey the object code using peer-to-peer transmission, provided you inform other
peers where the object code and Corresponding Source of the work are being offered to the
general public at no charge under subsection 6d.
56
Page 57

A separable portion of the object code, whose sourc e code is excluded from the
Corresponding Source as a System Library, need not be include d in conveying the object
code work.
A "User Product" is either (1) a "consumer product", which means any tangible personal
property which is normally used for personal, famil y, or household purposes, or (2)
anything d es igned or sold for inc orporation into a dwelling. In determining whether a
product is a consu mer pro duc t, doub tful ca ses sh all be reso lved in fa vor o f co verag e. F o r a
particular product received by a particular user, "normally used" refers to a typical or
common use of that clas s of pro duct, re gardle ss of t he stat us of the partic ular use r or of the
way in wh ich the par ticular user a ctually u ses, or expe cts or is exp ected to u se, the prod uct.
A product is a consumer product regardless of whether the product has substantial
commercial, industrial or non-consumer uses, unless su ch uses repr es en t the on ly
significant mode of use of the product.
"Insta llation Information" for a User Prod uct means any methods, p rocedures,
authorization keys, or other information required to install and execute modified versions
of a covered work in that User Product from a modified version of its Corresponding Source.
The informati on must suffice to ensure that the continued functioning of the modified
object code is in no case prevented or interfered with solely because modification has been
made.
If you con vey an object c ode work under this section in, or with, or specifically for use in,
a User Product, and the conveying occurs as part of a transaction in which the right of
posses sio n a nd us e o f t he U ser P ro du ct is tr ans fe rr ed to the re cip ie nt in p er pe tui ty o r for a
fixed term (regard less of how the tr a nsa ct ion is char ac ter ized), the Correspond i ng Sou rce
conve ye d und er th is se ctio n mus t be ac com pa nie d by the Ins ta llation Informa t ion. B ut th is
requirement does not apply if neither you nor any third party retains the ability to install
modified object code on the Us er Product (for example, the work has been installed in
ROM).
The requirement to provide Installation Information does not include a requirement to
continue to provide support service, warranty , or updates for a work that has been modified
or installed by the recipient, or for the User Product in which it has been modified or
installed. Access to a network may be denied when the modification itself materially and
adversely affects the opera tion of the network or violates the rule s and protocols for
communication across the network.
57
Page 58

Corre spo nd ing So urce co n ve ye d, a nd In sta lla tio n Inf orma tion provid ed, in ac cor d wi th this
section must be in a format that is publicly documented (and with an implementation
available to the pu b lic in source code form), and must requir e no special passwor d or key
for unpack ing, reading or copying.
7. Addit ional Terms.
"Additional permissions" are terms that supplement the terms of this License by making
exceptions from one or more of its c ond ition s. Ad ditio nal pe rmis sio ns tha t are ap pli cable to
the entire Program shall be treated as though they were incl uded in this License, to the
exten t tha t t he y ar e va lid un der app li cab le la w . I f a dd itio na l pe rm iss ion s ap pl y on ly to p a rt
of the Program, that part may be used separately under those permissions, but the entire
Program remains governed by this License without regard to the additional permissions.
When yo u con vey a co py of a co vered work, yo u ma y at yo ur op tion re mo ve a ny add itional
permissions from that copy, or from any part of it. (Additional permissions may be written
to requir e their own removal in certai n cases when you modify the work . ) You may place
addit iona l pe r miss io ns on ma ter ial, add e d b y you to a co ver ed wo rk, for w hich you have or
can give appropriate copyright permission .
Notwithstanding any other provision of this License, for material you add to a covered
work, you may (if authorized by the copyright holders of that material) supplement the
terms of this License with terms:
a) Disclaiming warranty or limiting liability differently from the terms of sections 15 and 16
of this Lic ense; or
b) R equir ing p rese rv atio n of spec ified reas ona ble legal not ices or a uthor a ttrib utions in tha t
material or in the Appropriate Legal Notices displayed by works containing it; or
c) Prohibiting misrepresentation of the origin of that material, or requiring that modified
versions of such material be marked in reasonable ways as different from the original
version; or
d) Limi ting the use for publicity purposes of names of licensors or authors of the material;
or
e) Declining to grant rights under trademark law for use of some trade names, trademarks,
or service marks; or
f) Requiring indemnificati on of licensors and authors of that materi al by anyone who
conve ys t he ma teria l (or m od ified v ers ions o f it) with contr ac tual as sum ption s of l iabi lity to
the recipient, for any liability that these contractual assumptions directly impose on those
licensors and authors.
58
Page 59

All other non-permissive additional terms are considered "further restrictions" within the
meaning of section 10. If the Program as you received it, or any part of it, contains a notice
stati ng tha t it is go verne d by this Lice nse a long wit h a ter m tha t is a fur ther r est rict ion, you
may remove that term. If a license document contains a further restriction but permits
relicensing or conveyi n g under this License, you may add to a covered work material
gover ned by the te rms o f th at l ic ens e do cu me nt, pro vid ed tha t the fur t her re s tric tion does
not survive such relicensing or conveying.
If you add terms to a cove r ed work in accord wit h this sec tio n, yo u mu st place, in the
relevant source files, a statement of the additional terms that apply to those files, or a
notice i nd ic ating where to find the applicable terms.
Additional terms, permissive or non-permissive, may be sta ted in the for m o f a sep ar at el y
written license, or stated as exceptions; the above requirements apply either way.
8. Termination.
You may not propagate or modify a cover e d w or k exc ep t as e xp re ssl y p ro v ided under t his
License. Any attempt otherwise to propagate or modify it is void, and will automatically
termi na te your rig hts under this License (includi ng a ny pate n t li c enses granted u nd er t he
third paragraph of section 11).
However, if you cease all violation of this License, then your license from a particular
copyright holder is re in s tated (a) provisionally, unles s a nd u n t il the copyright holder
explicitly and finally terminates your license, and (b) permanently, if the copyright holder
fails to notify you of the violation by some reasonable means prior to 60 days after the
cessation.
Moreover, your license fr om a particular copyright holder is reinstated perm anently if the
copyright holder no tifies you of the v iolation by some reasonab le mean s, this is the first
time you have received notice of violation of this License (for any work) from that copyright
holder, and you cure the violation prior to 30 days after your receipt of the notice.
T ermination of your rights unde r this sect ion does no t termina te the lice nses of par ties w ho
have received copies or rights from you under this License. If your rights have been
termi na te d and not perm anently rein s tated, you do not qualify to rece i ve ne w l ic enses for
the same material under section 10.
9. Acceptance Not Required for Having Copies.
59
Page 60

You are not required to accept this License in order to receive or run a copy of the Program.
Ancillary propagation of a covered work occurring solely as a consequence of using
peer-to-peer transmission to receive a copy likewise does not require acceptance.
However , nothing other than this License grants you permission to propagate or modify any
covered wo rk. Thes e actions infringe co pyright if you do not accep t this Licen se. There fore,
by modifying or propagating a covered work, you indicate your acceptance of this License
to do so.
10. Automatic Licensing of Downstream Recipients.
Each time you convey a covered work, the recipient automatically receives a license from
the or igina l lic enso rs, to run, mod ify and propagate t hat wo rk, subj e ct to this License. You
are not responsible for enforcing compliance by third parties with this License.
An "entity transaction" is a transaction transferring control of an organization, or
substantially a ll as se ts o f o ne, o r s ubd ivid ing a n o rga niza tio n, or me rg ing or gan iza tio ns. If
propagation of a covered work results from an entity transaction, each party to that
transact ion who receiv es a copy of the w ork a lso rece ives w hatever license s to the wor k the
party's predecessor in interest had or could give under the previous par agraph, plus a right
to possession of the Corresponding Source of the work from the predecessor in interest, if
the predecessor has it or can get it with reasonable efforts.
You may not impose any further restrictions on the exercise of the rights granted or
affirm ed under this Licens e. For example, you may not im p ose a license fee, royalty, or
other charge for exercise of rights granted under this License, and you may not initiate
litigation (including a cross-claim or counterclaim in a lawsuit) alleging that any patent
claim is infringed by makin g , using, selling , offering for sal e, or importing the Prog ram or
any portion of it.
11. Patents.
A "co ntributo r" is a copyright ho ld er who a ut ho rizes use under th is License of the Progra m
or a work on which the Program is based. The work thus licensed is called the contributor's
"contr ibutor version".
A contributor's "essential patent claims" are all patent claims owned or controlled by the
contributor, whether already acquired or hereafter acquired, that would be infringed by
some ma nner, permit ted by this L icense , of ma king, using, or se lling i ts con tributo r vers ion,
but do not include claims that would be infringed only as a consequence of further
modification of the contributor version. For purposes of this definition, "control" includes
60
Page 61

the right to grant patent sublicenses in a manner consistent with the requirements of this
License.
Each contributor grants you a non-exclusive, worldwide, royalty-free patent license under
the contributor's essential patent claims, to make, use, sell, offer for sale, import and
other wi se run, modify and propag a te the contents of its contributor version.
In the following three paragraphs, a "patent license" is any express agreement or
commitment, however denominated, not to enforce a patent (such as an express
permi ssio n to p ra ctic e a p a ten t or c o ve nan t no t to sue f or p a ten t in fri nge me nt). To "gr a nt"
such a pate nt l ice nse to a party means to ma ke such a n agreement or commitment not to
enforce a patent against the party.
If you co nvey a co vered wor k, knowing ly relying o n a patent lice nse, and t he Correspond ing
Source o f the work is not ava ilable for anyone to copy, free o f charge and und er the term s
of this License, through a publicly available network server or other readily accessible
means, then you must either (1) cause the Corresponding Source to be so available, or (2)
arrange to deprive yourself of the benefit of the patent license for this particular work, or
(3) arrange, in a manner consistent with the requirements of this License, to extend the
patent license to downstrea m recipients. " Kn ow ingly relying" means you have actual
knowledge that, but for the patent license, your c onveying the covered work in a country,
or your recipient's use of the cover ed work in a country, would infringe one or mor e
identifiable patents in that country that you have reason to believe are valid.
If, pursuant to or in connection with a single transaction or arrangement, you convey, or
propagate by p roc uring co n veya nce of, a covered wo rk, a nd gr a nt a pate nt li cense to so me
of the parties receivin g th e cove red work authorizing them to use, propaga te, modify or
convey a specific copy of the covered work, then the patent license you grant is
automatically extended to all recipients of the covered work and works based on it.
A patent license is "discriminatory" if it d oes not include within the scope of it s c overag e,
prohibits the exercise of , or is conditioned on the non-exercise of one or more of the rights
that a r e sp e cifically granted und er this License. You ma y not con ve y a covere d work if y ou
are a party to an arrangement with a third party that is in the business of distributing
software, under which you make payment to the third party based on the extent of your
activi ty of co nveyi ng t he wor k, a nd und er w hich the third par ty gr ants, to a ny o f t he par ties
who would receive the covered wor k f rom you, a discriminat ory patent license (a) in
connection with copies of the covered work conveyed by you (or copies made from those
61
Page 62

copies), or (b) primaril y f or and in connection with specific products or compilations that
conta in the cove red work, unle ss yo u en tered into that a rra ngem ent, o r tha t pa tent licen se
was granted, prior to 28 March 2007.
Nothing in this License shall be construed as excluding or limiting any implied license or
other defenses to infringement that may otherwise be available to you under applicable
paten t la w.
12. No Surren der of Others' Freedom.
If con ditions are imposed on you (whether by court order, agreement or otherwise) that
contra d ic t t he cond it ion s o f th is L ic ens e, th ey do not e xc use yo u from the co nd itio ns of this
License. If you cannot convey a covered work so as to satisfy simultaneously your
obligations under this License and any other pertinent obligations, then as a consequence
you ma y no t c o nve y i t a t a ll. F or ex amp le, if you ag ree to te rm s tha t ob liga te yo u to c o llec t
a royalty for further conveying from those to whom you convey the Program, the only way
you could satisfy both those terms and this License would be to refrain entirely from
conveyi ng the Program.
13. Use with the GNU Affero General Public License.
Notwit hstand ing a ny othe r prov ision of this L icens e, you h ave p ermiss ion to link or combine
any covered work with a work licensed under version 3 of the GNU Affero General Public
License into a single combined work, and to convey the resulting work. The terms of this
License will continue to apply to the part whi ch is the covered work, but the special
requirements of the GN U Affero General Public Li ce nse, section 1 3 , co nc erning inter action
through a network will apply to the combination as such.
14. Revised Versions of this License.
The Fre e Softw are F oundat ion may p ubli sh revis ed and/o r new versions of the GN U General
Public License from ti me to time. Such new ve rsions will be similar in spiri t to the pre se n t
version, but may differ in detai l to address new proble ms or concerns.
Each version is given a distinguishing version number. If the Program specifies that a
certa in n u mb ered versio n of the GNU General Pu b lic License "or any later ve r s ion" applies
to it, you have the option of followi ng the terms and condit ions either of that numbered
version or of any later version published by t he Free Softw are Foundat ion. If the Program
does not specify a version number of the GNU General Public License, you may choose any
version ever published by the Free Software Foundation.
62
Page 63

If the Program speci fies tha t a proxy can decide which futur e versions of the GNU General
Public License can be used, that proxy's public statemen t of acceptance of a version
permanently authorize s you to choose that version for the Program.
Later license versions may give you additional or different permissions. However, no
additi onal obligations are imposed on any author or copyright holder as a result of your
choosing to follow a la te r v e r s ion.
15. Disclaimer of Warranty.
THERE IS NO WAR RAN TY FO R THE P ROGR AM, TO THE EX TENT P ERM IT TED B Y APP LIC ABLE
LAW . EXCEPT WHEN O TH ERWIS E S T A TED I N WR ITIN G T HE COP YRIG HT HOL DER S AND /OR
OTHER PARTIES PROVIDE THE PROGRAM "AS IS" WITHOUT WARRANTY OF ANY KIND,
EITHER EXPRESSED OR IMPLIED, INCLUDING, BUT NOT LIMITED TO, THE IMPLIED
WARRANTIES OF MERCHANTABILITY AND FITNESS FOR A PARTICULAR PURPOSE. THE
ENTIRE RISK AS TO THE QUALIT Y AN D PERFORMANCE OF THE PROGRAM IS WITH YOU.
SHOULD THE PROGRAM PROVE DEFECTIVE, YOU ASSUME THE COST OF ALL NECESSARY
SERVICING, REPAI R OR CORREC TION.
16. Limitation of Liability.
IN NO EVENT UNLESS REQUIRED BY APPLICABLE LAW OR AGREED TO IN WRITING WILL
ANY COPYRIGHT HOLDER, OR ANY OTHER PARTY WHO MODIFIES AND/OR CONVEYS THE
PROGRAM AS PERMITTED ABOVE, BE LIABLE TO YOU FOR DAMAGES, INCLUDING ANY
GENERAL, SPECIAL, INCIDENTAL OR CONSEQUENTIAL DAMAGES ARISING OUT OF THE
USE OR INABILITY TO USE THE PROGRAM (INCLUDING BUT NOT LIMITED TO LOSS OF
DA T A OR DA T A B EIN G REND ERED INAC CUR AT E O R LO SSES SUST A INED BY YO U OR THIR D
PARTIES OR A FAILURE OF THE PROGRAM TO OPERATE WITH ANY OTHER PROGRAMS),
EVEN IF SUCH HOLDER OR OTHER PARTY HAS BEEN ADVISED OF THE POSSIBILITY OF
SUCH DAMAGES.
17. Interpretation of Sections 15 and 16.
If the d iscla im er of wa rr a nty a nd l im ita tio n of lia bil ity p ro v ided above canno t b e giv en lo ca l
legal effect a ccording to t heir terms, revi ewing courts shal l apply lo cal la w that most clo sely
approximates an absolute waiver of all civil liability in connection with the Program, unless
a warranty or assumption of liability accompanies a copy of the Program in return for a fee.
END OF TERMS AND CONDITIONS
63
 Loading...