

QMS SC-110 User Manual
SC-110
User's Manual
(D/N: 250-0250-E Rev. 1.0)

-ii
Trademarks
Microsoft is a U.S. registered trademark of Microsoft Corporation.
Windows and MS-DOS are trademarks of Microsoft Corporation.
IBM, PC, AT, XT are registered trademarks of International Business
Machines Corp.
Other brands and product names herein are trademarks or registered
trademarks of their respective holders.
Copyright
All rights reserved. No part of this publication may be reproduced,
transmitted, transcribed, stored in a retrieval system, or translated into
any language or computer language, in any form or by any means,
electronic, mechanical, magnetic, optical, chemical, manual, or
otherwise, without the prior written permission of the manufacturer.
Material scanned by this product may be protected by governmental
laws and other regulations, such as copyright laws, the customer is
solely responsible for complying with all such laws and regulations.
Warranty
The information contained in this document is subject to change
without notice.
The manufacturer makes no warranty of any kind with regard to this
material, including, but not limited to, the implied warranties of fitness
for a particular purpose.
The manufacturer shall not be liable for errors contained herein or for
incidental or consequential damages in connection with the furnishing,
performance, or use of this material.

iii
FCC Radio Frequency Interference Statement
This equipment has been tested and found to comply with the
limits for a Class B digital device, pursuant to Part 15 of the FCC
rules. These limits are designed to provide reasonable protection
against harmful interference in a residential installation. This
equipment generates, uses, and can radiate radio frequency
energy and, if not installed and used in accordance with the
instructions, may cause harmful interference to radio
communication. However, there is no guarantee that interference
will not occur in a particular installation. If this equipment does
cause harmful interference to radio or television reception, which
can be determined by turning the equipment off and on, the user is
encouraged to try to correct the interference by one or more of the
following measures:
* Reorient or relocate the receiving antenna.
* Increase the separation between the equipment and receiver.
* Connect the equipment into an outlet on a circuit different from
that to which the receiver is connected.
* Consult the dealer or an experienced radio/TV technician for help.
FCC CAUTION: To assure continued compliance,(example- use only
shielded interface cables when connecting to computer or peripheral
devices). Any changes or modifications not expressly approved by the
party responsible for compliance could void the user's authority to
operate the equipment.
This device complies with Part 15 of the FCC Rules. Operation is
subject to the following two conditions: (1) This device may not cause
harmful interference, and (2) this device must accept any interference
received, including interference that may cause undesired operation.
Responsible Party: QMS, Inc.
1 Magnum Pass Mobile, AL 36618
Telephone No.:
USA
+1 (334) 633-4300

-iv
EC Declaration of Conformity
According to EN45014
Manufacturer's Name: QMS, Inc.
Manufacturer's Address: QMS , Inc.
1 Magnum Pass
Mobile, AL 36618
334-633-4300
declare that the product
Model Number : SC-110
conforms to the following Product Specifications:
Emission: EN 50081-1 (1992)
EN 55022 (Class A)
(Conducted Radiated) (1994)
Immunity:
EN 60555-2 (Harmonics) (1987)
EN 60555-3 (Flicker) (1987)
EN50082-1 (1992)
IEC 1000-4-2 (ESD) (1995)
IEC 1000-4-3 (RS) (1995)
IEC 1000-4-4 (EFT/Burst) (1995)
IEC 1000-4-5 (SURGE) (1995)

v
Table of Contents
1. INTRODUCTION.............................................................................................1-1
2. INSTALLATION..............................................................................................2-1
2.1 PRECAUTIONS...........................................................................................2-1
2.2 UNLOCKING THE SC-110.........................................................................2-2
2.3 CONNECTING THE CABLE......................................................................2-3
2.3.1 CONNECTING SC-110 TO WORK AS A COPIER.....................2-3
2.3.2 CONNECTING SC-110 TO WORK AS A SCANNER/COPIER..2-4
2.4 DOCUMENT PLACEMENT......................................................................2-5
3. USING SC-110 AS A COPIER......................................................................3-1
3.1 THE CONTROL PANEL............................................................................3-1
3.2 BEFORE MAKING COPIES.......................................................................3-4
3.3 MAKING SIMPLE COPIES VIA THE FLATBED....................................3-9
3.4 MAKING COPIES WITH COPY FEATURES.........................................3-10
3.4.1 REMOVING ORIGINAL BACKGROUND...................................3-10
3.4.2 ENLARGING OR REDUCING YOUR ORIGINAL......................3-11
3.4.3 AUTO ZOOMING YOUR ORIGINAL............................................3-12
3.4.4 CHANGING YOUR COPY DENSITY............................................3-13
3.4.5 CHOOSING YOUR COPY QUANTITY.........................................3-13
3.4.6 ENHANCING YOUR COPY QUALITY.........................................3-14
3.4.7 MAKING COPIES OF A 3D OBJECT..........................................3-15
3.4.8 AUTOMATIC POWER SAVING....................................................3-16
3.4.9 FOCUS ON PHOTO COPY, TEXT COPY, OR MIXED PHOTO &
TEXT COPY................................................................................................3-17
4. USING SC-110 AS A SCANNER..................................................................4-1
4.1 INSTALLATION PROCEDURE.................................................................4-1
4.2 UNINSTALLING THE SC-110 DRIVER....................................................4-3
5. SCANNER OPERATION & DOCUMENT PRINTING...............................5-1
5.1 IMAGE TYPE...............................................................................................5-3
5.2 SCANNING PARAMETERS & IMAGE CONTROL...............................5-5

-vi
5.3 SCANNING................................................................................................5-10
5.4 PRINTING..................................................................................................5-11
6. MAINTENANCE...............................................................................................6-1
7. TROUBLESHOOTING...................................................................................7-1
7.1 QUESTIONS AND ANSWERS...................................................................7-1
7.2 TECHNICAL SERVICE...............................................................................7-5
8. SPECIFICATIONS ..........................................................................................8-1
9. SC-110 AUTOMATIC DOCUMENT FEEDE (ADF) USER’S GUIDE......9-1
9.1 INSTALLING THE ADF.............................................................................9-1
9.1.1 UNPACKING THE ADF...................................................................9-1
9.1.2 INSTALLING THE ADF....................................................................9-2
9.1.3 UNLOCKING THE SC-110.............................................................9-4
9.1.4 CONNECTING THE CABLES.........................................................9-5
9.2 USING THE ADF.........................................................................................9-6
9.2.1 BEFORE YOU BEGIN ......................................................................9-6
9.2.2 LOADING THE PAPER....................................................................9-7
9.2.3 STARTING YOUR FIRST COPY......................................................9-7
9.2.4 STARTING YOUR FIRST SCAN......................................................9-9
9.3 MAINTAINING THE ADF......................................................................9-13
9.3.1 CLEANING THE ADF....................................................................9-13
9.3.2 REPLACING THE ADF SNAP-IN PAD MODULE.....................9-15
9.4 HOW TO CLEAR THE PAPER JAM.......................................................9-17
9.5 ADF SPECIFICATION..............................................................................9-18
1-1
1. INTRODUCTION
Congratulations on your purchase of SC-110.
The SC-110 produces better printing quality and is free from
maintenance, compared with traditional copy machines. Its high
printing quality, maintenance-free operation and affordability make SC110 the best convenience copier solution for office.
The following sections introduce the unpacking, hardware and software
installation, operation, and maintenance information. Please spend a
few minutes reading through them to help you maintain quality scanning
results.
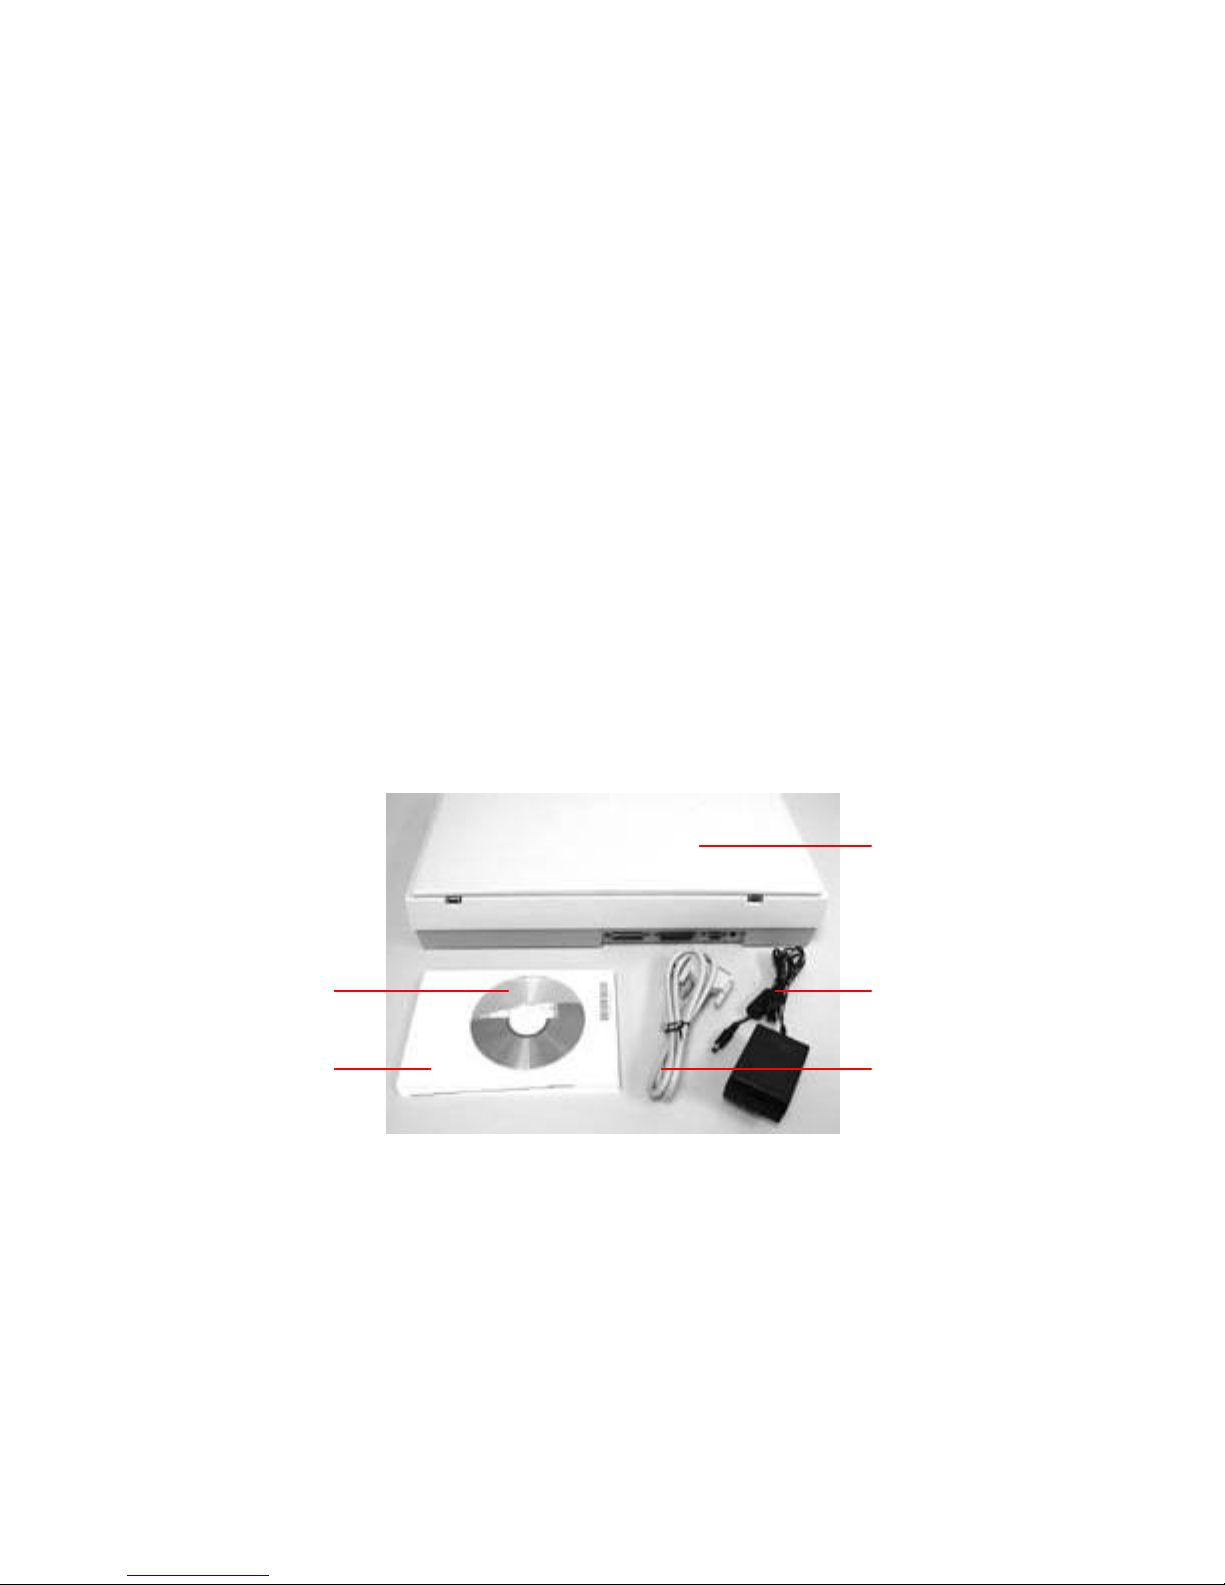
Figure 1-1 shows the package contents. Please check all the items
against Figure 1-1. If there is any missing or damaged, please contact
your nearest dealer immediately for the replacement.
1. Software CD
2. Power Adapter
3. SC-110 Parallel Cable
4. Quick Installation Guide
5. SC-110 main unit
Figure 1-1 SC-110 packing
1
5
2
3
4

2-1
2. INSTALLATION
2.1 PRECAUTIONS
Ÿ Keep the SC-110 out of direct sunlight. Direct exposure to
the sun or excessive heat may cause damage to the unit.
Ÿ Do not install the SC-110 in a humid or dusty place.
Ÿ Be sure to use the proper AC power source.
Ÿ Place the SC-110 securely on an even, flat surface. Tilted or
uneven surfaces may cause mechanical or paper-feeding
problems.
Ÿ Retain the SC-110 box and packing materials for shipping
purposes.
-2-2
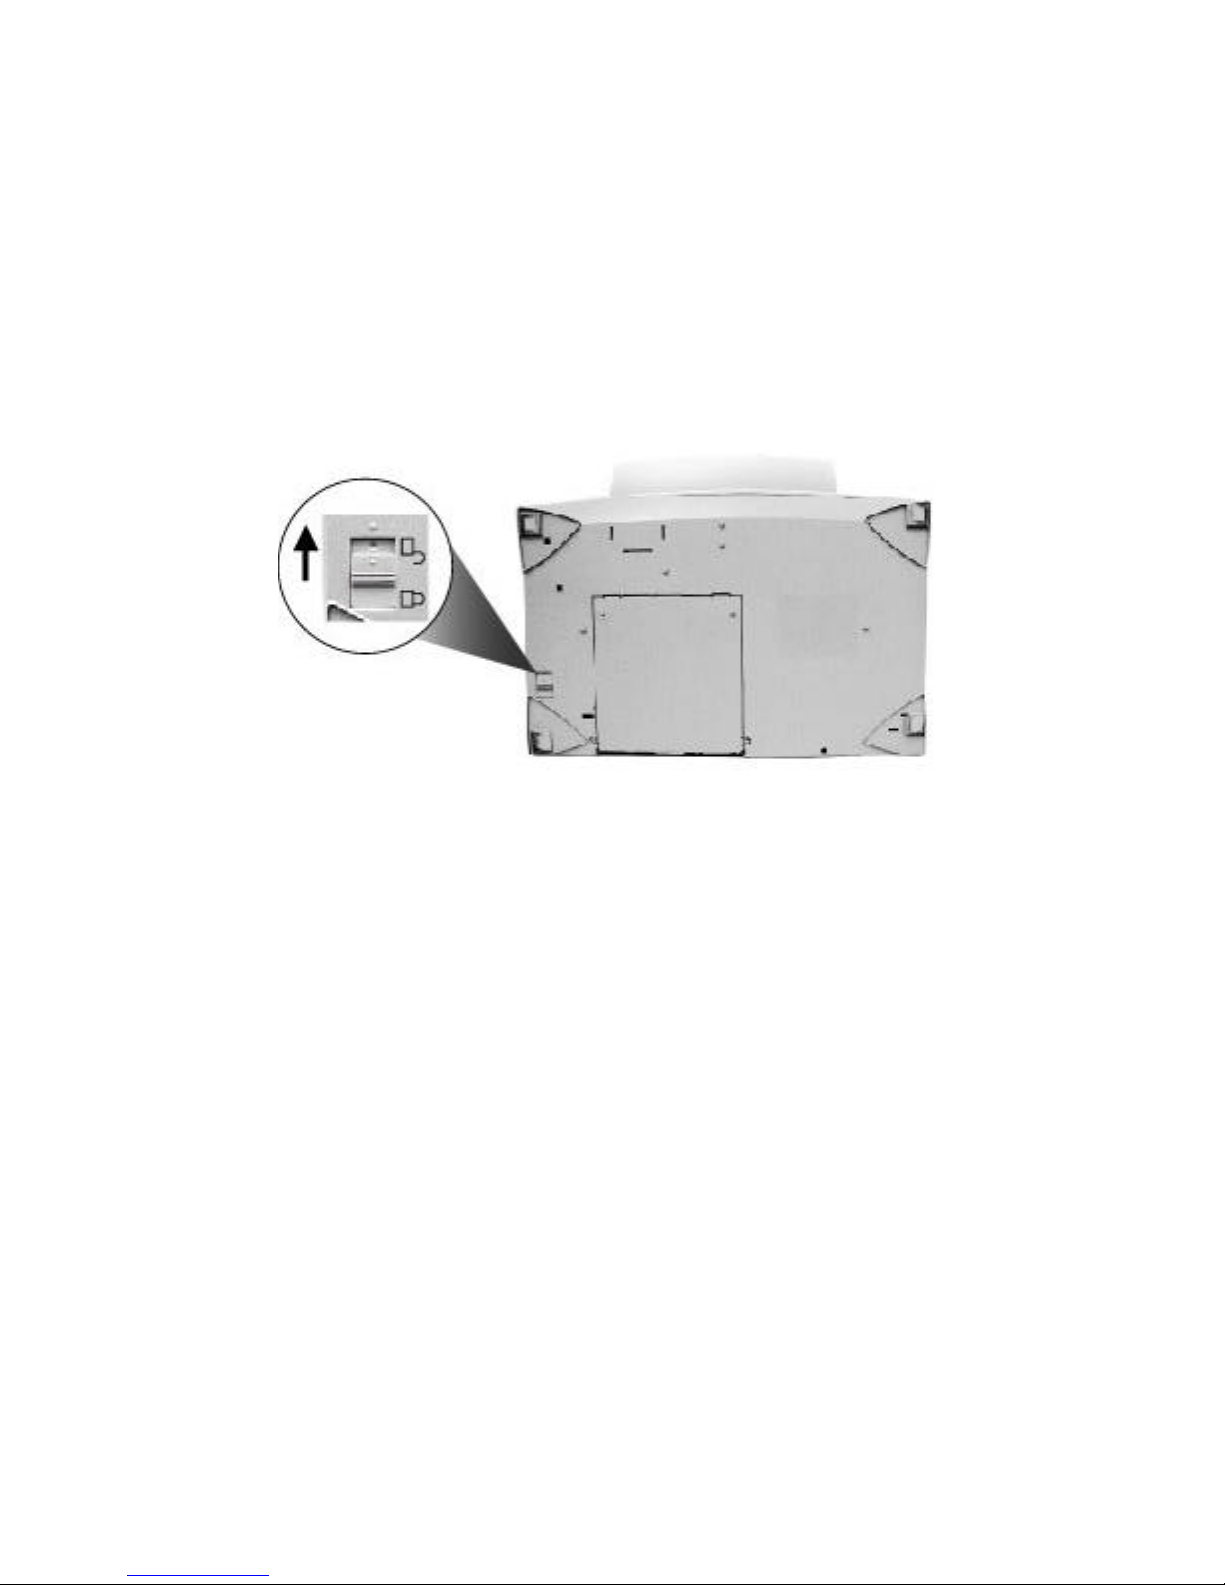
2.2 UNLOCKING THE SC-110
To protect the scanning head from damage during shipment,
the SC-110 is designed with a lock switch beneath the main
unit. Therefore, before using the SC-110, it is required to
unlock SC-110 by moving the lock switch to the Use
position.(See Figure 2-1)
1. “Shipping” Position 2. “Use” Position
Figure 2-1 Unlocking the SC-110
À
Á
2-3
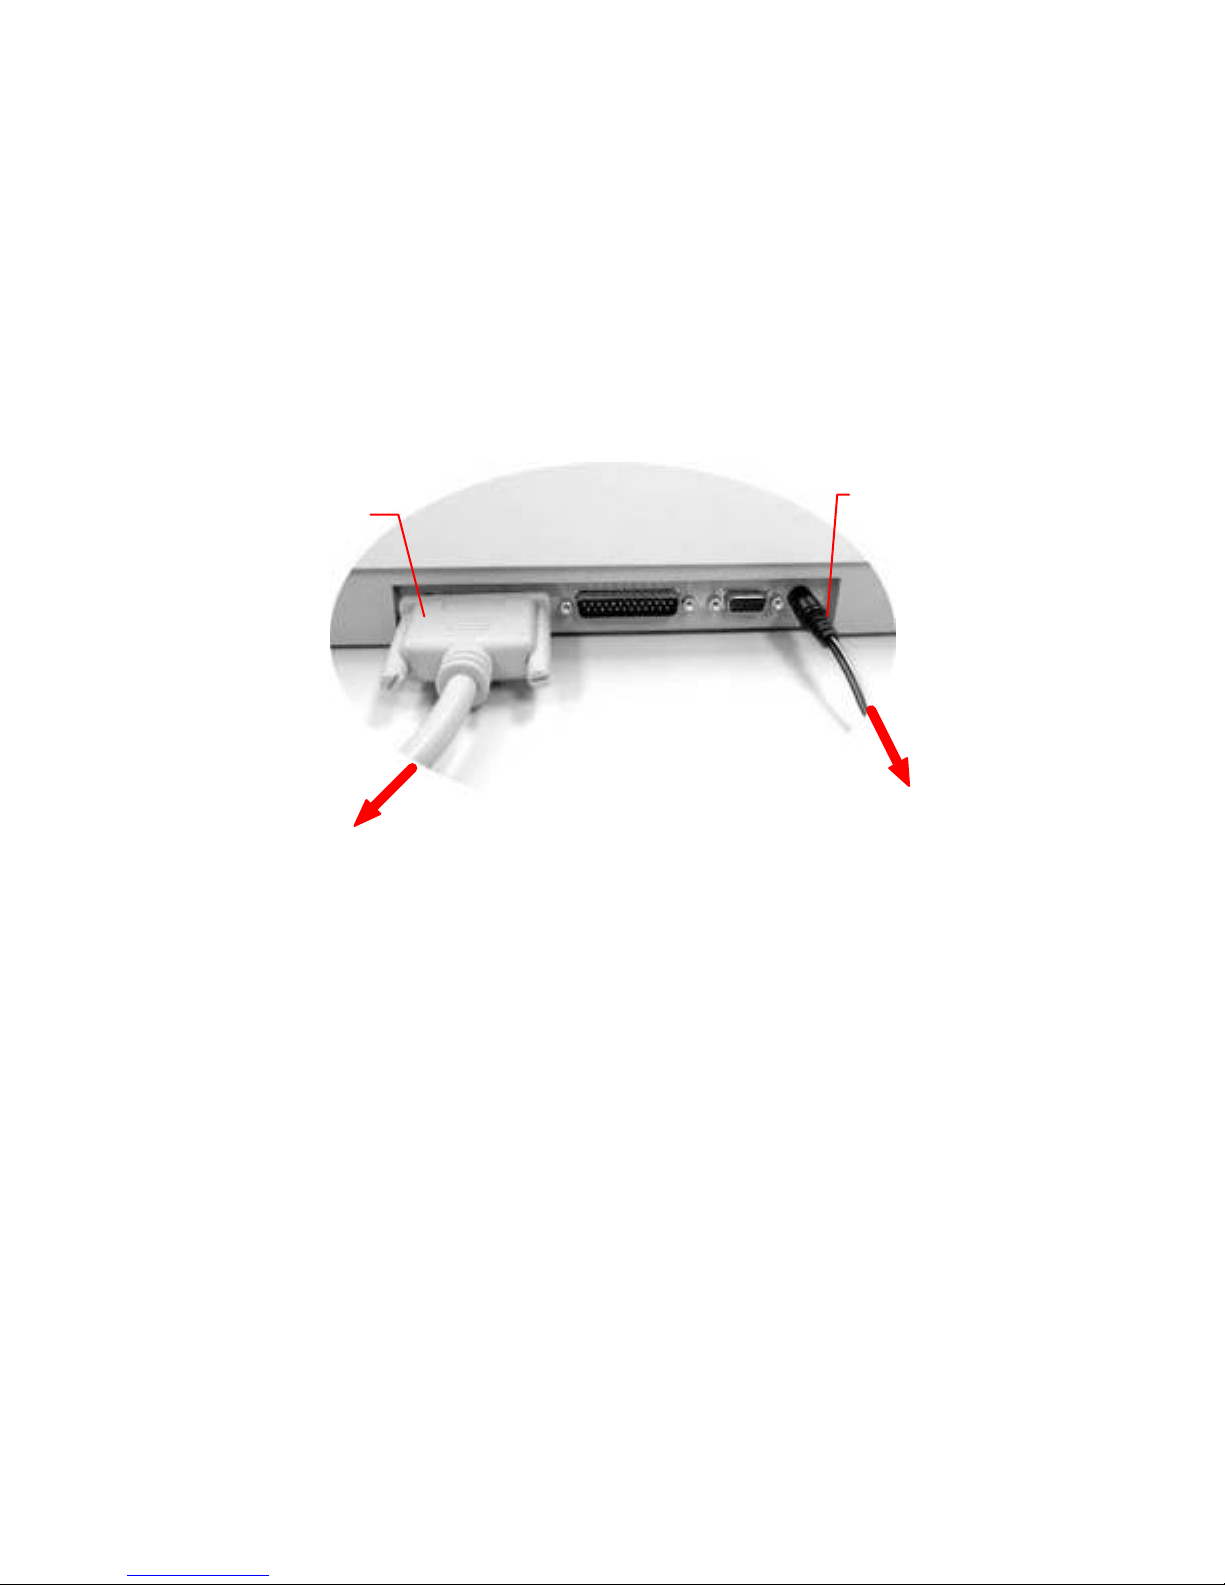
2.3 CONNECTING THE CABLE
2.3.1 CONNECTING SC-110 TO WORK AS A COPIER
Connect the power cable and signal cable as shown below.
Figure 2-2 Connect SC-110 to a printer
To Printer
To Power Outlet
Power Cable
Printer Cable

-2-4
2.3.2 CONNECTING SC-110 TO WORK AS A SCANNER/COPIER
Figure 2-3 SC-110 Cable Connection
Power
Cable
SC-110 Parallel
Cable
Printer Cable
To PC Parallel Port
To Power Outlet
To Printer
To optional ADF
2-5
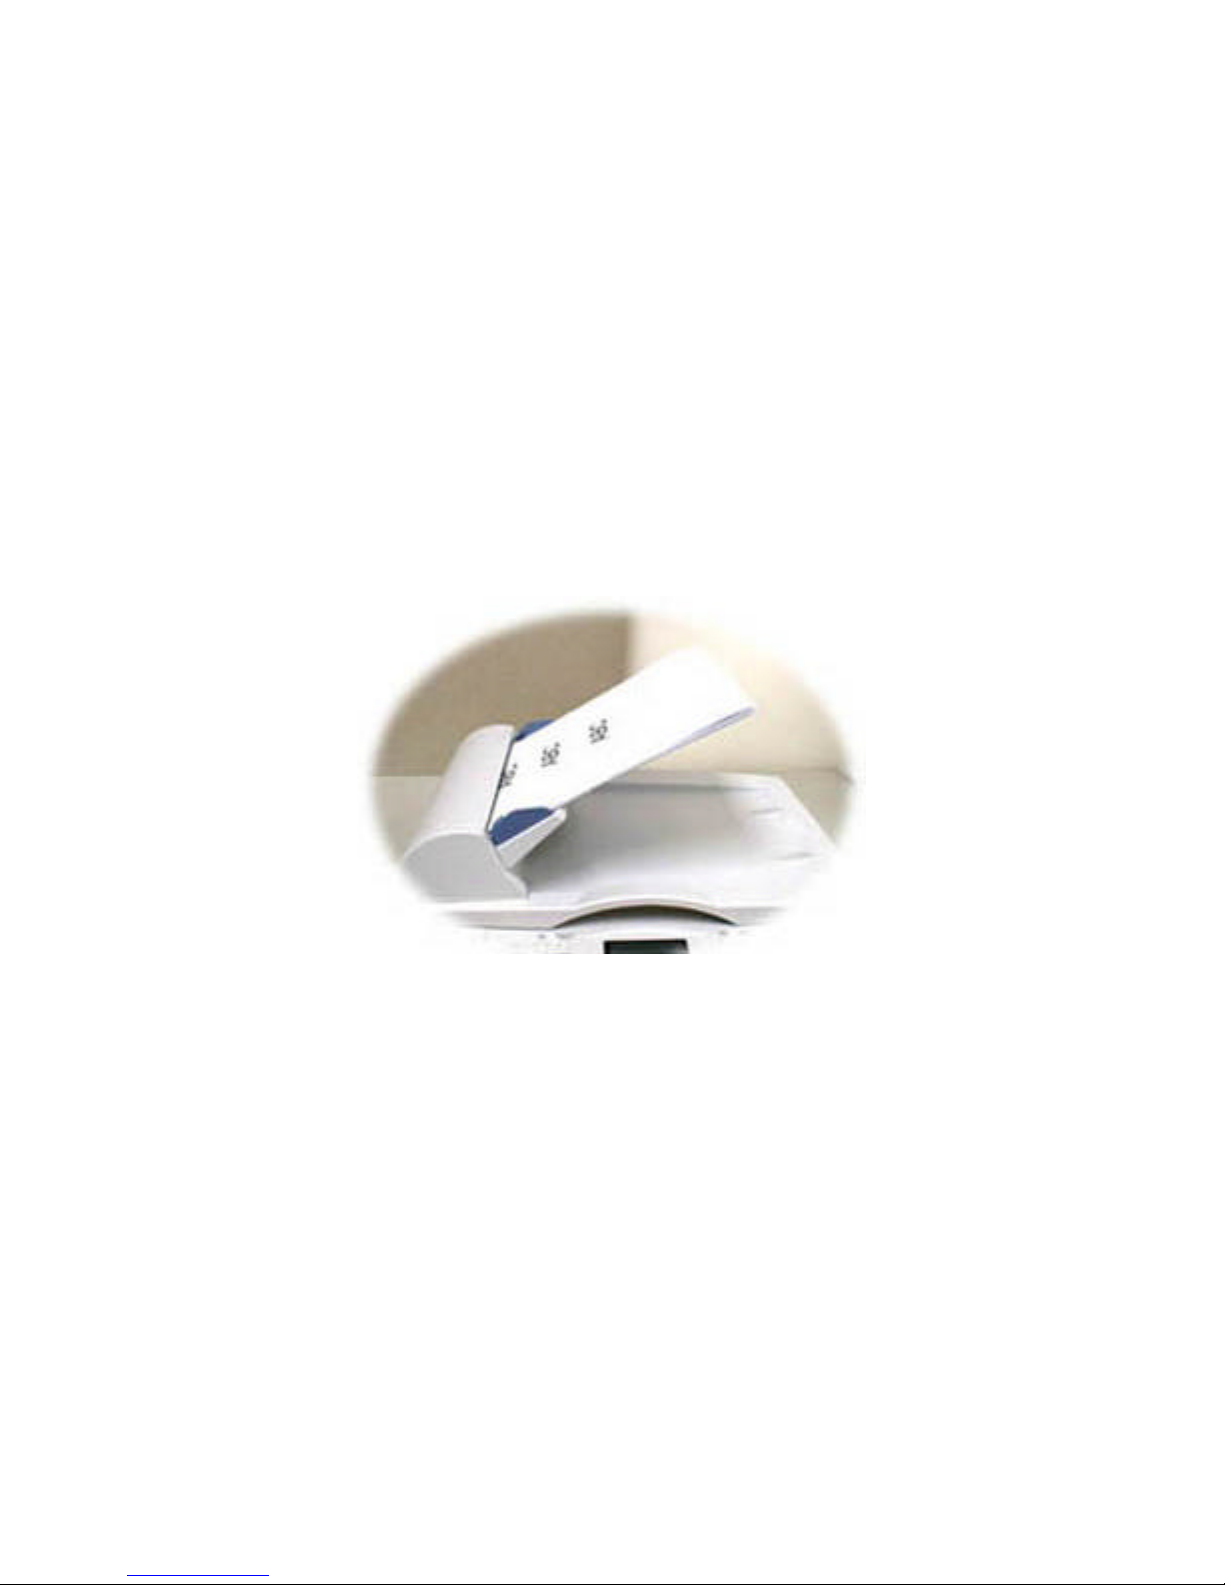
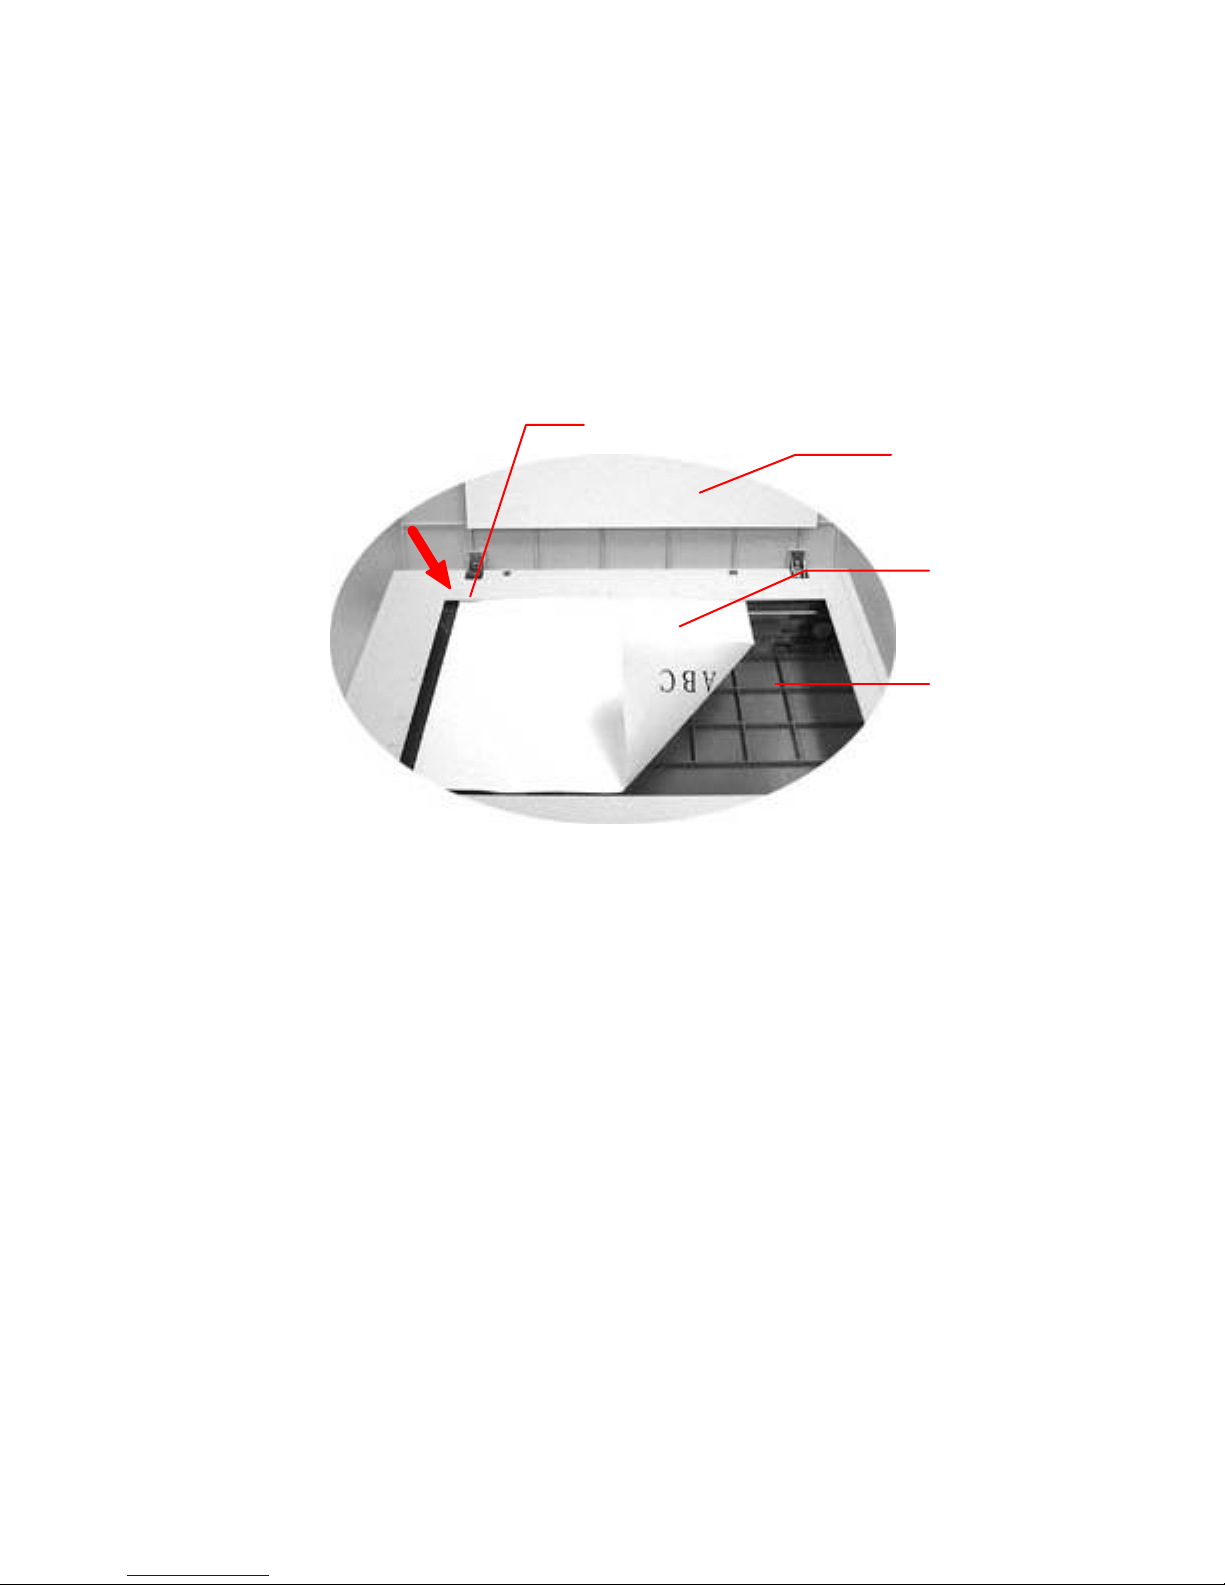
2.4 DOCUMENT PLACEMENT
As shown in Figure 2-4, place the document on the glass face
(text) down.
Figure 2.4 Document Placement
1. Document Cover
2. Home Position Mark
3. Document
4. Document Glass
1
4
2
3
3-1
3. USING SC-110 AS A COPIER
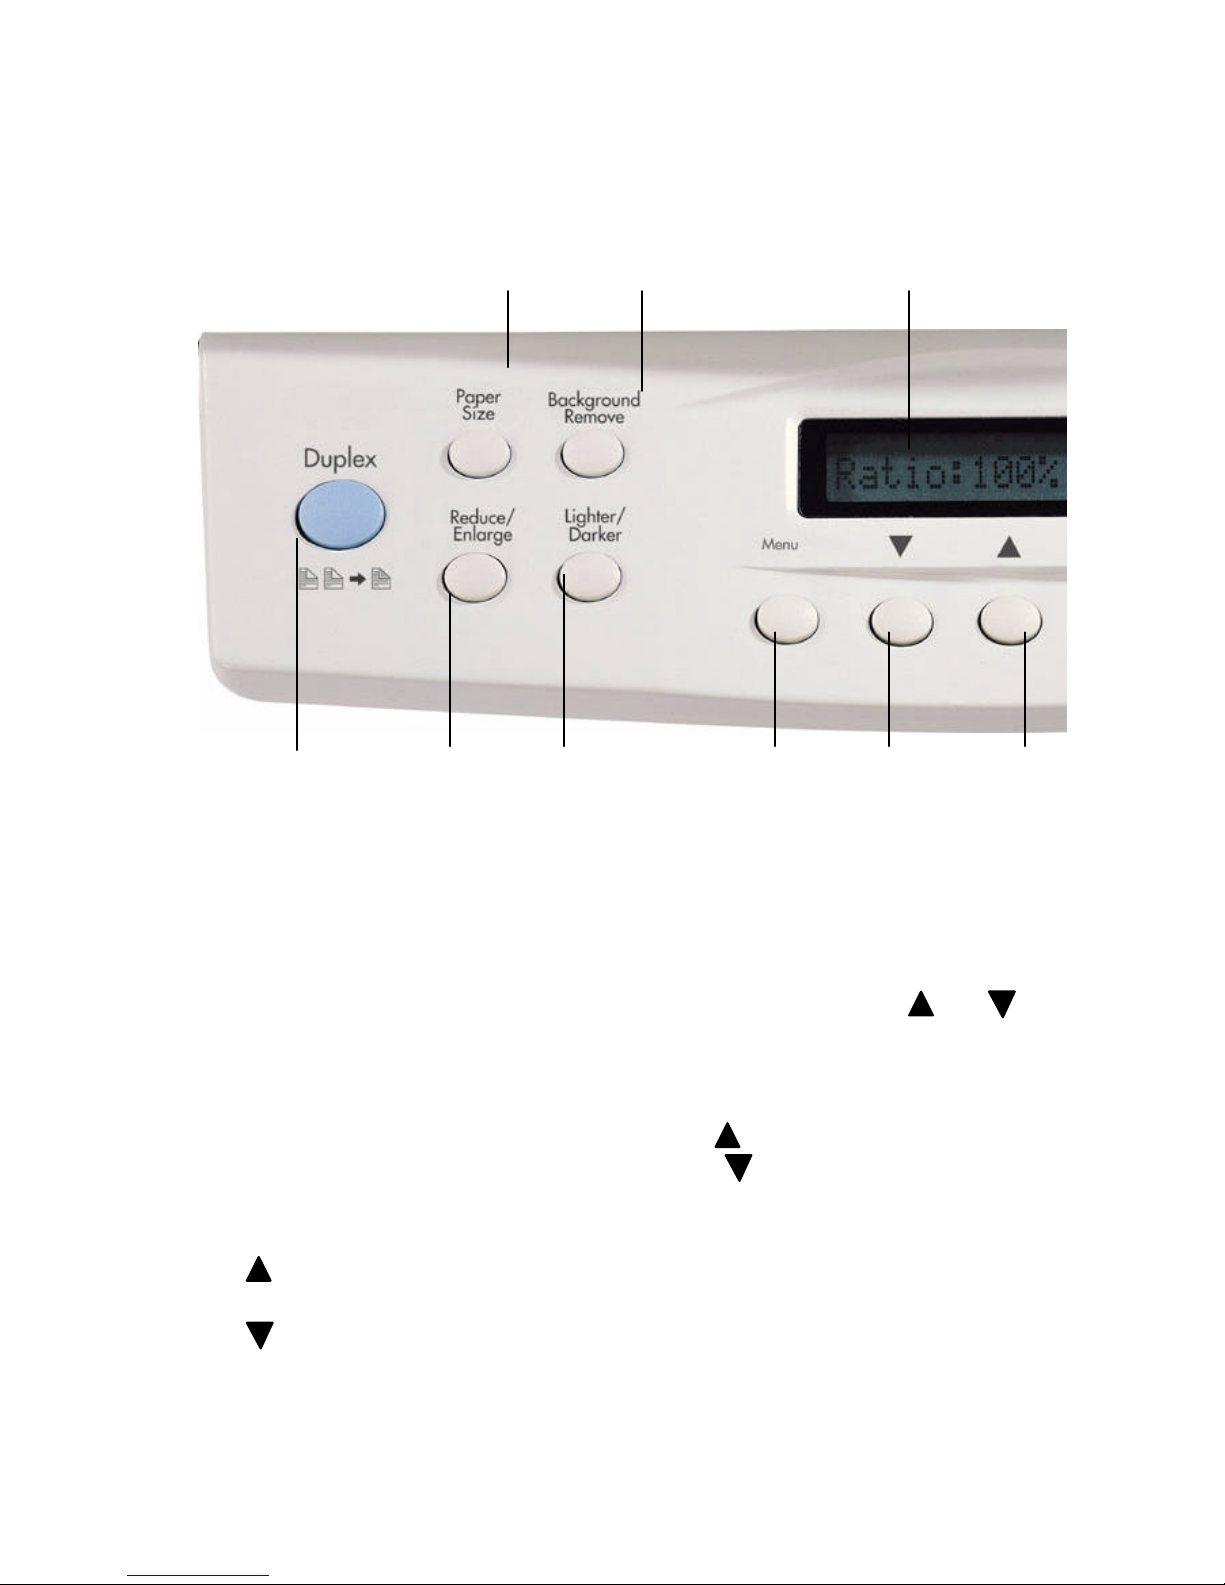
3.1 THE CONTROL PANEL
1. Paper Size: Select your output paper size from A4, A3, B4, Letter, or Legal.
2. Background Remove: Set “Background Remove” on to print your document without
the background color or off to print your document with the background color.
3. Message Display window: Display current settings.
4. Duplex: Press to start copying your single-sided originals to double-sided output.
5. Reduce/Enlarge: Reduce, enlarge or auto zoom your original document.
Press to select the preset ratio: 100%, 115%, 122%, 141%, 200%, 86%, and 50%.
Choose your desired ratio or adjust the ratio in 1% increment by the ( ) or ( )
button. Auto zoom: Automatically scale your original document to fit your output
paper.
6. Lighter/Darker: Lighten or darken your image.
Increase level of brightness or darkness by the ( ) button.
Decrease level of brightness or darkness by the ( ) button.
7. Menu: Configure copying features including Printer Select, Input Tray, Output Bin, Offset
Stacking, Staple, Hole Punch, Collate, and End Job Mode.
8. : Go to the previous item displayed in the Message Display window or increase
the value of the numeric entries.
9. : Go to the next item displayed in the Message Display window or decrease the
value of the numeric entries.
87
6 5
4
9
321
-3-2
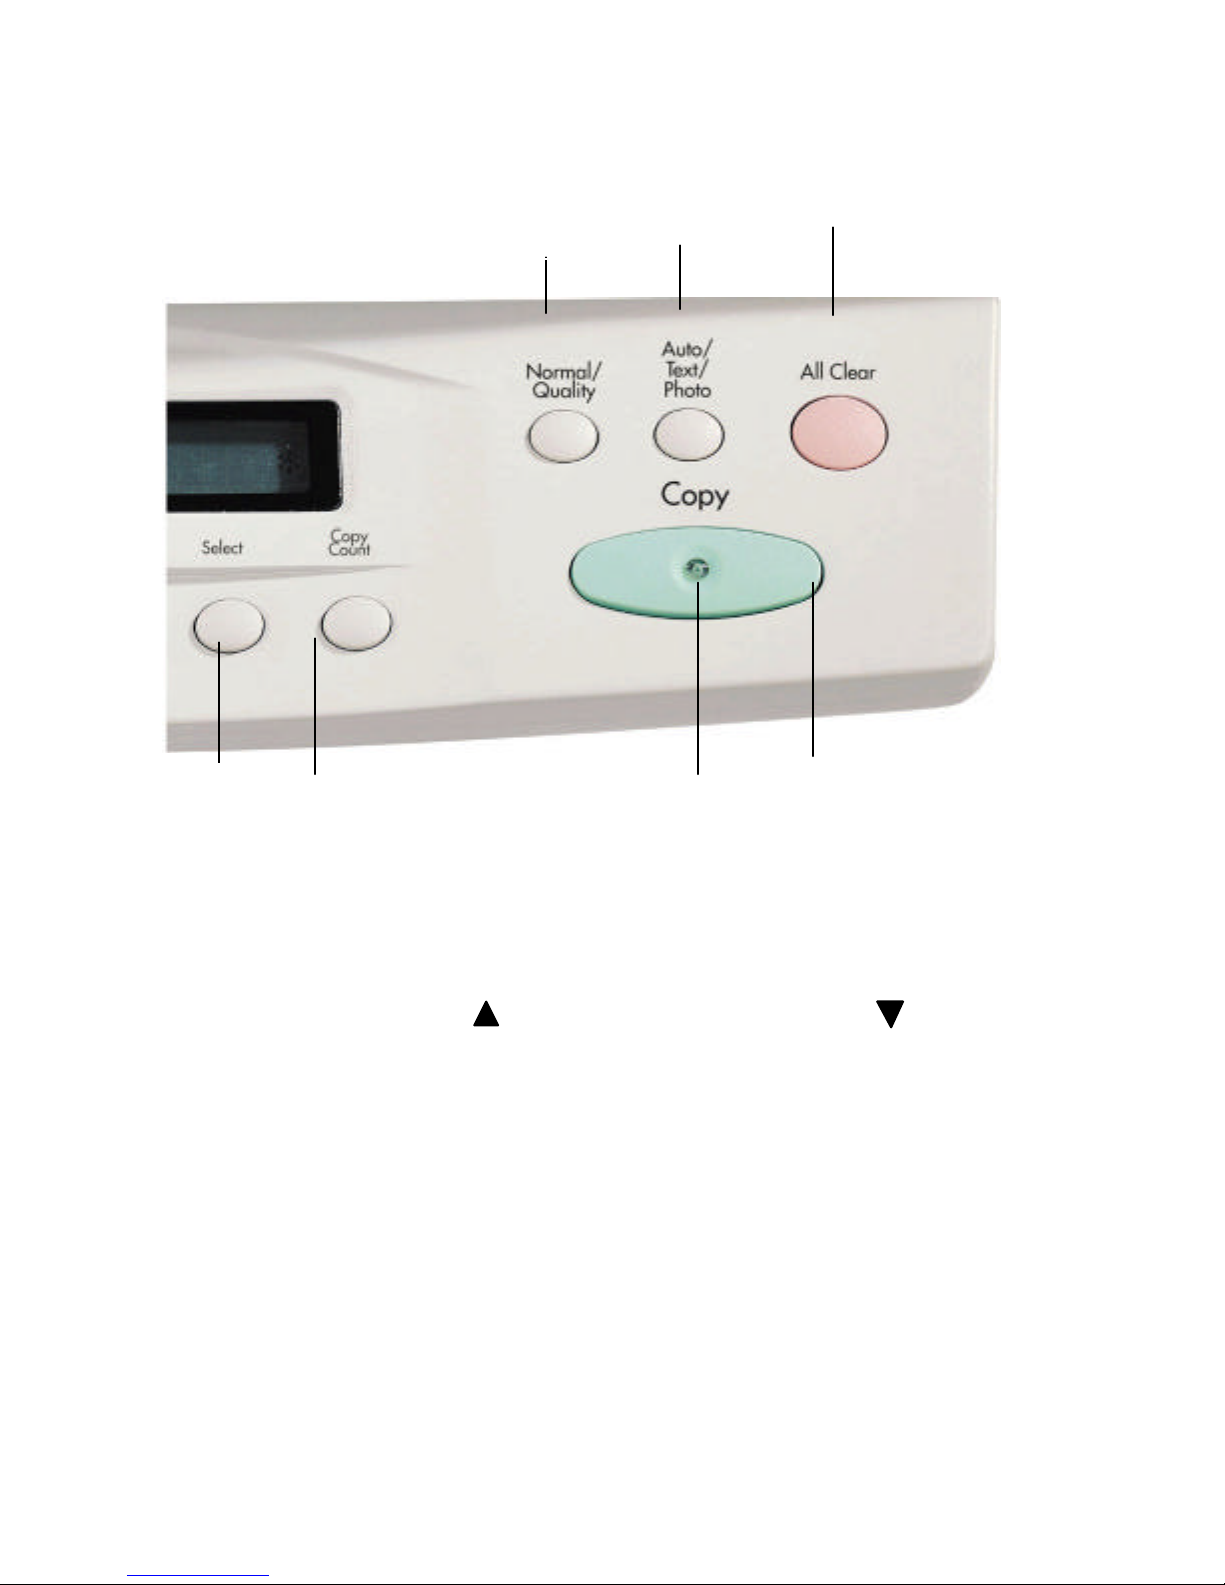
10. Normal/Quality: Select your Copy quality: Normal (300 dpi), or Quality (600 dpi).
11. Auto/Text/Photo: Press to respectively concentrate on photo, text, or auto copying.
12. All Clear: Clear your current settings and return to the default settings.
13. Select: Press to select your desired setting. (A star sign, "*", will appear to indicate
the selection is done.)
14. Copy Count: Choose the number of copies from 1 to 99. Increase the value of the
numeric entries by the ( ) button or decrease the value by the ( ) button.
15. Power/Copy LED: The LED indicator turns green when power is on and turns
flashing during copying.
16. Copy: Press to start copy.
11
12
16
15
14
13
10

3-3
Tips:
To use other settings than the one displayed in the Message Display
window, simply repress the button of that setting to select other options.
(For example, when you choose paper size with the Paper Size button, if
the Message Display window shows A4 and you prefer Letter, you can just
press the Paper Size button again until Letter is displayed.)
Note:
(1). An item message in the Message Display Windows ending with a “∗ “
means the last setting.
(2). The default settings are: A4 Size, Normal Print Quality, 100% ratio, 1
copy.
IMPORTANT!
PRINTER MEMORY
To make good use of SC-110, it is recommended to install at least 4 MB of
memory in your printer. If you want to print your document using Quality
mode - 600 dpi as your Copy Quality mode, you need more RAM for your
printer as using this feature requires more processing time and memory.
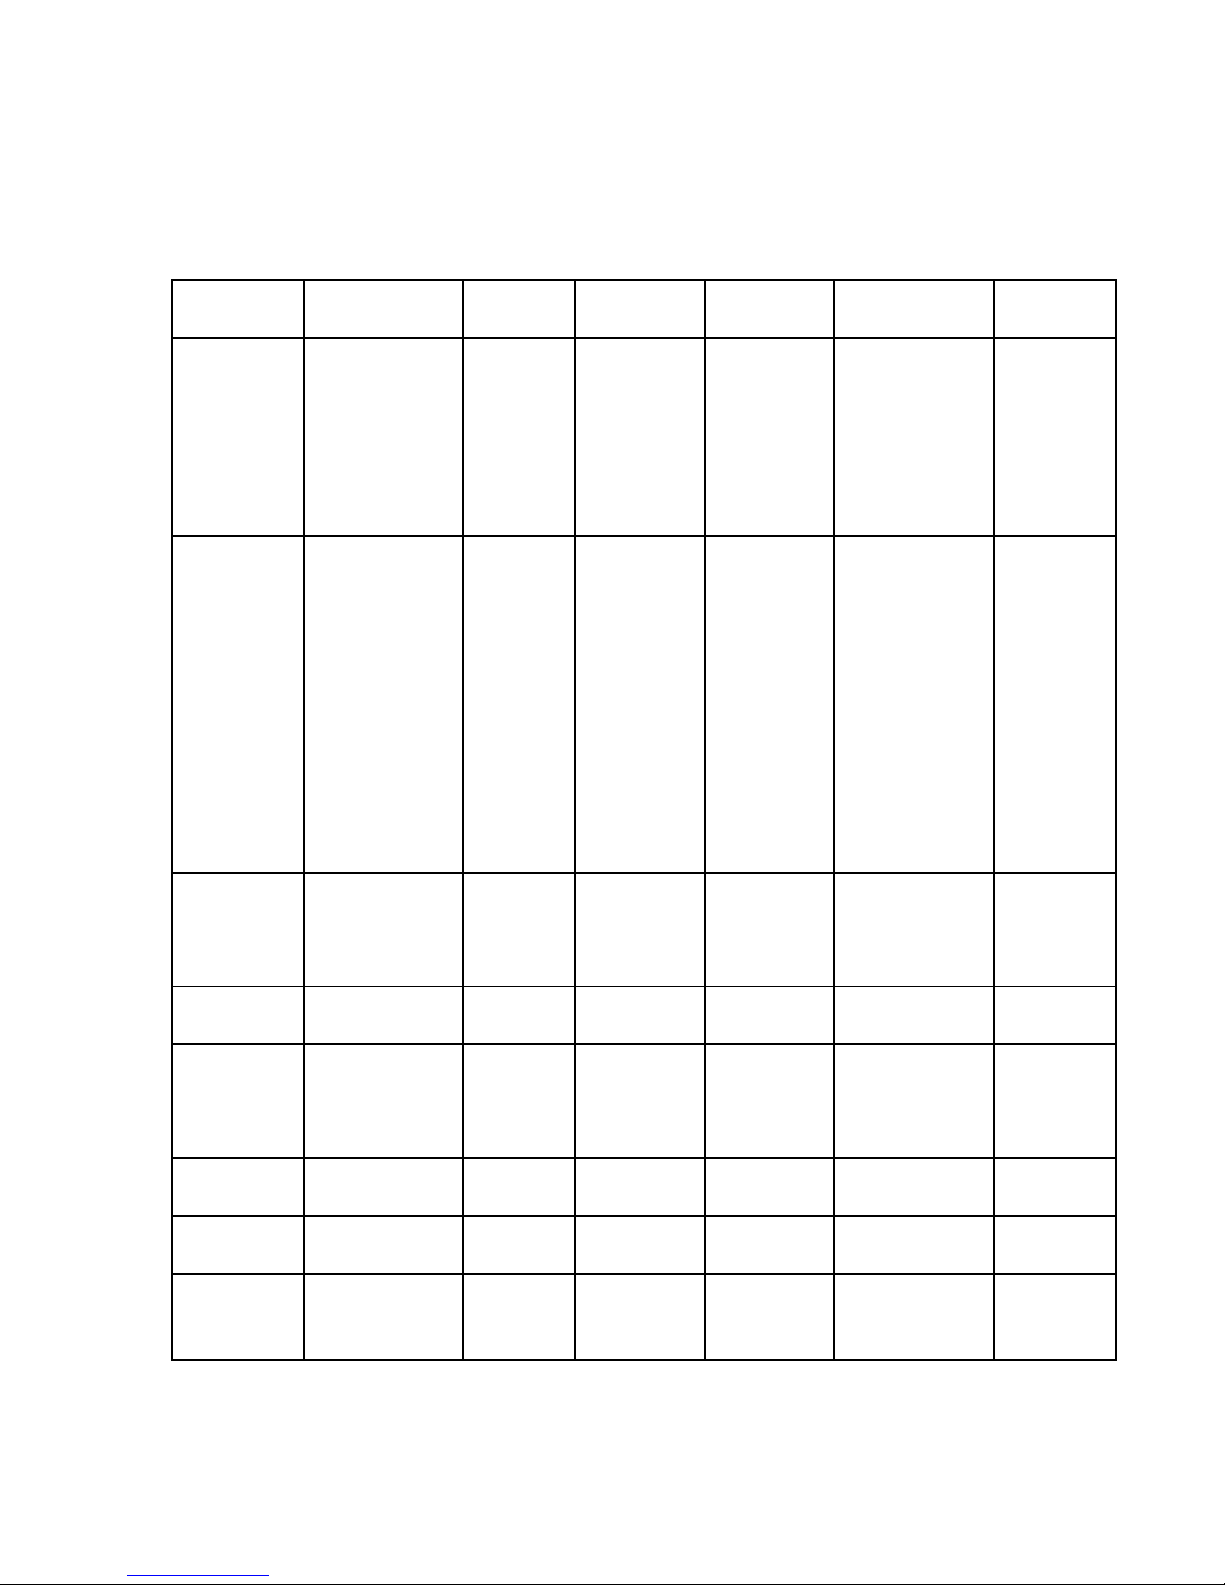
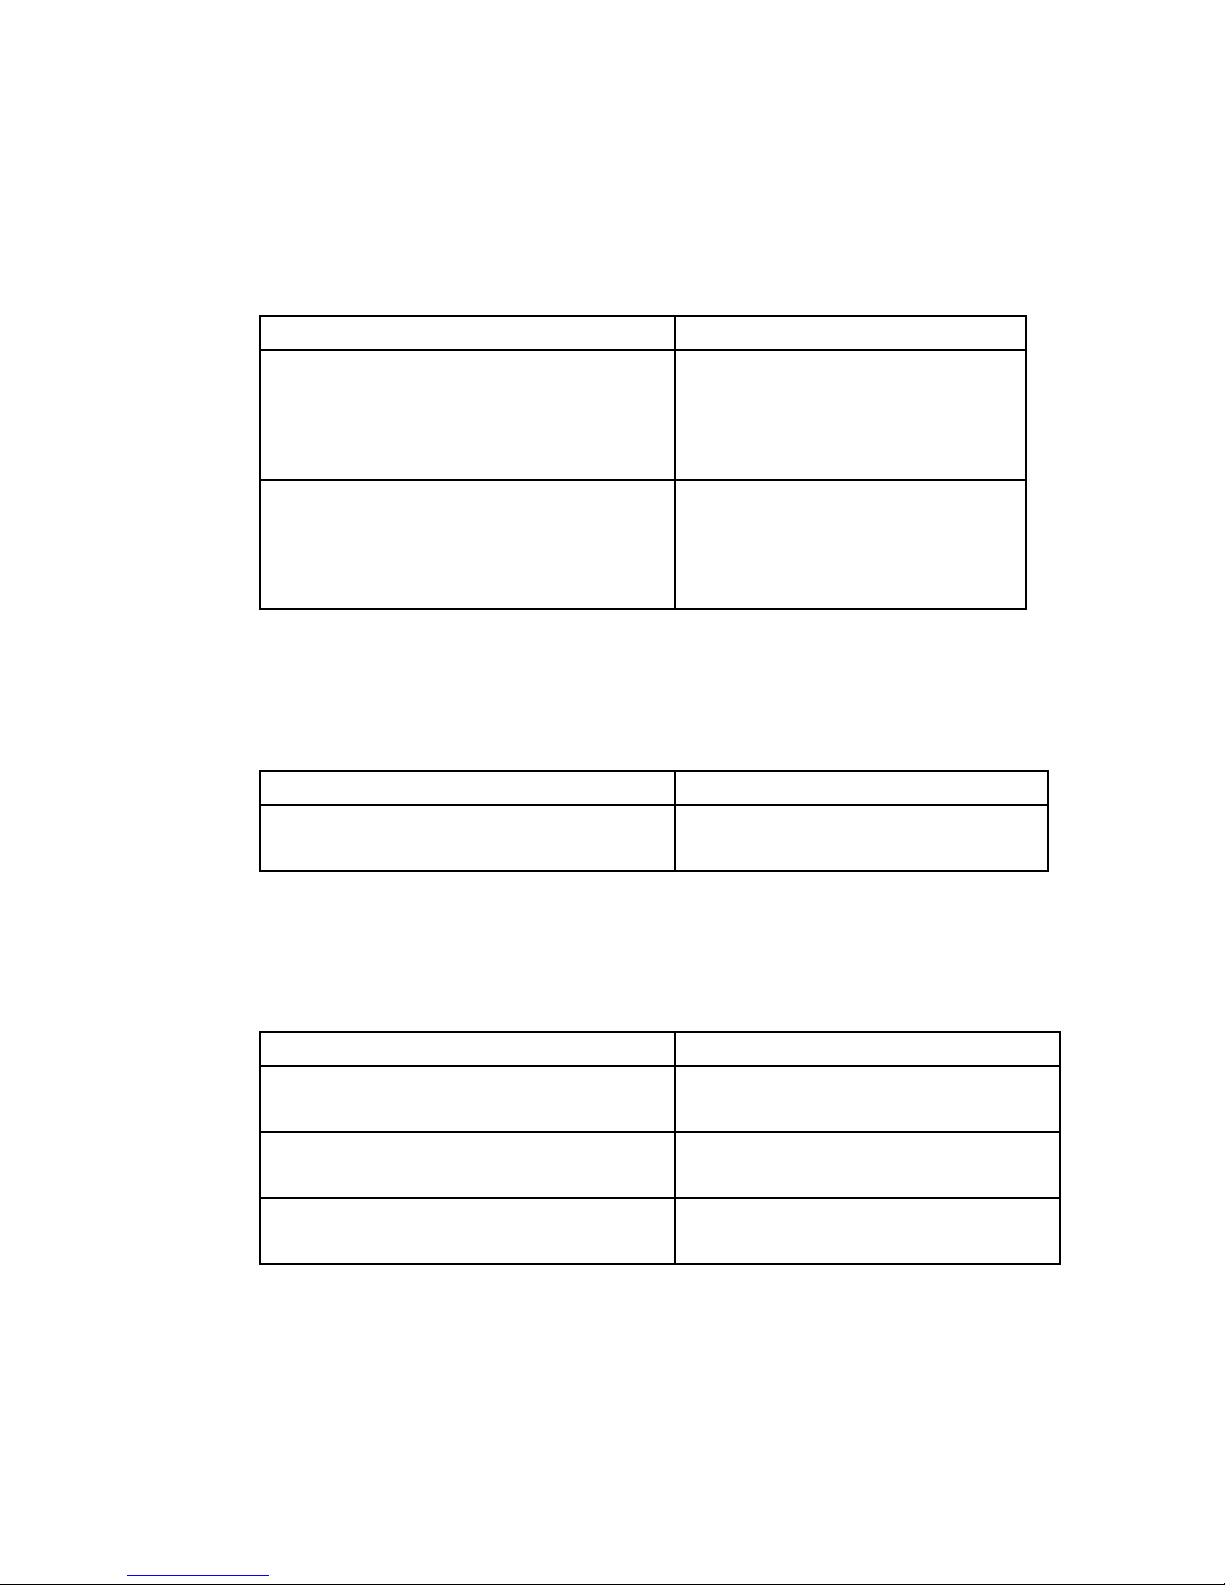
See the following chart for printer memory recommendations.
It is strongly recommended that you refer to the following table to ensure a
successful color copy.
Copy Quality Document Size Minimum Memory Recommended Memory
Normal Letter Size
Legal Size
1MB
2MB
4MB
8 MB
Quality Letter Size
Legal Size
4MB
6MB
16MB
20MB
If there is not enough memory in your printer, you may probably encounter
either the printer does not print or the print quality is bad.

-3-4
3.2 BEFORE MAKING COPIES
Customizing paper size:
The SC-110 provides five output paper sizes, A3, A4, B4, letter, and legal.
The flatbed and the ADF will support up to legal size paper. Check or
select the paper size to match your paper supply to ensure smooth
operations.
To check or select paper size,
1. Press “Paper Size” button. The Message window will display your
current default setting, such as “A4*”. If your current paper supply is the
same as your default setting, you can skip the following steps.
Otherwise, continue with the following steps.
2. Keep on pressing the or button until the desired paper size
appears. When the desired paper size message is shown in Message
Display window, press the Select button and a “ * “ sign will appear on
the right-hand side of the displayed paper size. For example:
Suppose you want Legal size to be the current setting. Press the
“Paper Size” button, and then or button until the size “Legal”
appears in Message Display window. Press the Select button and a
“ * “ sign will appear on the right-hand side of the word “Legal”.
ãã Note:
Each time when you press All Clear button or power off the SC-110, the SC110 automatically returns to the factory default setting. As a result, you
have to change any setting that you have customized to your environment
after pressing the All Clear button.

3-5
Customizing copying features:
SC-110 supports a variety of copying features to meet many copying
purposes.
Specifying a printer model is required before customizing copying features.
To specify a printer model,
1. Press Menu button to display the first copying feature, Printer Select.
2. Press Select and then or button to respectively display printer
models included.
3. Press Select button once again to specify one of printer models,
connected to SC-110. An asterisk will appear next to the printer model
name.
Note: If the printer model connected to SC-110 is not any of QMS
Print or PageWork systems currently supported, specify PCL
Emulation.This is a generic printer model that will work with
most laser printers that support the PCL Emulation. However,
you may lose the ability to select other options.
The following steps depict the procedures of how to configure all other
copying-feature combinations after a printer model is specified.
1. Press Menu and then the or button to display the desired copy
feature. Press Select.
2. Press the or button until the desired option is displayed. Press
Select.
3. Repeat step 1 to 2 to set up the other desired copy-feature preference
options.
-3-6
The following table includes available copying-feature preference options of
all printer models supported. As for the detailed direction of copying
features, please refer to respective printer user manuals.
Printer
Feature
QMS 2060 QMS 4060 QMS 2560 QMS 3260
/4032
PageWork
/Pro 18
PCL
Emulation
Input Tray Multipurpose
Upper
Optional
Upper
Middle
Lower
Optional
Multipurpose
Main
Optional 1
Optional 2
Optional 3
LCC
Multipurpose
Upper
Lower
Envelope
Optional 5
Optional 6
Optional 7
Multipurpose
Tray 2
Tray 3
N/A
Output Bin
N/A
Upper
Face-up
Stack
Facedown
Stack
Top Bin
Finisher Bin
Bin 1
Bin 2
Bin 3
Bin 4
Bin 5
Bin 6
Bin 7
Bin 8
Bin 9
Bin 10
Upper
Face-Up
Top Stack
Center
Stack
Bottom
Stack
N/A N/A
Duplex
(Button on
control
panel)
Off
On
Tumble
Off
On
Tumble
Off
Long
Short
Off
On
Tumble
Off
Long
Short
Not
Available
Offset
Stacking N/A
Off
On
Off
On
Off
On N/A N/A
Staple
N/A N/A
Off
On
Off
Front Corner
Back Corner
Center
N/A N/A
Hole Punch N/A N/A Off
On
N/A N/A N/A
Collate Off
On
Off
On
Off
On
Off
On
Off
On
N/A
End Job
Mode
None
QMS EOD
HP EOD
None
QMS EOD
HP EOD
N/A
None
QMS EOD
HP EOD
N/A N/A
Note: The default preference options are bolded.
3-7
Quick Note of copy-feature terms:
1. Duplex button: Double-sided copying is available when the original is
fed only through ADF of SC-110.
Off single-sided copying
Long/On double-sided copying:
The reverse-page content
starts being copied from the
left edge.
Short/Tumble double-sided copying:
The reverse-page content
starts being copied from the
top edge.
2. Offset Stacking: If the output bin selected supports offset stacking,
then the output jobs will be offset from each other when enabled.
Off Copying jobs stack normally.
On Each copying job is offset in
an output bin.
3. Staple: If the output bin selected supports stapling of jobs, the
enabled job will be stapled when the original is fed only through ADF
of SC-110.
None Pages are not stapled.
Front Corner Pages are stapled at the front
corner.
Back Corner Pages are stapled at the back
corner.
Center Pages are stapled at two
points in the center.

-3-8
4. Hole Punch: If the output bin selected supports hole punch,
the job will be hole-punched if enabled.
Off Pages are not punched.
On Pages are punched.
5. Collate: Multiple pages can be copied either as complete sets in
numeric order or as separate sheets.
Off Pages are not collated.
On Pages are collated.
6. End Job Mode: This printer mode enables the printer to identify the
end of each job to ensure correct printing respectively.
None No End Job Mode
QMS EOD QMS -formatted End Job Mode
HP EOD HP -formatted End Job Mode
Note: The type of End Job Mode set on SC-110 must match that on
QMS Print System.
7. Input Tray: This printer mode selects the input tray to pull paper from.
Refer to the chart on page 11for your particular printer type and
options.
8. Output Tray: This printer mode selects the output tray to push paper
to after printing. Refer to the chart on page 11for your particular printer
type and options.

3-9
3.3 MAKING SIMPLE COPIES VIA THE FLATBED
The Operating Steps:
1. Place your original face down on the document glass.
2. Press the Copy button. The Message window displays “Copy…”
and the Ready LED will flash.
3. Within a few seconds, the copying is done. The Message window
then displays “1 Copy @100%” and the Ready LED is now
steadily on until next task.
 Loading...