

QMS qms-ps 800+ User Manual
User's Guide
Publication
Number
1720393A
February
1987
QMS® is a registered trademark
of
QMS, Inc.
QMS.PS® is a registered trademark
of
QMS, Inc.
POSTSCRIPT®
is
a registered trademark
of
Adobe Systems, Inc.
POSTSCRIPT©
is
Copyrighted by Adobe Systems, Inc.
A I
™ A I T
IkTM
L
u:r.·
™ I
,(lH'
™
M'
I ™ d
pp e pp e a aser
nnter
mage
unter
acmtos 1 an
MacTerminal™ are trademarks
of
Apple Computer, Inc.
Times® Helvetica®
and
Palatino®
are
registered trademarks of
Al-
lied Corporation.
ITC
Avant Garde Gothic® ITC
Zapf
Chancery® ITC Zapf Ding-
bats®
and
ITC Bookman®
are
registered trademarks of International
Typeface Corporation.
Diablo®
is
a registered trademark of Xerox Corp.
LaserJet
Plus™
is a trademark
of
the Hewlett·Packard Company.
Centronics®
is
a registered trademark
of
Centronics Data Computer
Corp.
IBM®
is
a registered trademark
of
International Business Machines
Corporation.
About
This Manual
The manual is divided into these major parts:
• Part
I,
"Getting Started"
• Part
II, "Tutorial"
• Part
III, "Maintenance and Troubleshooting"
• Part IV, "Advanced User's Infomlation"
• Part
V,
"POSTSCRIPT
Addendum"
•
Appendix A, "Font Tables"
•
Appendix B, "Printer Specifications"
• Appendix C, "J liablo 630 Emulation Mode"
•
Appendix D, "Hewlett-Packard LaserJet Plus Emu-
lation
Mode"
•
Appendix E, "Hewlett-Packard 7475 Plotter Emulation
Mode"
Part
I, "Getting Started" will take you from unpacking
to power-up.
Part II, "Tutorial" will acquaint you with the many fea-
tures
of
your laser printer and help you start printing. If
you are new to
POSTSCRIPT
or laser printers, you will
want
to
read this section throroughly (after Part I) before
you go on to any other part
of
the manual.

POSTSCRIPT
Compatibility
Your
QMS-PS
800+ printer uses the newest, most accu-
rate version
of
the POSTSCRIPT Language, Version 46.l.
Other printers may use
an
older version
of
POSTSCRIPT.
This POSTSCRIPT version contains changes which may
not be compatible with some software packages written
for earlier versions. Although unlikely,
it
is
possible that
a software package developed using
an
earlier version
of
POSTSCRIPT may cause an error.
If
this should occur
it
is NOT due to printer failure. It
is
caused by the in-
compatibility
of
the software package with the newest
version
of
the POSTSCRIPT Language.
QMS
is committed to providing our customers with the
highest quality products. Thank you for your interest in
the
QMS
POSTSCRIPT family
of
printers.


Proprietary Statements
& Notices
Proprietary Statement
The digitally encoded software included with the QMSPS
800+
is
© Copyrighted 1986 by Adobe Systems Inc.,
All Rights Reserved. This software may not be reproduced, modified, displayed, transferred, or copied in any
form or in any manner or on any media, in whole or in
part, without the express written permission
of
Adobe
Systems, Inc.
Copyright Notice
This manual
is
©Copyrighted 1987
by
QMS, Inc., Mobile, Ala., All Rights Reserved. This manual may not be
copied in whole or in part, nor transferred to any other
media or language, without the express written permission
of
QMS, Inc.
Afanual Notice
QMS, Inc. reserves the right to make changes to this
manual and to the equipment described herein without
notice. Considerable effort has been made to insure
that this manual is free
of
inaccuracies and omissions.
However,
QMS, Inc. makes no warranty of any kind in-
cluding, but not limited
to, any implied warranties
of
merchantability and fitness for a particular purpose with
regard to this manual.
QMS, Inc. assumes
no
responsi-
i
bility for, or liability for, errors contained in this manual
or for incidental, special, or consequential damages arising out
of
the furnishing
of
this manual, or the use
of
this
manual in operating the equipment, or in connection with
the performance
of
the equipment when so operated.
Laser
Safety
This printer is certified as a Class 1 laser product under the U.S.
Department
of
Health and Human Services (DHHS) Radiation
Performance Standard according to the Radiation Control for
Health and Safety Act
of
1968. This means that the printer does
not produce hazardous laser radiation.
Since radiation emitted inside the printer is completely confined
within protective housings and external covers, the laserbeam
cannot escape from the machine during any phase
of
user oper-
ation.
FCC
Compliance
ii
This equipment generates and uses radio frequency energy.
If
not
installed and used properly, (in strict accordance with the manufacturer's instructions) it may cause interference
to
radio and
television reception.
It
has been type tested and found to comply
with the limits for a Class B computing device
in
accordance with
the specifications in Subpart J
of
Part 15
of
FCC Rules, which are
designed to provide reasonable protection against such interference in a residential installation. However, there is no guarantee
that interference will not occur in a particular installation.
If
this
equipment does cause interference to radio
or
television recep-
tion, which can
be
detennined by turning the equipment off and
on, the user is encouraged to try to correct the interference by
one
or
more
of
the following measures:
(1) Reorient the receiving antenna. (2) Relocate the computer
with respect to the receiver. (3) Move the computer away from
the receiver. (4) Plug the computer into a different outlet so that
computer and receiver are
on
different branch circuits. (5)
If
necessary, the user should consult the dealer or an experienced
radio/television technician for additional suggestions. The
Federal Communications Commision has prepared a helpful booklet:
"How
to
Identify and Resolve Radio-TV Interference Problems".
This booklet is available from the U.S. Government Printing Office, Washington, DC 20402. Stock No. 004-000-00345-4.
A SHIELDED INTERFACE CABLE IS REQUIRED
TO
COM-
PLY WITH CLASS B LIMITS.
Warning
To
prevent electrical shock, do not remove the cover
of
the
laser printer. There
are
NO
user-serviceable parts inside.
Servicing should be done
ONLY by qualified service per-
sonnel.
iii

Contents
I Getting Started
A Unpacking and Inspection
A.1
What's Included
...
......
.
A.2 Unpacking . . . . . . . . .
A.3 Inspection. . . . . .
..
.
....
AA
Reshipping . . . . . . .
.. ..
B Printer Set-Up
B.l
Find A Good Spot
B.2 Spacer Removal . . . . .
..
.
..
.
B.3 Print Cartridge Installation. .
....
o.
0 0
BA
Fixing Assembly Cleaner Installation 0 0 0
B.5 Paper Tray Installation . 0 0 0 • 0 0 0 0
B.6
Lllstalling
the
Paper Cassettes 0 • 0 0 0 0 0
B.7 Print Density
..
..
0 0 0 0 0 0
C Connecting the Printer
C.1
Connecting the Interface Cable
Co2
Connecting
the
Power Cord
D Ready
To
Go ...
Contents
1-1
1-1
1-1
1-2
1-3
1-4
1-4
1-4
1-6
1-7
1-10
1-11
1-13
1-15
1-16
1-16
1-17
1-17
v
II
Tutorial
2-1
A
The Display Panel 2-2
A.I
Display Light Functions
2-3
A.2
Display
Panel Illustrations
2--4
B
Power On
2-4
C
Start-Up
Page
2-5
D
Making Changes
2-8
D.I
Changing Persistent Parameters 2-8
D.2
Changing Volatile Parameters 2-10
E Printer Communications
2-10
E.l
Interfaces
. . . . . . . ~ .
2-10
E.2
Set-Up
.........
2-11
E.3 Modes of Operation
2-11
E.4 The Mode Switch
~ . . . ~ . . .
2-12
E.S
Changing Communication Parameters. .
2-15
E.6
Setting
Up
the Host
.............
2-17
F Printing a File
2-17
F.l
Sample File . .
.....
2-17
F.2
Printing Sequence
2-19
G
Paper Size
2-19
G.l
Changing Paper
Size.
.............
2-20
VI
Contents
H Paper Source
2-21
H.I The Default: Automatic Paper
Feed
.......
2-21
H.2 Manual Feed . . . . . . . . . . . . . . . . . . . 2-22
H.3
Selecting Manual Feed . . . . . . . . . . . . . . 2-22
HA
Overlay Printing . . . . . . . . . . . . . . . . . 2-25
H.5
Double-Sided Printing . . . . . . . . . . . . 2-25
I Fonts
I.1 The Fonts
2-26
2-26
1.2
Selecting a Font
...............
2-27
J Things You Need To Know ...
2-27
J.l
When
to
Replace the Print Cartridge. . . 2-27
J.2
Paper
Jam.
. . . . . . . . . . . . . . . . . . . . 2-28
J.3
Print Quality . . . . . . . . . . . . . . . . . . . 2-28
K For More Information ...
2-29
III
Maintenance/Troubleshooting
3-1
A Print Cartridge
A.I When
to
Replace
the
Print Cartridge
A.2
How
to
Replace the Print Cartridge . . . . . . .
A.3 Storing/Handling Cartridges . . . . . . . . . . .
B
Paper
B.l
Clearing a Paper Jam
...
3-1
3-2
3-3
3-3
3-5
3-6
B.2 Paper Storage . . . . . . . . . . . . . . . . .
3-9
Contents vn
C Fixing Assembly Cleaner
3-9
C.l
Replacing the Fixing Assembly Cleaner 3-9
C.2 Cleaning the Fixing Roller .
3-10
D Corona Wires
3-10
D.I Cleaning the Primary Corona Wire 3-11
D.2 Cleaning the Transfer Corona
Wire.
. 3-12
E Cleaning the Transfer Guide 3-13
F The Separation Belt 3-14
F.l
Cleaning the Separation Belt
3-14
F.2 Replacing the Separation
Belt.
.
3-14
G Troubleshooting 3-16
G.l
Display Panel Lights
G.2 Print Quality Problems.
H Placing A Service Call
I Warranty Information
I.1 Warranty Return
to
Factory
......
1.2 Warranty Repair
..
1.3
Warranty Exclusions
1.4 Non-Warranty Return
.....
I.5 Non-Warranty Repair
Charges.
1.6
Warranty Disclaimers
.........
viii
3-16
3-17
3-20
3-20
3-20
3-20
3-21
3-21
3-21
3-21
Contents
IV
Advanced User's Information 4-1
A The Printer
A.I The Controller
4-1
4-2
A.2 The Print
Engine.
. . . . . . . . . . . . . .
..
4-3
B Serial Communication 4-3
B.l The Communication Channels. . . . . . . .
..
4-3
B.2 Pin Assignments . . . . . . . . . . . . . . .
..
4-4
B.3
Connecting
to
the
Host. . . . . . . . . . . .
..
4-4
C Protocols 4-5
C.l
AppleTalk.....................
4-8
D Interactive Mode
4-9
D.I Using the Inte, active Mode . . . . . . . . .
..
4-9
D.2 Changing setsccbatch
...............
4-11
E Fonts 4-15
F Status Queries and Spontaneous Messages 4-15
G Timeouts
H The
Error
Handler
V PostScript Addendum
A System Parameters
B Persistent Parameters
Contents
4-18
4-19
5-1
5-1
5-2
ix
B.l
Changing Persistent Parameters
5-2
B.2
Persistant Status diet Operators .
5-4
B.2.l pagecount
...
5-4
B.2.2
pagestackorder
5-4
B.2.3
setprintername
5--4
B.2A printername .
5-5
B.2.5 setsccbatch .
5-5
B.2.6
sccbatch
· .
5-6
B.2.7 setsccinteractive .
5-6
B.2.S
sccinteractive
5-7
B.2.9 setdostartpage .
5-7
B.2.10 dostartpage
5-7
B.2.ll
setmargins .
5-7
B.2.12 margins
· .
5-8
B.2.13 setdefaulttimeouts
5-8
B.2.14 defaulttimeouts 5-9
B.2.15 setpassword
..
5-9
B.2.16
checkpassword 5-10
B.2.l7
setidlefonts .
5-10
B.2.1S idlefonts
· .
5-10
B.2.19 seteescratch 5-11
B.2.20 eescratch
..
5-11
B.3
Additional Persistent Parameters . 5-11
C Volatile Parameters
5-12
C.l
Volatile Statusdiet Operators. 5-13
C.l.l
setjobtimeout
~ . . .
5-13
x
Contents
C.1.2 jobtimeout
................
5-13
C.1.3 manualfeedtimeout
...........
5-14
C.IA
C.1.5
waittimeout
manualfeed
5-14
5-15
C.1.6
jobname
.................
5-15
C.1.7
printererror...............
5-15
C.1.8
product
.................
5-16
D Idle-Time Font Scan Conversion 5-16
E Known Problems 5-18
E.1
Input/Output Problems
..............
5-18
E.2 Font and Cache Problems
...
. . . . . . . . . 5-18
E.3 Miscellaneous Problems
.............
5-19
Appendix A - Fonts
A-I
Appendix B -Printer Specifications
B-1
Appendix C -Diablo
630
Emulation
C-l
A Purpose
C-l
B How to
Use
Diablo 630 Emulation
C-l
C Communications
C-2
D Protocol
C-2
Contents
xi
E Diablo 630 Parameters
F Fonts
G Differences
H Unsupported Commands
Appendix D - Hewlett-Packard
Laser
Jet
Plus Emulation
A Purpose
B How to
Use LaserJet Plus Emulation
C Communications
D Protocol
E LaserJet Plus Parameters
F Supported Commands
G
Differences
G.l Clipping Region
G.2
Paper Size Interactions .
G.3
Symbol Set
G.4
Character Widths .
G.5
Line Printer Font
G.6
Transparent Communication
G.7
Storage
of
Information .
xii
C-2
C-5
C-5
C-6
D-l
D-l
D-l
D-2
D-2
D-2
D-3
D-3
0-3
D-4
D-4
0-5
D-5
D-6
D-6
Contents
,
\
/
Appendix E - Hewlett-Packard
7475 Plotter Emulation
A
Purpose
B How to Use 7475 Plotter Emulation
C
Communications
D Protocol
E 7475 Plotter Parameters
F Paper Size
G Text
H Character Sets
I Pens
J
Transparent Communication
K Removing the Output
L Persistent State
M Commands
Mol
Supported Commands
E-l
E-l
E-l
E-2
E-2
E-2
E-3
E-3
E-3
E-4
E-4
E-4
E-5
E-5
E-5
Mo2
Unsupported Commands 0 0 0 0 0 0 0 0 0 0 0 0 0
E-6
M.3 Supported Commands with Differences 0 0 0 • 0
E-7
Contents
xiii

Part I
Getting Started
Introduction
The QMS-PS 800+
is
a compact printer which combines
the high quality
of
laser printing and the flexibility
of
the powerful
POSTSCRIPT
programming language. The
QMS-PS 800+ can be used with a wide variety
of
com-
puter systems, including IBM PC/compatibles and
the
Apple Macintosh. It will also work with many mainframe and minicomputers.
This user's guide provides all the necessary information
for the unpacking, inspection, installation, operation, and
maintenance
of
your printer. Technical information for
advanced users is also included.
A Unpacking
and
Inspection
Before you attempt to use your QMS-PS 800+ carefully
unpack and inspect it. Retain the shipping carton and
packing materials until the contents have been inspected
and checked against the packing list.
If
there is any ev-
idence
of
external damage, do not attempt
to
use the
equipment. Contact the carrier immediately, initiate a
damage claim, and notify your dealer
of
the problem.
A.I
What's
Included
The QMS-PS 800+ printer system is shipped in two
parts: the printer unit and the print cartridge.
The following items should be enclosed in the Printer
unit shipping container:
Getting Started
1-1
1.
QMS-PS 800+ print engine
2.
Print tray with sliding extension
3.
Manual-feed extension
4.
Cassette paper tray
5.
POSTSCRIPT
Language Reference Manual
6.
POSTSCRIPT Language Tutorial and Cookbook
7. QMS-PS
800+ User's Guide
The following items should be included in the
Print Car-
tridge shipping container:
1.
Print Cartridge
2.
Fixing Assembly Cleaner (plastic/felt rod)
3.
Installation sheet
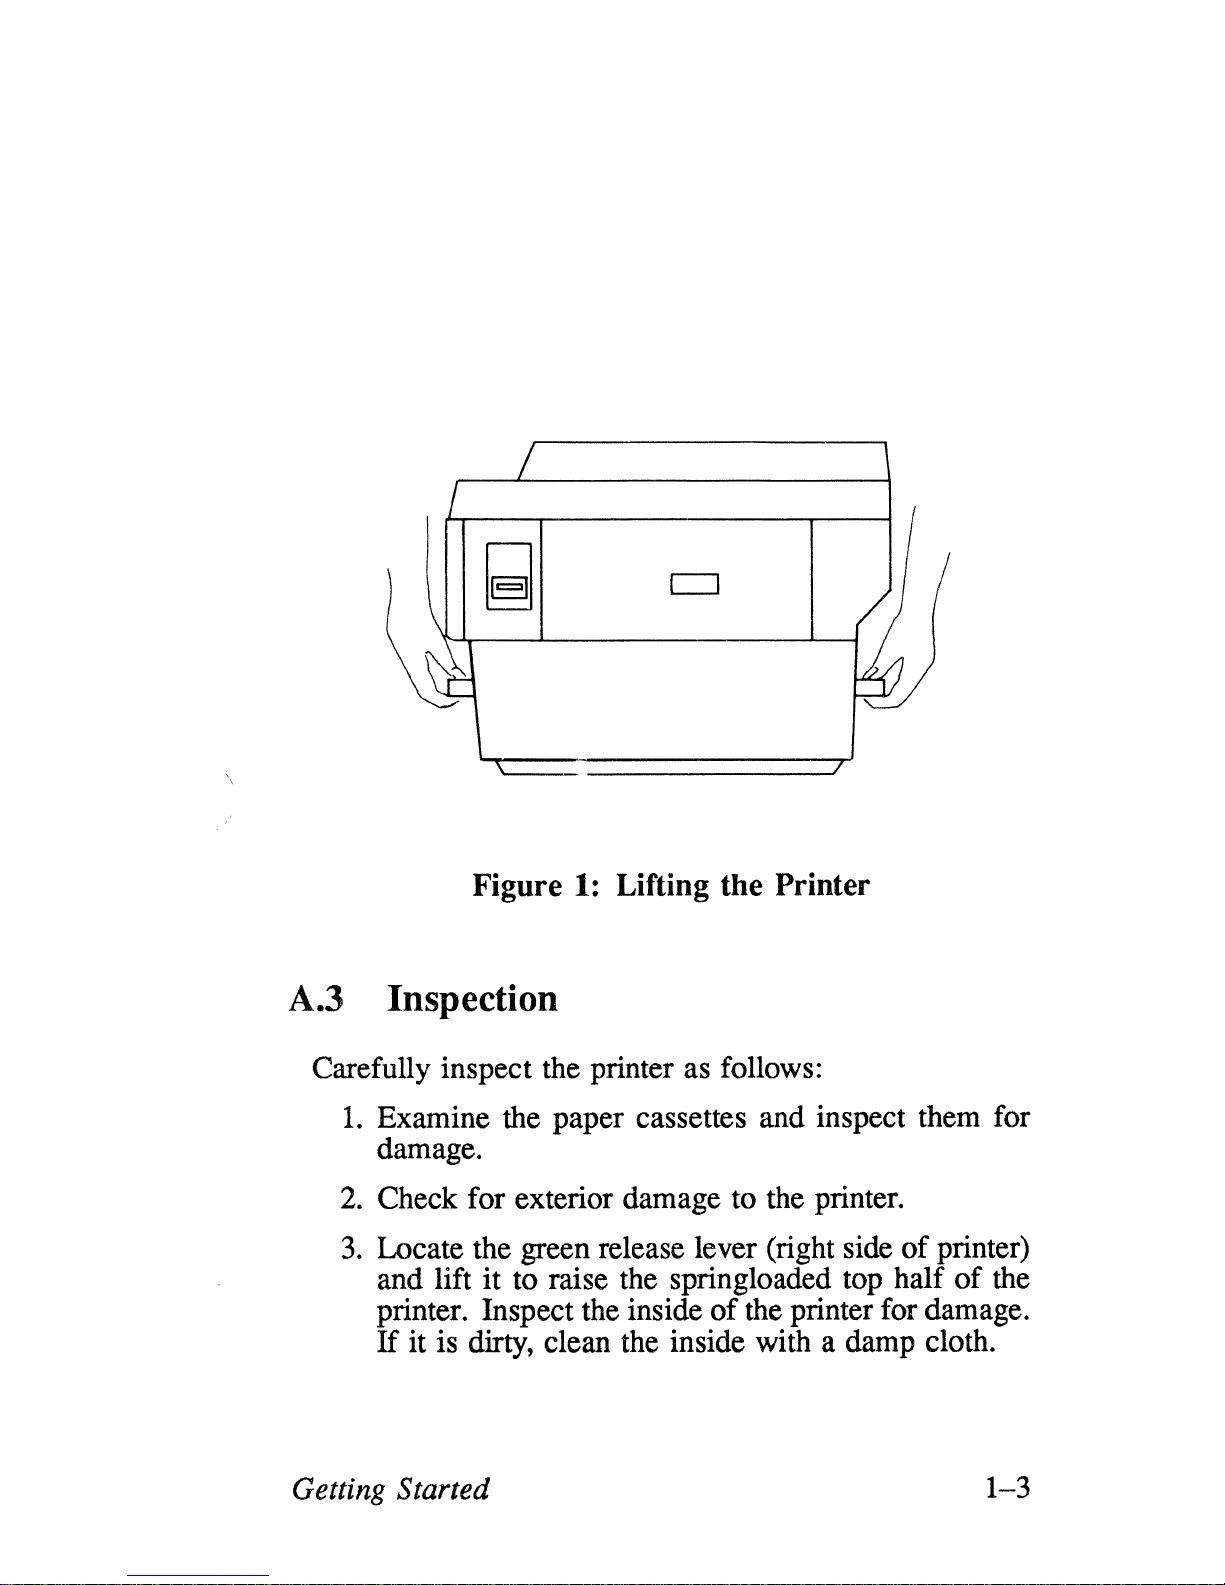
A.2 Unpacking
After opening the shipping container, carefully remove
the trays from the depression in the foam packing. Lift
off
the foam packing and locate the handles on the front
and rear
of
the printer (Figure 1). Lift the printer out
of
the shipping container. Always use the HANDLES
when lifting the printer!
Remove the plastic bag en-
closing the printer.
1-2
Getting Started
/
/
I
~
c::J
/
~
""
~
\
Figure
1:
Lifting the Printer
A.3
Inspection
Carefully inspect the printer as follows:
1.
Examine the paper cassettes and inspect them for
damage.
2.
Check for exterior damage to the printer.
3.
Locate the green release lever (right side
of
printer)
and lift
it
to raise the springloaded top half
of
the
printer. Inspect the inside
of
the printer for damage.
If
it is dirty, clean the inside with a damp cloth.
Getting Started 1-3
4.
Inspect the bag enclosing the print cartridge for
tears or any other indications
of
damage. Locate
the fixing assembly cleaner (separate) and check
for damage to the rod
or
the felt.
A.4 Reshipping
If
it becomes necessary to return your printer, a Returned
Merchandise Authorization (RMA) number must first be
obtained from
QMS (call 1-205-633-4300). The RMA
number must accompany the returned equipment. This
will help
QMS to make arrangements for repair or re-
placement
as
soon as possible.
When preparing the equipment for reshipment, please
give special attention to packing in order to prevent further damage.
B Printer Set-Up
To set up your printer, complete the procedures on the
following pages:
B.1 Find A Good Spot
Choose a location for your QMS-PS 800+ that meets the
following guidelines:
1-4
1.
Your printer should be installed on a sturdy, level
surface.
2.
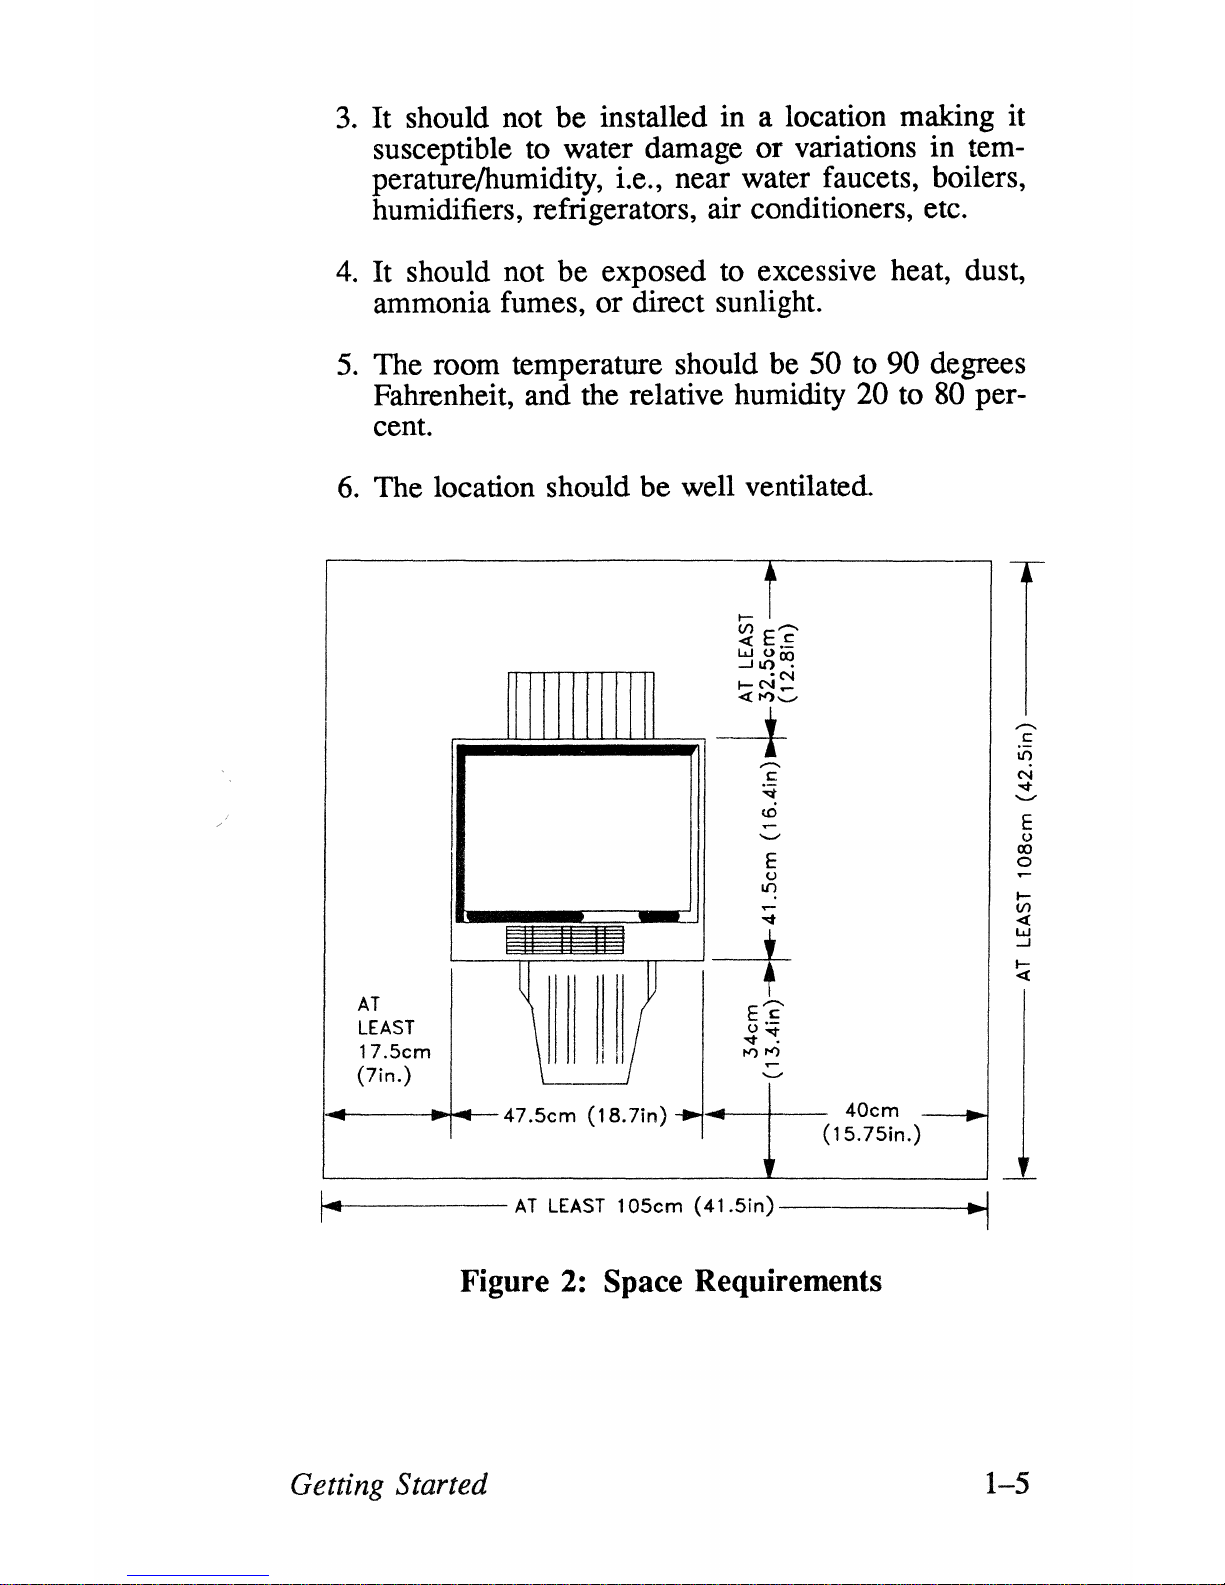
It should be located where there is sufficient space
to permit unimpeded operation. Refer to Figure 2
for recommended space requirements for the printer.
Getting Started
3.
It should not
be
installed in a location making it
susceptible to water damage or variations in tem-
perature!humidity, i.e., near water faucets, boilers,
humidifiers, refrigerators, air conditioners, etc.
4.
It should not be exposed to excessive heat, dust,
ammonia fumes, or direct sunlight.
5.
The room temperature should be 50 to 90 degrees
Fahrenheit, and the relative humidity
20 to 80 per-
cent.
6.
The location should
be
well ventilated.
AT
LEAST
17.5cm
(7in.)
1...----"+Oot---47.5cm
(18.7in)
-.1
.
...---+--
40cm
(15.75in.)
AT
LEAST
105cm
(41.5in)
Figure
2:
Space Requirements
Getting Started
~I
E
()
IX)
o
l-
V)
«
w
..J
I-
«
1-5

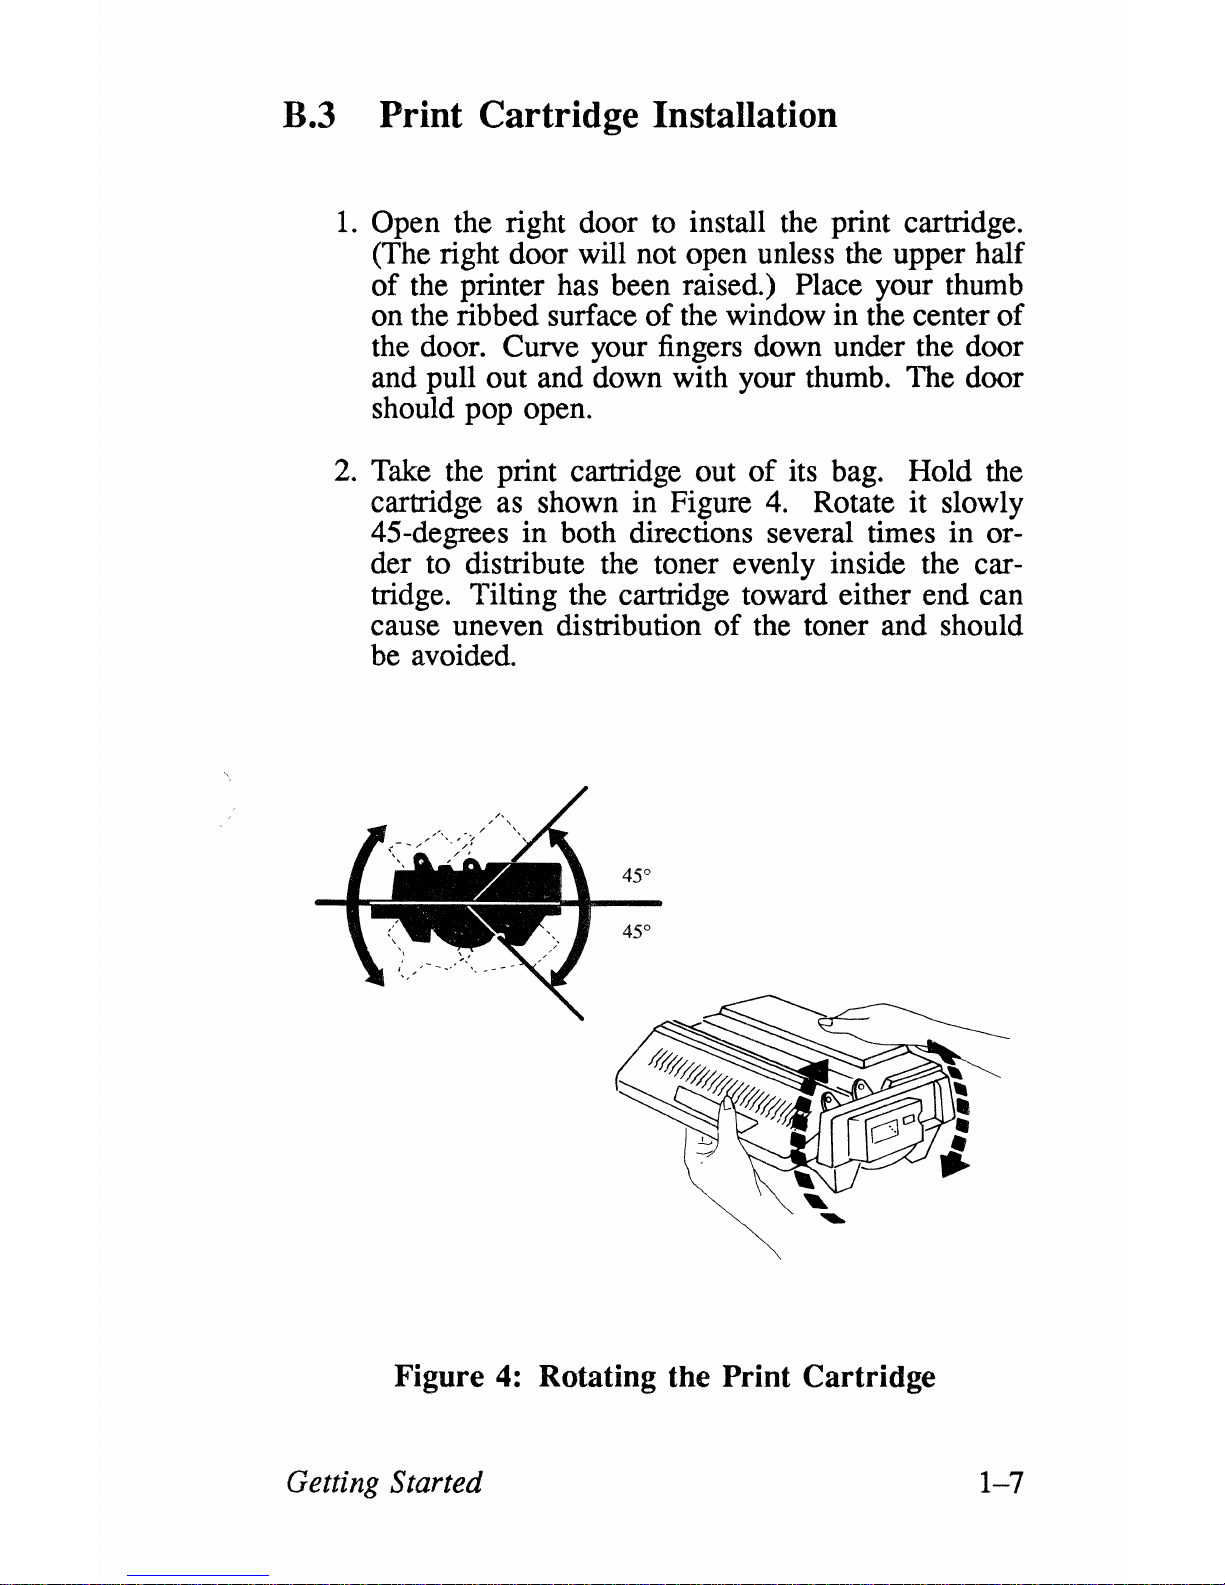
B.3 Print Cartridge Installation
1.
Open the right door to install the print cartridge.
(The right door will not open unless the upper half
of
the printer has been raised.) Place your thumb
on the ribbed surface
of
the window in the center
of
the door. Curve your fingers down under the door
and pull out and down with your thumb. The door
should pop open.
2.
Take the print cartridge out
of
its bag. Hold the
cartridge as shown in Figure
4.
Rotate it slowly
45-degrees in both directions several times in order to distribute the toner evenly inside the cartridge. Tilting the cartridge toward either end can
cause uneven distribution
of
the toner and should
be avoided.
Figure
4:
Rotating the Print Cartridge
Getting Started
1-7
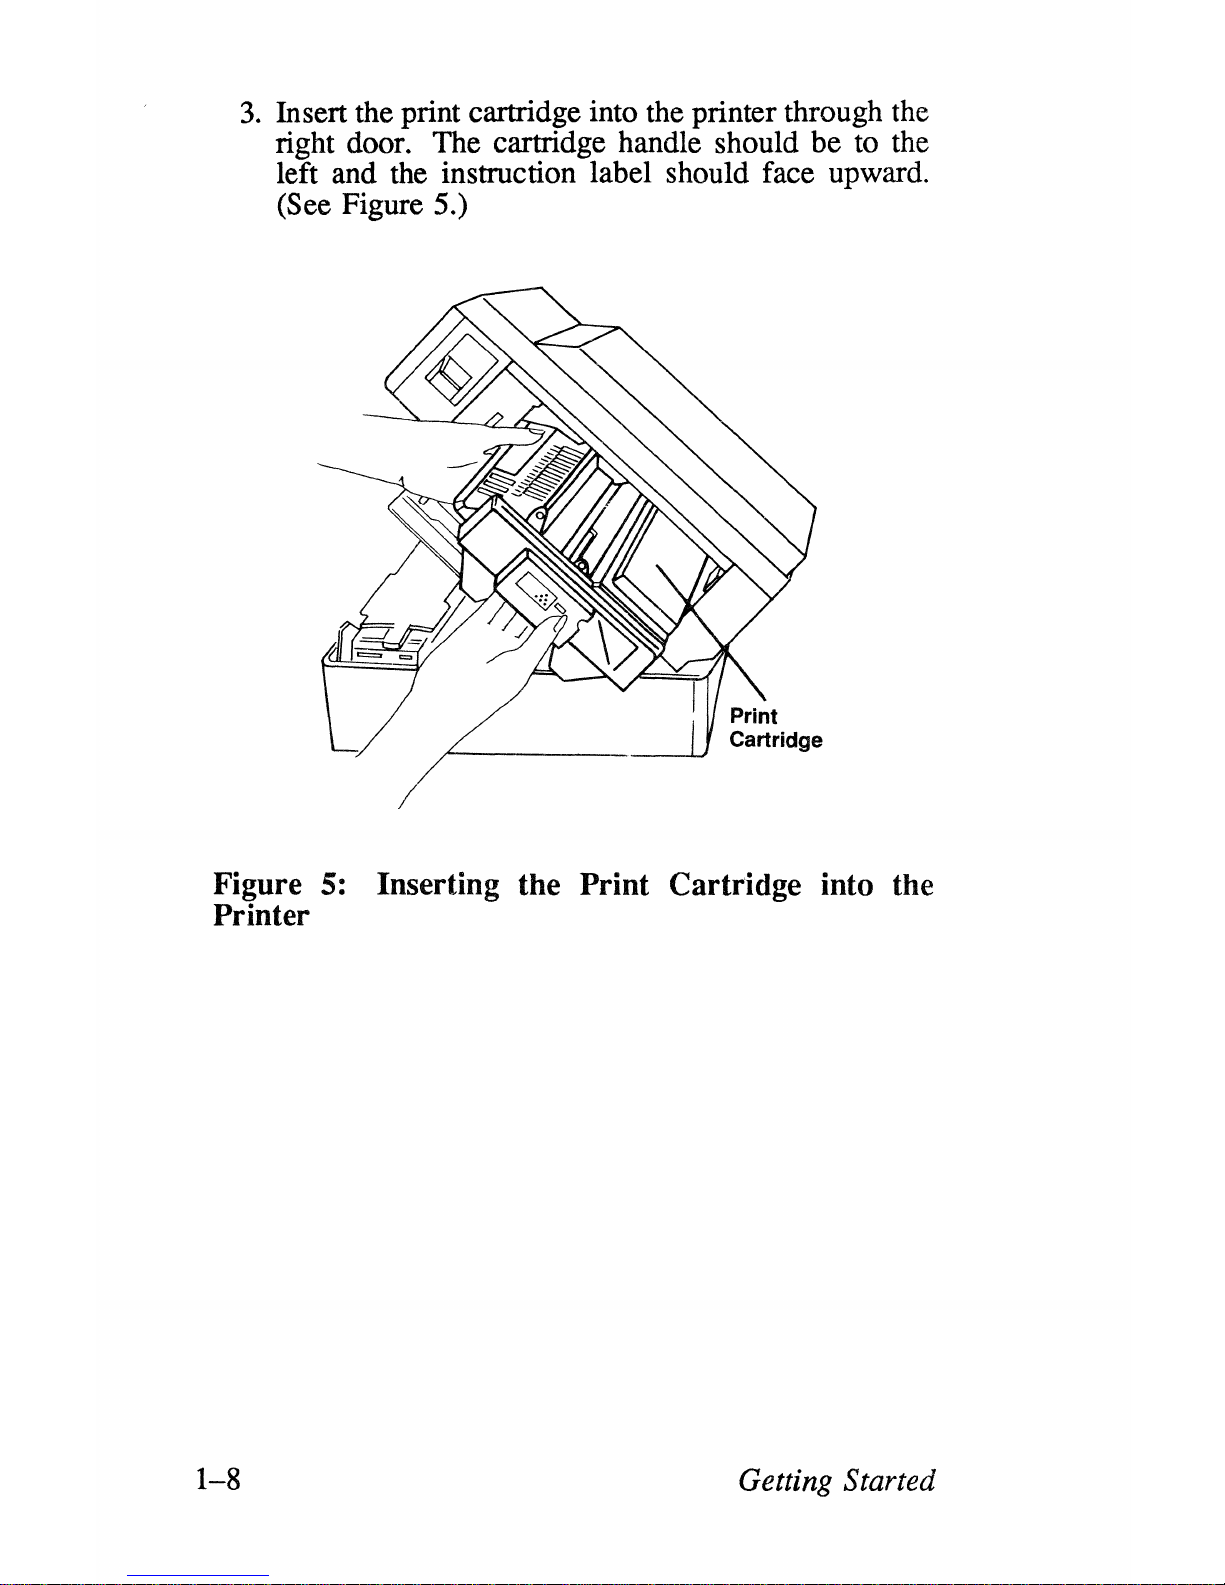
3.
Insert the print cartridge into the printer through the
right door. The cartridge handle should be to the
left and the instruction label should face upward.
(See Figure 5.)
Figure
5:
Inserting the Print Cartridge into the
Printer
1-8
Getting Started
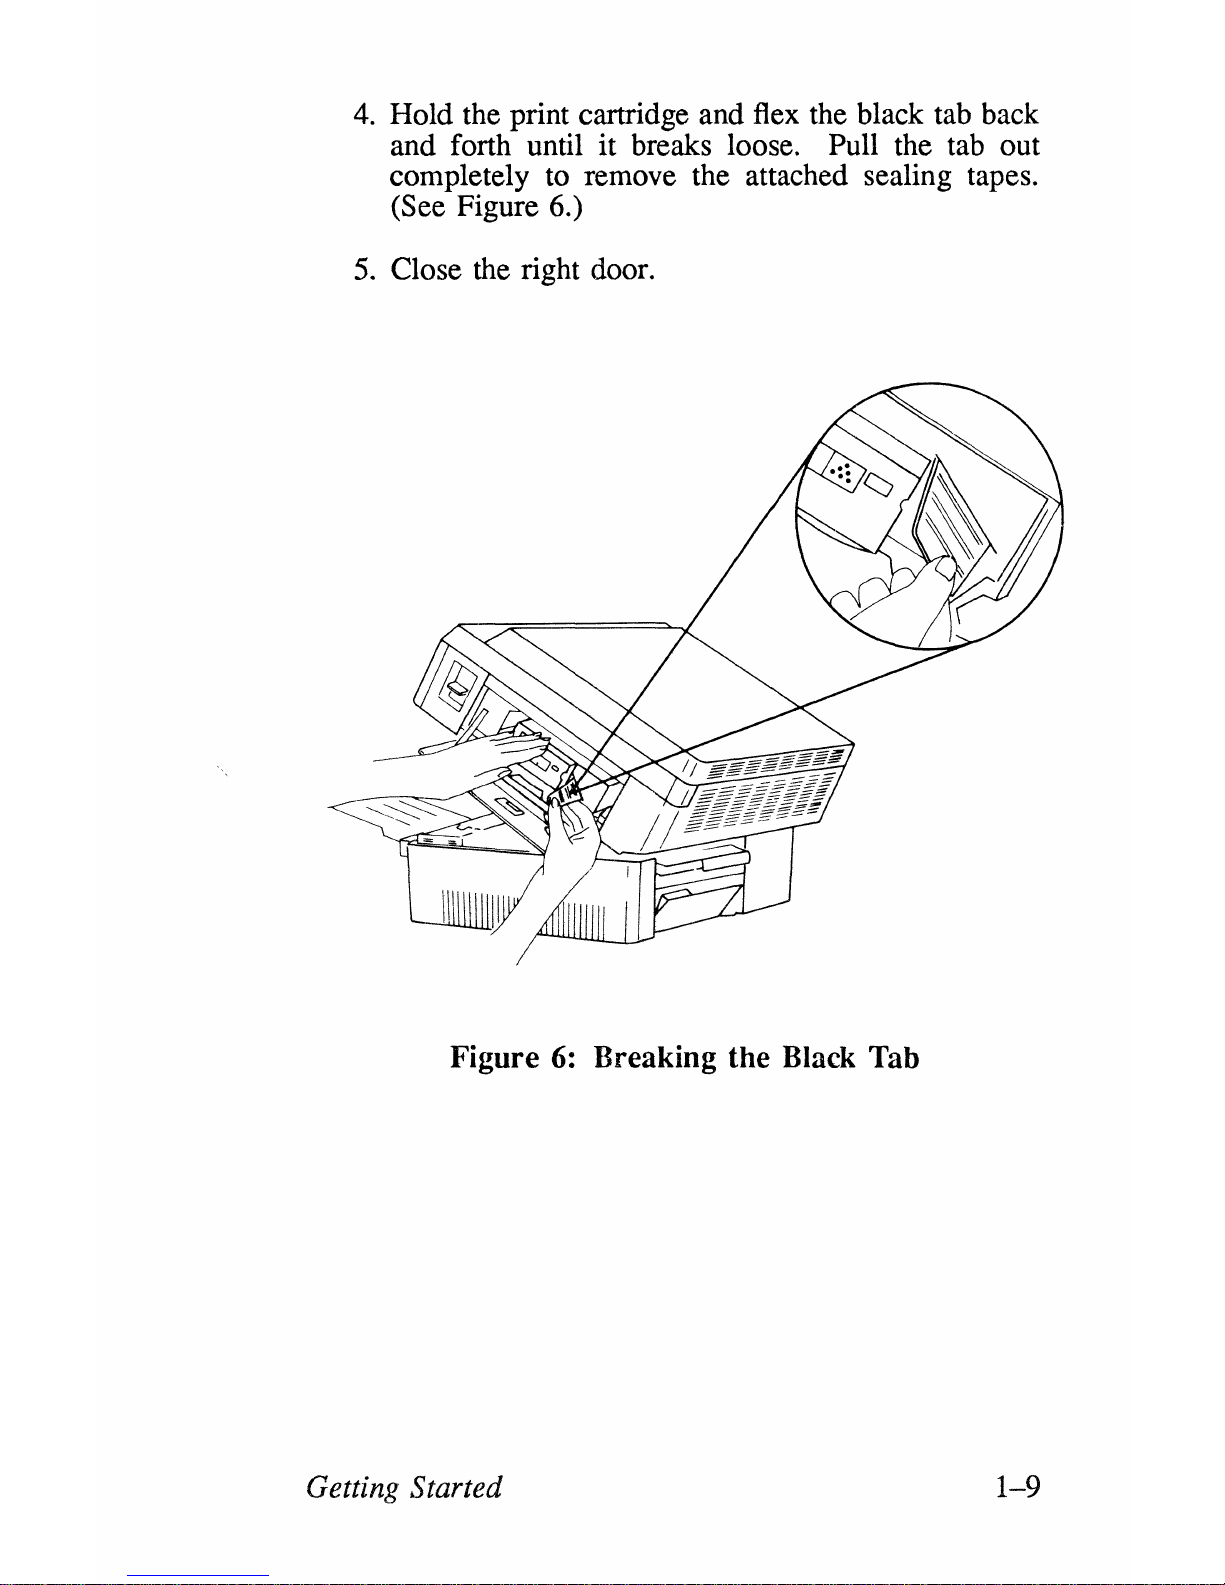
4.
Hold the print cartridge and flex the black tab back
and forth until it breaks loose. Pull the tab out
completely to remove the attached sealing tapes.
(See Figure 6.)
5.
Close the right door.
Figure
6:
Breaking the Black Tab
Getting Started
1-9
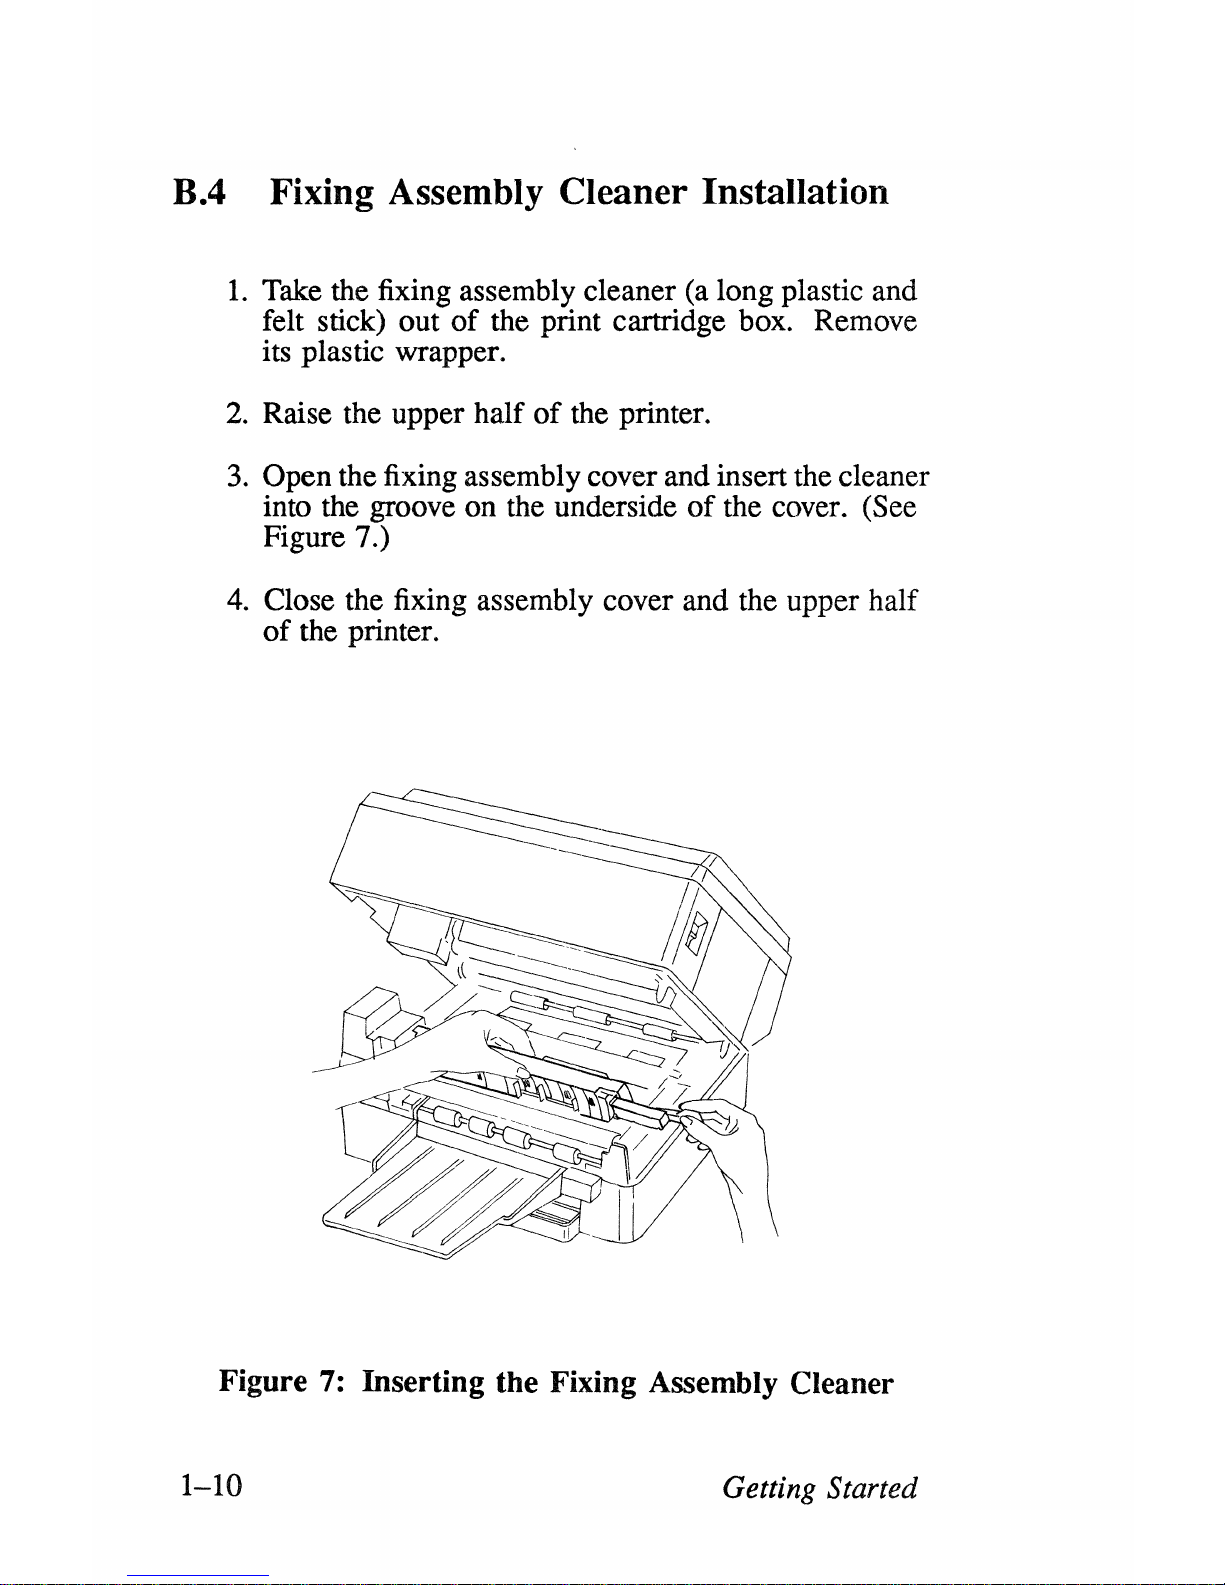
B.4 Fixing Assembly Cleaner Installation
1.
Take the fixing assembly cleaner (a long plastic and
felt stick) out
of
the print cartridge box. Remove
its plastic wrapper.
2.
Raise the upper half
of
the printer.
3.
Open the fixing assembly cover and insert the cleaner
into the groove on the underside
of
the cover. (See
Figure 7.)
4.
Close the fixing assembly cover and the upper half
of
the printer.
Figure 7: Inserting the Fixing Assembly Cleaner
1-10
Getting Started
 Loading...