

Page 1
High Velocity
Series
Air Curtains
INSTALLATION & OPERATING INSTRUCTIONS & PARTS MANUAL
FOR ALL 208-230/480 VOLT
3 PHASE. MOTOR MODELS
READ CAREFULLY BEFORE ATTEMPTING TO ASSEMBLE, INSTALL, OPERATE, OR MAINTAIN THE PRODUCT
DESCRIBED. PROTECT YOURSELF AND OTHERS BY OBSERVING ALL SAFETY INFORMATION. FAILURE TO
COMPLY WITH INSTRUCTIONS COULD RESULT IN PERSONAL INJURYAND/OR PROPERTY DAMAGE!
RETAIN INSTRUCTIONS FOR FUTURE REFERENCE.
REFER TO INDIVIDUAL MODEL NUMBERS
FOR UNIT WIDTH
117/8”
121/2”
153/4”
31/4”
Description
Leading Edge air curtains produce a wall of continuously
flowing air that acts as a thermal barrier against outside
air and flying insects. These air curtains maintain interior
conditioned temperature and prevent heated or cooled
air from escaping through open doorways. They reduce
humidity and loss of cold air when used over freezer and
cooler doors. High traffic area doors can be left open,
eliminating wear and nuisance of opening and closing
automatic and manual doors. Used over service
entrances, receiving doors, customer entrances, access
doors, etc. ... air curtains provide protection against
insects, dust, odor, fumes and other contaminant’s.
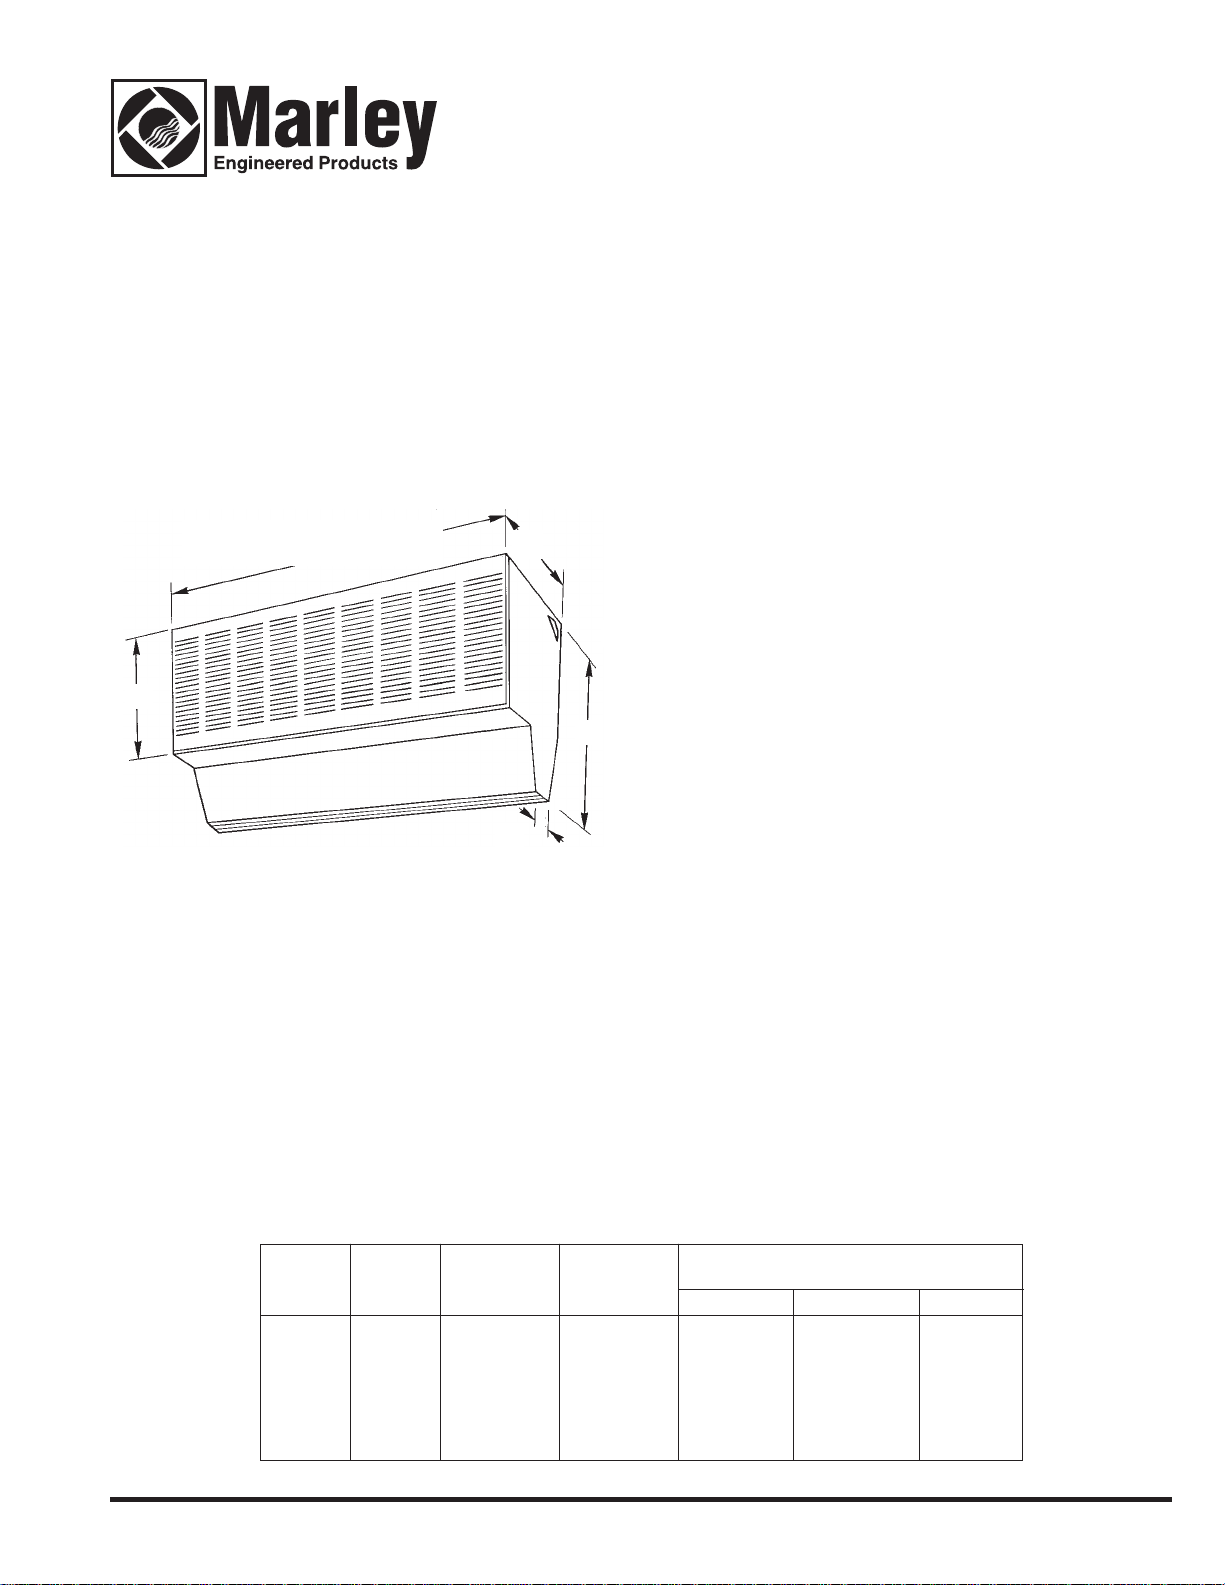
Fig. 1
Figure 1 Dimensions
Note that all dimensions are the same on all high velocity
series units. Model number indicates width of unit.
(Example: EL4800 indicates a 48” wide unit.)
Unpacking
1. With packaged unit on the floor, carton arrows should
point upward.
2. Carefully remove staples from top of carton and fold
back sides.
HP
1
Specifications and Performance
208-230/480
MAX.
RPM
1
1
/
2
3
1725
3450
3450
50/60Hz
MAX. AMPS
3.2
4.0
8.3
MAX.
FT. PER MIN.
AT NOZZLE 36” 48” 60”
5250
5900
7200
AVG. CFM AT NOZZLE FOR MOTOR SHOWN
IN VARIOUS CABINET SIZES
3400
3345
4080
4200
4080
4980
4960
4780
5830
Page 2
Unpacking (Continued)
3. Carefully remove cabinet from carton by lifting out unit
using straps provided.
CAUTION: Do not attempt to lift this air curtain by its
louver or damage may result.
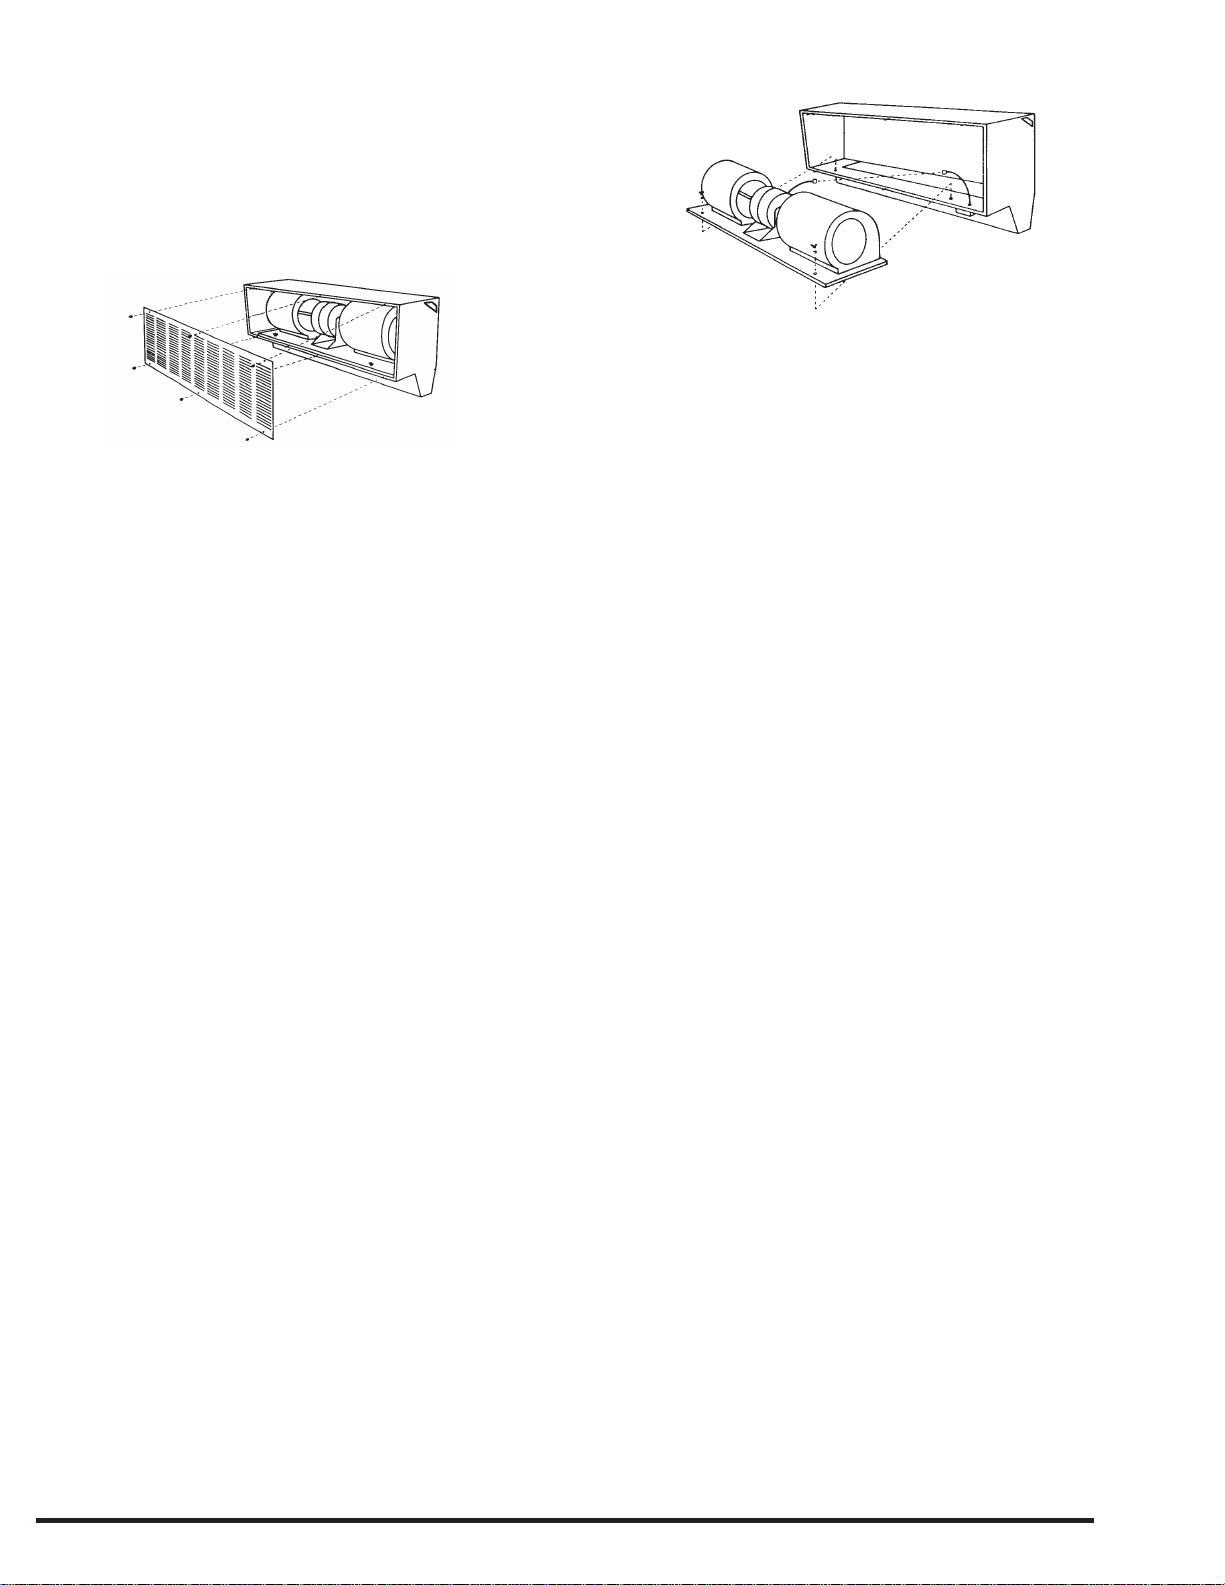
4. Unscrew six (6) knurled nuts and remove air intake
grille. (See Figure 2.)
Figure 3 - Removing Motor/Blower Assembly
6. To remove motor/blower assembly, lift from rear of
motor housing to prevent damage and misalignment
to shaft and blower wheels.
Figure 2 - Removing Air Intake Grille
5. Carefully disconnect motor electric cord plug
assembly and remove two wing nuts on blower base.
(See Figure 3.)
IMPORTANT SAFETY INFORMATION
“READ AND SAVE THESE INSTRUCTIONS”
WARNING - TO REDUCE THE RISK OF FIRE,
ELECTRIC SHOCK, OR INJURY TO PERSONS
OBSERVE THE FOLLOWING:
1. Use this unit only in the manner intended by the
manufacturer. If you have questions contact the
manufacturer.
2. Before servicing or cleaning unit, switch power off at
service panel and lock service disconnection means to
prevent power from being turned on accidentally.
When the service disconnecting means cannot be
locked securely fasten a prominent warning device,
such as a tag, to the service panel.
3. Installation work and electrical wiring must be done by
qualified persons in accordance with all applicable
codes and standards, including fire rated construction.
4. When cutting or drilling into wall or ceiling, do not
damage electrical wiring or other hidden utilities.
5. Make certain that the power source conforms to the
electrical requirements of the unit. Disconnect power
before installing or servicing. If the power disconnect
is out of sight, lock it in the open position and tag it to
prevent unexpected application of power. Failure to do
so could result in fatal electrical shock.
WARNING: DO NOT DEPEND UPON A THERMOSTAT
OR OTHER SWITCH AS THE SOLE MEANS OF
DISCONNECTING POWER WHEN INSTALLING OR
SERVICING THE UNIT. ALWAYS DISCONNECT
POWER AT THE MAIN CIRCUIT BREAKER AS
DESCRIBED ABOVE. FAILURE TO DO SO COULD
RESULT IN FATAL ELECTRIC SHOCK.
WARNING: TO REDUCE THE RISK OF FIRE OR
ELECTRIC SHOCK, DO NOT USE THIS AIR CURTAIN
WITH ANY SOLID STATE SPEED CONTROL DEVICE.
NOTE: After unpacking unit, inspect carefully for any
damage that may have occurred during transit. Check for
loose, missing or damaged parts.
6. All wiring should be done by a qualified electrician,
using copper wire only and in accordance with the
National Electrical Code (NEC), all applicable code
and ordinances, and all sections of this manual. Any
variance voids the warranty and may create unsafe
conditions.
7. Special attention must be given to any grounding
information pertaining to this product. To prevent the
risk of electrocution, the unit must be securely and
ad e quat ely grounded. This should be accomplished
by connecting a grounded conductor between the
service panel and the grounding lug or green lead wire
provided in the wiring compartment. To ensure a
proper ground, the grounding means must be tested
by a qualified electrician.
8. Do not insert fingers or foreign objects into the air
curtain. Do not block or tamper with it in any manner
while it is in operation. Do not touch it while in
operation or just after it has been turned off, as some
parts may be hot enough to cause injury.
9. This product must NOT be used in potentially
dangerous locations such as hazardous locations
where flammable, explosive, chemical laden, or wet
atmospheres are present.
10. Do not attach ductwork to this product. Such use
voids the warranty and may create unsafe
conditions.
11. This product is suitable for commericial or industrial
use only.
CAUTION:
To reduce the risk of injury to persons, install this unit at
least 2.1m (7ft.) above the floor.
2
Page 3

Installation
NOTE: ALL INSTALLATION SHOULD BE DONE TO MEET
LOCAL BUILDING CODES.
1. Using template provided, determine mounting location.
IMPORTANT: IN FREEZER APPLICATIONS, UNIT IS
ALWAYS MOUNTED OUTSIDE (WARM SIDE) OF
FREEZER OR COOLER
2. Drill holes and attach mounting hardware (not included).
IMPORTANT: THE HARDWARE AND THE SUPPORTING STRUCTURE MUST BE CAPABLE OF SUPPORTING A MINIMUM 150 LB. LOAD.
3. Mount cabinet on wall and securely tighten hardware.
4. Replace motor/blower assembly in cabinet. Secure
two wing nuts on blower base. Reconnect motor
electric cord plug assembly.
ELECTRICAL CONNECTIONS
WARNING: ALL AIR CURTAINS SHOULD BE INSTALLED
BY QUALIFIED PERSONNEL.
WARNING: THIS FAN HAS AN INTERNAL SELFRESETTING THERMAL OVERLOAD PROTECTOR.
ALWAYS DISCONNECT FROM POWER SUPPLY BEFORE
SERVICING.
1. Connect motor per name plate to correct power supply.
Use adequate size wire for all branch and feeder runs.
2. Install all wiring, protection and grounding in accordance with the National Electrical Code (NEC) and all
local requirements.
3. Remove two (2) screws holding the Outlet Box
Assembly in place. See Fig. A. Keep these screws. It
will be required to re-install the assembly in step 6.
4. Remove the Outlet Box Assembly to expose knockouts for
power supply wiring. Remove assembly be unlatching the
bottom of the assembly from the back of the cabinet. Put
assembly aside for now to make supply connections.
Lable on blower indicates voltage connection of motor
from factory. Compare with voltage on nameplate and
make sure the power supply to the disconnect that will
feed the unit are the same voltage.
5. Run wires from power supply disconnect to the outlet box.
Choose which knockout to use either from the back of the
cabinet or from the top of the cabinet. Use appropriate
wiring according to local code. Use a flexible connector to
allow for possible angle adjustments if necessary. You
may start connection of the power supply wire to the
internal wire leads with the cable attached to the outlet
box assembly. Use appropriate wire nuts (not provided).
There will be just the three wires for each of the three
phases to connect and the supply ground wire to the
green ground lead which is connected to cabinet ground.
6. Re-install outlet box assembly by latching the bottom first
and by using the two screws removed in step 3. Make
sure all wires and connectors are inside the outlet box.
Make sure no wire will be pinched between the outlet box
and the cabinet back wall, the cabinet top and the
cabinet right side panel.
7. From the outside of the cabinet on the top right corner,
remove three (3) screws. Keep these screws. It will be
needed to replace the outlet box cover. Carefully remove
outlet box cover. Inspect all wires and make sure all
connections are tight and the ground wires are properly
connected. Replace outlet box cover. Put power on the
the unit. Check for correct motor rotation. To change
motor rotation, interchange any two wires at the power
disconnect.
8. Unit is ready for operation.
9. Replace intake grille with louvers facing down and
refasten knurled nuts.
10. Upon completion of all installations, inspect unit for
excessive vibration during operation. If excessive
vibration is noticeable, disconnect power supply,
inspect mounting installation, and refer to
troubleshooting chart for probable cause.
NOTES: Air Curtain Control
1. On/Off Control by hand – A three pole On/Off switch may
be used or the Supply Disconnect Switch may also be
used to put the unit on or off. A magnetic motor starter is
not required with manual On/Off control.
2. When automatic On/Off function is required, a Motor
Control Panel must be used. The Motor Control Panel
can be such that a micro switch may control the On/Off
function of the Panel. The micro switch may be any dry
contact switch or a thermostat. The panel may be chosen
such that the opening and closing of a door may control
the closing and opening of a single pole contact of a door
switch which in turn controls the On/Off of the contactor
in the Control Panel which will turn the Air Curtain motors
on and off.
3. These controls are all optional devices that are external
of the Air Curtain. These can be installed between the Air
Curtain and its Disconnect.
4. It is recommended all control devices to be used with
these Air Curtain units should be UL and or CSA
approved devices and all local codes be followed in their
use and installation.
CAUTION: MAKE SURE AMP RATING OF ANY CONTROL
DEVICE OR ON/OFF SWITCH EXCEEDS NAMEPLATE
AMP RATING OF MOTOR.
3
Page 4

1, 11/2& 3 H.P. 3 PHASE
4
1
L1
7
5
2
L2
8
15
6
3
L3
9
16
G
14
47
1
L1
58
2
L2
69
3
L3
INS.
16 INS.
G
15
INS.
LOW VOLTAGE 208-230V
HIGH VOLTAGE 480V
FIGURE 4
Wiring Diagrams for 208-230V or 480V
4
Page 5

Operation
1. After power has been connected to unit, fans will start.
2. Air direction at outlet can be controlled by adjustable
vanes at the nozzle which compensates for possible
draft conditions.
NOTE: Air direction settings are shown in Figures 5, 6,
and 7.
NOTE: Cold air will try to escape near floor level. Warm
air will try to penetrate curtain near top of doorway. Air
flow can be controlled by direction of nozzle louvers and
by high/low settings.
Figure 5 - Desired Air Flow
Adjustment for Temperature and
Humidity Control.
Figure 6 - Desired Air Flow Adjustment
for Insect and Dust Control.
Maintenance
WARNING: ALWAYS DISCONNECT POWER SUPPLY
BEFORE SERVICING.
LUBRICATION
Ball bearings are permanently lubricated and require no
further lubrication.
CLEANING
1. The air door cabinet may be wiped off with a damp
cloth. Do not allow motor to get wet. Do not use
solvents or harsh detergents.
NOTE: Keep air intake louvers clear of dirt and dust
accumulation which could affect performance.
2. Check blower wheels for accumulated dirt twice a year
and clean. If disassembly is required, see GENERAL
SERVICING section.
GENERAL SERVICING
WARNING: IF SERVICING IS REQUIRED, IT SHOULD
BE DONE BY QUALIFIED PERSONS ONLY.
Figure 7 - Desired Air Flow
Adjustment for Freezer and
Cooler Applications.
WARNING: ALWAYS DISCONNECT POWER SUPPLY
BEFORE SERVICING.
1. Remove motor/blower assembly. All motor/blower
assemblies are designed for easy removal and service
with wing nuts and quick disconnect electrical
connections.
2. Place motor/blower assembly on workbench.
3. To replace blower wheel, remove the three slotted hex
head screws on outer blower ring assembly (See
Figure 9, Replacement Parts Illustration.) The wheel
is held onto shaft by one hex head screws.
IMPORTANT: NOTE POSITION OF WHEELS TO
PREVENT RUBBING WHEN REPLACED.
4. To remove motor:
a. Remove blower wheels. (See Step 3 above.)
b. Remove blower scrolI (six hex head screws).
c. Unscrew and remove motor mounts.
5. Replace motor/blower assembly.
5
Page 6

Troubleshooting Chart
SYMPTOM POSSIBLE CAUSE(S) CORRECTIVE ACTION
Fan inoperative 1. Blown fuse or open circuit breaker.
2. Electricity turned off.
3. Loose cord connection.
4. Defective motor.
Excessive noise
Insufficient air flow
1. Wheel rubbing on housing.
2. Motor base or blower not securely
anchored.
3. Defective motor bearings.
1. Improper voltage.
2. Outlet louvers closed.
3. Intakes obstructed.
4. Dirty blower wheels
5. Motors rotate in the wrong direction
1. Replace fuse or reset circuit breaker.
2. Contact local power company.
3. Re-check all connections.
4. Replace.
1. Center wheel.
2. Tighten mounting bolts.
3. Replace motor.
1. Reconnect to proper voltage.
2. Open.
3. Remove any obstruction.
4. Clean.
5. Interchange any two supply wires to unit
Fans cut out on
thermal overload
(self-resets)
1. Low voltage.
2. Obstruction to blower wheel.
1. Verify correct wire size.
2. Remove obstruction.
6
Page 7

Replacement Parts
For Air Curtain Cabinets
3
1.
5
4
Figure 9 - Replacement
Parts Illustration.
2
Replacement Parts List For Air Curtain Cabinets
Key Part Numbers for Cabinets (length)
No. Description 36" 38" 42" 48" 60"
1 Cabinet box assembly 1016-0096-000 1016-0096-001 1016-0096-002 1016-0096-003 1016-0096-004
2 Cabinet Intake Grille 1016-0093-000 1016-0093-001 1016-0093-002 1016-0093-003 1016-0093-004
3 Cabinet Intake grill knurled nut AP0002 AP0002 AP0002 AP0002 AP0002
4 Cabinet louver kit ACL36 ACL38 ACL42 ACL48 ACL60
5 Electric box cover 1402-2364-001 1402-2364-001 1402-2364-001 1402-2364-001 1402-2364-001
Replacement Parts
For Motor Blower Assemblies (6)
8
Figure 9 - Replacement Parts Illustration.
7
Replacement Parts For Air Curtain Cabinets
Key Part Numbers for Motor Blower Assemblies
No. Description 1HP 1-1/2HP 3 HP
6 Motor/Blower Assembly ACMB300 ACMB305 ACMB330
7 Cord, female connector ACWS616 ACWS614 ACWS314
8 Motor Assembly ACM3075 ACM3150 ACM3300
7
Page 8

LIMITED WARRANTY
All products manufactured by Marley Engineered Products are warranted against defects in
workmanship and materials for five years from date of installation. This warranty does not apply to
damage from accident, misuse, or alteration; nor where the connected voltage is more than 5%
above the nameplate voltage; nor to equipment improperly installed or wired or maintained in
violation of the product’s installation instructions. All claims for warranty work must be accompanied
by proof of the date of installation.
The customer shall be responsible for all costs incurred in the removal or reinstallation of products,
including labor costs, and shipping costs incurred to return products to Marley Engineered Products
Service Center. Within the limitations of this warranty, inoperative units should be returned to the
nearest Marley authorized service center or the Marley Engineered Products Service Center, and
we will repair or replace, at our option, at no charge to you with return freight paid by Marley. It is
agreed that such repair or replacement is the exclusive remedy available from Marley Engineered
Products.
THE ABOVE WARRANTIES ARE IN LIEU OF ALL OTHER WARRANTIES EXPRESSED OR
IMPLIED, AND ALL IMPLIED WARRANTIES OF MERCHANTABILITY AND FITNESS FOR A
PARTICULAR PURPOSE WHICH EXCEED THE AFORESAID EXPRESSED WARRANTIES ARE
HEREBY DISCLAIMED AND EXCLUDED FROM THIS AGREEMENT. MARLEY ENGINEERED
PRODUCTS SHALL NOT BE LIABLE FOR CONSEQUENTIAL DAMAGES ARISING WITH
RESPECT TO THE PRODUCT, WHETHER BASED UPON NEGLIGENCE, TORT, STRICT
LIABILITY, OR CONTRACT.
Some states do not allow the exclusion or limitation of incidental or consequential damages, so the
above exclusion or limitation may not apply to you. This warranty gives you specific legal rights, and
you may also have other rights which vary from state to state.
For the address of your nearest authorized service center, contact Marley Engineered Products in
Bennettsville, SC, at 1-800-642-4328. Merchandise returned to the factory must be accompanied
by a return authorization and service identification tag, both available from Marley Engineered
Products. When requesting return authorization, include all catalog numbers shown on the
products.
HOW TO OBTAIN WARRANTY SERVICE AND
WARRANTY PARTS PLUS GENERAL INFORMATION
1. Warranty Service or Parts 1-800-642-4328
2. Purchase Replacement Parts 1-800-654-3545
3. General Product Information www.marleymep.com
Note: When obtaining service always have the following:
1. Model number of the product
2. Date of manufacture
3. Part number or description
470 Beauty Spot Rd. East
Bennettsville, SC 29512 USA
ECR 36787
Part No. 5200-2410-002 11/07
8
 Loading...