

Page 1
“READ AND SAVE THESE INSTRUCTIONS”
“LEA Y GUARDE ESTAS INSTRUCCIONES”
MODELS 6060, 6060RL, 6080
6080RL, 6100 AND 6100RL
BATHROOM FANS
VENTILADORES DE BAÑOS
INSTALLATION INSTRUCTIONS
INSTRUCCIONES DE INSTALACION
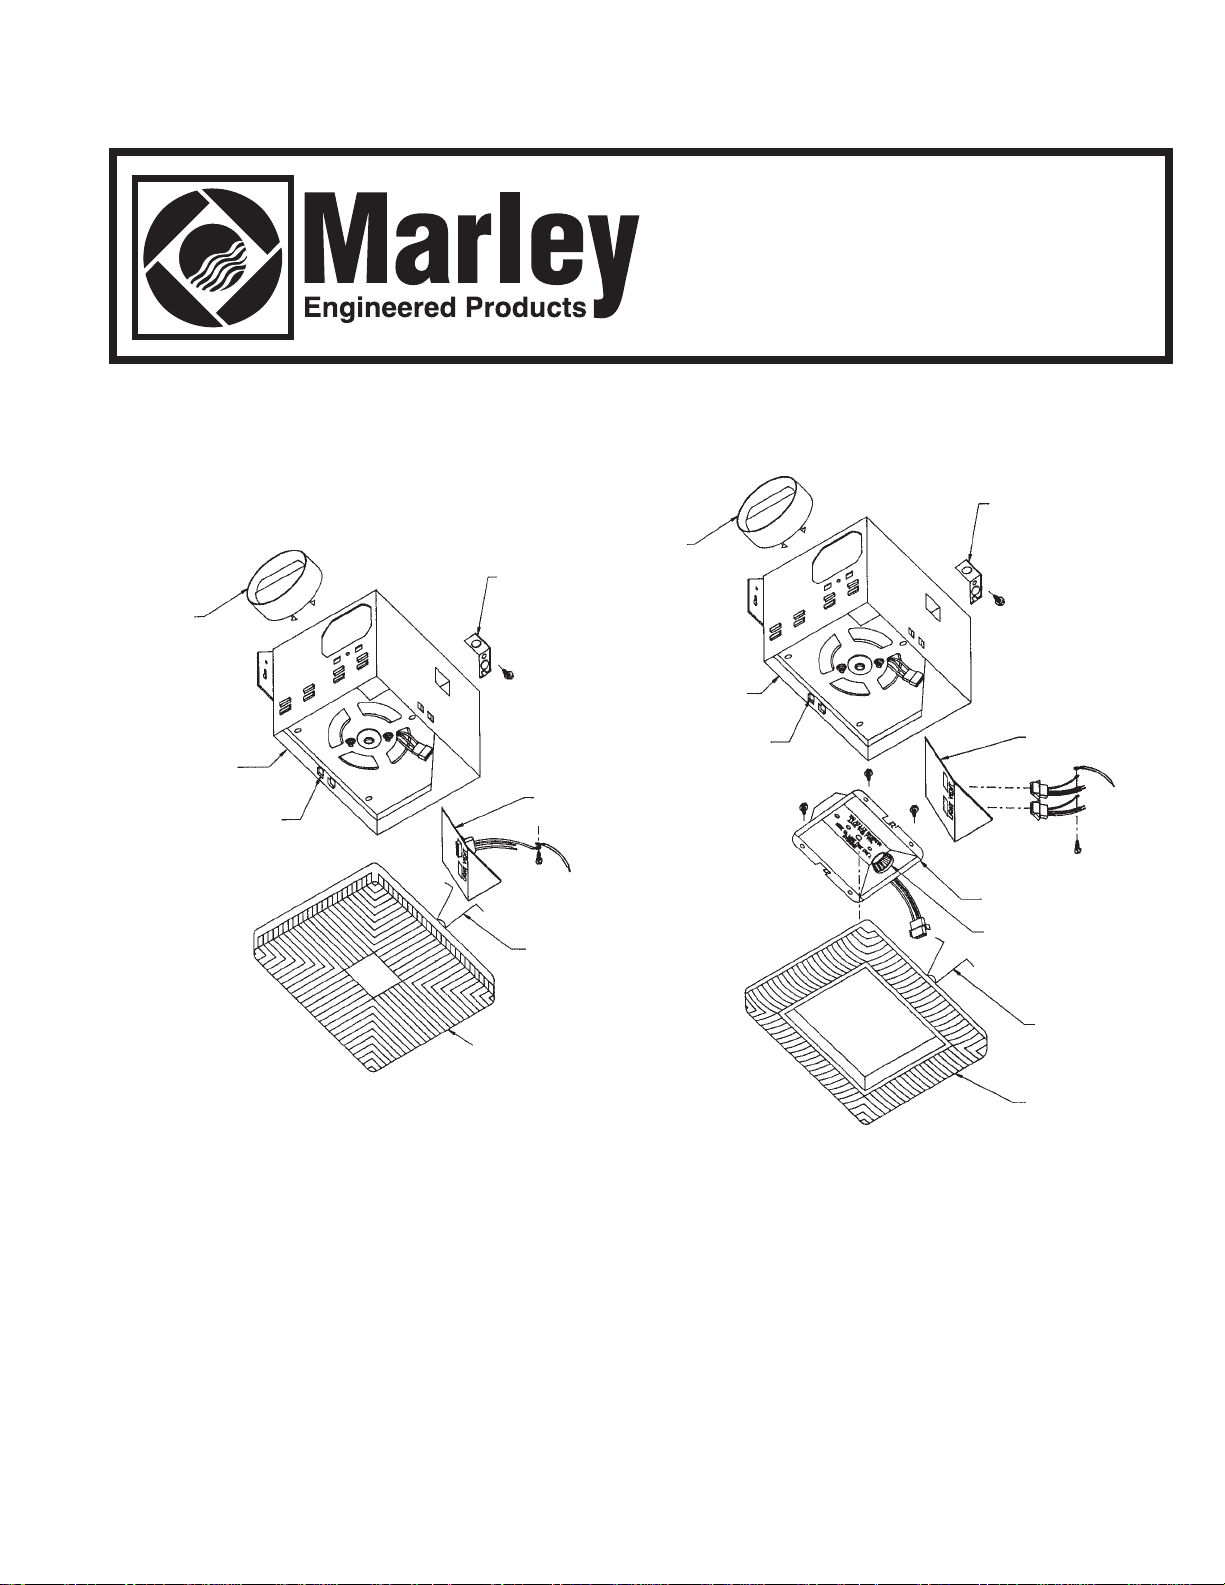
DUCT
ADAPTER
(ADAPTADOR
CONDUCTO)
BOTTOM EDGE
OF HOUSING
(EL REBORDE
INFERIOR DE LA
ENVOLTURA)
DE
GRILLE SPRING
SLOTS
(ABERTURAS DE
RESORTE DE
REJA)
KNOCKOUT
PAD
(MENSULA CON
ALMOHADILLA)
GRILLE
(REJA)
FIG. 1
OUTLET BOX
COVER
(CUBIERTA DE
CAJA DE SALIDA)
GRILLE
SPRINGS
(RESORTES
DE REJA)
DUCT
ADAPTER
(ADAPTADOR
DE CONDUCTO)
INFERIOR DE LA
BOTTOM EDGE
OF HOUSING
(EL REBORDE
ENVOLTURA)
GRILLE SPRING
SLOTS
(ABERTURAS DE
RESORTE DE
REJA)
KNOCKOUT
PAD
(MENSULA CON
ALMOHADILLA)
OUTLET BOX
COVER
(CUBIERTA DE
CAJA DE SALIDA)
REFLECTOR
ASSEMBLY
LAMP
RECEPTACLE
(ARMADURA
REFLECTORA)
(RECEPTÁCULO
DE LAMPARA)
GRILLE
SPRINGS
(RESORTES DE
REJA)
MODELS/MODELOS 6060, 6080, AND 6100
The Fans listed in these instructions are intended for use
in bathrooms. However, they can be used in other areas
where ventilation is required. These units are approved
for installation in the ceiling above a bathtub or shower
stall only when connected to a U.L. Listed GFCI
Protected Branch Circuit. All models are U.L. Listed type
I.C. (Inherently Protected) for installation in insulated
ceilings. Unpack carefully. If there are any missing
components or hidden damage, immediately contact your
distributor or the delivering carrier concerning
discrepancies.
GRILLE
(REJA)
MODELS/MODELOS 6060RL, 6080RL, AND 6100RL
Los ventiladores listados en estas instrucciones son para
uso en cuartos de baño. Sin embargo, pueden usarse en
otras áreas donde se requiere ventilación. Estas
unidades están aprobadas para instalación en el cielo
raso sobre una bañera o ducha, cuando están
conectadas a un circuito ramal protegido GFCI listado por
U.L. solamente. Todos los modelos son de tipo I.C.
(inherentemente protegidos) listados por U.L., para
instalación en cielos rasos aislados. Desempaque con
cuidado. En caso de haber componentes faltantes o
daños ocultos, avise inmediatamente a su distribuidor o a
la compañía de transportes con respecto a las
discrepancias.
Page 2

READ AND SAVE THESE INSTALLATION
INSTRUCTIONS
LEA Y GUARDE ESTAS INSTRUCCIONES DE
INSTALACION
IMPORTANT SAFETY INSTRUCTIONS
TO REDUCE RISK OF FIRE, ELECTRICAL SHOCK
OR INJURY TO PERSONS, OBSERVE THE FOLLOWING:
1. Do not use this fan with any Solid-State speed control device.
2. Use this unit only in the manner intended by the manu
you have questions, contact the manufacturer.
3. Before servicing or cleaning unit, switch power off at service panel
and lock service panel to prevent power from being switched on
accidentally.
4. Installation work and electrical wiring must be done by qualified
person(s) in accordance with all applicable codes and standards,
including fire-rated construction.
5. Sufficient air is needed for proper combustion and exhausting of
gases through the flue (chimney) of fuel burning equipment to
prevent back drafting. Follow the heating equipment
manufacturer’s guideline and safety standards such as those
published by the National Fire Protection Association (NFPA),
and the American Society for Heating Refrigeration and Air
Conditioning Engineers (ASHRAE), and the local code
authorities.
6. When cutting or drilling into wall or ceiling, do not damage
electrical wiring or other hidden utilities.
7. Ducted fans must always be vented to the outdoors.
8. If this unit is installed over a tub or shower, it must be marked as
appropriate for the application and be connected to a GFCI
(Ground Fault Circuit Interrupter) protected branch circuit.
9. NEVER place a switch where it can be reached from a tub or
shower.
10. CAUTION: For General Ventilating Use Only! Do not use to
exhaust hazardous or explosive materials and vapors.
11. Not for use in kitchens.
Tools Needed: Installation of your Marley Engineered Products is
easy. No special technical knowledge is needed; only a few ordinary
tools are required.
Screwdriver
Hammer
Saber saw, Keyhole Saw, Jig saw
Electrical drill
Wire cutters
Wire stripper
Safety glasses
Ruler and straight edge
Wire nuts and general electrical supplies
All hand tools should be insulated. Power tools should display the
U.L. Listing Mark.
WARNING:
facturer. If
INSTRUCCIONES IMPORTANTES DE SEGURIDAD
ADVERTENCIA:
OBSERVE LO SIGUIENTE PARA REDUCIR EL RIESGO DE INCENDIO,
CHOQUE ELECTRICO O LESIONES A LAS PERSONAS.
1. No use este ventilador con ningún mecanismo transitorizado de
control de velocidad.
2. Use esta unidad de la manera en que ha sido dispuesta por el
fabricante. En caso de tener preguntas consulte con el fabricante.
3. En caso de prestar servicio o limpiar la unidad, corte la
electricidad al panel de servicio y trabe el panel de servicio para
prevenir que la electricidad se conecte accidentalmente.
4. El trabajo de instalación y el cableado eléctrico deben efectuarse
por una persona(s) calificada de acuerdo con todos los códigos
y normas aplicables, incluyendo construcción de clasificación
nominal a prueba de incendio.
5. Se requiere aire suficiente para una combustión y escape
apropiados de los gases a través del tubo (chimenea) del equipo
quemador de combustible para prevenir el retroflujo. Siga las
pautas y normas de seguridad del fabricante de equipos de
calefacción tales como aquellos publicados por la Asociación
Nacional de Protección contra Incendios (NFPA) y la Sociedad
Americana de Ingenieros de Calefacción, Refrigeración y Aire
Acondicionado (ASHRAE), y las autoridades encargadas del
cumplimiento con los códigos locales.
6. Al cortar o perforar una pared o cielo raso, no dañe el cableado
eléctrico ni otros servicios ocultos.
7. Los ventiladores conectados a conductos deben siempre
ventilarse al aire libre.
8. Si esta unidad está instalada sobre una bañera o ducha, debe
estar marcada como apropiada para la aplicación y debe estar
conectadas a un circuito de derivación protegido por un
Interruptor Diferencial / Interruptor de Falla a Tierra (GFCI).
9. NUNCA instale un conmutador donde pueda alcanzarse desde
una bañera o ducha.
10. PRECAUCION: ¡Para uso de ventilación general, solamente! No
lo use para escape de materiales y vapores riesgosos o
explosivos.
11. No son para usar en cocinas.
Herramientas requeridas: La instalación de su equipo Marley
Engineered Products es fácil. No es necesario poseer ningún
conocimiento técnico especial y sólo se requieren unas pocas
herramientas comunes.
Destornillador
Martillo
Sierra tipo sable, sierra puntiaguda, sierra de vaivén
Taladro eléctrico
Cortacables
Pelacables
Gafas de seguridad
Regla y barra recta
Tuercas para cable y suministros eléctricos en general
Todas las herramientas manuales deben estar aisladas. Las
herramientas mecánicas deben mostrar la marca de listado de U.L.
Page 3

New Home Installation
If duct adapter is factory installed, disregard item #1.
1. Attach duct adapter onto housing.Press firmly to
lock in place. See Fig. 2. Insure that damper opens
and closes freely. The attachment of the duct may
be reinforced by installing a #8AB screw through
the obround hole in the duct adapter and the small
hole in the housing.
2. Attach housing directly to ceiling joist using (4)
screws or nails. Nonlighted Models: Bottom
flange of housing should drop below bottom of
ceiling joist a distance equal to the thickness of the
sheetrock. Lighted Models: Bottom flange of
housing should drop below bottom of ceiling joist a
distance equal to the thickness of the sheetrock
minus 5/16”. See Fig. 3.
3. Run 120 Volt AC, 60 Hz power cable from wall
switch/switches to appropriate knockout in
housing. The knockout support may be reversed,
if desired, to open alternate knockout hole. Use a
BX or ROMEX connector in the knock-out to
secure power cables to housing.
4. Remove the outlet box cover from housing. See
Fig. 1. Connect cables from wall switch/switches to
receptacle wires using approved wire connectors.
Connect ground wire to green wire in outlet box.
Replace outlet box cover insuring locking tab is
engaged. See Fig. 4 for wiring diagrams.
CAUTION: Be sure all wiring complies with
local and national electrical codes and
housing is properly grounded.
5. Install 4” round duct to duct adapter on housing.
Insure that duct discharges the fan to the outside.
Be sure nothing obstructs the discharge of the
vent. Take precautions to assure that insulation
does not get into duct work or fan discharge
opening.
6. After sheetrock and plaster has been put up, install
grille to housing by squeezing grille springs and
inserting into slots inside the housing. See Fig. 1.
Lighted Models: Remove lens from grille/reflector
assembly by pushing in at one of the two
indentations on the side of the lens. Push light plug
into light receptacle on outlet box cover. Install
grille/reflector assembly to housing by squeezing
grille springs and inserting into slots inside
housing. See Fig. 1.
7. WARNING: To reduce the risk of Fire, use only
Type A19 Lamps, 100 Watt maximum.
FIG. 2
LOCKING TABS
(ALETAS DE
TRABA)
MOUNTING
FLANGE
(REBORDE DE
MONTAJE)
FIG. 3
FIG. 4
MODELS 6060RL, 6080RL,
AND 6100RL
DUCT ADAPTER
(ADAPTADOR DE
CONDUCTO)
ALIGNING
TABS
KNOCKOUT
SUPPORT
(SOPORTE DEL
ORIFICIO CIEGO)
See Note 2
(Vea la Nota 2)
(ALETAS DE
ALINEACION)
Instalación en casas en construcción
1. Fije el adaptador de conducto sobre la envoltura.
Presione firmemente para calzar en su lugar. Vea
la Fig.2. Asegúrese que el regulador se abre y se
cierre libremente. La fijación del conducto puede
reforzarse instalando un tornillo no. 8AB a través
del orificio circular en el adaptador del conducto y
el orificio pequeño en la envoltura.
2. Fije directamente la envoltura a la viga del techo
usando cuatro (4) tornillos o clavos. Modelos sin
luz: El reborde inferior de la envoltura debe estar
ubicado debajo de la parte inferior de la viga del
cielo raso a una distancia igual al espesor del
material sheetrock. Modelos con luz: El reborde
inferior de la envoltura debe estar ubicado por
debajo de la parte inferior de la viga del cielo raso
a una distancia igual al espesor del material
“sheetrock” menos 5/16". Vea la Fig.3.
3. Tienda un cable eléctrico de 120 voltios CA, 60 Hz
desde el conmutador/ conmutadores de pared al
orificio ciego apropiado en la envoltura. El soporte
del orificio ciego puede revertirse si se desea para
abrir un orificio ciego alterno. Use un conector BX
o ROMEX en el orificio ciego para asegurar los
cables eléctricos a la envoltura.
4. Extraiga la cubierta de la caja de salida de la
envoltura. Vea la Fig. 1. Conecte los cables desde
el conmutador/ conmutadores a los cables del
receptáculo usando los conectores apropiados de
cable. Conecte el cable de conexión a tierra al
cable verde en la caja de salida. Vuelva a colocar
la cubierta de la caja de salida asegurándose que
esté calzada la aleta de traba. Vea la Fig.4 por los
diagramas de cableado. PRECAUCION:
Asegúrese que todo el cableado cumpla con
los códigos eléctricos locales y nacionales y
que la envoltura esté bien conectada a tierra.
5. Instale un conducto circular de 4" al adaptador de
conducto en la envoltura. Asegúrese que el
conducto descargue el ventilador al aire libre.
Asegúrese que nada obstruya la descarga de
ventilación. Tome precauciones para asegurar
que la aislación no penetre al conducto o a la
abertura de descarga del ventilador.
6. Después de colocar el material “sheetrock” y el
yeso, instale la rejilla en la envoltura presionando
los resortes de la rejilla e insertando dentro de las
ranuras dentro de la envoltura. Vea la Fig.1.
Modelos con luz: Extraiga los lentes de conjunto
de rejilla/reflector empujándolos dentro de una de
las dos muescas laterales de los lentes. Empuje el
enchufe de la luz dentro del receptáculo de la luz
en la cubierta de la caja de salida. Instale el
conjunto de rejilla/reflector en la envoltura
presionando los resortes de la rejilla e insertando
dentro de las ranuras dentro de la envoltura. Vea
la Fig. 1.
7. ADVERTENCIA: Para reducir el riesgo de
incendio, utilice solamente el tipo lámparas de
A19, máximo de 100 vatios.
Page 4

WARNING: RISK OF FIRE!
Use of lamps other than those specified
constitutes a fire hazard!
8. Check installation to insure that wiring
has been installed properly and that no
mechanical noise is present which may
be caused by loose components.
Existing Home Installation
1. In attic, mark ceiling for cutout by using
housing as template. Note that housing is
mounted directly to ceiling joist. See Fig. 5
2. Follow Steps 1-7 in the New Home
Installation section for the remaining
installation steps.
.
FIG. 5
CEILING MATERIAL
(MATERIAL DE
TECHO)
ADVERTENCIA: ¡RIESGO DE
INCENDIO!
¡El uso de lámparas diferentes a las
especificadas constituye un riesgo de
incendio!
8. Inspeccione la instalación para asegurarse
que el cableado se ha instalado bien y que
no haya ruido presente que puede estar
causado por componentes flojos.
Instalación en casas en construcción
1. En el altillo, marque el cielo raso a cortar
usando la envoltura como una plantilla. Note
que la envoltura está montada directamente
a la viga del cielo raso. Vea la Fig.5.
2. Siga los pasos 1-7 en la sección de
Instalación en casas en construcción para los
pasos restantes de instalación.
LIMITED WARRANTY
Dear Customer,
Thank you for your interest in Marley Engineered Products bath fans. We’re sure you will enjoy its
benefits for many years to come. Please take a minute to fill out the following information and keep
it in your permanent records.
Date Purchased ______________________________Date Installed____________________
Model Number________________________________
LIMITED WARRANTY
This Marley Engineered Products bath fan is warranted to be free of defects in material and
workmanship for 12 months from date of original purchase.
Elements for baseboard heaters are warranted for 10 years from the date of original purchase.
There is no other warranty, express or implied, except such as is expressly set forth herein. Seller
will not be liable for any general, consequential, or incidental damages, including without limitation
any damages for loss of use or loss of profits, for any breach of warranty or for negligence. Seller’s
liability and buyer’s exclusive remedy are limited to the repair of defective goods or the shipment of
equivalent goods, or the granting of a reasonable allowance on account of any defects, as the seller
may elect.
To obtain performance under this warranty, you must:
1. Contact the Marley Engineered Products Service Department at 1-800-642-HEAT between the
hours of 8:30 a.m. and 5:00 p.m. E.S.T., Monday through Friday.
2. Provide the model number of the product, the date of installation, and state the nature of the
difficulty being experienced.
3.
The Marley Engineered Products Service Representative will determine the best way to resolve
the difficulty.
Products within warranty which have been installed and returned to the seller for repair will be
repaired and returned as used products. Repairs to products outside the warranty period will be
subject to labor and parts charges.
Some states have enacted legislation which (a) does not allow the inclusion of limitations on
incidental or consequential damages; (b) does not allow limitations on the length of a warranty
period; (c) precludes exclusion, during the period of a limited warranty, of any implied warranties of
merchantability or fitness for purpose.
To the extent of such provisions being applicable in your state, the limitations in this warranty may
not apply.
TO ENSURE SAFE OPERATION
• Be sure that this unit is correctly installed and wired by a qualified installer in accordance with the
instructions and applicable NEC or equivalent codes.
• Be sure that operating instructions are followed and that moving and heating parts are
kept clean and free from obstructions.
Any warranties granted or liabilities assumed hereunder will not apply to goods that have been
damaged in transit, altered, repaired, installed or operated otherwise than in conformity with the
above requirements for safe operation.
GARANTIA LIMITADA
Estimado cliente,
Gracias por su interés en los ventiladores de baño Manley Engineered Products. Estamos seguros
que usted gozará de sus beneficios por muchos años venideros. Por favor tome un minuto para
completar la información siguiente y guárdela con sus archivos permanentes.
Fecha de compra______________________________Fecha de instalación ______________
Número de modelo ____________________________Número de Fabricación
GARANTIA LIMITADA
Este ventilador de baño Marley Engineered Products está garantizado de estar libre de defectos en
material y mano de obra por 12 meses a partir de la fecha original de compra.
Los elementos de los calentadores de zócalo están garantizados por 10 años a partir de la fecha
original de compra.
No hay otra garantía, expresa o implícita, excepto aquella expresamente establecida aquí. El
vendedor no es responsable por perjuicios generales, consecuentes, o incidentales, incluyendo sin
limitación, perjuicios por la pérdida de uso o ganancias, por cualquier violación de la garantía o por
negligencia. La responsabilidad del vendedor y el recurso legal exclusivo del vendedor están
limitados a la reparación de productos defectuosos o el envío de productos equivalentes, u otorgar
un reembolso razonable por cuenta de defectos, según sea la elección del vendedor.
Para obtener cumplimiento con los términos de esta garantía, usted debe:
1. Llamar al Departamento de Servicio de Marley Engineered Products al 1-800-643-HEAT entre
las horas de 8:30 a.m. y 5:00 p.m. E.S.T., de lunes a viernes.
2. Proporcionar el número de modelo del producto, la fecha de instalación, y explicación del
problema.
3. El representante de servicio de Marley Engineered Products determinará la mejor manera de
resolver el problema.
Los productos bajo garantía que se han instalado y devuelto al vendedor por reparaciones se
repararán y devolverán como productos usados. Las reparaciones a los productos fuera del
período de garantía están sujetos a cargos por mano de obra y piezas.
Algunos estados han promulgado leyes que (a) no permiten la inclusión de limitaciones en
perjuicios incidentales o consecuentes; (b) no permiten limitaciones en la duración del período de
garantía; (c) prohiben la exclusión, durante el período de garantía limitada, de las garantías
implícitas de comercialización o aptitud para un fin particular.
Al grado que tales provisiones sean aplicables en su estado, las limitaciones en esta garantía
pueden no aplicarse.
PARA ASEGURAR UNA OPERACION SEGURA
• Asegúrese que esta unidad esté correctamente instalada y cableada por un instalador calificado
de acuerdo con las instrucciones y códigos aplicables NEC o equivalentes.
• Asegúrese que se sigan las instrucciones de funcionamiento y que las piezas móviles y de
calefacción se mantengan limpias y libres de obstrucciones.
Todas las garantías otorgadas o responsabilidad asumida bajo la presente no se aplica a productos
que han sido dañadas en tránsito, modificados, reparados, instalados u operados de una manera
que no conforme con los requerimientos de arriba para una operación segura.
HOW TO OBTAIN WARRANTY SERVICE AND
WARRANTY PARTS PLUS GENERAL INFORMATION
1. Warranty Service or Parts 1-800-642-4328
2. Purchase Replacement Parts 1-800-654-3545
3. General Product Information www.marleymep.com
Note: When obtaining service always have the following:
1. Model number of the product
2. Date of manufacture
3. Part number or description
470 Beauty Spot Rd. East
Bennettsville, SC 29512 USA
COMO OBTENER SERVICIO EN GARANTIA,
PIEZAS DE REPUESTO E INFORMACION GENERAL
1. Servicio o repuestos, en garantía: 1-800-642-4328
2. Compra de piezas de repuesto: 1-800-654-3545
3. Información general sobre productos: www.marleymep.com
Nota: Cuando solicite servicio, siempre dé la información que sigue:
1. Número de modelo del producto
2. Fecha de fabricación
3. Número de parte o descripción
Part No. 5200-2620-001 ECR 37351 Pieza Nº 5200-2620-001
05/07
 Loading...