


INSTRUCTION MANUAL
Before using the
TV,
please read this manual thoroughly,
and retain it for future reference.
e(
M。del:
“ This product is manufactured and sold by Curtis
RCA, the RCA logo, the two dogs (Nipper and Chipper) logo, are registered trademarks or trademarks
Trademark Management and are used under license by Curtis
Any other product, service,
n。r
sponsored by RCA Trademark Management
RNSMU5536
lnternati。nal
c。mpany,
trade or product name and logo referenced herein are neither endorsed
or
its
lnternati。nal
affiliates"
Ltd
Ltd
of
us
RCA
CONTENTS
English
SAFETY
PRECAUTI。N
IMPORTANT
SAFETY
2
INSTRUCTIONS
ACCESSO阳ES
3
GETTING
4
STARTED
CONTROL
5
REFERENCE
GUIDE
WALL MOUNT
6
INSTALLATI。N
7
c。N
NECTI。NS
Remote
Front
Side
Back
Installation
Antenna
AV
YPbPr
HDMI Connection
Power
Optical audio output Connection
Control
View
View
View
Connection
Connection
Connection
Cord
Connection
1
2
3
3
4
5
5
6
7
8
9
9
10
10
11
12
8
INITIAL SETUP
TV SETUP
9
Putting
Turning The
Source
Picture
Sound
Function
Time
Option Menu
Lock
Channel
The
Selection
Menu
Menu
Menu
Menu
Menu
Menu
Unit
Unit
On A
Proper
On For The
Place
First
Time
13
13
13
14
15
16
17
18
20
21
10
use
MEDIA
PLAYER
CONTENTS
22
11
12
SMART
。
PER.I:π。N
DISPLAY
”。
SPECIFICATION
13
14
TROUBLE-
SHO。τING
GUIDE
TV
DE
24
Video Formats 26
27
TV
Symptom
28
• The pictures, functions and
If
it
does
not
match the
actual
other
information provided
object, please
refer
to the
in
actual
the manual are
product.
for
reference
on
伽
SAFETY
PRECAUTION
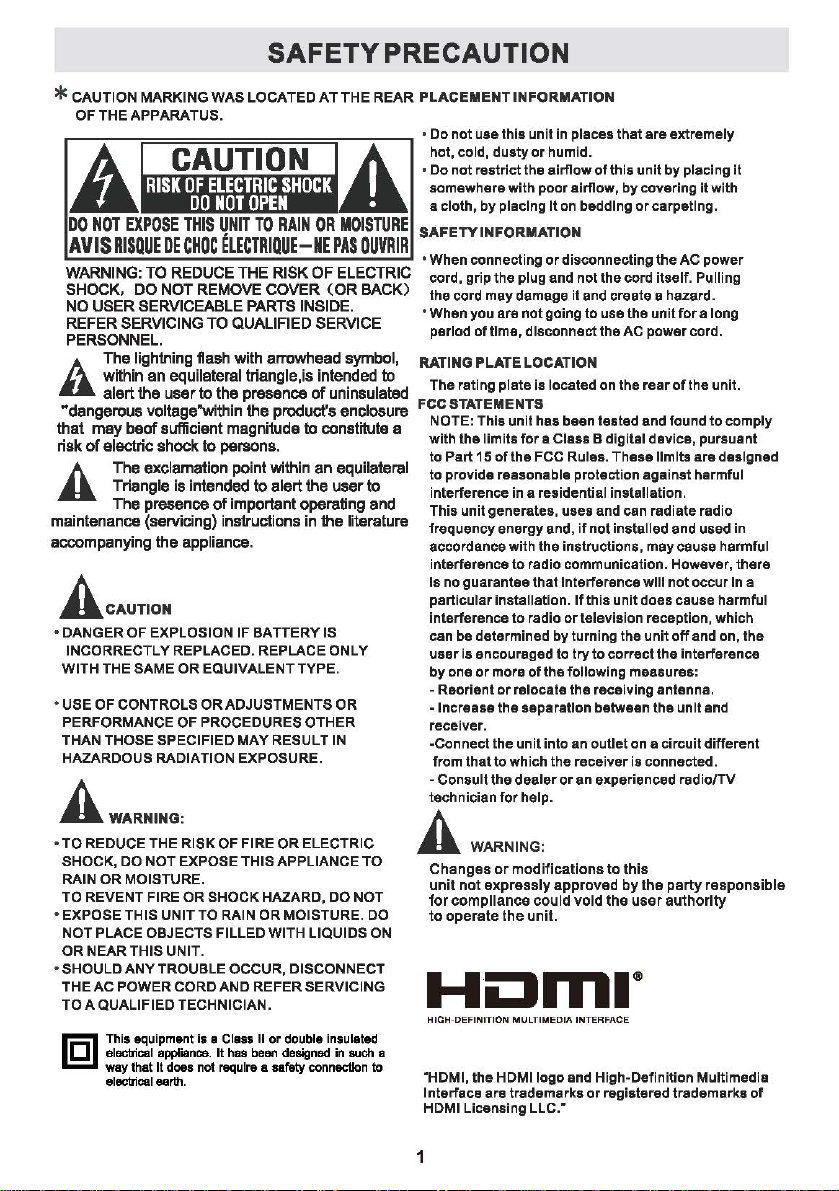
* CAUTION MARKING
。
F
THE
---
APPARATUS.
tuM
A
,
UA
回国阳刚可以山回回
..
四川
ι
-
wSNRPA
明皿叩
们川一
AmoEhhmtMKAr
mm
WAS
LOCATED
一响
-
-
一阳
E
EE
-
Em·
耻而-
m
阳刚阳-
nEMMmv
HUπ
UE
’
配
EE
RU
E -
囚川,旦
啤『
且
E
晦
HUED
咽
UU
m
m
四-。
-
-
-
CM
mvpU
u
ETCNg
去
-
EQJemmmp
且。由
EGa
TM
AT
THE
lllUMM
1l
一即国·阳
一曲而圃川→-
一呻霄’
-
-
O
KEMLmmτ
司
席团川则-阳。
uESVS
臼
TFmg
MMM
da
aEm
-
K
咽凹-
MH
晴-
阳-
-
ORSS
UR
E
F
KE
。
(
ERHm
DE
削
-
vm
D
匹
站时
忧
川-
MmZ
刷
e
M
伽抽
ZEZ
-
pmkaαP
tpmMfl
吨阳
ddra
臼
.
MEm
削
g
叫
V
晦
Zmm
町
阔
BMmmMb
raMZ
由
hgMm
白
口
,
hddcum
cnn
ma
-
mem
usmanuh
阳归
副叩
h
创届世
恼。-
enm
由
m
缸
4·trdma
VMM
础
A
配到刀
mA
umm
机由
咽州时刷刷
mFkdm
wwt
阴阳
TTJ
M
1
即叫川
川
m
阳
吨
m
蹦酬
.四叫
h
副巾
呻-
A CAUTION
• DANGER OF EXPLOSION
INCORRECTLY REPLACED. REPLACE ONLY
WITH THE
• USE OF CONTROLS
PERFORMANCE OF
THAN THOSE SPECIFIED MAY RESULT IN
HAZARDOUS RADIATION EXPOSURE.
AwA
•T。
SHOCK, DO NOT EXPOSE THIS APPLIANCE TO
RAIN
TO REVENT FIRE OR SHOCK HAZARD,
• EXPOSE THIS UNIT TO RAIN OR MOISTURE.
NOT
。
R NEAR THIS UNIT.
• SHOULD
THE AC POWER CORD AND REFER SERVICING
TO A QUALIFIED TECHNICIAN.
田
IL」Ee阳刨副ap回阳n曲Ith瞌be酣de啕n回in阳由a
- waythatlt
SAME。R
…
REDUCE
THE
OR
M。ISTURE.
PLACE。BJECTS
ANY
TROUBLE OCCUR, DISCONNECT
This
equi阳ent川1
·阳
d幅s n创陌qui阳a
trical阔叶1
IF
BATTERY
EQUIVALENT TYPE.
OR
ADJUSTMENTS OR
PROCEDURES。THER
RISK。F
FIRE。R
FILLED WITH
95
ELECTRIC
Sil俑ty
IS
DO
NOT
LIQUIDS。N
conn缸llon
REAR
PLACEMENT
--
AHHM
aa
h
‘
--
u
..
··WFLEEEK
配昭删古旧’“陪
mwm
町坦白讪
-
RC
rz
刷
咱划山阳叫刷刷
厅
hw
K
前划自晦叫
晦
cm·
a
唰陪
』
bam
rgB
M
D
。
to
INF。RMATION
MA
…川州
叫川口
U
川…山
mh
s
··
口
mMmhm
REvda
t
syt
川
dh
时
twh
咱
刷刷
Mbmmq
mmmrh
川
MnlandLeTHID
、
EC
川
目
LW
MM
由
叮
dE
dG
且川市川…弘口时
凹’
刚
mm
啤
m
川巾山
比勒
Mm
NMOdn
mMmMM
川
m
Umwp
仰”四川剧
叫叫叶
叫叩
川川剧创时剧时
MmH
tEauB
mmIMSM
耐
mE
响川
肌
』
mHJM
HHAU
mmr
剧
町川剧
M
阳市肌口时
阻町酬啤
d
町
mF
Umwm
川町
a
剧创町
esem
Mr
WM
配画
山阴阳川川
副
td
WM
骂骂阳
阶剧
阳州
Mm
MJ
M
阳
耐
M
m
晴
eoushhmMmMm
-
oaag
伽
rM
创「阳吨。
bni
M
刚刚帆
叩阳
副
a
mt
。
mM
Mne
附∞
刷刷刷刷叫“
MM
--
eHOW
町
MaM
川
mb
州
mωm
4
咆阳比
肌川
川曲”盯盯
嗣川加邮
Mmn
ee
AUE
e
Changes
unit
fo『compllancec。uld
to
Hi:Jn
HIGH DEFINITION MULTIMEDIA INTERFACE
“HDMI,
Interface are trademarks
HDMI Licensing LLC."
or
modifications
n口t
exp『·esslyapp『口ved
operate
the
unit.
void
to
the
咽@
the
HDMI logo and High-Definition Multimedia
or
registered trademarks
阳’咱
MU
刷阳毗伽
hg
们。-
叶
mmA
mMW
HEelAh
肌
Meed
刷
M
川剧创
酬川阳
副幅
T
刷
n
odaαEOnC
副町
hM
MehH
忡灿川
且-
币,
mu·
hu
mMhwHVW
明
阴阳∞」闹闹剧
e
勘
mmM
配
血
murw
hMm
MS·
阳
刷
this
by
the
use「authority
阴晴阳
MMF
仙”川阳阳刚响创句
MWMmMMMmm
蛐附
MV
叫川同∞
m
ErPE
4be
町』
msh
刨曰“
时
eob
Nr1vw
陆咐
副
n
Mddm
啊’咱
atHmemosrttrwi
叮-
hsmHtuned
『《
party
mdhg
陪阳
pneAfzorfues
ufhcpuwrchn
阳川
dJ
川
m
引
AU
阳
’
mum
ahuu
刨
EbmaotaHMHM
剧
川
S
朋
U
附
vcutaMdmMddω
muoatulUH
时
um
山
tm
此
d
resp口nsible
WHW
emwum
仙阳咽吨吭∞…山阳巾。
川明白
L
川
dvt
m
onEn
yel
川崎|
du
阳’旧
刻
ωWM
n
eteurunteMHHT
刚
MιMdhm
mluest
--
山川嘟州”川咱
1
’阳
町
v
of
1
IMPORTANT
SAFETY
INSTRUCTIONS
1 )Read these instructions.
2)Keep these instructions.
3)Heed all warnings.
all instructions.
4)Follow
5)Do not use this apparatus near waler.
6)Clean only with a dry cloth.
7)Do not block any ventilation openings.
Install in
ace。rdance
with the
manufacturer's instructions.
S)Do
not I nstal I near any heat sources such
as
radial
。阳,
heal
registers,
stoves
,。『
other apparatus {Including amplifiers) that
produce
9)Do not defeat the safety purpose
heat.
polarized口r
A polarized
grounding-type
plu目has
two blades with one
pl
咽,
of
tha
wider than the other.
A groundingtype plug has two blades
in
and a third ground
The wide blade or the third prong
p『ovlded
for your safety.
If the provided plug does not
wall
。
utlet,
replacement
目 P『ong.
consu It
an
electrician
of
the obsolete outlet.
fit
is
into
y。ur
for
PERSONAL SAFETY NOTICE
•
ALWAYS
read
and
follow
all
instructions
for
1 O)Protect the power cord from being walked on
。
r
pinched particularly at plugs, convenience
receptacles, and the point where they exit
from the apparatus.
11
)Only use attachments / accessories specified
manufacturer
by the
12)Use。nly
with the cart, stand, ~,目,.‘
tripod, bracket,
specified by the
or sold with the apparatus.
When
movl
ng
or
table
manufacture
a cart
is
used, use caution when
『,
the cart I apparatus com blnallon
~咽-
•
‘民
to
avoid injury from tip-over.
13)Unplug this apparatus during lightning
Storms or when unused
long periods
of
for
time.
14
)Refer all servicing
to
qualified service
personnel. Servicing is required when the
apparatushas
been damaged
such as the power cord
liquid has been spilled
In
any way,
o『plug
is
o『objects
damaged,
have fallen
into the apparatus, the apparatus has been
exp。sed
to rain
or
no『mally,。r
The
mains
15)
the
disα:,nnect
the
installation
molstu『e,d口es
has been dropped.
plug
Is
us创as
device shall
and
use
not operate
disconnect
m『『1ain陪adily
of
the
TV.
d
制”,
operable.
一
1.1
J
噩噩~二
ι
阻埠’
,,11"
•
Place
the
•
DO
NOT
child「en.
•
DO
NOT
•
DO
NOT
•
ALWAYS
grabbed
•
When
by
installing
professional
•
Before
the
weight
installer.
TV
in a location
place
allow
allow
route
children.
TV
installer,
installing
of
the
the
TV
children
children
all
the
the
TV
the
TV
and
that
is
on a furniture
to
pull
the
t。play
cables
connecting
on a wall,
and
follow
TV
on a wall,
the
mount.
level
in
f『。nt
with
TV
or
please
the
installation
please
If
in
doubt,
and
of
stu『dy.
drawers
climb
O『around
to
the
on
that
the
TV
the
s。the
purchase a TV
instructions
check
to
make
please
ask
2
can
be
furnitl』re
TV.
cables
mount
sure
the
advice
used
as
steps
where
the
cannot
recommended
that
come
the
wall
structure
f「·om
by
small
TV
is
placed.
be
easily
by
with
the
can
a
professional
pulled
a
TV
mount.
suppo『t
and
TV
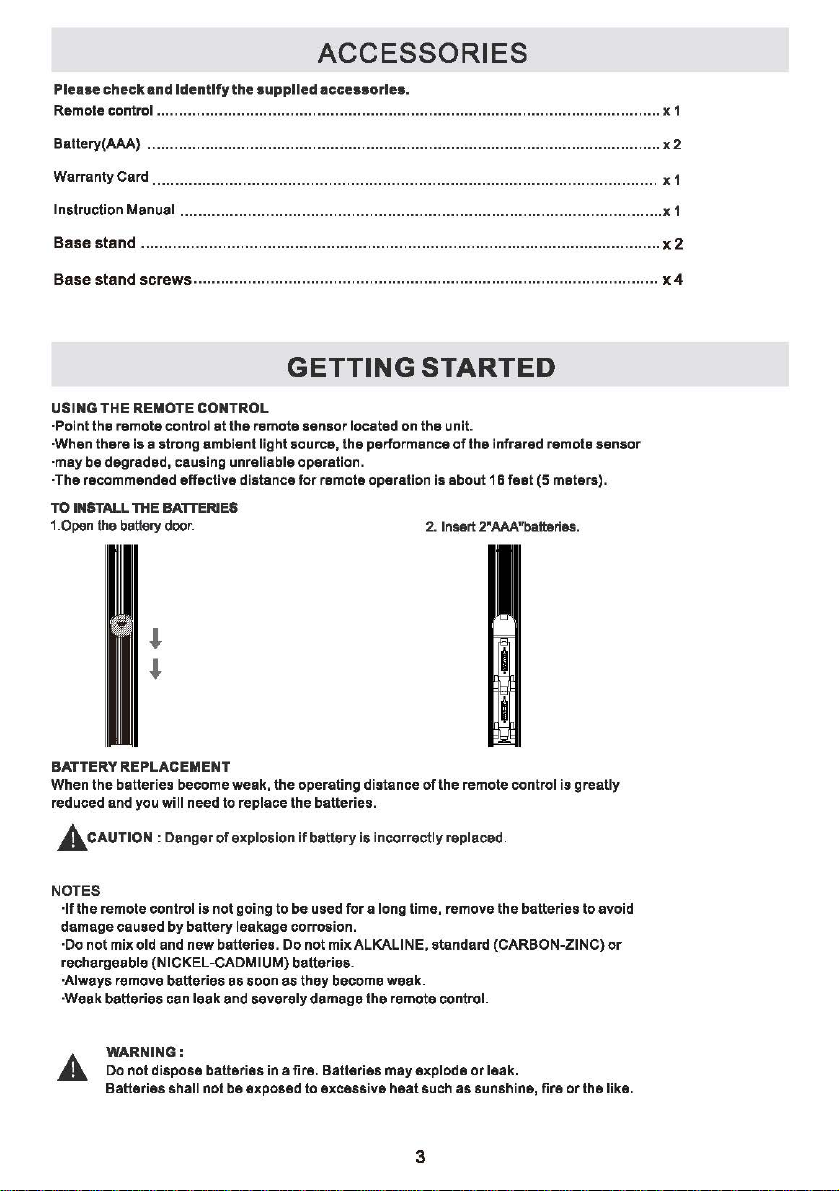
ACCESSORIES
Please
c:hec:k
and
Identify
the
supplied
Remote control
Ballery(AAA) ................................................................................................................... x 2
.....…..……………E…..…..…..………..…..…..……………E………E…..………..…......
ac:c:ess。rles.
x 1
Warranty Card
Instruction Manual
Base
stand
Base
stand
USING THE REMOTE
·Point the remote control
·When there
·may
be
·The recommended affective distance
τ。INS1l,且LL
T。闵n伽e
…-……-…-…-…...…-…-…--…--
…-……-…-…--…...…-…--…--…--…·-…-……-…·-…..
........…E………..…E………..…………
screws
....................................................................................................... x 4
C。NTR。L
at
is
a strong ambient
degraded, causing unreliable operation.
THEBA"πER』ES
batte『y
door.
the remote
lighlsource,
,I.
,I.
E…E …E
…………...…E………..……..………..…....
GETTING
sens。r
located
。
the
performance
for
remote operation
… -…-……- …
STARTED
n
the unit.
of
the infrared remote
is
about
16
feat (5 meters).
2.
lnse时2”'AAA”ba恤,而
as.
-…-….
sensor
x 1
x 1
x2
BATTERY REPLACEMENT
When the batteries become weak, the operating distance
reduced and you will need
A刷n。N:Dan目er
NOTES
·If the remote control is
damage caused
·Do not mix old and new batteries. Do not mix ALKALINE, standard
『
echar目。able
·Always remove batteries as soon
·Weak batteries can leak
A
(NICKEL-CADMIUM) batteries.
WARNtNG:
Do
not
dis pose batteries in
Batteries shall not
by
battery
t。replace
of
not
and回verely
be
the
batteries.
explos川battery
going to
be
leaka日e
corrosion.
as they become weak.
a 币睛,
exposed
is
used
for
damage the remote control.
Batteries
t。excessive
of
the remote control is greatly
i
nco叫ly
a long lime, remove the batteries to avoid
may explode
『@
heat
such as sunshine, fire
3
(CARB。N-ZINC)or
or
leak.
or
the like.
CONTROL
REFERENCE
GUIDE
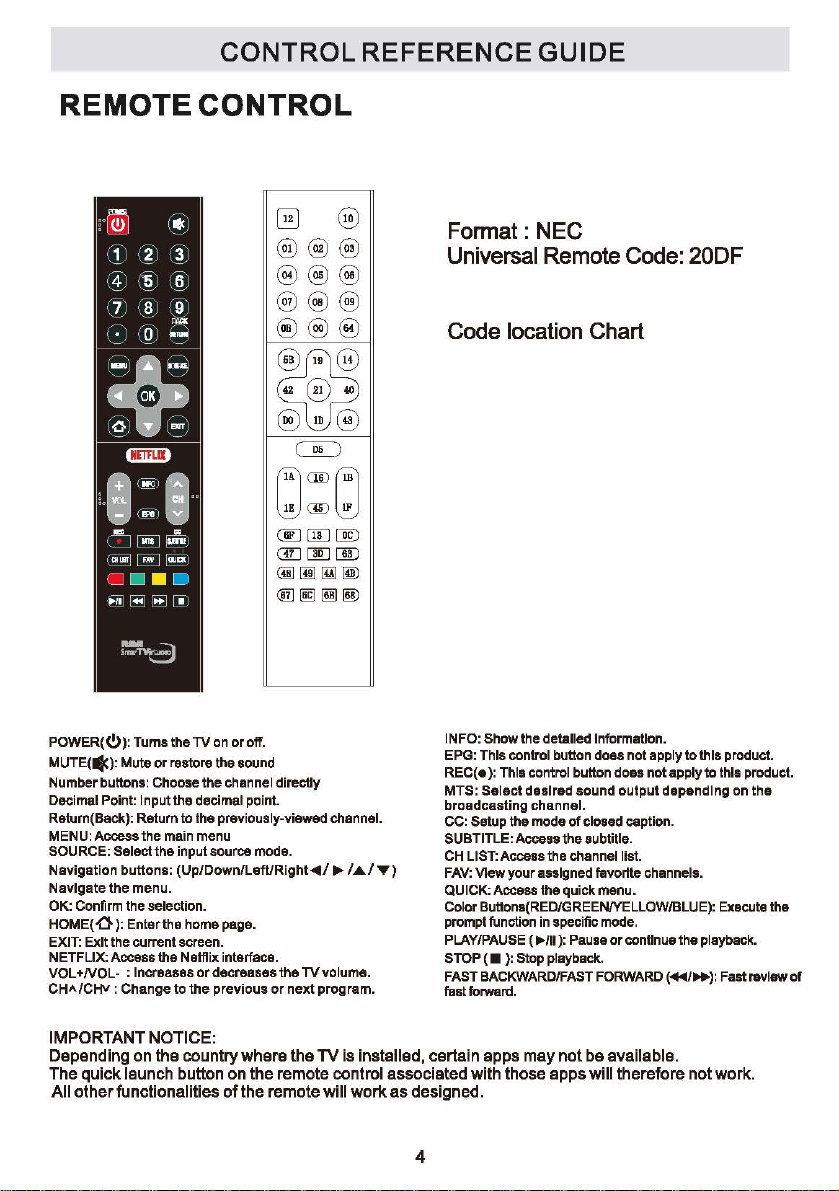
REM。TE
CONTROL
z
叫
00画JOO
(ill型E宣D
@)
[1ID
IMl
[ID
道
ll~~IID
Format: NEC
Universal Remote Code: 20DF
Code location Chart
p。WER(<!>):
MUTE
Number buttons: Choose the channel
Deci『nalp。
Return(Back): Return to the
MENU:Ac饵ss
SOURCE: Select the input
Navigation
Navigate
OK: Confirm the selection.
H。ME(O
EXIT: Exit the
NETFLIX: Access the Nelllix interface.
v。
L+NOL-
CHA/CHv
IMP。RTANTN。
Depending
The
All
Tums the
TV
on
or
(晾):Mu悔。r咱即用
int·
Input the decimal point.
the main menu
bu忱。ns:
the
menu.
):
Enter the home page.
curr哩ntscreen.
:
lncraasasordecreasestheTVvolume.
Change
on
quick
launch
other
functionalities
the
previou创y-viewed
sour帽mod
(Up/Down/LefURight
t口the
previous
TICE:
the
country
button
。
of
off.
sound
where
n
the
the
di陪ctly
a.
or
next
the
remote
remote
channel.
..,.,’,.,..,,)
program.
TV
is
installed,
control
will
work
INFO: Show the detalled lnformauon.
EPG: This control
REC(•):
This control button
MTS:
Select
bro回dcesting
CC: Setup the mode
SUBTITLE:
CHLIST:Ac四”the
FAV:
QUICK:Acce锚the
Col。r
prompt function in
PLAY/PAUSE (
STOP ( • ): Stop playback.
FAST
fastforwa
certain
associated
as
designed.
desired
channel.
Ac回回the
View your
Buttona(RED/GREEN/YELLOW/BLU
~/II):
BACKWARD』FAST
时,
apps
may
with
those
4
bu址。n
does not apply
d口
es
sound
of
clo四d四ption.
subtitle
channel list.
assigned阳vortte
quick menu.
speci自cm。
Pau
not
be
apps
not apply to this product.
output
channels.
de.
帽。『
continua
FORWARD
available.
will
thereto陪not
lo
this product
depending
E):
the
p国yback.
(~”’):
work.
on
the
Execute the
F,笛t
『刷阳
wot
CONTROL
REFERENCE
GUIDE
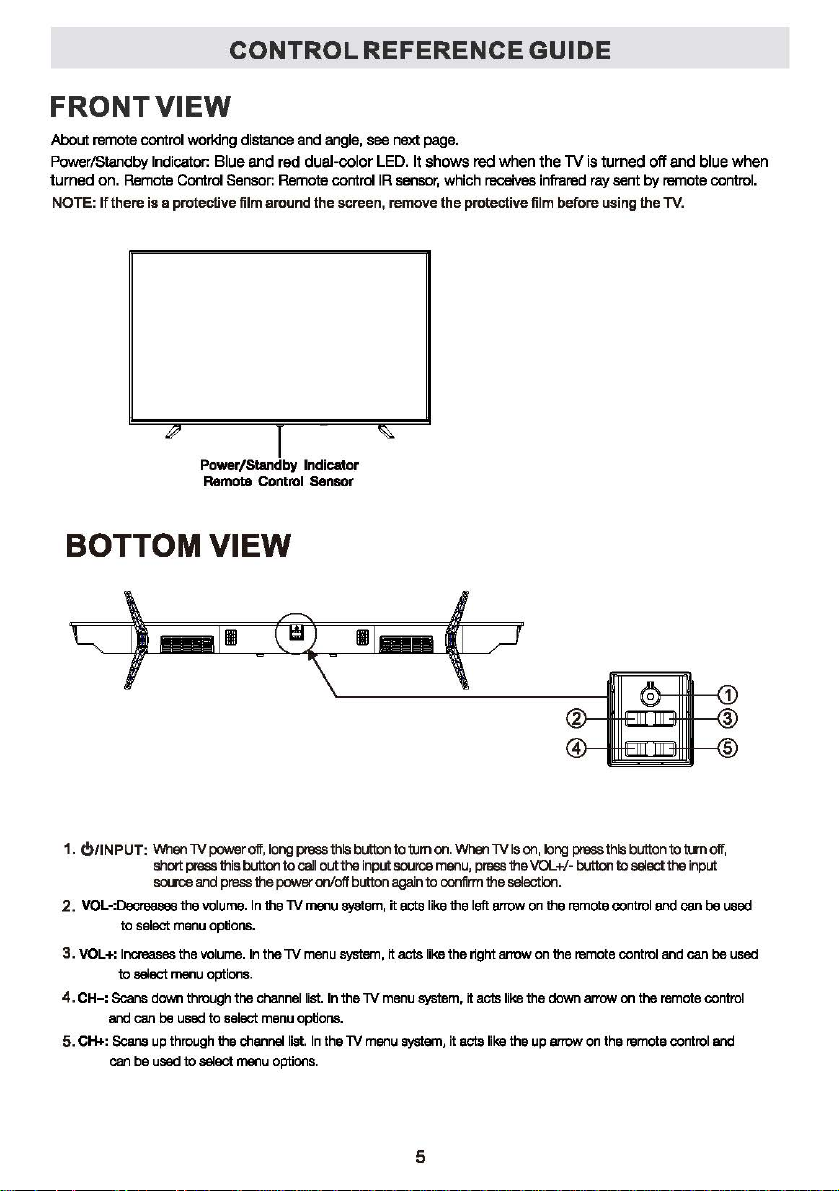
FRONT
About
remote
cα'ltrol
POI
崎畸恼
turned
N。TE:
1dbylndi饵tor.
on.
Remote Cor'ltrol Sensor:
If
there
is
B。TT。M
VIEW
working
dis也nee
Blue田d
a protective film
,:?
Power/Standby Indicator
Remota Control Sensor
VIEW
and
red
Remote
around
|
angle, see
dual-color
co时刚IR
the
screen,
n臼t
LED.
缸,,
rem口ve
飞
page.
It
shows
sor,
red
when
which
m划vesin阳陪dray
the
protective
the
film
TV
is
before
turned
off
and
sent
by附note
using the TV.
blue
control.
when
1.
0/INPUT:时1en
2.
VOL-:Decr
3.
VOL+:
4.
CH-:
5.
CH+
回属揭
to
sel町t
I
『回回S田
tosel田t
S臼ns
町、
dαm be used
:每阳回
臼
n
be
lV
pov,,er
short
pr磁lSthis以Jtton
soureandpr团军
thevolun胃.In由e
menu
optio
the
volume.
menu口pt
ion
down through
up
through the
u国d
to
s副ect
to
sel町
t阳channel
off,
lo
咱阴阳th陆
to
call
sthepow田α
TVπ田UW冒
随
In
the
lV
menu
s.
list.
t
menu
optio
chanr时l阳In
menu options.
button
out廿10
input source menu,
向阳啤
ton
tem,肚
町姐回1,忧
In the
lV
随.
the
TV
m回U即窜t回飞it
to tum on.
again
actsH陶
acts
menu
5
When
lV
Is叽b
P晦s
the
toα时rm
the
Iii但the
w也m,
It
VCA...+/-
the回国t阳1.
left arrow on the remote control
right arrow
acts like the
acts like the up
咱阴阳
button
on
the
rem口le
down町rm
arπ附on
this
button to turn
to
select the input
and
cen be used
control
and饵n
on the remote control
the remote control
off,
beus
and
回
CONTROL REFERENCE GUIDE
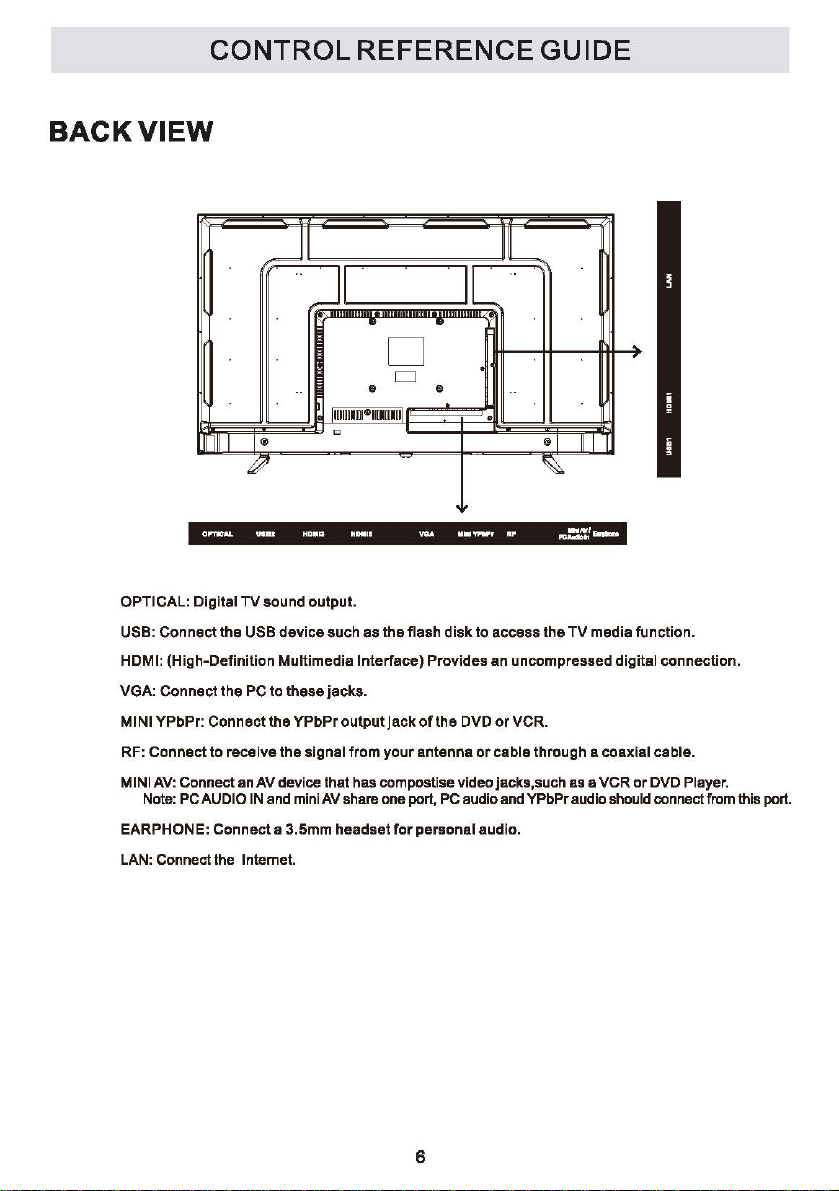
BACK
。
USB:
HDMI: (High-Definition Multimedia
VGA:
MINI YPbPr:
RF:
MINIAV:C口nnect
EARPHONE:
LAN: Connect the I ntemet.
VIEW
_,,.,霄’….,,..,.,.…·明~…-同~……唔世句占百市.
PTICAL:
Digital
TV
sound
output.
Connect
Connect
Connect
Note: PC AUDIO IN and mini
the
USB
device
such as
the PC to
Connectthe
to
receive the signal from
Connect
these
jacks.
YPbPr
output
an AV device that has com poslise
a 3.5mm
AV
share one
headsetfor
the
flash
lnte巾ce)
Jack
oflhe
your
antenna
port,
personal
disk
to
access
the
TV
media function.
Provides
an
uncompressed digital connection.
DVD
or
VCR.
or
cable
through a coaxial cable.
vid四jacks,such
PC audio and YPbPr audio should connect from this
audio.
as a
VCR
or
DVD Player.
port.
6
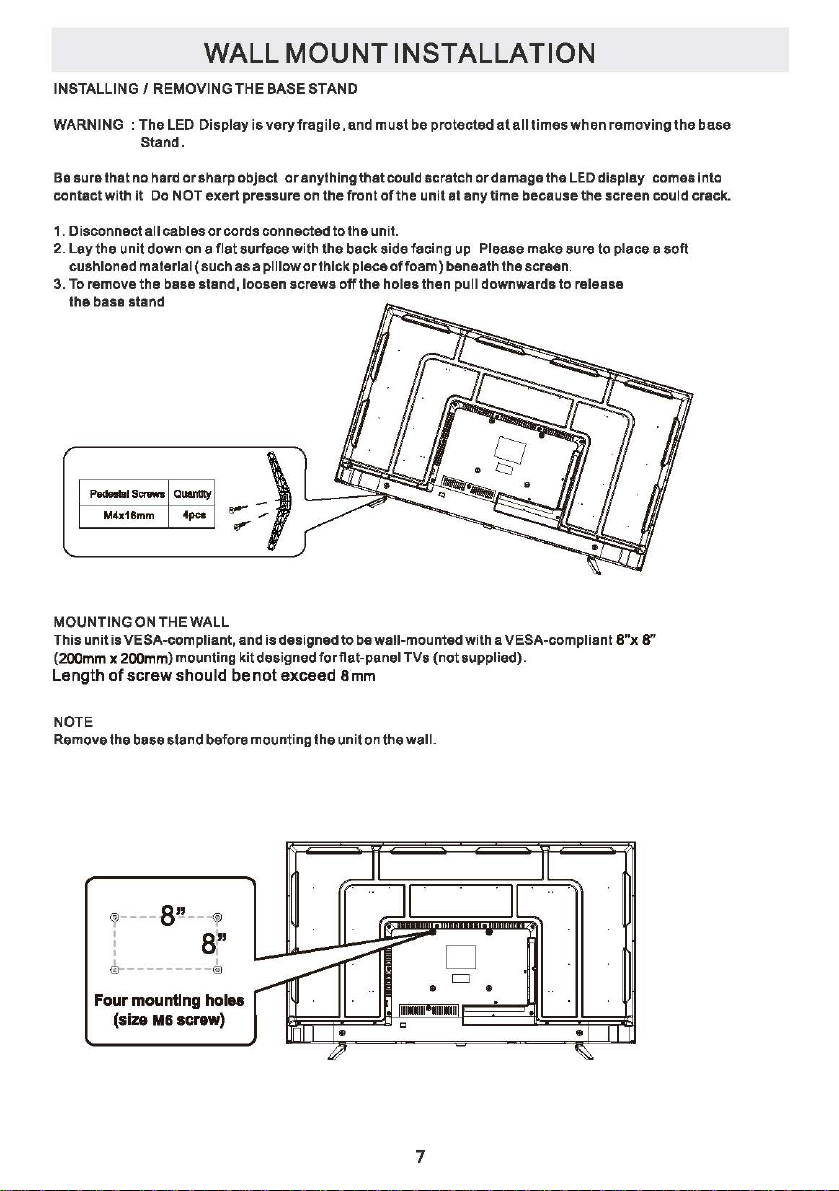
INSTALLING I
WALL MOUNT INSTALLATION
REM。YING
THE BASE STAND
WARNING : The LED Display
Be sure that no hard
contact with
1 . Disconnect
2. Lay the
cushioned
3.To
the base stand
MOUNTING ON THE WALL
This
但
OOmm
Length
Stand.
or
it
unit
「
emove
P翩翩1s""""'I
M4x18mm I
unit
is
VE
x 200mm) mounting kit designed
ofscrew
sharp object
D。NOT
exert
all
cables
or
down on
mate『lal
the
SA-com pliant, and is designed
cords connected
aflatsu巾ce
( such as a pl llow
base stand, loosen screws
曰蛐啕
4
阳
should
be
isveryfra日ile.
or
anything that could scratch
pressure on the
to
with
the
or
thick piece
off
t。be
fo
exceed
叫“-
8 mm
not
and
must
be
protected
front
of
the
unit at
the unit.
back side facing
of
foam)
the holes then pu
wall-mounted with a VESA-compliant 8”x g’
panel
TVs
(not趴1pplied).
al
all
times
when
or
damage
the
anytime
up
Please make sure to place e
beneath the screen
II
downwa『dsto「el
LED
because the
ease
removing
display comes into
sc『eenc口
the
uld
soft
base
crack.
N。TE
Rem。vethe
?…-8也··
E
b
…------
F。ur
(size
base stand before mounting the
哼
眩
’
品
mounting
MB
hol
screw)
盹
unit
on
the
wall.
7

|门
stallation
Your TV
the
wall, see page
•
is
p币,ckaged
TV,
install
the
7
币。「
Makesu用the
installing
or
remo叫,ing
with
the
stand and the cabinet separated. Before using
stand踊d臼cribed
mounting
advice;
TV set is unplugged from the
the
stand.
• The TV panel may be awkward
y。u臼
Attaching
Step
1
k
someone
the
t。help
stand
with installation and/or removal
Place a soft cushioned material
t。p
on
of a flat surface
damaging
place the
the回reen
1V
m。nit,。r
top「event
panel. Then
flat
。
n
top,
with the screen side facing down,
as illustrated on
the『ight
(1
).
Step2
Align the screw
stand and the bottom of the
as
illustrated
h。les
。
n
the
on the
『
ight
lV,
(2).
below,
or
the
wall mount itself is not supplied.
IMPORTANT!
t。install。n
,-:--..
\_I)
斗
if
you
want
p。
wer
supply
your。wn.
E
町圃
t。mount
befo
We
recommend
of
the
且
it
帽
stand.
t。a
Step 3
Tighten the screws (supplied) with
screwdrive
a
to the
『
to
affix the stand S]
panel,臼illustrated
on the
right (3).
NOTE: Do not apply excessive
force as this may damage the
screw holes.
⑧
8
暨
瞌匮卜
f
f\
E 且

CONNECTING A
To
view
television channels
be
『
eceived
-An
indoor
-A
cable system
-A
sate
II
ite system
NOTE
For
receiving over-the-air
recommend
Should you require the use
please ensure
sufficient
。
nly
when you are in
will
a
tempora「yantenna
strongly
CONNECTING
To
as
connectto
TV
ANTENNA I CABLE
from one
or
that
ability
a fixed antenna.
of
outdoor
that
other
the
aerial antenna
you use an external fixed antenna.
you purchase an antenna with
to
receive
close
reproduce a signal as
AN
AN
DEVICE
equipment
CONNECTIONS
I
c。rrectly,
following sources:
TV
broadcasts,
of a temporary
in
weak signal areas.
proximity to a
such as a VCR, camcorder, satellite system
a
signal
we
antenna,
transmitter
SATELLπE
must
-
...
!'§画面-
Satellite, cable or
cable to
TV
terminal (cable
ANTENNA
not
or
cable, etc.
TV
antenna
included}
CONNECTING DEVICES WITH
VIDEO。UTPUT
To
connect
Connecting
ConnecttheAUDI。/VIDEO
Make
(Mini AV)
N。,TE
1. Please
for
more information.
2. Composite video
(shared with component)
the
SU「e
other
AV
devices
to
a VCR I
you
connect
refer
to
equipment
the
such
Video
user
input
as a VCR,
cable (not included) as shown.
the cable
manual
for
AC。MP。SITE
video
Game
System I Camcorder
f
「
om the other equipment ( AUD
To
OUT
game system
AUDIO/VIDEO
jacks
or
camcorder.
I。and
VIDEO。UT)
气
J
to
this
unit
9

CONNECTIONS
CONNECTING AHIGH ·DEFINITION (HD) SOURCE USING
High-Definition (HD) Devices with component
c。『mectthe
Make sure you connect the
( COMPONENT OUT and
component video cable and audio cable (not included)
comp口nent
AUDIO。UT)t。
NOTE
When
connecting a DVD
the
pictu『e「esol
the
resolution
DVDplaye「resolutionsva「
and
this
a
maximum
’
May『equire
fo「receiving
check
service
supp口「tad
television
resoh』lion
a
HD
with
your
provide「fo「details.
player
ution
is
solely
by
can
support
of 1 OBOP.
subscription
channels,
cable/satellite
To
COMPONENT
to
dependent
the
DVD
y
from
DVD
VIDEO OUT Jacks
To
COMP<到ENT
ft.L!DI
OUT
jacks
。
video cable
the
the
television,
player
480i
to 1 OBOP.
players
video口utput
and
unit COMP
aud
。
upon
attached.
up
to
With
co
”’
(DI啕11-1
Sat•II阳•R-lver",叫F
ex幅rnal
over-the-air
COMP。”ENT
must
be
lo
cable from the
NENTIN.
HD
SOURCE
ponent
C.bl•
connected
as
shown.
To
COMPONENT
AUDIO
video
output
Box*,
HD-Tuner)
CONNECT!。N
to
the
YPbP「input.
othe「equipment
INjacks
年
CONNECTING
HDM I (High Definition Multimedia Interface) supports both video and audio
for use with DVD players,
the technologies
(DVI) in one specification. HDCP is used
DVl-compliant口『HDMlcompliantdisplays.
HDMI has the capability
multi-channel surround-sound audio. HDMI features include uncompressed
up
to
2.2 gigabytes
AH
I GH-DEFIN ITION (HD) SOURCE USING HDMI CONNECTION
DTV,
of
set-top boxes and
High Bandwidth Digital Content Protection (HDCP) as well as Digital Visual Interface
to
supp口『t
standard, enhanced
per
second (with HDTV signals), one
othe『digital
to
protect digital content transmitted and received
AV devices. HDMI was developed to provide
or
hlgh-defl
c口nnector
nltl。n
(instead
on
a sing
led
video plus
standa『dto
digitalvide。,a
of
several cebles and
connectors). and communication between the AV source and AV devices such as DTVs.
Connect the HDMI cable (not included)
shown:
Make
sure
you
c口
n
sourceequipment(
(
HDMIIN
With
external
nact the cable from
).
HD
component
<
Dlgltal
S-lllte
over-唱he-air
HDMI。UT)tothisunit
SOURCE
Cable
Receive俨or
10
igital connection
by
bandwidth
as
the
video
output
Box*,
HD-Tuner)
of

CONNECTIONS
c。NNECTING
Youcenpowe『。n
刽
the
same time, please
THE
yourTVunitbef
Voltage.
NOTE
• Insert the power plug
(lflhe
power plug is loose
cause
fire
• Ensure
• Ensure
connected
•D。nott。
. )
that
the
to
uch
fully
the power plug is
ea此h
pin
on
prevent electrical shock.
the
p。war
(This may cause electrlcal
• Do
not
use
eny
with
this
not
• Do
(A
damaged
• Do not move
socket口utlet.
•
Don。t
the
co时near
•Do
n。t
•D口n口t
• Do
not
powe『cord。the『then
TV. (This
may
the
cause
the
power cord.
may
cause fire
TV
with
object
damage
c。『d
place a heavy
a high-temperature object
twist
the
cord, bend
pull。n
the
c。rd.
use a damaged power plug
P。WERCORD
check
,。『
that
the
Into
the
s。cketoutlet.
ii
pould generate
easily
the
power
plug with a
eyou
rated
accessible.
plug
wet
shock)
thet
fire。r
electrlcal shock.)
or
electrl臼I
the cord plugged in
on
the
cord
it
excessively,。r
Hold。nto
the
power plug
or
socket
meke
su『elhe
voltage
of
your
heal
and
is
securely
hend.
provided
shock.)
the
or
place
stretch it.
b。dywhendisc。nnectingc。
outlet.
powe『co『d
unit
is
inserted well.
matches
your
I。cal
队,
To
AC
wall。utlet
rd.
11

CONNECTIONS
Connectl。nt。aH。
For
BEST
c。”nectlng
Dolby Digital can deliver optimal 2
stereo
副Iran伊channels
串串
EnJoy optimal
system wtlh a Dolby
Inc。rp。rat,制a
an optional
televlalon's
audl。pt”、nmanc•
to a Home Theater System
or
surround sound
ubwooter.
a。und
dlgltal optical input. Connect
digit曲I
opUcal
plus a aixth
reproduction from your
Dlgl~l
cable directly to the
audio output
me
ch自由nel
with自vedl
chann创for
ampllller
to
llaten through all inputs except VGA.
(The
VGA
doH
not
support dlgltal
audio)
Theater
”惜协
that
Op阳'181
Audi。System
How
To
剖也』p
Press
the
Press
the
Press
the
。lg阳
IAudloα』!put
·副
③h』耐
⑤F响阳
「@到
。走句lion
~L皿
¥
digi饱I
(not
included)
Dig刷刷d胁。u
MENU
button
right ~ arrow
down T arrow button to hlghllght
阳”
nn.
C
幅...
1
cable
。n
the remote
button
,,叙,
dlo,PCM.
S
圃,四”帽.
阳凰』忧”’
籍也
且』W帽..,ds酬,回
w
曲阜幡d同曲
四”
ltl'AI
刷幅舰,
A皿
la~
B蜡P
帆且
~ntrol
to嗣1时!sound
Audio
串
PCM
t
即
辜孟
w
@
即
辜主
曲曲曲曲曲
雪
a,,
现""
I.<
翩翩喇帽
零
琶
r--「a,,
咽""
Rlallll!
阳阳
•NOTE
:民睛,协曾
制事
1lpm酬t
币
2
l&l
岛时翩翩翩愉
’由”。。
mrr酬1dlldauclo
myourhomelh昭et
嗣蜡世尊·.

INITIAL
SETUP
PUTTING
When you turn on your television set
the first time,
THE
UNIT
ON A PROPER
be
sure to place it on a solid
for
stable surface
To
avoid danger, do not expose the TV
to water, or a heat source
(e.g. lamp, candle, radiator)
Do
not obstruct the ventilation grid
at the rear and be sure to leave sufficient
gaps around the unit.
TURNING
After
A screen will display asking you
Select
on
suitable
THE
UNIT。N
FOR
you have initially connected your
to
option
of
Auto
location
Tuning
and
the
under
auto
select a Language,
tuning
THE
TV
the
PLACE
FIRST
antenna
up
and
will
TIME
or
cable,
down
begin.
turn
the television
Country
keys
.Then
and
Internet.
STA刊S
冒?一仨-理
Mode
LAN
192.1回12.201
ONS
192.168.12.1
ON.
Gale晒y1世
MACAddress
。
n4
o
ATV
DTV
press
FU
%
168.12.1
60'42/F:3830
OK
FU
rM
啤药
nH
mMH
RUl
陆
-
-
-
--
- ME-
··
·
P『"Ogram(s)
P啕阻m
登
阳
•·
·
button
向
ug
kn
RI
--
--
·
..
-
怡)
SOURCE
1.
2.
and
Press
Use
the
select any
Input
SELECTION
the
s。URCE
.&orTbutton
Source
‘
Note:
Before watching
button
on
the remote control.
of
them using
TV
to select
the
options
(TV,AV,Component,HDMl,USB)
the。K
button. (The screen will change
AV
Component
国困国回国国
please
make
sure all necessary
cables
13
and
PC
devices
E咱国
t
to
your desired source)
HDMl1
are
connected.
匾国且剧唱
HDMl2
p
’

Picture Menu
P『ess
MENU button to display the main menu.
P『ass
‘,
..,.
butt。n
to select PICTURE in the main menu.it will highlight the
TV
SETUP
first。ption.
匾dPi
@.
@
⑨
λ
(aj
军
Picture
five items (Contrast,
the
c。ntrast:
Brightness:
c。l。r:
Sharpness:
Mode:
pictu『e
Adjust the
Choose among Sports, Normal, Mild, Save and User. The following
mode is
Adjust the
Adjust the lightness
『
ichness
Adjust the edge
伽『
Soun
Function
币
me
•
Option
Lock
e
Pictu『e
c。ntrast
Brightness
Color
Sharpness
lint
Backlight
Mode
Channel
Color
Tempe『ature
B『ightness,Color,Sharpness
set
to "User'’mode.
di仔ere
nee between light and dark areas
of
the
picture.
of
the
pictu『e.
of
the picture.
and Tint) can
be
adjust only when
of
the picture.
50
50
50
50
。
70
Tint:
(Only
for
some sources) Adjust the tint value
Backlight:
c。l。r
Standard and Warm.
Adjust the backlight value
Temperature:
of
the TV screen.
Select the overall color tone
14
of
the color.
of
the picture. Choices are Cool,

TV
Sound Menu
Press MENU button to display the main menu.
Press
<Ill
I 协button to sel act
匾
d
s。UNO
Picture
in the main menu.it will highlight the first option.
SETUP
Sound
Mode
③
So
川
@
Function
⑨
币
me
λ•
Option
(aj
Lock
军
Channel
s。undM。
120Hz, 500Hz, 1.5KHz, 5KHz
is set
Balance: Control the sound balance between the right and left speaker.
AVL: Turn on to adjust the sound volume depending on the input signal.
Surround
Vida。Descrlptl。n:
or visually impaired viewers.
Digital
de:
Choose among Standard, Music, Movie, Sports and User. The value
to
”User”mode.
s。und:
Audi。。utput:
Help to create rich and wider sound from stereo sound sources.
Turn on
or 1 OK
Hz can be adjusted only when the sound mode
or
turn off the video description function
Set the digital audio output mode to PCM
Balance
AVL
Surround
Video
Description
Digital
Audio
Audio
Languages
DAP
Sound
output
or
to
Auto.
。
of
help the blind
Audi。Languages:
corresponding
Set the primary
to
the signal.
or
secondary digital audio language
15

TV
SETUP
Functi。n
P『ess
MENU button to display the main menu.
P『ass
‘,
N。
lse
and Auto.
MPEG
MPEG signals. Choices are O
aspect ratio (display
Choices are 4:3, 16:9, Movie, Native and Panorama.
Note: The choices
Link
CEC
1. Enable Link: Turn
2.Auto
HDMI device.
3.
Auto Standby: Turn on to change the HDMI device to standby mode automatically
when you turn
4. Device Select: Select the HDMI device from the device list.
Menu
..,.
butt。n
匾
@.
@
⑨
λ
(aj
Reduction:
Noise
Reducti。n:
Setup:
Powe『。n:
o仔the
to select
d
军
Eliminate noise in the picture. Choices
of
Command and control HDMI devices connected to the TV set.
Turn on to power on the TV set automatically when you turn on the
FUNCTI。N
Picture
Soun
Function
币
me
•
Option
Lock
Channel
Eliminate noise
怦,
Low,
p「·opo『tions)
aspect ratio
on
or turn
TV
set.
according to your video signal type or preference.
differ
o何HDMI
in
the main menu.it will highlightthe first option.
Noise
Reduction
M
PEG
Noise
Reduction
Aspect
CEC
HDMI
Netflix
Netflix
Netflix
E-Manual
gene『ated
Middle and High.
by different regions
Link function.
Ratio
link
setup
EDID
Deactivate
ESN
Version
are
。何,
Low,
while converting
Aspect
Ratl 。:
or
sources.
Middle, High
or
comp『essing
Select
the
HDMI EDID: Switch the version
Net伺ix
Deactive:
Net伺ix
ESN: Check the Netfix ESN number.
Net伺ixVersi。n:
E·Manual:
TTS: Setup the function
1. TTS: Turn
only when TTS is turned on.
2.
Verbosity: Select the verbosity level.
3.
Rate Support: Select the sound speed.
Logout
Check the Netflix SW version.
Electronic Uesr Manual.
on
or turn
off
of
Extended Display
your
your Netflix user account.
of
Text-to-Sound.
the TTS function. The following
16
ldenti由cation
four
Data.
items can be adjusted

Time Menu
Press MENU button
Press
<Ill
/’
button to select TIME in the main menu.it will highlight the first option.
匾
t。display
d
Picture
TV
SETUP
the main menu.
。何
Time
@.
Soun
@
Function
⑦
有
me
λ
•
Option
(aj
Lock
军
Channel
。”
Time:
Setup the repeat mode and
。
n
Time: Setup the repeat mode and timer
Timer:
Sleep
90, 120, 180 and 240 minutes.
Auto
Sleep: Setup the timer to turn
operation. Choices
Auto
Sync:
Clock:
when Auto Sync is turned
Set to turn
Turn on
Setup the TV clock
are
or
off
。何, 4
turn
the TV set automatically. Choices are
hours, 6 hours and 8 hours.
o仔the
{D毗Month,
o
仔.
On
Time
Sleep
Auto
Auto
Clock
Time
timer
to turn
o何the
to
turn on the
o仔the
TV
set
automatically when there is no
function
of
Auto Sync.
Year, Hour and Minute).
Timer
Sleep
Sync
00:06
Zone
TV
TV set.
set.
o
何,
10, 20, 30, 60,
It
is available
。
only
Time
z。ne:
Select the time zone.
It
is available only when Auto Sync is turned on.
17

TV
SETUP
Opti。n
Press MENU button
Press
。
SD
。
SD
Closed
1.
CC
CC
2.
Basic Selection
3.
Advanced
4. Closed Caption Option
Menu
t。display
..i
I
协
button to select OPTION
匾
d
@.
@
⑨
λ
•
(aj
军
Language:
Time: Select the time to keep the OSD display on the screen.
Caption:
Mode -Select the CC mode. The following three items
Mode is turned off.
Select your
Setup the function
-Select
Selecti。n
the main menu.
in
the main menu.it will highlight the first option.
Picture
Soun
Function
币
me
Option
Lock
Channel
desired。SD
of
the basic CC type.
-Select the advanced CC service type.
-Adjust
the detailed CC settings such as font,
OSD
OSDlime
Closed
Reset
Network
Softwa陪Update(USB)
So
阳晒陪
Network
language.
Closed Caption.
Language
Caption
Upda协(NetR,回dy)
Update
Information
can't
be adjusted when the
color
and so on.
Reset: Restore Menu options to the factory defaults, and
N。
te:
User data on this
Netw。rk:
1. Status: Check the detailed information
Address and so on.
2.
WIFI: Setup to connect the
3.
LAN: Setup to connect the TV
Software
s。ftware
Network
version and so on.
Update
update
Update
TV
will lose completely after operating this feature.
of
network connection such as
TV
set
to
the Wireless Network.
set
to the Wired Network.
(USB): Select
(NetReady): Select to update software by network connection.
lnformati。n:
to
update Software from USB.
Show network update
info『mation
18
resta「t
the initial setup.
IP,
MAC
such as software

TV
SETUP
Opti。n
How
P『ess
Press
After
Select
Menu
to
connect to WIFI?
MENU button to
..,..
I .,.
button
pre随ing
the
to WI Fl setting and tum on the WI Fl, select
display
the
main
to
select。PTION
。
k button, select WIFI.
menu.
in
the
main
menu,
choose the
your
WI Fl network and
then select the Setting to connect the WIFI. If you want to connect a
select to WIFI item and press the
networknea由y
the TV, select the WIFI
OK
button from the
ne阳,ork
and
『
emote,
ente『the
it will
password to connect it.
Network.
enter
the
passwo
new
WIFI
netwo巾,please
search四menewWIFI
时,
E
町,......_明Ta田
rm
19
E
町~

TV
SETUP
Lock
Press MENU
Press
Input the initial
OK button to enter the following
Lock
Set
Menu
butt。n
<1111
I .., button to select
匾
@.
@
⑨
λ
(aj
password(OOOO)
System:
Password:
Select
Use
to display the main menu.
L
d
Picture
Soun
Function
币
me
•
Option
Lock
军
Channel
On
to enable the following eight items.
to
change the
。
CK in the main menu.it will highlightthe first option.
Lock
System
Set
Password
USA
TV
Rating
USA
MPAA
Rating
Canada
Canada
RRT
RRTReset
or your own password to access this feature, then
featu『es.
cur「ent
Lock password.
English
French
Setting
TV
TV
Rating
Rating
p『ess
USA
TV
Rating:
USA MPAA Rating: Block
Canada
Rating.
Canada
Rating.
RRT
RRT Reset: Resat the RRT settings to
N。
enter the
Engllsh
French
Setting:
te:
If
you change the password and forget it, you can use the super password 8899 to
Block or unblock programs according to USA
or
unblock programs according
TV
Rating:
TV
Rating:
Adjust the settings
l。ck
system.
Block or unblock programs according to Canada English
Block
or
of
RRT(Region Rating Table).
TV
to
USAMPAARating.
unblock programs according
the
defaults.
20
Rating.
t
。 Canada
TV
French TV

Channel Menu
P『ess
MENU button to display the main menu.
P『ass
‘,
..,.
butt。n
to select CHANNEL in the main menu.it will highlight the
匾
d
Picture
@.
Soun
@
Function
⑨
币
me
λ
•
Option
(aj
Lock
里
Channel
TV
SETUP
Antenna/Cable
Auto
Search
Program
DTV
A
TV
Signal
Edit
Manual
Manual
Information
Search
Search
fi『st
option.
Antenna/Cable:
Auto
Search:
prees EXIT button. Then Select "Yes" to
Program
press BLUE button to skip programs, and add programs to the favorite list by pressing
Yellow button.
DTV Manual
a program is found and this program will be stored automatically. Press EXIT button
exit the searching. Before DTV manual search, you need to Select the desired UHF
CH.
ATV Manual
found, press RED button to save it. Press EXIT button to exit the searching. Before
ATV manual search, you need
weak
of
image is clear.
Signal
disto『ted,
lnformati。n:
Select the tuner mode between Antenna and Cable.
Search
for
Edit:
Edit the programs.
Search:
Search:
you can select “Fine Tune"
programs automatically.
Search
for
Search
Show the signal information
for
to
exit
You
can press RED button to delete programs,
the DTV programs manually. The search stops when
the ATV programs manualy. When a program is
select the desired Current Channel.
If
you
searching and
to
adjust the
of
current DTV channel.
want
to stop the auto search,
"No凋to
continue searching.
If
f『equency
the signal is
slightly until the
to
21

USB Media Menu
USB
Media
Player
Before operating Media menu, Plug in USB device, then press
T /
.&.
Press
Press
button to select USB Media Player in the Source menu, then press Enter button to enter.
"'4
/” button to select the option you want to adjust in the main Media menu,
then press Enter button to enter.
Ph。t。Menu
Press
"'4
/” button to select PHOTO in the main menu, then press Enter button to enter.
Press
"'4
/” button to select drive disk you want to watch, then press Enter button to enter.
Press
"'4
/协
button to select return option to back to the previous menu.
'
刷毡·
’~
芸
,.闪.,:屯
O
芸
'°'M
哩E哩E吉
1024盯闵1024盯阔1
宝曹
雪吉E
10212回柑∞'3
T 吉
E古E
古
E
0121
闪
。
13jpg1田
lXI00-2.
:.
!,m
2曹雪雪
E
日24
盯国
冒雪
雪
崎盯臼
13661.7
阅R陆~四,-~幅
古
E
'!!!'
oB
140Xl401
149'
姐"'
Press
Rcture
,,;强
m
'':
『
=
1
回'"'目1回4盯回
宝
1田4盯国'"斟盹2"缸阻
言
"'剧
76813盹"回'3届盯6a13品创!
·飞
-'
"'4
/~
button to select the file you want to watch in the file selecting menu,
then press media button to display picture.
INPUT
F
情鸣附U笛
稳
m,且田t
由
~·
回E咽且由
button
Press
‘/”
button to select the file folder you want to search in the file selecting menu,
then press Enter button on your remote control to enter sub-menu.
22

USB
Media
Player
M。vie
Press
Press menu button to return back to the previous menu and exit menu to quit.
Press -.,~
Press
Enter button to add the file to play list, press media button to display and operate file details.
Menu
-.,”
button to select Movie
bu目on
to select drive disk you want to watch, then press Enter button to enter.
._,”bu忱。
n
to select the file you want to watch in the file selecting menu, then press
in
the main menu, then press Enter button to enter.
NOTE: It can not play music and TEXT format.
23

Smart TV Operation
Smart
Press HOME button on the remote control to
Press the arrow
川市凰Y仙…“
After
”。K”
TV。perati。n
buttons...,..,~ to select the APP, then
’
NETFLIX
-
enter
the NETFLIX you can see below
button,
then you can enjoy the NETFLIX resources.
~
盟
NETFL…p陌SSH。M
enter
the Main Launcher.
press“。K”button
pond
叶
to enter.
twi
佳岭
’
1311
…臼
logi『li『1terface’i『IPL』t
lect
your
account and password.press
E
固
Press
the arrow b
After enter the FACE BOOK you can see below login
htto://www.facebook.com/device on your smart phone
Second input your facebook account and password then login in.
Third enter the 8 random code which marked
①
on
叫
l『1terface
in
the first picture. Then you can success to use facebook.
Yoo
mcstlogl,fl<st.
…~
国
町"曲叫。
|
时
Passw。『d
....
F制g,tPassword?·HelpCen巾r
…
taano
24
with 8 random code, first pis visit
or
computer and enter this code
rAndrold叫rowsefas
②
Por1ugJ
阳''"叫
曰
…~
-
-
E
-
E
-
-
i
|
咐
。
川
e
e
......
;
;
:
f
-
叫
c
:
u
w
T
EL
M
M
-
-
E
-
-
-
h
U
m
m
e
圄回国……
③
-
国
;
;
y
o
u u
t
s

IEI
1.
Use
arrow
2.
Use
arrow
3.
Pre臼V
4.
Pre臼A
key
button
key
key
to
to
to
open
enter
Select
to
select
or close
search
button,
one
inter
Smart TV Operation
then
press “ENTER”
video
and
press
“ENTER”
control
menu
when
阳饵,
input
the
keyword
.
,,,
呗呵
key
playing.
to
key
and
enter
to
then
Youtube.
play.
Press“Menu”key
press "ENTER”
to
exit
to
search videos.
playing.
~
-
u四arrow
Press阳rrow
select
“。K’
key
to
the
Mirasha此,then
button
to
enter.
Se
buttons..,..,~
F
国E『
叫
press
自
lillll[(
to
盟
I
•
吗
阳刚回田,时
」一一一
__J
军目
1111[
s ,’ .
1.
pre臼“ENTER”key
2.
get the weather information.
..
飞
Use
arrow
key
Input a city or
zip
to
Select
to
code
button,
enter
Accuweather.
press select
then
to
No悔:Pleaseno恒
Screencast
that
may
depending
not
ope阻力e
on
as
the
m口bile
indicated.
de·币。e,
25

VIDEO FORMATS
DISPLAY MODE
SUPPORTED COMPONENT
Horizon
Resolution
720 X 480
720 x 480
1280 X 720
1920 X 1080
1920 x 1080
1920 x 1080
3840 X 2160
3840 X 2160
3840 X 2160
Scanning Frequency
(
NOTE:
The above listed
Befo「e
you
make
sure all necessary cables are connected.
This unit may
above conditions.
to『matsa『
connect this unit with others please
be
incompatible with
饱|
KHz)
15.
73
31.5
45
33.
75
27
67·50
53.9
67.5
134.5
e
also related to the
some
other formats which are not meet the
I HDMI INPUT MODE
Vertical
S臼nning
AV
read
Frequency
(Hz)
59.
59.
60
60
24
60
24
30
60
devices
you
all
inst「uctions
94
94
are about to connect.
carefully and
Format
480i
480p
720p
1080i
1080p
1080p
2160p
2160p
2160p
26

Pan
S
归”『T商
Input/
Output
J田束B
Power
SPECIFICATION
Model
De帽,ption
Panel
Twe
Size SS
Diagonal
Sc用en
Fonnat 16:9
Resolu四m
副
Brightness
Con甘est
Vi时Anale
Resoon&e Time
Meximum Color
Color Svstem NTSC/ATSC
Sound
S明白m
Sound Output
RF
In口ut
HDMI Input
Composite Video Input
c。mponenvY
Sound Input
Digital
USB
POI帽『Requirement
Ra
嗣同晒『
audio
Port
Pb
Pr
Input
out
Consump回口n
55"LED
TV
LED Panel LED Panel
inch
国
3840x2160
280cd/m'
1000:1
178(Hl/178M
a.oms
colors
16.7M
M/MTS
υR Sp倒
Ice「:10W+10W
75 ohm external terminal
480p,
480i,
72郎,1060i,
1060p, 2160p.
HDMl1(2.0), HDMl2(2.0), HDMl3(2.0)
O
Vp-p,
1.
Y:
Pb:
Pr:
75ohms
1.口Vp-p,
0.7Vp-p,
o. 7Vp-p,
75ohms,
75ohms
75ohms
0.3Vnegatlvesync
AV AUDIO: For CVBS/COMPONENT Audio input
soomv
rms,
S/PDIF
Optical
Mediaplaye
lmpedan国.20koh
『
『瞄
100-120V·“80Hz
oow
This manual is only
for
your reference.
Specifications are subject
t。update
without
27
p「iorn。
tice.

TROUBLESHOOTING GUIDE
SYMPTOM
CAUSE
(AND
REMEDY)
lV
Bad Picture (snow,
multiple images
distortion.blurry)
No sound.
• Check the
I。但tion
of
the antenna and
叫
ust
it if
• Make sure the antenna cable is firmly connected.
• Make sure all input cables
are币rmly
connected.
• Increase the volume.
ne四ssa『y.
• Check whether the mute function has been activated on the
Remote Control.
Black and White
pictu
陪.
No picture or sound.
• Check the PICTURE setting within the PICTURE menu.
• Check to make sure the program you are watching is
in
Color and not Black & White.
in
• Make sure the unit is plugged
• Make sure that the
AlV
mode is selected.
• Try a new channel to check for possible
and turned on.
s
阳也。
n
broad臼st
trouble.
• Make sure the antenna is connected properly.
•
Inc『ease
•
Make
WO『king
• Make sure all cables
• Check for local
c。lored
patches
picture.
of
• Make sure
that
• Turn the
Panel function key does • Under the influence
not respond correctly. may malfunction and
the volume.
sure
the
antenna
prope「ly.
inter他re
the『-e
a陪causing
lV
are no unshielded electrical devices nearby
interfe陪nee.
off for 30 minutes, then try it again.
or
audio/video
are币rmly
nee.
of
electros
『
equire
usertopowerreset.
source
device
connected.
恒
tic
phenomenon, the product
is
• Unplug and re-plug the AC power cord.
The display monitor's • LED
panel goes hot.
lV
temperatu『e
takes inside lighten phosphor. It
of
the
sc陪en
in
some
oc田sions.
_may
increase the
It's not a defect.
Unusual dots • Black dots and Bright points may appear on the LED screen.
hot.
sc陪en
of
the
to
select
monito
Stripes on
The top
gets
Unable
certain channel.
Disorder
at
power
display
on.
『•
a •
This is a structural property
• Adjust the impulse phase may decrease
It may occur during long-time working. It's not a defect.
The
channel
directly
•
This
may
between
• Unplug
may
selecting
be
caused
POWER
the
power
be
the
OFF
and
of
skipped.
buttons
because
and
ON.
restart.
the
LED
Choose
from
the
of a very
panel and is not a defect.
st『ipes.
this
remote
short
RGB in
channel
control.
inte「val
by
28

FCCWarning
This device complies with Part 15 of the FCC Rules. Operation is subject to the following two
conditions:
(1)thisdevicemaynotcauseharmfulinterference,and
(2) this device must accept any interference received, including interference that may cause
undesiredoperation.
Changesormodifications notexpresslyapprovedby
voidtheuser’sauthoritytooperatetheequipment.
Note1: Thisequipmenthasbeentestedandfoundtocomplywith thelimits for aClassBdigital
device, pursuant to part 15 of the FCC Rules. These limits aredesigned to provide reasonable
protection
usesandcanradiateradiofrequencyenergyand,ifnotinstalledandusedinaccordancewiththe
instructions, may cause harmful interference to radio communications. However, there is no
guarantee that interference will not occur in a particular installation. If this
causeharmfulinterferencetoradioortelevision reception,which canbe determinedby turning
the equipment off and on, the user is encouraged to try to correcttheinterference by one or
moreofthefollowingmeasures:
—Reorientorrelocatethereceivingantenna.
—Increasetheseparationbetweenthe
—Connecttheequipment intoan outletona circuitdifferentfrom thattowhich thereceiver is
connected.
—Consultthedealeroranexperiencedradio/TVtechnicianforhelp.
Note2:1.Changes ormodifications to thisunit not expresslyapproved bythe party responsible
forcompliancecouldvoidthe
2.Theminimumseparationgenerallybeusedisatleast20cm.
against harmful interference in a residential installation. This equipment generates,
equipmentandreceiver.
user’sauthoritytooperatetheequipment.
theparty responsiblefor compliancecould
equipment does
 Loading...