

Page 1
TechLife App's User Manual
1、 Download and Install APP
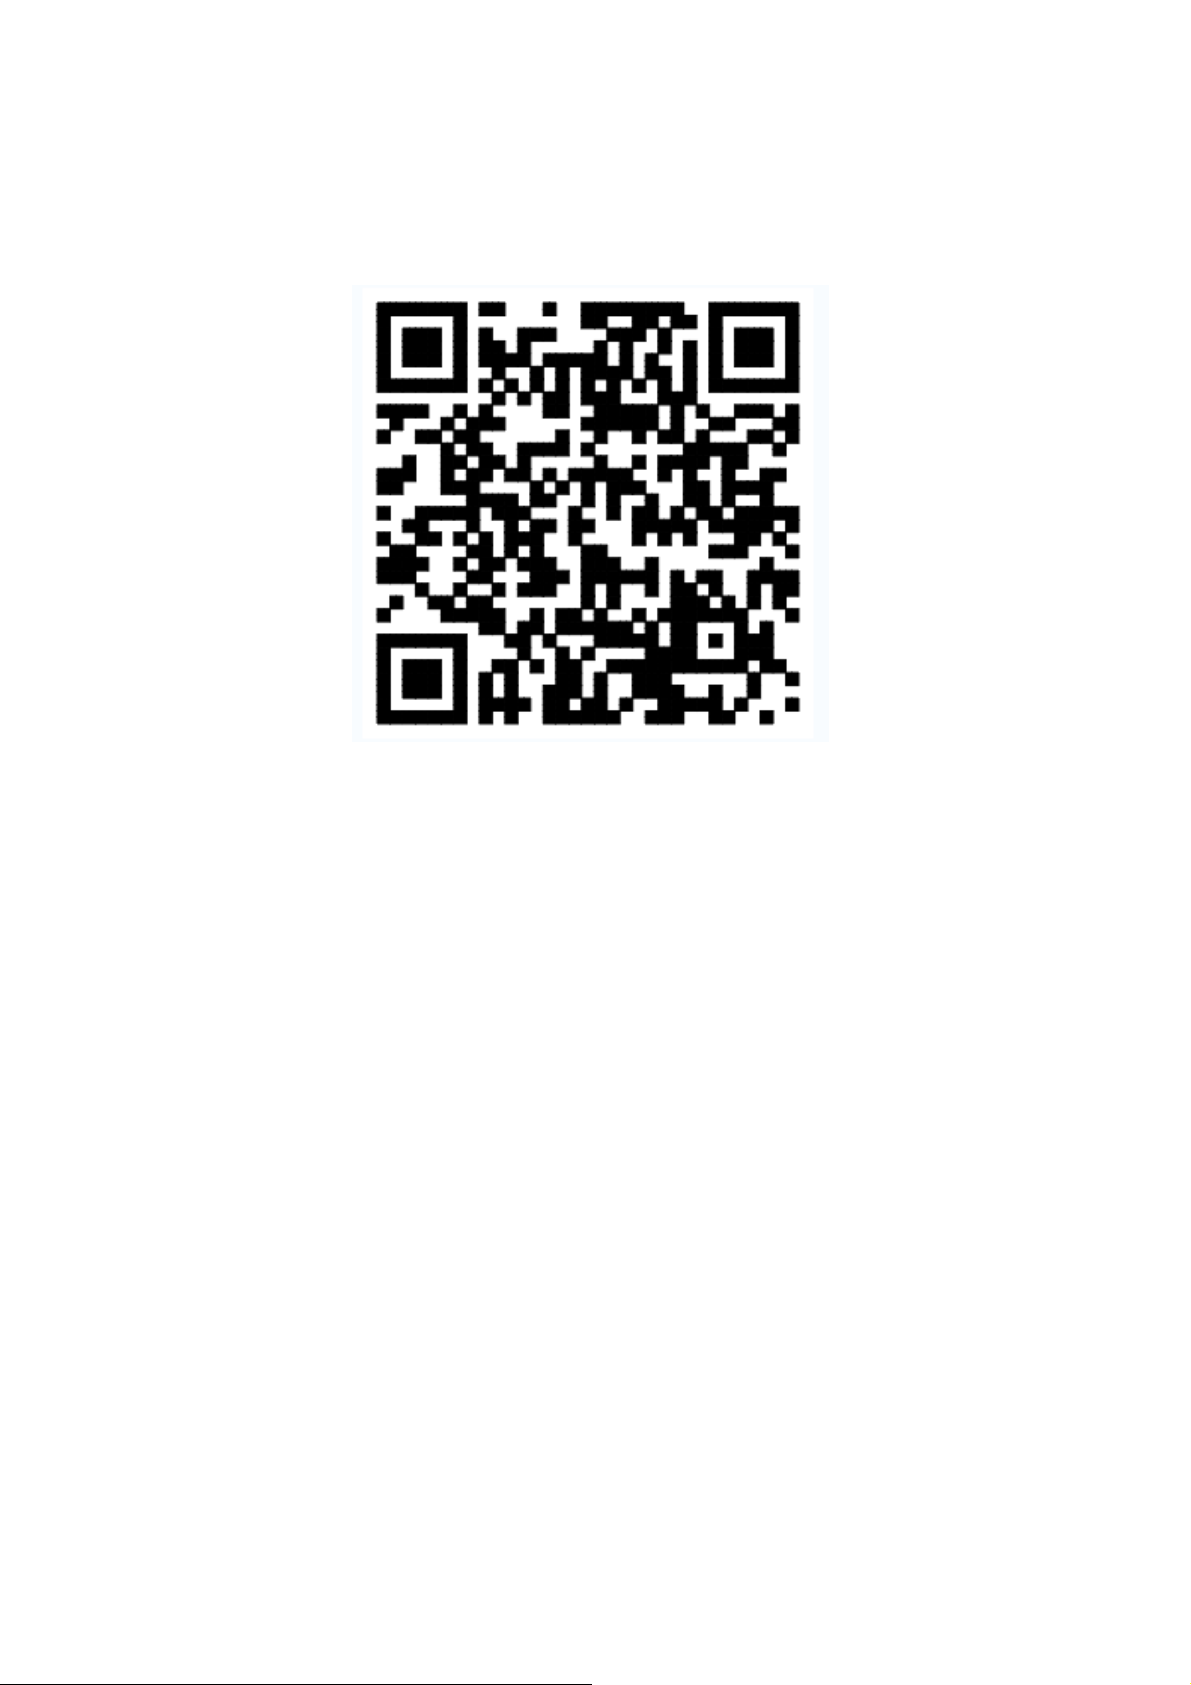
Use your phone to scan the QR code below or search “TechLife” in application market to
download and install the app
FCC ID: 2ASYM-CONTROLLER
2、 Register/Login/Forgot password
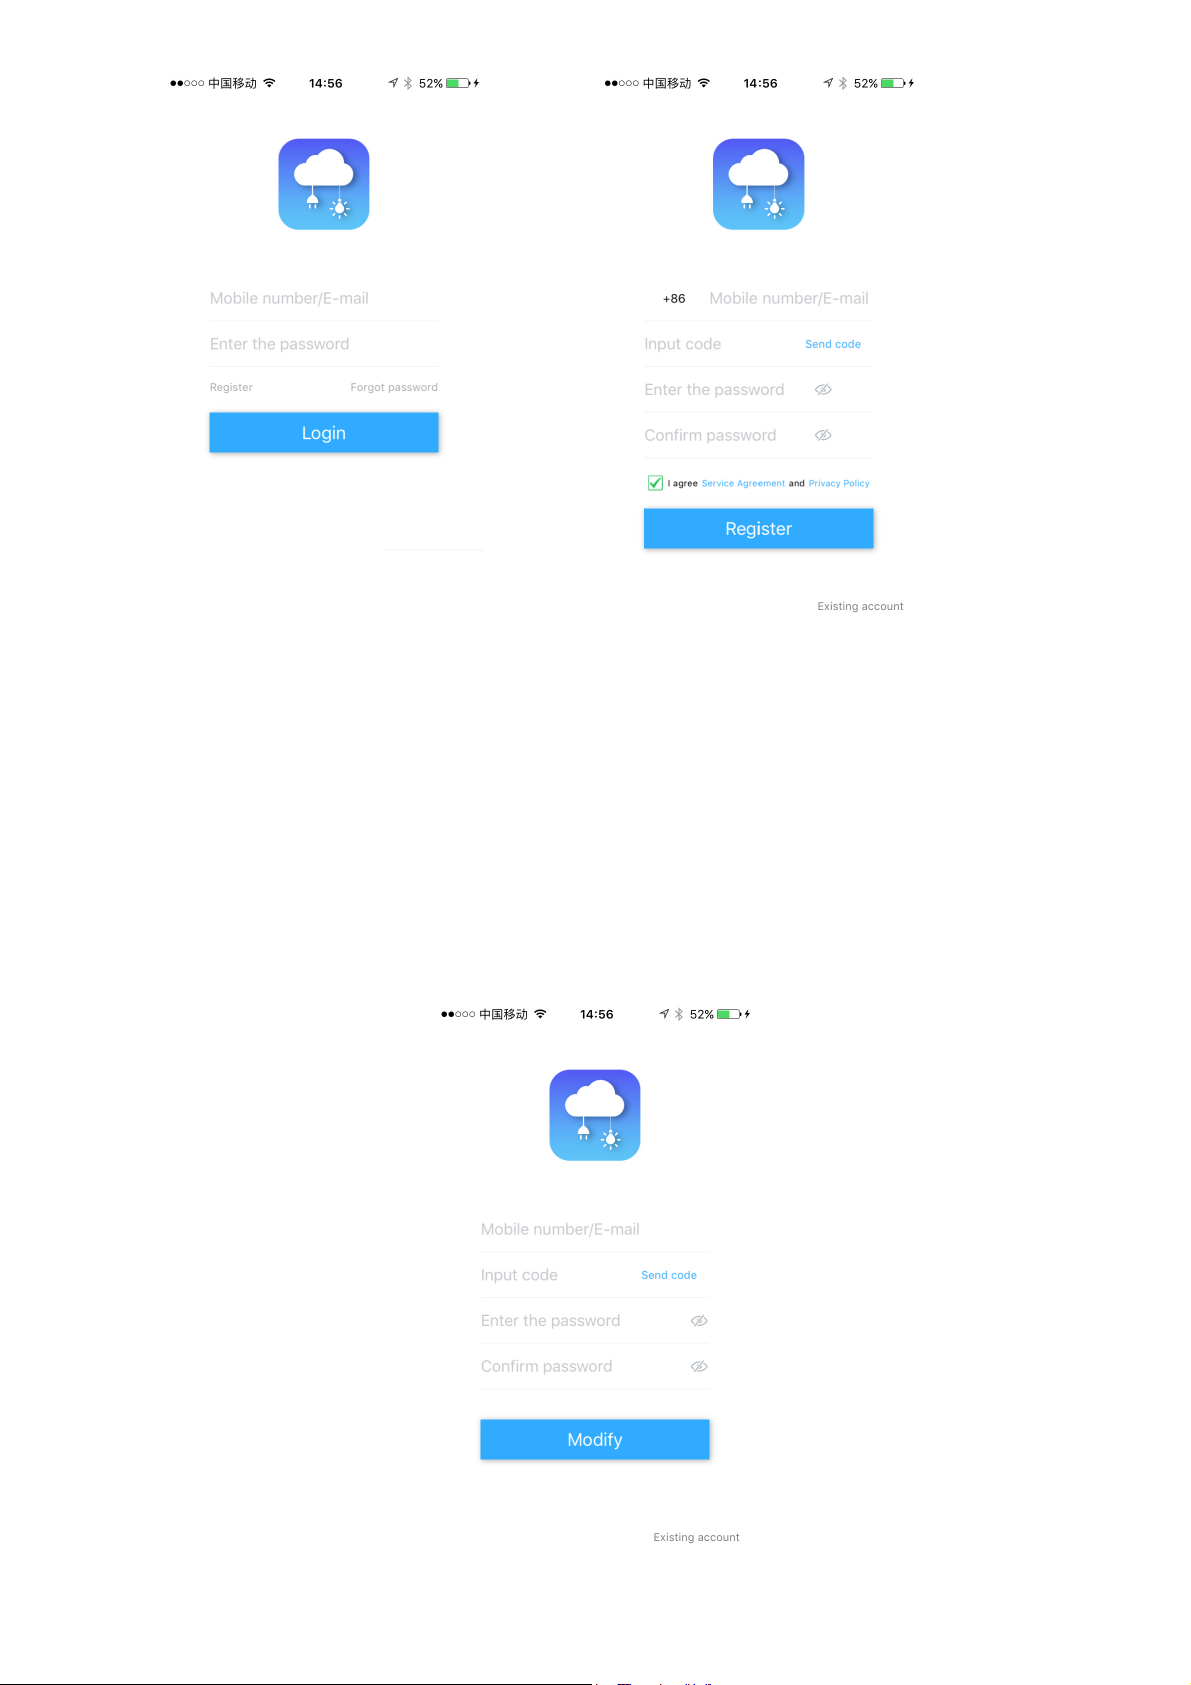
Register
If you don't have an app account, register an account to login. This page describes the
registration process.
A. Open app, tap the “Register” to enter the register page, as shown in the picture 1.
B. Enter the mobile number/E-mail and tap “Send code” , and also enter the password, as shown in
the picture 2. The verification code will send to your mobile/ E-mail. Tap the “Register” will create
new account.
Picture 0
Page 2
Picture 1
Login
Account and password
Enter the mobile number/E-mail and password, then tap “Login”, as shown in the picture1.
Forgot password
To find your password back, please follow the procedures:
A. Enter the mobile number/E-mail and tap “Send code” , and also enter the new password, as
shown in the picture 3. The verification code will send to your mobile/ E-mail.
B. Tap the “Modify” to set the new password.
Picture 2
Picture 3
Page 3
3、 Add - Wi-Fi connection - Network Configuration
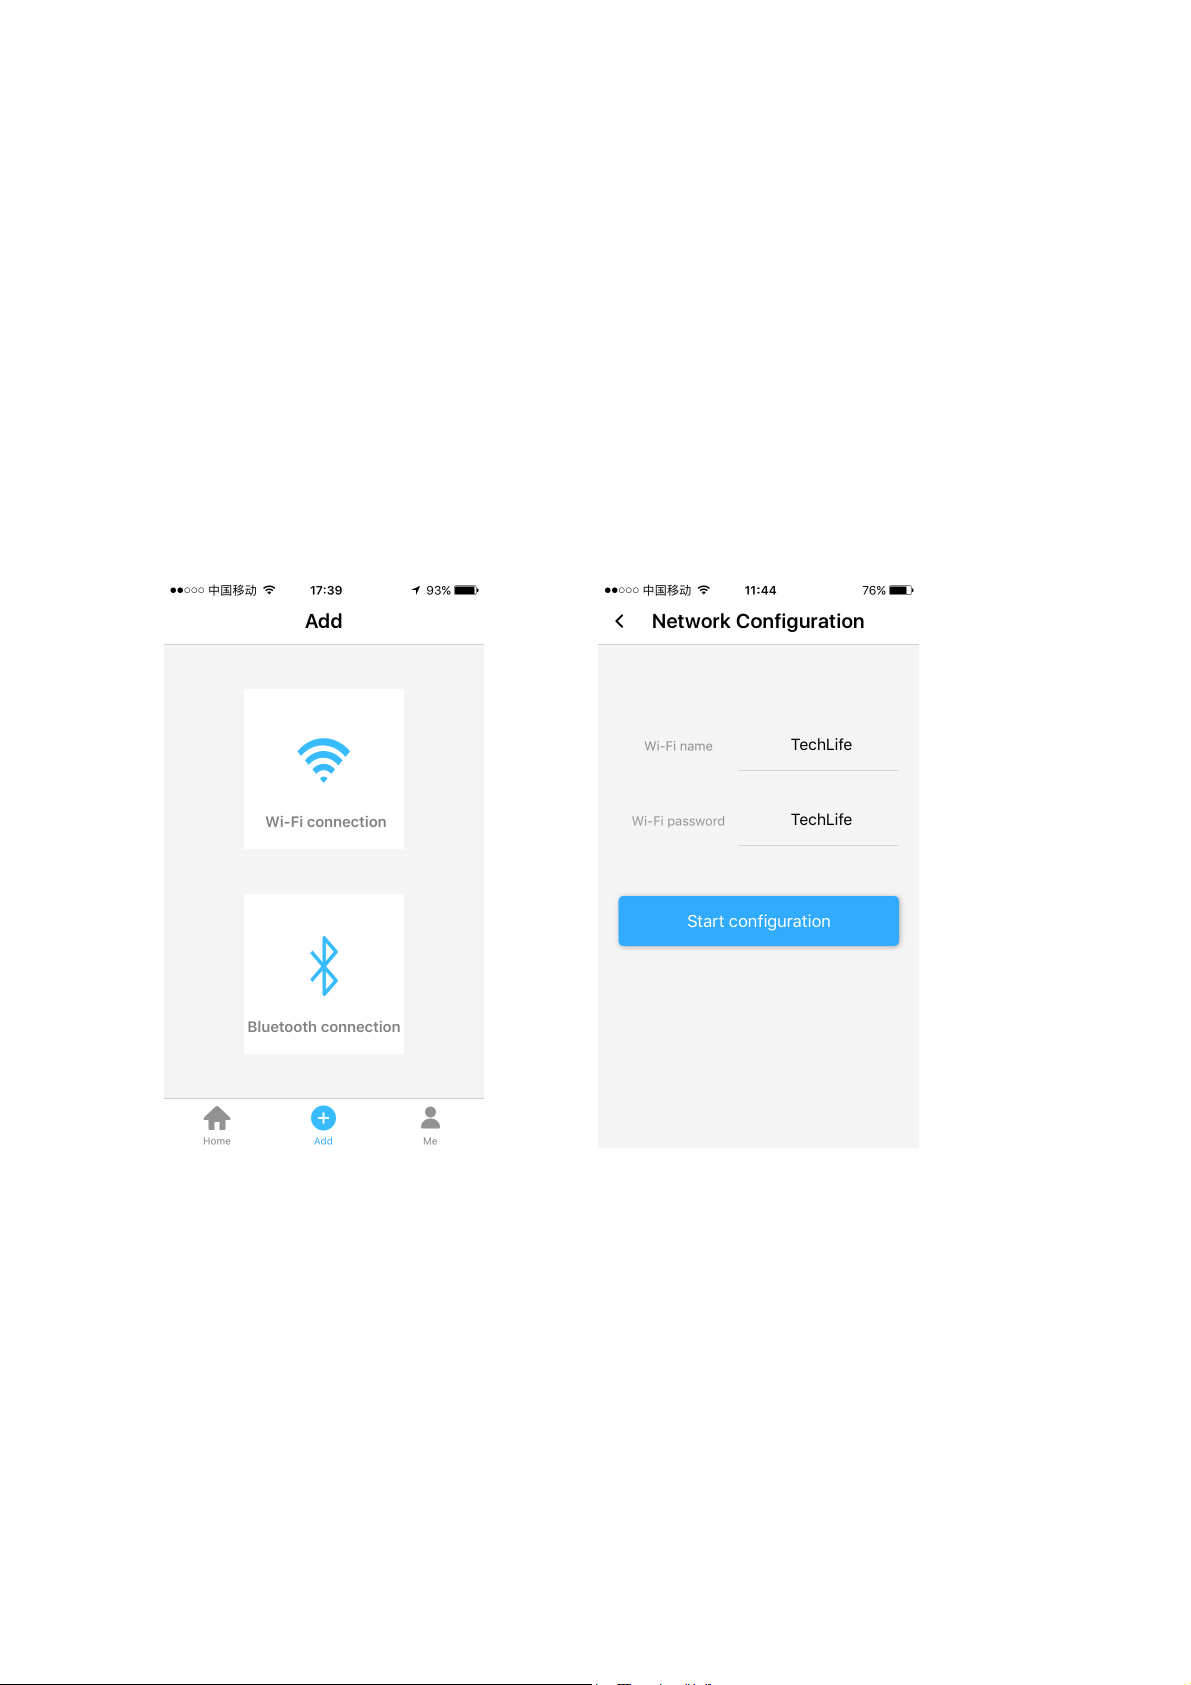
A. Tap the”Add”,click the “Wi-Fi connection”, as shown in the Picture 4.
B. Enter the “Wi-Fi name”and“Wi-Fi password”, tap the“Start configuration”, as shown in the
picture 5. Note: Only support 2.4GHz Wi-Fi network.
C. The app goes through the processes as shown in the picture 6. When the network connection is
successfully, the app page will be shown the “Discover devices”. And the system will try to binding
the device.
D. If network configuration failed, app will shown “Have no device”,you can retry network
configuration progress again.
E. When binding the device success,the app “Home” page will shown the device type, tap the
device will enter the “Control” page, as shown in the picture 7 and picture 8.
Picture 4
Picture 5
Page 4

Picture 6
Picture 8
Picture 7
4、 Home
There are five types of light control equipment:Single(1 Pulse-Width Modulation pin), CCT(2
Pulse-Width Modulation pin), RGB(3 Pulse-Width Modulation pin), RGBW(4 Pulse-Width Modulation
pin) and RGB&CCT(5 Pulse-Width Modulation pin).
The app will be automatically identified the light type.
Function:”Adjust”, “Music” ,”Style” ,”Tape” and “Timing”.
Page 5
A. Here's an example of RGB&CCT light (supporting color RGB and color temperature CCT
adjustment). Tap the“Adjust” ,you can adjust the color, as shown in the picture 8;Tap
the ”Adjust” ,you can adjust the CCT, ,as shown in the picture 9.
B. Tape the “Music”, as shown in the picture 10 and picture 11, by entering this function, playing
music and turning on the jump switch, the light can change with the frequency of music and adjust
the atmosphere.
Note: This function only exists on the same Wi-Fi lan with mobile phones and lights.
C. Tap the “Style”, as shown in the picture 12. There are dozens of options,light will run the style
as you select.
D. Tape the “Tape”, as shown in the picture 13. The light can change the color according to the
microphone frequency of the mobile phone.
E. Tape the “Timing”, as shown in the picture 14,it can set the switch of the light in different time
periods to enrich the intellectualized control.
F. Tape the sideslip column, as shown in the picture 16,click the device MAC address,can
enter the “Device settings”,here you can Rename, Unbond , Share device, Unshare device,
Factory Reset as so on. As shown in the picture 17.
Note:Binding the device refers to the device that has been connected with the network and the
light will bound to the current login account.
Share device will sharing the bound device to other exist accounts.
Factory reset refers to restoring the current equipment to the waiting configuration network
status, and at the same time, the cloud data of the current device will be cleared.
G. Tape the sideslip column, as shown in the picture 16,click“Remote control”,you can
remote control the light. When open the “Remote control” ,the ”Music” and ”Tape” will be closed,
as shown in the picture 19.
Page 6

Picture 9 Picture 10
Picture 11
Picture 12
Page 7

Picture 13 Picture 14
Picture 15
Picture 16
Page 8

Picture 17
Picture 18
5、 Me
For the ”Me” page, can shown the “Account information”(As shown in the picture 20),”Account
setting”(As shown in the picture 21),”Third party access”,”About” and so on.
Picture 19
Page 9

6、 Remark
A. The pictures used in this manual are iOS app interface, Android version is a bit different.
B. Product and software update periodically, the number and app interface in this manual are
only for example. No extra notification on further changes.
C. Feedback:info@qh-tek.com
Picture 20
Picture 21
Page 10

20C
 Loading...