

Page 1
QHY367C
User’s Manual Rev. 1.3
Page 2
QHY367C
This document is an online document. You may save this PDF file or print it
out. QHYCCD reserves the right to change this user manual without prior notice.
Package Contents
please confirm that the package contains the following items:
USB3.0 cable(1.5m)
1
Self-locking power cable
1
Car power adapter
1
Drying tube
1
Desiccant
1
Angle adjustment adapter ring
1
5mm Spacer to convert M54 to 2 inches
1 1
Inspection report
1
Driver download card
1
QHY367C camera
1
Optional accessories
12V power adapter + power cable
1
Note that if the user wants to buy 12V power adapter by themselves, its output current is at
least 3.5A, and the polarity must be center positive.
Page 3

QHY367C
Table of Contents
01 Software Installation
02 Use QHY367C in SharpCap
03 White Balance Adjustment
04 Use QHY367C on ASCOM platform
05 Use QHY367C in EZCAP_QT
06 Use BroadCast Video Streaming
07 FAQ
08 Camera Maintenance
09 Specifications
10 Mechanical Dimensions
11 Revision history
Page 4
QHY367C
1
01 Software Installation
1. Download and install ASCOM platform
2. Download and install Camera Driver
3. Download and install ASCOM Driver
As you most probably want to use your QHY367C as an expose camera, please download the
Capture version. If you want to use it as a guide camera, please download the Guide version.
4. QHY367C camera uses SharpCap as the default capture software. Please download SharpCap.
QHY367C camera can run on SharpCap 2.9 or later versions
Note that QHY367C requires the latest qhyccd.dll for the new version of SharpCap, and QHYCCD
has already developed a software named SharpCap Patch for it. You should download and install it
prior to using SharpCap.
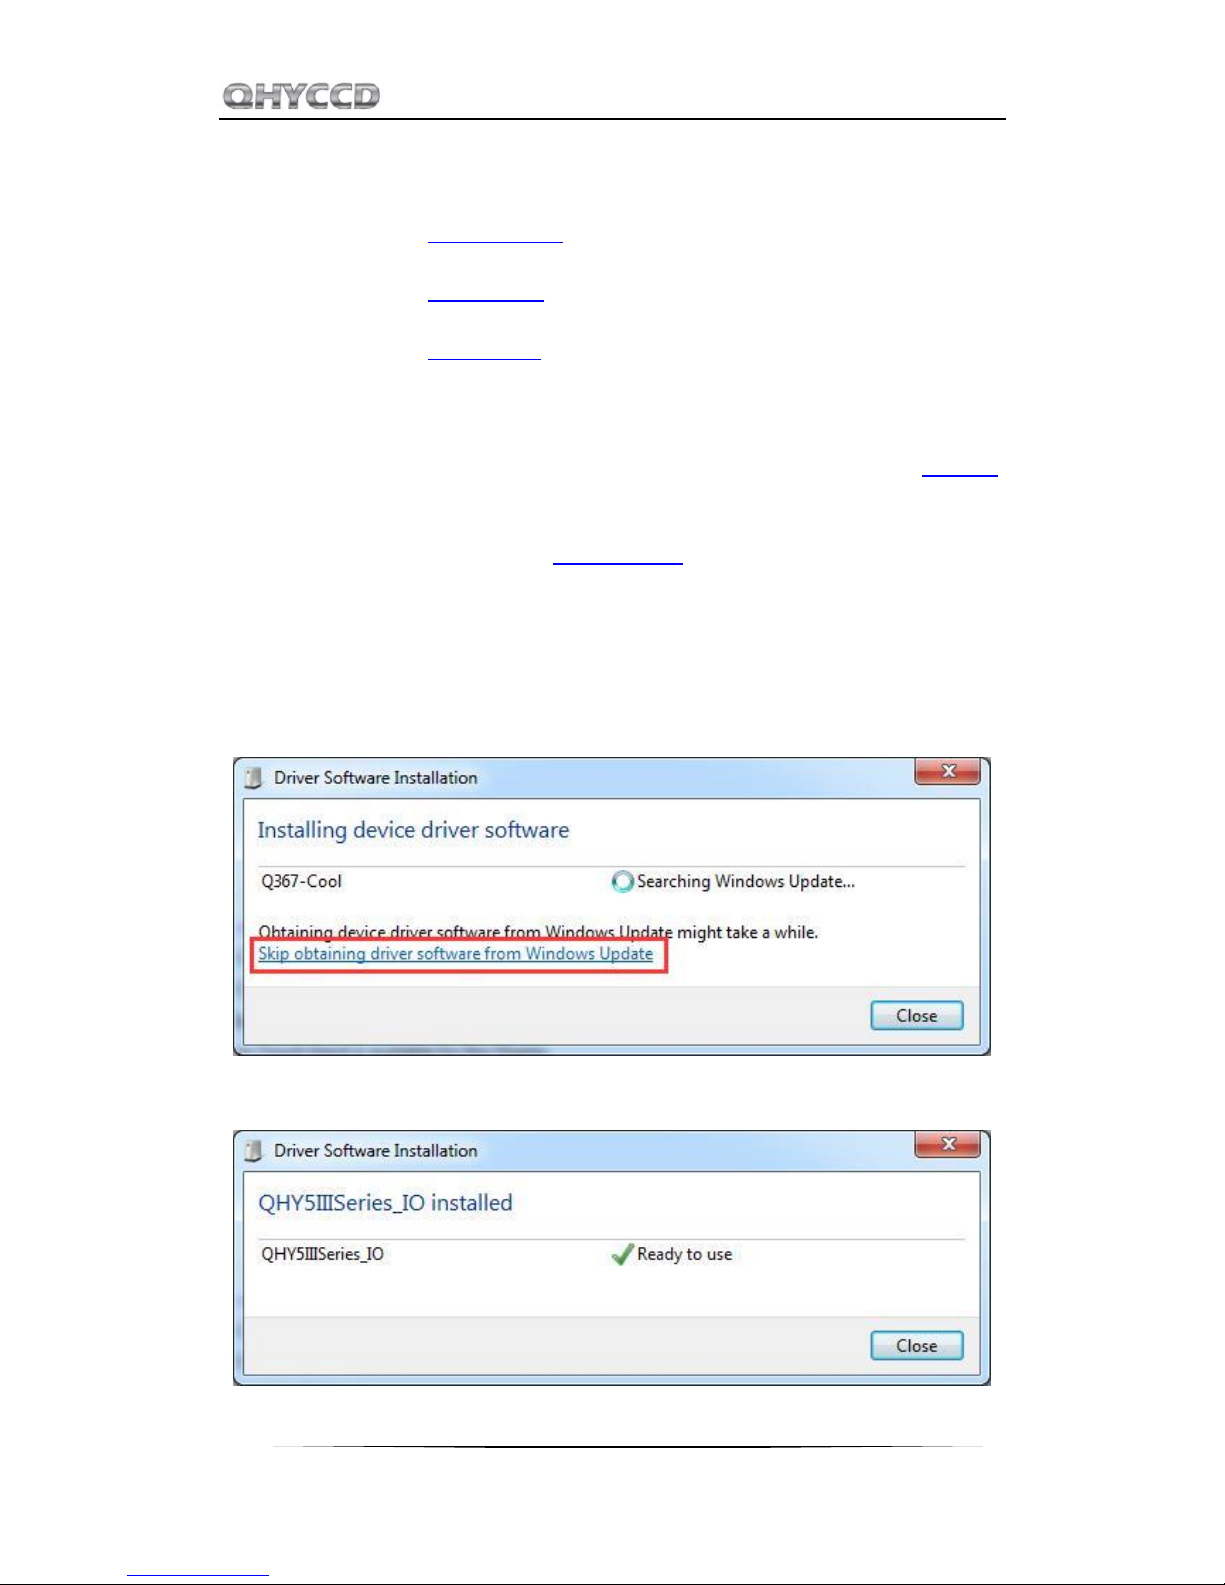
5. Connect QHY367C to your PC with USB3.0 cable. Connect your QHY367C to 12V power supply
(Make sure 12V power supply is always connected when you use QHY367C). For the first time the
system will find a new device and search the driver. You can skip the online searching by clicking
“Skip obtaining driver software from Windows Update” and the computer will find the drivers.
After installation is complete successfully, you can find the device in the device manager as shown
in the picture below.
Page 5

QHY367C
2
6. QHYCCD has developed a software named UpdateCheck that can check if the drivers
installed on your computer are the latest versions as well as update the drivers if needed. If the
status of some driver is “Need Update”, you can directly download its update package in this
software freeing you from the inconvenience of looking for and downloading it from our website.
Take QHY367C for example, you can see the drivers we need are the latest versions and don’t
need to be updated as shown in the following picture.
Note that after you downloading and installing the new drivers by using this software, be sure to
pull the USB cable out and then plug it in to enable the new drivers.
Page 6
QHY367C
3
02 Use QHY367C in SharpCap
1. Connect your QHY367C to 12V power supply. Connect your QHY367C to your computer with
USB3.0 cable.
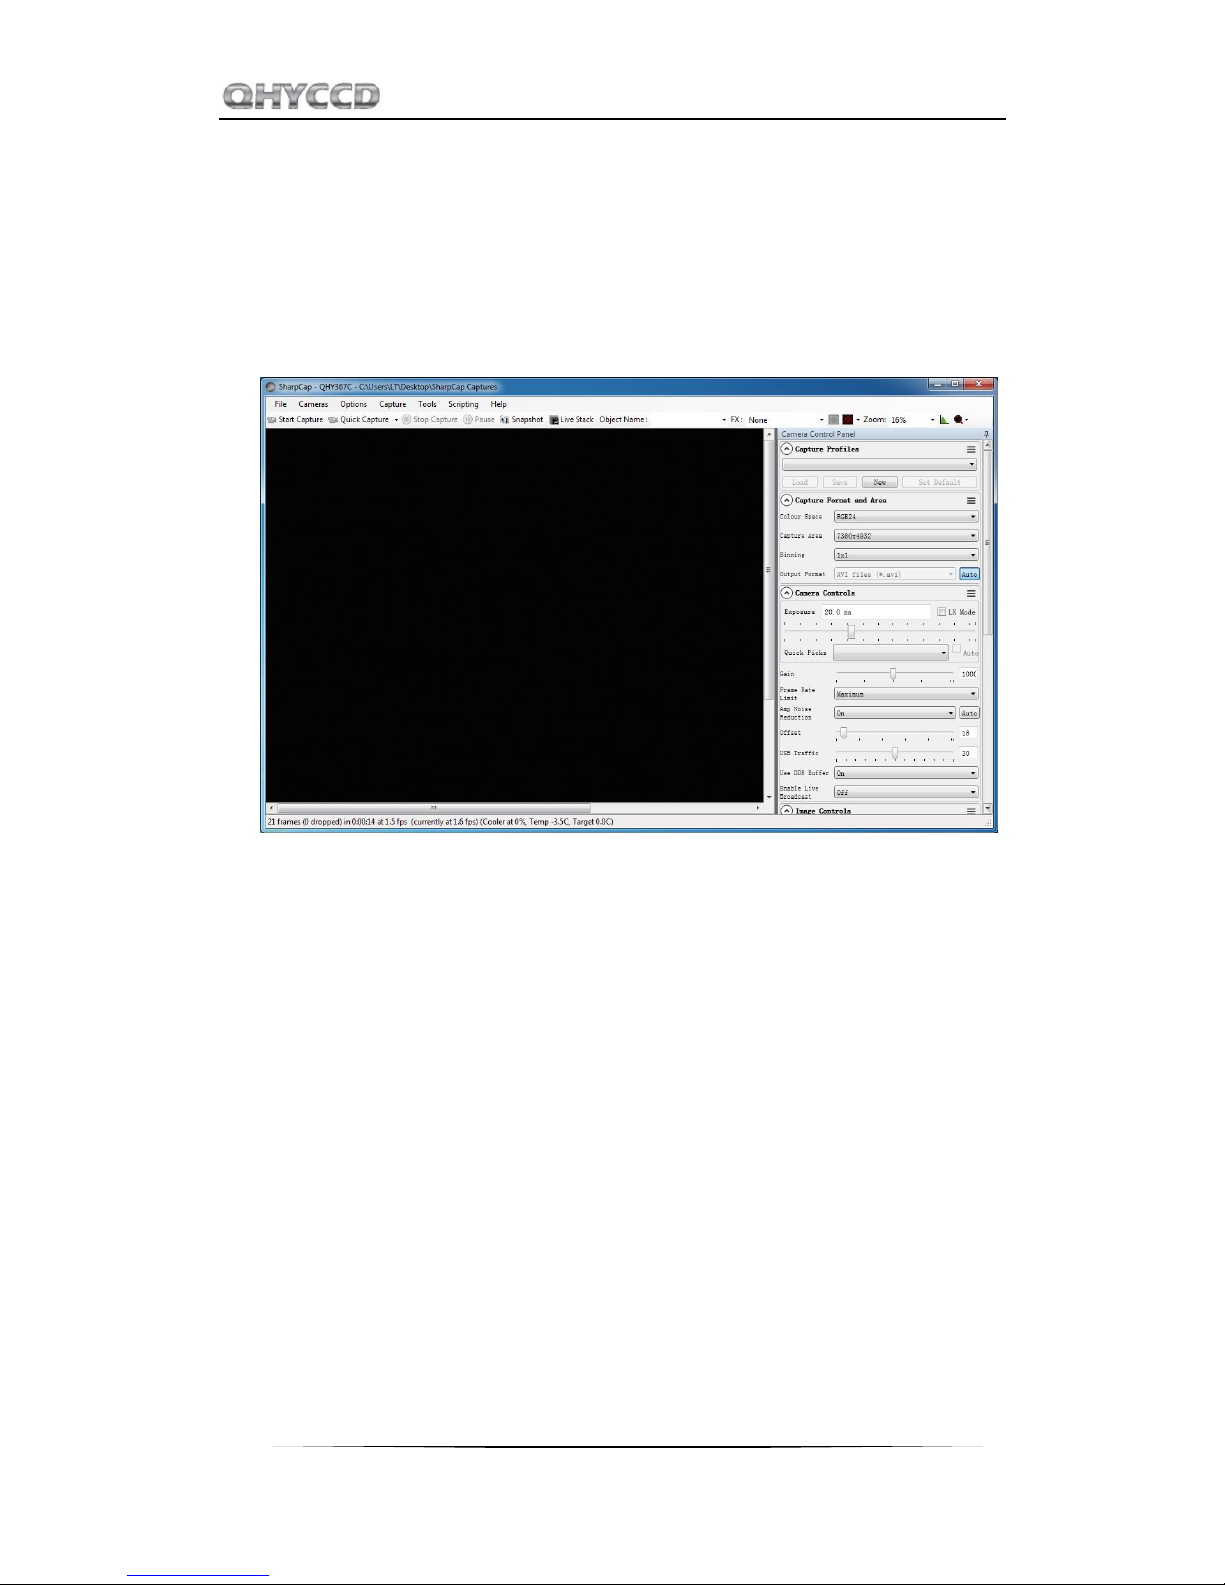
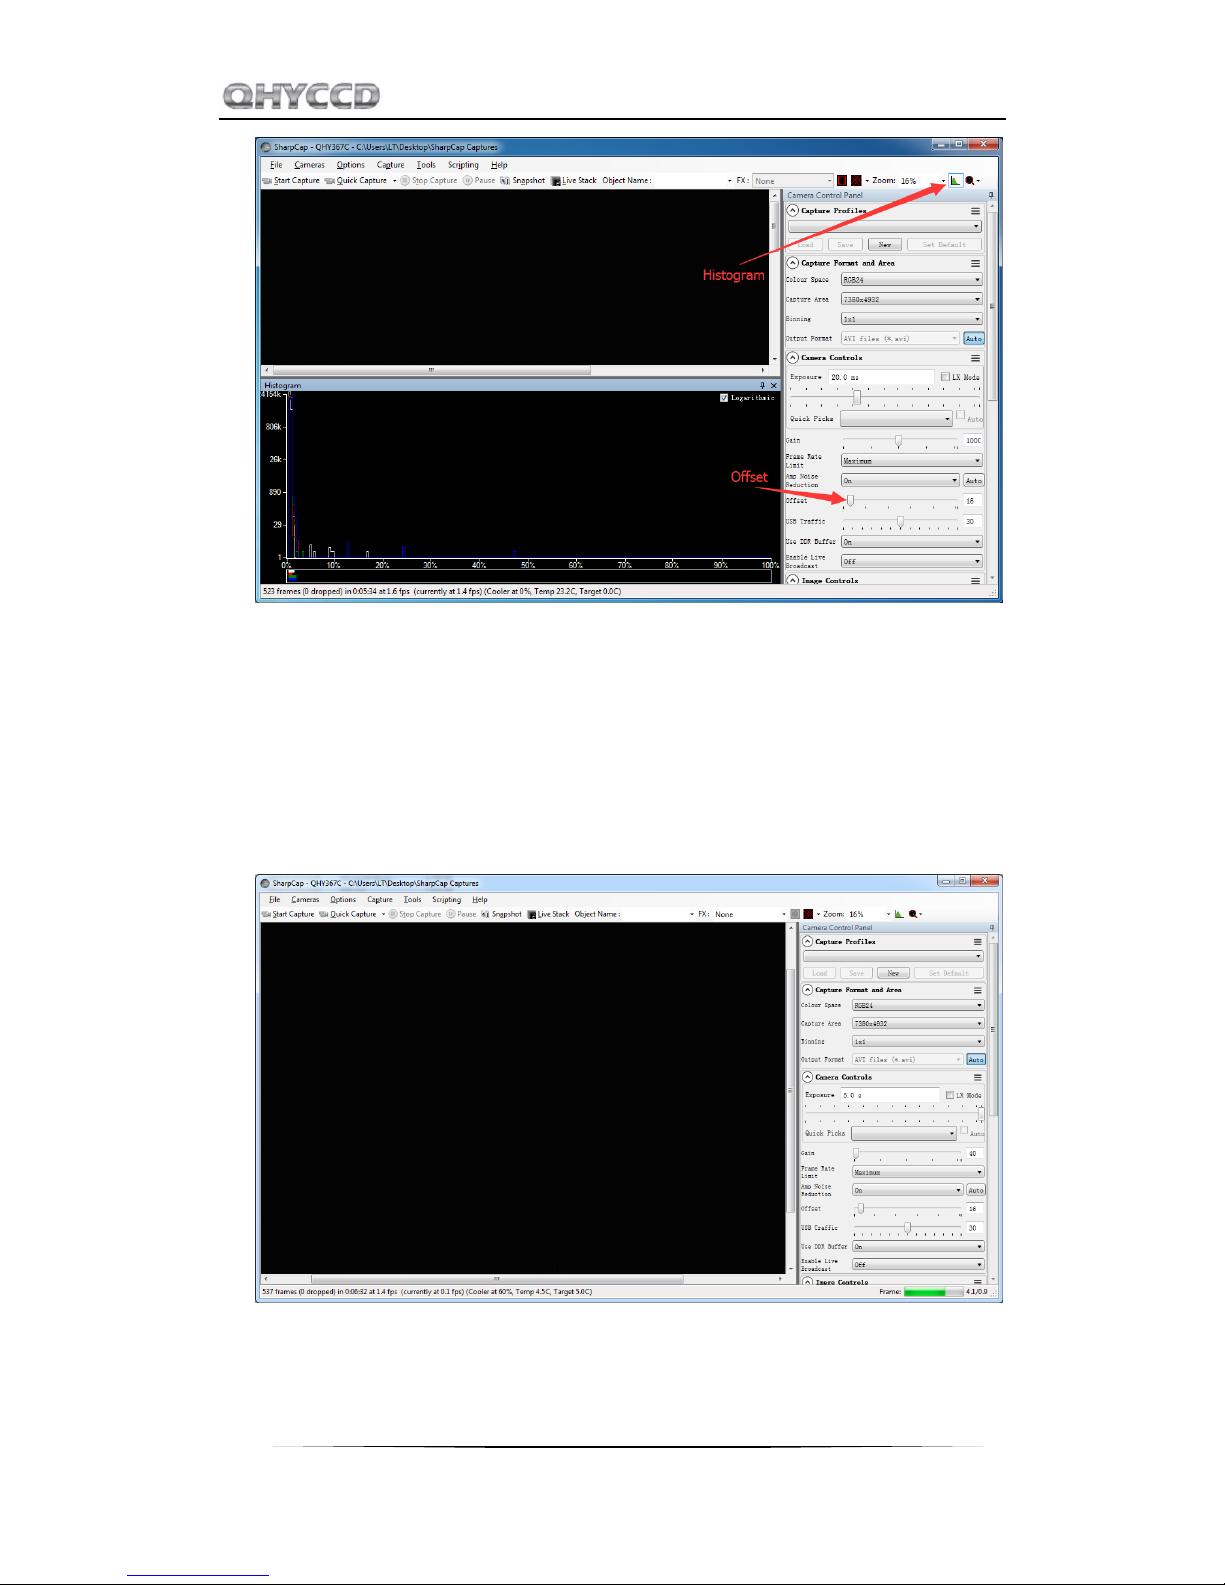
2. Run SharpCap. If the aforementioned software and drivers all have been installed properly,
the video image will appear automatically and you will see the frame rate at the lower-left
corner of the software as shown below
3. If you have started the SharpCap before connecting camera to your PC. You can click
menu->cameras->rescan for cameras to search the camera and check on the camera name
(QHY367C in this case).
4. To make sure the camera can run properly, the software will start the camera at the lowest
speed, which makes the frame rate much lower than the highest frame rate declared on its
webpage. Now you can try to get the most out of it by changing several settings. First you
can try to set the exposure time to 1ms, then try to reduce the “USB traffic” value. For
modern computer with i7-4 core, it should get the max performance. But please note that
not all computers can get the best performance due to various reasons such as the CPU
loading, the saving-energy mode setting, the mainboard performance and USB3.0 port
performance. Sometimes the display size may also impede obtaining the best performance.
So you can try to use the “Zoom” function to reduce the display size to see if it helps.
5. Adjust the offset. When you block the light thoroughly, you may find that the image is not
really “zero” (entirely black). Sometimes this will lower the quality of image contrast. You
can adjust the offset to make the histogram peak close to zero in order to get a better
background. You can open the histogram to confirm that.
Page 7
QHY367C
4
6. If you want to try 16bit image, you can switch the Colour Space to “RAW16”.
7. By check the “LX” mode you can expand the exposure setting range and take long exposure
shot. QHY367C camera has the anti-amp light control circuit and it can reduce the amplifier
glow significantly. Note that it’s impossible to reduce the glow in the corner thoroughly, and
it’s normal to see a very small amount of glow in the corner when you do long exposure.
A typical long exposure image in 5℃, 5 sec exposure and 40 gain of QHY367C is shown
below.
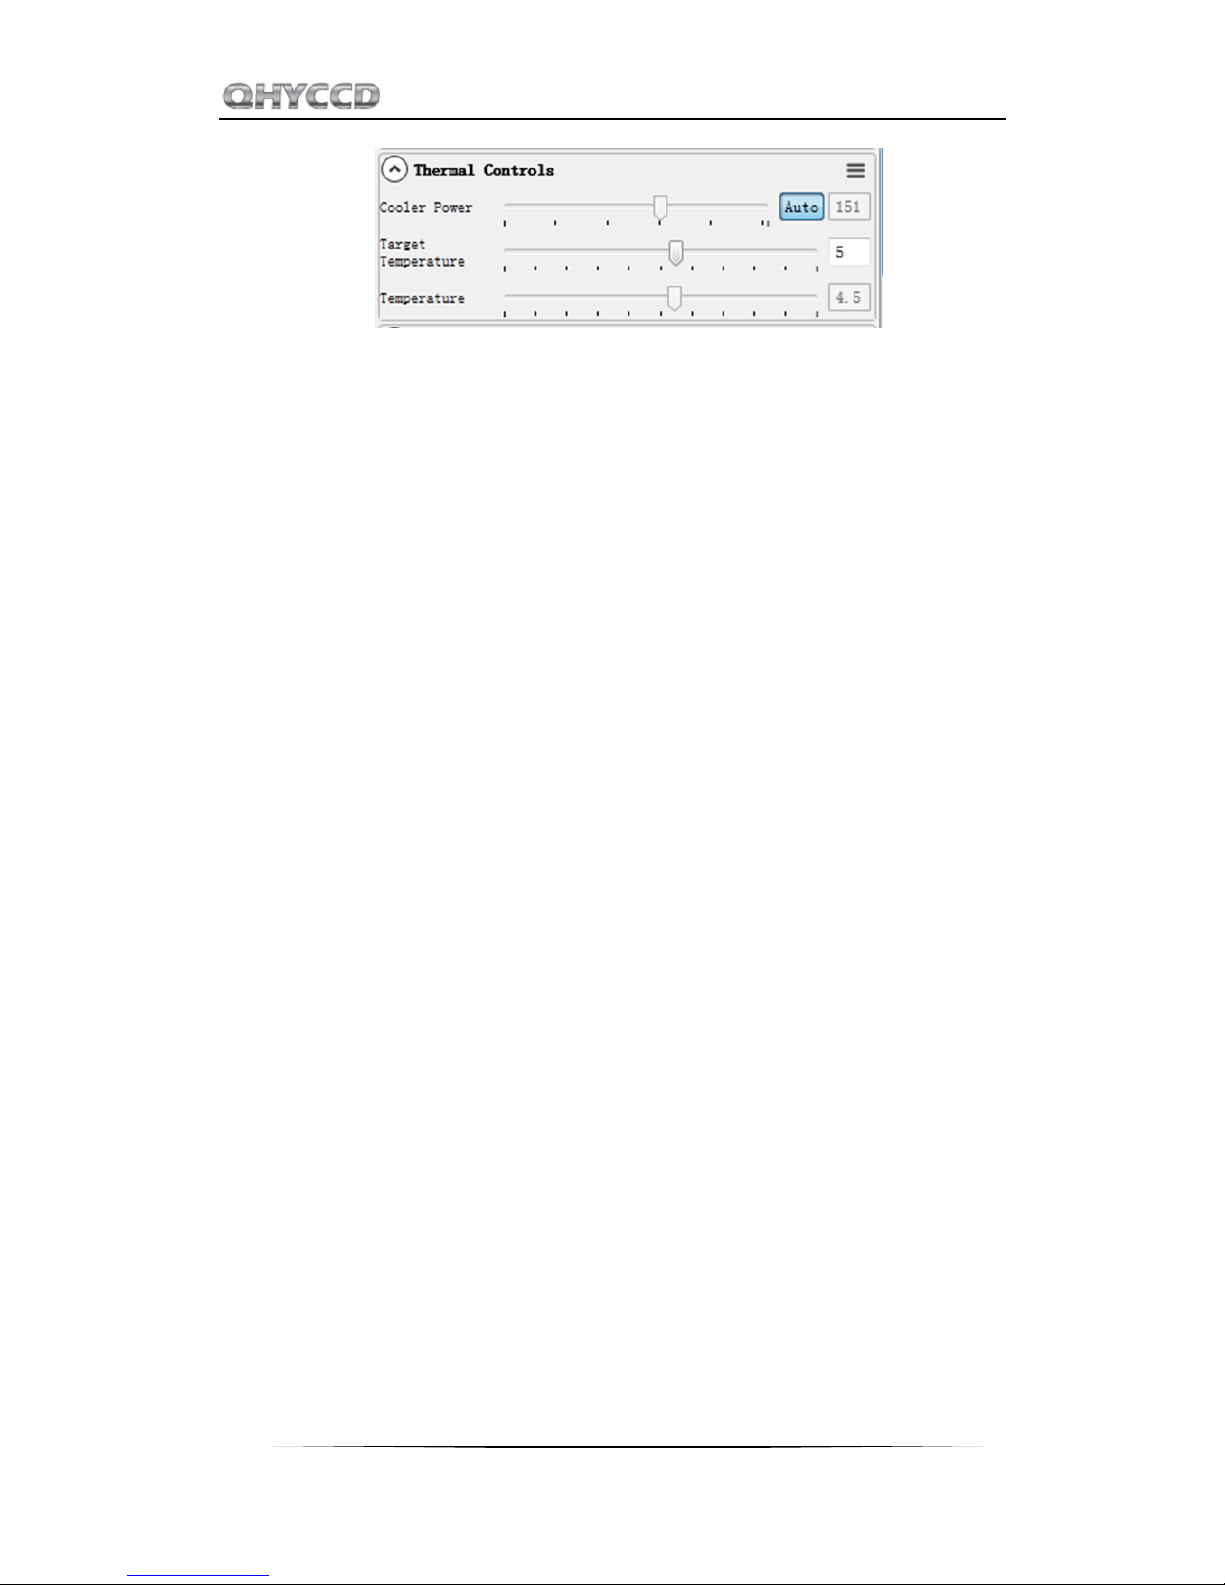
8. After you connect 12V power supply for QHY367C to power the TEC cooling circuit, you can
set the CMOS sensor cooling temperature in the “Thermal Controls” section in SharpCap as
shown in the following picture.
Page 8
QHY367C
5
Basically, you can control the temperature of CMOS by either adjusting “Cooler Power” or
clicking “Auto” and adjusting “Target Temperature”. You can also see the CMOS temperature
at lower-left corner of the software.
Before use this function, you should read the content about how to protect the cooler in the
FAQ section.
Page 9

QHY367C
6
03 Color Balance Adjustment
SharpCap will start at the default RGB balance for color camera. Here is the screenshot of the
QHY367C start up.
For color camera, SharpCap will show the WB Red/Green/Blue progress bar.
Since the color balance is the ratio between Red to Green and Blue to Green. You can fix the
Green color to its default value and adjust the Red and Blue.
For example, in the image above the blue is 1199 and red is 1112, green is 612. It looks the image
is well white balanced. If you need more blue, since it has limit of 2027. In this condition, you can
reduce the green a little and you will have more room for the ratio.
As we said before, if you are doing planetary imaging you should set the offset value as low as
possible. To make the background close to zero. Then you can easy to get correct color balance.
Otherwise it will not easy to get it. Sometimes the offset of an image is good but you cannot get
good balance.
Page 10

QHY367C
7
The reason is that the Color balance is a ratio of the RGB sensitivity difference. So we use a ratio
to multiply the RGB value and get it done. But if there is a bias exist. The ratio will not be correct.
For example, the G sensitivity is the double of R sensitivity.
G=2R In order to get white balance. We multiply a ratio of 2 to R
R’ = 2R = G so we get R = G
When a bias exist. The bias is a constant added to each pixel. So the image you see is:
R’’= R + bias
G’’ = G + bias = 2R+bias
Now the ratio R’’: G’’= (R+bias) / (2R+bias) and it is not equal to 1:2. It shows the bias will affect
the true value of the R:G. And the ratio of R:G will vary when the image light changed. It is hard
to correct with a fixed ratio.
But for DSO capture, you should keep the offset above zero and avoid the background being cut
off. A background from 1000-5000 is a good value (16bit mode) for DSO imaging.
Page 11

QHY367C
8
04 Use QHY367C with ASCOM
You can connect many software that support ASCOM. Currently QHY367C only supports normal
ASCOM connection and does not support the ASCOM VIDEO connection. Please note that
QHY367C always transfers maximum bit depth by ASCOM to make the best DSO imaging
performance. The image format is 16bit width and patch zero on low bit.
MaxIM DL
1. First you have to make sure that both ASCOM Platform and ASCOM driver have been
installed. If not, please install it first.
2. Connect your QHY367C to 12V power supply. Connect your QHY367C to your computer with
USB3.0 cable.
3. Start MAXIMDL
4. Follow the instructions shown below to finish the setup
Page 12

QHY367C
9
Normally, you can set the gain=1 and offset=10 to start. Keep clicking “Okay” to return to
Camera Control window.
Keep clicking “OK” to return to the Camera Control window. Click “Connect” before clicking
“start” button in the Expose tab.
Page 13

QHY367C
10
05 Use QHY367C in EZCAP_QT
EZCAP_QT is the software developed by QHYCCD. This software has the basic capture function
for QHYCCD deep sky cameras.
1. Download and install EZCAP_QT
2. Connect your QHY367C to 12V power supply. Connect your QHY367C to your computer with
USB3.0 cable.
3. Run EZCAP_QT. Select “Connect” in Menu->Camera. If the camera is successfully connected.
The title of EZCAP_QT will display the camera firmware version and the camera ID as shown
below.
4. In Menu->Camera Setup, Click “Temp Control” and set the CMOS sensor temperature. You
can enable the “Auto Control” and set the target temperature. For example here we set the
temperature to -10C. The CMOS temperature will come to -10C very fast (in about 23minute). If you want to close the TEC, you can select “TEC OFF”. If you just want to set the
TEC power but not the temperature. You can select “Manual” and then set the percent of
the TEC power.
Page 14

QHY367C
11
5. You can use the preview tab to do preview. And use the focus tools to do focus. Then use the
capture tab to capture image.
6. In EZCAP_QT there is a planner for image tasking. You can capture a series images by using
the table below.
Page 15

QHY367C
12
06 Use BroadCast Video Streaming
BroadCast video steaming is a special function that QHY367C supports. It can send the video image
to multiple target software via QHYCCD BroadCast video driver. For example, you can use the
SharpCap software to control the QHY367C camera and at the same time the video appearing on
the SharpCap will be sent to any of software that support the WDM camera, like the HandyAvi,
Adobe video encoder, online chat software etc. This function is very useful for the video live
broadcast applications.
1. Install the BroadCast Driver
2. Connect QHY367C to your PC and start SharpCap
3. Turn on “Enable Live Broadcast” at the bottom of Camera Control panel in SharpCap as shown
below.
4. Select “QHYCCD camera (WDM)” as your webcam in the software you are using.
Page 16

QHY367C
13
Page 17

QHY367C
14
07 FAQ
1. Does QHY367C support 10bit or 14bit?
QHY367C supports both 10bit and 14bit output (For 10bit, it is 0-255 and only use the high
8bit, for 14bit it is 0-16383 mapping to 0-65535)
2. How to get maximum FPS?
Since QHY367C has very high data bandwidth. Not all computer can get the maximum FPS.
Normally i7-4core should have no problem for that. The CPU loading will also affect the
maximum FPS. So please reduce the CPU load by close other applications when using camera.
If the CPU load is too high, the software may become very slow or hang.
3. How to avoid the camera hanging?
If you camera always hangs. It may be caused by many reasons. You can check the following
things.
3.1 If your computer is via chipset, or some type of the mainboard. In SharpCap it cannot get
image at all. (But in ASCOM it works well). In this condition, you need enable the DDR buffer of
the camera. Current SharpCap supports DDR function enable. The next version SharpCap will
support it.
3.2 If there is power leak for your mounts and computers? The power leak may cause the leak
current transfer from computer to the camera via the GND. This may affect the USB transfer
and causes the data packet lost and cause it hang. You need to make sure the computer and
the mount is well grounded.
3.3 If the USB port’s voltage not enough? Some computer’s USB port +5V is not enough. It may
cause the camera always hangs. In this condition you can use a powered USB3.0 HUB to
connect camera and get the good +5V power for camera.
3.4 If your CPU load is too high? If CPU load is too high, it will cause many frame lost and cause
the camera hangs. You can increase the USB traffic value to reduce the FPS and get more
stable video transfer.
3.5 If the USB cable connection is good enough? Sometimes the contact issue in the USB cable
to camera or USB cable to computer will cause the signal loss and cause camera to hang.
Especially when you move the cables. In this condition. You can try to add a little silicon oil
into the USB socket/plug .This can increase the contact a lot better.
3.6 Avoid the statics. Sometimes the static electricity on human body will cause the camera to
hang. You can touch the computer metal case for first before touch the camera to let the
static electricity on your body release.
Page 18

QHY367C
15
3.7 Some computer’s front USB port is not so good for high speed transfer (The reason is it
connected to mainboard by a cable and which has no good signal integrity). If you found the
camera always hang on front USB port. You can try the USB port on backside of the computer
(which is connected to chipset directly on the mainboard).
4. How to clean the CMOS sensor and the optic windows of the camera?
If you found there is dust on the CMOS sensor. You can screw off the front part of the
QHY367C. The QHY367C’s CMOS sensor has the AR coating so you need to be careful to clean
it. You can use the clean kit for DSLR sensor to do it.
The optic window is the IR cut coating or AR coating. So you need to be careful when cleaning
it. You can also use the DSLR clean tools or the lens paper. Don’t use strong force to clean it.
The coating is not so hard and it is easy to get scratch when you use strong force on it.
5. How is the anti-amplifier function in QHY367C?
QHY367C camera has the anti-amp light control circuit and it can reduce the amplifier glow
significantly. Note that it’s impossible to reduce the glow in the corner thoroughly, and it’s
normal to see a very small amount of glow in the corner when you do long exposure.
6. What’s on-camera DDR buffer and what is benefit for?
The QHY367C has the on-camera 128MB DDRII image buffer. It brings two advantages: It can
buffer whole image and avoid it lost during USB transfer. Because CMOS sensor outputs the
image continuous after exposure end and it does not allow the pause. But the computer may
have some pause due to the multi-task feature of the windows. If the pause is too long, the
small buffer in the USB transfer chip will full and the coming image data will lost. And it will
cause one frame is lost some data and this frame will be a bad frame. For short exposure it
maybe not cause big problem because the next frame will comes soon. But for long exposure
it means you lost a long exposure frame. The 128MB DDRII buffer can solve this problem by
storing the whole frame into it and transfer. Even the computer has big pause it will not lost
data.
Another advantage is that it will make the video more smooth when in some slow computer or
some mainboard which is not friendly to USB3.0(like the VIA chipset) . In these computers they
cannot handle the high speed USB data well and the data is always lost. With this DDR it can
buffer the input image data and then send to computer. Even the high frequency pause
happens, it can keep the USB data lossless.
SharpCap version has options for enabling/disabling the DDR buffer. The current ASCOM driver is
always working under DDR enabled mode.
7. How to protect the cooler in QHY367C?
Page 19

QHY367C
16
The cooler in QHY367C can lower the CMOS temperature to a value that’s almost 40 degrees
centigrade below the ambient temperature. So you need to be careful to avoid thermal shock,
which refers to when the cooler’s temperature rises or fall dramatically, the cooler is
subjected to strong internal stress due to contraction principle. Drastic thermal shock can
shorten cooler’s service life or permanently break it.
So when you begin to adjust the CMOS temperature, you should avoid setting “Cooler Power”
to its maximum value, and you should gradually turn up the “Cooler Power” value. When you
turn off the power, if the “Cooler Power” value is very big, you should gradually turn it down
before turn off the power.
8. The FPS of cameras sometimes suddenly drops to zero under DDR mode on
SharpCap, what’s the solution for this problem?
Recently, we have been told by our users that the FPS of their cameras sometimes suddenly
drops to zero under DDR mode on SharpCap. It is caused by the fact that the receiving speed
of computer is relatively slower than the sending speed of camera. Once CMOS sensor starts
working, it will incessantly conduct exposure and output image data over and over again, and
it cannot be interrupted. If USB transmission was interrupted too often by the operating
system, the data overflow of DDR would ensue resulting in bad frame. Therefore, not a single
frame is a complete frame, and the FPS will drop to zero.
Solutions:
The first solution to this problem is to increase the value of USB traffic to decrease the FPS of
the cameras. Note that by using previous version of SharpCap Patch, the value of USB traffic
cannot be set to a value large enough, so you should go to our website to download the latest
version of SharpCap Patch.
The second solution to this problem is to turn off the DDR mode, but for computers whose
performance isn’t very good, this solution may not work very well.
Page 20

QHY367C
17
08 Camera Maintenance
1. Drying the CCD Chamber
The CCD sensor is located in a CCD chamber. This chamber is airproof and connect to the
socket of the silicone gel tube on one side of the QHY367C front case. If there is moisture and
cause the CCD sensor glass get dew. You can connect the silicone gel tube on the socket to dry
it.
Please put the effective silicone gel into the silicone gel tube. Make sure there is a small
amount of cotton inside to prevent the silicone gel get into the CCD chamber.
2. Avoid CCD chamber optic window get dew
If the environment humidity very high, the optic window of the CCD chamber may get dew. The
QHY367C has the build-in heat board on this optic window to heat the optic window to avoid it.
In most conditions it can take effect.
If the optic window still get dew please try the following method.
1. Avoid the CCD Camera face down to ground. The cold air is heavy than warm air, if you put
the camera facing down to the ground, the cold air is easy to get the optic window and
cause it very cold and get dew
2. Increase the temperature of the CCD sensor. You can increase the CCD sensor temperature
a little to prevent the optic window get dew.
3. Check if the heat board working. If the heat board not working, the optic window is easy to
get dew. Normally the heat board can get about 65-70C in +25C environment. If it is not so
warm, it maybe the problem of the heat board damaged. Need to contact QHYCCD to
replace one heat board.
Page 21

QHY367C
18
09 Specifications
CMOS Sensor
Sony full-frame 36MP CMOS Sensor
Effective Pixels
7380*4932
Pixel Size
4.88um*4.88um
Effective Area
36mm*24mm
Shutter
Electric Rolling Shutter.
FullWell
TBD
QE
TBD
Readout Noise
TBD
System Gain
TBD
Unity Gain
TBD
Frame Rate (on 8bit)
TBD
ROI Support
Yes. Any Area ROI
Exposure Time
50us-1800sec
AD Sample Depth
14bit
On Camera Image Buffer
Yes, 128MB DDRII Buffer
Cooling
2-stage TEC, Typical -40 below Ambient. Temperature Regulated
Power
+12V power supply for both TEC and camera
Anti-Dew Control
Air Connector for removable silicone gel tube
Heat board for optic window of airproof CCD chamber
Computer Interface
USB3.0 Super Speed
Optic Window
AR+AR
Power consumption
TBD
Page 22

QHY367C
19
10 Mechanical Dimensions
Drawing of QHY367C without angle adjustment adapter ring
The back focal length of QHY367C with angle adjustment adapter ring is about 18.50mm
Drawing of QHY367C with angle adjustment adapter ring
The back focal length of QHY367C with angle adjustment adapter ring is about 22.50mm
Page 23

QHY367C
20
Drawing of angle adjustment adapter ring
Drawing of Spacer to convert M54 to 2 inches
Page 24

QHY367C
21
11 Revision history
Date of change
Revision
Content of change
November 29th,
2016
1.0
First edition
December 20th,
2016
1.1
Added solution to the problem that cameras halt
under DDR mode in the FAQ section
January 5th,
2017
1.2
Added introduction about broadcast
application(Section 6)
Added notes about 12V power adapter
August 30, 2017
1.3
Updated introduction about Optic Glass Window in
the “09 Specifications” section
 Loading...