

Page 1
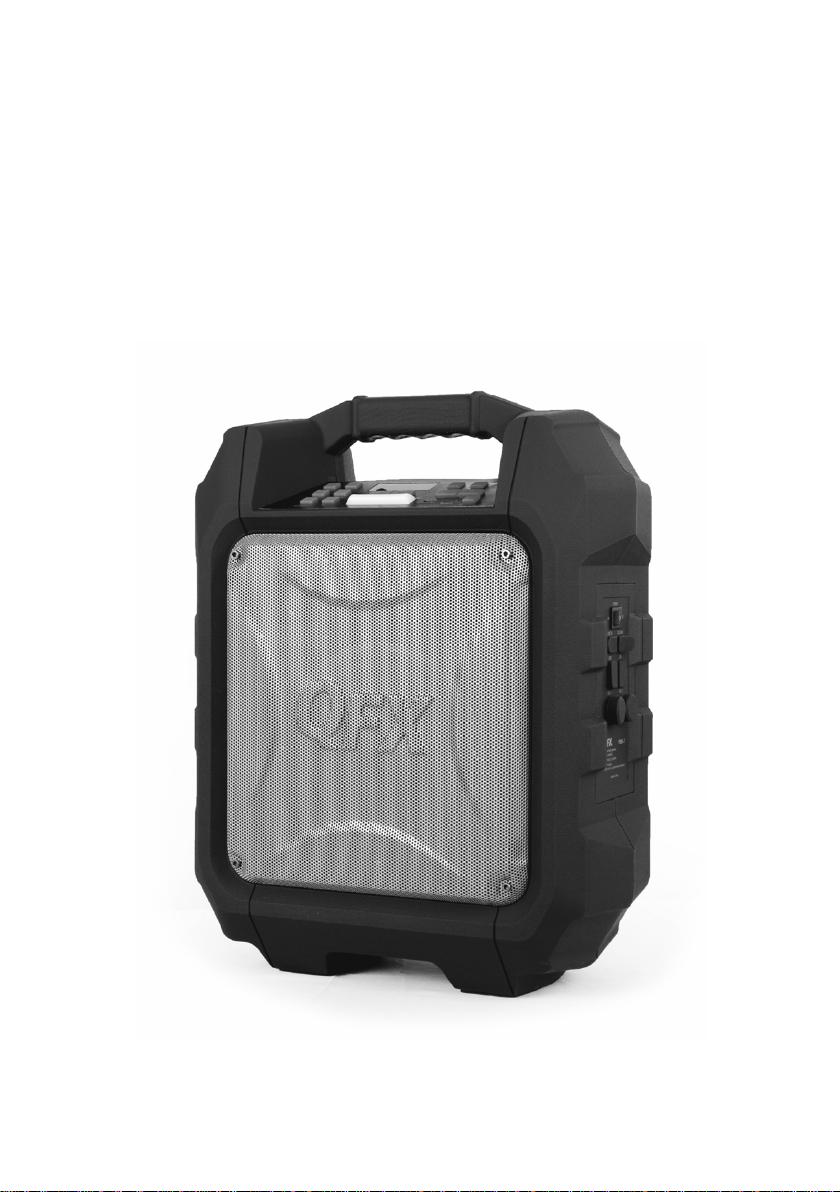
MOBILE PARTY SPEAKER
MODEL: PBX-7
Page 2

Page 3

TABLE OF CONTENTS
PART DESCRIPTIONS 1
SAFETY INSTRUCTIONS 2
POWER CONNECTION 3
BLUETOOTH CONNECTION 3
FM RADIO 3
USB PORT (MUSIC PLAYBACK) 4
LINE IN 4
RECHARGING 4
SMARTPHONE / TABLETS RECHARGING 5
SING-A-LONG 5
SOUND EFFECTS 5
TROUBLE SHOOTING 6
SPECIFICATIONS 6
Page 4
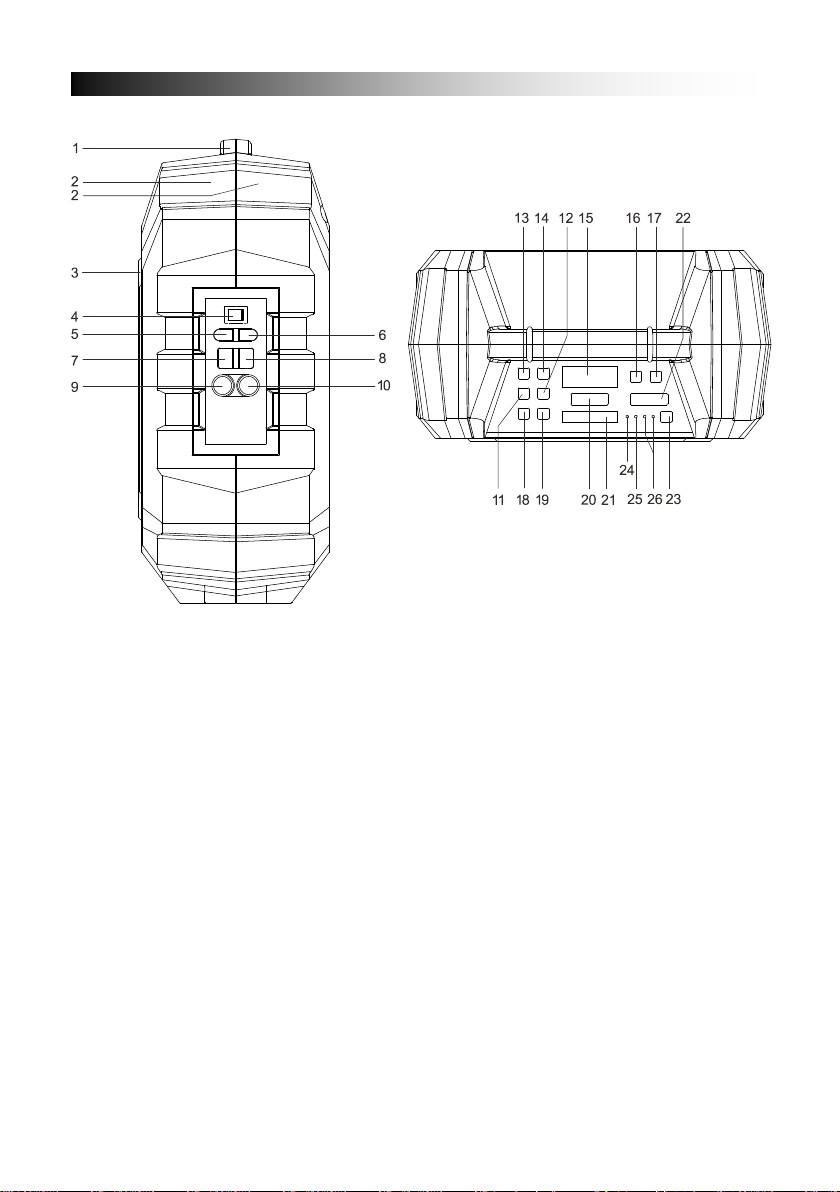
1. HANDLE
14. EQ KEY
PART DESCRIPTIONS
2. RUGGEDIZED HOUSING
3. NET COVER
4. POWER ON/OFF KEY
5. DC INPUT
6. LINE INPUT
7. USB PORT
8. USB CHARGE PORT
9. MIC PHONE PORT1
10. MIC PHONE PORT2
11. TUNING DOWN
12. TUNING UP
13. REPEAT KEY
15. LED DISPLAY
16. EH DOWN
17. EH UP
18. SOURCE SELECT
19. PAUSE / PLAY KEY
20. VOLUME (-/+) KEY
21. LED LIGHT
22. MIC VOLUMEUP / DOWN
23. LIGHT
24. STANDBY STATUS
25. BLUETOOTH LED INTERFACE
26. BATTERY LEVEL INDICATION
EN-1
Page 5
To ensure proper operation of the products and prevent fire or shock hazard, please
persons.
SAFETY INSTRUCTIONS
carefully read all information cont ained in these Safety instructions.
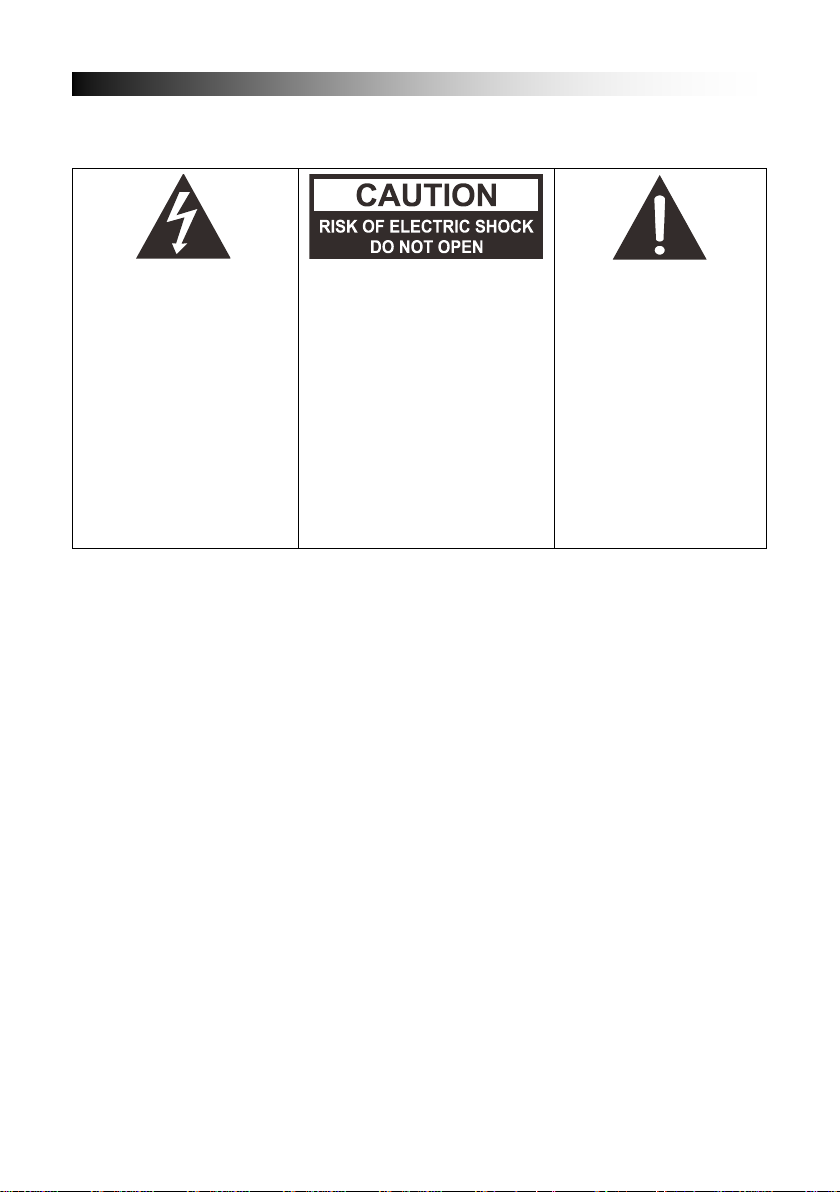
The lightning flash with
arrowhead symbol, within
an equilateral triangle, is
intended to alert the user
to the presence of
uninsulated "dangerous
voltage" within the
product's enclosure that
may be of sufficient
magnitude to constitute a
risk of electric shock to
UNPACKING:
Check that all the following items should be included in the box.
- PBX-7 Unit
- AC Power Adaptor
- User Manual
IMPORTANTS INSTRUCTIONS:
1. Ensure the plug is fully inserted into the wall outlet and the product is operated on an
electric power source matched to i ts rated voltage.
2. Nev er operate the product if the cord or adaptor i s damaged or overly hot.
3. Do not modify the cord or damage it in any way such as by bending, twisting or
pulling on it unnecessarily.
4. Do not attempt to modify, repair or in any way dismantle the product, other than
when discarding it at the end of its useful life.
5. Do not allow the power cord to be immersed in, splashed with, or rinsed under
water.
6. Nev er unplug this product with wet hands.
7. Unplug the product from the wall outlet before cleaning and maintenance . Do not
use liquid cleaners or aerosol cleaners.
8. The power cord should be unplugged from the wall outlet when unused for a long
period of time.
9. Keep and storage this product in dry and not m oi s ture area when are not using.
WARNING: TOREDUCE
THE RISK OF ELECTRIC
SHOCK, DO NOT REMOVE
COVER (ORBACK). NO
USER-SERVICEABLE
PARTS INSIDE. REFER
SERVICING TO QUALIFIED
SERVICE PERSONNEL.
The exclamation point
within an equilateral
triangle is intended to
alert the user to the
presence of important
operating and
maintenance (servicing)
instructions in the
literature accompanying
the appliance.
EN-2
Page 6
10. Do not use this product near water, or any other heat sources or other apparatus
POWER CONNECTION
FM RADIO
that produce heat.
11. Battery shall not be direct exposed to suns hine and fire.
12. Do not attempt to replace the battery. For repairing and servicing, please c onsult
from the store of purchase or customer s ervice center designated by the store.
CAUTION: Danger of explosion if battery is incorrectly replaced.
13. Do not use any other power supply other than the one specially designed for this
product.
14. Keep this operating instruction in a saf e place.
15. Contact an authorized service center if you have any inquiry about this product
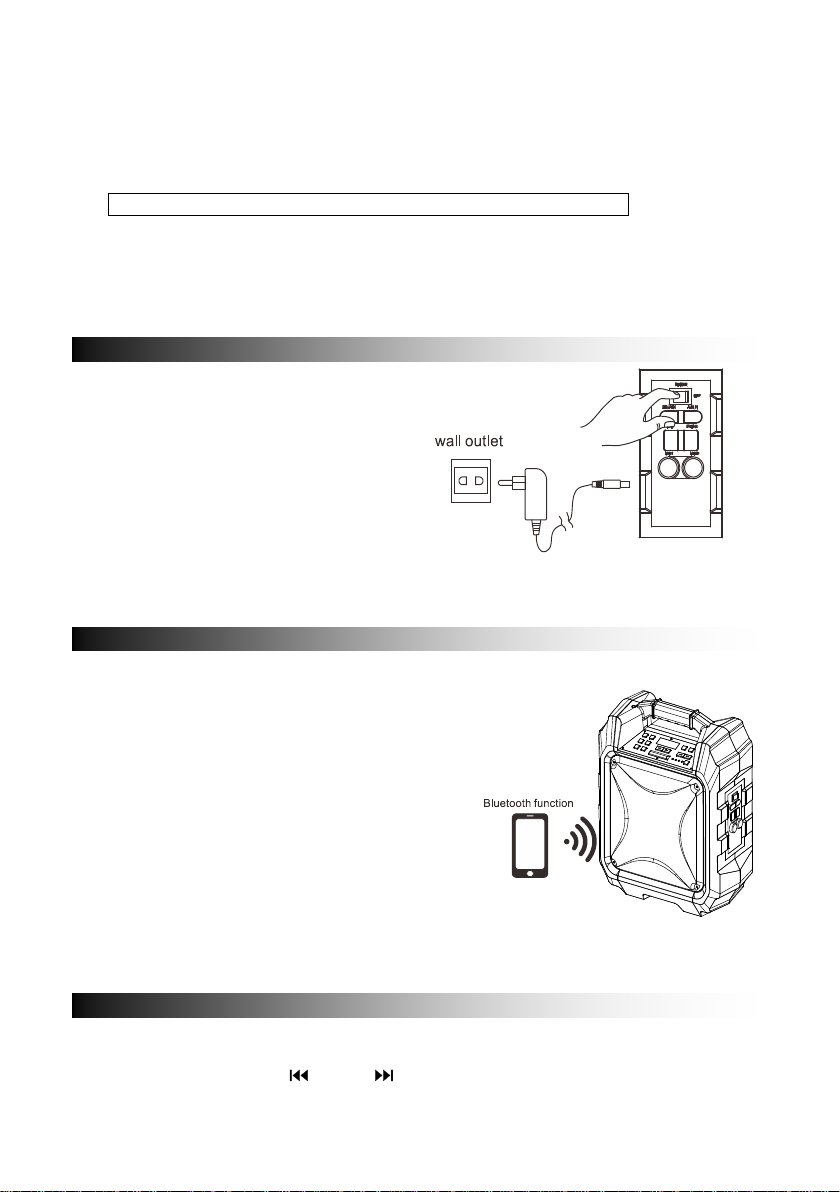
- Unpack “Cust omer brand and model”,
ensure the power ON/OFF switch is
on “OFF”
- Connect the supplied AC adaptor to
“model no.”, plug the AC cord to the
wall outlet
- Switch the Power to “ON”
- Power RED LED will turn on.
- Battery GREE N LED indicator will turn on
- Ready to use
BLUETOOTH CONNECTION
- Once the power switch is turned to "On",
Bluetooth “BT” mode has set as default
- Blue LED indicator will be long bright after
Bluetooth connection. The RED LED displa y
will show “BT”
- Turn on the Bluetooth function on your
device and search for "QFX PBX-7" then
press to connect.
- Connected sound signal will be heard and
the blue led connection indicator will stop
blinking and stay steady.
- Bluetoot h connection is completed.
- Select the m usic from your Bluetooth device and start playing.
- Press the “ S ource” Button and select to Radio, the FM Radio Frequency will show
on the RED LED display.
- Press and hold the TU
station.
or TU buttons for auto s canning the next available
EN-3
Page 7
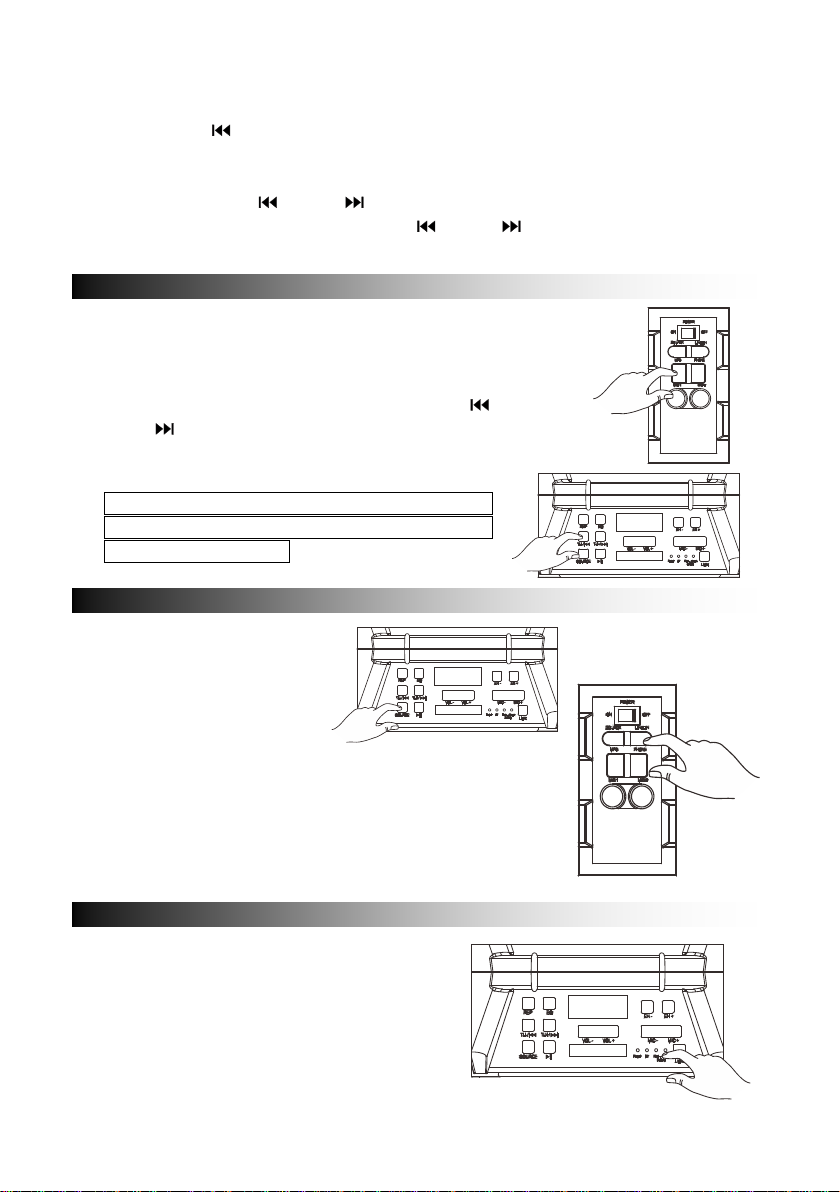
- Store your favorable stations:
LINE IN
RECHARGING
USB PORT
Tune to the desired stations
press TU to save the stations into program
repeat the above steps to save other radio st ation (Maximum can store up to 20
favorable stations)
Light press TU or TU to retrieve the stored stations. To go for the next
stored station, light press agai n TU
or TU .
- Press the “Source” Button and select to USB,
USB will show on the RED LED display.
- Insert the USB stick into the side panel marked
with “MP3”.
- Select yo ur favorable music by pressing TU
or TU
.
- Press “REP” to repeat once for the current song,
Press again “REP” to repeat all songs.
If unit is playing on Bluetooth mode “BT”, it
will automatically switch to USB mode once
insert the USB stick.
- Press the “Source” Button
and select to LINE, LINE
will show on the RED LED
display. W e should change
the display to LINE.
- Plug in your 3. 5mm cable
into the LINE IN put on the side panel and the unit will
enter into LINE IN mode.
- You can connect any audio device that has 3.5mm
audio output jack and playback any audio from the
connected device.
- Unit comes with a LED indicator alert.
- If RED LED i s on, it means the battery level
is low and recharging is required.
- By connecting the AC power, the RED LED
will be on, it means the unit is under
recharging.
EN-4
Page 8

- The GRE EN LED is on and stays steady, it means the level of battery is fully
SMART PHONES/TABLETS RECHARGING
SING-A-LONG
SOUND EFFECTS
recharged.
It is recommended to charge the battery about 6 hours before you start using
the unit for the first time.
- Smart phon es/Tablets recharging works only
when AC power is using.
- Plug in the Power AC Adaptor to the wall
outlet.
- Plug in your smart phones/tablets USB
recharging cable into the side panel m arked
“PHONE”.
- Connect t he recharging cable to your smart
phones/tablets. Recharging starts.
- Unplug your USB recharging cable when
your smart phones / tables are fully recharged.
- “Customer’s model” allo ws you to sing-a-long with
the songs are playing either on BT , USB (MP3) or
LINE IN mode and allow 2 microphones at the
same time.
- Plug in your Mic rophone cable into the side panel
marked “MIC 1 and/or “MIC 2”.
- Adjust the MI C Volume “MIC + / MIC – “on the top
control panel.
- Adjust the E c ho level “EH + /EH –“.
- Start t o sing
WARNING: - If the MIC Volume and ECHO
level set too high or to the maximum, be
caution with the high pitch reflection tone.
- “Customer’s model “has a built in Equalizer
- Press and select the preset sound effect for your music; FLAT, CLASSIC, POP,
ROCK and JEZZ
EN-5
Page 9

General
TROUBLESHOOTING
SPECIFICATIONS
No power
- Check that A C power cord is securely inserted in t he unit and the electrical outlet.
- Check the Power On/Off switch is turn to On position.
- If batt ery is flat Plug in the AC Power cord to chan ge and operate.
Keys no response
- Turn t he P ower On/Off switch to Off, and then On again to r es et the unit.
- Unplug th e AC Power cord and plug it back again.
No sound heard
- Make sure the LINE connected volume is turn to reasonable level.
- Make sure the Bluetooth connected device output the audio thru BT out.
- Make sure the Bluetooth connected device volume is turn to reasonable level.
Bluetooth Operations
Audio quality is poor
- Bluetooth reception is poor. Move the Bluetoot h device nearer to the Speaker.
Cannot pair to Bluetooth device
- Make sure both Bluetooth device and Speaker is not connected to any other
Bluetooth device.
- Make sure the Bluetooth On/Off switch located below Speaker is slide to On
position.
- Make sure the Blue LED on the Speaker is flashing fast (Pairing mode).
- Turn Power switch to Off, and then On again, Press and hold BT button for 2
seconds to enter into pairing mode.
General
Input Source: ………………………………………..… Bluetooth / LINE / FM / USB
Power Out: …………………………………………..… MAX 30W
Bluetooth Range: …………………………………….. 10M (33 feet)
LINE IN: ……………………………………………….. 3.5mm
USB Playback: ……………………………………...… Full Speed 2.0
USB Recharging: ……………………………….…….. 2A
Control Buttons: ………………………………….….. Power, Source, Bluetooth pairing,
Volume Up/Down, EQ, MIC (EH- /
EH+), REP, LIGHT
EN-6
Page 10

LED Indicator: …………………………………………. Power / Standby (RED LED x 1)
Bluetooth (BLUE LED x 1)
Battery Level LED (RED LED x
1 ,GREEN LED x 1)\
Battery: ………………………………………………..... Yes
Power Input: …………………………………………….. AC IN 100 – 240V, 50/60Hz
DC 5V
Speaker Output Wattage: …………………………….. 30W (MAX)
Speaker Driver Size: …………………………………... 6.5"
Speaker Grill: …………………………………………… Metal Speaker Grill
Full Range: ……………………………………………… Yes
THD: …………………………………………………….. 10% 20W
S/N: ……………………………………………………… > 50 dB
Cabinet Material: …………………………………….…. Plastic
Dimension (W x H x D): ……………………………….. 175 X 425 X 333(mm)
Weight (KG): ………………………………………….… 5.28KG
Bluetooth
Bluetooth Version: ……………………………………… 3.0 + EDR
Bluetooth Profile: ……………………………………….. A2DP, AVRCP
Bluetooth Frequency Band: …………………………… 2.402 GHz – 2.480 GHz
Bluetooth Range: ……………………………………..... 10 meters
1.5A
(Woofer) + High Pitch
EN-7
Page 11

Bocina Portátil Para Fiestas
Modelo: PBX-7
Page 12

Page 13

Contenido
Descripción de partes 1
Instrucciones de seguridad 2
Conexiones 3
Conexión Bluetooth 3
Radio FM 4
Puerto USB (Reproducción de música) 4
Entrada auxiliar 4
Recarga 5
Recarga de Smartphones / Tablets 5
Karaoke 5
Efectos de sonido 6
Resolución de problemas 6
Especificaciones 7
Page 14

1. Manija
14. Ecualizador
Descripción de partes
2.Carcasa con terminado de
goma
3. Rejilla protectora
4. Encender/Apagar
5. Puerto DC
6. Puerto auxiliar
7. Puerto USB
8. Puerto de carga USB
9. Puerto Micrófono 1
10. Puerto Micrófono 2
11. Anterior
12. Siguiente
13. Repetir
15. Pantalla LED
16. EH- Bajar Eco
17. EH+ Subir Eco
18. Seleccionar fuente de audio
19. Pausar/Reproducir
20. Volumen +/-
21. Luz LED
22. Subir/Bajar Volumen del
micrófono
23. Luz
24. Modo de espera
25. LED Bluetooth
26. Indicador de nivel de batería
ES-1
Page 15

Para asegurar el correcto uso de los eq uipos y prevenir fuego o descargas eléctricas,
eléctricas a personas.
Instrucciones de seguridad
por favor lea cuidadosamente toda la información contenida en las instrucciones de
seguridad.
El símbolo de rayo con
cabeza de flecha dentro
de un triángulo
equilátero, sirve para
alertar al usuario sobre
la presencia de voltaje
peligroso dentro del
equipo, el cual podría
tener suficiente magnitud
como para representar
un riesgo de descargas
AL ABRIR LA CAJA:
Verifique que los siguientes elem entos estén incluidos en la caja:
- Bocina PBX-7
- Adaptador A C
- Instructivo
INSTRUCCIONES IMPORTANTES:
1. As egúrese de que el conector esté firmemente conectado al enchufe, y también
asegúrese de que el voltaje sea el correcto.
2. Nunca utilice el equipo si el cable o el adaptador están dañados o demasiado
calientes.
3. No modifique el cable ni lo dañe de ninguna forma, evite doblarlo, retorcerlo o
jalarlo innecesariamente
4. No int ente modificar, reparar o desmantelar el equipo, únicamente podrá hacerlo
cuando termine su vida útil y decida tirarlo.
5. No p ermita que el cable de alimentación se sumerj a en líquidos, sea salpicado o
expuesto a lluvia o líquidos.
6. Nunca desconecte el equipo con las manos mojadas.
7. Desconecte el equipo del enchufe antes de limpiarlo o darle mantenimiento. No
utilice limpiadores líquidos ni aerosoles.
ADVERTENCIA: PARA
REDUCIR EL RIESGO DE
DESCARGA ELÉCTRICA, NO
RETIRE LA TAPA (O PARTE
TRASERA). NO EXISTEN
PARTES REPARABLES POR
EL USUARIO DENTRO DEL
EQUIPO. PARA CUALQUIER
TIPO DE SERVICIO,
DIRÍJASE AL PERSONAL DE
SERVICIO CALIFICADO.
El símbolo de signo de
exclamación dentro de
un triángulo equilátero,
sirve para alertar al
usuario sobre la
presencia de
instrucciones
importantes de uso y de
mantenimiento (servicio)
en el texto que
acompaña al equipo.
ES-2
Page 16

8. El cable deberá perm anecer desco nectado del enc hufe durante p eriodos largos de
Conexiones
Conexión Bluetooth
inutilización.
9. Conserve este equipo en lugares secos, con la menor humedad posible.
10. No utilice el equipo cerca de agua o cerca de fuentes de calor o equipos que
generen calor.
11. La batería no deberá exponerse directamente a luz solar ni a fuego.
12. No intente reemplazar la baterí a. Para reparación y servicio, por favor consulte a
su distribuidor o al centro de servicio al cliente indicado por la tienda.
PRECAUCIÓN: Riesgo de explosión si la batería se conecta incorrectamente,
13. No utilice ninguna fuente de alimentación distinta a la diseñada para est e equipo.
14. Conserve este instructivo en un lugar seguro.
15. Acuda a un centro autorizado de servicio si tiene cualquier duda sobre su equipo.
- Desempaq ue su equipo, asegúrese
de que el interruptor de encendido
se encuentre en la posición de
apagado (“OFF”).
- Conecte el adaptador AC provisto a
su equipo y conecte el otro extremo
al enchufe eléctrico.
- Coloque el interruptor en la posición
de encendido (“ON”).
- El LED rojo se encenderá.
- El indicador LED verde de la batería se encender á.
- El equipo es tá listo para usarse.
- Una vez que e l equipo esté encendido
(en la posición “ON”), el modo
predeterminado es el modo Bluetooth.
- El indicador LED azul permanecerá
encendido al entrar al modo Bluetoot h.
La pantalla LED roja mostrará “BT”.
- Encienda la función Bluetooth en su
dispositivo externo (celular, Tablet, etc.)
y busque el equipo “QFX PBX-7”, luego
presione “conectar”.
- Se escuchará el soni do de la conexión y
el LED azul dejará de parpadear y
permanecerá encendido.
ES-3
Page 17

- Presio ne el botón “Fuente de audio” y seleccione el modo Radio FM. La pantalla
Radio FM
Puerto USB
Entrada Auxiliar
LED roja mostrará la estación FM.
- Mantenga presionado el botón “Anterior” o el botón “ S iguiente” para navegar por
las estaciones disponibles.
- Almacene sus estaciones favoritas
• Sintonice la estación deseada.
• Presione “Anterior” par a guardar la estación.
• Repita los pasos anteriores para almacenar más estaciones de radio (máximo
20 estaciones).
• Presione brevemente A nterior o Siguiente para cambiar entre las estaciones
almacenadas. Para ir a la siguiente estación almacenada solo presione
ligeramente Anterior o Siguien te.
- Presione el botón “Fuente de audio” y
seleccione el modo USB, la pantalla LED
roja mostrará “USB”.
- Inserte una memoria USB en el panel
lateral marcado con “MP3”.
- Seleccion e su canci ón favorit a pres ionand o
los botones Anterior o Siguiente.
- Presione “REP” para repetir la canción
actual, presione de nuevo para repetir
todas las canciones.
Si el equipo está en el modo de
“Bluetooth”, automáticamente cambiará
al modo USB al insertar una memoria
USB.
- Presione el botón “Fuente de
audio” y seleccione “Auxiliar ” la
pantalla LED roja mostrará
“LINE”.
- Conecte su c able de 3.5mm al
puerto auxiliar en el panel
lateral, el equipo entrará al modo Auxiliar.
- Puede conectar cualquier dispositivo de audio que cuente
con salida de audio de 3.5mm y reproducir su música a
través de la bocina.
ES-4
Page 18

- El equipo cuenta con un LED indicador.
Recarga
Recarga de Smartphones/Tablets
Karaoke
- Si le LED rojo está encendido, significa
que el nivel de la batería es bajo y
necesita recargarse.
- Al conectar a l a fuente de alimentac ión AC,
el LED rojo se encenderá indicado que el
equipo se está cargando.
- El LED Verde se enciende para indicar
que la batería está completamente car gada.
Se recomienda cargar la batería por aproximadamente 6 horas antes de
comenzar a utilizar el equipo por primera vez.
- La recarga de Smartphones/Tablets
funciona únicamente cuando se utiliza la
alimentación AC.
- Conecte el a daptador AC a la fuente de
alimentación.
- Conecte su el cable de recarga USB de
su Smartphone/Tablet al puerto USB
marcado como “PHONE” ubicado en la
parte lateral del equipo.
- Conecte el otro extremo del cable a su
Smartphone/Tablet. La recarga comenzará.
- Desconect e el cable de c arga US B cuando el teléfono o t ablet est é complet amente
cargado.
- PBX-7 le permite cantar al ritmo de las
canciones que se reproducen ya sea por m edio
de Bluetooth, de USB (MP3) o desde el puerto
Auxiliar, le permite utilizar 2 micrófonos al
mismo tiempo.
- Conecte su m icr ófono a l puer t o “MI C 1” o “ MIC 2”
ubicados en la parte lateral del equ i po.
- Ajuste el volumen d el micr ófono con “M IC+/ MIC“ en la parte superior del equipo.
- Ajuste el volumen del eco con
“EH+/EH-“.
- Comience a cantar.
ES-5
Page 19

ADVERTENCIA: Si el volumen y el eco del micrófono están al máximo, o muy
Efectos de sonido
Resolución de problemas
altos, tenga cuidado con la fuerza del sonido.
- PBX-7 tiene un ecualizador integrado.
- Presione para seleccionar el ecualizador preestablecido que se ajuste mejor a su
música: FLAT, CLÁSICO, POP, ROCK, JAZZ.
General
No enciende
- Verifiq ue que el cable de alimentación AC esté c orrectamente conectado al equipo
y a la fuente de alimentación.
- Verifiq ue que el interruptor de encendido/apagado se encuentre en la posición de
encendido “ON”.
- Si la batería está descargada, conecte el equipo a la fuente de alimentación para
cargar y utilizar el equipo.
Los botones no responden
- Apague y re-encienda el equipo.
- Desconecte el cable de alimentación y luego re-conéctelo.
No se escucha sonido
- Asegúrese de que el dispositivo conectado vía auxiliar, tenga el volumen en un
nivel razonable.
- Asegúrese de que el dispositivo conectado vía Bluetooth, esté reproduciendo
música vía Bluetooth.
- Asegúrese de que el dispositivo conectado vía B l uetooth, tenga el volumen en un
nivel razonable.
Bluetooth
Mala calidad de audio
- Si la recepc i ón Bluetooth es mala, acerque el dispos itivo Bluetooth a la bocina.
No se puede sincronizar con un equipo Bluetooth
- Asegúrese de que ambos dispositivos no estén conec tados a otro dispositivo
Bluetooth.
- Asegúrese de que el interruptor de encendido Bluetooth ubicado en la parte inferior
de la bocina, esté en la posición de encendido “ON”.
- Asegúrese de que el LED azul en la bocina esté parpad eando rápidamente (lo cual
indica que está en el modo de sincronizac ión).
- Apague el equipo y re-enciéndalo. Mantenga presionado el botón de Bluetooth por
2 segundos para entrar al modo de sincro ni zación.
ES-6
Page 20

General
Especificaciones
Fuentes de audio: ..................................................... Bluetooth/Auxiliar/FM/USB
Potencia de salida: ................................................... MAX 30W
Rango Bluetooth: ...................................................... 10M (33 pies)
Auxiliar: ..................................................................... 3.5mm
Reproducción USB: .................................................. Velocidad completa 2.0
Recarga USB: ........................................................... 2A
Botones: .................................................................... Encendido/Apagado, Fuente,
Sincronización Bluetooth,
Subir/Bajar volumen, Ecualizador,
Eco del micrófono +/-, Repetir, luz
LED Indicador: .......................................................... Encendido / Modo de espera
(LED ROJO x 1)
Bluetooth (LED AZUL x1)
Nivel de batería (LED ROJO x1,
LED VERDE x1)
Batería: ..................................................................... Sí
Entrada de alimentación: .......................................... Entrada AC 100 – 240, 50/60Hz
Entrada DC 5V
Salida de bocina: ....................................................... 30W (Máx.)
Tamaño de bocina: .................................................... Búfer 6.5’’ + High Pitch
Rejilla de la bocina: .................................................... Rejilla metálica
Rango Completo : ..................................................... Sí
THD: .......................................................................... 10% 20W
S/N: ............................................................................ > 50 dB
Material del gabinete: ................................................. Plástica
Dimensiones: ............................................................. 175 x425 x 333 (mm)
Peso: .......................................................................... 5.28 K
Bluetooth
Versión: ...................................................................... 3.0 + EDR
Perfil: .......................................................................... A2DP, AVRCP
Frecuencia: ................................................................ 2.402 GHz – 2.48 GHz
Rango: ....................................................................... 10 metros
1.5A
ES-7
Page 21

HAUT-PARLEUR
PORATABLE POUR LE BAL
MODÈLE: PBX-7
Page 22

Page 23

CATALOGUE
PARTIE DE DÉSCRIPTIONS 1
INSTRUCTIONS DE SÉCURITÉ 2
CONNECTION DE PUISSANCE 3
CONNECTION DE BLUETOOTH 3
RADIO FM 4
INTERFACE DE USB (REDIFFUSION DE MUSIQUE) 4
INPUT DE LIGNE 4
RECHARGEMENT 5
RECHARGEMENT DU TÉLÉPHONE INTELLIGENT/TABLETTES 5
CHANTONNER 5
EFFETS DU SON 6
DÉPANNAGE 6
SPÉCIFICATIONS 6
Page 24

PART DESCRIPTIONS
1. MANCHE
2. CAISSE CONSOLIDÉ
3. COVERCLE DE FILET
4. BOUTON POUR
BRANCHER/DÉBRANCHER
5. INPUT DC
6. INPUT DE LIGNE
7. INTERFACE USB
8. INTERFACE DE RECHARGEMENT
DE USB
9. INTERFACE1 DU MIC PHONE
10. INTERFACE2 DU MIC PHONE
11. BAISSER LE VOLUME
12. HAUSSER LE VOLUME
13. BOUTON DE RÉPÉTITON
14. EQ BOUTON
15. ÉCRAN LED
16. EH BAISSER
17. EH HAUSSER
18. SÉLECTION DE LA SOURCE
19. BOUTON POUR ARRÊTER /
JOUER
20. BOUTON DE VOLUME (-/+)
21. LAMPE LED
22. MIC VOLUME
HAUSSER/BAISSER
23. LAMPE
24. ÉTAT INACTIF
25.INTERFACE DE BLUETOOTH
DE LED
26. INDICATION DU NIVEAU DE
BATTERIE
FR-1
Page 25

Pour assurer l’opération appropriée du pro duit et éviter le feu ou l’hasar d du choc, lisez
choc électrique aux gens.
POUR LE SERVICE.
INSTRUCTIONS DE SÉCURITÉ
attentivement toutes les informations incluses dans les instructions de sécurité.
La foudre avec le
symbole de flèche, au
dedans du triangle
équilatéral, a pour
l’intention d’alerter les
utilisateurs du présence
du "voltage dangereux"
non-isolé à l’intérieur de
l’enceinte du produit qui
pourrait avoir une
magnitude suffisante
constituant un risque du
DÉBALLAGE:
Inspectez que tous les articles suiv ants doivent être inclus dans la boîte.
- PBX-7 Unité
- AC Adapteur de puissance
- Manuel d’utilisation
INSTRUCTIONS IMPORTANTES:
1. Assurez-vo us que la fiche a été pleinement insérée à la d ouille du mur et ce produit
a été opéré avec une source électri que c orrespondante au voltage nominal.
2. N’opérez jamais ce produit si le cordon ou l’adapteur a été endommagé ou
surchauffé.
3. Ne m odifiez pas le cordon ni y causer des dommages en tout cas, par exemple,
courber, tordre, tier qui n’est pas nécessaire.
4. N’es sayez pas de modifier, réparer ou en tous cas démonter ce produit, à moi ns
qu’il ne soit jeté à la fin de sa durée de servi ce.
5. Ne per mettez pas au cordon d’alimentati on d’être immergé, éclaboussé ou arrosé
sous l’eau.
6. Ne dé branchez pas ce produit avec la main humi de.
7. Débranchez ce produit de la douille du mur avant le nettoyage et le maintien.
N’utilisez pas les détergents li quides ou les aérosol.
AVERTISSEMENT:
POUR RÉDUIRE LE
RISQUE DU CHOC
ÉLECTRIQUE, NE
DÉPLACEZ PAS LE
COUVERCLE (OU LE
DERRIÈRE).
PAS DE PARTS
UTILISABLES POUR LES
UTILISATEURS DEDANS.
SE RÉFÉRER AU
PERSONNEL QUALIFIE
Le point d’exclamation
au dedans du triangle
équilatéral a pour
l’intention d’alerter les
utilisateurs du présence
Des instructions
importantes d’opération
et de maintien dans le
document se rattachant
à cet appareil.
FR-2
Page 26

8. Le cordon d’alimentation doit être débranché de la douille du mur si il n’a pas été
CONNECTION DE PUISSANCE
utilisé depuis longtemps.
9. G ardez et déposez ce produit dans l’endroit sec et sans l’humidité.
10. N’utilisez pas ce produit près de l’eau, ou les autres sources thermiques ou les
appareils qui produisent la chal eur.
11. La batterie ne doit pas être exposé direc tement à la lumière du soleil et l e feu.
12. N’essayez pas de remplacer la batterie. Pour le maintien et le service, cons ul tez le
magasin ou le centre de service des c l ients désigné par le magasin.
PRÉCAUTION: Danger d’explosion si la batterie est remplacée de façon
incorrecte.
13. N’utilisez pas d’autres sources d’ ali mentation que celle destinée spéc ialement pour
ce produit.
14. Gardez l’instruction d’opératio n à la place sécuritaire.
15. Contactez un centre de service autori sé si vous avez des problèmes sur ce produit.
- Déballez “M ar que et modèle du client”,
assurez que la commutation entre
BRANCHER/DÉBRANCHER est
“DÉBRANCHER”
- Connectez l’adapteur AC fourni au
“numéro de modèle”, branchez le cordon
AC à la douille du mur
- Le commutateur a été “BRANCHÉ”
- Puissance LED ROUGE s era allumée.
- Batterie in dicateur LED VERTE sera allumé
- Prêt à utiliser
CONNECTION DE BLUETOOTH
- Une fois que le commutateur a été
"Branché", le mode Bluetooth “BT ” a été
établi comme par défaut.
- Indicateur de LED bleue sera allumé pour
longtemps après la connection de
Bluetooth. L’écran de LED ROUGE LED
montrera “BT”
- Branchez l a fonc tion de Bluetooth à votre
appareil et recherchez "QFX PBX-7" et
puis pressez pour la connection.
- Le signal du s on connecté s era écouté et
l’indicateur de led bleue s’arrêtera de
clignoter et restera stable.
- La connection de Bluetooth a été complétée.
FR-3
Page 27

- Selecti onnez la musique de votre appareil Bluetooth et commencez la diffusion.
RADIO FM
INPUT DE LIGNE
INTERFACE DE USB
- Pressez le bout on “ Source” et selectionnez à la Radio, la fréquence de la Radio FM
sera montrée sur l’écran LED ROUGE.
- Pressez et maint enez le bouton TU
ou TU buttons pour balayer
automatiquement la station dispon i ble suivante.
- Sauvegarder vos stations favorites:
Tournez aux stations désirées
presser TU pour sauvegarder les stations au programme
répétez les étapes ci-dessus pour sauvegarder l’autre station de radio (Au
maximum il peut sauvegarder plus de 20 stations favorites)
Pressez doucement TU ou TU pour retrouv er les stations
sauvegardées. Pour aller à la station prochaine sauvegardée, pressez
doucement encore une fois TU
ou TU .
- Pressez le bouton “Source” et selectionnez au
USB, USB sera montré sur l’écran LED
ROUGE.
- Insérez le bâton USB au panneau sur côté
marqué par “MP3”.
- Selecti onnez v otr e musiq ue favorite en pressant
TU
ou TU .
- Pressez “REP” pour répéter une fois la chason
actuelle, Pressez encore une fois “REP” pour
répéter toutes les chansons.
Si la diffusion de cette unité est en mode
Bluetooth “BT”, elle tournera
automatiquement en mode USB une fois que le bâton USB a été inséré.
- Pressez le bouton “Source” et
selctionnez à la LIGNE, La
LIGNE sera montré sur l’écran
LED ROUGE. Nous devons
changer l’écran à la LIGNE.
- Insérez vot re câble de 3.5mm
à l’INPUT DE LIGNE mettez le panneau sur côté et cette
unité tounera en mode LINE IN.
- Vous pouvez connecter tous les appareils a udios qui ont la
douille d’output de 3.5mm et rediffuser tous les audios de
l’appareil connecté.
FR-4
Page 28

- L’unité rencontre une alarme de l’indicateur
RECHARGEMENT DU TÉLÉP HONE INTELLIGENTS/TABLETTES
CHANTONNER
RECHARGEMENT
de LED.
- Si LED ROUGE a été allumée, cela signifie
que le niveau de batterie est bas et le
rechargement est demandé.
- En connectant la puissance AC, LED
ROUGE sera allumée, cela signifie que
cette unité est en train d’être rec hargée.
- LED VERTE a été allumée et reste stable, cela signifie que le niveau de batterie a
été pleinement réchargé.
Il est recommendé de recharger la batterie pour environ 6 heures avant de
commencer à utiliser cette unié pour la première fois
- Le rechargement des téléphones
intelligents/Tablettes ne fonctionne qu’en
utilisant la puissance AC.
- Insérez l’adapteur de puissance AC à la
douille du mur.
- Insérez le câble de rechargement de USB
de vos téléphones intelligents/tablette au
panneau sur côté marqué par “PHONE”.
- Connectez le câble de rechargement à vos
téléphones intelligents/tablettes. Le rechargement commence.
- Débranch ez le câble de rechargement de USB après que vos téléphones
intelligents / tablettes ont été pleinement rechargés.
- “Modèle du client” vous permet de chantonner
avec la diffusion des chansons en mode BT, USB
(MP3) ou en mode LINE IN et permet 2
microphones en même temps.
- Insérez le câble de votre Microphone au panneau
sur côté marqué par “MIC 1 et/ou “MIC 2”.
- Ajustez le Volume MIC “MIC + / MIC – “sur le
panneau de contrôle supérieur .
- Ajustez le nive au Écho “EH + /EH –“.
- Commencez à chanter
VERTISSEMENT: - Si le Volume MIC et niveau
ECHO sont très hauts ou touchent le
maximum, attention à l’hauteur du ton de
réflection.
FR-5
Page 29

- “Modèle du client “ a un égaliseur intérieur
EFFETS DU SON
DÉPANNAGE
SPÉCIFICATIONS
- Pressez et selectionnez l’effet du son préétabli pour votre musique; FLAT, CLASSIC,
POP, ROCK et JEZZ
Général
Sans puissance
- Inspectez que le cordon d’alimentation a été ins éré sûrement à cette unité et à la
douille électrique.
- Inspectez que le commutateur Brancher/Débrancher a été branché.
- Si la batterie est plate Insérez le cordon d’alimentation AC pour changer et opérer.
Sans la réponse
- Débranch ez le commutateur Brancher/Débrancher, et puis branchez encore une
fois pour réétablir cette unité.
- Débranchez le cordon d’alimentation AC et branchez-le encore une fois.
Sans écouter le son
- Assurez que le volume connecté à la ligne a été ajusté au niveau raisonnable.
- Assurez l’output d’appareil connecté au Bluetooth l’output d’audio par BT.
- Assurez que le volume d’appareil connecté au Bluetooth a été ajusté au niveau
raisonnable.
Opération de Bluetooth
Qualité d’audio est mauvaise
- La réception de Bluetooth est mauvaise. Déplacez l’appareil Bluetooth près du
Haut-parleur.
Ne pouvoir pas accoupler à l’appareil de Bluetooth
- Assurez que l’appareil Bluetooth et le Haut -parleur ne sont pas connectés à un
autre appareil Bluetooth.
- Assurez que le commutateur Bluetooth Brancher/Débrancher situé sous le
Haut-parleur a été Branché.
- Assurez que LED bleue sur le Haut-parleur clignote vite (Mode d’accouplement).
- Débranch ez le commutateur, et puis branchez enc ore une fois, pressez et
maintenez le bouton BT pour 2 secondes pour entrer en mode d’accouplement.
Géneral
Source d’input: …………………………………... Bluetooth / LIGNE / FM / USB
Puissance d’output: ……………………………… MAX 30W
FR-6
Page 30

Portée de Bluetooth: …………………………….. 10M (33 feet)
INPUT DE LIGNE: ……………………………….. 3.5mm
REDIFFUSION DE USB: …………………………Toute vitesse 2.0
Rechargement de USB: ………………………….. 2A
Boutons de contrôle: ……………………….......... Puissance, Source, A ccouplement de
Bluetooth, Hausser/Baiser le volume,
EQ, MIC (EH- / EH+), REP, LAMPE
Indicateur de LED: ……………………………...... Puissance/Inactif (LED ROUGE x 1)
Bluetooth (LED BLEUE x 1)
Niveau de batterie de LED (LED
ROUGE x 1 , LED VERTE x 1)
Batterie: ………………………………………….... Oui
Input de puissance: ………………………………. AC IN 100 – 240V, 50/60Hz
DC 5V
Watt d’output du haut-parleur: ………………….. 30W (MAX)
Dimension du drive du haut-parleur: ………....... 6.5"
Grille du haut-parleur: ……………………………. Grille du haut-parleur Métale
Toute amplitude: ………………………………….. Oui
THD: ……………………………………………….. 10% 20W
S/N: ………………………………………………… > 50 dB
Matériel du cabinet: ………………………………. Plastique
Dimension (W x H x D): ………………………….. 175 X 425 X 333(mm)
Poids (KG): ………………………………………… 5.28KG
Bluetooth
Version de Bluetooth: …………………………….. 3.0 + EDR
Profil de Bluetooth: ………………………………... A2DP, AVRCP
Bande de fréquence de Bluetooth: ……………… 2.402 GHz – 2.480 G Hz
Portée de Bluetooth: ……………………………… 10 mètres
(Haut-parleur à basse voix) +
Hauteur du son
1.5A
FR-7
Page 31

Page 32

 Loading...