

Page 1
www.qfxusa.com
PBX-2008-1
120V-240V
30W RMS
User Manual for PBX-2008-1 Portable Speaker
Page 2

-1-
CAUTION: TO REDUCE THE RISK OF ELECTRIC SHOCK, DO NOT REMOVE THE COVER ON
THIS SPEAKER.
THERE ARE NO USER-SERVICEABLE PARTS INSIDE. REFER ALL SERVICING TO A QUALIFIED
TECHNICIAN.
The lightning flash with arrowhead symbol within an equilateral triangle is intended to alert the user
to the presence of dangerous voltage within the product's enclosure that may be of sufficient
magnitude to constitute a risk of electric shock to humans.Users should exhibit extra safety when this
symbol appears in this instruction manual and follow all precautions as they are stated.
The exclamation point within an equilateral triangle is intended to alert the user to the presence of
important operating and maintenance (servicing) instructions in this manual.
1- Read these instructions.
2- Keep these instructions.
3- Heed all warnings.
4- Follow all instructions.
5- WARNING: To prevent fire or electric shock, do not expose this equipment to rain or moisture.
Do not store or operate this product near any liquids.
6- Clean only with a dry cloth.
7- Do not store or operate this product near any heat sources such as radiators, heat registers,
stoves, or other apparatuses (including amplifiers) that produce heat. Keep this product in a well
ventilated area.
8- Do not defeat the safety purpose of the polarized or grounding-type plug. A polarized plug has
two blades with one wider than the other. A grounding plug has two blades and a round grounding
prong. The wide blade or third prong is provided for your safety. If the provided plug does not fit your
outlet, consult an electrician for the replacement of the ob solete outlet.
9- Protect all the wires connected to this unit from being walked on or pinched, particularly plugs
and the point where they exit from the unit. When removing the cord from the poweroutlet, remove
it by holding the plug, not by pulling the cord.
10- Unplug the unit during lightning storms or when unused for long periods of time.
11- When wiring this unit and all other equipment used in connection to this unit make sure that all
of your equipment is turned OFF.
12- Once installation and wiring is complete power on all your equipment with the volume and level
controls turned DOWN. Once all the equipment in ON slowly raise the volume or level controls to
their proper positions.
13- Before Placing, Installing, rigging, or suspending any product, inspect all hardware, suspension,
cabinets, transducers, brackets and associate equipment for damage. Any missing, corroded,
deformed, or non-load rated component could significantly reduce the strength of the installation,
placement or array. Any such condition severely reduces the safety of the installation and should
be immediately corrected. Use only hardware which is rated for the loading conditions of the
installation and any possible short-term, unexpected overloading, Never exceed the rating of the
hardware or equipment.
14- Consult a licensed, Professional Engineer regarding physical equipment installation,Ensure
that all local, state and national regulations regarding the safety and operation of equipment are
understood and adhered to.
15- Refer all servicing to qualified service personnel. Servicing is required when the apparatus has
been damaged in any way, such as power supply cord or plug is damaged, liquid has been spilled
or objects have fallen into the apparatus, the apparatus has been exposed to rain or moisture,
does not operate normally, or has been dropped.
Introduction
Congratulations and thank you for your purchase of this QFX Powered Portable PA System
with wired microphone, USB & SD Card inputs . To get the most from yoursystem, we recommend
you review all the information provided in this instruction Manual.
BE SURE THAT YOU HAVE COMPLETELY CHARGED THE BATTERY PRIOR TO FIRST USE
TO MAXIMIZE THE BATTERY'S LIFESPAN.
WARNING!
Page 3
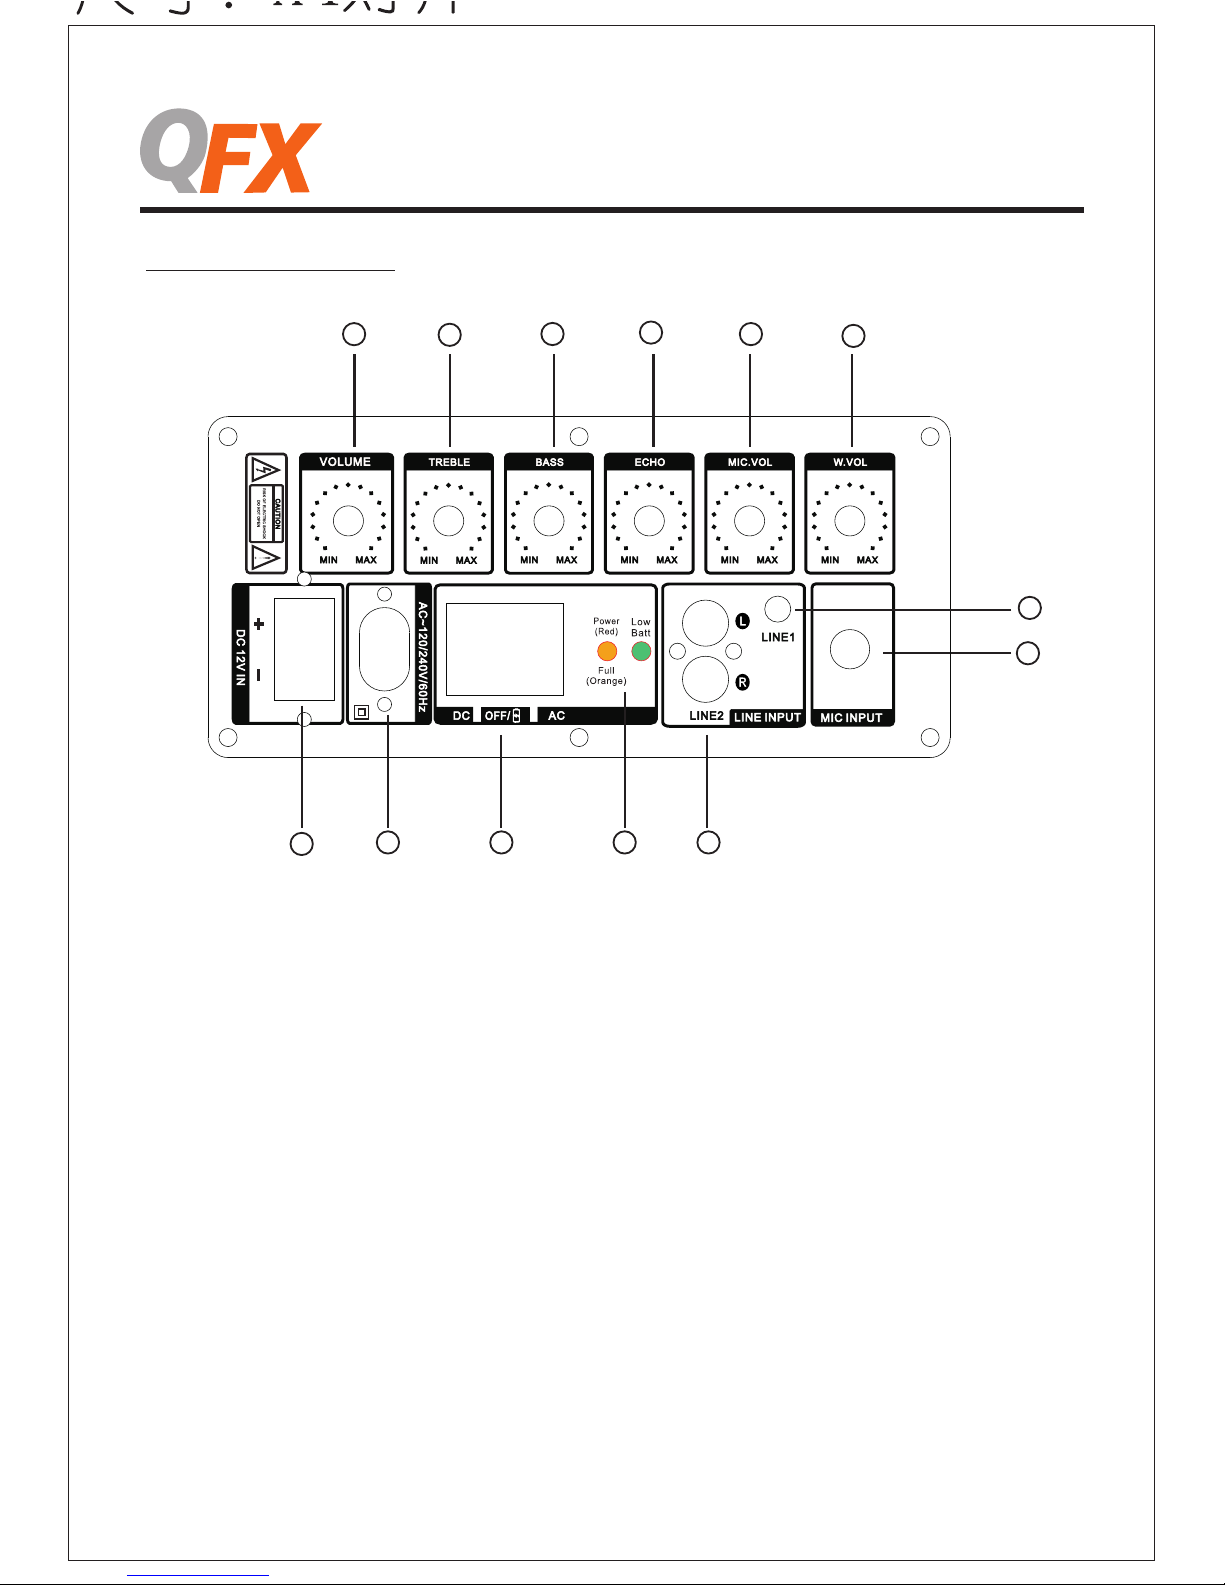
PBX-2008-1 REAR PANEL
-2-
PBX-2008-1
1
3
6
7
8
2
4
5
9
10
1112
13
1. Master Level Control: Turn this knob to adjust the master volume.
2. Treble adjustment: Turn this knob to increase the treble on the LINE/USB/SD/FM inputs
3. Bass adjustment: Turn this knob to increase the bass on the LINE/USB/SD/FM inputs
4. Microphone Echo Knob: Use this knob to adjust the echo for the microphone input.
5. Microphone Volume Knob: Turn this knob to adjust the microphone volume level of the
microphone input.
6. Wireless Microphone Volume Knob: Turn this knob to adjust the microphone volume level
of the wireless microphone input.
7. LINE1 Input (RCA): The RCA Input is designed to connect directly to a CD/DVD/TV or any
other stereo level audio device.
Please note that there are two LINE Inputs, RCA and 1/8”. If both the RCA and 1/8”inputs are
connected the unit is automatically play from the 1/8” Line input. To play from the RCA Line
input, please disconnect the 1/8” connection from the 1/8” Line Input.
8. Microphone Input(1/4"): Connect a microphone to this microphone input terminal.
9. LINE2 Input(1/8"): The 1/8” Line Input is designed to connect directly to a mp3 player or any
other stereo level audio device. Please note that there are two LINE Inputs, RCA and 1/8”. If both
the RCA and 1/8”inputs are connected the unit is automatically play from the 1/8” Line input.
10. Charge Indicator: When you are charging the battery, the charge indicator will illuminate RED.
Once fully charged the indicator will illuminate orange. The low Battery indicator will illuminate
GREEN.
11. Power Switch: There are three possible settings. Setting the unit to DC will allow the unit to
play using only internal battery. If the unit's battery is not charged, you can set the unit to AC. In
this setting the unit will still charge, but it will do very slowly. To charge the unit properly, set the
unit to OFF.
12. Power Supply: The power switch should be set to the off position before the power supply is
connected.
13. 3.DC 12V IN is for connecting to 12V external battery if needed.
Page 4
-3-
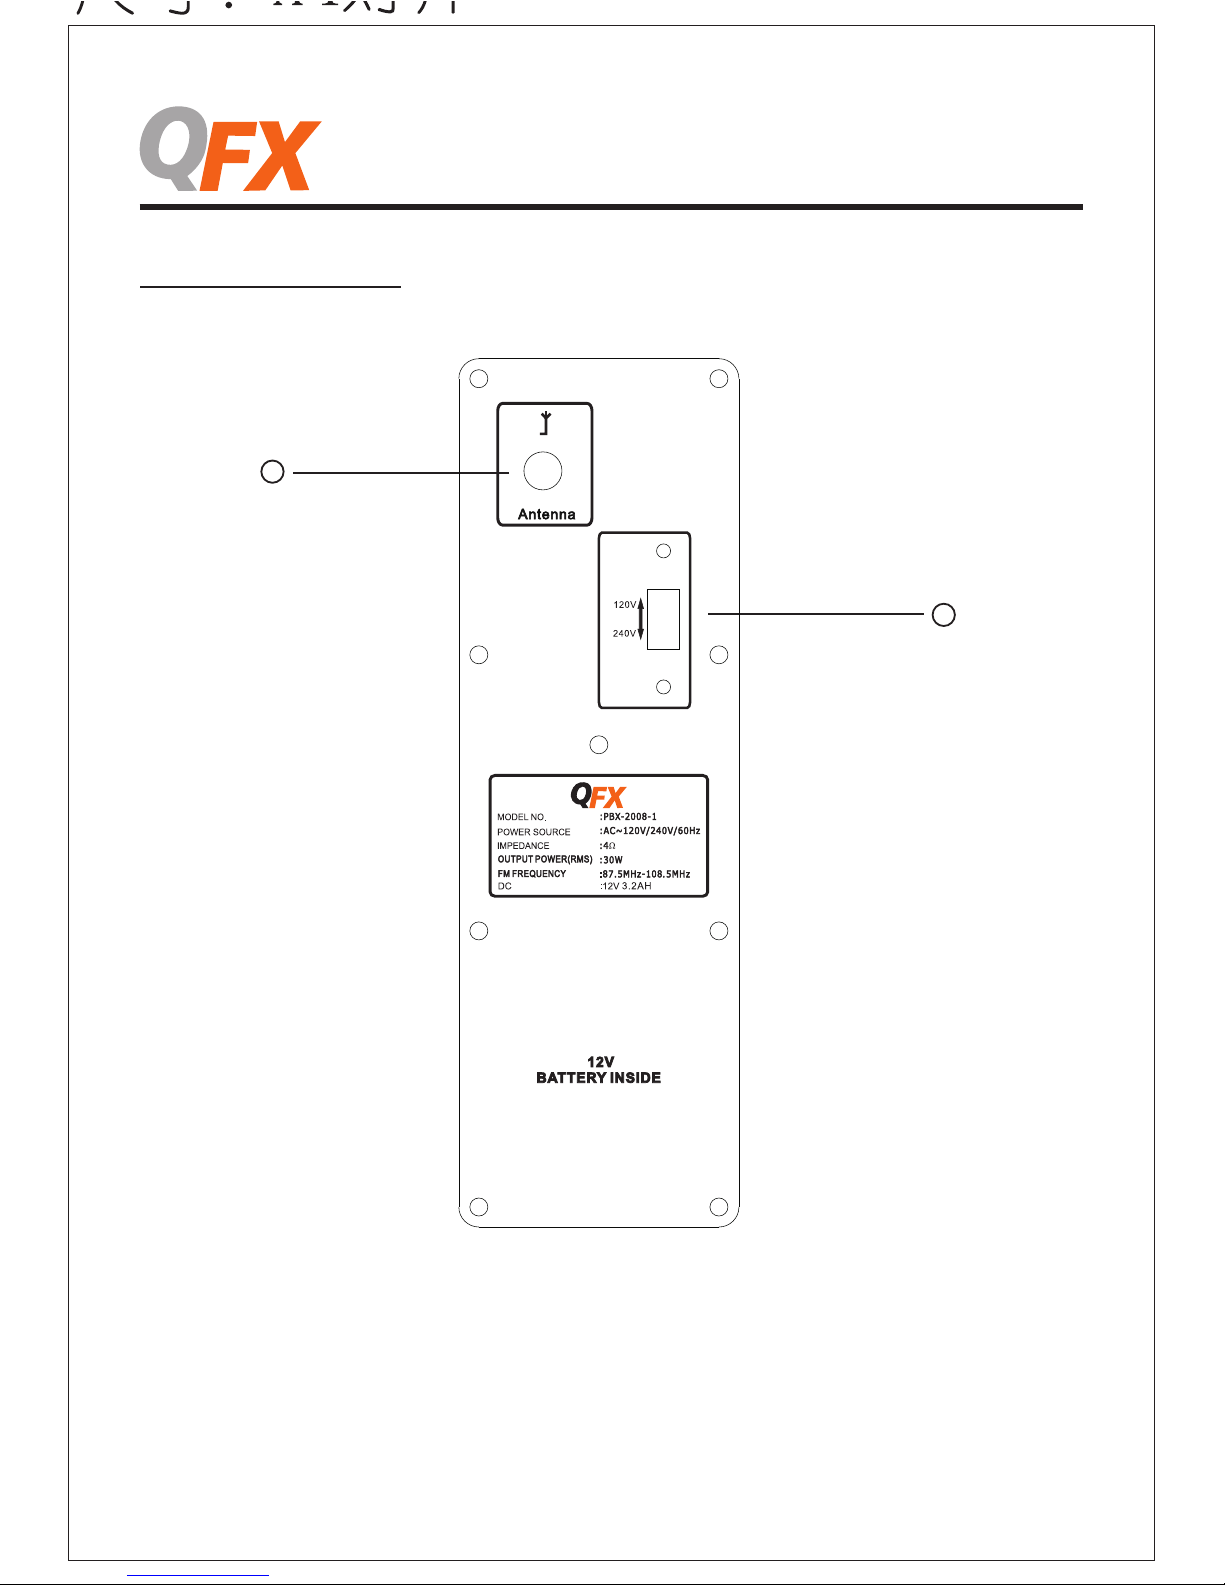
PBX-2008-1 FRONT PANEL
PBX-2008-1
1
2
1.Antenna is for receiving the FM signal. Before use, pull up the telescopic FM antenna. After
use,pack up the FM antenna to better protect it.
2.Voltage Selector 120V-240V. Be sure the unit's voltage in the outlet you are using.
Page 5
-4-
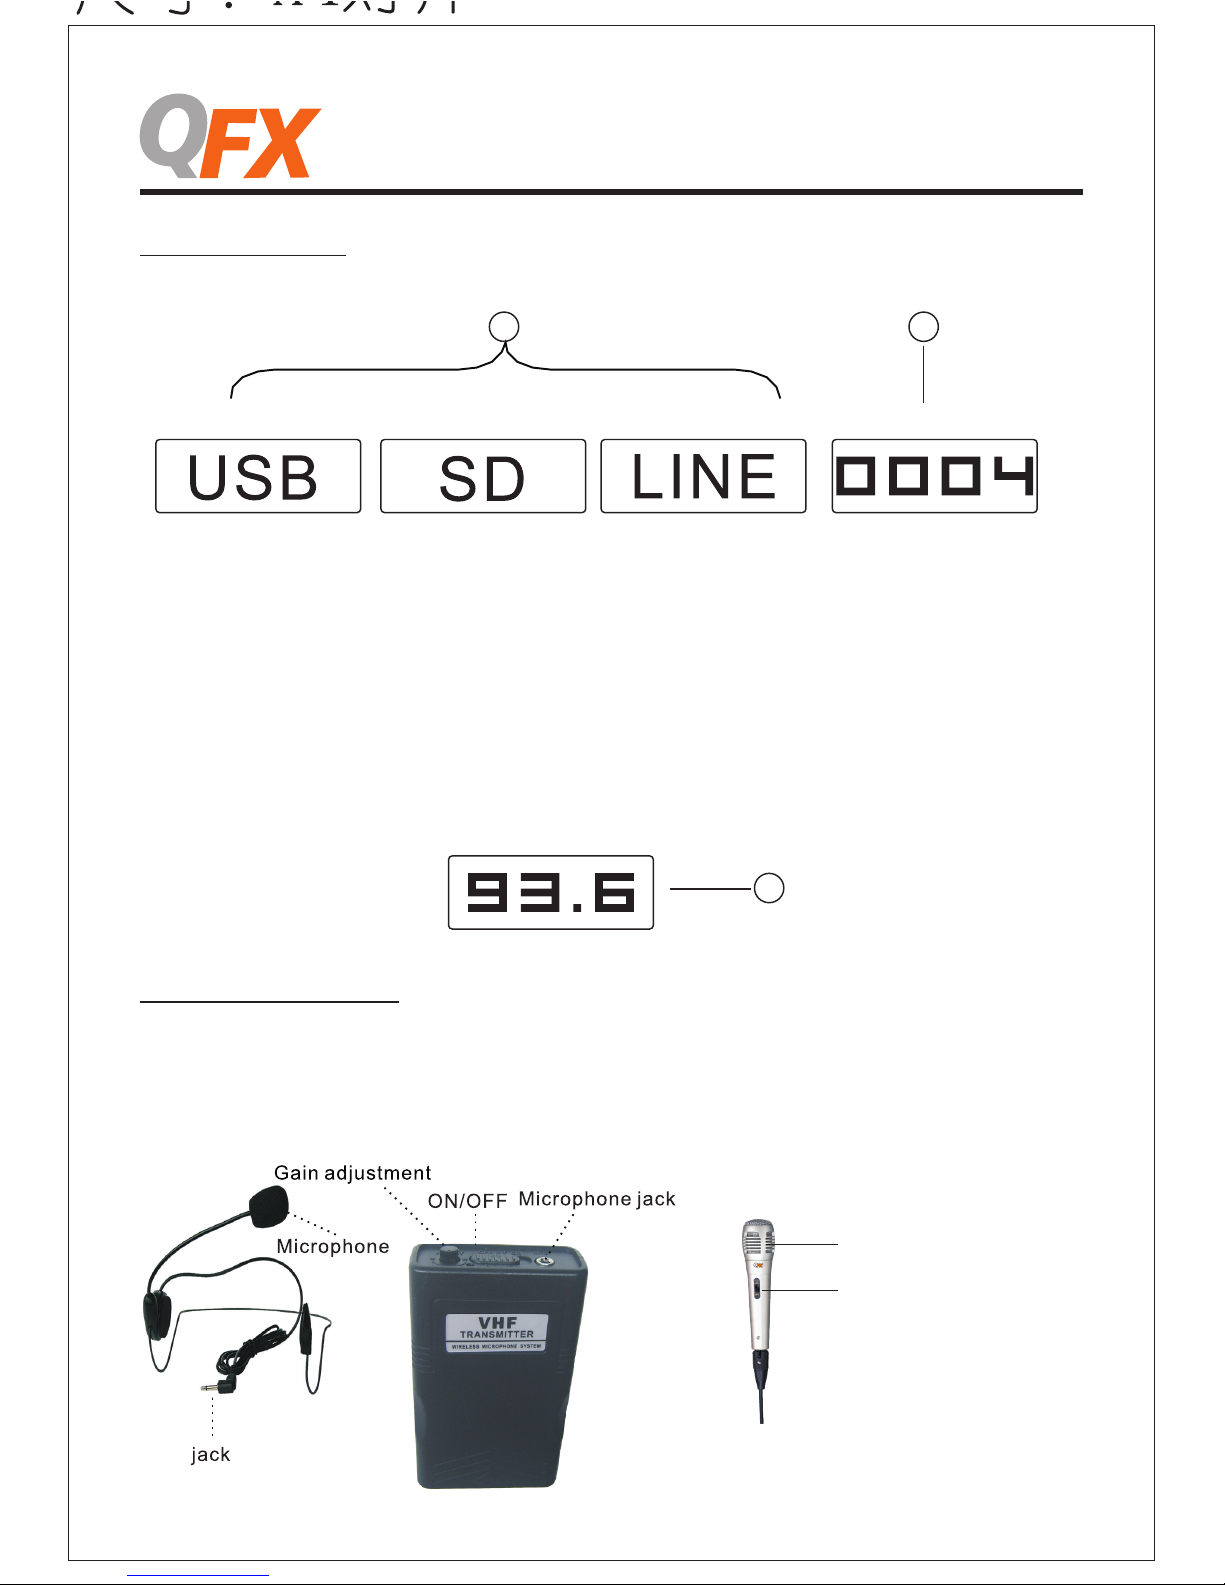
PBX-2008-1 DISPLAY
PBX-2008-1
1 2
DIGITAL AUDIO PLAYER DIGITAL AUDIO PLAYER DIGITAL AUDIO PLAYER
DIGITAL AUDIO PLAYER
1. Input Mode: The LED display screen will display the information of input mode for USB/SD/
LINE/FM.
2. When a USB flash drive / SD Card is inserted into the USB/SD input, the unit will automatically
switch to USB/SD mode and begin playing .mp3 audio files from the USB flash drive / SD Card.
EQ Mode: EQ modes will display here.
Repeat Mode: When the USB flash or SD card mode is selected, press the REP button on the
remote control to select the one repeat for playing track for USB/SD. Press again to cancel rep
eat mode.
2. Track Number: The track number currently playing from the USB/SD will display.
3. FM Mode: All FM channels display here. Long press "play/pause" button on front panel for
auto scan all channels.
3
DIGITAL AUDIO PLAYER
PBX-2008-1 MICROPHONE
1. Before powering on the microphone, be sure to set the Microphone Volume Knob to zero. Once
the microphone is powered on, slowly increase the microphone volume.
2. If you notice static or distortion in the microphone, check if XLR is fixed to the body properly or
echo volume is too high.
3. When not in use, turn off the power of the microphone.
ON/OFF
Microphone
Page 6

-5-
PBX-2008-1 BATTERY
PBX-2008-1
1. The PBX-2008-1 is a battery powered PA loudspeaker. Be sure that you have completely
charged the battery prior to first use to maximize the battery's lifespan.
The PBX-2008-1 takes approximately 8 hours to fully charge. The PBX-2008-1 will automatically
begin charging once the power cord is connected to a power source and Power Switch is set to OFF.
The unit will also power on when connected to a power source even if the battery power is low.
When connected to a power source the PBX-2008-1 will play while also charging the battery.
When the battery is full, the charging indicator light on the front panel will illuminate orange.
2. Upon completion of the charging, Please disconnect the power cable.
3. If the unit's Low Battery indicator is illuminating red, please power off the unit and begin
charging the battery.
4. With standard usage, a fully charged battery can play for about 4-5 hours.
5. Battery can be recharged about 300 times in its lifetime..
6. When not in use, the speaker should always be set fo OFF to prevent the unit from draining
the battery.
7. When the unit is not used for prolonged periods of time, the battery will gradually lose its
power. It is recommended to fully charge the battery at least every 60 days.
Page 7

-6-
PBX-2008-1 REMOTE CONTROL
PBX-2008-1
4
21
3
5
7
8
6
9
13
10
11
12
14
1.STANDBY: Pulse el botón de modo de espera para que el aparato esté el modo de espera.
2. Botón de modo de entrada: Pulse este botón para cambiar entre las distintas entradas (línea,
USB, SD, FM).
3.Mudo: Pulse este botón para silenciar la pista de USB / SD.
4. Botón de pista: Pulse este botón para ir a la100a o 200a pista .
5.Tecla digital serve para elegir la pista de flash USB o tarjeta SD.
6. STOP: Pulse este botón para detener la pista de flash USB o tarjeta SD.
7. VOL-: Pulse este botón para descender el volumen general para USB / SD / LINE / FM.
8.REP:. Pulse este botón para repetir la pista de flash USB o tarjeta SD.
9. Pista anterior: Pulse este botón para elegir la pista anterior de flash USB o tarjeta SD y FM.
10. Pista siguiente: Pulse este botón para elegir la siguiente pista de flash USB o tarjeta SD y FM.
11.EQ: Pulse este botón para elegir el modo EQ de Jazz Normal, Rock, Pop, Clase.
12.VOL +: Pulse este botón para aumentar el volumen principal de USB / SD / LINE / FM.
13.PLAY / PAUSE: Cuando está en el modo de flash USB o SD, pulse este botón para reproducir o
pausar la pista.Cuando el modo de FM, pulse este botón para escanear todos los canales
automáticamente.
14. USB / SD: Pulse este botón para elegir los modos de flash USB o tarjeta SD.
Page 8

-7-
ADVERTENCIA!
ATENCIÓN: PARA REDUCIR EL RIESGO CONMOVICIÓN ELÉCTRICA, NO QUITE LA CUBIERTA
DE ESTE ALTAVOZ, NO HAY PIEZAS QUE EL USUARIO PUEDA REPARAR. CONSULTE TODOS
LOS SERVICIOS A UN TÉCNICO CALIFICADO.
El símbolo de centella que está en triángulo equilátero significa que, dentro de caparazón de
producto hay una tensión muy alta y puede resultar electrocución para persona. Los usuarios
deben cumplir extremadamente las normas y seguir las precauciones al ver los símbolos de este
folleto.
El símbolo de exclamación dentro de un triángulo equilátero tiene una finalidad de alertar al
usuario la importancia de los manejos y mantenimiento(servicio).
1- Lea las instrucciones.
2-Guarde estas instrucciones.
3- Observe todas las advertencias.
4- Siga todas las instrucciones.
5- ADVERTENCIA: Para prevenir incendios o electrocuciones, no exponga este equipo a la lluvia
ni a la humedad. No ponga el producto cerca del ningún líquido mientras que ultilizando.
6-Limpie sólo con un paño seco.
7- No almacene o utilice este producto cerca de fuentes de calor tales como radiadores, registros
de calor, estufas u otros aparatos (incluyendo lupas) que produzcan calor. Mantenga este producto
en un sitio bien ventilada..
8-No dañe enchufe polarizado o lo de tierra, el enchufe polarizado tiene dos clavijas, una más
ancha que la otra, otro enchufe que conecta a tierra tiene dos clavijas y un pin redondo que
conecta a la tierra. La parte ancha o la tercera espiga le ofrece la seguridad. Si el enchufe
facilitado no corresponde a su tomacorriente, consulte a un electricista para cambiar tomacorriente.
9- Cuide todos los cables conectados ,los cuales puedan ser pisado o pinchado, particularmente
los enchufes y el punto en el que salen del aparato cuando saca el cable de la tomacorriente,
sácalo sosteniendo el enchufe sino el cable.
10- Desenchufe el aparato cuando encuentra el tiempo de las tormentas o no utilice durante un
período largo.
11- Asegúrese de que todo el equipo esté apagado cuando conecte al fuente de alimentación y
otros equipos utilizados.
12- Una vez que mande la luz y instale todos equipos,descienda el volumen y los niveles
controlables. Posteriormente ajustel el volumen del equipo y los niveles controlables a posición
correcta.
13-Antes de colocar, instalar y montar o colgar cualquier producto, examine todo el hardware, la
suspensión, los transductores, los soportes y el equipo de compañía asociada para ver que si han
dañado. Cualquier configuración del hardware puede surgir los problemas y influenciar instalación.
Cualguier posible influencia para instalación debe corregir de inmediato y instalar los productos
en condición de que no exceda la capacidad de cargar harward. Nunca exceda la capacidad del
hardware o equipo.
14-Consulte a un ingeniero profesional con licencia en cuanto a la instalación del equipo físico,
Asegúrese de que esté instlado bajo todas las normativas locales, estatales y nacionales
relacionadas con la seguridad y operación de los equipos son comprendidos y respetados.
15- Constulte a persona de servicio calificado.en cuando a los problemas cuando no funciona
normalmente, tales como el cable de alimentación o el enchufe está dañado ,se ha derramado
líquido o han caído objetos dentro del aparato y el aparato ha sido expuesto a la lluvia o humedad.
INTRODUCCIÓN
Felicidades y agradecemos que usted compre este altavoz portátil QFX con micrófono con cable,
entradas USB y tarjeta SD . Para obtener mayor informaciñon de su sistema, le recomendamos
que lea todas las informaciones proporcionadas en este folleto de instrucciones.
SEGURÁSE QUE USTED HA YA COMPLETAMENTE CARGADO DE LA BATERÍA ANTES DE USAR
PRIMERO VEZ PARA PROLONGAR SU VIDA.
Page 9

PBX-2008-1 VERDADERO PANEL
-8-
PBX-2008-1
1
3
6
7
8
2
4
5
9
10
1112
13
1. Control maestro: Para ajustar el volumen principal.
2. Ajuste de tiple: Gire este botón para ajustar el treble de LINE/USB/SD/FM.
3. Ajuste de Bombo: Gire este botón para ajustar el bombo de LINE/USB / SD / FM.
4. Botón de micrófono: Gire este botón para ajustar eco de micrófono.
5. Botón de volumen de micrófono: Gire este botón para ajustar el nivel de volumen del
micrófono.
6. Botón de volumen de micrófono inalámbrico: Gire este botón para ajustar el nivel de
volumen del micrófono inalámbrico.
7. LÍNEA1 de entrada (RCA): La entrada RCA está diseñado para conectarse directamente
a un CD / DVD / TV o cualquier dispositivo estéreo .Tenga en cuenta que hay dos entradas
de línea, RCA y 1/8 ". Si la RCA y 1/8 están conectados, el aparato se reproducirá automáticamente
la 1/8" .Cuando se reproduce la línea entrada RCA, hay que desconectar la 1/8 "desde línea
entrada 1/8 ".
8. Entrada de micrófono(1/4" "): Conecte un micrófono a este terminal entrado de micrófono.
9. LÍNEA 2 de entrada (1/8 "): La entrada 1/8" está diseñado para conectarse directamente a
mp3 player o cualquier otro dispositivo estéreo.Tenga en cuenta que hay dos entradas de línea,
RCA y 1/8 ". Si la RCA y 1/8 " está conectados, la altavoz se reproduce automáticamente la 1/8" .
10. Charge Indicator: Cuando carga la batería, la luz del indicador ilumina rojo. Cuando la batería
está completamente cargada, la luz del indicador ilumina naranja. Si la bateía baja, el indicador
del aparato mostrará iluminación verde siginfica baja carga.
11. Power Switch: Existen tres configuraciones posibles. Ajuste de la unidad para DC permitirá
que la unidad para jugar utilizando únicamente la batería interna. Si la batería de la unidad no
está cargada, puede configurar la unidad para corriente alterna. En esta configuración, la
unidad aún se cargará, pero lo hará muy lentamente. Para cargar la unidad correctamente,
ajuste la unidad en OFF.
12.El suministro de alimentación: El interruptor debe estar en la posición de Off antes de conectar
fuente de alimentación de corriente.
13.DC12V IN sirve para conectar a batería externa de 12V si es necesario.
Page 10

-9-
PBX-2008-1 PANEL FRONTAL
PBX-2008-1
1
2
1.Antena sirve para recibir la señal de FM. Antes de usar,tire la antena telescópica de FM,
después de su uso,regoge bién para que no lo dañe.
2.Elege tención 120V-240V. Asegúrese de que voltaje de altavoz esté utilizando en la
tomacorriente.
Page 11

-10-
PBX-2008-1 MONITOR
PBX-2008-1
1 2
DIGITAL AUDIO PLAYER DIGITAL AUDIO PLAYER DIGITAL AUDIO PLAYER
DIGITAL AUDIO PLAYER
3
DIGITAL AUDIO PLAYER
PBX-2008-1 MICRÓFONO
ON/OFF
Microphone
1. Modo de entrada: La pantalla LED mostrará la información de modo de entrada de USB / SD /
LINE / FM.
2. Cuando USB flash / tarjeta SD inserta a la entrada de USB / SD, el aparato cambiará
automáticamente a USB / SD y empezará abrir Archivos de Mp3.
Modo EQ: Modo EQ se mostrará aquí.
Modo de repetición: Cuando el modo de flash USB o de tarjeta SD está elegido, pulse el botón
REP de delemando a distancia para repetir la pista de USB/SD. Pulse de nuevo para cancelar el
modo de repetición.
2. Número de la pista: El sistema mostrará la cantidad de las pistas de USB/ SD que están
reproduciendo.
3.Modo FM: Todos los canales de FM mostrarán aquí.Mantenga pulsando el botón play / pausa" y
se escaneará automáticamente todos los canales.
1. Antes de encender el micrófono, asegúrese de ajustar el control de volumen del micrófono a
cero. Una vez que el micrófono esté encendido, aumente lentamente el volumen del micrófono.
2.Si se percata el micrófono distorisona el sonido o no tiene sonido, compruebe si XLR está
instalado correctamente o volumen de eco está demasiado alto.
3.Cuando no está en uso, apague el micrófono.
Page 12

-11-
PBX-2008-1 BATERÍA
PBX-2008-1
1. PBX-2008-1 es una batería abastecida para altavoz PA. Asegúrese de que haya cargado
completamente la batería antes del primer uso con el fin de prolongar la su máxima vida.
PBX-2008-1 Necesita arededor de 8 horas para cargarse completamente. PBX-2008-1
comenzará a cargar automáticamente una vez que el cable esté conectado a la corriente y su
interruptor está ajustado en posición“OFF”.
El aparato también se enciende cuando se conecta a una fuente de corriente aunque la batería
esté descargado,sin embargo PBX-2008-1 se reproducirá cuando se conecta a la fuente de
corriente.
Cuando la batería está completamente cargada, la luz del indicador de carga de tablero va a
se iluminará de naranja.
2. Al terminar la carga, desconecte el cable de alimentación de corriente.
3.Si el indicador del aparato mostrará iluminación verde siginfica baja carga, por favor lo apague
y gargue.
4. En el caso de usar con estandarización, una batería totalmente cargada puede reproducir
4-5 horas apróximadamente.
5. Se puede recargar la batería aproximadamente 300 veces en su vida.
6.Cuando no está en uso, el altavoz debe estar en posición de OFF para evitar descargar la
batería.
7.Cuando el aparato no se utiliza durante períodos largos, la batería perderá gradualmente
su poder. Se recomienda cargar completamente la batería por lo menos una vez cada 60 días.
Page 13

-12-
PBX-2008-1 REMOTE CONTROL
PBX-2008-1
4
21
3
5
7
8
6
9
13
10
11
12
14
1.STANDBY: Pulse el botón de modo de espera para que el aparato esté el modo de espera.
2. Botón de modo de entrada: Pulse este botón para cambiar entre las distintas entradas (línea,
USB, SD, FM).
3.Mudo: Pulse este botón para silenciar la pista de USB / SD.
4. Botón de pista: Pulse este botón para ir a la100a o 200a pista .
5.Tecla digital serve para elegir la pista de flash USB o tarjeta SD.
6. STOP: Pulse este botón para detener la pista de flash USB o tarjeta SD.
7. VOL-: Pulse este botón para descender el volumen general para USB / SD / LINE /FM.
8.REP:. Pulse este botón para repetir la pista de flash USB o tarjeta SD.
9. Pista anterior: Pulse este botón para elegir la pista anterior de flash USB o tarjeta SD y FM.
10. Pista siguiente: Pulse este botón para elegir la siguiente pista de flash USB o tarjeta SD y FM.
11.EQ: Pulse este botón para elegir el modo EQ de Jazz Normal, Rock, Pop, Clase.
12.VOL +: Pulse este botón para aumentar el volumen principal de USB / SD / LINE / FM.
13.PLAY / PAUSE: Cuando está en el modo de flash USB o SD, pulse este botón para reproducir o
pausar la pista.Cuando el modo de FM, pulse este botón para escanear todos los canales
automáticamente.
14. USB / SD: Pulse este botón para elegir los modos de flash USB o tarjeta SD.
Page 14

 Loading...