

Page 1

A3 LAMINATOR
QCLA3
HOT AND COLD LAMINATING
• A3 Laminiergerät, Heiß- und Kaltlaminierung • Plastieuse A3, Plastication à chaud et à froid
• A3 Plasticeermachine, Warm en koud plasticeren • Plasticadora A3, Plasticadora frío/calor
• Plasticadora A3, Plasticação a frio e a quente • Plasticatrice A3, Plasticazione a caldo e a freddo
• A3 Lamineringsmaskin, Varm og kaldlaminering • Laminointilaite A3, Kylmä -ja kuumalaminointi
• Μηχανή πλαστικοποίησης Α3, Θερμή και ψυχρή πλαστικοποίηση
• A3 Ламинатор, Топло и студено ламиниране • A3 laminálógép, Laminace za tepla a za studena
• Laminátor A3, Laminácia za tepla a za studena• Laminátor A3, Hideg és meleg laminálás
03 Instruction manual
04 Bedienungsanleitung
05 Mode d’emploi
06 Gebruiksaanwijzing
07 Manual de instrucciones
08 Manual de instruções
09 Manuale d’istruzioni
10 Bruksanvisning
11 Käyttöohjeet
12 Οδηγίες χρήσης
13 Упътване за употреба
14 Használati útmutató
15 Návod k použití
16 Návod k použitiu
WWW.Q-CONNECT.COM
Page 2
9
1
2
2
7
6
1
3
5
4
8
3
4
Page 3

t
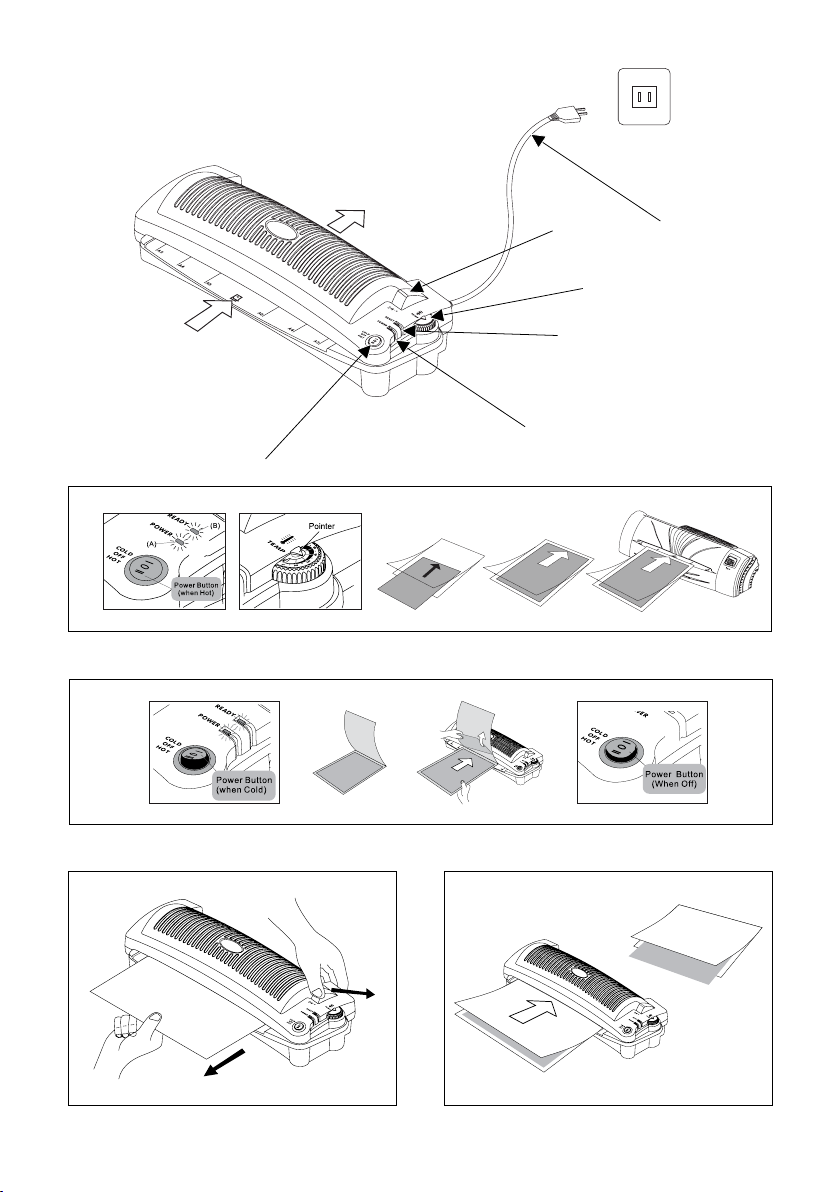
1 Inlet
2 Outlet
3 Power button
4 Power LED (red when ON)
5 Ready LED (green when ready)
6 Temperature control dial
7 Roller release button
8 Electric plug
9 Power socket
GeNeRAL SAfeGuARDS
Failure to comply with any of the following safety precautions
may result in serious injury, re or electrocution. Keep out of the
reach of children. Unauthorised maintenance is not allowed. Do
not allow liquid to get into the machine.
Do not insert any foreign object or put your ngers or hand inside.
This machine is heat emitting, do not leave
unattended during operation. Allow enough space behind the
laminator to ensure free clearance of the laminated object and
prevent blockage.
OpeRATING INSTRuCTIONS HOT
LAMINATING
1 Insert the electric plug (8) into the power socket (9).
2 Turn on the laminator by pressing the power button (3)
towards the HOT direction. The power LED (4) will glow red.
3 The green ready LED (5) will glow when the laminator is ready
for lamination.
4 Adjust the temperature by turning the temperature control
dial (6) so that the pointer is pointing to the corresponding
temperature setting
Temperature reference table
Item to be laminated 80µm 100µm 125µm 150µm
Newspaper 1-2 2-3 4-5 6-7
Copying paper 2-3 3-4 4-5 6-7
Photograph 4-5 5-6 6-7 7
5 Prepare the item to be laminated. Insert the item in between
the laminating pouch and push it to the sealed end of the
pouch. WE RECOMMEND TO USE Q-CONNECT LAMINATING
POUCHES.
6 Insert the sealed end of the pouch straight into the laminator
through the inlet (1). Once the pouch is engaged by the roller,
it will be rolled into the laminator automatically.
7 Remove the laminated item from the outlet (2).
8 After use, turn o the laminator by pressing the power button
(4).
COLD LAMINATING
1 Insert the electric plug (8) into the power socket (9).
2 Turn on the laminator by pressing the power button (3)
towards the COLD direction. The power LED (4) will glow red.
3 The green ready LED (5) will glow immediately.
4 Prepare the item to be laminated. Open the pouch and insert
the item in between the laminating pouch so that the part
with the protective paper is on top.
5 Peel o the rst few centimeters of the protective paper and
insert the closed end of the pouch centrally into the laminator
through the inlet (1). Once the pouch is engaged by the roller,
carefully remove the protective paper as the pouch is rolled
into the laminator.
6 Remove the nished product from the outlet (2). Do not
attempt to pull the pouch out before the laminating process is
completed.
7 After use, turn o the laminator by pressing the power button
(4).
Re MOvING jAMMeD LAMINATING
pOuCHeS
If the laminating pouch is jammed inside the laminator during the
laminating process, press the roller release button (7) and pull the
jammed pouch out immediately.
After the jammed pouch is removed, release the roller release
button and continue with a fresh laminating pouch.
If the jammed pouch cannot be removed, turn o the laminator
and report to the dealer shop for assistance.
CLeANING THe LAMINATOR
After laminating several documents, adhesive material from the
pouch may accumulate inside the laminator. Please clean the
laminator regularly as follows:
1 Turn on the laminator by pressing the power button (3)
towards the HOT direction until the ready LED (4) glows.
2 Fold a sheet of fresh copying paper once at the middle and
insert with the folded end rst through the laminator. Repeat
the same procedure for 3 - 5 times.
CLeANING THe bODy
1 Unplug the laminator.
2 Wipe with a soft cloth and a general-purpose household
cleaner.
SpeCIfICATIONS
Max. Laminating width: 330mm.
Laminating speed: 252mm/min.
Max. Laminating Thickness: 0,6mm.
Pouch lm Thickness: 75 - 150 micron per side.
Jammed paper release: roller release button.
2 rollers.
Pre-heat time: 5 minutes.
Carrier free.
Voltage: 220V.
Consumption power: 435 W.
Current: 1,9 A.
Weight: 2,9 kg.
Dimensions: 466 x 189 x 121mm.
Body Material: ABS.
3
Page 4

k
1 Zufuhrschacht
2 Ausgabeschacht
3 Netzschalter
4 Bereitschaftsanzeige (grün)
5 Temperaturwahlschalter
6 Freigabe-Taste
7 Netzkabel
8 Netzstecker
GeNeReLLe SICHeRHeITSHINweISe
Dieses Gerät wurde zum Laminieren von Papier entwickelt.
Verwenden Sie es nur zu diesem Zweck und wie in dieser
Bedienungsanleitung beschrieben. Darf nicht in die Hände von
Kindern gelangen. Nicht autorisierte Wartung ist nicht erlaubt.
Schützen Sie das Gerät vor Feuchtigkeit. Greifen Sie nicht in das
Gerät hinein.
Lassen Sie das Gerät abkühlen, bevor Sie es reinigen.
Achten Sie auf genügend Platz hinter dem Gerät, um das
laminierende Dokument ungehindert entnehmen zu können.
GebRAuCHSANweISuNG
HeISSLAMINIeRuNG
1 Stecken Sie den Netzstecker in die Steckdose.
2 Stellen Sie den Netzschalter auf HOT.
3 Warten Sie, bis das grüne Licht erscheint.
4 Drehen Sie die Temperaturwahlschalter auf die gewünschte
Folienstärke.
Temperatur-referenz tabelle
Objekt zum Laminieren 80µm 100µm 125µm 150µm
Newspaper 1-2 2-3 4-5 6-7
Kopierpapier 2-3 3-4 4-5 6-7
Photograph 4-5 5-6 6-7 7
5 Legen Sie das Dokument mittig in die Folientasche.
6 Führen Sie die Folientasche mit der geschlossenen Seite voran
mittig in den Zufuhrschacht ein. Das laminierte Dokument
wird auf der Rückseite des Geräts automatisch herausgeführt.
7 Entnehmen Sie das laminierte Dokument und lassen Sie es
abkühlen.
8 Falls Sie keine weitere Dokumente laminieren möchten:
Schalten Sie das Gerät aus.
KALTLAMINIeRuNG
1 Stecken Sie den Netzstecker in die Steckdose
2 Stellen Sie den Netzschalter auf COLD
3 Das grüne READY Licht erscheint sofort
4 Legen Sie das zu laminierende Dokument in die Folientasche.
5 Önen Sie die Folientasche so dass die haftende, mit einem
glänzenden Schutzblatt abgedeckte Seite nach oben geklappt
wird.
6 Legen Sie den inhalt mit den bedruckten Seite nach oben auf
die transparante, nichthaftende Seite, ohne jedoch die
Folientasche zu schliessen
7 Das fertige Blatt verlässt von selbst den Ausgabeschiltz.
Entnehmen Sie es erst dann dem Auanggitter, wenn es das
Gerät vollständig verlassen hat
8 Falls Sie keine weitere Dokumente laminieren möchten:
Schalten Sie das Gerät aus.
fOLIeNTASCHe bLeIbT IN GeRäT
STeCKeN
Drücken Sie die Freigabe-Taste (7) und ziehen Sie die Folientasche
umgehend heraus
wARTuNG uND pfLeGe
Um überschlüssigen Kleber aus dem Gerät zu entfernen, reinigen
Sie regelmässig die Walzen, wie nachfolgend beschrieben:
1 Stellen Sie den Netzschalter auf ON. Warten Sie, bis das LED
READY (3) erscheint.
2 Falten Sie ein blatt unbenutztes Kopierpapier in der Mitte.
Führen Sie das Papier mit der geschlossenen Seite voran 3 - 5
Mal mittig in den Zufuhrschacht ein.
uM DAS GeHäuSe zu ReINIGeN
1 Ziehen Sie den Netzstecker.
2 Wischen Sie das Gerät mit einem weichen Tuch und sanftem
Haushaltsreiniger ab.
TeCHNISCHe DATeN
Max. Breite: 330mm.
Max. Durchlaufgeschwindigkeit: 252mm/min.
Max. Dicke des Laminierguts: 0,6mm.
Empfohlene Folienstärke: 75 - 150 mic.
Freigabe-Taste.
2 Rollen.
Vorheizzeit: 5 min.
Laminierung ohne Schutzkarton.
Stromversorgung: 220 V.
Leistungsaufnahme: 435 W.
Vermögen: 1,9 A.
Nettogewicht: 2,9 kg.
Abmessungen: 466 x 189 x 121mm.
Gehäusematerial: ABS.
4
Page 5

p
1 Fente d’entrée
2 Fente de sortie
3 Bouton d’alimentation
4 Lumière d’alimentation ‘POWER’ (rouge une fois en marche)
5 Lumière ‘READY’ (verte quand la machine est prête à relier)
6 Cadran de contrôle de température
7 Bouton de déblocage
8 Prise de courant
9 Prise de courant femelle
CONSIGNeS GéNéRALeS De SéCuRITé
Ne pas se conformer aux precautions de sécurité peut entraîner
des dommages sérieux, un risque d’incendie et l’électrocution
Conserver hors de portée des enfants. La maintenance sans
autorisation est interdite. Ne pas mouiller la machine
Ne pas introduire d’objet étranger ou mettre les doigts ou les
main à l’intérieur de la machine. La machine est une source de
chaleur. Ne pas la laisser sans attention lors de la plastication.
Veiller à ménager un espace susant derrière l’appareil, pour
pouvoir ôter sans problème le document plastier et éviter toute
obstruction.
GuIDe D’uTILISATION pLASTIfICATION
à CHAuD
1 Brancher la prise de courant
2 Tourner le bouton d’alimentation vers la position HOT jusqu’à
ce que la lumière rouge s’allume
3 La lumière verte s’allume quand la plastieuse est prête à
plastier
4 Régler la température à l’aide de la molette de contrôle de la
température.
Tableau de références de température
Elément à plastier 80µm 100µm 125µm 150µm
Journal 1-2 2-3 4-5 6-7
Feuille de papier 2-3 3-4 4-5 6-7
Photo 4-5 5-6 6-7 7
5 Préparer l’élément à plastier. Introduire l’élément à l’intérieur
de la pochette jusqu’à ce qu’il atteigne le la partie fermés
de la pochette. NOUS RECOMMENDONS L’UTILISATION DES
POCHETTES Q-CONNEC T.
6 Introduire directement le côté fermée de la pochette dans la
fente d’entrée de la pochette. Une fois que la pochette est
engagée par le rouleau, elle sera pressée automatiquement
dans la plastieuse
7 Récupérer l’élément plastié de la fente de sortie.
8 Après utilisation, éteindre la plastieuse en appuyant sur le
bouton de plastication
pLASTIfICATION à fROID
1 Brancher la prise de courant.
2 Tourner le bouton de d’alimentation vers la position COLD
jusqu’à ce que la lumière rouge s’allume.
3 La lumière verte s’allume immédiatement.
4 Préparer l’élément à plastier. Ouvrir la pochette et glisser
l’élément à l’intérieur de la pochette à plastier en prenant soin
de mettre la partie avec le papier de protection sur le dessus.
NOUS VOUS RECOMMANDONS D’UTILISER LES POCHETTES A
PLASTIFIER Q-CONNECT.
5 Soulever de quelques centimètres le papier de protection,
bien centrer et introduire le côté fermé de la pochette dans la
fente d’entrée de la plastieuse(1).
6 Une fois que la pochette est engagée par le rouleau, retirer
délicatement le papier de protection tandis que la pochette
est pressée dans la plastieuse.
7 Récupérer le produit ni dans la fente de sortie (2). Ne pas
essayer de tirer la pochette avant la n de la plastication
complète.
8 Après utilisation, éteindre la plastieuse en appuyant sur le
bouton de plastication.
eNLeveR LeS pOCHeTTeS à pLASTIfIeR
bLOQuéeS
Si la pochette à plastier est bloquées à l’intérieur de la plastieuse
pendant le processus de plastication, appuyer sur le bouton de
déblocage (5) et retirer immédiatement sur la pochette bloquée.
Une fois que la pochette est retirée, relâcher le bouton de
déblocage et recommencer la plastication avec une nouvelle
pochette. Si la pochette bloquées ne peut pas être retirée, éteindre la plastieuse et rapporter la en magasin pour assistance
eNTReTIeN De LA pLASTIfIeuSe
Après la plastication de plusieurs documents, des éléments
adhésifs provenant de la pochette peuvent s’accumuler à
l’intérieur de la machine. Merci de nettoyer la plastieuse
régulièrement.
1 Allumer la plastieuse en tournant le bouton d’alimentation (3)
vers la position HOT jusqu’à ce que la lumière s’allume (4)
2 Plier en deux une feuille de papier à copie non utilisé. Insérer 3
à 5 fois le papier, côté soudé en premier, dans la fente d’entrée,
en veillant à le positionner au centre.
NeTTOyAGe Du bOîTIeR
1 Débrancher le cordon d’alimentation.
2 Essuyer la machine avec un chion doux et un nettoyant
ménager tous usages.
fICHe TeCHNIQue
Largeur max.: 330mm.
Vitesse de passage: 252mm/min.
Épaisseur max. de la matière à plastier: 0,6mm.
Épaisseur de lm conseillée: 75 - 150 mic.
Retirer papier bloqué: bouton de déblocage.
2 galets.
Durée de préchauage: 5 min.
Sans support de document.
Alimentation: 220 V.
Puissance absorbée: 435 W.
Courant: 1,9 A.
Poids net: 2,9 kg.
Dimensions: 466 x 189 x 121mm.
Matériau utilisé pour le boîtier: ABS.
5
Page 6

1 Invoerlade
2 Uitvoerlade
3 Netschakelaar
4 Rood LED-lampje dat gloeit wanneer het apparaat aanstaat.
5 Groen LED-lampje dat oplicht wanneer het apparaat klaar is
voor gebruik.
6 Temperatuurregelaar
7 Vrijgavetoets
8 Stekker
9 Stopcontact
ALGeMeNe veILIGHeIDSReGeLS
Het niet naleven van de volgende veiligheidsvoorschriften kan
ernstige verwondingen, brand of elektrocutie veroorzaken.
Buiten bereik van kinderen bewaren. Het onderhoud van de
machine dient te gebeuren door een geautoriseerd persoon.
Vermijd dat het apparaat in contact komt met vloeistoen.
Steek geen vingers of vreemde voorwerpen in het apparaat.
Dit apparaat werkt op basis van verhitting. Laat het nooit werken
zonder toezicht. Let erop voldoende ruimte achter het apparaat te
laten om het gelamineerde document zonder problemen uit het
apparaat te kunnen halen.
GebRuIKSAANwIjzING wARM
pLASTIfICeReN
1 Steek de stekker (8) in het stopcontact (9).
2 Schakel het apparaat aan door de netschakelaar (3) op ‘HOT’ te
zetten. Het rood LED-lampje (4) zal oplichten.
3 Het groen LED-lampje (5) zal oplichten als het apparaat klaar is
voor gebruik.
4 Stel de juiste temperatuur in door aan de temperatuurregelaar
(6) te draaien.
Tabel met temperatuurreferentie
Te plasticeren object 80µm 100µm 125µm 150µm
Krant 1-2 2-3 4-5 6-7
Kopiepapier 2-3 3-4 4-5 6-7
Foto 4-5 5-6 6-7 7
5 Voorbereiden van het te plasticeren object: Steek het object
tussen de plasticeeretui tot aan het uiteinde van de gesloten
zijde. WIJ RADEN U AAN OM Q-CONNECT PLASTIFICEERETUIS
TE GEBRUIKEN.
6 Steek de gesloten zijde van de etui in de invoerlade (1), waarna
de etui automatisch in de plasticeermachine wordt gerold.
7 Haal het geplasticeerde object uit de uitvoerlade (2).
8 Na gebruik zet u het apparaat uit door de netschakelaar (4) in
te drukken.
KOuD pLASTIfICeReN
1 Steek de stekker (8) in het stopcontact (9).
2 Schakel het apparaat aan door de netschakelaar (3) op ‘COLD’
te zetten. Het rood LED-lampje (4) zal oplichten.
3 Het groen LED-lampje (5) zal onmiddellijk oplichten.
4 Voorbereiden van het te plasticeren object: Steek het object
tussen de plasticeeretui zo dat het beschermpapier
bovenbaan zit. WIJ RADEN U AAN OM Q-CONNECT
PLASTIFICEERETUIS TE GEBRUIKEN.
5 Maak enkele centimeters van het beschermpapier los en steek
de gesloten zijde van de etui centraal in de invoerlade (1).
Zodra de etui automatisch in de plasticeermachine wordt
gerold, verwijdert u voorzichtig het beschermpapier terwijl het
papier verder door de transportrollen gaat.
6 Haal het geplasticeerde object uit de uitvoerlade (2). Trek de
etui niet uit de uitvoerlade als het plasticeerproces nog niet
volledig is afgerond.
7 Na gebruik zet u het apparaat uit door de netschakelaar (4) in
te drukken.
veRwIjDeReN vAN vASTGeLOpeN
pLASTIfICeeReTuIS
Wanneer een etui is vastgelopen in het apparaat tijdens het
plasticeerproces, drukt u de vrijgavetoets (5) in en trekt u tegelijk
de etui uit het apparaat.
Nadat de vastgelopen etui is verwijderd, laat u de vrijgavetoets los
en herbegint u met een nieuwe etui.
Indien de vastgelopen etui niet verwijderd kan worden, schakelt u
het apparaat uit en neemt u contact op met uw verdeler.
ReINIGeN vAN De pLASTIfICeeRMACHINe
Na het plasticeren van verschillende documenten, kan er
kleefstof van de etui in het apparaat terechtkomen.
1 Schakel het apparaat aan door de netschakelaar (3) op ‘HOT’ te
zetten. Het rood LED-lampje (4) zal oplichten.
2 Vouw een blad ongebruikt kopieerpapier in het midden en
voer het met de gesloten zijde naar voor in het midden in de
invoerlade. Herhaal 3 tot 5 maal.
ReINIGeN vAN De beHuIzING
1 Trek de stekker uit het stopcontact.
2 Maak het apparaat schoon met een zachte doek en een mild
schoonmaakmiddel.
TeCHNISCHe GeGeveNS
Max. werkbreedte: 330mm.
Max. doorloopsnelheid: 252mm/min.
Max. dikte van de te lamineren stukken: 0,6mm.
Aanbevolen foliedikte: 75 - 150 mic.
Vrijgavetoest om vastgelopen papier los te maken uit de
transportrollen.
2 transportrollen.
Voorverwarmingstijd: 5 min.
Geen beschermkarton nodig.
Stroomvoorziening: 220 V.
Opgenomen vermogen: 435 W.
Stroomsterkte: 1,9 A.
Nettogewicht: 2,9 kg.
Afmetingen: 466 x 189 x 121mm.
Materiaal behuizing: ABS.
6
Page 7

m
1 Bandeja de alimentación
2 Bandeja de salida
3 Interruptor
4 Luz LED roja cuando está encendida.
5 Luz LED verde cuando está preparada.
6 Control térmico.
7 Tecla de liberación
8 Enchufe eléctrico.
9 Toma de energía.
MeDIDAS pARA Su SeGuRIDAD
No cumplir alguna de las siguientes medidas de seguridad puede
provocarle serios daños, provocar un fuego o peligro de
electrocución. Manténgase fuera del alcance de los niños.
El mantenimiento no autorizado no está permitido. No arrojar
líquidos en la máquina. No insertar los dedos ni ningún otro
objeto que no sea papel. Esta máquina emite calor y no se debe
dejarla sin vigilancia mientras se usa. Asegúrese de que queda
suciente espacio en la parte posterior del equipo para poder
retirar sin problemas el documento plasticado.
INSTRuCCIONeS pLASTIfICACIóN pOR
CALOR
1 Inserte el enchufe eléctrico en la toma de energía.
2 Encienda la plasticadora presionando el botón de encendido
el cual le mostrará una luz roja.
3 Cuando se encienda una luz verde la plasticadora estará
preparada.
4 Ajuste la temperatura moviendo el dial hasta que el puntero
muestre la temperatura correcta para empezar.
Tabla de referencias para la temperatura
Documentos que pueden ser plasticados
80µm 100µm 125µm 150µm
Diarios 1-2 2-3 4-5 6-7
Fotocopias 2-3 3-4 4-5 6-7
Fotografías 4-5 5-6 6-7 7
5 Prepare el documento para ser plasticado. Inserte el
documento en la bolsa para plasticar. NOSOTROS LE
RECOMENDAMOS QUE USE BOLSAS PARA PLASTIFICAR
Q-CONNECT.
6 Inserte el documento por el lado de la bolsa que ya esta
previamente cerrado. Una vez el documento ha sido cogido
por el rollo, usted verá cómo va pasando el documento
automáticamente por la plasticadora.
7 Una vez haya salido todo el documento plasticado puede ya
retirarlo.
8 Una vez usada la máquina, apáguela presionando el botón de
encendido.
pLASTIfICACIóN eN fRIO
1 Conecte el enchufe en la toma de energía.
2 Encienda la plasticadora presionando el botón de encendido
hacía la dirección donde verá escrito FRIO.La luz LED de encen-
dido se iluminará.
3 La luz LED verde se iluminará inmediatamente.
4 Prepare el documento para ser plasticado. Abra la bolsa para
plasticar e inserte el documento entre las dos hojas. Intente
que la parte protegida quede arriba. NOSOTROS LE
RECOMENDAMOS QUE USE LAS BOLSAS PARA PLASTIFICAR
Q-CONNECT.
5 Retire unos centímetros el papel protector e introduzca esa
parte en el centro de la plasticadora por la bandeja de
alimentación. Una vez el documento ha sido cogido por el
rollo plasticador, con cuidado quite el papel protector a
medida que va entrando el documento en la plasticadora.
6 Una vez que haya pasado todo el documento ya puede
retirarlo. No tire del documento mientras la máquina no haya
acabado de plasticar.
7 Una vez usada la máquina, apáguela presionando el botón de
encendido.
eN CASO De ATASCO
Si la bolsa de plasticar se queda atascada dentro de la máquina
durante el proceso de plasticación, presione la tecla de
liberación y tire del documento atascado rápidamente.
Una vez ha solucionado el atasco suelte la tecla de liberación y
continúe si lo desea plasticando pero con una nueva bolsa para
plasticar. Si no puede solucionar el atasco, apague la
plasticadora e informe a la tienda donde lo compró.
LIMpIezA De LA pLASTIfICADORA
Después de plasticar bastantes documentos, pueden quedar
restos adhesivos de las bolsas acumuladas dentro de la
plasticadora. Por favor limpie la plasticadora regularmente
como se le indica a continuación:
1 Ponga el interruptor en ON. Espere a que aparezca la LED
READY (3).
2 Doble por la mitad una hoja de papel no plasticado.
Introduzca entre tres y cinco veces el papel con el lado cerrado
hacia delante centrado en el alimentador.
LIMpIezA De LA CARCASA
1 Desenchufe el equipo.
2 Limpie el equipo con un paño suave y un limpia hogar no
agresivo.
eSpeCIfICACIONeS
Anchura máxima: 330mm.
Velocidad de paso máxima: 252mm/min.
Espesor máximo del material a plasticar: 0,6mm.
Espesor de cartera recomendado: 75 - 150 micras.
Función marcha atrás para evitar atascos.
2 rodillos.
Tiempo de calentamiento: 5 min.
Sin transportador.
Alimentación: 220 V.
Potencia absorbida: 435 W.
Corriente: 1,9 A.
Peso neto: 2,9 kg.
Dimensiones: 466 x 189 x 121mm.
Material de la carcasa: ABS.
7
Page 8

O
1 Abertura de entrada
2 Abertura de saída
3 Interruptor
4 Luz indicadora de energia (vermelha quando ligado)
5 Luz indicadora de operação (verde quando pronto a usar)
6 Indicador de temperatura
7 Botão de “release” desencravamento
8 Cabo eléctrico
9 Transformador de corrente
SeGuRANçA
O não cumprimento das normas descritas neste manual, podem
implicar lesões graves, incêndio ou até mesmo electrocução.
Manter fora do alcance das crianças. Não é permitido o uso de
equipamentos e manutenção não autorizada pelo fabricante.
Evitar que produtos líquidos entrem no aparelho. Não insira
objectos dentro do aparelho que não os adequados. Não coloque
os dedos dentro da bandeja de entrada do aparelho. Este
equipamento emite calor. Não o deixe inutilizado durante largos
períodos de tempo. Certique-se que atrás do aparelho há espaço
suciente para que o documento a ser plasticado possa ser
retirado do aparelho sem diculdades.
INSTRuçõeS De uSO pLASTIfICAçãO
A QueNTe
1 Insira o cabo eléctrico (8) no adaptador de corrente e ligue o
aparelho à cha eléctrica onde o aparelho vai ser instalado ou
colocado.
2 Ligue o aparelho pressionando o botão de corrente (3) na
direcção (HOT). A luz indicadora (4) cará vermelha.
3 A luz verde (5) acenderá assim que a plasticador estiver
pronta a usar.
4 Ajuste a temperatura através do botão de control de
temperatura (6) até que o ponteiro de temperatura alcance a
temperatura desejada.
Tabela de referências de temperaturas
Objecto a plasticar 80µm 100µm 125µm 150µm
Jornal 1-2 2-3 4-5 6-7
Papel de fotocópia 2-3 3-4 4-5 6-7
Fotograas 4-5 5-6 6-7 7
5 Prepara o documento a plasticar. Insira o documento na
bandeja de entrada do equipamento e empurre-o até que
este alcance a posição correcta e que que bem encaixado.
RECOMENDAMOS QUE USE LÂMINAS PLASTIFICADORES DA
MARCA Q-CONNECT.
6 Assim que o documento esteja na posição correcta(na
bandeja de entrada (1) ele será automáticamente puxado pelo
aparelho e iniciar-se-á o processo de plasticação.
7 Remova o item plasticado da bandeja de saída (2).
8 Após uso, desligue o aparelho pressionando o botão de
energia (4).
pLASTIfICAçãO A fRIO
1 Insira o cabo eléctrico (8) no adaptador de corrente e ligue o
aparelho à cha eléctrica onde o aparelho vai ser instalado ou
colocado.
2 Ligue o aparelho pressionando o botão de corrente (3) na
direcção (COLD). A luz indicadora (4) cará vermelha.
3 A luz verde (5) acenderá assim que a plasticador estiver
pronta a usar.
4 Prepara o documento a plasticar. Insira o documento na
bandeja de entrada do equipamento O papel protector deverá
car na parte de cima. RECOMENDAMOS QUE USE LÂMINAS
PLASTIFICADORES DA MARCA Q-CONNECT.
5 Retire alguns centímetros do papel protector e procure centrar
o documento na bandeja de entrada (1). Assim que a lâmina
estiver engatada no mecanismo, remova cuidadosamente o
papel protector enquanto o aparelho puxa o documento a
plasticar.
6 Remova o documento plasticado da bandeja de saída (2).
Não retire o documento antes de todo este processo terminar.
7 Depois de usar, desligue o aparelho pressionando o botão de
energia (4).
ReMOveR LâMINAS eNCRAvADAS
Caso a lâmina de plasticar que encravada no aparelho durante
o processo de plasticação, pressione o botão (7) e puxe a lâmina
bloqueada para fora imediatamente.
Depois de remover a lâmina encravada, liberte o botão( 7) para a
posição normal e continue a plasticação com uma lâmina nova.
Caso não consiga remover a lâmina encravada, desligue o
aparelho e procure assistência técnica para o mesmo.
LIMpezA e MANuTeNçãO DO ApAReLHO
Depois de usar por diversas vezes o aparelho, convém limpar o
mesmo. Material adesivo ca por diversas vezes retido dentro
do aparelho. Por favor, proceda da seguinte forma para limpar o
equipamento:
1 Ligue o aparelho pressionando o botão (3) para posição (HOT)
até que a luz (4) acenda.
2 Dobre ao meio uma folha de papel de cópia limpa. Insira o
papel com o lado fechado 3 a 5 vezes de modo central na
abertura de entrada.
pARA LIMpAR A CARCAçA
1 Tire a cha da tomada.
2 Limpe o aparelho com um pano macio e um produto suave de
limpeza doméstica.
eSpeCIfICAçõeS
Largura útil máx.: 330mm.
Velocidade máx. de serviço: 252mm/min.
Espessura máx. do material a ser plasticado: 0,6mm.
Espessura recomendada de folha: 75 - 150 mic.
2 rolos.
Pré-aquecimento: 5 min.
Sem apoio de documentos.
Abastecimento de corrente: 220 V.
Consumo de energia: 435 W.
Peso líquido: 2,9 kg.
Dimensões: 466 x 189 x 121mm.
Material da carcaça: ABS.
8
Page 9

C
1 Fessura d’ingresso
2 Fessura di uscita
3 Interruttore di alimentazione
4 LED Ready (verde quando pronto)
5 Interruttore di alimentazione (rosso quando ON)
6 Manopola di controllo temperatura
7 Tasto di rilascio
8 Spina elettrica
9 Presa di corrente
pReCAuzIONI GeNeRALI
La mancata osservanza di una delle seguenti precauzioni di
sicurezza può provocare gravi ferite, incendi o fulminazione.
Conservare fuori della portata dei bambini. Non è permessa una
manutenzione non autorizzata. Evitare la penetrazione di liquidi
nell’apparecchio. Non inserire oggetti estranei né porre le dita o le
mani all’interno. Questo apparecchio emette calore. Non lasciarlo
incustodito durante il funzionamento.
Fare in modo che dietro l’apparecchio vi sia spazio suciente
perché l’oggetto plasticato possa essere emesso liberamente e
non venga arrestato.
ISTRuzIONI peR L’uSO pLASTIfICAzIONe
A CALDO
1 Inserire la spina (8) nella presa di corrente (9).
2 Accendere la plasticatrice spingendo l’interruttore di
alimentazione (3) verso la direzione HOT. Il LED rosso Power
(4) si accende.
3 Il LED Ready verde (5) si accende quando la plasticatrice è
pronta al funzionamento.
4 Regolare la temperatura girando la manopola di controllo
temperatura (6) e posizionando l’indicatore sulla temperatura
da impostare.
Tabella di riferimento temperatura
Oggetto da plasticare 80µm 100µm 125µm 150µm
Giornale 1-2 2-3 4-5 6-7
Carta copiativa 2-3 3-4 4-5 6-7
Fotograa 4-5 5-6 6-7 7
5 Preparare l’oggetto da plasticare. Inserire l’oggetto nella busta
e spingerlo verso l’estremità sigillata della busta. CONSIGLIAMO
DI UTILIZZARE BUSTE PER PLASTIFICAZIONE Q-CONNECT.
6 Inserire l’estremità sigillata della busta direttamente nella
plasticatrice attraverso la fessura d’ingresso (1). Una volta
che il rullo ha fatto presa sulla busta la plasticazione avviene
automaticamente.
7 Rimuovere l’oggetto plasticato dalla fessura di uscita (2).
8 Dopo l’uso spegnere la plasticatrice premendo l’interruttore
di alimentazione (4).
pLASTIfICAzIONe A fReDDO
1 Inserire la spina (8) nella presa di corrente (9).
2 Accendere la plasticatrice spingendo l’interruttore di
alimentazione (3) verso la direzione COLD. Il LED rosso Power
(4) si accende.
3 Il LED verde Power (5) si accende immediatamente.
4 Preparare l’oggetto da plasticare. Aprire la busta e inserirvi
l’oggetto in modo tale che la carta protettiva sia rivolta verso
l’alto. CONSIGLIAMO DI UTILIZZARE BUSTE PER
PLASTIFICAZIONE Q-CONNECT.
5 Staccare i primi centimetri della carta protettiva e inserire
la busta, col lato chiuso in avanti, al centro della fessura
d’ingresso (1). Una volta che il rullo ha fatto presa sulla busta
rimuovere accuratamente la carta protettiva mentre la busta
entra nella plasticatrice.
6 Rimuovere il prodotto nito dalla fessura di uscita (2). Non
cercare di estrarre la busta prima che il processo di
plasticazione sia concluso.
7 Dopo l’uso spegnere la plasticatrice premendo l’interruttore
di alimentazione (4).
RIMOzIONe DI OGGeTTI INCeppATI
Se la busta è inceppata all’interno della plasticatrice durante il
processo di plasticazione, premere il pulsante di rilascio (7) e
spingerla fuori immediatamente. Dopo la rimozione della busta
lasciare il tasto di rilascio e continuare con una nuova busta.
Se non è possibile rimuovere la busta inceppata spegnere la
plasticatrice e portarla al distributore per l’assistenza.
COMe puLIRe LA pLASTIfICATRICe
Dopo la plasticazione di diversi documenti del materiale adesivo
della busta può accumularsi all’interno della plasticatrice. Pulire
regolarmente l’apparecchio come di seguito descritto.
1 Accendere la plasticatrice spingendo l’interruttore di
alimentazione (3) verso la direzione HOT no a quando il LED
Ready (4) si accende.
2 Piegare a metà un foglio di carta per fotocopie non utilizzato.
Inserire il foglio, col lato chiuso in avanti, al centro della fessura
d’ingresso. Ripetere il procedimento per 3 - 5 volte.
pe R ef fe TT uARe LA puLIzIA
DeLL’ALLOGGIAMeNTO
1 Staccare la presa di alimentazione.
2 Pulire quindi l’apparecchio con un panno morbido, usando un
detergente ad azione non aggressiva per uso domestico.
DATI TeCNICI
Larghezza massima di passaggio: 330mm.
Velocità massima di scorrimento: 252mm/min.
Spessore massimo dell’oggetto da plasticare: 0,6mm.
Spessore della pellicola consigliato: 75 - 150 mic.
Rilascio carta inceppata: tasto di rilascio.
2 rulli.
Durata preriscaldamento: 5 min.
Senza carrier.
Alimentazione elettrica: 220 V.
Potenza assorbita: 435 W.
Corrente: 1,9 A.
Peso netto: 2,9 kg.
Dimensioni: 466 x 189 x 121mm.
Materiale alloggiamento: ABS.
9
Page 10

N
1 Innmatingssjakt
2 Utmatingssjakt
3 Strømbryter
4 Strømlampe (rødt når maskinen er på)
5 Klarlampe (grønt når maskinen er klar)
6 Bryter for temperaturkontroll
7 Frigjøringsknapp
8 Strømkabel
9 Stikkontakt
GeNeReLLe fORHOLDSReGLeR
Manglende overholdelse av følgende sikkerhetsregler kan føre til
alvorlig skade, brann eller elektrisk støt.
Oppbevares utilgjengelig for barn
Uautorisert vedlikehold er ikke tillatt.
Unngå å få væske inn i maskinen.
Ikke før inn fremmede gjenstander eller stikk inn ngre eller
hender. Denne maskinen slipper ut varme. Ikke forlat maskinen
når den er på. Sørg for at det er nok plass bak apparatet, slik at det
laminerte dokumentet kan tas ut uhindret.
bRuKSANvISNING vARM LAMINeRING
1 Sett strømkabelen (8) inn i stikkontakten (9).
2 Slå på lamineringsmaskinen ved å trykke strømbryteren (3)
ned mot HOT. Strømlampen (4) lyser rødt.
3 Den grønne klarlampen (5) lyser når lamineringsmaskinen er
klar for laminering.
4 Juster temperaturen ved å vri på bryteren for
temperaturkontroll (6), slik at pekeren peker på riktig
temperaturinnstilling.
Referansetabell for temperaturer
Produkt som skal lamineres 80µm 100µm 125µm 150µm
Avis 1-2 2-3 4-5 6-7
Kopipapir 2-3 3-4 4-5 6-7
Fotograf 4-5 5-6 6-7 7
5 Klargjør det som skal lamineres. Legg det som skal lamineres
inn i lamineringslommen og skyv det til den forseglede enden
av lommen. VI ANBEFALER AT DU BRUKER Q-CONNECT
LAMINERINGSLOMMER.
6 Sett den forseglede enden av lommen rett inn i
lamineringsmaskinen gjennom innmatingssjakten (1).
Når lommen blir aktivert av trommelen, blir den automatisk
rullet inn i lamineringsmaskinen.
7 Fjern det laminerte produktet fra utmatingssjakten (2).
8 Etter bruk slår du av lamineringsmaskinen ved å trykke på
strømbryteren (4).
KALD-LAMINeRING
1 Sett strømkabelen (8) inn i stikkontakten (9).
2 Slå på lamineringsmaskinen ved å trykke strømbryteren (3)
ned mot COLD. Strømlampen (4) lyser rødt.
3 Den grønne klarlampen (5) lyser umiddelbart.
4 Klargjør det som skal lamineres. Åpne lommen og legg
produktet inn i lamineringslommen, slik at delen med
beskyttelsespapiret er øverst. VI ANBEFALER AT DU BRUKER
Q-CONNECT LAMINERINGSLOMMER.
5 Riv av noen centimetre av beskyttelsespapiret og sett inn den
lukkede enden av lommen i midten av innmatingssjakten (1)
på lamineringsmaskinen. Når lommen er aktivert av
trommelen, erner du forsiktig resten av beskyttelsespapiret
etterhvert som lommen trekkes inn i lamineringsmaskinen.
6 Fjern det ferdige produktet fra utmatingssjakten (2). Ikke prøv å
trekke ut lommen før lamineringsprosessen er fullført.
7 Etter bruk slår du av lamineringsmaskinen ved å trykke på
strømbryteren (4).
fjeRNe fASTLåSTe LAMINeRINGSLOMMeR
Hvis lamineringslommen sitter fast inne i lamineringsmaskinen
under lamineringsprosessen, trykker du på knappen for frigjøring
av trommelen (7) og trekker den fastlåste lommen ut umiddelbart.
Etter at den fastlåste lommen er ernet, slipper du knappen for
frigjøring av trommel og fortsetter med en ny lamineringslomme.
Hvis du ikke klarer å erne den fastlåste lommen, slår du av
lamineringsmaskinen og kontakter forhandleren for hjelp.
ReNGjøRe LAMINeRINGSMASKINeN
Etter å ha laminert ere dokumenter, kan lim fra lommene samle
seg inne i lamineringsmaskinen. Rengjør lamineringsmaskinen
jevnlig på følgende måte:
1 Slå på lamineringsmaskinen ved å trykke strømbryteren (3)
ned mot HOT helt til klarlampen (4) lyser.
2 Brett et ark ubrukt kopieringspapir på midten. Legg papiret inn
i innmatingsjakten med den lukkede siden foran i midten 3 - 5
ganger.
ReNGjøRe KApSLINGeN
1 Trekk ut strømledningen.
2 Tørk av apparatet med en myk klut og et mildt
rengjøringsmiddel.
SpeSIfIKASjONeR
Maks. bredde: 330mm.
Maks. gjennomløpshastighet: 252mm/min.
Maks. lamineringstykkelse: 0,6mm.
Anbefalt plastlommetykkelse: 75 - 150 mic.
Fjerning av fastlåst papir: knapp for frigjøring av trommel.
2 ruller.
Forhåndsoppvarmingstid: 5 min.
Uten carrier.
Strømtilførsel: 220 V.
Innganseekt: 435 W.
Strøm: 1,9 A.
Nettovekt: 2,9 kg.
Mål: 466 x 189 x 121mm.
Kapslingsmaterial: ABS.
10
Page 11

q
1 Syöttöaukko
2 Ulostuloaukko
3 Virtakytkin
4 Virta päällä valo (valo punainen, kun laite on päällä)
5 Valmisvalo (vihreä, kun laite on käyttövalmis)
6 Lämpötilansäädin
7 Vapautuspainike
6 Virtajohto
7 Pistorasia
yLeISIä TuRvALLISuuSOHjeITA
Seuraavien turvaohjeiden noudattamatta jättäminen, saattaa
aiheuttaa vakavaa vahinkoa, tulipalon tai sähköiskun.
Säilytettävä lasten ulottumattomissa. Huolto ainoastaan
valtuutetuilla huoltoliikkeillä. Laitteeseen ei saa päästä nestemäisiä
aineita. Älä laita vieraita esineitä, sormia tai kättä laitteeseen.
Laite tuottaa lämpöä. Älä jätä käytössä olevaa laitetta vartioimatta.
Aseta laite siten, että laminoiduilla asiapapereilla on riittävästi tilaa
ulostullessa. Näin estetään tukoksia.
KäyTTöOHje KuuMALAMINOINTI
1 Laita pistoke pistorasiaan.
2 Laita virta päälle kääntämällä virtakytk intä (3) HOT-suuntaan.
Punainen valo (4) syttyy.
3 Vihreä valmisvalo (5) syttyy kun laite on käyttövalmis.
4 Valitse lämpötila kääntämällä lämpötilansäädinta (6) oikeaan
lämpötilaan.
Lämpötilan valintataulukko
Laminoitava dokumentti 80µm 100µm 125µm 150µm
Sanomalehtipaperi 1-2 2-3 4-5 6-7
Kopiopaperi 2-3 3-4 4-5 6-7
Valokuva 4-5 5-6 6-7
5 Aseta laminoitava dokumentti laminointitaskuun. Suosit-
telemme käytettäväksi Q-Connect laminointitaskuja.
6 Aseta laminointitasku suljettu reuna edellä syöttöaukkoon (1).
Kun tasku koskettaa telaa, automaattinen laminointi
käynnistyy.
7 Poista laminoitu dokumentti ulostuloaukosta (2)
8 Katkaise virta käytön jälkeen virtakytkimestä (4).
7
KyLMäLAMINOINTI
1 Laita pistoke pistorasiaan.
2 Laita virta päälle kääntämällä virtakytk intä (3) COLD-suuntaan.
Punainen valo (4) syttyy.
3 Vihreä valmisvalo (5) syttyy välittömästi.
4 Aseta laminoitava dokumentti laminointitaskuun siten että
taskun suojapaperi on ylhäällä. Suosittelemme käytettäväksi
Q-Connect laminointitaskuja.
5 Poista suojapaperia muutaman sentin verran ja aseta tasku
suljettu reuna edellä keskelle syöttöaukkoa (1). Kun tasku
koskettaa telaa, poista suojapaperia varoen samanaikaisesti
kun tasku kelautuu laitteen sisään.
6 Poista laminoitu dokumentti ulostuloaukosta (2). Älä vedä
dokumenttia, vaan odota kunnes laminointi on kokonaan
valmis.
7 Katkaise virta käytön jälkeen virtakytkimestä (4).
TuKOKSeN pOISTAMINeN
Paina telan vapautuspainiketta (7) poistaaksesi jumiutuneen
laminointitaskun ja poista tasku. Kun tasku on poistettu, vapauta
vapautuspainike ja jatka laminointia uudella taskulla.
Jos tukosta ei voida poistaa, sammuta laite ja käänny jälleenmyyjän puoleen.
LAITTeeN puHDISTuS
Laite tulee puhdistaa säännöllisesti, jotta liimaa ei jää koneeseen.
1 Laita virta päälle kääntämällä virtakytk intä (3) HOT-suuntaan.
Punainen valo (4) syttyy.
2 Taita yksi käyttämätön kopiontipaperi keskeltä. Vie paperi
suljettu sivu edellä 3 - 5 kertaa syöttöaukon keskelle.
KuOReN puHDISTAMISeKSI
1 Vedä verkkopistoke irti.
2 Pyyhi kuori pehmeällä pyyhkeellä ja miedolla
yleispuhdistusaineella.
TeKNISeT TIeDOT
Maksimi laminointileveys: 330mm.
Maksimi läpikulkunopeus: 252mm/min.
Laminoitavan työn maks. paksuus: 0,6mm.
Suositeltava laminointitaskun paksuus : 75 - 125 mic/sivu.
Paperitukoksen vapautin: telan vapautuskytkin.
2 telaa.
Esikuumennusaika: 5 min.
Ilman siirrintä.
Virtalähde: 220 V.
Tehonotto: 435 W.
Sähkövirta: 1,9 A.
Nettopaino: 2,9 kg.
Mitat: 466 x 189 x 121mm.
Kuoren materiaali: ABS.
11
Page 12

z
1 Είσοδος
2 Έξοδος
3 Διακόπτης λειτουργίας
4 Λυχνία ένδειξης λειτουργίας (κόκκινο φως)
5 Λυχνία ένδειξης ετοιμότητας προς χρήση (πράσινο φως)
6 Διακόπτης ρύθμισης θερμοκρασίας
7 Διακόπτης απεμπλοκής κάρτας
8 Ρευματολήπτης (πρίζα)
9 Ρευματοδότης (πρίζα τοίχου)
Γενικες προφυλάξεις
Αδυναμία συμμόρφωσης με οποιοδήποτε από τα παρακάτω
προληπτικά μέτρα ασφαλείας μπορεί να προκαλέσει σοβαρό
τραυματισμό, πυρκαγιά ή ηλεκτροπληξία. Κρατήστε τη μηχανή
μακρυά από παιδιά. Συντήρηση χωρίς εξουσιοδότηση δεν επιτρέπεται.
Κρατήστε τη μηχανή μακρυά από νερό και άλλα υγρά. Κρατήστε
μακρυά από την είσοδο πλαστικοποίησης τα χέρια σας καθώς και
ξένα αντικειμένα. Η μηχανή αυτή εκπέμπει θερμότητα και δεν πρέπει
να λειτουργεί χωρίς επιτήρηση. Βεβαιωθείτε ότι υπάρχει αρκετός
ελεύθερος χώρος στο πίσω μέρος της μηχανής πλαστικοποίησης
προκειμένου να διευκολύνεται η έξοδος του πλαστικοποιημένου
εγγράφου και να αποτρέπονται τυχών εμπλοκές.
οδηΓιες λειτουρΓιάς Θερμη πλάςτικοποιηςη
1 Εισάγετε τον ρευματολήπτη (8) στον ρευματοδότη (9).
2 Θέστε σε λειτουργία την μηχανή πλαστικοποίησης πατώντας
τον διακόπτη λειτουργίας (3) προς την κατεύθυνση ΘΕΡΜΗ
ΠΛΑΣΤΙΚΟΠΟΙΗΣΗ. Η λυχνία ένδειξης λειτουργίας (4) θα ανάψει με
κόκκινο φως.
3 Η λυχνία ένδειξης ετοιμότητας προς χρήση (5) θα ανάψει με
πράσινο φως όταν η μηχανή θα είναι έτοιμη για πλαστικοποίηση.
4 Προσαρμόστε την θερμοκρασία ρυθμίζοντας τον διακόπτη, έτσι
ώστε ο δείκτης να βλέπει προς την επιθυμητή θερμοκρασία.
Επιλογή θερμοκρασίας: Πίνακας αναφοράς
Έγγραφο προς πλαστικοποίηση
80µm 100µm 125µm 150µm
Εφημερίδα 1-2 2-3 4-5 6-7
Φωτοαντιγραφικό χαρτί 2-3 3-4 4-5 6-7
Φωτογραφία 4-5 5-6 6-7 7
5 Προετοιμάστε το έγγραφο προς πλαστικοποίηση. Τοποθετήστε
το ανάμεσα στα δύο φύλλα της κάρτας πλαστικοποίησης
και βεβαιωθείτε πως η άκρη του εγγράφου ακουμπάει στην
κλειστή πλευρά της κάρτας. ΣΥΝΙΣΤΟΥΜΕ ΤΗΝ ΧΡΗΣΗ ΚΑΡΤΑΣ
ΠΛΑΣΤΙΚΟΠΟΙΗΣΗΣ Q-CONNECT.
6 Τοποθετήστε την σφραγισμένη μεριά της κάρτας
πλαστικοποίησης στην είσοδο της μηχανής (1). Μόλις η κάρτα
εισέλθει στην είσοδο πλαστικοποίησης, θα κυλήσει αυτόματα
μέσα στον πλαστικοποιητή.
7 Αφαιρέστε το πλαστικοποιημένο έγγραφο από την έξοδο της
μηχανής (2).
8 Μετά την χρήση, θέστε την μηχανή πλαστικοποίησης εκτός
λειτουργίας πατώντας τον διακόπτη λειτουργίας (4).
Ψυχρη πλάςτικοποιηςη
1 Εισάγετε τον ρευματολήπτη (8) στον ρευματοδότη (9).
2 Θέστε σε λειτουργία την μηχανή πλαστικοποίησης πατώντας
τον διακόπτη λειτουργίας (3) προς την κατεύθυνση ΨΥΧΡΗ
ΠΛΑΣΤΙΚΟΠΟΙΗΣΗ. Η λυχνία ένδειξης λειτουργίας (4) θα ανάψει με
κόκκινο φως.
3 Η λυχνία ένδειξης ετοιμότητας προς χρήση (5) θα ανάψει με
πράσινο φως αμέσως.
4 Προετοιμάστε το αντικείμενο προς πλαστικοποίηση. Εισάγετε το
αντικείμενο στην κάρτα πλαστικοποίησης, έτσι ώστε το μέρος
της κάρτας με το προστατευτικό χαρτί να βρίσκεται από πάνω.
ΣΥΝΙΣΤΟΥΜΕ ΤΗΝ ΧΡΗΣΗ ΚΑΡΤΑΣ ΠΛΑΣΤΙΚΟΠΟΙΗΣΗΣ QCONNECT.
5 Ξεκολλήστε τα πρώτα εκατοστά της προστατευτικής μεμβράνης
από το μπροστινό μέρος της κάρτας και τοποθετήστε την
σφραγισμένη μεριά της κάρτας κεντρικά στην είσοδο της μηχανής
(1). Μόλις η κάρτα εισέλθει στην είσοδο πλαστικοποίησης,
προσεχτικά αφαιρέστε το υπόλοιπο μέρος της προστατευτικής
μεμβράνης καθώς η κάρτα κυλάει μέσα στον πλαστικοποιητή.
6 Αφαιρέστε το πλαστικοποιημένο έγγραφο από την έξοδο της
μηχανής (2). Μην προσπαθήσετε να τραβήξετε την κάρτα πριν η
διαδικασία πλαστικοποίησης ολοκληρωθεί.
7 Μετά την χρήση, θέστε την μηχανή πλαστικοποίησης εκτός
λειτουργίας πατώντας τον διακόπτη λειτουργίας (4).
άπεμπλοκη κάρτάς πλάςτικοποιηςης ςε
περιπτωςη κολλημάτος
Εάν η κάρτα πλαστικοποίησης κολλήσει μέσα στην μηχανή κατά
τη διάρκεια της διαδικασίας πλαστικοποίησης, πιέστε το διακόπτη
απεμπλοκής (7) και τραβήξτε την κολλημένη κάρτα προς τα έξω.
Αφού αφαιρεθεί η κάρτα πλαστικοποίησης, αφήστε τον διακόπτη
και ξεκινήστε τη διαδικασία πλαστικοποίησης από την αρχή,
χρησιμοποιώντας μια καινούρια κάρτα. Εάν η κάρτα δεν μπορεί να
αφαιρεθεί, θέστε την μηχανή εκτός λειτουργίας και ζητήστε βοήθεια
από το κατάστημα που αγοράσατε τη μηχανή.
εςωτερικος κάΘάριςμος της μηχάνης
Η πλαστικοποίηση αρκετών έγγραφων, μπορεί να προκαλέσει
συσσώρευση του συγκολλητικού υλικού μέσα στην μηχανή. Συνιστούμε
τον συχνό καθαρισμό της μηχανής πλαστικοποίησης, σύμφωνα με τις
παρακάτω οδηγίες:
1 Θέστε σε λειτουργία την μηχανή πλαστικοποίησης πιέζοντας
τον διακόπτη λειτουργίας (3) προς την κατεύθυνση ΘΕΡΜΗ
ΠΛΑΣΤΙΚΟΠΟΙΗΣΗ. Η λυχνία ένδειξης λειτουργίας (4) θα ανάψει με
κόκκινο φως.
2 Διπλώστε ένα καθαρό φύλλο φωτοαντιγραφικού χαρτιού και
τοποθετήστε το στην υποδοχή της μηχανής με την διπλωμένη μεριά
του να εισέρχεται πρώτη. Επαναλάβετε την διαδικασία 3- 5 φορές.
κάΘάριςμος της μηχάνης πλάςτικοποιηςης
1 Βγάλτε τη μηχανή από την πρίζα
2 Χρησιμοποιήστε ένα μαλακό πανί για να ξεσκονίσετε την μηχανή
πλαστικοποίησης. Εάν κρίνεται απαραίτητο μουσκεύετε ελαφρώς
το πανί σας με νερό και ουδέτερο απορρυπαντικό. Απαγορεύεται η
χρήση βενζόλης, βενζίνης και άλλων ουσιών καθαρισμού.
τεχνικες προδιάΓράφες
Μέγιστο πλάτος πλαστικοποίησης: 330mm.
Ταχύτητα πλαστικοποίησης: 252 mm ανά λεπτό.
Μέγιστο πάχος πλαστικοποίησης: 0,6mm.
Πάχος κάρτας πλαστικοποίησης: 75-150 micron.
Απεμπλοκή κάρτας σε περίπτωση κολλήματος: διακόπτης απεμπλοκής.
Αριθμός ρολών 2.
Χρόνος προθέρμανσης: 9 - 10 λεπτά.
Τάση: 220V.
Κατανάλωση ενέργειας: 435 W.
Ρεύμα: 1,9 A.
Βάρος: 2,9 κιλά.
Διαστάσεις: 466 x 189 x 121mm.
Υλικό Κατασκευής: Πλαστικό ABS.
12
Page 13

e
1 Входящ отвор
2 Изходящ отвор
3 Бутон за включване
4 Индикация “Ready” (зелен цвят при готовност за работа)
5 Бутон за включване (червен при включване)
6 Въртящ бутон за контрол на температурата
7 Бутон за освобождаване
8 Електрически щепсел
9 Захранващо гнездо/ контакт
ПредПазни мерки
Неспазването, на която и да е от предпазните мерки за
сигурност, може да предизвика сериозна травма, пожар или
токов удар. Пазете далече от деца. Ремонт от неупълномощени
лица не е позволен. Не позволявайте навлизането на течност в
машината. Не слагайте предмети в машината и пазете пръстите
си. Машината има топлопроводим корпус. Не оставяйте без
надзор по време на работа. Осигурете достатъчно място около
ламинатора, за да предотвратите евентуално задръстване.
инструкции за уПотреба
1 Поставете електрическия (8) щепсел в захранващото гнездо
(9).
2 Пуснете ламинатора като натиснете бутона за включване
(3), който ще светне в червено при активиране (4).
3 Индикацията ще светне в зелено (5) при готовност за
ламиниране.
4 Нагласете температурата като завъртите бутона (6) докато
показалецът посочи желаната от вас температура.
Temperature reference table
Материали за ламиниране 80µm 100µm 125µm 150µm
Вестници 1-2 2-3 4-5 6-7
Копирна хартия 2-3 3-4 4-5 6-7
Снимки 4-5 5-6 6-7 7
5 Пригответе документа за ламиниране, като го поставите
вътре във фолиото и го подравните по подлепената част.
Препоръчваме да използвате фолио за ламиниране
Q-Connect.
6 Поставете подлепената част на фолиото точно срещу
входящия отвор (1). Когато ролките захванат фолиото,
автоматично ще го придвижат навътре.
7 Извадете ламинирания документ от изходящия отвор (2).
8 След употреба, изключете ламинатора с копчето за
включване/ изключване (4).
студено ламиниране
1 Поставете електрическия (8) щепсел в захранващото гнездо
(9).
2 Включете машината като натиснете бутона за включване (3)
на студено ламиниране и индикацията ще светне червено.
3 Индикацията ще светне в зелено (5) при готовност за
ламиниране.
4 Пригответе документа за ламиниране, като отворите
джобчето и го поставите така, че частта с предпазната
хартия да бъде отгоре.
5 Отлепете няколко сантиметра от предпазната хартия и
поставете фолиото със затворения край точно срещу
входящия отвор (1). Когато ролките захванат документа,
внимателно отлепете останалата част от предпазното
фолио.
6 Извадете завършения продукт от изходния отвор (2). Не
издърпвайте преди ламинирането да е завършило.
7 След използване изключете ламинатора, натискайки бутона
за изключване (4).
Премахване на заседнало фолио за
ламиниране
Ако по време на ламиниране в машината заседне фолио,
натиснете бутона за освобождаване на ролките (5).
След като премахнете заседналото фолио натиснете отново
освобождаващия бутон и можете да продължите с ново фолио.
Ако заседналото фолио не може да бъде премахнато
изключете машината и се обърнете към сервиз за съдействие.
Почистване на ламинатора
След ламинирането на няколко документа може да се натрупат
лепкави материали вътре в ламинатора.
1 Включете ламинатора и изчакайте да светне индикацията за
готовност (3).
2 Прегънете лист хартия на две и го пуснете, с прегънатия
край напред, през ламинатора. Повторете процедурата 3-5
пъти.
Почистване на корПуса
1 Извадете кабела на ламинатора от контакта.
2 Почистете със суха кърпичка или при нужда навлажнете с
неутрална течност за почистване.
технически характеристики
Максимална ширина: 330мм.
Скорост на ламиниране: 252мм/мин.
Максимална дебелина: 0,6мм.
Препоръчителна дебелина на фолиото: 75-125mic от всяка
страна.
Бутон за освобождаване при задръстване.
2 ролки.
Време за подготовка: 5мин.
Захранване: 220 V.
Консумация на енергия: 435 W.
Ампераж: 1.9А.
Тегло: 2,9кг.
Размери: 466 х 189 х 121мм.
Материал на корпуса: ABS.
13
Page 14

H
1 Bemenet
2 Kimenet
3 Kapcsológomb
4 Bekapcsolt állapotot jelző POWER led (pirosan világít)
5 READY (kész) led (zölden világít)
6 Hőmérséklet szabályzó
7 Görgő kioldó gomb
8 Elektromos csatlakozó
9 Konnektor
ÁltalÁnos biztonsÁgi előírÁsok
Ha nem tartja be az alábbi óvintézkedéseket, annak az eredménye
súlyos sérülés, tűz vagy áramütés lehet.
Ne engedjen gyermekeket a készülék közelébe.
A készülék karbantartását kizárólag szakemberrel végeztesse.
Védje a készüléket a nedvességtől.
Idegen tárgyat, az ujjait vagy a kezét soha ne tegye a gépbe.
A készülék hőt bocsát ki. Működés közben soha ne hagyja
felügyelet nélkül. Hagyjon elegendő helyet a készülék mögött,
hogy a laminált tárgyak szabadon kijöhessenek, és ne történjen
elakadás.
A KéSzüLéK HASzNáLATA
MeLeGLAMINáLáS
1 Az elektromos csatlakozót (8) dugja a konnektorba (9).
2 A bekapcsológomb (3) megnyomásával kapcsolja be a
készüléket, és állítsa meleglaminálásra. Ekkor a POWER led (4)
pirosan világít.
3 A zöld READY led (3) fog világítani, amikor a készülék
üzemkész.
4 A hőmérséklet szabályzóval (6) állítsa be a kívánt
hőmérsékletet úgy, hogy a mutató a megfelelő hőfokra
mutasson.
Hőmérséklet referencia táblázat
Laminálható dolgok 80µm 100µm 125µm 150µm
Újság 1-2 2-3 4-5 6-7
Fénymásoló papír 2-3 3-4 4-5 6-7
Fénykép 4-5 5-6 6-7 7
5 Készítse elő a laminálni valót. Helyezze a lamináló fóliák közé,
és tolja a fólia zárt vége felé. JAVASOLJUK, HOGY Q CONNECT
MÁRKÁJÚ LAMINÁLÓ FÓLIÁT HASZNÁLJON.
6 A bemeneti nyíláson (1) keresztül helyezze a lamináló fóliát,
a zárt végével, a készülékbe. Ha a görgők befogták a fóliát, a
készülék automatikusan behúzza azt.
7 A kimeneti nyílásból (2) vegye ki a laminált készterméket.
8 Használat után, a kapcsológomb (4) megnyomásával kapcsolja
ki a készüléket.
HIDeGLAMINáLáS
1 Az elektromos csatlakozót (8) dugja a konnektorba (9).
2 A bekapcsológomb (3) megnyomásával kapcsolja be a
készüléket, és állítsa hideglaminálásra. Ekkor a POWER led (4)
pirosan világít.
3 A zöld READY led (3) azonnal világítani fog.
4 Készítse elő a laminálni valót. Nyissa ki a fóliát, és a laminálni
valót helyezze a lamináló fóliák közé, úgy, hogy a védő papír
legyen felül.
5 Húzza le a védő papír első néhány centiméterét, és a bemeneti
nyíláson (1) keresztül, középen helyezze a lamináló fóliát, a zárt
végével, a készülékbe. Ha a görgők befogták a fóliát, óvatosan
távolítsa el a védő papírt, ahogy a készülék behúzza a fóliát.
6 A kimeneti nyílásból (2) vegye ki a laminált készterméket. Ne
próbálja meg kihúzni a fóliát addig, amíg a laminálás nem
fejeződött be.
7 Használat után, a kapcsológomb (4) megnyomásával kapcsolja
ki a készüléket.
Az eLAKADT LAMINáLófóLIA
eltÁvolítÁsa
Ha a laminálófólia laminálás közben elakadt a készülék belsejében,
nyomja meg a görgő kioldó gombot (5), és azonnal húzza ki az
elakadt fóliát.
Miután az elakadt fóliát eltávolította, már ne nyomja tovább a
görgő kioldó gombot, és folytassa a laminálást egy új fóliával.
Ha nem tudja eltávolítani az elakadt fóliát, kapcsolja ki a
készüléket, és a hibát jelentse a forgalmazónak, és kérjen tőlük
segítséget.
a készülék tisztítÁsa
Miután már számos laminálást elvégzett, a készülék belsejében
felhalmozódhatnak a fóliából származó ragasztóanyagok.
Javasoljuk, hogy - az alábbi módon - rendszeresen tisztítsa meg
a készüléket.
1 A bekapcsológomb (3) megnyomásával kapcsolja be a
készüléket, és állítsa meleglaminálásra. Ekkor a POWER led (4)
pirosan világít.
2 Hajtson félbe egy tiszta fénymásolópapírt és hajtott éllel befelé
tegye a készülékbe. Ezt ismételje meg 3-5 alkalommal egymás
után.
a készülék burkolatÁnak tisztítÁsa
1 Húzza ki a hálózati csatlakozót a konnektorból.
2 Törölje át egy puha ronggyal, és a tisztításhoz általános
háztartási tisztítószert használjon.
pARAMéTeReK
Maximális laminálási szélesség: 330mm.
Működési sebesség: 252mm/perc.
Maximális laminálási vastagság: 0,6mm.
A lamináló lm vastagsága: 75-150 mikrométer oldalanként.
Elakadt papír kiszedése: a görgő kioldó gombbal.
2 görgő.
Előmelegítés: 5 perc.
Dokumentum tálca: nincs.
Működési feszültség: 220 V.
Fogyasztás: 435 W.
Áramerősség: 1,9 A.
Súly: 2,9 kg.
Méretek: 466 x 189 x 121mm.
A készülék burkolatának anyaga: ABS műanyag.
14
Page 15

j
1 Vstupní otvor
2 Výstupní otvor
3 Síťový vypínač
4 Indikace zapnutí sítě, svítí červeně
5 Indikace připraven, svítí zeleně
6 Vypínač topení
7 Tlačítko k uvolnění válce
8 Síťový kabel
9 Síťová zástrčka
bezpečnostní pokyny
Nesplnění některých z následujících bezpečnostních opatření
může vést k vážnému zranění, požáru nebo úrazu elektrickým
proudem.
Přístroj ukládejte mimo dosah dětí.
Neodborná manipulace - oprava, není povolena
Do přístroje nelijte žádné tekutiny.
Do přístroje nevkládejte žádné cizí předměty, nestrkejte prsty,
nebo ruce dovnitř.
Tento přístroj je teplo vyzařující zařízení. Nenechávejte jej bez
dozoru během provozu.
Zajistěte dostatečný prostor za výstupním otvorem, aby bylo
možno laminovaný dokument bezpečně vyjmout
nÁvod k použití laminace za
použití tepla
1 Zapojte el. zástrčku (8) do zásuvky (9).
2 Přepněte síťový vypínač (3) do polohy HOT. Rozsvítí se červené
indikační světlo (4).
3 Vyčkejte do rozsvícení zeleného indikačního světla (5) , po té je
laminátor je připraven .
4 Nastavte regulátor teploty (6) na požadovanou hodnotu.
Teplotní tabulka
Předmět laminování 80µm 100µm 125µm 150µm
Noviny 1-2 2-3 4-5 6-7
Kopírovací papír 2-3 3-4 4-5 6-7
Fotograe 4-5 5-6 6-7 7
5 Vložte dokument do laminovacího pouzdra. Doporučujeme
používat pouzdra značky CONNECT.
6 Vložte pouzdro s dokumentem uzavřenou stranou do
laminátoru (1), posuv je automatický.
7 Vyjměte zalaminovaný dokument (2) a nechte vychladnout.
8 Pokud nebudete pokračovat v laminaci, přístroj vypněte (4).
LAMINACe zA STuDeNA
1 Zapojte el. zástrčku (8) do zásuvky (9).
2 Zapněte Laminátor stisknutím vypínače (3) ke studené
směrem. Červené indikační světlo (5) se rozsvítí.
3 Zelené indikační světlo (5) se rozsvítí.
4 Vložte dokument do laminovacího pouzdra tak, aby ochranný
papír byl nahoře.
5 Odloupněte prvních pár centimetrů ochranného papíru a
vložte uzavřenou stranou pouzdra do laminátoru (1). Jakmile
je pouzdro uchopeno válci, opatrně odstraňte ochranný papír
za automatického posuvu do laminátor.
6 Vyjměte zalaminovaný dokument (2) . Nepokoušejte se
dokument vytáhnout před dokončením laminování.
7 Pokud nebudete pokračovat v laminaci, přístroj vypněte (4).
zaseknutí pouzdra v laminÁtoru
Stiskněte tlačítko (7) a vyjměte pouzdro z laminátoru.
Po vyjmutí zaseklého pouzdra uvolněte tlačítko a pokračujte v
laminování s novým pouzdrem.
Pokud zaseklé pouzdro nelze vyjmout, vypněte laminátor a
obraťte se na Vašeho dealera.
čištění laminÁtoru
Po laminování několik dokumentů, se mohou na válcích
nahromadit zbytky materiálu z pouzder. Laminátor čistěte
pravidelně takto:
1 Zapněte Laminátor stisknutím vypínače (3), rozsvítí se indikační
světlo (4).
2 Přeložte list kopírovacího papíru v polovině a vložte do něho
čistící list z příbalu. Vložte papír složenou stranou do
laminátoru. Opakujte stejný postup 3 - 5 krát.
čištění venkovních ploch přístroje
1 Odpojte přístroj od sítě.
2 Přístroj čistěte měkkým hadrem a běžnými domácími čistidly.
TeCHNICKé ÚDAje
Max. šířka: 330mm.
Max. rychlost laminování: 252mm/min.
Max. tloušťka: 0,6mm.
Doporučená fólie: 75 - 150 mic.
Tlačítko k uvolnění zaseknutého papíru.
2 válce.
Doba ohřevu: 5 min.
Laminování bez ochranného kartonu.
Napětí: 220 V.
Příkon: 435 W.
Proud: 1,9 A.
Hmotnost: 2,9 kg.
Rozměry: 466 x 189 x 121mm.
Materiál tělesa: ABS.
15
Page 16

W
1 Vstupný otvor
2 Výstupný otvor
3 Sieťový vypínač
4 Indikácia zapnutia siete, svieti červeno
5 Indikácia pripravenosti, svieti zeleno
6 Vypínač tavenia
7 Tlačidlo k uvoľneniu valca
8 Sieťový kábel
9 Sieťová zástrčka
bezpečnostné pokyny
Nesplnenie niektorých z nasledujúcich bezpečnostných opatrení
môže viesť k vážnemu zraneniu, požiaru alebo úrazu elektrickým
prúdom. Prístroj ukladajte mimo dosah detí. Neodborná
manipulácia - oprava nie je povolená. Do prístroja nelejte žiadne
tekutiny. Do prístroja nevkladajte žiadne cudzie predmety,
nestrkajte dovnútra prsty alebo ruky. Tento prístroj je teplo
vyžarujúce zariadenie. Nenechávajte ho v priebehu prevádzky bez
dozoru. Zaistite dostatočný priestor za výstupným otvorom, aby
bolo možné laminovaný dokument bezpečne vyňať
nÁvod k použitiu laminÁcia s
použitím tepla
1 Zapojte el. zástrčku (8) do zásuvky (9).
2 Prepnite sieťový vypínač (3) do polohy HOT. Rozsvieti sa
červené indikačné svetlo (4).
3 Počkejte na rozsvietenie zeleného indikačního svetla (3),
potom je laminátor pripravený.
4 Nastavte regulátor teploty (6) na požadovanú hodnotu
Teplotná tabuľka
Predmět laminovania 80µm 100µm 125µm 150µm
Noviny 1-2 2-3 4-5 6-7
Kopírovací papier 2-3 3-4 4-5 6-7
Fotograe 4-5 5-6 6-7 7
5 Vložte dokument do laminovacieho puzdra. Doporučujeme
používať puzdrá značky CONNECT.
6 Vložte pouzdro s dokumentom uzatvorenou stranou do
laminátora (1), posuv je automatický.
7 Vytiahnite zalaminovaný dokument (2) a nechajte vychladnúť.
8 Pokiaľ nebudete pokračovať v laminácii, prístroj vypnite (4).
LAMINáCIA zA STuDeNA
1 Zapojte el. zástrčku (8) do zásuvky (9).
2 Zapnite laminátor stlačením vypínača (3) smerom ku
STUDENÁ. Červené indikačné svetlo (5) sa rozsvieti.
3 Počkejte na rozsvietenie zeleného indikačního svetla (5),
laminátor je pripravený.
4 Vložte dokument do laminovacieho puzdra, tak aby bol
ochranný papier hore.
5 Odlúpnite prvých pár centimetrov ochranného papiera a
vložte uzatvorenou stranou puzdra do laminátora (1). Akonáhle
je puzdro uchopené valcami, opatrne odstráňte ochranný
papier za automatického posuvu do laminátora.
6 Vytiahnite zalaminovaný dokument (2) . Nepokúšajte sa
dokument vytiahnuť pred dokončením laminovania.
7 Pokiaľ nebudete pokračovať v laminácii, prístroj vypnite (4).
zASeKNuTIe puzDRA v LAMINáTORe
Stlačte tlačidlo (7) a vytiahnite puzdro z laminátora.
Po vytiahnutí zaseknutého puzdra uvolnite tlačidlo a pokračujte v
laminovaní s novým puzdrom.
Pokiaľ sa nedá zaseknuté puzdro vytiahnuť, vypnite laminátor a
obráťte sa na Vášho dealera.
čištenie laminÁtora
Po laminovaní niekoľkých dokumentov, sa môžu na valcoch
nahromadiť zvyšky materiálu z puzdier. Laminátor čistite
pravidelne takto:
1 Zapnite laminátor stlačením vypínača (3), rozsvieti sa indikačné
svetlo (4).
2 Preložte list kopírovacieho papiera v polovici a vložte do neho
čistiaci list z príbalu. Vložte papier zloženou stranou do
laminátoru. Opakujte rovnaký postup 3 - 5 krát.
čistenie vonkajších plôch prístroja
1 Odpojte prístroj od siete.
2 Prístroj čistite mäkkou handrou a bežnými domácími čistidlami.
TeCHNICKé ÚDAje
Max. šírka: 330mm.
Max. rýchlosť laminovania: 252mm/min.
Max. hrúbka: 0,6mm.
Doporučená fólia: 75 - 150 mic.
Tlačidlo k uvoľneniu zaseknutého papiera.
2 valce.
Doba ohrevu: 5 min.
Laminovanie bez ochranného kartónu.
Napätie: 220 V.
Príkon: 435 W.
Prúd: 1,9 A.
Hmotnosť: 2,9 kg.
Rozmery: 466 x 189 x 121mm.
Materiál telesa: ABS.
16
 Loading...