

Page 1
• Comb binding machine • Spiralbindegerät für Plastik-Spiralbinderücken
• Perforelieur à anneaux plastique • Inbindmachine voor plastic bindruggen
• Encuadernadora para canutillos • Encadernadora • Rilegatrice a pettine
• Spiral inbindningsmaskin • Spiralinnbindingsmaskin
• Kampasidontalaite • Μηχανή βιβλιοδεσίας σπιράλ • Машина за подвързване
• Spirálozógép • Bindownica do grzbietów plastikowych
• Переплетная машина для переплета пластиковыми пружинами
• Vázací stroj • Viazací stroj • Naprava za spiralno vezavo
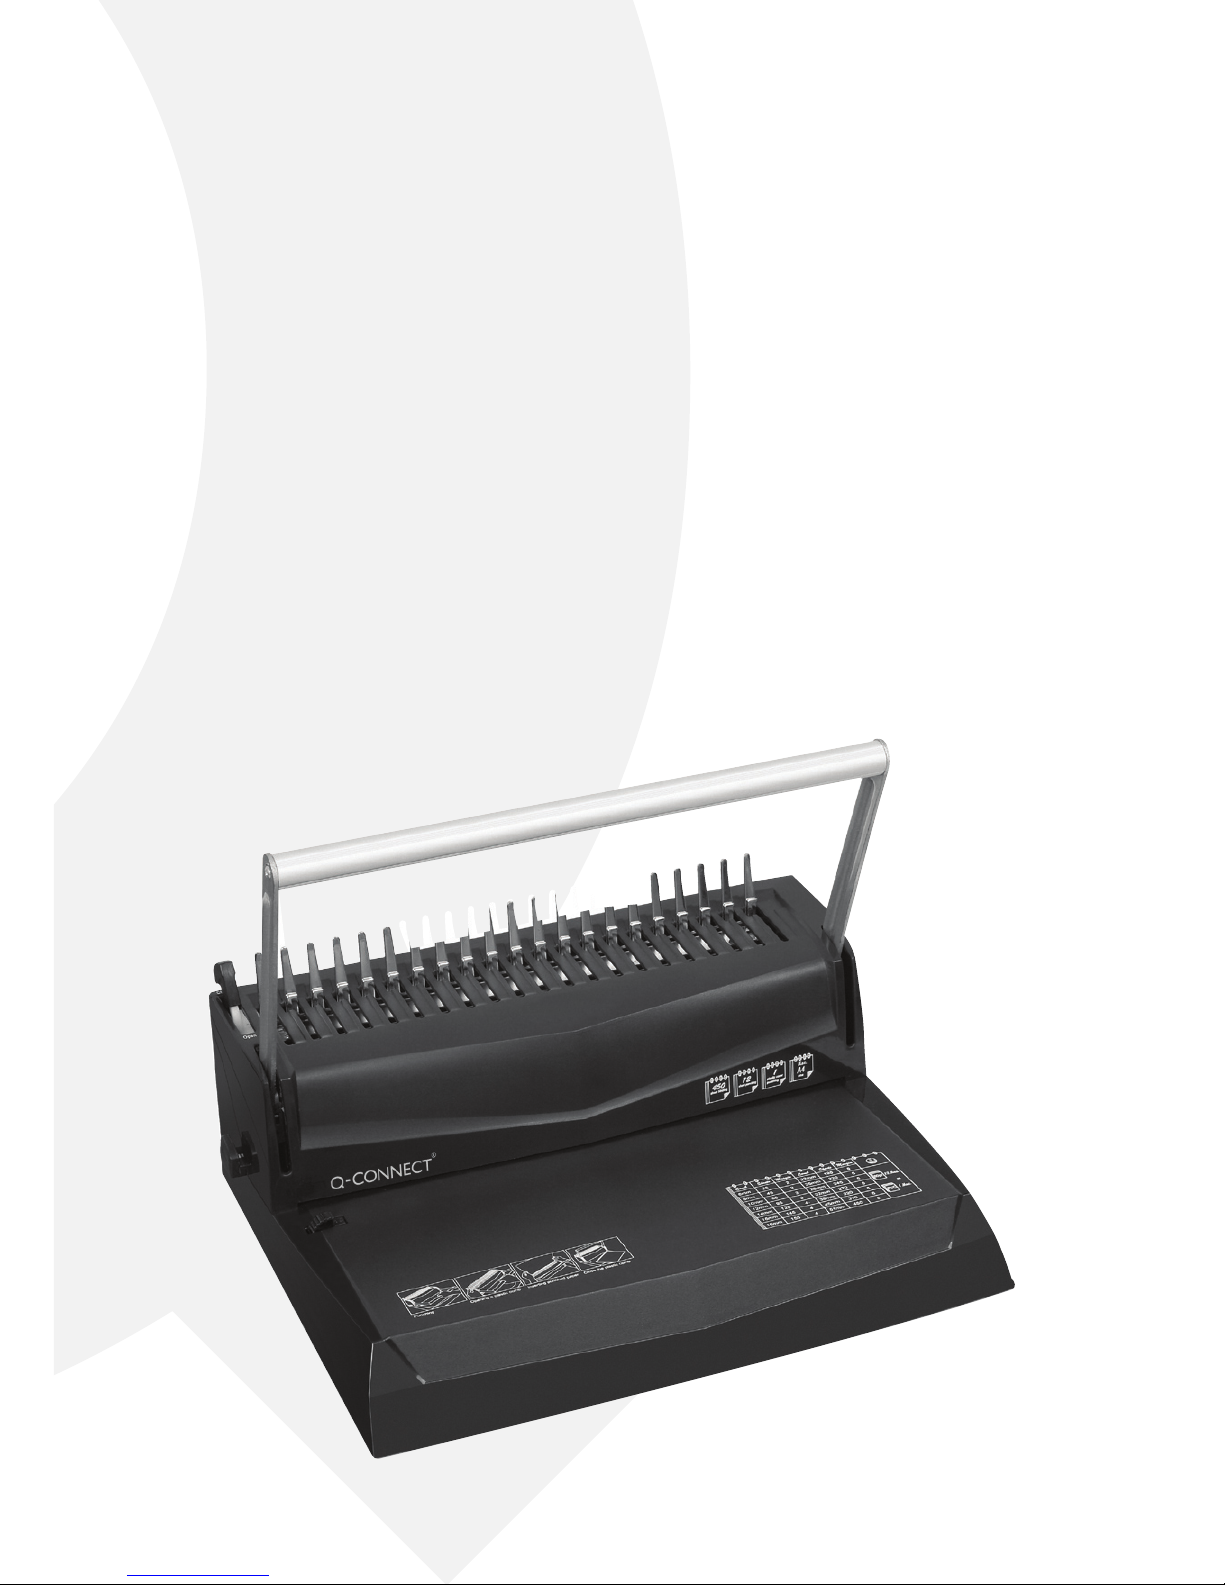
PREMIUM
COMB BINDER 12
Page 2
2
4
1
7
5
3
6
FIg. A
FIg. D
FIg. B
FIg. E
FIg. C
FIg. F
Page 3

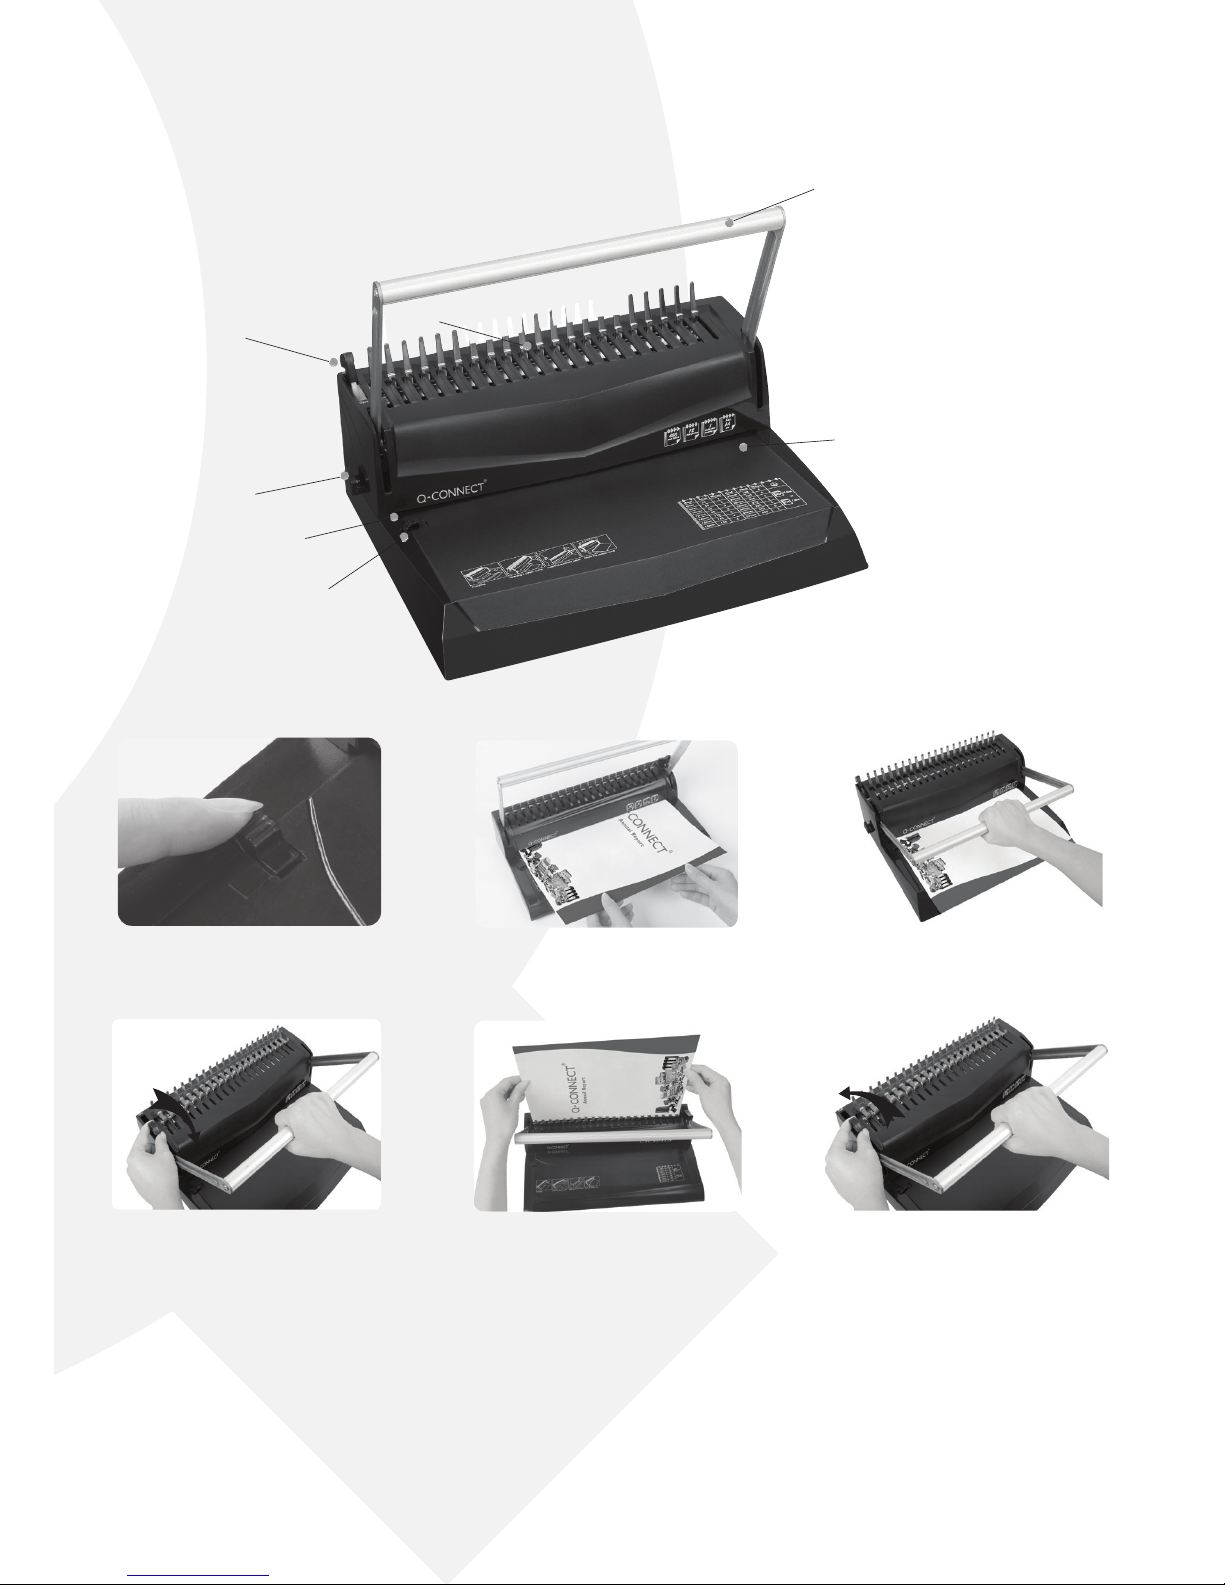
3
1 Carrying Slot
2 Punching and Binding Handle
3 Punching Channel
4 Comb Opening Lock
5 Binding Mechanism
6 Edge guide
7 Waste Tray
SEtUP
Assemble the handle at the vertical start position.
EDgE AlIgNMENt (A)
The adjustable Edge Guide allows pages of various
sizes to be accurately aligned for the best punching
results.
Move the edge guide left or right and stop at the
required position. Test punching the scrap sheet
and re-adjust if necessary.
PUNChINg
With the Punching Handle in the vertical position,
align sheets or covers and insert the edge to be
bound into the Punching Channel and ensure
they are aligned to the Edge Guide. (B) Pull the
Punching Handle all the way down. (C)
The PREMIUM COMB BINDER 12 can punch max.
12 sheets of 80 gsm paper at once. Punch max. 1
plastic covers at a time.
Move the punching Handle upwards again and
remove the punched document.
BINDINg
Place a plastic comb with the side to be opened
upwards onto the Binding Mechanism. Push
backwards the Punching Handle so far that the
comb is opened enough. (D)
Position the punched sheets vertically in the open
comb. Locate the punched holes over the open
comb ngers and rotate the sheets forward onto
the comb. (E) When all the sheets are loaded
onto the plastic comb, release the Binding Handle
to its original position to close the plastic comb
completely. You can now remove the bound
booklet and enjoy your nished work.
t
EMPtyINg thE wAStE tRAy
Take out the waste tray from the back of the
machine. For best results, empty the tray
regularly.
gENERAl SAFEgUARDS
Place the comb binder on a secure and stable
work table to prevent it from falling and
causing personal injury and damage to the
machine.
Use the machine only for its intended purpose.
Always test the machine with some scrap
paper before punching the nal document.
When punching plastic covers, we recommend
to punch the cover with a sheet of paper on
both sides.
Empty the waste tray regularly.
Lift the machine from the bottom, not from the
lids or handles.
Unauthorised maintenance is not allowed.
tEChNICAl DAtA
Punching capacity: 12 sheets (80gsm).
Number of punches: 21 rectangular holes
Binding capacity: 450 sheets.
Max. Binding Comb: 51mm.
Adjustable Edge Guide
Page 4

4
1 Transportgri
2 Stanz- und Bindehebel
3 Stanzschacht
4 Spiralönungshebel
5 Bindemechanik
6 Kantenausrichter
7 Abfallbehälter
INBEtRIEBNAhME
Befestigen Sie den Hebel in der vertikalen Startposition.
KANtENAUSRIChtUNg (A)
Der verstellbare Kantenausrichter ermöglicht Blätter mit unterschiedlichen Größen so auszurichten,
dass ein optimales Ergebnis entsteht.
Bewegen Sie den Kantenausrichter nach links
oder rechts, bis sie die optimlae Position gefunden
haben. Machen Sie eine Testlochung und adjustieren Sie die Einstellung falls nötig.
StANzEN
Vergewissern Sie sich, dass das Bindegut gerade am
Kantenausrichter und am Boden des Stanzschachtes anliegt. (B) Drücken Sie den Stanzhebel
so weit zurück bis sich der Binderücken weit genug
önet. (C) Das Gerät hat eine maximale
Lochungskapazität von 12 Blatt 80g. Papier oder
1 Plastikumschlag auf einmal. Klappen Sie den
Stanzhebel wieder nach oben und entnehmen Sie
das Bindegut.
BINDEN
Legen Sie den Binderücken mit der zu önenden
Seite nach oben in den Bindemechansimus. Önen
Sie den Binderücken durch Anziehen des Bindehebels soweit, um das Bindegut bequem einlegen
zu können. (D)
Positionieren Sie die gelochten Blätter vertikal
in die geönete Spirale. (E) Drücken Sie die
gelochten Blätter in die Spiralnger und drehen Sie
die Blätter vorwärts auf die Spirale. Wenn alle Blätter auf der Spirale sind, setzten Sie den Bindehebel
in seine
k
Ausgangsposition zurück und schließen Sie die
Spirale kompelett. Nun können Sie das fertig
gebundene Werk entnehmen.
StANzABFAllBEhältER lEEREN
Der Stanzabfallbehälter ist an der Rückseite
des Gerätes. Entleeren Sie diesen Behälter
regelmäßig.
gENEREllE SIChERhEItShINwEISE
Stellen Sie das Gerät auf eine sichere und
stabile Unterlage um Beschädigungen und
Verletzungen zu vermeiden.
Benützen Sie dieses Gerät nicht für einen
anderen Zweck als es bestimmt ist.
Machen Sie immer einen Test bevor Sie das
Dokument lochen.
Wenn Sie Folien stanzen, legen Sie bitte vorne
und hinten ein Blatt Papier vor.
Entleeren Sie diesen Behälter regelmäßig.
Heben Sie das Gerät am Boden, nicht am
Deckel oder Hebel.
Ausschließlich autorisierte Wartung erlaubt.
tEChNISChE DAtEN
Stanzhöhe: 12 Blätter (80gsm).
Anzahl der Stanzlöcher: 21 quadratische Löcher
Bindekapazität: 450 Blätter.
Maximaler Binderückendurchmesser: 51 mm.
Verstellbarer Kantenausrichter
Page 5

5
1 poignée de transport
2 Poignée de perforation et de reliure
3 Canal de perforation
4 Cran d’ouverture de peigne
5 Mécanisme de reliure
6 Réglette de guidage
7 Tiroir à confettis
MISE EN SERvICE
Fixer la poignée de perforation en position
verticale.
AlIgNEMENt DU PAPIER (A)
La réglette de guidage ajustable permet
l’alignement exact de
divers formats de papier pour le meilleur résultat de
perforation.
Déplacez la réglette de guidage vers la gauche ou
la droite et arrêtez sur la position adéquate. Testez
à l’aide d’une feuille de brouillon et réajuster si
nécessaire.
PERFORER
Avec la poignée de perforation en position
verticale, alignez les feuilles de papier ou les
couvertures et insérez les dans le canal de perforation en vous assurant qu’elles soient bien alignées
à l’aide de la réglette de guidage. (B) Appuyer
à fond sur la poignée pour que le peigne s’ouvre
susamment. (C) La PREMIUM COMB BINDER 12
peut perforer jusqu’à 12 feuilles de 80 gr maximum
en une seule fois. Perforez 1 seule couverture en
plastique à la fois.
Soulevez de nouveau la poignée en position
verticale puis enlevez le papier perforé.
RElIER
Insérez dans le mécanisme de reliure le peigne en
plastique avec le côté ouvert vers le haut . Ouvrez
le peigne en abaissant la poignée de perforation.
(D)
Positionnez les feuilles perforées à la verticale
dans le peigne ouvert. (E) Placez les trous de
perforation en face des dents du peigne et faites
pivoter les feuilles vers l’avant an que les dents
du peigne s’insèrent dans les trous. Quand
l’ensemble des feuilles a été chargé sur le
peigne en plastique, relâchez la poignée à relier
dans sa position initiale pour fermer complètement le peigne en plastique. Vous pouvez
à présent retirer la brochure et apprécier le
résultat nal.
vIDER lES CONFEttIS
Enlever le récupérateur de déchets situé au dos
de la machine. Pour de meilleurs résultats, videz
le tiroir régulièrement.
CONSIgNES géNéRAlES DE
SéCURIté
Placez la machine à relier sur une table solide et
stable an d’éviter qu’elle ne tombe, qu’elle ne
blesse quelqu’un et qu’elle ne soit
endommagée. Utilisez la machine uniquement
pour l’usage indiqué. Toujours tester la machine
avec des feuilles de brouillon avant de perforer
le document.
Quand vous perforez des couvertures en
plastique, il est
recommandé de positionner la couverture
entre 2 feuilles de papier. Videz le tiroir à confettis régulièrement.
Soulevez la machine par son socle ou par la
poignée de transport et non par les couvercles
ou les autres poignées.
La maintenance sans autorisation est interdite.
FIChE tEChNIqUE
Capacité de perforation : 12 feuilles de 80 gr.
Nombre de trous: 21 trous rectangulaires
Capacité de perforation : 450 feuilles.
Taille maxi du peigne : 51 mm.
Réglette de guidage
p
Page 6

6
1 Draaghandvat
2 Perforatie- en inbindhendel
3 Perforatiekanaal
4 Open-Bindrugslot
5 Bindmechanisme
6 Kantlijngeleider
7 Confettihouder
INgEBRUIKNAME
Bevestig de hendel in verticale positie.
gElEIDINg vAN DE KANtlIjN (A)
Door de aanpasbare Kantlijngeleider kunnen
bladen papier van verschillende afmetingen
nauwkeurig afgelijnd worden om een optimale
perforatie te garanderen.
Beweeg de Kantlijngeleider naar links of rechts tot
op de gewenste positie. Test met een kladpapier en
pas aan indien nodig.
PERFOREREN
Als de perforatiehendel zich in verticale positie
bevindt, lijnt u de bladen of omslagen uit en voert
u de te binden zijde in het perforatiekanaal in.
Vergewis u ervan dat de bladen afgelijnd zijn tegen
de Kantlijngeleider. (B) Duw de Perforatiehendel
volledig naar beneden. (C)
De PREMIUM COMB BINDER 12 kan maximum 12
bladen papier van 80 gsm in eenmaal perforeren.
Perforeer maximaal 1 plastic omslag per keer.
Duw de Perforatiehendel opnieuw naar omhoog
en verwijder het geperforeerde document.
INBINDEN
Plaats de bindrug met de open kant naar boven
in het bindmechanisme. Druk de bindhendel naar
achteren totdat de bindrug voldoende geopend
is. (D)
Plaats de geperforeerde bladen verticaal in de
open bindrug. (E) Schuif de perforaties over de
metalen vingers van het bindmechanisme en draai
de bladen naar voor en dus op de bindrug. Als alle
bladen zich op de bindrug bevinden, plaatst u de
bindhendel terug in zijn originele positie waardoor
de bindrug volledig gesloten wordt. U kan nu
het gebonden
document verwijderen.
vERwIjDEREN vAN DE CONFEttI
De confettihouder bevindt zich aan de
achterkant van het apparaat. Ledig de houder
regelmatig voor een optimaal resultaat.
AlgEMENE vEIlIghEIDSREgElS
Plaats de bindmachine op een veilig en stevig
werkvlak. Zorg ervoor dat de machine niet
kan vallen want dit kan persoonlijke letsels en
schade aan de machine veroorzaken.
Gebruik het apparaat enkel voor het doel
waarvoor het bestemd is.
Test het apparaat altijd eerst met wat kladpapier vooraleer u het denitieve document
perforeert.
Wanneer plastic inbindomslagen worden
geperforeerd, raden wij aan om aan iedere zijde
een papieren pagina mee te perforeren.
Ledig de confettihouder regelmatig.
Til de machine op aan de onderkant, niet aan
de deksels of
hendels.
Het onderhoud van de machine dient te
gebeuren door een
geautoriseerd persoon.
tEChNISChE gEgEvENS
Perforatiecapaciteit: 12 bladen (80 g/m²).
Aantal perforaties: 21 rechthoekige
Inbindcapaciteit: 450 bladen.
Maximum afmeting Inbindrug: 51mm.
Aanpasbare kantlijngeleider.
Page 7

7
1 Ranura para transportar la máquina
2 Palanca para Perforación y Encuadernación
3 Canal de perforación
4 Seguro del peine de Perforación
5 Asa taladradora
6 Guías de Márgenes
7 Contenedor de recortes
MONtAjE
Levante el asa para ponerla en posición vertical.
BORDE AlINEAtORIO (A)
La guía de borde ajustable permite ajustar páginas
de varios tamaños perfectamente para conseguir
un buen acabado. Mueva la guía de borde hacia
la derecha o la izquierda y párela donde necesite.
Pruebe con la palanca de perforaciones la posición
de la página, y si no está bien colocada, reajústela.
PERFORACIóN
Con la palanca de perforaciones en posición
vertical, alinee las páginas o las tapas e inserte su
costado en el selector de perforaciones, asegúrese
de alinearlo con la guía de borde para que quede
bien recto. (B) Presione hacia abajo la palanca de
perforaciones y encuadernaciones. (C)
La encuadernadora PREMIUM COMB BINDER 12
puede perforar como máximo 12 hojas de 80
gramos. Perfora como máximo 1 tapa de plástico.
Levante la palanca hacia su posición inicial y retire
el papel perforado.
ENCUADERNACIóN
Inserte el canutillo con el lado abierto hacia arriba
de los peines metálicos. Abra el canutillo plástico
completamente presionando hacia atrás la palanca.
Ponga las hojas agujereadas verticalmente en
el canutillo abierto. (D) Acabe de posicionar el
canutillo con los agujeros y tumbe las hojas hacia
adelante. (E) Cuando las hojas queden dentro del
canutillo levante el asa de encuadernación hasta
llegar a su posición inicial para cerrar el canutillo
completamente. Usted puede sacar ahora su
encaudernación.
m
ElIMINACIóN DE RECORtES
Retire el contenedor de recortes de la parte
posterior de la máquina. Para mejores
resultados vacíelo regularmente.
MEDIDAS PARA SU SEgURIDAD
Panga siempre la encuadernadora en una
mesa o supercie de trabajo estable, para
prevenir que se resbale o se caiga.
Úsela exclusivamente para encuadernar.
Pruebe siempre la encuadernadora con
papeles sin importancia antes de realizar la
encuadernación nal.
Cuando taladre tapas de plástico es recomendable hacerlo entre dos hojas de papel.
Limpie el contenedor de recortes regularmente.
Levante o transporte la máquina cogiéndola
por abajo o por la ranura para transportarla,
nunca por los cajones o palancas.
No se permite el mantenimiento de la
máquina por personal no autorizado.
DAtOS téCNICOS
Capacidad máxima de perforación: 12 hojas
(80 gramos)
Número de taladros: 21 agujeros rectangulares
Capacidad máxima de encuadernación: 450
hojas
Tamaño máximo del canutillo: 51 mm.
Guía de márgenes
Page 8

8
1 Ranhura para transporte da máquina
2 Alavanca de perfuração e encadernação
3 Selector de perfuração
4 Abertura da perfuradora
5 Mecanismo de perfuração
6 Guia de margens
7 Recipiente de restos (resíduos)
INStAlAçãO
Coloque a alavanca de perfuração na posição
vertical inicial.
AlINhAMENtO (A)
A ajustável guia de margens permite alinhar
folhas de vários formatos para obter os melhores
resultados.
Mova a guia de margens para a esquerda ou para a
direita e pare na posição desejada/adequada. Teste
a alavanca de perfuração com uma folha de teste.
PERFURAçãO
Com a alavanca de perfuração na posição vertical,
alinhe as folhas e insira as guias. Assegure-se de
que as guias estão alinhadas com as folhas. (B)
Agora mova a alavanca de perfuração de cima para
baixo até ao nal do seu curso. (C)
O aparelho PREMIUM COMB BINDER 12 perfura até
12 folhas de 80 grs de uma só vez. Uma folha de
plástico de cada vez.
Levante a alavanca de perfuração até à sua posição
inicial (vertical) e retire o papel perfurado.
ENCADERNAçãO
Insira o plastico com o lado aberto para cima no
mecanismo do aparelho. Empurre para trás o
manípulo de perfuração de forma a que o pente
esteja sucientemente aberto. (D) Coloque as
folhas na posição vertical na abertura do aparelho.
(E) Localize os “pins” de perfuração e alinhe-os
com a folha ou capa. Liberte a alavanca para a sua
posição original para fechar
completamente o plástico. Agora pode retirar o
plástico e apreciar o trabalho de encadernação.
ElIMINAçãO DE REStOS
Retire o cesto de papeis parte de trás do
aparelho. Para melhores resultados, esvazie-o
regularmente.
SEgURANçA
Coloque o aparelho sempre numa posição
segura e estável para evitar quedas e danos
físicos.
Use este aparelho somente para os ns
indicados nas instruções do mesmo.
Antes de usaar o aparelho deve sempre testá-lo
com folhas usadas.
Para encadernações, aconselhamos sempre
que coloque 2 folhas de papel à volta do
plastico. Uma folha de papel de cada lado.
Esvazie o cesto de restos com regularidade.
Eleve o aparelho sempre pela sua parte inferior.
Nunca segure o aparelho pela alavanca de
perfuração.
Não é permitida manutenção não autorizada.
DADOS téCNICOS
Capacidade de perfuração: 12 folhas (80gm).
Número de perfurações: 21 buracos
rectangulares
Capacidade maxima de encadernação:
450 folhas.
Altura máxima de encadernação: 51mm.
Guias de margem ajustáveis
O
Page 9

9
C
1 Maniglia per il trasporto
2 Barra di perforazione e rilegatura
3 Canale di perforazione
4 Fermo apertura dorso
5 Meccanismo di rilegatura
6 Guida per allineamento fogli
7 Raccoglitore riuti
INStAllAzIONE
Montare la leva nella posizione di avvio verticale.
AllINEAMENtO FOglI (A)
La guida per allineamento fogli regolabile permette di allineare accuratamente pagine di varie
dimensioni per i migliori risultati di perforazione.
Spostare la guida per allineamento fogli a sinistra
o a destra e arrestarla nella posizione desiderata.
Testare su un foglio la perforazione e migliorarne
eventualmente la regolazione.
PERFORAzIONE
Con la manopola di perforazione in posizione
verticale allineare i fogli o le copertine e inserire
il margine da rilegare nel canale di perforazione,
assicurandosi che sia allineato con la guida per
allineamento fogli. (B) Tirare completamente in
basso la leva di perforazione. (C)
La PREMIUM COMB BINDER 12 può perforare max.
12 fogli di carta da 80 g/m2 alla volta. Perfora al
max. 1 copertina di plastica alla volta.
Risollevare la leva di perforazione e rimuovere i
documenti
perforati.
RIlEgAtURA
Inserire nel meccanismo di rilegatura un dorso
plastico con il lato da aprire verso l’alto. Spingere
all’indietro la maniglia di punzonatura in modo
che la spirale sia sucientemente aperta. (D)
posizio-nare i fogli perforati tenuti in verticale
nel dorso aperto. (E) Posizionare i fori dei fogli
sugli anelli del dorso e ruotare i fogli in avanti
negli anelli. Quando tutti i fogli sono inseriti negli
anelli, lasciar tornare la leva di rilegatura nella
sua posizione originale per chiudere il dorso
completamente. Ora si può rimuovere il fascicolo
rilegato e godersi il proprio lavoro nito.
SvUOtARE Il RACCOglItORE
RIFIUtI
Tirare fuori il raccoglitore riuti dal retro
della macchina. Per i migliori risultati svuotare
regolarmente il raccoglitore.
PRECAUzIONI gENERAlI
Porre la rilegatrice su un tavolo di lavoro stabile e
sicuro per evitare che cada con il rischio di ferite
e di danni alla macchina.
Usare la rilegatrice unicamente per la nalità
prevista.
Prima di perforare il documento nale testare
sempre la macchina con della carta per appunti.
Raccomandiamo di eettuare la perforazione di
copertine di
plastica usando un foglio di carta da entrambi i
lati.
Svuotare regolarmente il raccoglitore riuti.
Sollevare la macchina dalla parte inferiore e non
dalle coperture o dalle leve.
Non è permessa una manutenzione non
autorizzata.
DAtI tECNICI
Capacità di perforazione 12 fogli da 80 grammi.
Numero di punzoni: 21 rettangolari
Capacità di rilegatura 450 fogli.
Massima spirale utilizzabile 51 mm.
Guida per allineamento fogli regolabile.
Page 10

10
1 Χειρολαβή μεταφοράς
2 Χειρολαβή διάτρησης και βιβλιοδεσίας
3 Υποδοχή κοπής χαρτιού
4 Διακόπτης κλειδώματος ανοίγματος
5 Μηχανισμός βιβλιοδεσίας
6 Οδηγός ευθυγράμμισης κοπής
7 Δίσκος υπολειμμάτων
Εγκατασταση
Βεβαιωθείτε ότι η χειρολαβή βρίσκεται σε κάθετη
θέση.
Ευθυγραμμιση κοπησ (A)
Ο ρυθμιζόμενος οδηγός ευθυγράμμισης κοπής
δίνει τη δυνατότητα σε σελίδες διαφορετικού
μεγέθους να ευθυγραμμιστούν με ακρίβεια.
Μετακινήστε τον οδηγό κοπής δεξιά ή αριστερά
μέχρι να βρείτε την επιθυμητή θέση. Διατρήστε
πρώτα ένα πρόχειρο χαρτί και ξαναπροσαρμόστε
τον οδηγό αν είναι απαραίτητο.
Διατρηση
Κρατήστε τη χειρολαβή διάτρησης σε κάθετη θέση,
ευθυγραμμίστε τα φύλλα που θέλετε να ενώσετε
και εισάγετε τα φύλλα στην υποδοχή κοπής
χαρτιού. Βεβαιωθείτε ότι τα φύλλα είναι σωστά
ευθυγραμμισμένα χρησιμοποιώντας τον οδηγό
ευθυγράμμισης κοπής. (B) Έπειτα, τραβήξτε τη
χειρολαβή διάτρησης προς τα κάτω. (C)
Η μηχανή βιβλιοδεσίας PREMIUM COMB BINDER
12 επιτρέπει την ταυτόχρονη διάτρηση 12 φύλλων
(80 γρ.) Δυνατότητα διάτρησης ενός πλαστικού
εξωφύλλου κάθε φορά.
Τραβήξτε τη χειρολαβή διάτρησης ξανά προς τα
πάνω και αφαιρέστε τα τρυπημένα έγγραφα.
ΒιΒλιοΔΕσια
Τοποθετήστε ένα πλαστικό σπιράλ στο μηχανισμό
βιβλιοδεσίας με την πλερά που ανοίγει προς τα
πάνω. Σπρώξτε προς τα πίσω το μοχλό, ώστε το
σπιράλ να ανοίξει αρκετά. (D) Τοποθετήστε
τα τρυπημένα έγγραφα κάθετα στο ανοικτό
σπιράλ. (E) Πέραστε κάθε τρύπα του εγγραφου
στο σπιράλ. Όταν όλα τα φύλλα έχουν περαστεί
στο σπιράλ, ελευθερώστε τη χειρολαβή
βιβλιοδεσίας μέχρι να φτάσει στην αρχική
της θέση και το σπιράλ βιβλιοδεσίας να είναι
τελείως κλειστό. Το βιβλιοδετημένο έγγραφό
σας είναι έτοιμο.
αΔΕιασμα του Δισκου
υπολΕιμματων
Αφαιρέστε το δίσκο απορριμμάτων από
το πίσω μέρος της μηχανής. Για καλύτερα
αποτελέσματα, αδείαζετε το δίσκο συχνά.
γΕνικΕσ προφυλαξΕισ
Τοποθετήστε τη μηχανή βιβλιοδεσίας σε μια
ασφαλή και σταθερή επιφάνεια εργασίας
προκειμένου να αποτρέψετε τυχόν δικό σας
τραυματισμό ή φθορά της μηχανής από πτώση.
Χρησιμοποιήστε τη μηχανή μόνο για τον λόγο
για τον οποίο προορίζεται.
Τρυπάτε πάντα ένα πρόχειρο χαρτί, πριν
περάσετε στη μηχανή τα έγγραφα που θέλετε
να δέσετε.
Όταν τρυπάτε πλαστικά εξώφυλλα, συνιστούμε
να τα τοποθετείτε ανάμεσα σε δύο λευκές
κόλλες χαρτί.
Αδειάζετε το δίσκο υπολειμμάτων συχνά.
Για να σηκώσετε ή να μεταφέρετε τη μηχανή,
κρατήστε την από κάτω και όχι από το κάλυμμα
ή τις χειρολαβές.
Συντήρηση χωρίς εξουσιοδότηση δεν
επιτρέπεται.
τΕχνικΕσ προΔιαγραφΕσ
Δυνατότητα ταυτόχρονης διάτρησης: 12 φύλλα
(80 γρ).
Αριθμός τρυπών: 21 παραλληλόγραμμες τρύπες
Δυνατότητα δεσίματος: 450 φύλλα.
Μέγιστο σπιράλ: 51 mm.
Ρυθμιζόμενος οδηγός ευθυγράμμισης κοπής
z
Page 11

11
e
1 Дръжка за носене
2 Дръжка за пробиване и подвързване
3 Отвор за пробиване
4 Застопоряващ механизъм
5 Механизъм за подвързване
6 Водач за настройка на формата
7 Тава за отпадъците
8 Водач за фиксиране на хартията (4 дупки)
Настройка На формата (A)
Водачът за настройка на формата помага за
точното подравняване на листата от различен
размер, за да бъдат точно пробити.
Преместете водача наляво или надясно до
необходимата позиция.
Пробвайте пробиването с тестов лист и при
необходимост настройте отново водача.
ПробиваНе
Поставете дръжката за пробиване (3) във
вертикална позиция, подравнете листата
или кориците, поставете ги в процепа за
пробиване (2) до край и се уверете, че
са подравнени с водача за настройка на
формата(5). (B) Натиснете дръжката за
пробиване (3) до долу. (C)
PREMIUM COMB BINDER 12 може да
пробива максимум 12 листа хартия 80 гр/м²
едновремено. Пробивайте максимум 1 PVC
корица.
Преместете дръжката за пробиване (3) нагоре
и извадете перфорирания документ.
ПодвързваНе
Поставете пластмасова спирала с отварящата
се страна нагоре в механизма за подвързване
Натиснете дръжката за подвързване (3) назад,
за да отворите спиралата достатъчно. (D)
Поставете перфорираните листа вертикално
в отворената спирала. (E) Нагласете
перфорацията в отворените гребени и
завъртете листата към спиралата. Когато
листата са изцяло поставени в спиралата,
върнете дръжката за подвързване (3) в
основна позиция и затворете спиралата.
Извадете документа от подвързващия
механизъм.
ПочистваНе На тавата за отПадъци
Извадете тавата за отпадъци от задната страна
на машината и изхвърлете събраните отпадъци.
Почиствайте тавата редовно.
иНструкции за безоПасНост
Поставете машината за подвързване на
сигурна и стабилна работна повърхност, за да
предотвратите падането й, счупването й или
наранявания.
Използвайте машината само по предназначение.
Винаги тествайте машината с ненужни листа
преди да пробиете оригиналния документ.
Когато пробивате пластмасова корица, ви
препоръчваме да я пробивате с по един лист
хартия от двете страни.
Почиствайте тавата за отпадъци редовно.
Повдигайте машината, захващйки я отдолу или
за дръжката за носене (1), а не захващайки
я за капаците или дръжката за пробиване и
подвързване.
Не се допуска сервизно обслужване от
неоторизиран сервиз.
техНически даННи
Капацитет за пробиване: 12 листа (80гр/м²).
Брой перфорации: 21 правоъгълни
Капацитет за подвързване: 450 листа.
Максимална големина на спиралата: 51 мм.
ВОДАЧ ЗА НАСТРОЙКА НА ФОРМАТА
Page 12

FOR OthER lANgUAgES, PlEASE vISIt
www.q-CONNECt.COM
 Loading...