

Page 1
A4 & A3 STANDARD
LAMINATOR
HOT AND COLD LAMINATING
• Laminiergerät, Heiß- und Kaltlaminierung • Plastieuse, Plastication à chaud et à froid
• Plasticeermachine, warm en koud plasticeren • Plasticadora, Plasticadora frío/calor
• Plasticadora, Plasticação a frio e a quente • Laminointilaite, kylmä -ja kuumalaminointiin • Μηχανή
πλαστικοποίησης, Θερμή και ψυχρή πλαστικοποίηση • Ламинатор, Топло и студено ламиниране
• laminálógép, laminace za tepla a za studena • Laminator do folii na gorąco i na zimno • Laminátor, laminácia
za tepla a za studena • Laminátor, hideg és meleg laminálás • plastikator, hladno in toplo plasticiranje
t Instruction manual
D Bedienungsanleitung
F Mode d’emploi
Gebruiksaanwijzing
E Manual de Instrucciones
P Manual de instruções
q Käyttöohjeet
z Οδηγίες χρήσης
e Упътване за употреба
H Használati útmutató
Instrukcja obsługi
j Návod k použití
W Návod na použitie
X Navodila
WWW.Q-CONNECT.COM
Page 2
Model No. QA4s QA3s
Max. Lamination Width A4 / 240mm / 9.5” A3 / 340mm / 13.5”
Heating System 2pcs hot rollers
Max. Laminating
Thickness
Laminating Pouch 2x75 mic to 2x125 mic (3 - 5 mil)
Anti Jam Jam Release Lever
Power Supply AC 220-240V ~ 50-60Hz
Rated Current Max. 2.2A Max. 3.5A
Power Consumption
265W (starting)
4 - 135W (standby)
0.5mm
365W (starting)
4 - 185W (standby)
Preheating Time 3 - 5min. 3 - 5min.
Laminating Speed 250mm/min.
Weight 1.25 kgs 1.7 kgs
Dimension (L x W x H) 360 x 150 x 78mm 454 x 150 x 78mm
Page 3

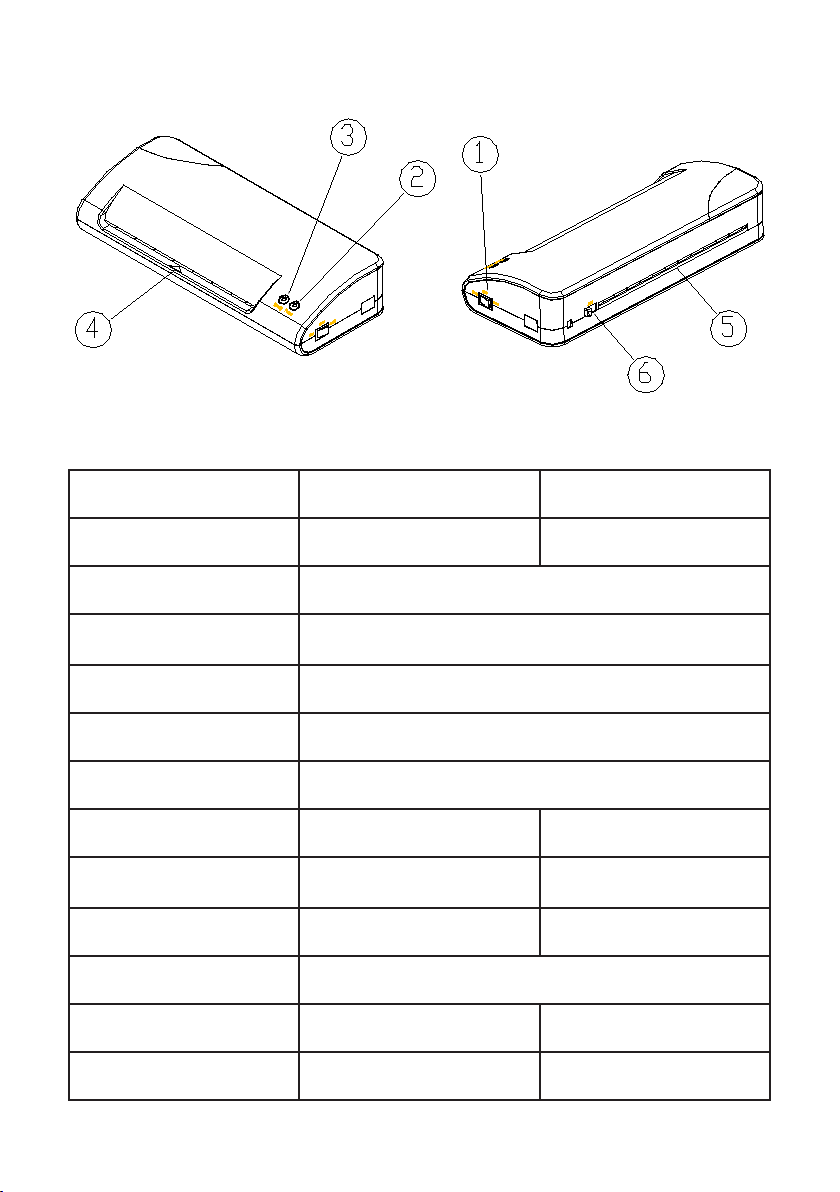
1 Power Switch
2 LED for Power
3 LED for Ready
4 In-feed slot
5 Pouch outlet
6 Anti Jam Lever
t
FOR OpTIMAL ReSuLT we ReCOMMeND uSING
Q-CONNeCT LAMINATING pOuCHeS.
COLD LAMINATING
1. Connect the power cable to an easily accessible, standard
and correct electrical socket. Switch on the power switch to
COLD position on the right side of the laminator. The two LEDs
for both POWER and READY will light on and the drive motor
starts up. It is ready for cold lamination.
Attention: If you have just nished using the laminator for
hot laminating, you must let the laminator cool down for
minimum 30 minutes.
2. Insert the document in the laminating pouch, leave a margin
of approx. 3-5 mm to the edge of the laminating pouch on all
sides.
3. Insert the laminating pouch containing the document in the
laminator’s in-feed slot. Always insert the ready closed side of
the laminating pouch in rst. The laminating process occurs
automatically.
4. When the laminating tasks had been nished, switch o the
power switch of the laminator, and disconnect the power plug
HOT LAMINATING
1. Connect the power cable to correct electrical socket, switch
on the power switch to HOT position, the LED for POWER will
light on and the machine is in warm-up phase which takes
about 5 to 6 minutes. The LED for READY lights up when the
correct temperature is reached. Then, the device is ready for
use.
Attention: The machine is for laminating pouch thickness from
2x75 to 2x125micron. When the machine is just ready for use,
it is suitable for laminating laminating pouches of 2x75micron,
but the hot rollers’ temperature maybe not high enough for
laminating 2x125micron pouches immediately, so you have to
wait 3-5 minutes more in order to get a better lamination.
2. Insert the laminating pouch containing the document in
the laminator’s in-feed slot, it will come out from the out-let
automatically, lamination nished.
Attention: Always insert the already closed side of the
laminating pouch in rst.
Attention: Pull out the Laminating Pouch pouch immediately
after it comes out of the out-let and stops moving to avoid
overheat (smudging and blistering).
3. If the foil jams, use one hand pressing the laminator and
sliding the Jam Release Lever, meantime, use the other hand
to pull back the laminating pouch from the laminator’s in-feed
slot.
4. When the laminating tasks had been nished, switch o the
power switch and disconnect the power plug.
IMpORTANT SAFeTy INFORMATION
The laminator can only be operated horizontally on a level •
surface indoors in dry rooms with good ventilation.
The socket-outlet shall be installed near the equipment and •
shall be easily accessible.
Children or pets must be kept away from the laminator during •
operation.
Never touch the top of the device. Risk of burns! •
Never cover the top of the device with anything. Risk of re!•
Switch o the laminator and disconnect the power plug when •
it is not being used.
TROubLeSHOOTING
Laminated pouch is not completely transparent and/or the edge
is not well sealed.
Wait for a few minutes to get a higher temperature. •
Laminate the same pouch again to improve the lamination •
result.
Use the correct laminating pouches.•
DISpOSAL
This symbol (crossed out waste bin) indicates that
the product must be returned to an authorised
recycling centre or collection point when it has
reached the end of its service life. This symbol only
applies in member states of the EEA1.
3
Page 4

1 Stromschalter
2 Betriebsleuchte
3 Bereitschaftsleuchte
4 Einzugsschacht
5 Auswurfsschacht
6 Hebel zur Staulösung
D
Fü R e IN OpTIM ALe S e RGe bNI S e MpF eHLeN wI R
Q-CONNeCT LAMINIeRHüLLeN.
KALT-LAMINIeReN
1. Verbinden Sie das Stromkabel mit einer ordnungsgemäßen
Steckdose. Schalten Sie den Stromschalter auf die COLD
Position auf der rechten Seite des Laminiergerätes. Die 2
Leuchten für Betrieb und Bereitschaft leuchten auf und der
Motor startet. Das Gerät ist bereit zum Kalt-Laminieren.
Achtung: Falls Sie das Gerät vorher zum Heiß-Laminieren
verwendet haben, müssen Sie das Laminiergerät für
mindestens 30 Minuten auskühlen lassen.
2. Legen Sie das Dokument in die Laminierfolie ein, lassen
Sie einen Abstand von ca. 3-5 mm zu allen Rändern der
Laminierfolie.
3. Legen Sie die Laminierfolie mit dem Dokument in den
Einzugsschacht des Laminiergerätes. Legen Sie immer die
geschlossene Seite der Folie zuerst ein. Der Laminierprozess
startet automatisch.
4. Wenn der Laminiervorgang beendet ist, schalten Sie das Gerät
aus und stecken Sie es aus.
HeISS-LAMINIeReN
1. Verbinden Sie das Stromkabel mit einer ordnungsgemäßen
Steckdose, schalten Sie den Stromschalter auf die HOT
Position, die Betriebsleuchte leuchtet auf, wenn das Gerät
eingeschaltet ist. Die Aufwärmzeit des Gerätes dauert ca. 5 bis
6 Minuten. Die Bereitschaftsleuchte leuchtet auf, wenn das
Gerät betriebsbereit ist. Das Gerät ist dann bereit zum HeißLaminieren.
Achtung: Das Gerät ist für Laminierfolien der Stärke 2x75
bis 2x125micron. Bei Betriebsbereit ist das Gerät bereit für
Folien der Stärke 2x75micron, die Walzentemperatur ist
möglicherweise noch nicht hoch genug zum Laminieren von
Folien der Stärke 2x125micron, warten Sie bitte weitere 3-5
Minuten für ein optimales Laminierergebnis.
2. Legen Sie die Laminierfolie mit dem Dokument in den
Einzugsschacht des Laminiergerätes, sie kommt automatisch
aus dem Auswurfschacht, der Laminiervorgang ist beendet.
Achtung: Legen Sie immer die geschlossene Seite der Folie
zuerst ein.
Attention: Entfernen Sie die Laminierfolie unmittelbar
nach dem Laminiervorgang aus dem Auswurfschacht,
vermeiden Sie eine Überhitzung. (führt zu Verschmieren und
Blasenbildung).
3. Bei einem Stau der Folie im Gerät, betätigen Sie den Hebel zur
Staulösung, währendessen halten Sie die Folie und hindern
Sie am Einzug.
4. Wenn der Laminiervorgang beendet ist, schalten Sie das Gerät
aus und stecken Sie es aus.
wICHTIGe SICHeRHeITSINFORMATION
Das Laminiergerät kann nur horizontal verwendet werden, •
auf einer geraden Fläche und in Innenräumen mit einer guten
Belüftung.
Benützen Sie das Gerät nahe einer gut zugänglichen •
Steckdose.
Benützen Sie das Gerät nicht in der Gegenwart von Kindern •
oder Haustieren.
Berühren Sie das Gerät nicht an der Oberäche – •
Verbrennungsgefahr!
Decken Sie das Gerät nicht ab – Brandgefahr!•
Schalten Sie das Gerät aus und stecken Sie es aus wenn Sie es •
nicht verwenden.
pRObLeMbeHebuNG
Das Laminierergebnis ist nicht vollständig transparent und/oder
die Ränder sind nicht gut verschweißt.
Warten Sie ein paar Minuten bis sich das Gerät mehr •
aufgeheizt hat.
Laminieren Sie die Folie nochmals um das Laminierergebnis •
zu optimieren.
Verwenden Sie die richtige Folienstärke.•
eNTSORGuNG
Dieses Symbol (durchgestrichene Mülltonne)
bedeutet, daß das Gerät entsorgt werden muss:
In einem autorisierten Abfallsammelzentrum oder
Sammelpunkt – bei Defekt, oder am Ende seiner
Laufzeit. Dieses Symbol gilt nur für Mitgliedsstaten
der EEA1.
4
Page 5

1 Interrupteur
2 Voyant “marche”
3 Voyant “prêt à l’emploi”
4 Entrée du lm plastiant
5 Sortie du lm plastiant
6 Levier anti-bourrage
F
pO uR uN RéSuLTAT OpT IMA L, L’uT ILI SATION De S
pO CHe TTe S De pLA STI FIC ATIO N Q -CO NNeCT eS T
ReCOMMANDée.
pLASTIFICATION à FROID
1. Branchez le câble d’alimentation à une prise électrique
facilement accessible. Allumez l’interrupteur d’alimentation
en position froid sur le côté droit de la plastieuse. Les deux
voyants « marche » et « prêt à l’emploi » s’allument et la
machine démarre. Elle est prête pour la plastication à froid.
Attention: Si vous venez d’utiliser la plastieuse pour une
plastication à chaud, vous devez laisser la plastieuse refroidir
pendant au moins 30 minutes.
2. Placez le document dans la pochette de plastication, laissez
une marge d’env. 3-5 mm sur les côtés.
3. Insérez la pochette contenant le document dans la fente de
la plastieuse. Insérez toujours le côté scellé en premier. Le
document se plastie automatiquement.
4. Une fois terminée, éteindre l’interrupteur d’alimentation et
débranchez le cordon d’alimentation
LAMINAGe à CHAuD
1. Branchez le câble d’alimentation à une prise électrique,
allumez l’interrupteur d’alimentation en position chaud,
le voyant « marche » s’allume et la machine commence
à chauer pendant environ 5-6 minutes. Le voyant « prêt
» s’allume lorsque la température souhaitée est atteinte.
L’appareil est prêt à l’emploi.
Attention: La machine peut plastier des lms entre 2x75 et
2x125mic d’épaisseur.
Lorsque la machine est prête à l’emploi, elle peut plastier du
2x75micron.
Mais il faut attendre 3-5min supplémentaire pour plastier du
2x125mic.
2. Insérez la pochette contenant le document dans la fente de la
machine, elle ressortira automatiquement plastiée.
Attention: Insérez toujours le côté scellé en premier.
Attention: Enlevez la pochette immédiatement une fois sortie
de la machine.
3. En cas de bourrage, actionnez le levier de dégagement, et tirer
en même temps la pochette de plastication.
4. Une fois terminé, éteindre l’interrupteur d’alimentation et
débranchez le cordon d’alimentation.
INFORMATIONS IMpORTANTeS De SéCuRITé
La plastieuse ne peut être utilisée qu’à l’horizontale sur une •
surface plane à l’intérieur dans des locaux secs avec une
bonne ventilation.
La prise de courant doit être installée près de l’équipement et •
doit être facilement accessible.
Les enfants ou les animaux domestiques doivent être tenus à •
l’écart de la machine pendant le fonctionnement.
Ne jamais toucher le haut de l’appareil. Risque de brûlure!•
Ne jamais couvrir le haut de l’appareil. Risque d’incendie!•
Eteignez la plastieuse et débranchez le cordon •
d’alimentation lorsqu’elle n’est pas utilisée.
DépANNAGe
Le lm plastiant n’est pas complètement transparent et / ou le
bord n’est pas bien scellé.
Attendez quelques minutes pour obtenir une température •
plus élevée.
Plastier à nouveau le lm pour améliorer le résultat.•
Utiliser uniquement des pochettes spécialement conçues •
pour le type de plastication souhaité.
DISpOSITION
Ce symbole (poubelle barrée) indique que le
produit doit être retourné à un centre de recyclage
autorisé ou point de collecte quand il sera en n de
vie. Ce symbole ne s’applique que dans les Etats
membres de l’EEA1.
5
Page 6

1 Aan / uit schakelaar
2 Stroomindicator
3 Startlamp
4 Invoer
5 Uitvoer
6 Vrijgave toets (ABS)
VOOR eeN OpTIMAAL ReSuLTAAT RADeN wIj
Q-CONNeCT pLASTIFICeeRHOezeN AAN.
KOuD pLASTIFICeReN
1. Sluit het netsnoer aan op een gemakkelijk toegankelijke,
standaard en correcte elektrische aansluiting. Schakel
de stroomschakelaar op de rechterzijde van de
plasticeermachine naar de COLD (koud) positie. De twee
LED’s voor zowel de POWER en READY lichten op en de
aandrijfmotor start. De machine is klaar voor gebruik.
Let op: Als je de machine net gebruikt hebt voor warm
plasticeren dient de plasticeermachine af te koelen
gedurende minimaal 30 minuten.
2. Plaats het document in het plasticeeretui, laat een marge van
circa. 3-5 mm aan de rand van het plasticeeretui rondom.
3. Plaats het plasticeeretui met het document in de invoer sleuf
van de plasticeermachine. Voer de gesloten zijde van het
plasticeeretui altijd als eerste in. Het plasticeerproces start
automatisch.
4. Na het voltooien van het plasticeren, schakelt u de
plasticeermachine uit, en haalt u de stekker uit het
stopcontact.
wARM pLASTIFICeReN
1. Sluit de voedingskabel aan op een stopcontact, schakel de
machine aan en plaats de aan/uit-knop op HOT (warm). De
lamp voor POWER zal oplichten terwijl de machine opwarmt.
Deze fase duurt ongeveer 3 tot 5 minuten. De lamp voor
READY brandt wanneer de juiste temperatuur bereikt is. De
machine is klaar voor gebruik.
Let op: De machine is geschikt voor het plasticeren van etuis
van 2x75 micron tot 2x125 micron. Wanneer de machine klaar
is voor gebruik, is deze geschikt voor het plasticeren van
etuis van 2 x 75 micron. De temperatuur van de rollen is nog
niet hoog genoeg voor het plasticeren 2x125 micron etuis.
Wacht hiervoor nog 3-5 minuten.
2. Plaats de etui met het document in de invoersleuf van de
plasticeermachine. Deze zal afgewerkt worden uitgevoerd
aan de achterzijde van de machine.
Let op: Voer altijd eerst de reeds gesloten zijde van de etui in
de machine.
Let op: Verwijder de geplasticeerde etui onmiddellijk na het
uitvoeren om oververhitting te vermijden.
3. Indien de etui vastloopt, gebruikt u één hand om de ABS
hendel aan de zijkant van de machine over te halen. Verwijder
ondertussen met de andere hand het plasticeeretui uit de
invoersleuf van de machine.
4. Na het voltooien van het plasticeren, schakelt u de
plasticeermachine uit, en haalt u de stekker uit het
stopcontact.
beLANGRIjKe VeILIGHeIDSINFORMATIe
De plasticeermachine kan alleen horizontaal binnenshuis •
gebruikt worden op een vlakke ondergrond in droge ruimtes
met goede ventilatie.
Het stopcontact moet zich in de buurt van de •
plasticeermachine bevinden.
Kinderen of huisdieren moeten uit de buurt van de •
plasticeermachine gehouden worden tijdens het gebruik.
Raak nooit de bovenkant van de plasticeermachine aan. •
Gevaar voor brandwonden!
Bedek nooit de bovenkant van het apparaat met om het even •
wat. Brandgevaar!
Schakel de plasticeermachine uit en trek de stekker uit het •
stopcontact wanneer deze niet wordt gebruikt.
pRObLeeMOpLOSSING
De etui is niet volledig transparent en/of de rand is niet goed
afgesloten.
Wacht een paar minuten zodat de machine een hogere •
temperatuur bereikt.
Plasticeer hetzelfde etui opnieuw voor een beter resultaat.•
Gebruik de juiste plasticeeretuis.•
ReCyCLAGe
Dit symbool (doorgestreepte afvalbak) geeft aan
dat het product moet worden geretourneerd naar
een erkend recyclingbedrijf of verzamelpunt
wanneer de machine niet meer werkt. Dit symbool
is alleen van toepassing in de lidstaten van de
EEA1.
6
Page 7

1 Botón encendido
2 Botón LED encendido
3 LED preparado
4 Ranura
5 Salida
6 Contra atascos
E
pAR A u N ópT IMO Re SuLTADO, Le ACON Sej AMO S
uSAR bOLSAS De pLASTIFICAR Q-CONNeCT.
pLASTIFICADO eN FRíO
1. Conecte el cable de alimentación a una toma de corriente
de fácil acceso, estándar y correcta. Encienda el interruptor
de encendido a la posición FRÍO en el lado derecho de la
plasticadora. Los dos para ENCENDIDO y LISTO se encenderá
y el motor de accionamiento se pondrá en marcha. Estará listo
para plasticar en frío.
Atención: Si acaba de usar la plasticadora para laminar en
caliente, hay que dejar que la misma se enfríe durante un
mínimo de 30 minutos.
2. Inserte el documento en la lámina de plástico, dejar un
margen de aprox. 3-5 mm del borde de la bolsa de laminación
en todos los lados.
3. Inserte la lámina de plástico que contiene el documento en la
ranura de alimentación de la plasticadora. Inserte siempre el
lado cerrado listo de la lámina de plástico primero. El proceso
de plasticado se produce automáticamente.
4. Cuando las tareas de plasticado hayan terminado, apague el
interruptor de alimentación de la máquina, y desconecte el
enchufe de alimentación.
pLASTIFICADO eN CALIeNTe
1. Conecte el cable de alimentación en la toma eléctrica,
encienda el interruptor de encendido a la posición HOT, el LED
de encendido se iluminará en y la máquina se pondrá en fase
de calentamiento durante 5 a 6 minutos. El LED de READY se
encienderá cuando alcance la temperatura correcta. Entonces,
el dispositivo está listo para su uso.
Atención: La máquina soporta un grueso de lámina de 2x75
a 2x125micron. Cuando la máquina se encuentra listo para
su uso, es conveniente para las bolsas de laminación de
2x75micron, pero la temperatura de los rodillos calientes
puede que tal vez no esté lo sucientemente alta como para
plasticar 2x125micron de láminas de inmediato, así que
tendrá que esperar 3-5 minutos con el n de obtener un
mejor plasticado.
2. Inserte la lámina de plástico que contiene el documento en la
ranura de alimentación, ésta saldrá de forma automática y la
laminación habrá nalizado.
Atención: Inserte siempre el lado cerrado de la lámina de
plástico en primer lugar.
Atención: Saque la lámina inmediatamente después de que
la plasticación y deje espere para evitar sobrecalentamiento
(manchas y ampollas).
3. Utilice una mano presionando y deslizando la palanca de
liberación y mientras tanto, utilice la otra mano para tirar de la
lámina de plástico de la ranura de plasticado.
4. Cuando las tareas de laminado hayan nalizado, apague el
interruptor de encendido y desconecte el enchufe.
INFORMACIóN IMpORTANTe De SeGuRIDAD
La plasticadora sólo puede funcionar en posición horizontal •
sobre una supercie plana en interiores, en lugares secos con
una buena ventilación.
La toma de corriente debe estar instalada cerca del equipo y •
debe ser fácilmente accesible.
Niños o los animales domésticos deben mantenerse alejados •
de la plasticadora durante la operación.
Nunca toque la parte superior del dispositivo. Riesgo de •
quemaduras!
Nunca cubra la parte superior del dispositivo con cualquier •
cosa. Riesgo de incendio!
Apague la plasticadora y desconecte el cable de •
alimentación cuando no se esté utilizando.
SOLuCIóN De pRObLeMAS
El plasticado de la lámina no es completamente transparente y /
o el borde no está bien sellado.
Espere unos minutos para conseguir una temperatura más •
alta.
Plasticar la misma lámina de nuevo para mejorar el resultado •
del plasticado.
Use las láminas de laminado correctas.•
eLIMINACIóN De DeSeCHOS
Este símbolo (cubo de basura tachado) indica que el
producto debe ser devuelto a un centro de reciclaje
autorizado o punto de recogida cuando se ha
alcanzado el nal de su vida útil. Este símbolo sólo es
aplicable en los Estados miembros de la EEA1.
7
Page 8

1 Botão de ligação
2 LED de ligada (POWER)
3 LED de pronta (READY)
4 Ranhura de alimentação
5 Ranhura de saída
6 Rolo anti encravamento
P
pARA ObTeR óTIMOS ReSuLTADOS,
Re COM eNDA MOS A uTI LIz Açã O D e b OLSAS De
pLASTIFICAR Q-CONNeCT.
pLASTIFICAçãO A FRIO
1. Ligue o cabo à corrente. Mude o botão para posição de frio
no lado direito da Plasticadora. Os dois LEDs para o POWER e
o READY vão acender e o motor vai iniciar. Estará pronta para
plasticação a frio.
Atenção: Se utilizou a Plasticadora para plasticação a
quente, deverá deixar a Plasticadora arrefecer pelo menos 30
minutos.
2. Insira o documento na bolsa de plasticar deixe uma margem
aprox. 3-5 mm até às pontas em todos os lados.
3. Insira a bolsa contendo o documento na Plasticadora. Insira
sempre primeiro o lado fechado da bolsa. O processo de
plasticação é automático.
4. Quando a plasticação terminar, desligue o botão de “Power”
da Plasticadora, e em seguida desligue da tomada.
pLASTIFICAçãO A QueNTe
1. Ligue o cabo de alimentação à corrente, mude o botão para
a posição de quente, a luz LED irá acender e a plasticadora
tardará cerca de 5 a 6 minutos a aquecer. A luz LED de “READY”
irá acender quando a temperatura ideal for alcançada. Depois
o aparelho estará pronto a usar.
Atenção: A máquina está preparada para uma espessura de
2x75 até 2x125 microns. No inicio a máquina apenas está
preparada para plasticar até 2x75microns e os rolos podem
não estar quentes o suciente para plasticar 2x125microns
imediatamente, deverá aguardar 3-5 minutos para poder
conseguir uma plasticação melhor.
2. Insira a bolsa contendo o documento na Plasticadora, e sairá
automaticamente pela ranhura de saída com a plasticação
pronta.
Atenção: Insira sempre a bolsa pelo lado já fechado primeiro.
Atenção: Puxe sempre a bolsa plasticada assim que ela acabe
de sair pela ranhura para evitar o sobreaquecimento.
3. Se a bolsa encravar, segura a plasticadora com uma mão e
ao mesmo tempo puxe a bolsa com a outra mão deslizando
suavemente até sair por completo.
4. Quando a plasticação terminar, desligue o botão de “Power”
da Plasticadora, e em seguida desligue da tomada.
INFORMAçãO De SeGuRANçA
A Plasticadora só pode ser utilizada na horizontal em •
ambientes fechados e com boa ventilação.
A tomada deve estar instalada perto do equipamento e deve •
ser de fácil acesso.
As crianças ou animais de estimação devem ser mantidos •
longe do Plasticadora durante a operação.
Nunca toque na parte superior do dispositivo. Risco de •
queimaduras!
Nunca cobrir a parte superior do dispositivo com qualquer •
coisa. Risco de incêndio!
Desligue o Plasticadora e desconecte a cha da tomada •
quando não estiver a ser usada
SOLuçãO De pRObLeMAS
A bolsa não é completamente transparente e / ou a borda não é
bem selada.
Aguarde alguns minutos para obter uma temperatura mais •
elevada.
Plastique a mesma folha de novo para melhorar o resultado •
de plasticação
Utilize bolsas com as dimensões e espessuras corretas.•
DeSCARTe
Este símbolo (contentor de lixo de resíduos) indica
que o produto deve ser devolvido para um centro
de reciclagem autorizado ou ponto de recolha,
quando chegou ao m da sua vida útil. Este
símbolo só é aplicável nos Estados-Membros da
EEA1.
8
Page 9

1 Virtakytkin
2 LED virta
3 LED valmis
4 Syöttöaukko
5 Ulostulo
6 Jumiutuksen vapautusvipu
q
SuOSITTeLeMMe Q-CONNeCTLAMINOINTITASKujeN KäyTTöä OpTIMAALISeN
TuLOKSeN SAAVuTTAMISeKSI.
KyLMäLAMINOINTI
1. Yhdistä virtakaapeli standardiin, helppopääsyiseen ja ehjään
pistorasiaan. Kytke virtakytkin COLD (kylmä) asentoon
laminointilaitteen oikealta sivulta. Kaksi LED-valoa syttyy sekä
POWER (virta) ja READY (valmis) ja syöttömoottori käynnistyy.
Laite on valmis kylmälaminointiin.
Huomio: Jos olet juuri käyttänyt kuumalaminointia, laitteen
pitää jäähtyä vähintään 30 minuuttia.
2. Aseta asiakirja laminointitaskun sisään jättäen n. 3-5 mm
marginaalit molempiin reunoihin.
3. Aseta asiakirjan sisältävä laminointitasku laminointilaitteen
syöttöaukkoon. Laminointi suoritetaan aina taskun suljettu
reuna edellä. Laminointi tapahtuu automaattisesti.
4. Kun laminointi on lopetettu, kytke virta pois päältä ja irrota
töpseli pistorasiasta.
KuuMALAMINOINTI
1. Yhdistä virtakaapeli standardiin, helppopääsyiseen ja ehjään
pistorasiaan. Kytke virtakytkin HOT (kuuma) asentoon.
POWER LED –valo syttyy ja laite on lämmitysvaiheessa n. 5-6
minuuttia. READY LED –valo syttyy kun laite on saavuttanut
oikean lämpötilan. Laite on valmis kuumalaminointiin.
Huomio: Laitetta voidaan käyttää aina 2x75mic paksuisista
2x125mic paksuisten taskujen kanssa. Kun laite on
käyttövalmis, se on valmis 2x75 mic taskujen laminointiin.
Laminoitaessa 2x125mic taskuja tulee laitteen lämmetä vielä
3-5 minuuttia lisää paremman lopputuloksen saamiseksi.
2. Aseta asiakirjan sisältävä laminointitasku laminointilaitteen
syöttöaukkoon. Se tulee ulos ulostulosta automaattisesti,
laminointi on valmis.
Huomio: Syötä tasku aina suljettu reuna edellä.
Huomio: Vedä laminoitu tasku pois heti kun se tulee ulos
ulostulosta ja eteneminen on pysähtynyt.
3. Jos tasku jumittuu kesken laminoinnin, vapauta se painamalla
jumiutuksen vapautusvipua ja vedä taskua syöttöaukosta
ulospäin.
4. Kun laminointi on lopetettu, kytke virta pois päältä ja irrota
töpseli pistorasiasta.
TäRKeä TuRVALLISuuSTIeDOT
Laminointilaitetta tulee käyttää vaakatasossa vaakasuoralla •
alustalla sisätiloissa kuivassa huoneessa, jossa on hyvä
ilmastointi.
Pistorasian tulee sijaita lähellä laitetta ja olla helposti •
saavutettavissa.
Lapset ja kotieläimet tulee pitää erossa laminointilaitteesta •
käyttöajan.
Älä koske laitetta päältä palovamman takia! •
Laitetta ei saa koskaan peittää palovaaran takia!•
Sammuta laite ja irrota töpseli pistorasiasta kun laite ei ole •
käytössä.
ONGeLMATILANTeeT
Laminoitu tasku ei ole kokonaan kirkas ja/tai reuna ei ole kunnolla
kiinni.
Odota muutama minuutti, jotta laite lämpenee lisää. •
Laminoi sama tasku uudelleen saadaksesi paremman tuloksen.•
Käytä oikeita laminointitaskuja.•
HäVITyS
Tämä symboli (ruksattu roska-astia) kertoo, että
tuote on palautettava auktorisoituun
kierrätyskeskukseen tai jätteenkeräyspisteeseen
kun laite on poistettu käytöstä. Tämä symboli on
vain EEA1 jäsenmaissa.
9
Page 10

z
1 Διακόπτης Τροφοδοσίας
2 Ένδειξη LED Τροφοδοσίας
3 Ένδειξη LED Ετοιμότητας
4 Είσοδος
5 Έξοδος
6 Μοχλός απεμπλοκής
Ψυχρή ΠλαστικοΠοιήσή
1. Συνδέστε το καλώδιο ρεύματος σε κάποια εύκολα
προσβάσιμη και κατάλληλη πρίζα. Θέστε το διακόπτη
τροφοδοσίας που βρίσκεται στη δεξιά πλευρά του
πλαστικοποιητή, σε θέση «COLD». Οι δύο ενδείξεις
LED (Τροφοδοσίας και Ετοιμότητας) θ’ ανάψουν και θα
ξεκινήσει το μοτέρ της συσκευής. Πλέον είστε έτοιμοι να
πραγματοποιήσετε ψυχρή πλαστικοποίηση.
Προσοχή: Αν έχετε μόλις ολοκληρώσει θερμή πλαστικοποίηση,
θα πρέπει ν’ αφήσετε τη συσκευή να κρυώσει για 30 λεπτά
τουλάχιστον.
2. Τοποθετήστε το έγγραφο στην κάρτα πλαστικοποίησης,
αφήνοντας περιθώριο περίπου 3-5 χιλ. από όλες τις πλευρές
της κάρτας πλαστικοποίησης.
3. Τοποθετήστε την κάρτα πλαστικοποίησης που περιέχει
το έγγραφο στην είσοδο του πλαστικοποιητή. Πάντα να
τοποθετείτε την κάρτα πλαστικοποίησης πρώτα με την πλευρά
που είναι σφραγισμένη. Η διαδικασία πλαστικοποίησης
πραγματοποιείται αυτόματα.
4. Αφού ολοκληρωθεί η διαδικασία πλαστικοποίησης,
απενεργοποιήστε το διακόπτη τροφοδοσίας του
πλαστικοποιητή και αποσυνδέστε το καλώδιο ρεύματος από
την πρίζα.
Θερμή ΠλαστικοΠοιήσή
1. Συνδέστε το καλώδιο ρεύματος σε κάποια εύκολα
προσβάσιμη και κατάλληλη πρίζα. Θέστε το διακόπτη
τροφοδοσίας που βρίσκεται στη δεξιά πλευρά του
πλαστικοποιητή, σε θέση «HOT». Η ένδειξη LED τροφοδοσίας
θα ανάψει και η συσκευή θα μπει σε κατάσταση
προθέρμανσης, η οποία διαρκεί περίπου 5 με 6 λεπτά. Η
ένδειξη LED Ετοιμότητας θ’ ανάψει μόλις η συσκευή φτάσει
στη σωστή θερμοκρασία. Η συσκευή είναι έτοιμη για
πλαστικοποίηση.
Προσοχή: Η συσκευή προορίζεται για κάρτες πλαστικοποίησης
πάχους από 2x75 έως 2x125micron. Όταν η συσκευή είναι
έτοιμη για χρήση, είναι κατάλληλη για πλαστικοποίηση καρτών
2x75micron, αλλά ενδέχεται η θερμοκρασία των κυλίνδρων
πλαστικοποίησης να μην είναι αρκετά υψηλή για άμεση
πλαστικοποίηση καρτών 2x125micron, οπότε θα πρέπει
να περιμένετε 3-5 λεπτά παραπάνω για να έχετε καλύτερη
πλαστικοποίηση.
2. Τοποθετήστε την κάρτα πλαστικοποίησης που περιέχει
το έγγραφο στην είσοδο του πλαστικοποιητή. Μόλις
ολοκληρωθεί η διαδικασία πλαστικοποίησης, θα βγει
αυτόματα από την έξοδο του πλαστικοποιητή.
Προσοχή: . Πάντα να τοποθετείτε την κάρτα πλαστικοποίησης
πρώτα με την πλευρά που είναι σφραγισμένη.
Προσοχή: Αφαιρέστε την κάρτα πλαστικοποίησης μόλις βγει
από την έξοδο και σταματήσει να κινείται, ώστε ν’ αποφύγετε
υπερθέρμανση (κηλίδωση και φουσκάλες).
3. Αν η κάρτα κολλήσει στον πλαστικοποιητή, χρησιμοποιήστε το
ένα χέρι σας για να πιέσετε τον πλαστικοποιητή και να σύρετε
το μοχλό απεμπλοκής. Χρησιμοποιήστε ταυτόχρονα το άλλο
χέρι σας για να αφαιρέσετε την κάρτα πλαστικοποίησης από
την είσοδο του πλαστικοποιητή.
4. Αφού ολοκληρωθεί η διαδικασία πλαστικοποίησης,
απενεργοποιήστε το διακόπτη τροφοδοσίας του
πλαστικοποιητή και αποσυνδέστε το καλώδιο ρεύματος από
την πρίζα.
σήμαντικεσ οδήγιεσ ασφαλειασ
Ο πλαστικοποιητής μπορεί να χρησιμοποιηθεί μόνο σε •
επίπεδη επιφάνεια, σε εσωτερικό, ξηρό χώρο, με καλό
εξαερισμό.
Η πρίζα ρεύματος στην οποία θα συνδέσετε τη συσκευή, θα •
πρέπει να είναι εύκολα προσβάσιμη.
Τα παιδιά και τα κατοικίδια θα πρέπει βρίσκονται μακριά από •
τον πλαστικοποιητή κατά τη διάρκεια της λειτουργίας του.
Ποτέ να μην αγγίζετε το πάνω μέρος της συσκευής. Υπάρχει •
κίνδυνος εγκαύματος!
Ποτέ να μην καλύπτετε το πάνω μέρος της συσκευής με άλλα •
αντικείμενα. Υπάρχει κίνδυνος φωτιάς!
Να απενεργοποιείτε τον πλαστικοποιητή και να τον •
αποσυνδέετε από το ρεύμα όταν δεν χρησιμοποιείται.
αντιμετώΠισή Προβλήματών
Η κάρτα πλαστικοποίησης δεν είναι εντελώς διάφανη και/ή η
άκρη της δεν είναι καλά σφραγισμένη.
Να περιμένετε μερικά λεπτά για να επιτευχθεί υψηλότερη •
θερμοκρασία.
Να πλαστικοποιήσετε ξανά την ίδια κάρτα για να βελτιώσετε •
το αποτέλεσμα πλαστικοποίησης.
Να χρησιμοποιείτε τις σωστές κάρτες πλαστικοποίησης.•
αΠορριΨή
Αυτό το σύμβολο (ένας κάδος απορριμμάτων με
ένα Χ), σημαίνει ότι αν θέλετε να πετάξετε τη
συσκευή, θα πρέπει να την επιστρέψετε σε
εξουσιοδοτημένο κέντρο ανακύκλωσης ή σημείο
συλλογής τέτοιων απορριμμάτων. Αυτό το
σύμβολο ισχύει για τα κράτη- μέλη της Ε.Ε..
10
Page 11

συμμορφώσή με τισ οδήγιεσ ε.κ
Με την παρούσα, η ΠΛΑΙΣΙΟ COMPUTERS Α.Ε.Β.Ε., δηλώνει ότι
αυτός ο πλαστικοποιητής συμμορφώνεται με τις απαιτήσεις της
οδηγίας 2006/95/ΕΚ χαμηλής τάσης και της οδηγίας 2004/108/
ΕΚ (EMC) και φέρει τη σήμανση
Αντίγραφο της Δήλωσης συμμόρφωσης μπορείτε να ζητήσετε
από τα γραφεία της εταιρείας στη διεύθυνση: ΘΕΣΗ ΣΚΛΗΡΗ,
ΜΑΓΟΥΛΑ ΑΤΤΙΚΗΣ ή στην ιστοσελίδα http://www.plaisio.gr/
epipla-grafeiou/parousiasi/plastikopoiisi.htm
Πλήροφοριεσ για το Περιβαλλον
Το παρών προϊόν συμμορφώνεται με τις απαιτήσεις της
οδηγίας 2002/95/ΕΚ ΤΟΥ ΕΥΡΩΠΑΪΚΟΥ ΚΟΙΝΟΒΟΥΛΙΟΥ ΚΑΙ
ΤΟΥ ΣΥΜΒΟΥΛΙΟΥ της 27ης Ιανουαρίου 2003, σχετικά με τον
περιορισμό της χρήσης ορισμένων επικίνδυνων ουσιών σε
είδη ηλεκτρικού και ηλεκτρονικού εξοπλισμού και φέρει την
ακόλουθη σήμανση
αΠοκομιδή Προϊοντών
Σύμφωνα με τις απαιτήσεις της οδηγίας 2002/96/ΕΚ ΤΟΥ
ΕΥΡΩΠΑΪΚΟΥ ΚΟΙΝΟΒΟΥΛΙΟΥ ΚΑΙ ΤΟΥ ΣΥΜΒΟΥΛΙΟΥ της 27ης
Ιανουαρίου 2003 σχετικά με τα απόβλητα ειδών ηλεκτρικού
και ηλεκτρονικού εξοπλισμού (ΑΗΗΕ) τα περιλαμβανόμενα
στις οδηγίες προϊόντα και επιμέρους εξαρτήματα αυτών μετά
τη χρήση ή την απαξίωση τους δεν πρέπει να πετιούνται
στα σκουπίδια με τα άλλα οικιακά απορρίμματα αλλά να
επιστρέφονται στο σημείο πώλησης ή σε κατάλληλο σημείο
ανακύκλωσης ηλεκτρικού και ηλεκτρονικού εξοπλισμού. Για
περισσότερες πληροφορίες επικοινωνήστε με τις υπηρεσίες
καθαριότητας του δήμου σας.
Φροντίζοντας για τη σωστή απόρριψη του προϊόντος βοηθάτε
στην πρόληψη των αρνητικών συνεπειών για το περιβάλλον
και την ανθρώπινη υγεία που θα μπορούσαν να προκληθούν
από την ακατάλληλη απόρριψη του προϊόντος αυτού. Για
περισσότερες πληροφορίες σχετικά με την ανακύκλωση αυτού
του προϊόντος, παρακαλείστε να επικοινωνήσετε με τις αρμόδιες
υπηρεσίες του δήμου σας ή με την εταιρεία ΠΛΑΙΣΙΟ COMPUTERS.
Γραμμή Επικοινωνίας: 800 11 12345
Θέση Σκλήρη, Μαγούλα Αττικής, 19018
www.plaisio.gr
Πλήροφοριεσ ασφαλειασ
Για να μην τραυματίσετε τον εαυτό σας ή άλλα άτομα και για
να μην προκαλέσετε ζημιά στη συσκευή σας, διαβάστε όλες
τις πληροφορίες που ακολουθούν πριν χρησιμοποιήσετε τη
συσκευή σας.
Προσοχή:
Μη τοποθετείτε τη συσκευή στο νερό ή σε μέρος με εμφανή
υγρασία, το προϊόν δεν είναι συμβατό να λειτουργεί σε
περιβάλλον με υγρασία.
Ελέγξτε την τάση των αγωγών με αυτήν που υποδεικνύεται στη
πινακίδα ταυτοποίησης του προϊόντος (220V).
Προσοχή:
ή συσκευή αυτή δεν ειναι καταλλήλή για χρήσή
αΠο Παιδια και αΠο ατομα με μειώμενεσ φυσικεσ ή
διανοήτικεσ ικανοτήτεσ ή αΠο ατομα Που δεν εχουν
γνώσή ή εμΠειρια. ή συσκευή αυτή δεν ειναι Παιχνιδι
και τα Παιδια ΠρεΠει να εΠιβλεΠονται ώστε να μή
ΠαιΖουν με αυτή τή συσκευή.
Για τον καθαρισμό βεβαιωθείτε ότι έχετε αφαιρέσει το προϊόν •
αυτό από την τάση και είναι κρύο. Εάν θέλετε να καθαρίσετε
εξωτερικά το προϊόν, περιμένετε πρώτα να κρυώσει,
αφαιρέστε το από την τάση και κατόπιν καθαρίστε το.
Μη το βουτάτε σε νερό, καθαρίστε το χρησιμοποιώντας ένα •
στεγνό ή νωπό πανί ΟΧΙ ΒΡΕΓΜΕΝΟ.
ΠΡΟΕΙΔΟΠΟΙΗΣΗ: Μην χρησιμοποιήστε χλωριούχα •
απορρυπαντικά (χλωρίνη, κ.λ.π.) ή τοξικά προϊόντα για τις
διαδικασίες καθαρισμού.
Σε περίπτωση που η συσκευή δεν δουλεύει και η ενδεικτική
κόκκινη λυχνία δεν ανάβει:
αφαιρέστε την συσκευή από την τάση•
Προσοχή: σε ΠεριΠτώσή βλαβήσ ή κ αταστροφήσ του
καλώδιου, μήν εΠιχειρήσετε να ανοιξετε
τήν συσκευή ή να εΠισκευασετε το
καλώδιο. αΠευΘυνΘειτε στο σήμειο
Πώλήσήσ ή στον κατασκευαστή.
Μη χρησιμοποιείτε καλώδια ρεύματος ή βύσματα που έχουν •
υποστεί ζημιά, ή χαλαρές ηλεκτρικές πρίζες.
Μην ακουμπάτε το καλώδιο ρεύματος με βρεγμένα χέρια και •
μην αποσυνδέετε το προϊόν αυτό, τραβώντας το καλώδιο.
Μην τσακίζετε και μην προκαλείτε ζημιά στο καλώδιο •
ρεύματος.
ΠΡΟΕΙΔΟΠΟΙΗΣΗ: Μην εμποδίσετε με οποιοδήποτε τρόπο •
τον κατάλληλο εξαερισμό της συσκευής. Υπάρχει κίνδυνος
υπερθέρμανσης.
γενικοι οροι εγγυήσήσ
1. Η εγγύηση ισχύει από την ημερομηνία αγοράς όπως αυτή
αναγράφεται στην νόμιμη απόδειξη αγοράς και έχει χρονική
διάρκεια ίση με αυτή αναγράφεται επίσης στην νόμιμη απόδειξη
αγοράς.
2. Η εγγύηση ισχύει μόνο με την επίδειξη του εντύπου εγγύησης
και της νόμιμης απόδειξης αγοράς.
3. Για οποιαδήποτε συναλλαγή του πελάτη όσον αναφορά το
προϊόν που έχει προμηθευτεί από την Πλαίσιο Computers, είτε
αυτό αφορά Service καταστήματος, είτε τηλεφωνική υποστήριξη,
είτε επίσκεψη στο χώρο του πελάτη, θα πρέπει να γνωρίζει τον
κωδικό πελάτη του όπως αυτός αναγράφεται στην απόδειξη
αγοράς του προϊόντος.
4. Πριν την παράδοση ενός προϊόντος είτε για επισκευή, είτε
πριν την επίσκεψη τεχνικού στον χώρο του πελάτη, είτε πριν
την χρησιμοποίηση οποιασδήποτε τεχνικής υπηρεσίας, σε κάθε
περίπτωση ο πελάτης οφείλει να δημιουργήσει αντίγραφα
ασφαλείας για τα τυχόν δεδομένα του και να έχει σβήσει στοιχεία
11
Page 12

εμπιστευτικού χαρακτήρα ή προσωπικής φύσεως.
5. Η επισκευή θα γίνεται στις τεχνικές εγκαταστάσεις της Πλαίσιο
Computers, με την προσκόμιση της συσκευής από τον πελάτη
κατά τις εργάσιμες ημέρες και ώρες.
6. Σε περίπτωση αδυναμίας επισκευής του ελαττωματικού
προϊόντος η Πλαίσιο Computers το αντικαθιστά με άλλο ίδιο
αντίστοιχων τεχνικών προδιαγραφών.
7. Ο τρόπος και τα έξοδα μεταφοράς από και προς τα σημεία
τεχνικής υποστήριξης της Πλαίσιο Computers καθώς και
η ενδεχόμενη ασφάλιση των προϊόντων είναι επιλογή και
αποκλειστική ευθύνη του πελάτη.
8. Ο χρόνος αποπεράτωσης της επισκευής των προϊόντων
αποφασίζεται αποκλειστικά από την Πλαίσιο Computers και
ορίζεται από 4 έως 48 ώρες εφόσον υπάρχει το απαραίτητο
ανταλλακτικό. Μετά το πέρας των 15 ημερών η Πλαίσιο Computers δεσμεύεται να δώσει στον πελάτη προϊόν προς προσωρινή
αντικατάσταση μέχρι την ολοκλήρωση επισκευής.
9. Η επισκευή ή αντικατάσταση του προϊόντος είναι στην
απόλυτη επιλογή της Πλαίσιο Computers. Τα ανταλλακτικά ή
προϊόντα που αντικαταστάθηκαν περιέχονται στην αποκλειστική
κυριότητα της.
10. Η παρούσα εγγύηση δεν καλύπτει αναλώσιμα μέρη (πχ. CD,
μπαταρίες, καλώδια, κτλ.)
11. Οι τεχνικοί της Πλαίσιο Computers υποχρεούνται να προβούν
στην εγκατάσταση και παραμετροποίηση μόνον των υλικών
και προγραμμάτων που έχουν προμηθευτεί οι πελάτες από τα
καταστήματα της Πλαίσιο Computers αποκλειόμενου οιουδήποτε
άλλου προϊόντος άλλης εταιρείας.
12. Οι τεχνικοί της Πλαίσιο Computers δεν υποχρεούνται να
προβούν σε οποιαδήποτε αντικατάσταση υλικού, στα πλαίσια της
εγγύησης του προϊόντος και εφόσον ισχύει η εγγύηση αυτών, εάν
δεν τους επιδειχθεί η πρωτότυπη απόδειξη ή το τιμολόγιο αγοράς
του προς αντικατάσταση υλικού.
13. Η Πλαίσιο Computers δεν υποστηρίζει και δεν καλύπτει με
εγγύηση προϊόντα στα οποία έχουν χρησιμοποιηθεί μη νόμιμα
αντίγραφα λειτουργικών συστημάτων ή προγραμμάτων.
14. Η Πλαίσιο Computers δεν υποχρεούται να αποκαταστήσει
βλάβες οποιονδήποτε υλικών τα οποία δεν έχουν αγορασθεί
από τα καταστήματα της Πλαίσιο Computers, ή/και είναι είτε
εκτός είτε εντός εγγύησης, είτε η βλάβη είχε προαναφερθεί,
είτε παρουσιάστηκε κατά την διάρκεια της επισκευής ή της
παρουσίας του τεχνικού.
15. Σε περίπτωση που η αγορά δεν έχει γίνει από τα καταστήματα
της Πλαίσιο Computers ή είναι εκτός εγγύησης. Οποιαδήποτε
επισκευή/ αντικατάσταση γίνει, πραγματοποιείτε με αποκλειστική
ευθύνη και έξοδα του πελάτη.
16. Η Πλαίσιο Computers δεν ευθύνεται για την εγκατάσταση,
παραμετροποίηση, αποκατάσταση, παρενέργεια οποιουδήποτε
λογισμικού ή/και προγράμματος που δεν εμπορεύεται.
17. Οι επισκέψεις των τεχνικών της Πλαίσιο Computers
πραγματοποιούνται εντός της ακτίνας των 20 χλμ από το
πλησιέστερο κατάστημα της και οι πραγματοποιηθείσες εργασίες
επίσκεψης χρεώνονται βάση τιμοκαταλόγου.
18. Προϊόντα που παραμένουν επισκευασμένα ή με άρνηση
επισκευής ή με αδύνατη επικοινωνία με τον κάτοχο της συσκευής
άνω των 15 ημερολογιακών ημερών από την ενημέρωση του
πελάτη, χρεώνονται με έξοδα αποθήκευσης.
19. H η μέγιστη υποχρέωση που φέρει η Πλαίσιο Comput-
ers περιορίζεται ρητά και αποκλειστικά στο αντίτιμο που
έχει καταβληθεί για το προϊόν ή το κόστος επισκευής ή
αντικατάστασης οποιουδήποτε προϊόντος που δεν λειτουργεί
κανονικά και υπό φυσιολογικές συνθήκες.
20. Η Πλαίσιο Computers δεν φέρει καμία ευθύνη για ζημιές που
προκαλούνται από το προϊόν ή από σφάλματα λειτουργίας του
προϊόντος, συμπεριλαμβανομένων των διαφυγόντων εσόδων και
κερδών, των ειδικών, αποθετικών ή θετικών ζημιών και δεν φέρει
καμία ευθύνη για καμία αξίωση η οποία εγείρεται από τρίτους ή
από εσάς για λογαριασμό τρίτων.
21. Με την παραλαβή της παρούσας εγγύησης ο πελάτης
αποδέχεται ανεπιφύλακτα τους όρους της.
τι δεν καλυΠτει ή εγγυήσή Προϊοντών
1. Δεν καλύπτει οποιοδήποτε πρόβλημα που έχει προκληθεί από
λογισμικό ή άλλο πρόγραμμα καθώς και προβλήματα που έχουν
προκληθεί από ιούς.
2. Δεν καλύπτει μεταφορικά έξοδα από και προς τις
εγκαταστάσεις της Πλαίσιο Computers.
3. Δεν καλύπτει επισκευή, έλεγχο ή/και αντικατάσταση στον
χώρο του πελάτη (Onsite)
4. Βλάβες που έχουν προκληθεί από κακή χρήση όπως, φθορές,
πτώση ρίψη υγρών, σπασμένα ή/και αλλοιωμένα μέρη κτλ.
δεδομενα και αΠώλεια
1. Πριν την παράδοση ενός προϊόντος είτε για επισκευή, είτε
πριν την επίσκεψη τεχνικού στον χώρο του πελάτη, είτε πριν
την χρησιμοποίηση οποιασδήποτε τεχνικής υπηρεσίας, σε κάθε
περίπτωση ο πελάτης οφείλει να δημιουργήσει αντίγραφα
ασφαλείας για τα τυχόν δεδομένα του και να έχει σβήσει στοιχεία
εμπιστευτικού χαρακτήρα ή προσωπικής φύσεως.
2. Σε περίπτωση βλάβης σκληρού δίσκου ή/και γενικότερα
οποιοδήποτε αποθηκευτικού μέσου η Πλαίσιο Computers
υποχρεούται να αντικαταστήσει το ελαττωματικό υλικό, το οποίο
αυτομάτως σημαίνει απώλεια των αποθηκευμένων αρχείων και
λογισμικών χωρίς η Πλαίσιο Computers να έχει ευθύνη για αυτά.
3. Ο πελάτης είναι αποκλειστικά υπεύθυνος για την ασφάλεια
και την φύλαξη των δεδομένων του, καθώς και για την
επαναφορά και επανεγκατάσταση τους οποιαδήποτε στιγμή
και για οποιοδήποτε λόγο και αιτία. Η Πλαίσιο Computers δεν
θα είναι υπεύθυνη για την ανάκτηση και επανεγκατάσταση
προγραμμάτων ή δεδομένων άλλων από αυτών που εγκατέστησε
αρχικά κατά την κατασκευή του προϊόντος.
4. Η Πλαίσιο Computers δεν φέρει καμία ευθύνη για τα
αποθηκευμένα δεδομένα (data, αρχεία, προγράμματα) στα
μαγνητικά, μαγνητο-οπτικά ή οπτικά μέσα, καθώς και για
οποιαδήποτε άμεση, έμμεση, προσθετική ή αποθετική ζημιά που
προκύπτει από την απώλειά τους. Η φύλαξη και αποθήκευσης
των δεδομένων ανήκει στην αποκλειστική ευθύνη του πελάτη.
12
Page 13

ή εγγυήσή Παυει αυτοματα να ισχυει στισ Παρακατώ
ΠεριΠτώσεισ:
1. Όταν το προϊόν υποστεί επέμβαση από μη εξουσιοδοτημένο
από την Πλαίσιο Computers άτομο.
2. Όταν η βλάβη προέρχεται από κακή συνδεσμολογία, ατύχημα,
πτώση, κραδασμούς, έκθεση σε ακραίες θερμοκρασίες, υγρασία
ή ρίψη υγρών.
3. Όταν το προϊόν υποβάλλεται σε φυσική ή ηλεκτρική
καταπόνηση.
4. Όταν ο αριθμός κατασκευής, τα διακριτικά σήματα, ο
σειριακός αριθμός έχουν αλλοιωθεί, αφαιρεθεί ή καταστραφεί.
5. Όταν το προϊόν χρησιμοποιείται με τρόπο που δεν ορίζεται
από τις κατασκευαστικές προδιαγραφές ή σε απρόβλεπτο για τον
κατασκευαστή περιβάλλον.
6. Όταν το πρόβλημα οφείλεται σε προγράμματα ή λογισμικό
(πχ. ιούς, custom rmware κτλ.) που μεταβάλλουν τα λειτουργικά
χαρακτηριστικά της συσκευής.
7. Όταν δεν ακολουθούνται οι διαδικασίες συντήρησης του
κατασκευαστή.
8. Δεν παρέχεται εγγύηση ούτε εγγυάται προστασία για ζημιά
που προκλήθηκε από λανθασμένη εγκατάσταση ή χρήση.
9. Δεν παρέχεται εγγύηση ούτε εγγυάται προστασία για προϊόντα
τρίτων, λογισμικό και υλικό αναβάθμισης.
Θα πρέπει να παρέχετε στην Πλαίσιο Computers κάθε εύλογη
διευκόλυνση, πληροφορία, συνεργασία, εγκαταστάσεις και
πρόσβαση ώστε να έχει την δυνατότητα να εκτελέσει τα
καθήκοντά της, ενώ σε περίπτωση μη τήρησης των ανωτέρω
η Πλαίσιο Computers δεν θα υποχρεούται να εκτελέσει
οποιαδήποτε υπηρεσία ή υποστήριξη. Είστε υπεύθυνοι για την
αφαίρεση προϊόντων που δεν προμήθευσε η Πλαίσιο Computers
κατά την διάρκεια της τεχνικής υποστήριξης, για την τήρηση
αντιγράφων και την εμπιστευτικότητα όλων των δεδομένων που
αφορούν το προϊόν.
13
Page 14

1 Прекъсвач
2 LED за захранване
3 LED за готовност
4 Отвор за поставяне
5 Отвор за изваждане
6 Лост против засядане
e
За оптимални реЗултати препоръчваме да
иЗполЗвате ламинатно фолио Q- ConneCt.
Студено ламиниране
1. Включете захранващия кабел в стандартен, лесно достъпен
и технически изправен контакт. Включете прекъсвача за
захранването от дясната страна на ламинатора на позиция
COLD (СТУДЕНО). Двата LED индикатора за захранването
(POWER) и за готовност (READY) ще светнат и моторът ще се
задвижи. Ламинаторът е готов за студено ламиниране.
ВНИМАНИЕ: Ако току що сте завършили процес на горещо
ламиниране трябва да оставите ламинатора да изстине за
поне 30 минути.
2. Поставете материала за ламиниране в ламинатното фолио,
като оставяте разстояние 3-5мм от всички страни на
материала, за да може фолиото да се залепи около него.
3. Поставете ламинатното фолио заедно с материала в него
в отвора за поставяне на ламинатора. ВИНАГИ поставяйте
фолиото с фабрично залепената страна напред. Процесът
на ламиниране ще започне.
4. Когато ламинирането приключи, изключете ламинатора от
прекъсвача за захранването и от контакта.
Горещо ламиниране
1. Включете захранващия кабел в стандартен, лесно достъпен
и технически изправен контакт. Включете прекъсвача за
захранването на позиция HOT (ГОРЕЩО). LED индикаторът
за захранването (POWER) ще светне и ламинаторът ще
започне за загрява за около 5–6 минути. LED индикаторът
за готовност (READY) ще светне, когато бъде достигната
нужната температура. След това ламинаторът е готов за
работа.
ВНИМАНИЕ: Ламинаторът работи с фолио с дебелина
от 2x75 до 2x125 микрона. Когато машината е готова за
работа, тя може да ламинира фолио с дебелина 2x75мик.,
но може да не е готова за ламиниране на фолио с дебелина
2x125мик. веднага. За по-добро ламиниране изчакайте още
3-5мин. за загряване.
2. Поставете ламинатното фолио заедно с материала за
ламиниране в отвора за поставяне. Готовият ламиниран
материал ще излезе от другата страна на ламинатора.
ВНИМАНИЕ: ВИНАГИ поставяйте фабрично залепената
страна на фолиото напред.
ВНИМАНИЕ: Вземете ламинирания материал веднага
след излизането му през отвора, за да го предпазите от
прегряване, което може да доведе до замъгляване или
появата на мехури.
3. Ако фолиото заседне, с едната ръка хванете ламинатора и
приплъзнете лоста за освобождавене, а с другата изтеглете
фолиото назад през отвора за поставяне.
4. Когато ламинирането приключи, изключете ламинатора от
прекъсвача за захранването и от контакта.
важна информация За беЗопаСноСт
Ламинаторът може да работи само в хоризонтално •
положение, на равна поръхност, на закрито и сухо място с
добра вентилация.
Контактът трябва да е близо до ламинатора и да е лесно •
достъпен.
Пазете деца и домашни любимци далече от ламинатора,•
докато работи.
Не пипайте горната част на ламинатора, за да избегнете •
изгаряния.
Никога не покривайте ламинатора с нищо. Съществува •
риск от пожар!
Когато ламинатора не работи го изключете от прекъсвача •
за захранването и от контакта.
отСтраняване на неиЗправноСти
Проблеми: Ламинатното фолио не е напълно прозрачно и/
или ръбовете не са добре залепени.
Изчакайте няколко минути за по-добро загряване на •
ламинатора.
Пуснете фолиото за повторно ламиниране.•
Използвайте подходящо ламинатно фолио.•
иЗхвърляне
Този символ (зачертана кофа за смет) показва, че
продукта трябва да бъде върнат в оторизиран
център за рециклиране или място за събиране,
когато престане да работи. Този символ важи
само за страните-членки на EEA1.
14
Page 15

1 Bekapcsoló gomb
2 Bekapcsolás LED lámpa
3 Üzemkész LED lámpa
4 Fólia/dokumentumadagoló nyílás
5 Tasak/dokumentum kivezető nyílás
6 Elakadást kioldó kar
H
Az OpTIMáLIS eReDMéNy eLéRéSéHez HASzNáLjA
Q-CONNeCT LAMINáLó FóLIáVAL.
HIDeG LAMINáLáS
1. Csatlakoztassa a készüléket egy könnyen hozzáférhető
dugaszolóaljzathoz. Kapcsolja be a készüléket a POWER
gombbal és válassza ki a „COLD” („HIDEG LAMINÁLÁS”) funkciót
a kezelőfelületen. A bekapcsolás és az üzemkész LED lámpák
világítani fognak és a motor elindul. A gép kész a hideg
laminálásra.
Figyelem: Ha éppen befejezte a meleg laminálást, akkor
hagyja a gépet 30 percig hűlni. 2. Helyezze a dokumentumot
a fóliába, hagyjon kb. 3-5 mm margót a fólia széleitől minden
oldalon.
3. Tegye a laminálandó fóliát az adagoló nyílásba. Először mindig
a fólia jól lezárt oldalát helyezze be. A laminálási folyamat
automatikusan elindul.
4. Ha a laminálási folyamat befejeződött, kapcsolja ki a gépet a
POWER gombbal és húzza ki a hálózati dugót.
MeLeG LAMINáLáS
1. Csatlakoztassa a készüléket egy könnyen hozzáférhető
dugaszolóaljzathoz, kapcsolja be a készüléket a POWER
gombbal és válassza ki a „HOT” („MELEG LAMINÁLÁS”) funkciót
a kezelőfelületen. A bekapcsolás LED lámpa világítani fog
és a gép a felmelegedési fázisban lesz, ami kb. 5-6 percig
tart. Az üzemkész LED lámpa világítani fog, ha a gép elérte a
megfelelő hőmérsékletet. Azután a készülék üzemkész.
Figyelem: A laminálandó fólia vastagsága 2x75 és
2x125micron közötti lehet. Ha a gép már használatra kész,
alkalmas 2x75micron vastag fólia laminálására, de a meleg
görgők hőmérséklete talán nem elég magas ahhoz, hogy
2x125micron vastagságú fóliát lamináljon, így várni kell 3-5
percet még, hogy jobb laminálási eredményt érjünk el.
2. Tegye a laminálandó fóliát az adagoló nyílásba, ami a kivezető
nyíláson keresztül automatikusan távozni fog, ha a laminálás
befejeződött.
Figyelem: Először mindig a fólia jól lezárt oldalát helyezze be.
Figyelem: Húzza ki a lelaminált fóliát a kivezető nyílásból és
fejezze be a mozgatást, hogy elkerülje a túlhevülést.
3. Ha a fólia elakad, egy kézzel nyomja meg a készüléket és
közben csúsztassa az elakadást kioldó kart, a másik kezével
pedig húzza ki a fóliát az adagoló nyílásból.
4. Ha a laminálási folyamat befejeződött, kapcsolja ki a gépet a
POWER gombbal és húzza ki a hálózati dugót.
FONTOS bIzTONSáGI INFORMáCIóK
A laminálógépet vízszintes felületen, zárt, száraz, jól szellőző •
helyen kell elhelyezni.
A lamináló készüléket egy hálózati dugaszalj közelében állítsuk •
fel, jól hozzáférhető helyen.
Tartsuk távol a gyerekeket és a háziállatokat a géptől működés •
közben.
Soha ne nyúljunk a készülék tetejéhez égés veszély miatt!•
Soha ne takarjuk le a készüléket, mert tűzveszélyes!•
Kapcsolja ki és áramtalanítsa a készüléket, ha nem használja.•
HIbAeLHáRíTáS
A lamináló fólia nem teljesen átlátszó és/vagy a sarkak nem jól
záródnak.
Várjon néhány percet és állítsa magasabb hőmérsékletre •
Laminálja le újra ugyanazt a fóliát, hogy a laminálási eredmény •
javuljon.
Használja a helyes fóliát.•
eLeKTRONIKuS HuLLADéK
Az áthúzott szemetes szimbólum azt jelzi, hogy a
terméket egy kijelölt újrahasznosító központban
vagy egy gyűjtőpontban kell elhelyezni, ha a gép
élettartama lejárt és ki szeretné dobni.
Ez a szimbólum csak a EEA1 tagállamaiban
érvényes.
15
Page 16

1 Bekapcsoló gomb
2 Bekapcsolás LED lámpa
3 Üzemkész LED lámpa
4 Fólia/dokumentumadagoló nyílás
5 Tasak/dokumentum kivezető nyílás
6 Elakadást kioldó kar
HIDeG LAMINáLáS
1. Csatlakoztassa a készüléket egy könnyen hozzáférhető
dugaszolóaljzathoz. Kapcsolja be a készüléket a POWER
gombbal és válassza ki a „COLD” („HIDEG LAMINÁLÁS”) funkciót
a kezelőfelületen. A bekapcsolás és az üzemkész LED lámpák
világítani fognak és a motor elindul. A gép kész a hideg
laminálásra.
Figyelem: Ha éppen befejezte a meleg laminálást, akkor
hagyja a gépet 30 percig hűlni. 2. Helyezze a dokumentumot
a fóliába, hagyjon kb. 3-5 mm margót a fólia széleitől minden
oldalon.
3. Tegye a laminálandó fóliát az adagoló nyílásba. Először mindig
a fólia jól lezárt oldalát helyezze be. A laminálási folyamat
automatikusan elindul.
4. Ha a laminálási folyamat befejeződött, kapcsolja ki a gépet a
POWER gombbal és húzza ki a hálózati dugót.
MeLeG LAMINáLáS
1. Csatlakoztassa a készüléket egy könnyen hozzáférhető
dugaszolóaljzathoz, kapcsolja be a készüléket a POWER
gombbal és válassza ki a „HOT” („MELEG LAMINÁLÁS”) funkciót
a kezelőfelületen. A bekapcsolás LED lámpa világítani fog
és a gép a felmelegedési fázisban lesz, ami kb. 5-6 percig
tart. Az üzemkész LED lámpa világítani fog, ha a gép elérte a
megfelelő hőmérsékletet. Azután a készülék üzemkész.
Figyelem: A laminálandó fólia vastagsága 2x75 és
2x125micron közötti lehet. Ha a gép már használatra kész,
alkalmas 2x75micron vastag fólia laminálására, de a meleg
görgők hőmérséklete talán nem elég magas ahhoz, hogy
2x125micron vastagságú fóliát lamináljon, így várni kell 3-5
percet még, hogy jobb laminálási eredményt érjünk el.
2. Tegye a laminálandó fóliát az adagoló nyílásba, ami a kivezető
nyíláson keresztül automatikusan távozni fog, ha a laminálás
befejeződött.
Figyelem: Először mindig a fólia jól lezárt oldalát helyezze be.
Figyelem: Húzza ki a lelaminált fóliát a kivezető nyílásból és
fejezze be a mozgatást, hogy elkerülje a túlhevülést.
3. Ha a fólia elakad, egy kézzel nyomja meg a készüléket és
közben csúsztassa az elakadást kioldó kart, a másik kezével
pedig húzza ki a fóliát az adagoló nyílásból.
4. Ha a laminálási folyamat befejeződött, kapcsolja ki a gépet a
POWER gombbal és húzza ki a hálózati dugót.
FONTOS bIzTONSáGI INFORMáCIóK
A laminálógépet vízszintes felületen, zárt, száraz, jól szellőző •
helyen kell elhelyezni.
A lamináló készüléket egy hálózati dugaszalj közelében állítsuk •
fel, jól hozzáférhető helyen.
Tartsuk távol a gyerekeket és a háziállatokat a géptől működés •
közben.
Soha ne nyúljunk a készülék tetejéhez égés veszély miatt!•
Soha ne takarjuk le a készüléket, mert tűzveszélyes!•
Kapcsolja ki és áramtalanítsa a készüléket, ha nem használja.•
Rozwiązywanie pRoblemów
Folia laminująca nie jest całkowicie przezroczysta i/lub krawędzie
nie są dobrze sklejone.
Odczekaj kilka minut w celu uzyskania wyższej temperatury. •
Laminuj ponownie tę samą folię w celu uzyskania lepszego •
rezultatu.
Użyj właściwej kieszeni foliowej. •
uTyLIzACjA
Ten symbol (przekreślony pojemnik na śmieci)
wskazuje, że sprzęt musi zostać zwrócony do
autoryzowanego centrum recyklingu lub punktu
zbierania elektrośmieci po zakończeniu przydatności
do użytku. Symbol ten stosowany jest tylko w
krajach członkowskich Unii Europejskiej EEA1.
16
Page 17

1 Vypínač
2 LED kontrolka zapnutí
3 LED kontrolka začátku ohřevu
4 Vstupní slot
5 Výstupní otvor
6 Páka pro uvolnění
j
pRo op tim áln í výs ledek do poRuč uje me
používat Q-ConneCt laminovaCí kapsy
STuDeNá LAMINACe
1. Připojte napájecí kabel do snadno přístupné, standardní a
správné elektrické zásuvky. Zapněte hlavní vypínač na pozici
za studena na pravé straně laminátoru. Dvě LED diody se
rozsvítí a hnací motor se spustí. Je připraven pro laminování za
studena.
Upozornění: Pokud jste právě dokončili používání laminátoru
pro horké laminování, musíte nechat laminátor vychladnout
nejméně 30 minut.
2. Vložte dokument do laminovací fólie, ponechejte prostor cca.
3-5 mm k okraji laminovací fólie na všech stranách.
3. Vložte fólii obsahující dokument do vstupního slotu. Vždy
vložte připravený dokument uzavřenou stranou fólie jako
první. Proces laminování probíhá automaticky.
4. Po dokončení laminování vypněte hlavní vypínač na
laminátoru, a odpojte napájecí kabel
TepLá LAMINACe
1. Připojte napájecí kabel do elektrické zásuvky, zapněte hlavní
vypínač do polohy HOT, rozsvítí se kontrolka LED pro napájení
a stroj je v zahřívací fázi, která trvá asi 5 až 6 minut. Kontrolka
LED pro začátek ohřevu se rozsvítí, když je dosaženo správné
teploty. Potom, je zařízení připraveno k použití.
2. Pozor: Přístroj je určen pro tloušťku fólie od 2x75 do 2x125
micronů. Po zapnutí je stroj připraven pro laminaci fóĺie
2x75 micronů, ale teplota válců není možná dost vysoká pro
laminování fólií o tloušťce 2x125 micron, takže budete muset
čekat o 3-5 minut déle. Vložte fólii obsahující dokument
do vstupního slotu. Vždy vložte připravený dokument
uzavřenou stranou fólie jako první. Proces laminování probíhá
automaticky.
Pozor: Vytáhněte laminovaný dokument ihned, jakmile se
laminátor zastaví, aby nedošlo k přehřátí (rozehřátí fólie).
3. Pokud se fólie zasekává, jednou rukou stisněte Jam páčku
a druhou rukou vytáhněte laminovaný dokument.. Po
dokončení laminování vypněte hlavní vypínač na laminátoru, a
odpojte napájecí kabel.
důležité bezpečnostní pokyny
Laminátor lze provozovat pouze ve vodorovné poloze na •
rovném povrchu v interiéru v suchých místnostech s dobrou
ventilací.
Zásuvka musí být umístěna v blízkosti zařízení a musí být •
snadno přístupná.
Děti a domácí zvířata se musí uchovávat mimo dosah •
laminátoru během provozu.
Nikdy se nedotýkejte horní části přístroje. Nebezpečí popálení! •
Nikdy nezakrývejte horní části přístroje. Nebezpečí požáru! •
Vypněte laminátor a odpojte napájecí kabel, když není •
používán.
poRadCe při potížíCh
Laminovací fólie není zcela průhledná nebo okraj není dobře
utěsněn.
Počkejte 5 minut, abyste docílili vyšší teploty.•
Laminujte fólii o stejné tloušťce vícekrát, abyste docílili vyšší •
kvality laminace.
Používejte vhodné laminovací fólie.•
LIKVIDACe
Tento symbol (označení přeškrtnutého
odpadkového koše), znamená to, že výrobek musí
být po skončení životnosti vrácen do
autorizovaného recyklačního centra nebo na
sběrné místo.Tento symbol platí pouze v členských
státech EEA1.
17
Page 18

1 Vypínač
2 LED kontrolka zapnutia
3 LED kontrolka začiatku ohrevu
4 Vstupný slot
5 Výstupný otvor
6 Páka pre uvoľnenie
W
pR e o ptimálny výsl edo k d opo Ru čuj eme
používať Q-ConneCt laminovaCie vReCká
STuDeNá LAMINáCIA
1. Pripojte napájací kábel do ľahko prístupnej, štandardnej
a správnej elektrickej zásuvky. Zapnite hlavný vypínač na
pozícii za studena na pravej strane laminátora. Dve LED
diódy sa rozsvietia a hnací motor sa spustí. Je pripravený pre
laminovanie za studena.
Upozornenie: Pokiaľ ste práve dokončili používanie laminátora
pre teplé laminovanie, musíte nechať laminátor vychladnúť
najmenej 30 minút.
2. Vložte dokument do laminovacej fólie, ponechajte priestor
cca. 3-5 mm k okraju laminovacej fólie na všetkých stranách.
3. Vložte fóliu obsahujúcu dokument do vstupného slotu. Vždy
vložte pripravený dokument uzatvorenou stranou fólie ako
prvou. Proces laminovania prebieha automaticky.
4. Po dokončení laminovania vypnite hlavný vypínač na
laminátore, a odpojte napájací kábel
TepLá LAMINáCIA
1. Pripojte napájací kábel do elektrickej zásuvky, zapnite hlavný
vypínač do polohy HOT, rozsvieti sa kontrolka LED pre
napájanie a stroj je v zahrievacej fáze, ktorá trvá asi 5 až 6
minút. Kontrolka LED pre začiatok ohrevu sa rozsvieti, keď je
dosiahnutá správna teplota. Potom je zariadenie pripravené k
použitiu.
2. Pozor: Prístroj je určený pre hrúbku fólie od 2x75 do 2x125
micrónov. Po zapnutí je stroj pripravený pre lamináciu fóĺie
2x75 micrónov, ale teplota válcov nie je možno dosť vysoká
pre laminovanie fólií s hrúbkou 2x125 micrónov, takže budete
musieť čakať o 3-5 minút dlhšie. Vložte fóliu obsahujúcu
dokument do vstupného slotu. Vždy vložte připravený
dokument uzatvorenou stranou fólie ako prvou. Proces
laminovania prebieha automaticky.
Pozor: Vytiahnite laminovaný dokument ihneď, ako sa
laminátor zastaví, aby nedošlo k prehriatiu (rozohriatiu fólie).
3. Pokiaľ sa fólia zasekáva, jednou rukou stlačte Jam páčku
a druhou rukou vytiahnite laminovaný dokument.. Po
dokončení laminovania vypnite hlavný vypínač na laminátore,
a odpojte napájací kábel.
dôležité bezpečnostné pokyny
Laminátor je možné používať iba vo vodorovnej polohe na •
rovnom povrchu v interiéri v suchých miestnostiach s dobrou
ventiláciou.
Zásuvka musí byť umiestnená v blízkosti zariadenia a musí byť •
ľahko prístupná.
Deti a domáce zvieratá se musia držať mimo dosah laminátora •
behom prevádzky.
Nikdy sa nedotýkajte hornej časti prístroja. Nebezpečenstvo •
popálenia!
Nikdy nezakrývajte horné časti prístroja. Nebezpečenstvo •
požiaru!
Vypnite laminátor a odpojte napájací kábel, keď nie je •
používaný.
pORADCA pRI pRObLéMOCH
Laminovacia fólia nie je úplne priehľadná alebo okraj nie je dobre
utesnený.
Počkajte 5 minút, aby ste docielili vyššiu teplotu.•
Laminujte fóliu s rovnakou hrúbkou viackrát, aby ste docielili •
vyššiu kvalitu laminácie.
Používajte vhodné laminovacie fólie.•
LIKVIDáCIA
Tento symbol (označenie preškrtnutého
odpadkového koša), znamená to, že výrobok musí
byť po skončení životnosti vrátený do
autorizovaného recyklačného centra alebo na
zberné miesto.Tento symbol platí iba v členských
štátoch EEA1.
18
Page 19

1 Vklop/Izklop
2 LED za VKLOP
3 LED za READY
4 Reža za vstavljanje
5 Reža za izhod
6 Ročica za zastoj
X
za optimalni Rezultat vam pRipoRočamo
Q-ConneCtove žepke za plstifiCiRanje.
HLADNO LAMINIRANje (pLASTIFICIRANje)
1. Priključite napajalni kabel na preprosto dostopno, standardno
in pravilno vtičnico. Vklopite stikalo za vklop na hladno
položaj na desni strani laminator. Dve LED za tako POWER
in pripravljen bo zasvetila in se pogonski motor zažene. Je
pripravljen za hladno laminacijo. Pozor: Če ste ravnokar končali
z uporabo laminator za vroče laminiranje, morate pustiti
laminator da se ohlaja najmanj 30 minut.
2. Vstavite dokument v vrečko iz folije, puščaj pribl. 3,5 mm do
roba vrečke iz folije na vseh straneh.
3. Vstavite vrečko iz folije, ki vsebuje dokument v plastikatorji
v dovajalno režo. Vedno vstavite pripravljen zaprtega strani
vrečke iz folije v prvi.Postopek laminiranje zgodi samodejno.
4. Ko so končali naloge laminiranje, izklopite stikalo za vklop v
laminator in izključite napajalni kabel.
vRoče laminiRanje (plastifiCiRanje)
1. Priključite napajalni kabel v električno vtičnico, vklopite stikalo
za vklop v položaj HOT, bo LED za Lučka za vklop prižgana in
stroj je v fazi segrevanja, ki traja približno 5 do 6 minut.LED za
READY zasveti, ko je dosežena pravilna temperatura. Potem,
naprava je pripravljena za uporabo.
Pozor: stroj za debeline od 2x75 do 2x125micron. Ko je
naprava le pripravljen za uporabo, je primerna za plasticiranje
2x75micron, vendar temperature vročega valjčki “morda ni
dovolj visoka, da lahko takoj laminiranje 2x125micron vrečkah,
tako da boste morali počakati 3-5 minut več, da bi dobili bolje
plasticiranje.
2. Vstavite , ki vsebuje dokument v režo laminatorja , bo prišel
ven iz reže- samodejno, plasticiranje je končano.
Pozor: Vedno prvo vstavite že zaprti stran vrečke v
Pozor: Izvlecite folijo takoj po tem, ko pride iz reže in se ustavi,
da se prepreči pregretje (barva razmaže in mehurji).
3. Če se zagozdi , uporabite eno roko pritiskom laminatorja in
potisnete Jam ročico za sprostitev, medtem, z drugo roko
potegnite nazaj iz laminatorja režo.
4. Ko so končano naloge laminiranje, izklopite stikalo in izključite
napajalni kabel.
pOMeMbNe VARNOSTNe INFORMACIje
Laminator je mogoče upravljati le vodoravno na ravni površini •
v zaprtih suhih prostorih z dobrim prezračevanjem.
Vtičnica naj bo nameščena blizu opreme in lahko dosegljiva.•
Otroci ali živali, je treba preprečiti dostop do laminatorja med •
delovanjem.
Nikoli se ne dotikajte vrha naprave. Nevarnost opeklin.•
Nikoli ne prekrivajte zgornjega dela naprave z ničemer. •
Nevarnost požara!
Izklopite laminator in izključite napajalni kabel, ko ga ne •
uporabljate.
odpRavljanje težav
Žepe za plasticiranje ni popolnoma prozoren in / ali rob ni dobro
zatesnjen.
Počakajte nekaj minut, da bi dobili višjo temperaturo.•
Ponovno plarticirajte enak žepek za izboljšanje rezultata •
plasticiranje.
Uporabite pravilne vrečke .•
ODSTANjeVANje ODpADKOV
Ta simbol (prečrtan koš za smeti) navaja, da mora
biti izdelek vrnjen k pooblaščenemu centru za
recikliranje ali zbirnem mestu, ko je dosegel konec
svoje življenjske dobe. Ta simbol se uporablja samo
v državah članicah EEA1.
19
 Loading...