


QUICK START GUIDE
D CARE AND WARNING
WARNING: Changes or modifications to this unit not expressly approved by the party responsible for
compliance could void the user's authority to operate the equipment.
QUICK START GUIDE
NOTE: This equipment has been tested and found to comply with the limits for a Class B digital device,
pursuant to Part 15 of the FCC Rules. These limits are designed to provide reasonable protection
against harmful interference in a residential installation. This equipment generates, uses and can radiate
radio frequency energy and, if not installed and used in accordance with the instructions, may cause
harmful interference to radio communications.
However, there is no guarantee that interference will not occur in a particular installation. If this
equipment does cause harmful interference to radio or television reception, which can be determined
by turning the equipment off and on, the user is encouraged to try to correct the interference by one or
more of the following measures:
● Reorient or relocate the receiving antenna.
● Increase the separation between the equipment and receiver.
● Connect the equipment into an outlet on a circuit different from that to which the receiver is
connected.
● Consult the dealer or an experienced radio/panel PC technician for help.
This device complies with Part 15 of the FCC Rules. Operation is subject to the following two conditions:
(1) this device may not cause harmful interference, and
(2) this device must accept any interference received, including interference that may cause undesired
operation.
Correct Disposal of this product. This marking indicates that this product should not be disposed
with other household wastes throughout the EU. To prevent possible harm to the environment or
human health from uncontrolled waste disposal, recycle it responsibly to promote the sustainable reuse
of material resources. To return your used device, please use the return and collection systems or
contact the retailer where the product was purchased. They can take this product for environmental
safe recycling.
″FCC & CE RF Radiation Exposure Statement Caution: To maintain compliance with the FCC & CE′s RF
exposure guidelines, place the product at least 20cm from near by persons.″
Quick Start Guide
This quick guide will help you go through installation quickly
Panel PC TD-0350
Declaration of Conformity
This device complies with the requirements set out in the Council Directive on the Approximation of the
Laws of the Member States relating to Electromagnetic Compatibility (2014/30/EU), Low-voltage
Directive (2014/35/EU), ErP Directive (2009/125/EC), RoHS directive (2011/65/EU) and Radio Equipment
Directive (2014/53/EU).
This product has been tested and found to comply with the harmonized standards for Information
Technology Equipment, these harmonized standards published under Directives of Official Journal of
the European Union.
Adaptor with ferrite must be used with this equipment to ensure
compliance with the Class B FCC limits.
Specifications of the DC power adapter
Model: SOY-0500200-090/PSAF10R-050Q
Input: 100-240V~50/60Hz 0.5A Max
Output: 5V 2A
NOTE: Operating Temperature: 0~40°C
Qbic Technology Co.,Ltd.
26F-12, No.99.Sec.1, Xintai 5th Rd., Xizhi Dist., New Taipei City 221, Taiwan(R.O.C)
Tel: 886-2-2697-2000 FAX: 886-2-2697-2868
The color depends on the actual product.
The specifications are subject to change without prior notification to improve the
performance.
QUICK START GUIDE QUICK START GUIDE
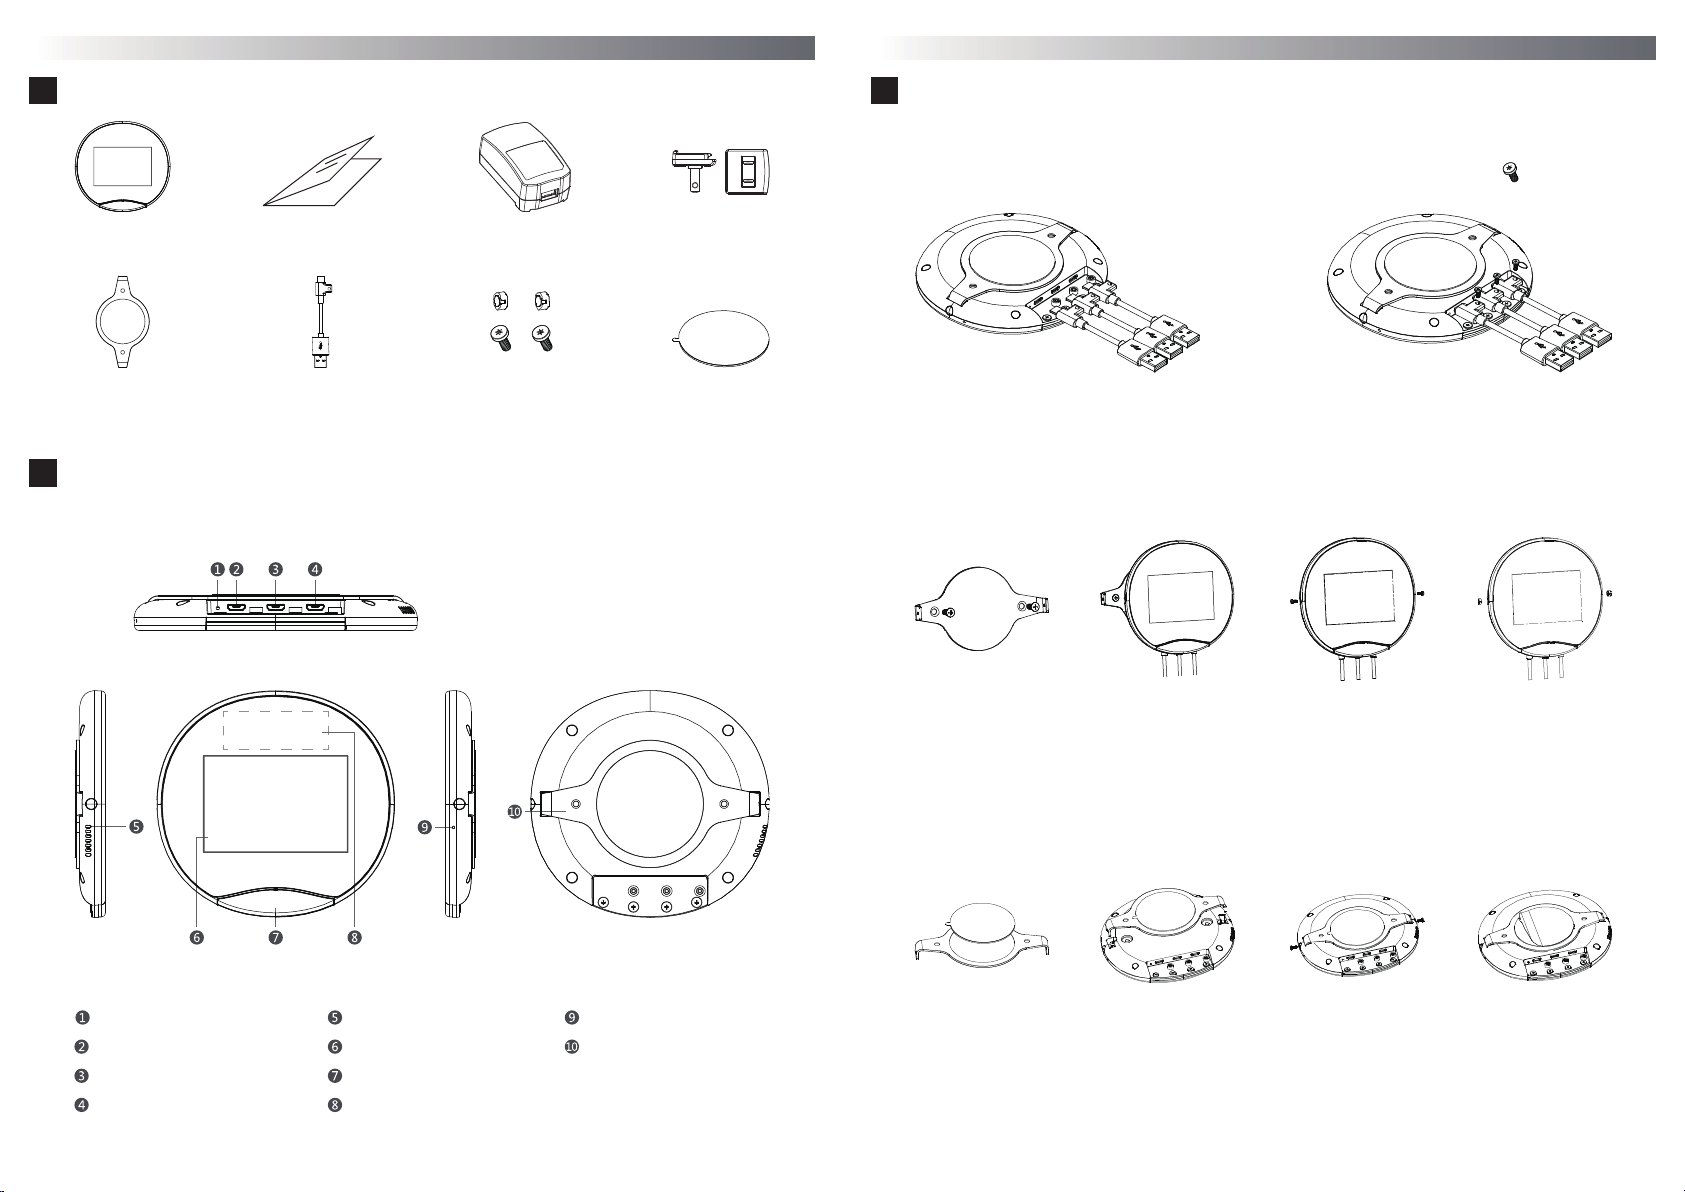
Contents
A
Panel PC
Indication
B
Quick Start Guide DC Power Adapter Power Plug
Screw pack
(Screws*7, Rubber caps*4)
Adhesive tape
Installation
C
Cable connection
1.
Step 1 Step 2
Plug USB cable into USB port
Surface Bracket Mount Installation
2.
Step 1
Step 2
Step 3
Provided in screw pack
Fix the screws to secure the USB cables.Bracket USB cable
Step 4
Reset Button
ADB
DC 5V IN
USB
Speaker
Touch screen
LED indicator light
NFC
Microphone
Bracket
Install the bracket on surface
Screw specifications: KA4*14,
diameter: 7 mm
(Screws are not provided)
Adhesive Bracket Mount Installation
3.
Step 1
Laminate adhesive to
the back of bracket
* Please install and use this product in strict accordance with the instructions.
Assemble the panel PC
to the bracket
Step 2
Install the bracket onto
the panel PC bracket
slot (at the back)
Tighten the screws. Locations
are shown in above illustration.
Screw specifications: M2*5 (T6)
(screw pack)
Step 3
Tighten the screws and cover
them with rubber caps
Screw specifications: M2*5 (T6)
(screw pack)
Please visit this link for software installation manual.
Cover the screws with
rubber caps.
Step 4
Peel off the adhesive and
attach the panel PC on a
smooth and clean surface
http://www.qbictechnology.com/support
 Loading...