

Page 1
Page 2

Page 3
Slim Pad B843Q
User’s Notice
This manual has important information and security issues to guide the
user to the correct use of the product.
This manual contains all information required for the utilization of this
product to meet the user’s requirements; but it may be changed, or
corrected at any time without notice. Manufacturer provides this manual
“as is” without warranty of any kind, and will not be liable for any indirect,
special, incidental or consequential damages (including damages for
loss of prot, loss of business, loss of use of data, interruption of
business and the like).
Products and corporate names appearing in this manual may or
may not be registered trademarks or copyrights of their respective
companies, and they are used only for identication or explanation and
to the owner’s benet, without intent to infringe.
Copyright of this manual belongs to QBEX ELECTRONICS. No part of
this manual, including the products and software described in it may be
reproduced, transmitted or translated into any language in any form or
by any means without written permission of the manufacturer.
Product Name: B843Q
version: 1.1
Release Date: May 2013
www.qbex.com
3
Page 4

Slim Pad B843Q
Safety Precautions
CAUTION
1. DO NOT press or touch the LED Screen. DO NOT place the tablet with small items, they may
scratch LED Screen or enter in the tablet.
2. DO NOT expose the TABLET to dirty or dusty environment. Keep in a clean and dry
environment. This Tablet is not water-proof.
3. DO NOT place the TABLET on uneven or unstable work surface.
4. DO NOT place or drop objects on the top of the TABLET. DO NOT shove any foreign objects
into the TABLET. DO NOT cover the LED Screen strongly.
5. DO NOT expose the TABLET to strong magnetic or electrical elds, YOU CAN LOST
INFORMATION.
6. DO NOT leave the TABLET facing the sun as it can damage the LED Screen, especially in
the car.
7. SAFE TEMP: This TABLET should only be used in environments with ambient temperatures
between 5oC (41oF) and 35oC (95oF).
8. DO NOT expose the TABLET to or use near liquids, rain, or moisture.
9. Use only QBEX spare parts. Dispose parts according to the local laws.
10. Warning: excessive sound pressure from earphones and headphones can cause hearing
loss.
11. The adapter may get warm during charging operation. DO NOT leave the TABLET on your
lap or any part of the body in order to prevent discomfort or injury from heat exposure.
12. INPUT RATING: Refer to the rating label on the TABLET and be sure that the Power Adapter
complies with the rating. Only use attachments or accessories specied by the manufacturer.
13. Checking the connections between the main TABLET and attachments before turning on the
TABLET.
14. DO NOT use the TABLET when you are eating food to avoid dirtying the TABLET.
15. DO NOT insert anything into the TABLET that may result in short circuit or damage the
circuit.
16. Power off the TABLET, if you want install or remove some external devices, which are not
support hot-plug.
17. Disconnect the TABLET from the electrical outlet before cleaning. And Keep it away from
children.
18. DO NOT disassemble the TABLET, only a certied service technician should perform repairs
on your computer. Otherwise, problem may result and the manufacturer should not hold
responsibility for the damage.
19. The TABLET has some little metal ake to disperse heat. DO NOT place the TABLET on soft
objects (e.g.: bed, sofa, your lap), because the TABLET may become hot and halt the operating
system.
4
Page 5

Slim Pad B843Q
Content
CHAPTER 1:
PRODUCT DESCRIPTION................................................... 07
1.1 GENERAL VIEW OF THE PRODUCT................................ 07
1.2 KEYS & CONNECTORS.................................................... 07
CHAPTER 2:
MAIN INTERFACE ICONS................................................... 09
CHAPTER 3:
QUICK VIEW
3.1 TOUCH PANEL................................................................... 11
3.2 SWITCH ON/OFF................................................................ 11
3.3 POWER SAVING MODES AND LOCK SCREEN............... 12
3.4 BATTERY AND CHARGING BATTERY.............................. 12
3.5 USB HOST FUNCTION...................................................... 12
3.6 TF CARD STORAGE.......................................................... 13
CHAPTER 4:
NETWORK ACCESS........................................................... 15
4.1 WI-FI ACCESS................................................................... 15
5
Page 6

Slim Pad B843Q
CHAPTER 5:
MAIN FUNCTIONS.............................................................. 17
5.1 AUDIO.................................................................................. 17
5.2 VIDEO.................................................................................. 19
5.3 PICTURE............................................................................. 19
5.4 RECORDING....................................................................... 19
5.5 FILE MANAGER................................................................... 20
5.6 E-BOOK............................................................................... 20
5.7 INTERNET BROWSER........................................................ 21
5.8 E-MAIL.................................................................................. 22
5.9 CALENDAR.......................................................................... 23
5.10 CALCULATOR...................................................................... 23
5.11 ALARM................................................................................. 23
5.12 APPLICATIONS INSTALLER............................................... 24
5.13 CAMERA AND PHOTOGRAPH........................................... 26
CHAPTER 6:
SYSTEM SETTINGS............................................................ 27
6.1 WIRELESS & NETWORKS SETTING................................. 27
6.2 SOUND SETTING................................................................ 27
6.3 DISPLAY SETTING.............................................................. 27
6.4 LOCATION & SETTING SECURITY.................................... 27
6.5 APPLICATIONS SETTING.................................................. 27
6.6 ACCOUNTS & SYNC SETTING.......................................... 27
6.7 PRIVACY SETTING............................................................. 27
6.8 SETTING STORAGE........................................................... 28
6.9 LANGUAGE & KEYBOARD SETTING................................ 28
6.10 DATE & TIME SETTING...................................................... 28
6.11 ABOUT DEVICE................................................................... 28
CHAPTER 7:
FREQUENTLY ANSWERED QUESTIONS.............................. 29
6
Page 7
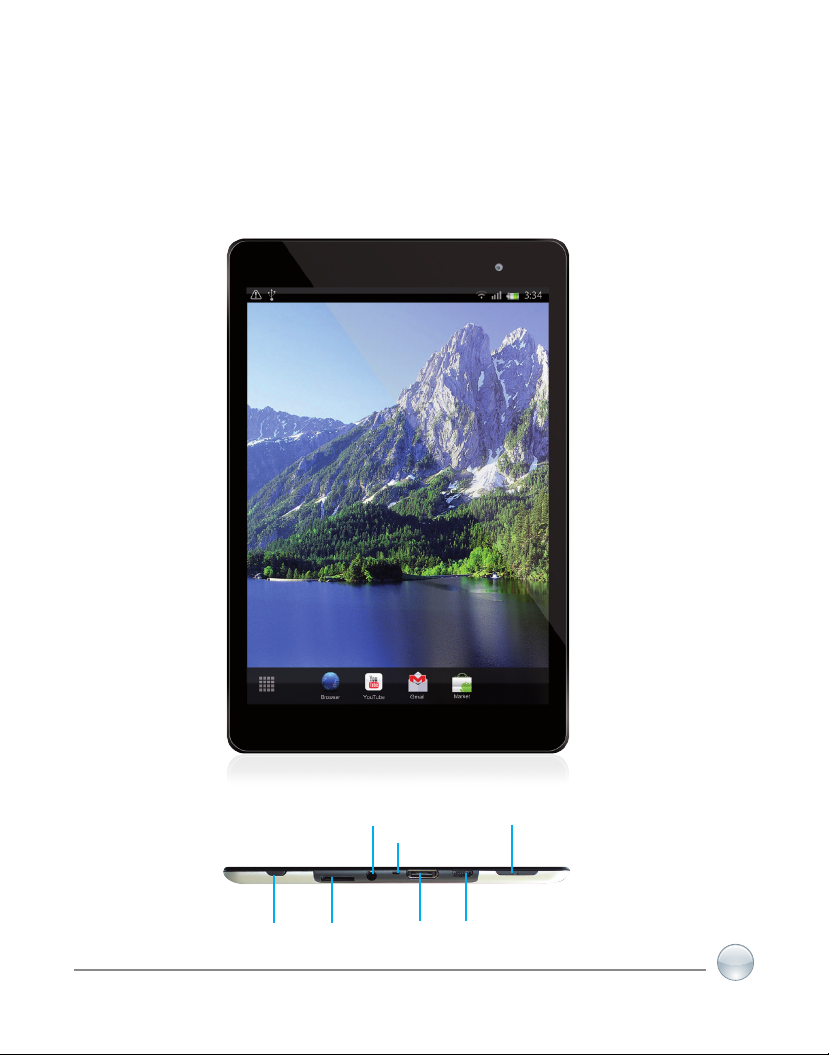
Chapter 1.
PRODUCT DESCRIPTION
1.1 General View of the Tablet
Slim Pad B843Q
Power Button
Earphone Connector
Microphone
Micro
SD Slot
Connector
HDMI Mini
Volume
Control
Connector
Mini USB
7
Page 8
Slim Pad B843Q
1.2 Keys and Connectors
Name Function
Power button
In startup: Long Press and hold the button.
The system enter the main interface.
In Shutdown: In the main menu interface, press
the button about 5 seconds to shutdown the
tablet. System will show “Power Off”. Then click
“OK” so you can safely shutdown
Lock screen: Short press Power button to lock
screen or unlock screen.
Remark:
1. When power is empty,
system will shut down automatically.
2. Illegal turn off the device, restart will scan and
restore the disk, it may take longer time to enter
into system
Earphone
Mini USB
Mini IHDMI
TF card reader
3.5mm’ earphone connector
Mini USB Connector, use it to connect to the
computer for data transmission, charging and
external connection USB ash drive
HDMI connector to connect tablet to a PC
External TF card slot
8
Page 9
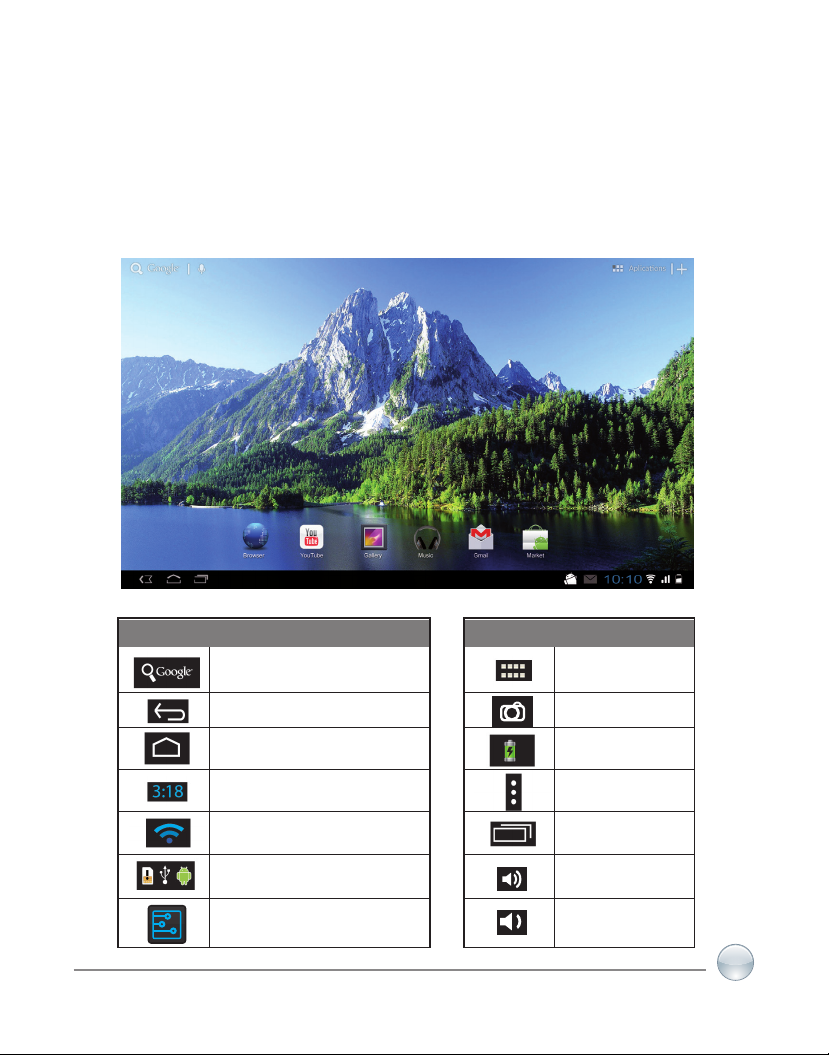
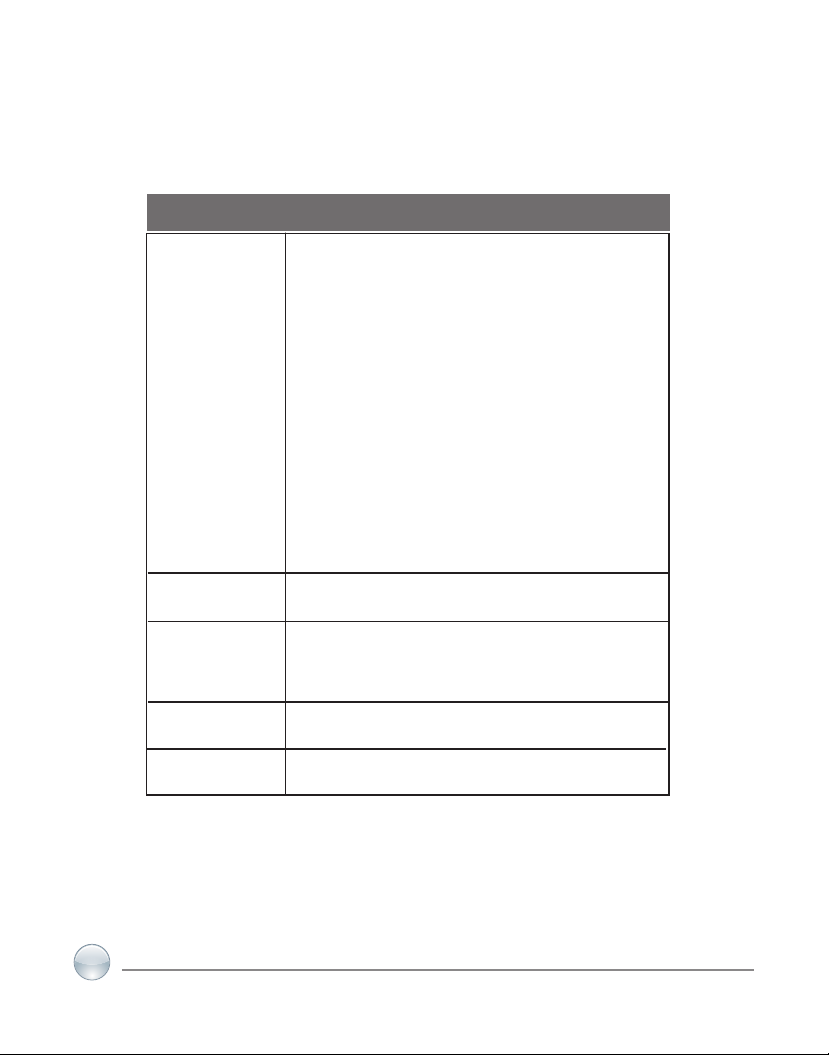
Chapter 2.
MAIN INTERFACE ICONS
2.1 Icons at the main Interface
Slim Pad B843Q
Icon Definition
Google Search
Back
Return to the Main interface
Current Time
WIFI signal
New device found
Settings
Icon Definition
Apps Menu
Camera
Battery
Display Menu
Last used apps
Volume+
Volume-
9
Page 10

Slim Pad B843Q
10
Page 11

Slim Pad B843Q
Chapter 3.
QUICK VIEW
3.1 About Touch Panel
The touch screen is capacitive touch screen; you can use ve ngers to touch the screen at the
same time.
3.2 Switch On/Off.
Switch On and Unlock: When the device is in the OFF mode, press and hold “Power” key for 3
seconds to enter the Android startup progress bar, it need about 20 seconds enter to the system
desktop, when the LCD is under locked mode, please press and pull the icon to the green
point, then the LCD will unlocked automatically, see the gures below,
11
Page 12

Slim Pad B843Q
3.3 Power Saving Modes and lock screen.
● Press the “POWER” key shortly after starting up, system enter to power save and lock mode.
● Press the “POWER” key or tap the touch screen, system will return to bright in 1 second
● The primary operation of the device will not stop under the power save mode, just the LCD is
shut and with black screen. For example: playing music, movie, etc
● Switch OFF: When the device is in the OFF mode, press and hold the “POWER” key for 3
seconds, the screen will display the power off interface, choose the power off item to conrm, the
system will shut automatically
Note: When the device with low battery it will alarm continuous and shut automatically without
charging. If the device can not start up please check if the battery is low, and try it again after the
battery is charged.
3.4 Battery management and charging.
3.4.1
rstly use.
Charge the battery for 8-12 hours to make sure the battery is fully charged when
3.4.2 Insert the micro port of the battery adaptor into DC slot on the device, and connect the
other side with the power socket. Then the desktop icon of the battery keep rolling which shows
it is charging, please wait until the battery is fully charged, don’t disconnect the power when
charging. Once the battery is fully charged, the Icon on the desktop will stop rolling.
Note: In order to keep the battery working in the best condition, please pay attention as below:
● Please don’t charge the power in high temperature.
● No need to release the power for this Li- battery, you can charge the power even there is still
some power in the battery, no need to wait it runs out.
● In order to keep the battery in good condition, please make sure to charge the power once
per two weeks if you don’t use this device for a long time.
12
Page 13

Slim Pad B843Q
3.5 USB HOST Function
3.5.1 USB- HOST Definition
The Mini USB on the device can be used as USB Host.
3.5.2 Read U-disk:
Insert the U-disk into the HOST port, press the Resource manager in the desktop, press
USB enter into u-disk.
3.5.3 External 3G USB Dongle.
(See network access guidance in chapter 4)
3.6 TF Card Storage
There is a TF card slot in this device, it support reading the les in TF card. Insert the TF card into
the card slot in right way, when take it out, just push the TF toward to the inside, then the slot will
release the TF card, the TF card will pop out automatically, take it then.
3.6.1 Please insert the TF into the card slot in the right side of the device.
3.6.2 Don’t pull out the card when operating ( reading, copying), or it may cause date error.
3.6.3 Don’t use the TF card under high temperature condition.
3.6.4 Keep the TF card far from the liquid and erosive materials.
13
Page 14

Slim Pad B843Q
14
Page 15
Slim Pad B843Q
Chapter 4.
NETWORK ACCESS
The device support Wi-Fi network .
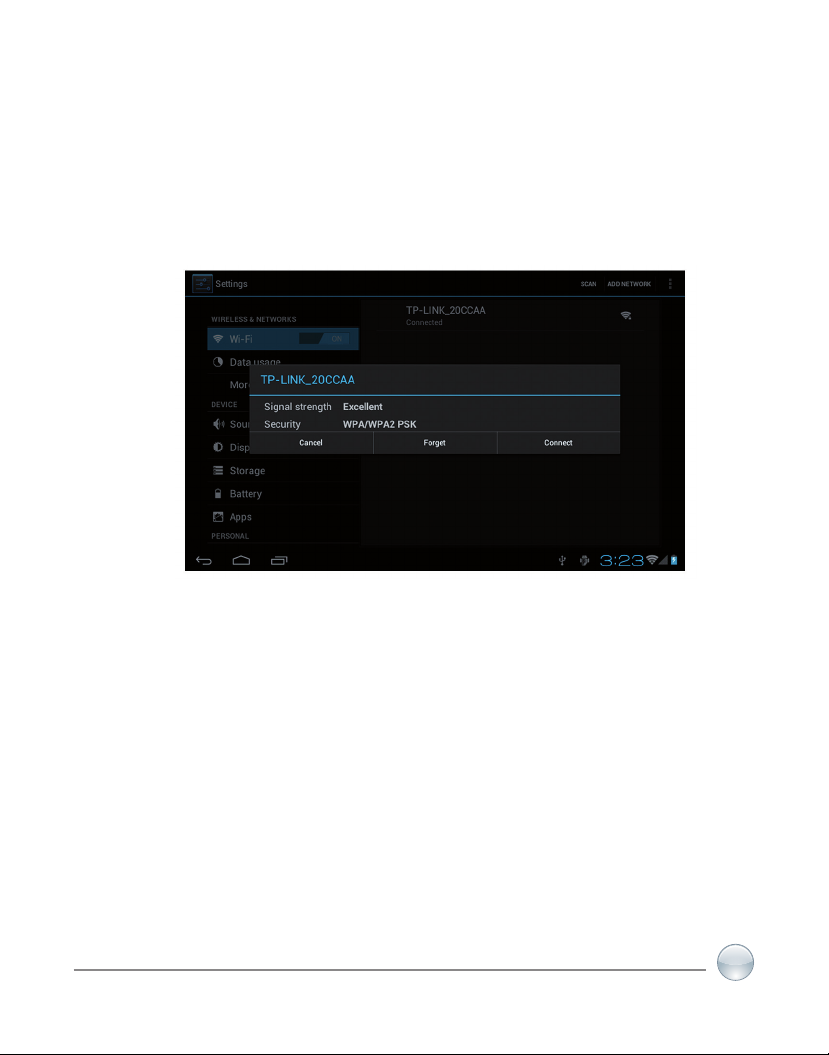
4.1 Network Access by Wi-Fi
4.1.1 Turn on Wi-Fi, and Press Wi-Fi settings. The device will scans automatically for
available Wi-Fi networks.
4.1.2 Choose the Wi-Fi network that you want to connect to.
4.1.3 Press Connect. Some network may need you input the password.
4.1.4 On the Wi-Fi settings screen, press the Menu key, touch Advanced, you will get
more settings for Wi-Fi.
15
Page 16

Slim Pad B843Q
16
Page 17
Slim Pad B843Q
Chapter 5.
MAIN FUNCTIONS
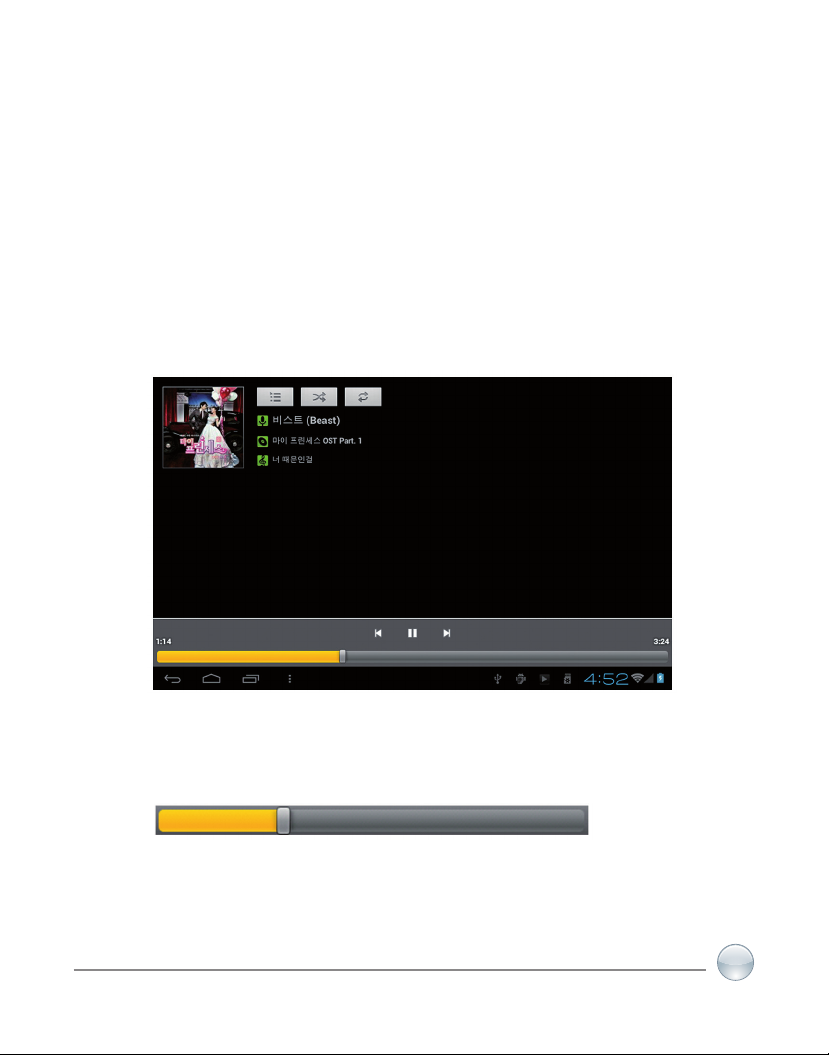
5.1 Audio Function
Enter the music player: In music player mode, double-click the favorite in the list to play music as
shown in the following picture
Drag the playing progress bar, to adjust the playing process.
Instructions of the buttons in the Music player
17
Page 18
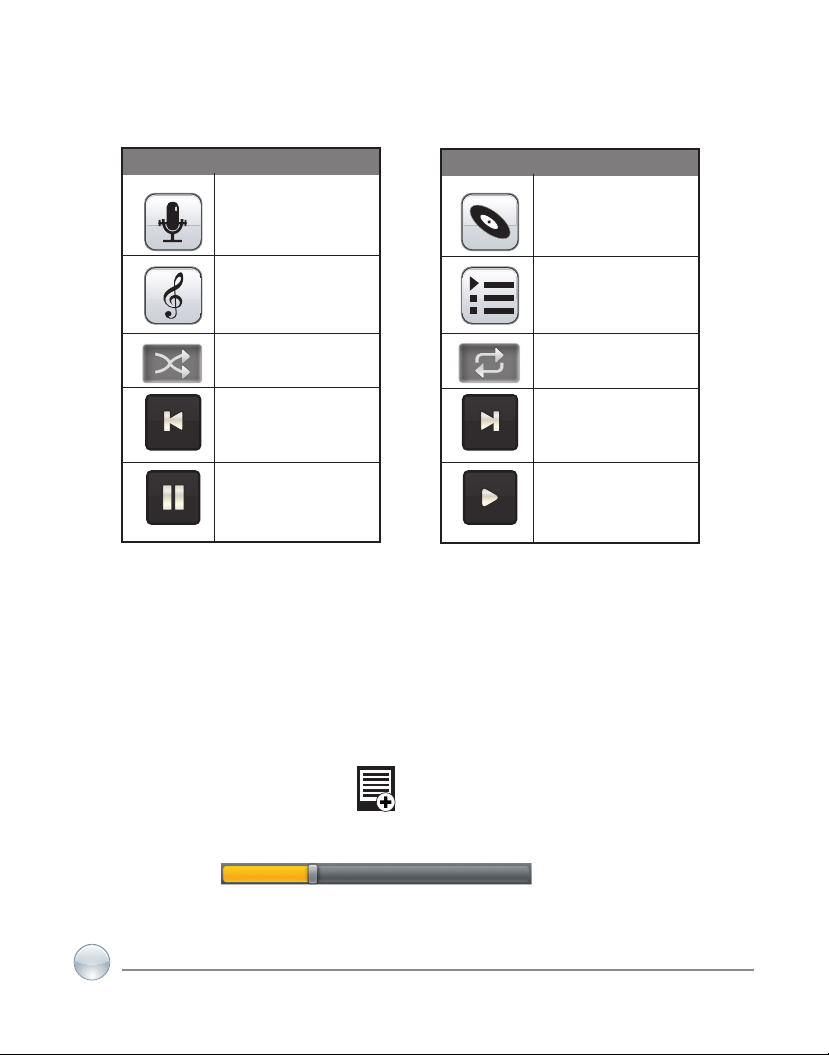
Slim Pad B843Q
Button Instruction
Artist
Song
Random Play
Play the last song
Pause
● When no music les in the audio player playlist, the system will automatically load the music
les from the card to the audio player playlist after turning on the audio player
(the device supported audio le format: mp3, wav, midi, wma). The playlist as shown in the above
gure
● If two more songs in the Music playlist area, slide up/down the touch screen to page up/down
Button Instruction
Album
Playing Music list
Loop playback
Play the next song
Play
● Double-click the favorite in the list to play music.
● In the music playing interface, click enter the audio playing list.
● Drag the playback progress bar to adjust audio playback progress.
18
Page 19

Slim Pad B843Q
5.2 Video Function
● Click the Video player icon to enter the video player interface, open the video les,
● The device supported audio le format:
MKV,AVI,RM,RMVB,MP4,MOV,VOB,DAT,FLV,3GP,etc.
● When no video les in the video player playlist, the system will automatically load the
video les from the card to the video player playlist after turning on video player.
● Drag the playback progress bar to adjust video playback progress.
● When no video les in the video player playlist, the system will automatically load the video
les from the card to the video player playlist after turning on video player.
● Drag the playback progress bar to
adjust video playback progress.
5.3 Picture Function
● Click the HD Video Player to enter the viewing interface
● Add image (supports the format of picture: BMP,JPG,JPEG,PNG,GIF, )
When there is no le in the photo list, the system will automatically load the image les from the
card to the photo browsing list after opening the photo browser.
Open the corresponding folder, nd the image le and add the picture you want.
● Click menu button, the photo can be set as wallpaper.
5.4 Record Function
Click the record icon to enter the record interface, click record button to start
recording, click this button
to stop recording, the system will remind you to use this recording or give up, please select
manually.
Recording playing: please select audio player to play the recording, rstly select the record les
from the explorer, then click it and playing, further details please refer to Audio Function.
19
Page 20

Slim Pad B843Q
5.5 File Manager
In le manager, you can check all les in the device, including les in built-in Memory and external
card. Also there is a quick view for pictures and videos.
5.6 E-book Function.
Support formats of E-Book: TXT, LRC, PDF, HTML, HTM, EPUB, etc.
20
Page 21

Slim Pad B843Q
5.7 Internet Browser
Before you use internet browse function, please make sure your network is connected. See network access guidance in former part.
● Click IE Browser icon to enter to the IE interface,
click the address bar and input website and click Go to enter a corresponding web page, you can
view the corresponding website information.
● Click icon to view bookmark and history record.
● Click menu icon to access settings
21
Page 22

Slim Pad B843Q
● The device also supports other internet browsers, detail functions of those internet
browsers refer to their own instructions.
5.8 Email Function
● Before you use email function, please make sure your network is connected. See network
access guidance in former part.
● When you rstly use this function, you need to add an email account to the device. The device
supports several accounts working together.
● Portal sites email accounts and enterprise email account adding methods are different.
Add portal sites email accounts. ( Example: Gmail, MSN, Yahoo, etc. )
Take Google email account for an example here.
Account: huaruian@gmail.com
Password: *********
● For portal sites email accounts, directly input your email address and password, then click
next.
● After successful connection, input Account Name and Your Name. Account Name means the
name of this account in the device, Your Name means the displayed name of your email in
receivers’ account.
22
Page 23

Slim Pad B843Q
● Then you will access the account. Click email titles to read emails, long press email titles to
access options.
● Click menu icon to access settings
Refresh: Checking new emails.
Compose: Write new emails.
Folders: Manage emails to different folders.
Accounts: View accounts in the device, add new accounts, delete accounts, set main account.
Accounts settings: More options for email account.
5.9 Calendar
Click Calendar icon to enter calendar interface.
● In calendar mode, press and pull up/down the screen to reduce/increase the Months; or to
turn the pages.
● Auto adjusts Years when the month exceeds December or January.
● Enter interface, the number in the orange form is the intraday date, you can change the date
in setting function; details as the setting section.
Click to return to main menu.
5.10 Calculator:
Click Calculator icon to enter calculator interface.
5.11 Alarm Clock
● Click Clock icon to enter time interface, then click the clock to access alarm interface, and you
can add new alarms or edit former alarms now.
● Long press former alarms to choose turn alarm on/off, edit alarm, and delete alarm. Click
alarms to edit alarm.
● You can edit alarms’ time, repeat mode, ringtone, and lable.
● In alarm interface, click menu icon to access settings. The following items could
be set.
23
Page 24

Slim Pad B843Q
5.12 APK Installer
● This device supports the third party’s Application Package (APK format) based on Android
OS. Many Application Package can be downloaded from internet, or copied from other devices
into the storage.
● If the Application Package is not downloaded from Google Android Market, you should
operate the following steps before installation. Please check Settings – Applications, make sure
Unknown sources is chosen.
● Click the File Manager icon and Choose the le you want to install APK, press
prompted to install
5.12.1 Install: Click Install, enter into the APK installer interface.
● Internal Memory means built-in Flash memory, SD card means inserted T-Flash;
● After entering, select the APK format setting program in the right side, click the application
to install, back to the main interface when complete this operation, then it nished the
installing, and there will be a relevant icon in application list.
24
Page 25

5.12.2 Manage: Click settings and Choose APPS
● Click the APPS, Choose the le you want to cancel software
● Click the software, uninstall the software.
Slim Pad B843Q
5.12.3 Exit: Go back to the main interface.
Note: All installed applications will be shown in application list menu. Here applications
include games, chatting TM, internet browser, media player, system tool, etc.
25
Page 26

Slim Pad B843Q
5.13 CAMERA AND PHOTOGRAPH
This machine is equipment with camera in the front, you can take photograph and record video
clips.
● Click on the applications tab to display all applications,then click “take photos” or “camera
shooting “ into the shooting model.
● Befor lming,you can click on camera’s work environment to have associate setting ,like:
white balance, photos size, photo quality, point mode etc.
● Click on button to start or end shooting .
● The photographs or video can be previewed in the preview window.
● If you want play the video you shooted ,turn on the video player and choose which video you
want to play.
● If you want to see the photograph you taken,turn into the photo model,and choose which
pictures you want to see.
26
Page 27

Slim Pad B843Q
Chapter 6.
SYSTEM SETTINGS
Click setting icon to enter system settings, then you can change wireless & networks,
sound, display, location & security, Applications, accounts & sync, Privacy, Storage, language &
keyboard, voice input & output, and date & time.
6.1 Wireless & Networks Setting, See chapter 4.
6.2 Sound Setting:
You can adjust Silent mode, Volume, Notication ringtone, Audible selection, Screen lock
sounds, and Haptic feedback.
6.3 Display Setting:
You can adjust Brightness, Auto-rotate screen, Animation, Screen timeout.
6.4 Location & Security Setting:
In this Setting, you can set up screen lock and device administrators, as well as TF card
password.
6.5 Applications Setting:
You can manage applications here, and check storage & battery usage.
Notice: If you want to install applications which are not downloaded from Google Android Market,
you should turn on Unknown sources in advance.
6.6 Accounts & sync Setting:
In this setting, you can manage accounts in the device.
6.7 Privacy Setting:
In this setting, you can back up data, and reset factory default.
27
Page 28

Slim Pad B843Q
6.8 Storage Setting:
In this setting, you can check storage use and Mount & Erase TF cards.
Notice: Before you fetch out TF Card (if you have inserted TF card), please Unmount TF card
rst, in case that some applications will arise problems.
6.9 Language & Keyboard Setting:
In this setting, you can change the language of system, and choose keyboard inputs.
Notice: If you have installed an input and you want to use it, please remember to turn on it in this
setting (All inputs could be turned on here). Long Press the blank where you want to type, there
will be popup to choose inputs.
6.10 Date & time Setting:
In this setting, you can adjust date and time.
6.11 About device:
Check device information.
28
Page 29

Slim Pad B843Q
Chapter 7.
FREQUENTLY ANSWERED QUESTIONS
Android
Q: What is the Android version?
A: 4.1.
Basic function of the device
Q: Do I need to charge the device before use?
A: You need to charge the battery for at least 4 hours, but you can operate the device while charging. When charging, always use a AC adaptor.
Email
Q: May I use my own email address to send and receive emails?
A: The device support POP3and SMTP accounts. The device may not support some free email
accounts. Please consult the email provider for details.
Storage card
Q: What storage card does the device support?
A: mini SD card.
Music
Q: What audio formats does the device support?
A: MP2, MP3, WAV, AAC, WMA
Q: How can I add music into the device?
A: You can copy the audio les from PC to SD card or USB disk, then copy them into the device
through File Browser.
Picture
Q: What picture formats does the device support?
A: JPG, JPEG, BMP and PNG.
Q: How can I add pictures into the device?
A: You can copy the picture les from PC to SD card or USB disk, then copy them into the device
through File Browser.
Video
Q: What video formats does the device support?
A: MPEG1/2/4, MJPG, H263, H264. H264 supports 720×480, other formats support 1280×720.
Q: Are videos in YouTube playable by the device”
A: Yes. You can click YouTube icon to play videos.
Q: How can I add videos into the device?
29
Page 30

Slim Pad B843Q
A: You can copy the video les from PC to SD card or USB disk, then copy them into the device
through File Browser.
Wi-Fi
Q: Do I need an eternal Wi-Fi device to connect to internet?
A: No. The device has built in Wi-Fi function.
The actual product you receive may differ.
Battery management
The battery is not fully charged when leaving the factory, so we suggest you charge the battery
for at least 4 hours before using.
The useful life of the battery is usually counted by charging times. However, you can try the following dos to prolong its useful life:
●Use the device at least once every week.
●Regularly fully charge the battery.
●Never keep the battery empty for a long time.
●Keep the device and the battery away from heat.
Charging the battery
Connect one end of the USB adaptor to the mains supply and the other end to the power jack on
the device (it takes about 5 hours to fully charge).
When the battery is full, the battery icon will display
It takes about 5 hours to fully charge an empty battery. You can operate the device while
charging.
Important safety instruction
Please follow the following safety instructions while using the device to avoid risk of re, electric
shock or injury:
● Keep the product away from rain and humidity.
● Keep the product away from direct sunlight and heat.
● Protect the power core. When connecting the power core, do not trample on it or place
anything on it. Use care to protect the connectors of the power core.
● Please only use the approved AC adaptor for charging. Using other adaptors may cause
damage.
● Never dissemble or try to repair the device.
Clean the device
Clean the screen tenderly. To clean the ngerprints or dust on the screen, we suggest you use the
soft cloth used on camera lens, but don’t use any rough cloth.
30
Page 31

Slim Pad B843Q
Advertencia al usuario
Este manual contiene información importante y medidas de seguridad
para el uso correcto de su producto. Por favor lea el manual cuidadosamente antes de usar el producto, para evitar accidentes.
El contenido de este manual puede cambiar o ser corregido en cualquier momento sin previo aviso. El fabricante QBEX provee este manual
como está, sin garantía de ninguna clase y sin ninguna responsabilidad
por daños indirectos, especiales, incidentales o a consecuencia de su
interpretación por el usuario, ni daños por pérdida de utilidad o negocios, perdida de datos, interrupción de negocios, etc.
Los productos y nombres corporativos mencionados en este manual
pueden o no ser marcas registradas o con derechos de sus respec-
tivos fabricantes, y esas solo se usan para propósitos de identicación
o explicación, con la intensión de beneciar y reconocer al fabricante
original, y sin la intensión de infringir ninguna patente.
Los derechos de reproducción total o parcial de este manual
pertenecen a QBEX ELECTRONICS. Ninguna parte de este manual podrá ser reproducida, transmitida o traducida sin el permiso de
QBEX ELECTRONICS.
Referencia: B843Q
Versión del Manual: 1.1
Fecha Última Revisión: May 2013
www.qbex.com
31
Page 32

Slim Pad B843Q
Instrucciones de Seguridad
PRECAUCIÓN
1) Opere el producto siguiendo los pasos correctos de instalación, con gran cuidado para que
tenga una experiencia de uso segura y confortable. Reérase a las instrucciones siguientes
para evitar daños o choque eléctrico o fuego.
2) Siga el manual de Instrucciones como guía de operación.
3) Rango de temperatura apropiado 0 °C–30 °C (32 °F–95 °F).
4) Humedad permitida 5% a 80% RH.
5) Para evitar sobrecargas y temperaturas elevadas, por favor use siempre la fuente o
cargador original de QBEX.
6) No use el producto cerca del agua.
7) Siempre desconecte los cables de potencia y datos del sistema, antes de limpiarlo.
8) Aplique solamente un trapo seco para limpiar el producto.
9) No lo use cerca de Fuentes de calor. No lo deje en lugares expuestos a altas temperaturas
como su carro, en verano.
10) Escoja un volumen apropiado. Si al usar audífonos siente tinnitus, disminuya el volumen o
pare de usar los audífonos.
11) Cuando el dispositivo esté inicializando o cargando o descargando un archivo, evite
desconexiones bruscas ya que pueden causar errores de aplicación.
12) No use alcohol, thinner, varsol o similares para limpiar el producto.
13) No use el dispositivo en lugares donde se prohíba el uso de equipo electrónico,
por ejemplo en aviones.
14) No use el dispositivo mientras maneja o camina en la calle.
15) No bloquee las rejillas de ventilación.
16) Remueva el adaptador de potencia cuando haya tormentas eléctricas o cuando no vaya
a usar el producto por largo tiempo.
17) Coloque el producto en una supercie estable.
18) No deje caer el producto, no lo golpee de ninguna forma.
19) No sacuda el dispositivo violentamente, especialmente la parte de la pantalla LCD. Puede
causar una imagen defectuosa.
20) No lo mueva cuando está cargando la batería.
21) No se pare ni enrede sobre o con los cables, ni coloque peso o algún objeto encima de los
cables ni de la tableta.
22) Solo puede ser intervenido o reparado por Centros Autorizados QBEX para este producto.
23) Use solamente partes originales suministradas por QBEX.
32
Page 33

Slim Pad B843Q
Contenido
CAPíTULO 1:
BREVE DESCRIPCIÓN......................................................................... 35
1.1 VISTA GENERAL DEL PRODUCTO........................................................ 35
1.2 BOTONES & CONECTORES.................................................................. 36
CAPíTULO 2:
ICONOS EN INTERFACE PRINCIPAL.................................................... 37
CAPíTULO 3:
GUIA RAPIDA
3.1 PANEL TÁCTIL........................................................................................ 39
3.2 ENCENDIDO Y APAGADO...................................................................... 39
3.3 MODOS DE AHORRO DE ENERGÍA Y BLOQUEO DE PANTALLA....... 40
3.4 MANEJO DE LA BATERÍA Y CARGA...................................................... 40
3.5 FUNCIÓN DE USB HOST........................................................................ 41
3.6 ALMACENAMIENTO EN TARJETA TF.................................................... 41
CAPíTULO 4:
ACCESO A LA RED.............................................................................. 43
4.1 ACCESO POR WI-FI............................................................................... 43
CAPíTULO 5:
INTRODUCCIÓN A LAS FUNCIONES PRINCIPALES ........................... 45
5.1 AUDIO..................................................................................................... 45
5.2 VIDEO..................................................................................................... 47
5.3 IMÁGENES............................................................................................. 47
5.4 FUNCIÓN DE GRABACIÓN................................................................... 47
5.5 MANEJADOR DE ARCHIVOS................................................................ 47
33
Page 34

Slim Pad B843Q
5.6 LIBROS ELECTRÓNICOS..................................................................... 48
5.7 NAVEGADOR DE INTERNET................................................................. 48
5.8 CORREO ELECTRÓNICO..................................................................... 49
5.9 CALENDARIO......................................................................................... 50
5.10 CALCULADORA..................................................................................... 51
5.11 ALARMA................................................................................................. 51
5.12 INSTALADOR DE APLICACIONES........................................................ 51
5.13 CÁMARA Y FOTOGRAFÍA..................................................................... 54
CAPíTULO 6:
CONFIGURACIÓN DEL SISTEMA........................................................ 55
6.1 CONFIGURACIÓN DE RED Y WI-FI...................................................... 55
6.2 CONFIGURACIÓN DE SONIDO............................................................ 55
6.3 CONFIGURACIÓN DE DISPLAY............................................................ 55
6.4 CONFIGURACIÓN DE LOCALIZACIÓN Y SEGURIDAD...................... 55
6.5 CONFIGURACIÓN DE APLICACIONES................................................ 55
6.6 CONFIGURACIÓN DE CUENTAS Y SINCRONIZACIÓN...................... 55
6.7 CONFIGURACIÓN DE PRIVACIDAD.................................................... 55
6.8 CONFIGURACIÓN DE ALMACENAMIENTO......................................... 56
6.9 CONFIGURACIÓN DE LENGUAJE Y TECLADO.................................. 56
6.10 CONFIGURACIÓN DE FECHA Y HORA................................................ 56
6.11 A CERCA DE LA TABLETA..................................................................... 56
CAPíTULO 7:
PREGUNTAS FRECUENTES................................................................. 57
7.1 COMO CAMBIAR EL LENGUAJE.......................................................... 57
7.2 COMO CAMBIAR LA ENTRADA DIGITANDO....................................... 57
7.3 COMO ENCONTRAR APLICACIONES YA INSTALADAS..................... 57
7.4 PROBLEMAS EN ENCENDIDO ............................................................ 57
7.5 NO HAY SONIDO EN LA SALIDA DE AUDIO ........................................ 57
7.6 NO PUEDO INSTALAR APLICACIONES............................................... 57
7.7 HAY CÓDIGO DE ERRORES EN LA PANTALLA................................... 57
7.7 HAY PROBLEMAS DE SISTEMA........................................................... 58
34
Page 35

CAPÍTULO 1.
BREVE DESCRIPCIÓN.
1.1 VISTA GENERAL DEL PRODUCTO
Slim Pad B843Q
Botón de
encendido
Conector Audífono
Micro
SD Slot
Conector
HDMI Mini
Micrófono
Control
Volumen
Conector
Mini USB
35
Page 36

Slim Pad B843Q
1.2 Botones, Conectores
Nombre Función
Botón de
Encendido
En inicio: Presione por un tiempo > 3 segundos
y el sistema entrará a la interface principal
En Apagado: En la interface del menú principal,
presione este botón por cerca de 4 segundos
para apagar la tableta. El sistema mostrará la
opción “Power Off o Apagado”. Clic “OK o Si” y el
equipo apagará correctamente.
En Bloqueo de la Pantalla: Presione por corto
tiempo el botón para bloquear o desbloquear la
pantalla.
ADVERTENCIA:
1- Cuando no haya suciente carga en la ba-
tería, el sistema se apagará automáticamente,
después de hacer sonar una alarma.
2- En un apagado incorrecto, el sistema en el re-
inicio hará una exploración y restauración en el
disco. Esto puede tomar un tiempo largo antes
de entrar a la interface disponible al usuario.
36
Conector
de Audífono
Conector
Mini USB
Conector
HDMI
Lector de
Tarjeta TF
3.5 mm’ conector de audífono
Conector USB a computador (PC o Portátil)
para transmisión de datos, carga de batería, o
para conectar un disco externo USB Flash.
Para conectar HDMI un PC
Ranura externa para tarjeta T-FLASH
Page 37

CAPÍTULO 2.
ICONOS EN INTERFACE PRINCIPAL
2.1 Iconos en Interface Principal
Slim Pad B843Q
Icono Definición
Búsqueda Google
Regreso
Regreso a la interfase principal
desde cualquier punto
Hora actual
Señal WIFI
Nuevo dispositivo encontrado
Conguración
Icono Definición
Menú de Aplicaciones
Cámara
Batería
Menu del Display
Menu de Cong.
Incrementar Volumen
Disminuir Volumen
37
Page 38

Slim Pad B843Q
2-2. Introducción a la interfase Principal
Después de presionar el botón de encendido para encender o desbloquear la tableta (ver capítulo 3), si la pantalla está bloqueada; deslice el ícono de bloqueo a la derecha hasta desbloquear la
tableta y entrar ala interfase principal. En esta interfase verá el estado, cambiar el papel de fondo,
adicionar widgets, adicionar atajos a programas, iniciar programas, etc.
2-2-1. Barra de estado:
Visible en la parte inferior de la interface principal:
2-2-2. Menu del Display:
Presione el botón “ ” para cambiar el papel tapiz-Administrar aplicaciones o congurar el
sistema.
●Papel de Fondo :
Puede escoger sus fotos favoritas como fondo de escritorio en la interfase principal.
●Administrar Programas de Aplicación:
Se pueden revisar y eliminar los programas no deseados
●Conguración del Sistema: clic para entrar a la conguración directamente.
2-3. Adicionar mover o borrar íconos en el escritorio
En la interfase principal, clic para entrar en el menú de funciones ,Mostrar las aplicaciones. Presiones y sostenga para arrastrar el ícono para copiar al escritorio los atajos.
Usted puede borrar el ícono que es adiciona a la interfase principal. Presione y sostenga el ícono
que va a eliminar, aparecerá un signo X en la parte superior, arrastre ( el ícono hasta la X
para borrarlo)
2-4. Atajo para ir a la pantalla que muestra todas las aplicaciones y funciones: clic :
38
Page 39

Slim Pad B843Q
CAPÍTULO 3.
GUIA RAPIDA
3.1 Panel táctil
La pantalla táctil es capacitiva. Puede usar sus 5 dedos para tocar la pantalla al mismo tiempo.
3.2 Encendido y Apagado- On/Off.
Encendido y Desbloqueo : Cuando el dispositivo está Apagado ( OFF), presiones y mantenga la
tecla de Encendido (“Power” ) por 3 segundos para entrar el modo de inicio del sistema operativo
Android , se necesitan cerca de 20 segundos para entrar el escritorio del sistema. Cuando el
dispositivo está en modo de bloqueo presione y libere el botón de encendido y luego arrastre el
ícono al punto verde de desbloqueo, según muestra la gura siguiente:
39
Page 40

Slim Pad B843Q
3.3 Modos de Ahorro de Energía y bloqueo de pantalla.
● Presione ligeramente el botón de ENCENDIDO ( “POWER”) cuando ya el dispositivo está
encendido. Este entrará en modo de ahorro de energía y bloqueo.
● Presione la tecla de ENCENDIDO (“POWER”), el la pantalla del equipo mostrará imagen
en menos de 1 segundo.
● La operación primaria del dispositivo no parará en el modo de ahorro de energía. Solo el
video se apaga. Por ejemplo reproduciendo música, videos, etc
● APAGADO-(OFF): Cuando el dispositivo está en modo APAGADO, presione y sostenga la
tecla de ENCENDIDO por 3 segundos , la pantalla mostrará la interface de apagado, Escoja
la opción de APAGAR y conrme OK. El sistema se apagará.
Nota: Cuando el dispositivo tiene poca carga en la batería, sonará la alarma continuamente y
se apagará. Si el dispositivo no inicia posteriormente, cargue primero la batería y luego intente
Encenderlo.
3.4 Manejo de la Batería y Carga.
3.4.1
cuando la use por primera vez.
Cargue la batería por 8-12 horas para asegurarse que queda con carga completa
3.4.2 Inserte el micro conector Plug del adaptador en el conector jack de la
tableta. Y conecte el otro extreme a la toma en la pared. El ícono de la carga de la batería se
mantendrá indicando que hay un proceso de carga hasta que la batería esté
completamente cargada.
Nota: Para tener la batería trabajando en óptimas condiciones verique lo siguiente:
● No cargue la batería en condiciones de Alta Temperatura ambiente.
● No necesita esperar que se agote la carga de la batería completamente para recargarla
pues es de Litio.
● Para mantener la batería en buenas condiciones cárguela una vez cada dos semanas si
no usa el dispositivo por largo tiempo.
40
Page 41

Slim Pad B843Q
3.5 Función USB HOST
3.5.1 Definición de USB- HOST
El conector o Puerto Mini USB en su dispositivo puede usarse como un USB Host
3.5.2 Lectura de U-disk:
Inserte el U-disk en el Puerto HOST, presione Manejador de Recursos ( Resource
manager) en el escritorio, presione USB entrar (enter) en el u-disk.
3.5.3 Dispositivo Externo 3G USB
(Ver guía de RED en Capítulo 4)
3.6 Almacenamiento en tarjeta TF
El Puerto para tarjeta TF soporta lectura de archivos en la tarjeta TF. Para insertar la tarjeta TF en
la ranura, verique que lo hace en la dirección correcta y para retirarla presiónela hacia adentro
suavemente y la ranura liberará la tarjeta mostrando un aviso de advertencia.
3.6.1 Por favor inserte la tarjeta TF en la ranura correspondiente según se indica en la
gura 1
3.6.2 No intente halar la tarjeta cuando está en uso (leyendo, copiando), pues
dañará el dispositivo y causará errores en datos.
3.6.3 No use la tarjeta TF bajo condiciones de alta temperatura
3.6.4 Proteja su tarjeta y dispositivo de la acción de líquidos y materiales abrasivos
y líquidos.
41
Page 42

Slim Pad B843Q
42
Page 43

CAPÍTULO 4.
ACCESO A LA RED
Su tableta Soporta Redes Wi-Fi.
Slim Pad B843Q
4.1 Acceso a la RED por Wi-Fi
4.1.1 Encienda el Wi-Fi, y presione conguración de Wi-Fi. La tableta buscará
automáticamente las redes Wi-Fi disponibles.
4.1.2 Escoja la red Wi-Fi a la cual se quiere conectar.
4.1.3 Presiones Conectar (Connect). Las redes que tengan seguridad habilitada le pedirán
una contraseña ( password).
4.1.4 En la pantalla de conguración de Wi-Fi , presione las teclas del Menu, escoja
Avanzado, y encontrará más opciones de conguración de Wi-Fi.
43
Page 44

Slim Pad B843Q
44
Page 45

Slim Pad B843Q
CAPÍTULO 5.
INTRODUCCIÓN A LAS FUNCIONES PRINCIPALES
5.1 Audio
Entra en el reproductor de música: Escoja en este modo la lista favorita hacienda doble clic
según se muestra en la siguiente gura:
Arrastre la barra de progreso de la reproducción, para ajustar el progreso
de dicha reproducción.
Instrucciones para los botones en el reproductor de Música.
45
Page 46

Slim Pad B843Q
Botón Instrucción
Artista
Canción
Reproducción Aleatoria
Toque la última canción
Pausa
● Cuando no hay archivos de música en la lista del reproductor, el sistema cargará automáticamente la lista de los archivos de música desde la tarjeta TF tan pronto se encienda el reproductor
de audio. (el dispositivo soporta formatos de audio : mp3, wav, midi, wma). La lista de reproducción se muestra en la gura anterior.
● Puede escoger canciones en la lista de reproducción mediante la pantalla táctil desplazándo-
se hacia arriba o hacia abajo en el área.
● Haga doble clic en la canción favorita para reproducirla.
Botón Instrucción
Álbum
Lista de Reproducción
de Música
Reproducción en bucle
Toque la siguiente
canción
Toque
● En la interface de reproducción de música, clic en para entrar en la lista.
● Arrastre la barra de progreso para ajustar
el progreso de reproducción.
46
Page 47

Slim Pad B843Q
5.2 Video
● Clic en el ícono del reproductor de Video para entrar en la interface y abrir los archivos
de video,
● La tablet soporta formatos de audio : MKV,AVI,RM,RMVB,MP4,MOV,VOB,DAT,FLV,3GP,etc.
● Cuando no hay archivos de video en la lista de reproducción de video, el sistema cargará
automáticamente los archivos de video de la tarjeta TF tan pronto se encienda el
reproductor de video.
● Arrastre la barra de progreso de reproducción para ajustar el progreso de la misma.
5.3 Imágenes
● Clic en el ícono del reproductor de HD Video para entrar en la interface correspondiente.
● Agregar imagen (soporta los formatos de imagines : BMP,JPG,JPEG,PNG,GIF, )
Cuando no hay archivos en la lista de fotos, el sistema cargará la lista de imágenes de la
tarjeta TF tan pronto se abra el visor de fotos.
Abra el directorio o carpeta correspondiente, encuentre la imagen deseada y agregue la
que desea.
● Clic en el botón menu , puede congurar la foto como imagen de fondo del escritorio.
5.4 Grabación
Clic en el ícono para grabar para entrar en la interface, clic en el ícono para
comenzar a grabar, clic en el ícono para detener la grabación, el sistema le recordará
guardar el archivo o eliminarlo, por favor seleccione manualmente.
Reproducción de grabación: Seleccione el reproductor de audio, seleccione los archivos grabados. Haga clic en estos para reproducirlos, más detalles en la función AUDIO.
47
Page 48

Slim Pad B843Q
5.5 Manejador de Archivos
En el manejador de archivos, puede vericar todos los archivos en la tableta, tanto en la memoria
interna como externa. También hay una vista rápida de imágenes y videos.
5.6 Libros Electrónicos (E-book).
Soporta formatos E-Book: TXT,LRC,PDF,HTML,HTM,EPUB, etc.
48
Page 49

Slim Pad B843Q
5.7 Explorador de Internet
Antes de usar el explorador de Internet, verique que está conectado a la RED. Ver la sección
correspondiente para más detalles.
● Clic en el ícono del explorador para entrar en la interface, Clic en la barra de
direcciones y digite el sitio WEB y haga clic en IR (Go).
● Clic en el ícono para ver el registro de las marcas e historia.
● Clic en el ícono del menu para acceder a la conguración
49
Page 50

Slim Pad B843Q
● El dispositivo también soporta otros exploradores de Internet.
5.8 Correo Electrónico
● Antes de usar la función de correo, verique que está conectado a la RED. Ver sección
correspondiente para más detalles.
● Al usar esta función por primera vez, debe agregar una cuenta de correo. Su tableta
soporta varias cuentas de correo trabajando juntas.
● Cada proveedor del servicio de correo tiene diferentes métodos de conguración de la
cuenta.
Ejemplos de portales de cuentas de correo: ( Gmail, MSN, Yahoo, etc. )
Una cuenta en Google, de correo, tendrá un nombre y una clave: por ejemplo
Nombre de Cuentat: anamaría@gmail.com
Clave: *********
50
Page 51

Slim Pad B843Q
● Para cuentas de correo o portales entre su nombre de cuenta y clave, después seleccione
siguiente.
● Después de una conexión exitosa, digite Nombre de cuenta(es el nombre de su cuenta en
la tableta), Su nombre (Your Name) signica el nombre que muestra a los que reciben
su correo.
● Cuando accese su cuenta, haga clic en los títulos para leer los correos. Una presión sobre
el título permite acceder a las opciones.
● Clic en el ícono para llegar a la interface de conguración.
Refrescar: Vericando nuevos correos.
Componer: Escribir nuevos correos.
Carpetas: Puede almacenar correos en diferentes carpetas.
Cuentas: Ver las cuentas en la Tableta, adicionar nuevas cuentas,borrar cuentas, denir la
cuenta principal.
Conguración de cuentas: Más opciones para una cuenta de correo.
5.9 Calendario
Clic en Calendario para entrar a la interface.
● Click to return to main menu.
5.10 Calculadora:
Clic en el ícono Calculadora para entrar a la interface.
5.11 Reloj Alarma
● Clic en el ícono Reloj para entrar a la interface, luego haga clic en reloj para accesar la
interface de la alarma, y podrá adicionar nuevas alarmas o editar alarmas ya conguradas.
● Presione sobre las alarmas para encender/apagar, editar o eliminar. Clic en las alarmas
para editarlas.
● Puede editar el tiempo de la alarma, el modo de repetición, el tono de timbre y nombre.
● En la interface de la alarma, haga clic en el ícono para accesar la
conguración.
51
Page 52

Slim Pad B843Q
5.12 Instalador de APK
● La tableta soporta el paquete de aplicaciones de terceros (APK), basado en el sistema
operativo Android . Muchos paquetes de aplicaciones pueden descargarse de Internet o copiarse
desde otros dispositivos de almacenamiento.
● Si el paquete de aplicaciones no se descarga desde el Mercado Android de Google, usted
debe operar de acuerdo a los siguientes pasos antes de instalar. Por favor escoja Conguración
de Aplicaciones y asegúrese de seleccionar Fuente desconocida.
● Clic en el ícono Manejador de Archivos y escoja el archivo que quiere instalar el APK.
Presione la opción apropiada.
5.12.1 Instalación:
Clic Instalar , para entrar en la interface del instalador de APK.
● La memoria interna signica memoria Flash incorporada, tarjeta SD signica T-Flash
insertada.
52
Page 53

Slim Pad B843Q
● Después de entrar, seleccione la conguración de APK, clic en la aplicación para instalar,
regrese a la interface principal cuando complete la operación y verá el ícono relativo a la
aplicación instalada, tan pronto termine la instalación.
5.12.2 Administración:
Clic en conguración y escoja APPS
● Clic en APPS, escoja el archivo del cual quiere cancelar el software
● Clic en el software y desinstale el programa.
53
Page 54

Slim Pad B843Q
5.12.3 Salida: Regresa a la interface principal.
Nota: Todas las aplicaciones instaladas se mostrarán en el menú de la lista de aplicaciones.
Las aplicaciones incluyen juegos, chat TM, navegación en Internet, reproductor,
herramientas del sistema, etc.
5.13 CÁMARA Y FOTOGRAFÍA
Su tableta está equipada con una cámara en el frente. Puede tomar fotografías y grabar clips
de video.
● Clic en la barra de aplicaciones para mostrar todas las aplicaciones, después haga clic en
Tomar Fotos para entrar en el modo de disparo.
● Antes de lmar puede hacer clic en el ambiente de trabajo de la cámara para tener
conguraciones asociadas como balance de blanco, tamaño de las fotos, calidad de las
fotos, etc.
● Clic en el ícono para comenzar o nalizar el disparo.
● Las fotografías o videos pueden verse previamente en la pantalla de vista previa.
● Si quiere reproducir el video, que usted lmó ,encienda el reproductor de VIDEO y escoja
que video quiere reproducir.
● Si quiere ver las fotografías que ha tomado, debe escoger el modo Foto y luego las
imágenes que quiera ver.
54
Page 55

Slim Pad B843Q
CAPÍTULO 6.
CONFIGURACIÓN DEL SISTEMA
Clic en ícono de conguración para entrar a congurar el sistema: cambiar la RED,
sonido, localización y Seguridad, aplicaciones, cuentas & Sync, Privacidad, Almacenamiento,
Lenguaje y teclado, entrada y salida de voz, fecha y hora.
6.1 Configuración de la RED:
ver sección 4.
6.2 Configuración de Sonido:
Puede ajustar el modo Silencio, Volumen, Tono de Noticaciones, Selección Audible, Sonidos
de Bloqueo de Pantalla.
6.3 Configuración de Display:
Puede ajustar Brillo, Auto-rotación de pantalla, Animación, Tiempo de Pantalla.
6.4 Localización & Configuración de Seguridad:
Puede denir el bloqueo de pantalla, administración de la tablet y una clave para el uso de la TF.
6.5 Configuración de aplicaciones:
Manejo de aplicaciones, vericar el almacenamiento y uso de las baterías.
Nota: Si quiere instalar aplicaciones que no son bajadas del mercado de Google Android , debe
encender la opción Fuentes Desconocidas, de antemano.
6.6 Cuentas y & configuración de sync.
En esta sección puede manejar cuentas en la tableta.
6.7 Configuración de Privacidad:
Puede hacer respaldo y volver a conguración de fábrica..
55
Page 56

Slim Pad B843Q
6.8 Configuración de almacenamiento.
Puede ver el uso del almacenamiento, Montar & Borrar tarjetas TF.
Nota: Antes de sacar la tarjeta TF Card (si la tiene insertada), por favor desmonte la tarjeta TF
primero, en algunos casos se pueden derivar problemas si no sigue esta norma.
6.9 Configuración de Languaje & Teclado:
Escoja el lenguaje de la tableta y el teclado de entrada.
Nota: Si usted tiene instalada una entrada y quiere usarla, por favor recuerde encender esta
conguración (Todas las entradas deberían ser Encendidas acá.). Presione varios segundos el
lugar en blanco donde quiere escribir, aparecerá una pantalla pidiendo escoger las entradas.
6.10 Configuración de Fecha & Hora:
Puede ajustar la fecha y hora.
6.11 A cerca de la tableta:
Verique esta información para saber la versión.
56
Page 57

Slim Pad B843Q
CAPÍTULO 7.
PREGUNTAS FRECUENTES
Android:
Q: Cual es la versión de Android en mi Tableta?
A: 4.1
Funcionamiento Básico:
Q: Tengo que cargar la batería antes de usar mi Tableta?
A: Usted debería cargar por primera vez por al menos 4 horas, Use únicamente el
adaptador de potencia incluido con su tableta. Este equipo NO PUEDE CARGARSE
por el cable USB.
E-mail:
Q: Puedo usar mi correo personal para enviar y recibir correo?
A: Esta tableta soporta cuentas POP3 y SMTP. Algunas cuentas de correo gratuitas no son
soportadas. Algunas cuentas gratis no son soportadas en dispositivos móviles. Verique con
su proveedor de correo si su cuenta es soportada.
Tarjeta de almacenamiento;
Q: Que tipo de tarjetas media son soportadas en mi tableta?
A: tarjetas micro SD.
Música:
Q: Que tipo de archivos pueden ser reproducidos en mi tableta?
A: MP2, MP3, WAV, AAC, WMA
Q: Como puedo agregar archivos de música a mi tableta?
A: Copie los archivos de música desde su computador en la tarjeta SD o en la USB , y
después use la aplicación File Browser para copiar los archivos a la tableta.
Fotos:
Q: Que tipo de fotos puedo ver en mi tableta?
A: JPG, JPEG, BMP and PNG.
Q: Como adiciono archivos de fotos a mi tableta?
A: Copie los archivos de su computador a la tarjeta SD o a la USB, y luego use el explorador de
archivos para copiarlos.
57
Page 58

Slim Pad B843Q
Video:
Q: Que tipo de archivos de video puedo reproducir en mi tableta?
A: Formatos soportados: MPEG1/2/4, MJPG, H263, H264. H264 soporta 720×480, El formato
mas grande soportado es resolución de 1280×720.
Q: Como puedo adicionar archivos de video a mi tableta?
A: Copie los archivos de su computador a la tarjeta SD o a la USB, y luego use el explorador de
archivos para copiarlos.
Wi-Fi:
Q: Necesito un adaptador Wi-Fi para conectarme a Internet?
A: No. El adaptador Wi-Fi está incorporado en su tableta.
ADMINISTRACIÓN DE LA BATERÍA
La batería nueva no está completamente cargada de manera que se recomienda cargar la batería por al menos 6 horas ante de comenzar a usar la tableta.
Esta batería está diseñada para ser usada y cargada con frecuencia. Como en todas las baterías
su capacidad se reduce cada vez que es cargada y descargada. Usted puede tratar de prolongar
la vida de la batería siguiendo estas recomendaciones:
● Use su tableta al menos una vez a la semana.
● Cargue la batería regularmente y completamente.
● Nunca deje la batería completamente descargada por un largo periodo de tiempo.
● Siempre mantenga la tableta y la batería alejadas del calor.
Carga de la batería
Conecte el adaptador en la toma de la pared y después conecte la tableta para carga completa
antes de usarla (Una carga completa toma cerca de 6 horas en estado apagado).
* No puede cargar la batería usando el cable USB.
Cuando tenga carga completa aparecerá el ícono .
58
Page 59

FCC Warning:
This device complies with Part 15 of the FCC Rules. Operation is subject to the following two
conditions: (1) this device may not cause harmful interference, and (2) this device must accept
any interference received, including interference that may cause undesired operation.
changes or modifications not expressly approved by the party responsible for compliance
could void the user's authority to operate the equipment.
NOTE: This equipment has been tested and found to comply with the limits for a Class B
digital device, pursuant to Part 15 of the FCC Rules. These limits are designed to provide
reasonable protection against harmful interference in a residential installation. This equipment
generates, uses and can radiate radio frequency energy and, if not installed and used in
accordance with the instructions, may cause harmful interference to radio communications.
However, there is no guarantee that interference will not occur in a particular installation. If
this equipment does cause harmful interference to radio or television reception, which can be
determined by turning the equipment off and on, the user is encouraged to try to correct the
interference by one or more of the following measures:
-- Reorient or relocate the receiving antenna.
-- Increase the separation between the equipment and receiver.
-- Connect the equipment into an outlet on a circuit different from that to which the receiver is
connected.
-- Consult the dealer or an experienced radio/TV technician for help.
FCC RF warning statement: The device has been evaluated to meet general RF exposure
requirement. The device can be used in portable exposure condition without restriction.
Page 60

 Loading...