

Page 1

For all respected users:
Thank you for choosing China’s high-quality brand tablet
PC.
Important Declaration
1. Before using the tablet PC, please read all information
provided by us first so that you can use this product correctly.
Please make sure that you have read this manual carefully
before using this product.
2. Our company reserves the copyright of this manual, any
random duplication or interpretation of the full or partial
manual is forbidden in commercial activities.
3. The information covered in this manual is all based on
the latest information when compiling the manual, and
products are subject to change without notice for further
improvement. We are not committed to any mistakes or
1
Page 2

incidences caused by the manual. For additional product
information, visit the company’s web site.
4. When using this product, please make backup for the
data by yourself and this company will just be responsible for
the product's hardware itself, and will not undertake any
responsibility for any loss or damage of personal data and
information due to wrong operations of hardware.
Precautions
This manual includes important information on safety
precautions and proper usage of this product. To prevent any
accident, please make sure that you have read this manual
carefully before using this product.
z Do not keep this product in a place with a high
temperature, humidity or too much dust. Especially do
not place this product in a car with all windows closed in
2
Page 3

summer, and keep out direct sunlight.
z Avoid dropping or shocking this product heavily and
avoid shaking the TFT display violently, otherwise, the
TFT display may be damaged or cannot play correctly.
z Please choose a suitable volume. Avoid excessively high
volume when using a headset. If you feel any ear noise,
please decrease the volume or stop using.
z Do not break the connection suddenly when this product
is conducting formatting, uploading or downloading
operations, otherwise there may be program errors.
z This company will not undertake any responsibility for
any memory loss due to product damage, repairing or
other reasons.
z Do not dissemble this product by yourself and do not
clean the surface of this product with alcohol, thinner or
benzene.
3
Page 4

z Do not use this product in a place where the using of
electronic device is prohibited, such as on a plane.
z Do not use this product while driving a car or walking on
the street, otherwise traffic accident may occur.
※ This Company reserves the right to make any improvement
on this product. No further notice will be provided on any
variation on the specification and design of this product!
★ (This product has no water-proof function)
4
Page 5

Content
Important Declaration…………………………………………1
Precautions………….…………………………………………2
Main Functions………………………………..………………8
Appearance and Buttons……………………………...…...…11
Chapter 1. Quick Start……..…………………………………12
1-1. Power ON/OFF/Lock/Unlock…………….……...……12
1-2 Battery and Charge………………………………………14
1-3. Computer Connection & File Transfer…………….……15
1-4. The using of touch screen…………….…………………16
1-5. G-Sensor……………….………………………..………18
1-6.Solve problem of machine run slowly………………….18
1-7.Text Entry………………………………………………18
Chapter 2.Main Interface/Icons………………...……………20
2-1. Main Interface Function………….………..……………20
2-2. Main Interface Introduction………………..……………21
5
Page 6

2-3. Add/Move/Delete Desktop Icon……………...…………22
2-4. Shortcut Key…………..……………...…………………24
Chapter 3. Program Installation………..……….……………26
Chapter 4. Internet…………………………………………...28
4-1. Internet Setting……………………………...…………..29
4-2. 3G Connection………………………………………..…31
4-3. Web Browser…………………………...………………..31
4-3-1.Bookmark manager……………………………...……32
4-3-2.Open new window……………………………………33
4-3-3.Change your browser homepage……………………34
4-3-4.Setting of browser……………………………………34
4-3-5. E-mail………………………………………………34
4-3-6.E-mail setting guide…………………………………35
4-3-7. Receiving and sending E-mail………………………35
4-3-8.Delete E-mail account………………………………36
4-3-9. Instant message………………………………………37
6
Page 7

Chapter 5 Main Interface Operation…………………..……..37
5-1.Music ……………….……………….………………37
5-2.Video………………………...………………...…………39
5-3. Photo.……………………………………………………42
5-4. Camera……………………………………..……………43
5-5. Recording………………………………………….…….44
5-6. Calculator………………………………………………..45
5-7. Clock and Alarm…………………………….…………..46
5-8. File Manager……………………………………………48
Chapter 6. OTG Function……………………………………48
Chapter 7. External USB Keyboard and Mouse………..……49
Chapter 8. TF Card………….………………………….……50
Chapter 9. Basic Setting……………….………….…….……51
Chapter 10. Trouble Shooting……………………………….63
Chapter 11. Specifications……………………….………..…67
7
Page 8

Main Functions:
●
7 inch HD TFT capacitive screen, 1280*800 definiton;
Support built-in 0.3 Mega front camera, 2 Mega back camera
(optional);
● Support built-in microphone recording function
● Support external USB mouse, keyboard, etc;
●Support OTG function, support U-disc, portable hard disc by
OTG to transfer data. (While connecting to portable hard disc,
DC power must be connected to supply power for the product;
otherwise the tablet PC will get crashed due to insufficient
power supply)
●Multiple network access to the Internet. Supporting Wi-Fi,
you can enjoy the internet life anywhere, anytime.
●Gravity sensor (G-sensor), in addition to the horizontal,
vertical screen switch, you can also install various software to
extent this function, such as turning the text, switching songs,
and funny games, etc.
●With Google Android intelligent operating system, abundant
software extension function, you can you're your personalized
space with apks by yourself.
8
Page 9

●Supporting apk installation and application, abundant
software can be downloaded and installed from Android
Market in your MID or from your PC to download from the
Internet.
●With this product, you can easily have business and
entertainment via abundant applications, such as E-Mail, word,
website browsing, news, instant messaging, financial, blog,
games online, video online, stock market , weather report ,
mobile TV, maps, fun software, etc.
●SupportingMP3/WMA/CBR/VBROGG/APE/FLAC/WAV/A
AC/AudibleRA/AC3/DTS/MIDI/AMR/AIFF/MPC etc.
● Supporting full HD video decoding (2160P, 1080P, 720P,
480P); video formats: AVI、WMV、MOV、MKV、RM、RMVB、
MP4、M4V、DivX、Xvid、FLV、3GP、DAT、VOB、MPG、
MPEG、AV S 、ASF、TP、TRP、TS、M2TS、MTS, etc.
● Supporting MJPEG, JPEG,JPG,BMP,GIF,PNG,MJPEG
9
Page 10

baseline 30k*15k decode,MJPEG baseline 8K*8K
decode , etc. formats image browsing..
● Supporting TF Card, with capacity up to 32GB.
● Personalized settings-freely adjustable brightness, key tone
on or off, changing wallpaper and so on.
● Supporting multi-languages.
● More functions could be added by Firmware updating
10
Page 11

Appearance and Buttons
Front:
Definition:
1.Front 0.3M camera;
2.DC charge port: 9V DC charger(2.5MM plug
3.HDMI slot;
11
Page 12

4.USB Port: Micro USB 5 Pin data cable supports external
U-disc, MP3, MP4, wired mouse, 3G wireless Internet card,
etc.;
5.Earphone Jack
6.“V- ”: Volume down;
7.“V+”: Vo l u m e u p;
:
8.“ ”: Power Button,long press this button to turn On/Off
the player, short press this button to lock screen in order to
avoid operation erro;
9.TF card slot
:
1、Quick Start:
1-1.Power On/Off and unlock: at the status of power off,
long press “
time to power on, please wait. It will take about 100 seconds to
enter system, drag unlock icon “
left to take photo and to the unlocking icon on the right to
unlock, see below:
” for three seconds to turn on. It will take some
” to the camera icon on the
:
12
Page 13

Energy-saving and locking mode:at the process of using,
system will automatically enter energy-saving mode, press
“
” to wake up the screen, system will enter unlocking mode
in one second, slip “
Notes: At the status of energy saving mode, the main operation
won’t stop, only LCD screen will be off, showing black screen.
Music or film continues playing.
Power Off: At the status of using, press “
screen will show power off option. Select “Power off” option,
” to unlock.
” for 5 seconds, the
13
Page 14

confirm your choice and system will automatically turn off.
Select “Cancel” to cancel power off operation.
Notes: At the status of low-power, it will have warning voice;
connect the DC adapter and begin to charge, it will
automatically turn off. If the product cannot boot, please check
the battery.
1-2.Battery and Charge
Battery should be charged for 8 to 12 hours for the first time
in order to make sure battery with enough power.
Please use charger approved by our company for charging.
Before charging, insert the miniport of the adaptor into DC
jack and the other side into power socket. Then the device is
being charged, the battery icon will show the charging status.
Please don’t disconnect the charger until device is fully
charged. Battery icon will show whether it is fully charged.
14
Page 15

Please note the following precautions for protecting lithium
battery
a. Don’t charge in high temperature environment
(like under direct sunshine)
b. Lithium battery doesn’t need to discharge. User
can charge the battery when there is still power
left.
c. While charging, it is normal that both charger and
device will heat up
1-3.Computer Connection & File Transfer
Connecting the product to the computer with USB cable,
the top status bar will show USB has connected. The product’s
default is charging for USB connection mode. If connecting
external mobile hard disk, you need to pull automatic running
list at the top status, then can see “USB connected” option.
Click the option, show USB status switch interface; according
to the note icon on the right bottom “Open USB storage
equipment”, switch into USB storage status. At this time the
15
Page 16
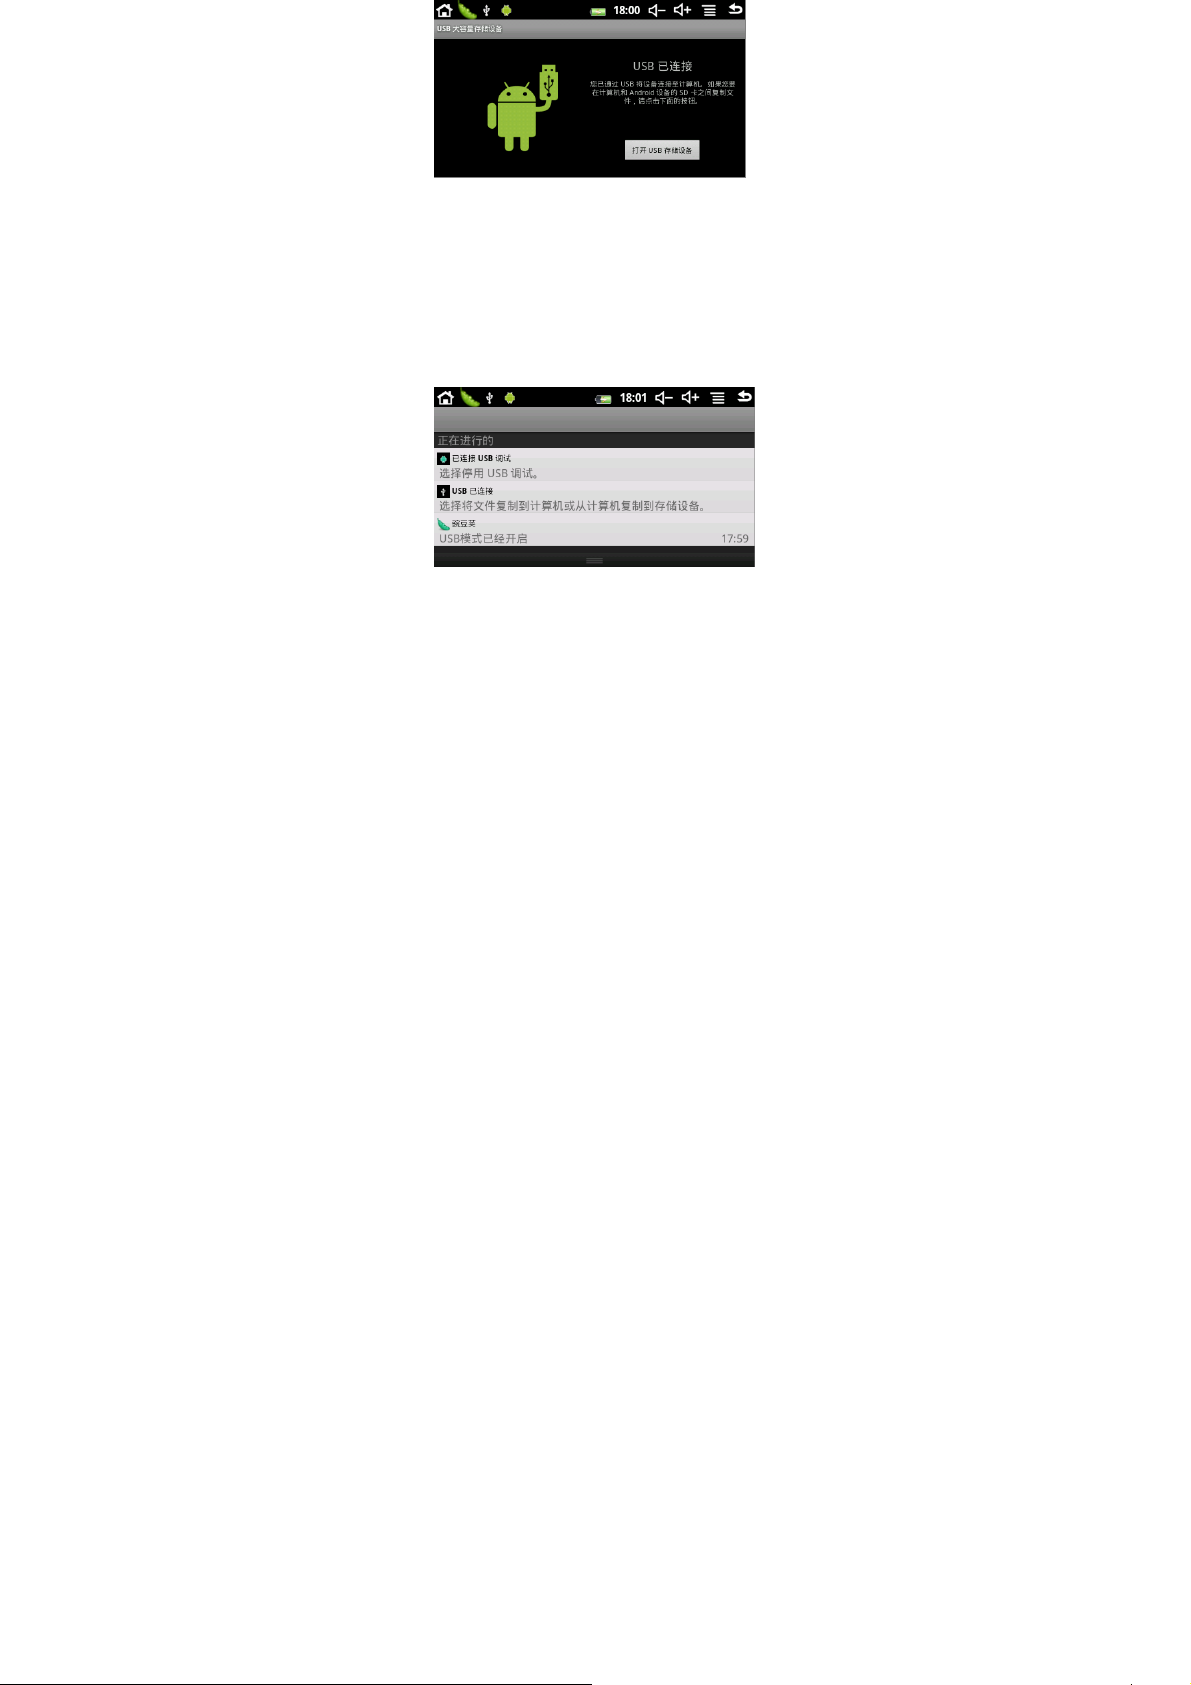
users can access the external hard disk. At the status of USB
storage, click the icon again to disconnect USB and recover to
charge mode. USB storage mode system will limit the users’
access to the local disk reference application. Disconnecting
USB storage mode, it will recover normal status, same as the
following picture
:
1-4.Use of Touch Screen
There are various operation methods. You can view the main
16
Page 17

screen, menu and application program.
1-4-1.Click
When you want to use screen keyboard input or select the
application program in the main interface, it can be realized
just use the fingers or stylus to click.
1-4-2.Press
When you want to open one available option or shortcut and
main application in the main interface, just press the option is
ok.
1-4-3.Quick sway or sway
Quick sway or sway with your finger or stylus to make the
vertical or horizontal drag fast action.
1-4-4.Drag
Before dragging, please use your finger or stylus to press, until
get to the wanted location.
。
17
Page 18

1-5.G-Sensor
The product has the function of G-sensor. After opening the
function in the setting (default is open), rotating the machine
into 90 degree, the screen will realize horizontal and vertical
screen switching automatically.
Besides screen switching, it can support more function, such as
turning the text, switching music and funny games.
1-6.Solve problem of running slowl y
After using the product for some time, although the used
applications have been shut down but they are still at work at
background, and that will make the system run slowly.
Therefore, you need to end these programs in Advanced Task
Manager to let the product run smoothly.
1-7.Select IME
According to the preview setting of the product, Android
keyboard will appear when you input the words.
18
Page 19
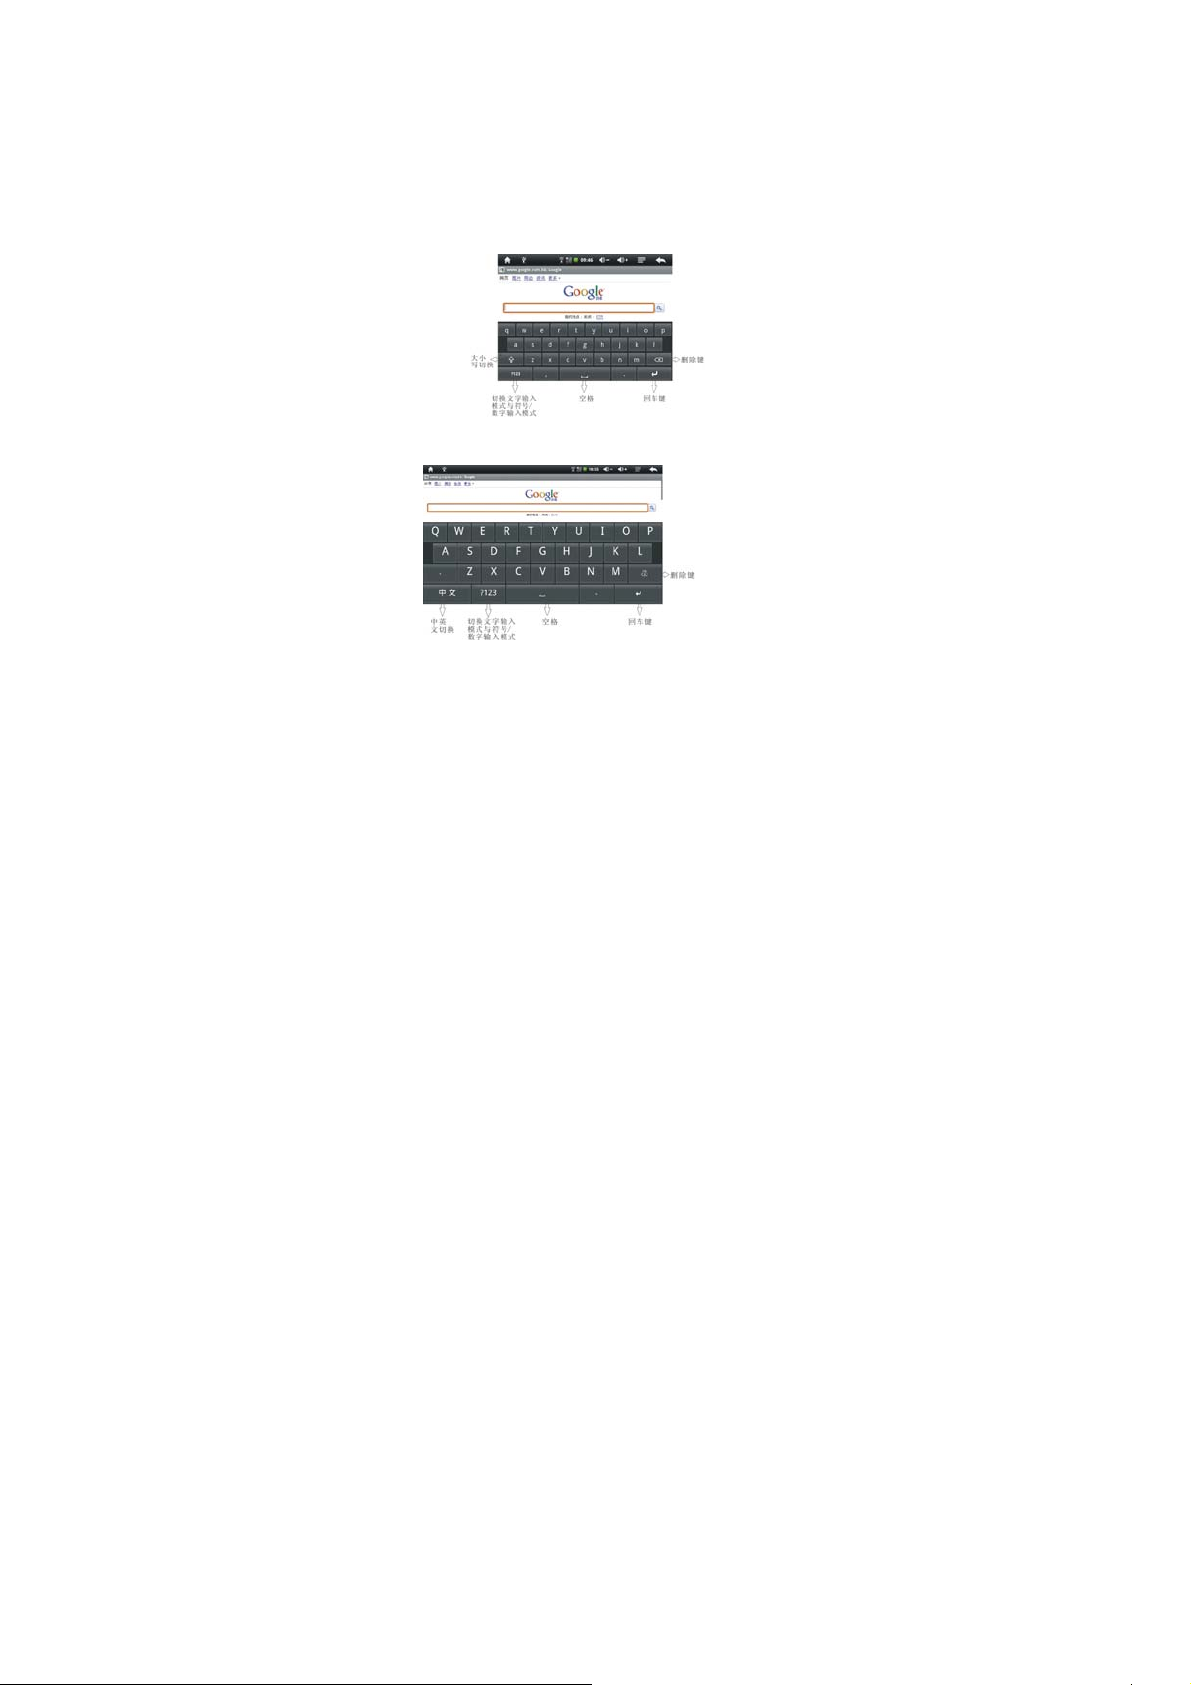
1. In the main interface press the menu key, and then click the
setting.
2. Click language & input
3. In the language & input area, the product will list the
installed IME.
4. Tick it after selecting the IME you need.
Android Keyboard Panel
Google Pinyin IME Panel
19
Page 20
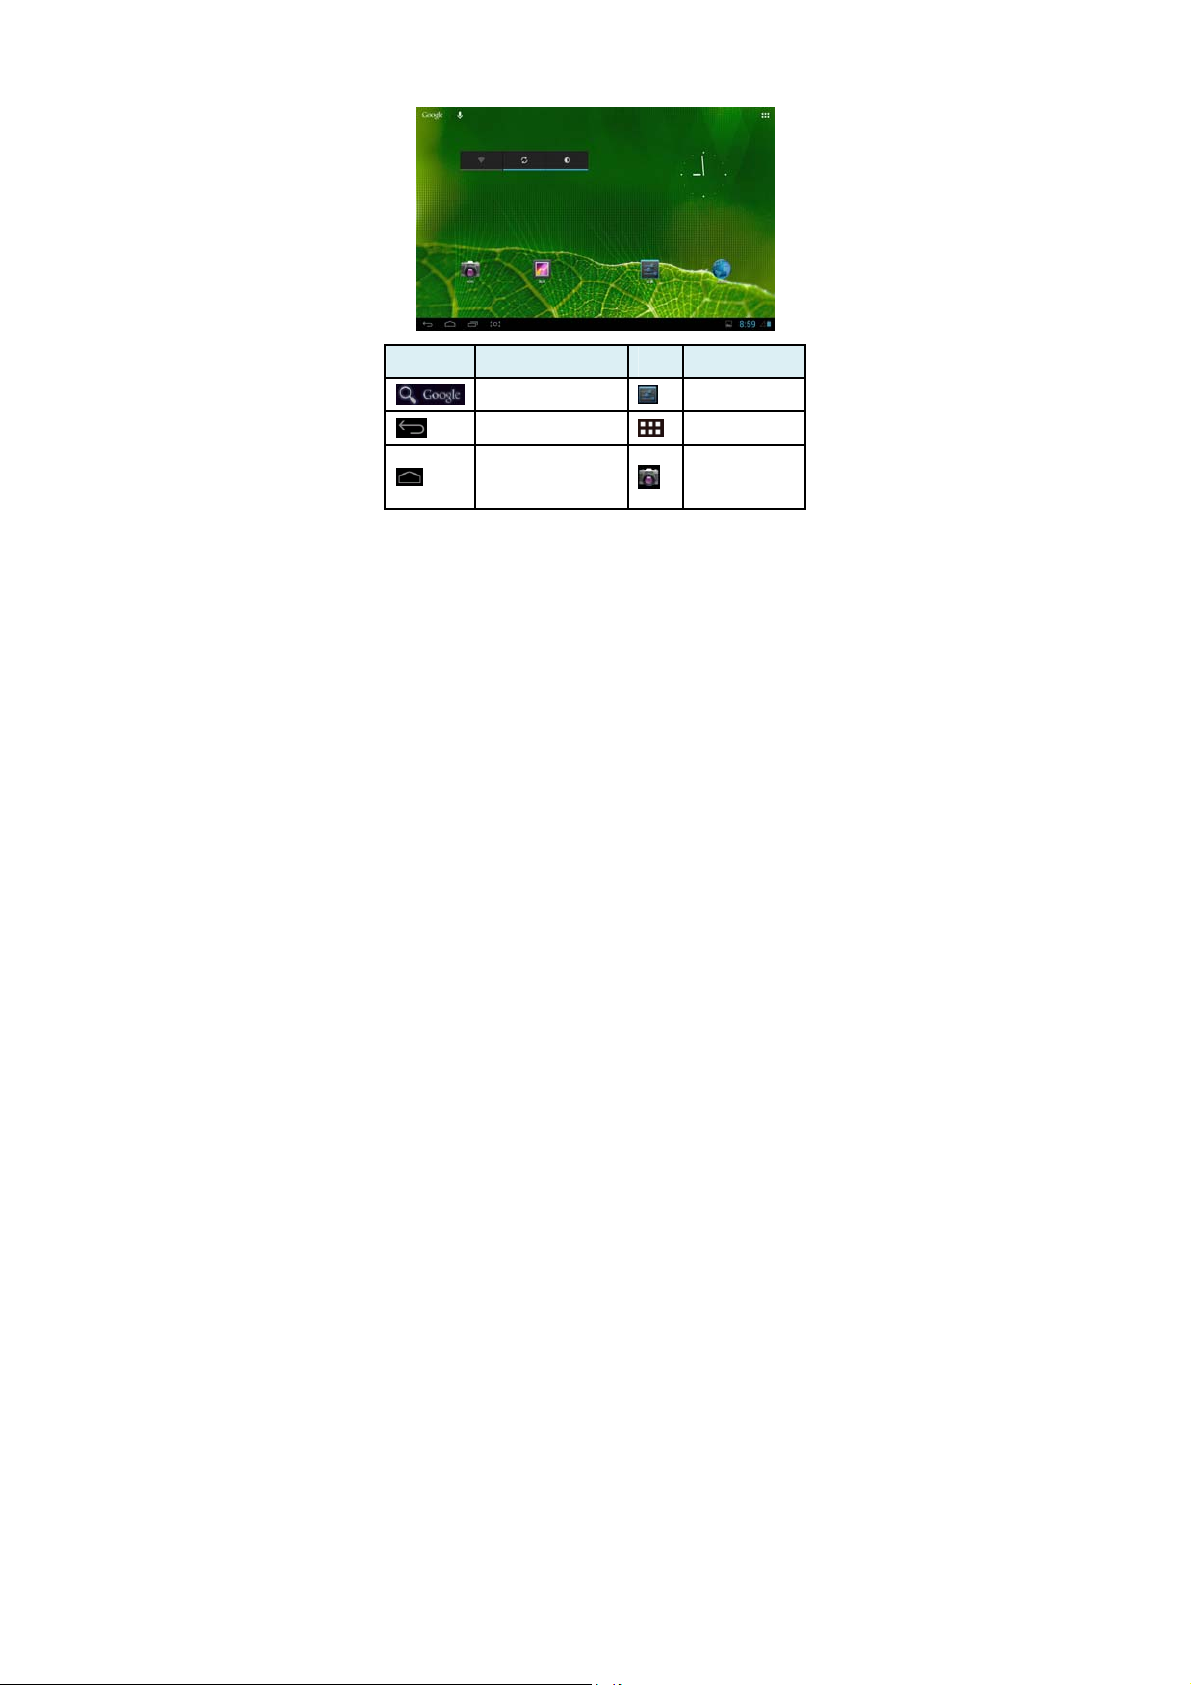
2:Main Interface Function/Icon
2-1: Main interface function icon definition
图标 功能说明 图标 功能说明
Google Search
Back
Back to main interface
from any interface
20
Setting
Function Module Menu
Camera
Page 21

System current time
WIFI signal Setting Menu
New device found
2-2.Main Interface
Long press power to turn on, the screen is locked after power
on; slip unlock key to unlock and enter the main interface as
Battery
Automatically
Screenshot
21
Page 22

blow. In this interface, you can view the status, change
wallpaper, add widgets, add program shortcut, start program,
etc.
2-2-1.Status Bar: With a stylus slide down to read prompts in
the status bar to open the notification bar and you can see
today's date.
2-2-2.Menu:Press menu button “ ” or short press “ ” to
open interface menu:
●Wallpaper: in this menu you can choose your favorite photos
as main interface background.
●Manage Application Program: check all the programs in this
device and you can remove all installed programs
●System Set: click to enter system setting menu interface
directly.
2-3.Add, move or delete desk icon
22
Page 23

In the main interface click to enter function menu list,
display applications in all webpages. Press and hold to drag the
icon to copy it to current desk, such as setting shortcuts on the
desk.
You can delete the icon which is added to main interface, press
and hold the icon which you are going to delete, at this time
there is a sign X on the top, just drag this icon to X to delete.
23
Page 24

2-4.Shortcut: click to show all function icons as below:
This window shows all the function icons, click any icon to
enter correspond interface, see following definition:
apk program installer: you can install new apks, manage
installed apks. Please refer to (3. Program Installation) for
operation method.
:Sending/Receiving Emails
24
Page 25

Browser: click to enter Internet interface to browse
webpage
Calendar: Check the calendar and setting
Calculator Icon: click this icon to use the calculator.
Alarm Clock: clock icon, click this icon to set alarm
:Play music. Please refer to (5-1 Music) for operating
method.
Video player icon : click this icon to play video . Please
refer to (5-2 Video) for operating method.
photo browser:view photo. Please refer to (5-3 Video) for
operating method.
Camera: please refer to (5-4 Camera) for operating
method.
:Enter recording interface. Please refer to (5-5 Recording)
for operating method.
File Manager: check all the file types and content.
Advanced task manager: manage applications and
remove. When the player runs slow, this function will stop
25
Page 26

some unused applications in order to solve the problem of
running slow.
interface.
Setting icon, click this icon to enter system setting
3.
Application Installation
This device can install apk( Android Package) freely, you can
get third-party application program which is suitable for this
Android system from Android Market and Internet and you can
install the apks into this player.
First open “Setting/Application Program”, select after
“unknown sources”
3-1-1.Program achieves method:
Method 1: Download from the website and copy the
applications into the TF card and insert into the product.
Method 2: Through the “Android Market” of the product to
26
Page 27

download the application program into the TF card.
3-2-2. Program Install:
Method 1: Click the main interface shortcut key, select “apk
installer” then select “Installer” to enter the SD card sub-menu,
select install application, pop up install option , click “Install”.
Finish it according to the guide.
Method 2 :Click the main interface shortcut key, select “ES
files browser” to enter the SD card sub-menu, select install
application , the install method is same as the ”Method 1”
Notes: In the website, all files are .apk suffix in the
third-party program.
3-3-3. Program Uninstall:
Click the main interface shortcut key, select “apk installer”, and
select “Manager” to enter apk list, click the wanted-to-uninstall
program, select “Uninstall” in the pop up dialogue box, then
27
Page 28

click “Yes” to install.
2.Uninstall:Click to enter application interface, this
interface will show all the installed applications. Click the icon
to go to the manager of applications, see below:
Uninstall: uninstall this
application, click
to go back to previous interface
4、
Internet
28
Page 29

4-1. Network Setting: Click the shortcut in the main
interface, choose “Setting/Wireless and Network” to enter
network setting interface:
4-1-1.WI-FI Connection
Click the main interface shortcut, select “Internet connects
manager”, click “WIFI setting”, enter WIFI setting interface,
select the “WI-FI” and turns it on.
29
Page 30

After WIFI opened, it will automatically search for the
wireless Internet, and show in the list, click the wireless
Internet , enter the password interface, input the password and
connect it, seconds later it will connect to the wireless Internet
automatically.
When open the WIFI, it will add about 1/4 power
consumption to the palyer. When not using the WIFI, please
turn it off to extend the using time of the player.
30
Page 31

4-2.3G Connection
a. External USB dongle 3G card
First, connect USB 3G card to the product through
OTG-USB cable. One moment later, the system will detect this
device and automatically switch the mode. After successful
switch, enter “Setting / Wi-Fi and Network”, select “Mobile
Network” and the system will connect to the network
automatically. Connection completed, you can use 3G.
Before connecting 3G, please close Wi-Fi.
Before connecting 3G, please make sure the product is with
enough power or connected to DC charger charging. Since 3G
will consume more power (add about 1/3 more), If you don't
use 3G, unplug the dongle to save power to extend battery life.
4-3. Webpage browser
Set up the network according to the method of 2-1 chapters,
you can use the browser to browse web pages. .
Click shortcuts in the main interface, select the "browser" into
31
Page 32

the browser interface, click the "Menu" button, pop-up browser
settings menu; Click "Start" pop-up address bar, enter the URL
to be determined. Open a Web page; slide your finger up and
down the screen to view other parts of the page. Drag web
pages, the bottom of the browser will appear zoom button; you
can click it to browse the Web.
4-3-1.Bookmark manager
●Setting bookmark
In the browsing interface, if you want to add the current
32
Page 33

address to bookmark. Click “Menu” to select “Bookmark”,
then click “Add bookmark”. Click “Yes” to confirm.
●Open bookmark
In the interface of browser, click “Menu” to select “Bookmark”,
select the bookmark which you want and open the webpage.
●Edit bookmark
In the interface of browser, click “Menu” to select “Bookmark”,
click and press bookmark to open the menu option. Select the
bookmark which you like to edit, select “Edit bookmark” to
edit it, and click “Yes” to confirm.
4-3-2.Open new window
●Open new browser window
In the interface of browser, click “Menu”, select “New
window” to open a new browser window.
●Switching the browser window
33
Page 34

In the browser window, click the “Menu” and click “window”
to open a new browser window..
4-3-3.Change your browser homepage
In the interface of browser, click “Menu” and pop up browser
setting menu, click “More” and then click “Setting”, click
“Setting homepage” in the setting interface, then enter URL,
click “Yes” to save it.
4-3-4.Setting of browser
In the interface of browser, click “Menu” and click “More”,
then click “Setting” to set browser.
4-3-5. E-mail
You can receive and send E-Mail with this player. There are
E-Mail setting guide in the application program, it can add
POP3 OR IMAP E-Mail account of normal WEB E-Mail
server (Such as Yahoo, Gmail, Hotmail).
Notes: Before setting E-Mail guide, please ensure your Internet
is working and the device time is right.
34
Page 35

4-3-6.E-mail setting guide
Click shortcut icon in the main interface, an E-Mail setting
guide will appear to help your setting.
Click the button “Next”, input your E-Mail address and
password of your E-Mail account. Click the button “Next”;
select your E-Mail form, POP3 or IMAP. Click the button
“Next”, to check whether the E-Mail sending and receiving
servers can be used or not, input account name and sending
E-Mail name, click “Finish”. If E-Mail is available, it will enter
your inbox automatically.
4-3-7.Receiving and sending E-mail
35
Page 36

Click shortcut key in the main interface, select icon “E-mail” to
enter inbox, it will refresh new E-Mail automatically, click it to
read.
In the inbox, click “Menu”, click “Writing” to enter writing
new E-Mail interface. Input the receiver’s E-Mail, subject and
information in the receiver’s field; if you want to add
attachment, click “Menu” to pop up the menu option, click
“Add attachment” to select the attachment. Then click “Send”
to send the E-Mail.
Notes: If you have more than one account, and hope to send
E-Mail using one specific account, click and choose the
account name and write the E-Mail.
4-3-8.Delete E-mail account
You can delete the POP3 OR IMAP E-Mail account from your
E-Mail program.
36
Page 37

Click shortcut icon in the main interface, select “E-Mail” icon
to enter your inbox, click “Menu”, then click “Account”,
choose the account you want to delete , then it will pop-up the
menu list, click “Delete account” , then click “Yes” to delete.
4-3-9. Instant message
You can send instant messages with friends through the built-in
“Google Talk” or “Mobile QQ” or other apks.
5, Operating Details of Main Interface
5-1. Music
Select the icon of “music”, enter music list, select the music
which you want to play, as the picture shown below:
37
Page 38

List music files by artists classification
:
Icon
:
Icon
List music files by album category
:
Icon
List all the song files
:
Icon
You can see the music files added recently
Icon:Enter the music interface
Click to enter the music playing interface directly.
;
;
38
Page 39

“ / ”:previous / next song, rewind / fast-forward; click
the progress bar directly can also fast rewind / fast forward.
“ / ”:Play/Pause the music;;
”: Random playing
“
”:Repeat All
“
”: Repeat once
“
5-2. Video
Choose Video Player icon, clock to enter video list., long
press video files to pop up a
to delete the video files. Click
details”, you can see the details here. Select video to enter
video playing interface. Click
in the video list, and click
to pop up “information
to play video.
39
Page 40

Icon:video storage,list all the video files
Icon:folder, list all the video file as a folder
Icon:click this icon could check the latest adding video;
Icon::list the video which have been played
40
Page 41

In the list of the video,when long press the video file, will
pop up a menu,could check up the detail materials of the
video,or could delete this video file. Select video to enter video
playing interface,click any place,there come a video show
“ / ”: Select last/next video, fast backwards/fast
forwards in the current video; click Progress Bar directly can
realize fast backwards/fast forwards function.
“ / ”: Play/Pause video;
“ ”: Screen expansion, there are two ways to adjust
the display mode on the screen
“
”: Return to previous menu
“ ”: Repeat All and Repeat one
41
Page 42

3-2-1. .HDMI out put
When you use HDMI output, click set-up file to tick HDMI,
insert HDMI output cable plug of the machine, the other end to
plug in the TV's.
Note: when you use the HDMI function, do not insert and draw
the HDMI line frequently.
5-3. Photo browser
Click the icon in the main interface in to the photo
browser list, long press video files to pop up a
list, and click
cancel the option. Select a picture file, view the interface in
full-screen picture, click on the upper right corner of the screen
brings up the Settings menu. Click
show, edit, rotate Left, rotate Right, trim photos for more
to delete the video files. Click “X cancel” to
bring up sub-menu: slide
in the video
information. Click
Return to previous menu;
42
Page 43

5-4.Camera
Select camera icon, enter camera mode.
43
Page 44

5-4-1.Self-timer photos
At the status of self-times photos, click “
The picture will automatic Jpg. picture, and saved into
DCIM/Camera menu, the files will named by year month day
hour minutes second. Click the icon
camera.to browser all the photos. Click the icon
5-4-2.Self-time videos
At the status of self-time videos, click “
mode, click “
to save files, then back to camera status. The video will be
saved to DCIM/Camera menu, the files will be named by year
month day hour minutes second. Click the icon
front/back camera.to browser all the video.
” to begin record, after record, click “ ”
”to take the picture.
transfer front/back
” to enter record
transfer
5-5.Recording
Click the recording icon to enter recording interface.
44
Page 45

Click “ ” to start recording. After recording, click
again and pop out to select whether to keep this recording or
not; at the same time, you can click
to stop playing. Select “Save” to keep this file or select
“Cancel” not to save.
Recording files will be saved as “recordingxxxxx.amr” format
in Files Manager.
5-6:Calculator
Click the application program icon
to enter application program management interface, select and
to play and click
in the main interface
45
Page 46

click icon to enter calculator interface.
5-7.Clock
In the main interface click icon
to enter the interface of
application list. Select the clock icon
in the main interface to enter alarm setting, see below:
or click the icon
46
In the
Page 47

interface above click to enter alarm setting as below, in
this interface you can add alarm and set alarm.
In the alarm clock setting interface, click time shown to set
time for alarm clock. And click icon
alarm clock.
47
to close or open
Page 48

5-8.File Manager
In main interface, click file manager icon
Card] or [Local Disk], [Mobile Disk] to expand the drop-down
folders and related files. Here you can copy, move, paste or
rename files. Long press a single folder or file, the Edit dialog
box will pop up with choices to delete, rename, copy, paste and
send E-Mail.
, select [TF
6.OTG Function
This product has OTG function, It can support USB disk and
some other devices like MP3, MP4, self-powered hard disk,
48
Page 49

etc.
This product will automatically detect the USB device after
connecting to it via OTG cable. And you can have access to
the USB device files like the files on the player.
External USB device rote is mnt/uhost
Files of the external USB locate in the catalogue of USB files,
could check and manage in the USB file of the resource
manager
With low battery or DC charger not charging, please don’t use
OTG function, or the player may turn off automatically
because of low power.
7. External USB Mouse/Keyboard Function
After mouse connected, mouse pointer will appear on the
screen. The left button is confirm button, the right button to
return and the middle slider to slide up and down .
49
Page 50

Note: Some keys cannot work on this player. And keyboard
code will be revised as per the definition of Android system.
We recommend a standard USB keyboard to be used.
8. Usage of TF Card
This product comes with TF card slot. It supports reading the
files in TF card. When using, inset the TF card to the product.
To drag out the TF card, push the TF card inside a little and
release; TF card will pop out automatically and you can take it
out. This product supports TF card from 1GB to 32GB.
Tips :
A. Please insert TF card to the card slot on the right correctly.
B. When TF card is working (such as reading, copying, etc.),
please do not pull out the card or it will lead to data errors.
C. Avoid using the memory card in high temperature or high
humidity environment.
D. Keep the memory card away from liquid or corrosive
50
Page 51

material.
Note: If you cannot take out the memory card, or it’s stuck with
other material or smudged and so on, you can use tweezers or
other tools to pull it out slowly and carefully.
9. Basic Setting
Click icon
Sound, Display, Storage, Battery, Applications, Accounts &
sync, Location services, Security, Language & input, Backup &
reset, Date & time, Accessibility, Developer options, about
tablet. Press and hold the screen up or down to turn pages.
9-1. Wireless & Network Setting
Click Wireless & network in “Settings” menu to enter the
interface (as follows).
to enter menu setting: Wireless & Networks,
51
Page 52

1. Wi-Fi: Click “ON” to open Wi-Fi.
2. Wi-Fi setting: Please refer to the operation of 2-1 Wi-Fi
Setting.
3. Mobile networks: Click “More”, then “Mobile networks”
and turn on Modem power. If Wi-Fi is on, there will pop up a
dialog box to prompt that “Please turn off Wi-Fi first” and click
“Yes”, Wi-Fi will shut down automatically.
4. Mobile network settings: Click to set Data enabled, Data
roaming, Access Point Names, Network operators, etc.
A. Data Traffic Enabled: Enable data access of mobile network
B. Data roaming: Tick
in this menu means roaming data
52
Page 53

services.
C. Access Point Names: Click “Access Point Names” to enter
and click the icon
or click
the prompts step-by-step.
D. Network Operators: Click to select your access network
operator.
in the upper right corner of the screen
to pop up new APN information. You can follow
9-2.Sound & Display Setting
Click “Sound” in Settings Menu to enter the setting interface
(as follows):
53
Page 54

A:Volumes: Click here for all the volume settings.
B:Ringtone & Notifications: Click here to set Phone ringtone,
Default notification, Vibration and ring.
C:System: Click here to set touch sound, notice sound,
vibration on touch.
9-3. Click Display in Settings menu to enter the setting
interface (as follows)
54
Page 55

A. Brightness: click here to adjust the brightness of this
product.
B. Wallpaper: Click here to set Live Wallpaper, Super-HD
Player, Wallpapers.
C:Sleep: Click here to adjust the time for automatic screen
lock with choices of 15 seconds, 30 seconds, 1 minute, 2
minutes, 5 minutes, 10 minutes, 30 minutes.
D:Font size: Click here to adjust the font size for the player.
E:Accelerometer coordinate system: Click here to set a special
coordinate for some games.
F:Screen adaption: Click here to adjust the screen size for
some games.
55
Page 56

9-4.Storage: Click here to check the space for SD card or
internal storage of the player, uninstall the SD card, format the
SD card.
9-5 Battery: click here to check battery usage.
9-6
Apps:
Click
56
Page 57

here to set “whether to allow third-party applications to be
installed”, “manage/delete the installed applications, view and
manage running services.
9-7 Location services: Google’s location service, Location &
Google search
57
Page 58

9-8 Location and Security:
You can set up device administration, screen lock and
password visibility.
1: Unknown sources: Allow installation of non-Market
applications.
A:Screen Unlock;
Click【Set up screen lock】to enter interface shown below:
A:None:Disable screen unlock security
B:Pattern:Draw pattern to unlock screen
C:PIN:Enter a numeric PIN to unlock screen
D:Password:Enter a password to unlock screen
58
Page 59

9-9 Language & Keyboard:Set up languages & input
keyboard
9-10 Backup and Restore:Set up “whether to show my
location, back up my data & Factory reset”.
9-11 Date and Time setting
59
Page 60

A:Set Date;
Click to set up year, month, day, click to
confirm.
B:Select Time Zone;
Select your time zone and confirm.
60
Page 61

C: Set Time;
Click to set up hour, minute,for example:10:
56,click to confirm.
D: Set Date Format; Click the date format you prefer and
confirm.
9-12. Accessibility
9-13.
61
Page 62

Developer Options
.
9-14.
About
Tablet
You can check legal information, model number, Android
version, Baseband version.
62
Page 63

10、Trouble Shooting
1. The tablet turns on slowly at first time
●After system update, factory restore, it takes about 2-3
minutes to install some pre-install applications at the first time,
then starting time will be quicker.
2. Unable to connect WIFI or weak signal
●Ensure the Network is working properly.
●Ensure the user name and password is correct.
●Ensure the internal antenna is not blocked.
●Ensure the tablet is within the proper distance of the Network
and there is no wall or other obstructions between.
3. Unable to connect 3G or weak signal
●Ensure the 3G USB Dongle is connected to the tablet
correctly and the SIM card with enough fees to access to the
Internet.
●Ensure the 3G USB Dongle is among the models supported
63
Page 64

by the tablet.
●Ensure you are in an area that gets access to the signal
●Check if the “Wireless and Network” is correctly set.
4. Indicator light does not turn on after 3G USB dongle is
plugged in.
●Check whether the OTG cable is connected properly, 3G
USB Dongle can work well, 3G connects successfully.
5. 3G connection fails-it indicates failure or it stay at the same
status all the time
●Check whether the 3G card is with enough fee.
●Ensure you are in a location with stable and strong signal.
●Close and restart the 3G
●Close 3G, and then plug OTG cable and re-plug in the cable
and 3G card again correctly.
●Close 3G and restart the tablet
6. Fail to copy files
64
Page 65

●Ensure the tablet is connected to the computer correctly.
●Ensure there is still disk space.
●Ensure the USB cable is functionally well.
7. No sound in the earphone
●Ensure that the volume is not set to 0.
●Check whether the headset is correctly connected and the
wire is broken.
8. The system has some trouble
●When you install some third-party applications it may
lead to some functional problems. You can restart the tablet or
uninstall the applications.
9. Unable to set E-mail or use registration applications.
●Ensure your Network is working properly.
●Ensure the E-Mail account is correctly set.
●Ensure your system time is the same with the local time.
●Please run the “Advanced Task Manager” to stop some
65
Page 66

other running applications.
10. The memory capacity is different from the nominal figure.
●Just like hard disk on computer, the capacity shown on
the computer is usually less than the nominal capacity; this is
due to different unit conversion used by computer and storage
device manufacturers.
In computer, 1GB=1024MB, but storage device
manufacturers use 1GB=1000MB as default. The actual
capacity is not lessened.
●The OS of this tablet pre-installs some applications,
games and the OS itself occupies some capacity. This is also
one reason why the capacity that can be used for storage is less
than the
nominal figure.
66
Page 67

11、Specification
Dimension 190*113*7.7mm
Display
PC
connection
Configuratio
n
Access
network
7 inch HD TFT touch-screen display;
resolution 1280*800 pixels
High speed USB 2.0
CPU ATM7029
Memory 8GB、16GB、32GB(Optional)
TF card 1GB~32GB(optional)
Operation Android 4.1
Wifi IEEE802.11b/g/n
Power Battery Lithium battery 3.7V
Power DC Adapter DC 5V-9V,1.5-2A
Audio
Parameter
Max. earphone
output
MP3 bit
rate
WMA bit
rate
Frequency
response
(L)7mW+(R)7mW(32 ohm)
32K bps – 320K bps
16K bps –320K bps
20Hz to 20KHz +/-3dB
67
Page 68

SNR >=85dB
Distortion
degree
Music
Formats
Video
Formats
Image
Formats
E-book
Formats
Environmen
MP3/WMA/CBR/VBROGG/APE/FLAC/WAV/AAC/Aud
ibleRA/AC3/DTS/MIDI/AMR/AIFF/MPC, etc
AVI、WMV、MOV、MKV、RM、RMVB、MP4、M4V、
DivX、Xvid、FLV、3GP、DAT、VOB、MPG、MPEG、
AVS、ASF、TP、TRP、TS、M2TS、MTS, etc
MJPEG, JPEG,JPG,BMP,GIF,PNG
MJPEG baseline 30k*15k decode
MJPEG baseline 8K*8K decode, etc
PDF/TXT/CHM/DOC/EX
CEL/EPUB/RTF/FB2
, etc
-5 to 40℃
t
Temperatur
e
Traditional Chinese, Simplified
Language
Chinese, English, Multi-Languages
supported
OS
Supported
Windows2K/XP/Vista/Windows7/Linux2
.4/MAC OS 10.4
68
<0.6%
Page 69

This device complies with Part 15 of the
FCC Rules. Operation is subject to the
following two conditions: (1) this
device may not cause harmful
interference, and (2) this device must
acceptany interference received,
including interference that may cause
undesired operation.
changes or modifications not expressly
approved by the party responsible for
compliance could void the user's
authority to operate the equipment.
NOTE: This equipment has been tested
69
Page 70

and found to comply with the limits for
a Class B digital device, pursuant to
Part 15 of the FCC Rules. These limits
are designed to provide reasonable
protection against harmful interference
in a residential installation. This
equipment generates, uses and can
radiate radio frequency energy and, if
not installed and used in accordance
with the instructions, may cause
harmful interference to radio
communications. However, there is no
guarantee that interference will not
occur in a particular installation.
If this equipment does cause harmful
70
Page 71

interference to radio or television
reception, which can be determined by
turning the equipment off and on, the
user is encouraged to try to correct the
interference by one or more of the
followingmeasures:
-- Reorient or relocate the receiving
antenna.
-- Increase the separation between the
equipment and receiver.
-- Connect the equipment into an outlet
on a circuit different
from that to which the receiver is
connected.
-- Consult the dealer or an experienced
71
Page 72

radio/TV technician for help.
FCC RF warning statement: The device
has been evaluated to meet general RF
exposure requirement. The device can
be used in portable exposure condition
without restriction.
72
 Loading...