


User ’s Manual
You are reading the User’s Manual provides
information regarding the various componets in
the notebook PC and how to use them. After
you read through this manual, please keep it well
for you can refer it anytime in the future.
Please read the safety precautions mentioned
on Page 3 before you operate the notebook
Table of Content
User´s Manual............................................. 3
Safety Precautions...................................... 5
■How To Use Your Notebook
Power System............................................. 9
■Before Operating Your
Notebook
Introducing Your Netbook............................ 11
Connecting AC Adapter
and Charging Battery.................................. 17
Using Touchpad.......................................... 21
Using Keyboard.......................................... 23
Adjusting Volume........................................ 26
Adjusting LCD Resolution........................... 27
Using Wireless LAN.................................... 30


Safety Precautions
The following safety precautions will increase the life of the notebook. Follow all precautions and instructions.
Except as described in this manual, refer all servicing to qualied personnel. Do not use damaged power cords,
accessories, or other peripherals. Do not use strong solvents such as thinners, benzene, or other chemicals on
or near the surface of your notebook.
The sign shows the behavior prohibited
The sign shows the regulative behavior or the indication
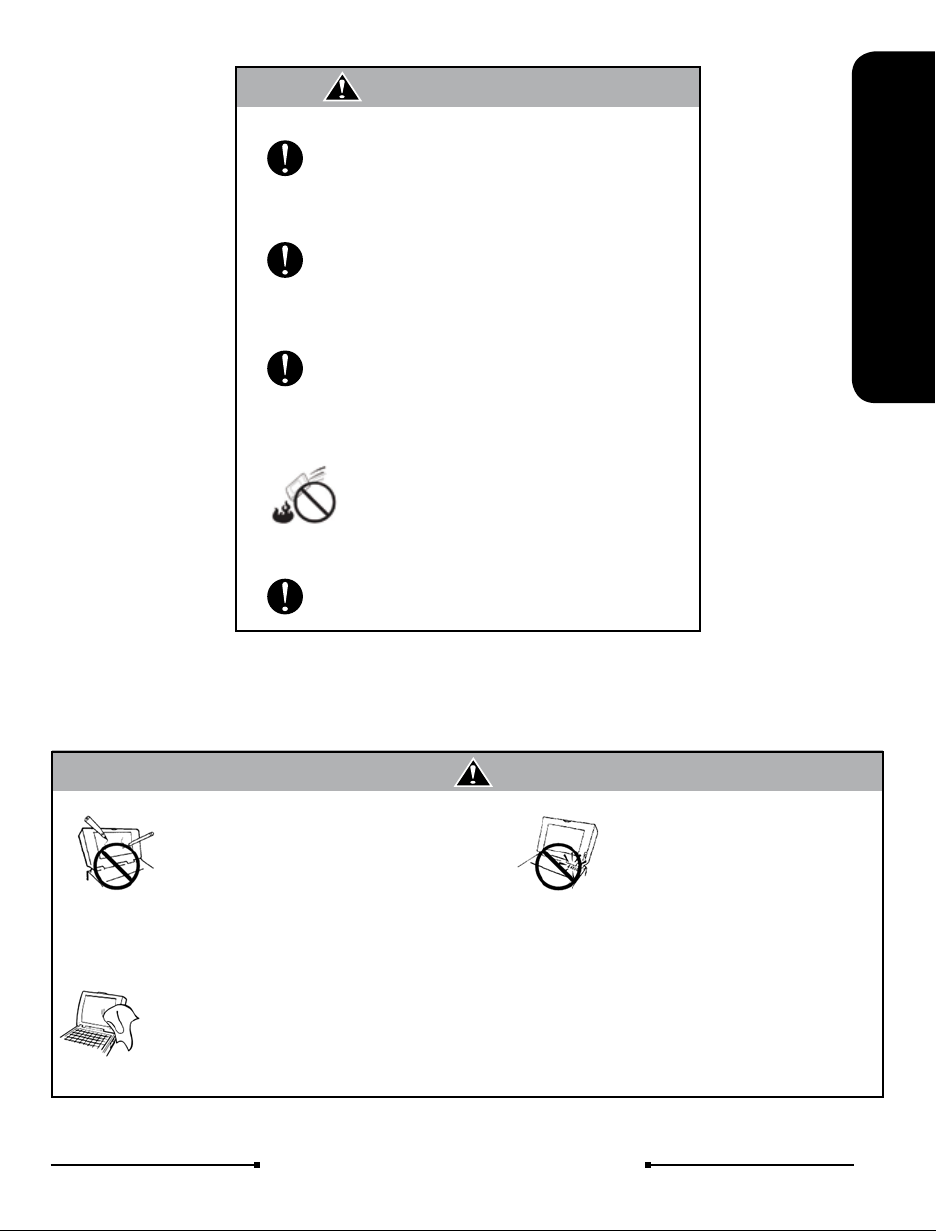
Warning (The device and AC adapter
DO NOT expose to or use near liquips,
rain, or moisture. DO NOT use the LAN
during the electrical storm
DO NOT use the AC adapter notincluded in
the package. Use ofanother type of adapter
may riskre or explosion.
Before you connect the notebook to a
power source, ensure the voltage rating of
the AC adapter matches the available
powe source.
qbex aero style / User’s guide
DO NOT attempt to service this product by
yourself. As opening or removing covers,
you will be exposed to the dangerou
svoltage or other risks.
When you fell the surface of the AC adapter
is very hot or bad odor give off from it.
Please pull out the power plug immediately.
Continue to usem the AC adapter may risk
re or electrical shock.
DO NOT leave the notebook on your lap or
any part of the body to prevent discomfort
or injury from heat exposure.
5

Attention (The device and AC adapter)
Please be sure not to pull out thepower plug
from the cord only. You have to pull out the
power plug from the plug part.
DO NOT place this notebook on an
unstable cart, stand, or table.
DO NOT place heavy object on this
notebook. It may be broken to cause some
serious damage.
Please verify whether there is no foreign
object such as ball-point pen on the
keyboard when you close the notebook lid.
When while the foreign object is put, there is
possible to break display panel.
When you carry the notebook, please close
the display lid. It is possibe to break the
dispplay panel by the unexpected force.
If an extension cord is used with this
notebook, make sure that the total ampere
rating of the1 equipment plugged into the
extension cord does not exceed the
extension cord amper rating.
Danger of explosion may occur if battery is
incorrectly replaced. Replace only with the
same or equivalent type battery
recommended by the manufacturer
DO NOT impact the battery.
If it exceed the specied charge time and
the charge doesn’t complete, please stop
the battery charge. It may risk re or
explosion if you continue to charge the
battery.
Do not crush, disassemble, puncture, or
incinerate the short external contacts of the
battery pack
Unplug this notebook from the wal outlet
when you stop using this notebook.
SAFE TEMP:
This notebook should onl be used in
environments with ambient temperatures
between 10°C and 35°C.
DO NOT press or touch the display panel.
DO NOT place together with small items
that may scratch or enter the notebook.
If you operate the touchpad with
unreasonable force or posture, it may hurt
you nger or wrist.
Avoid using the notebook during
anelectrical storm. Disconnect all plugs and
cables to avoid the possible damage.
DO NOT allow anything to rest on the
power cord. DO NOT locate this notebook
where people will step on the cord.
DO NOT dispose batteries in a re.
They may explode. Check with local
authorities for disposal instructions.
If the battery pack leaks and the uid ge
in your eyes, do not rub them. Instead,
rinse your eyes with clean running water
and immediately seek medical attention.
Otherwise, eye injury may be resulted
If the battery pack leaks, gives off a bad
odor, generates heat, becomes
discolored or deformed, or in any way
appears abnormal during use, recharging
or storage, immediately remove it from the
notebook and stop using it.
6
qbex aero style / User’s guide
Attention (Battery Pack)
If liquid solution from the battery comes
out and contacts with skin or clothes,
ush out with clean water.
Do NOT immerse the battery pack in water
or allow it to get wet. Its protective features
can be damaged. Abnormal chemical
reactions may occur, possibly leading it to
leak acid, overheat, emit smoke, burst and
/or ignite.
If you nd a bad odor, overheating, battery
balloon or swell up, discolor, deformation,
and/or other irregularities when using the
battery, return it to your supplier or vendor.
Do not connect the positive (+) and
negative (-) terminals with a metal object
such as wire. Short-circuiting may occur
leading the battery pack to leak acid,
overheat, emit smoke, burst and/or ignite.
DO NOT throw the battery in re.
Keep the battery away from children.
How To Use Your Notebook
DO NOT
knock or scratch
the machine
Clean your computer with a soft cloth
dampened with water. Do not use liquid
or aerosol cleaners, which may contain
ammable substances.
LCD monitors are obviously more
vulnerable to damage than the
classic CRT. Even the slightest
contact with a sharp object can
leave your liquid crystal display
damaged
qbex aero style / User’s guide
General Warnings
DO NOT remove your notebook while the hard disk is in
operating status. It may be
DO NOT
moving the machine
while operating
● Please keep all accessori es well
● Periodical ly backup your data i n the
hard disk.
broken to cause some serious
damage.
7


Power System
1 To install the battery pack
Close the notebook lid and
1
turn over it gently.
2 Connect the DC plug to DC-IN Jack
Slide the battery pack into the slot.
2
Battery Pack .
Before Operating Your Notebook
Connect the DC
plug to DC-IN Jack
2
3
Connect the AC power cord to the AC adapter
Connect the AC power cord to an AC outlet
qbex aero style / User’s guide
DC-IN Jack
9


Introducing Your Netbook
Open/Close the Netbook
Open the panel cover and adjust it to a easy to see
angle.
Front Side
Close the panel cover and make sure the
notebook is closed well.
1
Before Operating Your Notebook
4
3
10
2
8
5
6
7
99
qbex aero style / User’s guide
1 Web Camera
2 Display Panel
3 Wireless LAN Switc
4 Power Button
5 Keyboard
6 Internal Microphone
7 Status LEDs
8 Stereo Speaker
9 Touchpad(right button)
Touchpad(left button)
10 Touchpad
11

1 Web Camera
The built-in camera allows picture taking or video recording.
2 Display Panel
It functions as the same as a desktop monitor. The LCD panel does not produce any radiation or ickering
so it is easier on the eyes. Use a soft cloth without any chemical liquids to clean the display panel.
3 Wireless LAN Switch ( )
Press the button to enable the built-in Wireless LAN.
4 Power Button ( )
The button allows powering ON and OFF the notebook.
The blue indicator LED lights when the notebook turned on.
When HDD LED light up, please do not directly push the
power button to turn off the notebook.
It is possibe to damage the data or notebook.
Attention
5 Keyboard
The keyboard provides with comfortable travel (depth at which the keys can be depressed) and palm rest
for both hands.
6 Internal Microphone
It can be used for video conferencing, voice narration, audio recording, and multimedia applications.
7 Status LEDs
Indicate the system status of the notebook.
8 Stereo Speaker
The built-in speaker allows you to hear audio without any additional accessories
For Speaker volume down and up, you can use the Fn key to increase/decrease the volume.
9 Touchpad (right button/ left button)
The touchpad and its buttons comprises a pointing device that provides the same functions as a desktop
mouse.
10 Touchpad
This is the pointing device of the notebook.
After turn OFF the notebook, please wait 5 more
seconds for the second time power on.
12
qbex aero style / User’s guide

Right Side
5
4
2
1 DC-IN Jack ( )
To connect the AC adapter
To prevent damage to the notebook and battery pack, always use the supplied
power adapter.
Attention
2 Display Output Port ( )
To connect an external monitor
3 LAN Port ( )
The 10/100/1000 Ethernet connector is used to connect a LAN cable for network connection.
May become warm to hot when in use. Be sureAttention not to cover the adapter
and keep it away from your body
6
3
7
1 DC-IN Jack
2 Display Output Port
3 LAN Port
4 HDMI Port
5 Headphone Output Jack
6 Microphone Jack
7 Kensington Lock Port
1
Before Operating Your Notebook
The cable which can be connected to the LAN port is the 10BASE-T/100BASEX/1000BASE-T standard Ethernet cable.Please do not use the cable other than
that.
Attention
4 HDMI Port
To input Audio or A/V signal synchronously to TV set with HDMI interface.
5 Microphone Jack ( )
It is designed to connect the microphone used for Skype, voice narrations, or simple voice recordings
6 Headphone Output Jack ( )
It connects the notebook’s audio out signal to amplied speakers or headphones. Using this jack automatically
disables the built-in speakers.
7 Kensington Lock Port ( )
Allows the notebook to be secured using Kensington Lock
Do not connect the especially ISDN cable and the modular cable to the LAN port.
It may be broken to cause damage
qbex aero style / User’s guide
13

Left Side
1 USB Port
2 Ventilation Slot
3 Card reader
1
2
1
3
1 USB Port ( )
The USB port is compatible with USB 2.0 or 1.1 devices.It allows many devices to run simultaneously on a single
computer, with some peripherals acting as additional plug-in sites or hubs. The USB also supports hot-swapping
function. Allows the notebook to be secured using Kensington Lock
2 Ventilation Slot
The slot is designed to cool the system. DO NOT block the ventilation for air circulation
3 Card reader
The following cards listed belown can be used on this notebook
Memory cards have different insert directions, Please make sure the
correct direction before insert it into the memory card slot.
Notice
14
miniSD card cannot insert into the memory card slot. Please verify
the card type before you insert it.
qbex aero style / User’s guide
* Memory Stick
* Memory Stick Pro
* SD
* MMC
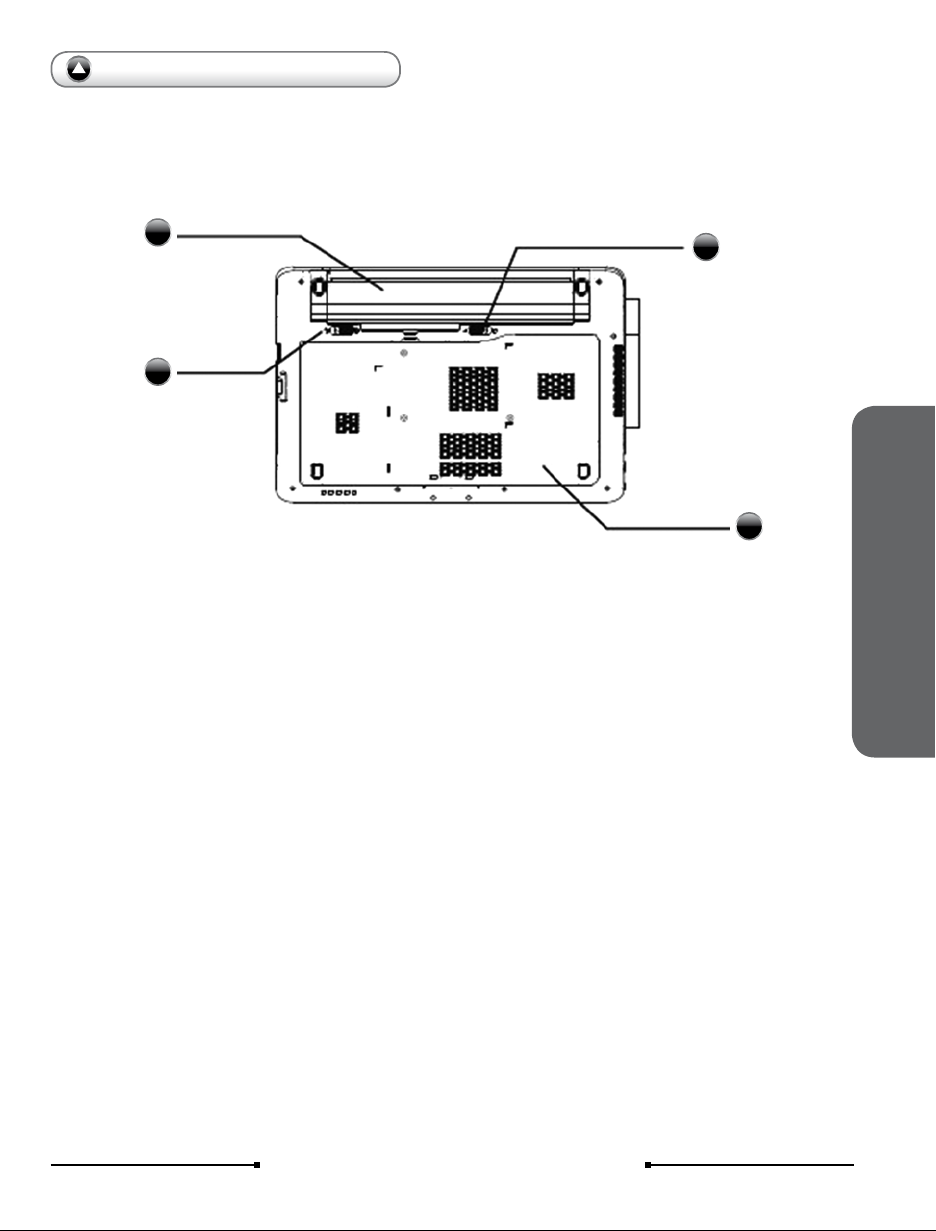
Bottom Side
1 Battery Release Latch
2 Battery Pack
3 Battery Lock Switch
4 Memory Module and HDD Cover
5 USB Port
2
1
3
4
1 Battery Release Latch:
The latch keeps the battery pack secure. When the battery pack is inserted, it will automatically lock.When
remove the battery pack, this latch must be retained in the unlocked position.
2 Battery Pack:
The notebook will be powered by the battery pack when the AC adapter is disconnected.
3 Battery Lock Switch:
The switch is used to keep the battery pack secured.Move the lock to the unlocked position to insert or
remove the battery pack. Move the lock to the locked position after inserting the battery pack.
Before Operating Your Notebook
4 Memory Module and HDD Cover:
The memory module, hard disk drive, and wireless LAN module are located under the cover. Please take the
cover off when adding/removing the module.
5 USB Port:
The USB port is compatible with USB 2.0 or 1.1 devices. It allows many devices to run simultaneously on a
single computer, with some peripherals acting as additional plug-in sites or hubs. The USB also supports
hot-swapping function.
qbex aero style / User’s guide
15

About Status LEDs
4
4
1
5
3
2
1 Num LK LED ( )
This LED light when you press Num LK key on keyboard
2 Caps Lock LED ( )
Pressing Caps Lock key will set this LED light and in lower case when the Shift key is pressed the letter typed will be
in lower case.
3 HDD ( )
The LED blinks when data is written to or read from HDD
When HDD LED lights up, please do not directly push the power button to turn off
the notebook. It is possibe to damage the data or notebook
Attention
4 Power LED ( )
The LED lights when the notebook is turned ON and blinks slowly when the notebook is in the Save-to-RAM
(Suspend) mode. The LED is off when the notebook is turned OFF.
5 Wireless LAN LED ( )
When the built-in WLAN is enabled, the LED lights.
16
After turn OFF the notebook, please wait more than 5seconds for the second time
power on.
qbex aero style / User’s guide

Connecting AC Adapter
and Charging Battery
For the First Time Using
The battery included in the package is not fully charged. When you use the notebook for the rst time, please
connect the AC adapter after slide the battery pack
DO NOT use the AC adapter not included in the package. Use of another type of
adapter. Attentionmay risk re or explosion.
Attention
DO NOT allow anything to rest on the AC adapter. It may overheat the AC adapter
and risk re or explosion.
You can use the notebook while charging the batery.
Tip
Connecting AC adapter and charging battery
Connect the DC plug to DC-IN Jack.
1
DC-IN Jack
Connect the AC power cord to the AC
2
adapter and connect the AC power
cord to an AC outlet.
Tip
Before Operating Your Notebook
The notebook comes with a universal ACDC adapter for connecting to any 100V-240V
outlets without setting switches or using power
converters.
Different countries may require an adapter to
connect the provided AC power cord to a
different standard. Most hotels will provide
universal outlets to support different power cords
as well as voltages.
When operating with the battery only, please
remove the AC adapter.When using with AC
power, please connect the AC adapter.
qbex aero style / User’s guide
17

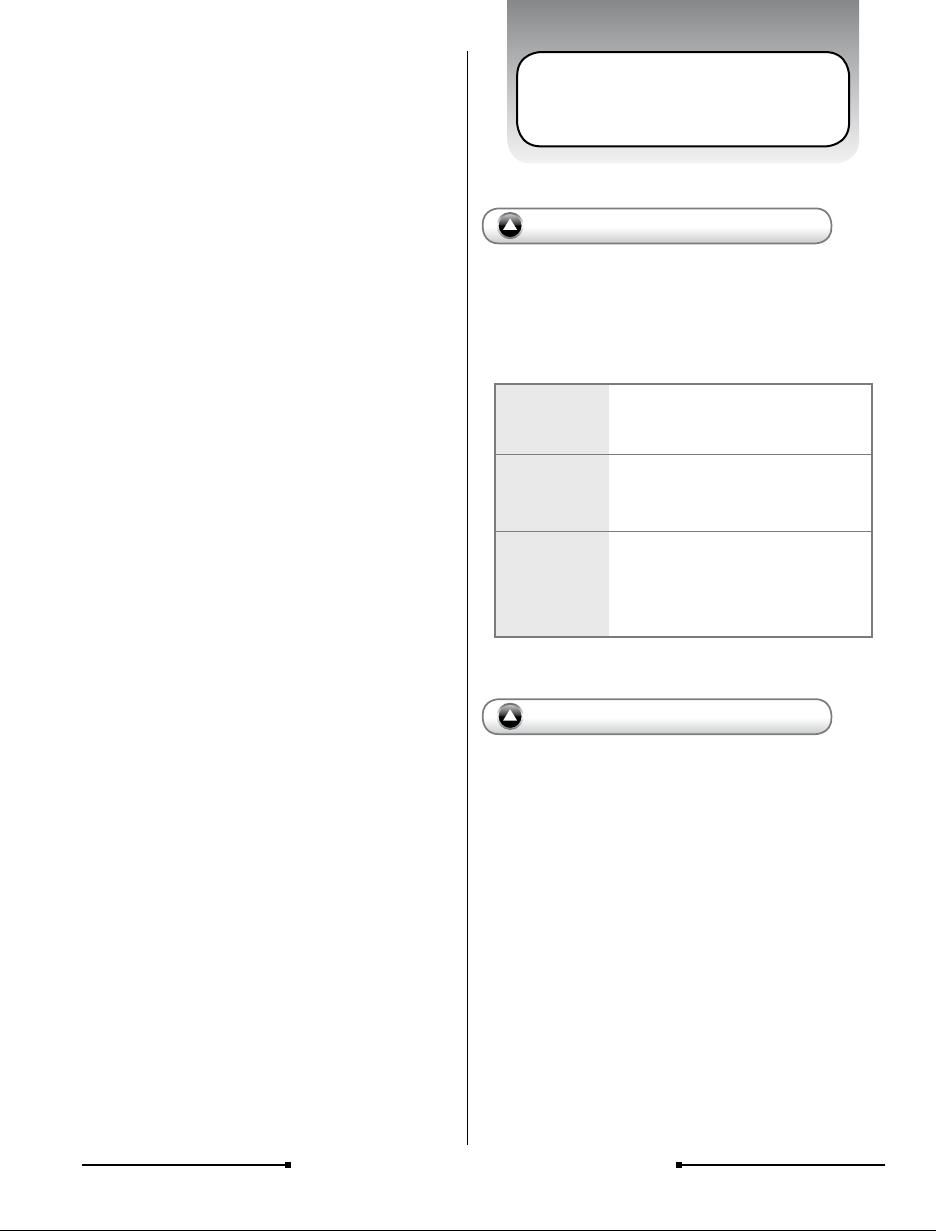
Power and Battery Status LEDs
Power LED ( )
Status Content
Blue ON The notebook is powered on
Blue Blinking The notebook is in suspend mode
Orange Blinking Battery charge is between 15% ~ 3%
Red Blinking Battery charge is less than 3%
Battery LED ( )
Status Content
ON Battery charging
OFF Battery is fully charged
Battery pack cannot be exchanged during battery charging.
Attention For “Removing and Installing the battery”
Attention
When the charge remained amount of the battery is small, your data is possible to
lose if your continue to operate the notebook. When the remained charge of the
battery is gone entirely, even while using the application the power will be OFF.
When alarm of the battery sounds, please store your data immediately.
Difference of stand-by and hibernate state
Stand-by:
Put the notebook on stand-by when it is idle. While on standby, the notebook switches to a low-power
state where devices, such as the monitor and hard disks turned off and the notebook uses less power.
When you want to use the notebook again, it comes out of stand-by quickly, and your desktop is
restored exactly as you left it. Stand-by is particularly useful for conserving battery power in portable
computers.
Because Stand-by does not save your desktop state to disk, a power failure while on Stand-by can
cause you to lose unsaved information.
Hibernate
Put the notebook in hibernation. The hibernate feature saves everything in memory on disk, turns off
your monitor and hard disk, and then turns off the notebook. When you restart the notebook, your
desktop is restored exactly as you left it. It takeslonger to bring your notebook out of hibernation than
out of stand-by.
18
qbex aero style / User’s guide

For the First Time Using
Ensure the notebook is powered off before doing battery exchange. Please ensure ()The battery LED is off.
DO NOT use the AC adapter not included in the package. Use of another type of
adapter may risk re or explosion.
Do not connect the positive (+) and negative (-) terminals with a metal object such
Attention
as wire. Short-circuiting may occur leading the battery pack to leak acid, overheat,
emit smoke, burst and/or ignite. DO NOT throw the battery in re.
Please refer to the safety precautions in this manual.
Before removing the battery, ensure the
1
notebook is powered off.
Move the battery lock switch to the right
2
(unlock position).
Battery Lock Switch
Slide and hold the battery release latch
3
Remove the battery
Slide and hold the battery release latch
4
Remove the battery
Ensure the battery lock switch is
Tip
5
unlocked then insert the battery
rmly.
Slide the battery lock to switch back
to the locked position.
Before Operating Your Notebook
qbex aero style / User’s guide
Battery Lock Switch
19


Using Touchpad
Introducing the Touchpad
Left Button
The left button has the same function as mouse
left button.Making selections, dragging objects,
or double clicking.
Touchpad
Move the pointer over the icon you wish to execute, press the left button or tap the pad twice
in rapid succession, and the system
launches the corresponding program. If the
interval between the clicks or taps too long, the
operation will not be executed.
Right Button
The right button has the same function as
mouse right button. When clicking the right
button, the shortcut menu is indicated.
Scroll Operation
Using the ngertip to slide up or down on the
grey area of the touchpad to scroll a window up
or down
Before Operating Your Notebook
Attention
DO NOT use something like the nib or pointed object to touch the touchpad. It
may cause touchpad damage.
DO NOT operate the touchpad with wet nger. Sometimes, the touchpad
doesn’t function normally with the sebum and the soiling of the ngertip. Please
clean your ngertip if necessary.
Just touch and move the pointer gently, when nger touch the touchpad with
the power above necessity or operate in unreasonable gesture, it may hurt
your nger or wrist.
qbex aero style / User’s guide
21


Using Keyboard
Explanation of the Keys on a standard Windows keyboard
Function Keys
Before Operating Your Notebook
Windows Logo Key
Windows Logo Key
Pressing the key in combination with other keys allows
invoking many common functions through the keyboard.
+ f1
+ M
+ Tab
+ R
+ E
+ F
+ Pause
+ Ctrl + F
Open “Help and Support Center”
in Windows XP
Minimize the Window
To Switch Between Active Windows
To open Run Dialog
To open My Computer
To open Search
To Open Sy stem Properties
To open Search For Computers
program
qbex aero style / User’s guide
Application Key
Application Key
The Application Key functions as same as
the right button on touchpad or mouse.
Function Keys
The Function Keys at the top of the keyboard
provide shortcuts to do things in the Windows
operating system. If you are using a program
such as a word processing application or
spreadsheet, the function keys can have
different uses in the program.
23

Fn Key
The following denes the hot keys on the keyboard. The commands can only be accessed by rst pressing
and holding the Fn key while pressing a key with a icon.
Power Saving Function
Places the netbook in suspend
mode
Fn + F1
(Save-to-RAM).
Press the power butt on to return
from suspend mode
Wireless LAN Function
Fn + F2
Toggles the internal wireless
LAN ON or OFF.
LCD/External Monitor Display Function
Toggles between the netbook’s
Fn + F3
LCD display and an external
monitor in this sequence:
1 Notebook LCD only
2 CRT(External Monitor) only
3 LCD+CRT Clone
LCD Brightness Adjust Function
Speaker Down/Up Function
Fn + F7
Decrease and Increase the
speaker volume
F8
LCD Display ON/OFF Function
Fn + F9
Turns off the display
backlight
Web Camera Function
Fn
+ F10
Toggles the Web Camera
ON or OFF
Bluetooth Function
Fn + F4
Decrease and Increase the
display brightness
F5
Speaker Mute Function
Fn + F6
Mute the speaker
24
+ F11
Fn
3G Function
+ F12
Fn
qbex aero style / User’s guide
Toggles the Bluetooth
ON or OFF
Toggles the 3G module
ON or OFF

Function of Keys
1 23
8
5
5.1
15
6
7
9
10
15
11 12131414
Sending the Command to Discontinue or
Interrupt the Operation
1. ESC (Escape)
Equivalent to clicking the Cancel button.
2. Pause/Break
Press ing it to stop the execution of the current
program or transmission.
Programmed to Perform Certain Actions
3. Function Keys
The function keys perform different functions in
different applications and programs. In combination
with other keys these function keys perform different
functions.
Sending Command (Order)
4. Enter
Creates a new Paragraph or what is referred to as a
Hard Return. In any dialog box a selected button or
command can be selected by depressing this key.
4
Before Operating Your Notebook
Taking the Hard Copy of the Screen
5. Prt Sc (Print Screen)
Pressing the Print Screen key causes the computer
to send whatever images and text are currently on
the display screen to the printer. Some graphics
programs and Windows, use the Print Screen key to
obtain Screen Captures.
5.1 Insert
Allows text to be inserted. When insert is enabled,
the text inserted in a document will not overwrite
any other text. However, when disabled, text will
be overwritten.
6 Delete
While working with text, use this key to delete
characters to the right of the insertion point.
This key can also be used to delete selected les.
7 Backspace
While working with text, use this key to delete
characters to the left of the insertion point.
8 Tab
This key can be used to move forward through options in
a dialog box. Ctrl+ Shift+ Tab can be used to move
backward through the options. Ctrl + Tab allows
movement from one open window to the next in an
application with more than one open window.
qbex aero style / User’s guide
25
Combining to Input Text
9 Caps Lock
Pressing it will set a keyboard mode in which typed letters
are capitalized by default and in lower case when the
Shift key is pressed; the keyboard remains in this mode
until Caps Lock is pressed again.
10 Shift
Giving the other keys an alternate meaning. When
combined with alphabetic keys, the Shift key causes the
system to output a capital letter. The Shift key can also be
combined with other keys to produce program-dependent
results.
11 Space
To ent er t he s pace b etween words during ty ping.
Cursor Movement
12 Cursor Keys
The keys that move the pointer, or cursor, on screen.
They include the up, down, left and right arrow, home,
end, PgUp and PgDn keys.
Combining the Other Key to Execute Function
13 Ctrl (Control)
Ctrl is a key commonly used to refer to a keyboard
shortcut key such as:
Ctrl + Alt + Del
Adjusting Volume
About the Built-in Speaker
The stereo speaker is built in to the product.Three types
of sound sources can be output from the speaker. You
can do the adjustment with “Volume Control” of
Windows.
PC Speaker
Digital Sound
Function
Microphone
Input
The netbook built-in sound,
normally hear “beep” sound from
the notebook.
The sound playback from the sound
circuit using 16bit D/A converter and
the sound output from FM synthesis.
The sound is from the
microphone connected to the
microphone jack or the built-in
microphone.
14 Alt (Alternate)
Alt is a key generally located by the space bar on
keyboards. This term may be used to describe a key
combination such as:
Ctrl + Alt + Del
The above combination means press and hold on the
keyboard CTRL and ALT and DEL to perform the
function, in this case reboot the computer or open
the close program window / task manager window.
15. 1 Num Lk (Number Lock)
Turning the Num Lock on will allow you to use the
numbers on the keypad.
15.2 Scr Lk (Scroll Lock)
The scroll lock key is intended to temporarily
stop the scrolling of text or halt the operation
of a program.
16 Fn (Function)
The commands can only be accessed by rst
pressing and holding the Fn key while pres
sing a key with a icon.
26
qbex aero style / User’s guide
Adjusting Speaker Volume
Adjust the volume of the speaker/headphone as follows.
Using Keyboard to Adjust Volume
Volume can be adjusted from the function key of the
keyboard.
First pressing and holding the Fn key, then pressing F7
and F8 key to decrease and increase the volume.
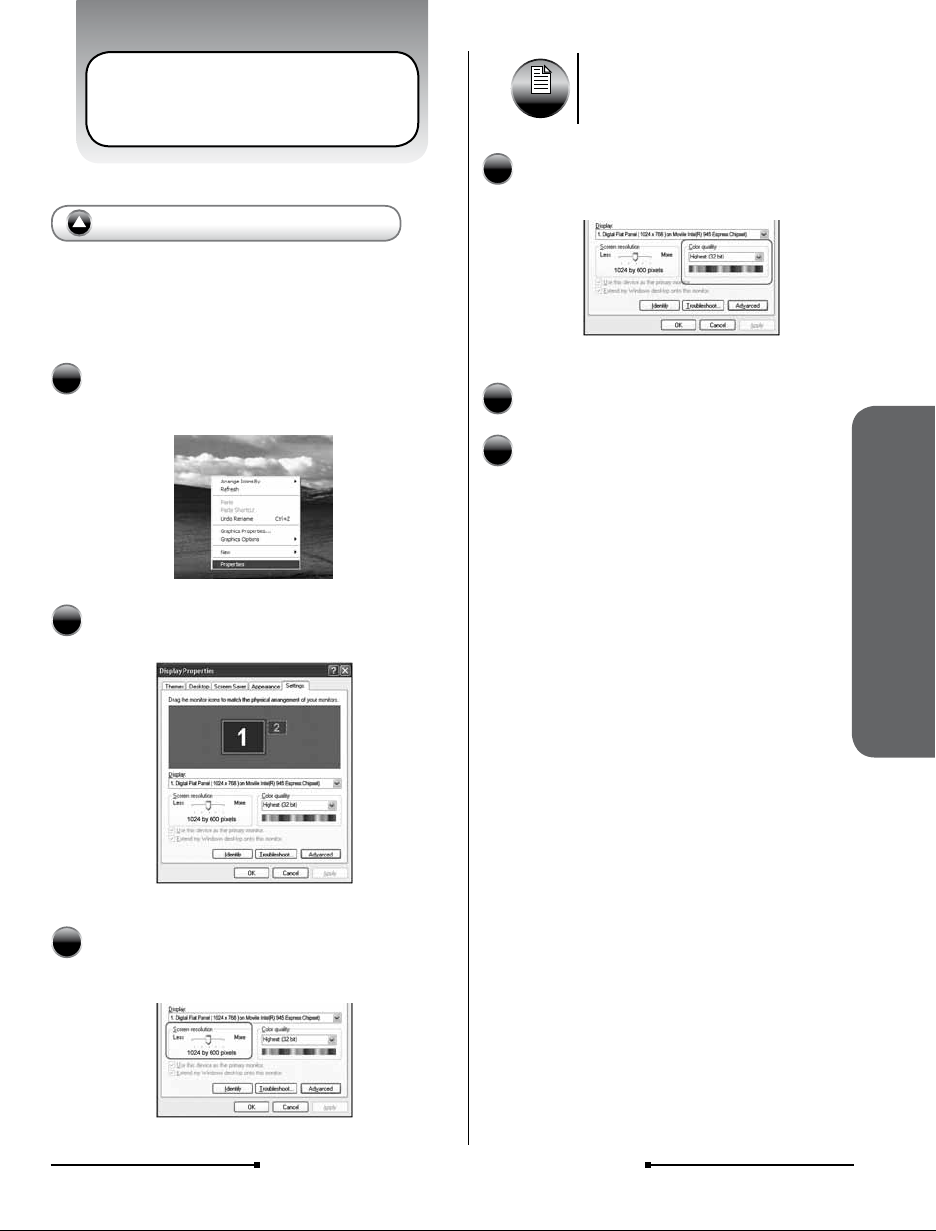
Adjusting LCD Resolution
Changing Screen Resolution
and Color Quality
You can adjust screen resolution and color quality in
“Display Properties”.
Right Click on the desk top, select [Properties]
1
from the menu.
The default screen resolution of the
Tip
4
5
notebook is 1024 x 600.
Click the selection box to select the Color
quality.
Click [Apply].
Select [Setting] tag.
2
Slide the bar left and right, selects the resolution
3
of the screen.
6
Click [OK].
Before Operating Your Notebook
qbex aero style / User’s guide
27

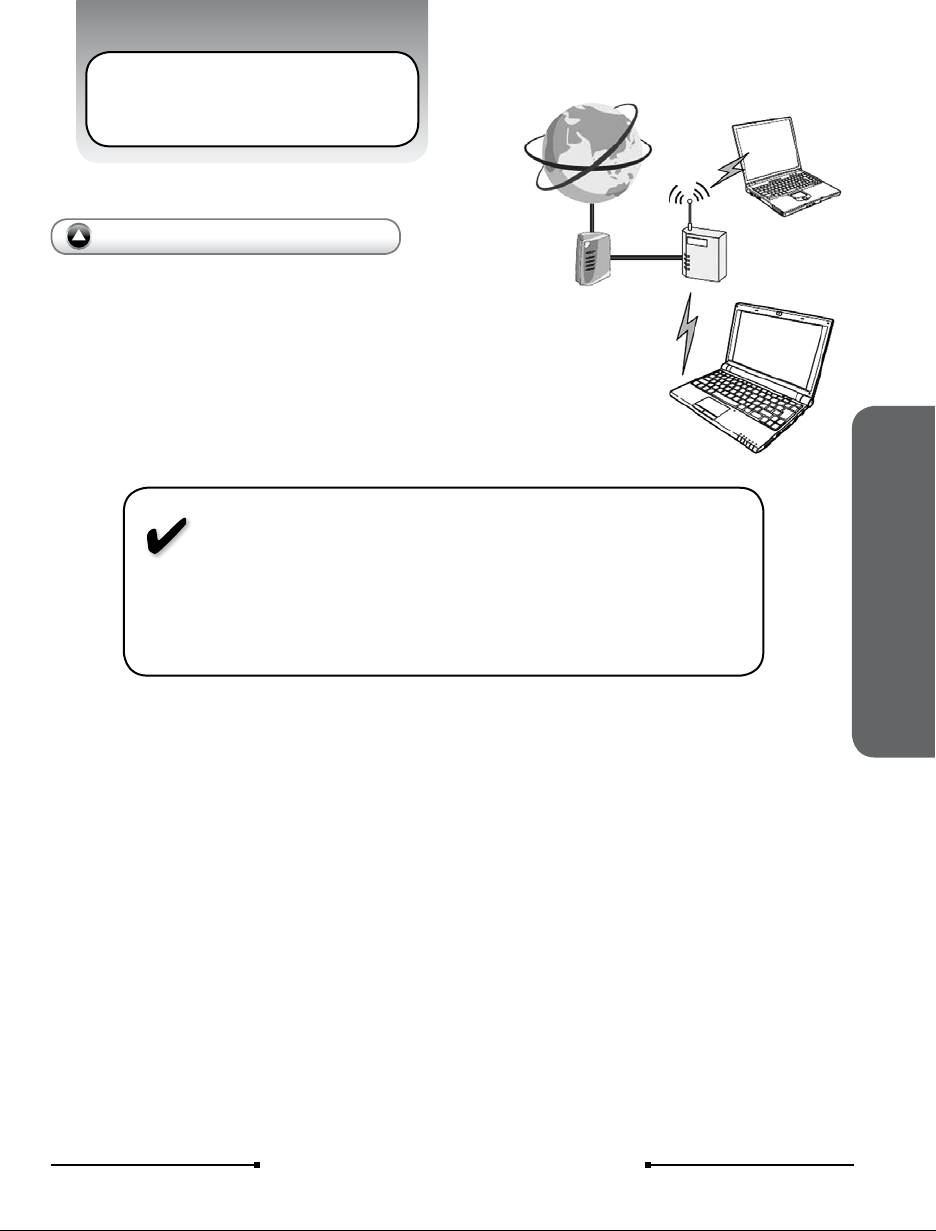
Using Wireless LAN
Internet
Notebook with
Wireless LAN Capability
What Is Wireless LAN?
Router
Access Point
Data Communication by Radio Wave
Wireless means using radio frequency signal to do data
exchange without LAN cable.
Internet Connection Capability
Combined with router and access point, the netbook can
access internet without any LAN cable.
*WLAN function built in the netbook follow IEEE 802.11 b. IEEE 802.11g
and Bluetooth standart
Notice
If the security setting is not done, it is possible to occur problem when you exchange information
with wireless LAN.
*Please turn off wireless LAN function when the noise with electrical
interference effect is produced.
*Please do not use wireless LAN in the area where the radio device is
prohibited.
Communication contents can be peeped
It is possible for the third party with malice to intercept radio wave intentionally. The following kind of
communication contents can be peeped.
Before Operating Your Notebook
* Private information such as ID, password or credit card number etc.
* Mail contents
Wireless LAN Invasion
It is possible for the third party with malice accessing the private/company network without permission and doing
the following kind of behaviors:
* Retrieve private and condential information (secret disclosure)
* Send a program that appears legitimate to the netbook, but performs some illicit activity when it is run.(Trojan)
* Rewrite the communication contents (alteration)
* Infect computer virus and destroy the system (destruction)
It is customer’s responsibility to do the setting of network security.
The customer has to sufciently understand the result occured without setting network security.
qbex aero style / User’s guide
29
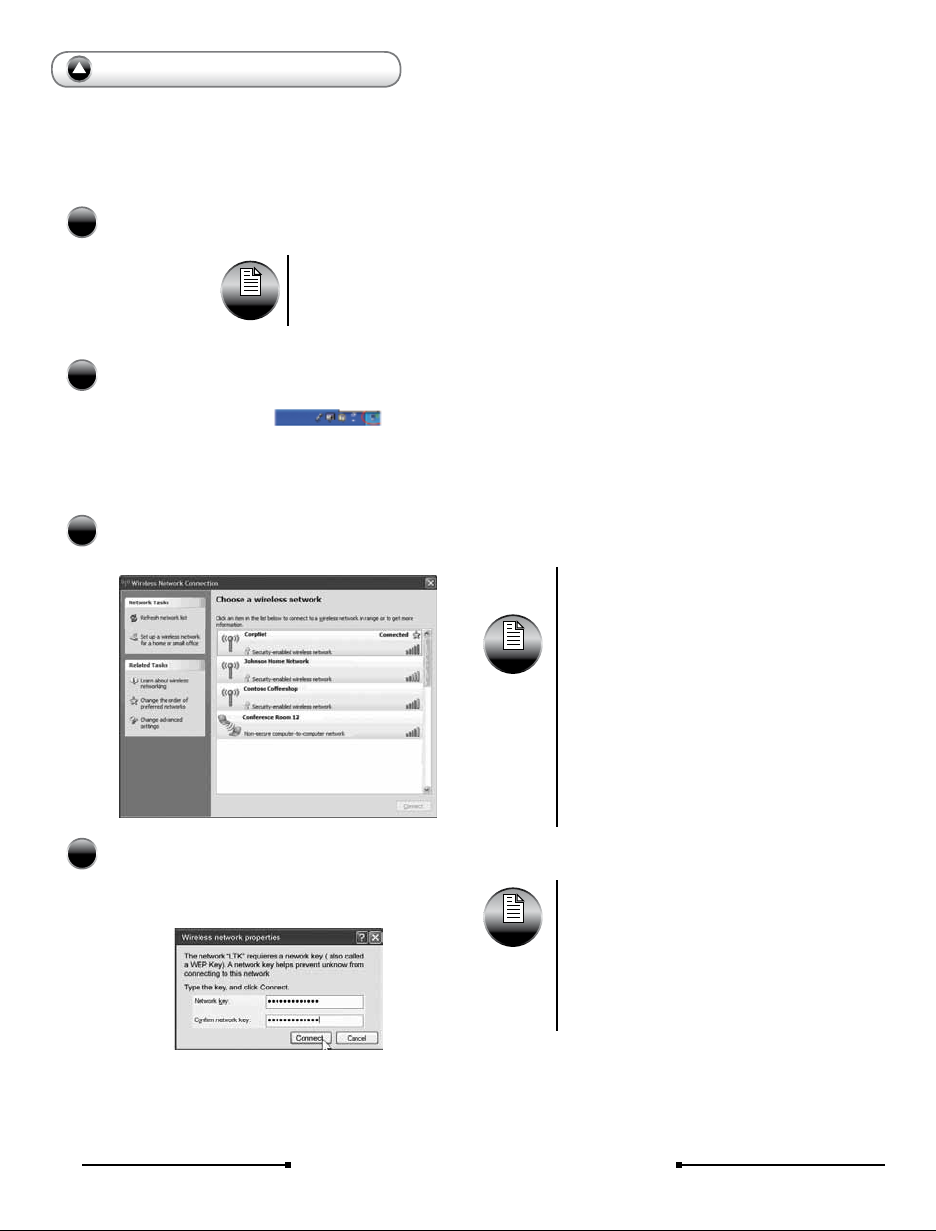
Connecting Wireless LAN
Set Up Automatic Wireless LAN Recognization
Press Fn + F2 or wireless LAN switch to turn on wireless LAN function. When wireless LAN is enabled,
1
the Wireless LAN LED lights.
The connection message will appear on task bar when the possible wireless
Tip
Click the wireless network connection icon and the program of Wireless Network Connection
2
will be launched.
Select a wireless network from the list that appears, and then click [Connect] button. If the network you is
3
security enabled, the program will ask you to type “Network key”.
LAN connection is detected.
Wireless Network
Connection Icon
Tip
* Click [Refresh network list], if there is no
wireless networkin the list.
*If the network is one that support “Wireless
ProvisioningServices”, you might be asked
to download additional les that will allow
your notebook to connect the network.
* If you connect to a unsecured wireless
netwrok, the warning message will appear.
Directly click [Connect] to connect or click
[Cancel] to quit the dialog box. After setting
up the security, connecting the wireless
LAN again.
Type [Network key] and [Conrm network key], click [Connect] to connect wireless LAN.
4
*If the network key automatically provide by
the network, the connection will be made
automatically, and the program wi ll not
request you typing networ k key.
*Sometimes, setting up network is
necessary.
30
Tip
qbex aero style / User’s guide
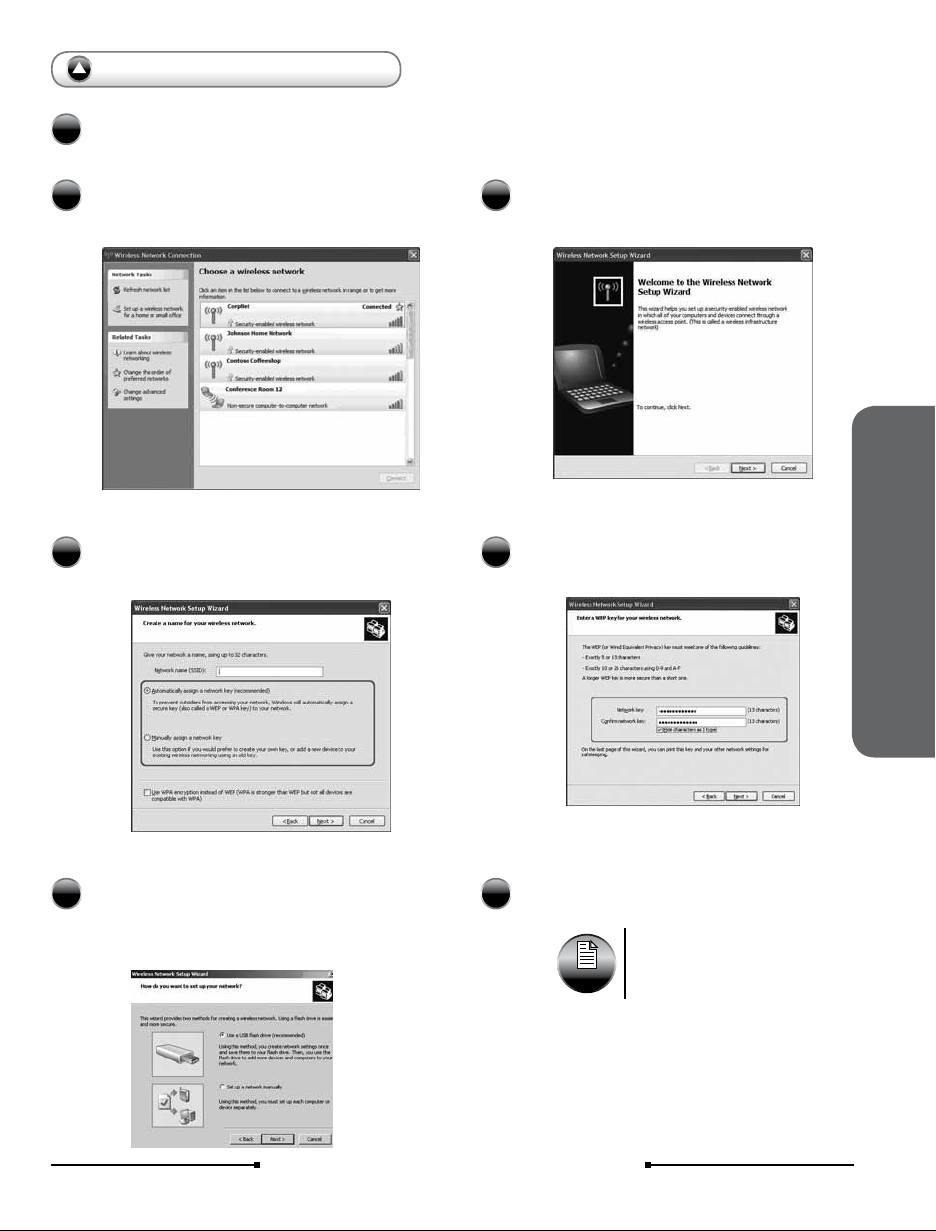
Manually Set Up Wireless LAN
Apply the step 1 and 2 mentioned for “Set Up Automatic WLAN Recognization”.
1
Click [Set up a wireless network for a home and
2 3
small ofce] on “Network Tasks”, and begin the
setup.
Type “Network name (SSID)” and choose the
4 5
method to assign a network key, click [Next]
Click [Next]
Before Operating Your Notebook
Type the Network key and Conrm
network key, click [Next].
If you want to save network settings to your
6 7
ash disk, please choose “Use a USB ash
drive” or “Set up a network manually”, click [Next].
Finish Setting Up Wireless LAN
Press Fn + F2 or push wireless LAN switch to turn
off wireless LAN function, and the wireless LAN LED
will be off.
qbex aero style / User’s guide
Click [Finish] and the netbook will connect to a
wireless LAN.
Sometimes, setting up network
Tip
is necessary.
31

 Loading...