


Q-better User Guide
Q-DS 3.0 (Digital Signage)
Q-FL 3.0
(Digital Signage + Queue Management)
This user guide, as the software described, is purchased under license and is to be used in order to the
terms in that license only.

User’s Guide for Q-DS and Q-FL
2
Table of Contents
Introduction 3
Chapter 1. Installing Q-FL/Q-DS
4
1.1. System Requirements 4
1.2. Preparing a system 4
1.3. Hardware – typical Q-better installations 5
1.4. Software 6
Chapter 2. Composer 7
2.1. Understanding the basics 7
2.1.1. Projects 7
2.1.2. Schedule 8
2.1.3. Ambient Sound 8
2.1.4. Queue Management 8
2.2. Graphical User Interface (GUI) 9
2.3. Creating Projects 10
2.4. Publishing Projects or Schedules 12
Chapter 3. Player 13
3.1. Setting Up Player 13
3.2. Video Inputs Setup 14
Chapter 4. Queue Management (only for Q-FL versions) 15
4.1. Setting up 15
4.2. Layout 16
4.3. Statistics over web browser 17

User’s Guide for Q-DS and Q-FL
3
Introduction
Welcome to Q-better the professional presentation package for Corporate-TV, Digital
Signage and Queue Management Systems.
Q-better features real-time playback of presentations. Q-better offers a complete package
for creation, distribution and playback of any type of information or media.
This chapter presents the different parts of the system and helps the installation of
Q-better and its tools.

User’s Guide for Q-DS and Q-FL
4
Chapter 1. Installing Q-FL/Q-DS
1.1. System Requirements
Mother board with Intel chipset
Dual Core CPU, 2 GB RAM (3 GB for Multiview versions)
Dedicated Graphic Card (for best performance)
Microsoft Windows XP, Vista or 7.
For systems that will be mainly used for Queue Management, it is possible to run the player in
Intel Atom based systems with 2GB RAM.
1.2. Preparing a system
For the best performance of Q-better Player it is recommended to carry out the following tasks
before installation:
• For Windows Vista and 7 turn off User Account Control, otherwise each time Q-better
Player runs, UAC asks for confirmation. Please turn off User Account Control in:
Windows Vista: Start/Control Panel/User Accounts/Turn User Account Control on or
off;
Windows 7: Start/Control Panel/User Accounts/User Account Settings/ Never Notify
(Down Option);
• For Windows Vista and 7 it is strongly recommended to turn off Windows Aero.
Windows Vista: To turn Aero off, right-click on the desktop and choose Personalize
from the menu. From the new window, select “Window Color & Appearance”, then
on the new page, click the “Open classic appearance properties” link. When the
Properties box appears, select “Windows Vista Basic” and click the Apply button. Give
it a few seconds and Aero will be switched off.
Windows 7: Right click anywhere on your desktop and select “Personalize”. In the
Personalization window, choose any of the available “Basic and High Contrast
Themes”. Windows 7 applies the new theme automatically.

User’s Guide for Q-DS and Q-FL
5
• Install Codec Packs
By installing Microsoft’s Media Player (installed by default with Windows XP, Vista
and 7) various standard video codec’s are preinstalled, including support for Windows
Media Video files (WMV). To support other file formats such as MPEG-2 or DivX it is
required to install the appropriate codecs.
For MPEG-2, DivX or Xvid support, download and install the ffdshow codec pack:
http://sourceforge.net/projects/ffdshow-tryout/
Note: If you are using media that is compressed using a non-windows-standard codec (DivX,
MPEG2, etc).This codec must also be installed on each player PC for correct playback
.
In case of not knowing which codec a media file was encoded with, it is possible to use
the free GSpot Codec Information Appliance:
http://gspot.headbands.com/
To use GSpot, drag and drop the media file under investigation from ‘My Computer’ to
GSpot. The frame titled ‘Container’ will display which codec was used for encoding the
media file.
1.3. Hardware – typical Q-better installations
In this setup the same computer is used to create presentations and to playback them, suitable
for smaller installations. It’s highly advisable to use a PC with dual head VGA graphics adapter.
For more architectures consult the respective Guides.
More information in http://www.q-better.com

User’s Guide for Q-DS and Q-FL
6
1.4. Software
Installing Q-better is easy – just follow the on-screen instructions.
Insert the Q-better CD into your CD-ROM.
When the Setup screen appears, follow the instructions to install Q-better in your computer. If
the Setup screen does not appear automatically, click the Start button on your Windows
taskbar and then click the Run command. When the Run dialog box opens, enter D:\setup.exe
and click OK (where D is the letter of your CD-ROM drive)
Important: In case of installing Q-better from a file and the O.S. is Windows Vista or
Windows 7, click it with the right button of the mouse and select “Run as administrator”
Running the Applications:
Select All Programs/Q-FL/Q-Fl Composer from the Start Menu to run Composer and All
Programs/Q-Fl/Q-FL Player to run Player.

User’s Guide for Q-DS and Q-FL
7
Chapter 2. Composer
This chapter gives the basic knowledge on how Composer works. The basic concepts schedule,
projects and modules are described, followed by the description of the graphical user interface
(GUI) where projects can be created.
2.1. Understanding the basics
The Q-better system was created to display information in different kinds of output devices. In
the Composer, one tells what, how and when information will be presented.
2.1.1. Projects
The projects created in the Composer follow a four
layer model:
Background: may contain a color or image;
Modules: modules of content (described in
chapter 2.3);
Mask: image with transparencies in PNG format;
Popup: list of editable text and images in full screen.
Allows the configuration of the time and number of
times for showing each item.

User’s Guide for Q-DS and Q-FL
8
2.1.2. Schedule
In composer it is possible to create
multiple projects. With the schedule it is
possible to create rules to play the
projects.
Schedule has 2 kinds of events:
• Main events – list of projects that
play in loop;
• Sub events – take priority over
main events. It is a list of projects
that play in scheduled periods.
2.1.3. Ambient Sound
The sound system is independent of the
projects or schedules.
Monitors the ambient sound, manage a
playlist of music or audio inputs from
input card, inserts audio spots randomly
or with defined intervals. Combined with
the hardware of radio buttons (CLA) can
enter a spot when a button is pressed.
The project may change but the
ambience remains. If a project contains
videos with sound, the sound environment lowers the volume to be heard only the sound of
the video. At the end of the video the sound volume environment back to the previous level.
2.1.4. Queue Management
Allows the setup of the queue
management hardware (ticket dispensers
and calling buttons), users, services and
desks. Includes a link to a statistics
module.
As the surround sound system, the queue
management is also independent of the
project which is running in the Player. The
module queue management project
receives commands to update the
numbers to call. This way you can change
the project and the values will always be
the same.
User’s Guide for Q-DS and Q-FL
9
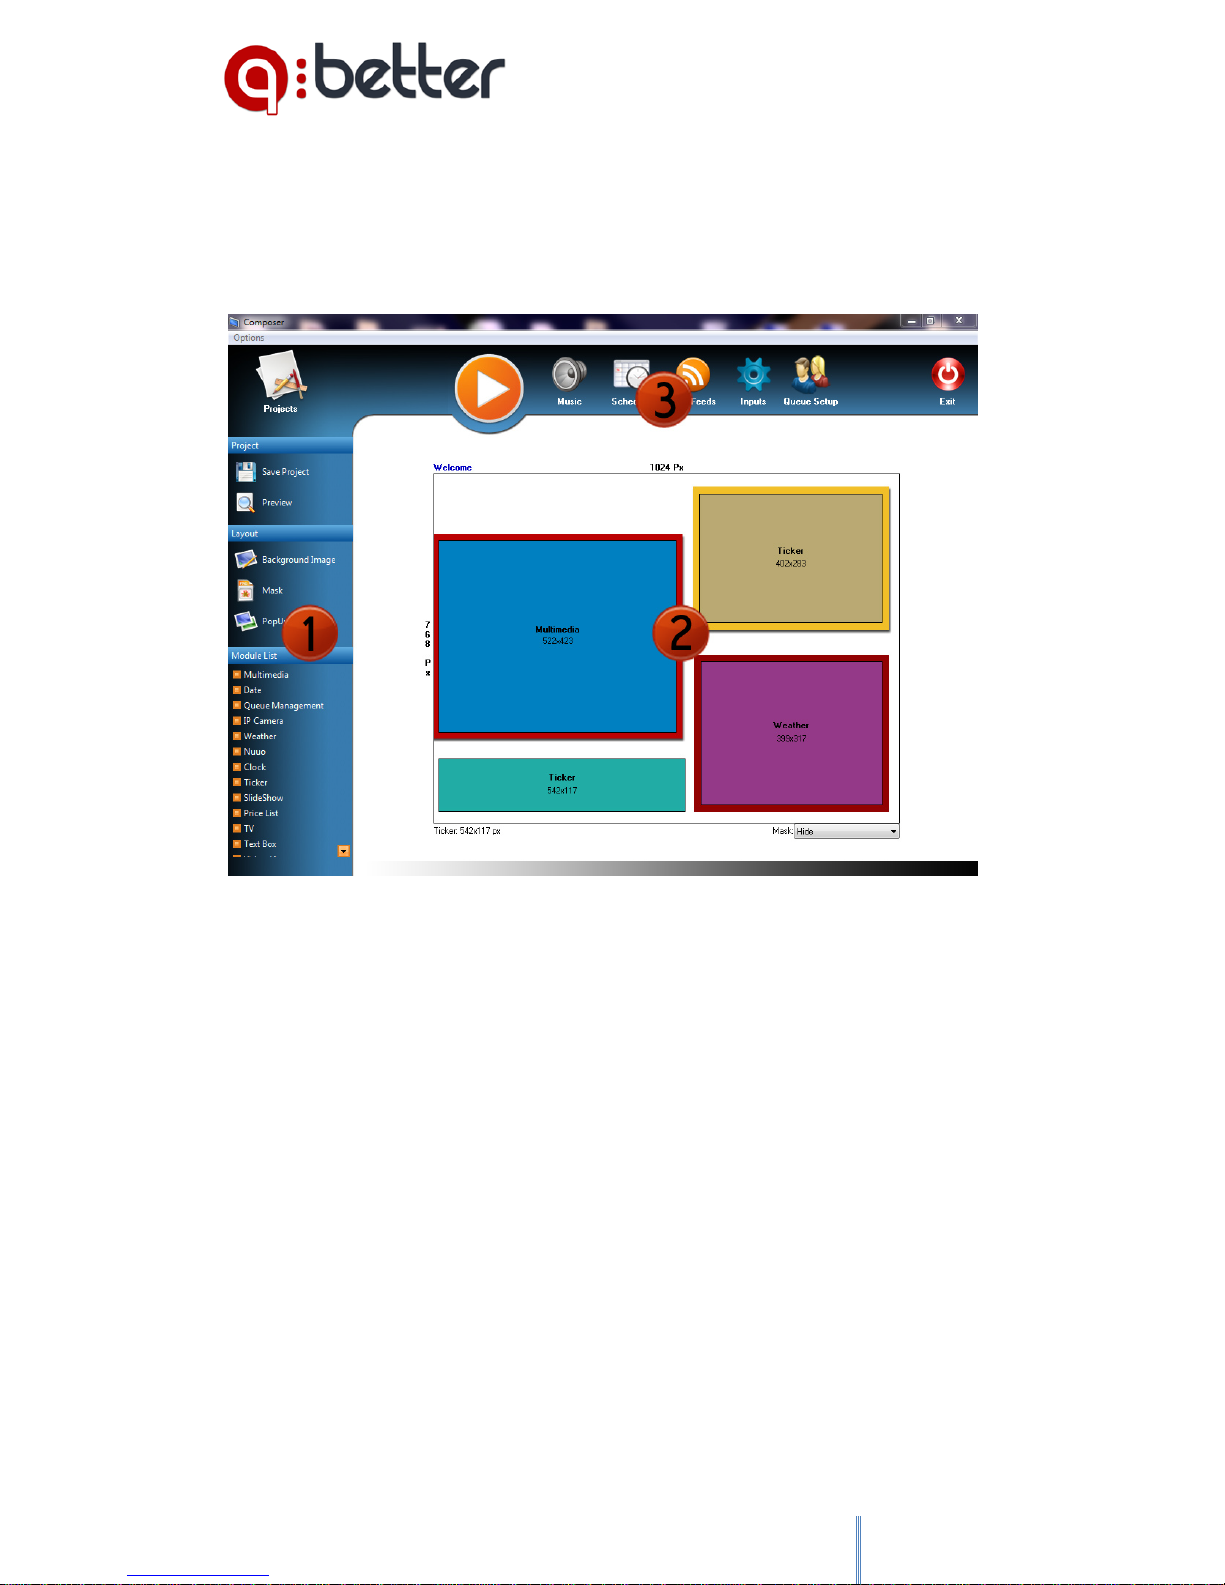
2.2. Graphical User Interface (GUI)
The Composer is designed to be very easy to use, even for a beginner, even without IT
knowledge.
The main window is built as many other applications with menus and toolbars:
1- On the left, there are different tools and content modules to be used in the creation of
projects:
• Background image, mask and Popup;
• Module list;
• Save Project and Preview;
2- The area on the center it is the project canvas area;
3- On the top there are the icons for the tools of:
• Ambient sound;
• Queue Management settings and statistics;
• Scheduling (create project rules and playlists of projects );
• Inputs (to setup hardware for interaction);
• RSS feeds;
• PLAY button (deploys projects and schedules to Player);

User’s Guide for Q-DS and Q-FL
10
2.3. Creating Projects
To start creating projects run Composer.
Clicking Projects, the Projects window appears. Click
new and write the title of the project, choose the
resolution (Recommended or manually, define width
and height – portrait or landscape).
Click Save and Open.
Now insert modules, background, masks and Popup
(all optional).
To insert modules, click on the module name and a colored rectangle appears in the canvas
design area. It is possible to drag and resize the module box. To setup the module just double
click it.
Summary list of the main modules
Multimedia
The multimedia module allows the creation of playlists
of pictures, videos, flash (swf) and texts. All elements
of the playlist can be timed.
Incorporates a simple tool for editing images and
adding shapes and editable text.
Ticker/RSS
The Ticker / RSS module allows the insertion of simple
text messages or RSS. This module can be configured
with 2 types of input:
Text: Simple text with horizontal animation. The text
size is automatically adjusted to the box of the
module.
RSS Feeds: Provides horizontal and vertical
coordination of RSS feeds, allowing the integration of
content with standard RSS format.

User’s Guide for Q-DS and Q-FL
11
TV/Video
The TV/Video is one of the sources of
TV/External Video capture of Q-better. This
module allows the capture of a TV signal from a
TV card and uses the entries of s-video,
composite video or RF (antenna). It also captures
images from Web cameras.
The settings panel of this module is available
from the Player menu (Input Video Hardware
Setup).
Weather
Show ?? (Presents) the weather in key locations up to 5 days in advance. This module requires
an Internet connection.
Clock
Contains analog or digital clock.
Date
Date in numeric or extensive form.
Price list
Q-better provides a specific module for the presentation of pricing lists.
This module allows customization of colors, number of lines, import TXT external files or direct
editing (edit directly) in the module.
IP Camera
Show real-time video from IP cameras.
Text Box
Allows the use of text or text list with exposure time configurable. Formatted for placement of
small captions or short messages.
Queue Management
Module for customization of information table for managing queues.
Allows for customization of the type of information to present to the user of a service, as well as
the ticket number in attendance at each service.

User’s Guide for Q-DS and Q-FL
12
2.4. Publishing Projects or Schedules
To control the contents on screens just click PLAY;
Control panel shows a command list to each screen configured on player setup. It allows
seeing a preview of the current program, sending a new project or schedule.
Attention:
Control panel communicates directly
with the player. Be sure that the
player is running and that there are
no firewall blocking the traffic
between both applications (default
port: 5700).

User’s Guide for Q-DS and Q-FL
13
Chapter 3. Player
3.1. Setting Up Player
The main purpose of Q-better Player is to playback Q-better projects or project schedules
made through the composer (Q-better Player has one task in the Q-better system, and that is
to play Q-better projects or project schedules). The Player was (application is) designed to play
continuously 24/7.
Since Q-better Player is designed to be a fully automatic playback engine, there are not many
settings or controls in the application.
Setting up Player
After you open the Player, an icon appears on the
system tray (two icons in Q-FL version).
Click with the right button of your mouse on the
player icon and select Open Player. The Player
Window appears.
• To setup video outputs Click Options –
Setup. Setup window will appear; Select
graphic outputs where to show the
instances of the player (one with normal
version and up to3 in Multiview version);
Click Save and Exit; The Player main
window will show one tab for each
selected graphic output.
• The Player window shows five icons on
each tab: Open, Minimize, Update, Close
and Restore. Each tab controls a graphic
output.
• If the Player is maximized, click with the
right side mouse button to control the
player.
Now it is possible to control the player over the Composer or Q-Network.
If the icon of the player is on the system tray, it will open if you send projects or schedules
from the Composer or Q-Network.

User’s Guide for Q-DS and Q-FL
14
3.2. Video Inputs Setup
To configure a webcam or a
Video/TV capture card open the
Player Window and select
Options/Input video hardware
setup.
In the Video Hardware Setup
Window select the hardware,
settings and preview.

User’s Guide for Q-DS and Q-FL
15
Chapter 4. Queue Management (only for Q-FL versions)
4.1. Setting up
When the Player starts, two icons show up in the system
tray – Player and Queue Management System (QMS).
Click with the right side mouse button on the QMS button
and select Open Queue Management.
The QMS Window shows the status of the
system, links to the setup window,
Statistics and Reset Values of the counters.
You can setup the QMS clicking on Setup
button.
Setup window allows setting up ticket
dispensers (including ticket layout), queue
management policies, caller buttons,
services/desks and system users.
From the Composer
The same configurations can be done from
the Composer clicking in the icon Queue
Settings.

User’s Guide for Q-DS and Q-FL
16
4.2. Layout
In projects where you want to show the queue attendance tickets and services, you should
place a queue management module in the project.
In the setup of the module select the fields that you need and the color scheme.

User’s Guide for Q-DS and Q-FL
17
4.3. Statistics over web browser
In the Player you can activate a web server that
allows access to statistics about the queue
management system.
To activate the web server click Options/Setup from
the Player Window and check Activate Web Server. It
is possible to change the communications port,
username and password.
After the web server activation it is possible to open the statistics module clicking in the
statistics icon in Composer Queue Settings or in the Queue Management System Window
The computer pre-defined web browser opens and show the statistics.
 Loading...