

Page 1

D1
PYROTECPYROTEC
T
1
t
1
t
2
PYROTEC
PYROTEC
5
4
3
2
¡C
h : min
✔
--
++
T
2
P
1
Bedienungsanleitung
Operating Instructions
Page 2

D1
PYROTECPYROTEC
T
1
t
1
t
2
PYROTEC
PYROTEC
5
4
3
2
¡C
h : min
✔
--
++
T
2
P
1
Bedienungsanleitung
Page 3

Einleitung .............................................................3
Inbetriebnahme der Regelanlage..........................3
Brennkurve...........................................................4
Programme...........................................................4
Starten eines Brennvorganges..........................5
Ändern eines Programmes...............................6
Kontrolle der Programmwerte..........................6
Tastaturverriegelung.............................................7
Netzausfall ...........................................................7
Betriebsgrenzen....................................................7
Ergebnisse des letzten Brandes.............................8
Fehlermeldungen..................................................8
Technische Spezifikationen
Elektrische & mechanische Daten..................10
Steckerbelegung (HAN7D) ............................10
Inhaltsverzeichnis
2
PYROTECPYROTEC
T
1
t
1
t
2
PYROTEC
PYROTEC
5
4
3
2
¡C
h : min
✔
--
++
T
2
P
1
33 55442211
88 12121111101066 77 99
Die Bedienelemente
1 Werteanzeige (Ofentemperatur und
Programmwerte)
2 Einheit des dargestellten Wertes (1)
3 Tasten zum Verstellen der Werte
4 Taste zum Sperren der Tastatur
5 Netzschalter
6 Anzeigen/Ändern der Endtemperatur
7 Anzeigen/Ändern der 1. Haltetemperatur
8 Anzeigen/Ändern des Anheizens
9 Grafische Darstellung der Brennkurve
(Leuchtpunkte zeigen aktuelles Segment)
10 Anzeigen/Ändern der Haltezeit
11 Taste zur Programmwahl
12 Taste zum Starten/Stoppen des Brands
Page 4

Ihre Mikroprozessor-Regelanlage PYROTEC D1
verfügt über die neueste Technologie im Bezug auf
Brennsicherheit, Genauigkeit und leichte Bedienung.
Im Äußeren als ein einfach zu handhabender Regler
erscheinend, ist der PYROTEC D1 ein hochmodernes
System mit einer bei Bedarf konfigurierbaren Struktur,
die an alle Anwendungen angepaßt werden kann. Das
Durchlesen dieser Anleitung macht Sie schnell mit
den vielen Funktionen Ihres PYROTEC D1 vertraut.
Beachten Sie ferner die Sicherheitshinweise Ihres
Ofenherstellers. Achten Sie darauf, dass die Steuerung
in ausreichendem Abstand vom Ofen montiert und
ausserdem keiner direkten Hitze vom Ofen durch
Abluft oder Strahlung ausgesetzt wird.
Je nach Ofenmodell wird Ihre PYROTEC D1 entweder
am Ofen oder an der Wand befestigt (siehe der
Lieferung beiliegende Halterung).
Ihr PYROTEC Ofen und Ihre Regelanlage unterliegen
bei der Produktion strengen Qualitätsprüfungen.
Trotzdem empfehlen wir den Brennvorgang während
der Schlussphase zu beaufsichtigen.
Befestigen Sie die PYROTEC D1 Regelanlage an der
Ofen- bzw. Wandhalterung. Die elektrische
Verbindung zum Ofen wird über die Anschlußleitung
mit einem verpolungssicheren Mehrpol-Stecker
hergestellt. Nach dem Einstecken wird der Stecker mit
dem Überwurfbügel gesichert.
Nach dem Einschalten über den Netzschalter (5) erscheint in der Anzeige (1) nach 3 Sekunden die Ofentemperatur. Die PYROTEC D1 ist jetzt betriebsbereit.
3
PYROTECPYROTEC
Einleitung
Inbetriebnahme
der Regelanlage
Achtung: Legen Sie die PYROTEC D1
Regelanlage niemals auf den Ofen!
Page 5
Der PYROTEC D1 Programmregler ermöglicht eine
präzise und reproduzierbare Steuerung Ihres
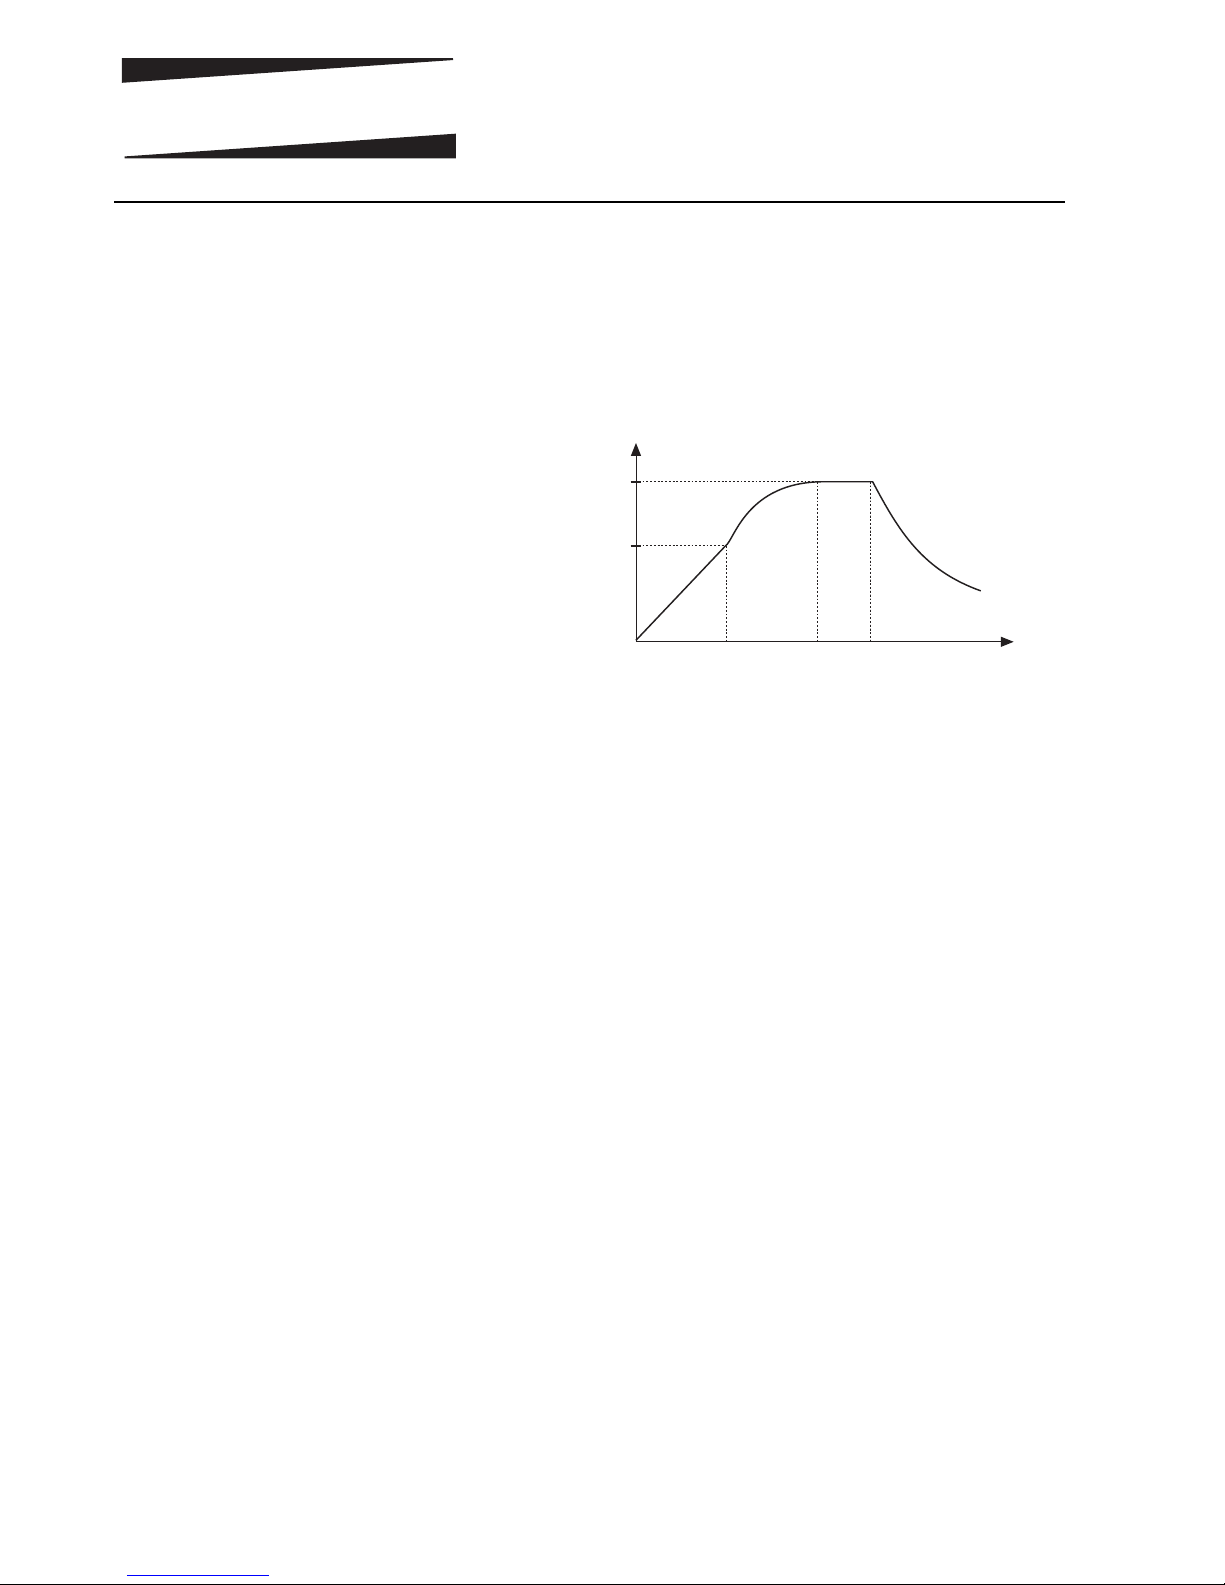
Brennofens. Ein Brennablauf besteht aus den Brennabschnitten (auch „Segmente“ genannt) (a) bis (d):
Beispiel:
Anheizen auf 1. Haltetemperatur (a):
Der Ofen wird mit der angegebenen Geschwindigkeit
aufgeheizt. Die Festlegung erfolgt über die Zeit (zum
erreichen der 1. Haltetemperatur).
Aufheizen auf Endtemperatur (b):
Der Ofen heizt mit Volllast auf die Endtemperatur.
Haltezeit der Endtemperatur (c):
Der Ofen verweilt die eingestellte Zeit auf der
Endtemperatur. Die Haltezeit sorgt für gleichmäßiges
Durchheizen des Brenngutes im Ofen.
Abkühlen bzw. Programmende (d):
Nach Beenden der Haltezeit kühlt der Ofen mit der
natürlichen Geschwindigkeit ab.
Die PYROTEC D1 verfügt über 5 typische Brennkurven, die als Programm Nr. 1 (P1) bis Nr. 5 (P5) im
Regler abgelegt sind. Diese Programme können Sie
nach Ihren Anforderungen verändern. Werksseitig
sind die folgenden Werte eingestellt:
4
PYROTECPYROTEC
900
Temp
(°C)
600
Segment
d
ab
c
6:00 0:10
Brennkurve
Programme
Page 6
Beachten Sie, dass obenstehende Werte der
Brennprogramme nur zutreffen, solange Sie diese
nicht abgeändert haben !
Das folgende Beispiel beschreibt den Start eines
Brandes durch den Aufruf von Programm Nr. P2.
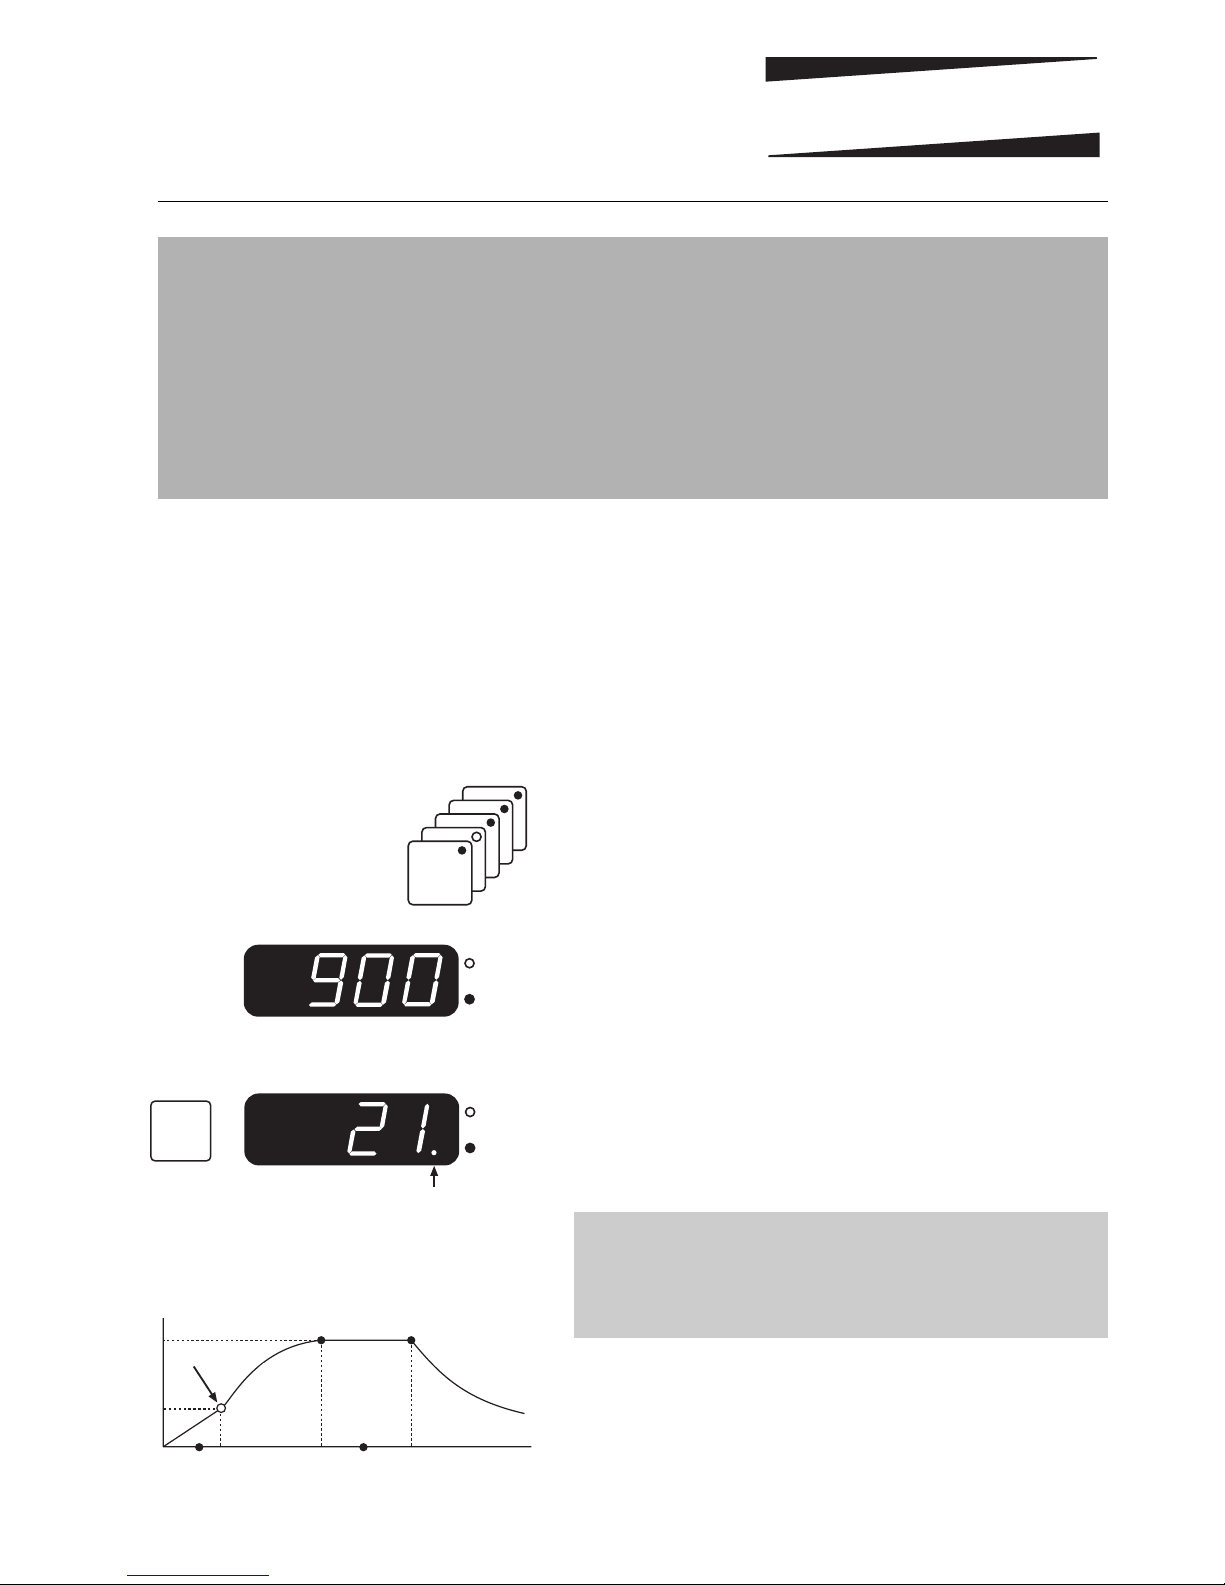
Nach dem Einschalten zeigt das Display (1) der
PYROTEC D1 die aktuelle Ofentemperatur.
Drücken Sie die Taste (11) so oft, bis der Leuchtpunkt
auf Programm 2 zeigt (siehe nebenstehende Grafik).
Auf der Anzeige (1) steht nun die Endtemperatur von
Programm P2 (Anzeige springt nach 15 Sekunden auf
Ofentemperatur zurück).
Zum Start des Brandes drücken Sie die Taste (12). Die
Anzeige (1) zeigt während des Brennvorganges die
aktuelle Ofentemperatur dar. Alle 20 Sekunden wird
die Endtemperatur blinkend eingeblendet.
Die Leuchtpunkte in der grafischen Brennkurve (9)
zeigen den aktuellen Brennabschnitt an (das dargestellte Beispiel zeigt Segment (a) an).
5
PYROTECPYROTEC
Programm Anheiz- Anheiz- End- Halte-
zeit (t1) Temperatur (T1) Temperatur (T2) zeit (t2)
P1 Trocknen 5:00 150 150 0:00
P2 Schrühen langsam 6:00 600 900 0:10
P3 Schrühen schnell 4:00 600 900 0:10
P4 Glasur 1050°C 2:00 400 1050 0:20
P5 Glasur 1180°C 2:00 400 1180 0:20
Hinweis
Der blinkende Dezimalpunkt rechts in der Anzeige (1)
weist auf einen laufenden Brennvorgang hin
Starten eines
Brennvorganges
blinkend
¡C
h : min
P
1
2
3
4
5
¡C
h : min
✔
Page 7

Nach erfolgreicher Beendigung des Brennvorganges
zeigt die PYROTEC D1 in der Anzeige (1) „EndE“ an
(im Wechsel mit der aktuellen Ofentemperatur).
Warten Sie vor dem Öffnen bis der Ofen abgekühlt ist.
Das nachfolgende Beispiel beschreibt das Abändern
der Endtemperatur von Programm Nr. P2 von 900°C
(Originalwert) auf 850°C.
Rufen Sie wie im Beispiel zuvor beschrieben
Programm Nr. P2 auf. Nach dem Drücken der Taste
(6) erscheint in der Anzeige (1) der aktuelle Wert des
Programms (900°C). Der entsprechende Abschnitt der
Brennkurve (9) leuchtet auf.
Über die Tasten (3) wird der Wert auf 850°C geändert.
Für größere Werteänderungen halten Sie die Taste
gedrückt. Das Ändern der anderen Werte funktioniert
auf die selbe Art und Weise: Durch Drücken der
entsprechenden Taste (6, 7, 8, 10) wird der aktuelle
Wert angezeigt, der dann über die Tasten (3) verändert
werden kann.
Die Änderung eines Programmwertes ist permanent,
d.h. bleibt auch nach dem Ausschalten des Reglers
erhalten. Ein Programmwert kann jedoch beliebig oft
geändert werden.
Zum Starten des Brandes mit der neuen Brennkurve
drücken Sie einfach die Taste (12).
Alle Programmwerte können durch Betätigen der
entsprechenden Taste (6, 7, 8, 10) angezeigt werden.
Diese Abfrage ist jederzeit, d.h. auch während eines
laufenden Brennvorganges möglich.
Die Anzeige (1) zeigt den Programmwert für 2 Sekunden, bevor wieder die Ofentemperatur erscheint.
Der entsprechende Abschnitt in der Brennkurve (9)
leuchtet während dieser Werteabfrage auf.
6
PYROTECPYROTEC
Ändern eines Programmes
¡C
h : min
T
2
-
+
✔
Kontrolle der Programmwerte
Page 8

7
PYROTECPYROTEC
Beachten Sie, dass bei Kontrolle von t1 bzw. t2 nur
die verbleibende Restzeit im Segment gezeigt wird.
Um die Brennkurve eines bereits laufenden Brandes
zu verändern, muss dieser zuerst durch Drücken der
Taste (12) gestoppt werden. Nach Verändern der
Brennkurve wird der Brennvorgang durch erneutes
Drücken der Taste (12) fortgesetzt.
Die PYROTEC D1 kann über die Tastaturverriegelung
gegen unbefugten Eingriff gesichert werden. Drücken
der Taste (4) verriegelt die Tastatur. Der Dezimalpunkt
links in der Anzeige (1) bedeutet „Tastatur verriegelt“.
Nach Verriegelung der Tastatur können nur noch
Werte abgefragt werden, nicht aber z.B. der Brennvorgang unterbrochen werden.
Um den Regler zu entriegeln drücken Sie die Taste (4)
und halten sie gedrückt, bis der Dezimalpunkt erlischt.
Falls während des Brandes ein Netzausfall eintritt,
wird der Brand unterbrochen. Nach Wiederkehr der
Netzspannung setzt die PYROTEC D1 den Brand an
der Stelle fort, an der der Netzausfall eingetreten ist.
Wenn die Ofentemperatur während des Brandes um
mehr als 50°C gefallen ist, wird der Brand unterbrochen und es erscheint die Fehlermeldung „F2 2“.
Alle Zeiten werden in der Form „Stunden : Minuten“
bei einem Höchstwert von 99 Stunden 59 Minuten
eingegeben. Temperaturen werden im Bereich 20°C
bis 1320°C akzeptiert. Bei einer Brenntemperatur von
1320°C ist jedoch aus Sicherheitsgründen die Haltezeit auf 10 Minuten begrenzt.
Beachten Sie außerdem die Höchsttemperatur des
PYROTEC Ofens. Aufgrund der Leistungsgrenzen von
Lichtstrom können bestimmte Ofenmodelle die am
Regler einstellbare Höchsttemperatur nicht erreichen.
Unter keinen Umständen darf der Ofen außerhalb der
angegebenen Maximalgrenzen betrieben werden !
Tastaturverriegelung
blinkend
¡C
h : min
t
2
Netzausfall
Tastatur verriegelt
¡C
h : min
Betriebsgrenzen
Page 9

8
Nach Beendigung des Brandes können die folgenden
Ergebnisse abgefragt werden. Durch Drücken und
gedrückt halten der Taste (7) werden in der Anzeige
(1) folgende Werte nacheinander dargestellt:
• Betriebsstunden der Heizspiralen seit
Programmstart (netto - Einschaltzeit)
• Betriebsstunden der Heizspiralen seit Inbetriebnahme des Ofens (netto - Einschaltzeit)
• Temperatur bei Programmende bzw. bei
Auftreten einer Fehlermeldung
• abgelaufene Zeit seit Programmende bzw.
bei Auftreten einer Fehlermeldung
Der integrierte Mikroprozessor der PYROTEC D1
überprüft ständig den Brennverlauf. Sobald eine
Störung auftritt, erscheint auf dem Display eine
Fehlermeldung. Nachfolgend eine Auflistung und
Erläuterung aller Fehlermeldungen:
Der Ofen folgt nicht dem geforderten Temperaturanstieg
Diese Fehlermeldung weist eindeutig auf ein Pr
oblem
am Ofen hin. Mögliche Ursachen:
•Eine Sicherung / Netzphase ist defekt
•Der Türkontakt ist geöffnet
•Eine Heizspirale ist defekt
•Die Heizspiralen sind überaltert (speziell bei
hohen Brenntemperaturen)
•Das Thermoelement bzw. seine Zuleitung ist
kurzgeschlossen
•Problem im Schaltkasten (z.B. Schützdefekt)
Sicherheitsabschaltung wurde aktiv
Der Regler hat eine Übertemperatur festgestellt und
den Ofen über das Sicherheitsschütz (falls vorhanden)
abgeschaltet (20°C über T1 bzw. T2 bei Temperaturen
größer 880°C). Vor Klärung der Ursache (z.B. defektes
Ofenschütz) darf der Ofen aus Sicherheitsgründen
nicht weiterbenutzt werden !
PYROTECPYROTEC
Fehlermeldungen
Ergebnisse des letzten
Brandes
Page 10

9
PYROTECPYROTEC
Brennvorgang nach Netzausfall abgebrochen
Die Ofentemperatur ist während des Netzausfalls um
mehr als 50°C gefallen; der Brennvorgang wurde von
der PYROTEC D1 abgebrochen, da die Qualität des
Brennergebnisses nicht mehr gewährleistet war.
Im Temperaturmesskreis ist ein Fehler aufgetreten.
Mögliche Ursachen:
• Temperaturfühler defekt
• Zuleitungskabel zum Temperaturfühler defekt
• Kontaktproblem in der Steckverbindung
Die Temperaturmessung liefert unkorrekte Werte
Mögliche Ursachen:
•Temperaturfühler verpolt angeschlossen
•Temperaturfühler misst eine Temperatur
unter -40°C
Der Selbsttest ergab ein Problem im Regler.
Bei jedem Einschalten wird ein Selbsttest
durchgeführt. Wird hierbei ein Fehler festgestellt,
erscheint im Display diese Fehlermeldung. Falls nach
dem Aus- und Wiedereinschalten die Meldung erneut
erscheint, wenden Sie sich an Ihren Händler.
Page 11

10
PYROTECPYROTEC
Schutzleiter
220 V Phase
220 V Null
(Option)
(a)
(b)
(c)
(d)
(e)
(f)
(+)
(-)
Thermoelement
(g)
(h,n)
Schütz
"Heizen"
a...n: Anschlüsse für Regelanlage
6-
5-
4-
1-
2-
3-
7-
Schaltschema eines Ofens
Steckerbelegungen
Technische Spezifikationen
Versorgungsspannung 180 - 245V AC 50/60 Hz
Sicherung 0,5 A mittelträge
Leistungsaufnahme 5 W
Messeingang Thermoelement PtRh10%-Pt (S)
Messauflösung 0.1°C
Genauigkeit 0,1% des Endwertes
Gehäuseabmessungen 200 x 110 x 60 mm
Gewicht 1100 g
Umgebungstemperatur -10°C to 55°C
Elektrische & mechanische Daten
Vergleichen Sie den Typ des verwendeten Thermoelementes mit dem auf der Rückseite des
Reglers angegebenen Typ. Bei Nichtbeachtung Beschädigung von Ofen und Brenngut !
Änderungen, die dem technischen Fortschritt dienen, bleiben vorbehalten.
Bedienungsanleitung PYROTEC D1 V1.0 (C)opyright 2002 Pyrotec GmbH, Osnabrück
Plan # Funktion HAN7D CPC14
a zusätzlicher Schaltausgang 7 7
b Schaltausgang Schütz (Phase) 6 14
c Schaltausgänge Schütz (Null) 1 13
d Schutzleiter * 10
e Stromversorgung Phase 5 9
f Stromversorgung Null 2 8
g Thermoelement + 3 1
h Thermoelement - (PtRh10%-Pt) 4 2
* Der Schutzleiter muß angeschlossen werden!
3
1
74
11
8
1412
CPC14 bHAN7D a
Page 12

11
D1
PYROTECPYROTEC
T
1
t
1
t
2
PYROTEC
PYROTEC
5
4
3
2
¡C
h : min
✔
--
++
T
2
P
1
Operating Instructions
Page 13

12
General Information...........................................13
Setting up the Controller....................................13
Firing Curves......................................................14
Programmes........................................................14
Starting a Firing .............................................15
Changing a Programme.................................16
Checking Programme Values.........................16
Locking the Controller........................................17
Power Failure......................................................17
Operation Limits ................................................17
Results of the Previous Firing..............................18
Error Messages ...................................................18
Technical Specifications
Electrical & Mechanical Data........................20
Pin Assignements of the Plug.........................20
Contents
PYROTECPYROTEC
T
1
t
1
t
2
PYROTEC
PYROTEC
5
4
3
2
¡C
h : min
✔
--
++
T
2
P
1
33 55442211
88 12121111101066 77 99
Controllers Panel
1 display for kiln temperature and
programme values
2 unit of the value shown in (1)
3 keys to change programme values
4 key to lock the controllers keypad
5 mains switch
6 read / change final temperature
7 read / change 1st dwell temperature
8 read / change 1st heat up ramp
9 grafical scheme of the firing curve
(LEDs pointing to current segment)
10 read / change dwell time
11 selecting a programme
12 key to start and to stop a firing
Page 14

13
General Information
Setting up the
Controller
Your PYROTEC D1 uses the latest technology
available concerning firing safety, accuracy and easy
handling. Appearing as a handy controller easy to use,
it is a highly sophisticated instrument with a totally
configurable control design allowing adaption to
almost all applications. Reading through this manual
quickly familiarizes you with the numerous features of
your PYROTEC D1.
Please also refer to the safety advise of your kiln
manufacturer. Make sure that the control is placed at a
proper distance from the kiln and is not exposed to
direct heat or radiation from the kiln.
Depending on the kiln model the controller is either
mounted on the kilns operating panel or on the wall
(use mounting bracket coming with the kiln).
Your PYROTEC kiln and controller has passed
extended tests during the manufacturing process.
However, we strongly recommend never to fire the
kiln unattended especially at the end of the firing.
Mount the PYROTEC D1 controller on the kilns resp.
the wall accordingly. The controller is connected to
the kiln by a multipole plug (fits only in one orientation). Lock the plug by the lever on the socket.
When turning on the controller with the mains switch
(5) after 3 seconds display (1) shows the actual kiln
temperature. Your PYROTEC D1 is now ready for use.
Note: Never place the PYROTEC D1
controller on the top of your kiln !
PYROTECPYROTEC
Page 15

The PYROTEC D1 microprocessor controller allows
an exact and reproduceable control of your kiln. A
firing curve consists of the segments (a) to (d).
Example:
heating up to 1st temperature (a):
The kiln heats up at the set rate. Rate is entered by the
time to reach the temperature (600°C in the example).
heating up to final (firing) temperature (b):
Kiln heats up at maximum power to firing temperature.
dwell at final temperature (c):
The kiln temperature remains at the final temperature
for the set time. This is to ensure that all fired goods
are entirely heated through.
programme end resp. uncontrolled cooling (d):
After completing dwell the kiln cools down naturally.
The PYROTEC D1 comes with 5 typical firing curves,
programme no. 1 (P1) to programme no. 5 (P5). You
can adapt these programmes according to your needs.
The programmes are factory set as follows:
14
900
Temp
(°C)
600
Segment
d
ab
c
6:00 0:10
Firing Curves
Programmes
PYROTECPYROTEC
Page 16

Keep in mind that the programme values shown above
only apply if you haven’t changed them !
The following example demonstrates how to start a
slow biscuit firing by calling up programme P2.
After turning on the PYROTEC D1 the display (1)
reads the actual kiln temperature.
Press key (11) again and again until the indicator
points to P2 (as depicted on the left hand side).
Display (1) now reads the firing temperature of
programme P2 (returns to kiln temperature after 15
seconds).
Press key (12) to start the firing. Display (1) reads the
actual kiln temperature during the entire firing. Every
20 seconds the firing temperature is shown flashing.
The indicator in the firing curve (9) points to the
current programme segment (example shows heating
up in segment (a) of the firing).
15
programme heat up heat up firing dwell
time (t1) Temp. (T1) Temp. (T2) (t2)
P1 drying 5:00 150 150 0:00
P2 slow biscuit 6:00 600 900 0:10
P3 fast biscuit 4:00 600 900 0:10
P4 glaze 1050°C 2:00 400 1050 0:20
P5 glaze 1180°C 2:00 400 1180 0:20
Note
The flashing decimal point on the right hand side of
display (1) always indicates a running programme.
Starting a Firing
flashing
¡C
h : min
P
1
2
3
4
5
¡C
h : min
✔
PYROTECPYROTEC
Page 17

When the firing is completed successfully the
PYROTEC D1 reads „EndE“ alternating with the actual
kiln temperature. Wait until the kiln has cooled down
naturally before opening.
The following example explains how to change the
firing temperature of programme P2 from its original
value of 900°C to 850°C.
Select programme P2 as described in the example
before. After pressing key (6) the display (1) shows the
current value of the programme (900°C). The
corresponding indicators in firing curve (9) light up.
Use keys (3) to alter the value to 850°C. Keep the key
pressed for large changes in value. Changing the other
values of the firing works the same way. Press one of
the keys (6, 7, 8, 10) to show the current programme
value in display (1) and adjust the value using keys (3)
if required.
The programme change is done permanent, ie. is also
kept when the controller is powered down. However,
all programme values can be changed as often as you
like.
To start the firing with the new firing curve simply
press key (12).
All programme values can be checked by pressing
the corresponding key (6, 7, 8, 10). This can be done
at anytime also during a firing process without
interrupting the firing process.
Display (1) reads the programme value for 2 seconds
before returning to the actual kiln temperature. As
well the corresponding indicator of the firing curve (9)
is blinking during displaying the programme value.
16
Changing a Programme
¡C
h : min
T
2
-
+
✔
Checking Programme Values
PYROTECPYROTEC
Page 18

Note that when checking t1 or t2 only the remaining
time of the segment is shown.
If you want to change the programme value the firing
must be stopped by pressing key (12). After changing
the firing curve simply restart the firing by pressing
key (12) again.
To prevent the PYROTEC D1 from unauthorized usage
you can lock the keypad by pressing the key (4). A
decimal point on the left hand side in display (1)
indicates the controllers keypad is locked. If the
controller is locked you can check values but not for
instance start or interrupt a firing.
To unlock the controller press and hold key (4) again
for 3 seconds until the decimal point disappears.
In case of a power breakdown the firing process is
interrupted. After power is established again the firing
process is continued from that point at which it was
interrupted. If the kiln temperature has dropped more
than 50°C since the power failure happened the firing
is interrupted (error messages „F2 2“ comes up).
All times are entered as hours : minutes at a maximum
of 99 hours 59 minutes. Temperatures are allowed to
be entered from 20°C up to 1320°C. Note that when
entering 1320°C the maximum dwell is limited to 10
minutes for safety reasons.
Also watch the maximum temperature of the
PYROTEC kiln. Due to the mains limitations of one
phase kilns some kiln models are not capable of
reaching the maximum temperature of the controller.
Never try to operate the kiln outside its temperature
range.
17
Locking the Controller
¡C
h : min
flashing
t
2
Power Failure
¡C
h : min
keypad locked
Operation Limits
PYROTECPYROTEC
Page 19

After the firing is completed the follwing results of the
firing can be displayed in (1) by keeping the key (7)
pressed:
• operation hours of the heating elements
(net time) since starting the firing
• total operation hours of the heating elements
(net time) since using the controller
• temperature at the end of the firing resp. when
error occured
• elapsed time since end of firing resp. when
error occured
The integrated microprocessor inside your PYROTEC
D1 performs continuous checking of the firing
process. In case of any malfunction the display reads
an error message pointing to the problem. Following is
a description of the possible error messages:
The kiln doesn´t follow the required temperature
increase. This error message points clearl
y to a kiln
problem. Possible cause:
• broken fuse, power phase or relay failed
• the door (lid) contact is open
• a heating element is broken
• the heating elements are too old
(esp.with high firing temperatures)
• the thermocouple has a short circuit
Safety Switch Off feature was activated
The PYROTEC D1 has detected an overtemperature in
the kiln and switched off the kiln by the 2nd power
relay (20°C overshoot vs. T1 or T2 at or above 900°C).
Check and repair the cause carefully before continue
using the kiln again to avoid further damage !
18
Error Messages
Results of the
Previous Firing
PYROTECPYROTEC
Page 20

Firing interrupted due to power breakdown
In case of a power breakdown the firing process is
interrupted. After power is established again the firing
process is continued from that point at which it was
interrupted. If the kiln temperature has dropped more
than 50°C since the power failure happened the firing
is finished and the PYROTEC D1 shows error message.
Thermocouple or thermocouple circuit defect
Possible cause:
• thermocouple broken
• thermocouple wiring bad
• bad contacts of the connecting plug
Impossible values on data acquisition
Possible cause:
• thermocouple polarized bad
• thermocouple temperature less than -40°C
Error detected during power-up self check
On every power-up the controller performs a self
check. If an error is detected the controller shows F8.
Please contact your local dealer.
19
PYROTECPYROTEC
Page 21

20
6-
5-
4-
1-
2-
3-
7-
We reserve the right to make any changes without notice
Operating Instructions PYROTEC D1 V1.0 (C) 2002 Pyrotec GmbH, Osnabrück
Simplified Schematic of a Kiln
Pin Assignements of the Plug
Please compare type of thermocouple used in the kiln with the controllers thermocouple input
marked on the back of the controller. Mismatch can cause severe damage of kiln and contents
pin no. function HAN7Da CPC14b
a additional control output 7 7
b control output (live) 6 14
c control output (neutral) 1 13
d earth ground * 10
e mains supply (live) 5 9
f mains supply (neutral) 2 8
g thermocouple + 3 1
h, n thermocouple - (PtRh10%-Pt) 4 2
* earth ground must be connected!
Technical Specifications
power supply 180 - 245V AC 50/60 Hz
fuse 0,5 A semi-lag
rated power 5 W
signal input thermocouple PtRh10%-Pt (S)
resolution 0.1°C
accuracy 0,1% full scale
case dimensions 200 x 110 x 60 mm
weight 1100 g
ambient temperature -10°C to 55°C
Electrical & Mechanical Data
PYROTECPYROTEC
mains supply neurtral
mains supply live
protection ground
(+)
thermocouple
(-)
(optional)
power relay
(heating)
(h,n)
(g)
(f)
(d)
(c)
(b)
(a)
a ... n: electrical links for the controller
(e)*
e.g. 2nd power relay
3
1
74
11
8
1412
CPC14 bHAN7D a
 Loading...