


Pyro Tower Assembly Manual
12/16

WARNING: FOR YOUR SAFETY
1. This appliance is for outdoor use only and should NOT be used in a building, garage, or any other enclosed area.
2. Do NOT use this outdoor fire pit for indoor heating. TOXIC carbon monoxide fumes can accumulate and cause
asphyxiation.
3. This outdoor fire pit is NOT recommended for unsupervised use.
4. This outdoor fire pit is NOT to be operated by children.
5. This outdoor fire pit is NOT to be used in or on boats or recreational vehicles.
6. Always use in accordance with all applicable local, state, and national codes. Contact your local fire department for
details on outdoor burning.
7. When using this outdoor fire pit, exercise the same precautions you would with any open fire.
8. The use of alcohol, prescription or non‐prescription drugs may impair the consumer’s ability to properly assemble or
safely operate this outdoor fire pit.
9. Do NOT use this outdoor fire pit without reading this “Owner’s Manual.”
10. This outdoor fire pit is for use with dry, seasoned hardwood. It will burn hotter, more completely and create less smoke.
11. Do NOT burn manufactured logs, driftwood, trash, leaves, paper, cardboard, plywood, painted or stained or pressure
treated wood. Avoid using soft woods such as pine or cedar that can throw sparks.
12. Do NOT alter this outdoor fire pit in any manner.
13. Do NOT use this outdoor fire pit until it is completely assembled.
14. Do NOT store or use gasoline or other flammable vapors or liquids in the vicinity of this or any other appliance.
15. Do NOT store or use an LPG cylinder within 10 feet of this outdoor fire pit while it is in operation.
16. Do NOT use this outdoor fire pit near automobiles, trucks, vans or recreational vehicles.
17. Do NOT use in an explosive atmosphere. Keep outdoor fire pit area clear and free from combustible materials, gasoline
and other flammable liquids.
18. Do NOT use this outdoor fire pit under any overhang or near any unprotected combustible constructions. Avoid using
near or under any overhanging trees or shrubs.
19. Always empty this outdoor fire pit before each use once the fire pit has cooled COMPLETELY. Leave a thin layer of ash
to protect the bottom of the base.
20. Do NOT wear flammable or loose clothing when operating this fire pit.
21. Do NOT use in windy conditions.
22. Do NOT use gasoline, kerosene, diesel fuel, lighter fluid or alcohol to light or re‐light fires.
23. Keep all electrical cords away from a hot fire pit.
24. All surfaces of this outdoor fire pit are hot when in operation. To avoid burns, do NOT touch any part of the fire pit until
it has cooled completely. Wear protective gear (i.e. potholders, gloves, BBQ mittens, hot pads, etc.) to handle any parts.
NEVER touch ashes or coals to see if they are hot.
25. Do NOT leave a lit outdoor fire pit unattended, especially around children and pets.
26. Do NOT attempt to move or store this outdoor fire pit until all ashes and coals are completely extinguished.
27. Do NOT remove ashes or coals until they are completely and fully extinguished.
28. Use heat resistant gloves or hot pads when touching any surfaces of the fire pit.
29. Only use the fire tool provided to add or move logs.
30. Do NOT place wood or charcoal directly into bottom of the outdoor fire pit. Place wood only on the LOG grate.
31. Do NOT overload the fire pit. Do not add additional firewood until the fire burns down. NOTE: If any portion of the tower,
lid or spark guard/firescreen of this outdoor fire pit are glowing, your fire is TOO BIG and the fire pit is overloaded.
33. Do NOT lean over this outdoor fire pit when lighting or while in use.
34. Do NOT place a hot spark guard/firescreen or hot fire tool onto a combustible surface such as grass, wood or furniture.
35. Avoid breathing smoke from the fire and avoid getting it into your eyes.
36. This outdoor fire pit should be thoroughly inspected and cleaned on a regular basis.
37. After a period of storage and/or non‐use, check for signs of damage and creosote build‐up. Do NOT operate until
necessary repairs and/or clean up are executed.
38. Death, serious injury or property damage may occur if the above is not followed exactly.
CAUTION: If you intend to use this item on a wooden deck or other combustible surface, or any surface that is not entirely
resistant to high heat, you MUST use the spark screen to prevent sparks or burning material from coming into contact with
the ground or surrounding area. A non‐flammable and heat resistant material such as concrete pavers, brick, or stone
between the fire pit and the surface must also be used if the optional Pedestal Base is not attached.

Hardware List
1
Two bags of hardware are included with your Pyro Tower. The first bag contains
hardware for assembling the four side pieces of the tower. The second bag
contains hardware for assembling the four side pieces to the bottom base.
1/4” Zinc Lock Washer
1/4” Zinc Flat Washer
1/4” Stainless Lock Washer
1/4” Stainless Socket Head Cap Screw
1/4” Zinc Hex Nut
Shoulder Tabs
1/4” Zinc Lock Washer
1/4” Zinc Flat Washer
1/4” Zinc Carriage Bolt
1/4” Zinc Hex Nut
Shoulder Tabs
Tower Bag
Base Bag
Qty. 12
Qty. 12
Qty. 12
Qty. 12
Qty. 12
Qty. 12
Qty. 6
Qty. 6
Qty. 6
Qty. 6
Qty. 6

2
Parts List
Your Pyro Tower is constructed from 3/16” steel and requires four boxes for
safe shipping because of the size and weight of the pieces. Below you will find
a description of the parts contained in each box:
Tower Side Pieces
Tower Back Piece
Tower Front Piece
Removable Shelf
Firewood Basket
Tower Base

3
Base Description
Below is an overview of the various holes and slots on the Pyro Tower Base:
Drain Holes
Carriage Bolt Holes
Slots for Tower Pieces
Slots for optional
Pedestal Legs

4
Tower Front/Rear Description
Slots for Removable
Shelf
Tabs
Bolt Hole
Slot for Shoulder Tab
Air Vents
Bolt hole for
optional vent
louvre (comes
with cooking kit)

5
Tower Side Pieces Description
Slots for Front/Back Panel Tabs
Slot for Shoulder Tabs
Tabs

6
Tab and Slot Design
The Pyro Tower is designed with a unique tab and slot assembly that will align
all of the pieces in position before being secured together with the included
hardware.
Tab on Tower Front
Corresponding Slot
on Tower Side Piece

7
Shoulder Tabs
The Shoulder Tabs are inserted into the smaller slots on the Tower Side Pieces.
The hole in the Shoulder Tab will align with the hole on the Front and Rear
Tower Pieces where a bolt is inserted to secure the pieces together.
Shoulder Tab
Corresponding Bolt
Holes
Shoulder Tab Alignment
Shoulder Tab Inserted
Insert Bolt Here

8
Bolt Hardware Sequence
Below is a description of the proper assembly sequence to secure the Pyro
Tower hardware:
Bolt
Flat Washer
Shoulder Tab
Flat Washer
Lock Washer
Hex Nut

9
Tower Assembly Overview
This graphic will aid in identifying the parts of your Pyro Tower and their
position prior to assembly.
Tower Side Piece
Tower Side Piece
Tower Back Piece
Tower Front Piece
Tower Base

10
Selecting the Outside Face
Two factors should be considered prior to assembling your Pyro Tower.
Part of what makes the Pyro Tower such a unique and beautiful product is the
decision to preserve the look of the natural raw steel from which it is
constructed. The milling process that creates the large sheets of steel that we
cut the Pyro Tower parts from have a random variance in the metals
appearance not unlike the grain found in wood. Some sheets are darker or
lighter in color and some have a beautiful “marble-like” appearance.
Depending on your particular taste you can choose to highlight whatever
pattern you like best be picking which side of the panel faces outward.
Much care is taken to ensure your Pyro Tower arrives in the best possible
condition. While the heavy duty 3/16” steel is nearly impervious to damage
from any reasonable handling during shipment, scratches to the surface are
expected. The nature of shipping large and heavy pieces of steel makes some
movement inevitable resulting in minor surface scratches that will not affect
the performance of your Pyro Tower. We recommend you examine both sides
of each piece and position the side you like best so that it faces outward. This
ensures the side with any surface imperfections will remain hidden from view
on the inside.

11
Base Assembly
There are six carriage bolts that need to be positioned through the bottom of
the base prior to assembling the tower. To do so, simply turn the base on its
side and slide the carriage bolts through the square holes and thread a hex
nut 1/4 of the way down to prevent the bolt from falling through as you tip the
base back to the ground. Once you have positioned the base right side up on
flat and level ground, you can remove the hex nuts from the carriage bolts.
Insert 6 Carriage Bolts in square holes

12
Prepare Side Pieces For Assembly
The Shoulder Tabs must be inserted into the bottom slots of the Tower Panels
prior to assembly on the Base. Two Shoulder Tabs are used on the Side Panels
and one Shoulder Tab is used on the Front and Rear Panels.
Insert Shoulder Tabs into bottom slots

13
Assembly Sequence
Two people are recommended for easy assembly. One person can easily hold
the pieces in position while the second person aligns the slots and tabs. Once
all of the pieces are in position the unit become self-supporting so you can
safely and easily secure the pieces with the Shoulder Tabs and hardware.
Shoulder Tabs
Slide Over Carriage Bolts
In Base
123
Position the front and rear
panels while the second person
holds in place.
Add the first Side Panel by
inserting the Front and Back
Panel tabs into the corresponding
slots on the Side Panel
Add the last panel by
repeating step 2. Verify all
panels are aligned with their
respective slots and tabs.
Insert Shoulder Tabs in the
slots on the Side Panels and
secure hardware as instructed
on Page 7.
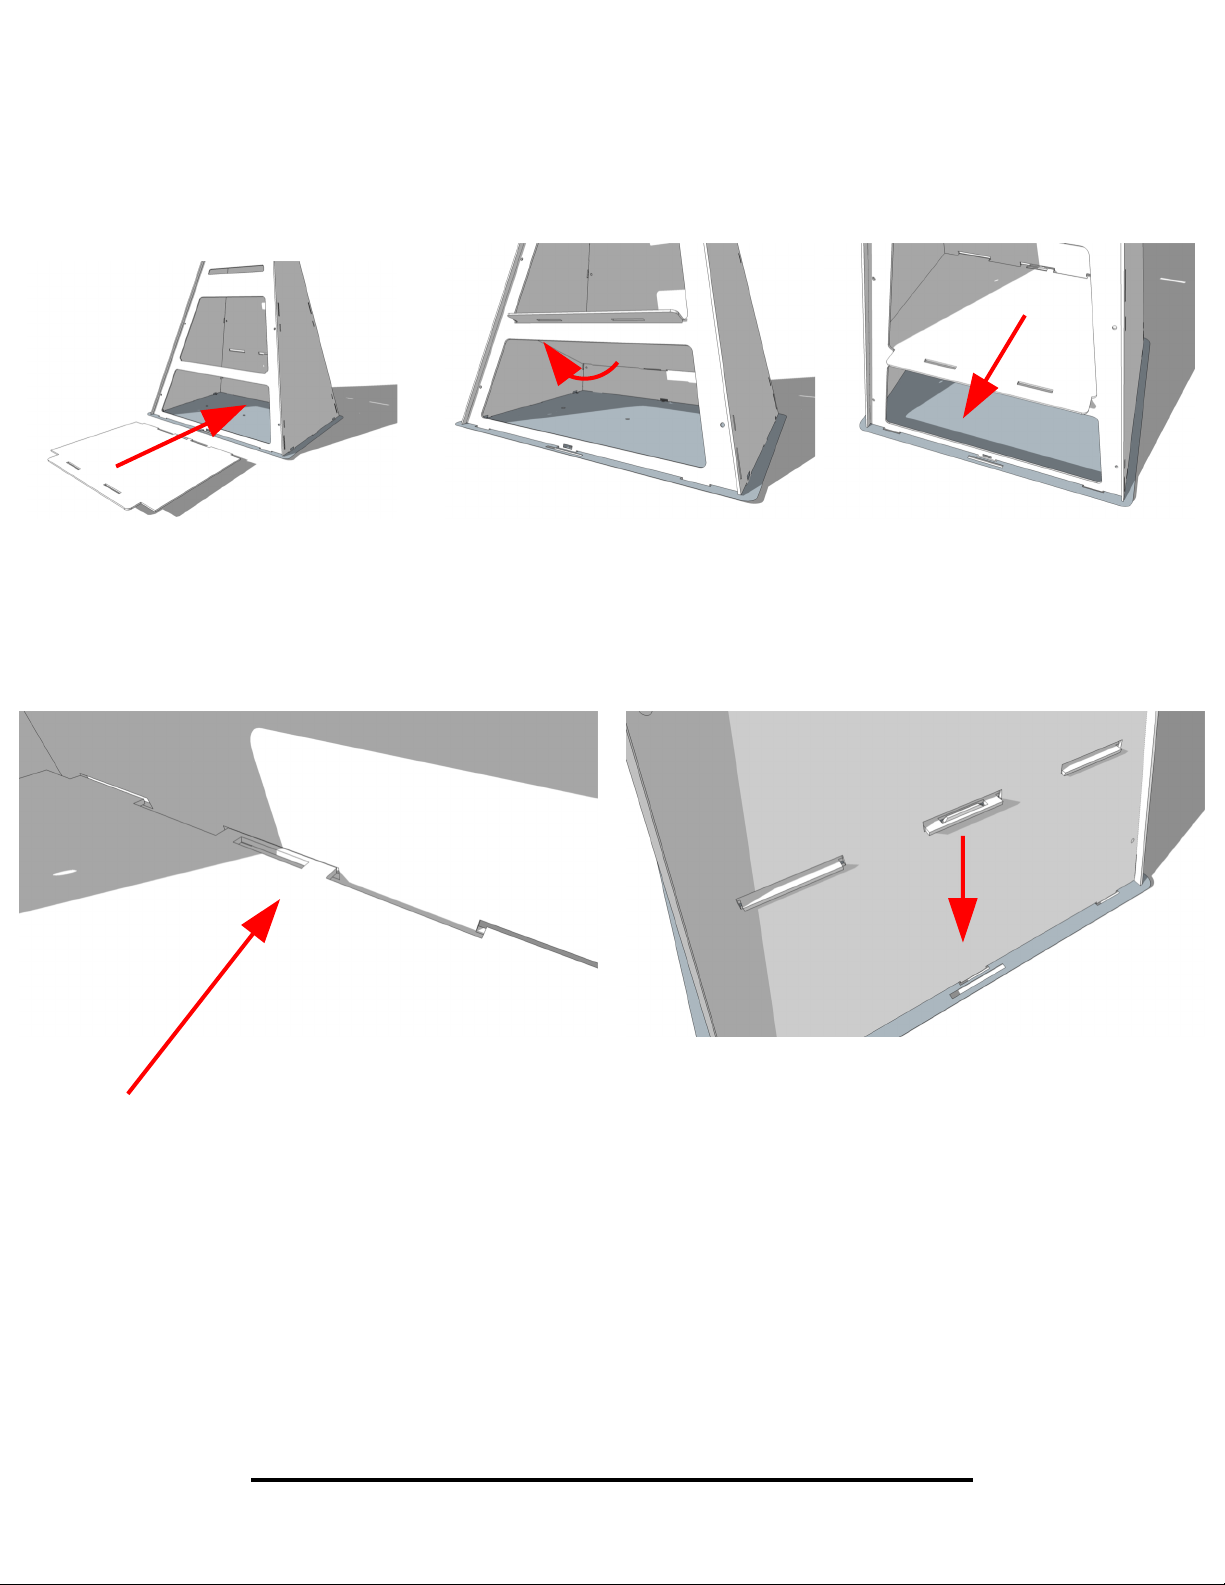
14
Installing The Shelf
Slide the removable shelf
in through the bottom
opening of the Blaze Tower.
Tilt the front end of the
shelf up at an angle above
the middle divider.
Slide the shelf forward as
far as possible and tilt the
back of the shelf up to a
level position
Slide the three tabs rearward into
the corresponding slots.
Push the shelf down until the slot
in the middle tab of the shelf is
secure around the tab in the
middle slot of the rear panel.
WARNING: Never start a fire directly on the shelf. To prevent warping
caused by high temperatures, always use the included firewood rack.

15
Caring For Your Pyro Tower
Every part of your Pyro Tower was hand-rubbed with an FDA Approved
polymerized linseed oil to provide a safe and natural finish to protect the steel
from moisture designed to delay the natural rusting process.
If you wish to preserve the look of your Pyro Tower’s original appearance then
it will be necessary to apply additional coats of oil after the first burn and to
periodically inspect and reapply the oil as it will degrade over time due to UV
exposure from the sun. Simply clean your Pyro Tower with a dry cloth or warm
water if necessary. Allow to dry completely. Use a staining pad or cloth rag to
apply a very thin layer of food-safe polymerized linseed oil to all surfaces.
Thoroughly buff when done to remove excess oil to prevent a gummy finish.
You may also choose to allow the Pyro Tower to age beautifully through the
natural Patina process. Patina is a natural weathering process which occurs
when metal is exposed to oxygen and moisture that will gradually change bare
steel from a bluish gray color to a dark reddish brown. This natural process
varies the appearance of each piece making every Blaze unique.
Patina vs. Rust
This is a bit like geometry where a square is a rectangle but a rectangle is not
a square. It's true that rust is a part of the patina process but whereas rust
has a well-deserved negative connotation a mature patina is actually a natural
protective coating that will preserve the integrity of the underlying metal.
The Pyro Tower is constructed from 3/16" plate steel that is three to five times
thicker than grills and fire pits from other manufacturers. The surface rust that
forms in the early stages of the patina process will not rust through the thicker
steel of the Pyro Tower as it will on thinner metal and will gradually convert
into an aesthetically pleasing protective shell that will last for decades.
One thing to note is that water runoff during the early stages of the patina
process can stain wood, concrete, or other light colored surfaces so keep that
in mind when selecting the location for your Pyro Tower.
 Loading...