


VERITEC P2
The award winning sequential
confirmation detector
PCX USER GUIDE
THIS GUIDE SUPPORTS
PCX - 12, 22 & 44
®
WWW.PYRONIX.COM
Designed and manufactured utilising by
TM
TM
TM

WARRANTY
This product is sold subject to our standard warranty conditions and is warranted against defects in
workmanship for a period of 2 years. In the interest of continuing improvement of quality, customer care
and design, Pyronix reserve the right to amend specifications without giving prior notice.
Pyronix Limited
Pyronix House
Braithwell Way
Hellaby, Rotherham
S66 8QY, ENGLAND
Tel: +44 (0) 1709 700100
Fax: +44 (0) 1709 533429
Technical help line (UK only): 0870 1223360
email:
export.sales@pyronix.com
marketing@pyronix.com
technical.support@pyronix.com
website: www.pyronix.com
www.DD243.co.uk
www.matrixpanel.com
Uk.sales@pyronix.com

PCX User Manual
RINS459-2 1
Contents
SECTION 1: INTRODUCTION ......................................................................................................2
1.1 The Keypad and Tag Reader ............................................................................................................2
1.2 Display Indications.............................................................................................................................3
1.3 Using a Tag .......................................................................................................................................4
SECTION 2: ARMING AND DISARMING THE SYSTEM ............................................................. 5
2.1 Before Arming the System.................................................................................................................5
2.2 Partitions............................................................................................................................................5
2.3 Leaving the Building ..........................................................................................................................6
2.4 Disarming the System........................................................................................................................ 6
2.5 Partial Arming of the System .............................................................................................................6
SECTION 3: ADVANCED FUNCTIONS........................................................................................7
3.1 Chime Function.................................................................................................................................. 7
3.2 Deliberately Omitting a Zone .............................................................................................................7
3.3 Ignoring an Open Zone......................................................................................................................8
3.4 Keypad Personal Attack ....................................................................................................................8
SECTION 4: MANAGER MODE ...................................................................................................9
4.1 Entering Manager Mode ....................................................................................................................9
4.2 Changing Time and Date...................................................................................................................9
4.3 Changing User Codes & Options..................................................................................................... 10
4.4 Reviewing Logs ...............................................................................................................................11
4.5 Walk Test......................................................................................................................................... 12
4.6 Bell Test...........................................................................................................................................12
4.7 Enter Engineer Menu.......................................................................................................................12
4.8 Exit Manager Mode.......................................................................................................................... 12
SECTION 5: SERVICE INFORMATION...................................................................................... 13
SECTION 6: SMS MESSAGING SYSTEM ................................................................................. 14
PCX User Manual
2 RINS459-2
Section 1: Introduction
Congratulations on your purchase of a Pyronix PCX alarm system. The PCX is designed and manufactured to our
ISO9001 approved quality system to offer a choice of options to suit your needs.
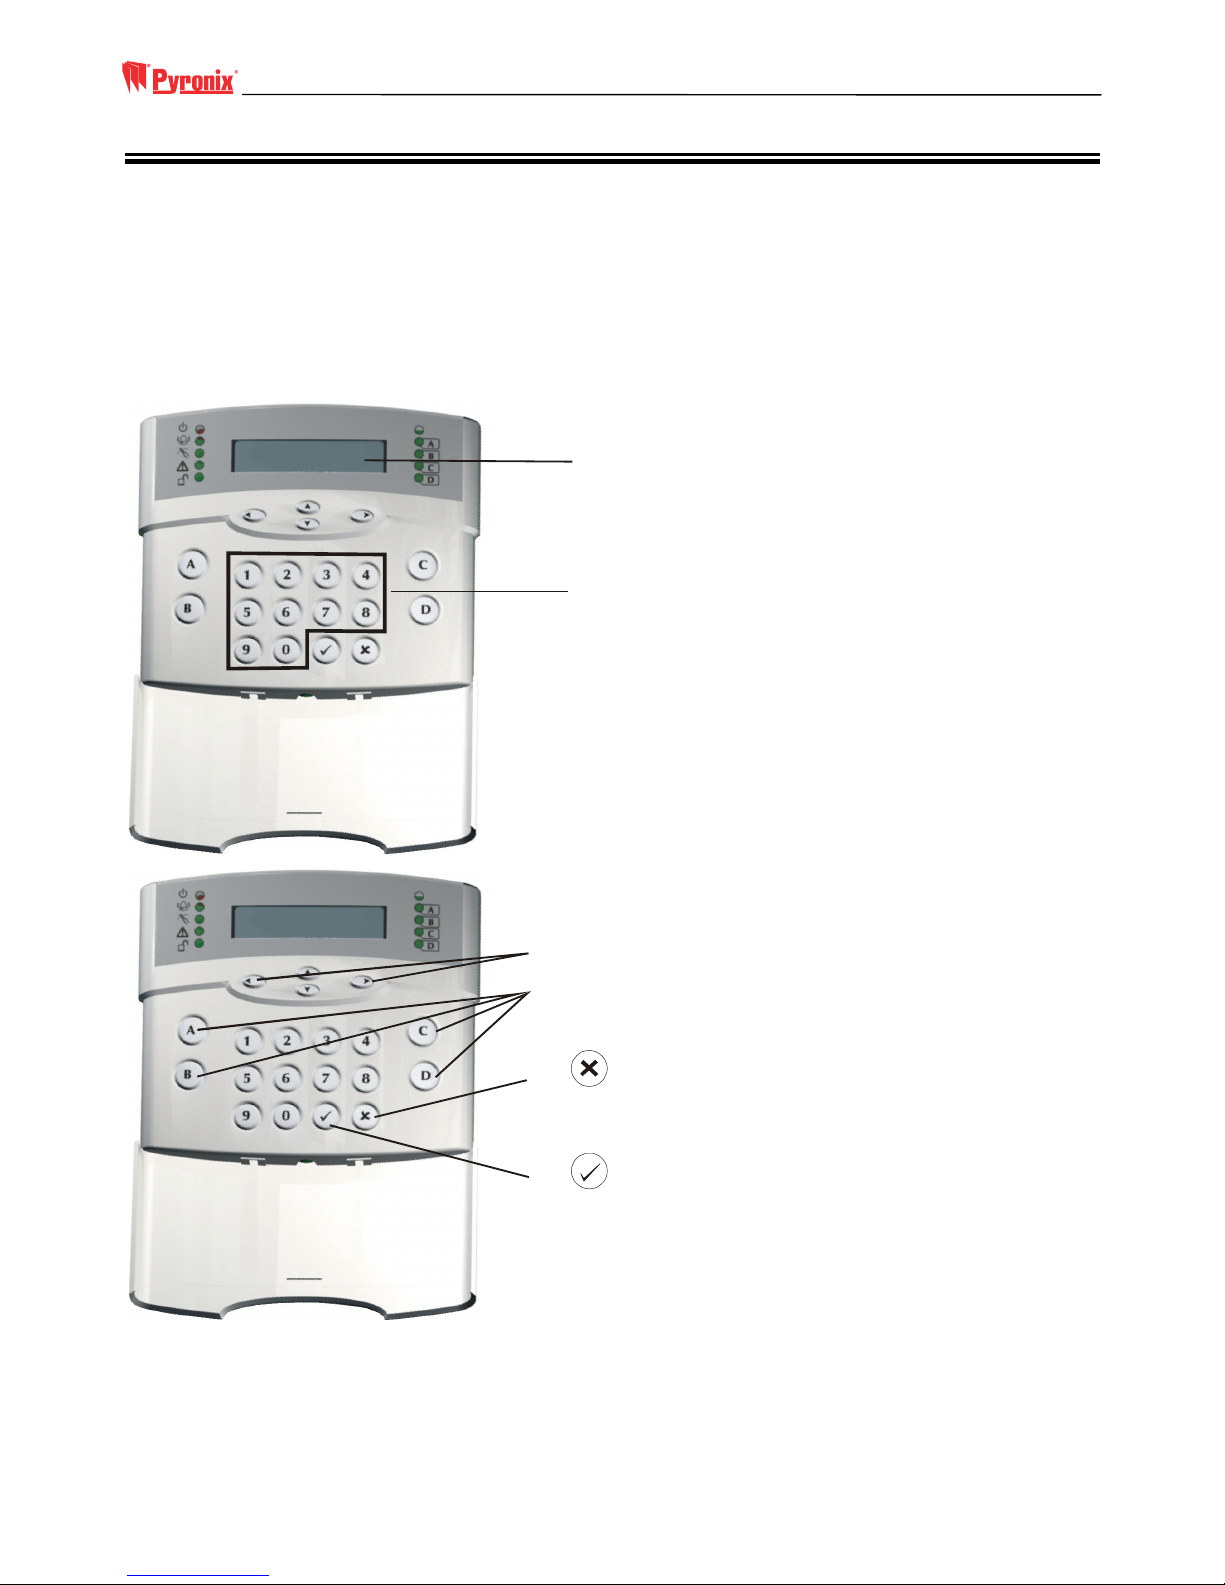
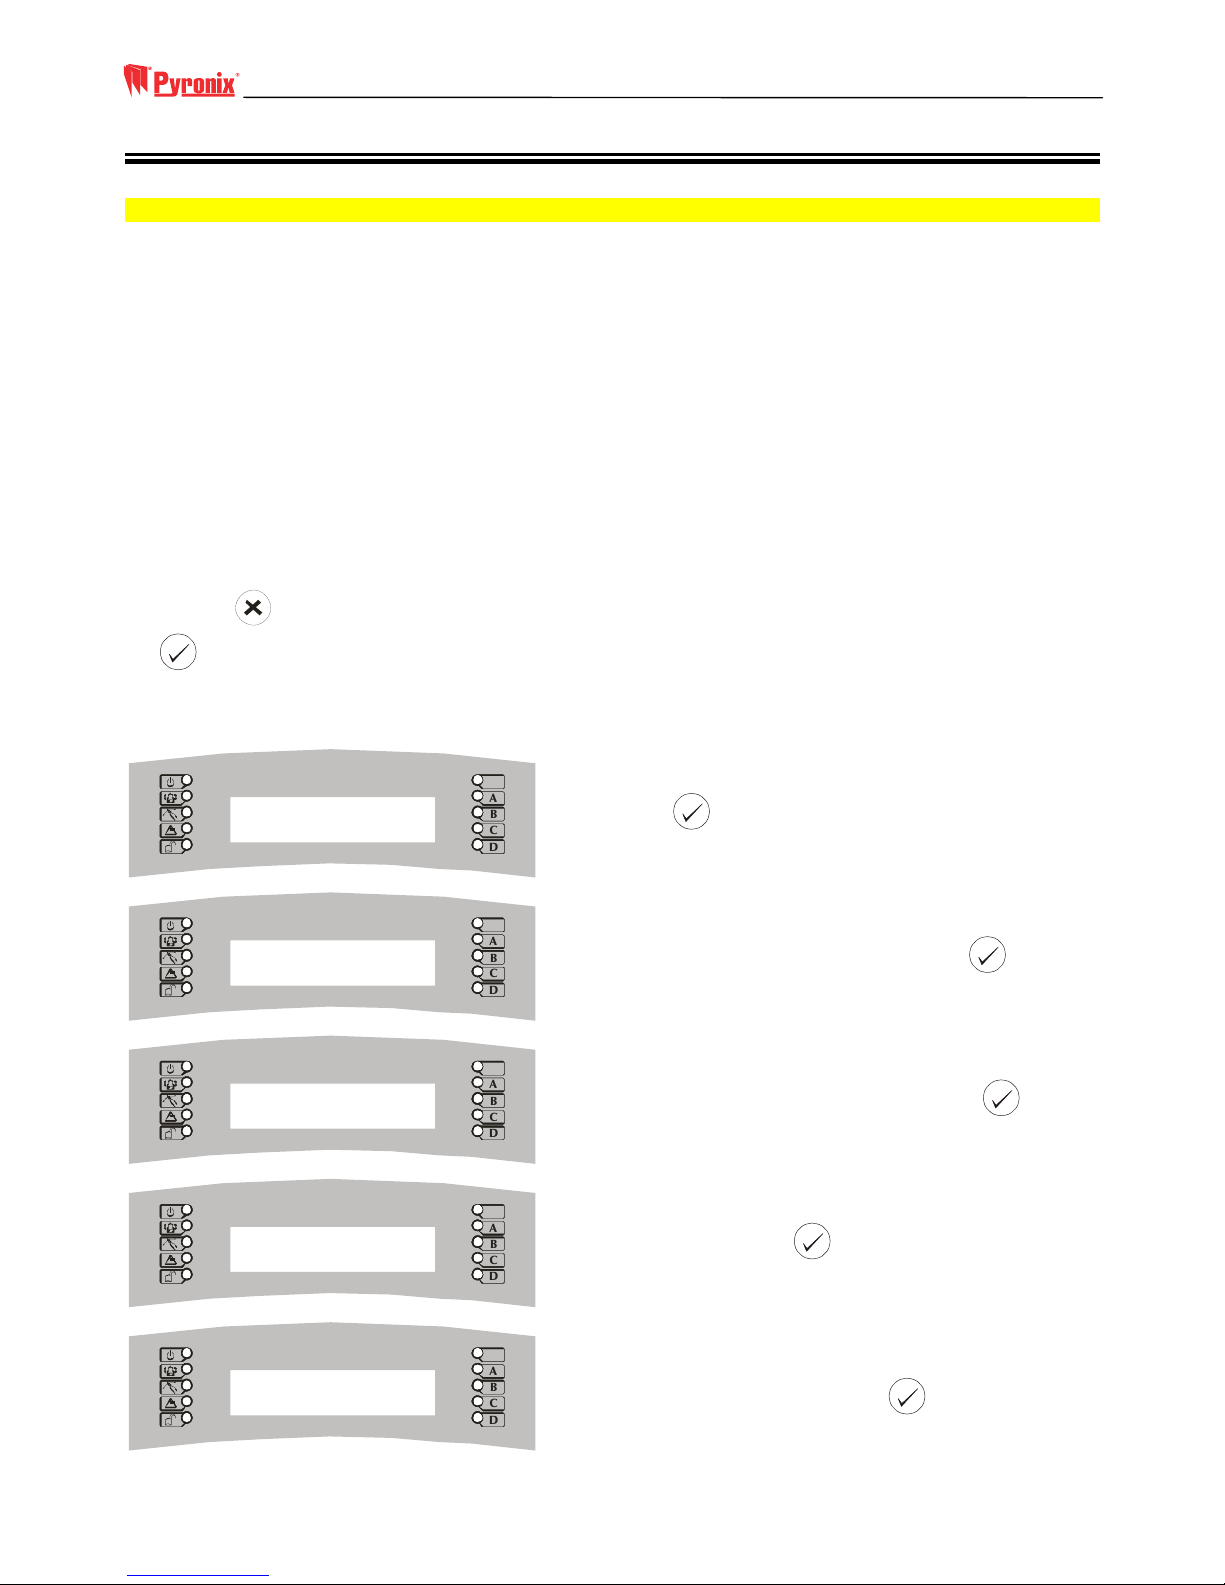
1.1 The Keypad and Tag Reader
The keypad and/or tag reader is where you will arm and disarm the system. You can also use the keypad to program
the system for your individual needs, including arming different partitions, adding codes and tags, and reading
system messages.
MAINS FAIL
The display shows you any important messages
The 10-digit numeric keypad is where you use
your PIN code.
PCX TIME
Directional keys for scrolling through menus
The , , and keys help simplify use, and will
light to highlight your choice of security cover, or
flash if there is a problem.
ABC D
The key = NO
The key = YES
PCX User Manual
RINS459-2 3
This is where you use your Tag.
Power
Tag
Alarm
Tam per
Fault
Unset
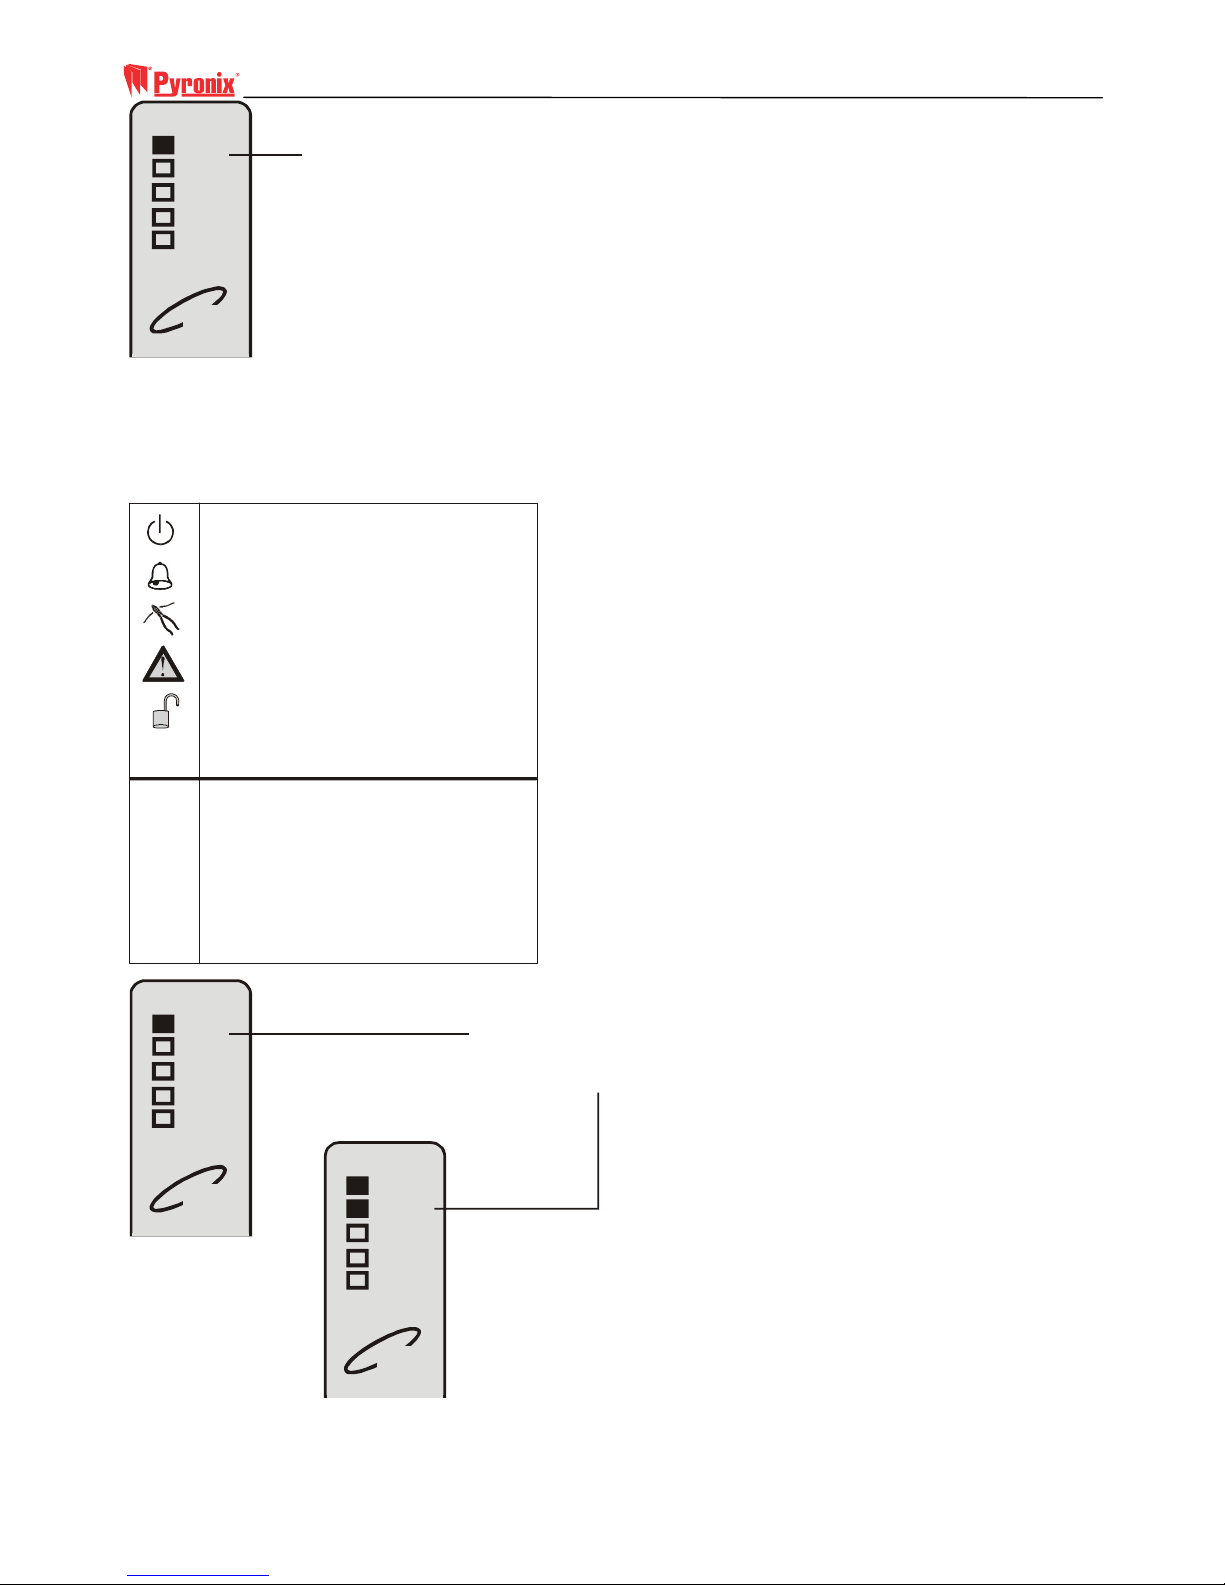
1.2 Display Indications
All arming points (keypads and tag readers) have lamps to clearly indicate what is happening.
LED Indication Table
(( ))
A
B
C
D
Green = Supply LED
Red = Alarm LED
Red = Tamper LED
Yellow = Fault LED
Green = Arm / disarm
Partition A
Partition B
Partition C
Partition D
The ‘ ’ lamp will flash if the mains supply
fails. The ‘ ’ lamp will flash if an alarm
occurs
Power
Alarm
Power
Power
Tag
Tag
Alarm
Alarm
Tam per
Tam per
Fault
Fault
Unset
Unset

PCX User Manual
4 RINS459-2
The ‘ ’ lamp will flash if the PCX wiring or
equipment is tampered with.
Ta m pe r
Power
Tag
Alarm
Tam per
Fault
Unset
The ‘ ’ lamp will indicate if a technical fault
occurs and will flash if you cannot arm the
system for any reason.
Fault
Power
Tag
Alarm
Tam per
Fault
Unset
The Disarm (‘ ’) lamp will light if the PCX is
completely disarmed (steady) or if some
partitions remain armed (flashing).
Unset
Power
Tag
Alarm
Tam per
Fault
Unset
1.3 Using a Tag
The PCX High Security Proximity Tag (or Card) will arm or
disarm your system with the minimum of fuss. The tag contains
batteries and is completely maintenance free. Simply pass the tag
close to the keypad or reader to arm or disarm your system. The
keypad or reader will beep to indicate it has acknowledged the
tag.
PCX User Manual
RINS459-2 5
Section 2: Arming and Disarming the System
2.1 Before Arming the System
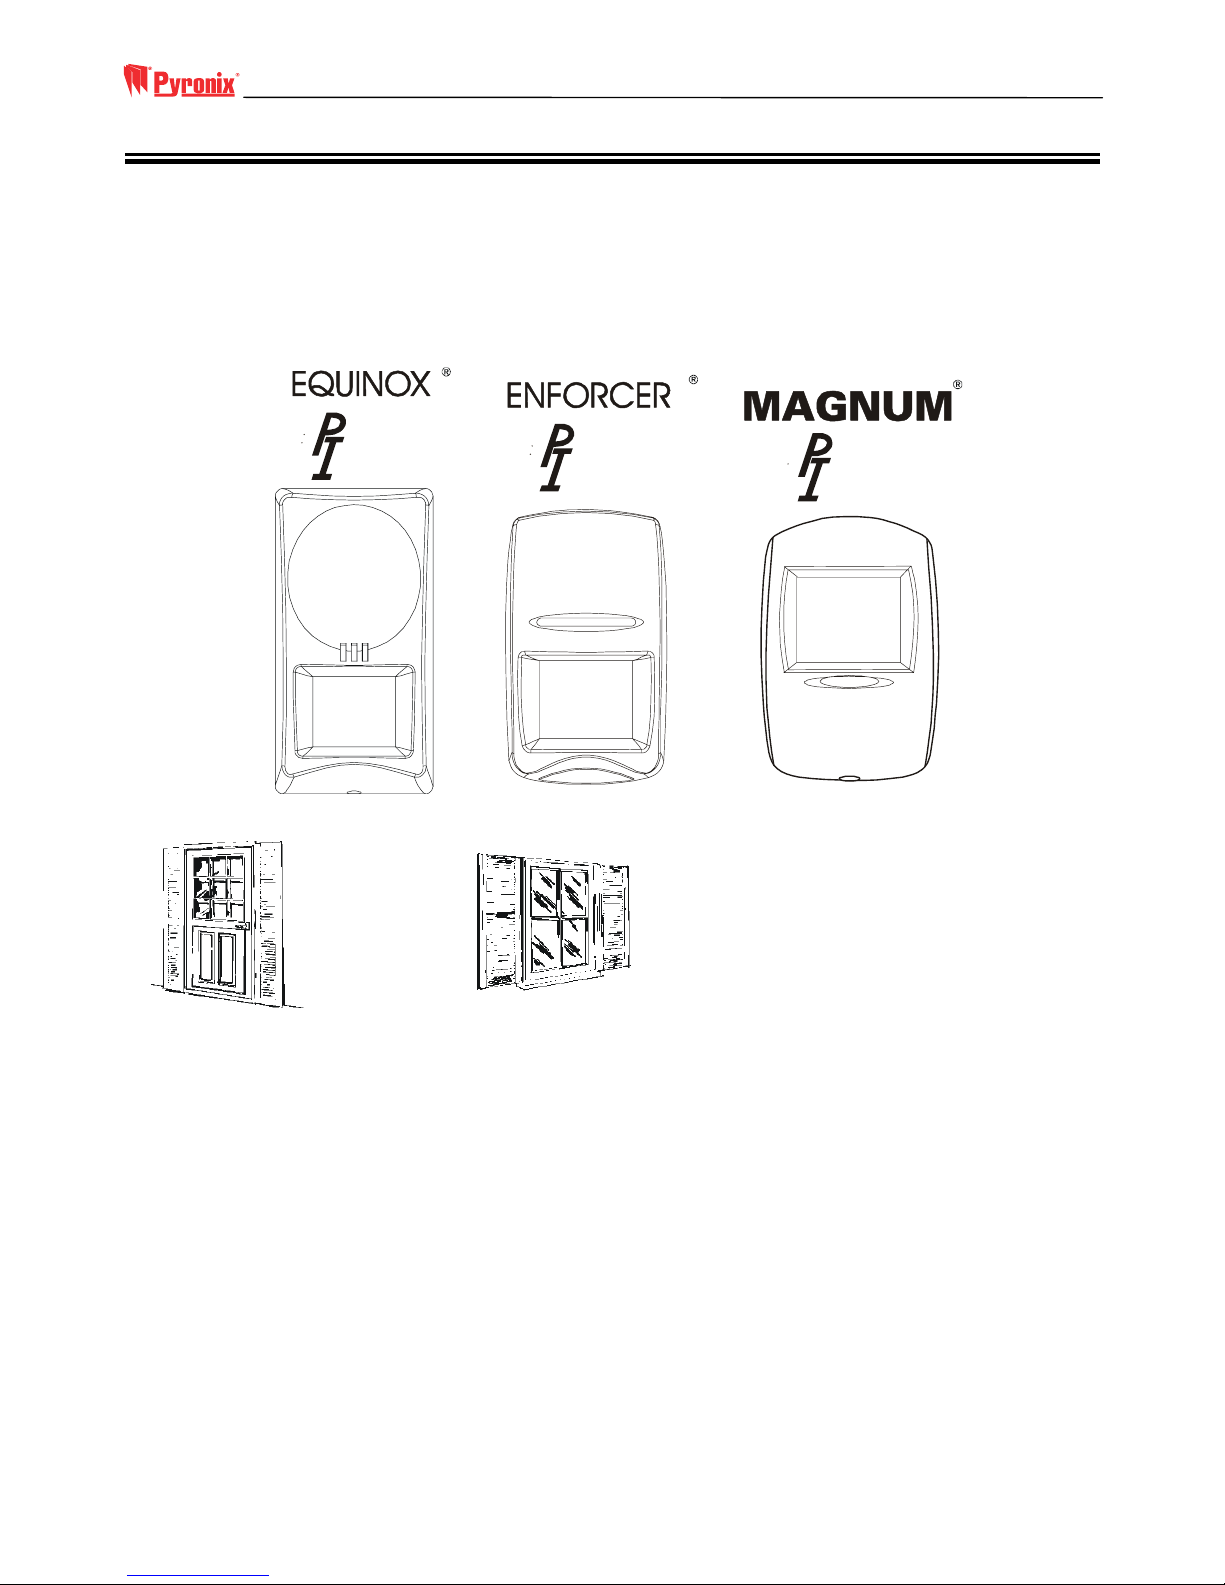
Before you arm your system, you must ensure that all doors and windows are securely closed, and that all pets are
accounted for, perhaps using one of the Pyronix range of Pet Immune detectors.
Note: Pyronix provide a comprehensive range of PI detectors, which provide pet immunity, including the Enforcer
PI, Equinox PI and Magnum PI
ET
MMUNE
ET
MMUNE
ET
MMUNE
Close all doors and windows.
2.2 Partitions
The partitions feature of the PCX allows you flexibility in using your system. The installation engineer can
programme the system so that each partition has a different function. For example:
Partition A – All zones armed
Partition B – Downstairs armed, upstairs disarmed
Partition C – Garage armed, house disarmed
Partition D – All except kitchen armed
There are 4 partitions available on the PCX system. You will need to discuss with your installer how the partitions
are to be programmed.

PCX User Manual
6 RINS459-2
2.3 Leaving the Building
1. Enter your PIN code, or present your tag.
2. Press the
key. The entry / exit tone will start.
3. Leave the building by the entry / exit route, closing the door firmly.
4. If fitted, press the ‘Push to Arm’ button.
5. The entry / exit tone will cease.
This will arm the system using partition A. This partition is usually programmed with all zones active.
2.4 Disarming the System
Upon entering the premises, the entry / exit tone will sound. Enter your PIN code, or present your tag. The system
will disarm, and the entry / exit tone will cease.
2.5 Partial Arming of the System
In some circumstances you may wish to arm only part of the system, leaving some of the building disarmed. For
example, at night you may wish to have the downstairs armed, whilst leaving the upstairs disarmed, or may wish to
have the whole building armed, except for the kitchen, where the dog is.
In this case, follow the procedure below:
1. Enter your PIN code, or present your tag.
2. Press the key (A, B, C or D) that corresponds to the security pattern you require.
3. Press the
key. The entry / exit tone will start.
4. Leave the building by the entry / exit route, closing the door firmly, or retire to an unprotected area of the
building.
5. The entry / exit tone will cease.

PCX User Manual
RINS459-2 7
Section 3: Advanced Functions
3.1 Chime Function
The C key can be used to select the Chime function while the system is disarmed. If enabled, a tone will sound every
time an entry / exit door is opened.
Whilst enabled, a ‘C’ will show on the keypad display.
D
C
B
A
PYRONIX
Time 02:30 c
3.2 Deliberately Omitting a Zone
If a zone has been programmed as ‘Omittable’ by your installer, you can leave this zone unarmed whilst arming the
rest of the zones in that partition. Follow the procedure below:
1. Enter your PIN code or present your tag, and press the
key. The system starts to arm. Press the key
again. The display shows:
D
C
B
A
Omit zones? [01]
2. Enter the zone you wish to omit. Always remember to use a leading zero for zones 01 – 09. The display shows:
D
C
B
A
Omit zones [02]
Zone 02
3. The system will now wait 10 seconds for any additional zones to be entered. After 10 seconds the arming
procedure will continue, and the entry / exit tone will sound. Exit the building as normal.
PCX User Manual
8 RINS459-2
3.3 Ignoring an Open Zone
You may wish to leave a zone open when you arm the system, for example, leaving a window open during the
summer. You can arm the system so that it ignores this open zone, if your installer has programmed this zone as
‘Omittable’.
To omit a zone during arming, follow the procedure below:
1. Enter your PIN code or present your tag, and press the
key. The display shows:
D
C
B
A
Exit via
Zone 02
2. Press the
key. The display shows:
D
C
B
A
Omit zones? [01]
3. Enter the zone you wish to omit. Always remember to use a leading zero for zones 01 – 09. The display shows:
D
C
B
A
Omit zones [02]
Zone 02
4. The system will now wait 10 seconds for any additional zones to be entered. After 10 seconds the arming
procedure will continue, and the entry / exit tone will sound. Exit the building as normal.
3.4 Keypad Personal Attack
You can use your PCX system as a personal attack alarm. Simply press the ‘1’ and ‘4’ keys at the same time. To
cancel the alarm, enter your PIN or present your tag.
Note: This facility is only available if your system has had this feature enabled by your installer.
PCX User Manual
RINS459-2 9
Section 4: Manager Mode
NOTE: You can only enter manager mode while the system is disarmed.
4.1 Entering Manager Mode
Enter Manager Mode by keying your 4-digit manager code.
You then have a choice of:
SET DATE AND TIME?
OMIT ZONES?
CHANGE CODES?
REVIEW LOGS?
WALK TEST?
BELL TEST?
TEST PHC COMMUNICATIONS?
ENGINEER MODE?
EXIT MANAGER MODE?
Pressing the
key will take you from one choice to the next (as well as escaping from within a choice). Pressing
the
key will take you into a choice (as well as accepting an option when within a choice).
4.2 Changing Time and Date
D
C
B
A
SET DATE & TIME?
Press
.
D
C
B
A
YEAR (00-99)
[03]
Enter the year (e.g., ‘03’ for 2003). Press
.
D
C
B
A
MONTH (01-12)
[06]
Enter the month (e.g., ‘06’ for June). Press
.
D
C
B
A
DAY (01-31)
[20]
Enter the day. Press
.
D
C
B
A
HOURS (00-23)
[16]
Enter the hours in 24 hour format (e.g., ‘16’ for 4
o’clock in the afternoon). Press
.

PCX User Manual
10 RINS459-2
D
C
B
A
MINUTES (00-59)
[54]
Enter the minutes. Press
. You will be at the main
Manager Menu.
4.3 Changing User Codes & Options
The Change Codes option allows you to assign or change codes for different users, as well as altering their options.
D
C
B
A
CHANGE CODES?
Press
.
D
C
B
A
User Number [02]
Enter the number for the user you wish to edit.
Remember to use a leading zero. Press
.
D
C
B
A
Enter User Code
[8765]
Enter the new code for the user. A code can be 4, 5 or 6
digits long. Press
.
D
C
B
A
User Type
(User) [0]
Enter the user type. Choose from 0 (User) or 1 (Master
User). Press
.
D
C
B
A
User Partitions
[ABCD]
Choose the partitions the user will be able to arm and
disarm. Press
.
D
C
B
A
User Arm Options
Disarm / Arm [0]
Enter the Arm Options. Choose 0 (Disarm & Arm), 1
(Disarm Only) or 2 (Arm Only). Press
.
D
C
B
A
Flexi Arm
Yes [1]
Choose if you wish the user to have FlexiArm. If you
choose o (NO), the user will only be allowed to Arm or
Disarm the partitions assigned above. If you choose 1
(Yes), then the user will be able to choose which
partitions to arm or disarm when entering his code. Press
.

PCX User Manual
RINS459-2 11
D
C
B
A
User Name
_
You can now add a label to the user. If you do not wish
to add a label, press
. The key functions are as
follows:
1 = ABCD 2 = EFGH 3 = IJKL 4 = MNOP 5 = QRST
6 = UVWX 7 = YZ,- 8 = ./01 9 = 2345 0 = 6789
In addition, the ABCD keys are used as follows:
A = capital
B = move cursor left
C = clears cursor / adds a space
D = moves cursor right
For example, to write ‘Ian’, press the:
‘3’ key once to write an ‘i’
‘A’ key once to make the letter a capital
‘D’ key once to move the cursor to the right
‘1’ key once to write an ‘a’
‘D’ key once to move the cursor to the right
‘4’ key twice to write an ‘n’
Press the
key. The display will show:
D
C
B
A
User Number [02]
Press the
key to return to the main Manager Menu, or enter a user number to alter settings for another user.
4.4 Reviewing Logs
D
C
B
A
REVIEW LOGS?
Press
.
D
C
B
A
User Log?
Press
to choose the User Log, or, if Access Control
is in use, press
to toggle between the user log and
the access log.
D
C
B
A
Date and Time
Event
The last event will be shown. Press
to scroll
backwards through the log, or use the F and G
keys to scroll backwards and forwards. To exit the log,
press
. To return to the main Manager Menu, press
again

PCX User Manual
12 RINS459-2
4.5 Walk Test
The Walk Test enables you to check that all the detectors are working properly. Follow the procedure below:
D
C
B
A
WALK TEST?
Press
.
D
C
B
A
Walk Test Parts
[ABCD]
Enter the partitions that you wish to test, using the A, B,
C and D keys. Once you have chosen them, press
.
The Walk Test will commence.
D
C
B
A
Walk Test Zones
Zone 01
The zones to be tested will scroll on the bottom line of
the display. Walk around the building, ensuring that you
pass each detector to be tested. As each detector is
activated, a chime will be played, and that zone will be
removed from the scrolling list.
D
C
B
A
Walk Test
Completed
When all the detectors have been activated, the display
shows “Walk Test Completed”. Press
to complete
the test, and then
to return to the main Manager
Menu..
4.6 Bell Test
Follow the procedure below to test any external sounders connected to the system.
D
C
B
A
BELL TEST?
Press
.
D
C
B
A
Testing Bell . . .
The bell will sound, and the strobe will flash. When the
test is completed, press
to return to the main
Manager Menu.
4.7 Enter Engineer Menu
This selection is reserved for your service engineer, and cannot be accessed without the Engineer Code.
4.8 Exit Manager Mode
Select this option to save any changes you have made, and return to normal, disarmed mode.

PCX User Manual
RINS459-2 13
Section 5: Service Information
We are sure you will be delighted with your PCX Alarm System. For your personal reference here is a record of the
relevant service information.
Service Company………………………………………………………………………………………………………
Date of Installation…………….Day……………………….Month…………………Year………………………….
Site Reference…………………………………………………………………………………………………………..
24 Hour Service Number………………………………………………………………………………………………
Keyholders…………….……………….Name…………………………………Tel…………………………………..
Name……………………………….Tel…………………………………….
Entry Time……………………………………………………………………………………………………………...
Exit Time………………………………………………………………………………………………………………..
Manager Code………………………………………………………………………………………………………….

PCX User Manual
14 RINS459-2
Section 6: SMS Messaging System
Your system may have been configured to send messages to a mobile telephone. If so, the system will call the
appropriate messaging bureau and forward the message to your mobile telephone whenever an event occurs that is
important to you. Message calls are charged at the normal network rate current at the time of the call. The fee for
this service is collected automatically via a premium rate number when the PCX System makes its regular
authorization and routing call to the Messaging computer. Should this call fail, the display will show “PHC Test
Fail” until the next time that the call is made successfully. This acts as a reminder that SMS Message signaling may
not be operational, but will NOT interfere with this, or any other aspect of the alarm system. If you wish to change
the information sent to your mobile telephone, or the mobile telephone number, please contact your alarm system
installation company.

PCX User Manual
RINS459-2 15
Engineer Programming Table
No
00 JAL 1234 ABCD
ARM/DISARM
NO 1 2 8
Manager
Name Code Type Areas Flexi
Access RDR
Attributes
 Loading...