

Pyroclassic Fires Eco Flue Installation Instructions Manual
PYROCLASSIC ECO FLUE | TECHNICAL SPECIFICATIONS
INSTALLATION
These instructions are to be read before installation
and used in conjunction with the heating appliance
manufacturer’s installation instructions.
1. Position heater on oor protector in accordance with the
correct clearances and manufacturers specications.
2. Mark the penetration centre in the ceiling and roof using
a plumb line.
3. Cut a 300mm square hole in the ceiling and trim with
noggins to support outer casing.
4. Cut a 250mm diameter hole in the roong material and
trim back all combustible material within 25mm from its
opening,
5. Fix anti-blocking shield on 4 tangential contact points
with the xing tags down and the shield bottom edge
level with the ceiling.
6. Fit outer liner with perforations into the blocking shield,
hold the bottom edge level with the ceiling.
7. Fix appropriate ashing around liner to seal on the roof
material.
8. Assemble the ue section ensuring that all seams are
inline.
9. Fit inner liner, ensure that the spacer brackets rest on
the swage in the outer liner. Bottom edge should be
2Smm up from ceiling level.
10. Place ceiling plate on top of heater with edge up and lay
insulation blanket into position.
11. Fit ue with crimped and swaged end down into
position. Flue must be extended 200mm above outer
liner for correct tting of ashing cone and cowl. Extra
sections of ue and liners may be added to achieve the
correct clearance above the roof.
12. Fit top spacer and tighten. Slide ashing cone over the
ue and t the and cowl. Do not fasten cowl to facilitate
removal for cleaning.
13. Fix ceiling plate with screws provided. No spacers
required between ceiling tile and ceiling.
INSTALLATION INSTRUCTIONS
FOR PYROCLASSIC FIRES
150MM STANDARD
ECO FLUE KIT 4.2M
COMPRISING:
1 Stainless Steel Flue Pipe 150 x 610mm
1 Stainless Steel Flue Pipe 150 x 1220mm
2 Stainless Steel Flue Pipe 150 x 1220mm
Painted Hi Therm Flues
1 Galvanised Outer Casing 250 x 1200mm
with Perforated Section
1 Anti-Blocking Shield 300 x 300mm
1 Stainless Steel Pyroclassic Cowl
1 Stainless Steel Flashing Cone
1 Stainless Steel Spreader
1 Packet of Screws
1 Ceiling Plate with Insulation Blanket
1 Galvanised Slip Joint 900mm
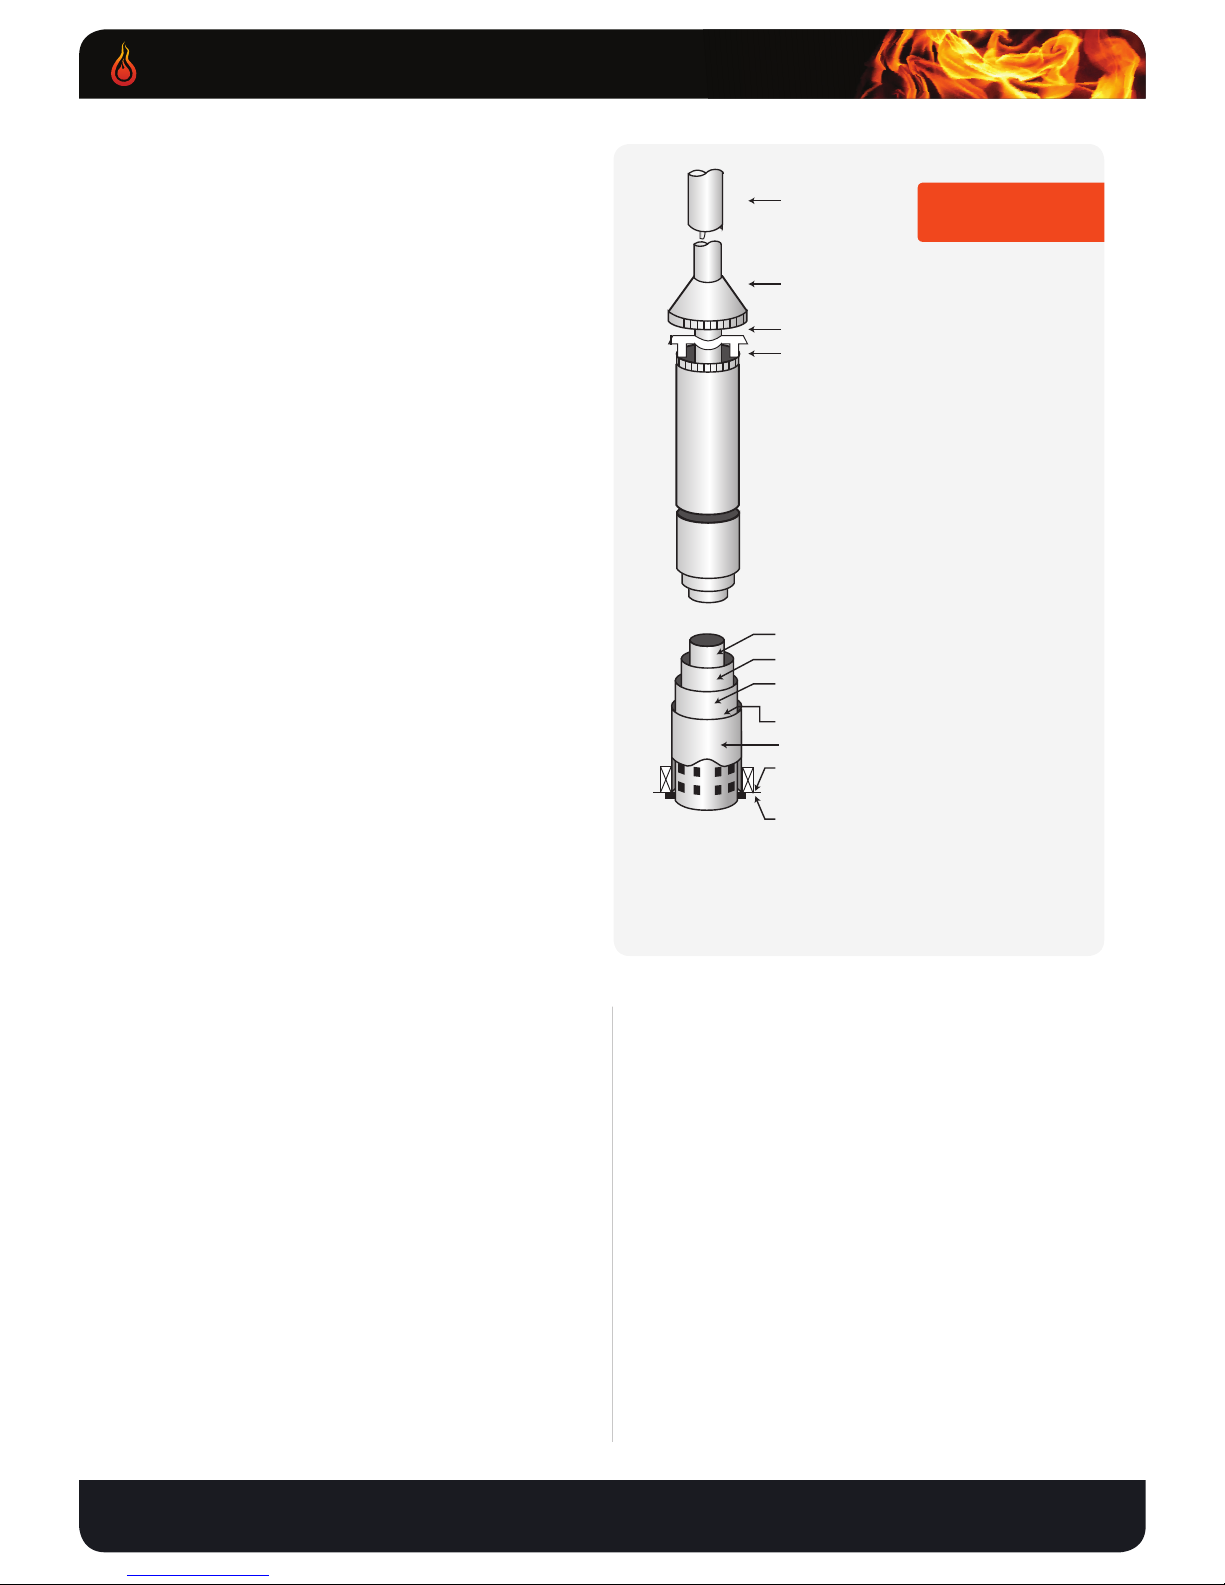
25mm Air Gap
200 DIA Inner Casing - 25mm up from ceiling
150mm Flue
Cooling Air Intake
Anti Blocking Shield 300 DIA x 300 High
345 x 345 x 30 Insulating Blanket
345 x 345 x 20.5 Ceiling Plate
250 DIA Inner Casing with perforated section
- level with ceiling
Cowl
Flashing Cone
Top Spider
PYROCLASSIC
ECO FLUE KIT
Tested to Appendix F of AS/NZS2918:2001
Meaning that it can be installed on any appliance which
has been tested to the old or the new standard.
Visit www.pyroclassic.co.nz for more info

PYROCLASSIC FIRES | TECHNICAL SPECIFICATIONS
FIXING FLUE TO FIRE
Sealant is not required as this joint has a 105mm restrictor
hole. If sealant must be used, apply sparingly to inside of
spigot to avoid sealant overowing.
RECOMMENDATIONS
• We recommend that this product is installed by a
registered installer.
• This product has sharp edges and gloves must be worn
during installation.
• The wood used in conjunction with the ue must be dry
and untreated.
We strongly recommend having your ues swept by a
professional chimney sweep before the rst use each
season.
CAUTION: Mixing of ue system components from different
sources of modifying the dimensional specications of
components may result in hazardous conditions. Where such
action is considered the manufacturer should be consulted.
WARNING: the appliance and ue system shall be installed
in accordance with AS/NZS2918:2001 and the appropriate
requirements of the relevant building code or codes.
• The ue pipe shall extend not less than 4.6m above the
top of the oor protector
• The ue cowl must be at least 600mm above the highest
point of the roof if within 3 meters of ridge, or 1 metre
above the roof penetration if more than 3 metres from the
ridge
No part of the building, or any adjacent building may be in
or above a circular area of a horizontal radius of 3 metres.
More than 3000mm
3000mm
600mm
3000mm
1000mm
min
3000mm
Increase as needed
to clear 3000mm
FLUE HEIGHTS AND LENGTHS
Visit www.pyroclassic.co.nz for more info
 Loading...