

Page 1
ELECTRONIC PAYROLL TIME
MODEL 4000/4000
HD
RECORDER INSTALLATION AND
OPERATION INSTRUCTIONS
IMPORTANT!
READ THESE INSTRUCTIONS BEFORE INSTALLING AND USING
THIS PRODUCT.
Keep these instructions for future reference
Page 2

The 4000/4000HD Payroll Time Recorder records and summarizes
weekly, BI-weekly (requires one time card per week per person), semimonthly or monthly payroll information for up to 100 employees. The
4000/4000HD uses bar-coded time cards (item #44100-10) that are prenumbered 1 to 100. For each pay period an individual is assigned one
pre-numbered (located in the upper right hand corner) time card. New
time cards must be issued after every pay period.
Note: Do not use duplicate time card numbers during a given pay period.
In addition, use only Rev. D or greater time cards (noted at the bottom of
each time card). Store your time cards in a dry area. Do not bend or soil
the time cards. A dirty or bent time card on the left edge of the card may
cause card read /ID errors. If you have lower revision level cards, please
contact our Technical Service Dept. at 1-888-479-7264.
Each 4000/4000HD is equipped with an internal memory backup that will
protect payroll data for up to one month.
SET-UP INSTRUCTIONS
STEP 1 – UNPACKING
1. Remove the 4000/4000HD from its box and place it on a firm surface.
2. Plug unit into an outlet.
3. Locate key packaged with the unit, unlock and remove the front cover
of the unit. Locate the programming buttons, which are labeled,
SELECT, UP, and DOWN.
STEP 2 – PROGRAMMING THE 4000/4000HD
Programming the 4000/4000HD to your specific payroll needs is very easy
and can be done in 3 easy steps.
1. To change or set a feature, press the SELECT button until the desired
feature is displayed.
2. Use the UP or DOWN button to change the feature.
3. After the displayed feature is changed, press the SELECT button to
change other feature and to return to the main display.
Note: Selecting YES for the SET-UP PAY feature will clear all recorded
payroll data. If YES is selected, new time cards must be issued.
STEP 3 – READY TO GO
Reinstall front cover and lock unit and you are ready to use your
4000/4000HD.
Page 3

FEATURE TABLE
LANG=ENGLISH – Use the UP or DOWN key to select the desired
language to print and program the Model 4000/4000HD. Select English,
Spanish, French or German.
SET YEAR – Use the UP or DOWN key to set the desired year (default
set at current year).
SET MONTH – Use the UP or DOWN key to set the desired month
(default set at current month).
SET DAY – Use the UP or DOWN key to set the desired day of month
(default set at current date).
DAYLIGHT SAV= – Allows the Model 4000 to automatically adjust to
daylight saving time. There are 5 options you can select with the UP or
DOWN key:
1. USA07+ Automatically adjusts time to 2007 United States
daylight saving time (starts Second Sunday of March and ends
First Sunday of November).
2. USA06- Automatically adjusts time to Pre-2007 United States
daylight saving time (starts First Sunday of April and ends Last
Sunday of October).
3. EURO Automatically adjusts time to European daylight saving
time. (Begins last Sunday in March and ends on the last
Sunday in October).
4. OTHER Allows you to select a custom start and end Sunday for
automatic daylight saving time changes. After SELECTING
OTHER, use the UP or DOWN key to select the desired Sunday
(only Sundays are allowed) you wish to START daylight saving
time, press SELECT and again use the UP or DOWN key to
select the desired Sunday to END daylight saving time. Note:
The time will automatically change at 2 a.m. on the selected
Sundays. Press SELECT and the TIME STD=LINE option will
appear. Press SELECT again to advance to the next option.
(Note: The TIME STD=LINE option should only be changed for
areas where there is frequency variation in the power line,
however, this does not occur in the US. If you are operating
this unit in an area that has problems with power line frequency
resulting in the unit loosing or gaining time or you are running
Page 4

the unit off a generator/inverter, use the UP or DOWN key to
change the TIME STD to CRYSTAL which will cause the unit to
keep time using an internal device.)
5. OFF- Unit will not adjust time for daylight saving time.
DSPLY FMT=AM/PM – Selects how the time will be displayed on the front
of the unit. Using the UP or DOWN keys, select one of the following
options:
1. AM/PM - Standard time (1-12 hours).
2. MIL - Military time (0-23 hours).
PRINT FMT=AM/PM – Selects how time will be printed on the time card.
Using the UP or DOWN keys, select one of the following options:
1. AM/PM - Standard time (default setting) (i.e. 3:30 PM).
2. MIL- Military time (i.e. 3:30 PM = 15:30).
3. ATAAP-Military time with minutes expressed in hundredths of
hour (i.e. 3:30 PM = 15.50).
SET HOUR – Sets the current hour of day by using the UP or DOWN key.
SET MINUTES – Sets the current minute of day by using the UP or
DOWN key.
BELL SET-UP
The internal buzzer is intended for quiet areas. To adjust the volume of
the internal buzzer, open the front cover and turn volume control on the
left side of the circuit board clockwise to increase volume or counter
clockwise to decrease volume.
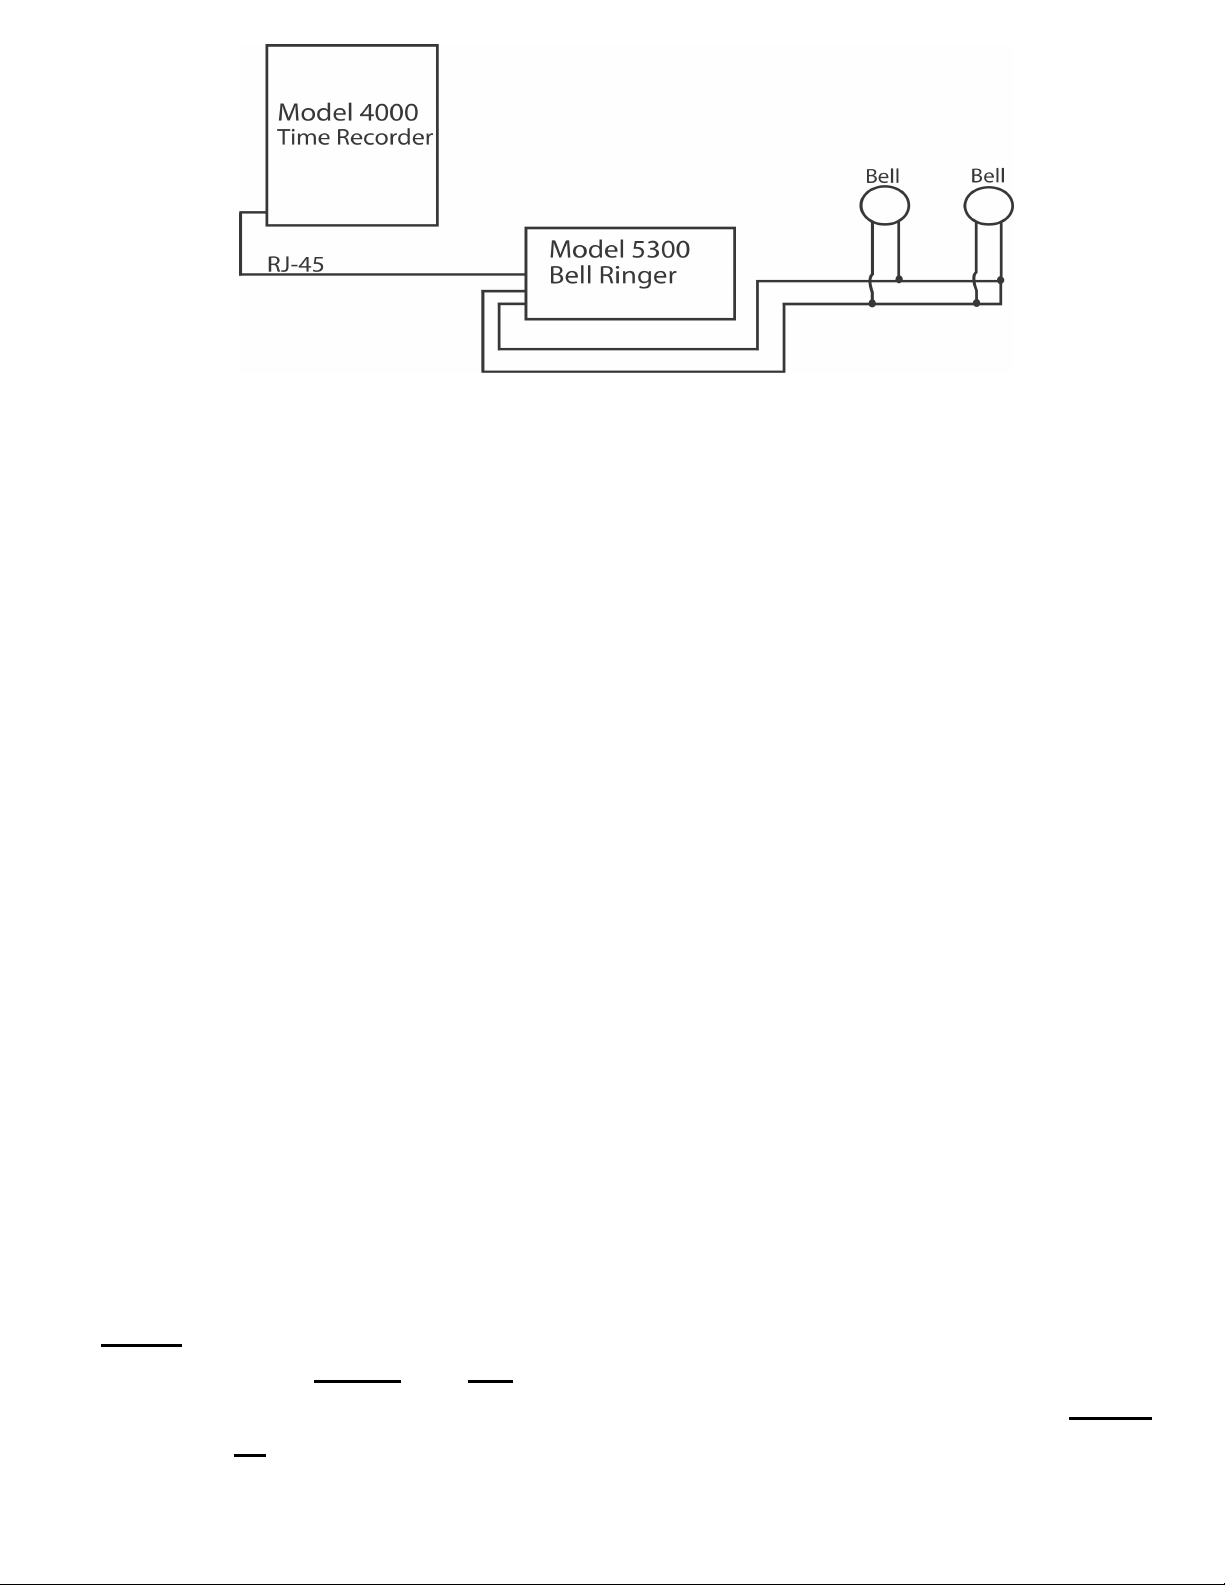
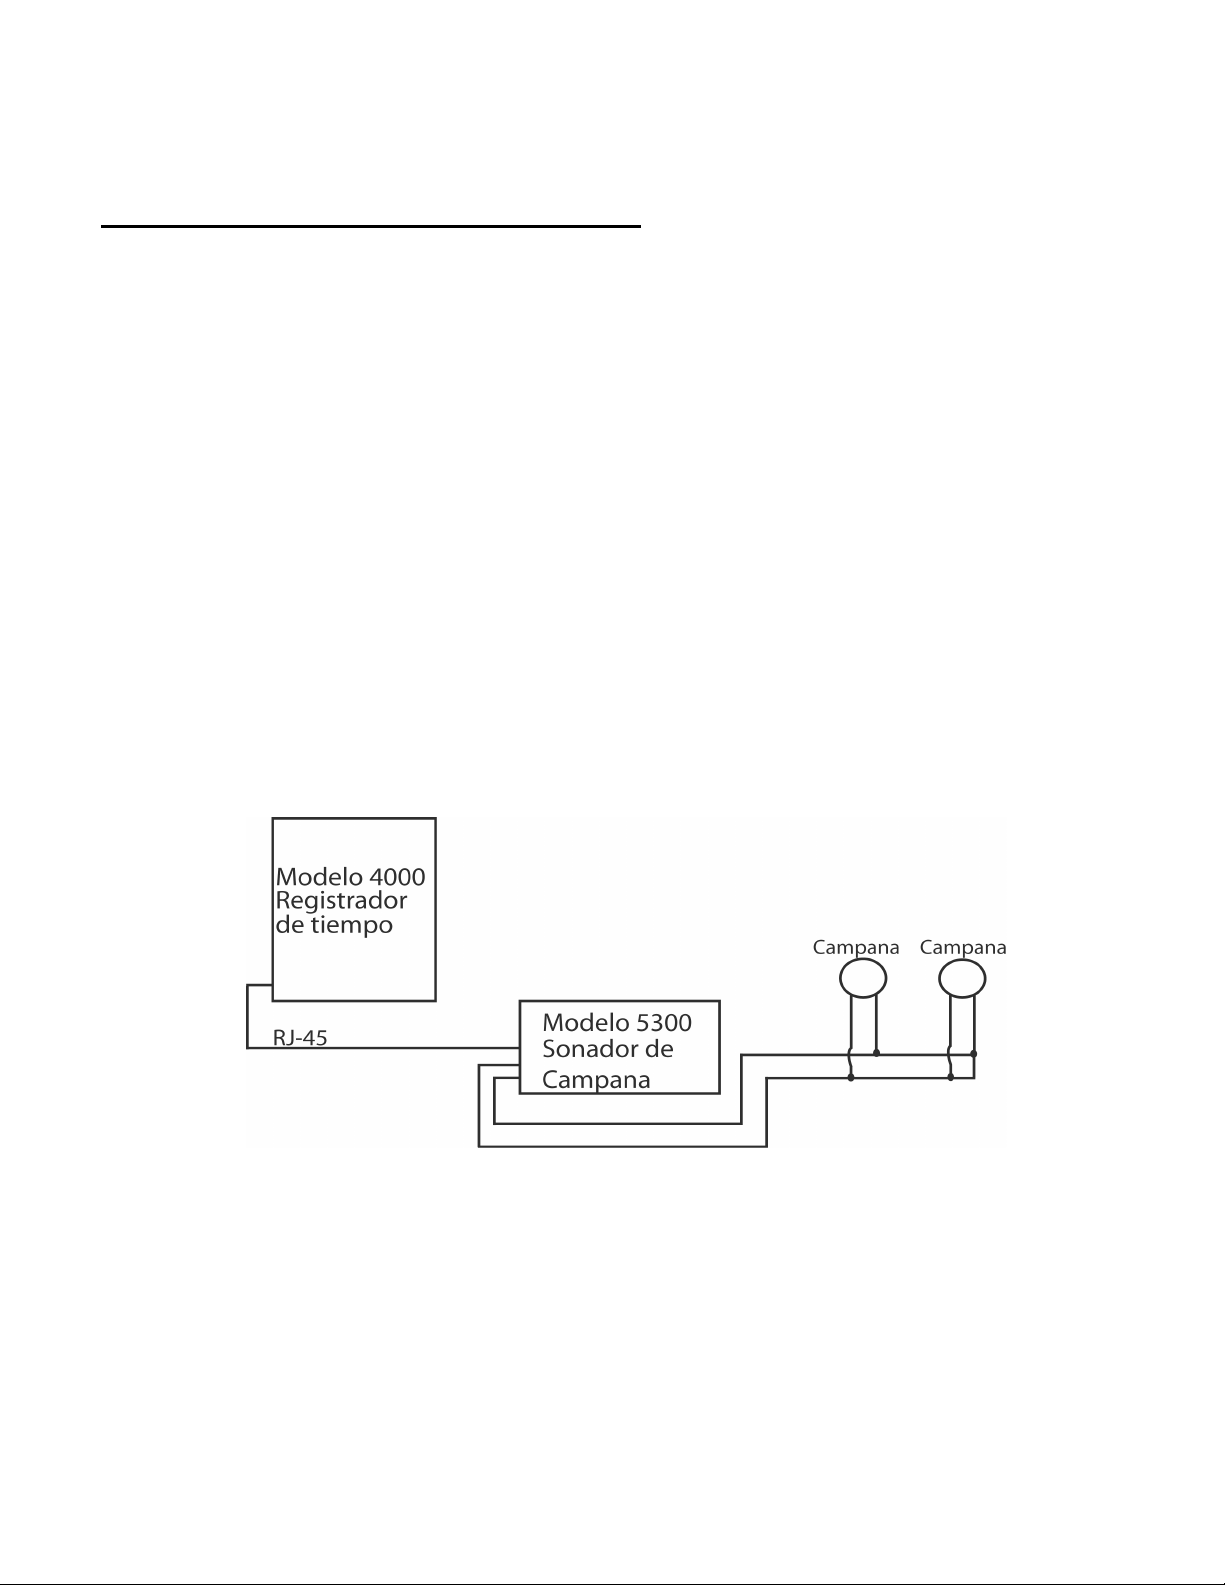
External bells or buzzers can be added by purchasing a Model 5300 Bell
Ringer. The Bell Ringer can ring up to 15 bells or horns with 50 events.
Please refer to Optional Supplies and Accessories table located at the
end of this booklet. To connect the 5300 Bell Ringer to the 4000/4000HD
Time Recorder, plug the RJ-45 cable into jack on the left side of the Time
Recorder. Connect the other end of the cable to the Model 5300. The
wall transformer provided with the 5300 must be connected to the
recepticle labeled POWER. Wire your bells/ horns to the labeled
terminals on the 5300. The Bells/Horns must be wired in parallel as
shown, not in series:
Page 5
SET EVENT # NO
Use the UP and DOWN key until the desired event number that you wish
to set-up, edit or turn off is displayed. An event is one bell/horn ring per
day (M-F or all 7 days) at a given time for a given duration. Press the
SELECT key to select the event you wish to program or modify. If you
wish to bypass the bell set-up feature, scroll to the SET EVENT # NO and
press SELECT.
EVENT 1 = OFF-Press the UP and DOWN key to select the duration of
time that the signal device will ring (.5-15 seconds) or select OFF to
disable the event.
EVENT 1 HR = 12AM - Use the UP and DOWN key to select the hour for
the event to ring.
EVENT 1 MIN = 00 - Use the UP and DOWN key to select the minute for
the event to ring.
EVENT 1 DAY = ALL - Use the UP or DOWN key to select the days that
the event is to be active.
Press SELECT to return to SET EVENT # NO, press UP or DOWN to add
another event. Press SELECT to continue set-up.
Note: The 4000/4000HD has an internal clock. Changing any of the
features listed above will not affect the time totals even if an individual is
clocked in during the change. Changing any of the features listed below
will clear all the stored payroll data including time totals. At this point new
time cards must be issued.
Page 6

SETUP PAY? NO – This feature allows you to set other feature that affect
how the 4000/4000HD calculates the time totals. By selecting YES with
the UP or DOWN key, the below listed feature can be modified. By
selecting NO, you will return to the main display and you will have
accepted all the default feature as listed below.
ARE YOU SURE? NO – This feature is listed to remind an individual that
all the stored payroll data will be cleared. By selecting YES with the UP or
DOWN key, the below listed feature can be modified. By selecting NO,
you will return to the main display.
TOTAL FMT = HR: MIN – Sets the format as to how the individual and
running totals will be displayed on the time card. Using the UP or DOWN
keys, select one of the following options:
1. HR: MIN – Standard hour and minute format (default setting) (8
hours and 30 minutes total would be displayed as 8:30)
2. HR.HUN - Standard hour with minutes in hundredths of hour (8
hours and 30 minutes total would be displayed as 8.50)
RESET=WEEKLY – Use the UP or DOWN key to select one of the
following pay periods. Press the SELECT key after you arrive at the
required pay period.
1. RESET=WEEKLY – SELECT this option for weekly payroll. Once
selected the clock will then indicate RESET DAY=SUN. Use the
UP or DOWN key to select the last day of your pay period which
will be referred to as the reset day. This is the day that the
4000/4000HD will reset all stored payroll data. New time cards
must be issued after this time. Using the UP or DOWN key, you
can select Sunday (SUN) through Saturday (SAT). New time
cards must be issued after each reset period (weekly). This
feature allows two IN/OUT punches per day average or 28 total
punches per period.
2. RESET=BI-MONTHLY – SELECT this option for bi-monthly
payroll (two times per month). Use the UP or DOWN key to select
one of the following reset days.
1. 15
2. RST=14
th
& LAST – 15th and last day of the month
th
& LAST-1 – 14TH and 1 day before the last
day of the month
Page 7

3. RST=13
th
& LAST-2 – 13th and 2 days before the last
day of the month
4. RST=12
th
& LAST-3 – 12th and 3 days before the last
day of the month
5. RST=11
th
& LAST-4 – 11th and 4 days before the last
day of the month
6. RST=10
th
& LAST-5 – 10th and 5 days before the last
day of the month
7. RST=16
th
& 1st – 16th and 1st day of the month
New time cards must be issued after each reset period. This
feature allows two IN/OUT punch per day average or 64 total
punches per period (2 per line).
3. RESET=2 WEEKS – SELECT this option for a payroll
administered every 2 weeks. Use the UP or DOWN key to select
the last date of your 2 week pay period which will be referred to as
the reset day. This is the date that the 4000/4000HD will reset all
stored payroll data. The clock will also reset automatically every
two weeks from the chosen date.
New time cards must be issued after this time. This feature allows
two IN/OUT punch per day average or 64 total punches per
period (2 per line).
4. RESET=MONTHLY – Select this option for a monthly payroll. Use
the UP or DOWN key to select the last day of your pay period
which is known as reset day:
1. RESET DAY=LAST - last day of the month
2. RESET DAY=LAST-1 - 1 day before the last day of the
month
3. RESET DAY=LAST-2 - 2 days before the last day of the
month
4. RESET DAY=LAST-3 - 3 days before the last day of the
month
5. RESET DAY=LAST-4 - 4 days before the last day of the
month
6. RESET DAY=LAST-5 - 5 days before the last day of the
month
7. RESET DAY=1st – 1st day of the month.
New time cards must be issued after each reset period This
feature allows one IN/OUT punch per day average or 64 total
punches per period (2 per line).
Page 8

RESET HOUR = 10PM – Sets the reset hour for the day (days) outlined
above using the UP or DOWN key. The default setting is 10PM.
Note: In some three-shift operations, an individual might punch in prior to
the reset period but will not punch out until after the reset period. This is
not a problem. The 4000/4000HD will not reset that card until the
individual punches out, however, the card number (upper right hand
corner of card) should not be issued to any other employee until he/she
punches out.
MAX HRS/PUNCH = 13 – The purpose of this feature is to guard against
an individual who forgets to punch out. This feature sets the number of
hours allowed between punches. For example, if 13 hours is selected
using the UP or DOWN key and an individual punches in and then forgets
to clock out, the 4000/4000HD will print the next line as an “in” punch if
more than 13 hours have elapsed. The time card will show the “in” punch
followed below by a space were the “out” punch would have been located
and then followed by the correct “in” punch. Hours can be set from 10-99.
The default is set at 13 hours.
ROUNDING = NONE – This feature is known as rounded time, flex time,
or grace period and only affects how the 4000/4000HD calculates the
clock in/out totals and the running totals but does not affect the printed
punch in/out time. Many businesses allow a “grace” period for employees
when they clock in or out. This is done either to allow for variations in the
time shown on different clocks, watches and time recorders throughout a
company, or just to make the calculation of payable time simpler by
“rounding off” the times recorded on a time clock. Use the UP or DOWN
key to select one of the four options listed below:
Press SELECT to return to the main display.
1. NONE – Turns rounding off. With this option, the PTR-4000 will
calculate the clock in/out totals and running totals using the actual
clock in/out times.
2. 5 MIN – This is the “5 minute rule”. With this option, the clock
in/out and running totals will be rounded to the nearest 5-minute
mark and will round “forward” at 2 minutes before the 5-minute
mark and will round “back” up to 3 minutes after every 5-minute
mark.
3. 10 MIN – This is the “10 minute rule”. With this option, the clock
in/out and running totals will be rounded to the nearest 10 minute
mark and will round “forward” at 5 minutes before the 10 minute
Page 9

mark and will round “back” up to 5 minutes after every 10 minute
mark.
4. 15 MIN – This option is known as the “15 minute rule” or the “7/8
rule” and is the most commonly used. With this option, the clock
in/out and running totals will be rounded to the nearest 15 minute
mark, therefore, up to 7 minutes before the 15 minute mark, the
starting time used to calculate the pay totals will move ahead to
the nearest 15 minute mark.
Up to 8 minutes after every 15-minute mark, the starting time used
to calculate the pay totals will move back to the nearest 15-minute
mark. For example, if a person clocks in at 7:52, the PTR-4000 will
calculate the time totals starting at 7:45, however, if the next
individual clocks in at 7:53, the PTR-4000 will calculate the time
totals starting at 8:00. Conversely, if an individual clocks in at
8:07, the time totals will calculate assuming an 8:00 start time. If
the next individual clocks in at 8:08, then the totals will be
calculated assuming an 8:15 start time.
Press SELECT to return to the main display.
NEED HELP? If you have any questions, visit pyramidtechnologies.com
or call sales and service toll free at 1-888-479-7264.
TIME CARDS
The 4000/4000HD uses custom time cards (item #44100-10) that are prenumbered 1-100. As noted prior, you cannot use two of the same
numbered time card during the same pay period. Do not cover the black
rectangles on the left side of the time cards. The same time card is used
for weekly, bi-weekly, semi-monthly, and monthly pay periods; however,
the print format will be different as noted below.
WEEKLY– In this mode the time card will accept up to 28 punches per
period which will allow for 7 days and four punches per day,however it is
not necessary to use all 28 punches or is it necessary to have 4 punches
per day. The only constraint is 28 punches per period.
Print format is as follows:
Clock in – Month, Day, Clock in time, “IN”, Day of week
Clock out - Month, Day, Time, Clock in/out time total, Running
time total
Page 10
SEMI-MONTHLY. 2 WEEKS, BI-WEEKLY AND MONTHLY- In these
Hold down tab
modes the time card will accept up to 64 punches per period (2 per line,
for a total of 32 lines maximum). Print format is as follows (both clock
in/out is on same line of the time card):
Clock in – Day of week, Clock in time
Clock out - Clock out time, Clock in/out time total, running time total
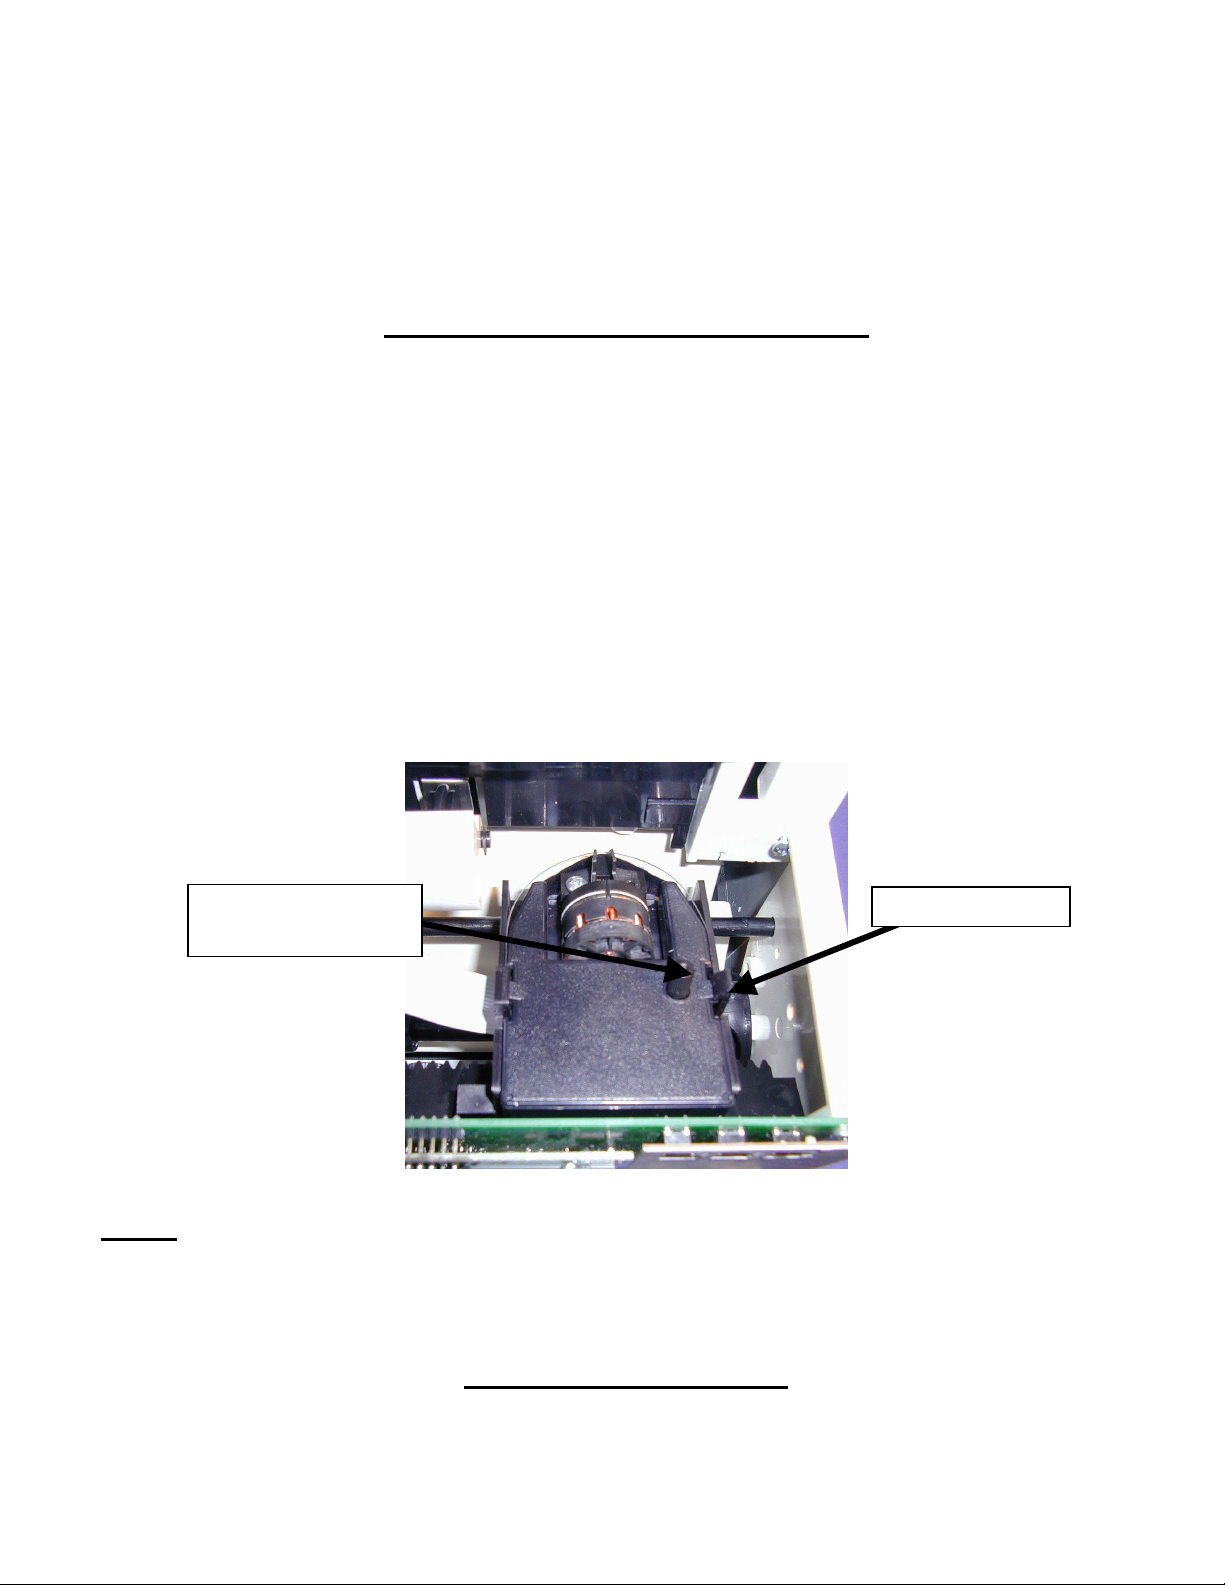
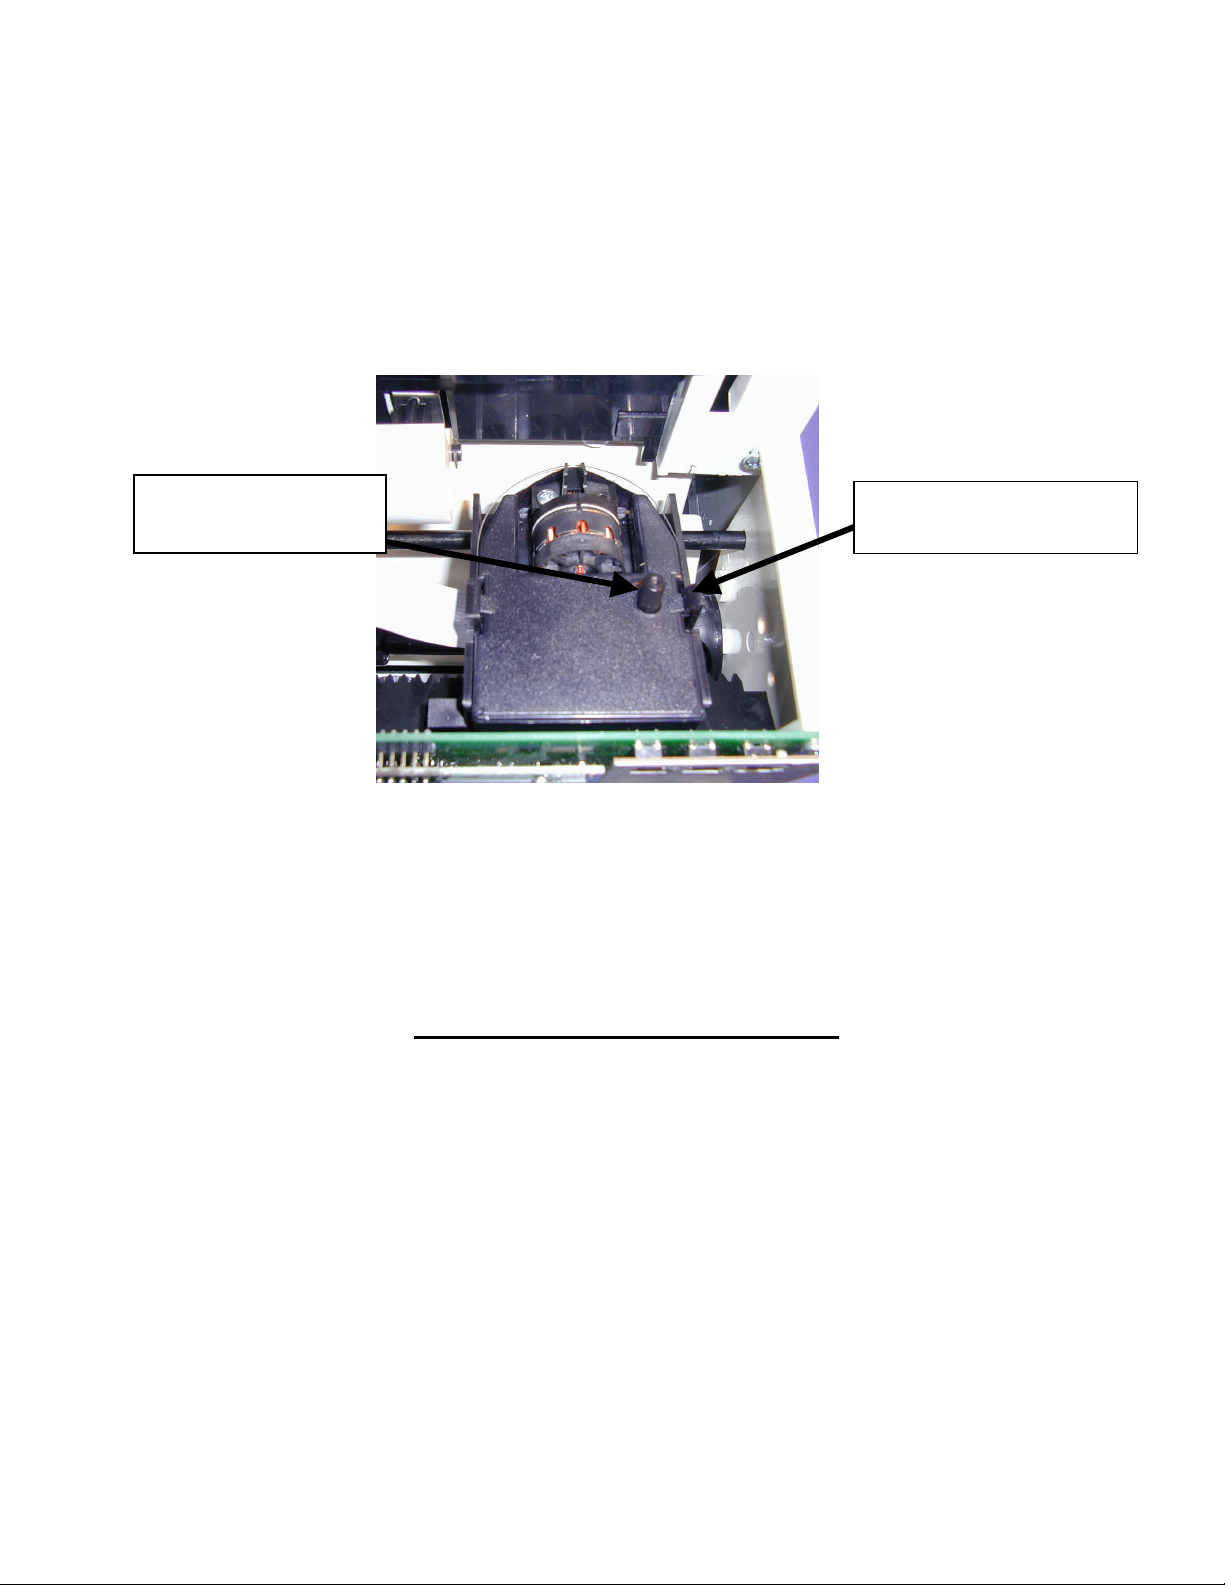
CHANGING THE PRINT RIBBON
1. Remove the cover using the key provided with the unit.
2. Locate the ribbon cartridge that is mounted on the holder (the holder is
permanently attached to the clock).
3. Push the hold tab located on the side of the holder away from the
ribbon cartridge and remove the ribbon cartridge.
4. Snap the new ribbon cartridge into the holder while turning the ribbon
advance knob located on the ribbon cartridge. Make sure the ribbon
and the clear plastic protector slide completely over the print head.
5. Replace and lock the cover. Test unit for proper installation by running
a time card through the unit.
Ribbon advance
knob
Note: If the ribbon is not completely over the print head the resulting print
will show incomplete characters. If the ribbon cartridge is not completely
snapped in the holder the resulting print will be increasingly lighter.
The 4000/4000HD is programmed with a number of error codes that will
help troubleshoot the unit. The error code will typically indicate on the
front display for several seconds. Error codes are as follows:
TROUBLESHOOTING
Page 11

CARD FEEDS WITH NO PRINT OR ERROR MESSAGE –1. Check that
the ribbon cartridge is snapped completely down and the ribbon is over
the print head. 2. Make sure the black bars on the left side of the time
card are not covered or damaged.
ERROR 1 – Indicates time card stuffing. If an individual tries to force a
card into the unit, the 4000/4000HD will accept the card but will not print
or store any payroll data. If this situation occurs, an ERROR 1 will show
on the front display and the card will not be “punched”. Solution: Rerun
the time card through the time recorder without pushing on the card.
ERROR 2, 5, 6 – Indicates a time card feed or jam. If an individual tries to
load a time card into the 4000/4000HD sideways or if the card is
extremely damaged, the time card may temporarily jam the transfer
mechanism and will not store any payroll data. If this situation occurs an
ERROR 2,5 or 6 will show on the front display and the card will not be
“punched”. Solution: Inspect the time card, straighten if necessary and
rerun the time card through the time recorder.
ERROR 3 – Indicates unit is not reading the bar codes on the time card.
An ERROR 3 will show on the front display. Solution: Inspect the time
card, straighten if necessary and rerun the time card through the time
recorder.
ERROR 7 – Indicates print head position error. This error occurs if the
print head is not in its proper position. If this situation occurs, an ERROR
7 will show on the front display and the card will not be “punched”.
Solution: Rerun the time card through the time recorder.
ERROR 14,15,50,51 – Indicates internal electronic error. Contact Pyramid
Technical Service.
MASTER RESET – This procedure will clear the entire time clock memory
and reset the program to the original factory defaults. This procedure
should only be used if the time clock is behaving completely erratic.
Master reset is accomplished by unplugging the unit and then plugging
the unit back in while depressing the center programming button (the UP
Page 12

button). Hold the center button until the front display is visible. All time,
set-up, and payroll data will be set to the original factory defaults.
Frequently Asked Questions
Q: When do I need new Time Cards?
A: New time cards are needed on the first day of each new pay period or
immediately after making any changes in the “SETUP PAY” feature.
Q: Do I have to use consecutive numbered time cards during a pay
period?
A: No, however, we strongly recommend you distribute time cards in
consecutive order to prevent the use of the same or duplicate numbered
time card in a given pay period.
Q: Why are some punches on top of other punches or there is a large
space between punches?
A: There are a number of issues that can cause this problem and are
listed below in order of most common occurrence. In either case a master
reset must be performed to correct this problem (ref) MASTER RESET of
this instruction booklet.
1. The same or duplicate numbered cards is used in the same pay period.
2. The “SETUP PAY” feature is changed during a pay period and new
time cards are not used.
3. An employee forgot to punch in or out and the time between punches
has exceeded the hours set in the “MAX HRS/PUNCH” feature. A
master reset is not required. However, the totaled hours must be
manually adjusted at the end of the pay period.
4. If you are running a 3 shift, 24-hour operation with more than 50
employees, please call customer assistance at Pyramid for set-up
assistance on this issue.
Q: Does the 4000/4000HD Time Recorder calculate overtime?
A: The 4000/4000HD Time Recorder will provide you a running total for
all hours worked. Because overtime policies vary from company to
company, overtime must be calculated manually.
Q: Does the 4000/4000HD Time Recorder have an automatic lunch
deduction feature?
Page 13
A: The 4000/4000HD Time Recorder provides a running total of hours
between punches and therefore any payroll deductions must be made
manually at the end of a pay period.
Q: What does ATAAP mean?
A: ATAAP is the acronym used by the U.S. government that describes
how time is accounted for using hundredths of hour (i.e. one and a quarter
hours equals 1.25 hours).
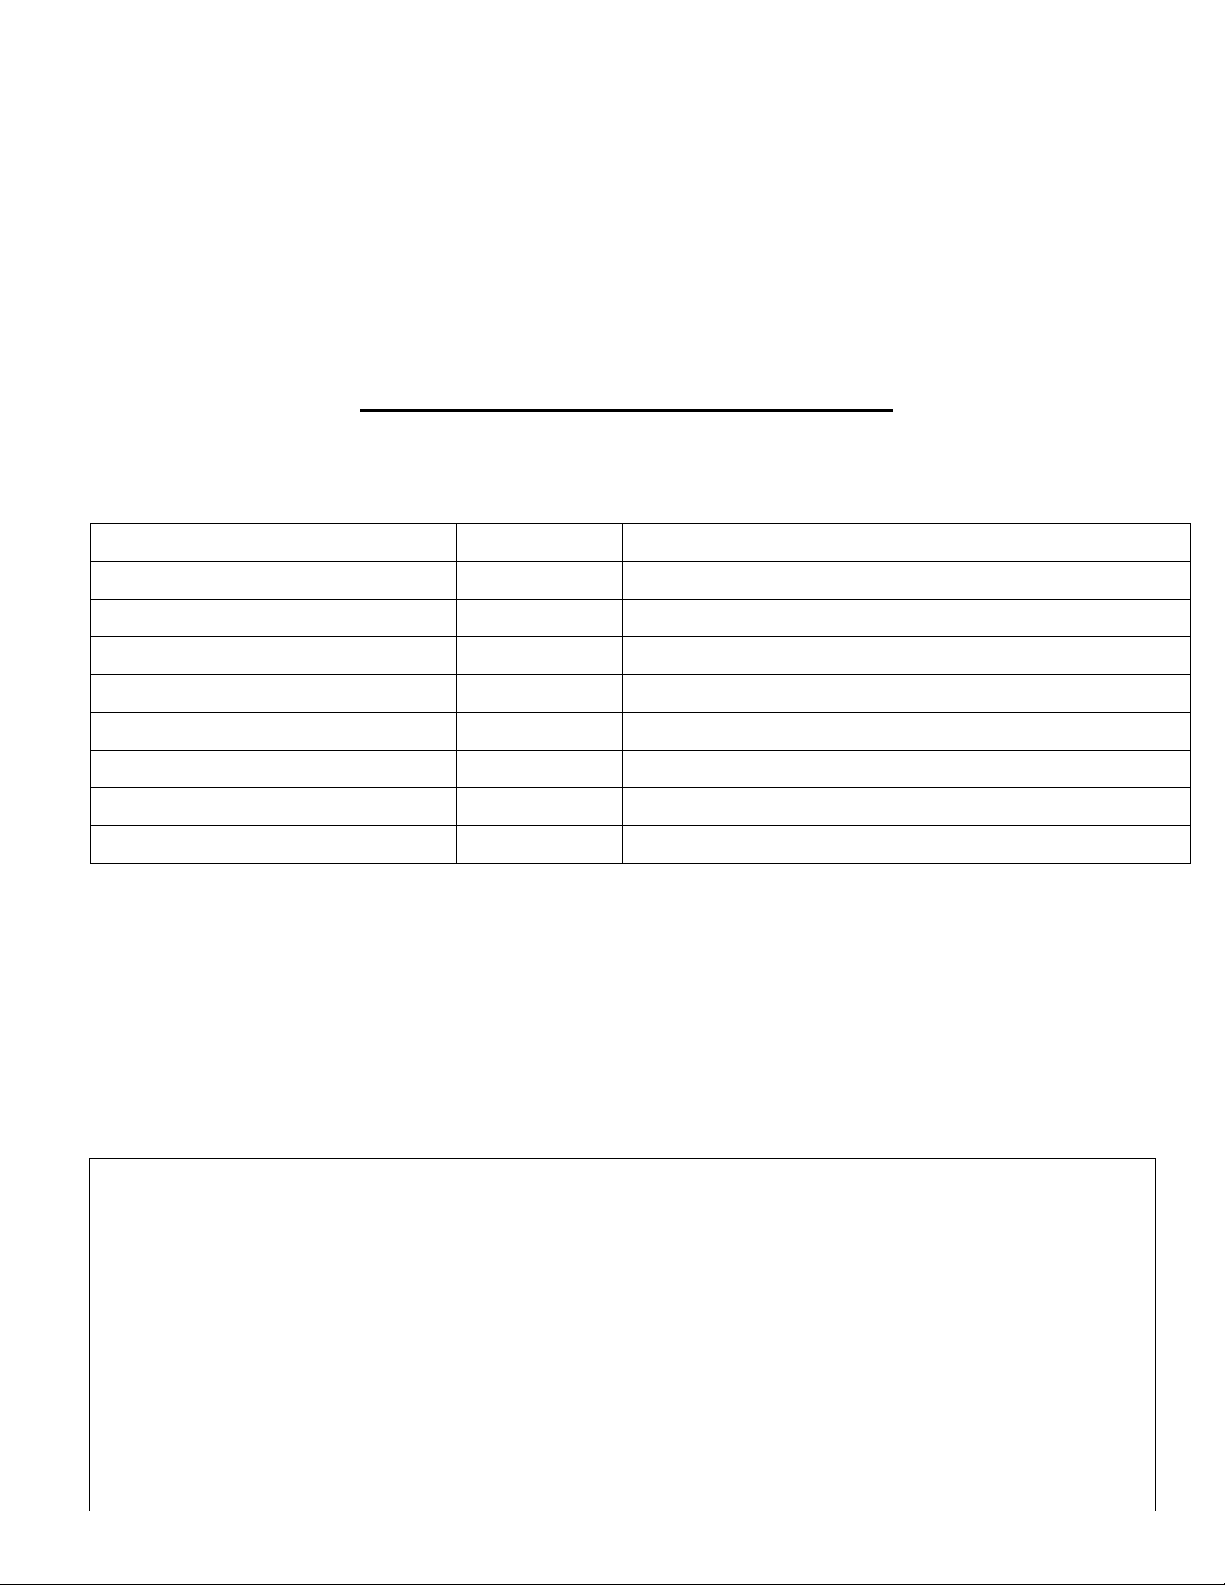
Supplies and Optional Accessories
Supplies and optional accessories for the Pyramid 4000/4000HD are
available at most office supply stores, or call Pyramid direct toll free at 1888-479-7264.
Item No
.
Qty
.
Description
4000-R 1 Replacement Printer Ribbon
44100-10 100 Pack Time Cards
44100-10M 1000 10 Packages of 100 Time Cards
400-3 1 25 Pocket Adjustable Time Card Rack
5300 1 Bell Ringer
41361 1 6” 24 VDC Bell
41392 1 8” 24 VDC Bell
41362 1 24 VDC Horn
Limited Warranty
The manufacturer warrants this equipment to the original user against
defective material or workmanship for a period of 1 year from the date of
purchase. The manufacturer’s responsibility under this warranty is limited
to the repair or replacement of the defective part or parts.
The manufacturer reserves the right to determine whether the parts failed
because of defective material, workmanship, or other causes. Failure
Page 14

caused by accident, alteration, misuse or improper packaging of returned
unit is not covered by this warranty. All warranty repairs must be done by
Pyramid Technologies, LLC. Any repair to the equipment other than by
PTI voids the warranty. Users in countries other than the USA should
contact the Dealer from whom the unit was purchased. The rights under
this warranty are limited to the original user and may not be transferred to
subsequent owners.
Extended Warranty
Extended warranties are available by calling Pyramid Technologies.
Pyramid Technologies, LLC
48 Elm St. Meriden, CT 06450
(888)-479-7264 toll free
(203)-238-0550 phone
(203)-634-1696 fax
E-mail: CustomerService@pti.cc
Website: WWW.PyramidTechnologies.com
Specifications
Operating Conditions
Temperature 0C to 50C, (3F to 122F)
Humidity 10 to 95% RH, non condensing
Power Failure
Battery Back-up of data and time for 30 days
Battery life >10 years
Calendar
Automatic Leap Year and daylight saving time, Year up to 2099
Page 15

Clock Accuracy
INSTRUCCIONES DE INSTALACIÓN Y
Less than 30 seconds/year
Memory Capacity
100 employees
Certifications
UL and CUL
Weight
4000 - 5.9 lbs (2.7 kg)
4000HD - 8.15 lbs (3.7 kg)
Dimensions
4000 - 7.25” H x 7.12” W x 6.65” D
4000 - 184.15mm H x 180.84mm W x 168.91mm D
4000HD - 7.75" H x 8.25” W x 7.25" D
4000HD - 196.85mm H x 209.55mm W x 184.15mm D
Mounting
Desktop or wall mountable.
PYRAMID
MODELO 4000/4000HD
OPERACIÓN DE LA GRABADORA
ELECTRONICA DE TIEMPO DE NOMINA
IMPORTANTE!
LEA ESTAS INSTRUCCIONES ANTES DE INSTALAR Y USAR ESTE
PRODUCTO.
Mantenga estas instrucciones para la referencia futura
Page 16

El 4000/4000HD Grabadora de Tiempo de Nómina registra y resuma
semanal, BI semanal o información quincenal de nómina hasta 100
empleados. El 4000/4000HD usa tarjetas de tiempo (artículo #44100-10)
codificadas de antemano del 1 a 100. Por cada período de pago el
individuo sera asignado una tarjeta de tiempo con numero de antemano
(localizado en la esquina superior derecha). Se deben publicar nueva
tarjetas de tiempo después de cada período de pago.
NOTA: No use tarjetas de tiempo con numeros duplicado durante el
mismo período de pago. Además, use solamente las tarjetas de tiempo
Rev. D o más alta (localizada en el fondo de cada tarjeta).Almacene sus
tarjetas de tiempo en una area seca.No doble o ensucie las tarjetas de
tiempo.Una tarjeta de tiempo doblada o sucia en el borde izquierdo de la
tarjeta puede ocasionar que se lea/errores ID.
Si usted tiene tarjetas con la revisión más baja por favor avisen nuestro
Departamento de Servicio Técnico a 1-888-479-7264.
Cada 4000/4000HD es equipado con una memoria interna que reserva
los datos nómina hasta un mes.
INSTRUCCIONES PARA INSTALACION
PASO 1 - DESEMBALAR
1. Quite el 4000/4000HD de su caja y lo coloca en una superficie firme.
2. Enchufe la unidad en una toma de corriente.
3. Localize la llave embalada con la unidad, destranque y quite la cubierta
delantera de la unidad. Localize los botones de programar que estan
marcado SELECTO, ARRIBA, y ABAJO.
PASO 2 - PROGRAMAR EL 4000/4000HD
Programar el 4000/4000HD a su nómina específicada es
extremadamente fácil y puede ser hecho en 3 pasos fáciles.
Page 17

1. Para cambiar o poner una característica, apriete el botón SELECTO
hasta que la característica deseada se demuestre.
2. Use el botón ARRIBA o ABAJO para cambiar la característica.
3. Después que la característica demostrada se cambia, apriete el botón
SELECTO para cambiar otras características y para volver al despliegue
principal.
NOTA: Seleccionando SI para establecer la característica de PAGA
limpiará todos los datos de nómina Registrados. Si seleciona si, tarjetas
de tiempo nuevas se deben distribuir.
PASO 3 - LISTO PARA USAR
1. Vuelva a instalar y cerrar la cubierta delantera de la unidad y usted
está listo para usar su 4000/4000HD.
TABLA DE CARACTERISTICAS
IDIOMAS - Use la clave ARRIBA o ABAJO para escoger el idioma
deseado de imprimir y programar el Modelo 4000/4000HD. Seleccione
Inglés, Español, Francés o Alemán.
FIJAR EL AÑO - Use la clave ARRIBA o ABAJO para poner el año
deseado (la falta es el año actual).
FIJAR EL MES - Use la clave ARRIBA o ABAJO para poner el mes
deseado (la falta es el mes actual).
FIJAR El DIA - Use la clave ARRIBA o ABAJO para poner el día del mes
deseado (la falta es la fecha actual).
AHORROS DE LUZ DEL DIA - Permite que el Modelo 4000/4000HD
ajuste automáticamente el tiempo de ahorros de luz del día. Hay 4
opciones que usted puede escoger con las claves ARRIBA o ABAJO:
1. USA - Ajusta automáticamente la hora al tiempo de ahorros de luz del
día en los Estados Unidos.
Page 18

2. EURO - Ajusta automáticamente la hora al tiempo europeo de ahorros
de luz del día. (Comienza el último domingo de Marzo y termina en el
ultimo domingo de Octubre)
3
. OTROS -
Permite que usted escoja un domingo de comienzo y final para
cambios automáticos de tiempo de ahorros de luz del día. Después que
selecciones OTRO, use la clave ARRIBA o ABAJO para escoger el
domingo deseado (sólo domingos se permiten) que usted desea
COMENZAR el tiempo de ahorros de luz del día, oprima SELECTO y otra
vez use la clave ARRIBA o ABAJO para seleccionar el domingo deseado
de FINALIZAR tiempo de ahorros de luz del día. NOTA: El tiempo
cambiará automáticamente a las dos de la mañana en los domingos
escogidos. Oprima SELECTO y la opción de el TIEMPO STD = LINEA
aparecerá. Oprima SELECTO otra vez para avanzar a la próxima opción.
NOTA: El TIEMPO STD = la opción de la LINEA debe sólo ser cambiada
para áreas donde hay variaciónes de frecuencia en las líneas de
electricidad, sin embargo, esto no ocurre en los Estados Unidos. Si usted
esta operando esta unidad en un área que tiene problemas con las
frequencias de las lineas electrica resultando en la unidad perdiendo o
ganando tiempo o usted corre la unidad con un generador/inversor, use la
clave ARRIBA o ABAJO para cambiar el TIEMPO STD a CRISTAL que
causará que la unidad mantenga el tiempo usando un aparato interno.
4. APAGADO- La Unidad no ajustará la hora para el tiempo de ahorros
de luz del día.
DSPLY FMT = AM/PM - Seleccióna cómo el tiempo se demostrará en el
frente de la unidad. Usando la clave ARRIBA o ABAJO, escoja una de las
opciones siguientes:
1. AM/PM - Tiempo Estándar (1-12 horas).
2. MIL - Tiempo de Ejército (0-23 horas).
IMPRESION FMT = AM/PM - Selecciona cómo se imprimirá el tiempo en
la tarjeta de tiempo. Usando la clave ARRIBA o ABAJO, escoge uno de
las opciones siguientes:
1. AM/PM - Tiempo uniforme (poniendo la falta) por ejemplo 3:30pm.
2. MIL- Tiempo de Ejército (por ejemplo 3:30 PM = 15:30).
3. ATAAP - El tiempo del ejército con minutos expresados en
centésimos de hora (por. E. PM 3:30 = 15.50).
HORA FIJA - Pone la hora actual de el día usando la clave ARRIBA o
ABAJO.
Page 19
MINUTOS FIJOS - Pone el minuto actual de el día usando la clave
ARRIBA o ABAJO.
PROGRAMACIÓN DE LA CAMPANA
La sirena interna es para usar en áreas donde no debe hacerse ruido.
Para regular el volumen de la sirena interna, abra la cubierta delantera y
gire el control de volumen del lado izquierdo del tablero de circuitos en
sentido horario para aumentar el volumen. Gírelo en sentido opuesto para
bajarlo.
Las campanas o sirenas externas se agregan cuando se compra el
modelo Bell Ringer 5300. El “Bell Ringer” tiene capacidad para hasta 15
campanas o bocinas con 50 eventos. Refiérase a la tabla de accesorios
que figura al final de este manual. Para conectar el Bell Ringer 5300 al
Reloj Registrador 4000/4000HD, conecte el cable RJ-45 en el enchufe del
lado izquierdo del Reloj Registrador. Conecte el otro extremo del cable al
Modelo 5300. El transformador suministrado con el 5300 debe conectarse
al receptáculo con la inscripción POWER. Conecte las campanas o
bocinas a los terminales correspondiente del 5300; haga la conexión en
paralelo, no en serie:
PROGRAMACIÓN DE EVENTO # NO
Oprima la tecla “ARRIBA” o “ABAJO” hasta que aparezca el número del
evento que desea programar, cambiar o desactivar. Un evento es el
sonido de una campana/bocina por día (lun. a vier. o los 7 días de la
semana) a una hora predeterminada durante un tiempo dado. Oprima la
tecla SELECTO para elegir el evento que desea programar o modificar.
Si desea ignorar la función de programación de la campana, vaya hasta
PROGRAMACIÓN DE EVENTO # NO y oprima SELECCIONAR.
Page 20

EVENTO 1 = OFF (desactivado) – Oprima la tecla “ARRIBA” o “ABAJO”
para seleccionar el tiempo durante el cual se escuchará la señal sonora
(0.5 a 15 segundos), o bien seleccione “OFF” para desactivar este
evento.
EVENTO 1 HR = 12AM - Oprima la tecla “ARRIBA” o “ABAJO” para
seleccionar la hora en la cual sonará el evento.
EVENTO 1 MIN = 00 - Oprima la tecla “ARRIBA” o “ABAJO” para
seleccionar los minutos en los cuales sonará el evento.
EVENTO 1 DÍA = TODOS - Oprima la tecla “ARRIBA” o “ABAJO” para
seleccionar los días durante los cuales el evento estará activado.
Oprima SELECTO para regresar a PROGRAMACIÓN DE EVENTO #
NO, oprima la tecla “ARRIBA” o “ABAJO” para agregar otro evento.
Oprima SELECTO para continuar con la programación.
NOTA: El 4000/4000HD tiene un reloj interno. Cambiando cualquiera de
las características mencionadas anteriormente no le hara efecto a las
sumas de tiempo aunque un individuo se marque adentro durante el
cambio. Cambiando cualquiera de las características mencionadas abajo
limpiará todos los datos almacenados de nómina inclusive sumas de
tiempo. En este punto tarjetas nuevas de tiempo se deben distribuir.
ARREGLO de PAGA ? No - Esta característica permite que usted ponga
otras características que efectan cómo el 4000/4000HD calcula las
sumas de tiempo. Seleccionando SI con la clave ARRIBA o ABAJO, las
características mencionadas abajo se pueden modificar. seleccionando
no, usted volverá al despliegue principal y usted habrá aceptado todas las
características de la falta mencionadas abajo.
USTED ESTA SEGURO? No - Esta característica se mencionan para
recordar a el individuo que todos los datos almacenados de nómina se
limpiarán. Seleccionando SI con la clave ARRIBA o ABAJO,las
características mencionadas abajo se pueden modificar. Escogiendo no,
usted volverá al despliegue principal.
FMT TOTAL = HORA: MIN - Pone el formato a cómo las sumas
individuales y corrientes se demostrarán en la tarjeta de tiempo. Usando
la clave ARRIBA o ABAJO, seleccione una de las opciones siguientes:
Page 21

1. HORA: MIN – Formato uniforme de hora y minuto (poniendo la falta)
(el total de 8 horas y 30 minutos serian demonstradas como 8:30)
2. HORA. HUN - Hora Uniforme con minutos en centésimos de hora (el
total de 8 horas y 30 minutes serian demostrados como 8.50)
REPONGA = SEMANAL – Use la clave ARRIBA o ABAJO para
seleccionar uno de los períodos siguientes de paga. Apriete la clave
SELECTA después que usted llega al período requerido de la paga.
1. REPONGA = SEMANAL - SELECCIONE esta opción para la nómina
semanal. Una vez seleccionada el reloj entonces indicará REPONE
DIA = DOM. Use la clave ARRIBA o ABAJO para seleccionar el
ultimo día de su período de la paga que se referirá como el día de
restauracion . Este es el día que el 4000/4000HD repondrá todos
datos almacenados de nómina. Las tarjetas nuevas del tiempo se
deben distribuir después de este tiempo. Una suma de 28 marcas se
permite en cada tarjeta por semana. Usando la clave ARRIBA o
ABAJO, usted puede escoger Domingo (DOM) a Sábado (SAB).
2. REPONGA = BI MENSUAL - SELECCIONE esta opción para la
nómina bimestral (dos veces por mes). Use la clave ARRIBA o
ABAJO para seleccionar uno de los siguientes días.de restauracion
1. 15 & ultimo - 15 y ultimo día del mes
2. RST=14 & ultimo -1 - 14 y 1 día antes del ultimo día del mes
3. RST=13 & ultimo -2 - 13 y 2 días antes del ultimo día del mes
4. RST=12 & ultimo -3 - 12 y 3 días antes del ultimo día del mes
5. RST=11 & ultimo -4 - 11 y 4 días antes del ultimo día del mes
6. RST=10 & ultimo -5 - 10 y 5 días antes del ultimo día del mes
7. RST=16 &1st - 16 y primer día del mes.
Tarjetas de tiempo nuevas se deben distribuir después que cada período
de restauracion. Un total de 64 marcas se permiten por período (2 por
línea).
3. REPONGA = 2 SEMANAS - SELECCIONE esta opción para una
nómina administrada cada 2 semanas. Use la clave ARRIBA o ABAJO
para escoger la ultima fecha de su período de la paga de la semana que
se referirá como el día de restauracion. Esto es la fecha que el
4000/4000HD repondrá todos los datos almacenados de nómina. El reloj
también se repondrá automáticamente de cada dos semanas de la fecha
escogida.
Page 22

Nuevas tarjetas del tiempo se deben publicar después este tiempo. Un
total de 64 marcas se permiten en cada tarjeta por cada período bisemanal de la paga de la semana (un dentro/fuera por promedio de día).
4. REPONGA = MENSUAL - Seleccioné esta opción para una nómina
mensual. Use la clave ARRIBA o ABAJO para seleccionar el ultimo día de
su período de la paga que se conoce como el dia de restauracion:
1. REPONGA DIA = ULTIMO - ultimo día del mes
2. REPONGA DIA = ULTIMO -1 - 1 día antes del ultimo día del mes
3. REPONGA DIA = ULTIMO -2 - 2 días antes del ultimo día del mes
4. REPONGA DIA = ULTIMO -3 - 3 días antes del ultimo día del mes
5. REPONGA DIA = ULTIMO -4 - 4 días antes del ultimo día del mes
6. REPONGA DIA = ULTIMO -5 - 5 días antes del ultimo día del mes
7. REPONGA DIA =1st - primer día del mes.
Las tarjetas nuevas del tiempo se deben distribuir después de cada
período de restauracion. Un total de 64 marcas se permiten por período
(un dentro/fuera por promedio de día).
REPONGA HORA = 10PM - Pone la hora de restauracion para el día
(días) trazado arriba usando la clave ARRIBA o ABAJO. La falta que
pone es 10PM.
NOTA: En operaciones de unos tres turnos, un individuo quizás sé marca
dentro antes del periodo de restauracion pero no se marca fuera hasta
después de el período de restauracion. Esto no es un problema. El
4000/4000HD no repondrá esa tarjeta hasta que el individuo marca fuera,
sin embargo, el número de tarjeta (rincón derecho superior de la tarjeta)
no deberá ser publicado a cualquier otro empleado hasta que él/ella da
una marca fuera.
MAX HORAS/el marcas= 13 - El propósito de esta característica deberá
proteger contra un individuo que se olvida de dar una marca fuera. Esta
característica pone el número de horas permitidas entre marcas. Por
ejemplo, si 13 horas se escogen usando la clave ARRIBA o ABAJO y un
individuo se marca adentro y entonces se olvida marcarce fuera, el
4000/4000HD imprimirá la próxima línea como un “adentro” si más de 13
horas han pasado. La tarjeta del tiempo mostrará el “adentro” seguido
abajo por un espacio donde el “fuera” se habría localizado y entonces
habría sido seguido por el “adentro” correcto. Las horas se pueden poner
de 10-99. La falta se pone en 13 horas.
Page 23

ROUNDING = NINGUNO -
Esta característica se conoce como tiempo
aproximado, tiempo flexible, o período de gracia y sólo afecta cómo el
4000/4000HD calcula el total de las marcas adentro/afuera y las sumas
corriente pero no afecta las marcas de tiempo estampadas adentro
/afuera.. Muchos negocios permiten un período de gracia para empleados
cuando ellos marquen adentro o fuera. Esto se hace o para permitir las
variaciones en el tiempo mostrado en diferentes relojes,y grabadoras de
tiempo a través de una compañía, o para hacer apenas el cálculo de
tiempo pagadero más sencillo por “aproximados” que los tiempo
registraron en un reloj marcador. Use la clave ARRIBA o ABAJO para
escoger una de las cuatro opciones mencionadas abajo:
1. NINGUNO - Apaga redondear. Con esta opción, el 4000/4000HD
calculará las sumas de adentro /afuera y sumas corrientes usando las
marcas actuales de adentro/afuera del reloj.
2. 15 MIN - Esta opción se conoce como la orden de “15”minutos o la
orden “7/8” y es la mayormente usada. Con esta opción, el reloj
adentro/fuera y los sumas corrientes serán redondeadas a la marca mas
cercana de 15 minutes, por lo tanto, hasta 7 minutos antes de la marca
de 15 minutos, el tiempo de comienzo usadó para calcular el total de la
paga se moverá hacia adelante a la más cercana marca de 15 minutos.
Hasta 8 minutos después de cada marca de 15 minutos, el tiempo de
comienzo usadó para calcular el total de la paga retrocederá hacia la
marca mas cercana de 15 minutos. Por ejemplo, si una persona se marca
a las 7:52, el 4000/4000HD calculará las sumas de tiempo comenzando a
las 7:45, sin embargo, si el próximo individuo se marca a las 7:53, el
4000/4000HD calculará a sumas de tiempo a las 8:00. Opuestamente, si
un individuo se marca a las 8:07, la sumas de tiempo calcularán
asumiendo un tiempo de comienzo de 8:00. Si el próximo individuo se
marca a las 8:08, entonces las sumas se calcularán asumiendo un tiempo
de comienzo de 8:15.
3. 10 MIN - Esto es la orden de 10 minutos. Con esta opción, el reloj
adentro/fuera y las sumas corrientes serán redondeadas a la márca mas
cercana de 10 minutos y redondeara hacia “adelante” a 5 minutos antes
de la marca de 10 minutos y redondeara hacia “atras” hasta 5 minutos
después de cada marca de 10 minutos.
4. 5 MIN - Esto es la orden de “5” minutos. Con esta opción, el reloj
adentro/fuera y las sumas corrientes serán redondeadas a la marca mas
cercana de 5 minutos y redondeara hacia “adelante” a 2 minutos antes de
la marca de 5 minutos y redondeara hacia “atras” hasta 3 minutos
después de cada marca de 5 minutos.
Page 24

Oprima SELECTO para volver al despliegue principal.
¿NECESITA AYUDA? Si usted tiene alguna pregunta, favor de llamar a
Pyramid servicios técnicos sin cargo, 1-888-479-7264.
TARJETAS DE TIEMPO
El 4000/4000HD usa tarjetas de tiempo especiales (artículo #44100-10)
numeradas de antemano 1-100. Como notado previo, usted no puede
usar dos de la misma tarjeta numerada de tiempo durante el mismo
período de la paga. No cubra los rectángulos negros en el lado izquierdo
de las tarjetas de tiempo. La misma tarjeta del tiempo se usa por
períodos semanales, bi semanales, y quincenales de paga; sin embargo,
el formato de la impresión será diferente como anotado abajo.
SEMANAL - En este modo la tarjeta de tiempo aceptará hasta 28 marcas
por el período que tendrá en cuenta 7 días y cuatro marcas por día, sin
embargo no es necesario usar las 28 marcas ni es necesario tener 4
marcas por día. La única limitación es 28 marcas por el período.
El formato de la impresión es el seguiente:
Marca adentro-Mes, el Día, tiempo marcado, “adentro”, el Día de la
semana
Marca fuera - Mes, Día,Tiempo, tiempo total de. adentro/afuera,total del
tiempo corriente.
QUINCENAL. 2 SEMANAS,BI SEMANAL,MENSUAL- En estos modos
la tarjeta de tiempo aceptará hasta 64 marcas por el período o 2 por línea
para un total de 32 líneas máximas. El formato de la impresión es el
seguiente (ambas marcas adentro/fuera están en la misma línea de la
tarjeta de tiempo) :
Marca adentro - Día de la semana, el tiempo marcado adentro
Marca afuera - Tiempo afuera, total del tiempo a marcado
adentro/afuera, total del tiempo corriente.
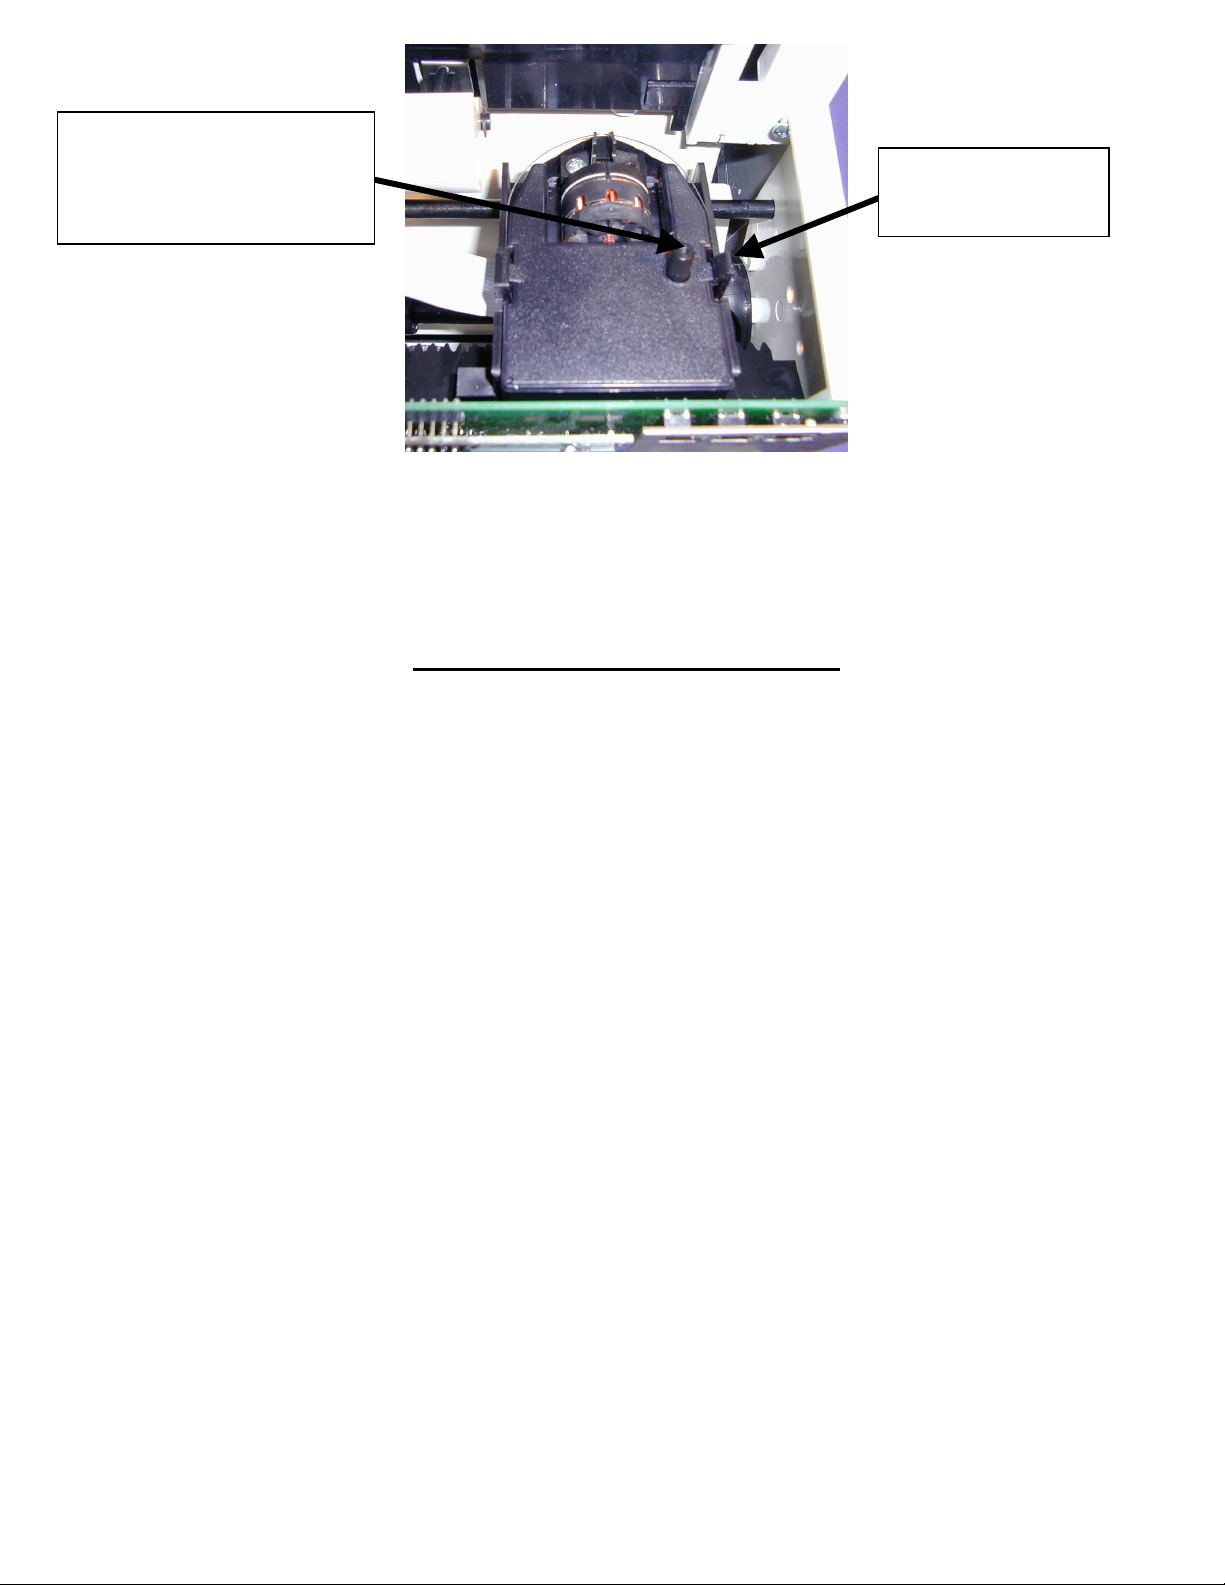
CAMBIANDO LA CINTA de IMPRESION
1. Quite la cubierta usando la llave proporcionada con la unidad.
2. Localize el cartucho de cinta que se monta en el poseedor (el
poseedor es conectado permanentemente a el reloj).
Page 25
3. . Empuje la etiqueta del asidero localizada en el lado del poseedor
lejos del cartucho de cinta y quite el cartucho de cinta.
4. Chasquée el cartucho nuevo de cinta en el poseedor girando la
perilla de avanze localizada en el cartucho de cinta. Cerciórese de
que la cinta y el protector plástico claro se deslize completamente
sobre la cabeza de impresión.
5. Reemplace y cierre la cubierta. Pruebe la unidad para la instalación
apropiada corriendo una tarjeta de tiempo por la unidad.
Perilla de avanze
Pestaña de enganche
NOTA: Si la cinta no esta completamente sobre la impression,la
impresión resultante mostrará los caracteres incompletos. Si el cartucho
de cinta no se chasquéa completamente en el poseedor,la impresión
resultante será cada vez más clara.
LOCALIZACION DE FALLAS
El 4000/4000HD es programado con varios códigos de error que
ayudarán a localizar las fallas de la unidad. El código de error se indicará
típicamente en el despliegue anterior por varios segundos. Los códigos
de error son los seguientes:
TARJETA SIN LA IMPRESION O UN MENSAJE DE ERROR -
1. Revise que el cartucho de cinta este chasquéado completamente hacia
abajo y la cinta está sobre la cabeza de la impresión.
2. Cerciórese que las barras negras en el lado izquierdo de la tarjeta de
tiempo no esten cubiertas o dañadas.
Page 26

El ERROR 1 - Indica la tarjeta forzada. Si un individuo trata de forzar la
tarjeta en la unidad, el 4000/4000HD aceptará la tarjeta pero no le
imprimirá ni almacenará ningun dato de nómina. Usted sabrá si esto
ocurre porque la impresora no se oirá audiblemente y un ERROR 1 se
mostrará en el despliegue de el frente. La solución: vuelva a correr la
tarjeta de tiempo por la grabadora de tiempo sin empujar la tarjeta.
El ERROR 2,5,6 - Indica un atascamiento de tarjeta de tiempo. Si un
individuo trata de cargar una tarjeta de tiempo en el 4000/4000HD de
lado o si la tarjeta esta extremadamente dañada, la tarjeta de tiempo
puede atascar el mecanismo de transferencia temporariamente pero
aceptará la tarjeta pero no almacenará ningun dato de nómina. Usted
sabrá si esto ocurre porque la impresora no se oirá audiblemente y un
ERROR 2 se mostrará en el despliegue de el frente. La solución:
Inspeccione la tarjeta de tiempo, enderezela si es necesario y vuelva a
correr la tarjeta de tiempo por la grabadora de tiempo.
El ERROR 3 - Indica la unidad no lee los códigos de la barra en la tarjeta
de tiempo. Usted sabrá si esto ocurre porque la impresora no se oirá
audiblemente y un ERROR 3 se mostrará en el despliegue de el frente.
La solución: Inspeccione la tarjeta de tiempo, enderezela si es necesario
y vuelva a correr la tarjeta de tiempo por la grabadora de tiempo.
ERROR 7– Indica error de la posición de la cabeza de impresión Este
error ocurre si la cabeza de impresión no está en su posición apropiada.
Si ocurre esta situación, un ERROR 7 mostrará en la visualización
delantera y la tarjeta no será “punched”. Solución: Vuelva a efectuar la
tarjeta de tiempo a través del registrador del tiempo.
El ERROR 14,15,50,51 - Indica error en la memoria de almacenamiento.
Avise a el servicioTécnico de PYRAMID.
El ERROR 51 - Indica la memoria escribe el error. Avise a el Servicio
Técnico de PYRAMID.
El ERROR 52 - Indica la memoria leyó el error. Avise a el Servicio
Técnico PYRAMID.
REAJUSTAMIENTO PRINCIPAL - Este procedimiento limpiará la
memoria entera de el reloj marcador y repondrá el programa a las
Page 27

rebeldías originales de la fábrica. Este procedimiento debe sólo ser usado
si el reloj marcador se comporta completamente irregular.El
reajustamiento principal es logrado,desenchufando la unidad y despues
enchufando la unidad
Otra vez mientras oprime el botón de programar del centro (el botón
arriba). Oprima el botón central hasta que el desplique de el frente sea
visible.Todo tiempo,arreglo,y datos de nómina seran puestos a las
rebeldias originales de la fabrica.
Preguntas Comunes
¿P: Cuándo necesito Tarjetas nuevas de Tiempo?
RE: Tarjetas Nuevas de tiempo se necesitan en el primer día de cada
período nuevo de la paga o inmediatamente después de hacer algunos
cambios en la caracteristica arreglo de paga.
¿P: Tengo que usar tarjetas de tiempo numeradas consecutivas durante
un período de la paga?
RE: No, sin embargo, nosotros recomendamos fuertemente que usted
distribuya tarjetas de tiempo en la orden consecutiva para prevenir el uso
del mismo o duplicar tarjeta numerada de tiempo en un período dado de
la paga.
¿P: Porqué es qué algunas marcas dan encima de otras marcas o hay un
espacio grande entre marcas?
RE: Hay varias razones que pueden causar este problema y se listan
abajo en orden de ocurrencias mas comunes. En cualquier caso la
restauración principal debe realizarse para corregir este problema.ref
Pagina 8 del folleto de instrucción:
1. El mismo o duplica tarjetas numeradas se usan en el mismo período
de
la paga.
2. La caracteristica de arreglo de paga; se cambia durante un período de
la paga y tarjetas nuevas de tiempo no son usadas.
3. Un empleado se olvidó de marcar adentro o afuera y el tiempo entre
marcas ha excedido las horas en la caracteristica “marca/horas maxima”.
Un ajustamiento principal no es requerido,sin embargo,las horas
totalizadas se deben ajustar manualmente a fines del periodo de la paga.
4. Si usted corre 3 turnos, operación de 24 horas con más de 50
empleados, favor de llamar al Servicio de ayuda al Cliente de Pyramid
para la ayuda de ajuste de paga en este asunto.
Page 28

¿P: Calcula horas extra la grabadora de tiempo 4000/4000HD?
RE: La Grabadora de tiempo, 4000/4000HD, le proporcionara un total
corriente de todas las horas trabajadas. Porque las normas de horas
extra varian de compañia a compañia, las horas extras deben calcularse
manualmente.
¿P: Tiene la grabadora 4000/4000HD una característica automática de la
deducción del almuerzo?
RE: La Grabadora 4000/4000HD proporciona una suma corriente de
horas entre marcas y por lo tanto cualquier deduccion de nómina se
deben hacer manualmente a fines de un período de paga.
¿P: Qué significa ATAAP?
RE: ATAAP es la sigla usada por el gobierno de EE.UU. que describe
cómo el tiempo es justificado usando centésimos de minutos (por.
ejemplo. uno y horas cuartas igualan 1.25 horas).
PROVISIONES y Accesorios Opcionales
Las provisiones y los accesorios opcionales para la PYRAMID
4000/4000HD están disponibles en la mayoría de las tiendas de
provisiones de oficinas, o llame a PYRAMID sin cargo al 1-888-479-7264.
El No. de
Cantidad La descripción
Artículo
4000 R 1 Cinta impresora de Reemplazo
44100-10 100 tarjetas de tiempo
44100-10M 1000 10 paquetes de tarjetas de tiempo
(100)
400-3 1 Anaquel ajustable de tarjetas de
tiempo de 25 bolsillos.
Page 29

La Garantía Limitada
El fabricante garantiza este equipo al usuario original contra material
defectuoso o la confección por un período de 1 año de la fecha de la
compra. La responsabilidad del fabricante bajo esta garantía es limitada
a la reparación o el reemplazo de la parte o partes defectuosas.
El fabricante reserva el derecho de determinar si las partes fallaron a
causa de material defectuoso, confección, u otras causas. El fracaso
causado por casualidad, la modificación, el maltrato o el envase
impropio de la unidad devuelta no son cubiertos por esta garantía.
Todas reparaciones de la garantía deben ser hechas por Pyramid
Technologies, LLC. Cualquier reparación al equipo de otra manera nula
la garantía de PTI . Los usuarios en países fuera de los Estados Unidos
de América deben avisar al Comerciante de quien la unidad se compró.
Los derechos bajo esta garantía son limitados al usuario original y no
pueden ser transferidos a dueños subsiguientes.
Pyramid Technologies, LLC
48 Elm Street. Meriden, CT 06450
(888)-479-7264 sin cargo de teléfono
(203)-238-0550
(203)-634-1696
E correo: CustomerService@pti.cc
Website: WWW.PyramidTechnologies. Com
Especificaciones
Page 30

Condiciones de Funcionamiento
Temperatura 0C a 50C (3F a 122F)
Humedad 10 a 95% HR, sin condensar.
Corte de Energia
Bateria alternativa- retiene el dato y hora por 30 dias
Vida de la bateria >10 años.
Calendario
Año Bisiesto y ahorro de tiempo, hasta el año 2099
Precisión de el Reloj
Menos de 30 segundos/año
Capacidad de la memoria
100 empleados
Certificación
UL y CUL
Peso
4000 - 5.9 lbs (2.7 kg)
4000HD - 8.15 lbs (3.7 kg)
Dimensiones
4000 - 7.25” Alto x 7.12” Ancho x 6.65” Hondo
4000 - 184.15mm Alto x 180.84mm Ancho x 168.91mm Hondo
4000HD - 7.75" Alto x 8.25” Ancho x 7.25" Hondo
4000HD - 196.85mm Alto x 209.55mm Ancho x 184.15mm Hondo
Montaje
Encima de el escritorio o en la pared
Page 31

PYRAMID 4000/4000HD
INSTRUCTIONS D’INSTALLATION ET
LISEZ ATTENTIVEMENT CES INSTRUCTIONS AVANT D’INSTALLER
ET D’UTILISER CE PRODUIT.
Gardez ces instructions pour pouvoir les consulter ultérieurement.
La pointeuse électronique 4000/4000HD a la capacité d’enregistrer et de
récapituler les informations de paie pour 100 employés au maximum, que
ces derniers soient payés à la semaine, tous les quinze jours ou tous les
mois. Le modèle 4000/4000HD fonctionne avec des fiches de présence
dotées d’un code à barres (article n° 44100-10) et pré-numérotées de 1 à
100. Un numéro de fiche (dans le coin supérieur droit de la fiche) est
assigné à chaque employé au début de chaque période de paie. De
nouvelles fiches doivent être utilisées pour chaque période de paie.
L’ENREGISTREUSE ELECTRONIQUE
MODE D’EMPLOI DE
IMPORTANT !
REMARQUE : n’utilisez pas deux fois le même numéro de fiche pendant
une période de paie donnée. Par ailleurs, utilisez seulement des fiches
portant la mention Rev.D ou plus élevé (information au bas de chaque
fiche). Stockez vos fiches de présence dans un endroit sec. Ne pas plier
ou salir les fiches. Une fiche sale ou froissée sur son côté gauche peut
provoquer des erreurs de lectures de fiche ou d’identité. Si vous avez des
fiches portant la mention Rev. A, Rev. B ou Rev. C, veuillez contacter
notre service technique au 1-888-479-7264.
Chaque modèle 4000/4000HD est équipé d’une mémoire interne de
secours permettant de protéger toutes les informations de paie pour une
durée d’un mois.
INSTRUCTIONS D’INSTALLATION
PREMIERE ETAPE – SORTIR L’APPAREIL DE SON EMBALLAGE.
Page 32

1. Enlevez le Modèle 4000/4000HD de sa boîte et placez-le sur une
surface plane.
2. Connectez l’unité à une prise de courant.
3. Repérez la clé qui va avec l’unité. Dégagez et mettez de côté le
couvercle de l’unité. Repérez les boutons programmateurs SELECT,
UP et DOWN.
DEUXIEME ETAPE – PROGRAMMER LE MODELE 4000/4000HD
La programmation du Modèle 4000/4000HD en fonction de vos besoins
de paiement spécifiques est extrêmement simple et peut être réalisée en
trois étapes faciles.
1. Pour changer ou mettre en place une fonction, appuyez sur le
bouton SELECT jusqu’à ce que la fonction souhaitée apparaisse sur
l’écran.
2. Utilisez les boutons UP et DOWN pour changer de fonction.
3. Une fois que vous avez changé une certaine fonction visualisée sur
l’écran, appuyez sur le bouton SELECT pour changer d’autres
fonctions et pour revenir au menu principal.
Remarque : Si vous sélectionnez YES pour la fonction SET-UP PAY,
alors toutes les informations sur le paiement en mémoire seront effacées.
Si YES est sélectionné, de nouvelles fiches horaire sont alors requises.
.
TROISIEME ETAPE – PRET A FONCTIONNER
1. Remettez en place le couvercle, fermez l’unité et vous voilà prêt à
utiliser votre Modèle 4000/4000HD.
INVENTAIRE DES FONCTIONS
LANG=ENGLISH – Utilisez les touches UP et DOWN pour sélectionner la
langue dans laquelle vous voulez imprimer et programmer le modèle
4000/4000HD. Sélectionnez Anglais, Espagnol, Français ou Allemand,
selon votre préférence.
SET YEAR – Utilisez les touches UP et DOWN pour sélectionner l’année
souhaitée (l’année actuelle est la valeur par défaut).
SET MONTH – Utilisez les touches UP et DOWN pour sélectionner le
mois souhaité (le mois actuel est la valeur par défaut).
Page 33

SET DAY – Utilisez les touches UP et DOWN pour sélectionner le jour
souhaité (la date d’aujourd’hui est la valeur par défaut).
DAYLIGHT SAV=USA – Cette option permet au modèle 4000/4000HD de
s’adapter automatiquement au système de changement d’heure de l’heure
avancée et vice versa. Vous avez le choix entre 4 possibilités que vous
pouvez sélectionner à l’aide des touches UP et DOWN :
1. USA- Réglage automatique de l’heure au système de changement
d’heure américain.
2. EURO- Réglage automatique de l’heure au changement d’heure
européen (qui commence le dernier dimanche du mois de mars et prend
fin le dernier dimanche du mois d’octobre).
3. OTHER- Vous permet de sélectionner les dimanches de changement
d’heure. Après avoir sélectionné OTHER, utilisez les touches UP et
DOWN pour sélectionner le dimanche (vous ne pouvez sélectionner que
le dimanche comme jour de la semaine) où vous souhaitez démarrer le
changement d’heure, puis appuyez sur SELECT et utilisez une fois de
plus les touches UP et DOWN pour sélectionner le dimanche où vous
souhaitez revenir à l’horaire précédente. REMARQUE : l’heure changera
automatiquement à 2 h 00 les dimanches sélectionnés. Appuyez sur
SELECT pour afficher l’option TIME STD=LINE. Appuyez une nouvelle
fois sur SELECT pour passer à l’option suivante. (REMARQUE : l’option
TIME STD=LINE ne doit être changée que dans les endroits où le courant
électrique subit des variations de fréquence, ce qui n’est jamais le cas
aux Etats-Unis. Si cette unité fonctionne dans un endroit où les problèmes
de chutes de fréquence ralentissent ou accélèrent l’horloge de l’unité, ou
si elle fonctionne à partir d’un générateur/onduleur, utilisez les touches
UP et DOWN pour passer de la fonction TIME STD à CRYSTAL, ce qui
permettra à l’unité de garder l’heure exacte à l’aide d’une horloge interne).
4. OFF. Choisissez cette option si vous ne souhaitez pas suivre le
changement d’heure.
DSPLY FMT=AM/PM – Permet de sélectionner l’affichage de l’heure sur
le devant de l’unité. A l’aide des touches UP et DOWN, sélectionnez l’une
des options suivantes :
1. AM/PM – Heure standard (1 – 12 heures)
2. MIL – Heure militaire (0 – 24 heures)
PRINT FMT – AM/PM – Permet de sélectionner l’affichage de l’heure sur
la fiche. A l’aide des touches UP et DOWN, sélectionnez l une des
options suivantes :
Page 34

1. AM/PM – Heure standard (par ex., 3 :30 PM)
2. MIL – Heure militaire (par ex., 3 :30 PM = 15 :30)
3. ATAAP – Heure militaire avec les minutes exprimées en centièmes
d’heure (par ex., 3 :30 PM = 15.50)
SET HOUR – Utilisez les touches UP et DOWN pour sélectionner
l’heure exacte.
SET MINUTES – Utilisez les touches UP et DOWN pour sélectionner les
minutes exactes.
CONFIGURATION DE LA SONNERIE
La sonnerie interne est conçue pour les zones calmes. Pour régler le
volume de la sonnerie interne, ouvrez le couvercle avant et tournez le
bouton du volume sur la gauche du circuit imprimé dans le sens des
aiguilles d’une montre pour augmenter le volume ou dans le sens
contraire des aiguilles d’une montre pour diminuer le volume.
Vous pouvez ajouter des sonneries ou vibreurs externes en achetant une
sonnerie modèle 5300. Cette sonnerie peut sonner jusqu’à 15 sonnettes
ou avertisseurs avec 50 événements. Veuillez-vous référer au tableau
des Pièces de remplacement et accessoires optionnels situé à la fin de ce
livret. Pour connecter la sonnerie modèle 5300 à la pointeuse
4000/4000HD, branchez le câble RJ-45 dans le jack sur le côté gauche
de la pointeuse. Connectez l’autre extrémité du câble au modèle 5300. Le
transformateur mural fourni avec le modèle 5300 doit être connecté à la
prise étiquettée POWER. Raccordez vos sonnettes/klaxons aux
terminaux etiquettés sur la 5300. Les sonnettes/avertisseurs doivent être
raccordés en parallèle comme le montre le schéma ci-dessous et non pas
en série :
Page 35

SET EVENT # NO
Utilisez les touches UP et DOWN jusqu’à ce que le numéro de
l’événement que vous souhaitez configurer, modifier ou désactiver
s’affiche à l’écran. Un événement est une sonnerie de
sonnette/avertisseur par jour (L-V ou les 7 jours) à un moment donné
pour une durée donnée. Appuyez sur la touche SELECT pour
sélectionner l’événement que vous souhaitez programmer ou modifier. Si
vous souhaitez sauter la fonction de configuration de la sonnerie, faites
défiler jusqu’à SET EVENT # NO et appuyez sur SELECT.
EVENT 1 = OFF-Appuyez sur les touches UP et DOWN pour sélectionner
la durée pendant lequel le dispositif va sonner (de 0,5 à 15 secondes) ou
sélectionnez OFF pour désactiver l’événement.
EVENT 1 HR = 12AM - Utilisez les touches UP et DOWN pour
sélectionner l’heure à laquelle l’événement doit sonner.
EVENT 1 MIN = 00 - Utilisez les touches UP et DOWN pour sélectionner
les minutes correspondant à l’heure à laquelle l’événement doit sonner.
EVENT 1 DAY = ALL - Utilisez les touches UP et DOWN pour
sélectionner les jours pendant lesquels l’événement doit être actif.
Appuyez sur SELECT pour revenir à SET EVENT # NO, appuyez sur UP
ou DOWN pour ajouter un autre événement. Appuyez sur SELECT pour
continuer la configuration.
Remarque : Le modèle 4000/4000HD possède une horloge interne.
Le changement de n’importe laquelle des fonctions énumérées cidessus n’affecte pas les totaux horaires même si un individu est
considéré comme ayant pointé à son arrivée pendant le
changement. Toutefois, le changement de n’importe laquelle des
fonctions listées ci-dessous efface toutes les données de paie en
mémoire y compris les totaux horaires. De nouvelles fiches de
présence doivent alors être utilisées.
SETUP PAY ? NO – Cette fonction vous permet de sélectionner d’autres
fonctions déterminant la façon dont le modèle 4000/4000HD calcule les
totaux horaires. Les fonctions énumérées ci-dessous peuvent être
Page 36

modifiées en sélectionnant YES à l’aide des touches UP et DOWN. Si
vous sélectionnez NO, vous retournez au menu principal et vous avez
ainsi accepté toutes les fonctions par défaut énumérées ci-dessous.
ARE YOU SURE? NO – Cette fonction est listée pour rappeler à un
individu que toutes les données de paie seront effacées. Les fonctions
énumérées ci-dessous peuvent être modifiées en sélectionnant YES à
l’aide des touches UP et DOWN. Si vous sélectionnez NO, vous retournez
au menu principal.
TOTAL FMT = HR : MIN – Sélectionne le format des totaux individuels et
en cours sur la fiche de présence. A l’aide des touches UP et DOWN,
sélectionnez l’une des fonctions suivantes :
1. HR:MIN – format standard pour les heures et les minutes (paramètre
par défaut) (8 heures et 30 minutes apparaîtraient de la sorte : 8:30).
2. HR.HUN – heure standard avec les minutes en centièmes d’heure (8
heures et 30 minutes apparaîtraient ainsi : 8.50).
RESET=WEEKLY – Utilisez les touches UP et DOWN pour sélectionner
l’une des périodes de paie suivantes. Lorsque la période de paie désirée
s’affiche à l’écran, appuyez sur la touche SELECT.
1. RESET=WEEKLY – SELECTIONNEZ cette option pour un paiement
hebdomadaire. Une fois celui-ci sélectionné, l’horloge indique RESET
DAY=SUN. Utilisez les touches UP et DOWN pour sélectionner le
dernier jour de votre période de paie appelé jour de référence. C’est le
jour à partir duquel le modèle 4000/4000HDHD règle à nouveau toutes
les informations de paie en mémoire. Vous devez alors utiliser de
nouvelles fiches de présence. A l’aide des touches UP et DOWN, vous
pouvez sélectionner de dimanche (SUN) à samedi (SAT). De
nouvelles fiches de présence doivent être utilisées pour chaque
période de paie (chaque semaine). Cette fonction permet l’utilisation
de deux pointages arrivée/départ par jour en moyenne, ou de 28
pointages au total par période.
2. RESET = BI-MONTHLY – SELECTIONNEZ cette option pour des
paiements bimensuels (deux fois par mois). Utilisez les touches UP et
DOWN pour sélectionner l’un des jours de référence suivants.
1. 15th & LAST – 15e et dernier jour du mois.
2. RST=14th & LAST-1 – 14e et 1 jour avant le dernier jour du mois.
3. RST=13th & LAST-2 – 13e et 2 jours avant le dernier jour du mois.
Page 37

4. RST=12th & LAST-3 – 12e et 3 jours avant le dernier jour du mois.
5. RST=11th & LAST-4 – 11e et 4 jours avant le dernier jour du mois.
6. RST=10th & LAST-5 – 10e et 5 jours avant le dernier jour du mois.
7. RST=16th & 1st – 16e et 1er jour du mois.
Des nouvelles fiches de présence doivent être utilisées pour chaque
période de paie. Cette fonction permet d’utiliser deux pointages
arrivée/départ par jour en moyenne ou 64 pointages au total par période
(2 par ligne).
3. RESET=2 WEEKS – SELECTIONNEZ cette option dans le cas d’une
paie tous les quinze jours. Utilisez les touches UP et DOWN pour
sélectionner la dernière date de votre période de paie de 2 semaines,
qui sera le jour de référence. C’est le jour à partir duquel le modèle
4000/4000HD règle à nouveau toutes les informations de paie en
mémoire. L’horloge aussi se règle également toutes les deux
semaines, à partir de la date choisie. Des nouvelles fiches de
présence doivent être utilisées pour chaque période de paie. Cette
fonction permet l’utilisation de deux pointages arrivée/départ par jour,
en moyenne, ou de 64 pointages au total, par période (2 par ligne).
4.RESET=MONTHLY – Sélectionnez cette option pour un paiement
mensuel. Utilisez les touches UP et DOWN pour sélectionner le dernier
jour de votre période de paie qui est connu comme étant le jour de
référence :
1. RESET DAY=LAST – dernier jour du mois
2. RESET DAY=LAST-1 – 1 jour avant le dernier jour du mois
3. RESET DAY=LAST-2 – 2 jours avant le dernier jour du mois
4. RESET DAY=LAST-3 – 3 jours avant le dernier jour du mois
5. RESET DAY=LAST-4 – 4 jours avant le dernier jour du mois
6. RESET DAY=LAST-5 – 5 jours avant le dernier jour du mois
7. RESET DAY=1st – 1er jour du mois.
Des nouvelles fiches de présence doivent être utilisées pour chaque
période de paie. Cette fonction permet un pointage par jour en moyenne
ou 64 pointages au total par période (2 par ligne).
RESET HOUR = 10 PM – Cette fonction permet de régler, à l’aide des
touches UP et DOWN, l’heure de référence pour la ou les journées
concernées. Le paramètre par défaut est 10PM.
Remarque : dans certains cas, lorsque les employés font les 3 x 8, il est
possible qu’un individu pointe à son arrivée avant la fin du travail de
Page 38

l’équipe précédente, et pointe à son départ seulement à la fin du travail de
son équipe. Cela n’est pas un problème puisque le modèle 4000/4000HD
n’enregistre pas cette fiche tant que l’individu ne pointe pas à son départ.
Cependant aucune autre personne ne doit utiliser ce même numéro de
fiche (en haut à droite sur la fiche) tant que le premier employé n’a pas
pointé à son départ.
MAX HRS/PUNCH = 13 – Le but de cette fonction est de se protéger
contre les individus qui oublieraient de pointer à leur départ. Cette
fonction règle le nombre d’heures permises entre les pointages. Par
exemple, si « 13 heures » est sélectionné à l’aide des touches UP et
DOWN, et qu’un individu pointe
à son arrivée et oublie de pointer à son départ, le modèle 4000/4000HD
imprime sur la ligne suivante un pointage d’arrivée si plus de 13 heures
se sont écoulées. La fiche de présence fait apparaître le pointage
d’arrivée suivi d’un espace où le pointage de départ devrait se trouver,
suivi ensuite du pointage d’arrivée correct. Les heures peuvent être
réglées de 10 à 99. Le paramétrage par défaut est de 13 heures.
ROUNDING = NONE – Cette fonction est connue comme celle du temps
arrondi, horaire variable ou période de grâce, et détermine seulement la
façon dont le modèle 4000/4000HD calcule les totaux de pointages
d’arrivée et de départ, ainsi que les totaux en cours, mais ne change en
rien l’heure imprimée par les pointages d’arrivée et de départ. Beaucoup
d’entreprises concèdent une période de grâce aux employés à leur départ
ou à leur arrivée, afin de tenir compte des variations horaires dues aux
différences entre les horloges, les montres et les pointeuses au sein
d’une même compagnie, ou bien pour calculer le temps payable de façon
plus simple en « arrondissant » les heures enregistrées par l’horloge.
Utilisez les touches UP et DOWN pour sélectionner l’une des quatre
options énumérées ci-dessous :
1. NONE – Annule l’arrondissement. Avec cette option, le modèle
4000/4000HD calcule les totaux des pointages d’arrivée et de départ
et les totaux en cours, à l’aide des heures réelles d’arrivée et de
départ.
2. 15 MIN – Cette option est connue comme la « règle des 15 minutes »
ou la « règle 7/8 », et c’est celle qui est le plus souvent utilisée. Avec
cette option, les totaux des pointages d’arrivée et de départ et les
totaux en cours sont arrondis au quart d’heure le plus proche, c’est
pourquoi jusqu’à 7 minutes avant le quart d’heure le plus proche,
Page 39

l’heure utilisée pour calculer les totaux de paiement avance jusqu’au
quart d’heure le plus proche.
Jusqu’à 8 minutes après chaque quart d’heure, le temps utilisé pour
calculer les totaux de paiement reviendra au quart d’heure le plus proche.
Par exemple, si une personne pointe à son arrivée à 7 h 52, le modèle
4000/4000HD calculera les totaux horaires en commençant à 7 h 45.
Cependant, si l’individu suivant pointe à son arrivée à 7 h 53, le modèle
4000/4000HD calcule les totaux horaires en commençant à 8 h 00. Vice
versa, si un individu pointe à son arrivée à 8 h 07, les totaux horaires sont
calculés en fonction d’une heure initiale de 8 h 00. Si l’individu suivant
pointe à son arrivée à 8 h 08, alors les totaux sont calculés en prenant en
compte l’heure initiale de 8 h 15.
3. 10 MIN – Il s’agit de la « règle des 10 minutes ». Avec cette option, les
totaux des pointages d’arrivée et de départ et les totaux en cours sont
arrondis aux 10 minutes les plus proches et s’arrondissent à la valeur
supérieure jusqu’à 5 minutes avant la période de 10 minutes, et à la
valeur inférieure jusqu’à 5 minutes après chaque période de 10
minutes.
4. 5 Min –Il s’agit de la « règle des 5 minutes ». Avec cette option, les
totaux des pointages d’arrivée et de départ et les totaux en cours sont
arrondis aux 5 minutes les plus proches et s’arrondissent à la valeur
supérieure jusqu’à 2 minutes avant une période de 5 minutes et à la
valeur inférieure jusqu’à 3 minutes après chaque période de 5 minutes
Appuyez sur SELECT pour revenir au menu principal.
VOUS AVEZ BESOIN D’AIDE ? Pour tout type de question, veuillez
appeler le Service Technique de Pyramid au numéro sans frais:1-888479-7264.
FICHES DE PRESENCE
Le modèle 4000/4000HD fonctionne avec des fiches de présence (article
n° 44100-10) pré-numérotées de 1 à 100. Comme nous l’avons signalé
auparavant, vous ne pouvez pas utiliser deux fiches ayant le même
numéro pendant une même période de paie. Ne recouvrez pas les
rectangles noirs situés sur le côté gauche des fiches. La même fiche de
présence est utilisée pour des périodes de paie hebdomadaires, tous les
quinze jours, bimensuelles et mensuelles .cependant, le format
d’impression diffère selon le type de période de paie .
Page 40

HEBDOMADAIRE – De cette façon, la fiche horaire accepte jusqu’à 28
pointages par période, ce qui correspond à 7 jours et à quatre pointages
par jour. Cependant, il n’est pas nécessaire d’utiliser la totalité des 28
pointages par période ou les 4 pointages par jour. La seule limite est de
28 pointages par période.
Le format d’impression est le suivant :
Clock in – Mois, Jour, Heure d’arrivée, Jour de la semaine
Clock out – Mois, Jour, Heure, Total horaire de pointage d’arrivée/de
départ, total horaire en cours
TOUS LES QUINZE JOURS-BIMENSUEL-MENSUEL – Si vous
choisissez ces options, la fiche accepte jusqu’à 64 pointages par période
(2 par ligne, avec un total de 32 lignes maximum). Le format d’impression
est le suivant (pointage d’arrivée et de départ tous les deux sur la même
ligne) .
Clock in – Jour de la semaine, Heure d’arrivée
Clock out – Heure de départ, Total horaire de pointage d’arrivée/de
départ, total horaire en cours.
CHANGEMENT DE LA CARTOUCHE D’IMPRESSION.
1 Retirez le couvercle de l’unité à l’aide de la clé fournie.
2 Localisez la cartouche d’impression qui est fixée dans le support
à cartouche (ce support fait partie de l’horloge),
3 Poussez la languette de maintien située sur le côté du support et
retirez la vieille cartouche d’impression.
4 Poussez à fond la nouvelle cartouche d’impression et faites
avancer le ruban à l’aide du bouton de rembobinage situé sur la
cartouche d’impression. Assurez-vous que le ruban et le
plastique protecteur transparent glissent sans difficulté sur la tête
imprimante.
5 Remettez le couvercle à sa place et verrouillez-le. Vérifiez que
l’unité est correctement installée en faisant passer une fiche de
présence dans l’unité.
Page 41
Bouton de
rembobinage du
Levier
ruban
Remarque : Si le ruban ne couvre pas complètement la tête imprimante,
l’impression est incomplète. Si la cartouche n’est pas complètement
enclenchée, l’impression est de plus en plus pâle.
CONSEILS DE DEPANNAGE
Le modèle 4000/4000HD est programmé avec un certain nombre de
codes d’erreur pour aider au dépannage de l’unité en cas de problème.
Le code d’erreur apparaît généralement sur l’écran pendant plusieurs
secondes. Les codes d’erreur sont les suivants :
CARD FEEDS WITH NO PRINT OR ERROR MESSAGE –
1. Vérifiez que la cartouche d’impression est bien poussée à fond et que
le ruban est bien au-dessus de la tête imprimante.2. Assurez-vous que
les barres noires sur le côté gauche de la fiche de présence ne sont pas
recouvertes ou abîmées.
ERROR 1 – La fiche de présence a été poussée. Si un individu essaie de
faire rentrer de force une fiche dans l’unité, alors le modèle 4000/4000HD
accepte la fiche mais n’imprime pas et ne garde pas en mémoire les
informations de paie. Dans ce cas-là, le code ERROR 1 apparaît à l’écran
et la fiche n’est pas pointée. Solution : repassez la fiche dans la pointeuse
sans forcer.
ERROR 2,5,6 – Bourrage. Si un individu essaie d’enfoncer une fiche de
présence de côté ou si la fiche est très abîmée, cette dernière peut
bloquer le mécanisme de transfert de façon temporaire et ne garder en
mémoire aucune information de paie. Dans ce cas-là, le code ERROR 2
,5 ou 6 apparaît à l’écran et la fiche n’est pas pointée. Solution : vérifiez
Page 42

l’état de la fiche, remettez-la bien droite si nécessaire et repassez-la dans
la pointeuse.
ERROR 3 – L’unité ne lit pas les codes à barres sur la fiche. Dans ce caslà, le code ERROR 3 apparaît à l’écran. Solution : vérifiez l’état de la
fiche, remettez-la bien droite si nécessaire et repassez-la dans la
pointeuse.
ERROR 7– Indique l'erreur de position de tête d’impression Cette erreur
se produit si la tête d'impression n'est pas bien positionnée. Dans ce caslà, le code ERROR 7 apparaît à l’écran et la fiche n’est pas pointée.
Solution : repassez la fiche dans la pointeuse.
ERROR 14,15,50,51,52– Erreur électronique interne. Contactez alors le
service technique de Pyramid.
MASTER RESET – Cette procédure efface toute la mémoire de la
pointeuse et paramètre le programme selon les valeurs réglées à l’usine.
Cette procédure ne doit être utilisée qu’en cas de fonctionnement très
anormal de l’horloge. Procédez à ce réglage intégral en débranchant
l’unité, puis en la rebranchant tout en appuyant sur le bouton de
programmation central (le bouton UP). Appuyez sur ce bouton jusqu’à ce
que le menu principal apparaisse sur l’écran. L’heure, la configuration de
l’appareil et les informations de paie seront tous paramétrés selon les
valeurs réglées à l’usine.
FOIRE AUX QUESTIONS
Q : Quand dois-je utiliser de nouvelles fiches?
R : De nouvelles fiches sont nécessaires le premier jour de chaque
nouvelle période de paie ou immédiatement après avoir effectué un
changement dans la fonction « SETUP PAY ».
Q : Dois-je utiliser des fiches de présence numérotées de façon
consécutive pendant une période de paie ?
Page 43

R : Non, mais nous vous recommandons fortement de distribuer vos
fiches dans l’ordre, de façon à éviter l’utilisation d’un même numéro ou
d’un duplicata pendant une période de paie donnée.
Q : Pourquoi certains pointages sont-ils au-dessus d’autres pointages, ou
existe-t-il de grands espaces entre les pointages ?
R : De nombreuses raisons peuvent causer ce problème et elles sont
listées ci-dessous dans l’ordre de leur probabilité d’apparition. Dans
chaque cas, un réglage intégral doit avoir lieu pour corriger ce problème.
Voir MASTER RESET dans ce mode d’emploi.
1. Un même numéro ou un duplicata de fiche de présence est utilisé dans
une même période de paie.
2. La fonction « SETUP PAY » est changée pendant une période de paie
sans l’utilisation de nouvelles fiches.
3. Un employé a oublié de pointer à son arrivée ou à son départ, et le
temps entre les pointages a dépassé le nombre d’heures paramétré avec
la fonction « MAX HRS/PUNCH ». Un réglage intégral n’est pas requis,
mais les heures totalisées doivent être manuellement ajustées à la fin de
la période de paie.
4. Si vous êtes dans le cas des 3 x 8, avec une opération 24 heures sur
24 et plus de 50 employés, veuillez appeler le service d’assistance au
client de Pyramid.
Q : La pointeuse 4000/4000HD calcule-t-elle les heures
supplémentaires ?
R : La pointeuse 4000/4000HD vous donne un total en cours pour toutes
les heures de travail. Parce que les règlements relatifs aux heures
supplémentaires varient d’une compagnie à l’autre, les heures
supplémentaires doivent être calculées à la main.
Q : La pointeuse 4000/4000HD est-elle dotée d’une fonction automatique
déduisant le temps du déjeuner ?
R : La pointeuse 4000/4000HD fournit un total en cours d’heures
écoulées entre les pointages. Par conséquent, toute déduction de paie
doit être calculée à la main à la fin de la période de paie.
Q : Que signifie ATAAP ?
R : ATAAP est l’abréviation utilisée par le gouvernement américain pour
définir le système décimal du calcul du temps utilisant les centièmes
d’heure (par ex : une heure et quart correspond à 1,25 heure).
Page 44

PIECES DE REMPLACEMENT ET ACCESSOIRES OPTIONNELS.
Les pièces de remplacement et les accessoires optionnels pour la
Pyramid 4000/4000HD sont disponibles dans la majorité des magasins de
pièces de remplacement, ou bien en appelant le numéro de téléphone
sans frais de Pyramid au 1-888-479-7264.
Article n Quantité Description
4000-R 1 Cartouche d’impression
44100-10 100 Paquet de fiches de présence
44100-10M 1000 10 paquets de 100 fiches de présence
400-3 1 Petit classeur pouvant contenir 25 fiches de
présence
Page 45

GARANTIE LIMITEE
Le fabricant offre à l’utilisateur original de ce produit une garantie de un an
depuis la date d’achat, contre un matériel défectueux ou des défauts de
fabrication. La responsabilité du fabricant, compte tenu de cette garantie, est
limitée à la réparation ou à la substitution de la pièce ou des pièces
défectueuses.
Le fabricant se réserve le droit de décider si les pièces ne fonctionnent pas
parce que le matériel est en soi défectueux, ou à cause d’un défaut de
fabrication, ou pour d’autres raisons. Les pannes causées par un accident,
une altération, un usage incorrect ou l’emballage inadéquat d’une unité
renvoyée, sont radicalement exclues de cette garantie. Toutes les
réparations couvertes par cette garantie doivent être réalisées par Pyramid
Technologies, LLC. N’importe quelle autre réparation de ce produit qui n’est
pas effectuée par PTI annule automatiquement cette garantie. Les
utilisateurs dans d’autres pays que les Etats-Unis doivent contacter le
vendeur chez qui ils ont acquis ce produit. Les droits couverts par cette
garantie sont limités à l’utilisateur d’origine et ne sont pas transférables aux
propriétaires ultérieurs.
Pyramid Technologies, LLC
48 Elm St.Meriden, CT 06450
(888)-479-7264 : téléphone sans frais
(203)-238-0550 : téléphone
(203)-634-1696 : fax
E.mail : CustomerService@pti.cc
WebSite : WWW.PyramidTechnologies.com
Page 46

Fiche signalétique
Conditions d’utilisation
Température 0 °C à 50 °C, (3 °F à 122 °F)
Humidité 10 à 95 % HR, pas de condensation
Coupure de courant
Batterie de secours des données et des heures pendant 30 jours
Durée de vie de la batterie >10 ans
Calendrier
Prise en compte automatique des années bissextiles et des changements
d’horaires, années allant jusqu’en 2099
Précision de l’horloge
Variation de moins de 30 secondes par an
Capacité de la mémoire
100 employés
Certifications
UL et CUL
Poids
4000 - 2.7 kg (5.9 livres)
4000HD - 3.7 kg (8.15 livres)
Dimensions
4000 - 7.25 po Hauteur x 7.12 po Largeu x 6.65 po Profondeur
4000 - 184.15mm Hauteur x 180.84mm Largeur x 168.91mm Profondeur
4000HD - 7.75 po Hauteur x 8.25 po Largeu x 7.25 po Profondeur
4000HD - 196.85mm Hauteur x 209.55mm Largeur x
184.15mm Profondeur
Montage
Bureau ou sur le mur
Page 47

4000/4000HD
Elektronische Stempeluhr
Bedienungsanleitung
WICHTIG!
LESEN SIE BITTE DIESE ANLEITUNG VOR DER INBETRIEBNAHME
UND VERWENDUNG DIESES GERÄTS
Es wird empfohlen, diese Anleitung aufzubewahren
Die Stempeluhr 4000/4000HD speichert und summiert wöchentlich, alle
zwei Wochen (dafür ist eine Zeitkarte pro Woche und pro Person
erforderlich), halbmonatlich oder monatlich die Anwesenheitszeit von bis
zu 100 Mitarbeitern. 4000/4000HD verwendet barcodierte Stempelkarten
(Best. Nr. 44100-10), die von 1 bis 100 vornummeriert sind. Für jede
Lohn- bzw. Gehaltsperiode wird dem Mitarbeiter eine vornummerierte
Stempelkarte (die Nummer befindet sich in der rechten oberen Ecke der
Karte) zugeordnet. Nach jeder Periode müssen neue Karten ausgegeben
werden.
Hinweis: Es dürfen nicht zwei Stempelkarten mit der gleichen Nummer in
derselben Lohn- bzw. Gehaltsperiode verwendet werden. Verwenden Sie
nur Karten der Ausgabe REV.D oder höher (die Bezeichnung befindet
sich am unteren Kartenrand). Bewahren Sie Ihre Stempelkarte an einem
trockenen Ort auf. Achten Sie darauf, dass die Karten nicht verbogen
oder verschmutzt sind. Stempelkarten, die am linken Rand verschmutzt
oder verbogen sind, können Lese- oder Identifikationsfehler verursachen.
Wenden Sie sich an Ihren Hersteller, falls Sie noch Karten einer früheren
Ausgabe besitzen.
Jedes 4000/4000HD ist mit einem internen Akku versehen, das die
gespeicherten Lohndaten bis zu einem Monat sichert.
INBETRIEBNAHME
SCHRITT 1 - AUSPACKEN
1. Nehmen Sie das 4000/4000HD aus der Verpackung und stellen Sie
es auf eine feste Unterlage.
Page 48

2. Stecken Sie das Gerät ans Netz.
3. Stecken Sie den mitgelieferten Schlüssel in das Schloss, das sich auf
der Abdeckung befindet, und entfernen Sie die Abdeckung. Beachten Sie
die Programmiertasten mit der Bezeichnung SELECT, UP und DOWN.
SCHRITT 2 - DAS PROGRAMMIEREN DES 4000/4000HD
Das 4000/4000HD lässt sich problemlos in drei einfachen Schritten
programmieren und Ihren speziellen Bedürfnissen anpassen.
1. Um eine Einstellung zu ändern bzw. einzugeben, drücken Sie die
SELECT-Taste, bis die gewünschte Einstellung angezeigt wird.
2. Verwenden Sie die UP oder DOWN-Taste, um die Einstellung zu
ändern.
3. Sobald die gewünschte Änderung vorgenommen wurde, drücken Sie
die SELECT-Taste, um weitere Einstellungen zu ändern oder zur
Ausgangsanzeige zurückzukehren.
Hinweis: Die Eingabe YES bei SET-UP PAY löscht alle gespeicherten
Buchungen. Danach müssen neue Stempelkarten ausgegeben werden.
SCHRITT 3 - STEMPELN
Setzen Sie die Abdeckhaube auf das Gerät und schließen Sie ab. Das
4000/4000HD ist nun einsatzbereit.
EINSTELLUNGSTABELLE
SPRACHE EINSTELLEN - Verwenden Sie die UP- oder DOWN-Taste,
um eine der folgenden Sprachen für den Ausdruck einzustellen: Englisch,
Spanisch, Französisch oder Deutsch.
JAHR EINSTELLEN - Bei SET YEAR verwenden Sie die UP- oder
DOWN-Taste, um das gewünschte Jahr einzustellen (das gegenwärtige
Jahr ist voreingestellt).
MONAT EINSTELLEN - Bei SET MONTH verwenden Sie die UP- oder
DOWN-Taste, um den gewünschten Monat einzustellen (der
gegenwärtige Monat ist voreingestellt).
TAG EINSTELLEN - Bei SET DAY verwenden Sie die UP- oder DOWN-
Taste, um den gewünschten Kalendertag einzustellen (der gegenwärtige
Tag ist voreingestellt)
SOMMER- bzw. WINTERZEIT - Mit der Einstellung DAYLIGHT
SAV=USA können Sie eine automatische Sommer- bzw. Winterzeit-
Page 49

Umstellung programmieren. Dazu stehen Ihnen 4 Optionen zur
Verfügung, die Sie mit der UP- oder DOWN-Taste auswählen können:
1. USA – Automatische Anpassung an die USA-Regeln.
2. EURO – Automatische Anpassung an die europäischen Regeln,
jeweils am letzten Sonntag im März (1 Stunde vorwärts) bzw. Oktober
(1 Stunde rückwärts).
3.OTHER – Mit dieser Einstellung können Sie einen beliebigen
Sonntag für den Anfang und das Ende der Sommer- bzw. Winterzeit
programmieren. Verwenden Sie dazu die UP- oder DOWN-Taste, um
den Sonntag auszuwählen, an dem die Zeit umgestellt werden soll
und wiederholen Sie den Vorgang für den Sonntag, an dem die
Rückstellung erfolgen soll (es sind nur Sonntage zulässig). Hinweis:
In beiden Fällen ändert sich die Zeit automatisch um 2 Uhr früh.
Drücken Sie jetzt SELECT, um die Option TIME STD=LINE
anzuzeigen. Drücken Sie SELECT erneut, um zur nächsten Option
zu gelangen. (Hinweis: Die Option TIME STD=LINE sollte nur in
jenen Regionen angewendet werden, in denen es zu häufigen
Stromschwankungen kommt bzw. wo die Uhr von einem Generator
betrieben wird und das Gerät dadurch langsamer oder schneller als
gewünscht läuft. In diesem Falle ändern Sie die Einstellung TIME
STD mit der UP- oder DOWN-Taste zu CRYSTAL, womit das Gerät
zum internen Zeitgeber wechselt.)
4.Falls sie keine Zeitumstellung wünschen, wählen Sie mit der UP-
oder DOWN-Taste OFF aus.
ZEITFORMAT - Mit der Einstellung DSPLY FMT=AM/PML können Sie
bestimmen, in welchem Format die Zeit auf dem Gerät angezeigt wird. Es
stehen folgende Optionen zur Verfügung:
1. AM/PM - 12-Stundenformat.
2. MIL - 24-Stundenformat.
DRUCKFORMAT – Die Einstellung PRINT FMT=AM/PM gibt an, in
welchem Format die Zeit auf der Stempelkarte gedruckt wird. Folgende
Einstellungen sind mithilfe der UP- oder DOWN-Tasten möglich:
1. AM/PM – 12-Stundenformat (Voreinstellung)
2. MIL - 24-Stundenformat (z. B. 15:30 statt 3:30)
3. ATAAP – 24-Stundenformat. Ausdruck in 1/100 Stunden statt in
Minuten (z. B. 15.50 statt 15:30)
STUNDE EINSTELLEN - Die Stunde wird bei SET HOUR mit der UPoder DOWN-Taste eingestellt.
Page 50
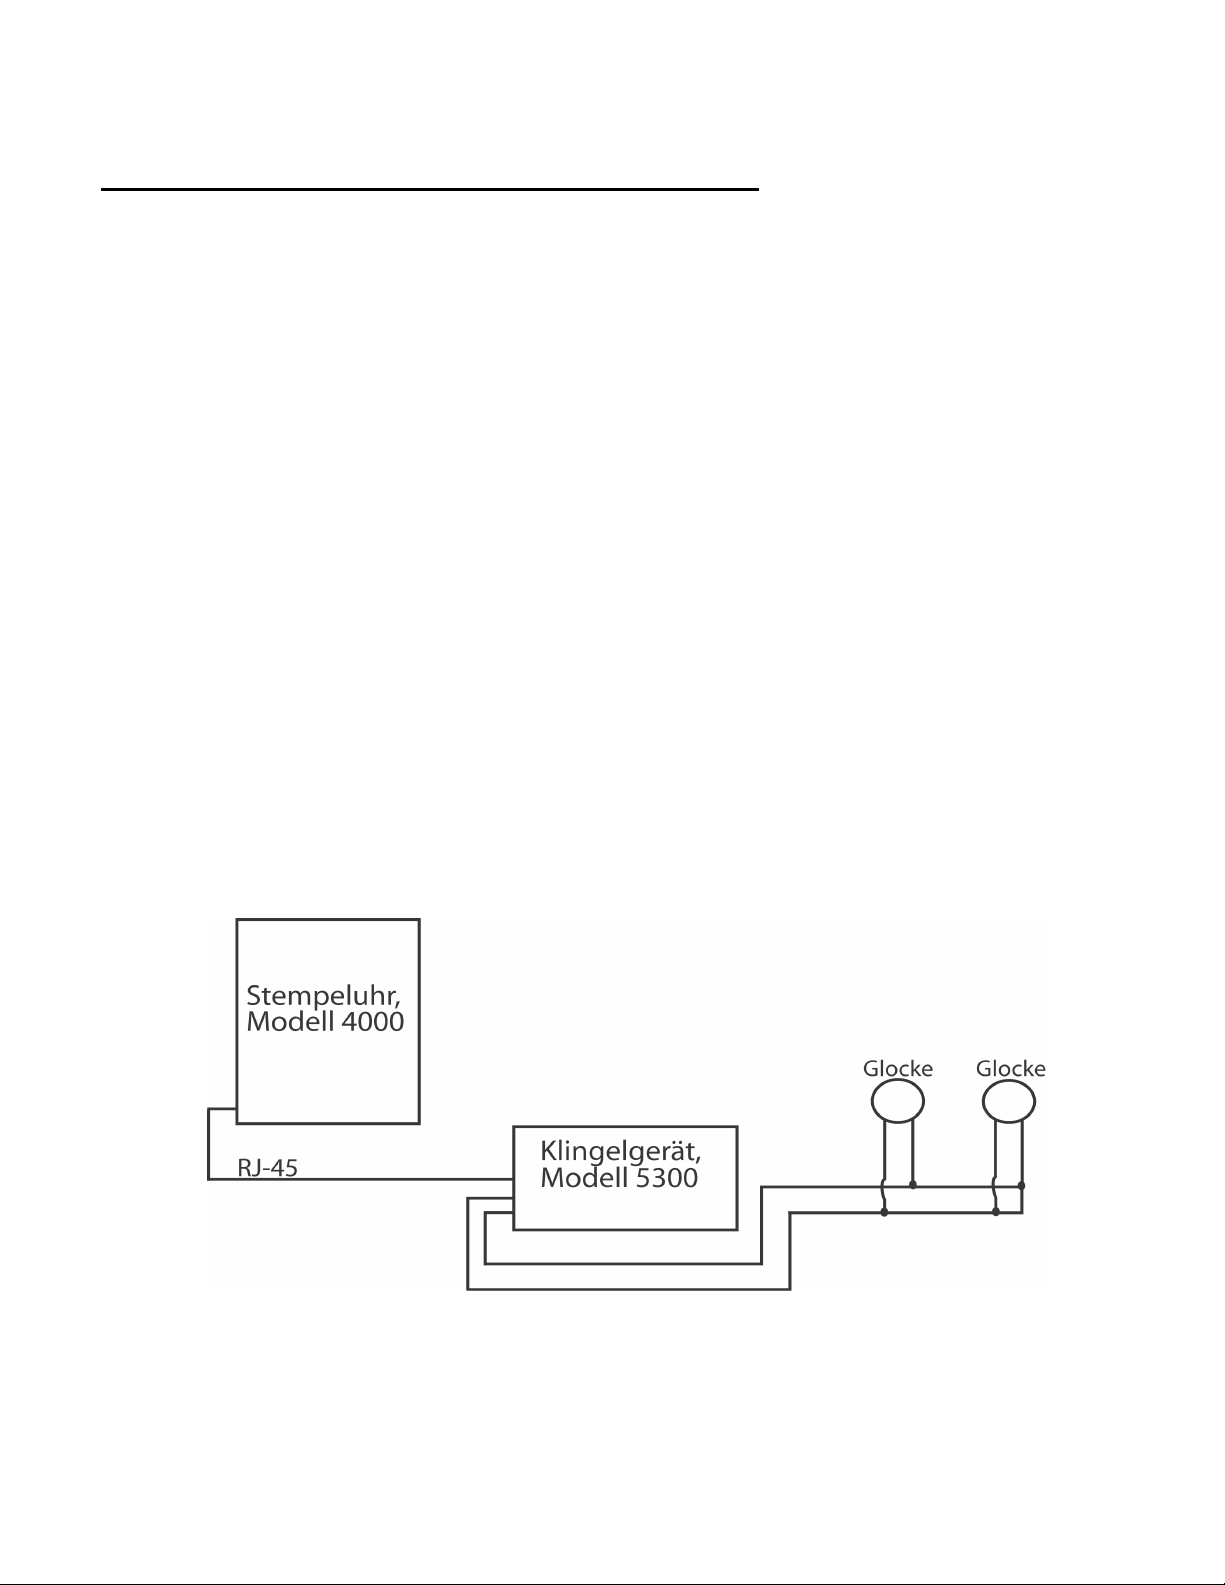
MINUTE EINSTELLEN - Die Minuten werden bei SET MINUTES mit der
UP- oder DOWN-Taste eingestellt.
EINRICHTEN DES AKUSTISCHEN SIGNALS
Das interne akustische Signal ist für stille Bereiche bestimmt. Um die
Lautstärke des internen akustischen Signals zu regulieren, öffnen Sie die
Abdeckhaube und drehen den Lautstärkeregler auf der linken Seite der
Leiterplatte im Uhrzeigersinn, um den Ton lauter zu stellen, bzw. gegen
den Uhrzeigersinn, um die Lautstärke zu verringern.
Wenn Sie externe akustische Signale hinzufügen möchten, können Sie
ein Klingelgerät, Modell 5300, kaufen. Das Klingelgerät kann bis zu 15
Glocken- und Klingelsignale mit 50 Ereignissen erzeugen. Weitere
Informationen finden Sie in der Zubehör-Tabelle am Schluss dieser
Anleitung. Um das Klingelgerät 5300 mit der Stempeluhr 4000/4000HD
zu verbinden, stecken Sie das RJ-45-Kabel in die Buchse auf der linken
Seite der Stempeluhr. Stecken Sie das andere Ende des Kabels in das
Modell 5300. Der mitgelieferte Transformator muss an die mit POWER
beschriftete Buchse angeschlossen werden. Verdrahten Sie die Glocken
bzw. Klingeln mit den beschrifteten Terminals auf dem Modell 5300. Die
Glocken bzw. Klingeln müssen parallel und nicht in Reihe (siehe
Abbildung) verdrahtet werden:
EREIGNISNUMMER EINSTELLEN
Verwenden Sie bei SET EVENT # NO die UP- und DOWN-Taste, bis
die gewünschte Ereignisnummer angezeigt wird, die Sie einstellen,
bearbeiten oder ausschalten möchten. Ein Ereignis ist ein
akustisches Signal (Glocken- bzw. Klingelton) pro Tag (MO bis FR
Page 51

oder 7 Tage in der Woche) zu einer festgesetzten Zeit für eine
festgesetzte Dauer. Drücken Sie die SELECT-Taste, um das
Ereignis auszuwählen, das Sie programmieren oder ändern
möchten. Falls Sie die Einrichtung des akustischen Signals
übergehen wollen, scrollen Sie zu SET EVENT # NO und drücken
SELECT.
EREIGNIS 1 = AUS – Drücken Sie bei EVENT 1 = OFF die UP- und
DOWN-Taste, um die Dauer auszuwählen, während derer das Signal
ertönt (.5 - 15 Sekunden) oder wählen Sie OFF, um das Ereignis zu
deaktivieren.
EREIGNIS 1 STD. = 12 AM (12-Stunden-Format) – Verwenden Sie bei
EVENT 1 HR = 12AM die UP- und DOWN-Taste, um die Stunde
auszuwählen, zu der das Signal ertönt.
EREIGNIS 1 MIN = 00 – Verwenden Sie bei EVENT 1 MIN = 00 die UPund DOWN-Taste, um die Minute auszuwählen, zu der das Signal ertönt.
EREIGNIS 1 TAG = GESAMT – Verwenden Sie bei EVENT 1 DAY = ALL
die UP oder DOWN-Taste, um die Tage auszuwählen, an denen das
Ereignis aktiviert ist.
Drücken Sie SELECT, um zu SET EVENT # NO zurückzukehren und
drücken Sie die UP- oder DOWN-Taste, um ein weiteres Ereignis
hinzuzufügen. Drücken Sie SELECT, um mit der Einrichtung fortzufahren.
Hinweis: Das 4000/4000HD wird durch eine eingebaute Uhr gesteuert.
Eine Änderung der oben genannten Einstellungen beeinflusst die
Gesamtzeit nicht, auch wenn Mitarbeiter während der Änderung
anwesend bzw. eingestempelt sind. Hingegen löscht eine Änderung der
folgenden Einstellungen alle gespeicherten Buchungen sowie deren
Summen. Anschließend müssen neue Stempelkarten ausgegeben
werden.
LOHNPERIODE Mit SETUP PAY? können Sie andere Einstellungen
vornehmen, die bestimmen, wie 4000/4000HD die Summen berechnet.
Wenn Sie SETUP PAY? und YES wählen, lassen sich mithilfe der UP-
und DOWN-Tasten die folgenden Einstellungen ändern. Mit der Eingabe
Page 52

NO kehrt die Anzeige zur Ausgangsstellung zurück und die unten
angegebenen Voreinstellungen werden übernommen.
BESTÄTIGUNG Als Vorsichtsmaßnahme wird die Frage ARE YOU
SURE? NO gestellt. Wird sie durch die UP- bzw. DOWN-Taste mit YES
bejaht, lassen sich die folgenden Einstellungen ändern, vorher
gespeicherte Daten werden jedoch gelöscht. Wird die Frage mit NO
beantwortet, kehrt die Anzeige zur Ausgangsstellung zurück.
SUMMENFORMAT Mit der Einstellung TOTAL FMT – HR:MIN wird
bestimmt, wie die einzelnen und kumulativen Summen auf der
Stempelkarte angezeigt werden. Mithilfe der UP- und DOWN-Tasten
können Sie folgende Optionen auswählen:
1. HR:MIN – Standardmäßiges Stunden- und Minutenformat
(Voreinstellung). 8 Stunden und 30 Minuten werden als 8:30
angezeigt
2. HR.HUN - Standardmäßiges Stundenformat, die Minuten
werden jedoch als 1/100 Stunden angegeben (8 Stunden und
30 Minuten werden als 8.50 angezeigt)
RESET=WEEKLY - Wählen Sie mit der UP- oder DOWN-Taste eine der
folgenden Lohnperioden aus. Wenn Sie bei der betreffenden
Lohnperiode angelangt sind, drücken Sie die SELECT-Taste.
1.WÖCHENTLICH – Wählen Sie RESET=WEEKLY für die
wöchentliche Lohnperiode. Nach Auswahl der Option zeigt die Uhr
RESET DAY=SUN an. Mithilfe der UP- bzw. DOWN-Taste können Sie
den letzten Tag der Lohnperiode auswählen, der als Rücksetzungstag
bezeichnet wird. An diesem Tag setzt 4000/4000HD alle
gespeicherten Lohndaten zurück. Danach müssen neue
Stempelkarten ausgegeben werden. Mithilfe der UP- oder DOWN-
Tasten können Sie nun Sonntag (SUN) bis Samstag (SAT) auswählen.
Nach jeder Rücksetzungsperiode (wöchentlich) müssen neue
Stempelkarten ausgegeben werden. Mit dieser Einstellung sind je 2
Ein-/Ausstempelungen pro Tag oder insgesamt 28 Stempelungen pro
Lohnperiode möglich.
2.HALBMONATLICH – Wählen Sie RESET=BI-MONTHLY für
halbmonatliche Lohnperioden (zweimal pro Monat) aus. Wählen Sie
Page 53

mithilfe der UP- oder DOWN-Taste einen der folgenden
Rücksetzungstage aus.
1. 15 & LAST – 15 und letzter tag des Monats
2. RST=14 & LAST-1 – 14.Tag und 1 Tag vor Monatsende
3. RST=13 & LAST-2 –13. Tag und2 Tage vor Monatsende
4. RST=12 & LAST-3 –12. Tag und 3 Tage vor monatsende
5. RST=11 & LAST-4 –11. Tag und 4 Tage vor monatsende
6. RST=10 & LAST-5 – 10 Tag und 5 Tage vor monatsende
7. RST=16 & 1ST—16. und erster Tag des Monats
Nach jeder Rücksetzungsperiode müssen neue Stempelkarten
ausgegeben werden. Bei dieser Einstellung sind je 2 Ein/Ausstempelungen pro Tag möglich bzw. insgesamt 64 Stempelungen pro
Lohnperiode (2 pro Zeile).
3 ZWEI WOCHEN – Mit der Einstellung RESET=2 WEEKS wechselt
die Lohnperiode alle 2 Wochen. Mithilfe der UP- bzw. DOWN-Taste
können Sie den letzten Tag der Zweiwochen-Lohnperiode auswählen, der
als Rücksetzungstag bezeichnet wird. An diesem Tag setzt 4000/4000HD
alle gespeicherten Lohndaten zurück. Die Uhr wird alle zwei Wochen vom
ausgewählten Datum an automatisch zurückgesetzt.
Danach müssen neue Stempelkarten ausgegeben werden. Bei dieser
Einstellung sind durchschnittlich 2 Ein-/Ausstempelungen pro Tag möglich
bzw. insgesamt 64 Stempelungen pro Lohnperiode (2 pro Zeile).
4 MONATLICH - Wählen Sie die Einstellung RESET=MONTHLY für
monatliche Lohnperioden. Mithilfe der UP- bzw. DOWN-Taste wählen Sie
den letzten Tag der Lohnperiode als Rücksetzungstag aus:
1. RESET DAY=LAST – Letzter Tag des Monats
2. RESET DAY=LAST-1 – 1 Tag vor Monatsende
3. RESET DAY=LAST-2 – 2 Tage vor Monatsende
4. RESET DAY=LAST-3 – 3 Tage vor Monatsende
5. RESET DAY=LAST-4 – 4 Tage vor Monatsende
6. RESET DAY=LAST-5 – 5 Tage vor Monatsende
7. RESET DAY=1st – Erster Tag des Monats
Nach jeder Rücksetzungsperiode müssen neue Stempelkarten
ausgegeben werden. Mit dieser Einstellung ist je eine Ein-/Ausstempelung
pro Tag oder insgesamt 64 Stempelungen pro Lohnperiode (2 pro Zeile)
möglich.
Page 54

10PM – Mit der Option RESET HOUR = 10PM legen Sie die
Rücksetzungsstunde der oben angegebenen Tage fest. Verwenden Sie
dazu die UP- oder DOWN-Taste. Die Voreinstellung ist 10 PM (22 Uhr).
Hinweis: In gewissen Dreischichten-Betrieben kann es
vorkommen, dass sich ein Beschäftigter vor der
Rücksetzungsperiode einbucht, sich jedoch erst nach der
Rücksetzungsperiode wieder ausbucht. Das ist kein Problem. Das
4000/4000HD setzt die Stempelkarte erst zurück, wenn sich der
Beschäftigte ausbucht. Die Kartennummer (in der rechten oberen
Ecke der Karte) darf jedoch erst dann einem anderen Mitarbeiter
zugewiesen werden, wenn der Beschäftigte ausgestempelt hat.
MAX HRS/PUNCH = 13 – Es kommt immer wieder vor, dass
Beschäftigte das Ausstempeln vergessen. Diese Einstellung legt die
Anzahl zulässiger Stunden zwischen den Stempelungen fest. Wenn zum
Beispiel (mithilfe der UP- oder DOWN-Taste) 13 Stunden auswählt wurde
und ein Beschäftigter das Ausstempeln vergisst, gibt das 4000/4000HD
die nächste Zeile als eine „Einstempelung“ an, falls mehr als 13 Stunden
verstrichen sind. Die Stempelkarte zeigt eine Einstempelung gefolgt von
einem Leerzeichen anstelle der Ausstempelung und danach wieder die
korrekte Einstempelung. Es können Einstellungen von 10-99 Stunden
programmiert werden. Die Standardeinstellung beträgt 13 Stunden.
RUNDUNGSKARENZ – Die Einstellung ROUNDING = NONE, die auch
als Rundungszeit oder Karenzzeit bezeichnet wird, bestimmt nur, wie das
4000/4000HD die Ein- und Ausstempelungssummen sowie die
kumulativen Summen berechnet. Sie wirkt sich nicht auf die gedruckte
Zeit der Ein- bzw. Ausstempelung aus. Viele Unternehmen lassen eine
Karenzzeit für das Ein- bzw. Ausstempeln der Mitarbeiter zu. Dies
geschieht, um möglichen
Abweichungen der verschiedenen Uhren oder Zeitaufzeichnungen einer
Firma Rechnung zu tragen oder ganz einfach um die Berechnung der
bezahlten Zeit durch Auf- oder Abrunden der aufgezeichneten Zeit zu
vereinfachen. Wählen Sie mithilfe der UP- oder DOWN-Taste eine der
folgenden vier Optionen aus.
1. NONE – Es findet keine Rundung statt. Bei dieser Option verwendet
das 4000/4000HD für die Berechnung der Summen die tatsächlichen Einund Auszeiten der Stempeluhr.
2. 15 MIN – Diese Option ist die am meisten verwendete und wird auch
als „15-Minuten-Regel” oder „7/8-Regel“ bezeichnet. Bei dieser Option
Page 55

wird auf die nächste Viertelstunde auf- bzw. abgerundet. Eine
Stempelung bis zu 7 Minuten vor dem Viertelstundenabschnitt wird auf
den folgenden Viertelstundenabschnitt aufgerundet. Eine Stempelung bis
zu 8 Minuten nach der Viertelstunde wird auf die vorhergehende
Viertelstunde abgerundet. Beispiel: Wenn sich eine Person um 7:52 Uhr
einbucht, berechnet das 4000/4000HD die Summen von 7:45 Uhr an.
Wenn sich jedoch die nächste Person um 7:53 Uhr einbucht, beginnt die
Berechnung um 8:00 Uhr. Umgekehrt, wenn sich eine Person um 8:07
Uhr einbucht, beginnt die Berechnung um 8:00 Uhr. Falls die nächste
Person sich um 8:08 Uhr einbucht, werden die Summen von 8:15 Uhr an
berechnet.
3. 10 MIN – Dies ist die „10-Minuten-Regel”. Mit dieser Option werden
die Summen auf die nächsten 10 Minuten auf- bzw. abgerundet. Eine
Stempelung von 5 Minuten vor dem 10-Minuten-Abschnitt wird auf diesen
Abschnitt aufgerundet. Eine Stempelung bis zu 5 Minuten nach einem 10Minuten-Abschnitt wird auf den vorhergehenden 10-Minuten-Abschnitt
abgerundet.
4. 5 MIN – Dies ist die „5-Minuten-Regel”. Mit dieser Option werden die
Summen auf die nächsten 5 Minuten auf- bzw. abgerundet. Eine
Stempelung von 2 Minuten vor dem 5-Minuten-Abschnitt wird auf diesen
Abschnitt aufgerundet. Eine Stempelung bis zu 3 Minuten nach einem 5Minuten-Abschnitt wird auf den vorhergehenden 5-Minuten-Abschnitt
abgerundet.
Drücken Sie SELECT, um zur Ausgangsanzeige zurückzukehren.
WENN SIE HILFE BENÖTIGEN - Falls Sie Fragen zu diesen
Einstellungen haben, rufen Sie bitte Ihren Lieferanten an.
STEMPELKARTEN
Das 4000/4000HD verwendet Stempelkarten mit der Bestellungsnummer
44100-10, die von 1-100 vornummeriert sind. Wie schon erwähnt, können
während einer Lohn- bzw. Gehaltsperiode nicht zwei Karten mit derselben
Nummer benutzt werden. Die schwarzen Rechtecke an der linken Seite
der Karten dürfen nicht überdeckt werden. Es werden die gleichen
Stempelkarten für die verschiedenen Lohn- bzw. Gehaltsperioden
verwendet; die Druckformate weichen jedoch leicht voneinander ab:
WÖCHENTLICH – Im Modus WEEKLY sind bis zu 28 Stempelungen pro
Lohnperiode möglich, d. h. bis zu 4 Stempelungen pro Tag während 7
Page 56

Tagen. Es müssen jedoch nicht alle Stempelungen verwendet werden.
Die obere Grenze ist 28 Stempelungen pro Periode.
Die Druckformate sind:
EIN - Monat, Tag, Buchungszeit, „EIN” und Wochentag
AUS - Monat, Tag, Buchungszeit, Arbeitszeit,
kumulierte Zeit
HALBMONATLICH, ALLE 2 WOCHEN UND MONATLICH – Bei diesen
Einstellungen akzeptiert die Stempelkarte bis zu 64 Stempelungen pro
Lohnperiode (2 pro Zeile, maximal 32 Zeilen). Das Druckformat ist das
Folgende (die Ein- und Ausbuchungen befinden sich auf derselben Zeile
der Stempelkarte):
EIN : Wochentag, Zeit der Einbuchung
AUS: Zeit der Ausbuchung, Arbeitszeit, kumulierte Zeit.
FARBBANDWECHSEL
1. Entfernen Sie die Geräteabdeckung mit dem mitglieferten Schlüssel.
2. Die Farbbandkassette befindet sich auf dem fest im Gerät montierten
Kassettenhalter.
3. Schieben Sie Kassettenbefestigung auf dem Kassettenhalter von der
Farbbandkassette weg und entfernen Sie die Kassette.
4. Drücken Sie die neue Farbbandkassette in den Halter und drehen Sie
gleichzeitig den Farbbanddrehknopf, bis die Kassette einrastet.
Achten Sie darauf, dass sich das Farbband sowie der transparente
Kunststoffschutz vollkommen über dem Druckkopf befinden.
5. Setzen Sie die Geräteabdeckung wieder auf und schließen Sie ab.
Überprüfen Sie die Installation mit einer Stempelkarte..
Page 57

Farbbandfortschritts
drehknopf
Halten Sie Tabulator
nieder
Hinweis: Falls sich das Farbband nur teilweise über dem Druckkopf
befindet, zeigt der Ausdruck unvollständige Zeichen. Bei einer
unvollständig eingerasteten Kassette wird der Druck zunehmend heller.
FEHLERSUCHE
Die Fehlersuche im 4000/4000HD wird durch vorprogrammierte
Fehlermeldungen erleichtert. Fehlercodes werden gewöhnlich einige
Sekunden lang auf dem Display angezeigt. Es werden folgende
Fehlercodes angezeigt:
CARD FEEDS WITH NO PRINT OR ERROR MESSAGE (Der
Kartendurchlauf funktioniert, jedoch ohne Druck oder Fehleranzeige) - 1.
Prüfen Sie, ob die Farbbandkassette auf dem Halter richtig eingerastet ist
und ob sich das Farbband über dem Druckkopf befindet. 2. Stellen Sie
sicher, dass die schwarzen Rechtecke an der linken Seite der
Stempelkarte weder verdeckt noch beschädigt sind.
ERROR 1 - Zeigt, dass die Stempelkarte mit Gewalt eingeschoben wurde.
Wenn jemand die Karte mit Gewalt einzuschieben versucht, wird sie zwar
vom 4000/4000HD-Gerät angenommen, es werden jedoch keine
Lohndaten gespeichert oder gedruckt. In einem solchen Fall wird ERROR
1 auf dem
Display angezeigt und die Karte wird nicht gestempelt. Lösung: Schieben
Sie die Karte vorsichtig durch die Stempeluhr.
Page 58

ERROR 2,5,6 - Zeigt einen Kartenstau an. Beim Versuch, eine Karte
seitwärts einzustecken bzw. eine stark beschädigte Karte einzuführen,
wird der Durchzugsmechanismus vorübergehend blockiert und die Daten
werden nicht gespeichert. In einem solchen Fall wird ERROR 2, 5 oder 6
auf dem Display angezeigt und die Karte wird nicht gestempelt. Lösung:
Glätten Sie die Stempelkarte wenn nötig und stecken Sie sie erneut ein.
ERROR 3 - Das Gerät kann den Barcode auf der Stempelkarte nicht
lesen. Auf dem Display wird ERROR 3 angezeigt. Lösung: Glätten Sie
die Stempelkarte wenn nötig und stecken Sie sie erneut ein.
ERROR 7 – Zeigt eine falsche Druckkopfposition an. In einem solchen
Fall wird ERROR 7 auf dem Display angezeigt und die Karte wird nicht
gestempelt. Lösung: Lassen Sie die Karte erneut durch die Stempeluhr
laufen.
ERROR 14,15,50,51 - Zeigt einen internen elektronischen Fehler an. Bitte
Ihrem Lieferanten melden.
MASTER RESET - Dieser Vorgang löscht den gesamten Speicher des
Geräts und setzt es in den vorprogrammierten Zustand zurück. MASTER
RESET sollte nur dann durchgeführt werden, wenn das Gerät in einer
unerklärlichen und willkürlichen Weise stempelt. Um den Vorgang
auszulösen, wird das Gerät vom Netz entfernt und bei gedrückter mittlerer
Programmiertaste (die UP-Taste) wieder ans Netz gesteckt. Halten Sie
die UP-Taste so lange gedrückt, bis das Display erscheint. Alle Werte
werden in den Originalzustand zurückversetzt.
HÄUFIG GESTELLTE FRAGEN
F: Wann benötige ich neue Stempelkarten?
A: Neue Stempelkarten werden am ersten Tag einer neuen Lohnperiode
benötigt bzw. sofort nachdem Änderungen in der Funktion SETUP PAY
(LOHNPERIODE) vorgenommen wurden.
F: Muss ich innerhalb einer Lohnperiode die Karten in der Reihenfolge
ihrer Nummern verwenden?
A: Nein, wir empfehlen jedoch sehr, dass Sie die Karten sequentiell
ausgeben, damit die Ausgabe gleich nummerierter Karten in derselben
Lohnperiode vermieden wird.
Page 59

F: Warum werden Stempelungen überdruckt bzw. große Leerräume
zwischen den Stempelungen gelassen?
A: Dafür kommen verschiedene Gründe in Frage. Sie werden wie folgt mit
abnehmender Häufigkeit aufgelistet. In jedem Fall muss ein Rücksetzen
des Geräts erfolgen. Lesen Sie dazu den Abschnitt MASTER RESET in
dieser Anleitung.
1. Es werden gleich nummerierte Karten innerhalb der gleichen
Lohnperiode verwendet.
2. Während der Lohnperiode wurde die Funktion SETUP PAY
geändert, es wurden jedoch keine neuen Stempelkarten ausgegeben.
3. Ein Mitarbeiter hat vergessen, ein- oder auszustempeln und die
Zeitspanne zwischen den Stempelungen übersteigt die Anzahl Stunden,
die unter „MAX HRS/PUNCH“ programmiert wurde. Ein Rücksetzen ist
nicht erforderlich. Die Arbeitszeit muss jedoch am Ende der Lohnperiode
manuell korrigiert werden.
4. Falls Ihr Unternehmen in 3 Schichten rund um die Uhr arbeitet
und mehr als 50 Mitarbeiter hat, setzen sich bitte für Anweisungen zur
Einrichtung des Geräts mit Ihrem Lieferanten in Verbindung
F: Berechnet das 4000/4000HD Überstunden?
A: Das 4000/4000HD liefert Ihnen eine kumulative Summe aller
gearbeiteten Stunden Da die Überstundenregelungen von Betrieb zu
Betrieb verschieden sind, müssen die Überstunden manuell berechnet
werden.
F: Kann das 4000/4000HD einen automatischen Mittagspausenabzug
vornehmen?
A: Das 4000/4000HD liefert Ihnen eine kumulative Summe der Arbeitszeit
zwischen den Stempelungen. Jegliche Abzüge müssen daher am Ende
der Lohnperiode manuell vorgenommen werden.
F: Was bedeutet ATAAP?
A: ATAAP ist eine Abkürzung, die von der US-Regierung verwendet wird,
um zu beschreiben, wie Zeit in Hundertstel Stunden berechnet wird (z. B.
Eineinviertel Stunden = 1.25 Std.)
ZUBEHÖR
Bestell.-Nr. Menge Beschreibung
Page 60

4000-R 1 Ersatzdruckerkassette
44100-10 100 Stempelkartensatz
44100-10M 1000 10 Sätze mit je 100 Stempelkarten
400-3 1 Justierbarer Kartenhalter für 25
Stempelkarten
GARANTIE
Der Hersteller garantiert dem Erstbesitzer dieses Geräts während eines
Jahres ab dem Kaufdatum fehlerfreies Material bzw. eine fehlerfreie
Herstellung. Die Garantie erstreckt sich auf die Instandsetzung bzw. den
Austausch von fehlerhaften Bestandteilen.
Der Hersteller behält sich das Recht vor festzustellen, ob das
Fehlverhalten der Bestandteile durch defektes Material, durch die
Herstellung oder durch andere Ursachen entstanden ist. Diese Garantie
deckt jedoch keine Fehler, die durch Unfall, Änderungen, falsche
Handhabung bzw. eine unsachgemäße Verpackung der
zurückgegebenen Einheit entstanden sind. Jede Instandsetzung hat
durch Pyramid Technologies LLC oder den Hersteller zu erfolgen.
Reparaturen durch Dritte heben diese Garantie auf. Benutzern in anderen
Ländern als der USA wird empfohlen, sich an den Hersteller zu wenden,
bei dem sie das Gerät gekauft haben. Die Rechte aus dieser Garantie
sind dem Erstbesitzer vorbehalten und sind an nachfolgende Besitzer
nicht übertragbar.
Pyramid Technologies, LLC
48 Elm St. Meriden, CT 06450
Tel. 001-203-238-0550
Fax 001-203-634-1696
E-Mail: CustomerService@pti.cc
Website: www.PyramidTechnologies.com
Technische Daten
Betriebsbedingungen
Page 61

Temperatur 0C to 50C, (3F to 122F)
Rel. Luftfeuchtigkeit 10 to 95%, ohne Kondensation
Stromausfall
Batteriegesteuerte Sicherung von Daten und Uhrzeit für 30 Tage
Batterielebensdauer: mehr als 10 Jahre
Kalender
Einstellung für automatisches Schaltjahr sowie Sommer- und Winterzeit
bis zu 2099
Genauigkeitsabweichung der Uhr
Weniger als 30 Sekunden pro Jahr
Speicherkapazität
100 Mitarbeiter
Zertifikate
UL und CUL
Gewicht
4000 - 2.7 kg
4000HD - 3.7 kg
Abmessungen
4000 - 7.25 Zoll Hoch x 7.12 Zoll Breit x 6.65 Zoll Tief
4000 - 184.15mm Hoch x 180.84mm Breit x 168.91mm Tief
4000HD - 7.75 Zoll Hoch x 8.25 Zoll Breit x 7.25 Zoll Tief
4000HD - 196.85mm Hoch x 209.55mm Breit x 184.15mm Tief
Montage
Auf einem Tisch oder an der Wand montierbar
Page 62

48 Elm Street, Meriden, CT 06450
www.PyramidTechnologies.com I2073 Rev A
 Loading...