


1 | P a g e
RIC10 – 10 GigE Vision Camera
quick start guide
For Service & Support, Call 1-813-984-0125,
or Request Service at support@pyramidimaging.com

RIC10 – 10 GigE Vision Camera quick user guide
Rev – B
2 | P a g e
Document Revision
Mechanical Installation
1. Mount the camera to a suitable mounting plate using the M4 mounting holes on the
front or on the back of the camera (Refer to Fig 1 below).
DATE
REVISION
TITLE
COMMENTS
AUTHOR
APPROVAL
10/08/2017
A
COMPLETION
OF DOC
READY TO BE REVIEWED
AL
RL
12/14/2017
B
COMPLETION
OF DOC
ADDED DETAILED
INSTRUCTIONS ON
POWERING
AL
RL

RIC10 – 10 GigE Vision Camera quick user guide
Rev – B
3 | P a g e
2. The camera is equipped with a standard C-mount lens mount. To achieve the IP65/67
rating, a protective IP tube must be used. You may use any C-mount lens that fits into
the IP tube. A 10 mm IP tube extension for longer lenses also is available as an
accessory. Nonetheless, IP tubes are optional.
Number
Description
1
Optical center of image sensor
2
4 mounting holes on front side (M4 threads)
3
4 mounting holes on front side (M4 threads)
Figure 1: Technical drawing of RIC10 camera.

RIC10 – 10 GigE Vision Camera quick user guide
Rev – B
4 | P a g e
Electrical Installation
3. Connect the power, 10GigEthernet and I/0 cables to the camera as shown in Figure 2.
4. To connect the opposite end of cable 1 (i.e. Power Cable), make sure to wire it as stated
on Figure 3 and 4.
Number
Description
1
Power in (12VDC -24 VDC)
2
10 G Ethernet
3
I/O connector (trigger/strobe, digital
inputs and outputs
Figure 2: Labeled connectors along with their respective
purpose.

RIC10 – 10 GigE Vision Camera quick user guide
Rev – B
5 | P a g e
OUTPUT COLOR
CODING
BROWN
V+
WHITE
V+
BLUE
V-
BLACK
V-
INPUT COLOR CODING
L
LINE BLACK (HOT)
(RIGHT SLOT)
N
NEUTRAL BLACK
(LEFT SLOT)
GROUND
GROUND
GREENISH (HOLE
BELOW IN
OUTLET)
Figure 3: Electrical connection for the power line. Wire code for connection between power supply and power cable.
CAMERA
N
L
G

RIC10 – 10 GigE Vision Camera quick user guide
Rev – B
6 | P a g e
Figure 4: Power cord layout.
Notes
• Cap screws are not part of the camera package.
• Please refer to Industrial 10 GigE Vision Camera User Guide link to download the User
Guide which will provide more insights on how to wire the I/O cable.

RIC10 – 10 GigE Vision Camera quick user guide
Rev – B
7 | P a g e
PC Configuration
Hardware: 10GigE Network Interface Card (NIC)
5. Look for a package for the 10GigE NIC. The package looks as in Figure 4. Have this on a
side.
Figure 5:- 1-port PCIe 10GBase – T/NBase-T Ethernet Netork Card.
6. Disassemble one of the covers that houses your CPU. For this you will need a screw
driver. Refer to Figure 5 below.
Disconnect power cord from CPU housing. Do not work on the CPU while it is
running.

RIC10 – 10 GigE Vision Camera quick user guide
Rev – B
8 | P a g e
7. Connect 10GigE NIC as shown in Figure 6.
8. Put back the cover on the CPU housing and now your CPU should look as in Figure 7.
Figure 6: Disassembling CPU housing.
Figure 7:Connection of NIC shown.

RIC10 – 10 GigE Vision Camera quick user guide
Rev – B
9 | P a g e
Driver
9. To install the driver, please insert the disc shown in Figure 8. If for some reason the disc
installation is not a viable option, be sure to refer to this link’s website installation to
install the driver.
Figure 9: Driver that comes with the package.
10. Once driver in, accept terms and click next through windows. When prompted, restart
your computer.
11. Now you are ready.
Figure 8: NIC installed in CPU housing.

RIC10 – 10 GigE Vision Camera quick user guide
Rev – B
10 | P a g e
OS – Configuration
12. Open the Network and Sharing Center following this directory: Control Panel\Network
and Internet\Network and Sharing Center
13. Click Change adapter settings.
14. Right-click the NIC for which you want to enable jumbo frames and select Properties.
15. Under the Networking tab, click the Configure button for the network adapter.
16. Select the Advanced tab.
17. Select Jumbo Frame and change the value from disabled to the desired value, such as
9kB MTU or 9,014 Bytes, depending on the NIC.
18. Click OK to all dialogs.
Notes
These steps are crucial for the system to work properly. Failure to follow these will cause the
camera to not communicate with the CPU. This can cost a lot of downtime.
Software Installation
19. To install the software please click this link, Industrial 10 GigE Vision Camera, to
download the drivers.
Tutorial – ROI Manipulation
Objective:
In this tutorial we will show how to manipulate the Region of Interest within the software.
Doing so can enhance frames per second consistency when camera is live.

RIC10 – 10 GigE Vision Camera quick user guide
Rev – B
11 | P a g e
1. Once software installed (refer to previous section on this manual for software
installation), you will find an icon of the software on your desktop. Refer to Figure 9.
Click on it.
2. Then you will see the software interface window pop up. There focus in the Discovery
and Device panes; shown in Figure 10. In the Discovery pane click refresh until you see
your camera show up as it shows in Figure 10. Then double click the camera of interest.
Figure 10: New software icon.

RIC10 – 10 GigE Vision Camera quick user guide
Rev – B
12 | P a g e
3. Now you will notice that within the Device pane, both Configuration and Features will
get enabled.
4. Then on the right window hit the Start button to start capturing live images. For this
example, I am looking at base piece in our lab. Refer to Figure 11 for more detail.
Figure 11: Selecting device to work with.

RIC10 – 10 GigE Vision Camera quick user guide
Rev – B
13 | P a g e
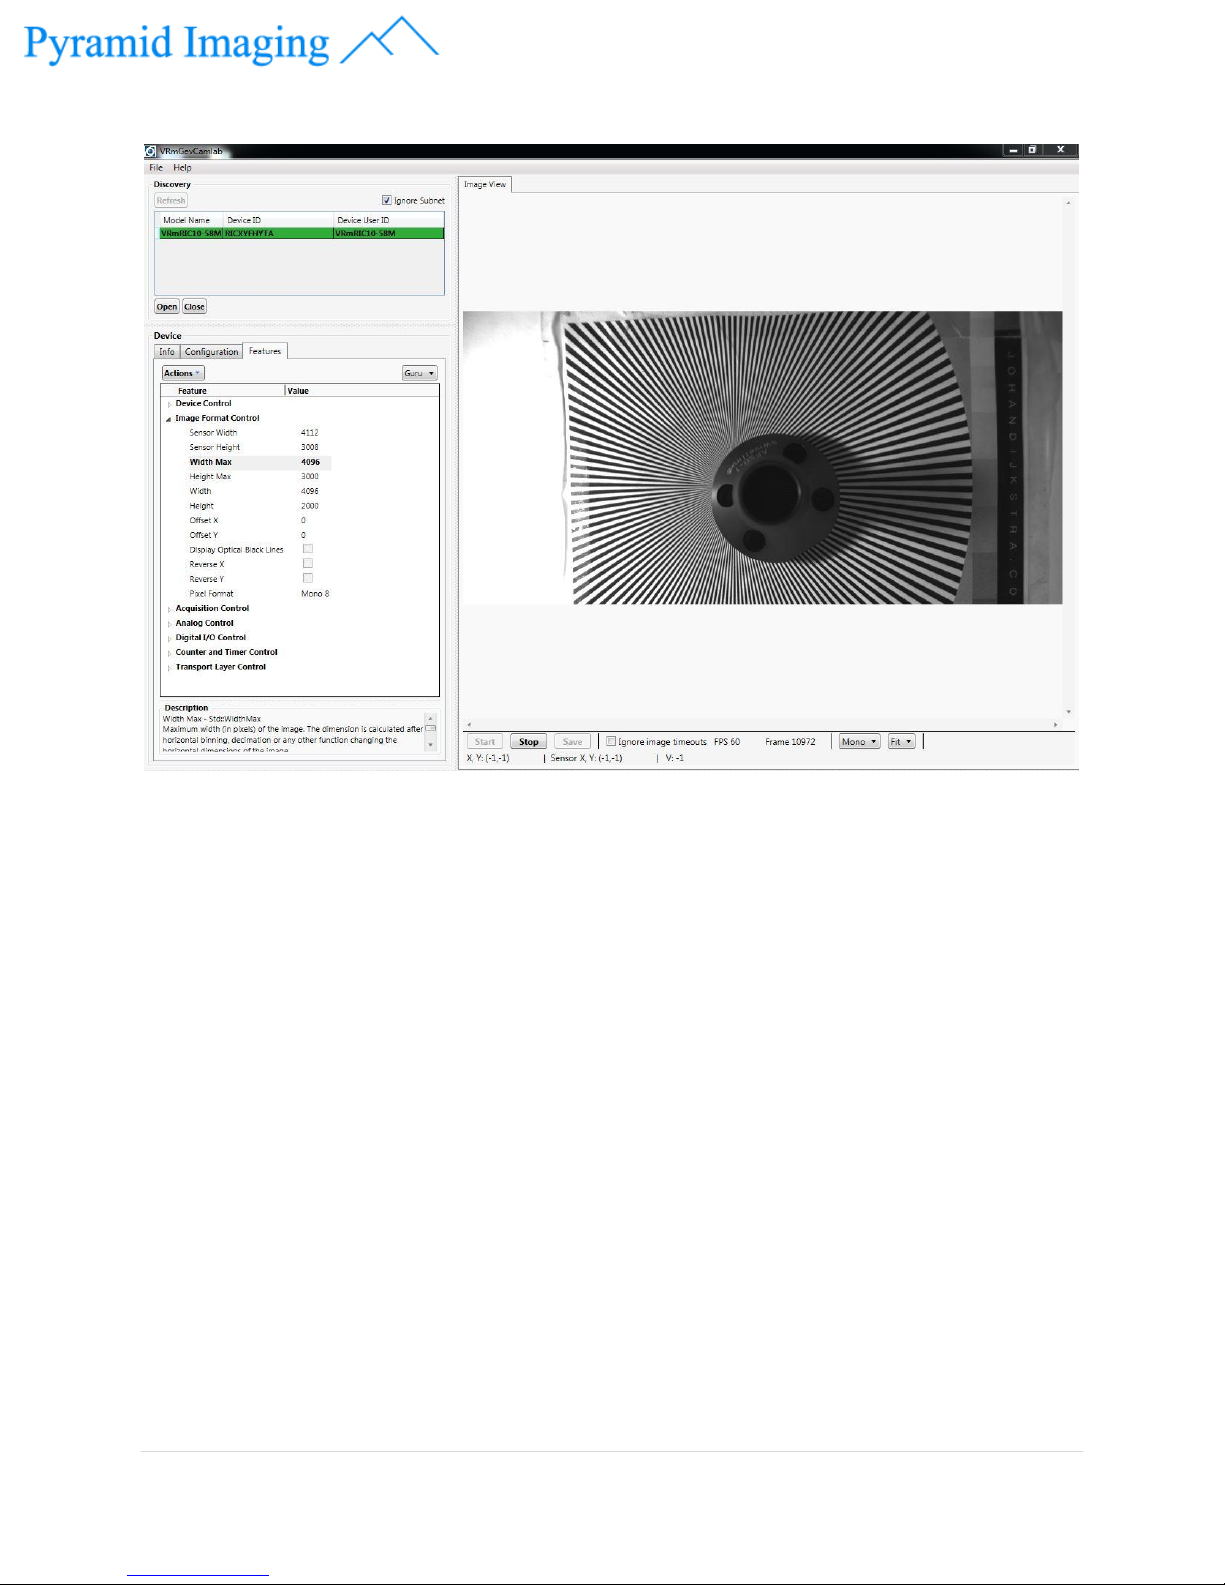
5. Once there, hit the Stop button so that you can modify parameters. Then
follow this sequence of actions: Within Device>in the Features tab>Expand Image
Format Control>Change Height to 2000. Refer to Figure 12 for more detail.
Figure 12: Live image, full resolution.
RIC10 – 10 GigE Vision Camera quick user guide
Rev – B
14 | P a g e
Figure 13: Reduced ROI.
6. Now your ROI has reduced; you are done.
 Loading...