

Page 1
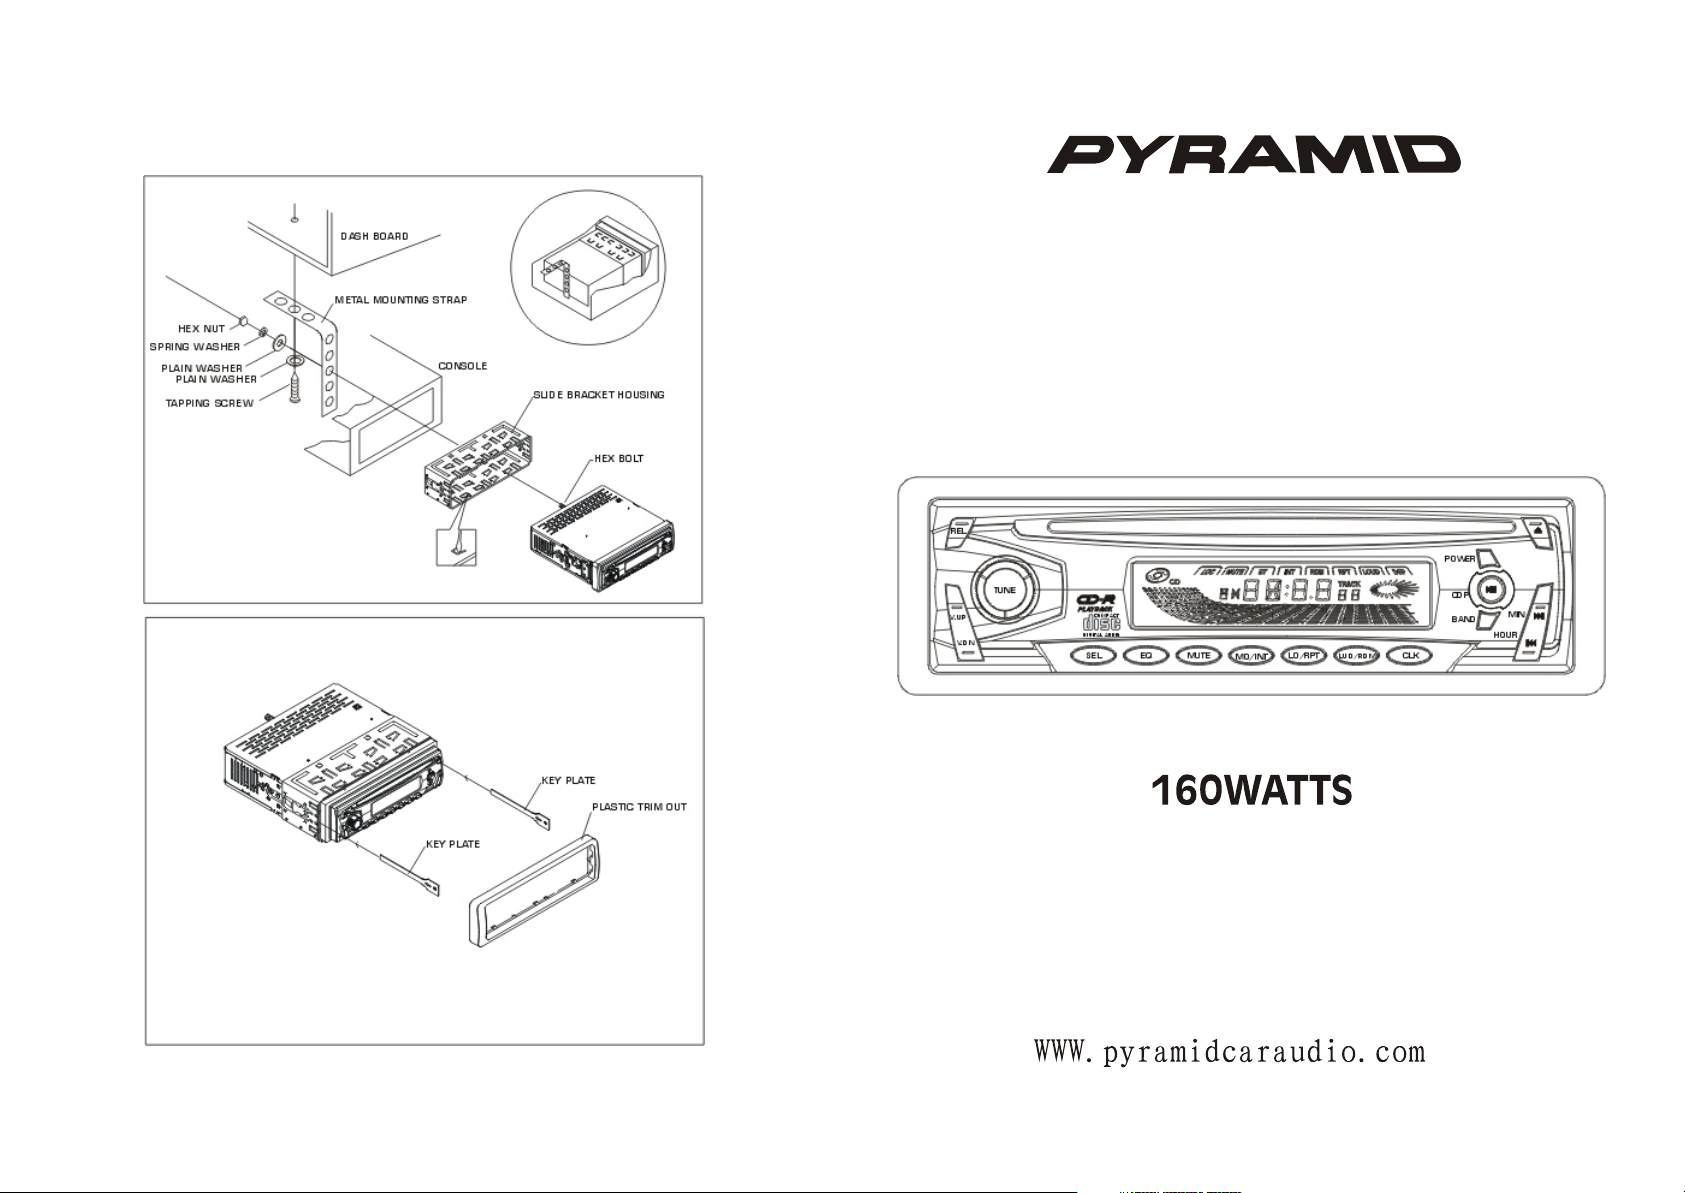
INSTALLATION
INSTRUCTION MANUAL
AUTO-LOADING COMPACT DISC PLAYER
WITH AM/FM-STEREO MANUAL TUNING RADIO
ANTI-THEFT DETACHABLE FRONT PANEL
CDR49
Page 2
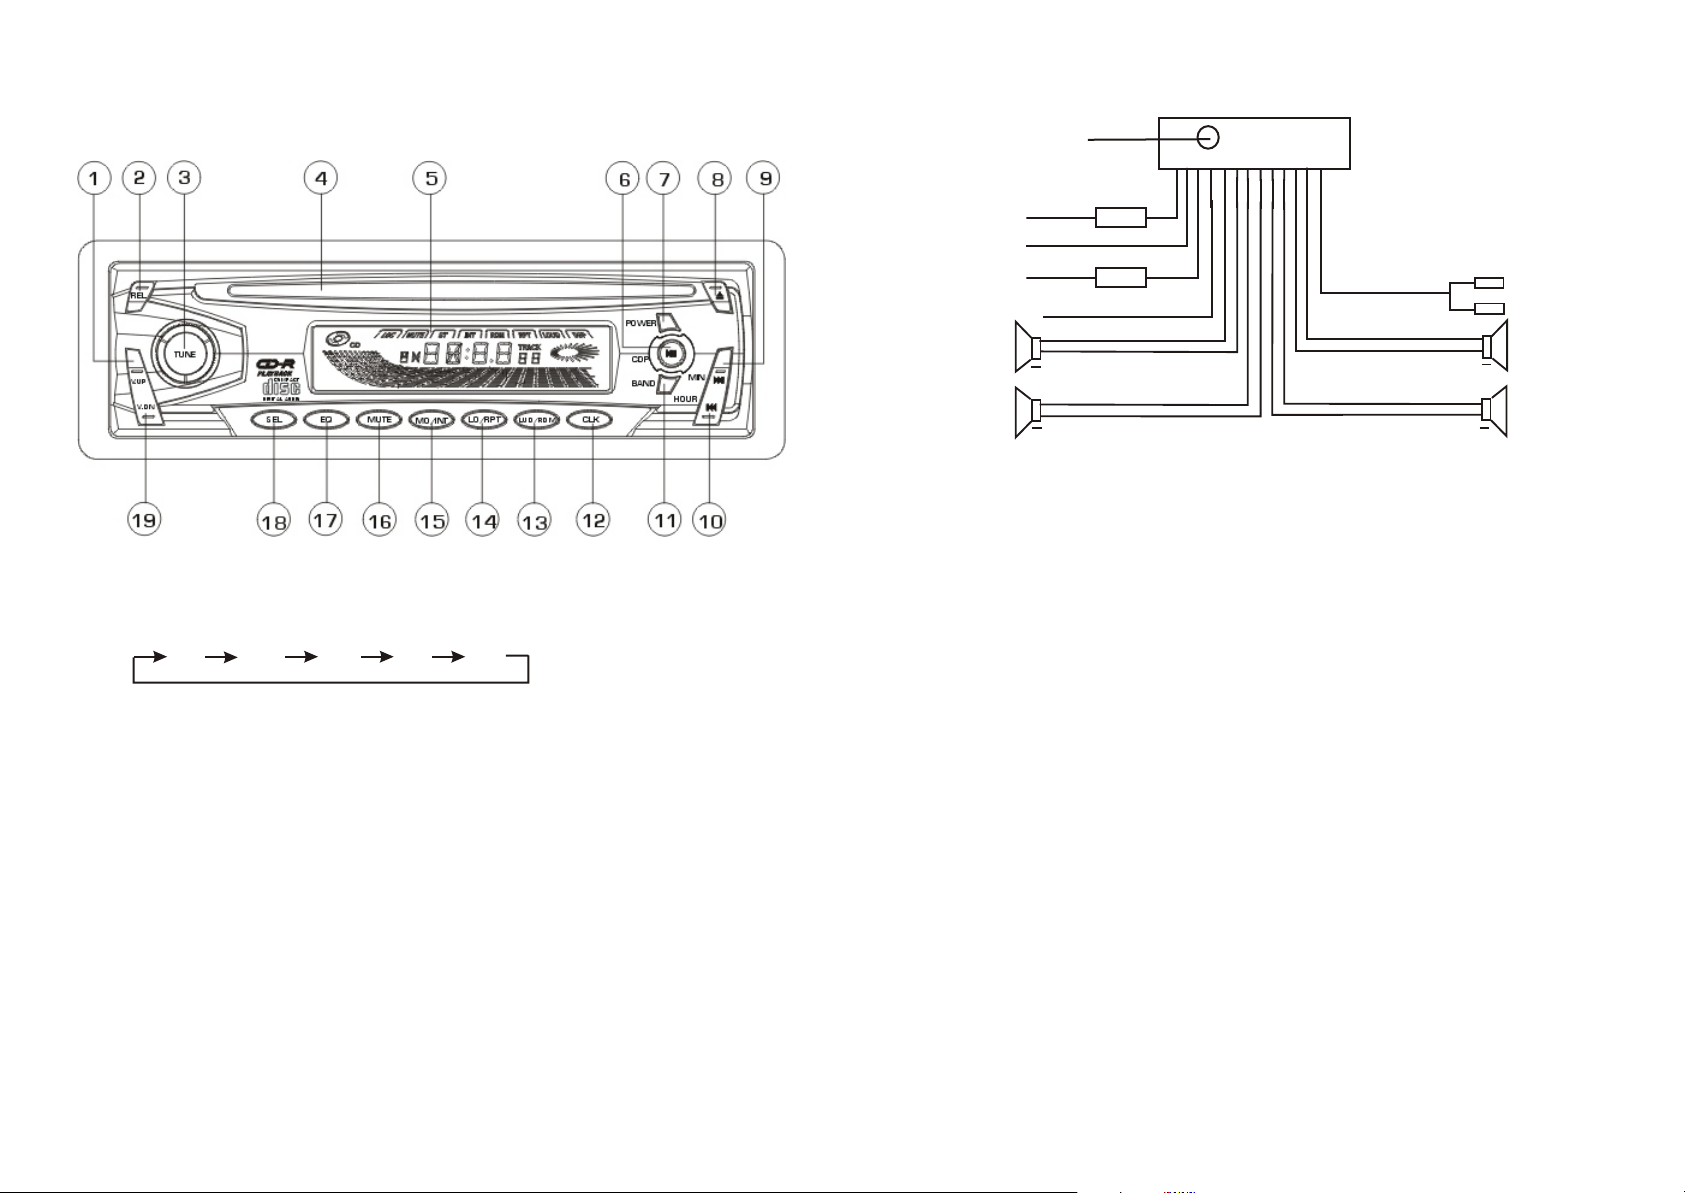
LOCATION AND FUNCTION OF CONTROLS
SPEAKER CONNECTION
ANTENNA PLUG
1.18.19. SEL( AUDIO MODE SELECT)/VOLUME UP/DN BUTTONS
Press SEL button to change the mode in the sequence of
VOL BAS TRE BAL FAD
a. The volume level can be adjusted at any time by pressing the UP or
DN button as select mode has been initially defaulted at volume mode.
b. The volume level is also obtained by stepping through the SEL button until
the word VOL is displayed and then press UP or DN button to adjust
the sound level.
c. Press and hold the UP or DN button to adjust the sound level.
BASS CONTROL
a. Press the SEL button to select the bass mode until BAS appears on the display.
b. Press UP or DN button to adjust the bass effect.
TREBLE CONTROL
a. Press the SEL button to select the treble mode until TRE appears on the display.
b. Press UP or DN to adjust the treble effect.
BALANCE CONTROL
a. Press the SEL button to select the balance mode until BAL appears on the display.
b. Press the UP or DN button to increase or decrease the sound level of
left or right speaker.
FADER CONTROL
a. Press the SEL button to select the fader mode until FAD appears on the display.
b. Press the UP button or DN button to increase or decrease the sound level
of front or rear speaker.
1 6
MEMORY B+
BLACK(GND)
RED (B+)
FRONT
LEFT
SP
REAR
YELLOW
BLUE AUTO ANT
++
++
7 A
FUSE
0.5 A
FUSE
WHITE
WHITE/BLACK
GREEN/BLACK VIOLET/BLACK
RCA LINE OUT
GRAY
GRAY/BLACK
VIOLETGREEN
++
++
RED R
WHITE L
FRONT
RIGHT
SP
REAR
NOTE:
In spite of having any kinds of speaker system, must use 4 ohms
impedance of speaker to reduce the distortion during high volume
level.
SPECIFICATION
GENERAL
Power requirement.................................................................................................DC 12V.
Current consumption..............................................................................................7A MAX.
Maximum Output Power..........................................................................................4 X 40W
FM SECTION
Frequency range.........................................................................................88MHz -108MHz
Usable sensitivity.........................................................................................................10uV.
I.F Frequency........................................................................................................10.7MHz.
AM(MW) SECTION
Frequency range.....................................................................................530KHz - 1700KHz
LINE - OUT [OPTION]
Output................................................................................250mV @ FM 10% THD POWER.
Impedance............................................................................................................600 ohm.
CD PLAYER
System........................................................................................compact disc audio system.
Usable disc......................................................................................................compact disc.
Signal format.............................................................................sampling frequency 44.1KHz.
No of quantization bits 1bit.
Frequency characteristics...............................................................................5-40Hz < 5dB
10K-20KHz < 5dB.
Signal to noise radio................................................................70dB [1KHz] [IEC - A net work].
Chassis dimensions.......................................................................178[W] X 50[H] X 150[D].
\ \
\ \
Page 3
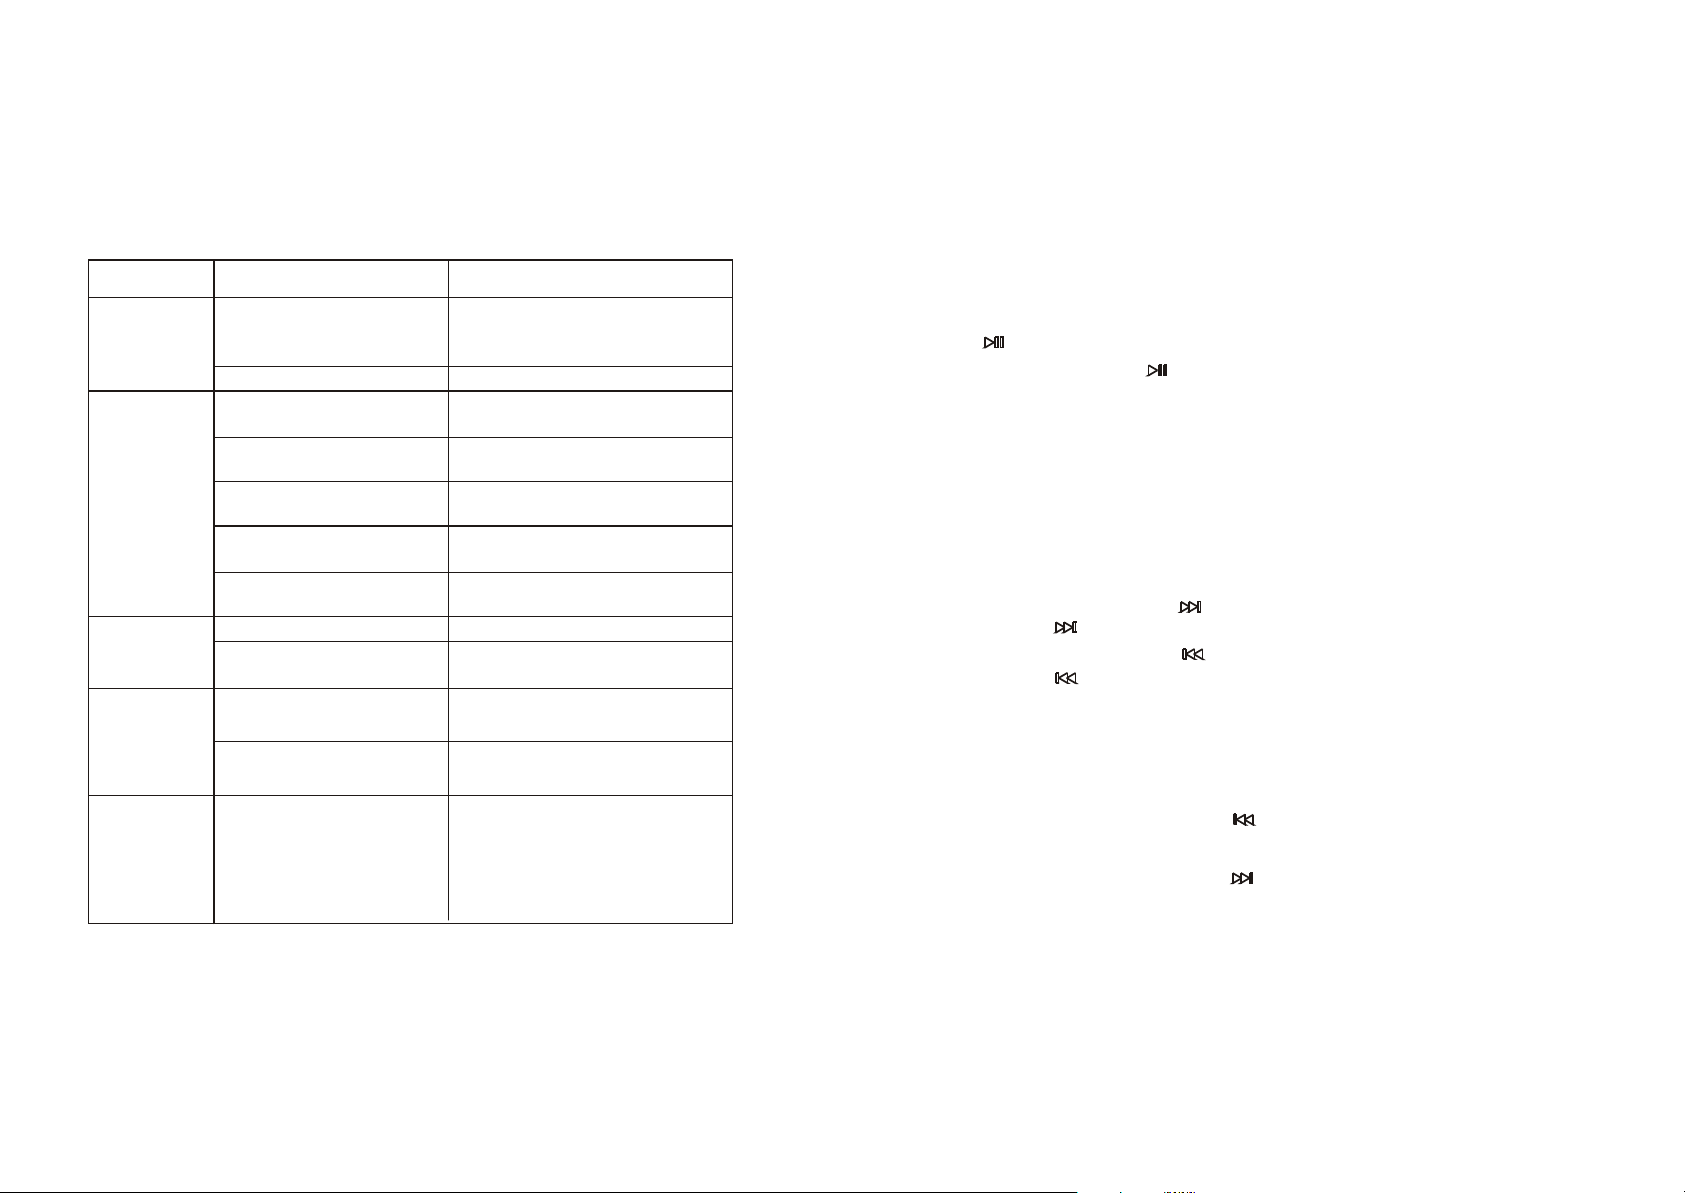
TROUBLE SHOOTING
Before going through the check list, wiring connection, should any of the
problem persist after check list has been made, consult your nearest service
dealer.
Symptom
No power
Disc cannot
be loaded or
ejected
No sound
Sound skips
The radio does
not work
The antenna cable is not
connected
the signals are too weak
Cause
The car ignition is not on. If the power supply is properly
The fuse is blown
Presence of CD disc inside
the player
Inserting the disc in upside
down
Compact disc is extremely
dirty or defective
Temperature inside the
car is too high
Condensation
Volume is in minimum
Wiring is not properly
connected
The installation angle
is more than 30 degrees
The disc is extremely
dirty or defective
connected to the car accessory
switch the ignition key to " ACC "
Replace the fuse
Remove the disc in the player
then put a new upward
Insert the compact disc with
the label facing upward
Clean the disc or try to play a
new one
Cool off until the ambient
temperature returns to normal
Leave the player off for an
hour or so, then try again
Adjust volume to a desired level
Check wiring connection
Adjust the installation angle
to less than 30 degrees
Clean the compact disc/try to
play a new one
Insert the antenna cable firmly
select a station manually
Solution
2. RELEASE BUTTON
Press it to detach the front panel when you want to take away.
3. TUNING KNOB
Rotate it to select your desired broadcasting station.
4. CD COMPARTMENT
5. LCD (LIQUID CRYSTAL DISPLAY)
6. CDP ( CD PLAY, PAUSE) BUTTON
At tuner mode, press button to switch to CD mode. At CD mode,
press it to pause the CD playing and press it again to resume CD
playback.
7. POWER BUTTON
Press it to turn on or off the unit.
8. EJECT BUTTON
Press it to eject the CD DISC.
9.10.TRACK UP/DOWN BUTTONS
a. During CD mode, press button to allow you to track forward.
Hold the button to allow you to skip forward.
b. During CD mode, press button to allow you to track backward.
Hold the button to allow you to skip backward.
9. 10.12. CLOCK ADJUSTMENT BUTTONS
During frequency display, press it to change to clock function.
Press CLK button for more than 2 seconds, until time flashes. and you can adjust
time now.
To adjust hour:
with time on display, push the tune button to adjust hour, when adjustment is
completed, release the button.
To adjust minute:
with time on display, push the tune button to adjust minute. When adjustment
Is completed, release the button.
11. BAND BUTTON
Press it to select your desired radio band and the word which band is
selected will be displayed on LCD.
13. LUD/RDM BUTTON
LUD MODE:
When reduce the volume to half level, press it to enhance the bass effect.
5 2
Page 4
RDM MODE:
During CD mode, press " RDM " button and hold for 2 seconds,
it display " RDM " and Random function performs.
14. LOC/RPT BUTTON
LOCAL/DISTANCE MODE:
When in the radio mode, press it to select local or distance broadcast
station receive sensitivity. The word LOC will appear on LCD during local
state.
Attention: During AM mode, LOC is non-functional.
REPEAT MODE:
During CD mode. Press RPT button to repeat a single track.
DISC PLAY:
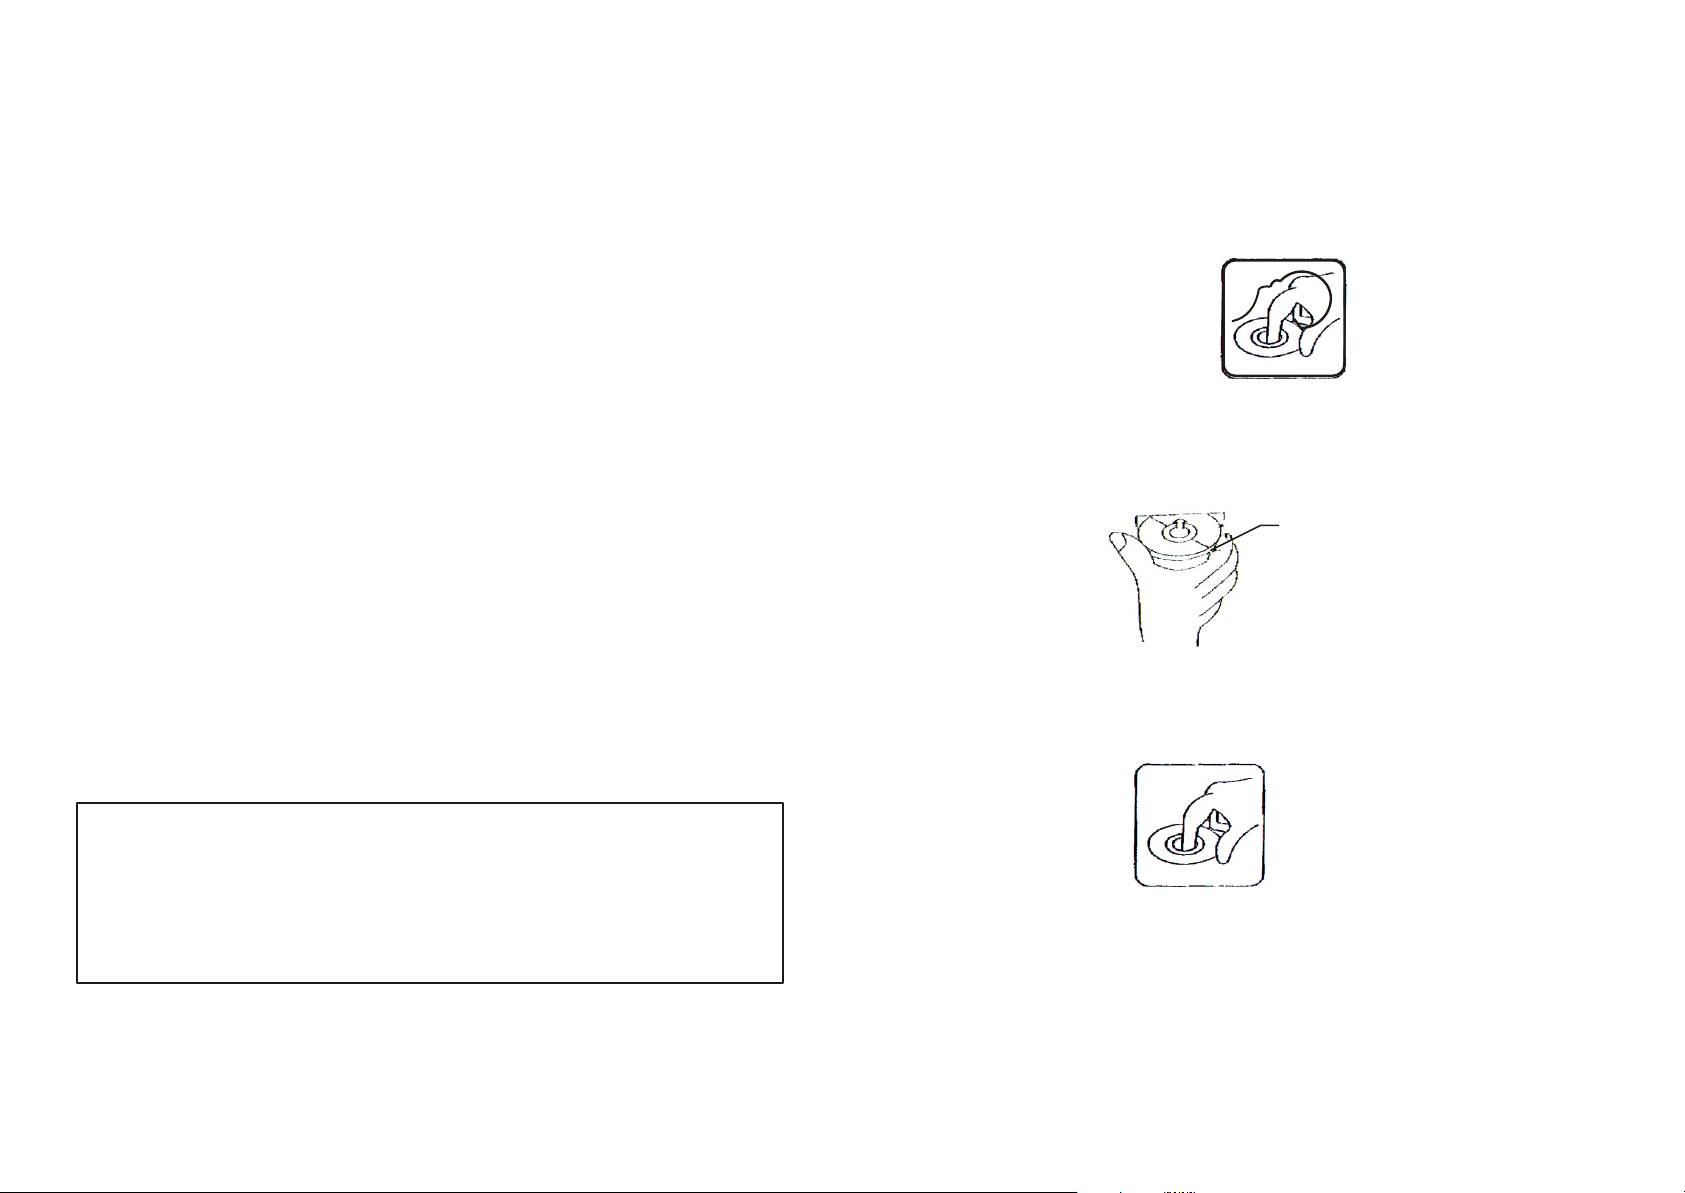
Cleaning discs
Before playing, clean the disc with a clean, lint-free.
Flip the disc in the direction of the arrow.
15. MO/INT BUTTON
MO MODE: During RADIO mode, press it to select mono or stereo mode.
INT MODE:
During CD mode, press " INTRO "button to hear the first 10 seconds
of each track on the disc. Press this button again to restore the
player to its normal play mode.
16. MUTE BUTTON
Press it to eliminate the sound immediately.
17. EQ BUTTON
Press it to switch between 4 preset equalizer curves: FLAT, POP, CLAS
and ROCK, the sound quality will be changed.
IMPORTANT:
MEMORY WIRE ( FOR BACKUP) AND POWER WIRE CAN NOT BE SWITCHED
OFF AT THE SAME TIME, ONCE IT HAPPENS, ALL THE FUNCTION WILL BE
TOTALLY IN DISORDER (DISTORTED DISPLAY IS ALSO INDICATED ).
IF IT REALLY HAPPENS,
PLEASE FOLLOW THE INSTRUCTIONS AS MENTIONED
BELOW:
5 MINUTES LATER,
PLEASE SWITCH ON THE MEMORY WIRE FIRST (CAN NOT
PASS THROUGH IGNITION SWITCH) AND THEN SWITCH ON THE POWER. IT WILL
RETURN TO NORMAL FUNCTION SOON.
NOTE:
. Do not use so solvents such as benzine, thinners. Commercially available
cleaners or anti static spray damage the unit.
Insert a disc with the label surface down. Doing so may damage the unit.
Label
surface up
NOTE:
. Do not try to insert another disc when one has been already inserted.
Doing so may damage the unit.
.Handle the disc by its edge. And to keep the disc clean, do not touch
the surface.
.Do not stick paper or tape on the disc.
.Do not expose the disc to direct sunlight or heat sources such as hot air
ducts. Or leave it in a car parked in direct sunlight where there can be a
considerable rise in temperature.
3 4
 Loading...