

Page 1
PM450-WR
Digital Wireless Sound Rocker with Rechargeable Battery
Owner’s Manual
Read and understand this entire manual before using!
For assistance contact Pyramat. DO NOT RETURN TO STORE.
Item Number:
10176601
10176613
Page 2
Congratulations on the purchase of your Pyramat PM450-WR Digital Wireless Sound Rocker. The Sound Rocker is a
comfortable, rockable chair that delivers a powerful audio experience designed to intensify your enjoyment of
games, movies, music and more. To ensure the best results, please read this manual completely before operating
your Sound Rocker, and retain it for future reference.
CONTENTS
Safety Warnings ............................................................ 1
Before You Begin ........................................................... 2
Features ......................................................................... 2
Sound Rocker Set-Up .................................................... 3
Wireless Transmitter Set-Up ......................................... 4
Wireless Multi-User Connection .................................... 4
Wireless Connection Methods ................................... 5-6
Direct Connection Methods .......................................7-8
Direct Multi-User Connection ........................................ 9
Portable Audio/Handheld Game Device Connection. .... 9
Troubleshooting ........................................................... 10
Warranty ...................................................................... 11
FCC Content ................................................................ 12
SAFETY WARNINGS
WARNING: The Pyramat Sound Rocker is intended for indoor use only. TO REDUCE THE RISK OF FIRE OR
SHOCK HAZARD, DO NOT EXPOSE THIS PRODUCT TO RAIN OR MOISTURE.
• Do not expose to direct sunlight or extreme temperatures.
• Adult supervision is required for set-up.
• Use only with the supplied power adapter. The power adapter is not a toy.
• Battery contains sealed lead acid. Battery must be recycled. Please do not discard box as it contains important
information.
• Do not mix old and new batteries. Do not mix alkaline, standard (carbon-zinc), or rechargeable
(nickel-cadmium) batteries.
• Excessive use of audio equipment at high volume may lead to hearing loss. Listen responsibly and use
common sense.
• Children under 13 should not use this product without parental supervision.
• DO NOT wash or soak the Sound Rocker with water. If cover becomes wet, disconnect power immediately and
don’t use until totally dry.
• To avoid injury or death from electrical shock, NEVER open the electrical cabinet or remove the cover.
The Sound Rocker is compatible with:
• All gaming consoles (including Xbox360, wII, and Playstation 3)
• iPod and all other MP3 players
• TVs, DVDs, VCRs
• Portable gaming devices (including Nintendo DS, Nintendo DS Lite, and PSP)
Need Help? Visit our website at www.pyramat.com, send an e-mail to [email protected]
or call toll-free at 877-591-1012.
1
Page 3
BEFORE YOU BEGIN
ON / OFF
CHANNEL
Remove the foam separators from the Sound Rocker and take unit out of box. Check to make sure you have all the
parts shown below and that all items are in good condition. If any of these parts are missing, please contact the
customer service department within 90 days of purchase by calling 877.591.1012 or emailing [email protected].
Replacement parts can also be purchased online at www.pyramat.com.”
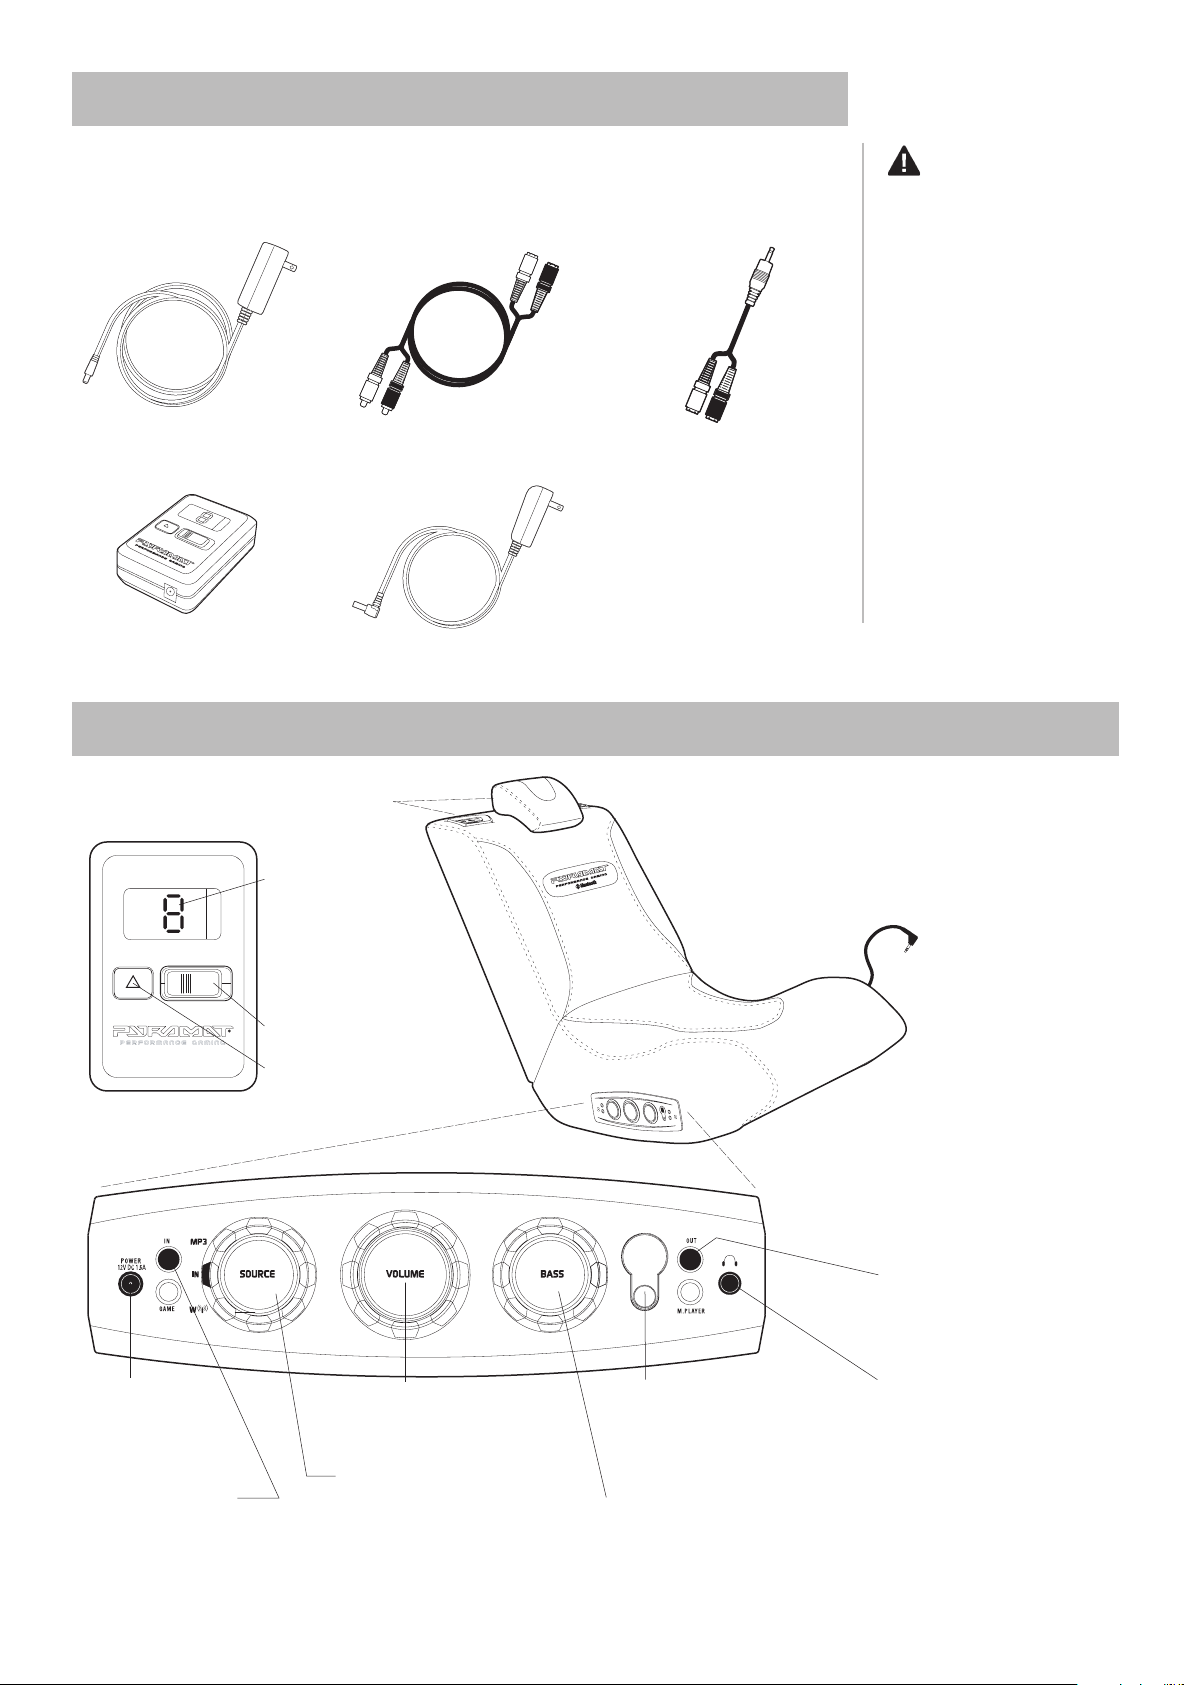
9 ft. 12 volt/1.6 amp
DC power adapter
11 ft. male to female
RCA audio cable
Transmitter power adapterDigital wireless transmitter
RCA to 3.5mm mini cable
FEATURES
CAUTION: Keep
fingers clear of the folding seam
when opening the unit.
Note: Replacement cables and mini
adapters can be purchased at your
local audio accessory dealer.
Digital Wireless Transmitter
Control panel
Speakers
LED channel window
Power on off switch
Channel Selector
3.5mm mini plug
Connect to an MP3 player,
an IPOD, or a handheld game
device such as Nintendo DS,
Nintendo DS Lite, and PSP.
Multi-player RCA audio output
ports
Connect up to four Sound Rockers
together for multi-user fun.
Power DC port
Connect the supplied
12 volt/1.6 amp DC power
adapter here.
Input RCA audio ports
Connect red and white RCA audio
cable here from game consoles, home
theater, satellite receiver
and stereo receiver.
Volume/power knob
Twist to click on and power up
and adjust the volume level.
Source knob
Select IN for direct connections to
the control panel.
Select W for wireless transmission.
Select MP3 for MP3 and portable
device connections to the MP3 and
portable device plug.
Channel selector button
Select the same channel as the
transmitter by pressing the channel
selector button.
Bass knob
Twist to adjust the bass to your
preference.
2
Headphone port
Connect headphones here.
Page 4
SOUND ROCKER SET-UP
9
CAUTION: Keep
fingers clear of the folding seam
when folding or unfolding the
rocker.
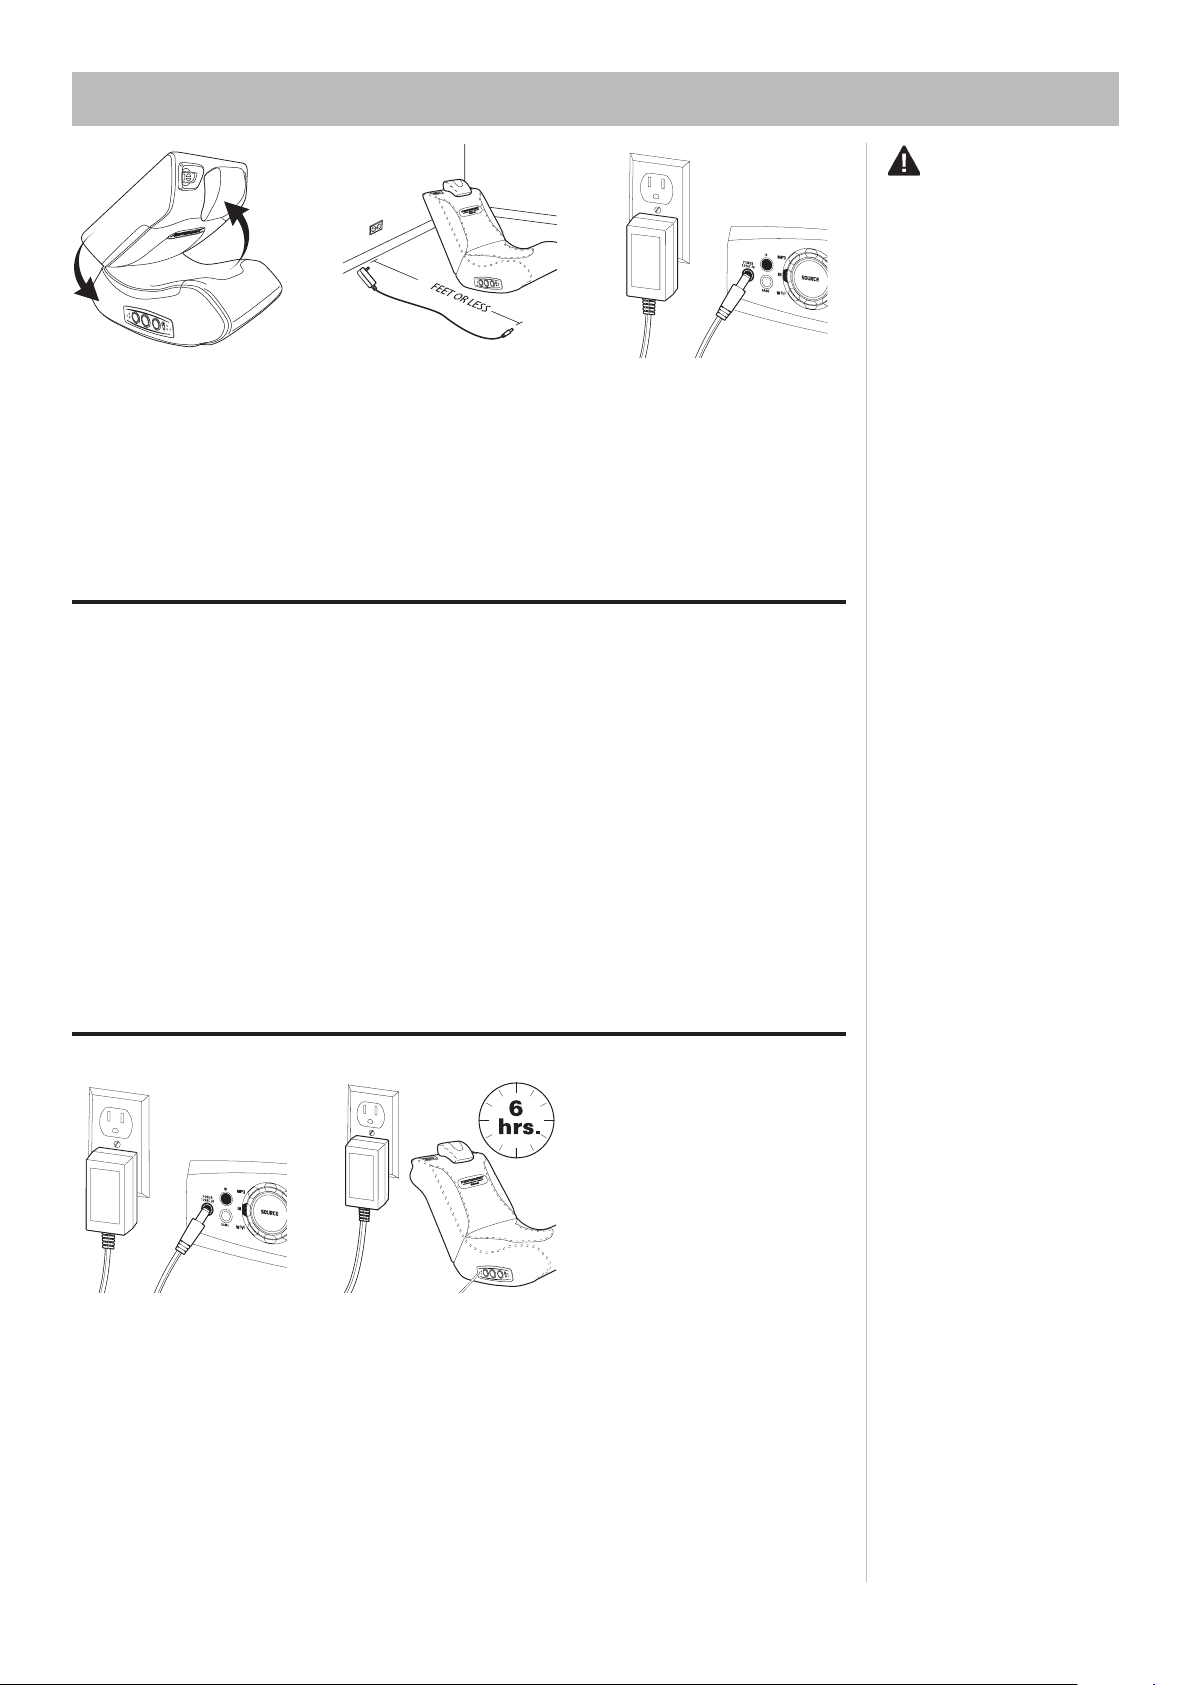
1 Unfold the top portion of the
Sound Rocker until the backrest
is flush with the seat portion.
2 Place the Sound Rocker so
that the control panel is less than
9 ft./2.75 meters from the power
source.
Control Panel Indicator Lights
BLUE
Blue light indicates the power
adapter is connected and the
power is on.
RED
Red light indicates the unit
is charging when the power
adapter is connected and the
power is off. When the unit is
fully charged the red light will
shut off.
3 Connect the power adapter
to the power DC port on the
control panel. Then, plug the power
adapter into an electrical outlet.
FLASHING RED
Flashing Red light indicates the
batteries are running low.
After 5 minutes of flashing
red light the unit will
automatically shut off and
will need to be plugged in.
Charging the Battery
The Sound Rocker is equipped with rechargeable batteries.
1 Connect the power adapter
to the power DC port on the
control panel. Then, plug the power
adapter into an electrical outlet.
2 Charge the battery for 6 hours before
attempting to unplug and use remotely.
When the unit is fully charged the red
lights will shut off.
Note: Run time of the rechargeable
battery is approximately 4-5 hours.
3
Page 5
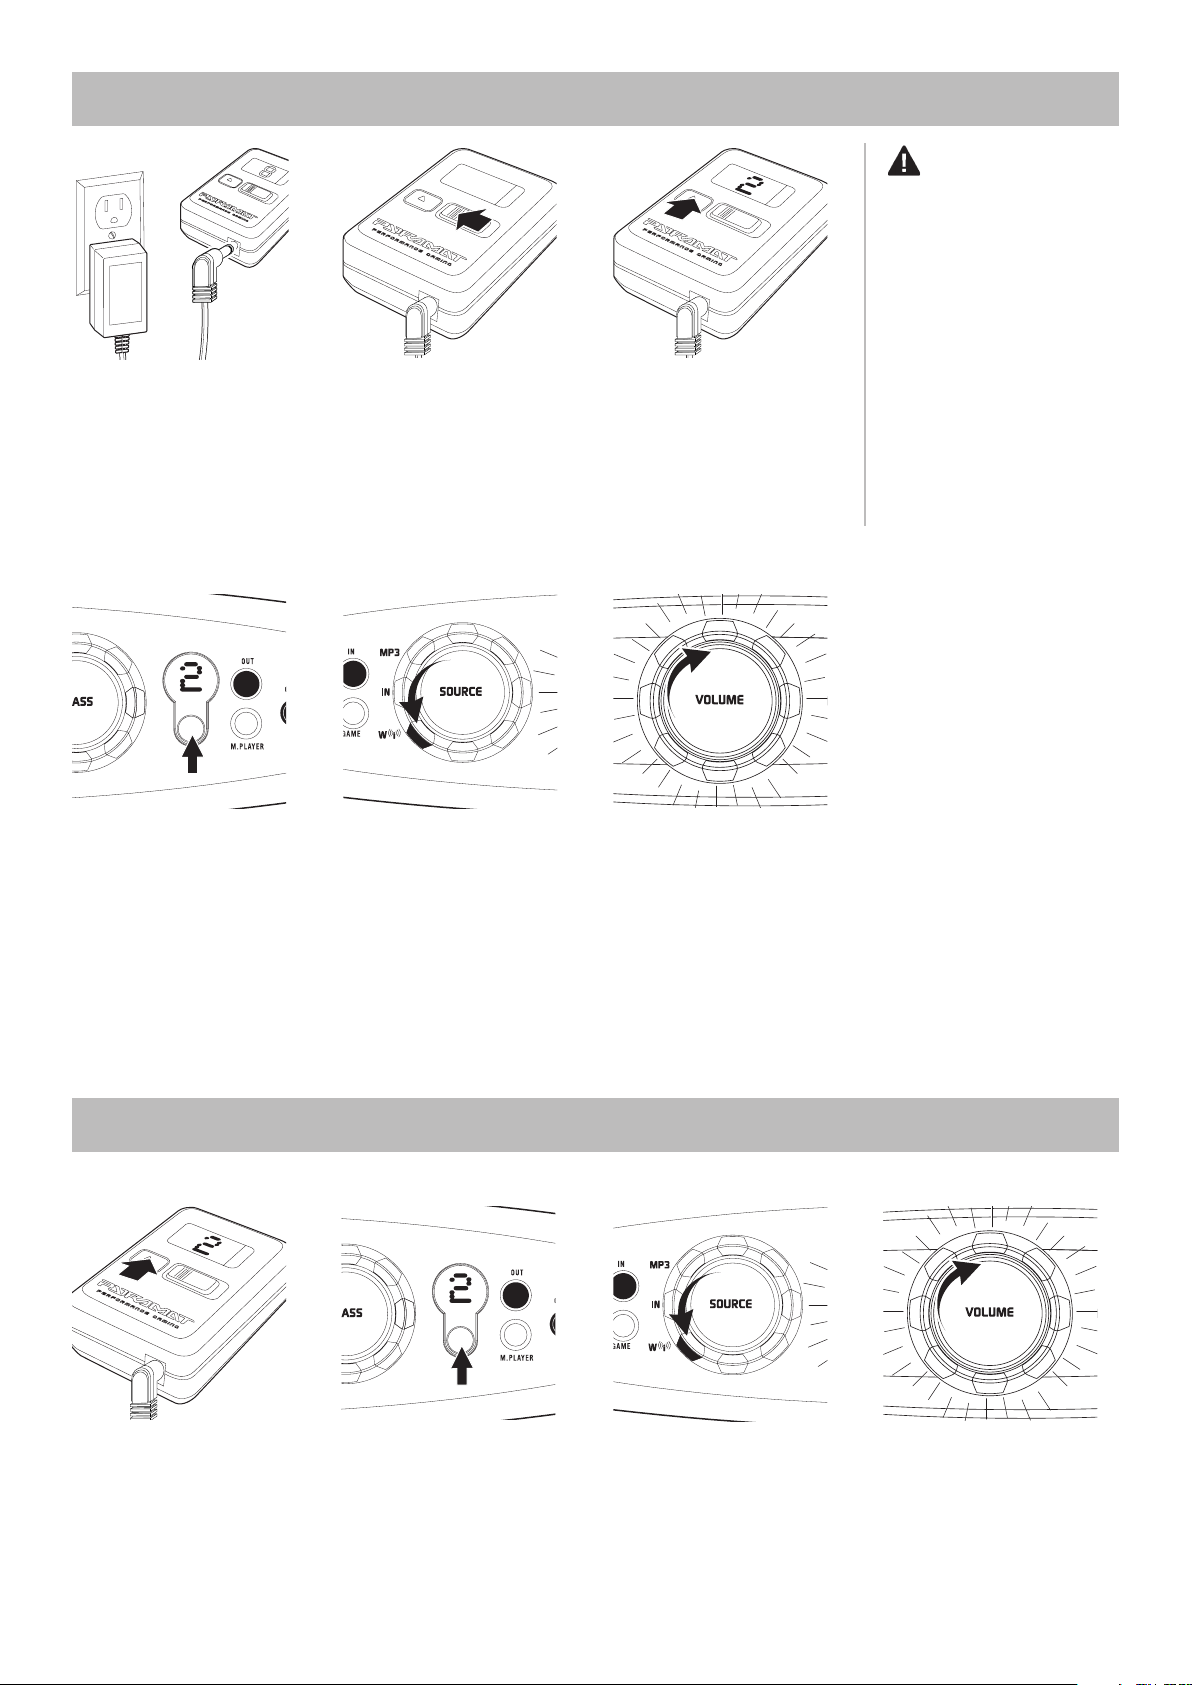
WIRELESS TRANSMITTER SET-UP
WARNING: Do not
mix old and new batteries. Do not
mix alkaline, standard (carbon-zinc),
or rechargeable (nickel-cadmium)
batteries.
1 Plug the transmitter power
adapter into the power port on
the transmitter. Then, plug the
power adapter into an electrical
outlet.
4 Select the same channel as the
transmitter on the Sound Rocker’s
control panel by pressing the channel button. Example: 1–1, 2–2, etc.
To add multiple Sound
Rockers, simply select the same
channel.
Note: Both the transmitter and
control panel must be on the same
channel to hear sound.
2 Turn the power switch on the
front of the transmitter to the “on”
position
5 Turn the source knob on the
control panel to W.
3 Press the channel button to
select the desired transmitter
channel: Eight channels are
available for the best quality
reception. If you experience
static or poor reception, try
another channel.
6 Twist the volume knob on
the control panel to click on the
power.
WIRELESS MULTI-USER CONNECTION
Only one wireless transmitter is needed for multi-users to connect.
1 For multi-player wireless
set-up, follow the wireless
transmitter set-up steps above.
2 To add multiple Sound Rockers,
simply select the same channel
on each additional chair. One
transmitter allows up to 8 chairs to
be used at the same time.
Note: Both the transmitter and
control panel must be on the same
channel to hear sound.
3 Turn the source knob on the
control panel to W.
4
4 Twist the volume knob on
the control panel to click on the
power.
Page 6
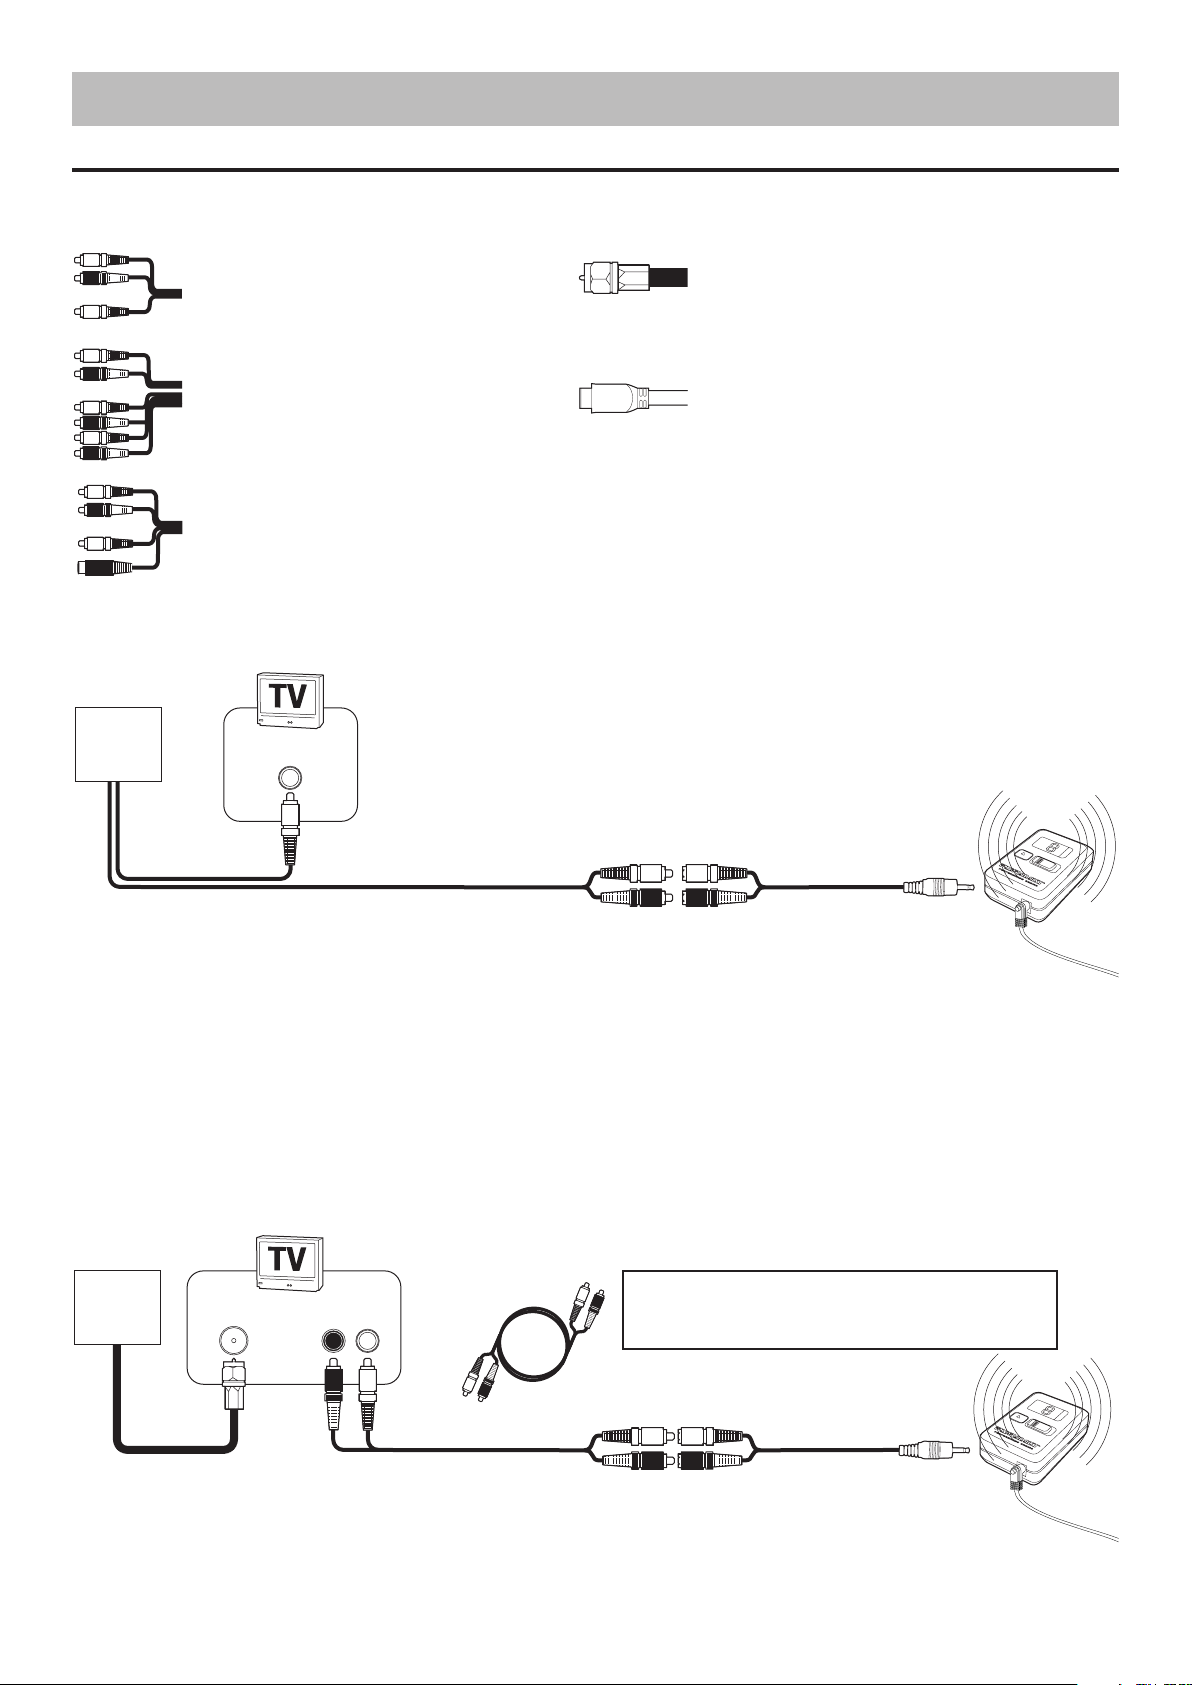
WIRELESS CONNECTION METHODS
Video Game Console Connection Cables
XBOX 360TM, PLAYSTATION 2TM, PLAYSTATION 3TM, GAMECUBE
There are five types of audio/video cables that come with video game consoles:
TM
and others
1. Standard AV/RCA Cable
(red, white–audio; yellow–video)
2. High Definition AV/RCA Cable
(red, white–audio; yellow, blue, red, green–video)
3. S-Video AV/RCA Cable
(red, white–audio; yellow, black–S-video)
3. Coaxial Cable
(single black cable)
5. HDMI Cable
(single cable)
AV/RCA Cable Connection
For standard AV/RCA cable, high definition AV/RCA cable and S-Video AV/RCA cable.
VIDEO
GAME
CONSOLE
VIDEO
INPUT
Note: If you have a coaxial cable
or HDMI cable, you will also need
to purchase a male to male RCA
audio cable from the console
manufacturer.
Yellow video cable
1 Follow the instructions from the
video game console’s manufacturer
to connect the video cable(s) from
your video game console to your
television.
Note: Depending on your
connection, there may be more than
one video cable from your video
game console.
2 Connect the RCA audio cables
from the video game console to
the RCA to 3.5mm mini cable.
3 Connect the 3.5mm mini cable
the INPUT port on the transmitter.
RCA to 3.5mm
mini cable
Coaxial Cable Connection
If you have a coaxial cable, you will also need to purchase a male to male RCA audio cable from the console manufacturer.
You will need
VIDEO
GAME
CONSOLE
Coaxial cable
COAXIAL CABLE
INPUT
AUDIO
OUTPUT
male to male RCA cables
(not included)
Note: If you do not have an audio output on your TV you will
need to purchase an AV/RCA cable from the video game console
manufacturer to replace the coaxial cable.
RCA to 3.5mm
mini cable
1 Follow the instructions from the
video game console’s manufacturer
to connect the coaxial cable from
your video game console to your
television.
2 Connect the male to male
RCA audio cable (not included)
to the AUDIO OUTPUT source on
the TV.
3 Connect the RCA audio cables
from the TV to the RCA to 3.5mm
cable.
5
4 Connect the
3.5mm mini cable the
INPUT port on the
transmitter.
Page 7
AUDIO
OUTPUT
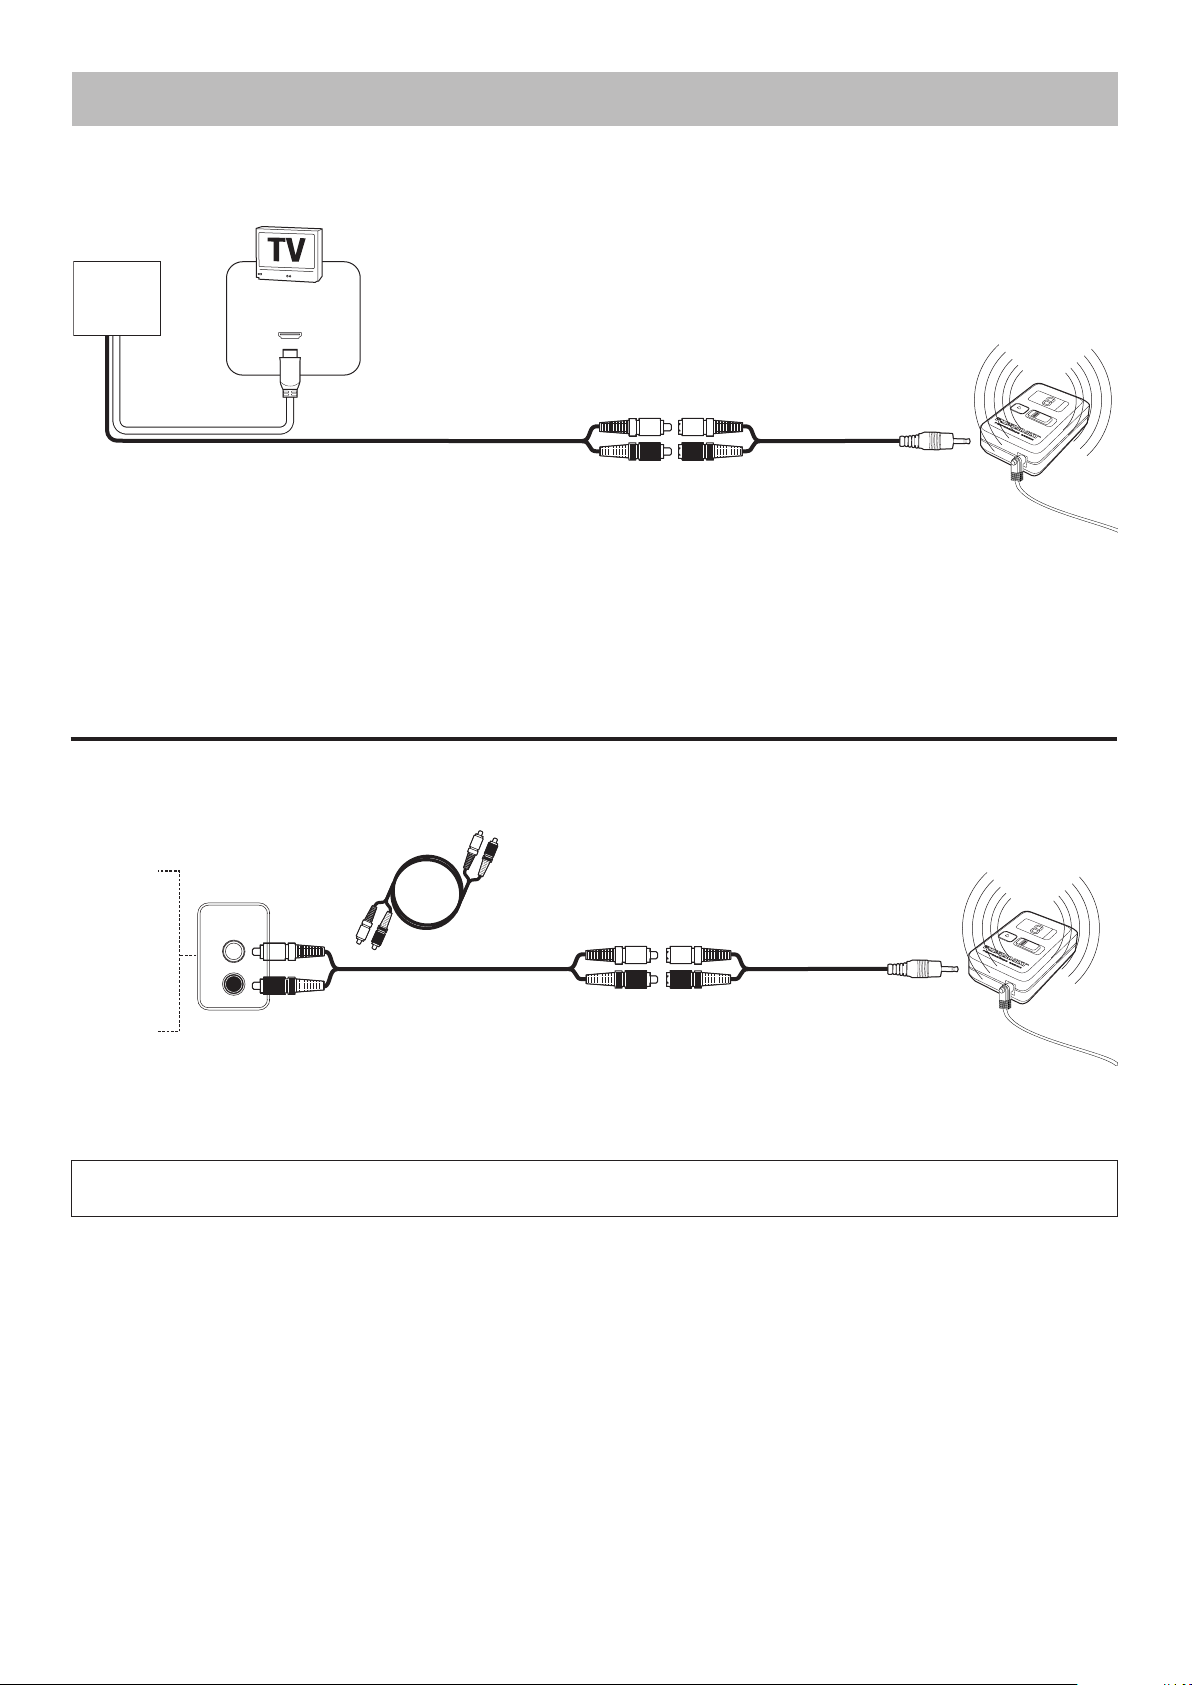
WIRELESS CONNECTION METHODS
HDMI Cable and PS3 Connection
HDMI cable is for high definition and transfer both audio and video from the source to the TV. If you are using an HDMI cable with your PS3 you
can use the HDMI connection for High Definition Video and use the AV/RCA Cable for audio.
PS3 VIDEO
GAME
CONSOLE
HDMI CABLE
INPUT
HDMI cable
1 Follow the instructions from
the PS3 to connect the HDMI cable
from your video game console to
your television.
2 Connect the RCA audio cables
from the video game console to the
RCA to 3.5mm mini cable.
Note: Do not connect the yellow
(video) cable.
3 Connect the 3.5mm mini
cable to the input port on the
transmitter.
Audio/Video Device Connection
TV, DVD PLAYER, VCR, SATELLITE RECEIVER, STEREO
You will need
male to male RCA cables
(not included)
TV
DVD
VCR
SATELLITE
RECEIVER
STEREO
3.5mm mini cable
4 On your
PS3 system menu
go to Settings>Sound
Settings>Audio Output
>Settings>Select Audio Input
Connector or AV Multi. The audio
will now play through the RCA
Cables and the TV will still have
High Definition.
3.5mm mini cable
1 Connect a male to male RCA
audio cable (not included) to
the audio/video device’s AUDIO
OUTPUT source.
Note: Connection must be made to an AUDIO OUTPUT source. The red and white audio connections on
the front of most devices are AUDIO INPUT. SOUND WILL NOT PLAY FROM AN AUDIO INPUT SOURCE.
2 Connect the male to male RCA
audio cable (not included) from the
audio/video device to the RCA to
3.5mm mini cable.
3 Connect the 3.5mm mini
cable to the input port on the
transmitter.
6
Page 8
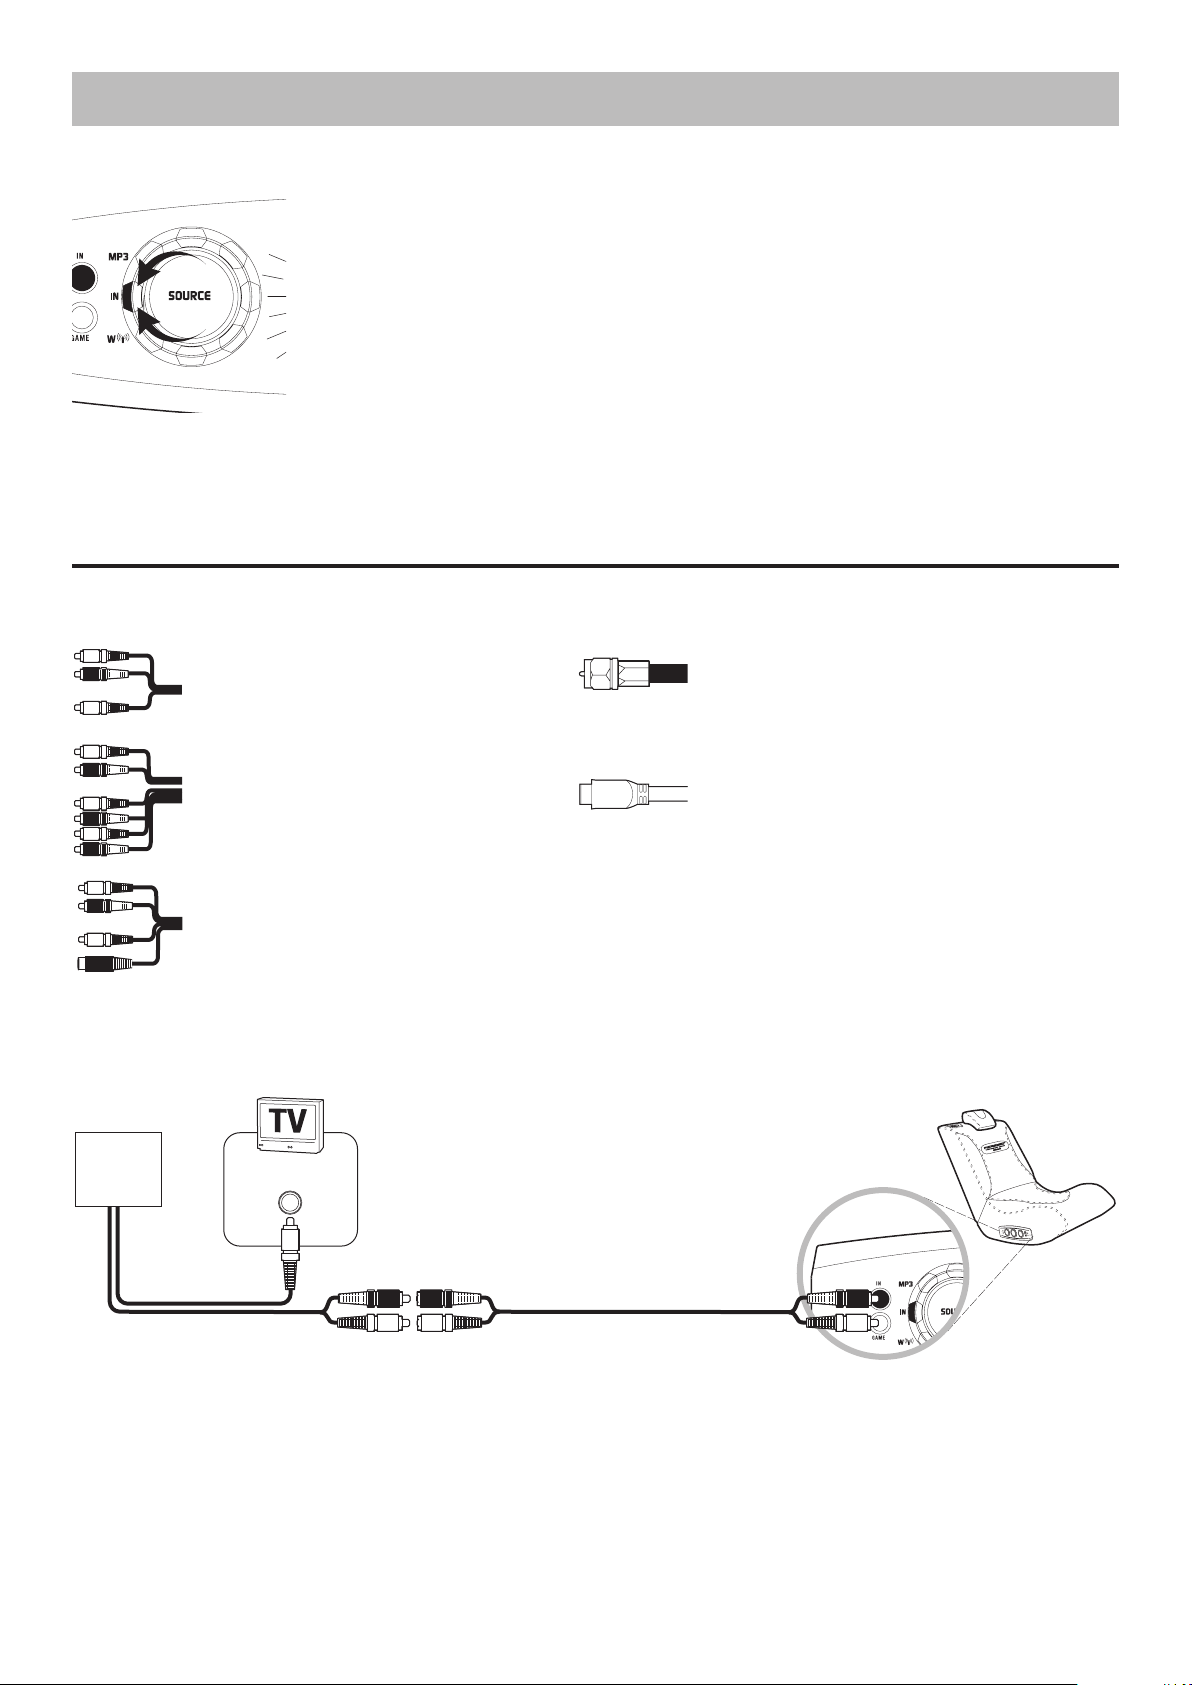
DIRECT CONNECTION METHODS
If you experience static or poor reception from your wireless connection in your location, you may need to select one of the direct connection
methods below to ensure the best possible sound quality.
1 Turn the source knob on the
control panel to IN.
Video Game Console Connection Cables
XBOX 360TM, PLAYSTATION 2TM, PLAYSTATION 3TM, GAMECUBE
There are five types of audio/video cables that come with video game consoles:
TM
and others
1. Standard AV/RCA Cable
(red, white–audio; yellow–video)
2. High Definition AV/RCA Cable
(red, white–audio; yellow, blue, red, green–video)
3. S-Video AV/RCA Cable
(red, white–audio; yellow, black–S-video)
3. Coaxial Cable
(single black cable)
5. HDMI Cable
(single cable)
AV/RCA Cable Connection
For standard AV/RCA cable, high definition AV/RCA cable and S-Video AV/RCA cable.
VIDEO
GAME
CONSOLE
VIDEO
INPUT
Note: If you have a coaxial cable
or HDMI cable, you will also need
to purchase a male to male RCA
audio cable from the console
manufacturer.
Yellow video cable
1 Follow the instructions from the
video game console’s manufacturer
to connect the video cable(s) from
your video game console to your
television.
Note: Depending on your
connection, there may be more than
one video cable from your video
game console.
Male to female RCA audio cable
2 Connect the RCA audio cable
from the video game console to the
female end of the RCA audio cable.
3 Connect the male end of the
RCA audio cable to the AUDIO IN
port on the control panel.
7
Page 9
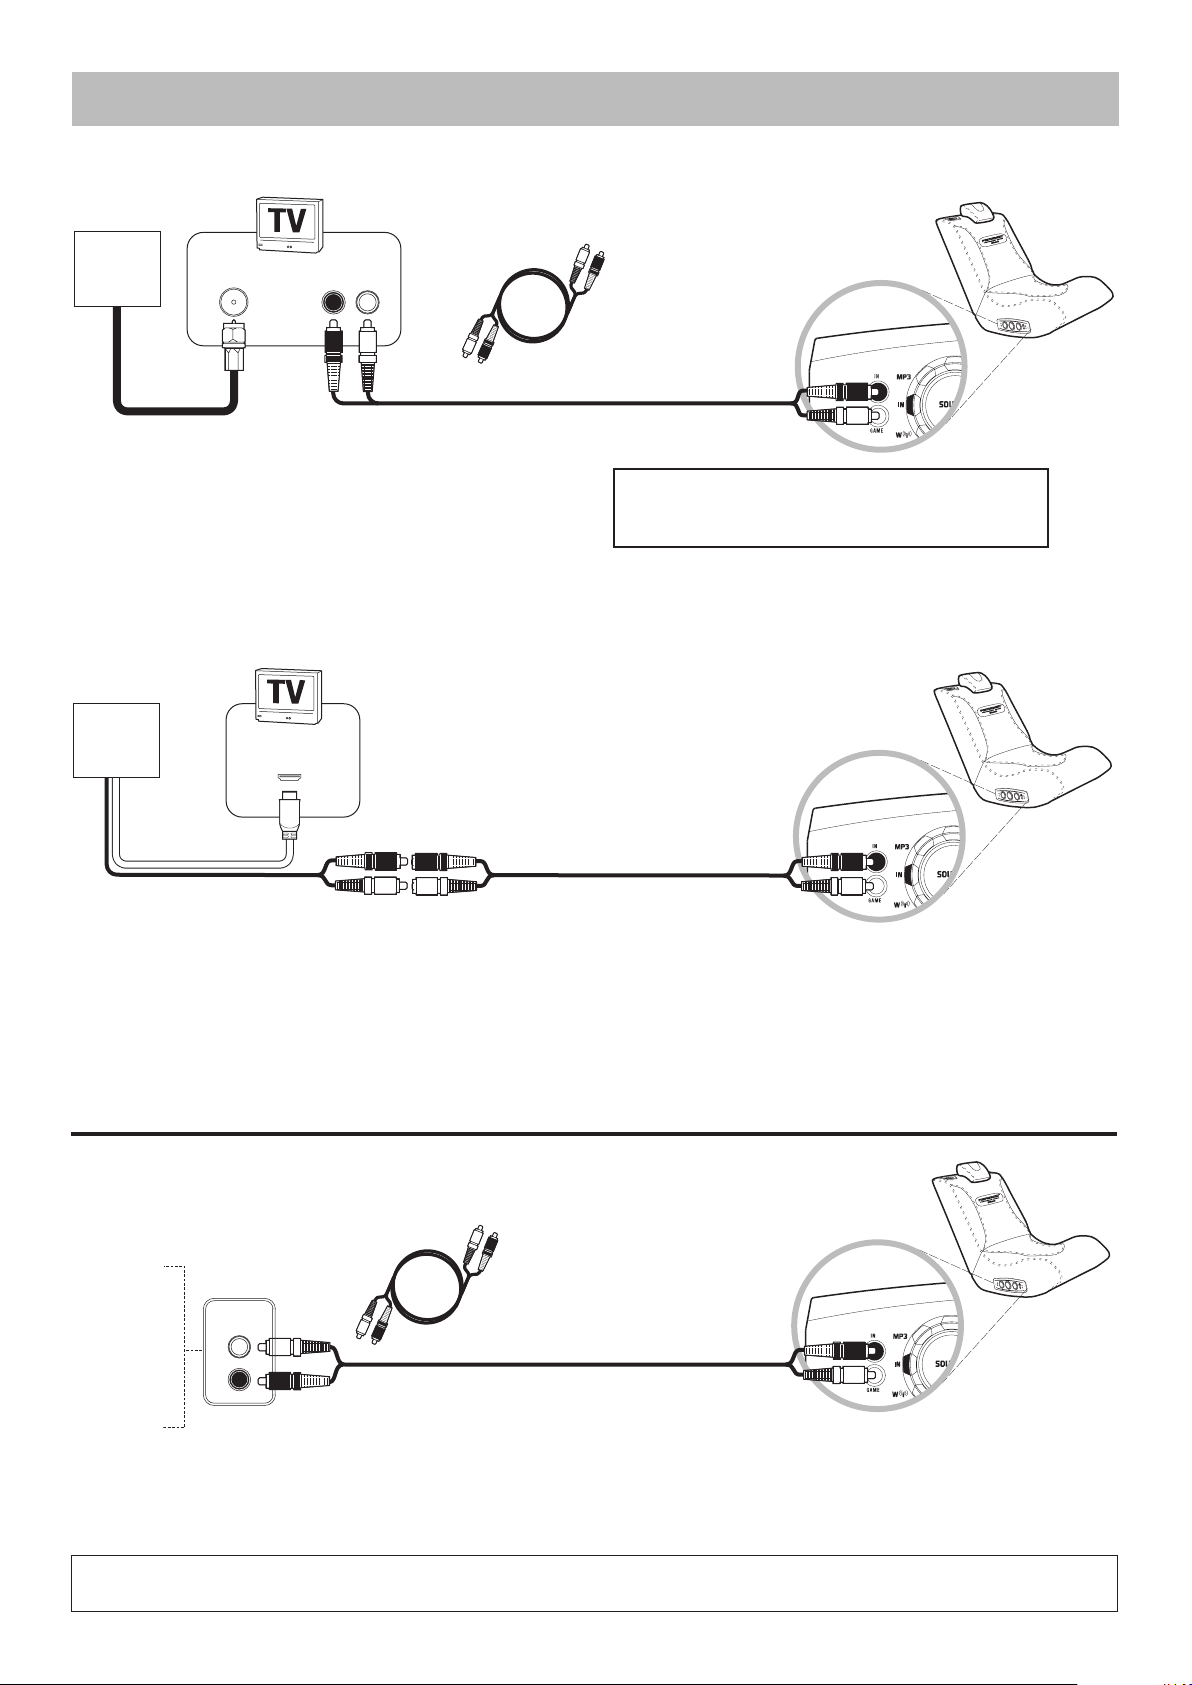
DIRECT CONNECTION METHODS
AUDIO
OUTPUT
Coaxial Cable Connection
If you have a coaxial cable, you will also need to purchase a male to male RCA audio cable from an electronics retailer.
You will need
VIDEO
GAME
CONSOLE
Coaxial cable
COAXIAL CABLE
INPUT
AUDIO
OUTPUT
male to male RCA cables
(not included)
1 Follow the instructions from the
video game console’s manufacturer
to connect the coaxial cable from
your video game console to your
television.
2 Connect the male to male
RCA audio cable (not included)
to the INPUT port on the control
panel.
Note: If you do not have an audio output on your TV you will
need to purchase an AV/RCA cable from the video game console
manufacturer to replace the coaxial cable.
HDMI Cable and PS3 Connection
HDMI cable is for high definition and transfer both audio and video from the source to the TV. If you are using an HDMI cable with your PS3 you
can use the HDMI connection for High Definition Video and use the AV/RCA Cable for audio.
PS3 VIDEO
GAME
CONSOLE
HDMI cable
1 Follow the instructions from
the PS3 to connect the HDMI cable
from your video game console to
your television.
HDMI CABLE
INPUT
Male to female RCA audio cable
2 Connect the RCA audio cable
from the video game console to the
female end of the RCA audio cable.
3 Connect the male end of the
RCA audio cable to the AUDIO IN
port on the control panel.
4 On your PS3 system menu go
to Settings>Sound Settings>Audio
Output >Settings>Select Audio
Input Connector or AV Multi. The
audio will now play through the
RCA Cables and the TV will still
have High Definition.
Audio/Video Device Connection
TV, DVD PLAYER, VCR, SATELLITE RECEIVER, STEREO
You will need
male to male RCA cables
(not included)
TV
DVD
VCR
SATELLITE
RECEIVER
STEREO
1 Connect a male to male RCA
audio cable (not included) to
the audio/video device’s AUDIO
OUTPUT source.
Note: Connection must be made to an AUDIO OUTPUT source. The red and white audio connections on
the front of most devices are AUDIO INPUT. SOUND WILL NOT PLAY FROM AN AUDIO INPUT SOURCE.
2 Connect the male to male RCA
audio cable (not included) from the
audio/video device to the INPUT
port on the control panel.
8
Page 10
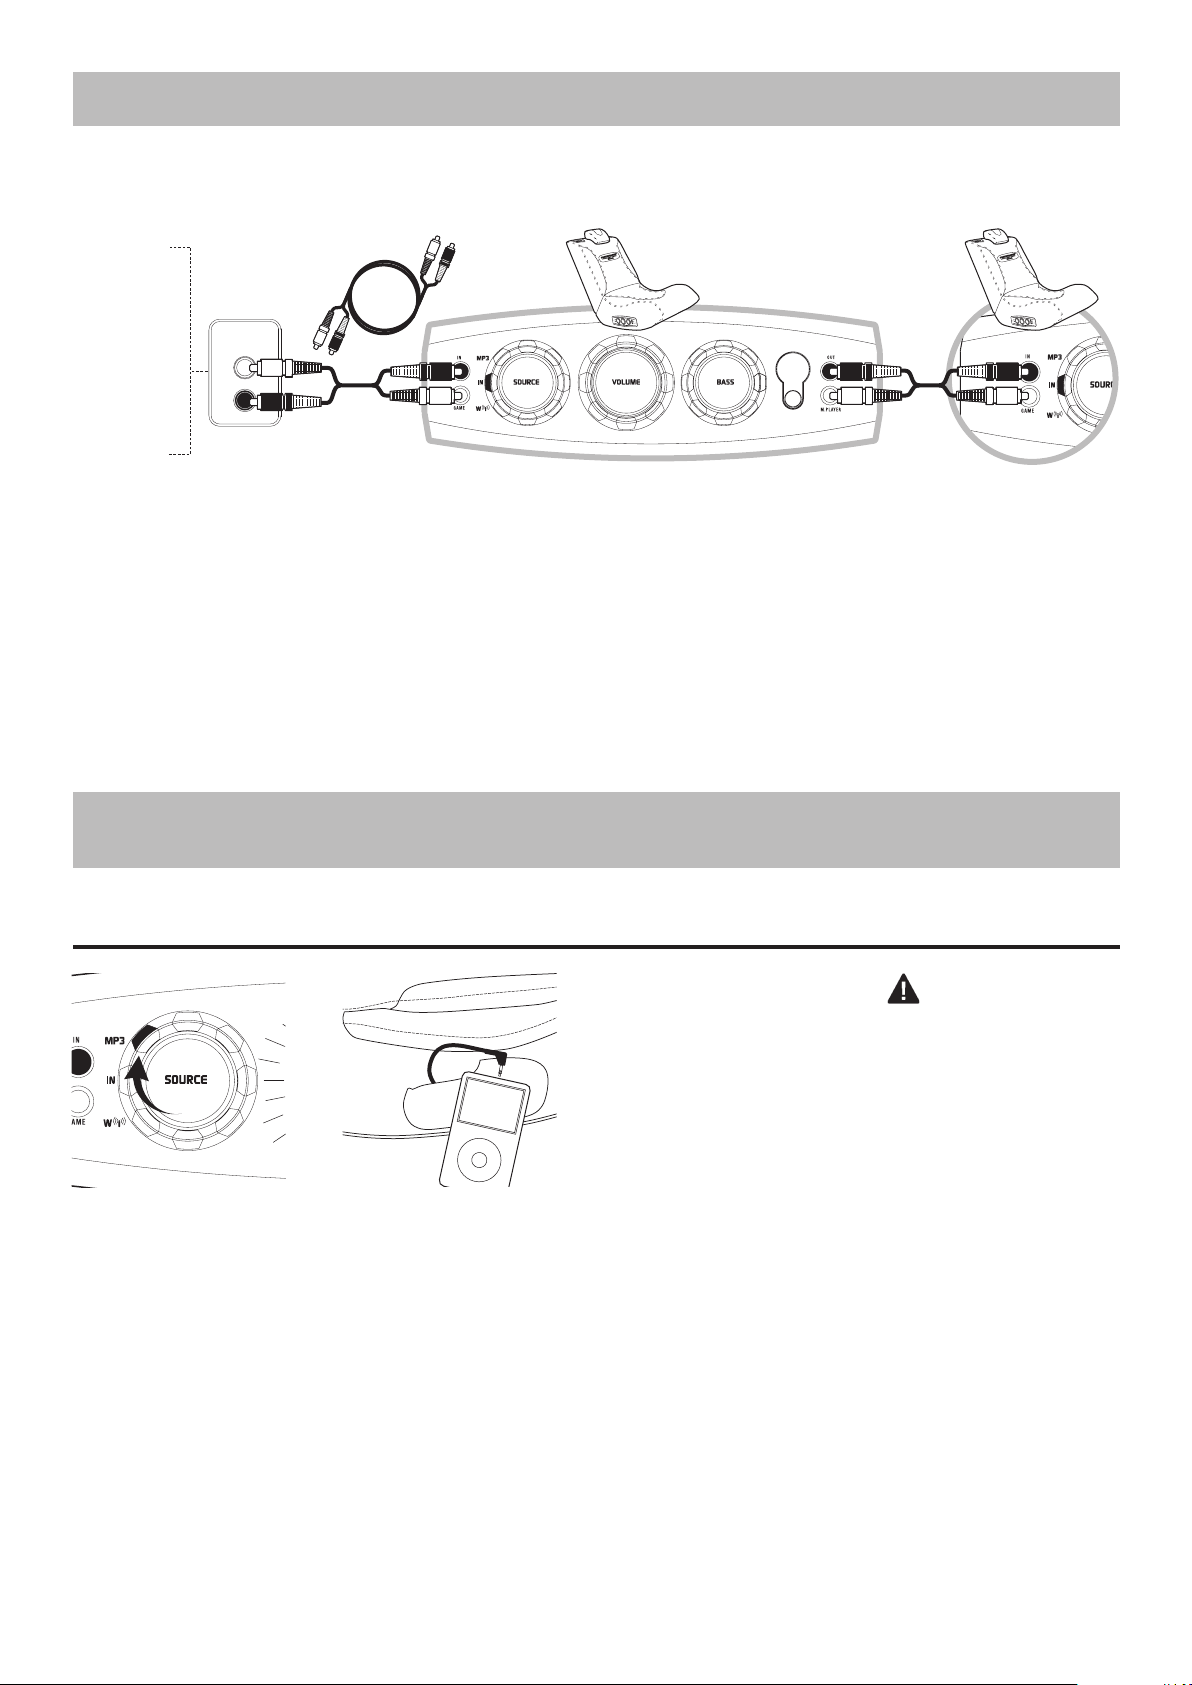
AUDIO
OUTPUT
DIRECT MULTI-USER CONNECTION
Connect up to four Sound Rockers together for multi-user fun!
You will need
male to male RCA cables
(not included)
VIDEO GAME
CONSOLE
TV
DVD
VCR
SATELLITE
RECEIVER
STEREO
1 After connecting one Sound
Rocker to an audio/video device,
you can connect additional Sound
Rockers together.
2 Connect a male to male RCA
audio cable (not included) to the
multi-player OUTPUT port on the
first Sound Rocker and then to
the INPUT port on the second
Sound Rocker.
3 Repeat step 2 to add up to four
Sound Rockers.
PORTABLE AUDIO/HANDHELD GAME DEVICE
CONNECTION
Use the 3.5mm mini plug to connect to an MP3 player, an IPOD, or a handheld
game device such as Nintendo DS, Nintendo DS Lite, and PSP.
CAUTION: Power
off all audio/video devices prior to
proceeding with the Sound Rocker
connection method.
1 Turn the source knob on the
control panel to MP3.
2 Connect the device to the
Sound Rocker with the 3.5mm mini
plug from inside the pocket.
Note: If your handheld game
device does not have a headphone
jack it is not compatible with the
Sound Rocker.
9
Page 11

TROUBLESHOOTING GUIDE
Problem Possible Cause Solution
Unable to hear sound.
Transmitter power light
does not light up.
Sound Rocker does not
turn on.
Unable to connect to the
gaming console.
The RCA audio cables are not connected
properly.
Transmitter and/or Sound Rocker power is
not on.
Different channels are selected on the
transmitter and control panel.
The source knob on the control panel is in the
wrong position.
Cable not connected properly.
The DC power adapter is disconnected from
the electrical outlet or the electrical outlet has
no power.
Your video game console has a coaxial cable
instead of an RCA audio cable.
Check the connection on your audio/video device. The RCA cables should be
connected to the AUDIO OUTPUT jacks. Check the connection on your rocker.
The RCA cables (red and white) must be in the AUDIO INPUT ports.
Check to make sure transmitter power is on and the power knob on the
Sound Rocker is on with the volume turned up.
Check to make sure that both the wireless channel on the transmitter and
the control panel are on the same: 1–1, 2–2, etc.
Turn knob to W (wireless) or IN (direct connection) for video games and
audio/video devices. Turn knob to MP3 for MP3 and portable CD players.
See page 2 for the correct knob position for the device you are playing.
Re-check your cable connections and make sure the outlet you’re using
works.
Check the plug on the DC power adapter. When properly connected with the
volume knob on, the logo on the back of the rocker will illuminate.
If the Sound Rocker still doesn’t power up, try another electrical outlet.
Use the instructions provided by the video game console’s manufacturer to
hook up the video game console to an intermediary device (such as a TV,
DVD, VCR, satellite receiver, etc.). Your intermediary device must have
both a coaxial input jack (the standard jack for cable TV) and an RCA audio
output jack.
Sound only plays from one
speaker.
Sound Rocker plays sound
from one source but not
another.
Missing or broken cables.
Missing or broken power
adapter.
The yellow RCA video cable is not connected
properly.
The RCA audio cables are not connected
properly.
Audio/video device has a single MONO audio
output (a common problem when connecting
to an older TV or VCR).
The source knob on the control panel is in the
wrong position.
The RCA audio cables are not connected
properly.
Purchase an RCA replacement cable directly from the console manufacturer.
The yellow RCA video cable connects to the VIDEO INPUT jack on the TV.
Refer to the instructions from the video game console’s manufacturer to
connect any other video cables to your TV.
Check that all RCA audio connections are correct–red to red, white to white.
If your audio source is mono only, as found mainly on older model TVs and
VCRs, an RCA “Y” adaptor (1 male to 2 male, not included) is needed to send
the signal to both Pyramat speakers. Please note: the use of this type of
adapter will not produce a true stereo sound. For optimal performance, it is
recommended that you connect your Sound Rocker to stereo outputs only.
Turn knob to W (wireless) or IN (direct connection) for video games and
audio/video devices. Turn knob to MP3 for MP3 and portable CD players.
See page 2 for the correct knob position for the device you are playing.
Check that all RCA audio connections are correct–red to red, white to white.
Replace items immediately. Replacement cables can be purchased at your
local audio accessory dealer.
Replace immediately with an authorized Pyramat power adapter. Do not use
the unit until the damaged power adapter has been replaced by calling the
Pyramat service center.
Parts can be purchased on the Pyramat website www.pyramat.com
Need Help? Visit our website at www.pyramat.com, send an e-mail to [email protected]
or call toll-free at 877-591-1012.
10
Page 12

WARRANTY
Digital PM450-WR with Rechargeable Battery
Sound Rocker Limited Warranty
Pyramat warranties this product and any included
accessories against defects in material and
workmanship for a period of 90 days from the date of
first consumer purchase. This warranty is enforceable
only by the original purchaser. ALL DAMAGED OR
MISSING PARTS MUST BE REPORTED WITHIN 14
DAYS OF PURCHASE.
This warranty covers all defects in materials and
workmanship, but DOES NOT COVER the following:
1. Damage, deterioration or malfunction resulting from:
a. Acts of God, accident, misuse, abuse, negligence,
improper installation, maintenance or operation, or
failure to follow the instructions contained in this
manual.
b. Any shipment of the product (claims must be
presented to the carrier).
c. Repair, attempted repair or modification by anyone
other than the Pyramat Service Center.
2. Any unit which has been altered or on which the
serial number has been defaced, modified or removed.
3. Any unit used for industrial or commercial purposes.
REPAIR OR REPLACEMENT AS PROVIDED UNDER
THIS WARRANTY IS THE EXCLUSIVE REMEDY OF THE
CONSUMER. PYRAMAT SHALL NOT BE LIABLE FOR
ANY INCIDENTAL OR CONSEQUENTIAL DAMAGES
FOR BREACH OF ANY EXPRESS OR IMPLIED
WARRANTY ON THIS PRODUCT. EXCEPT TO THE
EXTENT PROHIBITED BY APPLICABLE LAW, ANY
IMPLIED WARRANTIES, INCLUDING WARRANTIES
OF MERCHANTABILITY AND FITNESS FOR A
PARTICULAR PURPOSE, ARE LIMITED IN DURATION
TO THE LENGTH OF THIS WARRANTY.
Some states do not allow the exclusion or limitation of
incidental or consequential damages, or allow limitations
on how long an implied warranty lasts, so the above
limitations may not apply to you.
TO OBTAIN WARRANTY SERVICE
For service assistance, product information, or to locate
the dealer nearest you, please call or write:
Pyramat Service Center
877-591-1012
[email protected]
For further information on how to order accessories for
this product or other Pyramat products, please visit our
website at www.pyramat.com.
4. Products sold AS IS or WITH ALL FAULTS, or
consumables (such as fuses or batteries).
5. Customer installation, set-up, adjustments or signal
reception problems.
Pyramat will repair or replace (at its discretion) units
covered by this warranty, without charge to the
consumer for labor or materials. CONSUMER IS
RESPONSIBLE FOR ANY INSTALLATION OR REMOVAL
CHARGES AND ANY INITIAL SHIPPING CHARGES.
However, we will pay the return shipping charges to
any destination within the United States if repairs are
covered by the warranty.
IMPORTANT
For your records, save your original sales receipt with
this manual and write the serial number here.
––––––––––––––––––––––––––––––––––––––––––––––––––
11
Page 13

FCC CONTENT
FCC part 15.21:
Warning : Changes or modifications to this unit not expressly approved by the party responsible for compliance could
void the user’s authority to operate the equipment.
FCC part 15.105:
NOTE : This equipment has been tested and found to comply with the limits for a Class B digital device, pursuant to
Part 15 of the FCC Rules. These limits are designed to provide reasonable protection against harmful interference in
a residential installation. This equipment generates, uses, and can radiate radio frequency energy and, if not installed
and used in accordance with the instructions, may cause harmful interference to radio communications. However,
there is no guarantee that interference will not occur in a particular installation. If this equipment does cause harmful
interference to radio or television reception, which can be determined by turning the equipment off and on, the user
is encouraged to try to correct the interference by one or more of the following measures :
• Reorient or relocate the receiving antenna.
• Increase the separation between the equipment and receiver.
• Connect the equipment into an outlet on a circuit different from that to which the receiver is connected.
• Consult the dealer or an experienced radio TV technician for help.
REMINDING
This device complies with Part 15 of the FCC Rules. Operation is subject to the following two conditions:
(1) this device may not cause harmful interference, and
(2) this device must accept any interference received, including interference that may cause undesired operation
If you have problems with your Sound Rocker,
DO NOT RETURN TO STORE.
Follow instructions in this manual.
Failure to follow these instructions may damage
your Sound Rocker and void your warranty.
Need Help? Visit our website at www.pyramat.com, send an e-mail to
or call toll-free at 877-591-1012.
Printed in China for:
Pyramat, LLC
PO Box 3610
Cerritos, CA 90703
© Copyright 2007 Pyramat, LLC
12
08032007
 Loading...