

Page 1
IM PORTAN
T:
Pack carefully
in
original
package
if
possible.
We
are
not responsible for
damage
incurred
in returning items for repair.
A letter stating your
exact
street add res, daytime
phone
number,
and
the probl
em
you are experiencing should
be
included.
You
must also
enclose a copy
of the origina l receipt a sproof of
date
of
purchase
Monday Through Thursday. gAM to 5PM
Friday gAM to 1
PM
Eastern.
Page 2
TM
1
3
2 4
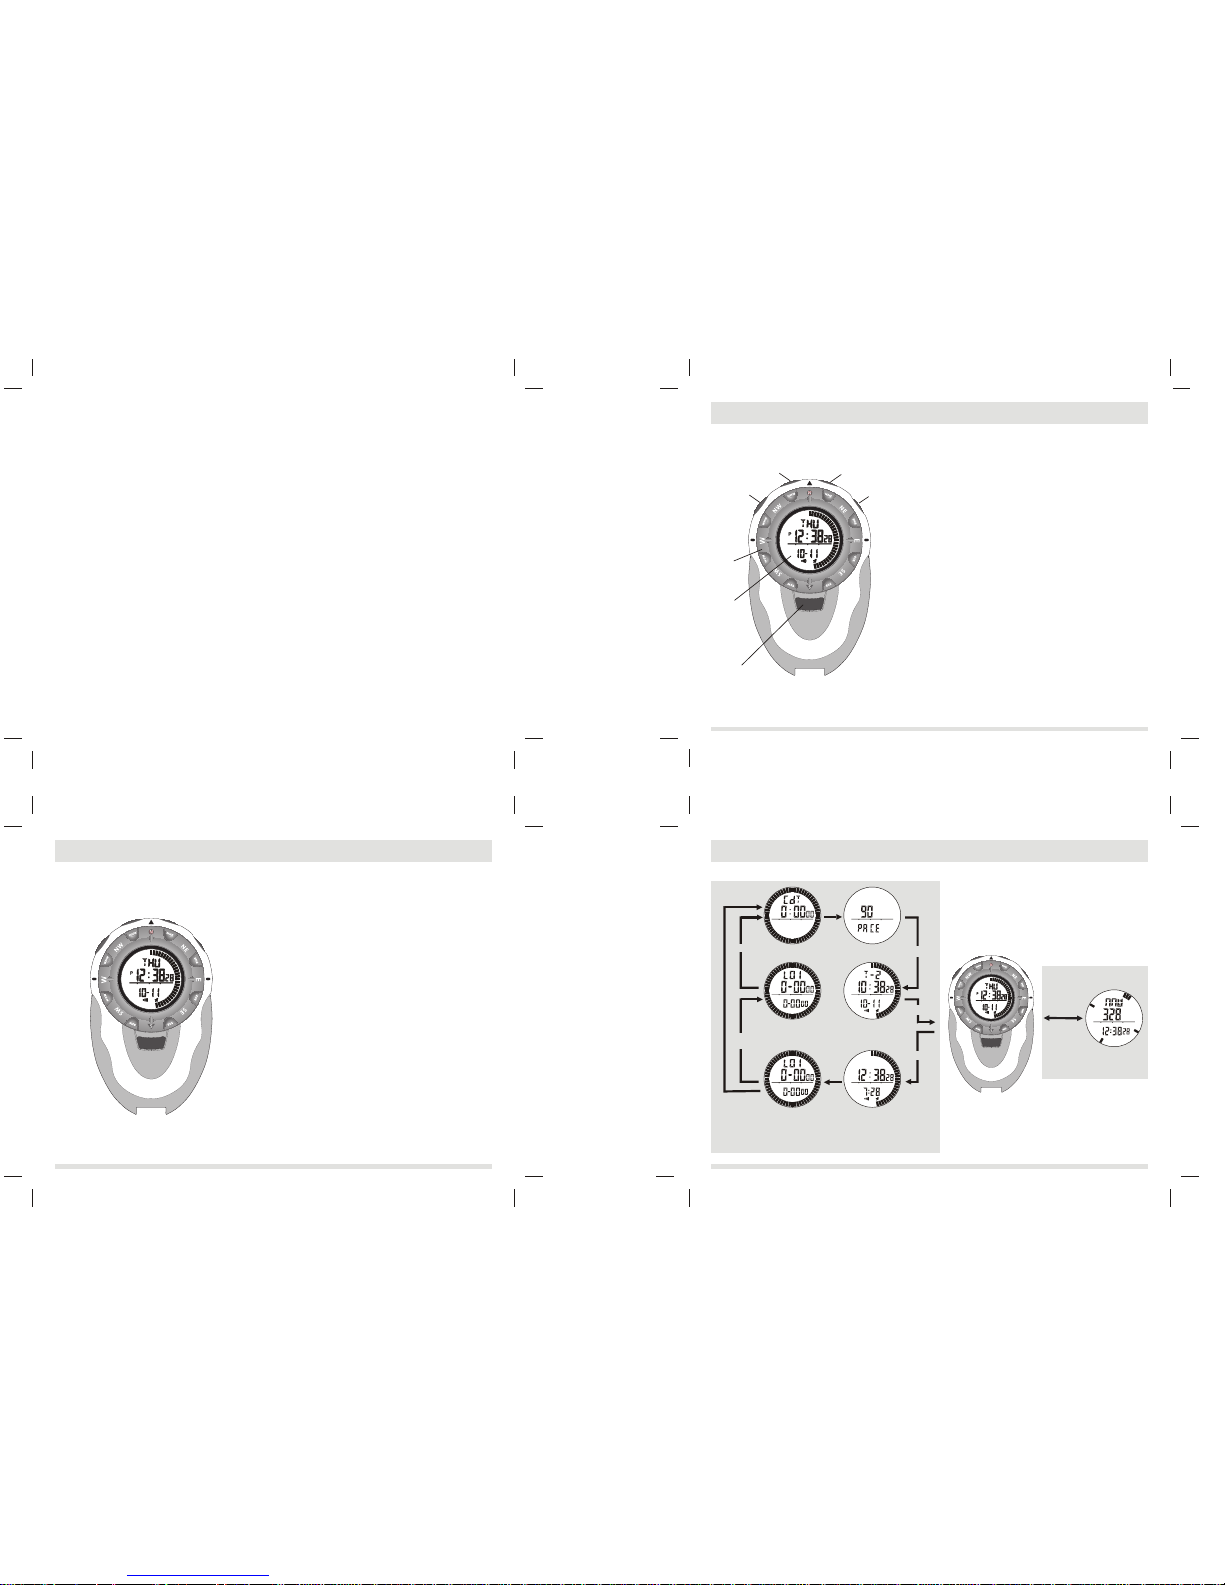
1.0 Introduction
3.0 Major Function Modes
display
Alarm Mode
Chronograph
Mode
Lap Memory
Recall Mode
Countdown
Timer Mode
Pacer Mode
Dual Time Mode
2.0 Parts and Its Functions
[compass]
Compass Mode
Thanks of your purchase of the HandHeld TrackMaster.
Your HandHeld TrackMaster features electronic sensors that
measures the compass directions.
Your HandHeld TrackMaster provides directions to you at the
time during you are hiking, climbing and doing other outdoor
activities.
Your HandHeld TrackMaster is carefully designed and
produced for outdoor activities, in order to utilize these
features of your watch, it is advisable to read the following
instructions:
Read the instruction before you use the HandHeld
TrackMaster.
- Avoid exposing your HandHeld TrackMaster to the extreme
conditions for an unreasonable time.
- Avoid rough uses or severe impacts to your
HandHeld TrackMaster.
- Do not open the HandHeld TrackMaster's case unless a
certified service agency because your HandHeld TrackMaster
contains precise electronic sensor and components.
- Clean your HandHeld TrackMaster with a soft cloth
occasionally that working for a longer use life of your watch.
- Keep your HandHeld TrackMaster away from magnets or
the appliances which contains magnetic objects such as
mobile phones, speakers and motors.
Your HandHeld TrackMaster also includes normal time, daily
alarm, chronograph, countdown timer, pacer and dual time.
-
- Store your HandHeld TrackMaster in a dry place when it is
not in use.
Mode Button
l
To select among the following modes: Current Time,
Alarm Time, Chronograph, Lap Memory Recall,
Countdown Timer, Pacer and Dual Time Mode.
l
Press and hold the button to change to setting displays
in various modes
l
To select among items which to be set
during setting sequence
l
To select between normal
compass bearing and backward bearing display
in
Compass Mode.
Start/Stop Button
l
To start/stop the timer, chronograph and pacer
l
To
lock / unlock the compass bearing
l
To increase the
number during setting sequences
l
To review the lap
memories by forward reviewing.
Compass Button
l
To select between Current Time and Compass Mode
l
To decrease the number during setting sequences
l
To select Compass function in Chronograph Mode. To
review lap memory by backward reviewing.
l
Press the button to reload the target time in Countdown
Timer Mode. Press and hold the button to reset the timer in
Countdown Timer Mode.
Light Button
l
Press the button once to turn on the EL back light for
about 3 seconds
l
Press and hold the button to
enable/disable the auto-light feature (If the auto-light
feature is enabled, press any button will turn on the back
light for about 3 seconds)
[mode]
[mode]
[mode]
[mode]
[mode]
Remarks 1:
If the chronograph is running, the Lap Memory Recall Mode will b e
reserved for the lap memory recording, hence it can not be reviewed
during this period of time.
[mode]*1
[mode]
[mode]
Current Time Mode
ALCH
REC
CH TM
mode
button
rotatory
ring
light
button
start/stop
button
light
button
compass
button
TM
TM
Page 3
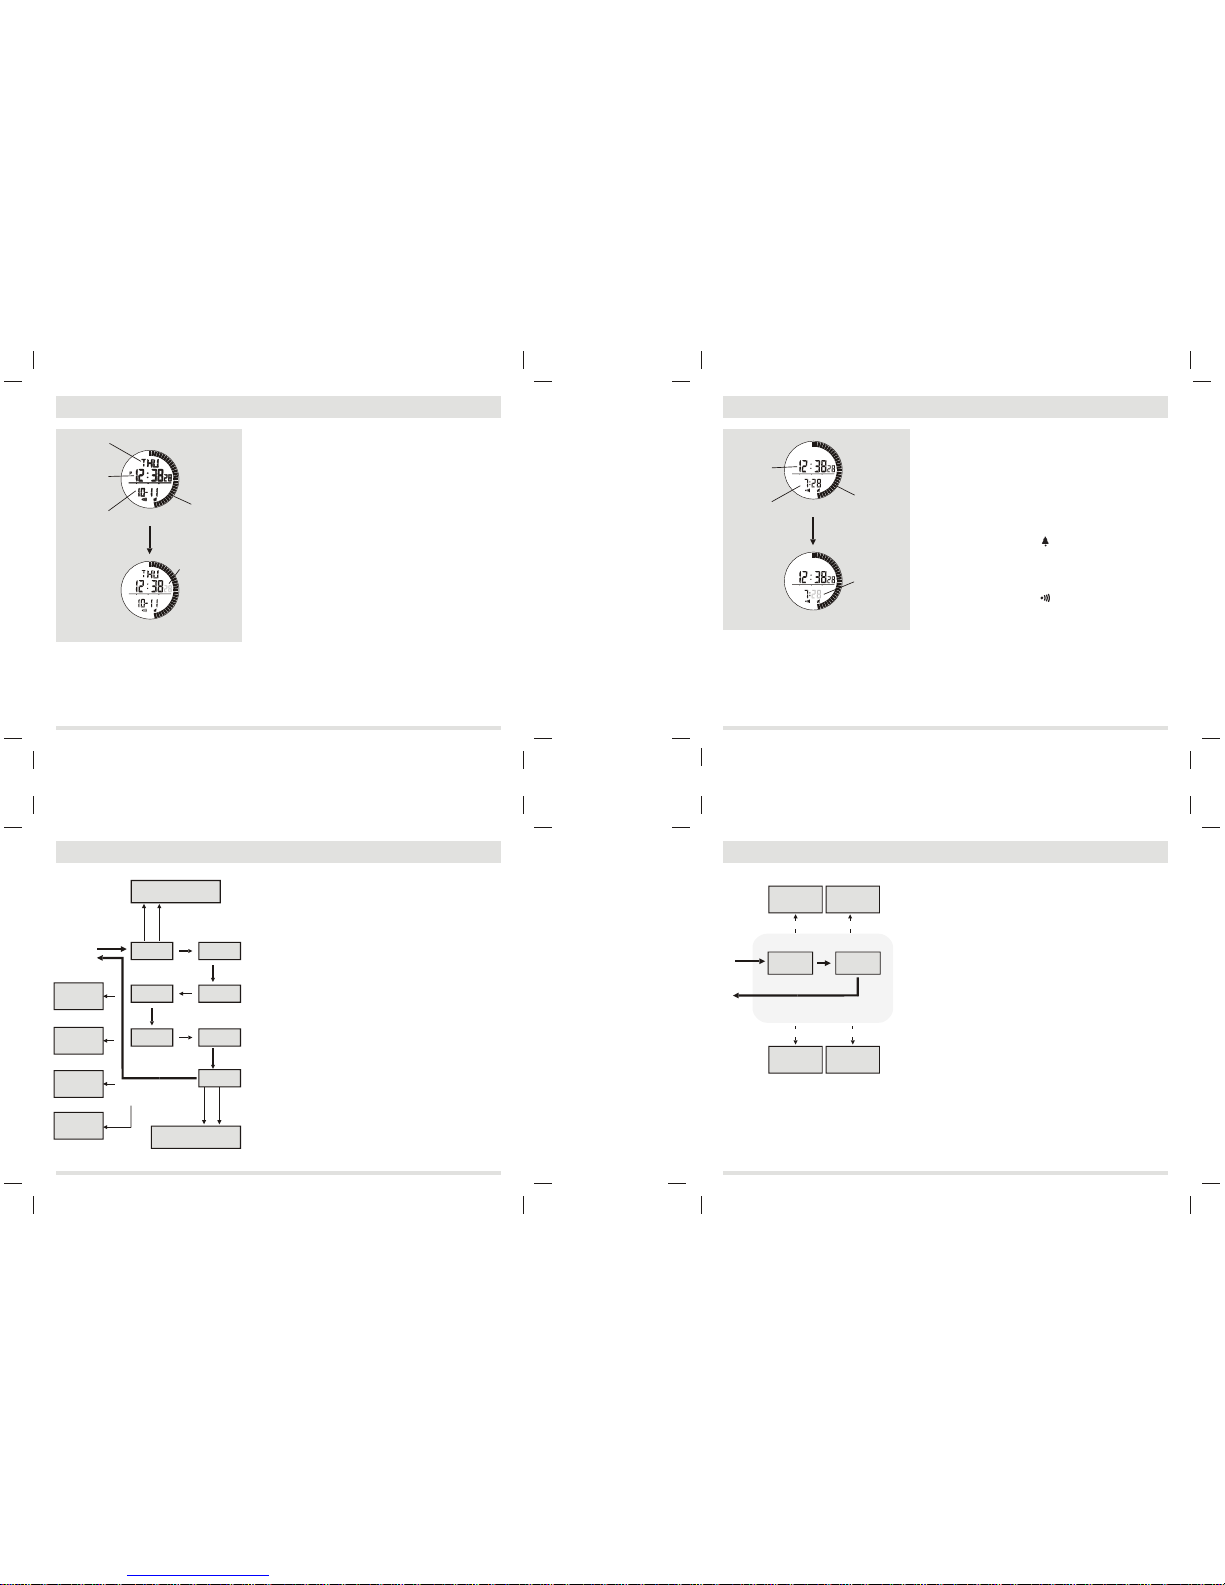
Alarm Time Mode
- The 2nd row of the display shows the current time:
hour, minute and second.
- The 3rd row of the display shows the alarm time: hour,
minute.
- The indicators encircle the display show the
current time in 1 second resolution analogically.
To Set the Chime ON/OFF
- Press the [compass] button to change the ON/OFF status
of the hourly chime, in the Alarm Time Mode.
- When the chime indicator is appeared (chime ON), the
HandHeld TrackMaster beeps every hour on the hour.
To Set the Alarm ON/OFF
- Press the [start/stop] button to change the ON/OFF
status of the alarm, in the Alarm Time Mode.
- When the alarm indicator is appeared (alarm ON), the
HandHeld TrackMaster sounds at the pre-set alarm time
every day.
To Set the Alarm Time
- Press and hold the [mode] button for 2 seconds to change
from Alarm Time Mode to Alarm Time Setting Mode.
- The minute digits flash on the display because it is being
selected.
The Setting Procedures
- Press [mode] button to change the selection following the
Alarm
Time
Setting Sequence.
- If the digits are flashing, press the [start/stop] but ton to
increase the number; hold the [start/stop] button
to change the number at a higher speed. Press the
[compass] button to decrease the number; hold the
[compass] button to change the number at a higher speed.
- After you set the alarm time, press the [mode] button to
exit the setting sequence.
- If no key-stoke has been activated for 30 seconds, the
setting display will auto return to Alarm Time Mode.
5
6
7
Current Time Mode
- The 1st row of the display shows the day of week.
- The 2nd row of the display shows the current time:
hour, minute and second.
- The 3rd row of the display shows the calendar: month,
date.
- The indicators encircle the display show the current time
in 1 second resolution analogically.
To Set the Current Time Mode
- To set the current time, calendar and 12/24 hour
format, press and hold the [mode] button for 2 seconds to
change the display from the Current Time Mode to Current
Time Setting Mode.
- The second digits flash on the
display because
they are
being selected.
The Setting Procedures
- Press [mode] button to change the selections following the
Current Time Setting Sequence.
- If the digits are flashing, press the [start/stop] but ton to
increase the number; hold the [start/stop] button
to change the number at a higher speed. Press the
[compass] button to decrease the number; hold
the [compass] button to change the number at a higher
speed.
- When second digits start flashing, press
the [start/stop] or [compass] button once to reset the
second to zero.
- When 12 or 24 digits start flashing, press the [start/stop] or
[compass] button once to select between 12 or 24
hour format.
- After you set the current time, calendar and 12/24 hour
format, press the [mode] button to exit the Current Time
Setting Sequence.
- If no key-stoke has been activated for 30 seconds, the
setting display will return to Current Time Mode.
hold
mode
hold
mode
Current Time Setting Mode
Current Time Setting
Alarm Time Setting Mode
Alarm Time Setting
Current Time Mode
Alarm Time Mode
second
minute
12/24
hour format
minute
hour
hour
date
year
month
Current Time
Setting Sequence
Alarm Time Setting Sequence
Alarm Time Setting Sequence
hold
mode
hold
mode
mode
button
mode
button
mode
button
mode
button
mode
button
mode
button
8
5.0 Alarm Time Mode -
Setting the Alarm and Chime On/Off
5.1 Alarm Time Mode -
Setting the Alarm Time
mode
button
mode
button
mode
button
4.0 Current Time Mode -
Current Time & Calendar
4.1 Current Time Mode -
Setting Current Time Mode
digits have been
selected (flashing)
digits have been
selected
(flashing)
calendar
(month-date)
alarm time
(hour-minute)
analogue
second
analogue
second
current time
(hour:minute
second)
current time
(hour: minute,
second)
day of week
AL
AL
Increase
the number
Increase
the number
increase the
number at a
higher speed
increase the
number at
a higher speed
[start/stop]
start/stop
start/stop
start/stop
compass
hold start/stop
hold compass
compass
compass
hold [start/stop]
decrease
the number
decrease
the number
decrease the
number at a
higher speed
decrease the
number at
a higher speed
hold [compass][compass]
TM
TM
'12' changes to '24';
'24' changes to '12'.
reset Second to zero
Page 4
CH
CH
CH
CH
6.0 Chronograph Mode -
Chronograph Mode
6.1 Chronograph Mode -
Start/Stop the Chronograph
Chronograph Mode
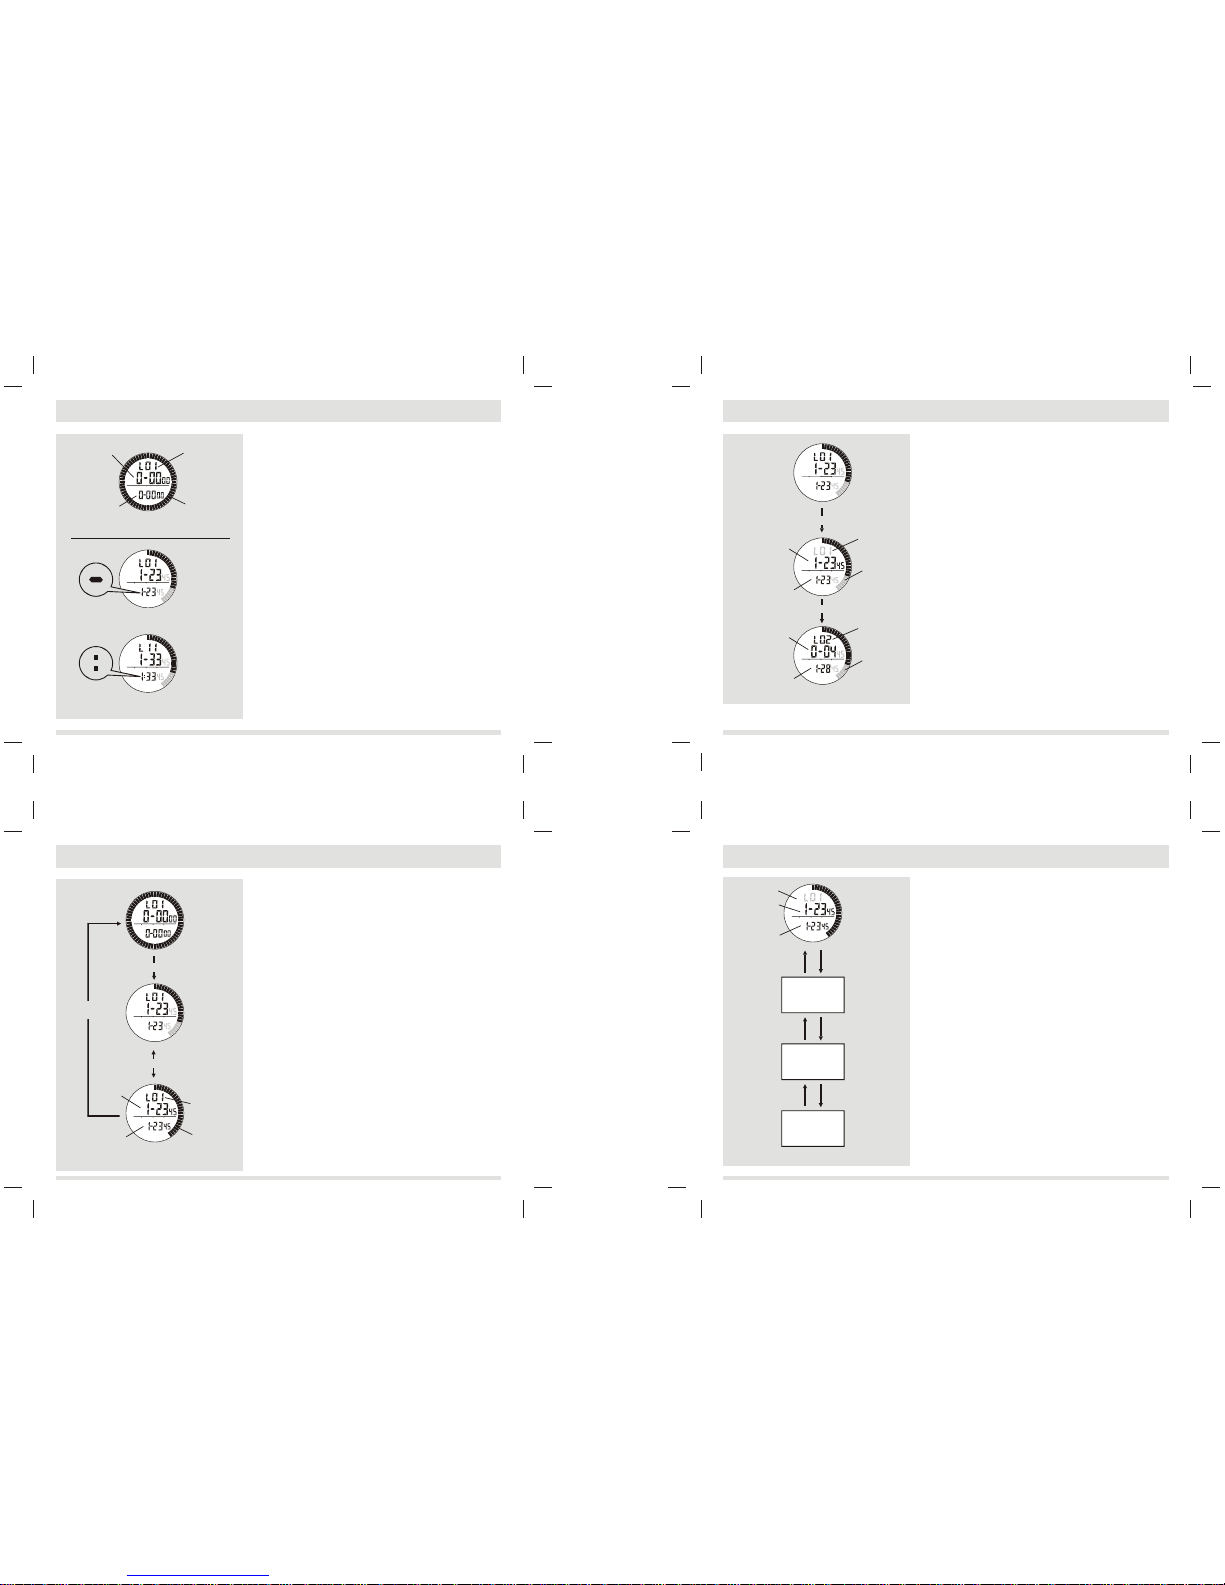
- The Chronograph measures elapsed times and lap times.
- The 1st row of the display shows the current lap number
of the chronograph.
- The 2nd row of the display shows the lap time: minute,
second and 1/100 second.
- The 3rd row of the display shows the accumulated
running time: minute, second and 1/100 second.
NOTE: if the accumulated time is long than 1 hour, the display
shows chronograph time in hour, minute and second instead
of minute, second and 1/100 second.
- The indicators encircled the display shows the
chronograph time in 1/10 second analogically.
NOTE: The maximum counting range of the chronograph is 9
hours 59 minutes and 59 seconds, hence the chronograph
will count continuously until it counts to that value or the
[start/stop] button is pressed.
To Start/Stop the Chronograph
- When the chronograph is stopped, press the [start/stop]
button once to start the chronograph; press
[start/stop] button once again to stop the chronograph.
- The elapsed time between the two 'start/stop'
keystrokes will be appeared on 3rd row of the
display.
- Repeat the above mentioned steps to get the
accumulative time of which the
chronograph is
running.
To Reset
the Chronograph
- Record a new set of elapsed time, press and hold
the [compass] button for 2 seconds (when the chronograph
has stopped ) to reset the chronograph.
NOTE: If you reset the chronograph, the lap memory will be
reset at the same time.
Chronograph Mode
Chronograph Mode
(chronograph time is
not longer than 1 hour)
Chronograph Mode
(Chronograph time is
longer than 1 hour)
Chronograph
Mode
Chronograph
'Running' Mode
Chronograph
'Running' Mode
Chronograph
'Stop' Mode
Chronograph
'Lap' Mode
Chronograph
'Running' Mode
CH
CH
lap time
lap time
'elaspe' time
since the
[compass] button
has been pressed
lap time
lap number
lap number
lap number
lap number
accumulative
'elapsed' time
accumulative
'elapsed' time
accumulative
'elapsed' time
accumulative
'elaspsed' time
'hyphen'
separator
'colon'
separator
1/10 second
1/10 second
1/10 second
1/10 second
hold
[compass]
[start/stop]
[compass]
5 seconds
[start/stop]
To Record Lap Memory
- The Chronograph Mode allows you to record
lap memory (maximum 42 lap memories).
- Press the [compass] button once to record the lap
memory during the chronograph is running.
- The lap number will be flashing on the 1st row of the
display.
- The lap time display on the 2nd row of the
display for 5 seconds, then it shows the 'elapse' time since
the [compass] button has been pressed.
- The accumulated 'elapse' time will be display on the 3rd
row of the display.
- During the lap number and lap time are displaying, the
chronograph keeps running.
- Repeat the steps mentioned above to get another set of
lap memory.
To Reset Lap Memory
- Press and hold the [compass] button for 2 seconds to reset
the lap memory in the Chronograph Mode, when the
chronograph was stopped.
6.2 Chronograph Mode
- Record Lap Time
CH
CH
CH
CH
the next recorded
lap memories
2nd lap
memory
the last recorded
lap memory
(max. 42 memory)
Lap Memory Recall Mode
- The lap number flashes at the 1st row of the
display; the 'REC' indicator will be appeared at the
same time.
- The 2nd row of the display shows the lap time of
the current lap memory: minute, second and 1/100
second (not longer than 1 hour) or hour, minute and
second (longer than 1hour).
- The 3rd row of the display shows the accumulated
'elapse' time: minute, second and 1/100
second (not longer than 1 hour) or hour, minute and
second (longer than 1hour).
To Recall Lap Memory
- Press the [start/stop] button to check the lap
memories through forward reviewing from lap 1 to
lap 42. Hold the [start/stop] button to change
lap memory at a higher speed.
- Press the [compass] button to check the lap
memories through backward reviewing from lap 42 to
lap 1. Hold the [compass] button to change lap
memory at a higher speed.
NOTE: Check the 'To Reset Lap Memory' section for lap
memory reset.
NOTE: If the chronograph is running, the Lap Memory
Recall Mode will be reserved for the lap memory recording
and this mode can not be reviewed during this period of
time.
Lap Memory
Recall Mode
(1st Lap Memory)
La
p Memory Recall Sequence
[start/stop]
[start/stop]
[start/stop][compass]
[compass]
[compass]
lap time
accumulative
'elapse' time
lap number
9
10
11
12
REC
7.0 Lap Memory Recall Mode
- Recall Lap Time
Page 5
8.1 Countdown Timer Mode -
Setting the Timer
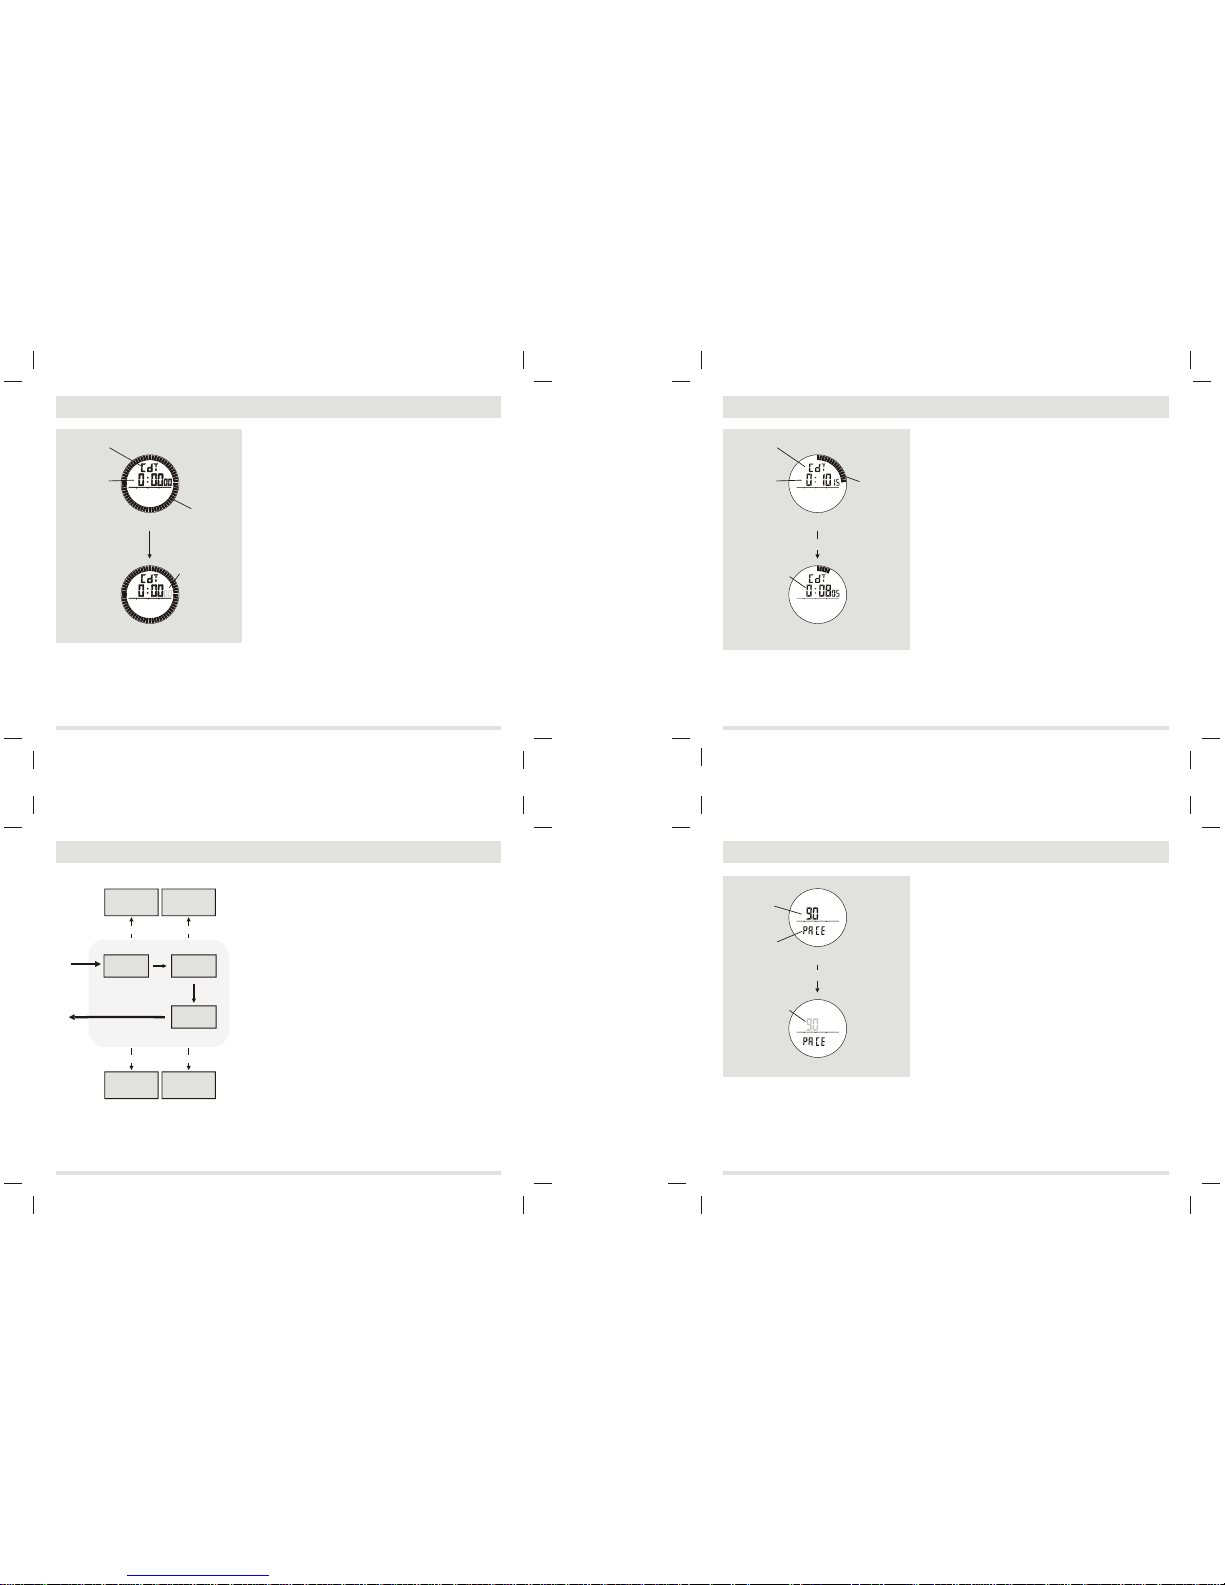
8.0 Countdown Timer Mode -
Countdown Timer Mode
To Set the Countdown Timer
- Press and hold the [mode] button for 2 seconds to
change the display from Countdown Timer Mode to
Countdown Timer Setting Mode.
NOTE: The setting range of the timer: 0 to 99 hours, 59
minutes, 59 seconds.
- The second digits flash on the display because it is
being selected.
The Setting Procedure
- Press [mode] button to change the selection following
the Countdown Timer Setting Sequence.
- If the digits are flashing, press the [start/stop] button
to increase the number; hold the [start/stop] button to
change the number at a higher speed. Press the
[compass] button to decrease the number; hold the
[compass] button to change the number at a higher
speed.
- After you set the timer, press the [mode] button to
exit the setting sequence.
- If no key-stoke has been activated for 30 seconds, the
setting display will return to Countdown Timer Mode.
Countdown Timer
- HandHeld TrackMaster has countdown feature: the
Countdown Timer Mode.
- The Countdown Timer starts counting from the
preset number to zero and stops at zero.
- The 1st row of the display shows the 'CdT'
indicator.
- The 2nd row of the display shows the countdown time:
hour, minute and second.
- The indicators encircled the display shows the
countdown
time in 1 second analogically.
To Use the Timer
- Once the timer has been set (for example 0:10 15), press
the [start/stop] button once to start the countdown. The
countdown time will be displayed continuously
throughout the countdown.
- To stop countdown, press the [start/stop] button once.
- When the countdown time is come to zero, press
[compass] button to re-load the preset time, or press
[start/stop] button to re-load the preset time and
starts the countdown simultaneously.
To Reset the Timer
- To reset the timer to zero, press and hold the [compass]
button for 2 seconds when the timer has stopped
counting.
Timer Alarm Sound
- The timer starts to beep twice when the countdown time
comes to 10,5,4,3,2,1 minute(s) and 50,40,30,20,10
seconds.
- The timer starts to beep once when the countdown time
comes to 9, 8,7,6,5,4,3,2,1 second(s).
- The timer starts to beep a long beep when
the countdown time comes to zero.
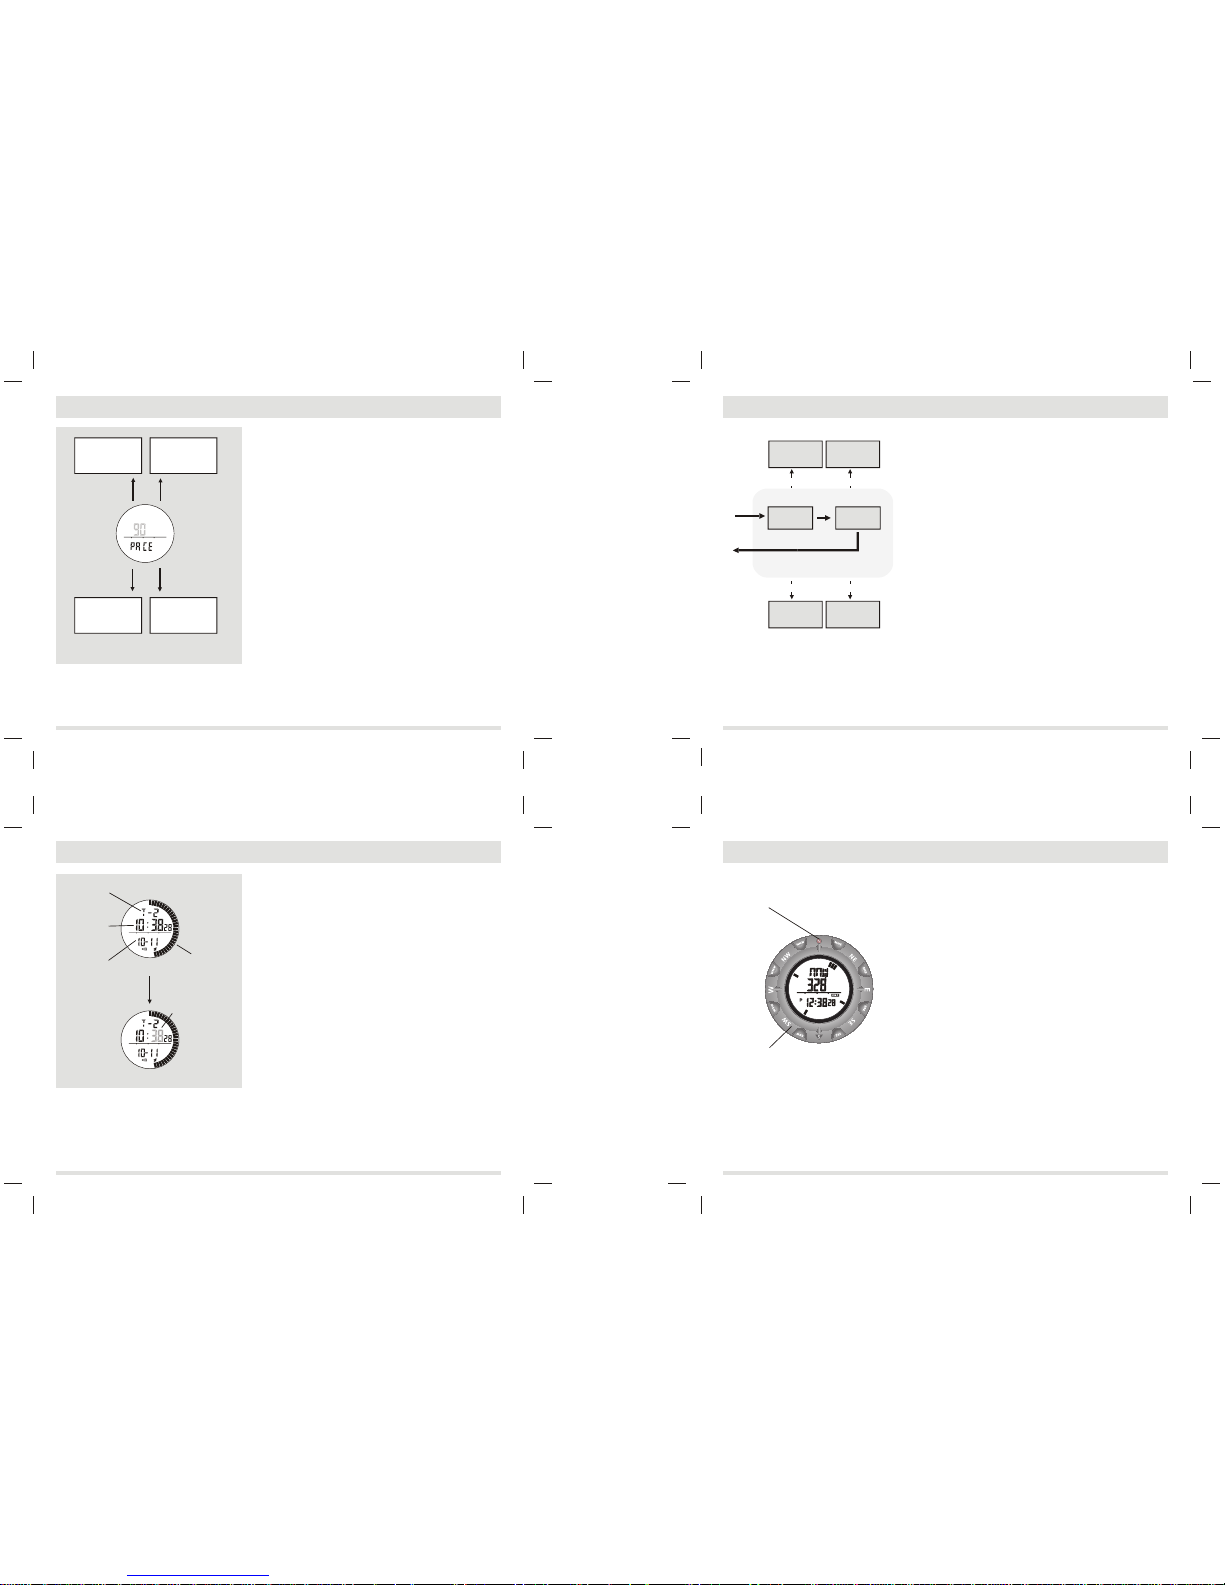
To Use the Pacer
- The HandHeld TrackMaster build-in a pacer for the user:
The Pacer Mode.
- The 2nd row of the display show the current pacer
setting.
- The ' PACE' indicator will be appeared on the 3rd
row of the display.
- If the pacer is activated, the HandHeld TrackMaster
will beep at the preset rate (bpm) for every
minute.
To Start/Stop the
Pacer
- If the Pacer has been set, press the [start/stop] button to
start the pacer. If the Pacer started, press the
[start/stop] button again to stop the pacer and the
beeping sound.
8.2 Countdown Timer Mode
- Using the Timer
9.0 Pacer Mode -
Using the Pacer
second minute
hour
Alarm Time Setting Sequence
hold
[mode]
[mode]
[mode]
[mode]
Increase
the number
increase the
number at
a higher speed
[start/stop] hold [start/stop]
decrease
the number
decrease the
number at
a higher speed
hold [compass][compass]
hold
mode
Countdown Timer Setting Mode Countdown Timer
'running' Mode
Countdown Timer Mode Countdown Timer Mode
digits have been
selected (flashing)
digits have been
selected (flashing)
analogue
second
analogue
second
countdown
time
Pre-set
countdown time
the countdown
time
the number
of bpm
(Beep per
minute)
Countdown
Timer Mode
indicator
Countdown
Timer Mode
indicator
Pacer Mode
indicator
[start/stop]
hold [mode]
Pacer Setting Mode
Pacer Mode
13
14
15
16
Page 6
TM
TM
To Set the Pacer Rate (bpm)
- Press and hold the [mode] button for 2 seconds to
change the display from Pacer Mode to Pacer Setting
Mode.
- The digits flash on the display because it is being
selected.
The setting procedure
- If the digits are flashing, press the [start/stop] button to
increase the number (step of 5 BPM); hold the
[start/stop] button to change the number at a higher
speed. Press the [compass] button to decrease the
number (step of 5 BPM); hold the [compass] button to
change the number at a higher speed.
- After you set the pacer, press the [mode] button to
exit the setting sequence.
- If no key-stoke has been activated for 30 seconds, the
setting display will return to Pacer Mode.
NOTE: The setting range of the pacer: 40 bpm to 180 bpm.
9.1 Pacer Mode -
Setting the Pacer Rate (bpm)
decrease the bpm
at a higher speed
increase the bpm
at a higher speed
decrease the bpm
increase the bpm
Pacer Setting Mode
(90 bpm)
Pacer Setting Sequence
hold
[compass]
hold
[start/stop]
[compass]
[start/stop]
17
18
19
20
Dual Time Mode
- The 'T-2 ' indicator will be displayed on the 1st row of the
display.
- The 2nd row of the display shows the dual time:
hour, minute and second.
- The 3rd row of the display shows the calendar: month,
date.
- The indicators encircle the display show the current time
in 1 second resolution analogically.
NOTE: The calendar readout of the Dual Time Mode will be
the same as the Current Time Mode.
To Set the Dual Time
- To set the dual time, press and hold the [mode] button for
2 seconds to change the display from the Dual Time
Mode to Dual Time Setting Mode.
- The minute digits flash on the display because they are
being selected.
The Setting Procedures
- Press [mode] button to change the selections following the
Dual Time Setting Sequence.
- If the digits are flashing, press the [start/stop] button to
increase the number; hold the [start/stop] button to
change the number at a higher speed. Press the
[compass] button to decrease the number; hold the
[compass] button to change the number
at a higher
speed.
- After you set the Dual Time, press the [mode] button to
exit the Dual Time Setting Sequence.
- If no key-stoke has been activated for 30 seconds, the
setting display will return to Dual Time Mode.
10.0 Dual Time Mode
- Dual Time Mode
10.1 Dual Time Mode
- Setting the Dual Time
11.0 Compass Mode
- The Precautions
hold
[mode]
Dual Time Setting Mode
Dual Time Mode
digits have been
selected (flashing)
Calendar
(month-date)
analogue
second
dual time
(hour,minute
second)
'T-2'
indicator
minute hour
Dual Time Setting Sequence
hold
mode
mode
button
mode
button
Increase
the number
increase the
number at
a higher speed
[start/stop] hold [start/stop]
decrease
the number
decrease the
number at
a higher speed
hold [compass][compass]
The Precautions when Using HandHeld TrackMaster
- Keep your HandHeld TrackMaster away from magnets or
the appliances which may contain magnetic objects such
as mobile phones, speakers, motors and etc.
- The HandHeld TrackMaster, like most magnetic
compass, points to the magnetic North which is slightly
different from the true North. Check the 'What is Magnetic
Declination' section for more detail.
- Perform the compass calibration on the following
conditions:
1)
when the HandHeld TrackMaster is used the first time,
2) when the 'DIST' indicator is flashing,
3) the battery has been replaced, and
4) use the compass in a location where is apart from the
place in which the compass had been calibrated.
- To achieve an accurate result, you should avoid
measuring a direction on the following conditions:
1) the watch is closed to magnetic/metal objects,
2) the watch is closed to electrical appliances, and
3) the watch is placed inside a moving object or a
ferroconcrete building.
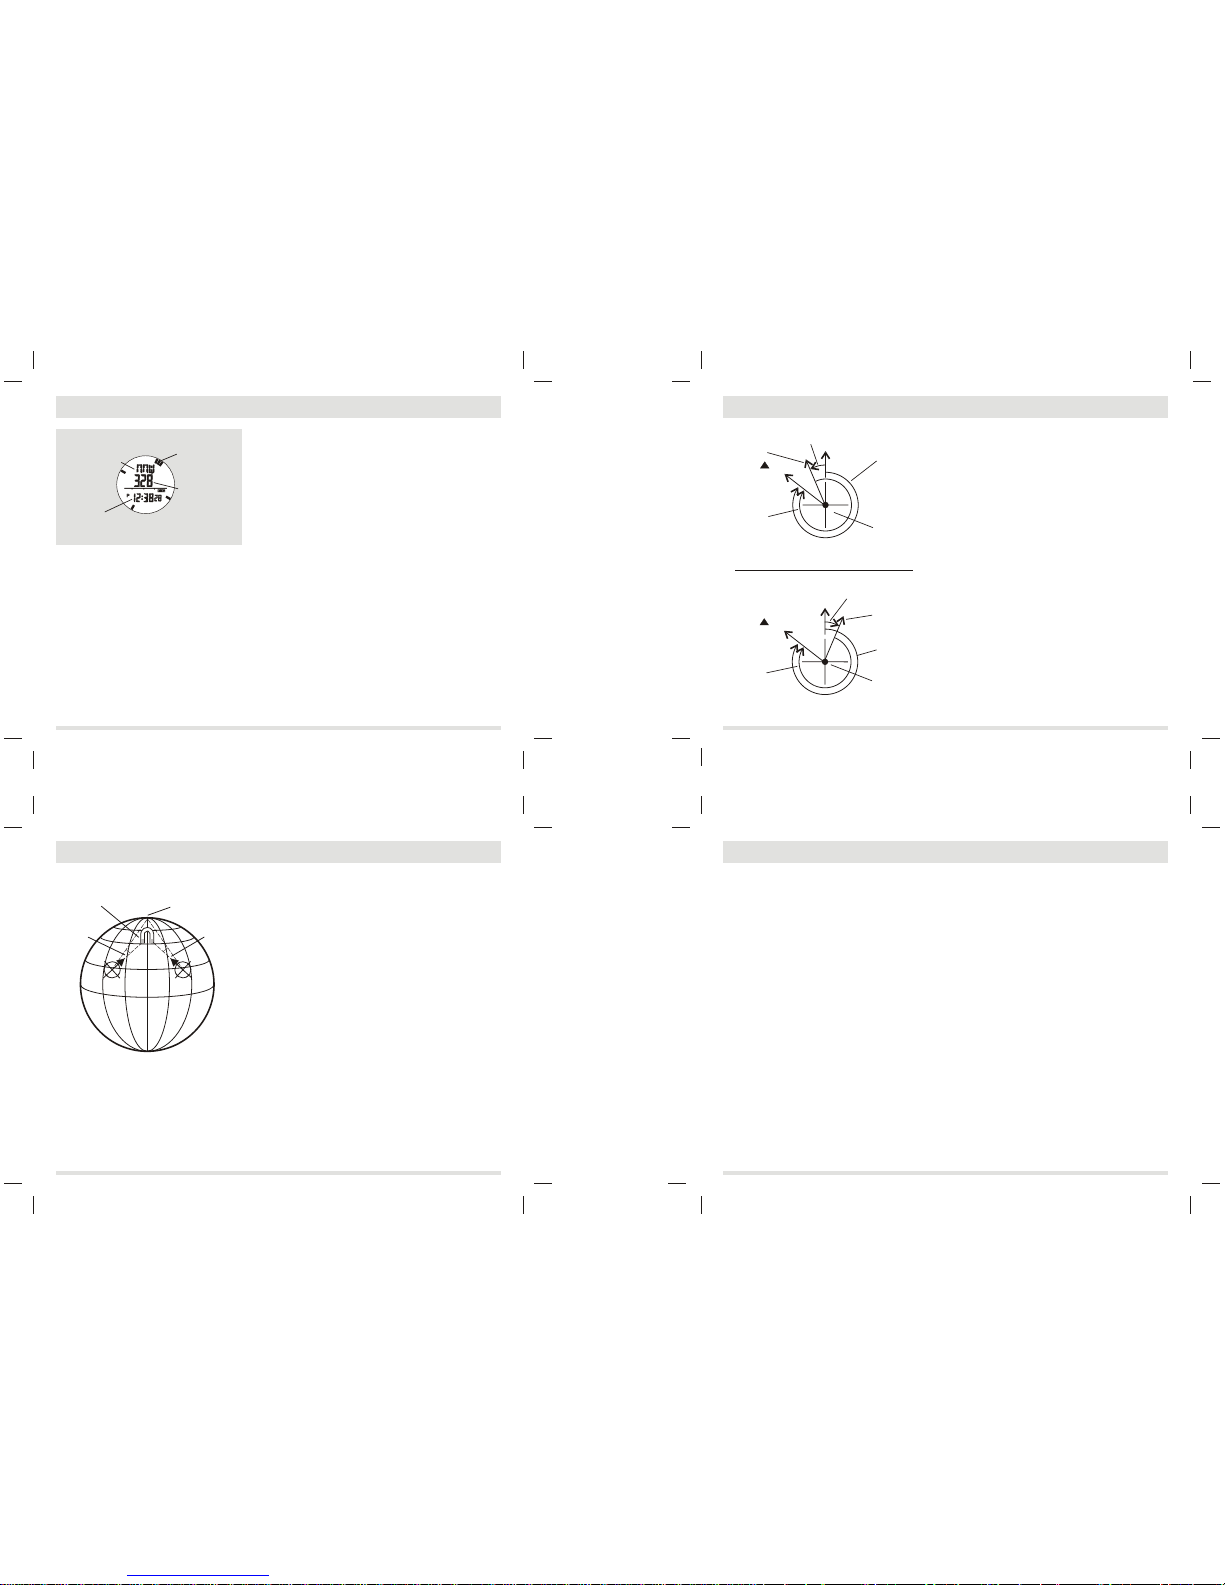
rotary bezel
The 'N' mark
which related to Compass Mode
The features of the HandHeld TrackMaster
Page 7
11.1 Compass Mode
- Compass Mode
Compass Mode
- In the Compass Mode, the 1st row of the display
shows the bearing (compass points) of the
direction which the watch's pointer is pointing.
- The 2nd row of the display shows the bearing
(digital) of the direction which the watch's pointer is
pointing.
- The 3nd row of the display shows the current time: hour,
minute and second.
- The indicators encircled the display show the direction
of magnetic North analogically.
- In the Compass Mode, the Compass Mode will change
to the standby mode after 1 minute.
- In the standby mode, press any button except
[Light] button once to return to Compass Mode.
Compass Mode
Magnetic Declination
current time
magnetic north
indicator
bearing direction
(digital)
bearing direction
(compass points)
What is Magnetic Declination
- The angular difference between Magnetic North Pole and
True North Pole is called magnetic declination. Its
amount (degrees and minutes) and direction (easterly
and westerly) depend on where you are.
- HandHeld TrackMaster also includes a compensation
setting for Magnetic Declination. Check 'Calibrating
the Compass' section for more detail of the setting.
Magnetic Declination Information
- Most topographic maps shown magnetic north pole and or
the magnetic declination information.
- This manual includes the magnetic declination for some
major cities. Check the 'Magnetic Declination at
Major Cities' section for more detail.
- For those cities whose names are not included in the list,
you may like to refer to the online magnetic
declination information at:
1. http://www.geolab.nrcan.gc.ca/geomag/e_cgrf.html
2. http://www.ngdc.noaa.gov/cgi-bin/seg/gmag/fldsnth1.pl
- Use an atlas to find your latitude and longitude before you
can use the links above.
- The Magnetic North Pole which is slightly
different from the True North Pole. The HandHeld
TrackMaster, like most magnetic compass, points to the
Magnetic North Pole. On the contrary, everything measure
from a map is related to the True North Pole.
- For serious compass user or who intends to perform
accurate navigation, compass must be adjusted to
compensate of magnetic declination.
11.2 Compass Mode
- Magnetic Declination
True North
Magnetic
Declination
Magnetic
Declination
Magnetic North
Magnetic Declination Compensation
- Compensate an object's bearing by subtract westerly
(W) magnetic declination or add easterly (E)
magnetic declination with the magnetic bearing.
Example 1
needle points 323.
- The bearing will be 323 (MB) - 23 (W) = 300 (TB).
Example 2
- 22 Easterly magnetic declination and the compass
needle points 278.
- The bearing will be 278(M) + 22(E) = 300 (TB).
- HandHeld TrackMaster will compensate the compass
bearing wherever the magnetic declination is either
Westerly (-ve) declination or Easterly declination (+ve)
automatically, if the user input the magnetic declination
angle of the city which close to the user's current location
into the watch during the calibration.
- Check the 'Calibrating the Compass' section for more
detail of the calibration.
11.3 Compass Mode
- Magnetic Declination Compensation
Compensate the Bearing at a place with
Westerly (W) Magnetic Declination
Compensate the Bearing at a place with
Easterly (E) Magnetic Declination
magnetic
declination
23 W
magnetic
declination
22 E
true
bearing
300
true
bearing
300
magnetic
bearing
323
magnetic
bearing
278
true north
0
true north
0
magnetic
north
magnetic
north
object B
object B
point A
point A
No. Country/Place Major City Declination
1 Afghanistan Kabul 2-E
2 Australia Canberra 12-E
3 Austria Vienna 2-E
4 Bahrain Manama 2-E
5 Bangladesh Dhaka 0
6 Belgium Brussels 1-W
7 Brazil Brasilia 19-W
8 Canada Ottawa 14-W
9 Chile Santiago 5-E
10 Beijing 6-W
11 China Hong Kong 2-W
12 Costa Rica San Jose 0
13 Cuba Havana 3-W
14 Czech Republic Prague 2-E
15 Denmark Copenhagen 1-E
16 Egypt Cairo 3-E
17 Finland Helsinki 6-E
18 France Paris 1-W
19 Germany Berlin 1-E
20 Greece Athens 3-E
21 Hungary Budapest 4-E
22 India New Delhi 1-E
23 Indonesia Jakarta 1-E
24 Israel 3-E
25 Italy Rome 1-E
26 Japan Tokyo 7-W
27 Jordan Amman 3-E
28 Kenya Nairobi 1-E
29 Korea Seoul 7-W
30 Malaysia Kuala Lumpur 1-E
31 Mexico Mexico City 6-E
32 Nepal Kathmandu 0
China
Jerusalem
No. Country/Place Major City Declination
33 Netherlands Amsterdam 1-W
34 New Zealand Wellington 22-E
35 Norway Oslo 0
36 Pakistan Islamabad 2-E
37 Philippines Manila 1-W
38 Portugal Lisbon 5-W
39 Russia Moscow 9-E
40 Singapore Singapore 0
41 South Africa Cape Town 23-W
42 Spain Madrid 3-W
43 Sweden Stockholm 3-E
44 Switzerland Bern 0
45 Taiwan Tai-pei 3-W
46 Thailand Bangkok 0
47 UAE Abu Dhabi 1-E
48 United Kingdom London 3-W
49 United States Washington, DC 10-W
50 Juneau 25-E
51 Phoenix 12-E
52 Little Rock 2-E
53 Sacramento 16-E
54 Denver 10-E
55 Atlanta 4-W
56 Honolulu 10-E
57 Boston 16-W
58 Saint Paul 2-E
59 Jackson 1-E
60 Santa Fe 10-E
61 Oklahoma City 6-E
62 Salem 18-E
63 Harrisburg 11-W
64 Salt Lake City 14-E
11.4 Compass Mode
- Magnetic Declination at Major Cities
21
22
23
24
- 23
o
Westerly magnetic declination and the compass
Page 8
25
26 28
27
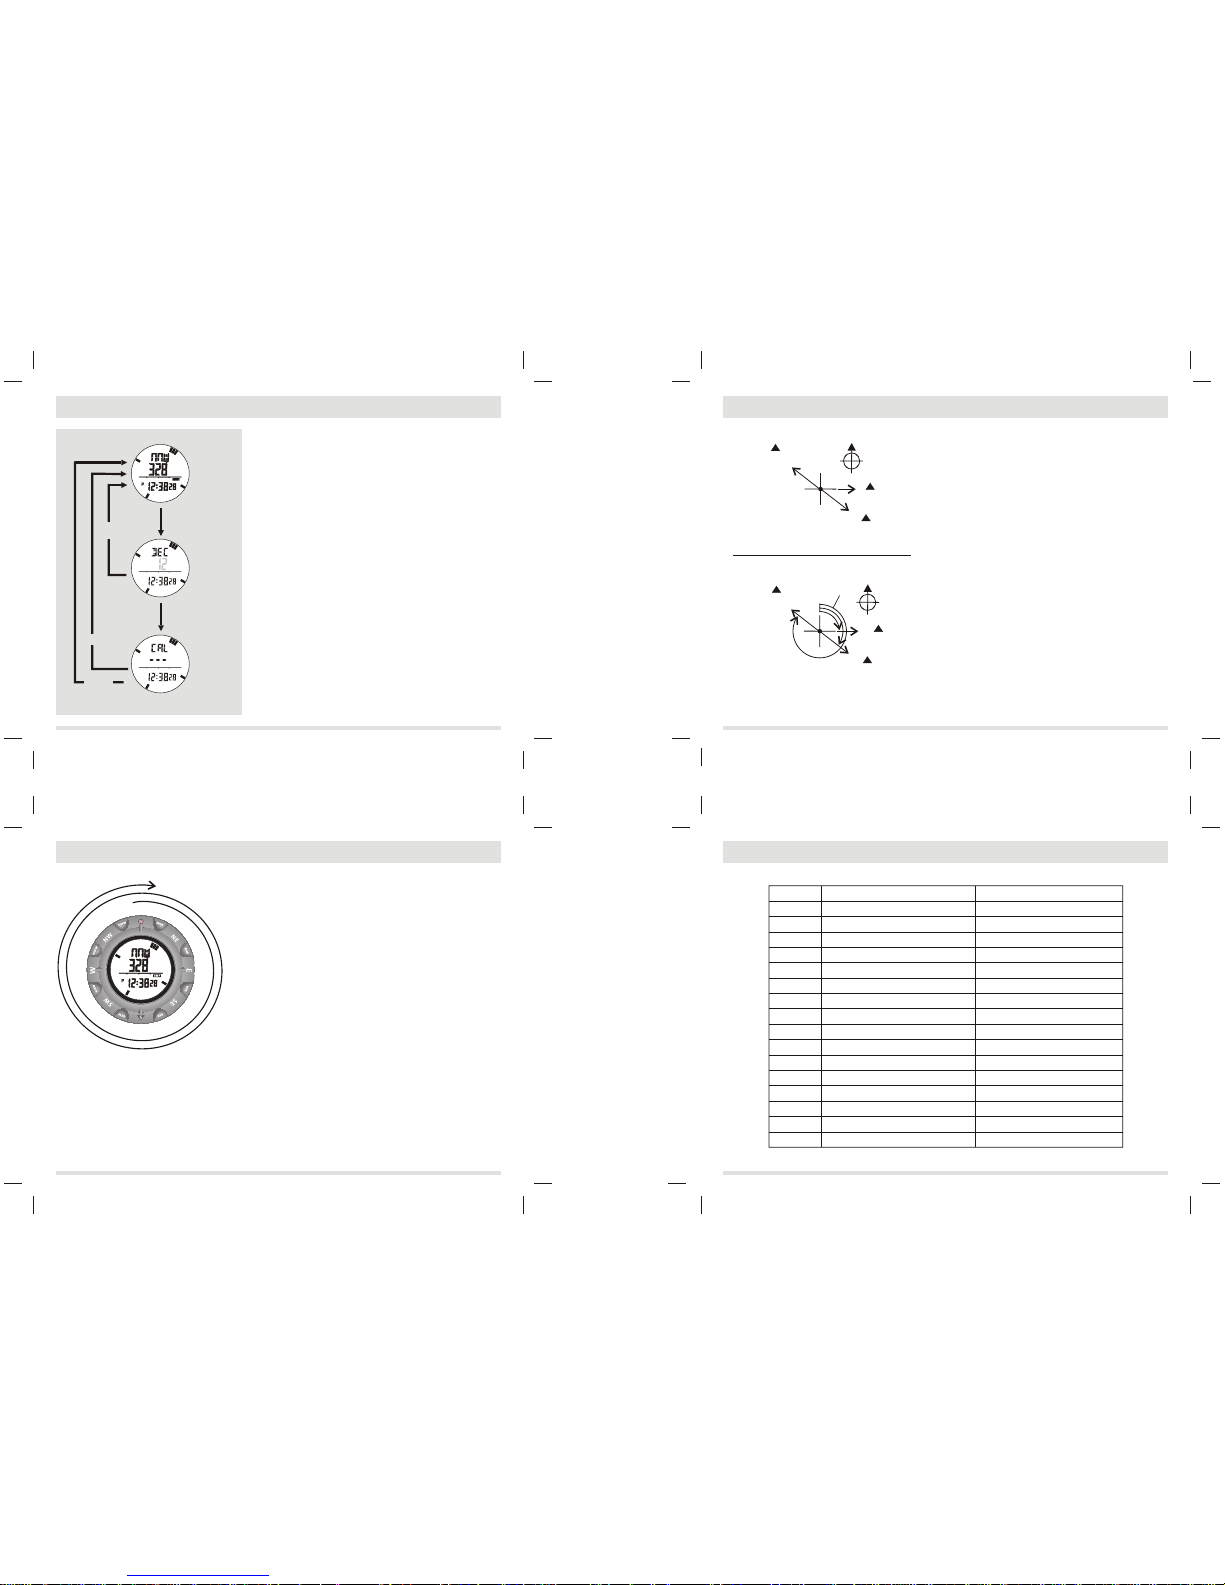
To Calibrate the compass
IMPORTANT: If the watch has not been calibrated, the
direction reading may be inaccurate.
- Check the 'Magnetic Declination at Major Cities' section
to get the magnetic declination of the city which close to
your current location, because such angle will be
inputted into the HandHeld TrackMaster during the
calibration.
- Perform the compass calibration on the following
conditions:
1) when the HandHeld TrackMaster is used the first time,
2) when the 'DIST' indicator is flashing,
3) the battery has been replaced, and
4) use the compass in a location where is apart from the
place in which the compass had been calibrated.
To Calibrate the Compass
- Press and hold the [mode] button for 2 seconds to
start the Magnetic Declination Setting, in the Compass
Mode.
- The ' DEC' indicator will be appeared on the 1st row of
the display. The digit will start flashing, press the
[start/stop] button to change the angle (from -90 to
90) until the desire magnetic declination appeared.
Example 1:
- Compensate the magnetic declination for Wellington in
New Zealand (22-E), select +22 in the magnetic
declination setting.
Example 2:
- Compensate the magnetic declination in Boston
in
the
USA (16-W), select -16 in the magnetic declination
setting.
- Press the [mode] button to go to the Calibration
'Rotation' Mode, the EL back light will turn on
automatically for a second. At the same time, the 'CAL'
indicator will be appeared on 1st row of the display and
the bearing indicators start to move.
- When the EL back light is off, hold the HandHeld
TrackMaster on a flat surface which is parallel to the
horizon, then rotate the HandHeld TrackMaster clockwise
at the rate as the bearing indicators' moving for 2 turns.
The rotation should be completed in a slow and steady way
.
- When the turning is completed, press the [mode] button
to return to Compass Mode otherwise the Calibration
'Rotation' Mode will return to Compass Mode after 1
minute.
11.5 Compass Mode
- Before Calibrate the Compass
11.6 Compass Mode
- Calibrating the Compass
finish
start
Compass
Mode
Calibration
'Rotation' Mode
Calibration Sequence
Calibration
'Rotation' Mode
Magnetic
Declination
Setting Mode
The Direction of an Object
- The direction of an object from a point is specified in
either compass points or digital bearing directions.
- The HandHeld TrackMaster provides both compass
points or digital bearing directions.
The Compass Points
- The compass points are North, Northeast, East.
Southeast, South, Southwest, West
and Northwest.
- For
example, in the figure on the left, the compass
points of object B from point A is East. The compass
points of object C from point A is Southeast. The
compass points of object D from point A is Northwest.
The Digital Bearing
- The digital bearing direction of an object is defined as
the angular difference between North and the
object. (Assuming that 0 for North, and the
measuring range is from 0 to 359 )
- For example, in the figure on the left, the digital bearing
direction of object B from point A is 90 . The digital
bearing direction of object C from point A is 135 . The
digital bearing direction of object D from point A is
315 .
11.7 Compass Mode
- Compass Points and Digital Bearings
11.8 Compass Mode
- Compass Points versus Digital Bearings
object B
Bearing Directions
(Digital)
Compass Points versus Digital Bearings
object C
object D
angular
difference
90
135
315
point
A
0
0
object B
object C
Bearing Directions
(Compass Points)
object D
point A
N
E
SE
NW
N
hold
[mode]
[mode]
[compass]
Digital Bearing Directions
348.75
to 11.25
11.25
to 33.75
33.75
to 56.25
56.25
to 78.75
78.75
to 101.25
101.25
to 123.75
123.75
to 146.25
146.25
to 168.75
168.75
to 191.25
191.25
to 213.75
213.75
to 236.25
236.25
to 258.75
258.75
to 281.25
281.25
to 303.75
303.75
to 326.25
326.25
to 348.75
Marks
N
NNE
NE
ENE
E
ESE
SE
SSE
S
SSW
SW
WSW
W
WNW
NW
NNW
Compass Points
North
North Northeast
Northeast
East Northeast
East
East Southeast
Southeast
South Southeast
South
South Southwest
Southwest
West Southwest
West
West Northwest
Northwest
North Northwest
[mode]
1 minute
Page 9
29
30 32
31
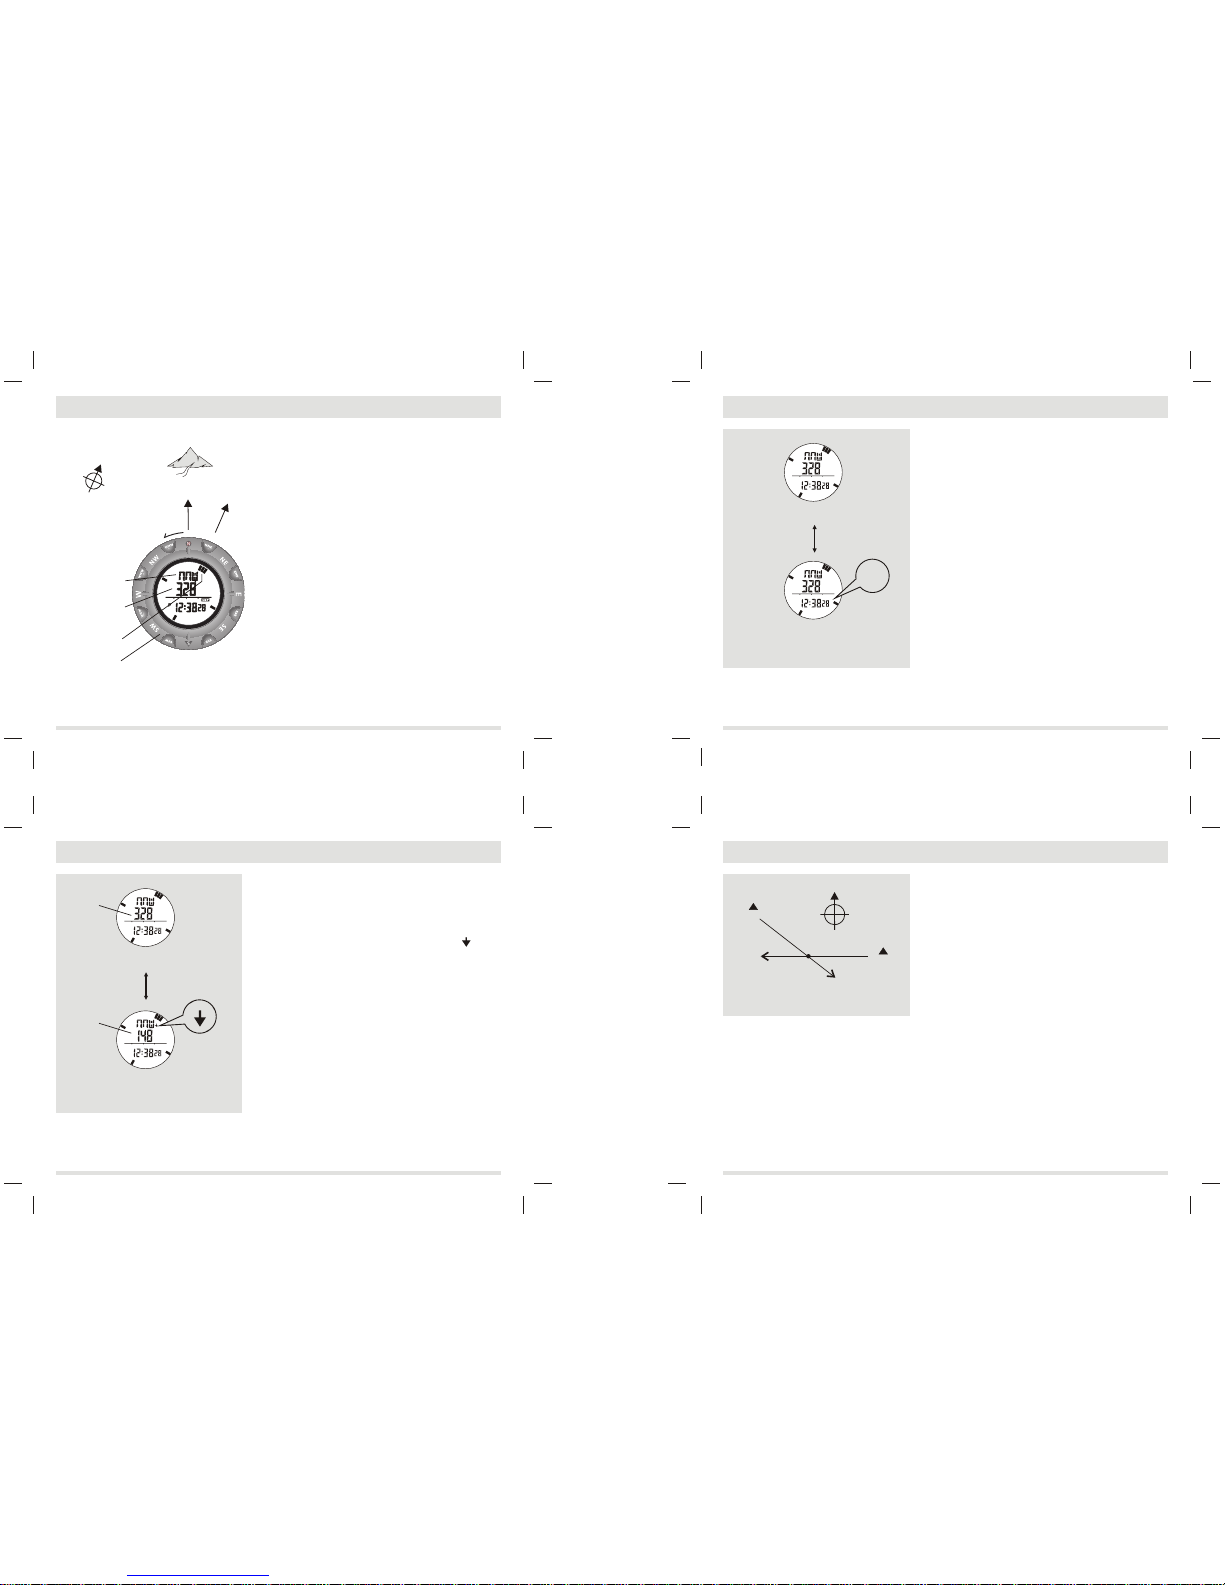
Backward Bearing Directions
- The HandHeld TrackMaster has a built-in function
which shows backward bearing direction of an object.
- The backward bearing direction is the bearing
direction that on the opposite direction from normal
bearing direction.
- When the 'Backward Bearing' indicator is
appeared, the HandHeld TrackMaster shows the backward
bearing direction of the direction which the watch's pointer
is pointing.
NOTE: In Backward Bearing Compass Mode, the magnetic
north indicator and the compass points readout will not be
affected.
To Select Normal Bearing and Backward Bearing
- Press the [mode] button to select between normal and
backward bearing directions, in the Compass Mode.
- The backward bearing will be return to normal
bearing automatically in the following conditions:
1) the HandHeld TrackMaster change to standby mode.
2) the HandHeld TrackMaster change to Current Time
Mode.
Compass Lock
- The HandHeld TrackMaster has a built-in lock function
to lock important direction readings, in the Compass Mode.
- When the 'Lock' indicator 'LOCK' is appeared, the
HandHeld TrackMaster locks the direction readings, hence
the direction reading will not be changed even the pointer
is pointing to another object.
To Lock/Unlock the Compass Lock
- Press the [start/stop] button to lock/unlock the direction
readings, in the Compass Mode.
- The compass lock will be released automatically on the
following conditions:
1) The HandHeld TrackMaster change to standby mode.
2) The HandHeld TrackMaster change to Current Time
Mode.
11.10 Compass Mode
- Backward Bearing Direction
11.11 Compass Mode
- Compass Lock
Compass Mode
(Direction unlocked)
Compass Mode
(Normal Bearing)
Compass Mode
(Direction locked)
Compass Lock
Compass Mode
(Backward Bearing)
Backward Bearing
compass lock
indicator
backward bearing
indicator
Check your position by Backward Bearing
- The HandHeld TrackMaster can check your position by
backward bearing.
- Spot two distant identifiable landmarks (mountains,
light-houses, forts and buildings) of your current
position, such as the mountain A and B.
- Consult a map to find out the mountain A and B's
locations on a map.
- Check out the backward bearing directions of mountain
A and B of your current position, such as 135 for
mountain A and 270 for mountain B.
- Use a ruler to draw the line 135 on the map which
starting from the mountain A. Draw the lines 270 on
the map which starting from the mountain B.
- Your current position will be at the intersection point
(point A) of the lines 135 and 270.
11.12 Compass Mode
- Application of the Compass I
mountain B
Check Current Position
By Backward Bearing
mountain A
270
135
point A
0
L
OCK
L
OCK
Measure Compass Directions
- When measuring compass directions, make sure
that the HandHeld TrackMaster is placed on a flat surface
which is parallel to the horizon.
- If you are wearing the HandHeld TrackMaster during
the measurement, make sure that your wrist is
parallel to the horizon.
IMPORTANT: If the watch does not parallel to the
horizon when taking a measurement, the result may
be inaccurate.
- Point the pointer which engraved on the watch in
the direction where is your target object.
- Press the [compass] button once to select the
Compass Mode, in the Current Time Mode.
- The Compass points of the target object appears on
the 1st row of the display. The digital bearing
direction of the target object appears on the 2 n d
row of the display. The arrow shape indicators o n
the display points the magnetic north analogically.
- Rotate the rotary direction bezel until the 'N' mark is
aligned with the arrow shape indicators on the display.
That action makes all of the marks on the bezel in the
correct direction.
- Check the marks on the bezel to identify the other
compass points.
11.9 Compass Mode
- Measure Compass Directions
Measure Compass Directions
2.
Press the [compass]
button once to switch
to Compass Mode, in
the Current Time Mode
5.
6.
4.
Magnetic
north
indicator will be
display
Rotate the bezel
until it aligns with
the magnetic
North indicator
3.
Compass point of
the object will be
displayed
Bearing direction
of the object will
be displayed
target object
0
0
328
1.
Point the pointer in
the direction of
the target object
start/stop
button
[mode]
normal
bearing
backward
bearing
LOCK
Compass Mode
Page 10
33
34 36
35
Countdown Timer
Resolution:
- 1 second resolution
Range:
- 99 hours 59 minutes 59 seconds
Timer Sounds:
- The timer starts to beep twice when the
countdown time comes to 10, 5,4,3,2,1 minute(s)
and 50, 40, 30,20, 10 seconds.
- The timer starts to beep once when the
countdown time comes to 9,8,7,6,5,4,3,2,1
second(s).
- The timer starts to beeps a long beep when
the countdown time comes to zero.
Pacer Mode
Range:
- 40 bpm to 180 bpm
Pacer Sounds:
- Pacer beep
Dual Time Mode
Time System:
- AM, PM, Hour, minute, second, and display with
bar graph animation at the rate of 1 second
Calendar:
- Month and date
Current Time Mode
Time System:
- AM, PM, Hour, minute, second, and display
with bar graph animation at the rate of 1
second
- 12-hour or 24-hour format
Calendar:
- Month, date and day of week display
- Auto-Calendar function for leap year and day
of week
Alarm Mode
Alarm Type:
- 1 daily alarm, hourly chime
Alarm Sound:
- Sounds for 20 seconds at preset time of real time
clock
Chronograph Mode
Resolution:
- 1/100 second
Range:
- 9 hours 59 minutes 59 seconds
Lap memory:
- 42 lap memories (maximum)
13.0 Specifications
Compass Mode
Back Light
Back
Light Type:
- Electro-Luminescent (EL) back light
Others:
- Auto back light
Battery
Battery Type:
- Single 3V lithium battery (CR2032)
Resolution:
-1 display (digital)
- 1 of 60 pointers (graphical)
- 16 compass points
Display Range:
- 0 to 359 (digital)
- 1 to 60 pointers (graphical)
Others:
- Digital bearing reading Lock
- Digital backward bearing
13.0 Specifications
TM
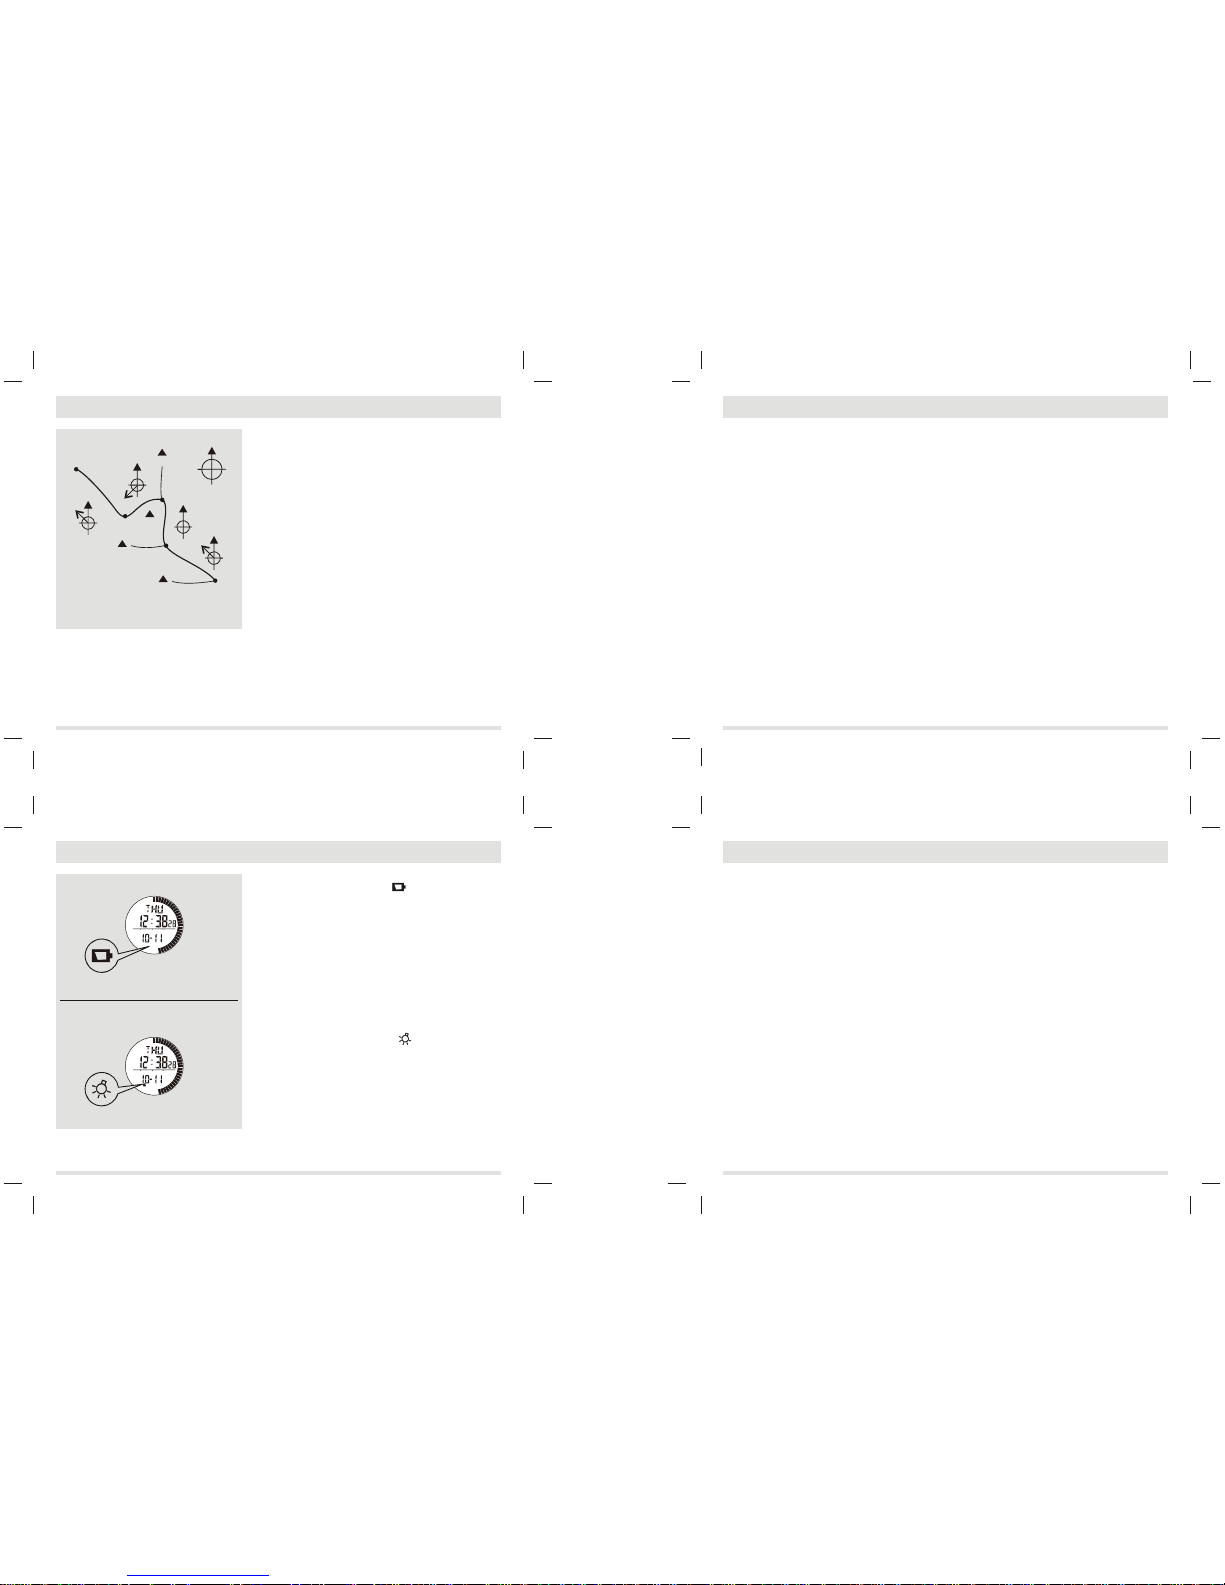
To Check the Track Course Correct
- If you are hiking on a track, the HandHeld TrackMaster
can keep your track course correct.
- For example, the correct track is from point A to point E
as it is mentioned on the map on the left.
Before the Track
- Mark the points (identifiable landmarks) on a
topographic map where the track turns its direction or
the track branches its way, such as the point A, B, C, D
and E.
- Check the bearing directions on a topographic map of
the following points:
1) point B from point A (315),
2) point C from point B (0 ),
3) point D from point C (225 ), and
4) point E from point D (315 ).
During the Track
- Check that you are in the correct bearing direction at the
turning points or where the trail branches its way.
IMPORTANT: If you doubt of the directions and positions of
the track, consult a wrangler or park administration officer
before starting your track.
11.13 Compass Mode
- Application of the Compass II
12.0 Low Battery Indication & Auto-Light Indication
4110 m
1110 m
2120 m
3120 m
point A
(starting point)
point B
A Sample Trail On A Map
point D
point E
(finish point)
point C
315
225
0
315
0
Low Battery Indication
- If the battery low indicator is appeared on the
display, it means that the capacity of the battery is
low. It is recommended to replace the battery with a new
one (CR-2032).
- Complete the battery replacement by
- However, if the appearance of battery low indicator is
caused by an extremely low temperature, the indicator will
be disappeared when normal temperature returns.
IMPORTANT:
Auto-Light Indication
- If the auto-light indicator is appeared, the
auto-light feature is enabled.
a certified
service agency, because this HandHeld TrackMaster
contains precise electronic sensor and components.
Perform the compass calibration immediately,
if the battery has been replaced. Refer to the 'Before
Calibrate the Compass' and 'Calibrating the Compass'
sections for more detail of the calibration.
- If the auto-light feature is enabled, press any button will
turn on the back light for about 3 seconds.
NOTE: Auto-Light feature will consume more battery than
that when the auto-light feature is disable, hence a shorter life
cycle for the battery when the auto-light feature is enabled.
To Enable/Disable Auto-Light
- Press and hold the [light] button for 2 seconds to enable
the auto-light feature when
the
auto-light is disabled.
- Press and hold the [light] button for 2 seconds to disable
the auto-light feature when the auto-light is enabled.
TM
low battery
indicator
Low Battery
Indication
auto-light
indicator
Auto-light
Indication
 Loading...