

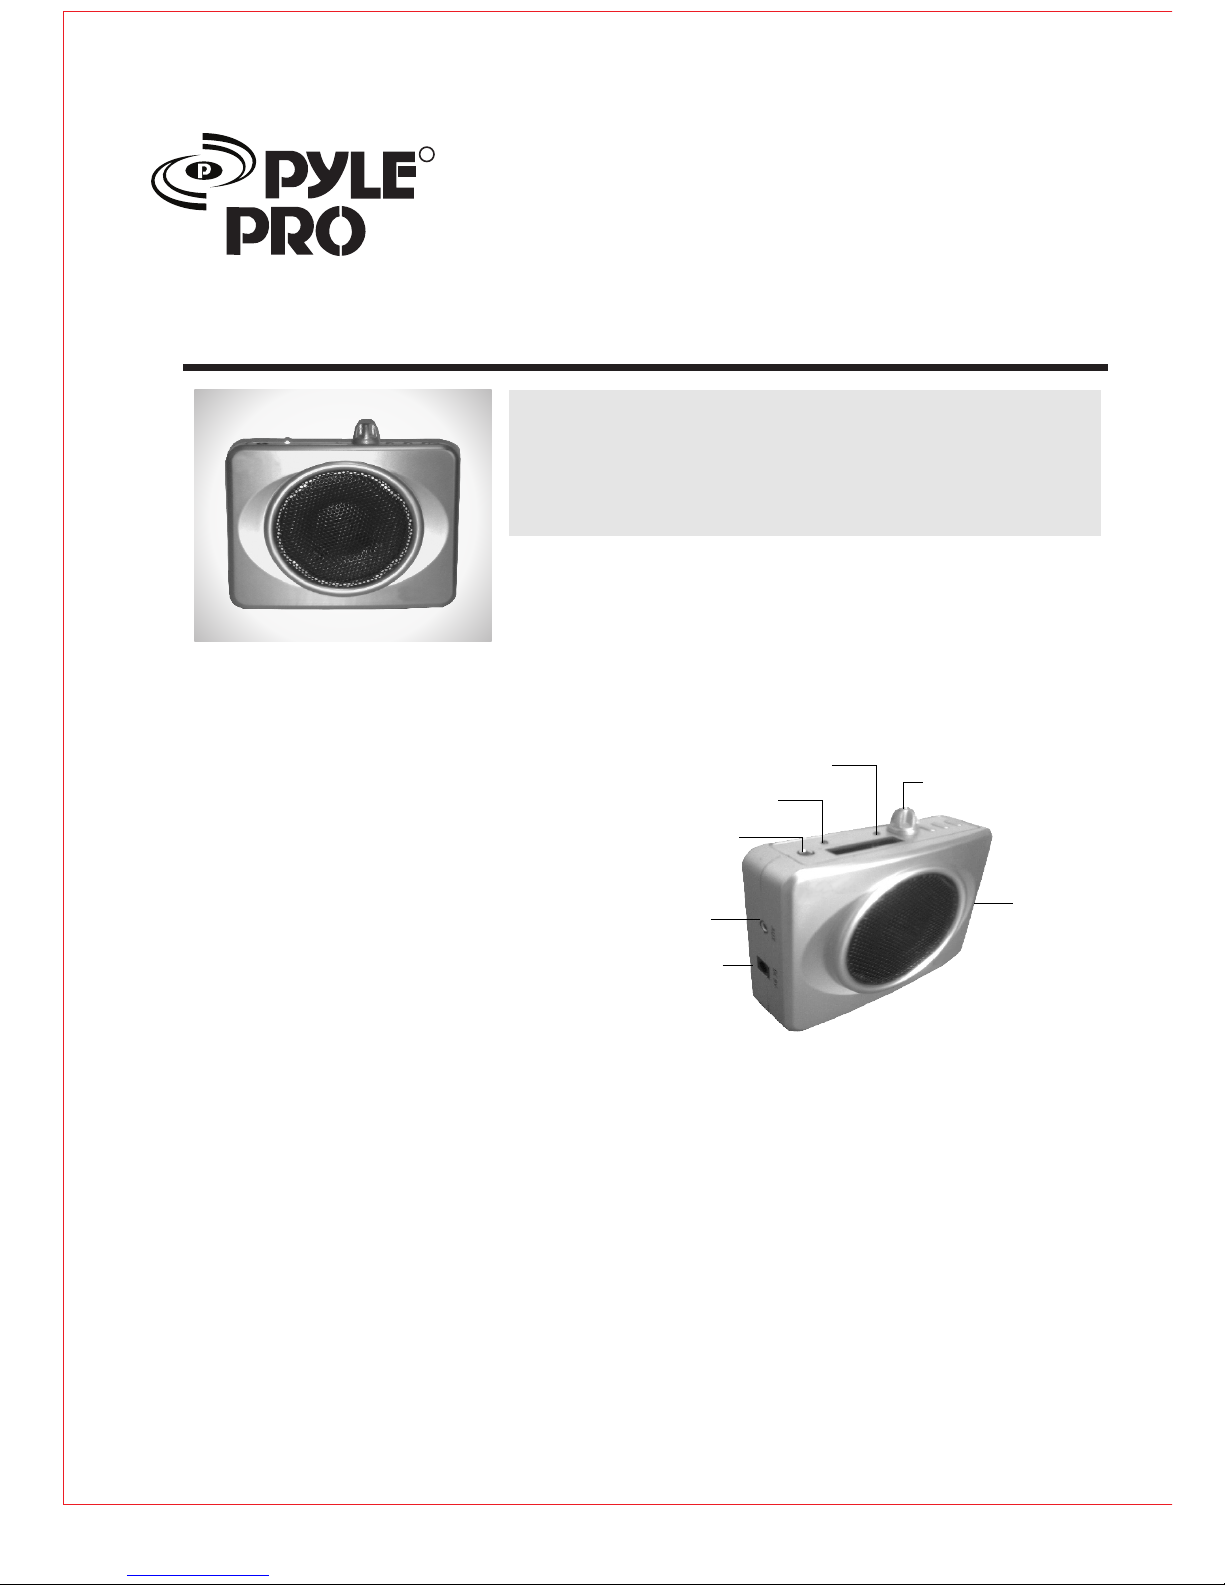
Microphone Jack
In Aux
Charge Socket
Power swi tch / volume bu tton
LED indicator
Power ind icato r
USB
1¡ (i ntr oduct ion )
C o n g r a t u l a t i o n s ! P l e a s e
read this manual carefully so that you can use this product easy. We try our best
to m ake it a cc ura te ; e rr ors may st ill exis t in thi s man ua l, so
please tell us your suggestions. specification subject to change without notice.
2¡ (feature s)
lo ng dura ble ti me u p to 8 h ou rs a fter full c harg e
Li thium b atte ry , lo ng batt ery li fe
lo ud-sp ea ke r wo rk s pr et ty g ood
ea sy to use, ca n work a s mp 3 sp ea ke r
st rong AB S plas ti c ma teria l, mak e th e qu il t strong
an d du rable
(e lectr ic s pe ci fi ca ti ons)
wo rking t empe ra tu re: 10C¡ -6 0C¡
Ma ximum o utpu t po we r:
50 W
fr equen cy R es po ns e: 1 00 HZ ~13KH Z
M
ic s
en sitiv it y: - 53 dB V/ Pa ¡3dB
ba ttery v olta ge : DC 7.4V
Ba ttery t ype: r ec ha rgeab le l it hi um b at te ry
3¡ ( b att ery c harge )
Pl ease ch arge b at te ry i f the LED lig ht is di m or o ff .
Sh ut off th e vo ic e am pl if ie r, an d then inse rt t he p lu g of t he p ow er a da pt er i nto charg e so ck et o f th e vo ic e am pl if ier
pl ug the powe r ad ap te r to 110 V p ow er s ou rc e
Wh en c har ge pro ce ss c om plete , th e LE D tu rn f ro m re d to g re en
To ext en d th e ba ttery l ife, p le as e ch arge af ter th e ba tt ery is u se out
4¡ ( v oic e amp lifier wearin g )
Wi th the atta ch ed w ai st ba nd , yo u ca n fix the voi ce amp li fi er t o your wais t in f ro nt o r ba ck o f yo ur b od y, as s hown belo w
You ca n ad ju st t he l en gt h of t he w aistb an d, a ls o as s ho wn b el ow
Multi-functional Voice Amplifier Manual
R
www.pyleaudio.com
There is a white line on the
end of microphone, please
Position against mouth.
Roughly 2~3 cm
Attentions before wearing
the Ear-hanging microphone:
Before wearing, please
don't turn on the power
and volume.
5¡( microphone using )
Wear microphone as the figure below
The two hole inside the sponge must aim at your mouth
The suitable distance between the microphone and the mouth is 20~30 millimeter
Insert the plug of the microphone into the right hole of the voice amplifier
To achieve a maximum effect, please choice the microphone we provide
cut in and pull out the plug often may cause a bad connection between microphone and amplifier
6¡ ( begin to use )
Fix the voice amplifier to your body as show before
Wear microphone to your head and insert the plug of the microphone into the voice amplifier
Turn the power switch clockwise, then LED light is lightened, that means the amplifier is working
Turn the volume button clockwise or anticlockwise can increase or decrease the volume
Decrease the volume to avoid noises
7¡ ( battery change )
Don't change the battery by yourself under warranty
The battery we provide can work long time and avoid the damage to the voice amplifier
Be sure that the pole is right when you change the battery
8¡£FAQ££
Question: why the voice amplifier produce so much noise?
Answer: Adjust the microphone and decrease the volume to avoid the noises.
Question: how long is needed for battery charge?
Answer: generally about 3-4 hours is needed for battery charge, temperature and other factors may change the time.
Question: can you tell me the life of the battery, and can l change the battery one year later.
The battery life is about 2-4 year, and it is changeable, please get in touch with us or our dealers.
Question: can you tell me why my voice amplifier can not work now?
Answer: please check: ¢your microphone is inserted into the right hole, ¢the battery is not used out, ¢your voice amplifier is on. Please get
in touch with us or our dealers if you still can solve it by yourself.
 Loading...