

Page 1
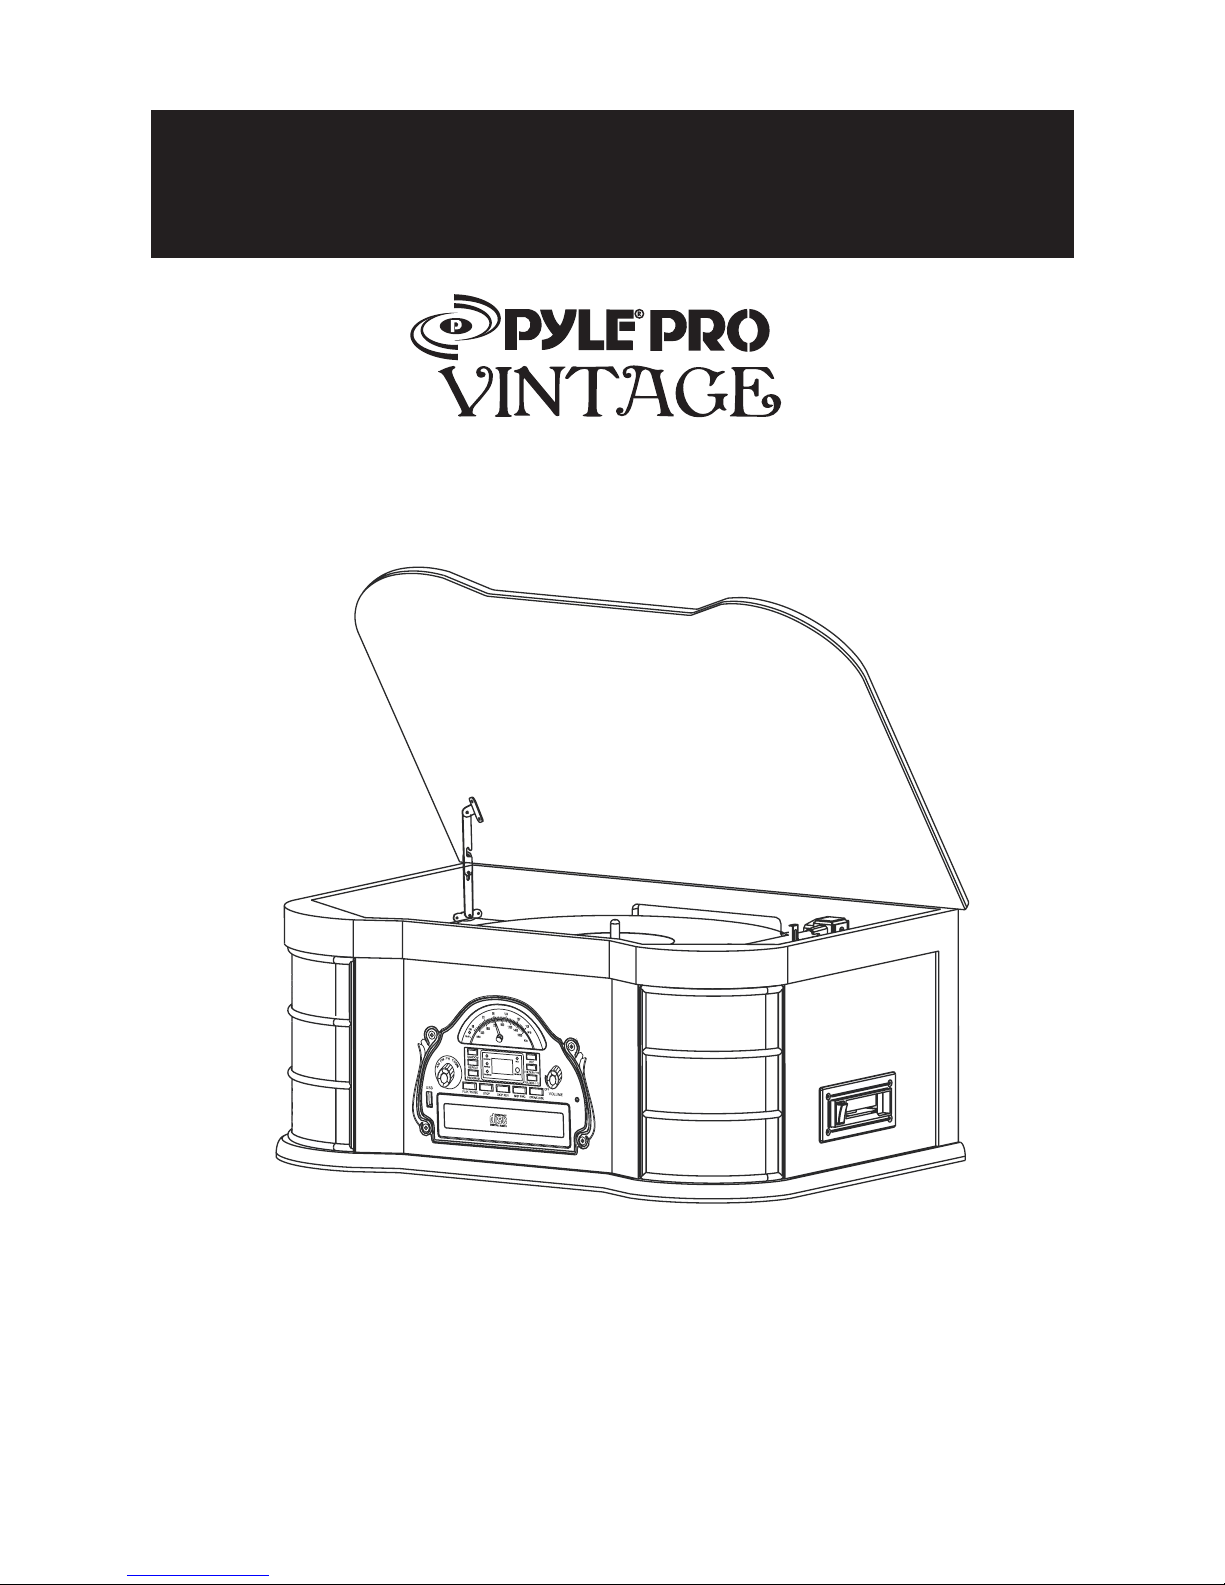
CLASSICAL USB TURNTABLE WITH
CD, AM/FM RADIO, CASSETTE
MEDEL:PTCDS2UI
Nostalgic Music System
Operating Instructions Manual
www.pyleaudio.com
Page 2
1
IMP O RTANT S A FETY I N STRU CTION S
1) Please read these instructions and keep them for future reference.
2) Pay attention to all warnings.
3) Follow all instructions.
4) Do not use this apparatus near water.
5) Clean only with a dry cloth.
6) Do not block any ventilation openings.
7) Install in accordance with the manufacturer's instructions.
Do not install near any heat sources such as radiators, heaters, stoves, or
other apparatus (including amplifiers) that produce heat.
8) Protect the power cord from being walked on or kinked, in particular where
the plug is fitted and at the point where it exits from the apparatus.
9) Only use attachments / accessories specified by the manufacturer.
10) Unplug this apparatus during lightning storms or when unused for long
periods of time.
11) Refer all servicing to qualified service personnel. Servicing is required
when the apparatus has been damaged in any way, such as power-supply
cord or plug is damaged,liquid has been spilled or objects have fallen into
the apparatus, the apparatus has been exposed to rain or moisture, does
not operate normally, or has been dropped.
12) This appliance should not be exposed to dripping or splashing water and
no object filled with liquids, such as vases, should be placed on the
apparatus.
13) Do not overload the wall power outlet. Use only power source as indicated
- i.e.120V AC mains.
Page 3

PREPARATION FOR USE
UNPACKING AND SET UP
● Carefully remove the unit from the display carton and
remove all packing material from the unit.
● Unwind the AC power cord and extend it to its full length.
● Unwind the FM Antenna wire and extend it to its full length.
● Place the unit on a stable, level surface, convenient to an AC
outlet, out of Direct sunlight, and away from sources of excess
h eat, dust, moisture, humidity or strong magnetic fields.
● Raise the lid to expose the phonograph. The phonog raph has
been secured for shipment with a transit screw. Use a coin or
screwdriver to turn the transit screw clockwise. This will allow the
Turntable to “float”.
POWER SOURCE
This product is designed to operate on 120V 60Hz AC only. Attempting to operate this
system from any other power source may cause damage to the system, and such damag e is
not covered by your warranty.
NOTE: You will note that this system is equipped with domestic standard AC power 2-pin
plug. If this plug does not fit into your existing AC outlet, do
not try to defeat this safety feature by filing the wide blade
to make it fit into your outlet. If this plug will not fit into
your outlet, you probably have an outdated
non-polarized AC outlet. You should have your
outlet changed by a qualified licensed electrician.
● Remove the opaque white plastic stylus cover from the phonograph stylus by sliding it
Forward and down.
● Discard the stylus cover.
● Remove the twist-tie that was used to secure the tone arm during shipment.
● Release the tone arm lock lever.
● Connect the plug to your AC outlet.
TRANSIT SCREW
STYLUS COVER
TONE ARM LOCK LEVER
IMPORTANT NOTES
Avoid installing this unit in places ex posed to di rect sunl ight or close to heat radiating
appliances such as electric heaters, on top of other stereo equipment that ra diates to o
much heat, places lacking ventilation or dusty areas, places subject to constant vib ration
and/or humid or moist areas.
Do not attempt to clean this unit with chemical solvents as this might damage the f inish. Us e
a clean dry cloth. Operate controls and switches as described in the manual. Before turn ing
On the power, make certain the AC power cord is plugged in. Store your CDs, In a cool area
to avoid damage from heat. When moving the set, be sure to first disconnect the pow er cord.
2
PROTECT YOUR FURN ITURE
This model is equipped with non-skid rubber 'feet' to prevent the product from moving when
you operate the controls. Th ese 'feet ' are made from non-migrating rubber material specially
formulated to avoid leaving any marks or stains on your furniture. However certain typ es of
oil based furniture polishes, wood preservatives, or cleaning sprays may cause the rubber
'feet' to soften, and leave marks or a rubber residue on the furniture.
AC Outlet
AC Plug
Page 4
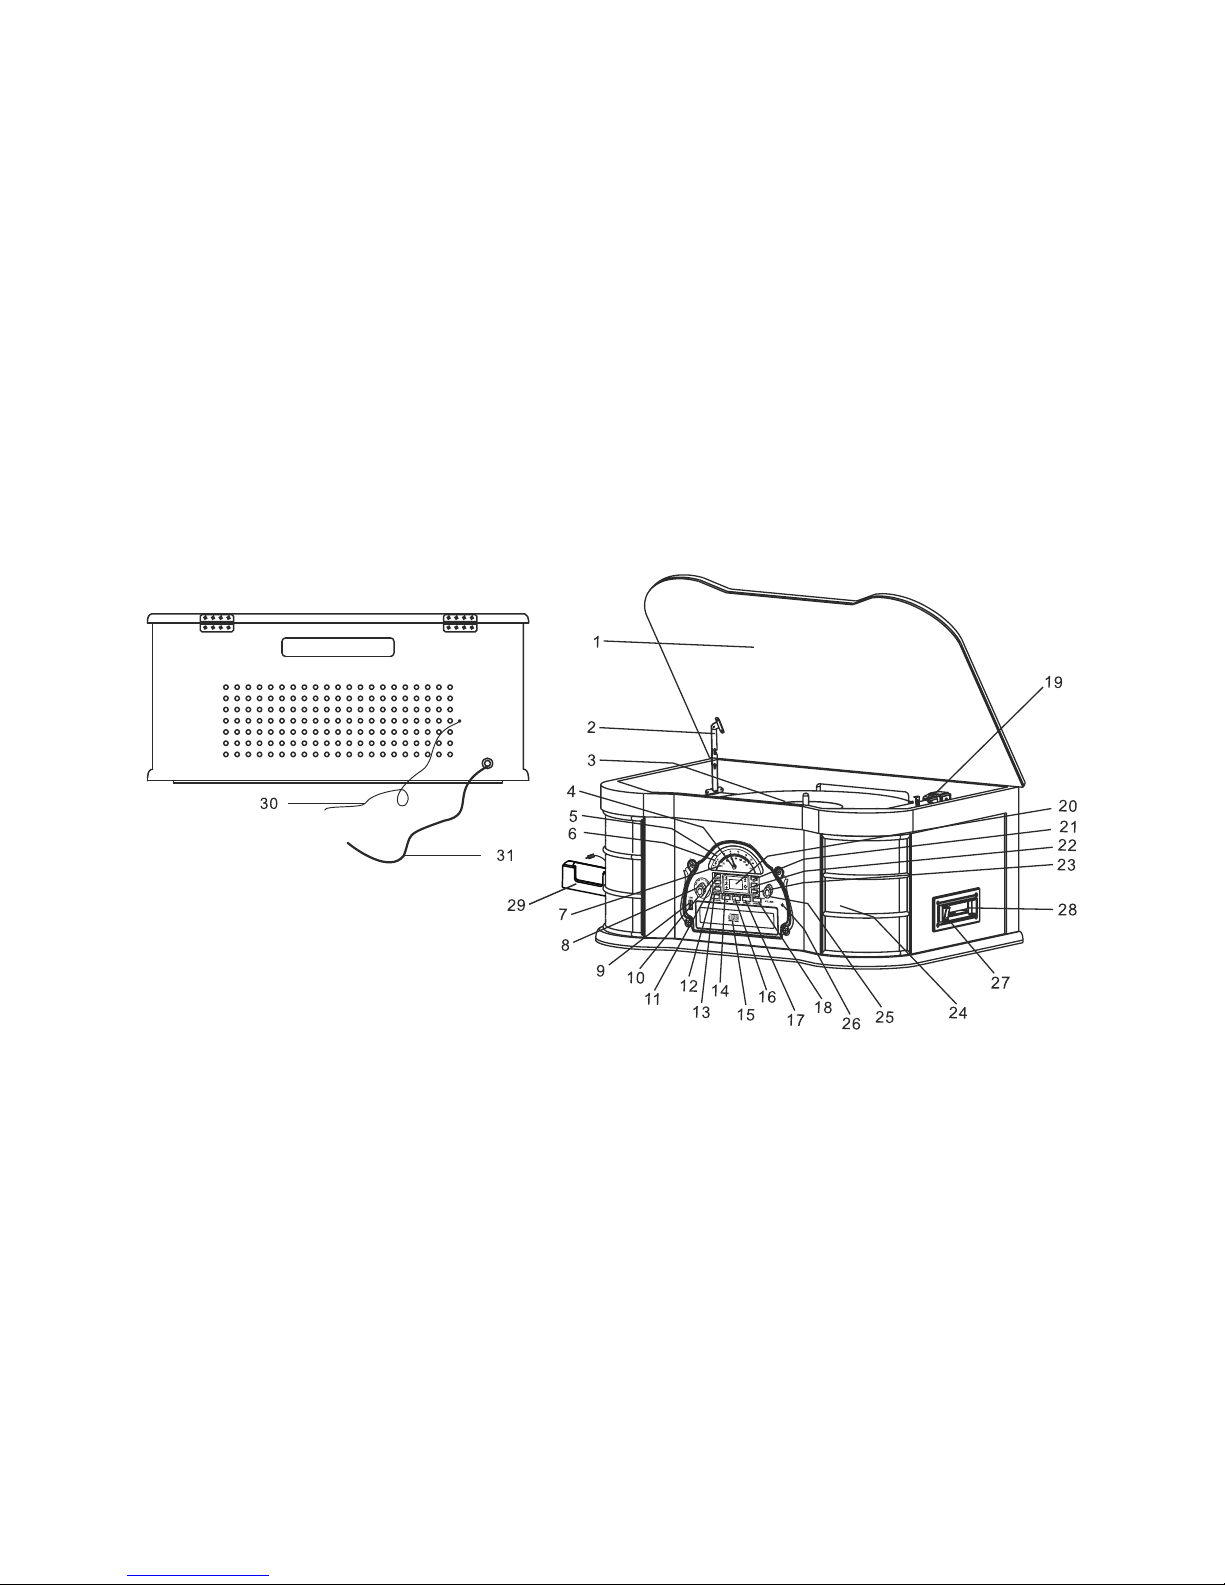
1) Phonograph Lid.
2) Phonograph Lid Support Bracket.
3) Turntable.
4) Tuning Control knob.
5) FM Dial Scale.
6) FM ST. Indicator.
7) MW Dial Scale.
8) AM/FM/PH/CD/TAPE Functi on Selector.
9) USB Socket.
10) RANDOM Control Button.
11) REPET Control Button.
12) PROGRAM Control Button.
13) PLAY/PAUSE Control Button.
14) STOP Control Button.
15) CD Drawer.
16) SKIP REV. Control Button.
17) SKIP FWD. Contr ol Button
18) OPEN/CLOSE Control Button
19) Tone-Arm.
20) CD Track Number Display
21) REC Control Button
22) FOLDER +10 Control Button
23) FOLDER -10 Control Button
24) Speakers
25) OFF-VOLUME Control
26) PHONE Jack
27) Cassette EJ/FF Button(Eject/fast Forward)
28) Cassette Player Slot
29) IPOD slot
30) FM Antenna
31) AC Power Cord
3
To prevent any damage to your furniture we strongly recommend that you
purchase small self-adhesive felt pads, available at hardware stores and home
improvement centers everywhere, and apply these pads to the bottom of the
rubber 'feet' before you place the product on fine wooden furniture.
IMPORTANT: Raising and Lowering the Lid
To open the lid, raise it as far as it will go until the lid support bracket locks in the
open position.
To close the lid, lift it upward slightly until the lid support bracket unlocks, and then
gently lower the lid.
TO AVOID DAMAGING THE CABINET OR THE LID, NEVER FORCE THE LID
CLOSED. ALWAYS RAISE THE LID TO RELEASE THE LID SUPPORT
BRACKET.
LOCATION OF CONTROLS AND INDICATORS
FRONT PANEL
Page 5
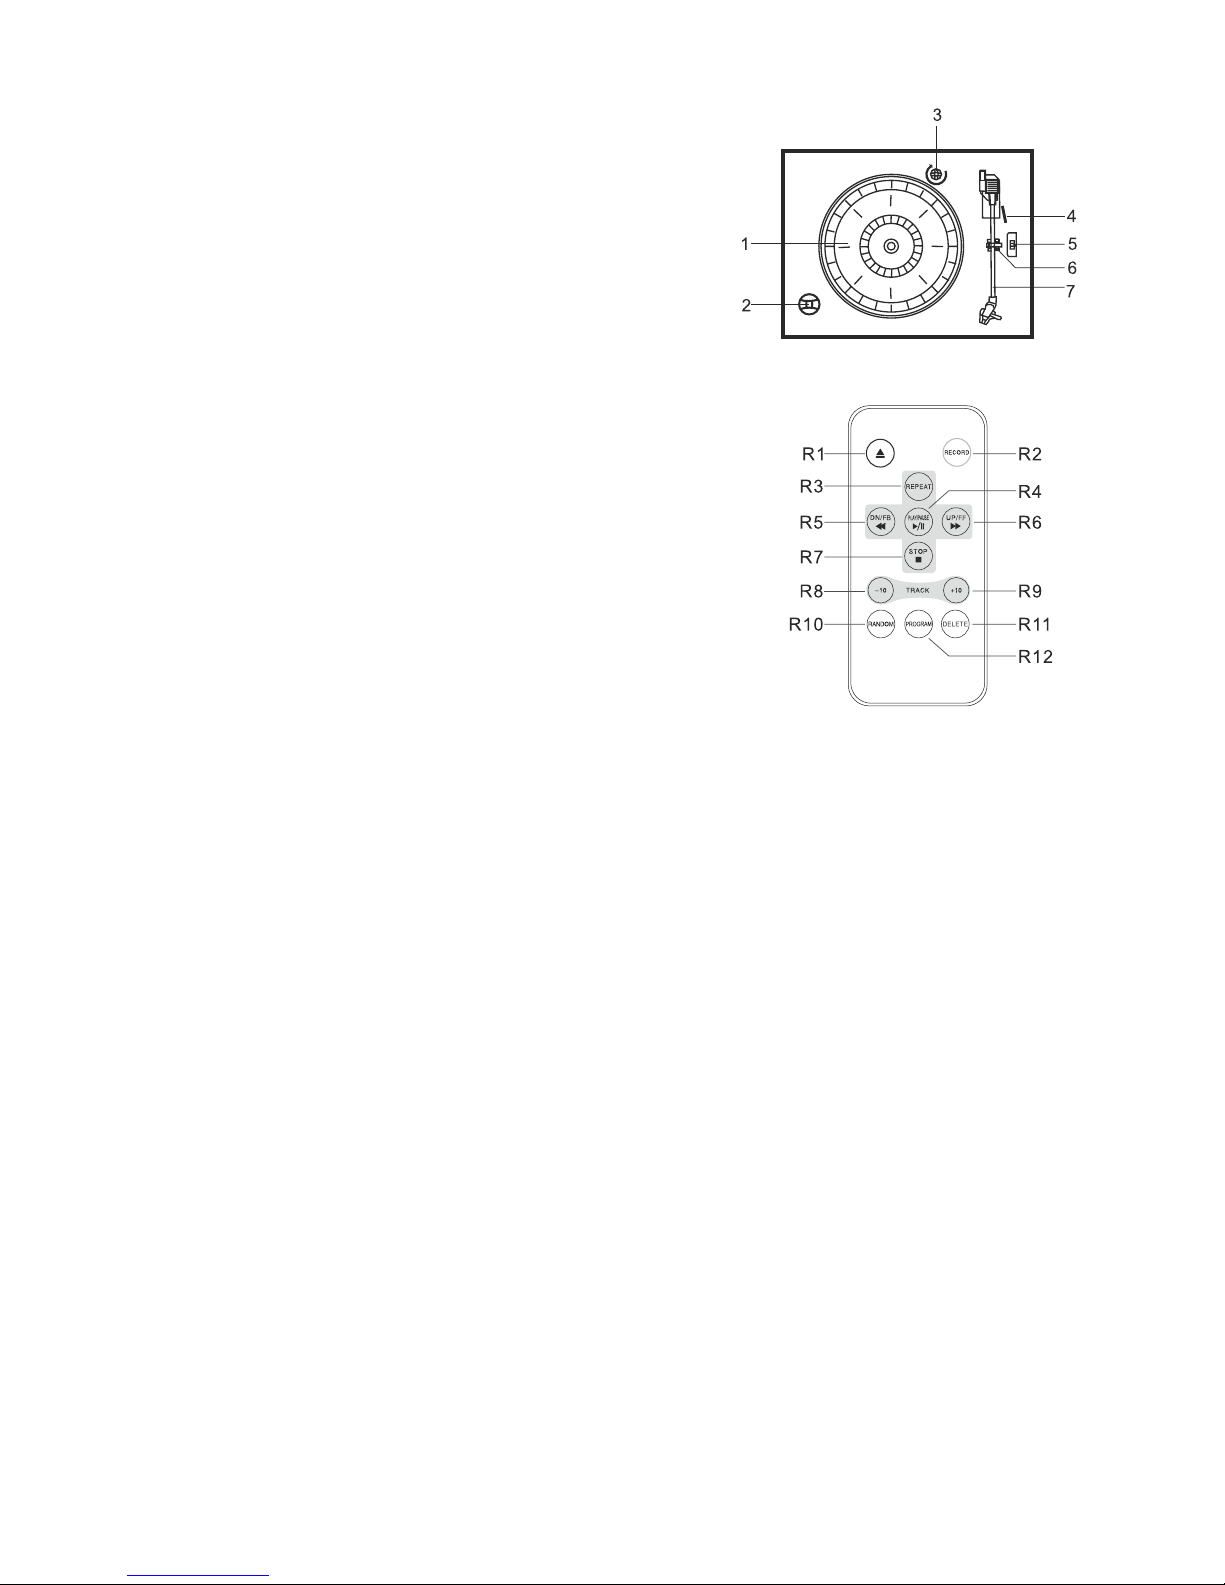
PHONOGRAPH
1) Turntable
2) 45 RPM Adapter
3) Transit Screw
4) Cue Lever
5) Speed Selector (33 / 45 / 78 RPM)
6) Tone arm Lock
7) Tone arm with Stylus
:
REMOTE CONTROL OP ERATION:
R1.OPEN / CLOSE
R2.RECORD
R3.REPEAT
R4.PLAY / PAUSE
R5.DN/FB (SKIP RE V)
R6.DN/FF (SKIP Fo rward)
R7.STOP
R8.TRACK -10
R9. TRACK +10
R10.RANDOM
R11.DELETE
R12.PROGRAM
NOTE: ALL of the buttons on the remote control have the same function as these buttons in
the unit. This remo te contro l just used f or CD/MP3, USB mode.
OPERATING INSTRU CTIONS
LISTENING TO THE RA DIO
To turn the system on, select the AM or FM function, adjusting the TUNING bu tton to rec eive
stations, when get the clear station, if you tune to strong FM Stereo st ation the F M ST
indicator lamp will light and reception will be in stereo. If you tune to a weaker FM station, the
reception will automatically switch to mono.
Antenna Information
The AM antenna is inside the cabinet. If AM reception is unsatisfactory try rep osition ing the
cabinet slightly until the internal antenna is picking up the strongest signal.
The FM wire antenna is located on the back of the cabinet. If necessary, adjust the position
and direction of this antenna until you find the position that provides the best recepti on.
4
Page 6

NOTE:
Level hold PLAY/PAUSE button to enter function change as follows: CD-USB
When the CD function model has not put in CD/MP3 disc, inserts USB card, will automatic
switching to USB card the playback. To confirm record ing succe ssful or no t, select the CD
function and level hold PLAY/PAUSE button to enter into USB function, insert USB card the
unit will read the USB songs.
CD/MP3 FUNCTION OPERATION :
Select to the CD function. press the OPEN/CLOSE button to o pen the CD do or and the un it
LCD displays <OP>.
1. Place your CD or MP3 disc in the drawer with the printed label side facing up.
2. Press the OPEN/CLOSE button once more to close the CD door and the unit LCD display
<CLO>. the disc will spin for a few seconds while the player reads the disc and will
automatism playback.
PLAY CONTROL IN CD/MP3/USB MOD EL:
1. Place your CD or MP3 disc in the drawer or insert USB card. Will automatism
playback. Play will continue until the end of the DISC or USB card. When the disc
ends, the display again shows the total number of tracks on the disc or USB card.
You may also stop playback at any time by press the STOP but ton.
2. Adjust the OFF/VOLUME control to the desired level.
3. In play model: Press the SKIP FWD button on the unit front panel or UP/FF button on the
remote control to begin the next song.
4. Press the SKIP REV b utton on th e unit fron t panel or DN/FB button on the remote control
to begin the previous song that has just been played.
5. Press the FOLDER +10 or FOLDER -10 button to skip forward or r ecede 10 tr acks in
CD/MP3/USB MODEL.
SELECTING THE FOLDER PLAYBACK FOR MP3/USB:
In stop model: Press FOLDER +10 or FOLDER -10 button to selec ted the FOL DER+ or
FOLDER- to confirm the FOLDER tracks number. Press PLAY/PAUSE button to playback.
The song number and folder number of your selected track will be shown consecutively in
every 2 seconds. Your may also stop playback at any time by press the STOP button.
5
Page 7
SELECTING YOUR DE SIRED PART FOR CD/MP3/USB:
Depress and hold SKIP FWD or SKI P REV button on the unit front panel or UP/FF or DN/FB
button on the remote control to select your desired part of the currently playi ng track an d
then release the buttons. Th e playbac k will resu me normal f rom that point.
PAUSE CONTROL IN CD/MP3/USB MODEL:
In CD/MP3/ USB playing mod: Press the PLAY/PAUSE button once.Play stops but the di sc
continues to spin and the LCD indicator of the track number will flashs. Press the
PLAY/PAUSE button once more to cancel pause and of track number stop flashing.
RECORD CD/MP3/USB/PHONO/CASSETTE FUNCTION:
In CD/MP3/ USB/PHONO and CASSETTE playing mode, select to the desi red track s ongs.
Insert USB and press REC button , the unit displays <rEC>, and the REC indicator lamp
will shows. Press REC button once more to confirm record to USB and the REC indicator
lamp will flashs. The unit can b e recorde d songs for y our selec t favorite songs numbers. If
want to cancel press STOP butt on.
NOTE: In PHONO / CASSETTE model record: To con firm reco rd model, the unit display
<rEC> and rec indicator lamp will flashs.
CANCEL USB SONGS OP ERATION
The unit plays the song in USB : You dislike, pressing and hold the STOP button or DE LETE
button on the remote control 2 seconds to cancel, the unit LCD will be displays <DEL>.
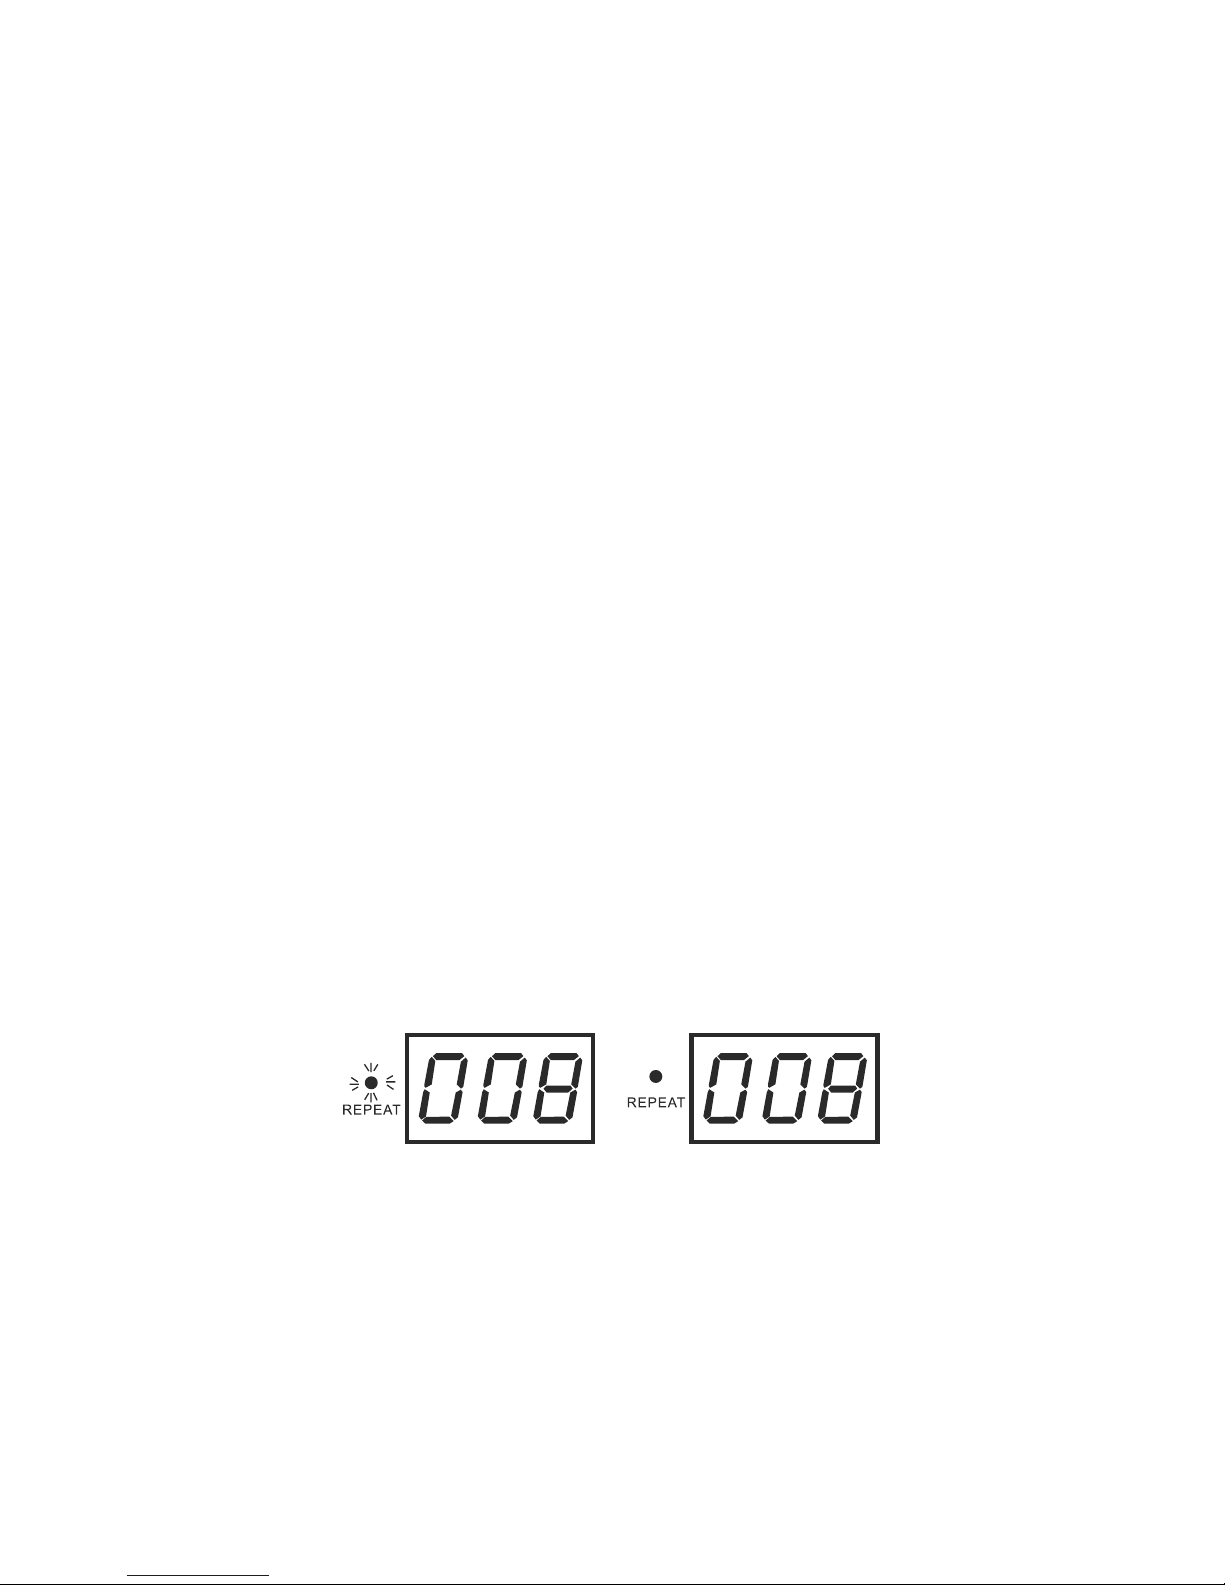
REPEAT PL AYBACK IN CD/MP3/USB MODE:
In CD/MP3/USB play mode: Press REPEAT bu tton once will play the present track repeat
playback and the repeat indicator lamp will shows and flashs.
Press the REPEAT but ton secon d time, wil l start repeat-all-song and the repeat indicator
lamp stop flashes.
To cancel repeat playback: Press the REPEAT button third, until the repeat Indicator lamp
goes off. Repeat pl ayback is a lso cance lled by pre ssing the S TOP button.
RANDOM PLAYBACK IN CD/MP3/USB MODE:
In CD/MP3/USB play mode: Press RANDOM button to start random playing functi on random
indicator lamp will be shown. Press this button again will cancel the random function.
once
6
Page 8
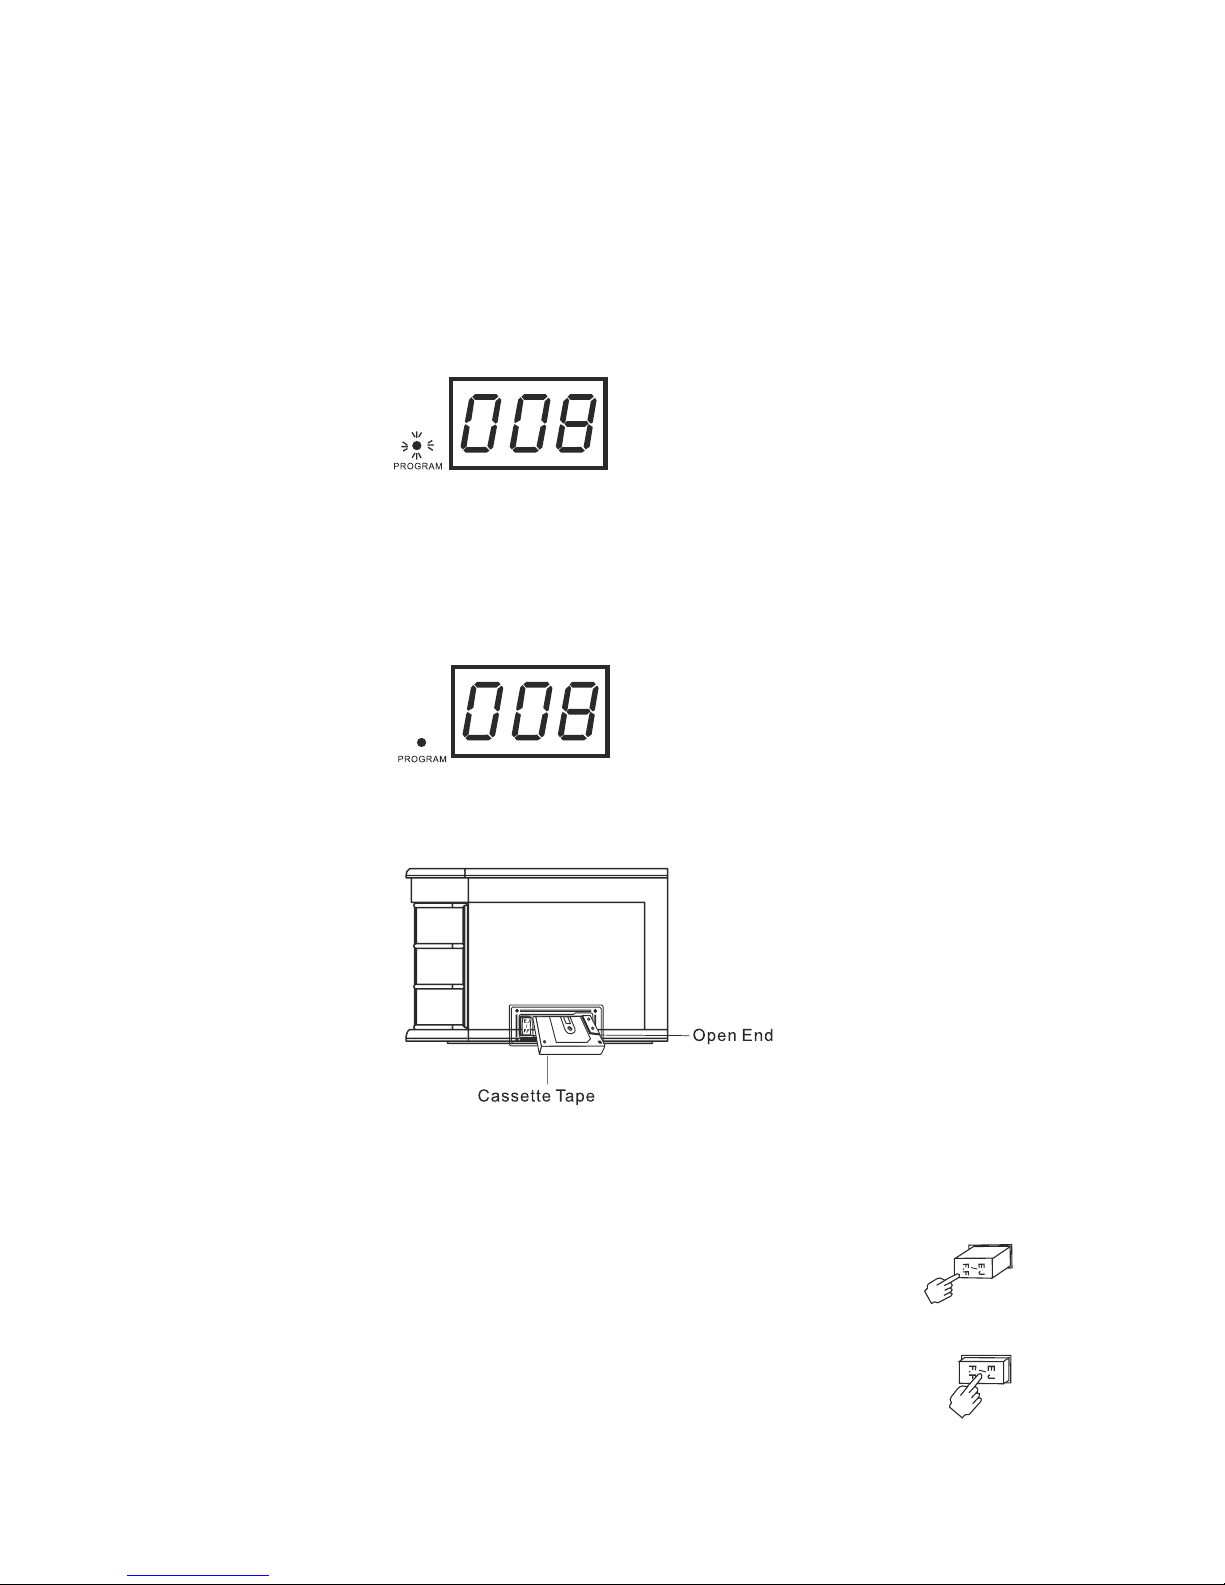
PROGRAM FUNCTION IN CD/MP3/USB MODE:
This feature allows you to program of the CD 20 tracks and MP3/USB 99 tracks on a disc fo r
playback in any desired order.
In CD/MP3/USB stop model: Press the PROGRAM button to enter the prog ram mode. The
program number briefly shows '0 0 1', and the program indicator lamp flash. Press the SKIP
FWD or SKIP REV butto n on the unit f ront pane l or UP/FF or DN/FB button on the remote
control to select the first track number you wish to enter in the program memory, example:
Track number'008'. When the desired track number appears on the display, press the
PROGRAM button again to memorize the track. The program number briefly shows '0 0 2',
then program indicator lamp will shows and flashes.
Repeat step of the above, select a differ ent track number each time until you have entered up
to CD 20 tracks and MP3/USB 99 tracks in the program memory.
Press the PLAY/PAUSE button to begin programmed playback. The PROGRAM indicator
lamp stop flashing. Playback will begin with the first track you have programmed and will
continue until the last programmed track has been played.
The programmed sequence may be cancelled by press STOP button twice.
CASSETTE FUNCTION OPERATION:
1. Select to the CASSETTE function. Insert your cassett e into the sl ot, as show n in the
illustration, with the side you wish to play facing up and the open end on the right side.
2. Cassette playback begins as soon as the tape is inserted. Adjust the OFF- VOLUM E
control knob to the desired level.
3. To advance the tape rapidly, depress the EJ/FF (Eject/Fast
Forward)button approximately half way. The tape will move forward rapidly
as long as the button is depressed. Normal playback will resume when the
button is released.
4. When the tape ends the player stops automatically. Depress the EJ/FF
(Eject/Fast Forward) button completely to remove the cassett e from the
player. You may press the EJ/FF (Eject/Fast Fo rward) bu tton to stop play
and remove the cassette at any time.
5. To turn the system off , rotate th e OFF-VOLUME control counter clockwise until a click is
heard.
7
Page 9
PHONO FUNCTION OPERATION:
Select to the PHONO function. Make sure that you have removed the styl us cover fr om the
stylus .
1. Place your PHONO DISC on the center spindle.
2. Adjust the OFF/ VOLUME control to the desired level.
NOTE: Do not turn or stop the turntable manually. Moving or jarring the turntable without
securing the Tone Arm clamp could result in da mage to the Tone Arm.
3. Set the turntable speed selector to the appropriate speed, 33, 45, or 78 RPM. If y ou are
playing 45 RPM singles, place the 45 RPM adapter on the center spindle.
4. To turn the system o f f , rotate the OFF/VOLUME control knob counter clockwise until a
click is h eard.
5. When turntable finishes playing, tone arm will return to original position automatically.
6. Move up or move down the speed adjustor to adjust PHONO playing speed. When the
Speed display indicates not exact 33 & 45 & 78.
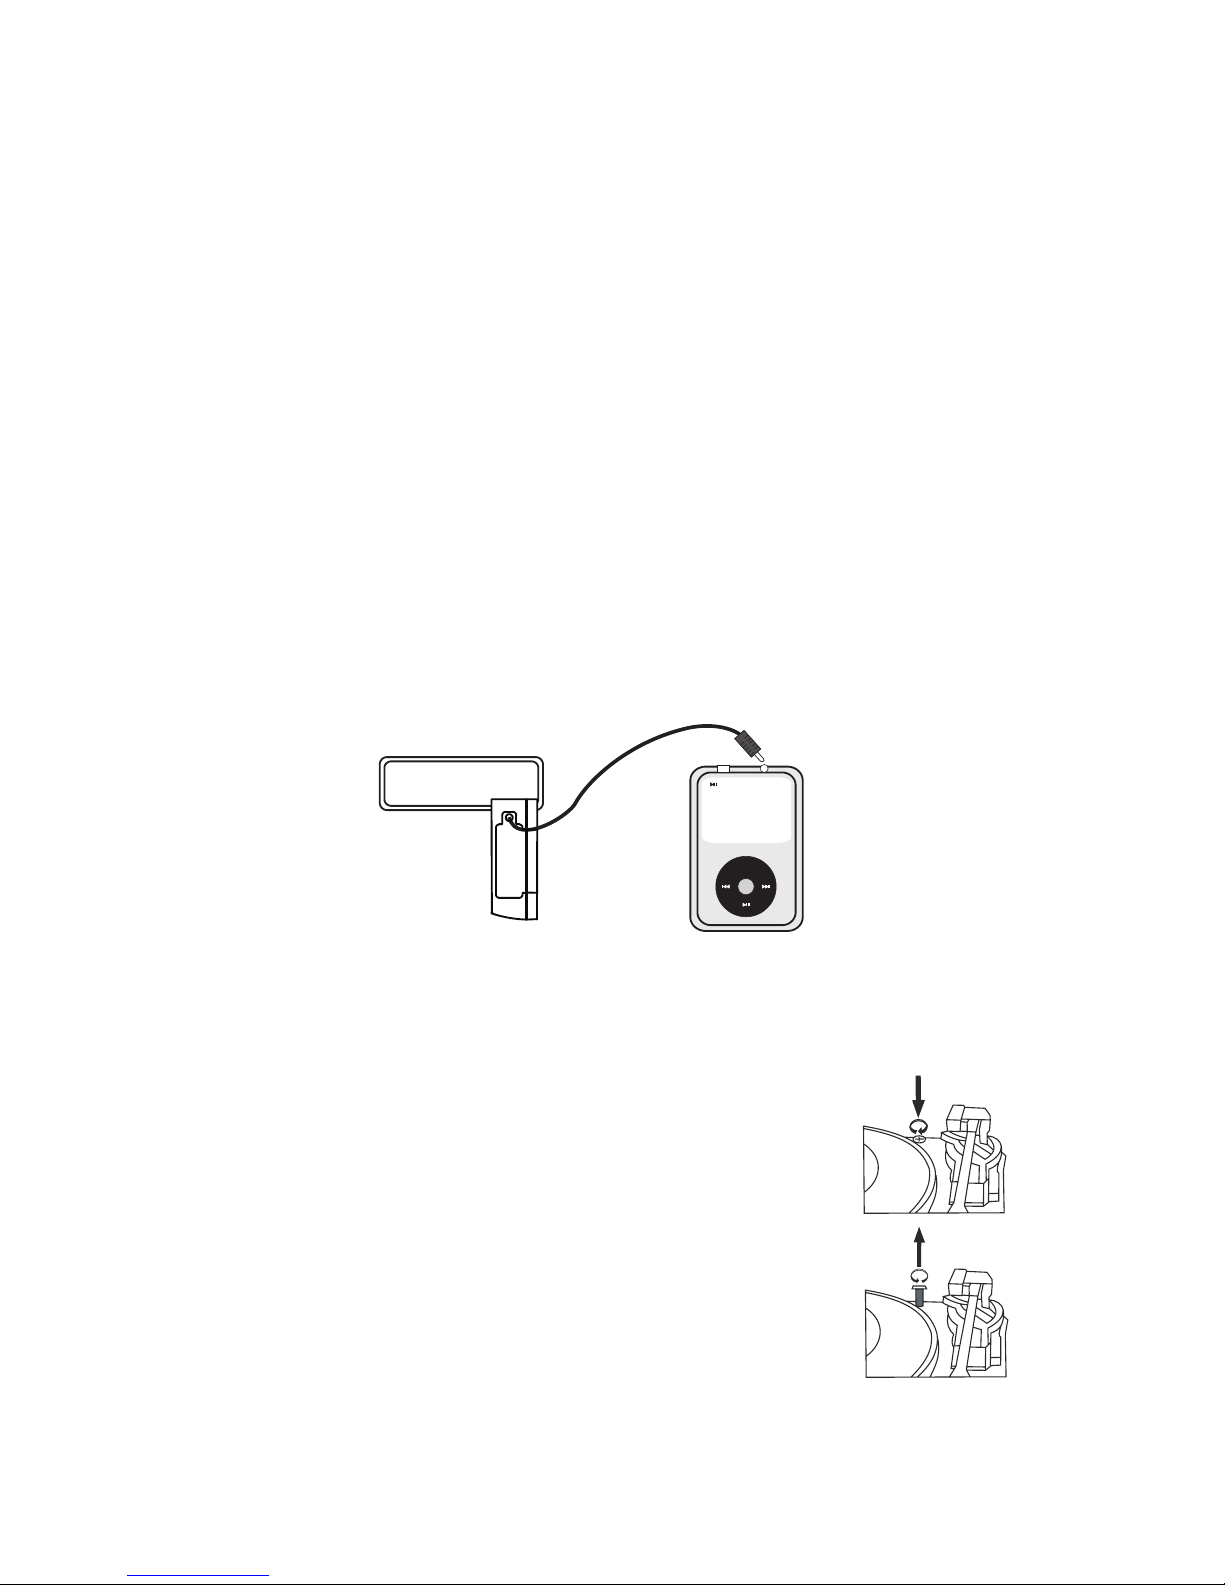
AUX IN (IPOD)FUNCTION OPERATION
Select to the PHONO function. Insert two ends cord into"AUX IN"socket of PTCDS2UI and
corresponding socket of th e MP3 player respectively. Opera te the MP3 as usual and through
the speaker of PTCDS2UI can hear the songs from the MP3
• BEFORE PLAYING A RECOR D, PLEASE U SE A SCREWDRIVER
OR COIN TO TURN THE TRANSIT SCREW COMPLETELY DOWN
IN CLOCKWISE DIRECTION TO UNLOCK THE TUR NTABLE.
• TO LOCK TH E TURNTABLE AGA IN FOR TRANSPORTATION,
PLEASE TURN THE SCREW IN COUNTER - CLOCKWISE
DIRECTION.
IMPORTANT!!
TO PROTECT THE TURNTABLE FROM DAMAGE DURING TRANSPORTATION,
A SILVER TRANSIT SCREW IS LOCATED IN THE UPPER RIGHT CORNER OF THE
TURNTABLE PLATFORM.
8
PTCDS2 UI MP3/MP4
MENU
感动天感动地
Page 10
CASSETTE CARE
Two common causes of trouble experienced when using cassettes are:
1) Tape jamming-Leading to uneven speed in playback.
2) Tape entangling- the tape wraps itself a round vit al parts of t he mechanism.
To reduce the likelihood of these problems occurring, the following precautions
should be observed:
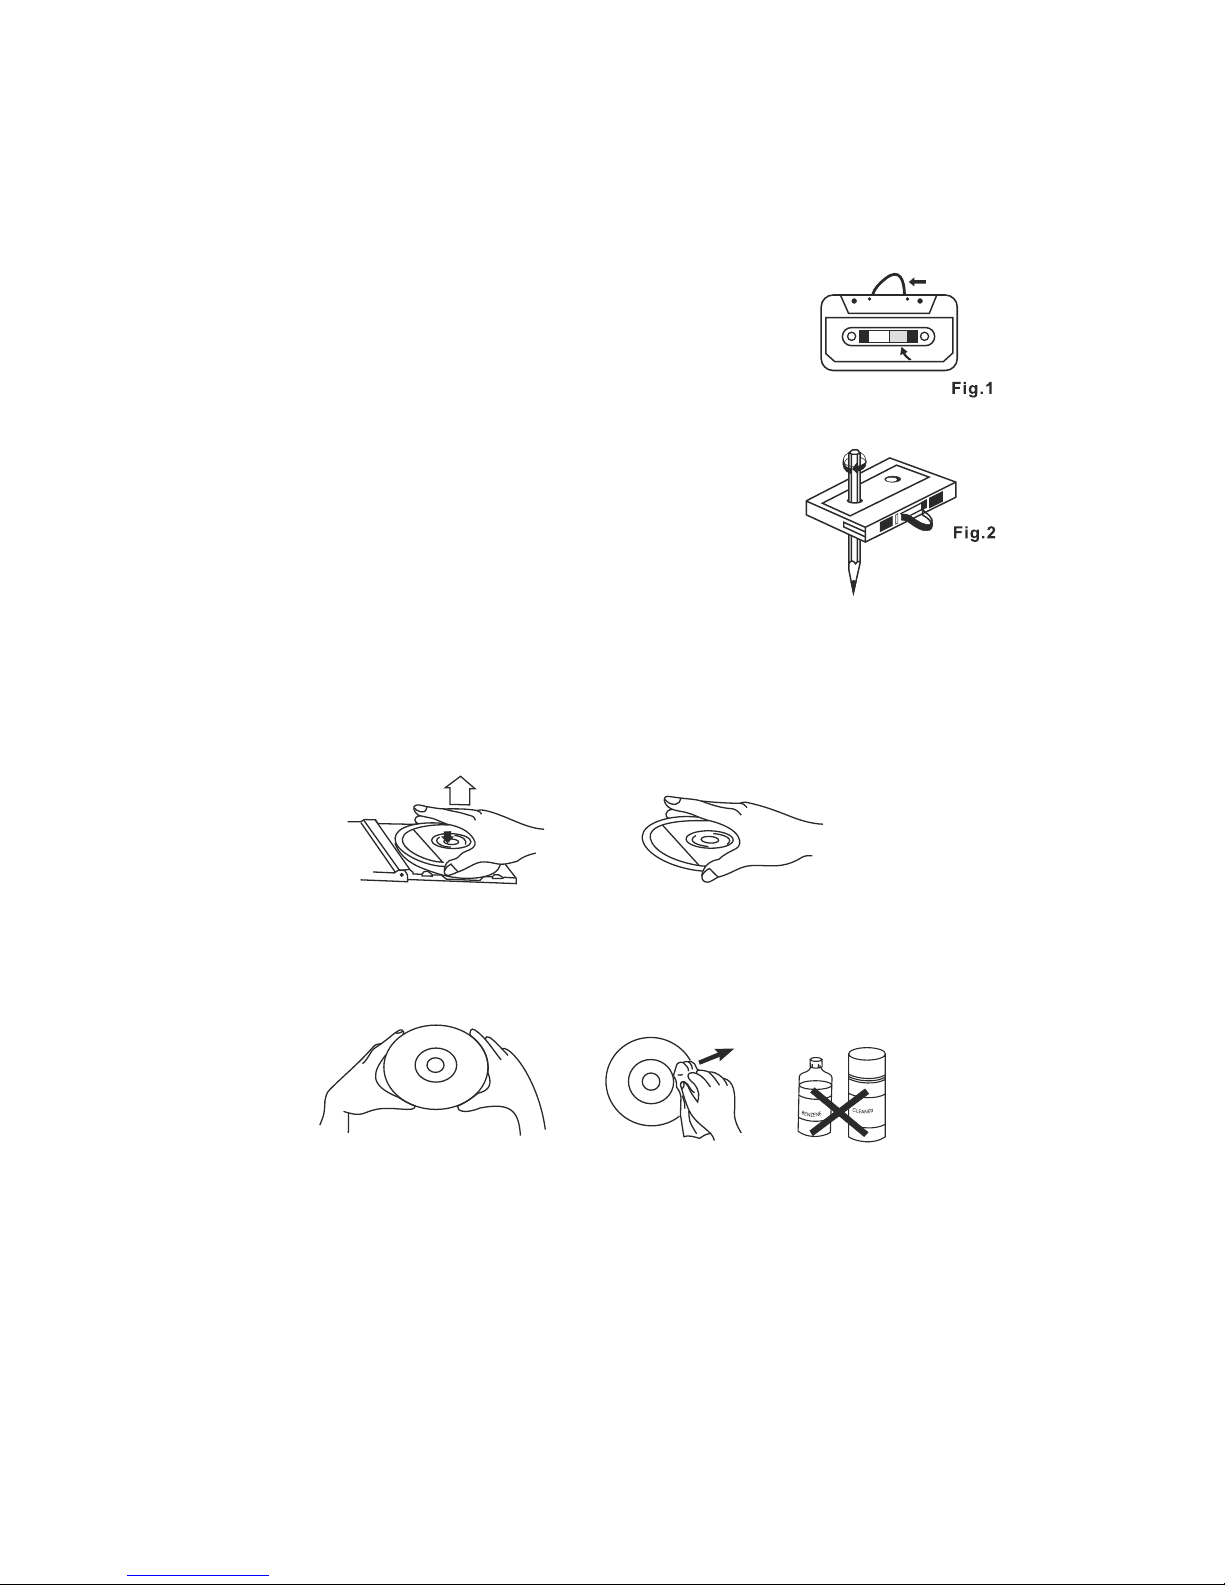
Check that there are no loose layers of tape visible
through the cassette centre window (see Fig. 1).
Take up any loose layers, using a pencil or hexagonally
Barreled ballpoint pen, before inserting the cassette
into the machine (see Fig. 2).
If the cassette feels tight while performing operation
shown (see Fig. 2), the tape may be jamming due to
ridges formed in the winding of the tape (visible
through the centre window). These may b e removed
in most cases, by fast winding of the cassette fro m
one end to the other and back again.
Use only well-known brands of tape. Avoid use of C-120 Cassettes. Furthe rmore, do n ot
expose cassettes to direct sunlight, dust or oil, and do not touch the tape surfa ces.
COMPACT DISC CARE
To remove a disc from its storage case, press down on the centre of the case and lift the dis c
out, holding it carefully by the edges.
Fingerprints and dust should be carefully wiped off the dis c s recorde d surface with a soft
cloth. Unlike conventional vinyl or shellac records, compact discs have no grooves to
collect dust and microscopic debris, so gently wiping with a soft cloth should remove most
particles. Wipe in a straight line from the inside to the outside of the disc. Smal l dust
particles and light stains will have absolutely no effect o n sound reproduction quality.
Clean the disc periodically with a soft, lint-free, dry cloth. Never use detergents or a brasive
cleaners to clean the disc. If necessary, use a CD cleaning kit.
Never affix labels to the surf ace of comp act discs or write on them, except very gently with
specialist CD-R Pens.
CARE OF THE CABINETS
You should care for the cabinet as you would care for any piece of fine furniture. When the
cabinet becomes dusty, wipe i t with a soft , non-abrasive dusting cloth. If the cabinet
becomes smudged with finger prints, you may use any good quality commercial dusting
and polishing spray cleaner. However, avoid spraying the plastic or metal parts of this
system. We recomm end that yo u spray the c leaner on to your dusting cloth not directly onto
the cabinet to avoid getting any of the spray on the plastic or metal parts.
9
 Loading...