

DIGITAL DRUM
PED06
Instruction Manual
www.PyleAudio.com
Congratulations!
Thank you for purchasing this digital drum module. The drum module has been
developed to act and play like a drum set but with greater ease. Before you use
the instrument, we recommend you to read through this manual.
Taking Care of Your Digital Drum Set
Location
Do not expose the unit to the following
conditions to avoid deformation,
discoloration, or more serious damage.
Direct sunlight.
High temperature (near a heat source, or
in a car during the day time).
Excessive humidity.
Excessive dust.
Strong vibration
Power Supply
Make sure to use the suitable AC adaptor,
and also make sure the AC outlet voltage
at your country matches the input voltage
specified on the AC adaptor`s label.
Turn the power switch OFF when the
instrument is not in use.
An AC adaptor should be unplugged from
the AC outlet if the instrument is not be
used for an extended period of time.
Unplug the AC adaptor during electric
storms.
Avoid plugging the AC adaptor into the
same AC outlet as appliance with high
power consumption, such as electric
heaters or ovens. Also avoid using multiplug adaptors since these can result in
reducing the sound quality, operation
errors, and possibly damage.
Radiated Immunity
Handling and Transport
Never apply excessive force to the
controls, connectors or other parts of the
instrument.
Always unplug cables by gripping the
plug firmly, but not pulling on the cable.
Disconnect all cables before moving the
instrument.
Physical shocks caused by dropping,
bumping, or placing heavy objects on the
instrument can result in scratches and
more serious damage.
Cleaning
Clean the unit with a dry soft clot h.
A slightly damp cloth may be used to
remove stubborn grime and dirt.
Never use cleaners such as alcohol or
thinner.
Avoid placing vinyl object on top of the
unit (vinyl can stick to and discolor the
surface).
Electrical Interference
This instrument contains digital circuitry
and may cause interference if placed too
close to radio or television receivers. If
this occurs, move the instrument further
away from the affected equipment.
The normal function of the product may
be disturbed by Strong Electro
Magnetic Interference. If so, simply reset
the product to resume normal operation
by following the instruction manual. In
case the function could not resume,
please use the product in other location.
ESD, Fast Transient and Surge may
cause the unit to temporary malfunction.
Switch off and on again to resume normal
operation.
THIS DEVICE COMPLIES WITH PART 15 OF THE FCC RULES.
OPERATION IS SUBJECT TO THE FOLLOWING TWO CONDITIONS:
(1) THIS DEVICE MAY NOT CAUSE HARMFUL INTERFERENCE, AND
(2) THIS DEVICE MUST ACCEPT ANY INTERFERENCE RECEIVED,
INCLUDING INTERFERENCE THAT MAY CAUSE UNDESIRED OPERATION.
Turn Power OFF When Making
Connections
To avoid damage to the instrument and
other devices to which it is connected,
turn the power switches of all related
device OFF prior to connecting or
disconnecting cables.

Contents
Panel Controls
- Front Panel
- Rear Panel
Setup
- Connect the Pads and the Pedals
- Connect the Power supply jack
- Connect a audio equipment
- Connect a CD player, etc.(Mix in jack)
- Connect Headphones
- Connect a MIDI and USB device
- MIDI out format
Functions
- Switch the power ON
- Set the main volume
- Select a drum kit
4
4
5
6
6
7
7
7
7
8
8
9
9
9
9
- Adjust the kit volume
- Select a pad voice
- Adjust the pad volume
- Save kit
- Select a pattern
- Listen to the pattern
- Adjust the pattern volume
- Recording
- Drum off
- Adjust the pattern tempo
- Click
- Select a click sound
- Adjust the click volume
- Factory reset
- Hi-Hat control
Specifications
9
10
10
10
11
11
11
12-13
13
14
14
14
15
15
15
16
Voice list
Pattern list
Percussion Set List
MIDI implementation chart
17
18
19
20
Panel Controls
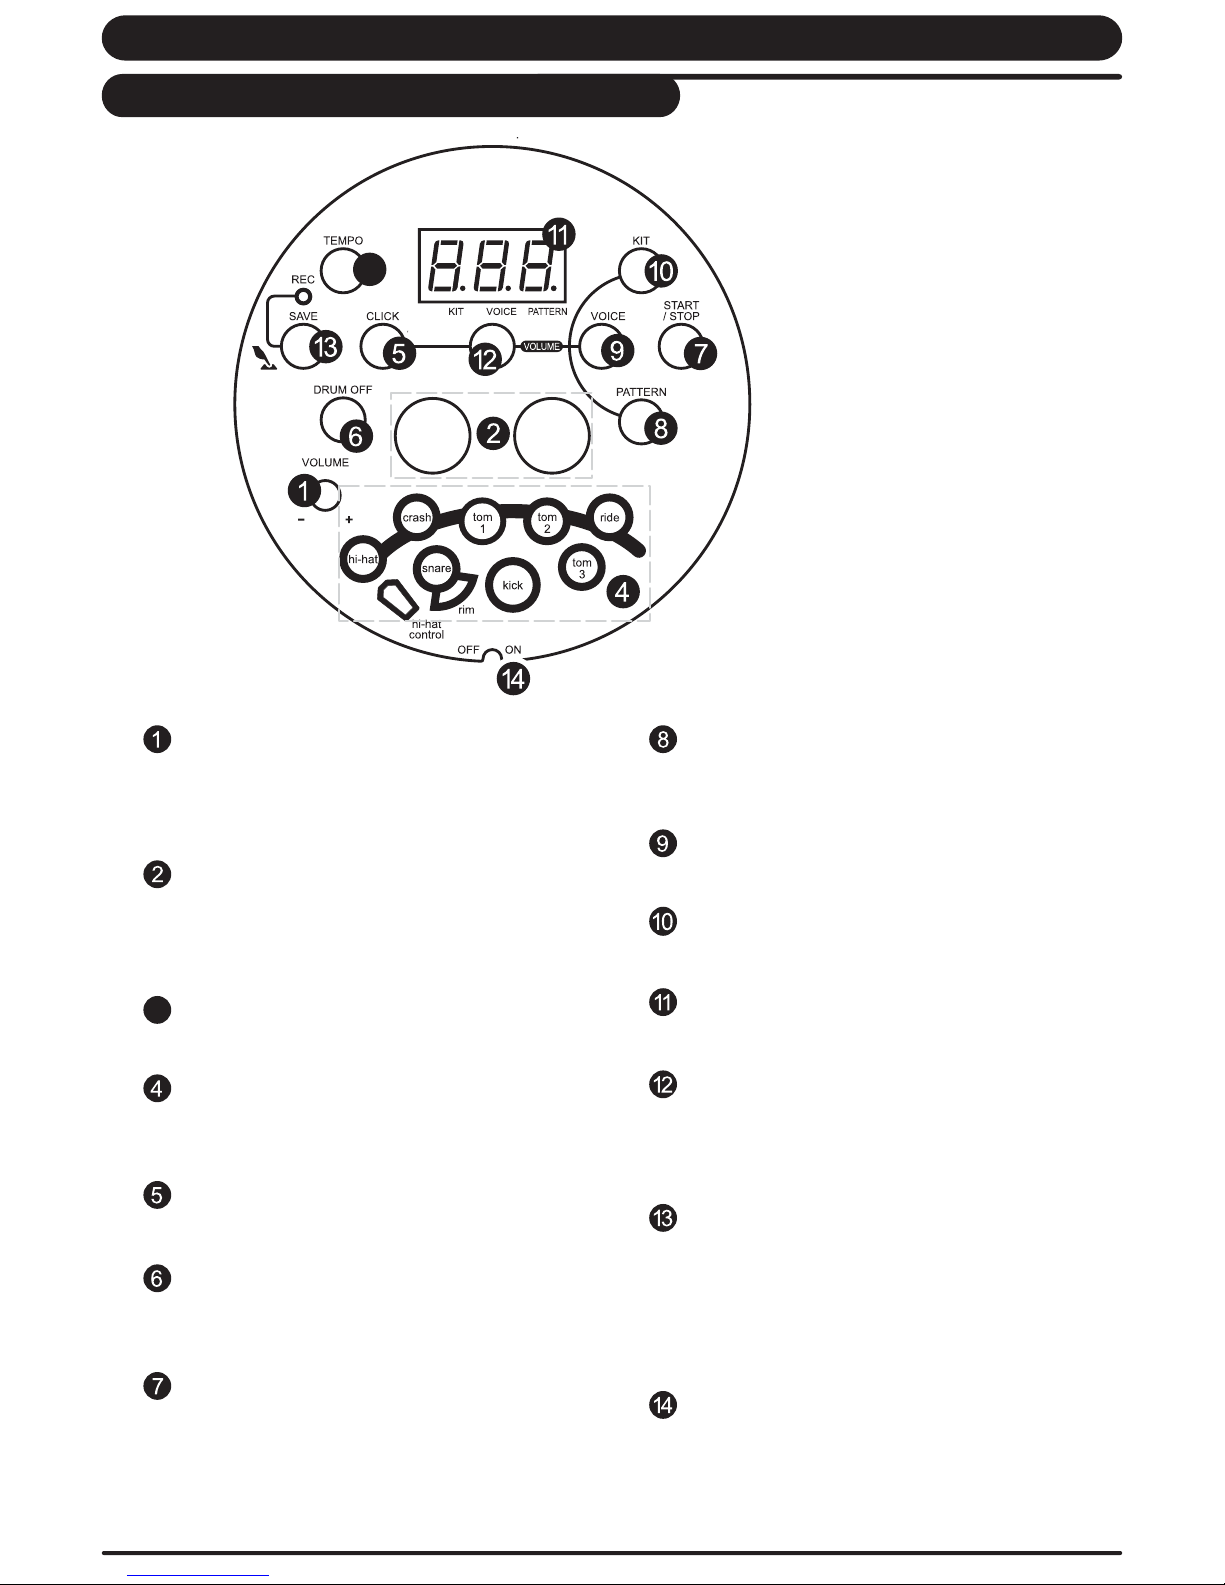
Front Panel
3
[volume] knob
Control the volume of phone.
Turn it clockwise to increase the volume
and anticlockwise to decrease it.
[ + ] and [ - ] buttons
Adjust the parameter of the current menu
(KIT, voice, pattern, click value, tempo
value, etc.).
[tempo] Button
3
Enter the tempo adjustment mode.
Pads indicators
It shows the trigger sound in process of
pattern play.
[click] Button and indicator
Turn on or off the metronome.
[drum off] Button and indicator
It is used to mute on or mute off the drum
part of the song.
[start/stop] Button
Start or stop song playing.
[pattern] Button
Enter the pattern select mode and provide
MIDI output format choice.
[voice] Button
Enter the voice select mode.
[kit] Button
Enter the kit select mode.
3-digit LED
Display the parameters of current menu .
[volume] Button
Enter the volume adjustment mode and to
separately adjust the kit volume, voice
volume, click volume and pattern volume.
[save/rec] Button
Afford two modes:
Short pressing [save/rec] button to save the
current kit setting to a user kit.
Press and hold on [save/rec] button to enter
recording mode.
Power Switch
Turn the power on or off .
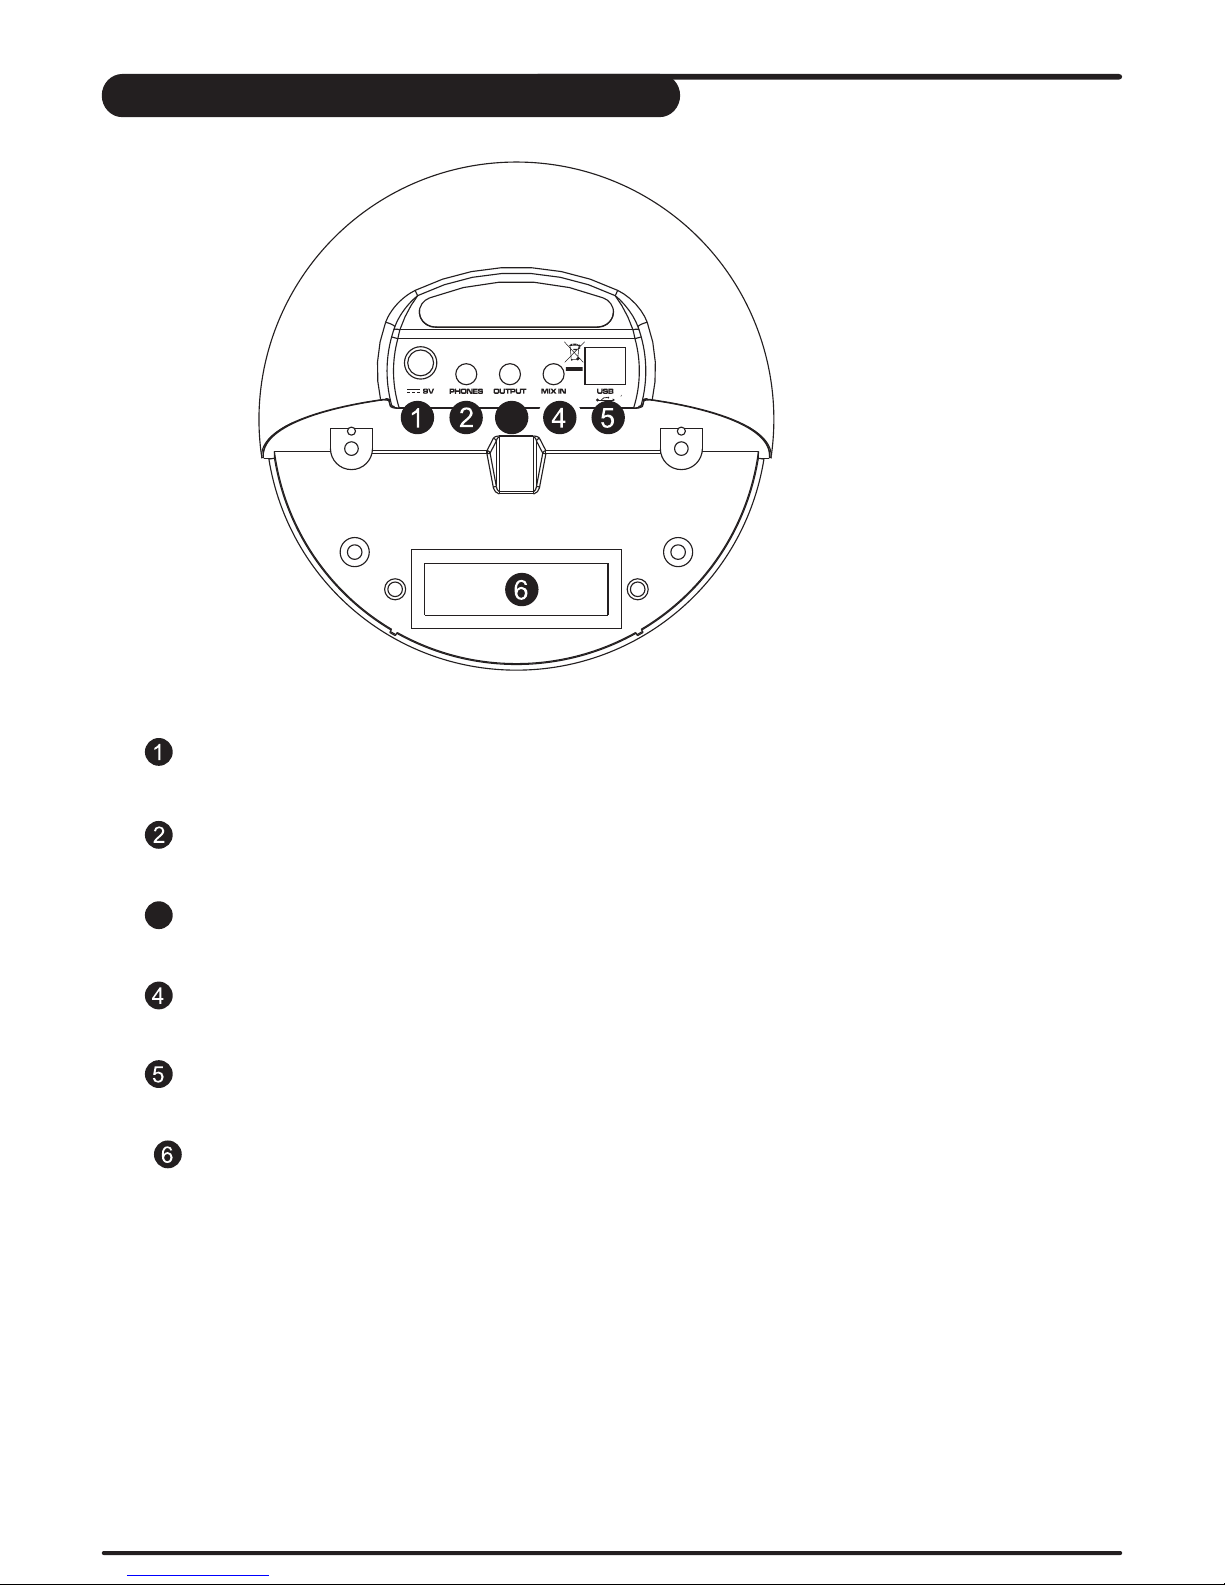
Rear Panel
3
DC Input
Support DC 9V power.
Phone Jack
Connect headphone or loudspeaker.
Output Jacks
3
Support Line stereo output.
MIX Input Jacks
Connect with external sound source.
USB Port
Connect to computer or other USB host devices.
Trigger Input Jacks
Connect with kick, snare, tom1~tom3, ride,
crash, hi-hat, hi-hat control triggers.
Setup
Caution!
To prevent electric shock and damage to the device, make sure the power is switched OFF
on the drum and all related device before making any connection.
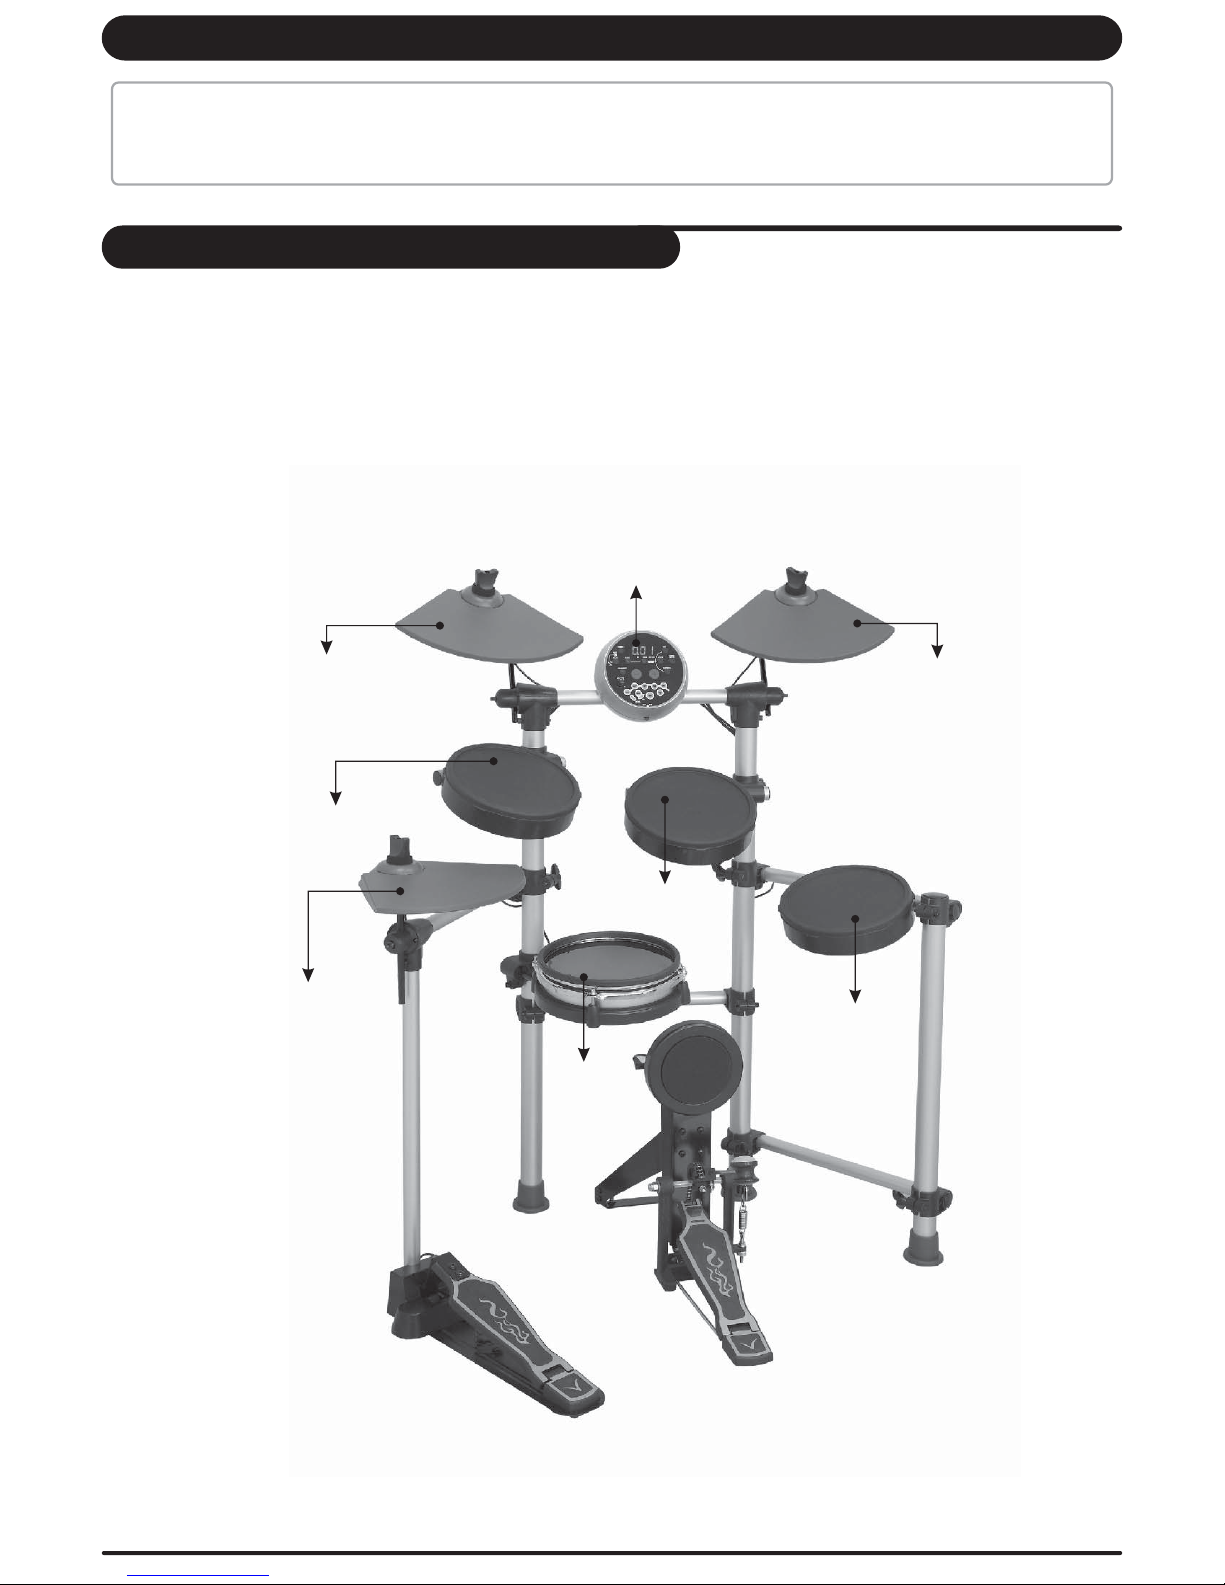
Connect the Pads and the Pedal
Using the provided cables,
Snare is stereo input, supports double triggering (increase edge triggering); cymbal (includes ride and crash)
kick, tom, Hi-Hat are mono input, which can't response edge triggering. Hi-Hat pedal is stereo input.
Note:
1. The voice of hi-hat pad hitting is controlled by hi-hat pedal. Similar to a real drum kit, the hi-hat pad functions
as an 'open hi-hat' when the pedal is released. When the pedal is stepped, it functions as a 'closed hi-hat' .
2. The valid striking area of a cymbal pad (ride, crash or hi-hat) is
is different from other pads.
connect with kick, snare, tom1~tom3, ride, crash, hi-hat, hi-hat control triggers.
half part of the pad on the player side, which
Drum Module
crash ride
tom 1
hi-hat
tom 2
tom 3
snare
Kic k Trigger
Hi-Hat control pedal
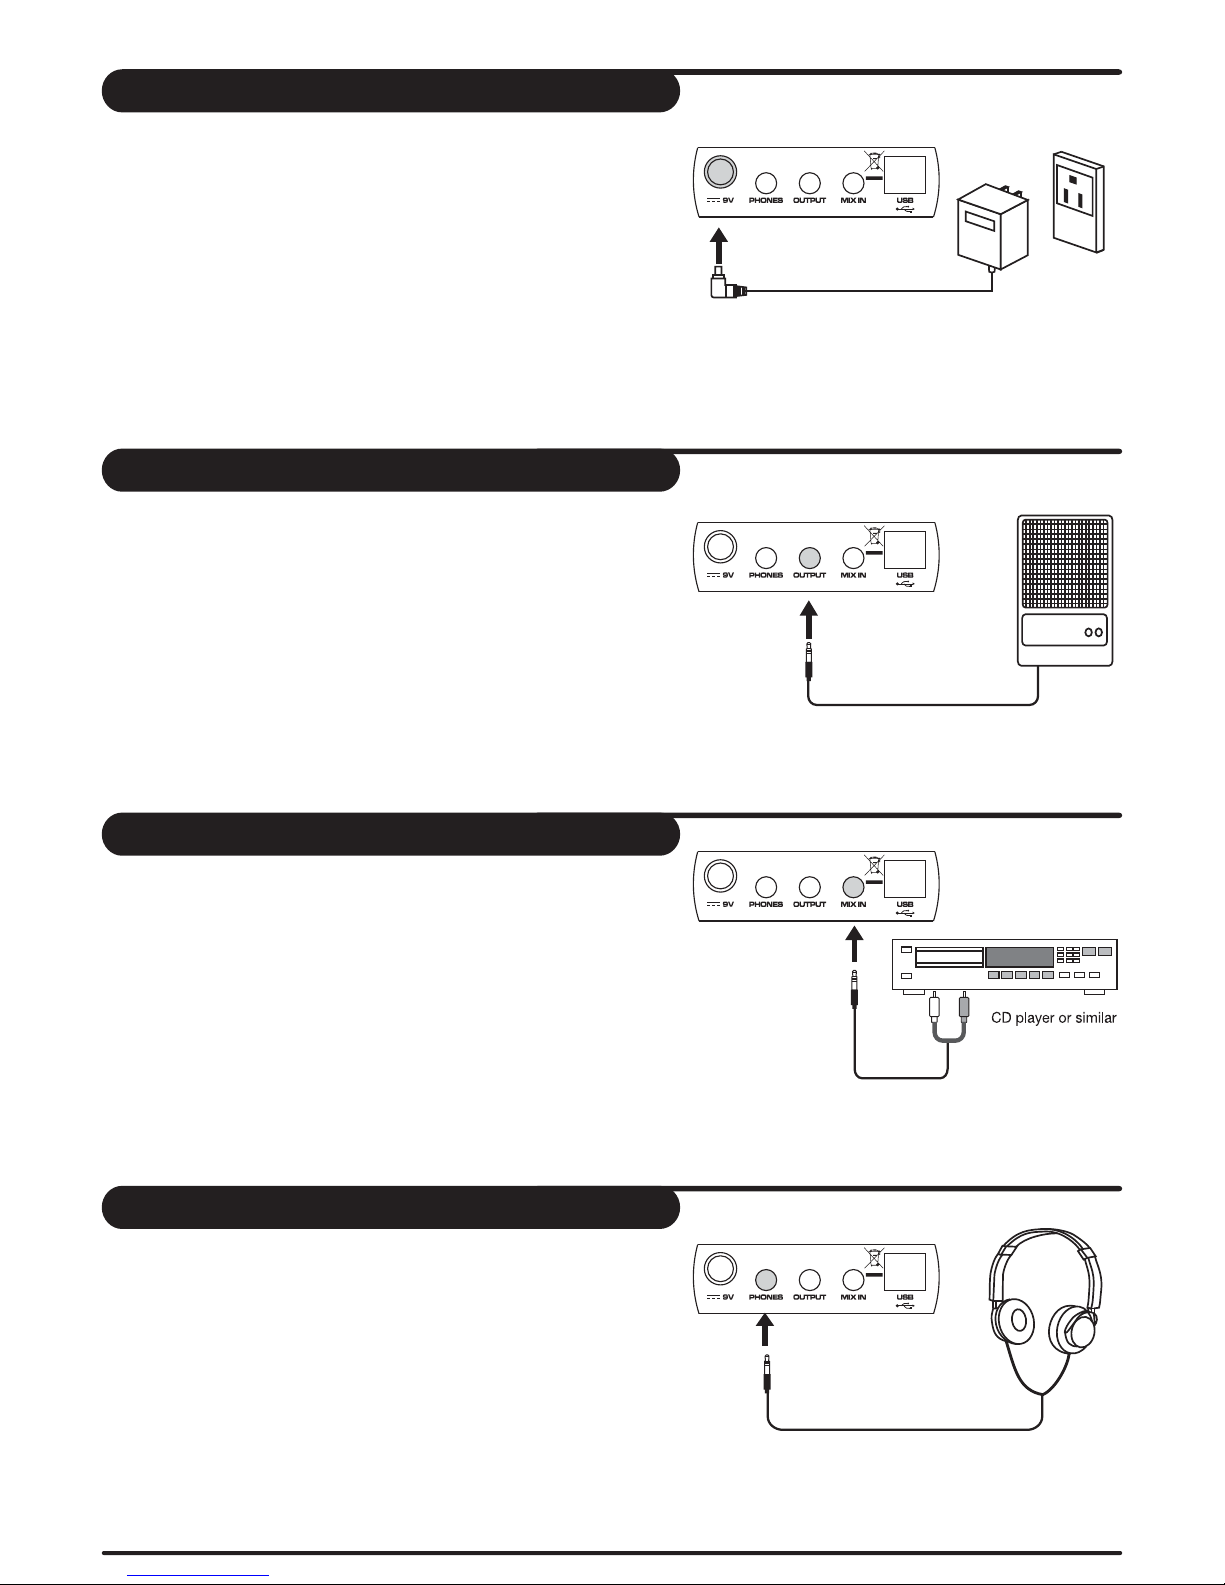
Connect the Power supply jack
Make sure the power is switched OFF and connect the power
adaptor with the DC jack on the rear panel.
Note:
1. To protect the speakers, amplifier and the drum module from
damage, rotate the volume knob to the minimum volume level
before switching the power ON.
2. Make sure the power is switched OFF when connecting drum
module with external devices.
Connect a audio equipment
When you want to listen to the voices with an amplifier,
connect amplifiers with the Output jacks on the rear panel.
Amplifier
Connect a CD player, etc.(Mix. In jack)
The audio output of a CD player, or other audio source,
to connect with the MIX IN jack on the rear panel can be
mixed with the sound of the drum. This function is convenient
that let you play along with a favourite song.
Connect Headphones
An optional set of stereo headphones can be connected with
the PHONES jack located on the rear of the drum module.
* Adjust the volume to a comfortable level.

Connect a MIDI and USB device
1.
Connect PC or other USB host devices that support USB Audio.
2.
For devices with USB cable, you can choose USB Audio Device in
the device menu of the software to transfer midi data.
compatible with XP, Vista and Mac OS without any PC driver
3.
The drum module sends the MIDI data by hitting pads or stepping
pedal through USB port. But the data of the click and song
playing is not included. USB port only sends and receives
MIDI information.
Note:
Channel 11 is default percussion channel.
The USB is
.
MIDI out format
One of the two different MIDI output formats can be selected for
the Drum Module: the internal format (default setting) and the GM
format.
Drum Module
The internal format is used when the Drum Module works as
sound source (
Module with USB host device by USB, and send midi data to
another Drum Module. One Drum Module can't connect to another
Drum Module by USB
The GM format is used when some other sound source applied
(Drum Module to other product which support GM format), such
as computer.
If you record your own drum play to PC software with internal format,
then only the drum module could recognize and playback your own
song(recorded midi file) correctly.
Nevertheless, if you would like to playback your recorded midi song
in any sound source device which support GM format ,we suggest
you to record your own drum performance with GM format output.
In pattern selecting mode, press [pattern] button to enter MIDI
output format choice mode, LED displays that the current MIDI
output format “P-N”(default setting, internal format) or “--N”(GM
format), it can be switched by pressing [+] and [-] button.
Drum Module must connect to computer or other
).
Drum Module
internal format
GM format
internal format
other MIDI device
with USB host
If the internal format (P-N) is selected, which means “program
change” and “note on/off” be transmitted. When the GM format
(--N) is selected, which means only 'note on/off' will be transmitted.
Note:
The above setting only affect to the primary percussion channel.
(MIDI channel 10)
GM format
 Loading...