

Page 1
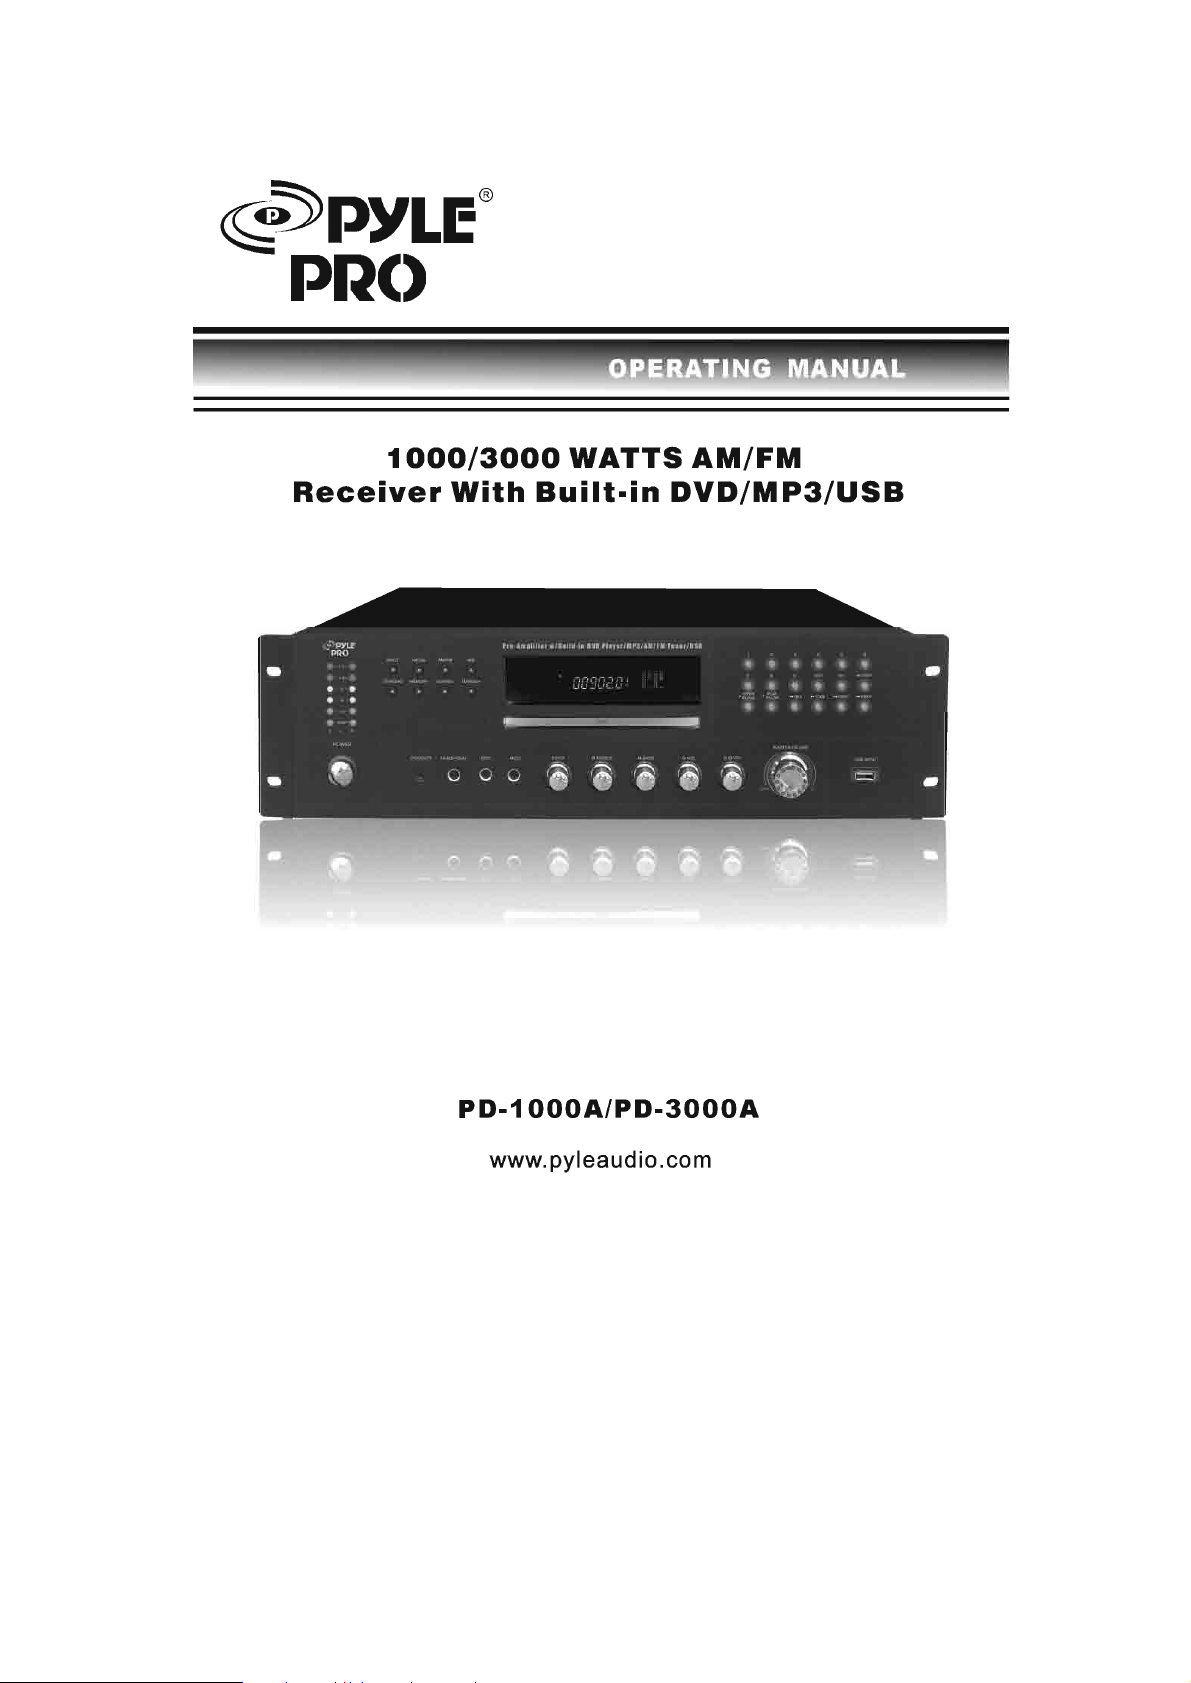
~~PYLE®
PRe)
1000/3000
Receiver
With
WATTS
Built-in
AM/FM
DVD/MP3/USB
PD-1000A/PD-3000A
www.pyleaudio.com
Page 2
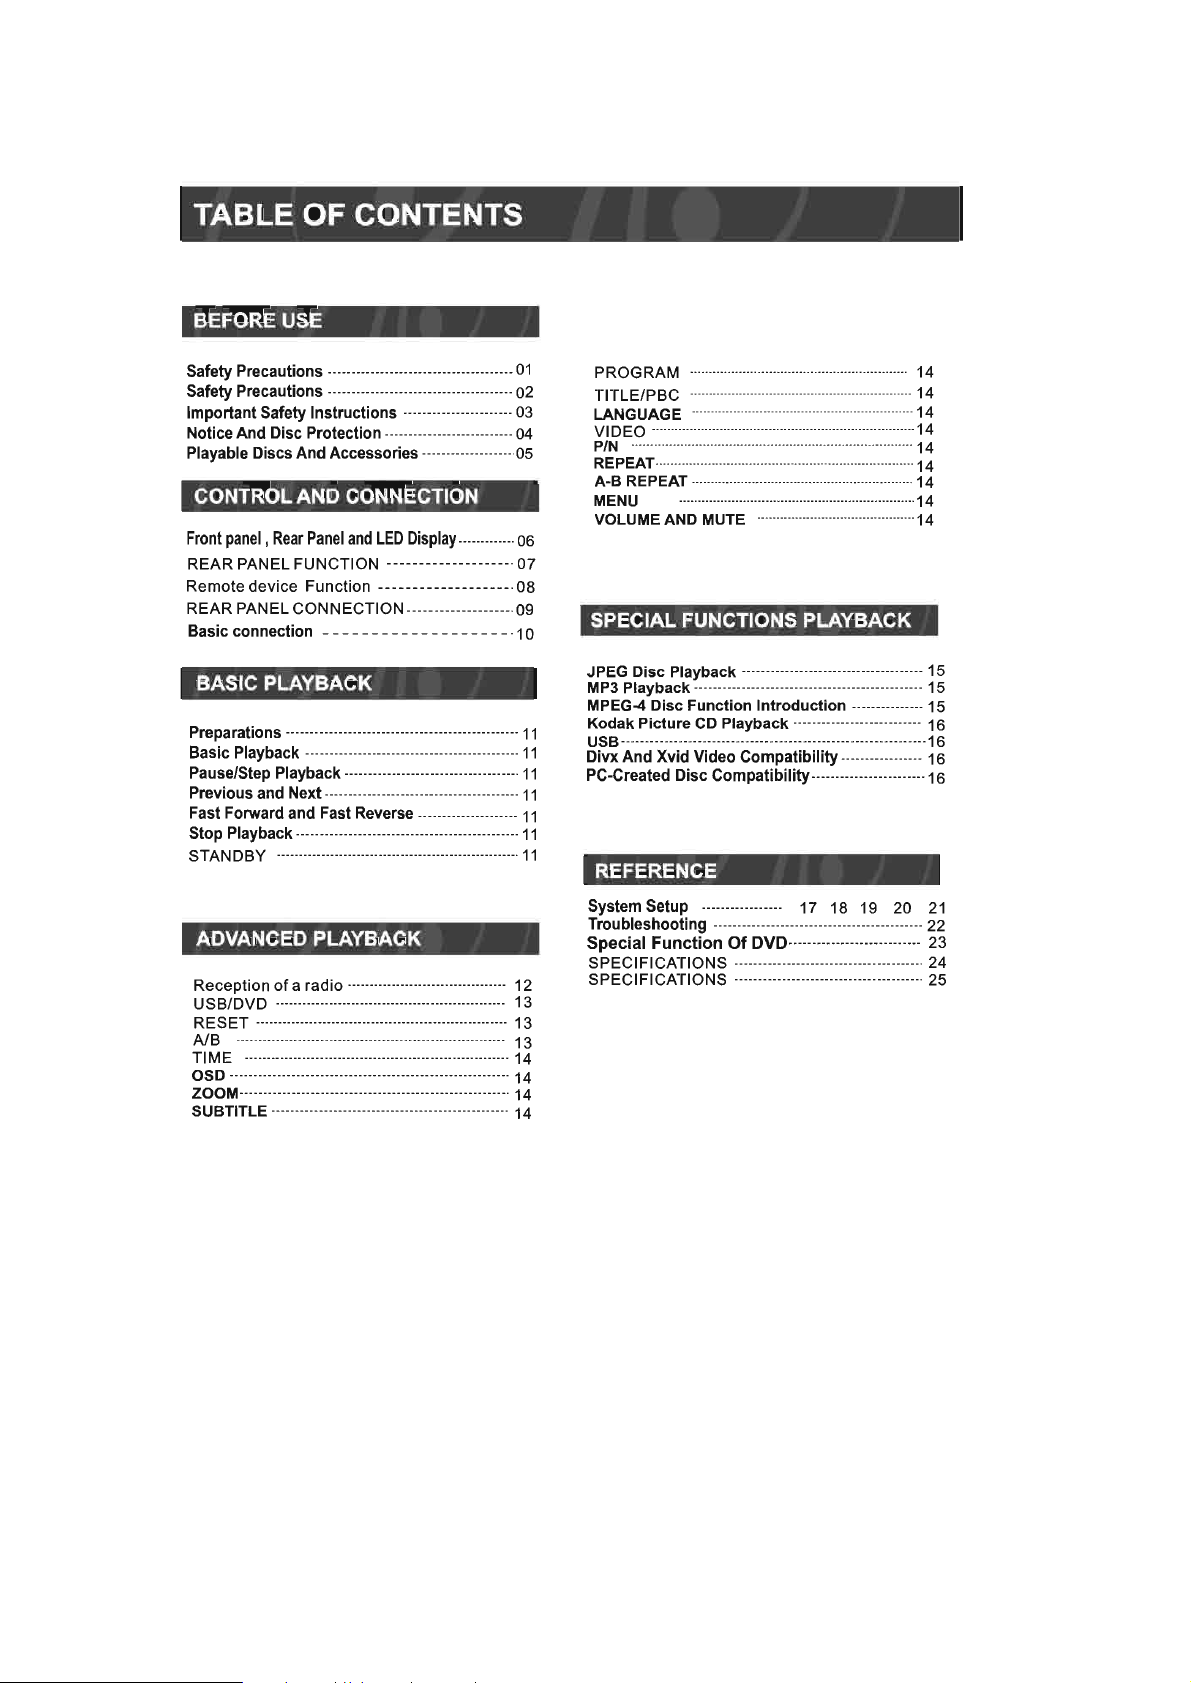
TABLE OF CONTENTS
BEFORE USE
Safety Precautions ......................... ..............
Safety Precautions .......................................
Important Safety Instructions .......................
01
02
03
Notice And Disc Protection ........................... 04
Playable Discs And Accessories
···················05
CONTROL AND CONNECTION
Front panel,
REAR
Remote device Function
REAR
Basic connection - - - - - - - - - - - - - - - - - -
Rear
Panel
and
LED
Display .............
PANEL FUNCTION
-------------------·07
-------------------·08
PANEL CONNECTION ------------------.
06
09
-·10
BASIC PLAYBACK
Preparations ........... -... -... -... -... -... -... -... -.........
Basic Playback .......................... -................
..
Pause/Step Playback .....................................
Previous and Next .........................................
Fast Forward and Fast Reverse .. -..................
Stop Playback ............................ -..................
STAN D BY ....•............................. _ ....................
ADVANCED PLAYBACK
Reception
USBIDVD .................................................... 13
RESET
AlB
TI ME ............................................................
OSD ........................................ -.-................ 14
ZOOM·················································· ....... 14
SUBTITLE ................................. -................ 14
of
a radio .................................... 12
.............. -........................ -................. 13
.................. -.......................................... 13
14
11
11
11
11
11
11
11
PROGRAM
TITlEIPBC
LANGUAGE .
VIDEO
PIN ...........................................................................
REPEAT··············
A-B
REPEAT ...........................................................
MENU
VOLUME AND MUTE ······
...........
.......
..........................
.........................................
.....
....
.........
....
...........
....
......................................................
·············
·············
...........
....................
.........
···
···········
....
........................... 14
··
·································-14
...
..........
.................
...
.....
···············-
···
·····
······-14
....
.
14
.
14
14
14
14
14
SPECIAL FUNCTIONS PLAYBACK
JPEG
Disc
MP3
MPEG-4
Kodak
USB ......... ..................... -....................... ··········16
Playback
Playback
Disc
Picture
........... .. .. ...... -...... _ ......... 15
...................................... -......... 15
Function
CD
Introduction
Playback
......... -..... 15
........................... 16
Divx And Xvid Video Compatibility ....... -......... 16
PC-Created Disc Compatibility ······················ ·
·16
REFERENCE
System Setup ..... -....... -... 17 18 19 20
Troubleshooting ...... -... -... -....... -....... -... -... -...
Special
SPECIFICATIONS ······_····
SPECIFICATIONS
Function
Of
DVD·_··_····_········-········· 23
···························
······-·································25
-.
22
··24
21
Page 3
SAFETY PRECAUTIONS
The lightning flash with arrowhead symbol,within an
equilateral triangle,is intended to alert the user to the
presence
the product's enclosure that may be
magnitude to constitute a risk
persons.
The exclamation point within an equilateral triangle is
intended to alert the user to the presence
operating and maintenance (servicing) instructions
the literature accompanying the appliance.
of
uninsulated"dangerous voltage" within
of
sufficient
of
electric shock to
of
important
in
The symbol for CLASS
WARNING: TO REDUCE THE RISK OF FIRE
OR
MOISTURE, AS DANGEROUS HIGH VOLTAGES ARE
plug
in
power
be
exact
duplicate,
ELECTRIC
SHOCK,
INSERT.
CAUTION:
APPLIANCE TO RAIN
PRESENT INSIDE THE ENCLOSURE. DO NOT OPEN THE CABINET. REFER
SERVICING TO QUALIFIED PERSONNEL
When
replacing
the
replacement
the
direct
must
TO
PREVENT
SLOT,
AND
FULLY
This Digital Video Disc player employs a laser System.
Use
of
controls, adjustments
specified may result herein hazardous radiation exposure.
exposure to laser beam, do not try to open the enclosure. Visible laser may
radiate when the cabinet is opened or the interlocks are defeated.
DO NOT STARE INTO BEAM.
II
(Double Insulation).
OR
ELECTRIC SHOCK,DO NOT EXPOSE THIS
ONLY.
supply
or a separable,
or
one
recommended
MATCH
or
the performance
WIDE
cord-connected
by
the
manufacturer
BLADE
OF
PLUG
of
procedures than those
To
prevent direct
power
TO
supply,
WIDE
Page 4
SAFETY PRECAUTIONS
This product incorporates copyright protection technology that is protected by
method claims
by Macrovision Corporation and other rights owners. Use
technology must be authorized by Macrovision Corporation, and is intended for
home and other limited viewing uses only unless otherwise authorized by Macrovision
Corporation. Reverse engineering or disassembly is prohibited.
of
certain
U.
S.
Patents and other intellectual property rights owned
of
this copyright protection
D[] I
DIGITAL
DOLBY
Manufactured under license from Dolby Laboratories.
I
symbol are trademarks
Copyright 1992-1997 Dolby Laboratories. All rights reserved.
of
Dolby Laboratories. Confidential unpublished works.
"Dolby"
and the double-D
Page 5
IMPORTANT
SAFETY
INSTRUCTIONS
CAUTION: PLEASE READ
THOSE MARKED ON THE UNIT. RETAIN THIS
This set has been designed and manufactured to assure personal safety. Improper use
The
hazard.
use
DO NOT REMOVE THE CABINET COVER OR YOU MAY
SERVICING TO QUALIFIED SERVICE PERSONNEL ONLY.
1.Read
After unpacki
Follow all the operating and other instructions.
2.Ventilation
Slots and openings in the cabinet are provided for
ventilation and to ensure operation
protect it from overheating. These openings must not be
blocked or covered. The openings should never be
blocked by placing the product on bed, sofa, rug
3.Heat
The product should be situated away from heat sources
such as radiators, heat registers, stoves,
products (including amplifiers) that produce heat.
4.Water
Do not use this product near water fo r example, near a
bathtub, wash bowl, kitchen sink,
basement or near a swimming pool.
5.Cleaning
Unplug this product from the wall outlet before cleaning.
Do not use liquid cleaners
cloth for cleaning.
6.Power-cord
Power-supply cords should be routed so that they are not
likely to be walked on
against them. Pay particular attention to cords at
plugs, convenience receptacles, and the point where
they exit from the product.
7.Lightning
For added protection for this product during storm,
when it is left unattended and unused for long periods
of time, unplug it from the wall out let. This will prevent
damage to the product due to lightning and power-line
surges.
a.ObJect and
Never push objects of any kind into this product through
openings as they may touch dangerous voltage points
or short-out parts that could result in a fire
shock. Never spill liquid
9.Attachments
Do not use attachments not recommended by the
product manufacturer as they may cause hazards.
10.Accessories
Do not place this product on an unstable cart, stand,
tripod, bracket,
serious injury to a child or adult, and serious damage to
the product. Use only with a cart, stand, tripod, bracket,
table recommended
safeguards incorporated
and
servicing. This unit
these
manuals
ng
and
Moisture
protection
LIquid
or
this product. read the manual carefully.
AND
OBSERVE
is
fully transistorized
or
or
aerosol cleaners. Use a dry
or
pinched by items placed upon
entry
of
any kind
table. The product may fall, causing
by
the manufacturer,
ALL
WARNINGS
BOOKLET
in
this unit will protect you if you observe the following procedures for installation,
and
does not contain any parts that can
of
the product. These
or
other.
or
other
laundry tub , in a wet
or
or
or
on
electric
the product.
or
sold with
or
AND
INSTRUCTIONS GIVEN
FOR FUTURE REFERENCE.
BE
EXPOSED TO DANGEROUS VOLTAGE. REFER
the product. Any mounting
product
manufacturer's instructions, and should
use a mounting
recommended by the manufacturer. A
product and cart combination should
be moved with care. Quick stops,
excessive force, and uneven surfaces may cause the
product and cart combination to overturn.
11.Disctray
Keep your fingers well clear
Neglecting to
and damage to the product.
12.Burden
Do not place a heavy object on
The object may fall causing serious personal injury and
serious damage to the product.
13.Damage
Unplug this product from the wall outlet and refer
servicing to qualified service personnel under the
following conditions:
a) When the power-supply cord
If
b)
product.
If
c)
d)
If
the operating instructions. Adjust only those controls that
are covered by the operating instructions as
adjustmentofothercontrols may result in damage and
will often require extensive work by a qualified technician
to restore the product to its normal operation.
e) Ifthe product has been dropped
f)
When the product exhibits a distinct change
performance -this indicates a need for service.
14.
Do not attempt to service this product yourself as opening
or
voltage
service personnel.
15.
When replacement parts are required ,be sure the service
technician has used replacement parts specified by the
manufacturer
original part. Unauthorized substitutions may result in fire,
electric shock,
16.Safety
Upon completion
ask the service technician to perform safety checks to determine thatthe product is
should
do
so may cause serious personal injury
Requiring
liquid has been spilled, or objects have fallen into the
the product has been exposed to rain
the product does not operate normally by following
Servicing
removing covers may expose you to dangerous
or
other hazards. Refer all servicing to qualified
Replacement
Parts
or
have the same characteristics as the
or
other hazards.
Check
of
any service or repairs to this product,
IN
THIS
MANUAL
can
result
in
electric shock or fire
be
repaired by the
of
follow
accessory
ofthe
disc tray as it
or
Service
or
in
proper operating condition.
user.
the
the
®
step on the product.
or
plug
is
damaged
AND
is
closing.
damaged.
or
water.
an
improper
in
anyway.
in
Page 6
NOTICES and DISC PROTECTION
NOTES ON HANDLING
• The top and rear panels
after a long period
• When the unit is not use, be sure to remove the disc
and turn off the power.
• If you do not use the unit for a long period, the unit
may not function properly
use the unit occasionally.
• Do not place foreign objects on the tray.
ofthe
of
use. This is
unit may become warm
nota
malfunction.
in
the future. Turn on and
LOCATION
Do not locate the unit
• Near heating devices or
• High temperature
humidity (90% or higher).
• Dirty places.
• Avoid direct exposure to sunshine
in
places such as:
in
enclosed car.
(4t
C or higher)
or
high
DISTURBANCE
When you place this unit near a
playback picture may become poor and the sound may
be distorted. In this case, place the unit away from the
TV,
radioorVCR.
NOTES
The pickup may be condensed with water under the
following situation.
• When you bring the unit directly from a cold place
• When you use the unit
• During the summer, when you use the unit
• The room is vaporous
If
Remove the disc, connect the power cord
the wall outlet, turn on the unit, and leave it for two
three hours. After two or three hours, the unit will have
warmed up and evaporated any moisture. Keep the
unit connected to the wall outlet and moisture
condensation will seldom occur.
ON
MOISTURE CONDENSATION
to a warm place.
turned on the heater,
from the air conditioner directly hits the unit.
and humid place
an air conditioned room.
condensation exists, the unitwill not operate properly.
just
TV,
radio or VCR, the
in
a room where you
or
a place where the cold air
after you move the unit from
or
damp.
in
of
the unit to
just
a hot
or
ON HANDLING DISCS
• Do nottouch the playback side
• Do not attach paper
or
ofthe
tape to disc.
disc.
ON CLEANING DISCS
• Fingerprints and dust on the disc cause picture and
sound deterioration. Wipe the disc from the centre
Outwa;~ftdOthAlwaY~{;"'dea".
• If you can not wipe off the dust with a soft cloth, wipe
the disc lightly with a slightly moistened soft cloth and
finish with a dry cloth.
• Do not use any type
benzine,
antistatic spray for vinyl Lps. It may damage the disc.
commercially
ON STORING DISCS
• Do not store discs
or
near heat source.
• Do not store discs
dust such as a bathroom or near a humidifier.
• Store discs vertically
object on discs outside
warping.
STRUCTURE OF DISC CONTENTS
Normally, DVD discs are divided into titles, and the titles
are sub-divided into chapters. Audio CDs are divided
into tracks.
of
solvent such as thinner,
available
in
a place subject to direct sunlight
in
place subject to moisture and
in
a case. Stacking
or
their case may cause
cleaners
or
placing
or
Each title, chapter, or track is assigned a number, which
is
called title number, chapter number or track number
respectively.
There may be discs that do not have these number.
Page 7
The following discs can be played:
PLAYABLE DISCS
and
ACCESSORIES
DISCS
OVOVIOEO
SUPER VCO
(SVCO)
Video-C~
(VCO)
AUOIOCO
•
Discs
than
•
Non-standardized
•
The
performance
the
disc
may
those
not
LABEL
~
VIDEO
·s~
rn
fi
0
OllTAlAUDI
listed
discs,
of
recorded
be
played.
~
VIDEO
above
even
co
can
if
disc
ACCESSORIES
•
AudioNideo
• Owner's manual ...................... 1
• Remote
• AM Antenna 1 Piece
FM
Antenna 1 Piece
•
•
MP3
AC
Power
•
•
Rack
Withs
cable ................. 1
control
Input
Cable
Cord
Mounting
Crews
....................... 1
..........
..........
............... 1
...............
Brackets
...................... 2
CONTENTS DISCS
Audio +Video
(moving picture)
Audio +Video
(moving picture)
Audio +Video
(moving picture)
Audio
not
be
played.
they
may
be
is
depend
1
1
1
labeled
on
One
the
(1) MP3
CO-R
CO-RW
JPEG
MP3
as
above
method
input
Two
(2)
can
and
Rack
not
quality
cable
mounting
LABEL
~
•
~
HP3
be
played.
of
disc-burning.
One
CONTENTS
(1)
brackets
Audio
or
Video
Audio or Video
Video(picture)
Audio
In
some
cases,
AC
Power
with
screws
Cord
AudioNideo
Owner's manual
cable Owner's manual
Remote
control
Q
AM
Antenna
1 Piece
FM
Antenna
1 Piece
Page 8
FRONT
PANEL and LED
FUNCTION
INPUT
MENU
AMlFM
••••
•
~
1,
0-+4
0-0-0
0--4-0
0--10-0
0-0<18-0
L + R
o
LIGHT
-0
L-
___
00000.0.0.6.6.
Signal intensity light indicate
2,
MEMORY
After a station has been found, you can store
by
the station
pressing the MEMERY button,
and the screen will display MEM above a channel
number, then you can press the number knob. to
save the station, when the channel number dIsplay
it
to move from right to left,
means the station has
been saved.
3, ST/MONO
Stereo and mono selector.
4, INPUT
This is used to select the input sources
DVD/CD/USB, TUNER, IPOD/MP3,
5,
MENU CONTROL
This is used to increment and decrement
level for the selected function
Bass,
Volume,
Station seek.
6,
AM/FM
Press it to selectAM/FM when it is tuning
7,
AlB SPEAKERS OUTPUT SELECTOR
Three mode:
8,
TUNING-/TUNING+
The two keys are used to adjust to the best signal
the stations.
9, FUNCTION DISPLAYED FLUORESCENT WINDOW
10, REMOTESENSORWINDOW
11, OPEN/CLOSE CONTROL
Press this key at any play mode will always turn to disc
play mode
12, PLAY/PAUSE
Play and pause control
13, REV,FR
Quick/backward search the set
Treble, Balance, Auto
A,
B,
of
A+B
AUX
Master
of
• , 6
• • •
14, NUMBER KEYS
While in radio status,you can choose the music number
directly,for example choose
then press
15, FWD,FF
It is quick to enter/forward search the set
16, PREV,SKPR
Top
17, STOP
Stop control
18, NEXT,SKPF
Next song/next set
19, PRESS SWITCH
Press to switch the power unit
20, IPOD/MP3 JACKS
IPOD/MP3 connect to these jacks
21, HEADPHONE JACKS
Headphone connect to these jacks
22, MIC INPUT JACKS 1&2
KARAOKE MIC connect to these jacks
23, ECHO CONTROL
Turn the knob to adjust the M
24, MIC TREBLE
Adjusts the treble
25, MICBASS
Adjusts the bass
26, MIC VOLUNE
Adjusts the volume level. Turn the knob
clockwise to increase the MIC volume
27, SUB. OUT VOLUME CONTROL
28, MASTER VOLUME CONTROL
Adjusts the volume level. Turn the knob.
Clockwise to increase the volume
29, USB INPUT JACKS
Please notes that this USB only can read
MP3 form files,not supportable for PWA
files.
When you take USB out,please select the
button
«8"
,you can get
a song/top a set
of
In
case
of
any damage to this unit,
"PAUSE"
of
"28"
,press
«28"
music
ON
or OFF
IC
echo level
MIC
MIC
or other input source
«10+"
or
key twice,
station
Page 9
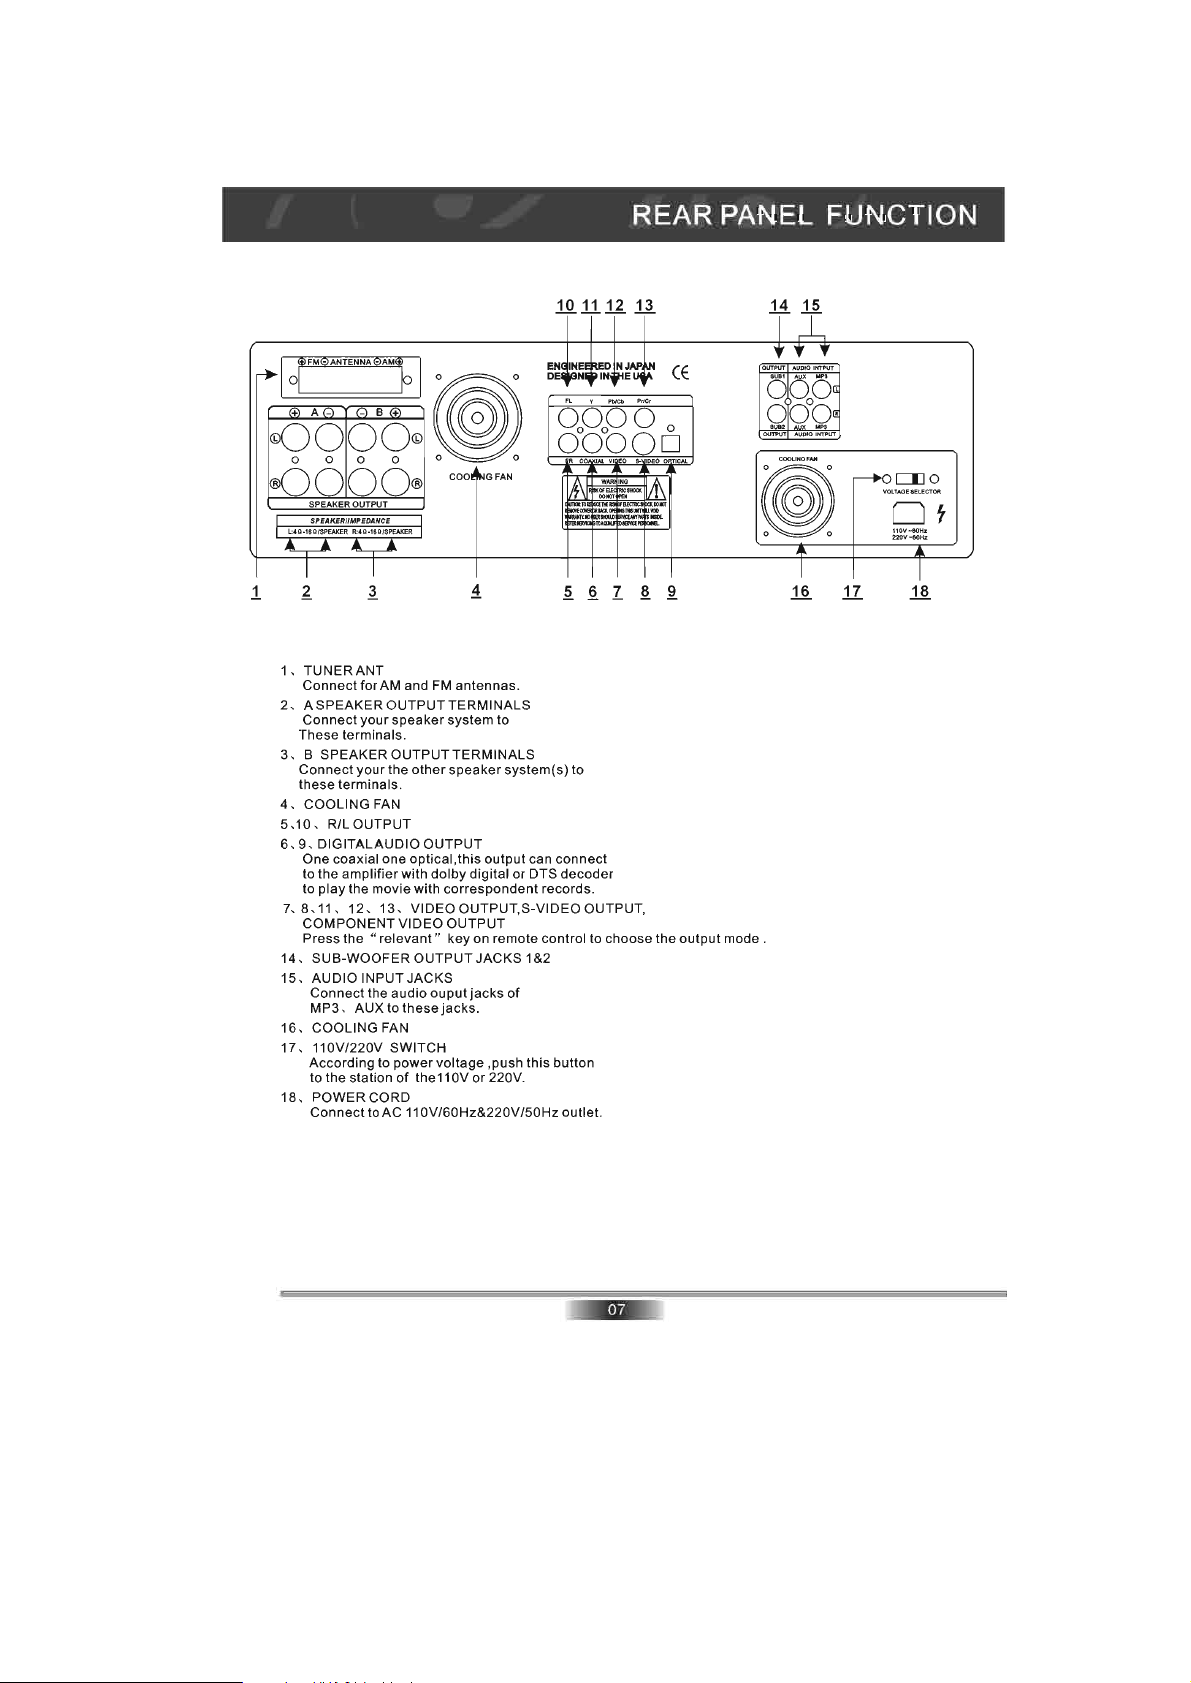
REAR PANEL
FUNCTION
1Q.111.£
I
O[FM<:5ANTENNA<:5AM~io
.A'.
<OOOO©
o 0 0 0 0 0
®OO
1
1,
2,
3, B SPEAKER
4, COOLING FAN
5,10 ,
6, 9,
7, 8,11, 12 ,
14, SUB-WOOFER
15,
16, COOLING FAN
17-
18, POWER CORD
OO®
SPEAKER OUTPUT
~
TUNERANT
Connect
ASPEAKER
Connect
These
terminals.
Connect
your
these
terminals
R/LOUTPUT
DIGITALAUDIO
One coaxial one optical, this
to the
amplifier
to
play
the movie with
COMPONENT
Press the " relevant" key on remote control to choose the
AUDIO INPUT
Connect
MP3, AUX to these
110V/220V SWITCH
According to
to
the
station
Connect
I 0 0
~
~
for AM and
OUTPUT
your
speaker
OUTPUT
the
.
with
13,
VIDEO
JACKS
the
audio
power
of
toAC
11
.4-
FM
antennas.
TERMINALS
system to
TERMINALS
other
speaker
OUTPUT
dolby
digital
correspondent
VIDEO
OUTPUT
OUTPUT
OUTPUT
ouputjacks
jacks.
voltage ,push this button
the
11
OV
OV/60Hz&220V/50Hz outiet.
FAN
system(s) to
output
can
or
DTS
records.
,S-VIDEO OUTPUT,
JACKS
1&2
of
or
220V
.
~
connect
decoder
II
1!.1§.
CE
LIlO
Ot
11
110V-60Hz
220V- 50
1.§.
Hz
~
.§.
§.
I
~
output
mode.
1.§.
Page 10

REMOTE
DEVICE
FUNCTION
21.Number button
22.Time select button
button
23.Menu button
24.PBC MENE button
ELECT
button
Remote Control Operation
1.
Remote control should be 0 perated within 6
meter and the scope
2.
Make sure that there is no big obstacle between
remote control and machme.
3.
Remote sensor should be far away
from the light,high amounts oflight can affect its performance.
of30
in front
of
receiver.
Page 11

REAR PANEL
CONNECTION
• Connecting
AlLeft AlRIght B/Rlght B/Left
Main
Speakers
SAFETY INSTRUCTIONS
1.
Make sure that all connections are
volume is set to minimum level before turning on the unit.
2.
When
more then one
speaker output) make sure that the speakers used are
wattage and impedance, otherwise the unit maybe damaged
high
power
or long term operation.
To
avoid humming sounds and unwanted noise, make sure that all the
3.
wires are
4.
Push
the wire tip, then fasten it and tighten the screw.
the wires stick
circuit when wires
5. After the
same is true with the bass and treble volume, etc.
properly
For
speaker cords, strip
down the
unit
to
amplifier
COOLING FAN
ENQINEERED
DE81QNED
IN
JAPAN
IN
THE
USA
CE
© ©
® ®
Preamp Out
properly
pair
of
speakers are used, (specially the
inserted.
offthe
vinyl coating and twist the wire tip.
pinkjack
out
is turned on, adjust the
or loosen the screw terminal, before inserting
of
the terminal otherwise this may cause a short
of
different terminal contact each other.
connected and the main
main
volume to the desired level
PowerAmp
.......
•
2 Mono Sub Outputs
PowerAmp
of
the same
Be
careful not to let
o
~
~
~
~~
~
main
under
[I]
Of
110V-80Hz
220V-50Hz
0
Page 12

BASIC CONNECTION
•
Connecting
to a TV
Television
with
AudioNideo
cable
D
To
vtdeolaudlo Input
To
S-video Input
•
If
the
TV
has an S-video input, connect the DVD player with an S-video cable.
When using an S-video cable, do not connect the yellow video cable.
Note: The volume adjusting here only works when it's connected to a power amplifier.
While it's connected to TV set without speakers, the volume can not be adjusted on this
device. You can only adjust the volume on the TV set.
•
Connecting
to
an
audio
system
Audio
•
Connecting
01
To
Type digital
Audio input
system
Amplifier
coaxial
DVD Player
Television
D
To
audio
inputs
of
If1e
amplifier
to
an
amplifier
equipment
DVD Player
CbPbICrPr inputs of
the
TV
Page 13

BASIC PLAYBACK
Preparations
• When you want to view a disc, turn on the TV and
select the video input connected to the unit.
Basic playback
1. Press POWER switch
unit turns on and the
start logo. If a disc is already
to play once the power is on.
2. Press OPEN/CLOSE ~ to open the disc tray,
place a disc on the disc tray.
• There are two different disc sizes. Place the
in
the correct guide on the disc tray. If the
disc
disc is out
and cause the unit to malfunction.
• Do not place a disc which is unplayable
unit.
of
3. Press OPEN/CLOSE to close the disc tray, the
playback will automatically start.
• Some disc maybe can not playback auto-
matically, you can press PLAY
start playback.
4. Some disc maybe start playback with a menu,
use the cursor button on the remote controller to
select menu options and press PLAY to start,
or
press digits to select a menu options
directly.
in
the front panel to ON, the
TV screen will display the
in
the tray, it will begin
the guide, it may damage the disc
in
this
~
button to
Fast forward and Fast reverse
1. Press FWD ~ to fast forward through the disc.
Each time the FWD
fast forward motion speed changes.
~
button is pressed, the
2. Press ENTER/PLAY to resume normal playback.
3. Press REV
Each time the
reverse motion speed changes.
..
to fast reverse through the disc.
REV"
button is pressed, the fast
4. Press ENTER/PLAY to resume normal playback.
Stop playback
1.
Press STOP • button to go to stop mode, the TV
screen will show the start logo. As some disc the
unit can recall the location where stopped, such
as DVDs and audio CDs.
2. Press PLAY to playback to resume play-back from
the location where playback is stopped or from the
beginning of the disc.
3. Press STOP twice to stop completely.
Standby
Press
player
STANDBY
to
standby
key
mode
on
remote
or
power
control
on.
to
switch
Pause/Step playback
1. Press PAUSE/STEP
back (still mode). The sound will be muted during
still mode.
2. Press STEP
to the next frame
3.
Press PLAY to resume normal playback.
II/II~
first time to pause play-
II~
continuous to single step forward
in
the video.
Previous and Next
During playing, press PREV
of
this chapter, then each press this key will skip a
chapter still the start
Each press
the current chapter and play the next one.
of
NEXT ~ key during playing will skip
of
the disc.
1+1
key can back to star
NOTES:
1. "INVALID
during operation.
A "INVALID KEY" means that the operation is not
permitted by the unit or the disc.
2. This unit controlled by CPU, under setting mode,
there
activate the unit. If you can not use this function,
you
SETUP
KEY"may
may
be
can
set SCREEN SAVER to OFF
PAGE
appear
screen
save, press
of SYSTEM SETUP.
on
the
TV
screen
any
in
SYSTEM
key
to
Page 14

LISTEN
TO
RADIO,
LINE
INPUT
OPERATION
ADVANCED
PLAYBACK
eMP3,
PresslNPUT key on
the
Inputted external connection
AM/FM audio signal, the display shows
Audio signal
INPUT
Press INPUT key on
machine panel, then
external connection
signal, the display shows the status. Audio signal
any
eLiSTEN
eFM/AM
Press
radio, then press
the remote control, the machine will turn into FM/AM
mode, and the
channel number
•
Press
panel
scan to search for
AUXEXTERNALCONNECTION
OF
AUDIO
SIGNAL
machine panel, then the machine can be
TRANSFER
equipment can be connected.
TO
IN
PUTkey can transfer to the reception
MANUAL
SCAN
(+II/FRE]
or
on the remote control to carry out manual
INPUT
the
remote control
of
MP3/AUX and
of
any
equipment can be connected.
TO
MP3,
the
the
of
AUX
remote control
machine can be Inputted
MP3/AUX and AM/FM audio
RADIO:
(FM/AM]
display
of
the current radio station
or
your
....
/ FRE-
key on the machine
shows the frequency and the
t+/FRE+]
need
key on the machine
~/FRE+
or
the
or
on
status.
on
the
of
of
a
or
o
eAUTOSCAN
Press AUTO key on the machine panel
remote control, then the machine
within the frequency range once completely
automatically
itself
or
on the
will scan
e FREQUENCY SELECTION SCAN
(TIME]
Press
display
shows the status. Then you can input
frequency
A.FM frequency range: 87.5-1 08.0MHz
B.AM frequency range: 530-1620KHz
key on the remote control,
of
the radio station you want to listen to.
C3;J
eCHANNLE
Press (i+II/Ch] and
control
channel you have already stored.
on
NOTES: You could store your favorite radio
stations in continuous channels.
e MONOPHONY/STEREO MODE
Press
select
the
radio .
NOTES: We advise you to select mono phony
mode when the signal
've chosen is not good enough .
AUTO
•
After
will store the radio stations received into ordinal
channels. The current frequency will be stored
into current channel number automatically.
•
MANUAL
Press
radio station you want to listen to, then press
(MEMORY]
station into the channel number you
signal intensity is strong enough.
SELECT
or
on the panel, then you can select
(LlRl
monophony
STORING RADIO STATIONS
starting AUTO SCANfunction, the machine
TO STORE RADIO STATIONS
(+l/FRE]
(~/CH+]
key on the remote control can
or
stereo mode
and
~/FRE+]
key to store the current radio
key on the remote
of
the radio station you
the
the
the
SELECT
to
listen
to
key to select the
want
until the
NOTES: The machine will store the radio station
into current channel number when the machine
receives one. The effect is much related to the
intensity
immethodical signal, you'd better choose manual
scan
of
the signal.
or
frequency selection scan.
If
there are no signal
or
TIPS:
If
the reception effect is not good
is some noise and it doesn't become better
even
after
should suitably adjust the antenna to a good
position till the effect is the best.
changing into mono phony mode, you
or
there
Page 15

ADVANCED
PLAYBACK
USB
• The machine will play them the same as disks when there is only a single form
file in the USB disk
• MP3 and WMA forms files have the priority cover others to be played after the machine has
scanned
READER
if
the USB disk contains several forms
FUNCTION
or
in the triple card .
of
playable files.
of
playable
USB/DVD
When the device is playing DVD, you can press
READ USB
USB and you can change into DVD status by following above operation.
USB
• You can insert USB equipment when the machine id playing MP3,CD or MPEG4. Documents
will be copied into the USB equipment
1. When playing MP3 disk, press
2. When playing CD disk, press
change them into MP3 form.(Single file
NOTES:
don't have the function .
after
pressing
COpy
It
only works when the USB equipment's capacity is large enough. Some styles
[ENTER]
key you can turn to USB status. The same when it's playing
FUNCTION
after
[SUBTITLE
[SUBTITLE]
[USB/DVD]
OF
SUBTITLE
you press
key, then the screen will displays
KEY
[SUBTITLE]
key on the remote control
1 key can copy the files on It Into USB equipment.
key can copy the songs on it into USB equipment after
or
all the files can be chosen to transfer)
of
the machine
..
Page 16

ADVANCED
IMPORTANT NOTE:
THE
FOLLOWING FUNCTION DESCRIPTIONS ARE FOR DVDS OPERATION AND DISPLAY
MAY
BE
DIFFERENT FOR OTHER DISC FORMATS .
PLAYBACK
ON
SCREEN
TIME
Once the
display messages. Use the LEFT/RIGHT cursor
button to select your preference. Press ENTER!
PLAY to confirm.
Pressing this button will display "DVD
XXlXX
1X15.1
XXIXX
XX
XXlXX
sixth will cancel function.
TI
M E button is press, the screen will
n XXlXX
(!)
00:00:05 (chapter elapsed) ", "
CHG
1/4 ENG • OFF", "DVD n XXlXX
(!)
-00:00:00 (chapter remain)", "DVD n XXI
CH
XXIXX
(!)
CH
00:00:00 (title elapsed)", "DVD n
XXlXX
(!)
-00:00:00 (title remain)", the
1/3
CH
ENG
CH
ZOOM
Press this button to zoom into the picture.
Each time the button is pressed, the magnification
level will change.
SUBTITLE
1 press this button and the screen will display:
"G
[1XX]"
, "XX" indicates the language of country.
(the number of language depends on disc).
PROGRAM
Press
this
key
can
store
your
favorite
picture
as
frame.
If
picture
press
[S
selecting
under
system
original
you
have
will
frame.
chosen
be
the
starting
ETU P 1 ,
then
[RESORE 1 key
settings
press
and
several
frame.
[ENTE
of
[LOGO
the
system
pictures, the
You
can
R 1
will
cancel
key
after
SELECT]
restore
starting
latest
it
by
to
TITLE/PBe
For DVD discs - Press this button to display the
title menu.Press the digits to select your preferred
chapter.
For SVCD and VCD - Follow the menu instructions
on screen.Press the digits during PBC playback.
AlB
SPEAKERS OUTPUT SELECT
LANGUAGE
Press this button on remote control to change the
mode of audio.
~
[1
[]]
XX 5.1
CH
For example:
the language
of
country.
J,
(the number of language depends on disc).
VIDEO
In
play
or
stop
status
press
remote
control,the
video-output
interface:TV-RGB,P-SCAN
S-VIDEO,INTERLACE
device
YUV.
VIDEO
will
switch
Press the key to switch between NTSC,PAL and
AUTO.
REPEAT
Press once to repeating CHAPTER.
Press twice to repeat TITLE.
Press thrice to repeat ALL.
Press 4 times to cancel the repeat.
A-B REPEAT
Press A-B to begin start-point , press again
an end point and complete setting. The selected
section A-B will be repeated. The third press will
cancel this function.
VOLUME AND MUTE
Press
"+"
volume, " -
the
MUTE will display Mute
at the right
"to
decrease volume. The first press
of
VOLUME to increase
no
voice,
press will return to normal.
MENU
This
is
used to increment and decrement level for the
selected function of Master Volume , Bass , Treble,
Balance, AutoStation seek.
By
pressing MENU
If
you want to adjust bass, press MENU
then press (aster volume +
control you
treble, press MENU
or (astervolume-)on the remote control you
treble. Others function above
key
you
can
select the functions above.
lor
can
increase or decrease bass.
(aster volume-)on the remote
key
to select treble, then press (aster volume
can
also
key
be
"XX" indicates
key
on
the
its
,
to
the second
to select bass,
If
you want to adjust
can
increase or decrease
adjusted
in
the same w
set
+)
ay.
Page 17

JPEG DISC PLAYBACK
SPECIAL FUNCTION PLAYBACK
When playing JPEG disc, a navigation menu will
In
the menu, use
UP
or
DOWN
cursor button to select a file, then press "ENTER/PLAY" to
Press PREY or NEXT to select the previous or the next picture. Press
viewing, press ENTER/PLAY, to return to normal playi
is
on,
press PREY or NEXT to switch between pictures . Pressing the CURSOR key can move the enlarged picture
and the picture display direction
UP-DOWN, LEFT - RIGHT, WINDOW
can
be
V,
be
displayed automatically if the disc
ng.
Press ZOOM to start zoom function,when ZOOM function
changed by pressing " PROG"
EDGE
TO
CENTER, etc.
is
loaded
be
PAUSE
to pause the current picture for
key,
including RANDOM, WIPER
in
succession.
played as a slideshow.
MP3 PLAYBACK
Place a MP3 disc
be
displayed automatically
will
In
the menu, use UP or DOWN cursor button to choose folder, then press "ENTER/PLAY" button to confrim.
the folder, use the UP or DOWN button to select the file, then press "ENTER/PLAY" to play this file.
using the LEFT cursor button will return to the previous
or next page.
on
the disc tray, the DVD player will begin to play once. Simultaneously, a navigation menu
if
the disc
is
loaded
in
succession.
In
mEl/lU
press PREY or NEXT to go back to the previous
e
...
"""""-
~
e
J:]
OS.COOS
04.COO4
~
oe.cooe
~
08.Cool
~
~
!
~
!
I
J:]
J:]
J:]
J:]
J:]
J:]
J:]
J:]
e.
I 01.L
OOKME
~& ~
.
;Q~
;Q
~& _
~&~
,~~
~~
~
&~
~
04.JPG
•
~
MPEG-4 DISC FUNCTION INTRODUCTION
MPEG-4 is the forth video and audio encoding standard released
Experts Group").
of
narrow
reconstructed technology.
compression
we
can
burn several films that has
DVD
to
Note
:
1.
The
MPEG-4
some
the
disc
VCD
is based on MPEG-1 technology and DVD is based on MPEG-2. MPEG-4 takes advantage
bandwidth, pursuing
technology
encode
and
compress a DVD
into
DVD-ROM
disc
discs available in the
discs
with
"MPEG-4"
cannot
function properly in
the
best
audio
picture quality
data
is
The
standard in AV field. It
film into
same
quality
as
VCD
.
market
market
are
this
player because
now
logo
in
compressed
has
the highest
one
or
into one
have
not
encoded
by
MPEG
by
compressing
by
WMA
compression
two
CD-R
disc
CD-R
disc
many
different formats,such
by
MPEG
of
the
incorrect encoding standard.
(The abbreviation
and
transmitting
standard. MPEG-4
rate.
with pretty
,or
bum several films
technology
good
. It is normal
of
the
data
is
the
By
MPEG-4
picture quality,
that
as
Xvid, AVI,
L,
WIPER
R,
In
this page,
"Moving Pictures
in
frame
most
advanced
technology,
or
has
can
similar quality
RM
etc. But
that
some
of
2.
The
MPEG-4
files are displayed
" ENTER/PLAY" button
3.
As
AVI is
the
together
can
be
MPEG-4
into a disc.
included into
to
playback the movie.
format, and
The
player
disc
will
together.
one
as
a list in
MPEG
only
the
screen,
is MPEG-1
recognise
MP3
choose
format
or
JPEG
the icon using
, please
do
in
that
the
not
combine
instance.
cursors and
AVI and
However
MP3
press
MP3/JPEG
and
JPEG
Page 18

SPECIAL FUNCTION PLAYBACK
Kodak
Playback
When a Kodak Picture CD is inserted into the unit, an automatic slide show is launched. Each picture in the
Kodak Picture CD will be displayed consecutively in a slide-show fashion and will be scaled to fit in the whole
TV
screen.
transition effects for each picture .
To
display an image indefinitely, press the "PAUSE" key.
"PREV" key.
Image
There are four modes to rotate a picture: "Invert", "Mirror", Left", and "Right".
only when a picture is being displayed normally and will be cancelled automatically
displayed. The arrow key is used to select the different rotation modes:
Picture
CD
(Normal)
some
slide-show transition
To
resume the slide show, press the "ENTER/PLAY" key.
Rotation
Up
/\
- InverUNormal
Down v - Mirror/Normal
Playback
modes
are provided, use "PROG" key to select. Customer can set
To
view the next or previous picture, press "NEXT"
These
operations are allowed
Left
< -Turn left
Right > - Turn right
when a new
picture is
Zoom
The "ZOOM" key is used to turn on
the last ratio selected by the user. A message on the screen will indicate the current zoom ratio.
If
zoom mode is on, "ZOOM" key are used to control the ratio
is scaled to fit the whole
Notes: During
function press the "ZOOM" key again to resume the slide-show.
IMPORTANT NOTE: Quality
zoom
TV
function,
or
off this function. When this mode is on,
of
zoom in/out. With ZOOM mode off, a picture
screen.
slide-show
of
pictures displayed on the screen is highly dependent on
transition and
image
rotation
are
any
picture will be displayed
disabled. To cancel the zoom
the
viewing device.
at
USB 2.0
or
Excellent turned a
FAT
document system to read, can support a higher ratio a rate document
to broadcast especially.
Divx
and
Xvid
Video
1 Plays most version
2 File entensions : .avi and . divx (these must be used for the player to recorgnize DivX video files) •
Note that
DivX
all
files with the . avi extension are recognized
video files
PC-Created
Discs recorded using a personal computer
application software used to create the disc.
publisher
Discs recorded
DVD-R
for
more detailed information.
/ RW
of
DivX And Xvid Video with standard playback
and
therefore
disc
in
packet write mode
or
CD-R
/ RW software
Compatibility
may
not
be playable on this
compatibility
may
(UDF
disc
boxes for additional compatibility information.
of
DivX and Xvid media files.
as
Mp4,
but
not
all
of
player
not be playable in this unit due to the setting
In
these particular instances , check with
format) are
not
compatible with this player. Check
these are necessarily
the
of
the
software
the
Page 19

SYSTEM SETUP
• When you press SETUP button on the remote
control, the setup menu will be displayed. It
will include "SYSTEM
SETUP",
"LANGUAGE
SETUP" , " AUDIO SETUP" , "VIDEO SETUP':
"SPEAKER SETUP" , "DIGITAL SETUP".
1.
Within the setup menu, you can use
UP,
DOWN, LEFT and RIGHT buttons on the
remote control to move the cursor, and
then press the ENTER/PLAY button to
make your selection. Press LEFT to return
to the previous menu.
2.
To
exit setup menu, you can select the
exit setup menu or press SETUP button.
1. SYSTEM SETUP PAGE
Setup
TV
functions.
1.1
TV SYSTEM: This player supports different
including AUTO, NTSC, PAL60 and
• If yourTV supports only NTSC
Note:
You
•
player to match the video signal
• The table below shows what kinds
patible with each setting (AUTO, PAL and NTSC)
screen format , video type and all DVD
NEXT PAGE
PREY
EXIT SETUP
TV
SYSTEM
SYSTEM
[ TV SYSTEM
AUTO
PLA
HDOUTPUT
VIDEO
TV
TYP
E
PASSWORD
SETUP
Y
TV
PAL
systems.
or
PAL and you had
inadvertently selected the wrong TV system, theTV
screen will flicker and only black and white colours
will be display.
In
this case, you should press the SETUP button
to set as following Note.
TV SYSlEM
How
to
Set
may switch the NTSC/PAL setting
Disc
Type
Format
DVD
NTSC
PAL
~
"";';';;;"'---
the
TV
Type?
of
of
Output
Format
TV
Selected
NTSC PAL MULTI
NTSC
NTSC
System Mode
PAL NTSC
PAL
-1.
of
the DVD
your
TV.
disc are com-
PAL
output,
1.2 AUTO PLAY
I A UTO PLAY
1.3 HD OUTPUT
I
HDOUTPUT
1.4 VEDIO
VIDEO: Sets the video output.
1.5
TVTYPE
The
TV
TYPE will select the different ratio
display format and the screen
various types
matches between Disc and
Multi-image ratio mode).
of
display on screen for different
of TV. There are
TV
(Please see page 20:
Note:
• No matte r which display format
picture recorded in standard 4:3 forma t always
in
displays
• The display format
refer to the information that accompanies your
specific DVD title.
• If the DVD title
format while the
horizontal compression
•
Some
formats.
appear
regardless
the 4:3 aspect ratio.
of
DVD titles may vary; please
is
recorded in 16:9 wide display
TV
is a standard 4:3 screen,
of
DVD
titles
In
such cases, the DVD titles will always
on
the
screen in
of
which TV display format you select.
the image will result.
may
be
recorded
their
I TVTYPE
1.6 PASSWORD
PASSWORD
password, please type 4 numerals as new password.
The initial password is 0000.
CHANGE:
you can change the
is
selected, a
in
original
of
special
format
,
WO
Rt!
~
.t;:
-=-=-=-~=::!I
Page 20

SYSTEM SETUP
1.7 NEXT PAGE
NE
XT PAGE:Select sub-item of NEXT PAGE
and press ENTER key to setup.
ELECT L OGO
E
SUM
~
1.7-1 DEFAULT
DEFAULT: Resets to all the manufacturer's original
settings for this DVD player Press ENTER/PLAY to
perform the reset.
DEFAUL
1.7-2 SELECT LOGO
DEFAULT: Resets to all the manufacturer's original
settings for this DVD player Press ENTER/PLAY to
perform the reset.
ELE LOGO ~ RE
1.7-3 RESUME
RESUME: This setup can realize the memory playback.
When this setup is on, the player will recall the memory
where the player stopped under the circumstances
power off or withdrawing the discs. That is to say, when
you replay the disc, it will be played from there it
stopped last time. Noted: With this function, each disc
of
different formats can be memorized.
~
MPEG LOGO
STORE
STO
RE
of
1.7-5 EXIT SETUP
EXI SETUE
2. LANGUAUAGE SETUP
EXIT
SETUP
2.1 OSD LANGUAGE
On Screen Display (OS D) Language: Users can
select the whole setup menu and on-screen display
language.
OSD
LANGUAGE II
2.2AUDIO
AUDIO: Sets the preferred audio language as the
default when playing DVD. (If DVD support these
languages)
r-------------------~
AUDIO LANG
2.3 SUBTITLE LANG
SUBTITLE: Sets the preferred subtitle language as
the default when playing DVD.(lf DVD support these
languages)
ENGI.!$H
~
C
GER MAN
SPANI SH
FRENC H
PORTU GUE SE
LANG
~
HINE
CHINESE
SE
1.7-4 PREV PAGE
EV AGE
SUBTffiE
LANG
CHINESE
~
ENGLISH
JAPAN
FRENCH
SPANISH
PORTUGUESE
GERMAN
OFF
Page 21

SYSTEM SETUP
2.4 MENU
MENU LANG: Sets the preferred menu language as
the default when playing DVD.
languages)
LANG
(lf
....----------J
MENU
LANG
~,;.;
~:;.:~~:;::N~:;:~
JAPAN
DVD support these
;.---I
.
2.5 EXIT SETUP
EXITSETUF'
3. AUDIO SETUP PAGE
lTI
AUDIO OUT
=lE
KEY
EXIT SETUP
3.1
AUDIO OUTPUT
AUDIO OUT: Sets the audio outputs.
UDIQ
----
~
r,:;
:~PD~:F§
SPDIFIPCM
IRJ>i
~WO=:,I
4.
VIDEO SETUP PAGE
4.1
BRIGHTNESS
BRIGHTNESS: Sets the brightness level of video
output.
~B=~G=~==E~=-~'~rr=====~
~
_ 6
4
2
~
o
4.2 CONTRAST
CONTRAST: Sets the contrast level
~c=~==~
-'~
rr===~~
~
_ 6
4
2
~
o
of
Video output.
3.2 KEY
KEY:
Use the Up and Down arrow button to move
the scroll and adjust the
KEY
key.
_ 0
~
~
·2
·4
b
4.3 HUE
HUE: Sets the hue value of the Video.
HUE
_ 0
+2
·2
·7
r
·6
Page 22

SYSTEM SETUP
4.4 SATURATION
SATURATION: sets the saturation
SATURATION
5.
SPEAKER SETUP
EXlTSETUP
5.1
SPEAKER SETUP PAGE
DOWN MIX MODE: sets front speakers to LT/RT
STEREO, V SURR
• The first 3 settings
downmix the sound Signal for 2-Speakers. This
setting allows you to enjoy a surround sound effect
with only two speakers. For this reason a setup for
additional speakers (described
sections) is disabled when DOWNMIX MODE
set to these settings.
(LT/RT,
of
the video.
12
10
8
6
4
2 _ 0
~
STEREO, V SURR)
in
the following
6. DIGITAL SETUP PAGE
EXlTSETUP
6.1
OP MODE
OP MODE: This can set the type
adjust audio frequency.
Of'MODE
6.2 DYNAMIC RANGE
DYNAMIC
choose this setting to adjust the line out ratio and get
different effect. If adjusting to FULL, the audio signal
peak value will be the minimum; while adjusting to
OFF, maximum.
is
RANGE:
DYNAMIC
When LINE OUT is selected,
RANGE
~
F:
2/8
~
-
OFF
of
output and
Page 23

6.3 DUAL MONO
DUAL
MONO: If your amplifier/decoder has Dolby
Digital output, you may select stereo, left mono, right
mono, or mixed mono mode for your amplifier decoder.
DUAL
MONO
7.
SOURCE
SOURCE: This system will automatically read the
USB if there is no playble dics loaded.
Use the Source menu to select to read
from either disc and USB directory.
I SOURCE
SYSTEM SETUP
Page 24

TROUBLESHOOTING
Before calling for service, you can perfonn the checks described in the troubleshooting guide for
immediate solutions.
PROBLEM
Unit can not be turned on
Remote control
doesn't work
No picture
Disc cannot be played
No sound
Poor picture quality
and audio
POSSIBLE
The power plug is not plugged
in
properly or is damaged
No battery or batteries are off
The remote control used
of
is out
Unit was not connected
Unit was not set up
Disc error
Loader doesn't close tray
No disc
Unit not connected properly
Volume too low
Disc dirty Clean the disc
Disc scratched
Disc warped
operational range
in
REASON
properly
properly
tray
TREATMENT
Try plugging
Replace batteries
Use it with right range
Connect again
Check setup instructions
Label side should be up
in
in
tray
Reload disc
Put disc
Connect it again
Adjust volume
Replace Disc
in
tray
again
Display correctly but
no response
Without response
Operation is wrong
Main unit
is
jammed
Renew operation
Reset
Page 25

SPECIAL
FUNCTION OF DVD
SETTING THE
Multi-aspect ratio suit to different
Picture format
on Disc
Functions
There are many functions available on DVD discs and
the functions vary per player and per manufacturer.
[][]
I DOLBY I
DIGITAL
TV
SCREEN SIZE
TV
screen size.
Pan Scan
supported
Regional code and signal system
Dolby digital surround sound
by
DVD
discs
TV Screen Size
4:3
Letter-box
IRI RESTRICTED I
16:9
Wide Screen
Picture proportion modes
Parental Control
Number
of
languages
Subtitle languages
Angles for viewing
Page 26

SPECIFICATIONS
System and Outputs
VF Signal
system
Frequency
response
SIN ratio > 90 dB
Audio
Audio output
(analog audio)
Video output Electric level output: 1.0Vp--p±0.2 resistance:
NTSC/PAL
CD:
20Hz-20KHz(EIAJ)
OVO
: 20Hz-44KHz(96KHz)(Sample result)
20Hz-22KHz(48KHz)(Sample result)
Electric level output: 1.8V±0.2 resistance:
10KS
75S
Page 27

SPECIFICATIONS
Amplifier Technical Specifications
Technical
MainChannelPowerOutput
(PMPO,80hms,1
THD1 KHz)
NormalLoadlmpedance
InputSensitivitylmpedance
CDIDVDAUX
Microphone
SignaltoNoiseRatioPureAmplifier
SignaltoNoiseRatio
FrequencyRange
(FrequencyResponse40Hz-15KHz)
FrequencyRange
(ToneCharacteristic1
Weight
PowerRequirements
Dimension
Operating
KHztest
KARAOKE
temperatu
OOHz-1
re
OKHz)
PD-1000A
1000WX2 3000WX2
<1% <1%
80hm 80hm
400mV/33kOhm
15mV/6000hm 15mV/6000hm
76dB 76dB
71dB 71dB
± 2dB ± 2dB
± 14dB ± 14dB
7.5kg
AC-11 OV/60Hz
483(W)X325(O)X132(H)mm
5°C
to 47°C (41°F to 95°F)
PD-3000A
400mV/33kOhm
9kg
AC-220V50Hz
Operating
humidity
5% to 90%
* Specifications subject to change without prior notice
Page 28

PyleAudio.com
718.535.1800 718.236.2400
1600 63rd
Street,
Brooklyn
NY
(fax)
11204
 Loading...