

Purchased at:
Catalog Merchandiser
Music Products Store
Date of Purchase
Model No. Serial #
City, State ZIP
Name
Address
within 10 days.
warranty, please mail this card
product. To activate your
Thank you for purchasing this PYLE
Please complete warranty card, detach and return
Other
Sound Contractor/Installer Mail Order
PYLE PRO ELECTRONICS
warranty registration card
(if available)
PYP-1 Stereo Control Preamplifier
Owner’s Manual
Your Pyle Pro PYP-1 Preamplifer has been created
to provide the home stereo audiophile with a
sophisticated control center for tailoring the sound
quality from multiple input sources and direcing
the signal to a sound processor or power amplifier
for playback.
The PYP-1 features a balance control, master volume
and mic output level controls, and BASS, MID,
TREBLE, and LOUDNESS controls for improving
and adjusting sound quality.
The PYP-1 provides both RCA and 1/4 inch connectors
on the aux input and output jacks, expanding options
when selecting input and output devices.
Please read this manual thoroughly before you attempt
to set up and use this peramplifier. It contains a range
of installation suggestions as well as instructions to
ensure safe usage. Installed properly, you can expect
years of trouble-free service from this product.
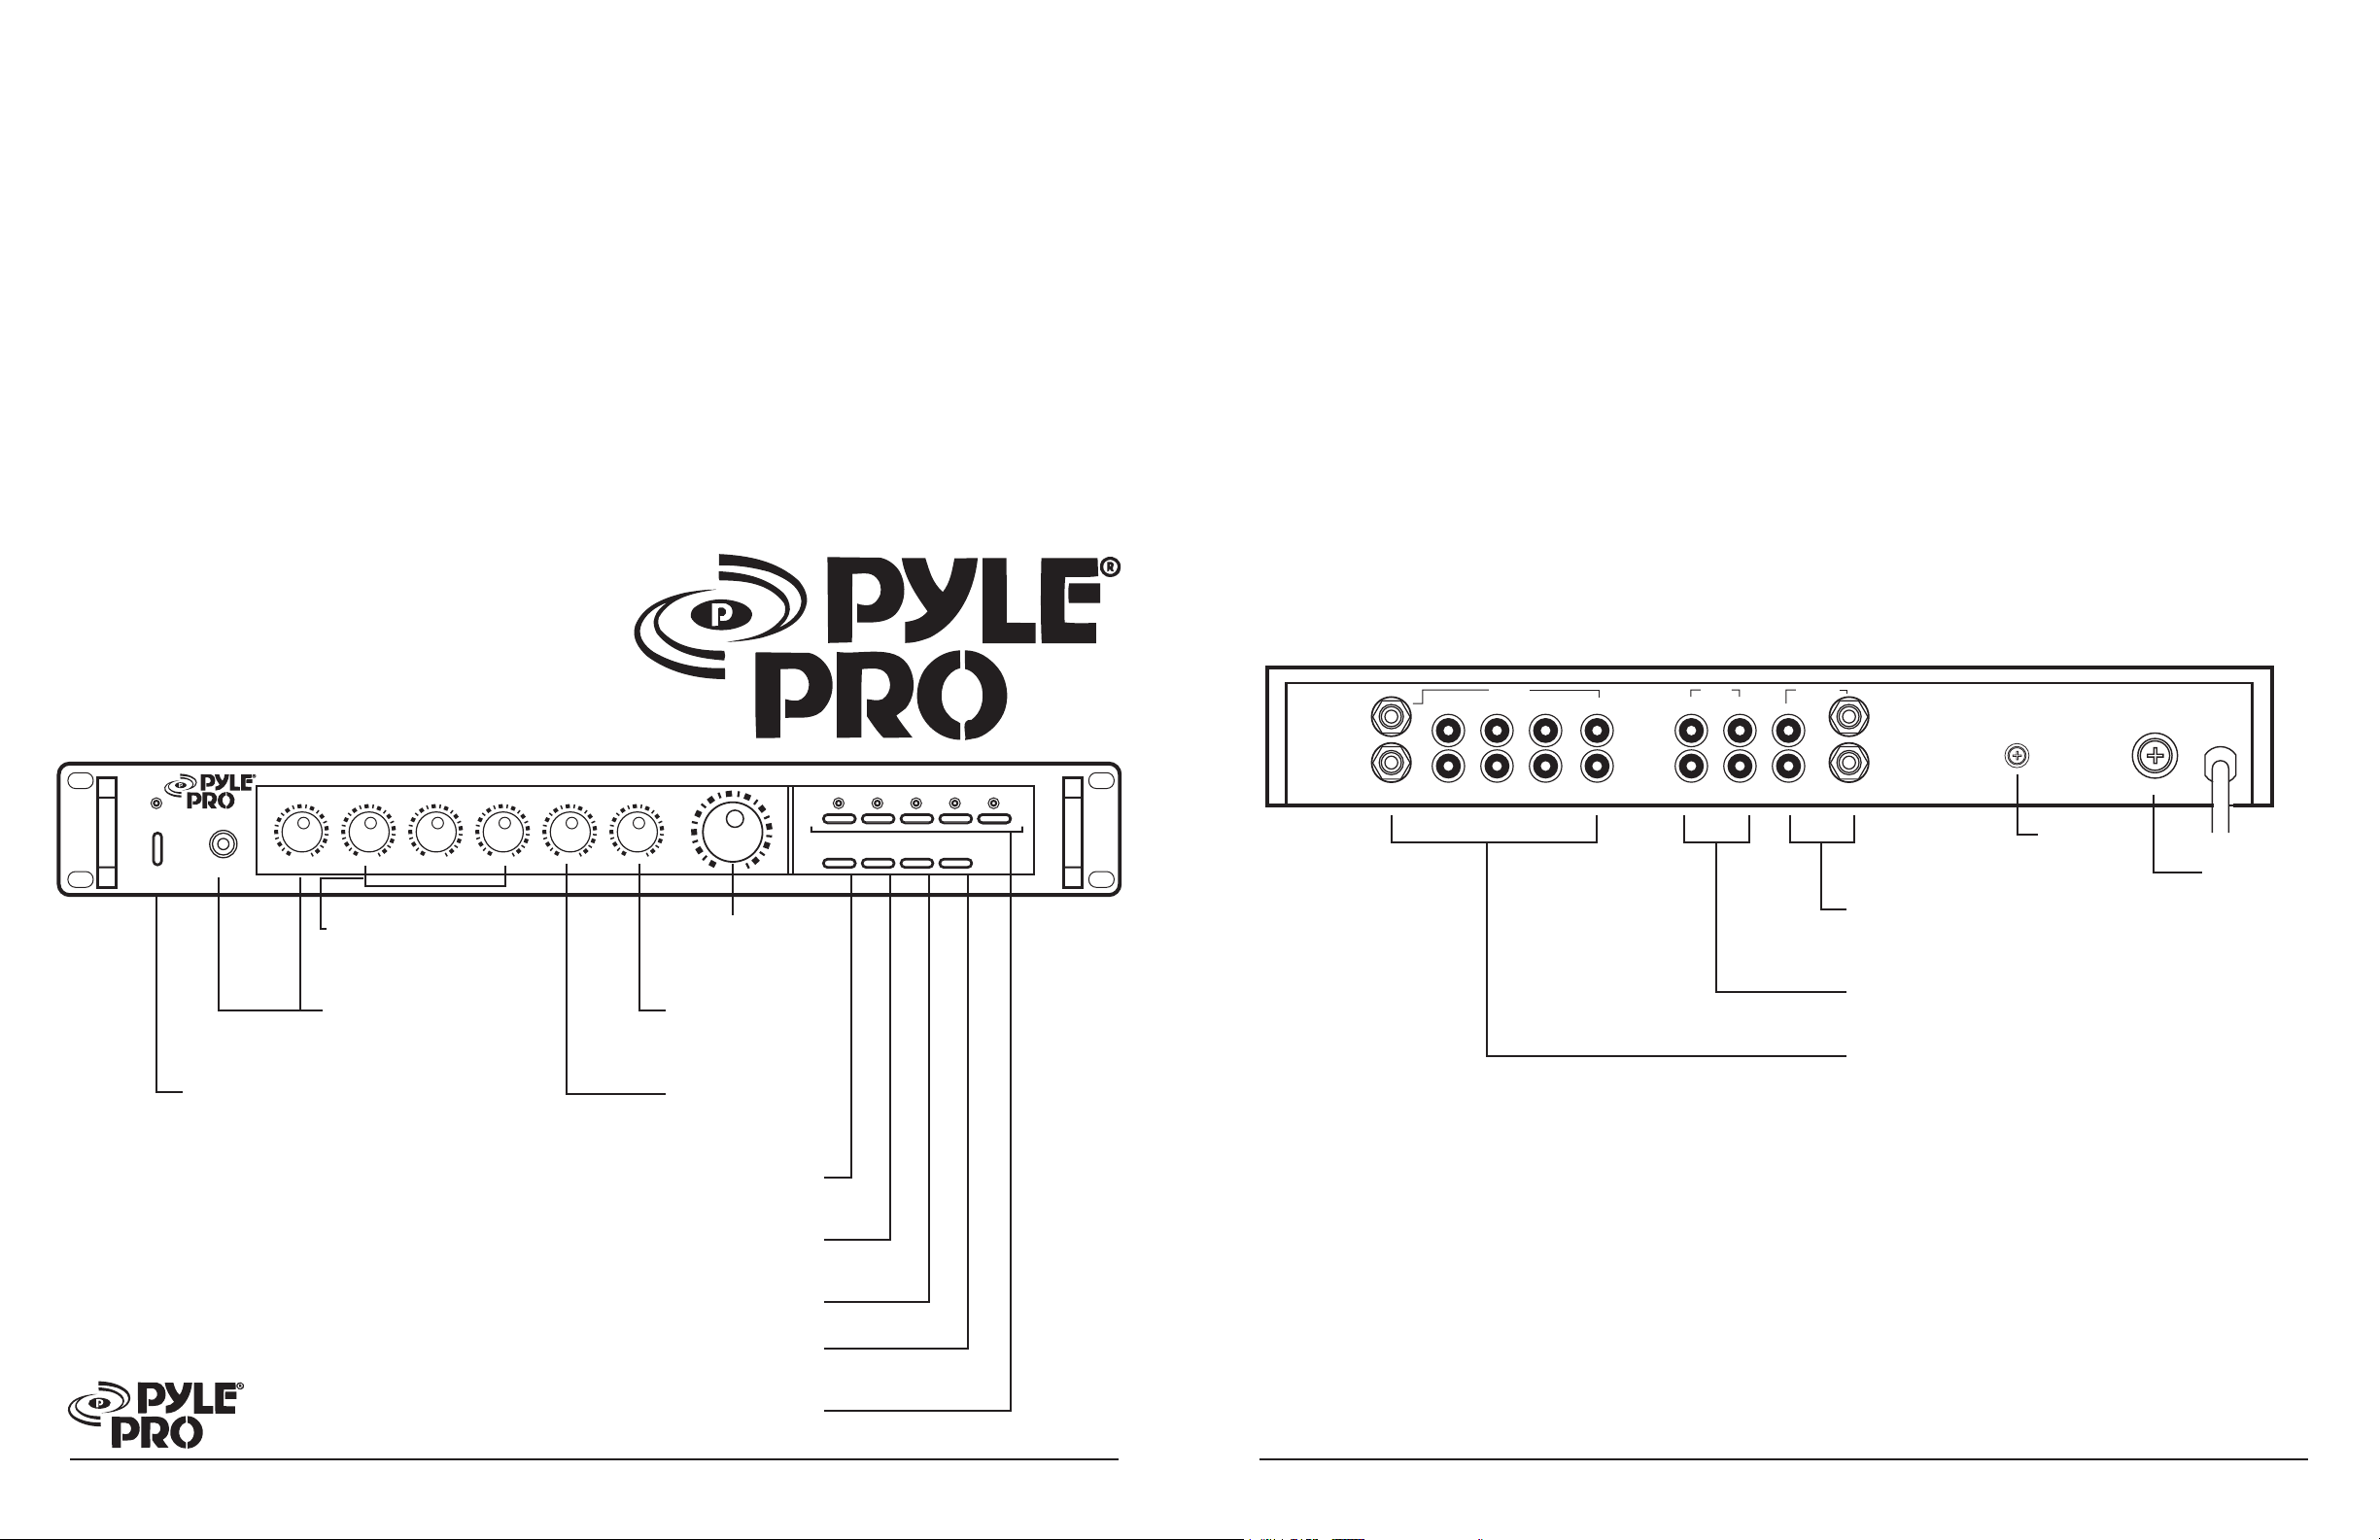
FEATURES AND CONTROLS
FRONT PANEL
POWER
MIC
Power On/Off
MIC LEVEL LOUDNESS BALANCE
MIN MAX
BASS MID TREBLE
MIN MAX MIN MAX MIN MAX MIN MAX Left RIGHT
Tone Controls
Adjusts levels of BASS,
MID, and TREBLE
Microphone Input Jack
and Level Control
Lets you connect and
adjust input signal from
microphone
Low Frequency Filter For elimination
of turntable rumble and other low
frequency noise
High Frequency Filter For elimination
of record scratches and other high
frequency noise
Stereo/Mono Switch Selects Stereo or
Mono input signal.
Muting Switch Reduces volume level
by 20dB
STEREO CONTROL PREAMPLIFIER
VOLUME
MIN MAX
Master Volume
Control Adjusts
output level of
speakers
Balance Control
Controls relative
volume of left
and right speakers
Loudness Control
Compensates for loss
of low frequencies at
low volumes.
TAPE TUNER CD AUX PHONO
PYP-1
LOW FILTER HI FILTER MONO MUTING
PHONO AUX CD TUNER
L
R
L
R
INPUT
1212
TAPE OUTPUT
PLAY REC
L
R
FUSE
L
R
Ground
Screw
Fuse
Holder
Left and Right Output Connectors
The PYP-1 offers a choice of 1/4" or RCA type
output jacks for connecting to the inputs of
your graphic equalizer or power amplifier.
Tape Recorder Inputs/Outputs
For recording to and playing from a tape
player or recorder.
Left and Right Input Connectors
For connecting the PYP-1 to a TAPE PLAYER,
TUNER, CD, AUX, and PHONO input sources.
The AUX features both1/4" or RCA type input
jacks.
Input Source Selectors Select signals
from TAPE, TUNER, CD, AUX or PHONO
jacks.
i – PYLE PRO PYP-1 Stereo Control Preamplifier Owner’s Manual PYLE PRO PYP-1 Stereo Control Preamplifier Owner’s Manual -1

INSTALLATION GUIDELINES
Input connections
The PYP-1 accepts a broad range of input sources, including:
Compact Disc (CD) player
Cassette, Reel-to-Reel or other tape recorder or player
Radio Tuner
Turntable
These can be connected via either 1/4” or RCA type jacks
to the input jacks on the rear panel of the PYP-1
Connecting a CD Player
INPUT
PHONO AUX CD TUNER
L
L
R
R
1212
TAPE OUTPUT
PLAY REC
L
R
CD Player
Output Connections to Amplifier or Signal Processor
The PYP-1 has been designed to provide output to a power
amplifier of sound processor. Output connections may be
made using either the RCA or 1/4” connectors on the rear
panel.
Grounding the preamplifier
Grounding your turntable to an earth ground is a good idea
in order to reduce or eliminate hum or static that the phono
system may introduce to the audio signal path. Securely
fasten a wire from the ground screw on the rear panel to
the ground lead from your turnable.
L
R
FUSE
Amplifier or Signal
Processor
Turntable
Ground
Wire
Connecting a phono turntable
TAPE OUTPUT
PLAY REC
L
R
L
R
L
L
R
R
INPUT
PHONO AUX CD TUNER
1212
Connecting an auxiliary input source
TAPE OUTPUT
PLAY REC
L
R
L
R
L
L
R
R
INPUT
PHONO AUX CD TUNER
1212
Input connections
using RCA jacks
–¬OR –
Aux input source
Aux input source
FUSE
FUSE
Connecting a Radio Tuner
L
L
R
R
INPUT
PHONO AUX CD TUNER
1212
L
R
PLAY REC
Connecting a Microphone
Input connection
using 1/4” jack
BASS MID TREBLE
MIC LEVEL LOUDNESS BALANCE
POWER
MIC
MIN MAX MIN MAX MIN MAX MIN MAX LEFT RIGHT
MIN MAX
TAPE OUTPUT
L
R
VOLUME
MIN MAX
Tuner
Microphone
STEREO CONTROL PREAMPLIFIER
TAPE TUNER CD AUX PHONO
LOWFILTER HI FILTER MONO MUTING
PYP-1
FUSE
TAPE OUTPUT
PLAY REC
L
R
L
R
NOTE: These diagrams
show hookups using the
RCA type jacks, but you
can use the 1/4” jacks
FUSE
instead with similar
results.
L
L
R
R
INPUT
PHONO AUX CD TUNER
1212
Recording from/Playing to the PYP-1 from a tape
recorder/player
The PYP-1 has been designed to serve as an audio source
for tape recording as well as to accept tape playback as an
input source. Connect the REC IN jack of your tape deck to
the REC jack of the PYP-1, and the TAPE OUT jack of the
deck to the PYP-1 PLAY jack.*
* Terminology for the
tape deck input and
output may vary. See
your tape deck owner’s
manual for questions.
INPUT
PHONO AUX CD TUNER
L
L
R
R
1212
L/R PLAY OUT
TAPE OUTPUT
PLAY REC
L
R
L
R
Tape Deck
L/R REC IN
FUSE
TAPE OUTPUT
PLAY REC
L
R
L
R
FUSE
L
L
R
R
INPUT
PHONO AUX CD TUNER
1212
Selecting the Input Source
Select signals from TAPE, TUNER, CD, AUX or PHONO jacks
using the push button switches on the front panel.
Adjusting Volume and Tone
Adjust the various tone controls, mic input level (if used)
and master volume to suit your taste or performance
requirements.
Adjusting the Balance
The balance control positions the audio program material
in your listening environment by balancing the relative
volume of left and right channels. This may be highly useful
in a mobile performance system where environmental
acoustics vary widely.
Filtering the audio program
The Low Frequency Filter has been designed to assist in the
elimination of low frequency noise such as turntable rumble.
Engage this filter by pressing the button marked LOW FILTER.
The High Frequency Filter removes high frequency noise
from the audio stream, such as that caused by record
scratches. This filter is activated by pressing the HIGH
FILTER button.
Muting the audio
When you need to lower the volume level temporarily, such
as when changing records or tapes, you may wish to take
L
L
R
R
INPUT
PHONO AUX CD TUNER
1212
TAPE OUTPUT
PLAY REC
L
R
L
R
Input connections
using 1/4” jacks
FUSE
advantage of the PYP-1’s muting function. This function
reduces the audio output level by 20 dB when the MUTE
button is depressed. Pressing again returns the audio to the
full level set by the MASTER VOLUME control.
2 – PYLE PRO PYP-1 Stereo Control Preamplifier Owner’s Manual PYP-1 Stereo Control Preamplifier Owner’s Manual -3

Connecting to standard AC power
After making all other connections, set the POWER switch
to OFF position. Then connect the power cord to a standard
AC outlet.
PYP-1 Specifications
Input Sensitivity/Impedance
Mic
Phono
Tape/Tuner/CD/Aux
0.5mV/600 Ohms
3.0mV/47k Ohms
150.0mV/47K Ohms
Place
Stamp
Here
Mounting the PYP-1
The PYP-1 is designed to accept standard rack mounting
installations. Two slots on each end of the front panel make
it suitable for such an installation.
Tightly secure four mounting screws (not supplied) through
these fours slots and into your standard electronics equipment
rack.
Caring for your PYP-1 Stereo Control Preamplifier
This component uses a 250V 0.5A fuse for protection from
power surges and short circuits. If the unit suddenly shuts
down and will not turn on, it is likely that this fuse has
blown.
To replace the fuse:
1. Locate the fuse holder on the rear of the cabinet and
unscrew the fuse compartment cap.
2. Remove the old fuse and replace it with an identical,
serviceable fuse.
CAUTION! Never use a fuse with a higher rating!
3. Replace the fuse compartment cap.
Output Level/Impedance
Tape Rec
Pre Output
Total Harmonic Distortion
Mic
Phono
Tape/Tuner/CD/Aux
Frequency Response
S/N Ratio
Mic
Phono
Tape/Tuner/CD/Aux
Tone Control
Bass
Mid
Treble
Loudness Control
Power Requirement
Dimensions
150.0mV/100k Ohms
500.0mV/47k Ohms
<0.4%
<0.04%
<0.02%
5Hz to 30k Hz (+0, -3dB)
>50dB
>70dB
>80dB
+/-12dB at 100 Hz
+/-6dB at 1k Hz
+/-12dB at 10k Hz
+4/0/+2dB at 100/1k/10k Hz
AC 110V/60 Hz or 230V/50 Hz
18
7/8 x23/8 x77/8
(480 x 60 x 200)
Please complete warranty card, detach and return
PYLE PRO Audio, Inc.
1600 63rd Street
Brooklyn, NY 11204
Limited Warranty
All PYLE PRO products are carefully constructed and tested before shipment.
Units purchased in the USA are warranted to be free of defects in material
and workmanship for two (2) years from the date of purchase. This warranty
is limited to the original retail purchaser of the amplifier.
Should the unit fail due to factory defects in material or workmanship, your
unit will be repaired or replaced at the sole discretion of PYLE.
To obtain warranty service, you must first call our Consumer Return Hotline
at (718) 236-6948 to obtain a Return Authorization Number. This R.A. # must
appear on the outside of your package and on all paperwork relating to your
return.
When returning the unit to us for warranty service, it must be carefully packed
and shipped, prepaid, to:
R.A.#: _____________
PYLE PRO Service Center
1600 63rd Street
Brooklyn, NY 11204
You must also include the following items with your return:
• A copy of your sales receipt or other proof of purchase
• A brief letter, indicating the problem you are experiencing with the
product
• Include in your letter your return address, daytime phone number and
R.A. number
• Also include a check or money order for $15.00 for return shipping,
handling and insurance, or provide your Visa/MC number with
expiration date.
Our obligation under this warranty is limited to the repair or replacement of
the defective unit when it is returned to us prepaid. This warranty will be
considered void if the unit was tampered with, improperly serviced or subject
to misuse, neglect or accidental damage.
4 – PYLE PRO PYP-1 Stereo Control Preamplifier Owner’s Manual PYLE PRO PYP-1 Stereo Control Preamplifier Owner’s Manual -5
 Loading...