

Page 1
Vintage Turntable With CD / Cassette / Radio
/ Aux-In / USB / SD / MP3 and Vinyl-to-MP3
Encoding
PTCDS7UI
www.PyleAudio.com
Page 2
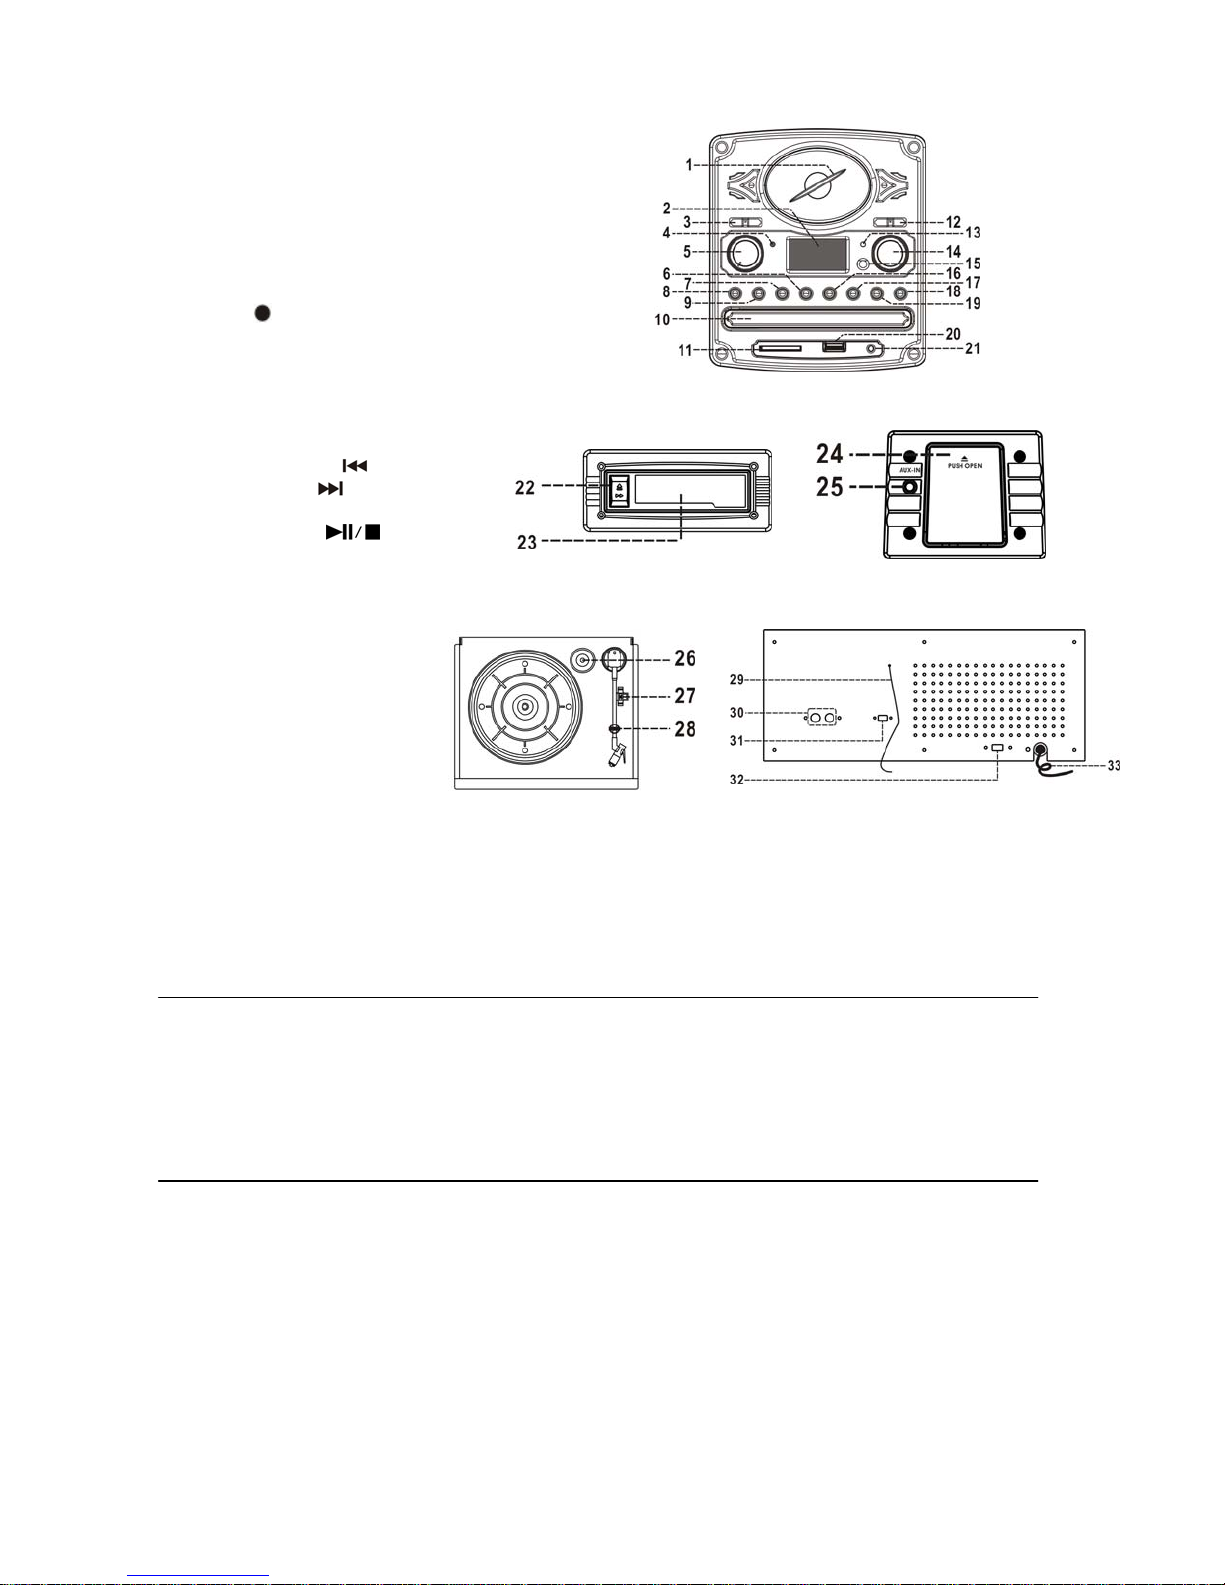
Location of controls
1) Dial pointer
2) LCD display
3) Functions switch
4) Power LED indicator
5) Power on/off, volume up/down knob
6) MP3 folder up button
7) Source button
8) Extra ba ss on/off button
9) Record
10) CD door
11) SD/MMC card slot
12) Radio band selector switch
13) FM stereo LED indicator
14) Tuning knob
15) Remote sensor
16) Skip/search down
17) Skip/search up
18) CD door open button
19) Play/pause/stop
20) USB socket
21) 3.5 mm headphone jack
22) Tape forward / eject button
23) Cassette door cover
24) Mobile drawer
25) Aux in jack
26) Spindle adaptor
27) Turntable selector
28) Pick-up holder
29) FM wire antenna
30) Line out socket (l/r)
31) Auto stop switch
32) 110/220V selector
33) AC cord
Caution:
Usage of controls or adjustments or performance of procedures other than those specified herein may
result in hazardous radiation exposure.
This unit should not be adjusted or repaired by anyone except qualified service personnel.
Precautions for use
Installation
Unpack all parts and remove protective material.
Do not connect the unit to the mains before checking the mains voltage and before all other
connections have been made.
Do not cover any vents and make sure that there is a space of several centimeters around the unit for
ventilation.
Connection
button
button
button
button
Caution : before connect the AC cord to main AC outlet, plea se check carefully the
supply voltage of your area and select the proper voltage position of the 110/220V
selector(32). Since wrong selection of the 110/220V selector (32) and plugged the
unit to main AC outlet will damage your unit and fire hazard can also occur.
1. Connect the power cord (33) to AC outlet.
2. Turn on the power (5) until the LCD display (2) with blue backlight on.
3. Then switch the Function selector (3) to “ Tuner “ function. If sound is coming out from the speaker, it’s
mean the power supply is normal. Now your system is ready to play the music.
E-1
Page 3

Listening to radio
Manual tuning
1. Select the desired band by Radio band selector (12) (AM or FM or FM-Stereo).
2. Tune to the required station by turning the Tuning knob (14).
3. Adjust volume knob (5) to the desire volume level.
FM & FM-Stereo reception
Set the Radio band selector (12) at “ FM ” position. Programs are received in mono mode. In p articular
when stereo signal are weak. It is preferable to receive the program in mono.
Set the radio band selector (12) at “FM-St” po sition fo r receiving stereo programs. The FM- Stereo LED
indicator (13) will light up to show FM stereo program is receiving.
Hints for best reception:-
- Am : The receiver has a built-in am bar antenna. If AM reception is weak, slightly rotate or
re-positioning of the unit will usually improve the am reception.
- FM : The receiver has a built-in FM wire antenna (29) hanging at the rear cabinet. This wire should be
totally unraveled and extended for best reception.
Playing compact disc
getting start
1. Turn Function selector (3) to select “ CD/USB/SD ” mode.
2. Press “Open/Close” button (18) to open the CD door (10).
3. Place a cd with the printed side facing up inside the tray & then close the co door.
4. Focus search is performing, the LCD display (2) will show the total number of tracks & total playing
time.
Play / pause / stop mode
1. Press the “ Play/Pause/Stop ” button (19) to start playback, the first track will start playback.
2. To interrupt, press the “ Play/Pause/Stop ” button (19) once, the playing time will be freeze & flashing
on the LCD display (2). Press again to resume normal playback.
3. If press and hold the “ Play / Pause/Stop “ button (19) for over 2 seconds during playback mode. The
system will go to stop mode.
Skip/search mode (skip/search up
/ skip/search down )
1. During play or pause mode, if “Skip up” button (16) is pressed. It will go to next track and display the
track no. And then remain the play or pause mode.
2. During play or pause mode, if “Skip down” button (17) is pr e ssed. It will go back to the beginning of the
track, original track no. Is display and remain the play or pause mode.
3. After step 2, press “Skip down” button (17) again will go to the previous track and remain the play or
pause m ode.
4. If press and hold the “ Skip up /down button “ (16,17) during CD/MP3 file playback, the playing track will
go fast forward or backward until the button being released.
For MP3 disc
1. Press “ MP3 folder “ up button (6), the folder no. Will goes up
2. Press “ ski p up
“ or skip down (16,17) button, the track no. Chan ge.
3. When the desired track is being selected, press the “ Play/Pause/Stop ” button (19) to start playback.
ID3 (track/album title) function (by remote handset)
1. Press the “ Info “ button during playback of MP3 disc, the song title is being displayed. Press the
“Iinfo ” button again to di sable the function.
Song title/folder name search function (by remote handset)
You can search the track by the title/folder name in disc during stop mode:-
1. Press the “ Find “ bu t ton once, then pr ess the “Skip up” ( o r S k i p d o wn) b u t t o n (1 6,17), you can search
the title of each song one by one under alphabet order on LCD display (2), then press the CD
“ Play/Pause /Stop ” button (19) to start the playback of the selected track.
2. Press again “ Find ” button, the folder name is being displayed. Then press the “Skip up” (or Skip down)
button (16,17) to select the desired folder, and press the CD “ Play/Pause/Stop ” button (19) to start the
playback of all tracks inside that selected folder.
E-2
Page 4
Remark:-
- In that case of no name had been assigned for the track, “ none “ or “ unknown “ is being displayed” on
LCD display (2).
- The system support English alphabet and numeral only for ID3 text
Mp3 track format requirement:-
- Mp3 bit rate : 32 kbps~256 kbps.
- The performance of playing MP3 disc is various from the quality of recording disc and the method of
recording. Furthermore, the searching lead-time for MP3-CD is longer than normal CD due to
difference format.
Repeat/Intro/Random mode (by remote control)
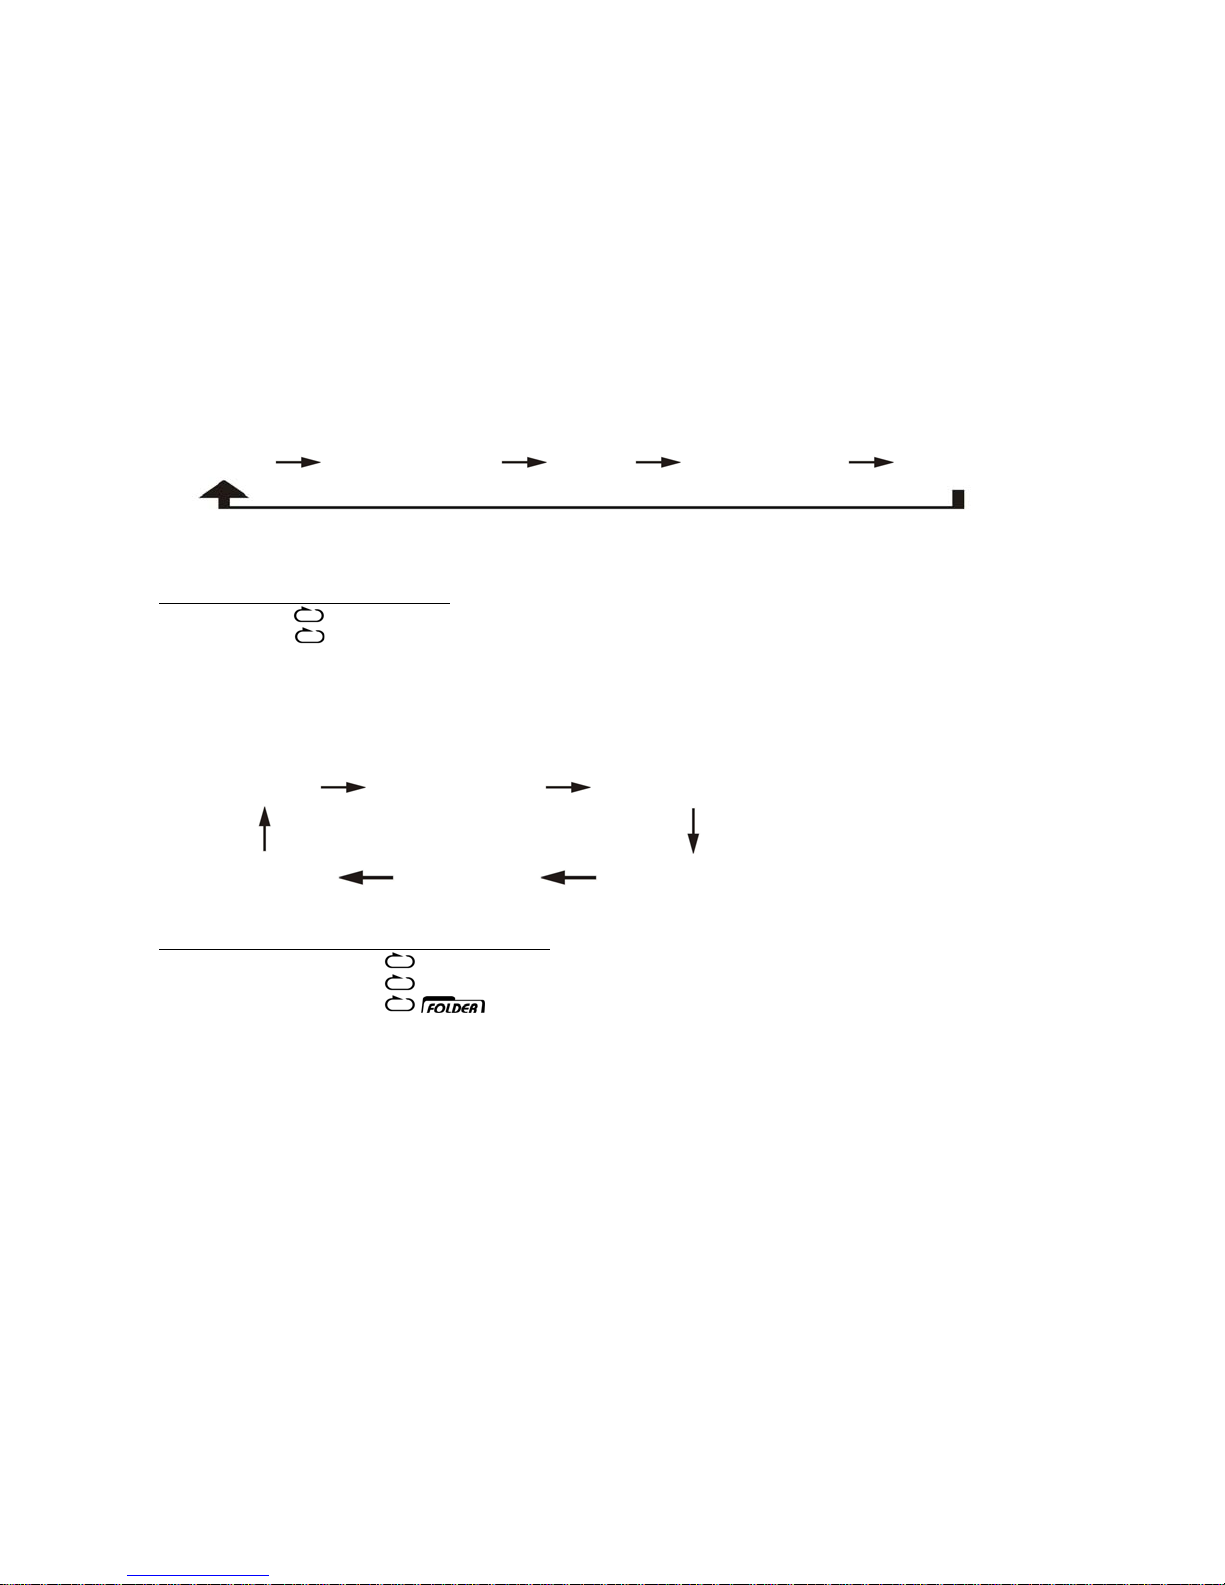
Press the Repeat/Intro/Random button before or during playback, a single track, single folder (MP3 file
only) or all the tracks can be played in difference mode as follow:-
For CD
(1) Repeat 1
(2) Repeat all track (3) Intro (4) Random (5) off mode
Indicator
Play mode on LCD display
Repeat trac k
Repeat all
ALL
Intro INTRO
Random RANDOM
Off mode --------------
For MP3 disc
(1) Repeat 1
(2) Repeat 1 folder (3) Repeat all folder
(6)Off mode (5)Random (4) Intro play
Indicator
Play mode on LCD display
Repeat single track
Repeat all tr ac k s
Repeat single folder
ALL
Intro play mode INTRO
Random mode RANDOM
Off mode -----------------
Repeat play
You can listen the desired track or folder repeatedly by this function.
Intro play
You can listen the beginning (10 seconds) of each track in a CD by this function & saving your time to
search the desire song
Random play
You can listen all the tracks or folder in a random order by this function
CD/MP3 disc programming (by remote control)
Up to 32 tracks can be programmed for CD or MP3 file and play in any order. Before use, be sure the
system is at stop mode before programming:-
E-3
Page 5
1. Set in CD/USB/SD mode & stop the cd/mp3 disc playback.
2. Press the “Program” button, “ PROG “ indicator will appear on LCD display (2). Moreover, it will
indicate pr ogram no. and digits for track no. to be programmed.
3. Select a desired track by pressing skip
or buttons (16,17).
4. Press t he “ Program ” button to store the trace into memory.
5. Repeat steps 3 and 4 to enter additional tracks into the memory if necessary.
6. When all the desired tracks have been programmed, press CD “ Play/Pause/Stop ”
button (19)
to play the disc in assigned order.
7. To cancel the programme d file, press “Stop” button on remote handset until “ PROG “ indicator is
disappear on LCD display (2)
Playback of MP3 song via USB storage media or memory card
Connecting
The system is able to decode and playback all MP3 file which stored in the memory media with USB
connecting port or SD/MMC me mory card.
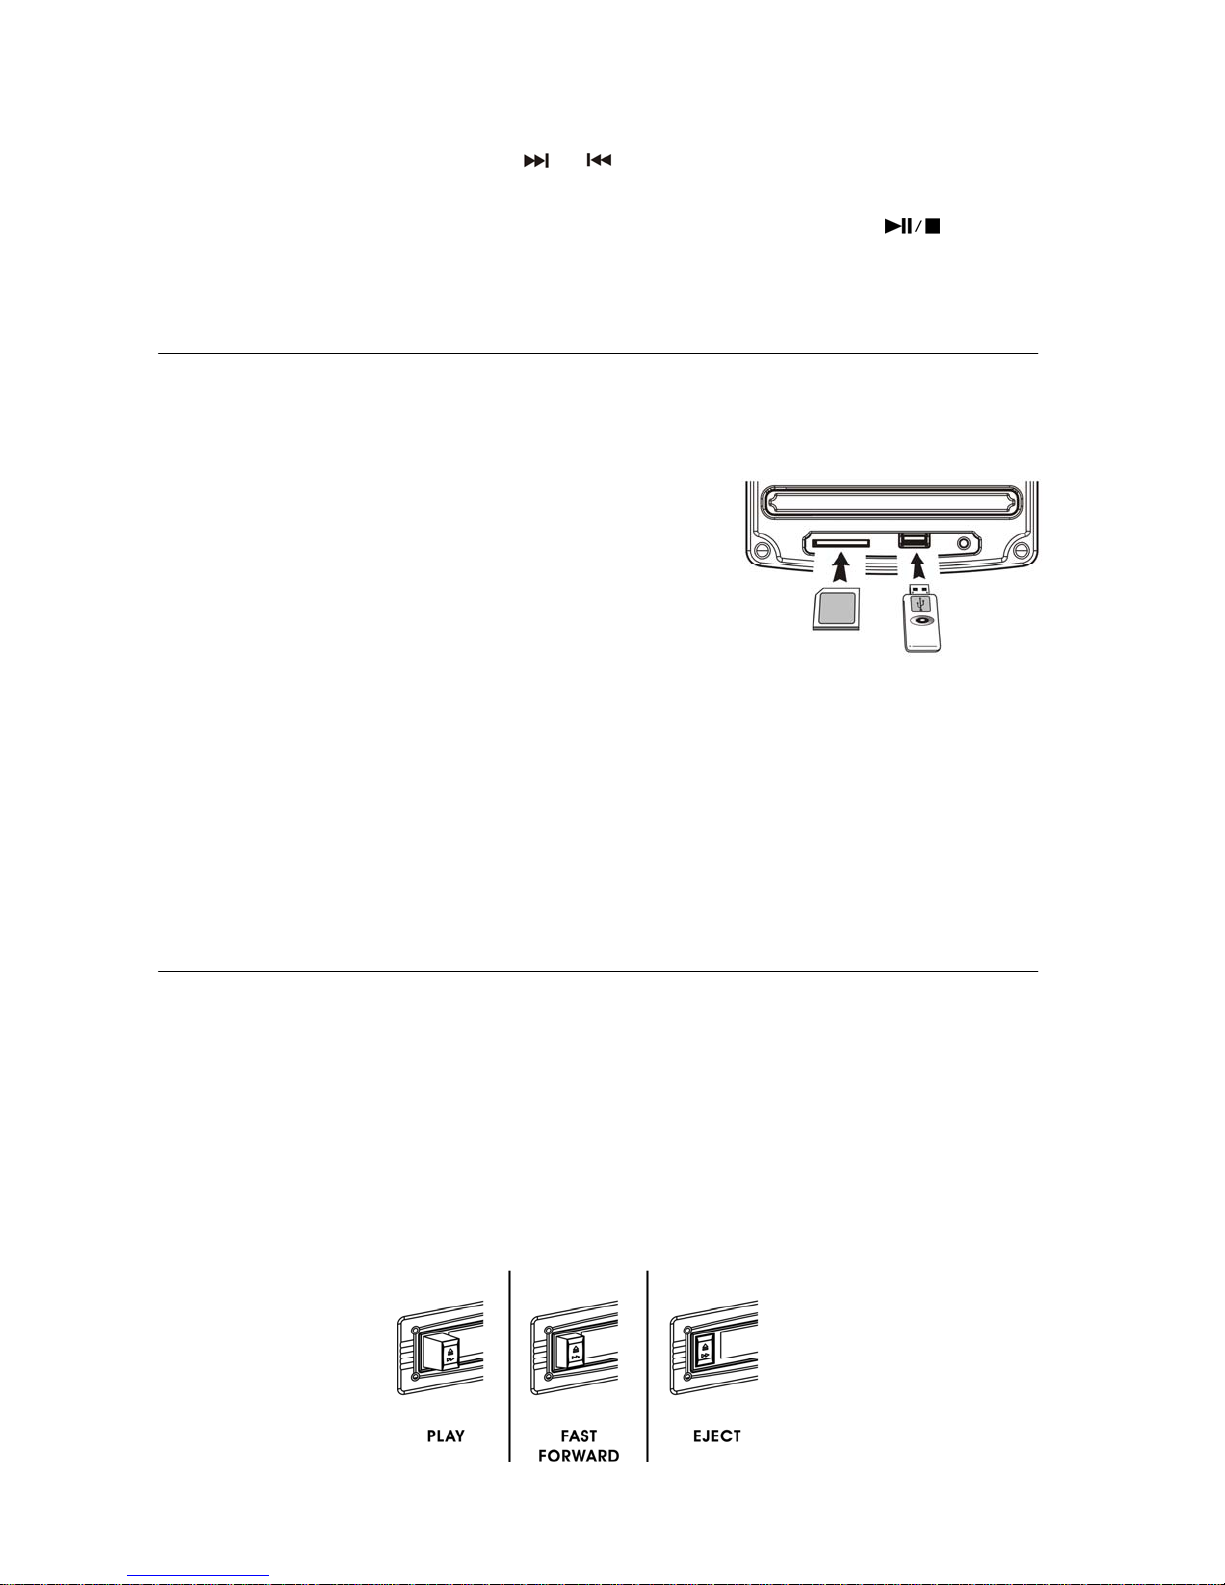
1. Set Function selector (3) at CD/USB/SD mode and then press source button (7) to select “ USB or
Card” mode.
2. Plug-in the USB plug with the face up & make sure it going into
completely or insert the memory card in the direction of the
arrow as shown in the label on the underside of the memory
card slot cover. Insert straight without bending.
Connecting the UBS upside down or backwards could
damage the audio system or the storage media (USB
thumb drive / SD/MC card). Check to be sure the direction
is correct before connection.
3. The system will start reading the storage media automatically after connecting, and LCD display (2)
will show the total number of MP3 files and total number of folder being detected.
4. Repeat the same playback procedure as playing cd/mp3 disc as above
Remark
- The system can detect and read the file under MP3 format only though the USB socket or SD/MMC
card.
- If connect the system to MP3 player via the USB socket, due to variances in MP3 encoding
format, some MP3 player may not be able to play via the USB socket. This is not a malfunction
of the system.
- USB port does not support connection with USB extension cable and is not designed for
communication with computer directly .
Listing to tape
General operation
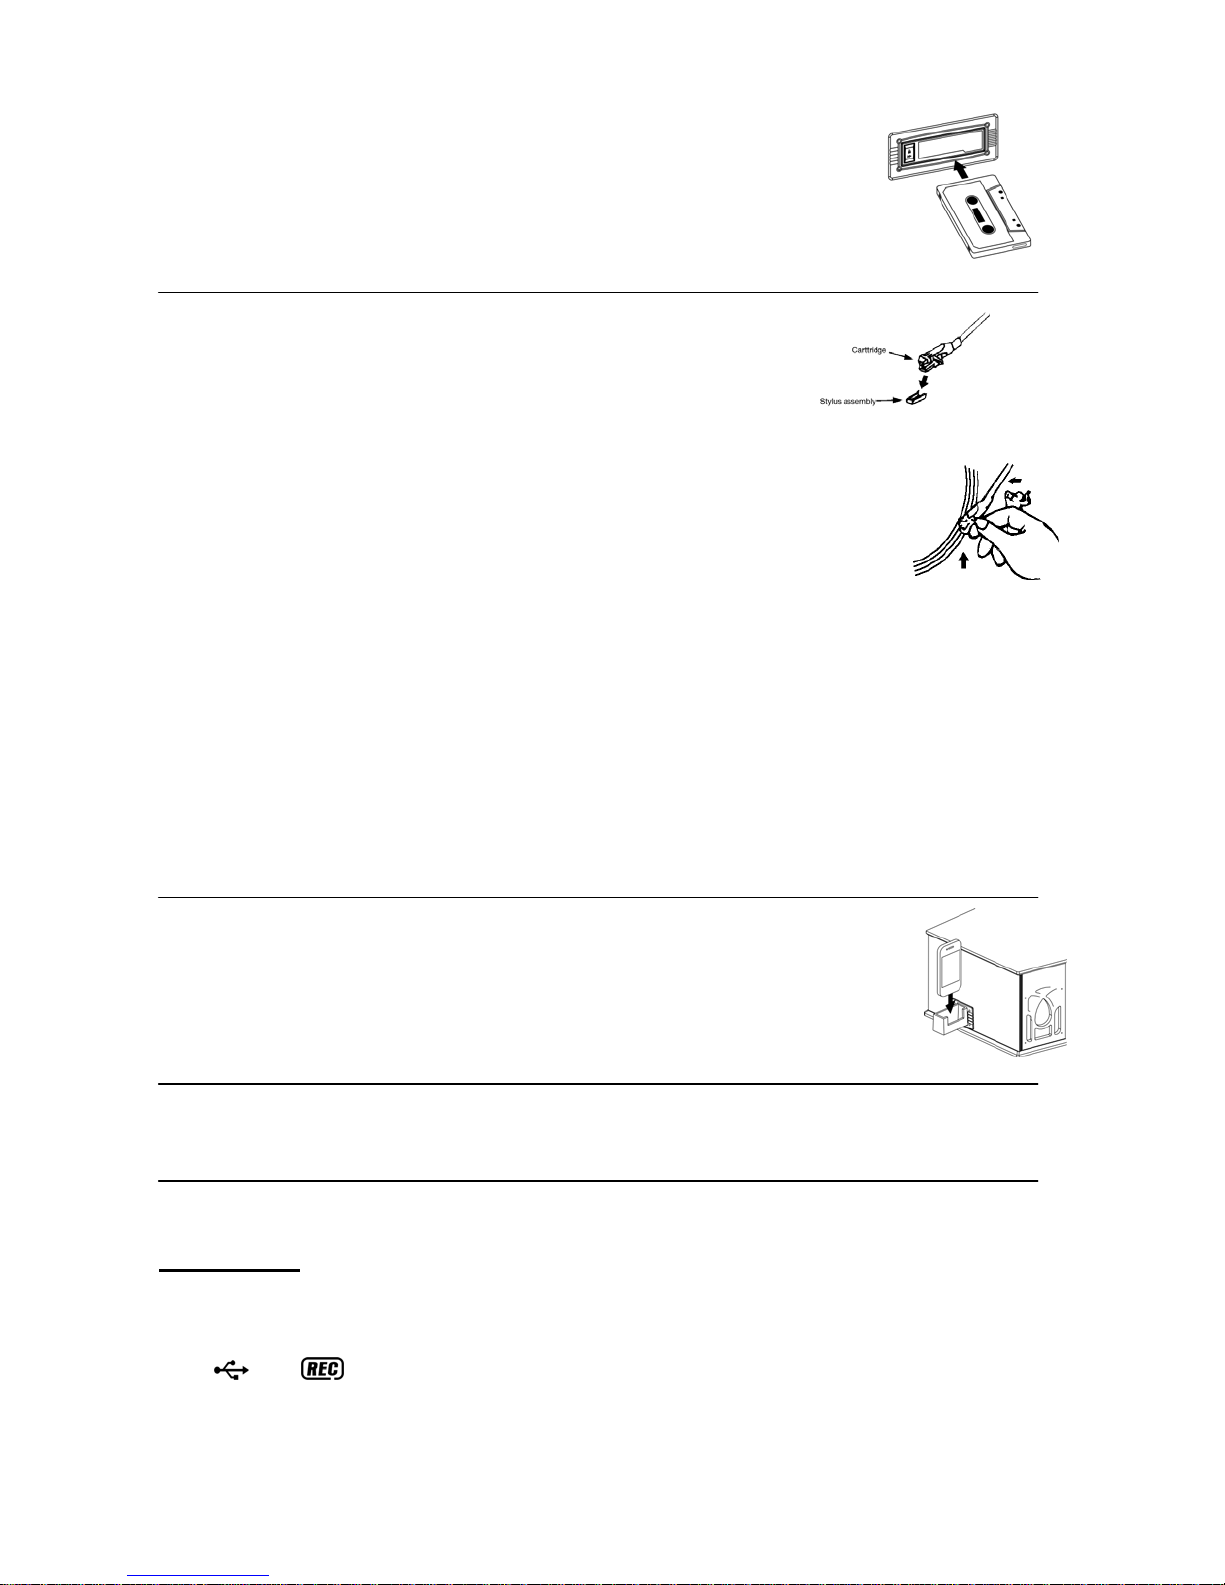
Cassette playback : The system will start the playback automatically after inserting of cassette tape.
Stop and ejection : Press the “ Tape forward / eject “ button completely inwards and the cassette
Tape will be ejected though the cassette door cover. The “ Tape forward/eject“
button will keeping at lowest height position.
Fast forward : Press the “ tape forward / eject “ button half inwards during playback mode, the tape
winding forward direction. The “ Tape forward / eject “ button will keeping at middle
height position.
Slightly press the “ Tape forward / eject “ button again to resume normal playback. The “ Tape forward /
eject “ button will resume to the highest position.
E-4
Page 6
Remark
- Make sure the direction is correct when inserting the tape into the system.
- There is some searching noise can be heard and the system cannot perform
normal playback function during fast forward mode.
- This is recommended to take out the cassette tape from the system every times
after listening and don’t leave the cassette tape inside the system when not
under playback mode.
Phono
noted:
- Remove the stylus protector.
- Be sure that the tone arm is being detached from the tone arm rest before
operating and re-secured again afterwards.
1. Select to “ Phono/Aux ” function from function selector (3)
2. Set the speed selector to the proper position depending on the record to be played.
3. Place the record on the platter (use the spindle adaptor if required).
4. Lift the tone arm from the rest and slowly move it to the record side. The platter will
start to rotate.
5. Place the tone arm to the desired position of the record.
6. Adjust the volume to the desired level.
7. At the end of record, the platter will automatically stop rotating. Lift the tone arm from
the record and return it to the rest.
8. To stop manually, lift the tone arm from the record and return it to the rest.
Remark : As some kind of record the auto-stop area was out of the unit setting, so it will stop before the
last rack finish. In this case, select the auto-stop switch (31) to “ off “ position, then it will run to the end of
the record but will not stop automatically (turn off the unit by po wer button or s witch back the a uto-stop
switch to “ on “ position to stop the platter rotate). Then put back the tone arm to the rest position.
Remark : Due to Phono and Aux design in same channel of this unit, once the Aux in jack (25) plugged by
any 3.5mm stereo plug, the Phono function will change to Aux in automatically and the turntable will stop to
spin. Made sure the Aux In jack (25) without plugged by anything before playing Bluetooth.
Aux-in connection with mobile drawer
Connect another audio device, e.g. mobile phone, MP3 player, , iPod, etc. To this system
via a cord with 3.5mm dia jack plugs (not supplied). Connect one end of this cord to the
headphone jack of the external device and the other end to the aux-in jack (25) at the side
of the unit near the mobile drawer and place your device into the drawer. Select
“ Phono/Aux ” function from Function selector (3), then start to playback your external
device to enjoy your music.
Line out connection
You can connect the system to your whole hi-fi system by connecting the line out socket (30) to the
auxiliary input socket with a RCA cable (not included).
Encoding of CD disc / Phono or Cassette tape into mp3 file
The system is able to encode CD, Record (from Phono) and cassette deck file (from Tape) to MP3 format
and recording at memory media with USB connecting port or SD/MMC card.
A) CD encoding
I) recording 1 track
1. Plug in the USB pen drive for recording (make sure it had enough empty space).
2. Play the CD track y ou want to encode/record, as no rmal.
3. Press the “ Record “ button (9) during playback of the desired track
4. “
“ & “ “ will be flashing on the LCD display (2) to show encoding is in progress.
5. After the encoding process has f inished, the unit will stop playback automatically.
E-5
Page 7
II) Recording the complete CD
1. Place a CD with the printed side facing up in side the CD tray & then close the CD door.
2. After disc se arch has be en compl eted, p ress th e “ Reco rd “ bu tton (9 ) – note: for recording whole CD,
do not press “ Play/Pause/Stop ” button (19) before press " Record " button(except in Recording in
program mode) as this procedure will only record the first track of the CD.
3. “
“ & “ “ will be flashing on the LCD display (2) to show encoding is in progress.
4. After the encoding process has f inished, the unit will stop playback automatically.
III) Recording by program
1. Place a CD with the printed side facing up inside the tray & then close the co door
2. Select the desire tracks by following “ CD/MP3 disc programming “ procedures. Then press
“ Play/Pause/Stop “ button (19) to start playback.
3. Press t he “ Record “ button (3) and the unit will display “
“ & “ “ & flashing. Encoding is
performing now.
4. After completing of encoding, unit will stop playback automatically.
Remark:-
- Insert either one type of memory media (USB pen drive or SD/MMC card) to the unit for encoding
process from CD/Phono/Tape respectively.
- The recording speed is 1:1 and according to the actual plying time of the Phono or Tape
- During copy mode, the system will copy the MP3 file only.
- The system will create a “ audio “ folder for encoding file and “ fcopy “ for copying file.
- The recording format is preset at – MP3 bit rate : 128 kbps, sampling rate : 44.1khz
- No song title will be recorded during encoding mode
- To interrupt the recording, press the “ Record “ button again during record mode.
- The system will store the file to USB source first if both USB and SD slot are being occupied during
encoding of Phono or Tape mode.
- Encoding CD to MP3 file or copying MP3 file from USB/SD will be successful only entire song
being encoded or copied, if terminate the encoding or copying process intermediately, there is
no track being recorded nor stored to the USB or SD/MMC card
IV) Copying of MP3 file
If putting a MP3 disc instead of a CD-disc, the system will copy the files to the USB or SD/MMC card if
press the “ Record “ button (9). The operation procedures is same as cd encoding as stipulate on above,
and the system will switch to copying mode only if MP3 file being read.
Remark:
- The system will store the file to USB source first if both USB and SD slot are being occupied by
storage media.
- If press the “ Record “ button (9) during playback of USB or SD source, the file will copy from USB to
SD or SD to US B.
B) Phono encoding
1) Plug in the USB pen drive for recording (make sure it had enough empty space).
2) Set the function button (3) to “ Phono “ position and then press the “ record “ button (9) directly.
3) The LCD display (2) with show the word “ USB “ and flashing, after then display “
“ & “
“ and flashing. Now the system is starting the encoding mode.
4) Start playback at Phono for the track which you want to record to USB or SD card.
5) After finish of recoding, press and hold the “ Record “ button (9) until the text on LCD display (2) stop
flashing and return to Phono mode.
C) Cassette encoding
1) Plug in the USB pen drive for recording (make sure it had enough empty space).
2) Set the function button (3) to “ Tape “ mode and then press the “ record “ button (9) directly.
3) The LCD display (2) with show the word “ USB “ and flashing, after then display “
“ & “
“ and flashing. Now the system is starting the encoding mode.
4) Start playback of cassette tape which the track you prepare to record.
5) After finish of recoding, press and hold the “ record “ button (9) until the symbol “
“ & “
“ disappear and resume to “ tape “ mode on LCD display (2).
D) File copy from USB to SD or reversal
The system allow to co py th e file s from th e U SB sou rce to SD/MMC card by pressing the “ Re cor d “ button
(9):-
E-6
Page 8
I) Copying 1 track (assume copy from SD card to USB mode)
1. Perform normal playback of the track at SD/MMC card you want to copy,
2. Press “ Record “ button (9) during the playback of the desire track, unit will display “
“ & “
“ and flashing. Copying is performing now.
3. After copying is completed, unit will stop playback automatically.
II) Copying all tracks (assume copy from SD card to USB mode)
1. Select “ SD “ mode and then insert the S/MMC card you want to copy.
2. After reading of card information is completed, press the “ Record “ button (9) and the unit will display
“
“ & “ “ and flas hing. Copying is performing now.
3. After copying is completed, unit will stop automatically.
E) Encoding bitrate (by remote handset)
You can select the desired bitrate during encoding, the higher bit rate will generate better sound quality
and occupy more space of memory. The selectable range is from 32 / 64 /96 /128 / 192 / 256 kbps
respectively
1. Set in “ Phono “ function (3) & remain stop mode.
2. Press the “Info “ button at remote handset and the LCD display (2) will show the default bitrate (128
kbps)
3. Press skip
or buttons (16,17) to select the desire bitrate f or encoding.
4. Press again the “ info “ to confirm the setting and the LCD display (2) will resume to phono mode
F) Track separation (by remote handset)
You can divide the recording music from Phono or Tape to USB/SD track by trace during encoding. Every
time when press the “
“ (track separation) button once at remote handset during encoding from
Phono or Tape to USB/SD, the system will generate a new track and continuous the recording. The text
“ PHONO “ or “ TAPE “ at LCD display (2) will flashing one time, it mean the unit is creating a new track
successfully.
File delete at USB / SD card (by remote control)
The system is able to erase the file stored inside the USB pen drive or SD/MMC card by following:-
A) Single file delete
1. Select at “ USB “ or “ SD “ mode.
2. Press and hold the “ Info “ button for 3 seconds and the LCD display (2) will show (del ---001)
3. Press skip forward
4. Press the “ Rec
backward
to select “ YES “ or “ NO “.
5. Press the “ Rec
or skip backward button to select the file going to delete
“ button to enter “ YES / NO “ mode and then press Skip forward or Skip
“ button again to confirm the setting.
B) All files delete (by remote control)
1. Select at “ USB “ or “ SD “ mode.
2. Press and hold the “ Info “ button for 3 seconds and the LCD display (2) will show (del ---001)
3. Press and hold the “ Info “ button again and the LCD will show “ FORMAT / Y/N “ and flashing. Then
press Skip forward
4. Press the “ Rec
or Skip backward to select “ Y (yes) “ or “ N (no) “.
“ button again to confirm the setting.
Remark :
- All the files inside the USB storage media or SD card will be deleted completely after confirming to “ Y
(yes) “ mode.
- Press “ Stop “ button once at remote handset to quite delete mode
Removing of USB / memory card
To remove the USB / memory card, turn off the power or switch the function mode to either CD, Tape or
Tuner first. For USB port – un-plug it by pulling out the USB socket directly, for memory card – press the
memory card inward & then re lease, now th e card being partially eject and you can remove it by hand.
x-bass sound effect
Press the x-bass button (8) to active x-bass function and enhance the bass effect at “ on
“ position.
E-7
Page 9
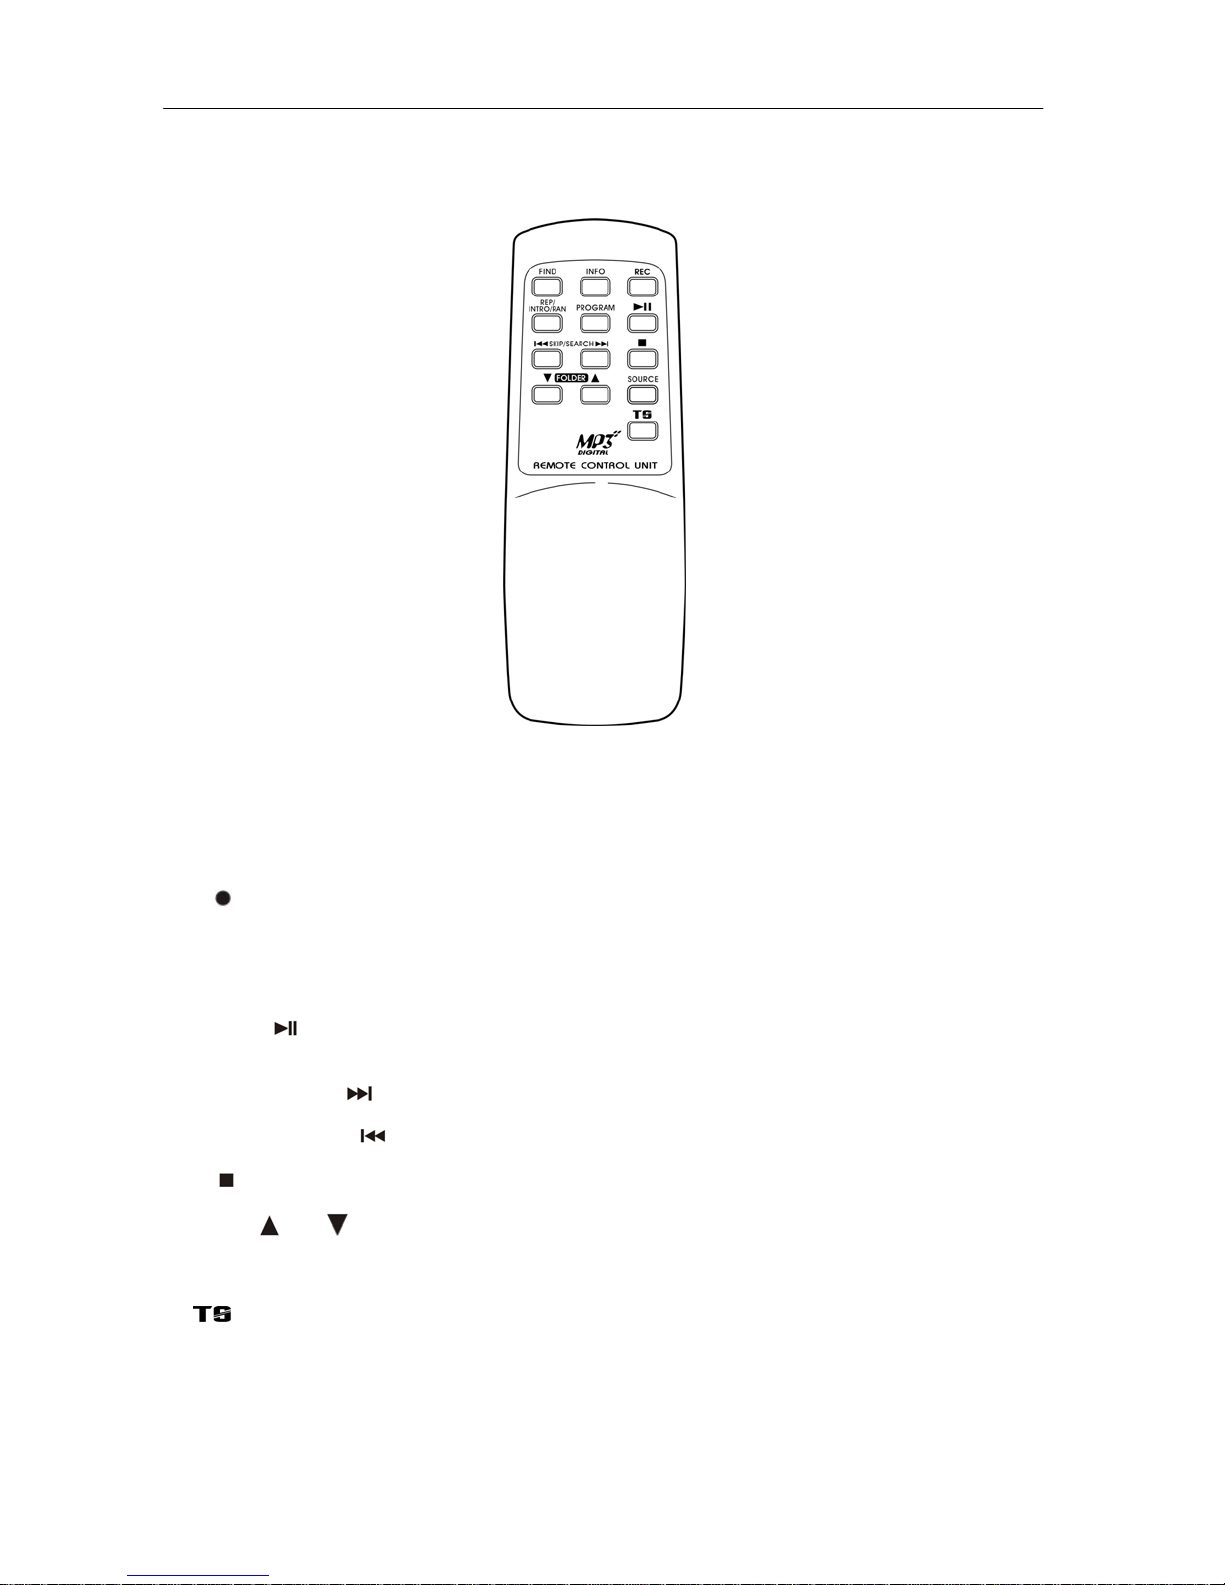
Remote control transmitter
Battery in stallation (battery not provided)
The infra-red transmitter requires 2 pcs AAA size battery for operation
Button description
1) Find In MP3 playback, press to active file/folder name search function.
2) Info In MP3 playback mode : press to active id3 function
In Phono mode : press to select encoding bitrate
3) Rec
Press to active encoding or recording function
4) Rep/Intro/Ran In SD/USB mode, press to active repeat / intro / random function
5) Program In SD/USB mode, press to active programming function
6) Play/pause
In SD/ U SB mode, press once to sta rt pl ay b ack. Press again to en t e r
pause mode.
7) Skip/sear ch forward
Press once to skip to next track, press & hold for search forward
Skip/search backward
Press once to skip to previous track, press & hold for search backward
8) Stop
In SD/USB mode, press to stop playback or cancel the stored program.
9) Folder up
/down In SD/USB mode, press to select folder up or down
10) Source In SD/USB mode, press to select SD or USB mode repeatedly
11)
(track s eparation) press to divide the recording track at turntable or tape one by one during
encoding
E-8
 Loading...