

Page 1

CLASSICAL USB TURNTABLE WITH
CD, AM/FM RADIO, CASSETTE
www.pyleaudio.com
MEDEL:PTCDS1U
Nostalgic Music System
Operating Instructions Manual
Page 2

IM P O RTAN T S A FET Y I N STRU CTIO N S
1) Please read th ese i nst ructions and keep them for future ref ere nce .
2) Pay attentio n to al l war nings.
3) Follow all ins tru cti ons.
4) Do not use this ap par atu s near water.
5) Clean only wit h a dry c lot h.
6) Do not block any v ent ila tion openings.
7) Install in acc ord anc e with the manufacturer's instruc tio ns.
Do not install ne ar an y hea t sources such as radiators, heater s, st ove s, or
other apparat us (i ncl uding amplifiers) that produce he at.
8) Protect the po wer c ord f rom being walked on or kinked, in parti cul ar wh ere
the plug is fitte d and a t the p oin t where it exits from the apparatu s.
9) Only use attac hme nts / a cce ssories specified by the manuf act ure r.
10) Unplug this a ppa rat us during lightning storms or wh en un use d for long
periods of time .
11) Ref er al l servicing to qualified service pe rso nne l. Servicing is required
when the appara tus h as be en damaged in any way, suc h as po wer -supply
cord or plug is dam age d,l iquid has been spilled or object s hav e fal len i nto
the apparatus , the a ppa ratus has been exposed to rain or moist ure , doe s
not operate nor mal ly, or has been dropped.
12) Th is ap pliance should not be exposed to d rip pin g or splashing water and
no object fille d wit h liq uids, such as vases, should be placed o n the
apparatus.
13) Do not overlo ad th e wal l power outlet. Use only power sou rce a s ind icated
- i.e.120V AC main s.
1
Page 3
IMPORTANT NOTES
Avoi d installi ng th is unit in places e xpo sed to direct sun lig ht or close to heat
radiati ng ap pliances such a s ele ctric heaters , on to p of other stereo e qui pment
that radi ate s too much heat, pl ace s lacking venti lat ion or dusty area s, pl aces
subject t o con stant vibrati on an d/or humid or moi st ar eas.
Do not atte mpt t o clean this unit w ith c hemical solve nts a s this might dama ge th e
finish. U se a cl ean dry cloth. Op era te controls and s wit ches as describ ed in t he
manual. Befo re turning On the p owe r, make certain th e AC pow er cord is plugge d
in. Store y our C Ds, In a cool area to a voi d damage from hea t. Wh en moving the
set, be sur e to fi rst disconnec t the p ower cord.
PREPARATI ON FOR USE
UNPACKING AND SET UP
● Care fu lly rem ov e the uni t fr om the di sp lay car to n and
remo ve a ll pack in g mater ia l from th e un it.
● Unwi nd the AC powe r co rd and ex te nd it to it s fu ll leng th .
● Unwi nd the FM Ante nn a wire an d ex tend it t o it s full le ng th.
● Plac e th e unit on a s ta ble, le ve l surfa ce , conve ni ent to an AC
outlet, out o f Direct su nlight, a nd away fro m so urces o f ex cess
h eat, du st , moist ur e, humi di ty or str on g magne ti c field s.
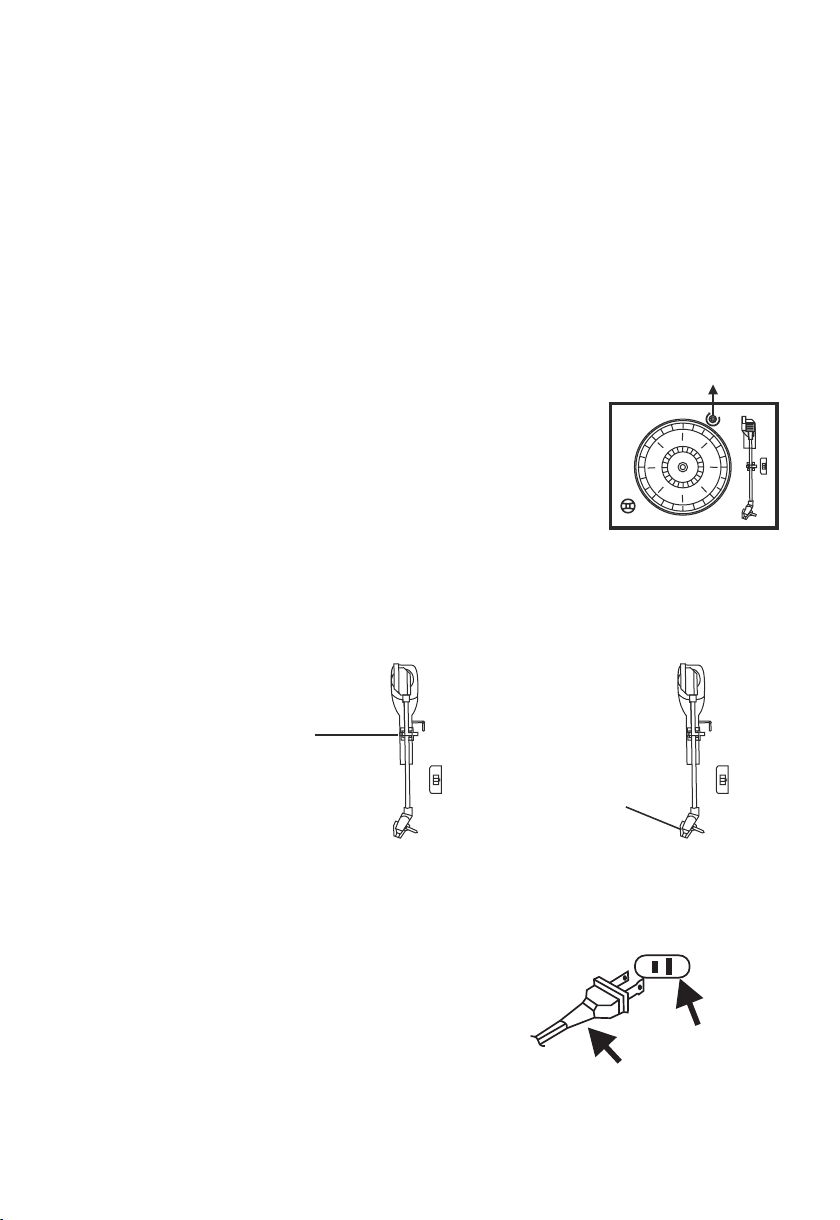
● Rais e th e lid to ex po se the ph on ograp h. T he p honog ra ph has
been secu red for shi pm ent wit h a tr ansit s cr ew. Use a co in o r
screwdr iver to tur n th e trans it s crew cl oc kwise . Th is w ill all ow t he
Tur ntable to “ float”.
● Remo ve t he opaq ue w hite pl as tic sty lu s cover f ro m the pho no graph s ty lus by sl id ing it
Forward a nd down.
● Disc ar d the sty lu s cover.
● Remo ve t he twis t- tie tha t wa s used to s ec ure the t on e arm dur in g shipm en t.
● Rele ase the ton e ar m lock le ve r.
● Conn ect the plu g to y our AC out le t.
TRANSIT S CRE W
TONE ARM L OC K LEVER
STYL US C OVER
POWE R SO URCE
This p ro duct is d es igned t o op erate o n 12 0V 60Hz AC o nl y. Att empti ng t o opera te t his
syst em f rom any o th er powe r so urce ma y ca use dam ag e to the sy st em, and s uc h damag e is
not co ve red by yo ur w arran ty.
NOTE : You will note t ha t this sy st em is equ ip ped wit h do mesti c st andar d AC po wer 2-pin
plug . If t his plu g do es not fi t in to your e xi sting AC o ut let, do
not tr y to d efeat t hi s safet y feat ur e by fili ng t he wide b la de
to mak e it f it into y ou r outle t. I f this pl ug w ill not f it i nto
your o ut let, yo u pr obabl y ha ve an out da ted
non- polariz ed AC o utlet . You sh ould ha ve y our
outl et c hange d by a q ualif ie d licen se d elect ri cian.
PROT EC T YO UR FURN IT URE
This m od el is equ ip ped wit h no n-ski d ru bber 'f ee t' to pre ve nt the pr od uct fro m mo ving wh en
you op erate the c on trols . Th es e 'feet ' ar e made from n on-migr ating rub ber mater ial speci ally
form ul ated to a vo id leav in g any mar ks o r stain s on y our fur ni ture. H ow ever ce rt ain typ es o f
oil ba sed furni tu re poli sh es, woo d pr eserv at ives, o r cl eanin g sp rays ma y ca use the r ub ber
'fee t' t o softe n, a nd leav e ma rks or a ru bb er resi du e on the fu rn iture .
2
AC Outlet
AC Plug
Page 4
To prevent an y dam age to your furni tur e we strongly rec omm end that you
purchas e sma ll self-adhes ive f elt pads, avail abl e at hardware sto res a nd home
improve men t centers every whe re, and apply the se pa ds to the bottom of t he
rubber 'f eet ' before you plac e the p roduct on fine wo ode n furniture.
IMPORTANT: Raisin g and L owering the Lid
To open the lid, rai se it as far as it will g o unt il the lid suppor t bra cket locks in the
open positio n.
To close the li d, li ft it upward slig htl y until the lid sup por t bracket unloc ks, a nd then
gently lo wer t he lid.
TO AVOI D DAM AGING THE CABINET OR TH E LID, NEVER FORC E THE LID
CLOSED. ALWAYS RAISE THE LID TO RELEASE THE LID SUPPORT
BRACKET.
LOCATION OF CONTR OLS AND INDICATORS
FRONT PANEL
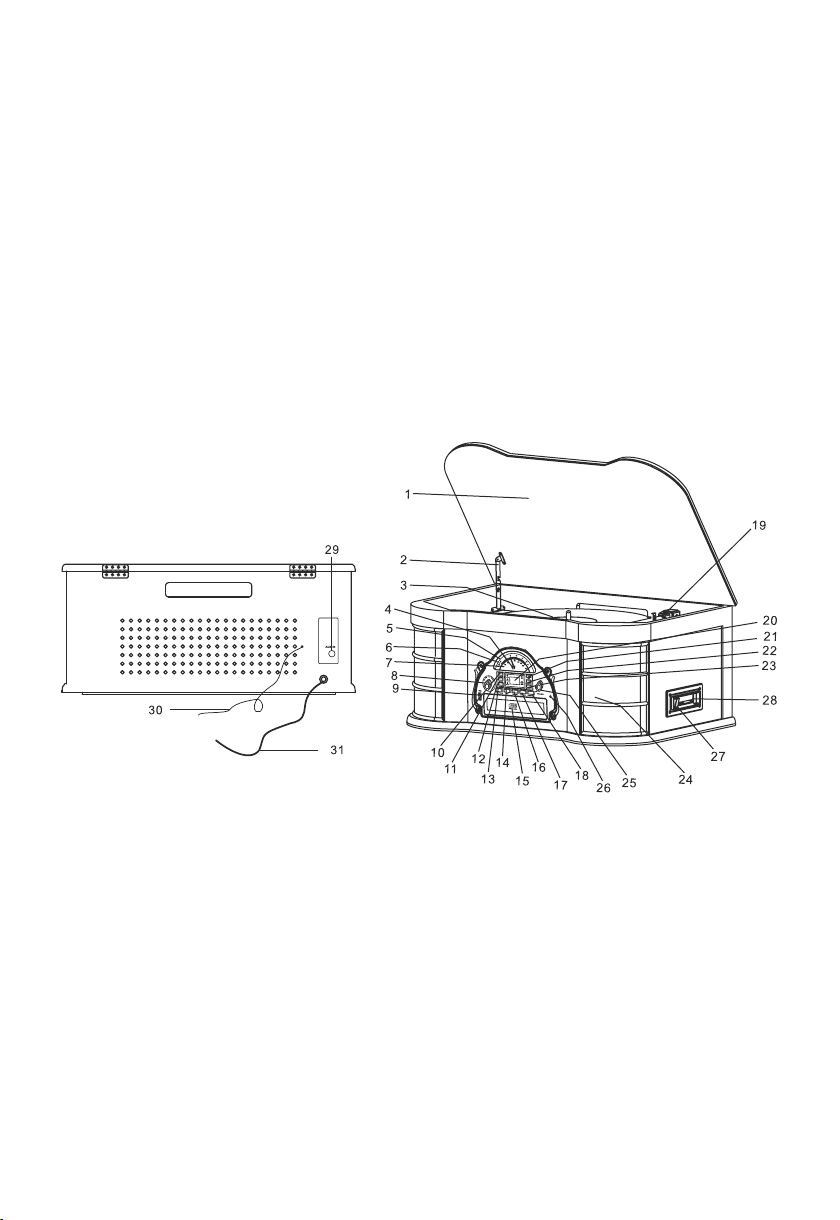
1) Phonograph Lid.
2) Phonograph Lid Support Bracket.
3) Turntable.
4) Tuning Control knob.
5) FM Dial Scale.
6) FM ST. Indicator.
7) MW Dial Scale.
8) AM/FM/PH/CD/TAPE F un ct io n Se le ct or.
9) USB Socket.
10) RANDOM Control Button.
11) RE PE T Co nt ro l Bu tt on .
12) PROGRAM Control Button.
13) PLAY/PA US E Co nt ro l Bu tt on .
14) STO P Co nt ro l Bu tt on .
15) CD Drawer.
16) SKIP RE V. Control Button.
3
17) SKIP FW D. C on tr ol B ut to n
18) OPEN/CLOSE Control Button
19) Tone- Ar m.
20) CD Track Number Display
21) REC Control Button
22) FOLDER +10 Control Button
23) FOLDER -10 Control Button
24) Speakers
25) OFF-VOLUME Control
26) PHONE Jack
27) Cassette EJ/FF Button(Eject/fast Forward)
28) Cassette Player Slot
29) AUX IN Jack
30) FM Antenna
31) AC Power Cord
Page 5
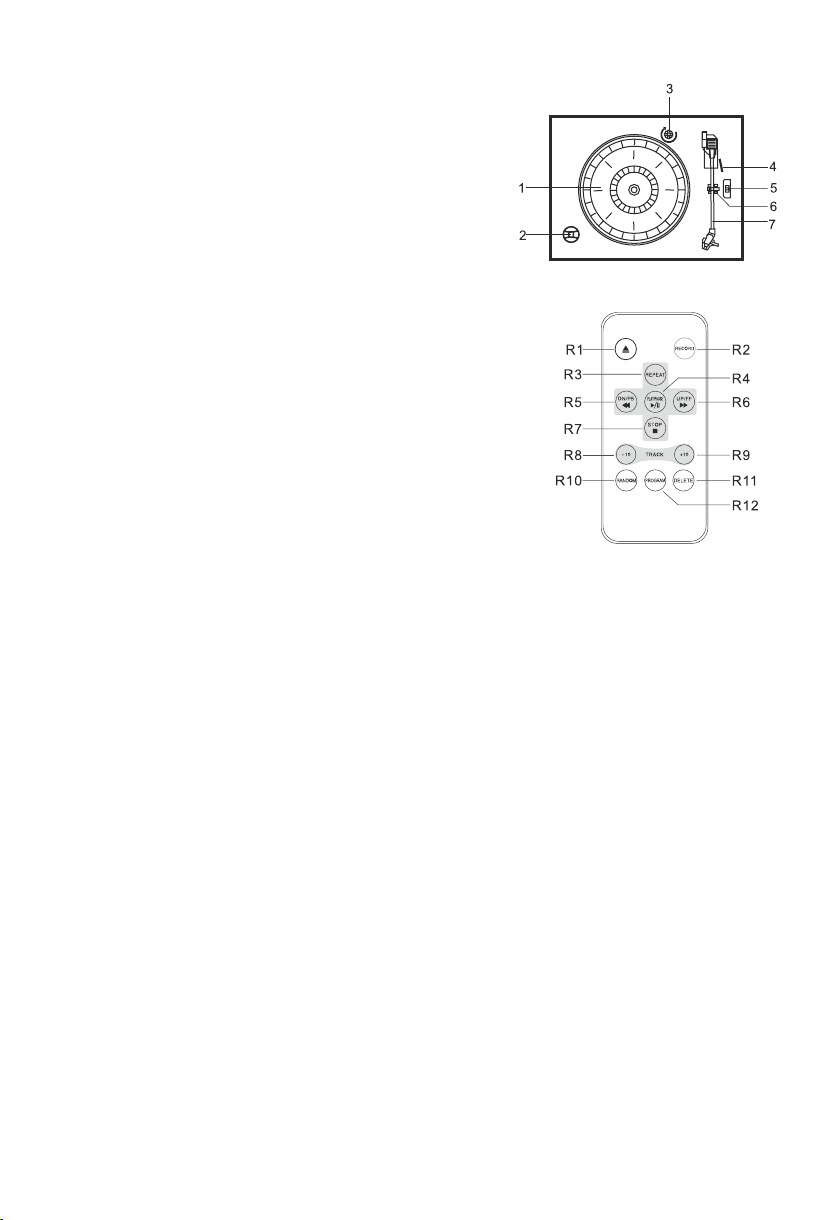
PHON OG RAPH
:
1) Turn ta ble
2) 45 RP M Adapter
3) Tran si t Screw
4) Cue L ever
5) Spe ed S elect or ( 33 / 45 / 78 RP M)
6) Tone arm Lo ck
7) Tone arm wi th S tylus
REMO TE C ONTRO L OP ER ATI ON:
R1.O PE N / CLOSE
R2.R EC ORD
R3.R EP EAT
R4.P LAY / PAU SE
R5.D N/ FB (SKI P RE V)
R6.D N/ FF (SKI P Fo rw ard)
R7.S TO P
R8.T RA CK -10
R9. TRAC K +1 0
R10. RA NDOM
R11.DEL ET E
R12. PR OGRAM
NOTE : ALL of the bu ttons on th e remote co ntrol hav e the same fu nc tion as t he se butt on s in
the un it . Th is remo te c ontro l ju st used f or C D/MP3, US B mode.
OPER ATI NG I NSTRU CT IONS
LIST EN ING TO THE RA DI O
To turn th e sy stem on , se lect th e AM o r FM func ti on, adj us ting th e TU NING bu tt on to rec ei ve
stat io ns, whe n ge t the cle ar s tatio n, i f you tun e to s trong F M St ereo st at ion the F M ST
indi cator lam p wi ll ligh t an d recep ti on will b e in s tereo . If y ou tune t o a we aker FM s ta tion, t he
rece pt ion wil l au tomat ic ally sw it ch to mon o.
Ante nn a Infor ma tion
The AM a nt enna is i ns ide the c ab inet. I f AM r ecept io n is unsa ti sfact or y try rep os ition in g the
cabi net sligh tl y until t he i ntern al a ntenn a is p ickin g up t he stro ng est sig na l.
The FM w ir e anten na i s locat ed o n the bac k of t he cabi ne t. If nec es sary, adjust t he positi on
and di rection o f th is ante nn a until y ou f ind the p os ition t ha t provi de s the bes t re cepti on .
4
Page 6

NOTE :
Leve l hold PLAY/PAUSE butto n to e nter fu nc tion ch an ge as fol lo ws: CD- US B
When t he C D funct io n model h as n ot put in C D/ MP3 di sc , inser ts U SB card , wi ll auto ma tic
swit ch ing to US B ca rd the pl ay back. To conf ir m recor di ng succ es sful or not , select th e CD
func ti on and le ve l hold PL AY/PAUSE but to n to ente r in to USB fu nc tion, i ns ert USB c ar d the
unit w il l read th e US B songs .
CD/M P3 F UNCTI ON O PERATION :
Sele ct t o the CD fu nc tion. p re ss the OP EN /CLOS E bu tton to o pe n the CD do or a nd the un it
LCD di splays <O P> .
1. Pla ce y our CD or M P3 d isc in th e dr awer wi th t he prin te d label s id e facin g up .
2. Pre ss t he OPEN /C LOSE bu tt on once m or e to clos e th e CD door a nd t he unit LC D display
<CLO >. t he disc w il l spin fo r a fe w secon ds w hile th e pl ayer re ad s the dis c an d will
auto ma tism pl ay back.
PLAY CON TROL IN CD/MP 3/ USB MOD EL :
1. Pla ce y our CD or M P3 d isc in th e dr awer or i ns ert USB c ar d. Will a ut omati sm
play ba ck. Pla y wi ll cont in ue unti l th e end of th e DI SC or USB c ar d. When t he d isc
ends , th e displ ay a gain sh ow s the tot al n umber o f tr acks on t he d isc or US B ca rd.
You may al so stop pla yb ack at an y ti me by pre ss t he STOP but to n.
2. Adju st the OFF/ VO LUME co nt rol to th e de sired l ev el.
3. In pl ay m odel: P re ss the SK IP F WD b utton on th e unit fron t panel or UP /FF butto n on the
remo te c ontro l to b egin th e ne xt song .
4. Pre ss t he SKIP REV b ut ton on th e un it fron t pa nel or DN/F B button on t he remote c ontrol
to beg in t he prev io us song t ha t has jus t be en play ed .
5. Pre ss t he FOLD ER + 10 or FOL DE R -10 but to n to skip f or ward or r ec ede 10 tr ac ks in
CD/M P3 /USB MO DE L.
SELE CT ING THE F OL DER PLAYBACK FOR M P3/USB:
In sto p mo del: Pr es s FOLDE R +1 0 or FOLD ER - 10 butt on t o selec te d the FOL DE R+ or
FOLD ER - to conf ir m the FOL DE R track s nu mber. Pr es s PLAY/PAU SE butt on t o playb ac k.
The so ng n umber a nd f older n um ber of yo ur s elect ed t rack wi ll b e shown c on secut iv ely in
ever y 2 se conds . Your may also s to p playb ac k at any ti me b y press t he S TO P bu tton.
5
Page 7
SELE CT ING YOUR DE SI RED PART FOR CD/ MP3/USB :
Depr ess and hol d SK IP FWD or SKI P REV bu tton on the u nit front p anel or UP/ FF or DN/FB
butt on o n the rem ot e contr ol t o selec t yo ur desi re d part of t he c urren tl y playi ng t rack an d
then r el ease th e bu ttons . Th e pl aybac k wi ll resu me n ormal f ro m that poin t.
PAUSE CON TR OL IN CD/MP3/ USB MODEL :
In CD/ MP 3/ USB pl ay ing mod : Pr ess the P LAY/PAUSE bu tt on once .P lay sto ps b ut the di sc
cont in ues to sp in a nd the LC D in dicat or o f the tra ck n umber w il l flash s. P ress th e
PLAY/PAUSE butto n on ce more t o ca ncel pa us e and of tr ac k numbe r st op flas hi ng.
RECO RD C D/MP3 /U SB/PH ON O/CAS SE TTE FUN CT ION:
In CD/ MP 3/ USB/ PH ONO and C AS SETTE p la ying mo de , selec t to t he desi re d track s on gs.
Inse rt U SB and pr es s REC but to n , the un it d ispla ys < rEC>, a nd t he REC in di cator l am p
once
will s hows. Pre ss R EC butt on o nce mor e to c onfir m re cord to U SB a nd the RE C in dicat or
lamp w ill flash s. T he u nit can b e re corde d so ngs for y ou r selec t fa vorite so ngs numbe rs. If
want t o ca ncel pr es s STOP butt on .
NOTE : In P HONO / CA SS ETTE mo de l recor d: To conf irm recor d model, th e unit disp lay
<rEC > an d rec ind ic ator la mp w ill fla sh s.
CANC EL USB S ONGS OP ER ATI ON
The un it p lays th e so ng in USB : You d is like, p re ssing a nd h old the S TO P bu tton or D EL ETE
butt on o n the rem ot e contr ol 2 s econd s to c ancel , th e unit LC D wi ll be dis pl ays <DE L> .
REPE AT PL AYBACK IN C D/ MP3/U SB M ODE:
In CD/ MP 3/USB p la y mode: P re ss REPE AT bu tt on once wil l play the pr esent tra ck repeat
play back and th e re peat in di cator l am p will sh ow s and fla sh s.
Pres s th e REPEAT but to n secon d ti me, wil l st art repea t-all-s ong and the r epeat ind icator
lamp s to p flash es .
To cance l re peat pl ay back: P re ss the RE PE AT bu tton thir d, until th e repeat In dicator l amp
goes o ff . Re peat pl ay back is a ls o cance ll ed by pre ss ing the S TOP bu tton.
RAND OM P LAYBA CK IN CD/MP 3/USB MOD E:
In CD/ MP 3/USB p la y mode: P re ss RAND OM b utton t o st art ran do m playi ng f uncti on r andom
indi cator lam p wi ll be sho wn . Press t hi s butto n ag ain wil l ca ncel th e ra ndom fu nc tion.
6
Page 8
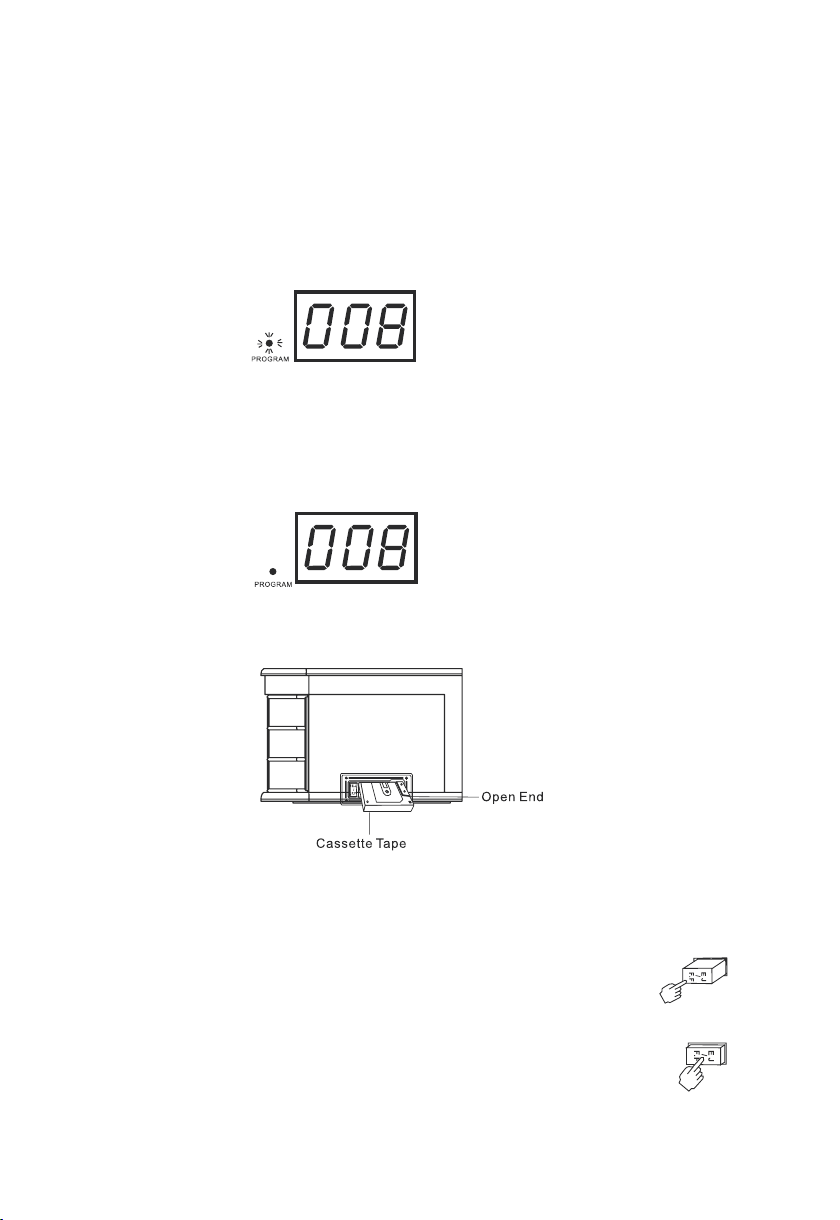
PROG RA M FUNCT IO N IN CD/M P3 /USB MO DE :
This f ea ture al lo ws you to p ro gram of t he C D 20 trac ks a nd MP3/ US B 99 trac ks o n a disc fo r
play back in any d es ired or de r.
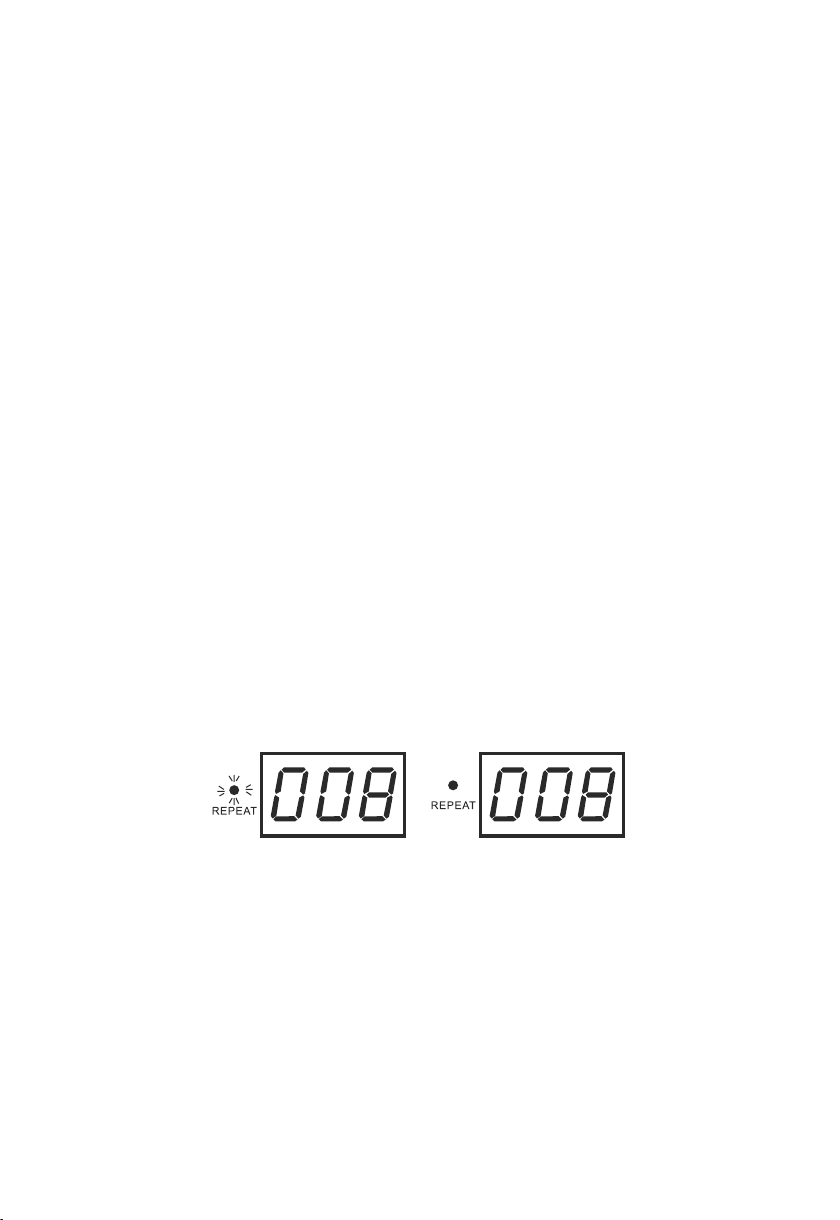
In CD/ MP 3/USB s to p model : Pr ess the P RO GRAM bu tt on to ent er t he prog ra m mode. The
prog ra m numbe r br iefly s ho ws '0 0 1', a nd t he prog ra m indic at or lamp f la sh. Pre ss t he SKIP
FWD or S KI P RE V butto n on t he unit f ro nt pane l or U P/FF or DN/ FB button o n the remot e
cont ro l to sele ct t he firs t tr ack num be r you wis h to e nter in t he p rogra m me mory, exampl e:
Tra ck number '008'. Wh en the desi red track n umber app ears on the d isplay, pres s th e
PROG RA M butto n ag ain to me mo rize th e tr ack. The prog ram numbe r briefly s hows '0 0 2',
then p ro gram in di cator l am p will sh ow s and fla sh es.
Repe at step of th e ab ove, se le ct a differ en t track num ber each ti me until yo u have ente red up
to CD 20 t ra cks and M P3 /USB 99 t ra cks in th e pr ogram m em ory.
Pres s th e PLAY/ PAU SE b utton t o be gin pro gr ammed p la yback . Th e PROGR AM i ndica to r
lamp s to p flash in g. Playb ack will be gin with th e first tra ck y ou have p ro gramm ed a nd will
cont in ue unti l th e last pr og ramme d tr ack has b ee n playe d.
The pr og ramme d se quenc e ma y be canc el led by pr es s STOP button twi ce.
CASS ET TE FUNC TI ON OPER ATION :
1. Sel ec t to the CA SS ETTE fu nc tion. I ns ert you r ca ssett e in to the sl ot , as show n in t he
illu stratio n, w ith the s id e you wis h to p lay fac in g up and th e op en end on t he r ight si de .
2. Cas se tte pla yb ack beg in s as soon a s th e tape is i ns erted . Adj ust the O FF - VOLUM E
cont ro l knob to t he d esire d le vel.
3. To advanc e th e tape ra pi dly, depress t he EJ/FF (E ject/Fa st
Forw ar d)but to n appro xi matel y ha lf way. The tape wil l move forw ard rapid ly
as lon g as the butt on i s depre ss ed. Nor ma l playb ac k will re su me when t he
butt on i s relea se d.
4. Whe n th e tape en ds t he play er s tops au to matic al ly. Depress th e EJ/FF
(Eje ct /Fast F or ward) b ut ton com pl etely t o re move th e ca ssett e fr om the
play er. You may pres s the EJ/FF ( Ej ect/F as t Forwa rd ) butto n to s top pla y
and re mo ve the ca ss ette at a ny t ime.
5. To turn t he s ystem o ff , ro tate th e OF F-VOLUM E control c ounter cl ockwise u ntil a clic k is
hear d.
7
Page 9
PHON O FU NCTIO N OP ERATION:
Sele ct t o the PHO NO f uncti on . Make su re t hat you h av e remov ed t he styl us c over fr om t he
styl us .
1. Pla ce y our PHO NO D ISC on th e ce nter sp in dle.
2. Adju st the OFF/ V OL UME con tr ol to the d es ired le ve l.
NOTE : Do n ot turn o r st op the tu rn table m an ually. Movin g or jarrin g the turnt able with out
secu ri ng the Tone Arm cl am p could r es ult in da ma ge to the Tone Arm.
3. Set t he t urnta bl e speed s el ector t o th e appro pr iate sp ee d, 33, 45 , or 7 8 RPM. If y ou a re
playi ng 45 RPM sin gles, pla ce t he 45 RPM a da pter on t he c enter s pi ndle.
4. To turn the s ys tem , rota te t he OFF/ VO LUME co nt rol kno b co unter c lo ckwis e un til a
off
cl ic k is hear d.
5. Whe n tu rntab le f inish es p layin g, t one arm w il l retur n to o rigin al p ositi on a utoma ti cally.
6. Mov e up o r move do wn t he spee d ad justo r to a djust P HO NO play in g speed . Wh en the
Spee d display i nd icate s no t exact 3 3 & 45 & 7 8.
AUX IN F UN CTION O PE RATION:
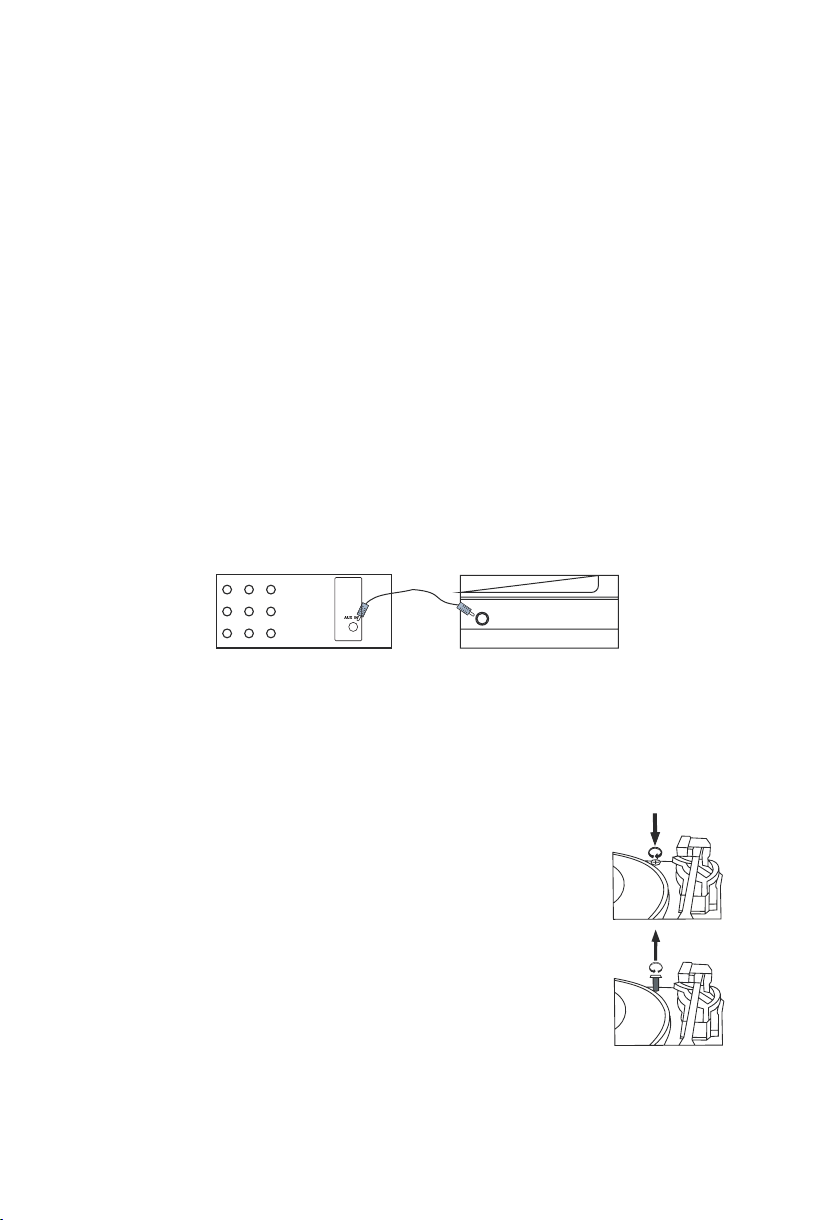
Sele ct t o the PHO NO f uncti on . Inser t tw o ends of c or d into “A UX I N” sock et o f unit an d
corr es pondi ng s ocket o f yo ur exte rn al devi ce r espec ti vely. Operat e externa l device as u sual
and th ro ugh the s pe aker of u ni t can hea r th e songs f ro m the ext er nal dev ic e.
PTCDS1 U ex te rn al device
IMPO RTA NT !!
TO PROTE CT THE TURNTABLE FR OM DAMAGE D URING TRANS PO RTATION,
A SILVER TRANSIT SCR EW I S LOCATED IN THE UPP ER RIGHT CORN ER O F TH E
TURN TAB LE P LATFORM.
• BEFO RE P LAYING A RECOR D, P LEASE U SE A SCR EWDRI VE R
OR COI N TO TU RN THE TRANSIT SCRE W CO MPLET ELY DOWN
IN CLO CK WISE DI RE CTION TO UNLOCK THE TUR NTABL E.
• TO LOCK TH E TU RNTABLE AGA IN F OR TRANSPORTATION,
PLEA SE T UR N TH E SCREW IN CO UNTER - CLO CKWISE
DIRE CT ION.
8
Page 10
CASS ET TE CARE
Two com mo n cause s of t roubl e ex perie nc ed when u si ng cass et tes are :
1) Tape jamm in g-Lea di ng to une ve n speed i n pl aybac k.
2) Tape enta ng ling- t he t ape wra ps i tself a ro und vit al p arts of t he m echanis m.
To reduc e th e likel ih ood of th es e probl em s occur ri ng, the f ol lowin g pr ecaut io ns
shou ld be obser ve d:
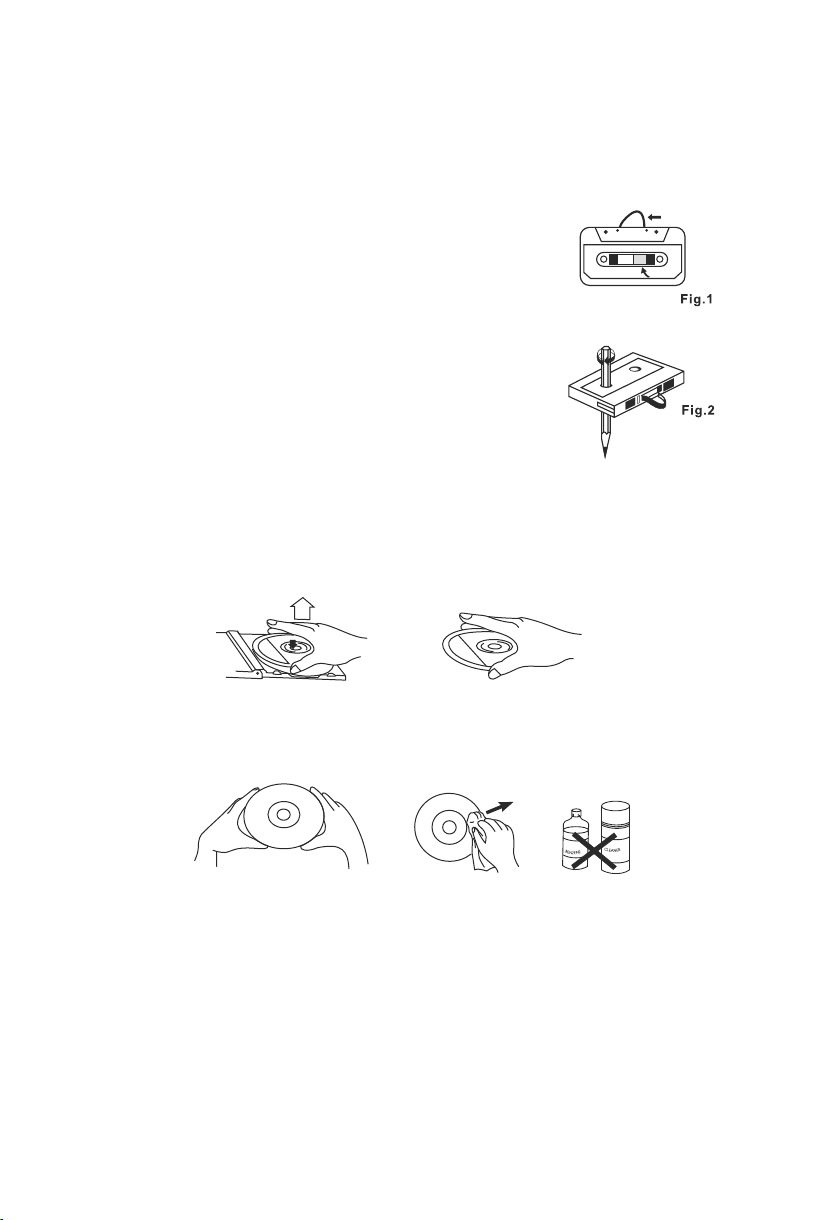
Chec k th at ther e ar e no loos e la yers of t ap e visib le
thro ug h the cas se tte cen tr e windo w (s ee Fig. 1 ).
Take up an y loose lay er s, usin g a pe ncil or h ex agona ll y
Barr el ed ball point pen , be fore in se rting t he c asset te
into t he m achin e (s ee Fig. 2 ).
If the c as sette f ee ls tigh t wh ile per fo rming o pe ratio n
show n (s ee Fig. 2 ), t he tape m ay b e jammi ng d ue to
ridg es formed i n th e windi ng o f the tap e (v isibl e
thro ug h the cen tr e windo w) . Th ese may b e re moved
in mos t ca ses, by f as t windi ng o f the cas se tte fro m
one en d to t he othe r an d back ag ai n.
Use on ly well-k no wn bran ds o f tape. Avoi d us e of C-12 0 Ca ssett es . Further more, do no t
expo se c asset te s to dire ct s unlig ht , dust or o il , and do no t to uch the t ap e surfa ce s.
COMPACT D IS C CARE
To remov e a di sc from i ts s torag e ca se, pre ss d own on th e ce ntre of t he c ase and l if t the dis c
out, h ol ding it c ar efull y by t he edge s.
Fing er print s an d dust sh ou ld be car ef ully wi pe d off the dis c s re corde d su rface wit h a soft
clot h. U nlike c on venti on al viny l or s hella c re cords , co mpact d is cs have n o gr ooves t o
coll ect dust an d mi crosc op ic debr is , so gent ly w iping w it h a soft cl ot h shoul d re move mo st
part ic les. Wi pe i n a strai gh t line fr om t he insi de t o the out si de of the d is c. Smal l du st
part ic les and l ig ht stai ns w ill hav e ab solut el y no effect o n so und repro duction q uality.
Clea n th e disc pe ri odica ll y with a so ft , lint- fr ee, dry c lo th. Nev er u se dete rg ents or a br asive
clea ners to cle an t he disc . If n ecess ar y, us e a CD cleani ng kit.
Neve r af fi x label s to t he surf ac e of comp ac t discs or wr ite on them , except ve ry gently w ith
spec ia list CD -R P ens.
CARE O F TH E CABIN ET S
You sh ould care f or the cabi net as you wo uld care fo r any piece o f fine furn iture. Wh en the
cabi net becom es d usty, wipe i t wi th a soft , no n-abras ive dusti ng cloth. I f the cabin et
beco me s smudg ed w ith fin ge r print s, y ou may us e an y good qu al ity com me rcial d us ting
and po lishing s pr ay clea ne r. Howev er, a void sp ra ying th e pl astic o r me tal par ts o f this
syst em . We r ecomm en d that yo u sp ray the c le aner on to y our dusti ng cloth no t directl y onto
the ca bi net to av oi d getti ng a ny of the s pr ay on the p la stic or m et al part s.
9
 Loading...