

Page 1

IMPORTANT:
Pack carefully
are
experiencing should
you
Brooklyn,
NY
1 -800-444-5671
Monday Through Thursday.
Friday
gAM
A letter stating your
11204
to 1
PM
Eastern.
in
original package
be
included.
gAM
to 5PM
if
possible. We are not responsible for
exact
street addres, daytime
You
must also enclose a
copy
damage
phone
number,
of the original receipt a sproof of
incurred
and
the problem
in
returning items for repair.
date
of purchase
Page 2

Table of Content Page
1.0 Wel co me 1
2.0 Fun ct ions of O pe ra ti ng K ey s 2
3.0 Fun ct ions of t he c he st b el t 2
4.0 Wea r th e Chest B el t 3
5.0 Fun ct ions Mo de 4
6.0 Acti va te o r De ac tivat e th e Ke y to ne a nd H ea rt rate z on e al er t 5
7.0 Langua ge , Cl oc k, Date and Pa iring w it h ch es t be lt 5
7.1 Set La ng ua ge 5
7.2 Set Cl oc k an d Da te 5 - 6
7.3 Pai ri ng t he Wat ch with che st b el t 6
8.0 Dual Tim e 6
8.1 Set Du al T im e 6
8.2 View D ua l Ti me 7
9.0 Stop wa tc h 7
9.1 Use the St op wa tc h 7
9.2 Take Lap Tim e 8
9.3 Review L ap T im e 8
9.4 Rese t St op wa tc h and Lap T im e 9
10.0 Set Your P er so na l Da ta for Your P er so na l He art Rate Mo de 9
10.1 Set Ge nd er, Birth da y an d He ig ht 9
10.2 Set Wei ght and S po rt Type 10
10.3 Set Target H ea rt R at e Zone Sett in g Type 10
11.0 View Targe t He ar t Ra te Zone Ind ic at io ns 10
11.1 Use He ar t ra te a nd R evise t he Trai ni ng R ec or d 11
12.0 Alar m 12
12.1 Sele ct A la rm 1 o r Al arm 2 12
12.2 Set Da il y Al ar m 12
12.3 Acti va te o r De ac tivat e th e Al ar m 12
13.0 SOS Mode 13
13.1 Set Na me f or S OS 13
13.2 Set Bl oo d ty pe f or S OS 13
13.3 Set Ph on e nu mb er f or SOS 14
13.4 View N am e, B lo od t ype, Ph on e nu mb er f or SOS 14
14.0 View S ca n Mo de 15
15.0 Birt hd ay R em in der 15
16.0 Low Ba tt er y In di catio n 16
17.0 Rese t th e Watc h an d Powe r Sa vi ng M od e 16
18.0 Pot en tial Ca us es f or N O He art Rat e Re ad in g or L ong Res po ns e Ti me 16
19.0 Ches t Be lt B at te ry Repl ac em en t 17
20.0 Wat ch B atter y Re pl ac em ent 17
Page 3

1.0 Welcome
Congratulations on your purchase of a heart rate monitor from Pro Touch. It
is designed for ease of use during following sport activities: jogging,
walking, cycling, fitness training and cross training. In order to learn and
apply the various functions of your new heart rate monitor, please read this
user manual carefully.
1.1 General
It’s important that you know your maximum heart rate (MHR), training zone,
upper heart rate limit and lower heart rate limit before you begin. This
information helps you to achieve the maximum health benefits out of your
workout. We recommend consulting a medical practitioner or registered
physician before setting your personal training-schedule and target. Or you
can set your own upper and lower limit using the following as a reference
guide. You may estimate your MHR using the following formula:
220 – age = MHR.
WARNING !
! This product set, like most electronic or
ma g n e t ic de v i c e s, ma y i n t e rfer e w i t h
pacemakers. We recommend patients with
pacemakers to consult wit h their doctor
before using this produc t set.
! Make sure that you fully understand the
functions and limita tions of this product set
before using it.
! This product set is a supplementary device
for measuring heart rate; it is NOT a
substitute for any med ical d evice s. You
should periodically compare th e heart rate
reading provided by this product set with the
reading from a doctor.
Care and Maintenance
!
Avo id rough u sage or se ve re
imp acts to thi s p roduct s et.
!
Sto re this prod uct s et in a dry
pla ce when it is n ot in use.
C l ea n y ou r p r od uc t s e t
!
o c ca s io n al l y w i th a s o ft
moi stened c lo th.
DO NOT expose this produ ct
!
s e t t o c h em i ca ls s uc h a s
ga sol ine and al coh o l; the s e
ch e mica l s wi l l da m age t h is
pro duct set.
1
Page 4

2.0 Fun ctions of the Op erating Keys
(+)
!
To i ncrea se the value in
setting mode.
!
To shif t from DUAL Clock to
Home Time in Time mode.
( - )
!
To decrease the value in
setting mode.
!
To t r i g g e r t h e k e y t o n e
ON/OFF.
!
To trigger the stopwatch
START/STO P.
!
To t r ig g e r t he A la r m
ON/OFF.
!
Press and Hold for 2 sec. to
turn ON the Backl ight.
3.0 Fun ctions of the ch est belt
(MODE)
!
To change modes among
the differ ent main function
modes.
!
To change modes among
d i ff er en t s et ti ng s ub modes.
(SET / SOS)
!
To e n te r ( h ol d f o r 2
seconds) or quit the setting
mode.
!
To take lap time and reset
stopwatch.
!
To enter SOS mode.
Conn ec to r
Front
Back
Batt er y coverCont ac t
Cont ac t
(con tact wi th t he sk in )
Elas ti c Ba nd
2
Page 5

4.0 Wear the Ch est Belt
Co n nec t on e co n n ect o r
1 2
with the chest belt. Ensure
t h a t t h e c o n ne c t o r is
complete ly lo dged into the
chest belt .
Extend the elastic band for
allowing a loose fitting the
chest belt o n your chest.
Fit the chest belt on your
3
chest with o ne hand.
C o n ne c t t h e o p p os i te
4
connecto r to the chest belt
with the ano ther hand.
IMPORTANT: Thi s Chest Bel t must be worn directly on your sk in. DO NOT wear th e chest belt on the top o f your
clothes, o therwise the ch est belt CANNOT g et the heart rate s ignal.
NOTE: In dry s easons, wet the c ontacts with wa ter to make the sig nal transmiss ion normal.
Fas ten t he el as tic b an d
5
until it is f itted on your
chest comf ortably.
Move the ches t belt until
6
the two cont acts are firmly
contacte d with the sk in of
your chest .
Pre ca utions / Tips
The re are two cont acts locate d on t he back of th e Ch est Belt. These tw o co ntacts mu st
+
mak e firm co nt act with the user's skin during measu rement.
DO N OT take heart rate measure me nt when divin g or unde r water.
+
Cle an the cont acts occ asional ly by app ly ing a f ew drops of water, a nd wipe it dry with a
+
pap er towel to remove any re si dual greas e.
DO N OT use hand crea m; it will i nsulate the signal betw een the s kin and the co ntacts.
+
Cle an your skin w ith soap an d water for a b etter si gnal trans mission .
+
For th ose with ext remely dry skin, apply some conducti ve ge l or water to inc rease
+
con ductivi ty.
Adj ust the Chest Belt with the suppl ie d elas tic band until it hol ds on your chest firmly to
+
avo id looseni ng when exerc ising.
Avo id do ing any awkward moti on du ring measure ment, it will create an inaccu rate heart
+
rat e readin g.
3
Page 6
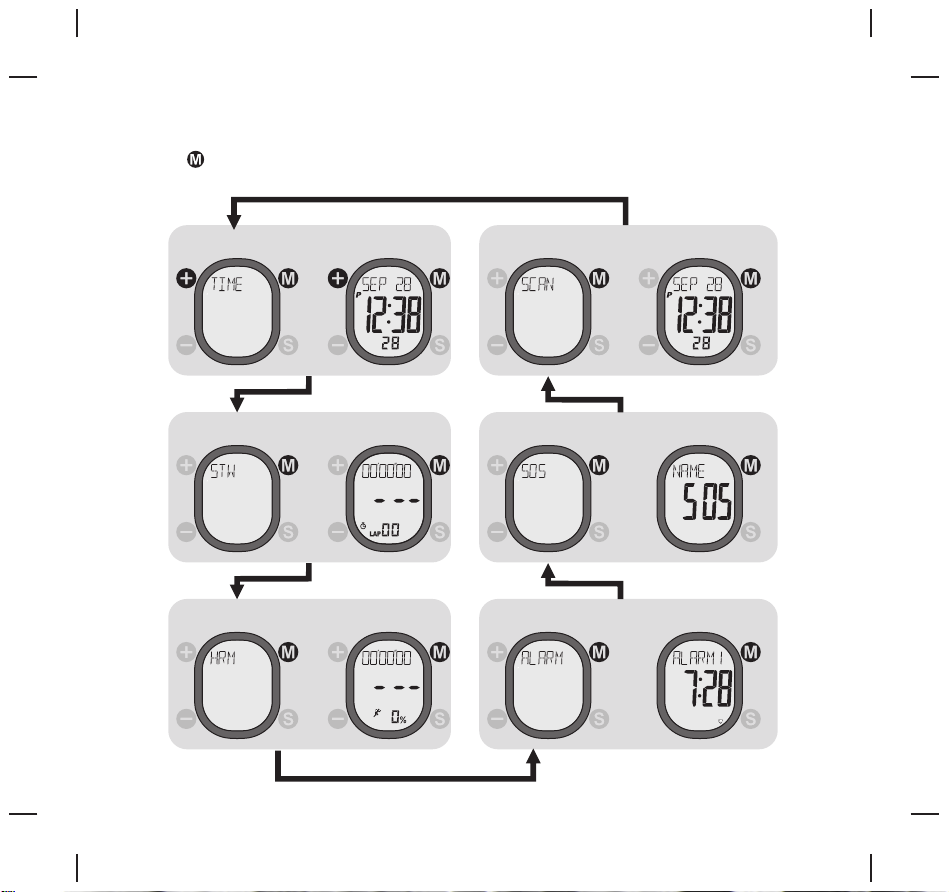
5.0 Functions Mode
!
Press any button to resume the display if is activated - Blank display.
!
Press
to next menu.
Power S avin g Mode
Time Mode
Stopwatc h Mode SOS Mode
Heart Rate M ode Alarm Mode
Time Mode
(2 seconds l ater)
Stopwatc h Mode
(2 seconds l ater)
Heart Rate M ode
(2 seconds l ater)
Scan Mode
Scan Mode
(2 seconds l ater)
SOS Mode
(2 seconds l ater)
Alarm Mode
(2 seconds l ater)
4
Page 7

6.0 Activate or D eactivate the Key Tone and Heart Rate Zone Alert
!
Press to act ivate ( appears ) or deactivate the Key t one and Heart rat e Zone Alert .( disappea rs)
7.0 Language, Clock, Date, an d Pairing with th e chest belt
7.1 Set Language
!
Press until "TIME" appears and hold for 2 second s. P ress / to select a languag e an d co nfirm
with .
7.2 Set Clock and D ate
!
Press / to sel ect "12" or "24" an d confirm with .
!
Press / to reset secon d, a nd c onfirm with . Press / to select hour and minute, and con firm
each with .
5
Page 8

!
Press / to sel ect year, month and day, and confirm e ach with .
7.3 Pairing the Watch with the Chest Belt
!
Press / to sta rt pairing (pair the ch est belt with the watch ) a nd confirm with . ! Press can
terminat e the process dur ing the pairing . Press to return t o Time Mode.
NOTE: Pairi ng will need to do on ce only when it is th e first time usin g the chest belt.
8.0 Dual Time
8.1 Set Dual Time
!
Press unti l "DUAL-T" appea rs and hold for 2 sec onds.
!
Press / to sel ect hour and minu te, and confirm e ach with . Press to r eturn to Dual Tim e Mode.
6
Page 9

8.2 View Dual Tim e
!
Press unti l "TIME" appear s and press .
9.0 Stopwatch
9.1 Use the Stopw atch
!
Press unti l STW appears. Th e heart rate func tion will be acti vated automat ically.
!
Press to sta rt or stop the stop watch.
NOTE:
!
Please wear the chest belt in adv ance b!efore using the Stopwatch with heart rate function, otherwise it
function s as a normal stopw atch.
!
The Total Lap Tim e, M aximum (MAX) and Averag e (AVG) heart rat e, U p (U ), I n (I ) an d Be low(L) Zone Exercis e
Time, Calorie (KCAL) , and Fat Burn (FATB) are recorded if the chest belt is worn. The se records can be
reviewed o n Heart Rate Mode .
Press to res ume the connect ion if the watch lo ses connectio n with chest belt d uring running ,
!
Check the ch apter 11.0 for th e implication s of Hea rt Rate Zone Indi cator.
current
Heart Rate
Zone Indicator
heart rate
running running
current lap ti me
7
Page 10

9.2 Take Lap time
!
Press to tak e a lap time when the s topwatch is run ning.
lap time ( la p 1)
running running
lap time ( la p 2)
9.3 Review Lap ti me
!
Press to stop the st opwatch a nd press to re view total lap time, lap time of e ach lap and the average
lap heart ra te of each lap. Pre ss to quit the revi ew.
total
lap time
running
lap time
( )lap 4
lap averag e
heart rate
8
Page 11
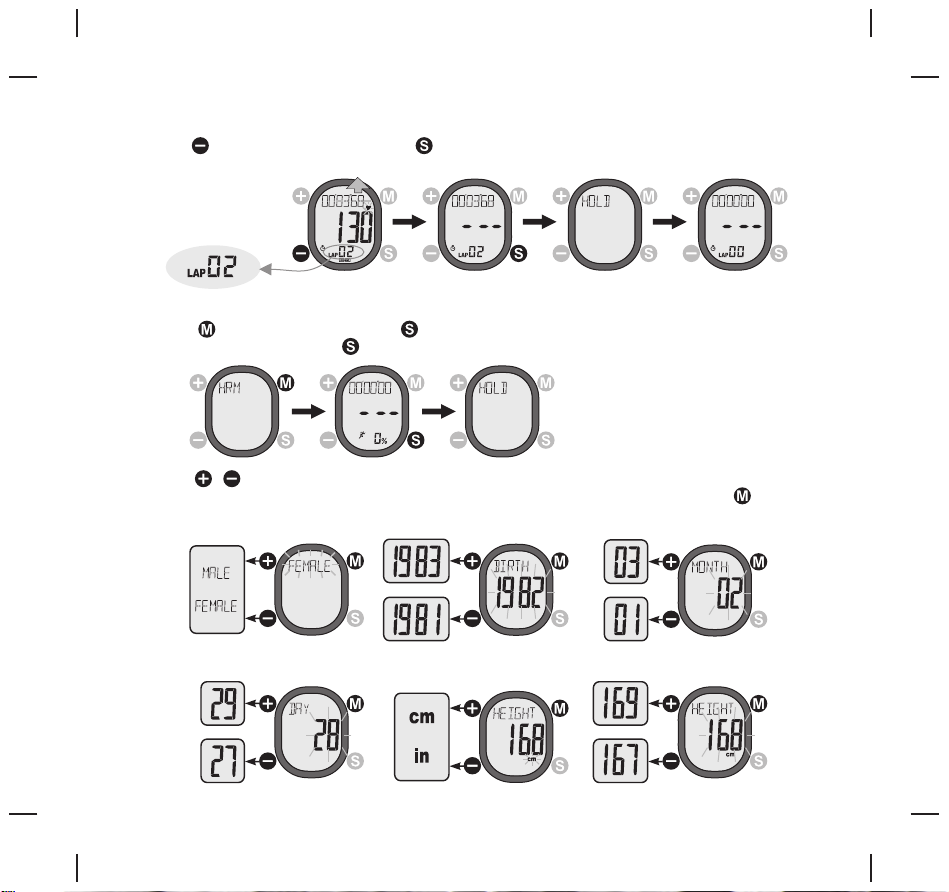
9.4 Reset Stopw atch and Lap time
!
old to reset t he stopwatch an d lap time. Press to sto p the stopwatch a nd h
running
10.0 Set Your Personal Dat a for Your Pe rsonal Heart R ate Mode.
!
Press until "H RM" appears and hold for 2 s econds. A ny Heart Rate sub-mo de can ente r the H eart R ate
Setting mo de too by holding f or 2 seconds.
!
Press / to set gend er, birthda y, heig ht, weig ht, spor t type, h eart rat e zone setting type ( )
and your upp er and lower hear t rate (for manua l setting) . Confirm each wi th .
heart rate z one
auto/man ual
10.1 Set Gender, Birthday And Height
9
Page 12

10.2 Set Weight and Sport Type.
Choose your sp or t ty pe
(slow)
(middl e)
(fast)
(slow)
(middl e)
(fast)
(low)
(middl e)
(high)
10.3 Set Target Heart Rate Zone Se tting Type
Lower
Limit
(Manual)
11.0 View the Target Heart Rate Zone Indicatio ns
Zone Heart Rat e
Visual
Indication
Above Zone
Upper Limit
(Auto or Manual)
In-Zone
(the target heart rate zone)
Lower Limit
(Auto or Manual)
NOTE:
!
When the heart rate exceeds th e uppe r or low er lim its, t he aud ible s igna l warning will go ON if key-tone is ON.
Below Zon e
Heart Rate Zon e Indica tio n
Audible
Indication
Beep !
Beep !
Upper
Limit
(Manual)
10
Page 13

11.1 Use Heart Ra te and Review the Training Record
Use th e He ar t Rate fu nc ti on
!
Press unti l "HRM" appears .
!
The heart ra te function wil l be activated au tomatically w hen Heart Rate Mo de is se lected.
NOTE:
!
Please wea r the chest belt in a dvance before u sing the Heart Ra te function.
Revi ew t he Tr ai ni ng R eco rd
!
Press / to see t
Below(L) Z one Exercise Ti me, Calorie (KCA L), and Fat Burn (FATB)
NOTE:
!
The Total Lap Time, Maximu m (MAX) and Av erage (AVG) he art rate, Up ( U), In (I) and Below(L) Zon e Exercise
Time, Calo rie (KCAL), and Fat Burn (FATB) are recorded i n Stop watch Mode only .
Put on the
1.
Wat ch
he Total Lap Time, Maximu m ( MAX) an d Avera ge (AVG) he art rat e, Up (U), In (I) and
Put on the
2.
chest be lt
total lap
time
(stopwatch )
In-zone
exercise
time
Get your
3.
heart ra te
Below-zone
exercise
time
Max. & Avg .
heart rate
Press to mov e to Alarm Mode.
Up-zone
exercise
time
current
heart rate
the current
heart rate
in term of %
of the
maximum
heart rate
l
Calorie
Expenditur e
l
Heart R at e Zo ne
Ind icato r (Refe r to
Chapt er 11 .0 )
Abo ve-zone
In- zone
Bel ow-zone
Fat Burn
11
Page 14

12.0 Alarm
12.1 Select Ala rm 1 or Alarm 2
!
Press to sel ect Alarm 1 or Alar m 2. Press unti l "ALARM" appea rs.
12.2 Set Daily Al arm
!
Press unti l "ALARM" appea rs and hold for 2 sec onds.
!
Press / to sel ect hour and minu te, and confirm e ach with . Press to r eturn to Alarm Mo de.
12.3 Activate o r Deactivate the Alarm
!
Press to act ivate ( appears ) or deactivate the alarm.( appears)
12
Page 15

13.0 SOS Mode
!
User's per sonal infomat ion for emergen cy.
13.1 Set Name for S OS.
!
Press once . for 2 second s.Press / unti l "NAME" appear s and hold
!
Press / to sel ect the alphabe t, and confirm ea ch with . Press to re turn to SOS Mode.
Spa ce Spa ce
(Sp ace)
13.2 Set Blood ty pe for SOS.
!
Press once. for 2 s econds. Press / until " BLOOD " appears a nd hold Press / to select a blood
type and con firm with . Press t o return to SOS Mod e.
13
Page 16

13.3 Set Phone nu mber for SOS.
!
Press once . for 2 second s.Press / until "PHON E" appears and hold
!
Press / to sel ect the digit, an d confirm each wi th . Press to retur n to SOS Mode.
13.4 View Name, B lood type, Phone number for SOS
!
Press once . Press / to view the N ame, Blood type , and phone numbe r. Press to r eturn to SCAN Mod e.
Name: P ETER
Phone n o: 123 45678
Blood t ype: O+
14
Page 17

14.0 View Scan mo de: Current Time Mode, Stopwatch Mode and Heart Rate Mo de cyclically.
The Scan Mode shows all training results after a trai ning.
!
Press unti l "SCAN" appear.
!
Without pre ssing any key the wat ch starts to show the fol lowing display s one by one cy clically: TIME, STW,
AVGHR, KCAL and FATB.
Time Display
l
Calorie Burnt Display
Stopwatch Display
Fat Bur nt Dis play
Average Heart Rate
Display
Time Display ...
15.0 Birthday R eminder
!
When the dat e is the same as the bi rthday set by the u ser, the wa tch will beep for 1 m inute to remind t he
user, after the watch i s being woke up fro m sleep mode.
15
Page 18

16.0 Low Batter y Indication
!
When the bat tery of the watch d rops to a low level , the Low Battery I ndicator will b e ON to re mind user.
17.0 Reset the Watch and Power Saving Mo de
!
In any Modes , hold all the 4 butt ons for more than 5 s econds will res et all the settin gs of the watch. Af ter
reset, all p arameters and p airing of chest b elt need to be set ag ain.
!
In Time Mode , press and hold fo r 5 seconds to go int o Power Saving Mod e (turning off th e LCD).
Timekeep ing function is s till running un der Power Saving M ode. Press any ke y to resume from th is mode.
Power S aving ModeReset Display (Fu ll Seg ment O N)
(5 seconds later)(5 seconds later)
18.0 Pot ential Causes for NO Heart Ra te Reading or Long Response Time
1) Ca use: Dry Skin.
Solution : Apply co nductive gel o r s aliva t horoughly to c hest area. (Even water will help if c onductive gel is
not availa ble).
2) Ca use: Chest belt i s not placed firmly over the c hest.
Solution : Make sure the Che st belt is placed f irmly over the ch est by tighteni ng ela stic band.
3) Ca use: Muscle tre mors caus ed by holding the C hest belt too hard on your che st.
Solution :
This will en sure good and con sistent readi ngs even while wa lking or joggin g with a rms swung natur ally.
4) Ca use: Dead skin on c hest.
Solution : Usually rubbi ng your chest wit h a towel will help .
5)Cause: A th in lay er of body grease can insulate th e ECG signal -basically preven ts the back sensor on
the Chest be lt from picking up one's ECG .
Solution : Wipe chest and th e contacts on the b ack of Chest belt w ith a tissue or sof t towe l.
6) Ca use: Hairy ches t.
Solution : Apply conduct ive gel to chest ar ea.
7)Cause: I rregula r heartbeats.
Solution : N /A. It is difficult to consisten tly pick up a rea ding for those with irregula r h eart beats.
Inconsis tent response t imes are expect ed for those with a rrhythmia.
8)Cause: L ow Batter y.
Solution : It might be due to th e battery level o f the Chest belt is l ow. Repl ace the battery o f the Chest belt.
The contacts mus t make fi rm contact (N OT too h ard) with the user's skin dur ing measurement.
16
Page 19

19. 0 C hest Belt B at tery Repla ce ment
1 . T u r n t h e b a t t e r y c o v e r w i t h a c o i n
cou nt erc lo ckwis e until the ar row p oi nting to
arr ow.
2.Turn the cover further gently to p op it o ut.
3.P ut aside the ba ttery cover.
4.R emo ve the em pty batt ery.
5.I nse rt a new CR 202 5 ba ttery w ith the (+) side
of t he batt ery touch w ith t he 'L ' s hape metal
con tac t.
6.I MPO RTA NT: Make sure t ha t the seali ng r ubb er
o-r ing is p lac ed corre ct ly i n i ts slot before t he
bat ter y co ver is close d.
7.P ut the batte ry cover back with the arrow on the
cov er poi nti ng to the arro w, and then pr ess the
cov er do wn g ent ly u nti l it i s on t he sa me l eve l
wit h th e su rfa ce.
8.Turn the cov er wit h the co in clo ckwis e unti l the
arr ow point ing to dot.
20. 0 Watc h B attery Replacement
1. Inser t the tip of a flath ead screw-driver into the
notch of the spring bar.
2. Push the notch a nd lift the wri st stra p t o d islo dge
the spring bar. Dislodge the lower strap similarly.
3. Un scre w the c ase- back with a cr ossh ead s crew -
driver.
4. Put asid e the case -bac k.
5. In sert o ne end o f the pi nche rs int o the no tch of t he
battery contact plate.
6. Push the no tch out ward GE NTLY .
7. Put asid e the empt y batte ry.
8. In sert a NEW CR 2025 ba tter y with (+) up ward .
9. A ‘cl ick’ wi ll soun d when the buckle is locked.
10.IMPORTANT: Make sure tha t the rubber r ing i s
sitting in th e slo t properly before screw the caseback, otherwise water will leak into the Watch .
11.Put the case-back back to its original positio n.
12.Screw the case-back to the case.
13.Insert on e end o f the s prin g bar i nto the lod ge on
the watch.
14.Insert the tip of a flathead screw-driver into the
notch of th e s prin g b ar. Pu sh the notch and lowe r
the wrist str ap o nto the watc h un til the spri ng b ar
is COMPL ETELY lodge d. Lodg e the lower st rap
similarly.
3
1
CR202 5
5
2
CR2025
8
2
6
CR202 5
1
3
9
10
12
7
6
4
7
CR2025
4X
13
11
4X
4
CR202 5
8
5
14
3
17
 Loading...